Pumpkin Streusel Bread Recipe
Deliciously Cozy: Pumpkin Streusel Bread Recipe
Hey there, friends! It’s Beau Collier, and I’m super excited to take you on a culinary adventure today. As we step into the mellow vibes of fall, we can’t ignore the star of the season—pumpkin! Pumpkins are not just fantastic for carving spooky faces; they’re incredible when whipped into a warm, inviting loaf of bread. Today, I’m sharing my ultimate Pumpkin Streusel Bread recipe with you. It’s perfectly moist, aromatic, and just the right amount of sweet—like a warm hug on a chilly day!
But wait—this isn’t just any pumpkin bread. We’re elevating it to new heights with a crumbly streusel topping that adds a delightful crunch. Imagine sinking your teeth into a slice while the kitchen fills with the inviting scents of cinnamon and nutmeg; it’s a moment to cherish. Whether you’re prepping for a cozy family gathering or simply need a slice of comfort on a rainy day, this recipe will quickly become one of your favorites.
Let’s roll up our sleeves, preheat that oven, and indulge in some kitchen magic together. Grab your favorite mug of coffee or tea, and let’s dig in!
A Slice of Nostalgia
One of my favorite memories growing up was helping my mom bake in our little kitchen every fall. The air would fill with the rich, spicy aroma of cinnamon and nutmeg, as her delicious pumpkin bread baked away in the oven. I vividly remember standing on a stool so I could reach the counter, meticulously measuring the flour, and sneaking in little tastes of the pumpkin puree when I thought she wasn’t looking.
After what felt like an eternity, the timer would go off, and we’d share a hot slice of that golden bread, slathering it with butter as we gathered around the kitchen table. That was our little ritual, a moment of warmth that brought us together in a busy world.
Now, as I stand here making my version of her pumpkin bread, it’s not just about the food—it’s about those precious memories, the laughter, and the love infused in every bite. I hope this recipe brings the same joy to your table as it did to mine!
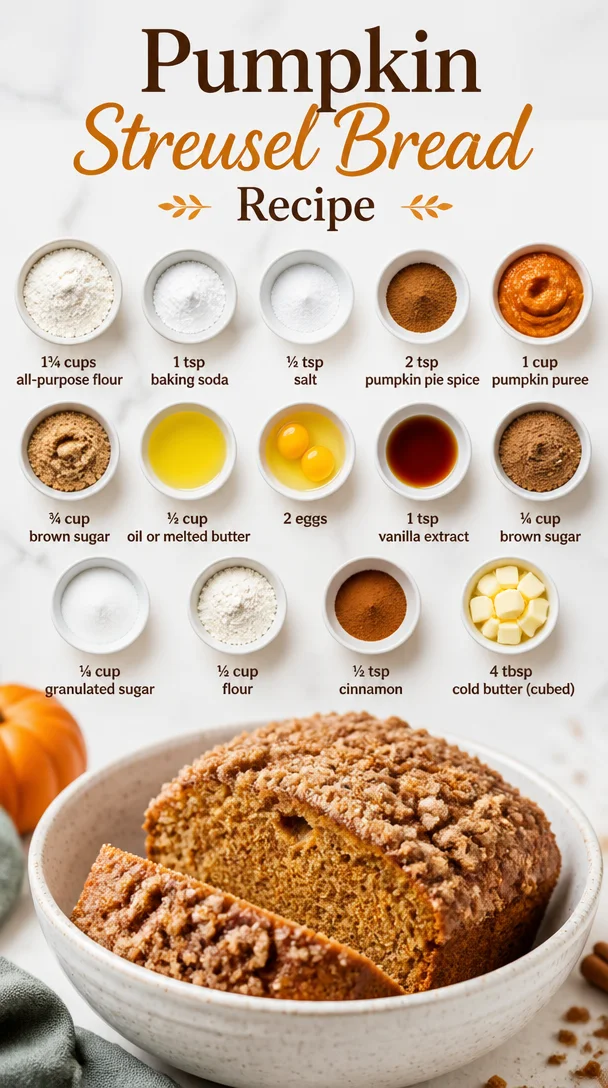
Ingredients
Let’s get down to business and talk ingredients! Here’s what you’ll need to whip up your Pumpkin Streusel Bread:
-
1¾ cups all-purpose flour
The backbone of our bread! For gluten-free options, you might want to try a 1:1 gluten-free flour blend. -
1 tsp baking soda
This little guy helps our bread rise and get that lovely fluffy texture. Don’t skip it! -
½ tsp salt
Just a pinch! Salt enhances all the flavors, bringing balance to the sweetness. -
2 tsp pumpkin pie spice
A blend of cinnamon, nutmeg, ginger, and often allspice. If you don’t have it, just combine 1 tsp cinnamon, ½ tsp nutmeg, and a pinch of ginger. -
1 cup pumpkin puree
Canned or fresh—whichever floats your boat! Just make sure it’s pure pumpkin, nothing else. You can substitute with mashed bananas for a different twist! -
¾ cup brown sugar
This adds moisture and that deep, caramel-like sweetness. Light brown sugar works well, but you can replace it with coconut sugar for a healthier option. -
½ cup oil or melted butter
Either works like a charm! If you’re looking for a lighter version, use unsweetened applesauce instead. -
2 eggs
These are the binders! You can substitute with flax eggs (1 tablespoon ground flaxseed + 2.5 tablespoons water) for a vegan option. -
1 tsp vanilla extract
A hint of this will elevate your flavors! Feel free to use almond extract for a different flavor profile. -
¼ cup brown sugar (for streusel topping)
More of that molasses flavor—it’s what makes our topping divine. -
¼ cup granulated sugar
A little extra sweetness never hurt anyone, right? -
½ cup flour (for streusel topping)
This adds body to our crumbly topping! -
½ tsp cinnamon
Because, let’s be honest, more cinnamon = more cozy vibes. -
4 tbsp cold butter (cubed)
Cold, cubed butter is essential for crisp streusel. Don’t let it get too soft, or your topping won’t be as crunchy!
Step-by-Step Instructions
Let’s dive into the exciting part—making our delectable Pumpkin Streusel Bread. Ready? Let’s go!
-
Preheat Your Oven: Start by preheating your oven to 350°F (175°C). This ensures your bread bakes evenly, so don’t skip this crucial step!
-
Prepare Your Pan: Grease a 9×5-inch loaf pan with either butter or non-stick spray. If you want to really ensure an easy release, you can also line it with parchment paper.
-
Mix the Dry Ingredients: In a large mixing bowl, whisk together 1¾ cups all-purpose flour, 1 tsp baking soda, ½ tsp salt, and 2 tsp pumpkin pie spice. This is your base. Whisking them together first ensures that everything is evenly distributed.
-
Combine the Wet Ingredients: In another bowl, combine 1 cup pumpkin puree, ¾ cup brown sugar, ½ cup oil or melted butter, 2 eggs, and 1 tsp vanilla extract. Whisk these together until they’re smooth and creamy.
-
Merge Dry and Wet: Gradually add the dry ingredients into the wet mixture. Gently fold it in using a spatula until just combined—don’t over-mix! A few lumps are okay; we want a moist bread, not a tough one.
-
Make the Streusel Topping: In a separate bowl, mix together ¼ cup brown sugar, ¼ cup granulated sugar, ½ cup flour, and ½ tsp cinnamon. Add the cold cubed butter, and using your fingers or a pastry cutter, work it in until the mixture resembles coarse crumbs.
-
Pour the Batter: Pour half of the pumpkin bread batter into your prepared loaf pan, smoothing it out with a spatula.
-
Add the Streusel: Sprinkle half of the streusel mixture over the batter. Then, pour the remaining batter on top, and finish with the last of the streusel.
-
Bake: Pop it into the preheated oven and bake for about 55 to 65 minutes. You’ll know it’s done when a toothpick inserted into the center comes out clean.
-
Cool it Down: Once baked, remove it from the oven and let the bread cool in the pan for about 10 minutes. After that, turn it out onto a wire rack to cool completely.
And voilà! You’re now the proud creator of a beautiful loaf of Pumpkin Streusel Bread.
Serving Suggestions
When it comes time to serve your delightful creation, the options are endless! I love to slice it up while it’s still warm (but not too hot—don’t burn those fingers!) and serve it on a rustic wooden board.
For a cozy afternoon snack, a pat of butter melting into that warm bread is perfection. You can also serve it alongside a piping hot cup of coffee, herbal tea, or even a delightful pumpkin spice latte to keep those fall vibes going strong.
For those special gatherings, a dollop of whipped cream or a scoop of vanilla ice cream can transform this delightful bread into a dessert showstopper.
Recipe Variations
Let’s mix things up! Here are some fun variations on this classic Pumpkin Streusel Bread to keep your kitchen adventures exciting:
-
Chocolate Chip Pumpkin Streusel Bread: Add ½ cup of semi-sweet chocolate chips to the batter for a deliciously chocolaty twist.
-
Nutty Pumpkin Bread: Throw in ½ cup of chopped walnuts or pecans to your batter for added texture and a nutty flavor.
-
Spiced Rum Glaze: Whisk together powdered sugar, a tablespoon of spiced rum, and a splash of milk to drizzle over the finished bread for a delightful kick.
-
Apple Cinnamon Twist: Dice up a medium apple and fold it into the batter for a sweet, fruity twist.
-
Vegan Version: Swap in flax eggs for the regular eggs and use your favorite plant-based oil instead of butter. You can also use almond milk instead of milk in any glazes.
Chef’s Notes
Let me share a little secret: this Pumpkin Streusel Bread gets better with time! That’s right! After a day or two, the flavors meld beautifully, and each slice becomes even more scrumptious. So if you can resist inhaling it all at once, allow it to sit on your counter for a day to let that flavor develop.
Also, I once made this recipe for my neighbor’s fall potluck, and one of the guests asked me where I bought it. Seeing their shocked faces when I told them it was homemade was honestly so rewarding. It made me appreciate the power of simple ingredients and shared moments in the kitchen.
FAQs and Troubleshooting
1. Why is my bread too dense?
This usually happens from over-mixing the batter. Remember, we want just combined—those lumps are your friends!
2. How can I tell if my bread is done baking?
A toothpick inserted in the center should come out clean. If it comes out with wet batter, give it a bit longer in the oven.
3. Can I freeze this bread?
Absolutely! Wrap it tightly in plastic wrap and then foil to keep it fresh in the freezer for up to three months. Just thaw it at room temperature when you’re ready to enjoy a slice!
4. How can I make it less sweet?
Try reducing the sugar by ¼ cup; you can cut down the sweetness without sacrificing moisture.
Nutritional Info
Now, let’s talk about numbers for a moment. Here’s a rough nutritional breakdown for one slice of this Pumpkin Streusel Bread (based on a 12-slice loaf):
- Calories: Approximately 200
- Total Fat: 8g
- Saturated Fat: 2g
- Cholesterol: 40mg
- Sodium: 120mg
- Total Carbohydrates: 30g
- Dietary Fiber: 1g
- Sugars: 12g
- Protein: 3g
Of course, nutritional values will vary based on specific ingredients and portion sizes, but I like to think of this as a little indulgence made with love!
Final Thoughts
And there you have it—the perfect recipe to celebrate the beauty of fall and reminisce about cozy moments spent in the kitchen. Whether you choose to enjoy your Pumpkin Streusel Bread plain, with a sprinkle of cinnamon, or a dollop of whipped cream, I hope it brings a smile to your face, just as it did for me and my family.
As you create your loaf, remember to share the love! Cooking is more than just a meal; it’s about connection, laughter, and memories made. I can’t wait for you to experience this delicious journey. So grab your apron, invite a friend, and let’s feast on some heartwarming flavors together.
Happy baking! 🍂
Print
Pumpkin Streusel Bread
- Total Time: 75 minutes
- Yield: 12 servings 1x
- Diet: Vegetarian
Description
A warm, inviting loaf of pumpkin bread topped with a delightful streusel, perfect for fall gatherings.
Ingredients
- 1¾ cups all-purpose flour
- 1 tsp baking soda
- ½ tsp salt
- 2 tsp pumpkin pie spice
- 1 cup pumpkin puree
- ¾ cup brown sugar
- ½ cup oil or melted butter
- 2 eggs
- 1 tsp vanilla extract
- ¼ cup brown sugar (for streusel topping)
- ¼ cup granulated sugar
- ½ cup flour (for streusel topping)
- ½ tsp cinnamon
- 4 tbsp cold butter (cubed)
Instructions
- Preheat your oven to 350°F (175°C).
- Prepare a 9×5-inch loaf pan by greasing it with butter or non-stick spray.
- Mix the dry ingredients: In a large bowl, whisk together flour, baking soda, salt, and pumpkin pie spice.
- Combine the wet ingredients: In another bowl, mix pumpkin puree, brown sugar, oil or melted butter, eggs, and vanilla until smooth.
- Merge the dry and wet mixtures, folding gently until just combined.
- Make the streusel topping by mixing brown sugar, granulated sugar, flour, and cinnamon, then working in cold, cubed butter until crumbly.
- Pour half the pumpkin batter into the prepared pan.
- Add half of the streusel topping over the batter.
- Top with the remaining batter, finishing with the last of the streusel.
- Bake for 55 to 65 minutes, until a toothpick inserted comes out clean.
- Cool in the pan for 10 minutes, then transfer to a wire rack to cool completely.
Notes
This bread tastes even better after a day or two as the flavors meld together.
- Prep Time: 15 minutes
- Cook Time: 60 minutes
- Category: Dessert
- Method: Baking
- Cuisine: American
Nutrition
- Serving Size: 1 slice
- Calories: 200
- Sugar: 12g
- Sodium: 120mg
- Fat: 8g
- Saturated Fat: 2g
- Unsaturated Fat: 2g
- Trans Fat: 0g
- Carbohydrates: 30g
- Fiber: 1g
- Protein: 3g
- Cholesterol: 40mg
Keywords: pumpkin bread, fall recipes, baking, streusel topping
Fall Pumpkin Bread with Cinnamon Streusel (One-Bowl Recipe)
Pumpkin Bread with Cinnamon Streusel
Hey there, food lovers! Welcome back to Feastical! Today, we’re diving into the cozy, spice-filled world of pumpkin bread with a cinnamon streusel topping that’ll make your kitchen smell like autumn bliss. Whether you’re in need of a delightful breakfast treat or a sweet afternoon snack, this recipe is sure to become a favorite in your household. So, grab your apron, put on some tunes, and let’s get baking!
Introduction
Fall is a magical time of year. The leaves change color, the air turns crisp, and the aroma of baked goods fills the homes of people everywhere. It’s a season ripe with the warm spices of cinnamon, nutmeg, and of course, pumpkin! There’s something so special about the first bite of freshly baked pumpkin bread. Not only does it bring comfort, but it also sparks memories of family gatherings, cozy afternoons, and festivities galore.
This pumpkin bread with cinnamon streusel is a true celebration of fall. The sweet, moist bread pairs perfectly with the crunchy, buttery topping that adds just the right amount of texture. Honestly, can you think of anything better than a slice of warm pumpkin bread, perhaps with a smear of butter or cream cheese, while wrapped up in a soft blanket on a chilly day? I can’t!
As we prepare to make this seasonal classic, I want to ensure you feel right at home in the kitchen. I believe everyone should experience that “aha!” moment when a dish comes together, so don’t be shy if you’re new to baking. You’ve got this, and I’m here to guide you every step of the way!
Personal Story
This pumpkin bread recipe takes me back to my childhood. I remember the first time my mom baked it in our cozy kitchen, the air thick with the scent of spices, enough to make anyone’s mouth water. I would stand on a stool, wide-eyed and eager, as she mixed the ingredients together. The best part? The streusel! She would let me sprinkle it on top, and I loved to see the excited look on her face when she removed the loaf from the oven, perfectly risen and golden brown.
Every autumn, we’d bake multiple loaves to share with neighbors, friends, and family. This simple act of sharing brought us joy, connection, and delicious treats. As I got older and ventured into my own kitchen, I knew I had to keep this tradition alive. Now, baking this pumpkin bread not only fills my home with nostalgia but also brings warmth and love to the table—whether I’m sharing it with friends or enjoying it solo with a cup of coffee.
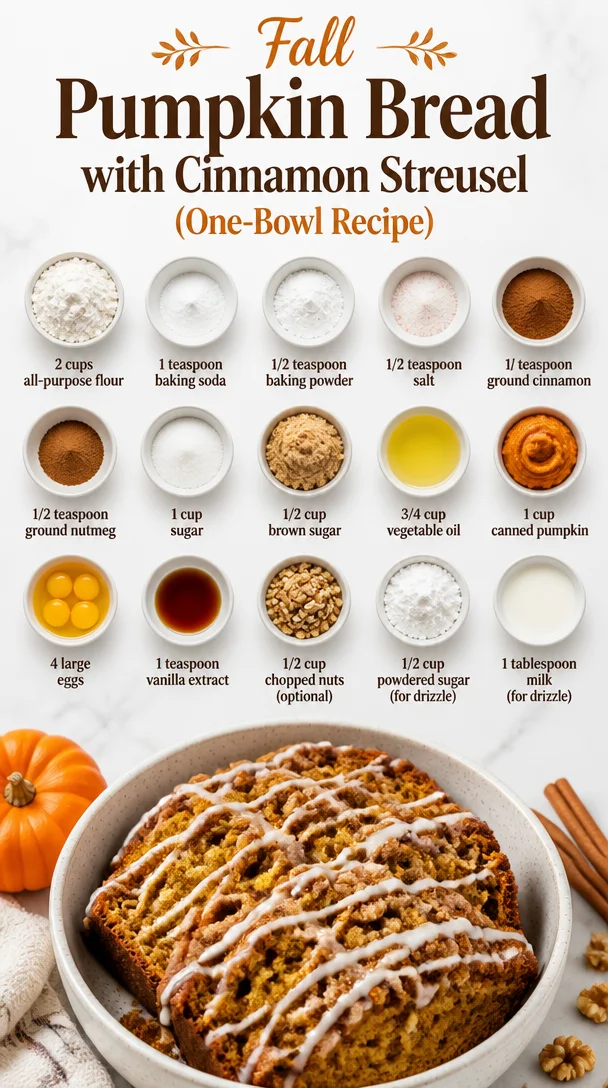
Ingredients
Now, let’s gather our ingredients for this irresistible pumpkin bread with cinnamon streusel. Here’s what you’ll need:
-
2 cups all-purpose flour: This is the foundation of our bread. If you want a lighter loaf, consider substituting some of it with whole wheat flour (just reduce the amount slightly, or it might be too dense).
-
1 teaspoon baking soda: This is crucial for giving our bread that wonderful rise. Be sure to check its expiration date because old baking soda can make your bread flat.
-
1/2 teaspoon baking powder: Used in combination with baking soda, it adds extra leavening for a fluffy texture.
-
1/2 teaspoon salt: A vital ingredient that helps enhance flavors in our bread. Don’t skip this step, or your pumpkin bread will taste flat!
-
1 teaspoon ground cinnamon: The classic fall spice! If you’re feeling adventurous, try mixing in pumpkin pie spice for an extra flavor punch.
-
1/2 teaspoon ground nutmeg: A little nutmeg goes a long way in adding that comforting depth to your loaf.
-
1 cup sugar: Regular granulated sugar sweetens the bread beautifully. You could use coconut sugar for a healthier option or brown sugar for a richer taste.
-
1/2 cup brown sugar: This adds a nice caramel-like flavor and moisture to the bread. Light or dark will work, depending on your preference.
-
3/4 cup vegetable oil: It keeps the bread moist and tender. You can substitute apple sauce for a healthier twist!
-
1 cup canned pumpkin: Make sure to grab 100% pure pumpkin puree—this is the star of our show! Fresh pumpkin works too; just cook and mash it up beforehand.
-
4 large eggs: These act as a binder. If you’re vegan, you could use flax eggs or chia seeds mixed with water.
-
1 teaspoon vanilla extract: Just a bit for that lovely aroma! Feel free to experiment with almond extract for a different flavor.
-
1/2 cup chopped nuts (optional): Walnuts or pecans add a delightful crunch, but leave them out if you prefer a nut-free option.
-
1/2 cup powdered sugar (for drizzle): This adds a pretty finish to your loaf. Feel free to skip it if you want to keep it simple.
-
1 tablespoon milk (for drizzle): Any milk will do—dairy or non-dairy!
Step-by-Step Instructions
Ready to get our bake on? Let’s break down the steps to create this delicious pumpkin bread with cinnamon streusel!
-
Preheat your oven: Start by preheating your oven to 350°F (175°C). This ensures your bread starts baking at the right temperature as soon as you pop it in.
-
Grease your loaf pan: Grab a 9×5-inch loaf pan and grease it with a little oil or baking spray. For a smooth release, you can also line the bottom with parchment paper.
-
Mix dry ingredients: In a large bowl, whisk together your all-purpose flour, baking soda, baking powder, salt, ground cinnamon, and ground nutmeg. This step helps ensure that your leavening agents are evenly distributed throughout the flour.
-
Combine sugars and liquids: In another bowl, mix together the granulated sugar, brown sugar, vegetable oil, canned pumpkin, eggs, and vanilla extract. Use a hand mixer or whisk to blend until everything is nicely combined and fluffy. Take a moment to inhale that sweet, pumpkin-infused aroma—heavenly!
-
Blend wet and dry: Gradually add the dry ingredients to your wet mixture, stirring gently with a spatula or wooden spoon. You want to combine them without overmixing; a few lumps are perfectly okay. Too much mixing can lead to a dense bread, and nobody wants that!
-
Fold in nuts (if using): If you’re adding any chopped nuts, now’s the time to gently fold them into the batter.
-
Prepare streusel topping: In a small bowl, combine 1/2 cup of all-purpose flour, 1/4 cup of granulated sugar, and 1/4 cup of butter (cold and cut into small pieces). Use your fingers or a pastry cutter to mix until crumbly. Add a teaspoon of cinnamon for that flavorful pop!
-
Pour and top: Pour the batter into your greased loaf pan. Sprinkle the streusel topping generously over the top, giving it that beautiful texture.
-
Bake: Place it in the preheated oven and bake for about 55-65 minutes. Check for doneness by inserting a toothpick; it should come out clean or with a few moist crumbs (not wet batter).
-
Cool: Once done, let the pumpkin bread cool in the pan for 10 minutes, then transfer it to a cooling rack to cool completely. Allowing it to cool will make slicing easier—trust me on this one!
-
Make the drizzle (optional): While the bread cools, whisk together the powdered sugar and milk until smooth. Drizzle over the cooled bread for that sweet finishing touch.
Serving Suggestions
To serve your delicious pumpkin bread, slice it into thick pieces and arrange them on a pretty platter. You can serve it as is or with some butter or cream cheese spread on top for an extra treat. For a whimsical touch, consider garnishing each slice with a sprinkle of cinnamon or even a small dollop of whipped cream!
This bread pairs wonderfully with a warm cup of coffee, herbal tea, or hot chocolate—so be sure to brew your favorite beverage alongside it! It also makes a fantastic gift; wrap it up in some decorative paper and share it with friends and family. Trust me; they’ll love you for it!
Recipe Variations
Here are a few creative twists to make this pumpkin bread your own:
-
Chocolate Chip Pumpkin Bread: Mix in 1 cup of semi-sweet or dark chocolate chips for a delightful dessert version. Chocolate and pumpkin are a match made in heaven!
-
Spicy Pumpkin Bread: Add a pinch of cayenne pepper or ginger to give it a kick!
-
Dairy-Free Version: Use coconut oil instead of vegetable oil and almond milk in the drizzle for a completely dairy-free treat.
-
Gluten-Free Option: Substitute the all-purpose flour with a 1:1 gluten-free flour blend. I suggest looking for one that contains xanthan gum; this will help to replicate the elasticity of regular flour.
-
Fruit-Infused: Add 1/2 cup of dried cranberries or raisins for a sweet and tangy twist!
Chef’s Notes
This pumpkin bread recipe holds a special place in my heart. Over the years, I’ve experimented with it, and I’ve loved watching it evolve. I remember the first time I tried adding chocolate chips; my friends couldn’t get enough! It’s incredible how food has the power to bring people together and create unforgettable memories.
And as for the drizzle? It may seem like a minor addition, but it elevates the bread from delicious to downright show-stopping! Trust me; once you drizzle it on, you’ll wonder how you ever lived without it.
FAQs and Troubleshooting
1. Why is my pumpkin bread too dense?
Overmixing the batter can lead to dense bread. Ensure you mix until just combined—remember, lumps are okay!
2. Can I use fresh pumpkin instead of canned?
Absolutely! Just make sure to cook and puree your fresh pumpkin until smooth before adding to the recipe.
3. My bread is cooked on the outside but raw in the middle. What went wrong?
This usually indicates that the oven temperature was too high or that the bread was not baked long enough. It’s a good idea to check on your bread as it bakes and use a toothpick to test for doneness.
4. How can I store leftovers?
Once completely cooled, store your pumpkin bread in an airtight container at room temperature for up to 4 days or in the refrigerator for a week. It can also be frozen for up to 3 months—just wrap it well!
Nutritional Info
If you’re curious about the nutritional side of this tasty treat, here’s a quick breakdown for a 1-slice serving (based on standard ingredients):
- Calories: Approximately 220
- Total Fat: 9g
- Saturated Fat: 1g
- Cholesterol: 40mg
- Sodium: 200mg
- Total Carbohydrates: 32g
- Dietary Fiber: 1g
- Sugars: 14g
- Protein: 3g
(Note: Nutritional values may vary slightly based on ingredient brands and additions.)
Final Thoughts
There you have it! Your step-by-step guide to creating a crowd-pleasing pumpkin bread with cinnamon streusel that’s worthy of the spotlight. As the leaves turn and the air gets brisk, this recipe brings the warmth of home into your kitchen.
Whether it’s your first time or your hundredth, I hope you enjoy every moment of mixing, measuring, and baking. Make it your own, share it with loved ones, and let the delicious aromas fill your home. After all, food is not just about nourishment; it’s about love, connection, and creating memories that last a lifetime.
So, tell me, are you ready to indulge in a slice of that warm, spiced delight? I know I am! Happy baking, friends! 🍂
Print
Pumpkin Bread with Cinnamon Streusel
- Total Time: 80 minutes
- Yield: 1 loaf (about 12 slices) 1x
- Diet: Vegetarian
Description
Delightful pumpkin bread topped with a crunchy cinnamon streusel, perfect for a cozy treat any time of the day.
Ingredients
- 2 cups all-purpose flour
- 1 teaspoon baking soda
- 1/2 teaspoon baking powder
- 1/2 teaspoon salt
- 1 teaspoon ground cinnamon
- 1/2 teaspoon ground nutmeg
- 1 cup sugar
- 1/2 cup brown sugar
- 3/4 cup vegetable oil
- 1 cup canned pumpkin
- 4 large eggs
- 1 teaspoon vanilla extract
- 1/2 cup chopped nuts (optional)
- 1/2 cup powdered sugar (for drizzle)
- 1 tablespoon milk (for drizzle)
Instructions
- Preheat your oven to 350°F (175°C).
- Grease a 9×5-inch loaf pan.
- Mix together flour, baking soda, baking powder, salt, cinnamon, and nutmeg in a large bowl.
- Combine granulated sugar, brown sugar, vegetable oil, pumpkin, eggs, and vanilla extract in another bowl.
- Blend the wet and dry ingredients without overmixing.
- Fold in nuts if using.
- Prepare streusel topping with flour, sugar, and butter until crumbly.
- Pour the batter into the pan and sprinkle streusel on top.
- Bake for about 55-65 minutes, or until a toothpick comes out clean.
- Cool for 10 minutes in the pan before transferring to a rack.
- Make the drizzle by whisking powdered sugar and milk until smooth, then drizzle over the cooled loaf.
Notes
Great served warm. Pairs well with butter or cream cheese.
- Prep Time: 15 minutes
- Cook Time: 65 minutes
- Category: Dessert
- Method: Baking
- Cuisine: American
Nutrition
- Serving Size: 1 slice
- Calories: 220
- Sugar: 14g
- Sodium: 200mg
- Fat: 9g
- Saturated Fat: 1g
- Unsaturated Fat: 8g
- Trans Fat: 0g
- Carbohydrates: 32g
- Fiber: 1g
- Protein: 3g
- Cholesterol: 40mg
Keywords: pumpkin bread, cinnamon streusel, fall recipes, baking, dessert
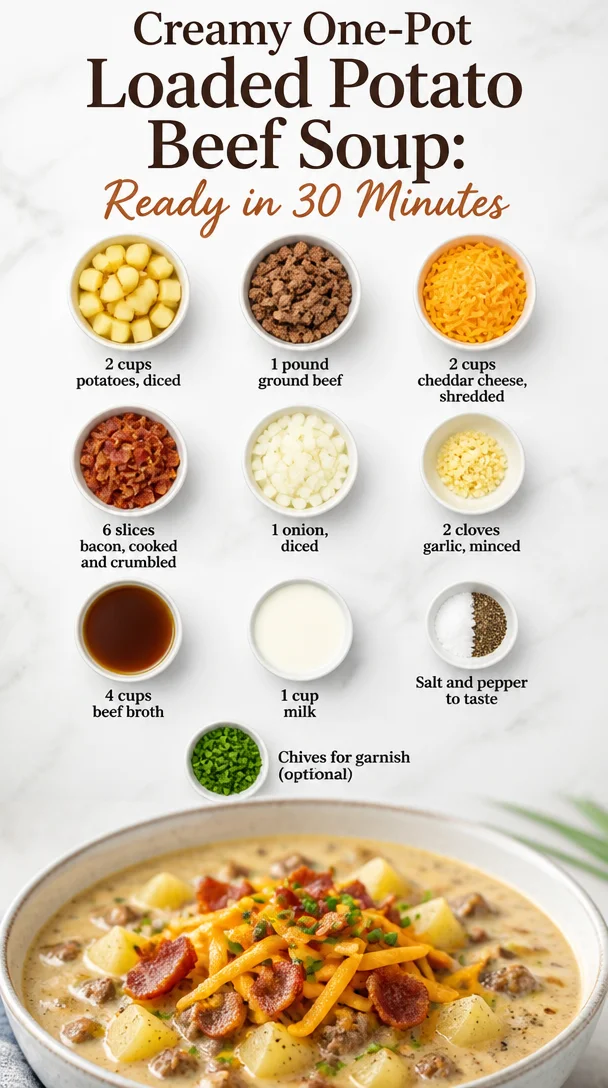
Creamy One-Pot Loaded Potato Beef Soup: Ready in 30 Minutes
Loaded Potato Beef Soup: A Deliciously Cozy Comfort Food
Hey there, foodie friends! Welcome back to Feastical! Today, I’m excited to share a hearty dish that’ll keep you cozy, satisfied, and coming back for seconds—Loaded Potato Beef Soup. Picture this: a steaming bowl of creamy, savory soup brimming with tender potatoes, savory ground beef, and a cheesy finish that warms both the belly and the heart. This recipe is like a warm hug in a bowl, perfect for those chilly evenings or when you need a little extra comfort after a long day. Let’s dig in!
A Nostalgic Memory
I’ll never forget the first time I made Loaded Potato Beef Soup. I was in my early twenties, living in a cozy apartment with some friends who had just moved away from home. We were all working hard and feeling a little homesick, and I decided it was time to recreate one of my childhood favorites that my mom used to make. There was something about her Loaded Potato Soup—the way it simmered on the stove, filling our small kitchen with mouthwatering aromas, and the laughter we shared over dinner.
The dish combined my two favorites at the time: potatoes and cheese! So, I called up my mom for her “secret” recipe, which she shared with me in a hushed tone (mostly the bacon part!). With a few adjustments, given what I had in my pantry, I whipped it up and invited my friends over. When the soup was finally ready to ladle into bowls, we gathered around the dining table, indulged in laughter, and shared our own stories. It marked the beginning of a tradition—soup nights! Each month, we’d try a different soup recipe, but this one remained our ultimate favorite.
As I ladle up this creamy concoction today, all those sweet memories flood back. So let’s get cooking—you’re in for a treat!
Ingredients
Here’s what you’ll need:
-
2 cups potatoes, diced
Use your favorite variety—Russets are great for creaminess, while Yukon Golds add a buttery touch. If you’re in a pinch, frozen diced potatoes work too! -
1 pound ground beef
I like to use lean beef for a healthier soup, but feel free to substitute with ground turkey or even a plant-based alternative for a meatless option. -
2 cups cheddar cheese, shredded
Sharp cheddar is my go-to for that rich flavor, but feel free to mix it up with Monterey Jack or even a spicy pepper jack for an extra kick. -
6 slices bacon, cooked and crumbled
Bacon adds a wonderful smoky flavor. If you’re avoiding pork, turkey bacon works just as well, or you can skip it entirely (but let’s be honest, why would you want to?). -
1 onion, diced
Onions bring a sweet depth to the flavor. Shallots are a great substitute if you prefer a milder taste. -
2 cloves garlic, minced
Fresh garlic is key for that aromatic base. If you’re out, garlic powder works in a pinch, but fresh is always best! -
4 cups beef broth
Use low-sodium if you’re watching your salt intake. Homemade broth elevates the flavor even further, but store-bought works great too. -
1 cup milk
For creaminess! You can swap this for heavy cream for a richer soup or a plant-based milk if you’re going dairy-free. -
Salt and pepper to taste
Essential for balancing flavors. Always season to your preference! -
Chives for garnish (optional)
Finely chopped chives add a fresh pop of flavor and color, but you can skip them if you don’t have any on hand.
Step-by-Step Instructions
Let’s get to the good part—cooking! Follow these steps to create your very own Loaded Potato Beef Soup:
-
Cook the bacon: In a large pot or Dutch oven, cook the bacon over medium heat until it’s crispy. This will take about 6-8 minutes. Once done, remove the bacon, crumble it, and set it aside. Don’t throw out that bacon grease yet—oh no! We’ll use it for flavor!
-
Cook the ground beef: In the same pot with the leftover bacon grease, add your ground beef. Break it up with a spoon, and cook until browned (about 5-7 minutes). Drain excess fat if necessary. A little grease adds flavor, but we don’t want a pool of it.
-
Add onions and garlic: Toss in the diced onion and minced garlic, and sauté until they’re soft and fragrant—about 3-4 minutes. Your kitchen will smell fantastic right about now!
-
Throw in the potatoes: Add the diced potatoes to the pot, followed by the beef broth. Bring everything to a boil, then reduce the heat to low. Let it simmer uncovered for about 15-20 minutes until the potatoes are tender. Stir occasionally to keep anything from sticking to the bottom.
-
Make it creamy: Once the potatoes are perfectly tender, stir in the milk. This creates that creamy texture we’re looking for. Feel free to add more milk if you like your soup a bit thinner!
-
Add the cheese: Gradually stir in the shredded cheddar cheese until it melts and blends into the soup. Look at that gooey goodness come to life!
-
Season it up: Give it a taste and add salt and pepper to your liking. The bacon, broth, and cheese will add some saltiness, so don’t overdo it at first!
-
Finish with toppings: Ladle the soup into bowls, top with crumbled bacon, and sprinkle with fresh chives for a vibrant finish.
And there you have it! A delightful bowl of Loaded Potato Beef Soup that is as comforting as your favorite childhood memories!
Serving Suggestions
To take your soup experience to the next level, serve it alongside some warm, crusty bread or buttery biscuits for dipping—trust me; that’s where the magic happens! You can even drizzle a little extra cheese over the top or add a dollop of sour cream for tanginess.
For a more gourmet touch, consider pairing your soup with a fresh green salad drizzled with a simple vinaigrette. The crispness will give a nice contrast to the creamy warmth of the soup. And don’t forget a glass of your favorite wine or a cozy hot drink to cozy up with afterward!
Recipe Variations
Keep this recipe fresh and exciting every time you make it by trying these creative twists:
-
Spicy Loaded Potato Beef Soup: Add diced jalapeños, crushed red pepper, or hot sauce during cooking for a spicy kick.
-
Veggie-Loaded Version: Toss in some carrots and celery with your onions for a more veggie-packed soup, or even throw in some frozen corn.
-
Dairy-Free Delight: Use coconut milk or an unsweetened almond milk instead of regular milk, and swap the cheese for a vegan alternative.
-
One-Pot Wonder: Cook the meat and vegetables in a pressure cooker to save time, then add broth and pressure cook again for a quick meal!
Chef’s Notes
One of the great things about this Loaded Potato Beef Soup is its versatility. Over the years, I’ve seen it evolve based on what’s in season or what I have on hand. It’s become a staple in my kitchen, evolving from a homesick comfort food to a go-to recipe for gatherings and family dinners. Who knew soup could bring so many people together?
FAQs and Troubleshooting
-
Why is my soup too thick?
If your soup turns out thicker than you like, simply add more broth or milk to reach your desired consistency. -
Can I freeze this soup?
Absolutely! This soup freezes well. Just be sure to let it cool completely before transferring it to an airtight container. Reheat it gently on the stove. -
What if I don’t have beef broth?
Chicken broth or vegetable broth can work in a pinch. It might alter the flavor slightly but will still deliver a hearty soup. -
What can I do if I over-salted my soup?
Add a little more milk or broth to dilute the saltiness. You can also toss in a peeled, raw potato and let it simmer for about 10 minutes; it can absorb some excess salt.
Nutritional Info
This Loaded Potato Beef Soup is not just delicious—it’s also packed with nutrition! Here’s a rough breakdown per serving (assuming about 6 servings per recipe):
- Calories: Approximately 450-500
- Protein: 24g
- Carbohydrates: 35g
- Fat: 25g
- Fiber: 3g
- Sodium: Varies (based on broth and added salt)
Of course, your actual nutritional values may vary based on the specific ingredients you use and any tweaks you make to this recipe.
Final Thoughts
There you have it, my friends! A recipe that brings nostalgia and warmth to your kitchen. The joy of cooking this Loaded Potato Beef Soup is not just in the delightful dish itself, but in the memories you’ll create around it. Whether reliving moments from your childhood or crafting new traditions with loved ones, this soup is perfect for every occasion.
So grab your pot, throw on your apron, and let’s make some memories together! Don’t forget to share your own kitchen stories and variations with me. Happy cooking, and may your soup always be loaded with love!
Print
Loaded Potato Beef Soup
- Total Time: 45 minutes
- Yield: 6 servings 1x
- Diet: Omnivore
Description
A hearty and creamy soup filled with tender potatoes, savory ground beef, and topped with cheese and bacon. Perfect for warming up on chilly evenings.
Ingredients
- 2 cups potatoes, diced
- 1 pound ground beef
- 2 cups cheddar cheese, shredded
- 6 slices bacon, cooked and crumbled
- 1 onion, diced
- 2 cloves garlic, minced
- 4 cups beef broth
- 1 cup milk
- Salt and pepper to taste
- Chives for garnish (optional)
Instructions
- Cook the bacon: In a large pot or Dutch oven, cook the bacon over medium heat until it’s crispy. This will take about 6-8 minutes. Once done, remove it, crumble it, and set it aside.
- Add the ground beef: In the same pot with the leftover bacon grease, add your ground beef. Break it up with a spoon, and cook until browned (about 5-7 minutes). Drain excess fat if necessary.
- Toss in the onions and garlic: Sauté until they’re soft and fragrant—about 3-4 minutes.
- Add the potatoes: Toss in the diced potatoes along with the beef broth. Bring everything to a boil, then reduce the heat to low and let it simmer uncovered for about 15-20 minutes until the potatoes are tender.
- Stir in the milk: Once the potatoes are tender, add the milk for creaminess.
- Gradually add the cheese: Stir in the shredded cheddar cheese until it melts.
- Season it up: Taste and add salt and pepper to your liking.
- Finish with toppings: Ladle soup into bowls, topping with crumbled bacon and chives.
Notes
Serve with warm crusty bread or biscuits for dipping. This soup is versatile; feel free to add vegetables or adjust the seasoning to your preference.
- Prep Time: 15 minutes
- Cook Time: 30 minutes
- Category: Soup
- Method: Stovetop
- Cuisine: American
Nutrition
- Serving Size: 1 serving
- Calories: 450
- Sugar: 4g
- Sodium: 800mg
- Fat: 25g
- Saturated Fat: 10g
- Unsaturated Fat: 8g
- Trans Fat: 0g
- Carbohydrates: 35g
- Fiber: 3g
- Protein: 24g
- Cholesterol: 70mg
Keywords: soup, comfort food, loaded potato, beef, cheese, bacon
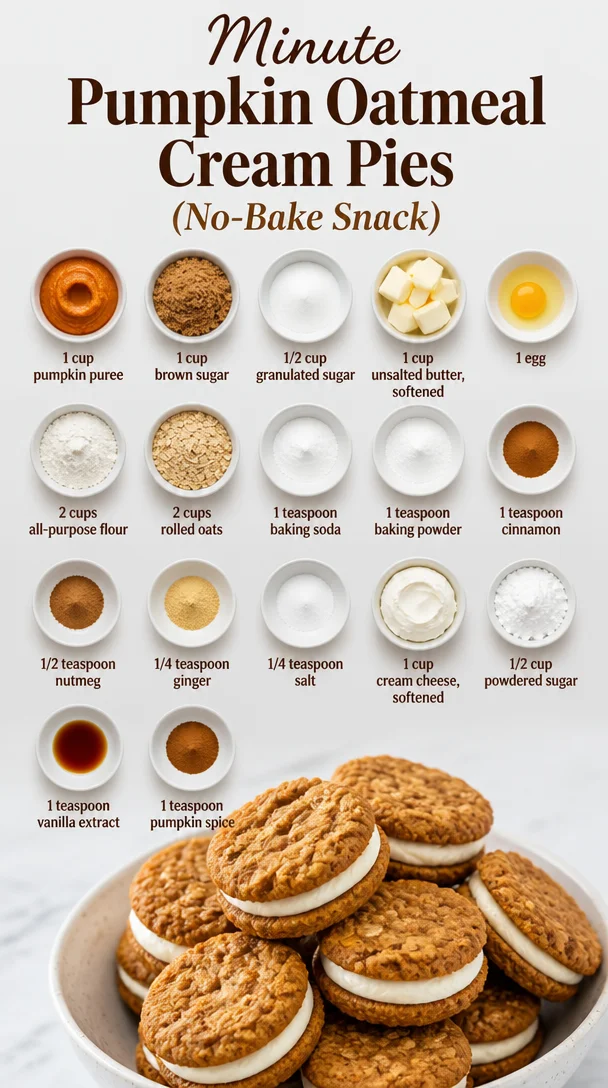
Minute Pumpkin Oatmeal Cream Pies (No-Bake Snack)
The Sweetest Fall Treat: Pumpkin Oatmeal Cream Pies
Hey there, food lovers! As the leaves turn golden and the air gets that crisp bite of autumn, there’s something truly special about the flavors of fall. Imagine biting into a soft, chewy cookie that tastes like autumn on a plate—spicy, sweet, and oh-so-comforting. That’s right, we’re diving into the world of Pumpkin Oatmeal Cream Pies today!
These delightful treats are not only packed with the warm spices of the season but also blessed with the rich taste of pumpkin. They make for the perfect afternoon pick-me-up or a cozy dessert after dinner. Plus, they come with a luscious cream cheese filling that will send your taste buds dancing. So, put on your favorite apron, and let’s embrace the kitchen magic!
A Slice of Nostalgia
The essence of these pumpkin oatmeal cream pies comes from my childhood, where the kitchen was a sanctuary filled with laughter and delicious aromas. Picture this: crisp autumn evenings, spent at my grandma’s house, where she’d whip up all sorts of goodies. One of my fondest memories is her baking with pumpkin while telling stories of her childhood in the south. Her kitchen would become a blend of chatter and sweet scents that seemed to wrap around you like a warm hug.
I remember the anticipation as the cookies would come out of the oven, their edges golden brown, while the center remained soft and gooey. I would sneak in a taste (or three) before they even made it to the cooling rack! As she pulled out her secret cream cheese filling recipe, she’d wink and say, “This is the trick, my dear.” Little did I know, this simple recipe would evolve into one of my favorites to share with you all.
Ingredients
Now, let’s gather our ingredients for these delightful pumpkin oatmeal cream pies. Here’s what you’ll need:
-
1 cup pumpkin puree
This is the star of the show! Perfectly sweet and packed with moisture, it’s what gives our cookies that tender bite. If you need a substitute, you can use applesauce or even mashed bananas, but the flavor will change a bit. -
1 cup brown sugar
For that lovely caramel flavor and added moisture. If you don’t have brown sugar on hand, you can use granulated sugar, though the cookies won’t have that lovely depth. -
1/2 cup granulated sugar
This will help balance the sweetness. For a healthier option, you can replace it with coconut sugar, but the texture might be slightly different! -
1 cup unsalted butter, softened
Makes the dough rich and flavorful. If you’re looking for a dairy-free version, feel free to use coconut oil or a vegan butter substitute. -
1 egg
Binds our ingredients together. If you need a vegan alternative, try a flax egg (1 tablespoon ground flaxseed mixed with 3 tablespoons water). -
2 cups all-purpose flour
This is the backbone of our cookies. You can swap half of this with whole wheat flour for added fiber. -
2 cups rolled oats
Provides that chewy texture we all love. Quick oats can be used in a pinch, but rolled oats give the best texture! -
1 teaspoon baking soda
Helps with the rise. Don’t skip this—unless you want flat cookies! -
1 teaspoon baking powder
A little lift to support our oatmeal cookies. It complements the baking soda for a perfect rise. -
1 teaspoon cinnamon
Because fall wouldn’t be fall without cinnamon! Feel free to use pumpkin pie spice here for an extra aromatic touch. -
1/2 teaspoon nutmeg
Just a pinch for added warmth and spice. If you’re not a fan, you can reduce this or skip it altogether. -
1/4 teaspoon ginger
Infuses a warm bite. Dried ginger works great, but freshly grated ginger brings a unique zing. -
1/4 teaspoon salt
Balances the sweetness. Every cookie needs this little kick! -
1 cup cream cheese, softened
The creaminess for our filling! If you need a dairy-free option, go for cashew cream or a vegan cream cheese. -
1/2 cup powdered sugar
Sweetens our filling. Feel free to swap with agave syrup, but it will change the consistency. -
1 teaspoon vanilla extract
Adds a warm depth of flavor. It’s hard to get a good substitution here, so use the real deal if you can! -
1 teaspoon pumpkin spice
For that signature fall flavor! You can create your own mix using cinnamon, nutmeg, and ginger.
Step-by-Step Instructions
Now that we’ve got all our ingredients together, let’s get baking! Follow these steps for a cookie experience that will remind you of cozy evenings by the fire.
-
Preheat Your Oven
Preheat your oven to 350°F (175°C). This ensures your cookies bake evenly and helps them fluff up nicely. -
Mix the Wet Ingredients
In a large mixing bowl, beat together the softened butter, brown sugar, and granulated sugar until creamy. This should take about 2-3 minutes. It’s your workout for the day—get in there and mix! -
Incorporate Pumpkin and Egg
Add in the pumpkin puree and the egg. Blend until fully combined. You’ll love the color this adds to your batter. -
Combine Dry Ingredients
In another bowl, whisk together the flour, rolled oats, baking soda, baking powder, cinnamon, nutmeg, ginger, and salt. Make sure it’s all well-mixed. You want those spices evenly spread to ensure each bite is packed with flavor! -
Join Forces
Gradually add the dry ingredient mixture to the wet mixture. Mix just until you see no flour streaks; overmixing can lead to tough cookies. Trust me, we want these soft! -
Scoop it Out
Using a cookie scoop or two spoons, drop the dough onto lined baking sheets. Leave some space in between because these little beauties will spread. -
Bake and Cool
Bake your cookies for about 12-15 minutes until they’re golden at the edges but still soft in the center. Let them cool for a few minutes on the baking sheet (very important for texture) before transferring to a cooling rack. -
Make the Creamy Filling
While the cookies are cooling, grab a new bowl and beat your softened cream cheese with the powdered sugar, vanilla extract, and pumpkin spice. Mix until smooth and fluffy. This part is like magic—so creamy! -
Sandwich Time
Once the cookies have cooled completely, spread a generous amount of the cream cheese filling on the flat side of one cookie and top it off with another cookie. You’re creating a sandwich, folks!
Serving Suggestions
Now that you have your pumpkin oatmeal cream pies all assembled, it’s time to serve them up! You could arrange them on a beautiful platter, dust a little powdered sugar over the top, and garnish with some cinnamon sticks for that extra fall flair.
For an appetizing twist, pair these cookies with a warm drink—like apple cider or a cozy cup of chai tea. They make fantastic gifts, too—wrap a few in kraft paper with some twine for those potluck gatherings.
Recipe Variations
While the classic version of our pumpkin oatmeal cream pies is simply divine, let’s chat about some creative twists you can try:
-
Chocolate Chips: Stir in a cup of chocolate chips into the cookie dough for a rich, sweet surprise in every bite.
-
Nutty Delight: Introduce chopped pecans or walnuts into the batter for an earthy crunch. Just toast them lightly beforehand for enhanced flavor!
-
Spiced Rum Cream: For the adult version, add a splash of spiced rum to your cream cheese filling for a fun twist.
-
Vegan Version: Use plant-based butter, a flax egg, and vegan cream cheese for a deliciously desirable vegan pumpkin oatmeal cream pie!
-
Cranberry Swirl: Fold in dried cranberries into the cookie dough for a tart contrast that balances the sweetness beautifully.
Chef’s Notes
As with any good recipe, this pumpkin oatmeal cream pie has its roots in evolution. My grandma, bless her heart, originally cooked these with a chocolate filling before I embarked on my quest to try a pumpkin twist! It was through countless experiments—some sticky, some catastrophically flat (never skip the baking soda, you guys!)—that I finally perfected this warm hug of a dessert.
And let me tell you, each bite evokes such nostalgia that I can’t resist making these every fall season. Trust me, the aroma of baking cookies will linger and bring people in from all around, just like it did in my grandma’s kitchen.
FAQs and Troubleshooting
-
Why are my cookies flat?
If your cookies turn out flat, you might have skipped the baking soda or baking powder, or perhaps your butter was too soft. Make sure to chill your dough for about 30 minutes before baking next time. -
Can I make the dough ahead of time?
Absolutely! You can chill the dough for up to a week or freeze it for about three months. Just let it sit at room temperature for a bit before scooping. -
How do I store leftovers?
Seal your cookies in an airtight container at room temperature for about 3-4 days, or in the fridge for up to a week. They also freeze beautifully—just make sure to layer them with parchment paper! -
What do I do if my cream cheese filling is too runny?
If your filling seems a bit too loose, add a bit more powdered sugar to thicken it up. And avoid over-mixing—this keeps the filling fluffy.
Nutritional Info
Not only do these delicious pumpkin oatmeal cream pies entice with their flavors, but they also offer some nutritional benefits thanks to pumpkin! Here’s a rough estimate per pie with filling:
- Calories: 250
- Total Fat: 11g
- Saturated Fat: 6g
- Cholesterol: 40mg
- Sodium: 140mg
- Total Carbohydrates: 36g
- Dietary Fiber: 2g
- Sugars: 16g
- Protein: 3g
This is a sweet treat, so enjoy them mindfully!
Final Thoughts
So there you have it, my dear foodies—the secret to making the ultimate Pumpkin Oatmeal Cream Pies! As you bake these delightful cookies, don’t forget to let your creativity shine. Get your loved ones involved, and don’t hold back on the laughter (or the taste-testing, let’s be real).
There’s something heartwarming about sharing good food and memories, and these cookies definitely deliver both in every fluffy bite. So grab your spatula, and let’s celebrate the flavors of fall! Happy baking! 🍂🍰
Print
Pumpkin Oatmeal Cream Pies
- Total Time: 35 minutes
- Yield: 12 servings 1x
- Diet: Vegetarian
Description
Delightful pumpkin oatmeal cream pies filled with luscious cream cheese frosting, embodying the warm flavors of fall.
Ingredients
- 1 cup pumpkin puree
- 1 cup brown sugar
- 1/2 cup granulated sugar
- 1 cup unsalted butter, softened
- 1 egg
- 2 cups all-purpose flour
- 2 cups rolled oats
- 1 teaspoon baking soda
- 1 teaspoon baking powder
- 1 teaspoon cinnamon
- 1/2 teaspoon nutmeg
- 1/4 teaspoon ginger
- 1/4 teaspoon salt
- 1 cup cream cheese, softened
- 1/2 cup powdered sugar
- 1 teaspoon vanilla extract
- 1 teaspoon pumpkin spice
Instructions
- Preheat your oven to 350°F (175°C).
- Mix the softened butter, brown sugar, and granulated sugar until creamy.
- Incorporate the pumpkin puree and egg into the mixture.
- Combine the flour, oats, baking soda, baking powder, cinnamon, nutmeg, ginger, and salt in another bowl.
- Join the dry ingredients gradually into the wet mixture.
- Scoop the dough onto lined baking sheets, leaving space.
- Bake for 12-15 minutes until golden at the edges.
- Make the filling with cream cheese, powdered sugar, vanilla extract, and pumpkin spice.
- Sandwich the filling between two cookies.
Notes
Feel free to customize with chocolate chips or nuts for added flavor.
- Prep Time: 20 minutes
- Cook Time: 15 minutes
- Category: Dessert
- Method: Baking
- Cuisine: American
Nutrition
- Serving Size: 1 cookie
- Calories: 250
- Sugar: 16g
- Sodium: 140mg
- Fat: 11g
- Saturated Fat: 6g
- Unsaturated Fat: 5g
- Trans Fat: 0g
- Carbohydrates: 36g
- Fiber: 2g
- Protein: 3g
- Cholesterol: 40mg
Keywords: pumpkin, oatmeal, cream pies, fall dessert, cookies
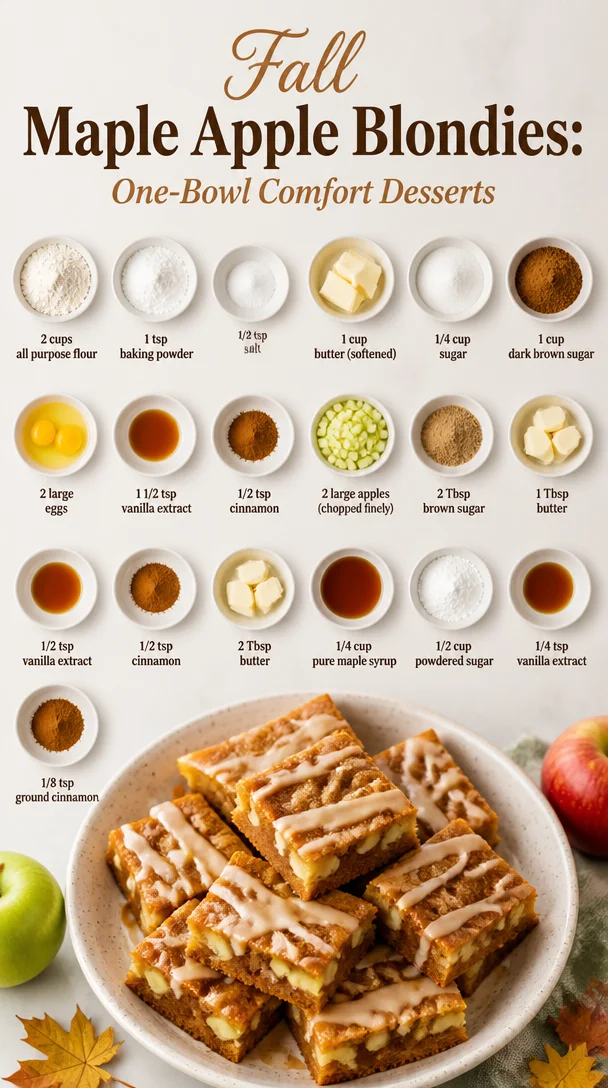
Fall Maple Apple Blondies: One-Bowl Comfort Desserts
Maple Glazed Apple Blondies: A Sweet Slice of Comfort
Hey food lovers! 🌟 It’s Beau Collier here, and I am so thrilled to share my Maple Glazed Apple Blondies with you. If there’s one thing that can instantly cozy up a kitchen, it’s the sweet, warm scent of baked apples mixed with a hint of maple syrup. These blondies are not just a dessert; they’re a delicious hug served on a plate! Now, I know what you might be thinking—“Blondies? What’s so special about that?” But let me tell you, these aren’t your ordinary blondies. We’re talking about a delightful combination of soft, chewy goodness topped with a luscious maple glaze that’ll keep you coming back for seconds (and maybe thirds).
A Sweet Slice of Nostalgia 🍏
Let me take you back to my childhood, where every fall meant one thing—apple picking season. My family would load up the car, and off we’d go to our favorite orchard. The anticipation of those ripe, juicy apples hanging off the trees was everything! I remember how my mom would fill our basket to the brim while sharing stories about which apples made the best pies or sauces.
But the real magic happened when we got home. While my dad handled the apple cider, my mom would whip up various treats, from classic apple pies to comforting apple bars. But it wasn’t until years later that I discovered the joys of blondies. My first batch was an experiment, trying to replicate the flavors of my family’s apple desserts but with a new twist. Tasting the warm, gooey center with the crunch of apples and a hint of cinnamon took me right back to autumn afternoons spent with family. That’s when I decided to create the Maple Glazed Apple Blondies—The perfect treat that combines nostalgia with a modern spin!
Ingredients 🥄
Here’s what you’ll need to whip up these delicious blondies, along with some helpful tips on substitutions and chef insights:
-
2 cups all-purpose flour: This is the base for your blondies. You can substitute with gluten-free flour if necessary; just make sure to use a blend that includes xanthan gum for structure.
-
1 tsp baking powder: This helps your blondies rise to that perfect chewy texture. Baking soda can be substituted in a pinch but adjust the quantity to 1/2 tsp.
-
1/2 tsp salt: Salt enhances flavor. Feel free to use sea salt for a bit of fancy flair!
-
1 cup butter (softened): Butter is essential for richness. If you want a lighter version, try using half butter and half applesauce.
-
1/4 cup sugar: Just a touch of white sugar brings out the sweetness! You can use coconut sugar for a deeper flavor.
-
1 cup dark brown sugar: The moisture from brown sugar creates a chewy texture. Light brown sugar works too; just keep in mind it will be slightly less flavorful.
-
2 large eggs: They bind everything together. You can replace the eggs with flax eggs (2 tbsp ground flaxseed mixed with 5 tbsp water) for a vegan version.
-
1 1/2 tsp vanilla extract: You can’t skip the vanilla—it’s the magic ingredient! Use pure vanilla for the best flavor.
-
1/2 tsp cinnamon: Perfect for that cozy autumn feel. You can add a pinch more if you’re a cinnamon lover like me!
-
2 large apples (chopped finely): Apples provide moisture and texture. Granny Smith or Honeycrisp work great, but feel free to use whatever you have on hand.
-
2 Tbsp brown sugar: This is for our apple topping, adding a caramelized, sweet finish.
-
1 Tbsp butter: A little butter goes a long way in achieving the perfect sautéed apples.
-
1/2 tsp vanilla extract (for the topping): Because more vanilla is always better!
-
1/2 tsp cinnamon (for the topping): To complement the apples.
-
2 Tbsp butter (for the glaze): It adds that extra level of richness.
-
1/4 cup pure maple syrup: The star of the glaze! Look for 100% pure maple syrup for maximum flavor.
-
1/2 cup powdered sugar: This is what makes the glaze sweet and spreadable.
-
1/4 tsp vanilla extract (for the glaze): Yep, one more dash of vanilla!
-
1/8 tsp ground cinnamon: Just a pinch to enhance the flavors of the glaze.
Step-by-Step Instructions 👨🍳
Now, let’s get our bake on! Follow these steps to create your Maple Glazed Apple Blondies. Don’t worry; I’ll sprinkle in some of my favorite chef hacks along the way!
-
Preheat your oven: Start by preheating your oven to 350°F (175°C). This step is crucial because you want your blondies to cook evenly. While the oven heats up, grab an 8×8-inch baking pan, line it with parchment paper, and lightly grease it with cooking spray or a little butter. This ensures your blondies will slide right out when they’re ready!
-
Mix your dry ingredients: In a medium bowl, whisk together the flour, baking powder, salt, and cinnamon until well combined. This step helps to distribute the baking powder evenly so your blondies rise like they should!
-
Cream the butter and sugars: In another bowl, beat together the softened butter, granulated sugar, and dark brown sugar until the mixture is light and fluffy—about 2-3 minutes. This is where the magic happens! The air you incorporate will give the blondies that nice chewy texture.
-
Add the eggs and vanilla: Beat in the eggs one at a time, followed by the vanilla extract. Make sure everything is mixed until smooth; this is your batter’s chance to come together.
-
Combine dry and wet ingredients: Gradually add your dry ingredients into the wet ingredients—mixing on low speed (or with a spatula) until just combined. Overmixing can lead to tough blondies, so once you see no flour streaks, stop!
-
Fold in the apples: Gently fold in the finely chopped apples until they are evenly distributed in the batter. And here’s a chef hack: if your apples are a little dry, you can toss them in a sprinkle of lemon juice to perk them up before adding them in!
-
Spread the batter in the pan: Pour your batter into the prepared baking pan, smoothing the top with a spatula. Bake it in your preheated oven for 25-30 minutes, or until the top is golden brown and a toothpick inserted in the center comes out with a few moist crumbs. This step is all about the perfect bake!
-
Make the apple topping: While your blondies are baking, melt 1 Tbsp of butter in a skillet over medium heat. Add the chopped apples and sprinkle 2 Tbsp of brown sugar over them, tossing to coat. Sauté until the apples are tender and caramelized, about 5-7 minutes. Set aside to cool.
-
Cool and glaze: Once your blondies are done baking, let them cool in the pan for about 10 minutes before transferring them to a wire rack. For the glaze, melt 2 Tbsp of butter in a bowl, and whisk in the maple syrup, powdered sugar, and a sprinkle of cinnamon. Drizzle it over the cooled blondies once they’re completely cool.
-
Slice and serve: Finally, cut into squares and serve those gorgeous blondies up! You can top each piece with some of those fabulous sautéed apples, and trust me, they look as good as they taste.
Serving Suggestions 🍽️
Now that you have your Maple Glazed Apple Blondies ready to go, let’s talk presentation! I love to serve these warm with a scoop of vanilla ice cream on top for that ultimate comforting dessert vibe. You can also sprinkle some crushed nuts—like walnuts or pecans—over the top for an added crunch. A dusting of powdered sugar or even a drizzle of extra maple syrup doesn’t hurt either!
For a cozy fall get-together, serve them alongside a steaming cup of coffee or a spiced apple cider. The warm flavors of apple and maple paired with the comforting spices are bound to keep everyone coming back for more!
Recipe Variations 🌈
Feeling creative? Here are a few variations you can try with this recipe:
-
Nutty Crunch: Fold in half a cup of chopped nuts like walnuts or pecans for an irresistible crunch.
-
Chocolate Chip Delight: Add a cup of semi-sweet chocolate chips to the batter for a sweet and savory combo.
-
Pumpkin Spice Twist: For a seasonal spin, substitute 1/2 cup of applesauce with pumpkin puree and add an extra teaspoon of pumpkin spice!
-
Caramel Sauce Drizzle: Instead of the maple glaze, drizzle warm caramel sauce over the blondies for a decadent dessert.
-
Vegan Version: Use flax eggs and substitute the butter with coconut oil or vegan butter for plant-based blondies!
Chef’s Notes 📝
These blondies are a personal favorite of mine, and I love that they remind me of those bustling fall days at the orchard. Fun fact: I initially made this recipe when I realized I had way too many apples from one of those picking adventures! What started as a way to use up excess fruit has turned into a household staple. Keep in mind, if you’re ever short on time, the blondies can be enjoyed without the glaze too—they’re still scrumptiously moist and packed with flavor on their own!
FAQs and Troubleshooting 🤔
-
Why are my blondies too cakey?
If your blondies are coming out cakey, it’s likely because they’ve been overmixed or overbaked. Always mix until just combined and keep an eye on them as they bake—each oven is different! -
What should I do if my blondies are dry?
If your blondies are dry, it could be a sign that you baked them too long. To fix this in the future, try reducing your baking time slightly, or add a tablespoon of applesauce for moisture. -
Can I freeze these blondies?
Absolutely! Let them cool completely, then wrap them tightly in plastic wrap before sealing them in an airtight container. They can last up to 3 months in the freezer! -
How do I know when my blondies are done?
Insert a toothpick in the center. If it comes out with a few moist crumbs, they’re perfect. If the toothpick is clean, they may be overcooked!
Nutritional Info 🥗
Here’s a sneak peek at the nutritional breakdown of each blondie (based on a 16-piece batch):
- Calories: 280
- Fat: 12g
- Carbohydrates: 40g
- Fiber: 1g
- Protein: 2g
Note that nutritional info may vary depending on ingredient brands and substitutions made. Don’t let the calories scare you; a little indulgence is all part of the fun, right?
Final Thoughts 💭
I hope you’ve enjoyed learning about my Maple Glazed Apple Blondies as much as I love making them! Remember, cooking is about more than just ingredients. It’s about the stories we share and the memories we create around the table. So next time you’re looking for a comforting dessert that evokes feelings of warmth and nostalgia, give these blondies a try. They’ll surely become a beloved recipe in your kitchen, just like they have in mine! Happy baking, everyone! 🍏✨
Print
Maple Glazed Apple Blondies
- Total Time: 45 minutes
- Yield: 16 servings 1x
- Diet: Vegetarian
Description
Delicious blondies with a soft, chewy texture, topped with a sweet maple glaze and chunks of apple, perfect for fall.
Ingredients
- 2 cups all-purpose flour
- 1 tsp baking powder
- 1/2 tsp salt
- 1 cup butter (softened)
- 1/4 cup sugar
- 1 cup dark brown sugar
- 2 large eggs
- 1 1/2 tsp vanilla extract
- 1/2 tsp cinnamon
- 2 large apples (chopped finely)
- 2 Tbsp brown sugar
- 1 Tbsp butter (for sautéing apples)
- 1/2 tsp vanilla extract (for the topping)
- 1/2 tsp cinnamon (for the topping)
- 2 Tbsp butter (for the glaze)
- 1/4 cup pure maple syrup
- 1/2 cup powdered sugar
- 1/4 tsp vanilla extract (for the glaze)
- 1/8 tsp ground cinnamon
Instructions
- Preheat your oven to 350°F (175°C) and line an 8×8-inch baking pan with parchment paper.
- Mix the flour, baking powder, salt, and cinnamon in a medium bowl.
- Cream the softened butter, granulated sugar, and dark brown sugar until light and fluffy.
- Add the eggs one at a time, followed by the vanilla extract.
- Combine the dry ingredients into the wet ingredients until just mixed.
- Fold in the chopped apples until evenly distributed.
- Spread the batter in the prepared baking pan and bake for 25-30 minutes.
- Make the apple topping by sautéing apples with brown sugar until tender.
- Cool the blondies in the pan for 10 minutes, then transfer to a wire rack.
- Glaze the cooled blondies with a mixture of melted butter, maple syrup, powdered sugar, and cinnamon.
- Slice into squares and serve.
Notes
Try serving warm with vanilla ice cream or crushed nuts for extra crunch.
- Prep Time: 15 minutes
- Cook Time: 30 minutes
- Category: Dessert
- Method: Baking
- Cuisine: American
Nutrition
- Serving Size: 1 blondie
- Calories: 280
- Sugar: 22g
- Sodium: 200mg
- Fat: 12g
- Saturated Fat: 7g
- Unsaturated Fat: 3g
- Trans Fat: 0g
- Carbohydrates: 40g
- Fiber: 1g
- Protein: 3g
- Cholesterol: 50mg
Keywords: blondies, apple dessert, fall recipes, maple glaze
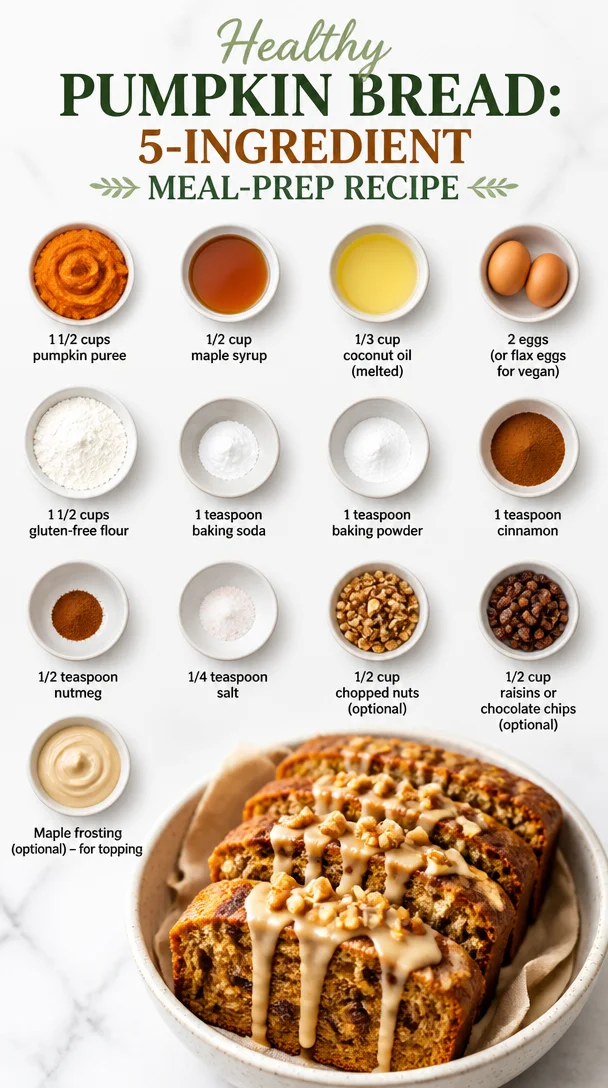
Healthy Pumpkin Bread: 5-Ingredient Meal-Prep Recipe
Healthy Pumpkin Bread: A Cozy Fall Favorite
Hey there, my fellow food enthusiasts! Welcome to Feastical, where the flavors are warm, inviting, and downright delicious. Today, I’m beyond excited to share a standout recipe that perfectly captures the spirit of fall: Healthy Pumpkin Bread. This delightfully moist and aromatic bread is not just a treat for your taste buds, but also packs a nutritious punch. Whether you’re cozying up with a cup of tea or sharing slices with friends at a gathering, this pumpkin bread is bound to elevate your day. So, grab your aprons, let’s roll up those sleeves, and dive into the kitchen!
The Magic of Pumpkin Bread
Pumpkin bread is more than just a recipe; it’s a celebration of comfort and nostalgia. It takes me back to my childhood in the kitchen with my grandmother, where the smell of cinnamon, nutmeg, and sugar danced through the air as we mixed up a batch. I remember the way she carefully measured out the pumpkin puree and talked about the importance of quality ingredients. It was a process filled with love, laughter, and the occasional flour fight.
One particular memory stands out: the first time I made pumpkin bread solo. I was about ten years old, and I decided to surprise my family with a homemade treat. I clumsily poured pumpkin puree all over the counter, whisked eggs like a mad scientist, and somehow managed to create an epic mess. But when that loaf came out of the oven, golden and fragrant, my family’s smiles were worth every spilled drop.
Now, as a cook and recipe creator, I love sharing this warm hug of a recipe with you. With just a few simple ingredients, you can whip up a loaf that not only satisfies cravings but also nurtures your body. So, let’s get started!
Ingredients
Here’s what you’ll need to make this delightful Healthy Pumpkin Bread:
-
1 1/2 cups pumpkin puree
Pumpkin is the star here! It lends moisture and a rich, earthy flavor. You can use canned pumpkin puree or make your own by roasting fresh pumpkins. Just remember to cool and blend it before using! -
1/2 cup maple syrup
Sweetener with a hint of flavor! I love using maple syrup for its unique taste, but feel free to substitute with honey or agave nectar if that’s what you have on hand. Adjust the sweetness based on your preference! -
1/3 cup coconut oil (melted)
This adds healthy fats and moisture. If you’re not a fan of coconut, you can easily replace it with olive oil or melted butter. Just make sure it’s cool before mixing! -
2 eggs (or flax eggs for vegan)
Eggs help bind everything together and keep your bread moist. If you’re going vegan, mix 2 tablespoons ground flaxseed with 6 tablespoons water and let it sit until it thickens! -
1 1/2 cups gluten-free flour
This bread is perfect for gluten-free eaters! You can use any gluten-free all-purpose flour blend. For a non-gluten-free version, just swap it with regular all-purpose flour. -
1 teaspoon baking soda
To help your bread rise and create that delightful texture. -
1 teaspoon baking powder
A must-have for extra fluffiness! -
1 teaspoon cinnamon
The essential fall spice! Feel free to experiment with pumpkin pie spice for an all-in-one flavor boost or add more cinnamon for a deeper profile. -
1/2 teaspoon nutmeg
A warm, aromatic spice that enhances the pumpkin flavor beautifully. -
1/4 teaspoon salt
A pinch of salt balances the sweetness and brings all the flavors together. -
1/2 cup chopped nuts (optional)
Walnuts or pecans add a delightful crunch! You can also leave them out if you prefer a smoother texture. -
1/2 cup raisins or chocolate chips (optional)
A fun add-in for sweetness and texture! Go with chocolate chips for a treat or raisins for a chewy bite. -
Maple frosting (optional)
Feel free to top it off with a simple maple frosting for a special touch. Mix powdered sugar with a bit of maple syrup and a splash of milk for a drizzle that takes it over the top!
Step-by-Step Instructions
Let’s transform those ingredients into something magical!
-
Preheat the Oven: First things first, preheat your oven to 350°F (175°C). This ensures it’s just the right temperature for baking your pumpkin bread to perfection.
-
Prep the Loaf Pan: Grease a loaf pan with coconut oil or line it with parchment paper. This will make it super easy to remove the bread later!
-
Mix the Wet Ingredients: In a large mixing bowl, whisk together the pumpkin puree, maple syrup, and melted coconut oil until combined. The mixture should look smooth and inviting! If you’re using eggs, add them one at a time, mixing well after each addition. If you’re using flax eggs, stir them in at this stage, too!
-
Incorporate the Dry Ingredients: In another bowl, combine the gluten-free flour, baking soda, baking powder, cinnamon, nutmeg, and salt. Mix these dry ingredients well. Then, gradually add the dry mix to the wet mixture, stirring gently until just combined. Remember, overmixing can lead to dense bread, so stir until there are no dry patches.
-
Add the Extras: If you’re using nuts, raisins, or chocolate chips, fold them into the batter now. This is where you can get creative—feel free to add extra goodies or spices.
-
Pour into the Pan: Pour the batter into your prepared loaf pan, smoothing out the top with a spatula. Don’t fret if it’s not perfect; that’s the beauty of homemade!
-
Bake: Place the loaf pan in the preheated oven and bake for about 50-60 minutes. Start checking at the 50-minute mark. Insert a toothpick into the center, and if it comes out clean or with just a few crumbs, it’s time to take it out!
-
Cool Time: Let your pumpkin bread cool in the pan for about 10 minutes before transferring it to a wire rack. This cooling step is essential; it helps the loaf set and keeps that lovely texture.
-
Serve: Once cooled, slice that beautiful loaf and serve! Whether you enjoy it plain, with a bit of butter, or drizzled with maple frosting, every bite will feel like a warm hug!
Serving Suggestions
Let’s talk about how to serve this enticing pumpkin bread! If you’re feeling extra fancy, plate your slices with a dollop of whipped cream or a smear of cream cheese. You can even get creative by adding a sprinkle of cinnamon or a drizzle of maple syrup on top. For gatherings, place the slices on a cute platter with a small bowl of chopped nuts and chocolate chips on the side, inviting everyone to top it their way!
For a cozy breakfast or brunch, serve it alongside a steaming cup of coffee or spiced chai. Trust me, the combination will feel like a moment of bliss on a chilly morning.
Recipe Variations
Let’s get those creative juices flowing! Here are a few delicious twists you can try with this pumpkin bread recipe:
-
Spiced Almond Pumpkin Bread: Swap out the regular spices for a mix of cardamom, ginger, and allspice for a different flavor profile that packs a punch!
-
Pumpkin Bread with Cream Cheese Swirl: Use cream cheese mixed with a little powdered sugar and vanilla. Swirl it into the batter right before baking for creamy, gooey goodness.
-
Gluten-Free Chocolate Chip Pumpkin Bread: Add dark chocolate chips instead of raisins or nuts for a decadent dessert version.
-
Pumpkin Banana Bread: Incorporate 1 mashed banana to add sweetness and flavor! This makes the bread extra moist and gives it a unique twist.
-
Maple Pecan Pumpkin Bread: Toss in chopped pecans and use maple syrup in the batter, and top it with a crunchy pecan streusel for added texture!
Chef’s Notes
Over the years, my pumpkin bread recipe has evolved. I started off with a heavily sweetened version but realized how wonderful it can be with less sugar. Every bite should celebrate the natural flavors of pumpkin and spices! I often find myself experimenting, tossing in what’s in my pantry, and each time someone tries my latest version, their smile is the best feedback I can get.
Oh, and let me tell you about the time I switched out the oil for applesauce in a desperate attempt to be healthier. It turned out fabulous, but my family was convinced I had a secret ingredient! Sometimes accidents in the kitchen lead to the best discoveries.
FAQs and Troubleshooting
-
Why is my pumpkin bread dense?
Overmixing can cause your bread to become dense. Be gentle when combining the wet and dry ingredients, and stop once everything is just combined. -
My bread is too dry. What happened?
This can happen if you overbaked it or if your measurements were slightly off. Make sure to check for doneness with a toothpick around the 50-minute mark! -
Can I use fresh pumpkin?
Absolutely! Just make sure to cook and puree it before using it in the recipe. Fresh pumpkin can add a wonderful texture and flavor. -
How should I store leftover pumpkin bread?
Keep it in an airtight container at room temperature for a couple of days or in the fridge for up to a week. You can also freeze slices for up to three months—just wrap them tightly!
Nutritional Info
While indulging in a cozy slice of pumpkin bread is lovely, let’s not forget the amazing nutritional benefits of our star ingredient, pumpkin! Pumpkin is loaded with vitamins A and C, fiber, and antioxidants. Plus, using maple syrup instead of refined sugar not only offers a unique flavor but also means you’re getting some essential minerals! With optional add-ins like nuts and raisins or chocolate chips, you can boost your bread with healthy fats and additional nutrients. A slice of pumpkin bread is a perfect balance of comfort and health—what could be more delightful?
Final Thoughts
And there you have it, my friends—a vibrant, Healthy Pumpkin Bread recipe that brings the essence of fall right to your kitchen. Whether you whip it up for a lazy Sunday brunch or cozy gatherings with friends, it’s bound to warm hearts and fill bellies. Remember, the best part about cooking is the memories you create—so don’t shy away from sharing a slice or two!
Make this recipe your own, and let the love you pour into it shine through every bite. Happy cooking, and as always, may your kitchen be filled with joy, laughter, and sweet aromas! Now, who’s ready to make some pumpkin bread? 🍞✨
Print
Healthy Pumpkin Bread
- Total Time: 75 minutes
- Yield: 8 servings 1x
- Diet: Vegetarian
Description
A moist and aromatic pumpkin bread that captures the spirit of fall, perfect for cozy moments and gatherings.
Ingredients
- 1 1/2 cups pumpkin puree
- 1/2 cup maple syrup
- 1/3 cup coconut oil (melted)
- 2 eggs (or flax eggs for vegan)
- 1 1/2 cups gluten-free flour
- 1 teaspoon baking soda
- 1 teaspoon baking powder
- 1 teaspoon cinnamon
- 1/2 teaspoon nutmeg
- 1/4 teaspoon salt
- 1/2 cup chopped nuts (optional)
- 1/2 cup raisins or chocolate chips (optional)
- Maple frosting (optional)
Instructions
- Preheat the oven: First things first, preheat your oven to 350°F (175°C).
- Prep the loaf pan: Grease a loaf pan with coconut oil or line it with parchment paper.
- Mix the wet ingredients: In a large mixing bowl, whisk together the pumpkin puree, maple syrup, and melted coconut oil until combined.
- Incorporate the dry ingredients: In another bowl, combine the gluten-free flour, baking soda, baking powder, cinnamon, nutmeg, and salt.
- Add the extras: Fold in nuts, raisins, or chocolate chips into the batter.
- Pour into the pan: Pour the batter into your prepared loaf pan.
- Bake: Place the loaf pan in the preheated oven and bake for about 50-60 minutes.
- Cool time: Let your pumpkin bread cool in the pan for about 10 minutes before transferring it to a wire rack.
- Serve: Once cooled, slice and serve with butter, or drizzled with maple frosting.
Notes
Feel free to experiment with add-ins like nuts and raisins or chocolate chips. This recipe is flexible for personal preferences.
- Prep Time: 15 minutes
- Cook Time: 60 minutes
- Category: Baked Goods
- Method: Baking
- Cuisine: American
Nutrition
- Serving Size: 1 slice
- Calories: 210
- Sugar: 10g
- Sodium: 200mg
- Fat: 9g
- Saturated Fat: 4g
- Unsaturated Fat: 5g
- Trans Fat: 0g
- Carbohydrates: 30g
- Fiber: 2g
- Protein: 3g
- Cholesterol: 50mg
Keywords: pumpkin bread, fall recipes, healthy baking, cozy desserts
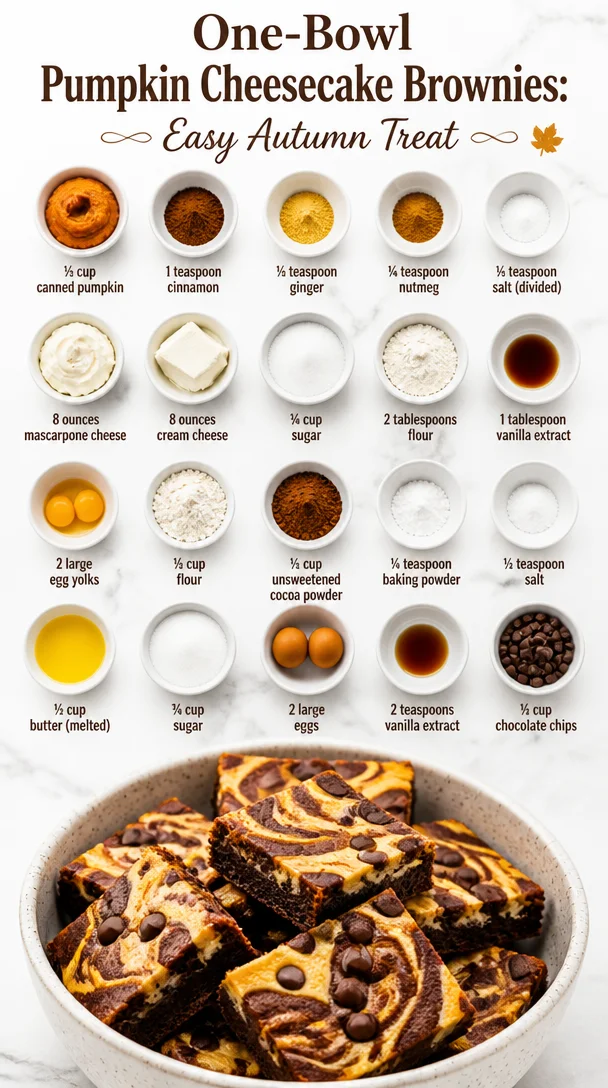
One-Bowl Pumpkin Cheesecake Brownies: Easy Autumn Treat
Indulge in Fall Bliss: Pumpkin Cheesecake Brownies
Hey there, fellow food lovers! Beau Collier here, and today we’re diving into a delightful treat that embodies the essence of fall: Pumpkin Cheesecake Brownies! Picture this: rich, fudgy brownies swirled with creamy pumpkin cheesecake—the perfect harmony of flavors that not only comforts the soul but also brings a smile to your face. Whether you’re sipping a warm beverage by the fire or gathering with family, these brownies are guaranteed to elevate the cozy vibes.
Now, I know what you’re thinking—pumpkin brownies? Aren’t they just for fall? Well, I say no way! These gooey delights are perfect for any occasion, from Sunday dinners to birthday parties, or simply a sweet treat on a Tuesday afternoon. So, let’s roll up our sleeves, grab our mixing bowls, and unleash that inner chef!
A Taste of Nostalgia
I remember the first time I made pumpkin cheesecake brownies. It was one of those rainy Sundays when nothing seemed to inspire me until I stumbled upon an old family recipe in my grandmother’s cherished cookbook. With its faint smell of vanilla and spices ingrained in the pages, it transported me back to my childhood kitchen where she would whisk up magic. The smell of cinnamon wafting through the air, the laughter shared over mixing bowls; those memories are the very heart of what I do today.
So, I decided to put my own spin on her classic, merging my love for rich brownies with that iconic pumpkin cheesecake. The result? A dessert that feels like a warm hug on a cool autumn day. These brownies became a family favorite, and I hope they’ll grace your kitchen with the same joy they’ve brought mine!
Ingredients
Gather these simple and delightful ingredients to make your own Pumpkin Cheesecake Brownies:
-
½ cup canned pumpkin: This is the star of our show! Canned pumpkin puree lends moisture and a hint of sweetness. You can substitute it with homemade pumpkin puree if you’re feeling adventurous.
-
1 teaspoon cinnamon: Adds a warm, spicy flavor that screams fall. If you want a little more warmth, add a dash more, or use pumpkin pie spice.
-
½ teaspoon ginger: This spice enhances the pumpkin’s flavor; fresh ginger can be used if you have it!
-
¼ teaspoon nutmeg: Nutmeg adds depth, making the flavors pop. If you don’t have nutmeg, you can skip it or use a bit more cinnamon.
-
½ teaspoon salt (divided): Balances sweetness and elevates flavors.
-
8 ounces mascarpone cheese: Creamy and rich, it adds a luxurious texture. You can substitute cream cheese if needed, but the flavor will slightly change.
-
8 ounces cream cheese: Rich and creamy—essential for our cheesecake layer.
-
¾ cup sugar: Sweetness to bring all the flavors together. You could swap it with coconut sugar for a more caramel-like note.
-
2 tablespoons flour: Just a bit for structure in the cheesecake filling.
-
1 tablespoon vanilla extract: Bring on that delicious aromatic note! Use high-quality vanilla for the best results.
-
2 large egg yolks: Adds richness to the cheesecake layer—don’t toss those whites; they can go into your breakfast omelet!
-
½ cup flour: For our brownie base, helping to create that delicious fudgy texture.
-
½ cup unsweetened cocoa powder: Essential for that chocolate flavor! You can use Dutch-processed cocoa powder for a deeper taste.
-
¼ teaspoon baking powder: Lightens the brownie base slightly; make sure it’s fresh for best results.
-
½ teaspoon salt: Enhances the chocolate flavor—don’t forget this essential ingredient.
-
½ cup butter (melted): The foundation of our fudgy brownie base. You can swap in coconut oil for a dairy-free option.
-
¾ cup sugar: If you’re craving that sweet brownie goodness, this is key!
-
2 large eggs: Provides moisture and binds everything together.
-
2 teaspoons vanilla extract: To up that delicious flavor profile.
-
½ cup chocolate chips: For that extra indulgence! Feel free to swap for white chocolate or butterscotch chips if that’s your jam!
Now that we’ve gathered our ingredients, let’s get cooking!
Step-by-Step Instructions
Step 1: Preheat the Oven
First things first, let’s crank that oven up to 350°F (175°C). This is key for achieving the perfect brownie texture—trust me, it makes a difference!
Step 2: Prepare Your Baking Dish
Grab an 8×8-inch baking pan and grease it lightly. You can also line it with parchment paper for easy removal after baking—this little hack makes for perfectly clean cuts when you’re ready to serve.
Step 3: Mix the Brownie Batter
In a medium bowl, combine the melted butter and sugar. Stir until you see no more sugar granules—that’s when the magic begins!
Add your eggs and vanilla extract to the mix, whisk until it’s smooth and luscious. Now, gently fold in your cocoa powder, flour, baking powder, and salt. Don’t overmix; we want that dreamy fudgy texture, not a cake!
Step 4: Spread the Brownie Base
Pour the brownie mixture into your prepared baking pan, spreading it evenly. Just let it be—don’t stress too much about getting it perfect!
Step 5: Prepare the Pumpkin Cheesecake Layer
In a separate bowl, mix your mascarpone cheese and cream cheese until it’s creamy. Add in the sugar, flour, cinnamon, ginger, nutmeg, ½ teaspoon salt, and vanilla. Now, mix in the egg yolks one at a time until everything is well combined.
Step 6: Swirl It Together
Spread the pumpkin cheesecake mixture over the brownie batter, leaving a few spoonfuls behind. With a knife or a skewer, swirl the remaining brownie batter on top of the pumpkin mixture for that signature marbled look. Each slice will reveal a delicious pattern—just like a beautiful autumn landscape!
Step 7: Bake to Perfection
Place the pan in your preheated oven and bake for 30–35 minutes. You’ll know they’re done when the cheesecake is set, and a toothpick inserted comes out with only a few moist crumbs (not wet batter!).
Step 8: Cool and Slice
Once baked, let your brownies cool in the pan before attempting to slice them. This is the hardest part, but it’s worth it! Allow at least 20-30 minutes to cool down at room temperature. Then, chill in the fridge for another hour or so for the best texture!
Serving Suggestions
When you’re ready to impress your guests (or just treat yourself), cut those brownies into generous squares—you deserve it! Feel free to dust them with powdered sugar or drizzle some caramel sauce over the top for that extra flair. Serve with a dollop of whipped cream or vanilla ice cream alongside a hot cup of your favorite drink— a cozy chai latte perhaps? It’s the perfect way to savor each bite!
Recipe Variations
-
Nutty Brownies: Fold in some chopped walnuts or pecans into the brownie batter for a lovely crunch! It plays beautifully against the creamy cheesecake.
-
Chocolate Swirls: Instead of a simple swirl, try layering chocolate ganache between the brownie and cheesecake layers for extreme chocolate satisfaction.
-
Crustless Delight: You can completely skip the brownie base and bake the pumpkin cheesecake filling on its own in a springform pan for a lighter, crustless dessert that’s equally delicious.
-
Spicy Kick: Add a pinch of cayenne or some finely chopped jalapeños for a surprising touch of heat that amplifies the sweetness in unexpected ways.
-
Vegan Version: Swap traditional ingredients with plant-based options like nut-based cream cheese, flax eggs, and coconut oil.
Chef’s Notes
This recipe has transformed over the years. Initially, I wanted to create something that kids and adults alike could enjoy, and I find it deliciously ironic that something so indulgent can have such a beautiful twist with pumpkin. These brownies are always a hit, and they never last too long! I often catch my family sneaking bites while they’re cooling because the smell fills the air like a promise of sweetness. Don’t be surprised if you find yourself making an extra batch!
FAQs and Troubleshooting
Q1: Why are my brownies dry?
A: Overbaking can lead to dryness. Use the toothpick test and remember that they will continue cooking a bit after you pull them out of the oven!
Q2: Can I use fresh pumpkin instead of canned?
A: Absolutely! Just be sure to roast and purée the pumpkin, and remove any excess moisture so your brownies don’t end up too watery.
Q3: How do I store leftover brownies?
A: Keep them in an airtight container at room temperature for a few days, or refrigerate them for a week! You can even freeze them for longer storage—just let them cool completely before wrapping them tightly.
Q4: What if my cheesecake layer doesn’t set?
A: If the cheesecake layer isn’t setting, it may need a little longer in the oven. Don’t panic, just put it back in for a few more minutes and check again!
Nutritional Info
These scrumptious Pumpkin Cheesecake Brownies are not just delicious but also relatively satisfying when it comes to balancing their indulgence with nutrition! While they’re decadent (as all good desserts should be), a single brownie packs in a good dose of flavor while providing some protein and healthy fats from the cheese.
Here’s a rough breakdown per brownie (based on 16 servings):
- Calories: 350
- Fat: 22g
- Carbohydrates: 42g
- Protein: 5g
Remember, moderation is key! Enjoy these decadent treats during your fall festivities and savor every last bite.
Final Thoughts
Well, there you have it, my friends! Your guide to whipping up the most delightful Pumpkin Cheesecake Brownies. I hope you’re feeling the spirit of fall as much as I do! This recipe isn’t just about the taste; it’s a celebration of nostalgia, family gatherings, and the warmth that good food brings into our lives. Don’t forget to share these with friends and family—for nothing brings people together quite like a delicious homemade treat! I can’t wait to hear how your brownies turn out. Until next time, keep cooking up joy and flavor—bon appétit!
Print
Pumpkin Cheesecake Brownies
- Total Time: 55 minutes
- Yield: 16 servings 1x
- Diet: Vegetarian
Description
Rich, fudgy brownies swirled with creamy pumpkin cheesecake, perfect for fall or any occasion.
Ingredients
- ½ cup canned pumpkin
- 1 teaspoon cinnamon
- ½ teaspoon ginger
- ¼ teaspoon nutmeg
- ½ teaspoon salt (divided)
- 8 ounces mascarpone cheese
- 8 ounces cream cheese
- ¾ cup sugar
- 2 tablespoons flour
- 1 tablespoon vanilla extract
- 2 large egg yolks
- ½ cup flour
- ½ cup unsweetened cocoa powder
- ¼ teaspoon baking powder
- ½ teaspoon salt
- ½ cup butter (melted)
- ¾ cup sugar
- 2 large eggs
- 2 teaspoons vanilla extract
- ½ cup chocolate chips
Instructions
- Preheat the oven to 350°F (175°C).
- Prepare an 8×8-inch baking pan and grease it lightly.
- Mix the melted butter and sugar in a medium bowl until no sugar granules remain.
- Add eggs and vanilla extract to the mix, whisk until smooth.
- Fold in cocoa powder, flour, baking powder, and salt.
- Pour the brownie mixture into the prepared baking pan.
- Mix mascarpone cheese and cream cheese in a separate bowl until creamy.
- Add sugar, flour, spices, salt, and vanilla to the cream cheese mixture.
- Mix in egg yolks one at a time until well combined.
- Spread the pumpkin cheesecake mixture over the brownie batter, swirling in some remaining brownie batter.
- Bake for 30-35 minutes, until the cheesecake is set.
- Cool in the pan before slicing into squares.
Notes
Dust with powdered sugar or drizzle caramel sauce for extra flair.
- Prep Time: 20 minutes
- Cook Time: 35 minutes
- Category: Dessert
- Method: Baking
- Cuisine: American
Nutrition
- Serving Size: 1 brownie
- Calories: 350
- Sugar: 24g
- Sodium: 320mg
- Fat: 22g
- Saturated Fat: 12g
- Unsaturated Fat: 8g
- Trans Fat: 0g
- Carbohydrates: 42g
- Fiber: 2g
- Protein: 5g
- Cholesterol: 75mg
Keywords: Pumpkin, Cheesecake, Brownies, Fall desserts, Sweet treats
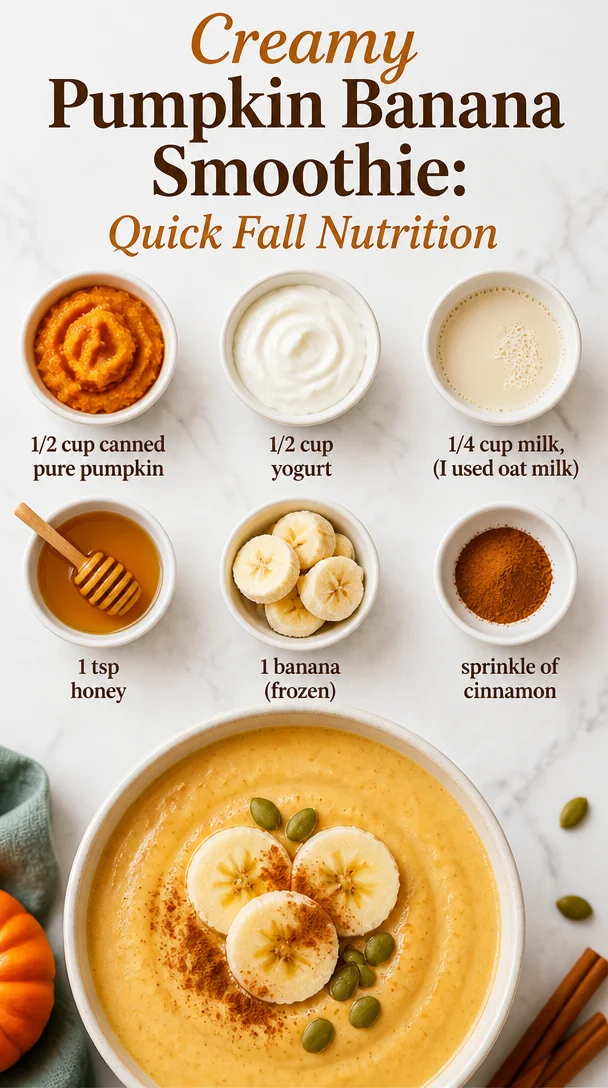
Creamy Pumpkin Banana Smoothie: Quick Fall Nutrition
The Ultimate Pumpkin Banana Smoothie: Your New Fall Favorite!
Hey there, fellow food lovers! Welcome back to my culinary corner here at Feastical, where we whip up deliciously comforting recipes that can bring joy to any day. Today, I’m super excited to share a recipe that blends the essence of fall with a creamy, dreamy twist – the Pumpkin Banana Smoothie! Perfect for breakfast, a snack, or even a treat on those chilly autumn afternoons, this smoothie is packed with flavors that warm your soul and give your taste buds a party.
A Little Personal Story: The Cozy Autumn Vibes
You know how certain flavors can transport you to specific moments in your life? That’s how I feel about pumpkin and banana together. This combo takes me back to my childhood kitchen, where the smell of fresh-baked pumpkin bread wafted through the air as the leaves outside turned to vibrant shades of orange and gold. I remember my mom pulling out an old blender that had seen better days, but she didn’t care – what mattered was the love that went into every meal.
On brisk autumn mornings, we’d whip up smoothies packed with whatever flavors we had on hand. I distinctly remember adding ripe bananas and creamy pumpkin to our blender, and voilà – the smoothie magic began! It was the perfect fuel for our Halloween adventures or afternoons spent at our favorite pumpkin patch. Now, as an adult, I find immense joy in recreating this blend and sharing it with you. Here’s how to bring this nostalgic goodness into your kitchen!
Ingredients: What You’ll Need
Here’s a quick shopping list for your Pumpkin Banana Smoothie, complete with some chef insights to make the experience even better:
-
1/2 cup canned pure pumpkin: Not only is pumpkin full of fiber and vitamins, but it also provides a creamy texture. If you don’t have canned pumpkin, you can use fresh pumpkin puree in a pinch!
-
1/2 cup yogurt: This gives the smoothie a rich and creamy base. I love using Greek yogurt for added protein, but feel free to use dairy-free yogurt if you’re going plant-based.
-
1/4 cup milk: I personally used oat milk for its natural sweetness, but you can choose almond milk, soy milk, or even regular cow’s milk.
-
1 tsp honey: Sweeten things up naturally! If you’re vegan or looking to cut sugar, agave syrup or maple syrup works great too.
-
1 banana (frozen): Frozen bananas lend a delightful creaminess without the need for ice. Plus, they’re naturally sweet! If you don’t have one on hand, you can use a fresh one – just throw in a few ice cubes.
-
Sprinkle of cinnamon: This isn’t just for flavor; cinnamon also adds warmth and sweetness. You can swap it for nutmeg if you want an earthier taste.
Step-by-Step Instructions: Let’s Blend It Up!
Now that we have all our ingredients lined up like a team ready to play, let’s jump into the process of creating this fabulous pumpkin banana smoothie! Follow these steps, and don’t forget to bring your chef energy!
-
Gather your tools: Grab your blender and measuring cups. Getting your tools ready sets the vibe for a smooth cooking experience.
-
Start with pumpkin: Pour 1/2 cup of canned pure pumpkin into your blender. This is where the magic begins! Pumpkin adds an amazing richness to your smoothie.
-
Add yogurt: Next, scoop in 1/2 cup of yogurt. If you’re using Greek yogurt for that extra protein punch, your smoothie will be even more filling!
-
Pour in your milk: Add in 1/4 cup of milk – your choice! If you like a creamier texture, don’t be shy to add a splash more.
-
Sweeten it up: Drizzle in 1 tsp of honey (or your sweetener of choice). This is where you’ll want to taste and adjust based on how sweet you like things.
-
Time for the magic fruit: Peel and break that frozen banana into chunks, then toss it into the blender. The frozen banana will help create a deliciously smooth, frosty texture.
-
Cinnamon sprinkle: Add a pinch of cinnamon for that cozy note. Feel free to add more if you’re like me and can’t resist that warm spice vibes.
-
Blend it all: Secure the lid on your blender and blend on high until smoothened to fluffy perfection. The length you’ll blend will depend on the strength of your blender, but generally, 30 seconds to a minute is perfect. Keep an eye on it – if it’s too thick, add a splash of more milk!
-
Taste test: Have a spoon handy for a little taste. This is the perfect moment to adjust the sweetness or add a pinch more cinnamon.
-
Pour and serve: Once satisfied with your mix, pour it into your favorite glasses. I love using clear glasses to show off the lovely orange and yellow swirls!
Serving Suggestions: How to Present Your Smoothie
Serving a smoothie is all about the details! Here are some creative ideas to elevate your Pumpkin Banana Smoothie experience:
-
Garnish it: Top with a sprinkle of cinnamon or a dollop of yogurt for an added touch of elegance. Feel free to add a few pumpkin seeds or sliced bananas for crunch.
-
Serve in a mason jar: It adds a rustic charm, plus they’re handy for on-the-go sipping!
-
Pair it up: Serve alongside an oatmeal cookie or even some zucchini bread for a cozy breakfast spread.
-
Sip with a straw: Finding a fun, colorful straw can make your smoothie drinking experience even better!
Recipe Variations: Get Creative!
Let’s jazz things up! Here are some creative variations to take your Pumpkin Banana Smoothie to the next level:
-
Chocolate pumpkin banana smoothie: Add a scoop of cocoa powder or chocolate protein powder for a chocolatey version. It’s like dessert in a glass!
-
Spicy pumpkin banana smoothie: Throw in a hint of ginger or cayenne pepper for some added kick.
-
Nutty flavor twist: Add a tablespoon of almond or peanut butter for a deliciously nutty version. This brings in healthy fats and protein.
-
Superfood boost: Toss in a handful of spinach or a tablespoon of chia seeds to amp up the nutrition without altering the yummy taste.
-
Tropical flavor: Substitute the banana with mango or pineapple and adjust the milk to coconut milk to get a refreshing tropical vibe.
Chef’s Notes: A Dash of Thoughts
As I crafted this recipe over the years, I’ve tried a multitude of variations! Sometimes I make a double batch to have it on hand for snacks – it freezes beautifully, and on busy days, nothing is better than pulling out an instant treat.
I fondly remember hosting a smoothie party for my friends where we tried all sorts of flavors. The Pumpkin Banana Smoothie was the star of the show and garnered rave reviews. Who would’ve thought this humble drink could steal the spotlight?
FAQs and Troubleshooting: Your Questions Answered!
-
Can I make this smoothie ahead of time?
Absolutely! You can make it and store it in the fridge for up to 24 hours. Just give it a good shake before enjoying! -
What if I don’t have frozen bananas?
You can use a fresh banana and add a handful of ice. It will have a slightly different texture but still delicious. -
How can I thicken my smoothie if it’s too runny?
Add more banana or a spoonful of oats to thicken it up! -
Can I use fresh pumpkin instead of canned?
Yes! Just make sure to puree it very well to reach that creamy consistency.
Nutritional Info
While enjoying this Pumpkin Banana Smoothie, let’s not forget about nutrition! Here’s a quick breakdown of the health highlights:
- Calories: Approximately 250-300 per serving, depending on the ingredients.
- Protein: About 8-10 grams from the yogurt and milk.
- Fiber: With the pumpkin and banana, you’ll get a nice fiber boost, keeping your tummy happy.
- Vitamin A: Pumpkin is rich in vitamin A, great for skin and eye health.
- Calcium: If you’re using dairy or dairy alternatives, you also get a calcium boost!
Final Thoughts: Blend Up Your Joy!
So there you have it, my delightful friends! The Pumpkin Banana Smoothie is not just a drink; it’s a warm hug in a cup filled with memories, flavors, and a touch of joy. I want you all to gather around your blender, relish the process of making this goodness, and share in the happiness it brings. Whether you sip it solo, share it with a friend, or present it at a gathering, I promise it will be a hit!
As the seasons change and the days grow colder, let’s embrace cozy vibes through our meals. So grab those ingredients and mix up a batch today! I can’t wait to hear how yours turns out, so drop me a comment below or tag me on social media. Happy blending, and cheers to creamy, dreamy moments! 🍂🥤
Print
Pumpkin Banana Smoothie
- Total Time: 10 minutes
- Yield: 2 servings 1x
- Diet: Vegetarian
Description
A creamy and dreamy pumpkin banana smoothie that captures the essence of fall, perfect for breakfast or a cozy treat.
Ingredients
- 1/2 cup canned pure pumpkin
- 1/2 cup yogurt (Greek or dairy-free)
- 1/4 cup milk (oat, almond, or cow’s)
- 1 tsp honey (or agave/maple syrup)
- 1 frozen banana
- Sprinkle of cinnamon
Instructions
- Gather your tools: Grab your blender and measuring cups.
- Start with pumpkin: Pour 1/2 cup of canned pure pumpkin into your blender.
- Add yogurt: Scoop in 1/2 cup of yogurt.
- Pour in your milk: Add in 1/4 cup of milk.
- Sweeten it up: Drizzle in 1 tsp of honey or sweetener of choice.
- Time for the magic fruit: Peel and break that frozen banana into chunks.
- Cinnamon sprinkle: Add a pinch of cinnamon.
- Blend it all: Secure the lid and blend on high until smooth.
- Taste test: Have a spoon handy to taste and adjust sweetness.
- Pour and serve: Once satisfied, pour it into your favorite glasses.
Notes
For a thicker smoothie, add more banana or a spoonful of oats. You can make this smoothie ahead of time and store it in the fridge for up to 24 hours.
- Prep Time: 10 minutes
- Cook Time: 0 minutes
- Category: Breakfast
- Method: Blending
- Cuisine: American
Nutrition
- Serving Size: 1 serving
- Calories: 275
- Sugar: 18g
- Sodium: 70mg
- Fat: 5g
- Saturated Fat: 2g
- Unsaturated Fat: 3g
- Trans Fat: 0g
- Carbohydrates: 48g
- Fiber: 5g
- Protein: 10g
- Cholesterol: 10mg
Keywords: pumpkin smoothie, banana smoothie, fall recipes, healthy smoothie, easy breakfast

Fall Cinnamon Oatmeal Stuffed Apples with Vanilla Custard
Cinnamon Oatmeal Stuffed Apples with Vanilla Custard Sauce: A Warm Hug from the Oven
Hey there, food friends! Welcome back to Feastical, where we whip up delicious comfort food with a sprinkle of joy. Today, I’m excited to share a recipe that marries nostalgic flavors with a pop of creativity. We’re diving into the sweet and cozy world of Cinnamon Oatmeal Stuffed Apples with Vanilla Custard Sauce. These little gems are not just desserts; they’re like a hug from the oven, ready to warm your heart and fill your belly.
When I think of autumn, I can almost hear the leaves crunching underfoot and the scent of crisp apples wafting through the air. This dish reminds me of my Grandma Mary, who had a knack for turning simple ingredients into pure magic. She often had a basket of apples on her kitchen counter, and I can still hear her voice, “Let’s make something special, Beau!” Those words were an open invitation to create something delicious, and nothing was off-limits. She loved to experiment, turning our family favorites into everything from pies to crisps.
While we’d make her famous apple pie, one day we decided to stuff apples themselves. The result was an explosion of warm cinnamon, nutty oats, and sweet apple goodness, all topped with a creamy vanilla custard that was just heavenly. It was as if we had captured the essence of fall in a dish. Fast forward to today, and I’ve taken that inspiration to craft something truly delightful and comforting — a cozy treat that’s perfect for dinner parties, holidays, or simply enjoying at home on a chilly day. Let’s get cooking!
Ingredients
Here’s what you’ll need to create these delicious Cinnamon Oatmeal Stuffed Apples:
-
6 large apples
Perfect for stuffing! Look for firm varieties like Granny Smith or Honeycrisp. If you prefer sweeter apples, go for Fuji or Gala. -
1 cup (115 g) old-fashioned rolled oats
These provide a lovely, chewy texture. If you’re gluten-free, feel free to swap these out for gluten-free oats. -
1/2 cup (65 g) all-purpose flour
This helps bind the filling together. For a gluten-free alternative, a 1:1 gluten-free flour blend works wonderfully! -
2/3 cup (138 g) brown sugar, packed
Adds depth and a caramel-like flavor. If you’re looking to cut down on sugar, coconut sugar is a great substitute. -
1/3 cup (66 g) granulated sugar
Balances the sweetness. You can use less if you prefer, especially if your apples are on the sweeter side. -
1 tsp ground cinnamon
The star spice here! If you want a little twist, try using cinnamon sugar for an extra kick. -
1/4 tsp ground nutmeg
This adds warmth and complexity to the dish. If you don’t have any, just use a bit more cinnamon. -
Pinch of kosher salt
A little salt brings out the sweetness beautifully. Don’t skip this! -
6 tbsp (87 g) salted butter, cubed
Adds richness. If you want to go dairy-free, substitute with coconut oil or a vegan butter. -
Cinnamon sticks, for garnish
Just a fun decorative touch, but it also contributes to the aroma. -
4 egg yolks
These will enrich the custard sauce. Vegan option: consider using cornstarch as a thickener instead. -
1/2 cup (100 g) granulated sugar
Sweetens the custard. You can use superfine sugar for a smoother texture if you like. -
1 cup (240 ml) whole milk
Whole milk gives a creamy mouthfeel; however, you can use almond milk or coconut milk for a lighter version. -
1 tsp vanilla extract
Because who doesn’t love the aroma of vanilla? You could even use fresh vanilla beans if you’re feeling fancy!
Step-by-Step Instructions
Let’s get to the good stuff! You’re just a few steps away from a comforting dessert that will make you feel right at home.
-
Preheat Your Oven
Start by preheating your oven to 350°F (175°C). This will ensure your apples bake evenly and get that lovely golden brown color. -
Prepare the Apples
Carefully core the apples, leaving the bottoms intact. This way, they hold all that ooey-gooey filling. An apple corer works magic here, but if you don’t have one, a sharp knife can do the trick. -
Make the Filling
In a mixing bowl, combine the oats, flour, brown sugar, granulated sugar, cinnamon, nutmeg, and salt. Mix it well. This dry mixture is going to provide a flavorful cushion for your apples. -
Add the Butter
Toss in the cubed butter and use your fingertips to rub it into the dry ingredients until it resembles coarse crumbs. This helps create that rich, buttery flavor. -
Fill the Apples
Gently spoon the oat mixture into the cored apples, packing it tight but not overflowing. Remember, those apples need space to puff and breathe as they cook! -
Bake the Apples
Place the apples upright in a baking dish. Pour a splash of water (about 1/4 cup) into the bottom of the dish to create steam. Cover with aluminum foil, and then pop them in the oven for about 25-30 minutes. -
Prepare the Vanilla Custard Sauce
While the apples bake, make the custard. In a medium saucepan, whisk the egg yolks and granulated sugar until smooth. Gradually whisk in the milk and vanilla extract. -
Cook the Custard
Over medium heat, cook the mixture, stirring constantly until it thickens slightly and coats the back of a spoon (about 7-10 minutes). Don’t let it boil or you’ll have scrambled eggs. If you want a quick tip: keep that spoon swirling to avoid lumps! -
Finish Baking the Apples
After 30 minutes, remove the foil from the baking dish and bake for another 10-15 minutes until the apples are tender and the tops are golden brown. They should be fragrant and looking mighty delicious! -
Serve and Enjoy
Plate those lovely apples and drizzle the velvety vanilla custard sauce over them. Garnish with a cinnamon stick for an Instagram-worthy finish. Dig in and enjoy that warm, comforting goodness!
Serving Suggestions
When it comes to plating, presentation is key! Here are a few fun ways to serve up your Cinnamon Oatmeal Stuffed Apples:
-
Individual Plates: Place one stuffed apple in the center of a plate and spoon a good amount of custard sauce around it. Add a sprinkle of cinnamon on top for an extra pop of flavor!
-
Family Style: Arrange a handful of stuffed apples on a large serving platter. Pour custard sauce in a small bowl on the side for guests to help themselves.
-
A la Mode: Top each apple with a scoop of vanilla ice cream before drizzling on the custard. It’s a decadent twist that’ll take your dessert to the next level!
No matter how you serve them, you’re bound to impress everyone — from your family to your friends.
Recipe Variations
Feeling adventurous? Here are a few twists to make this dish uniquely yours:
-
Nutty Delight: Add 1/2 cup of your favorite nuts (like pecans or walnuts) to the filling for that added crunch. They bring a great flavor and texture contrast!
-
Berry Patch: Toss in some dried cranberries or raisins into the filling for a sweet surprise. The tartness of cranberries pairs beautifully with the sweetness of apples.
-
Caramel Drizzle: Drizzle caramel sauce over the finished apples for an indulgent treat. You can make your own or take a shortcut with store-bought!
-
Spiced Up: Want more complexity? Add a pinch of allspice or ginger to the filling to enhance those warm flavors.
-
Vegan Twist: Substitute the egg yolks with cornstarch mixed with a splash of plant-based milk for the custard sauce. Use coconut milk for a rich and creamy flavor.
Chef’s Notes
These Cinnamon Oatmeal Stuffed Apples recipe has evolved over the years in my kitchen. I started out making them the traditional way, with just brown sugar and oats. However, after some experimenting and a few happy accidents (like the time I added almond extract instead of vanilla), they morphed into something quite special.
I remember making these for my friends at a cozy autumn gathering, and everyone was raving about them! For me, recipes like these are all about sharing joy and warmth. I hope they bring the same for you!
FAQs and Troubleshooting
Here are a few common questions and troubleshooting tips you might find helpful as you embark on your cooking adventure:
-
Can I prep these apples in advance?
Absolutely! You can core the apples and prep the filling a day ahead. Just store them separately in the refrigerator until you’re ready to bake. -
What if my apples are too soft?
If you accidentally picked soft apples, no worries! Just reduce the baking time to prevent them from turning mushy. -
My custard sauce didn’t thicken. What went wrong?
If your custard sauce isn’t thickening, it might not have cooked long enough. Just return it to the stovetop on medium-low heat and keep stirring until it coats the back of a spoon. -
Can I freeze the stuffed apples?
Yes, stuffed apples freeze well! Just bake them, let them cool, and then freeze in an airtight container. Reheat in the oven when you’re ready to enjoy them again.
Nutritional Info
While comfort food like this is all about indulgence, here’s a rough breakdown so you can enjoy without guilt:
- Calories: Approx. 280 per stuffed apple (including custard)
- Fat: 10g (mainly from the butter)
- Carbohydrates: 46g (natural sugars from apples and added sugars)
- Protein: 3g (from eggs and milk)
- Fiber: 5g (from oats and apples)
Of course, nutritional values will vary based on specific ingredient choices and any modifications you make.
Final Thoughts
There you have it, folks! A delicious journey wrapped in a warm, cinnamon-kissed apple. These Cinnamon Oatmeal Stuffed Apples with Vanilla Custard Sauce are bound to make your kitchen the heart and soul of your home, just like it did for my Grandma Mary and me. Whether enjoyed on a chilly evening or served at a festive gathering, this dish holds the power to create memories and fill hearts.
So gather your loved ones, get cozy in your kitchen, and let the delightful aroma of baked apples fill the air. I can’t wait to hear how yours turn out! Share your culinary creations with me on social media, and happy cooking, my friends! 🍏❤️
Print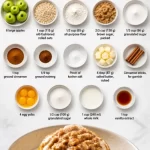
Cinnamon Oatmeal Stuffed Apples with Vanilla Custard Sauce
- Total Time: 55 minutes
- Yield: 6 servings 1x
- Diet: Vegetarian
Description
A warm, comforting dessert featuring apples stuffed with cinnamon oatmeal and topped with a creamy vanilla custard sauce.
Ingredients
- 6 large apples
- 1 cup (115 g) old-fashioned rolled oats
- 1/2 cup (65 g) all-purpose flour
- 2/3 cup (138 g) brown sugar, packed
- 1/3 cup (66 g) granulated sugar
- 1 tsp ground cinnamon
- 1/4 tsp ground nutmeg
- Pinch of kosher salt
- 6 tbsp (87 g) salted butter, cubed
- Cinnamon sticks, for garnish
- 4 egg yolks
- 1/2 cup (100 g) granulated sugar
- 1 cup (240 ml) whole milk
- 1 tsp vanilla extract
Instructions
- Preheat your oven to 350°F (175°C).
- Prepare the apples by carefully coring them, leaving the bottoms intact.
- Make the filling by combining oats, flour, brown sugar, granulated sugar, cinnamon, nutmeg, and salt in a bowl.
- Add the cubed butter and rub it into the dry ingredients until resembling coarse crumbs.
- Fill the apples with the oat mixture, packing it tight.
- Place the apples upright in a baking dish and add a splash of water to the bottom. Cover with aluminum foil and bake for 25-30 minutes.
- Prepare the vanilla custard sauce by whisking egg yolks and sugar until smooth, then gradually whisk in milk and vanilla extract.
- Cook the custard over medium heat, stirring constantly until thickened (about 7-10 minutes).
- Finish baking the apples by removing the foil and baking for another 10-15 minutes until tender.
- Serve the apples drizzled with custard sauce and garnish with a cinnamon stick.
Notes
You can prep the apples and filling a day in advance. These apples can also be frozen after baking.
- Prep Time: 15 minutes
- Cook Time: 40 minutes
- Category: Dessert
- Method: Baking
- Cuisine: American
Nutrition
- Serving Size: 1 apple
- Calories: 280
- Sugar: 34g
- Sodium: 150mg
- Fat: 10g
- Saturated Fat: 6g
- Unsaturated Fat: 4g
- Trans Fat: 0g
- Carbohydrates: 46g
- Fiber: 5g
- Protein: 3g
- Cholesterol: 120mg
Keywords: cinnamon apples, stuffed apples, dessert, comfort food, autumn recipe
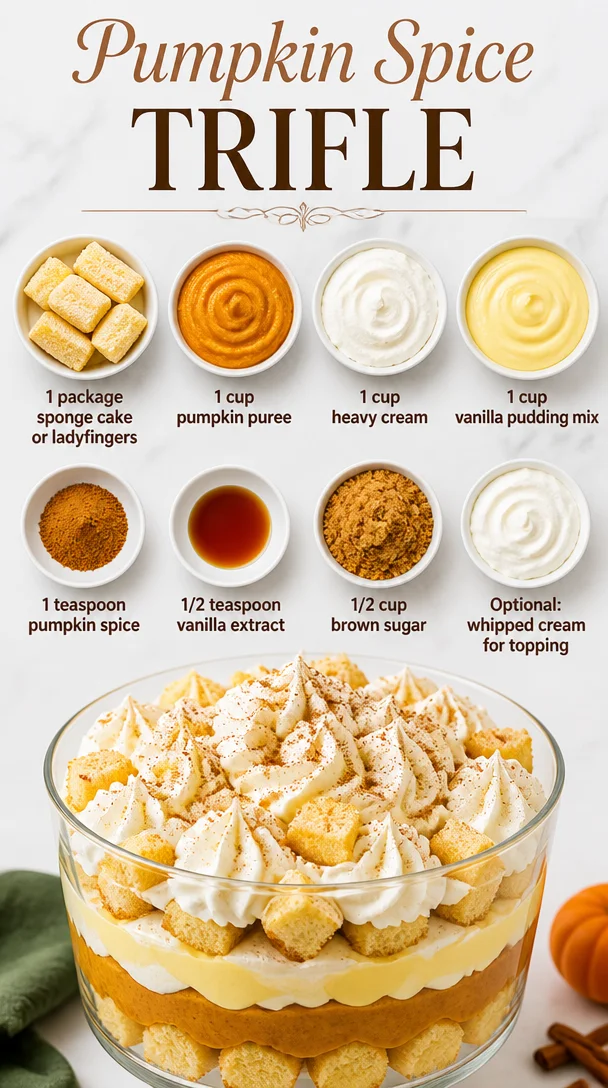
Pumpkin Spice Trifle
The Ultimate Pumpkin Spice Trifle: A Cozy Dessert for Fall
Hey there, fellow food lovers! Are you ready to dive headfirst into a dessert that embodies everything wonderful about autumn? If you’re like me and can’t resist that enticing pumpkin spice aroma wafting through your kitchen, then you’re in for a treat! Today, we’re whipping up a delightfully layered Pumpkin Spice Trifle that’s as easy to make as it is to devour. Perfect for cozy get-togethers or just a sweet night in, this trifle brings the flavors of fall right to your table.
But before we jump into the recipe, let me share a little story about why this dessert holds a special place in my heart.
A Walk Down Memory Lane
Picture this: it’s a crisp October afternoon, and the leaves are just starting to turn shades of amber and gold. With the scent of pumpkin spice lingering in the air, I would often get together with my grandma in her cozy kitchen. Armed with her trusty wooden spoon and a love for all things autumn, we would make her signature pumpkin trifle.
Those moments were filled with laughter, flour fights, and the occasional burned edge of a sponge cake (sorry, Grandma!). But the most memorable part? Layering the ingredients into that glorious glass bowl. Each layer told a story, starting with the soft sponge cake, moving to the rich creamy pumpkin, and finishing with a dollop of sweet whipped goodness and a sprinkle of cinnamon.
Fast forward to today, and I wanted to recreate that magic for you all! So gather around, because we’re about to craft a Pumpkin Spice Trifle that would make even my grandma proud. Ready to dive into this culinary adventure? Let’s go!
Ingredients
Here’s what you’ll need to bring this marvelous trifle to life:
-
1 package of sponge cake or ladyfingers
A great base for your trifle! You can use store-bought or homemade sponge cake. Ladyfingers add an elegant touch but feel free to experiment with either! -
1 cup pumpkin puree
Make sure to use pure pumpkin puree, not the spiced pie filling. It gives you full control over the flavor! You can also swap in butternut squash puree for a slight flavor twist. -
1 cup heavy cream
This will be whipped to fluffy perfection. If you’re looking for a lighter option, opt for coconut cream—but it will change the flavor profile a bit! -
1 cup vanilla pudding mix
This adds a lovely creaminess. If you’re feeling adventurous, vanilla custard works well too! -
1 teaspoon pumpkin spice
A delightful mix of cinnamon, nutmeg, ginger, and allspice. Feel free to make your own or adjust the proportions to your taste! -
1/2 teaspoon vanilla extract
Vanilla elevates the flavor beautifully. You can even swap this with maple extract for a unique touch! -
1/2 cup brown sugar
This adds a lovely depth of flavor. Honey or maple syrup can substitute, but adjust liquid ingredients slightly. -
Optional: whipped cream for topping
Because who doesn’t love a little extra fluffiness on top? Feel free to pile it on!
Step-by-Step Instructions
Now let’s bring our Pumpkin Spice Trifle to life! Here’s how to do it step by step:
-
Prepare the Ingredients:
Start by gathering all your ingredients. This makes the cooking process smoother—plus, it’s fun to see everything laid out! -
Whip the Heavy Cream:
In a mixing bowl, pour in the heavy cream. Using an electric mixer (or your trusty whisk if you’re feeling strong), whip the cream until soft peaks form. This usually takes about 2-3 minutes. Pro tip: Chill your bowl and beaters beforehand for extra fluffy whipped cream! -
Make the Pumpkin Mixture:
In another bowl, combine the pumpkin puree, vanilla pudding mix, pumpkin spice, vanilla extract, and brown sugar. Stir until everything is well combined and smooth. This smells heavenly, doesn’t it? -
Fold in the Whipped Cream:
Gently fold half of the whipped cream into the pumpkin mixture. Folding rather than mixing keeps the light and airy texture. Remember, we want fluffy heights in our trifle! -
Layer the Trifle:
Grab a glass bowl or individual serving cups, and start building your layers. Begin with a layer of sponge cake or ladyfingers, followed by a generous layer of the pumpkin cream mixture. Top it off with a handful of whipped cream. Repeat the process until your bowl is filled, ending with the whipped cream on top. -
Chill and Set:
Cover your trifle (if you can resist the urge to dig in right away) and let it chill in the refrigerator for at least 2 hours, though overnight yields even better flavors as everything melds beautifully. -
Serve & Enjoy:
When you’re ready to serve, add a final dollop of whipped cream on top and sprinkle with a touch of pumpkin spice or even crushed gingersnap cookies for some added crunch!
Serving Suggestions
When it comes to serving your Pumpkin Spice Trifle, presentation is key! Here are a few ideas:
-
Beautiful Glass Bowls: Serve the trifle in individual glass bowls for a chic look. Guests love digging into their own personal portion!
-
Layered and Stacked: If you’re using a larger trifle dish, consider adding layers so everyone can see the gorgeous pumpkin orange contrasting with the cream.
-
Garnishes Galore: Top with freshly grated nutmeg or caramel drizzle for an extra bit of flair. A cinnamon stick poking out of the cream looks festive too!
Recipe Variations
Get ready to get creative! Here are a few variations to make this Pumpkin Spice Trifle your own:
-
Chocolate Pumpkin Trifle: Switch out some of the sponge cake for chocolate cake or brownies for a decadent twist. The richness pairs beautifully with pumpkin!
-
Nutty Delight: Add a layer of crushed pecans or walnuts to introduce some crunch and an earthy flavor profile.
-
Dairy-Free Option: Swap the heavy cream with coconut cream and use dairy-free vanilla pudding. It still tastes fabulous and caters to dietary needs!
-
Spiced Rum Kick: For an adult version, drizzle some spiced rum over the sponge layers before adding the pumpkin mixture. It adds a lovely warmth!
-
Tropical Pumpkin: Include some crushed pineapple in the layers for a sweet surprise that balances the spices.
Chef’s Notes
As with all family recipes, mine has evolved over time. I find myself adding a little more pumpkin spice or experimenting with the types of cakes used. One time, I even mixed in some maple syrup instead of brown sugar, and wow, it transformed the flavor!
Laughter and a few kitchen mishaps (remember that time I accidentally swapped salt for sugar?) have seasoned this recipe with love over the years. It reminds me that cooking should be fun, creative, and Oh-so-tasty!
FAQs and Troubleshooting
Q: What should I do if my whipped cream isn’t thickening?
A: Make sure your cream is cold, and be patient while whipping! If it still doesn’t thicken, you can add a tablespoon of powdered sugar to help it along.
Q: Can I make the trifle the day before?
A: Absolutely! In fact, chilling it overnight allows the flavors to meld beautifully. Just ensure it’s well-covered to maintain freshness.
Q: What if I can’t find pumpkin puree?
A: No worries! Substitute with mashed cooked sweet potatoes or butternut squash puree. Just remember to adjust the spices accordingly!
Q: How do I store leftovers?
A: You can store any leftover trifle in the fridge, though it’s best enjoyed fresh. Cover tightly, and it should keep for about 2-3 days.
Nutritional Info
Here’s a general idea of the nutritional info per serving (about 1/4 of the trifle):
- Calories: 350
- Total Fat: 20g
- Saturated Fat: 10g
- Carbohydrates: 40g
- Sugar: 22g
- Protein: 4g
Of course, these numbers can vary depending on specific ingredients used. I always encourage mindful indulgence!
Final Thoughts
There you have it! Your step-by-step guide to whipping up a Pumpkin Spice Trifle that’s sure to impress and warm hearts this fall. Each spoonful captures the essence of crisp air, cozy evenings, and the sweet memories we create with loved ones.
So, go ahead—gather your ingredients, put on your favorite playlist, and let’s make magic happen in the kitchen! Remember, cooking is all about sharing joy, flavors, and love with those around us. Can’t wait to hear how your Pumpkin Spice Trifle turns out. Now, go grab a fork and dig in—you’ve earned it! Happy cooking!
Print
Ultimate Pumpkin Spice Trifle
- Total Time: 120 minutes
- Yield: 4 servings 1x
- Diet: Vegetarian
Description
A delightful layered Pumpkin Spice Trifle that embodies all the wonderful flavors of autumn, perfect for cozy get-togethers or a sweet night in.
Ingredients
- 1 package of sponge cake or ladyfingers
- 1 cup pumpkin puree
- 1 cup heavy cream
- 1 cup vanilla pudding mix
- 1 teaspoon pumpkin spice
- 1/2 teaspoon vanilla extract
- 1/2 cup brown sugar
- Optional: whipped cream for topping
Instructions
- Prepare the Ingredients: Gather all your ingredients.
- Whip the Heavy Cream: In a mixing bowl, whip the heavy cream until soft peaks form (2-3 minutes).
- Make the Pumpkin Mixture: Combine pumpkin puree, vanilla pudding mix, pumpkin spice, vanilla extract, and brown sugar until smooth.
- Fold in the Whipped Cream: Gently fold half of the whipped cream into the pumpkin mixture.
- Layer the Trifle: In a glass bowl or serving cups, layer the sponge cake, pumpkin mixture, and whipped cream until filled.
- Chill and Set: Cover and chill in the refrigerator for at least 2 hours.
- Serve & Enjoy: Top with whipped cream and sprinkle with pumpkin spice or crushed gingersnap cookies.
Notes
Chilling overnight enhances the flavors. Feel free to experiment with different layers and toppings.
- Prep Time: 15 minutes
- Cook Time: 0 minutes
- Category: Dessert
- Method: No-Cook
- Cuisine: American
Nutrition
- Serving Size: 1 serving
- Calories: 350
- Sugar: 22g
- Sodium: 200mg
- Fat: 20g
- Saturated Fat: 10g
- Unsaturated Fat: 8g
- Trans Fat: 0g
- Carbohydrates: 40g
- Fiber: 1g
- Protein: 4g
- Cholesterol: 30mg
Keywords: pumpkin spice, dessert, fall trifle, cozy recipe, autumn dessert