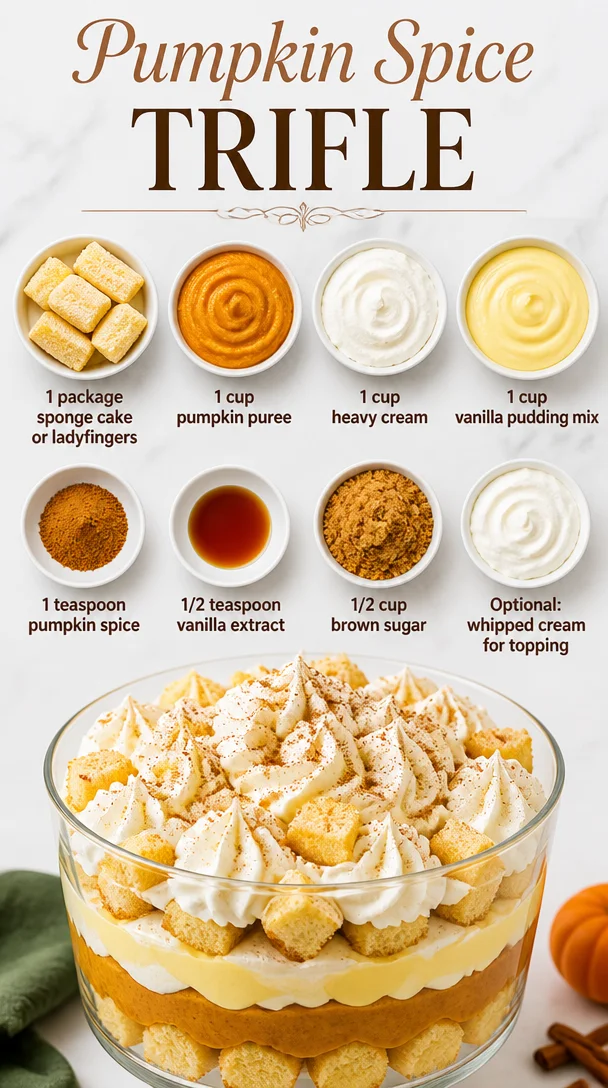
Pumpkin Spice Trifle
The Ultimate Pumpkin Spice Trifle: A Cozy Dessert for Fall
Hey there, fellow food lovers! Are you ready to dive headfirst into a dessert that embodies everything wonderful about autumn? If you’re like me and can’t resist that enticing pumpkin spice aroma wafting through your kitchen, then you’re in for a treat! Today, we’re whipping up a delightfully layered Pumpkin Spice Trifle that’s as easy to make as it is to devour. Perfect for cozy get-togethers or just a sweet night in, this trifle brings the flavors of fall right to your table.
But before we jump into the recipe, let me share a little story about why this dessert holds a special place in my heart.
A Walk Down Memory Lane
Picture this: it’s a crisp October afternoon, and the leaves are just starting to turn shades of amber and gold. With the scent of pumpkin spice lingering in the air, I would often get together with my grandma in her cozy kitchen. Armed with her trusty wooden spoon and a love for all things autumn, we would make her signature pumpkin trifle.
Those moments were filled with laughter, flour fights, and the occasional burned edge of a sponge cake (sorry, Grandma!). But the most memorable part? Layering the ingredients into that glorious glass bowl. Each layer told a story, starting with the soft sponge cake, moving to the rich creamy pumpkin, and finishing with a dollop of sweet whipped goodness and a sprinkle of cinnamon.
Fast forward to today, and I wanted to recreate that magic for you all! So gather around, because we’re about to craft a Pumpkin Spice Trifle that would make even my grandma proud. Ready to dive into this culinary adventure? Let’s go!
Ingredients
Here’s what you’ll need to bring this marvelous trifle to life:
-
1 package of sponge cake or ladyfingers
A great base for your trifle! You can use store-bought or homemade sponge cake. Ladyfingers add an elegant touch but feel free to experiment with either! -
1 cup pumpkin puree
Make sure to use pure pumpkin puree, not the spiced pie filling. It gives you full control over the flavor! You can also swap in butternut squash puree for a slight flavor twist. -
1 cup heavy cream
This will be whipped to fluffy perfection. If you’re looking for a lighter option, opt for coconut cream—but it will change the flavor profile a bit! -
1 cup vanilla pudding mix
This adds a lovely creaminess. If you’re feeling adventurous, vanilla custard works well too! -
1 teaspoon pumpkin spice
A delightful mix of cinnamon, nutmeg, ginger, and allspice. Feel free to make your own or adjust the proportions to your taste! -
1/2 teaspoon vanilla extract
Vanilla elevates the flavor beautifully. You can even swap this with maple extract for a unique touch! -
1/2 cup brown sugar
This adds a lovely depth of flavor. Honey or maple syrup can substitute, but adjust liquid ingredients slightly. -
Optional: whipped cream for topping
Because who doesn’t love a little extra fluffiness on top? Feel free to pile it on!
Step-by-Step Instructions
Now let’s bring our Pumpkin Spice Trifle to life! Here’s how to do it step by step:
-
Prepare the Ingredients:
Start by gathering all your ingredients. This makes the cooking process smoother—plus, it’s fun to see everything laid out! -
Whip the Heavy Cream:
In a mixing bowl, pour in the heavy cream. Using an electric mixer (or your trusty whisk if you’re feeling strong), whip the cream until soft peaks form. This usually takes about 2-3 minutes. Pro tip: Chill your bowl and beaters beforehand for extra fluffy whipped cream! -
Make the Pumpkin Mixture:
In another bowl, combine the pumpkin puree, vanilla pudding mix, pumpkin spice, vanilla extract, and brown sugar. Stir until everything is well combined and smooth. This smells heavenly, doesn’t it? -
Fold in the Whipped Cream:
Gently fold half of the whipped cream into the pumpkin mixture. Folding rather than mixing keeps the light and airy texture. Remember, we want fluffy heights in our trifle! -
Layer the Trifle:
Grab a glass bowl or individual serving cups, and start building your layers. Begin with a layer of sponge cake or ladyfingers, followed by a generous layer of the pumpkin cream mixture. Top it off with a handful of whipped cream. Repeat the process until your bowl is filled, ending with the whipped cream on top. -
Chill and Set:
Cover your trifle (if you can resist the urge to dig in right away) and let it chill in the refrigerator for at least 2 hours, though overnight yields even better flavors as everything melds beautifully. -
Serve & Enjoy:
When you’re ready to serve, add a final dollop of whipped cream on top and sprinkle with a touch of pumpkin spice or even crushed gingersnap cookies for some added crunch!
Serving Suggestions
When it comes to serving your Pumpkin Spice Trifle, presentation is key! Here are a few ideas:
-
Beautiful Glass Bowls: Serve the trifle in individual glass bowls for a chic look. Guests love digging into their own personal portion!
-
Layered and Stacked: If you’re using a larger trifle dish, consider adding layers so everyone can see the gorgeous pumpkin orange contrasting with the cream.
-
Garnishes Galore: Top with freshly grated nutmeg or caramel drizzle for an extra bit of flair. A cinnamon stick poking out of the cream looks festive too!
Recipe Variations
Get ready to get creative! Here are a few variations to make this Pumpkin Spice Trifle your own:
-
Chocolate Pumpkin Trifle: Switch out some of the sponge cake for chocolate cake or brownies for a decadent twist. The richness pairs beautifully with pumpkin!
-
Nutty Delight: Add a layer of crushed pecans or walnuts to introduce some crunch and an earthy flavor profile.
-
Dairy-Free Option: Swap the heavy cream with coconut cream and use dairy-free vanilla pudding. It still tastes fabulous and caters to dietary needs!
-
Spiced Rum Kick: For an adult version, drizzle some spiced rum over the sponge layers before adding the pumpkin mixture. It adds a lovely warmth!
-
Tropical Pumpkin: Include some crushed pineapple in the layers for a sweet surprise that balances the spices.
Chef’s Notes
As with all family recipes, mine has evolved over time. I find myself adding a little more pumpkin spice or experimenting with the types of cakes used. One time, I even mixed in some maple syrup instead of brown sugar, and wow, it transformed the flavor!
Laughter and a few kitchen mishaps (remember that time I accidentally swapped salt for sugar?) have seasoned this recipe with love over the years. It reminds me that cooking should be fun, creative, and Oh-so-tasty!
FAQs and Troubleshooting
Q: What should I do if my whipped cream isn’t thickening?
A: Make sure your cream is cold, and be patient while whipping! If it still doesn’t thicken, you can add a tablespoon of powdered sugar to help it along.
Q: Can I make the trifle the day before?
A: Absolutely! In fact, chilling it overnight allows the flavors to meld beautifully. Just ensure it’s well-covered to maintain freshness.
Q: What if I can’t find pumpkin puree?
A: No worries! Substitute with mashed cooked sweet potatoes or butternut squash puree. Just remember to adjust the spices accordingly!
Q: How do I store leftovers?
A: You can store any leftover trifle in the fridge, though it’s best enjoyed fresh. Cover tightly, and it should keep for about 2-3 days.
Nutritional Info
Here’s a general idea of the nutritional info per serving (about 1/4 of the trifle):
- Calories: 350
- Total Fat: 20g
- Saturated Fat: 10g
- Carbohydrates: 40g
- Sugar: 22g
- Protein: 4g
Of course, these numbers can vary depending on specific ingredients used. I always encourage mindful indulgence!
Final Thoughts
There you have it! Your step-by-step guide to whipping up a Pumpkin Spice Trifle that’s sure to impress and warm hearts this fall. Each spoonful captures the essence of crisp air, cozy evenings, and the sweet memories we create with loved ones.
So, go ahead—gather your ingredients, put on your favorite playlist, and let’s make magic happen in the kitchen! Remember, cooking is all about sharing joy, flavors, and love with those around us. Can’t wait to hear how your Pumpkin Spice Trifle turns out. Now, go grab a fork and dig in—you’ve earned it! Happy cooking!
Print
Ultimate Pumpkin Spice Trifle
- Total Time: 120 minutes
- Yield: 4 servings 1x
- Diet: Vegetarian
Description
A delightful layered Pumpkin Spice Trifle that embodies all the wonderful flavors of autumn, perfect for cozy get-togethers or a sweet night in.
Ingredients
- 1 package of sponge cake or ladyfingers
- 1 cup pumpkin puree
- 1 cup heavy cream
- 1 cup vanilla pudding mix
- 1 teaspoon pumpkin spice
- 1/2 teaspoon vanilla extract
- 1/2 cup brown sugar
- Optional: whipped cream for topping
Instructions
- Prepare the Ingredients: Gather all your ingredients.
- Whip the Heavy Cream: In a mixing bowl, whip the heavy cream until soft peaks form (2-3 minutes).
- Make the Pumpkin Mixture: Combine pumpkin puree, vanilla pudding mix, pumpkin spice, vanilla extract, and brown sugar until smooth.
- Fold in the Whipped Cream: Gently fold half of the whipped cream into the pumpkin mixture.
- Layer the Trifle: In a glass bowl or serving cups, layer the sponge cake, pumpkin mixture, and whipped cream until filled.
- Chill and Set: Cover and chill in the refrigerator for at least 2 hours.
- Serve & Enjoy: Top with whipped cream and sprinkle with pumpkin spice or crushed gingersnap cookies.
Notes
Chilling overnight enhances the flavors. Feel free to experiment with different layers and toppings.
- Prep Time: 15 minutes
- Cook Time: 0 minutes
- Category: Dessert
- Method: No-Cook
- Cuisine: American
Nutrition
- Serving Size: 1 serving
- Calories: 350
- Sugar: 22g
- Sodium: 200mg
- Fat: 20g
- Saturated Fat: 10g
- Unsaturated Fat: 8g
- Trans Fat: 0g
- Carbohydrates: 40g
- Fiber: 1g
- Protein: 4g
- Cholesterol: 30mg
Keywords: pumpkin spice, dessert, fall trifle, cozy recipe, autumn dessert
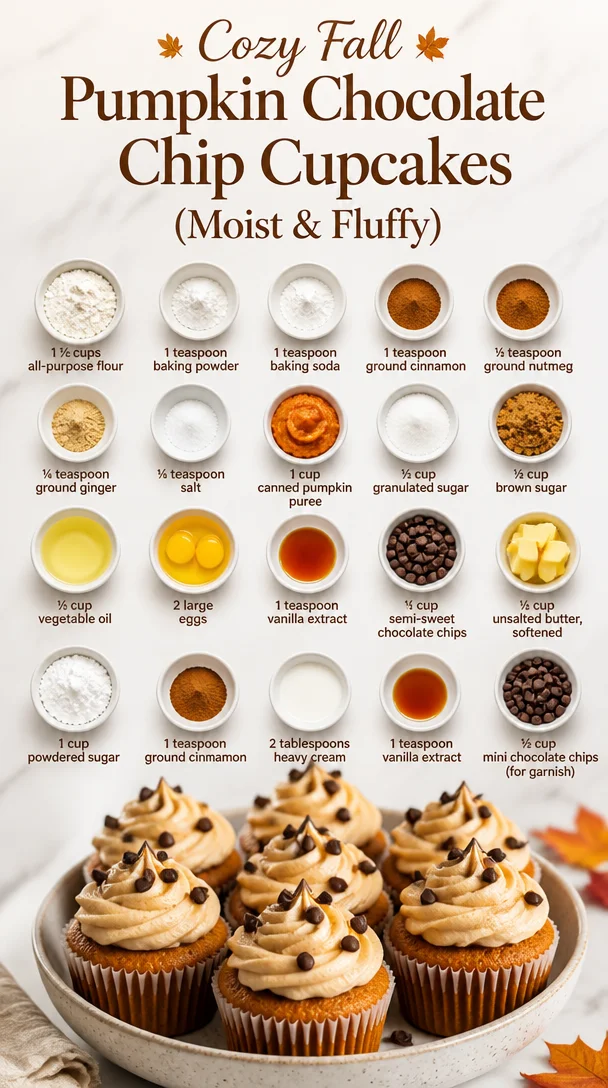
Cozy Fall Pumpkin Chocolate Chip Cupcakes (Moist & Fluffy)
Pumpkin Chocolate Chip Cupcakes: A Cozy Treat for Autumn
Hey there, fellow food lovers! As the leaves turn golden and the crisp autumn breeze sweeps in, there’s something truly magical about this time of year. We swap out our flip-flops for cozy socks and start craving those warm, comforting flavors that make our hearts sing. And you know what embodies that seasonal warmth perfectly? Pumpkin! So grab your apron and let’s dive into the delightful world of Pumpkin Chocolate Chip Cupcakes—a treat that brings together the best of both worlds: autumn spice and chocolatey goodness!
I can still remember the first time I baked with pumpkin as a kid. I was maybe seven or eight, and my grandmother would invite me into her cozy kitchen every fall. The air would fill with the rich aroma of cinnamon and nutmeg, contrasting beautifully with the sweet scent of chocolate chips. As we mixed our ingredients, she would tell me stories about how pumpkin had been a cherished ingredient in her family for generations. That kitchen became our playground, a place where laughter and love mingled with flour and sugar. I knew from those tender moments that I wanted to carry on that legacy.
Now, years later, I’m here to share the joy of pumpkin baking with you. These cupcakes are not only simple and fun to make, but they also carry that nostalgic essence that turns an ordinary day into a warm celebration. They’re perfect for anything from casual family gatherings to festive holiday parties. Trust me, you’re going to want to add this recipe to your culinary repertoire!
So, let’s get comfy and preheat that oven! It’s time to create some muffins that taste like a hug and smile all wrapped into one.
Personal Story
As I mentioned earlier, my cherished memories of baking pumpkin treats with my grandma have always inspired my own love for the kitchen. One particular autumn evening stands out vividly in my mind. We decided it was time to bake up a storm—her famous pumpkin pie would usually steal the spotlight, but this time, I persuaded her to let me take the lead on cupcakes.
We filled the kitchen with laughter, flour, and a little friendly competition over who could get the perfect swirl of frosting on top. I still giggle thinking about how my first attempts got swiped off the table by our rascally cat, Whiskers, who seemed to mistake the little treats for his toys! But that night, with my grandma cheering me on, I finally created a batch of cupcakes that not only looked good but tasted divine. Each cupcake was a delightful reminder of joy, family, and love.
To this day, I hold that warm and fuzzy feeling close to my heart, and it shines through every time I whip up a batch of Pumpkin Chocolate Chip Cupcakes. Whether it’s for a fall fest, a cozy gathering of friends, or simply a treat for myself on a chilly evening, this recipe is the perfect way to savor those sweet memories while creating new ones.
Ingredients
Here’s what you’ll need to whip up a batch of these decadent pumpkin chocolate chip cupcakes:
-
1 ½ cups all-purpose flour
The foundation of our cupcakes! You can swap this for whole wheat flour for added nutrition, but you may find the texture to be denser. -
1 teaspoon baking powder
A must for giving your cupcakes their lovely rise! Always check the expiration date; stale powder can leave your cupcakes flat. -
1 teaspoon baking soda
Acts as a leavening agent, balancing out the density of pumpkin. You can use baking powder instead if you’re in a pinch—just double the amount. -
1 teaspoon ground cinnamon
This spice brings warmth and depth. Consider experimenting with other spices like cardamom for a unique flavor twist! -
½ teaspoon ground nutmeg
Perfect for adding that classic autumn essence! Don’t skip it—it makes a world of difference! -
¼ teaspoon ground ginger
A subtle zing to elevate the flavors. Fresh ginger would also work great if you grate it finely. -
¼ teaspoon salt
Enhances all the flavors! It’s a key ingredient in balancing sweetness. -
1 cup canned pumpkin puree
The star of the show! Make sure it’s pure pumpkin, not pumpkin pie filling. You can homemade puree, too, if you’re feeling adventurous! -
½ cup granulated sugar
For that base sweetness. If you want a lower sugar version, feel free to reduce it by a quarter! -
½ cup brown sugar
Adds moisture and a richer flavor. For a caramel note, try using dark brown sugar instead! -
½ cup vegetable oil
Keeps these cupcakes ultra moist! You can substitute with melted coconut oil for a tropical twist. -
2 large eggs
Provides structure and richness. For a vegan version, you can use flax eggs (1 tablespoon ground flaxseed mixed with 2.5 tablespoons water). -
1 teaspoon vanilla extract
For a lovely aroma and sweetness; hence why you need to use high-quality vanilla! -
1 cup semi-sweet chocolate chips
Chocolate makes everything better! You can swap for dark chocolate or even white chocolate if you prefer a different vibe. -
½ cup unsalted butter, softened
For the frosting! Room temperature is crucial for a smooth texture. You can replace this with vegan butter for a dairy-free version. -
1 cup powdered sugar
Sweetens and thickens the frosting! If you run low on powdered sugar, feel free to blitz regular granulated sugar in a high-speed blender until it turns fine. -
1 teaspoon ground cinnamon
For flavoring the frosting, it ties everything together beautifully! -
2 tablespoons heavy cream
Gives that luscious texture to the frosting. If you’re vegan, coconut cream would work like a dream! -
1 teaspoon vanilla extract (for the frosting)
Just brings it all to another level! Again, use the good stuff. -
½ cup mini chocolate chips (for garnish)
Because you can never have too much chocolate! They are great for decoration and an extra sweet treat on top.
Step-by-Step Instructions
Okay, my friend, it’s GO time! Let’s bring these Pumpkin Chocolate Chip Cupcakes to life! Follow these simple steps:
-
Preheat Your Oven
Preheat your oven to 350°F (170°C) and line a muffin tin with paper liners. This is where the magic is going to happen, and trust me, you don’t want to miss it! -
Mix the Dry Ingredients
In a medium bowl, whisk together the flour, baking powder, baking soda, cinnamon, nutmeg, ginger, and salt. This helps to distribute everything evenly, ensuring each cupcake is packed with flavor. -
Combine the Wet Ingredients
In a large bowl, mix together the pumpkin puree, granulated sugar, brown sugar, vegetable oil, eggs, and vanilla extract until you have a smooth mixture. I always suggest using a hand mixer or whisk because the less air you incorporate into your batter, the denser the cupcake will be. -
Combine the Mixtures
Gradually add the dry mixture to the wet mixture until just combined. Don’t overmix or your cupcakes will be tough. It’s totally fine if there are a few lumps; we’re going for tender cupcakes here! -
Fold in the Chocolate Chips
Gently fold in the semi-sweet chocolate chips, allowing them to mix evenly throughout the batter—this is when the fun starts! You can save a few chips to sprinkle on top before baking if you wish. -
Fill the Muffin Cups
Spoon the batter into the prepared muffin tin, filling each cup about ¾ full. This allows room for the cupcakes to rise without overflowing. You want to create those perfectly dome-shaped tops! -
Bake
Pop them in the oven for about 18-22 minutes, or until a toothpick inserted into the center comes out clean. Oh, the sweet aroma will fill your kitchen—it’s just heavenly! -
Cool
Let them cool in the tin for about 5 minutes before transferring them to a wire rack to cool completely. This step is essential if you want to frost them nicely. -
Prepare the Frosting
While they cool, let’s whip up that dreamy frosting! In a mixing bowl, beat the softened butter until creamy, then gradually add in the powdered sugar, vanilla extract, and ground cinnamon, mixing until smooth. If it’s too thick, add the heavy cream a tablespoon at a time until you reach your desired consistency. -
Frost Your Cupcakes
Once cooled, frost each cupcake generously! You can use a piping bag for a fancy swirl or just a simple spatula for a homemade feel. Top with mini chocolate chips because, well, why not? They add that extra crunch and cuteness to your cupcakes! -
Serve and Enjoy
Place them on a beautiful platter, gather your friends and family, and watch the magic happen. These cupcakes are not just treats; they’re moments of joy!
Serving Suggestions
To serve these delightful Pumpkin Chocolate Chip Cupcakes, consider arranging them on a festive cake stand, or even a rustic wooden board, to accentuate that autumn vibe. You could sprinkle a little powdered sugar or a dusting of cinnamon on top for that extra touch of charm. Pair them with a warm mug of spiced cider or a cup of pumpkin spice latte for a truly seasonal experience.
Imagine a cozy setting with soft lighting—maybe some flickering candles—and the laughter of loved ones filling the air. Your pumpkin cupcakes will not only shine on the table but also warm the hearts of everyone who takes a bite.
Feel free to package a few as sweet gifts to friends, neighbors, or coworkers in adorable fall-themed boxes or treat bags. Nothing says “I appreciate you!” quite like homemade baked goodies!
Recipe Variations
Now, let’s talk about how you can make these cupcakes your own! These variations are great for those who want to experiment a little:
-
Spiced Pumpkin Chocolate Chip: Add some chopped pecans or walnuts to the batter for extra texture and a nutty flavor.
-
Pumpkin Spice Latte Cupcakes: Infuse your batter with a tablespoon of instant espresso powder for that delightful coffee kick.
-
Vegan and Gluten-Free: Swap out the eggs for flax eggs, use almond flour instead of all-purpose flour, and coconut oil instead of vegetable oil.
-
Pumpkin Cream Cheese Frosting: For a tangy twist, mix in some softened cream cheese into your frosting instead of butter for a rich flavor.
-
Fill with Ganache: Create a surprise inside by filling your cupcakes with a chocolate ganache before frosting! Just carefully hollow out a small portion, fill it with ganache, and then frost as usual.
No matter how you twist it, these cupcakes will surely be a crowd-pleaser!
Chef’s Notes
Oh, and let me share a little secret about these cupcakes—they’re just as tasty the next day (if they last that long, of course!). If you find you have leftovers, simply store them covered at room temperature. However, if you’re like me and always on the lookout for the next baking adventure, I encourage you to try out variations to this recipe.
I once hosted a pumpkin-themed potluck, and I decided to make a giant version of these cupcakes in a bundt pan. It was an absolute hit! Sometimes, playing around leads to delightful surprises, so don’t be afraid to experiment and have fun in the kitchen!
FAQs and Troubleshooting
1. My cupcakes fell in the middle, what happened?
This usually occurs if the batter was overmixed or if they were taken out of the oven too soon. Always use the toothpick test—insert it, and if it comes out clean, they’re ready!
2. Can I use fresh pumpkin instead of canned?
Absolutely! Just make sure to cook and puree the pumpkin until it’s smooth and thick—just like the canned version!
3. How can I store them for freshness?
Keep your cupcakes in an airtight container at room temperature for up to three days. For longer storage, pop them in the freezer; just thaw when you’re ready to enjoy again!
4. What if my frosting is too runny?
If your frosting is too runny, add a little more powdered sugar until it reaches your desired consistency. There’s always a solution in the kitchen!
Nutritional Info
Per cupcake, these delightful treats pack in approximately:
- Calories: 180
- Total Fat: 8g
- Saturated Fat: 2g
- Cholesterol: 38mg
- Sodium: 150mg
- Total Carbohydrates: 25g
- Dietary Fiber: 1g
- Sugars: 12g
- Protein: 2g
These are estimates, of course, and can change depending on ingredient variations. They’re certainly a treat, so enjoy them in moderation as part of a balanced diet.
Final Thoughts
So there you have it—a recipe to make some unforgettable Pumpkin Chocolate Chip Cupcakes packed with love, nostalgia, and tons of flavor! Whether you’re whipping them up for family, friends, or a late-night snack just for you, I guarantee these little delights will bring smiles all around.
Just as my grandma did with me, I encourage you to share the joy of baking, get a little flour on your nose, and let the kitchen be a place of laughter and love. Remember, cooking doesn’t have to be complicated—it should be a delightful experience that nourishes our souls as much as our tummies.
Now, go ahead and turn on that oven, mix up that batter, and create some magical memories! I can’t wait to hear about your baking adventures with these Pumpkin Chocolate Chip Cupcakes. Until next time, happy baking, friends!
Print
Pumpkin Chocolate Chip Cupcakes
- Total Time: 35 minutes
- Yield: 12 servings 1x
- Diet: Vegetarian
Description
Cozy and comforting cupcakes combining pumpkin and chocolate chips, perfect for autumn gatherings.
Ingredients
- 1 ½ cups all-purpose flour
- 1 teaspoon baking powder
- 1 teaspoon baking soda
- 1 teaspoon ground cinnamon
- ½ teaspoon ground nutmeg
- ¼ teaspoon ground ginger
- ¼ teaspoon salt
- 1 cup canned pumpkin puree
- ½ cup granulated sugar
- ½ cup brown sugar
- ½ cup vegetable oil
- 2 large eggs
- 1 teaspoon vanilla extract
- 1 cup semi-sweet chocolate chips
- ½ cup unsalted butter, softened
- 1 cup powdered sugar
- 1 teaspoon ground cinnamon (for frosting)
- 2 tablespoons heavy cream
- 1 teaspoon vanilla extract (for frosting)
- ½ cup mini chocolate chips (for garnish)
Instructions
- Preheat your oven to 350°F (170°C) and line a muffin tin with paper liners.
- Mix the dry ingredients: In a medium bowl, whisk together the flour, baking powder, baking soda, cinnamon, nutmeg, ginger, and salt.
- Combine the wet ingredients: In a large bowl, mix together the pumpkin puree, granulated sugar, brown sugar, vegetable oil, eggs, and vanilla extract until smooth.
- Combine the mixtures: Gradually add the dry mixture to the wet mixture until just combined.
- Fold in the chocolate chips gently.
- Fill the muffin cups about ¾ full with batter.
- Bake for 18-22 minutes or until a toothpick comes out clean.
- Cool for 5 minutes in the tin before transferring to a wire rack.
- Prepare the frosting: Beat softened butter, then gradually add powdered sugar, vanilla extract, and ground cinnamon until smooth. Add heavy cream as needed.
- Frost each cupcake generously, topping with mini chocolate chips.
- Serve and enjoy!
Notes
These cupcakes are just as tasty the next day. Store in an airtight container at room temperature.
- Prep Time: 15 minutes
- Cook Time: 20 minutes
- Category: Dessert
- Method: Baking
- Cuisine: American
Nutrition
- Serving Size: 1 cupcake
- Calories: 180
- Sugar: 12g
- Sodium: 150mg
- Fat: 8g
- Saturated Fat: 2g
- Unsaturated Fat: 5g
- Trans Fat: 0g
- Carbohydrates: 25g
- Fiber: 1g
- Protein: 2g
- Cholesterol: 38mg
Keywords: pumpkin, cupcakes, chocolate chips, fall desserts, autumn baking
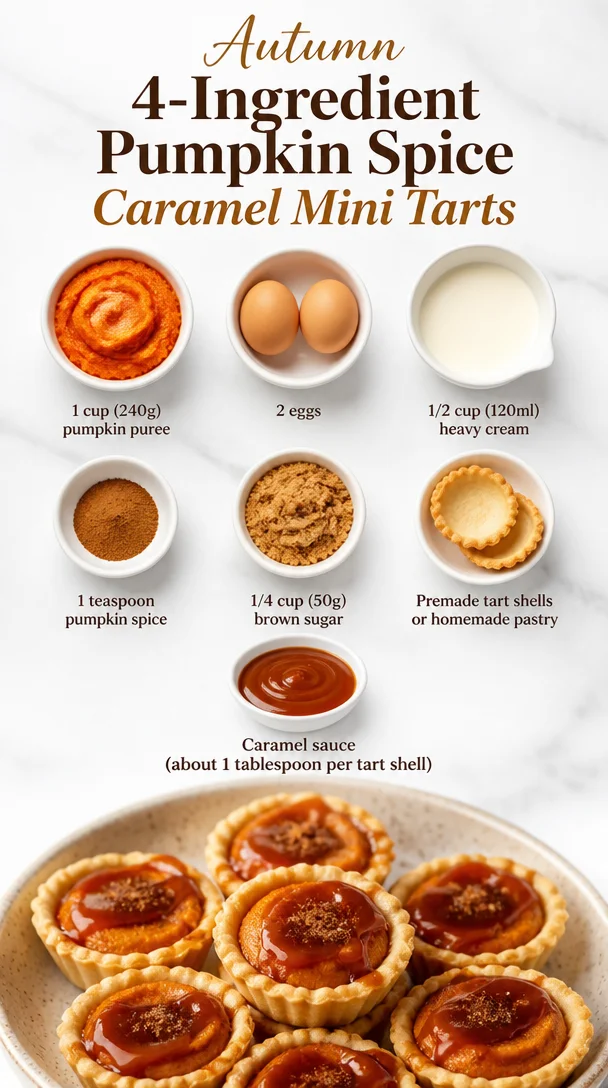
Autumn 4-Ingredient Pumpkin Spice Caramel Mini Tarts
Pumpkin Spice Caramel Tarts: A Cozy Embrace of Fall
Welcome back, my fellow food enthusiasts! If you’re like me, the fall season brings a delightful wave of warmth and comfort—not just in the air but also on our plates. Today, I’m sharing a recipe that’s as cozy as snuggling under a blanket with your favorite book. We’re diving into the world of Pumpkin Spice Caramel Tarts. These little beauties combine the rich flavor of pumpkin, the warmth of spices, and the sweet allure of caramel. Sound delicious? Let’s bake!
There’s something magical about this time of year. The leaves begin to change, the air turns crisp, and the scent of pumpkin spice wafts through the neighborhood. With Halloween and Thanksgiving just around the corner, pumpkin-flavored treats become the stars of the show. That’s why I developed this recipe for Pumpkin Spice Caramel Tarts. They’re sweet, creamy, and just a little indulgent. Plus, who can resist that golden drizzle of caramel on top?
Let’s face it: the best moments in life often happen around the kitchen table. Whether it’s family gatherings, cozy dinners with friends, or just treating yourself after a long day, food plays a pivotal role in creating memories. That’s why I’m here to help guide you through this simple yet impressive dessert that anyone can master. With these tarts, you’ll have the perfect way to celebrate the fall—one delightful bite at a time. So, roll up your sleeves, grab your favorite apron, and let’s get to it!
Personal Story
I still remember the first time I made pumpkin tarts with my grandmother. I was about eight years old, standing on a kitchen stool, peering over the counter where she effortlessly mixed spices into her homemade pumpkin pie filling. The aroma enveloped us like a warm hug as we chatted about life—about school, our family, and how she used to make these tarts every autumn. Those moments spent with her—the laughter, the shared stories, and the happy mess we created—sparked my love for cooking. Fast forward a couple of decades, and those cherished memories inspired me to put a twist on that classic recipe with these delicious tarts.
Every time I take a bite out of these Pumpkin Spice Caramel Tarts, I’m reminded of those golden days filled with love and laughter. Food for me is about connection, and I want to pass that experience on to you. So, are you ready to create your own cozy memories in the kitchen?
Ingredients
Here’s what you’ll need to whip up these scrumptious tarts:
-
1 cup (240g) pumpkin puree
A key ingredient that brings that iconic fall flavor! You can use canned pumpkin (just ensure there’s no added sugar or spices) or make your own by roasting fresh pumpkins. -
2 eggs
These give structure and a smooth custard-like texture to the filling. You can substitute with flaxseed meal mixed with water (1 tablespoon flaxseed with 2.5 tablespoons water) for a vegan version. -
1/2 cup (120ml) heavy cream
Rich and creamy, this adds a luxurious mouthfeel. For a lighter option, you can use half-and-half or coconut cream for a dairy-free alternative. -
1 teaspoon pumpkin spice
This magical mix typically contains cinnamon, nutmeg, ginger, and cloves. You can easily make your own blend or buy it pre-mixed. If you want a kick, try a dash of cayenne for some heat! -
1/4 cup (50g) brown sugar
This adds depth and caramel notes to the tarts. You can swap it for coconut sugar if you’re looking for a healthier option, or use maple syrup for a unique taste! -
Premade tart shells or homemade pastry
If you’re short on time, premade shells are a lifesaver. But if you want to take the homemade route, a simple shortcrust pastry works brilliantly. -
Caramel sauce
Store-bought or homemade; either delight will do. If you’re feeling adventurous, add a pinch of sea salt to elevate the flavors!
Step-by-Step Instructions
Alright, time to roll up those sleeves! Let’s get down to the steps to create these beauties.
-
Prepare Your Tart Shells
If using premade shells, simply arrange them in a muffin tin. If you’re making your pastry, roll out your dough to about 1/8 inch thickness and cut into circles to fit your tart pans. Press them gently into the pans, trimming off any excess. Pre-bake for about 10 minutes at 350°F (175°C) until golden and set aside to cool. -
Make the Filling
In a large mixing bowl, combine the pumpkin puree, eggs, heavy cream, pumpkin spice, and brown sugar. Whisk until smooth. Take a moment to breathe in those amazing autumn aromas—this is where the magic starts! -
Fill the Tarts
Pour the pumpkin mixture evenly into each tart shell. Fill them about three-quarters full to leave some room for rising. You want them to bake evenly and not overflow. Trust me, your muffin tin will thank you! -
Bake
Pop those babies in the oven at 350°F (175°C) for 20-25 minutes. You’ll know they’re done when the filling is set and a toothpick comes out clean. Let them cool for a bit before you unleash that glorious caramel sauce. -
Drizzle the Caramel
Once the tarts have cooled to room temperature, drizzle about one tablespoon of caramel sauce on top of each tart. For an extra special touch, sprinkle a pinch of sea salt on top—yum! -
Serve
If you can resist the temptation to dive in immediately, let the tarts chill in the fridge for about 30 minutes for a smoother texture before serving.
Each bite will transport you right into a cozy autumn afternoon, full of laughter and love.
Serving Suggestions
Serving these Pumpkin Spice Caramel Tarts is where you can get really creative! Here are a few ideas:
-
Plating: Arrange the tarts on a simple white plate for a beautiful contrast. Drizzle some extra caramel on the plate for a beautifully artistic touch.
-
Garnish: Top each tart with a dollop of whipped cream or a scoop of vanilla ice cream to take it to the next level of indulgence!
-
Drink Pairing: Serve alongside a warm cup of spiced chai or a steaming mug of cider to blend those cozy flavors perfectly.
-
Presentation: If hosting a gathering, consider placing each tart in decorative cupcake liners to make serving easy and add a splash of color to your dessert table.
Let your creativity shine during this step; after all, we eat with our eyes first!
Recipe Variations
Now that you’ve mastered the classic recipe, here are a few fun variations to excite your taste buds:
-
Chocolate Drizzle: Add some extra indulgence by drizzling melted chocolate over the caramel.
-
Nutty Topper: Sprinkle chopped pecans or walnuts over the caramel topping for a delightful crunch!
-
Spiced Pecan Crust: Swap your pastry shell for a pecan shortcrust for a nutty twist.
-
Maple Pumpkin Tarts: Substitute the regular sugar with maple syrup to create a lovely maple flavor in the filling.
-
Vegan Version: Use almond or coconut milk cream, vegan eggs (like flaxseed), and a coconut crust for a deliciously plant-based option.
There are no rules, just possibilities! Let your imagination guide you and customize the tarts to your heart’s content.
Chef’s Notes
I can’t stress how much of a crowd-pleaser these tarts are! They’ve evolved so much since my first attempts at baking. Initially, they were a simple pumpkin pie in a crust, but as I experimented and tasted, I realized the addition of caramel took them from good to absolutely heavenly!
And just a fun story: one Thanksgiving, I forgot to add the sugar entirely! Instead of tossing them out, I drizzled extra caramel and called them “sugar-free tarts.” They were a hit! Embrace your kitchen mistakes, friends; they can lead to the most delightful surprises!
FAQs and Troubleshooting
-
What if my tarts overflow during baking?
Ensure you’re filling them just three-quarters full. If you do have overflow, gently trim away any excess filling when cool. -
My filling didn’t set properly. What happened?
It’s crucial to make sure you bake them long enough, especially if your oven runs cool. Give them the full time and keep an eye on them for that toothpick test! -
Can I freeze these tarts?
Absolutely! Just make sure they’re cooled completely before wrapping tightly and freezing. To serve, simply thaw in the fridge overnight and reheat gently. -
What if I can’t find pumpkin puree?
You can make your own by roasting and pureeing fresh pumpkins or, in a pinch, use butternut squash for a similar flavor and texture.
Nutritional Info
If you’re keeping an eye on nutrition, here’s a quick breakdown per tart:
- Calories: Approximately 250
- Protein: 3g
- Fat: 12g
- Carbohydrates: 35g
- Fiber: 2g
- Sugar: 10g
Remember, it’s all about moderation and balance. Enjoy these tarts as a sweet treat during the fall festivities, savoring every rich bite!
Final Thoughts
There you have it! A cozy, delectable recipe for Pumpkin Spice Caramel Tarts that not only tastes great but also brings a sense of warmth and nostalgia to your kitchen. As you carve out a bit of time to create these tarts, remember to embrace the entire experience—the mixing, the baking, the delicious smells wafting through your home, and those shared moments over the table. Food is about connection, about love, and about celebrating the seasons.
So, whether you’re sharing these tarts with loved ones or indulging in a sweet moment all by yourself, know that each bite is a little piece of joy, a slice of comfort, and your key to making memories worth savoring. Happy baking, friends! Let’s keep the kitchen sizzling!
Print
Pumpkin Spice Caramel Tarts
- Total Time: 45 minutes
- Yield: 12 tarts 1x
- Diet: Vegetarian
Description
Delightful tarts that combine rich pumpkin flavor, warming spices, and sweet caramel, perfect for fall festivities.
Ingredients
- 1 cup (240g) pumpkin puree
- 2 eggs
- 1/2 cup (120ml) heavy cream
- 1 teaspoon pumpkin spice
- 1/4 cup (50g) brown sugar
- Premade tart shells or homemade pastry
- Caramel sauce
Instructions
- Prepare your tart shells by arranging premade shells in a muffin tin or rolling out homemade pastry and cutting into circles.
- Make the filling by combining pumpkin puree, eggs, heavy cream, pumpkin spice, and brown sugar in a bowl.
- Fill the tarts with the pumpkin mixture, filling them about three-quarters full.
- Bake in a preheated oven at 350°F (175°C) for 20-25 minutes.
- Drizzle caramel sauce on top of cooled tarts before serving.
- Serve chilled or at room temperature for the best texture.
Notes
These tarts can be served with whipped cream or ice cream for added indulgence. A sprinkle of sea salt can enhance the caramel flavor.
- Prep Time: 15 minutes
- Cook Time: 30 minutes
- Category: Dessert
- Method: Baking
- Cuisine: American
Nutrition
- Serving Size: 1 tart
- Calories: 250
- Sugar: 10g
- Sodium: 150mg
- Fat: 12g
- Saturated Fat: 7g
- Unsaturated Fat: 4g
- Trans Fat: 0g
- Carbohydrates: 35g
- Fiber: 2g
- Protein: 3g
- Cholesterol: 70mg
Keywords: pumpkin tarts, fall dessert, caramel, pumpkin spice
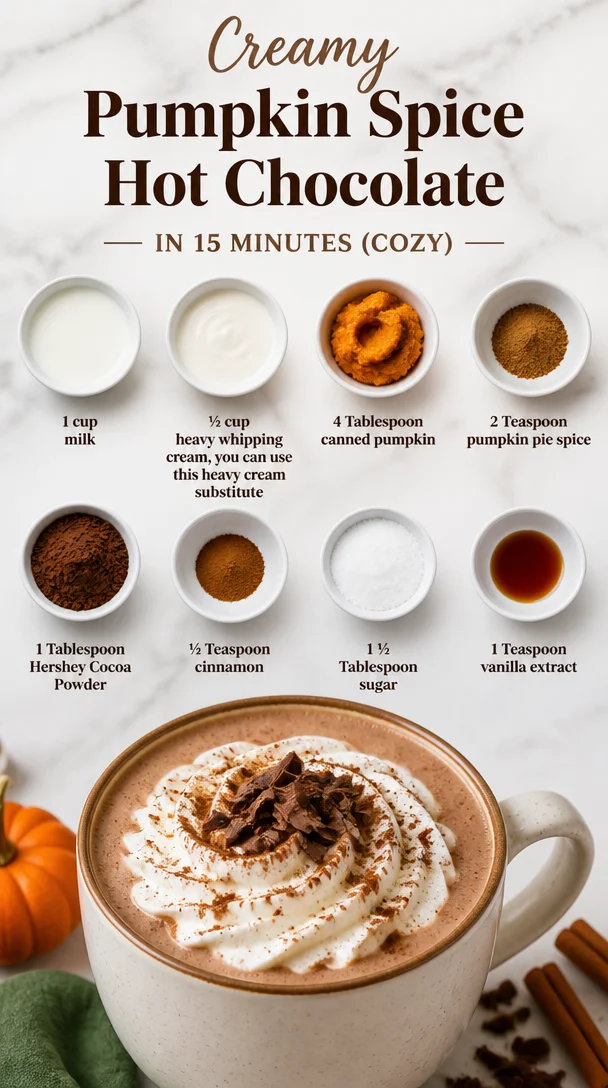
Creamy Pumpkin Spice Hot Chocolate in 15 Minutes (Cozy)
Easy Pumpkin Spice Hot Chocolate: A Comforting Fall Delight
Hey, food friends! 🍂 As the leaves turn vibrant shades of orange and gold, there’s something magical about curling up with a warm drink that whispers comfort and coziness. If you’ve been dreaming of a rich, creamy hot chocolate that captures the essence of autumn, then you’re in for a treat! Today, we’re diving headfirst into making the Easiest Pumpkin Spice Hot Chocolate that’s perfect for those chilly days when all you want is a warm hug in a mug.
I created this delightful recipe not just because it’s delicious, but because it brings me back to cherished memories. Picture this: a crisp fall afternoon, my grandma’s kitchen filled with the sweet aroma of spices and chocolate, and the laughter of family gathering around the table. Those moments inspired me to share this simple yet soulful drink that everyone can enjoy, whether you’re a whiz with a whisk or still trying to locate your spatula. So, let’s don our aprons and get started!
A Taste of Nostalgia
Growing up, fall was a time for family traditions, and there was one beverage that was a staple in our household: hot chocolate. My grandma had a magical way of transforming the simplest ingredients into something extraordinary. I fondly recall the evenings we’d spend in the kitchen, the warm glow of the lights reflecting off the colorful autumn leaves peeking through the window.
One of my favorite memories is when we first introduced pumpkin into our beloved hot chocolate. We’d sit by the fire, wrapped in cozy blankets, sipping as we watched the world outside transform. The added pumpkin turned our favorite drink into something festive, and the spices filled the room with a sense of comfort and warmth. Today, every sip of this Easy Pumpkin Spice Hot Chocolate takes me back to those beautiful autumn nights. And now, I invite you to create those memories in your kitchen!
Ingredients
Now that we’re feeling all cozy, let’s talk about what you’ll need for this delightful drink. Here’s your simple ingredient list:
-
1 cup milk
Regular cow’s milk works best, but you can totally use almond, oat, or coconut milk if you’re looking for a dairy-free option! -
½ cup heavy whipping cream
This adds creaminess and richness to your hot chocolate. If you want a lighter version, feel free to substitute with half-and-half or coconut cream for a dairy-free alternative. -
4 Tablespoon canned pumpkin
Make sure it’s pure pumpkin puree from the can, not pumpkin pie filling! This will give you that rich, autumn flavor. -
2 Teaspoon pumpkin pie spice
You can find this pre-mixed at most grocery stores, but if you’re feeling adventurous, mix your own with cinnamon, nutmeg, ginger, and allspice. Yum! -
1 Tablespoon Hershey Cocoa Powder
This gives your drink the chocolatey goodness we all crave. You can swap this for any other cocoa powder you fancy. -
½ Teaspoon cinnamon
A little extra kick of warmth! You can adjust this to taste, especially if you’re a cinnamon lover like me. -
1 ½ Tablespoon sugar
Sweeten to your preference—honey, maple syrup, or even agave syrup work well too! -
1 Teaspoon vanilla extract
This elevates the flavors and adds a lovely aroma to your drink. Don’t skimp on this one, it’s a game changer!
Step-by-Step Instructions
Alright, time to roll up those sleeves and bring this warm hug to life. Follow these steps, and I promise you’ll have a steaming cup of happiness in no time!
-
Mix the Pumpkin Base
In a medium saucepan over low heat, combine the canned pumpkin, pumpkin pie spice, cocoa powder, and sugar. Stir this mixture together until it’s smooth and well-combined. (Chef Tip: Low heat ensures you don’t scorch the pumpkin while adding flavor. You want everything to blend beautifully!) -
Add Milk and Cream
Gradually whisk in the milk and heavy whipping cream. (Chef Insight: Whisking constantly while adding the liquids prevents any lumps from forming. Plus, your arm gets a mini workout!) Keep stirring until the mixture is heated through but not boiling— we’re looking for a gentle simmer. -
Introduce the Flavors
Once your hot chocolate is warm, stir in the vanilla extract and cinnamon. Taste this dreamy concoction and adjust the sweetness if you desire. (Chef Hack: If it’s not sweet enough, add a bit of maple syrup instead of more sugar for a lovely twist!) -
Serve with Love
Pour your pumpkin spice hot chocolate into your favorite mugs. You can top it with whipped cream, a sprinkle of extra pumpkin pie spice, or even some chocolate shavings for that gourmet touch! (Tip: Use a marshmallow or two if you’re feeling nostalgic; they make everything more fun!) -
Relax & Enjoy
Take a moment to inhale that delicious aroma and savor the first sip. Nothing beats the feeling of creating something that warms your body and soul!
Serving Suggestions
When it comes to serving, presentation can elevate your drink from ordinary to spectacular! Here are a few creative ideas:
-
Mug Magic: Choose festive mugs that match the season. A chunky ceramic mug can keep your drink warm longer and adds a handmade charm.
-
Whipped Cream Wonders: Top your hot chocolate with dollops of whipped cream. You can even get fancy with a drizzle of caramel or chocolate syrup for an irresistible treat.
-
Garnish Time: Consider adding a cinnamon stick or a sprinkle of pumpkin pie spice on top. It not only looks beautiful, but it also enhances the flavors as you sip.
-
Pair It Up: Enjoy your hot chocolate alongside a spiced scone, pumpkin bread, or even some buttery popcorn for a cozy movie night treat!
Recipe Variations
Let your creativity shine! Here are some delightful twists you can try:
-
Spicy Pumpkin Mocha: Add a shot of espresso for a caffeinated kick. The chocolate and coffee flavors meld beautifully with the pumpkin!
-
Nutty Pumpkin Spice: Incorporate a tablespoon of almond or hazelnut extract for a delightful nutty flavor. You could even top with crushed nuts for added texture.
-
Choco-Mint Pumpkin Delight: Add a drop of peppermint extract for a minty spin. Perfect for those who love a hint of freshness!
-
Vegan & Dairy-Free: Use almond or oat milk and coconut cream for a completely dairy-free version. Adjust sweeteners to your liking!
-
Low-Cal Pumpkin Hot Cocoa: Substitute the sugar with stevia or another favorite sweetener, and use skim milk for a lighter and lower-calorie option.
Chef’s Notes
Fun fact: Last year, I attempted an entire pumpkin-themed drink menu for my fall gathering. Everything was going smoothly until I accidentally grabbed the cayenne pepper instead of the pumpkin pie spice! Let’s just say, there was a lot of surprised faces that evening. Remember, friends, always double-check your spices!
Through the years, my Easy Pumpkin Spice Hot Chocolate has evolved from just a simple recipe to a beloved tradition, one that warms my heart as much as it warms my hands. I love seeing families gather and create memories around this drink every fall. Feel free to add your own twists to make it your own!
FAQs and Troubleshooting
What should I do if my hot chocolate is too thick?
If your hot chocolate seems too thick for your liking, simply whisk in more milk, one tablespoon at a time, until you reach the desired consistency.
Can I make this ahead of time?
Absolutely! You can make a batch and store it in the fridge. Just reheat gently on the stovetop, adding a splash of milk to loosen it up.
Can I freeze pumpkin hot chocolate?
While it’s not ideal (the cream can separate), you can freeze it! Just make sure to leave room for expansion in your container.
How can I avoid lumps in my mixture?
When blending dry ingredients like cocoa or pumpkin with liquids, always whisk consistently, starting slow. This will help create a smooth mixture.
Nutritional Info
Now, let’s talk about that warm mug of joy you’re brewing! Here’s a rough estimate of the nutritional information for one serving of Easy Pumpkin Spice Hot Chocolate (without toppings):
- Calories: Approximately 400
- Protein: 6g
- Carbohydrates: 45g
- Fat: 20g
(Note that nutritional values can vary based on specific brands and substitutions.)
While this drink is a treat, it’s also packed with the goodness of pumpkin, which is loaded with vitamins and antioxidants. Enjoy it in moderation, and feel free to experiment with the ingredients for healthier swaps!
Final Thoughts
There you have it, friends! Your very own Easy Pumpkin Spice Hot Chocolate ready to warm up those chilly nights and bring families together. I hope this recipe fills your kitchen with delightful aromas and creates memories that linger long after the last sip. So gather your loved ones, cozy up with a blanket, and enjoy every moment because life, like good food, is meant to be savored.
Now go on, grab your ingredients, and let the pumpkin spice magic begin! Cheers to making more delicious memories—one sip at a time! 🍁🧡
Print
Easy Pumpkin Spice Hot Chocolate
- Total Time: 20 minutes
- Yield: 2 servings 1x
- Diet: Vegetarian
Description
A rich, creamy hot chocolate infused with pumpkin and spices, perfect for cozy fall evenings.
Ingredients
- 1 cup milk
- ½ cup heavy whipping cream
- 4 Tablespoon canned pumpkin
- 2 Teaspoon pumpkin pie spice
- 1 Tablespoon Hershey Cocoa Powder
- ½ Teaspoon cinnamon
- 1 ½ Tablespoon sugar
- 1 Teaspoon vanilla extract
Instructions
- Mix the Pumpkin Base: In a medium saucepan over low heat, combine the canned pumpkin, pumpkin pie spice, cocoa powder, and sugar. Stir this mixture together until it’s smooth.
- Add Milk and Cream: Gradually whisk in the milk and heavy whipping cream. Keep stirring until the mixture is heated through but not boiling.
- Introduce the Flavors: Stir in the vanilla extract and cinnamon. Taste and adjust the sweetness if desired.
- Serve with Love: Pour into mugs and top with whipped cream, pumpkin pie spice, or chocolate shavings.
- Relax & Enjoy: Inhale the aroma and savor the first sip of your warm drink.
Notes
For a dairy-free option, substitute with almond or oat milk and coconut cream.
- Prep Time: 10 minutes
- Cook Time: 10 minutes
- Category: Beverage
- Method: Stovetop
- Cuisine: American
Nutrition
- Serving Size: 1 serving
- Calories: 400
- Sugar: 15g
- Sodium: 100mg
- Fat: 20g
- Saturated Fat: 10g
- Unsaturated Fat: 8g
- Trans Fat: 0g
- Carbohydrates: 45g
- Fiber: 3g
- Protein: 6g
- Cholesterol: 60mg
Keywords: pumpkin spice, hot chocolate, fall drinks, cozy beverages, warm drinks
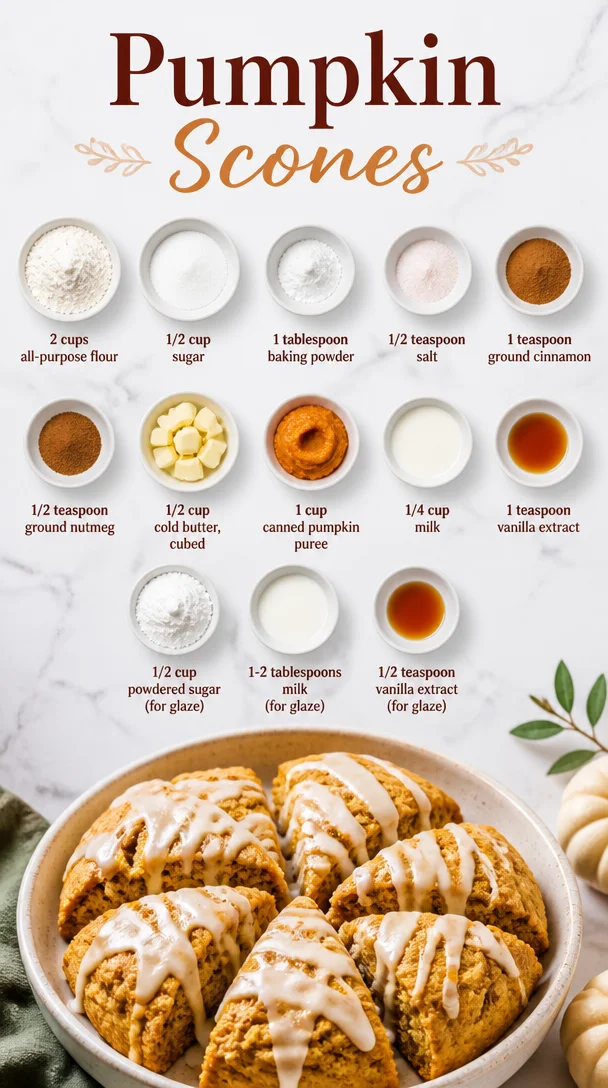
Pumpkin Scones
The Cozy Embrace of Pumpkin Scones: A Feel-Good Recipe for Fall
Hey there, food friends! As the leaves begin to turn and the air gets that unmistakable crispness, it’s time to embrace all things pumpkin. If you’re on the hunt for a recipe that’s as comforting as a warm blanket and as easy as pie (well, easier than pie!), then you’ve landed in the right spot. Today, we’re diving into the world of Pumpkin Scones—these little gems are bursting with fall flavor and are perfect for those cozy mornings at home or gatherings with family and friends.
You know, there’s something truly magical about the smell of baked goods wafting through the house. It has this incredible power to create warmth and community. Some of my fondest memories growing up involve the kitchen—a sacred space where my family would gather, elbows propped on the counters, flour dusting our noses while we baked together. I remember one particular Saturday morning when my mom decided we’d whip up a batch of pumpkin scones to enjoy with steaming cups of cocoa. The joy on our faces as those scones baked was only matched by the first bite, fluffy and slightly sweet, drizzled with a simple glaze that was oh-so-satisfying.
These scones are not just a recipe; they are a bridge to connection, laughter, and cozy moments. So grab your apron, and let’s take a journey through the flavors of fall!
A Nostalgic Taste of Home
While diving deep into recipes, I often find myself reminiscing about my childhood Saturdays spent beside my mom in our tiny kitchen. The cheerful clinking of bowls and the soft thud of the sifter dusting powdered sugar over our creations set the mood for what would become a delightful family tradition.
One rainy day, while the outside world shrouded in grey, my mom decided it was the perfect day for pumpkin scones. We turned on our favorite tunes, and as the rich smell of cinnamon and nutmeg filled our home, the rain outside became just a distant pitter-patter. It was in those moments—between laughs and flour-covered hands—that I learned not just to follow a recipe, but to create joy and share love through food. It was our way of embracing the season, and each warm bite was like wrapping ourselves in a cozy blanket. Fast forward to today, and I hope to share that same warmth and joy with all of you!
Ingredients for Pumpkin Scones
Let’s gather everything we need to whip up these delicious scones. Here’s what you’ll need:
-
2 cups all-purpose flour: This is the backbone of our scones. If you’re looking for a gluten-free option, feel free to substitute it with your favorite gluten-free flour blend or almond flour.
-
1/2 cup sugar: This adds just the right amount of sweetness to balance our pumpkin and spices. You can swap it with coconut sugar or brown sugar for a deeper flavor.
-
1 tablespoon baking powder: This is our trusty leavener, helping the scones rise to fluffy perfection. Make sure it’s fresh; stale baking powder won’t give us the lift we want.
-
1/2 teaspoon salt: A little pinch of salt elevates the sweetness and balances all the flavors.
-
1 teaspoon ground cinnamon: A warm hug of spice that screams fall! You can also use pumpkin pie spice for a more complex flavor.
-
1/2 teaspoon ground nutmeg: Another seasonal favorite that brings a wonderful aromatic flavor. Freshly grated nutmeg can take your scones to the next level!
-
1/2 cup cold butter, cubed: This butter adds richness and flakiness. Be sure to keep it cold to get that perfect scone texture—trust me!
-
1 cup canned pumpkin puree: Not just for pies, this adds moisture and flavor. Feel free to use homemade pumpkin puree if you’re feeling adventurous.
-
1/4 cup milk: This helps bind everything together. You can substitute with almond milk or oat milk if you prefer a dairy-free option.
-
1 teaspoon vanilla extract: A splash of vanilla enhances sweetness and depth.
-
1/2 cup powdered sugar (for glaze): We need this for a sweet finish on our scones.
-
1-2 tablespoons milk (for glaze): This will help us reach that perfect drizzling consistency for our glaze.
-
1/2 teaspoon vanilla extract (for glaze): Because why not add a little extra flavor to the glaze?
Sounds simple, right? That’s the beauty of these scones! Now, let’s get into the fun part—actually making them!
Step-by-Step Instructions
Preheat the Oven
Step 1: Start by preheating your oven to 400°F (200°C). This ensures a great rise in your scones and gets that lovely golden crust on the outside!
Mix Your Dry Ingredients
Step 2: In a large bowl, whisk together the flour, sugar, baking powder, salt, cinnamon, and nutmeg until well combined. (Tip: I like to do this with a whisk to incorporate as much air as possible for fluffier scones!).
Cut in the Butter
Step 3: Next, it’s time to cut in the cold, cubed butter. Using a pastry cutter (or your fingers if you’re feeling adventurous), work the butter into the dry ingredients until it resembles pebbly crumbs. (Chef’s note: Cold butter is key for flaky scones, so don’t skip this buttery love!)
Combine Wet Ingredients
Step 4: In another bowl, mix the pumpkin puree, milk, and vanilla extract until combined.
Joining Forces: Dry and Wet
Step 5: Pour the wet ingredients into the dry ingredients and gently stir until just combined. The dough should be slightly sticky but pull away from the sides of the bowl. (Tip: Be careful not to overmix—scones can get tough if you’re too eager!).
Shape Your Scones
Step 6: Turn the dough out onto a floured surface and lightly knead it a few times until it’s manageable. Pat it into a circle about 1-inch thick. Using a sharp knife or a pizza cutter, slice it into 8 wedges.
Bake to Perfection
Step 7: Transfer the wedges onto a lined baking sheet, leaving a little space between each one. Bake for about 15-20 minutes or until they turn a lovely golden brown. (Pro tip: Bake in batches if your oven is small—don’t overcrowd!).
Glaze Your Scones
Step 8: While they’re baking, it’s time to whip up our glaze! In a small bowl, combine the powdered sugar, milk, and vanilla extract until smooth. Once the scones are out of the oven and cooled for a bit, drizzle the glaze over the top.
And there you have it! In just a few simple steps, you’ve created a fantastic treat that’s as heartwarming as it is delicious!
Serving Suggestions
When it comes to serving these beauties, keep it simple. Arrange them on a pretty plate and maybe add a little sprig of rosemary or mint for visual flair. Pair them with a cozy beverage like a maple latte or a warm cup of tea, and you’ve got the ultimate fall experience.
You can also serve them with spreads like cream cheese or a pumpkin spice butter for an indulgent twist. These scones aren’t just a treat; they’re an experience!
Recipe Variations
Every great recipe deserves a little creativity. Here are a few variations to keep things fresh:
-
Chocolate Chip Pumpkin Scones: Stir in a cup of semi-sweet chocolate chips for a delightful sweet surprise in each bite.
-
Cranberry Pumpkin Scones: Toss in some dried cranberries for a little tartness that complements the sweet pumpkin beautifully.
-
Maple Pecan Scones: Use maple syrup instead of sugar and fold in chopped pecans for a nutty crunch.
-
Spiced Orange Scones: Add zesty orange zest to the dough for a bright, citrusy twist that pairs wonderfully with pumpkin.
-
Vegan Pumpkin Scones: Use a dairy-free butter alternative and substitute the milk with almond or oat milk to make a vegan-friendly version.
Play around; there’s no right or wrong way to enjoy pumpkin scones!
Chef’s Notes
As with many cherished family recipes, these pumpkin scones have evolved over time. I’ve experimented with different spices, ingredients, and even shapes. Sometimes, I use a cookie cutter to make them fun and festive, especially around the holidays. And truth be told, the best part of baking is making it your own—there’s creativity in every splash of vanilla and pinch of spice.
Oh, and for a hilarious kitchen story: I once forgot to put in the baking powder during a bake-off. Let’s just say, flat scones aren’t quite as charming!
FAQs and Troubleshooting
Q: Why are my scones dense?
A: The most common culprit is overmixing. Scones should be gently combined to maintain their light texture, so be sure to mix just until the ingredients come together.
Q: Can I freeze the scone dough?
A: Absolutely! You can shape the scones and freeze them before baking. Just pop them in the oven straight from the freezer, adding a few extra minutes to the bake time.
Q: How do I know when my scones are done?
A: They should be golden brown on the edges and a toothpick inserted in the center should come out clean.
Q: Can I make the glaze ahead of time?
A: Yes! Just store it in the fridge until you’re ready to drizzle it on. You might need to adjust the consistency with a splash of milk before using.
Nutritional Info
If you’re keeping an eye on nutritional info, here’s a rough breakdown per scone (assuming you get 8 scones per recipe):
- Calories: Approximately 220
- Carbohydrates: 30g
- Protein: 3g
- Fat: 10g
- Sugar: 8g
Remember, these numbers can vary based on ingredient swaps and specifics, so it’s always best to check your own brands if you’re counting calories!
Final Thoughts
And there you have it, my friends—deliciously fluffy pumpkin scones that are bound to fill your home with warmth and joy. Baking is not just about the end result; it’s about the laughter, the mess, and all the love that you put into the process.
So don your apron, invite over a friend or two (or just enjoy them solo while you binge-watch your favorite show), and celebrate those cozy moments this fall. Don’t forget to share your scone-making adventures with me on social media; I love seeing your creations!
Happy baking, and remember—life is short. Eat the scones!
Stay cool and keep creating flavorful memories,
Beau Collier
Pumpkin Scones
- Total Time: 35 minutes
- Yield: 8 servings 1x
- Diet: Vegetarian
Description
Deliciously fluffy pumpkin scones that capture the essence of fall, perfect for cozy mornings or gatherings.
Ingredients
- 2 cups all-purpose flour
- 1/2 cup sugar
- 1 tablespoon baking powder
- 1/2 teaspoon salt
- 1 teaspoon ground cinnamon
- 1/2 teaspoon ground nutmeg
- 1/2 cup cold butter, cubed
- 1 cup canned pumpkin puree
- 1/4 cup milk
- 1 teaspoon vanilla extract
- 1/2 cup powdered sugar (for glaze)
- 1–2 tablespoons milk (for glaze)
- 1/2 teaspoon vanilla extract (for glaze)
Instructions
- Preheat your oven to 400°F (200°C).
- In a large bowl, whisk together flour, sugar, baking powder, salt, cinnamon, and nutmeg until well combined.
- Cut in the cold, cubed butter until it resembles pebbly crumbs.
- Mix the pumpkin puree, milk, and vanilla extract in another bowl.
- Pour the wet ingredients into the dry ingredients and gently stir until just combined.
- Turn the dough onto a floured surface, lightly knead, and pat into a circle about 1-inch thick. Slice into 8 wedges.
- Transfer the wedges onto a lined baking sheet and bake for 15-20 minutes or until golden brown.
- While they bake, combine powdered sugar, milk, and vanilla extract for the glaze.
- Drizzle the glaze over scones once cooled slightly.
Notes
For variations, consider adding chocolate chips, dried cranberries, maple syrup, or adjusting spices to your preference.
- Prep Time: 15 minutes
- Cook Time: 20 minutes
- Category: Snack
- Method: Baking
- Cuisine: American
Nutrition
- Serving Size: 1 scone
- Calories: 220
- Sugar: 8g
- Sodium: 150mg
- Fat: 10g
- Saturated Fat: 6g
- Unsaturated Fat: 4g
- Trans Fat: 0g
- Carbohydrates: 30g
- Fiber: 1g
- Protein: 3g
- Cholesterol: 30mg
Keywords: pumpkin scones, fall recipes, baking, cozy treats
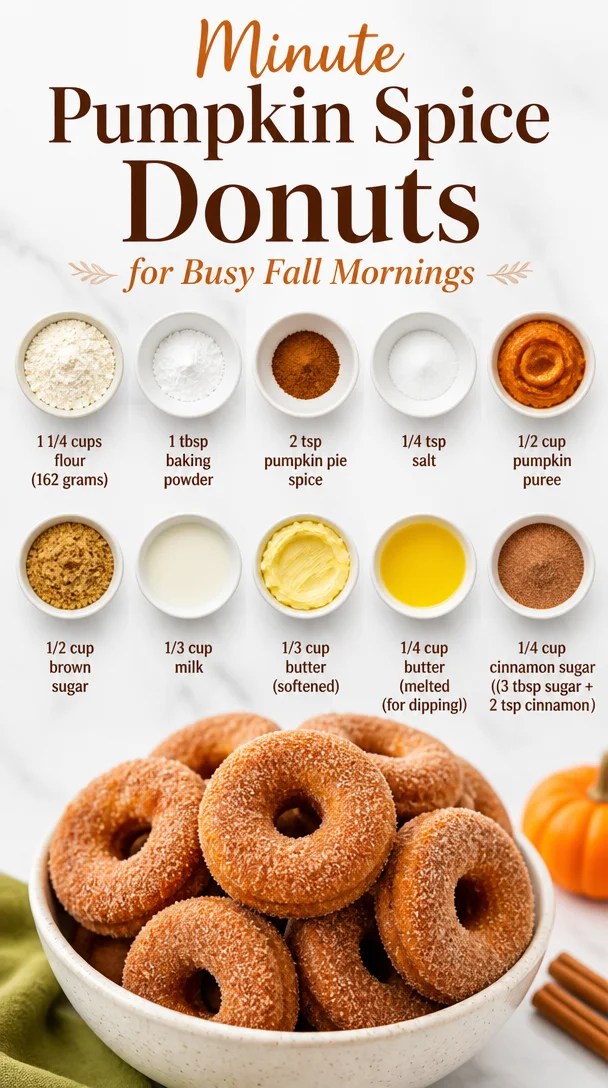
Minute Pumpkin Spice Donuts for Busy Fall Mornings
Pumpkin Spice Donuts: A Cozy Fall Treat
Hey there, fellow foodies! Welcome back to Feastical, where the kitchen is always buzzing with good vibes and even better food. Today, we’re diving into a delightful fall treat that’s sure to make your taste buds dance—Pumpkin Spice Donuts! Imagine biting into a soft, fluffy donut that perfectly captures the essence of autumn: warm spices, sweet pumpkin, and that comforting, homemade goodness. Whether you’re whisking up a storm on a cozy weekend or looking to impress friends with a sweet treat at a gathering, these donuts have got you covered.
A Taste of Nostalgia
Let me share a little story that always warms my heart. It was autumn years ago, and the leaves were turning those beautiful shades of gold and crimson. I was visiting my grandmother in her quaint little cottage, where she always had a pot of spiced cider simmering on the stove. On one particularly chilly afternoon, I remember walking into her cozy kitchen, the aroma of cinnamon and nutmeg enveloping me like a warm blanket. She was whipping up a batch of her famous pumpkin spice donuts, and the anticipation was almost magical.
As we rolled out the dough together, we shared stories and laughter, and I learned not just how to bake but also the joy of bringing people together through food. Those donuts were a staple in her kitchen, much like they have become in mine. Now, every time I create these treats, I feel her spirit encouraging me to embrace the love and warmth that comes from cooking. So, let’s recreate those magical moments and make our very own pumpkin spice donuts!
Ingredients You’ll Need
Here’s what you’ll need to get started on this delicious journey:
-
1 1/4 cups all-purpose flour (162 grams)
Flour is the backbone of any donut! For a healthier twist, you can swap in whole wheat flour, though the texture will be a bit denser. -
1 tablespoon baking powder
This is your secret leavening agent! Without it, your donuts would end up dense and flat. Make sure it’s fresh for the best rise. -
2 teaspoons pumpkin pie spice
A spice blend that screams fall, made up of cinnamon, nutmeg, ginger, and allspice. If you’re feeling adventurous, you can make your own blend! -
1/4 teaspoon salt
A pinch of salt enhances all the flavors, balancing the sweetness of the donuts. -
1/2 cup pumpkin puree
Pure pumpkin adds moisture and that signature fall flavor. Make sure to use pure pumpkin puree, not pumpkin pie filling, which is loaded with added sugar. -
1/2 cup brown sugar
This gives your donuts that rich, caramel-like sweetness. If you’re looking for a lighter option, coconut sugar works beautifully too. -
1/3 cup milk
Milk adds moisture. You can use almond milk or oat milk for a dairy-free version! -
1/3 cup softened butter
I always prefer real butter for that rich flavor, but coconut oil or vegan butter can be a fantastic substitute. -
1/4 cup melted butter (for dipping!)
This is where the magic happens! The warm melted butter makes for a perfectly sticky layer before dipping in cinnamon sugar. -
1/4 cup cinnamon sugar (3 tablespoons sugar + 2 teaspoons cinnamon)
A blend of sugar and cinnamon, this adds the finishing touch that makes these donuts simply irresistible!
Step-by-Step Instructions
Now, let’s get our hands dirty and dive into the fun part—making these delightful donuts!
-
Preheat the Oven:
Preheat your oven to 350°F (175°C). This step is crucial because you want those donuts to cook evenly as soon as they hit the hot oven. -
Prepare the Pan:
Grease your donut pan generously! This will help the donuts slide out easily once they’re baked. If you don’t have a donut pan, you could also use a muffin tin for a fun twist! -
Mix Dry Ingredients:
In a large bowl, whisk together the flour, baking powder, pumpkin pie spice, and salt. Make sure they’re well combined. You want all that spicy goodness evenly mixed for maximum flavor. -
Combine Wet Ingredients:
In another bowl, mix the pumpkin puree, brown sugar, milk, and softened butter until smooth. You can use a whisk or a hand mixer; just make sure everything is mixed together nicely. -
Combine Wet and Dry Ingredients:
Gradually add the dry mixture into the wet mixture, folding gently with a spatula. Be careful not to overmix—just combine until you see no more flour streaks. Overmixing can lead to tough donuts, and we want them soft and fluffy. -
Fill the Donut Pan:
Using a piping bag or a spoon, fill each donut cavity about 2/3 full. This will allow them to rise without spilling over. If you’re using a piping bag, it makes for a mess-free fill! -
Bake:
Place the pan in the preheated oven and bake for 10–12 minutes, or until a toothpick inserted comes out clean. Your kitchen will soon be filled with that dreamy pumpkin spice aroma! -
Cool Down:
Let the donuts cool in the pan for a few minutes before transferring them to a wire rack. This helps them set perfectly without getting soggy. -
Melted Butter and Cinnamon Sugar:
While those donuts are cooling, melt about 1/4 cup of butter in a small bowl. In another bowl, mix the cinnamon and sugar together. When the donuts are cool enough to handle, dip the tops in melted butter and then in the cinnamon sugar. Get ready for that crunchy, sweet exterior!
Serving Suggestions
Once your donuts are beautifully coated in cinnamon sugar, it’s time to serve them up! Arrange them on a pretty platter—perhaps with a cozy throw nearby for that fall ambiance. You could drizzle some maple glaze over the top for an extra touch of sweetness or serve with a side of warm apple cider for the full autumn experience. These donuts pair perfectly with a cup of coffee or tea, making them a fantastic treat for brunch gatherings or a cozy afternoon snack!
Recipe Variations
Now that you have the classic recipe down, let’s shake things up with a few creative twists:
-
Chocolate Pumpkin Donuts:
Add 1/4 cup of cocoa powder to the dry ingredients for a luscious chocolatey flavor that complements the pumpkin perfectly. -
Maple Glazed Donuts:
Instead of cinnamon sugar, drizzle a simple maple glaze made with powdered sugar and maple syrup over the tops for a sweet finish. -
Pecan-Crusted Donuts:
After dunking in melted butter, roll the donuts in finely chopped pecans instead of cinnamon sugar for a crunchy nutty flavor. -
Gluten-Free Version:
Substitute regular flour with a 1:1 gluten-free blend, ensuring you still get that fluffy texture without the gluten. -
Spicy Pumpkin Donuts:
Add a hint of cayenne pepper to the spice mixture for a surprising kick that balances the sweetness of the donuts.
Chef’s Notes
As with any recipe, there’s always room for a little creativity! Since I first made these donuts with my grandmother, I’ve experimented with various flavors and coatings. One of my favorite iterations involved incorporating a touch of fresh grated ginger into the batter, which brought a whole new layer of warmth that I just loved. Remember, cooking is all about having fun and making it your own—so don’t hesitate to play around!
FAQs and Troubleshooting
1. My donuts turned out dense—what went wrong?
Most likely, the batter was overmixed or you might have used too much flour. Make sure to gently fold the ingredients together until just combined!
2. Can I use pumpkin pie filling instead of puree?
It’s best to stick with pure pumpkin puree for this recipe, as pumpkin pie filling contains added sugars and spices that could alter the taste and texture of your donuts.
3. How can I store leftovers?
Store leftover donuts in an airtight container at room temperature for up to two days. You can refrigerate them to extend freshness but note they might lose a bit of that soft texture.
4. Can I freeze these donuts?
Absolutely! Freeze the donuts in a single layer on a baking sheet, then store in a freezer-safe bag for up to three months. When you’re ready to enjoy, just thaw them at room temperature and warm them for a few seconds in the microwave.
Nutritional Info
For each donut (assuming this recipe makes about 12), you’re looking at approximately:
- Calories: 150
- Fat: 6g
- Carbohydrates: 21g
- Fiber: 1g
- Sugar: 6g
- Protein: 1g
This is a delightful treat that can fit into a balanced diet, especially when enjoyed in moderation. Pairing it with a healthy breakfast or snack can make it even more satisfying!
Final Thoughts
There you have it—your very own pumpkin spice donuts that are as heartwarming as they are delicious! Whether you’re enjoying them warm from the oven or sharing them with friends and family, these donuts are sure to become a cherished addition to your fall recipes. Remember, cooking doesn’t have to be perfect; it just needs to be made with love. So, roll up those sleeves, let your creativity shine, and bake up a batch of these irresistible goodies. Happy cooking, and don’t forget to savor each delightful bite!
Print
Pumpkin Spice Donuts
- Total Time: 27
- Yield: 12 servings 1x
- Diet: Vegetarian
Description
Delightful pumpkin spice donuts that capture the essence of autumn with warm spices and sweet pumpkin.
Ingredients
- 1 1/4 cups all-purpose flour (162 grams)
- 1 tablespoon baking powder
- 2 teaspoons pumpkin pie spice
- 1/4 teaspoon salt
- 1/2 cup pumpkin puree
- 1/2 cup brown sugar
- 1/3 cup milk
- 1/3 cup softened butter
- 1/4 cup melted butter (for dipping)
- 1/4 cup cinnamon sugar (3 tablespoons sugar + 2 teaspoons cinnamon)
Instructions
- Preheat your oven to 350°F (175°C).
- Grease your donut pan generously.
- Mix the flour, baking powder, pumpkin pie spice, and salt in a large bowl.
- Combine the pumpkin puree, brown sugar, milk, and softened butter in another bowl until smooth.
- Fold the dry mixture into the wet mixture gently.
- Fill each donut cavity about 2/3 full.
- Bake for 10–12 minutes, or until a toothpick comes out clean.
- Cool the donuts in the pan for a few minutes before transferring them to a wire rack.
- Melt about 1/4 cup of butter and mix the cinnamon and sugar together.
- Dip the tops of the donuts in melted butter and then in the cinnamon sugar.
Notes
Store leftovers in an airtight container for up to two days, or freeze for up to three months.
- Prep Time: 15
- Cook Time: 12
- Category: Desserts
- Method: Baking
- Cuisine: American
Nutrition
- Serving Size: 1 donut
- Calories: 150
- Sugar: 6g
- Sodium: 100mg
- Fat: 6g
- Saturated Fat: 3g
- Unsaturated Fat: 2g
- Trans Fat: 0g
- Carbohydrates: 21g
- Fiber: 1g
- Protein: 1g
- Cholesterol: 15mg
Keywords: pumpkin spice, donuts, fall treat, autumn recipe, baked donuts