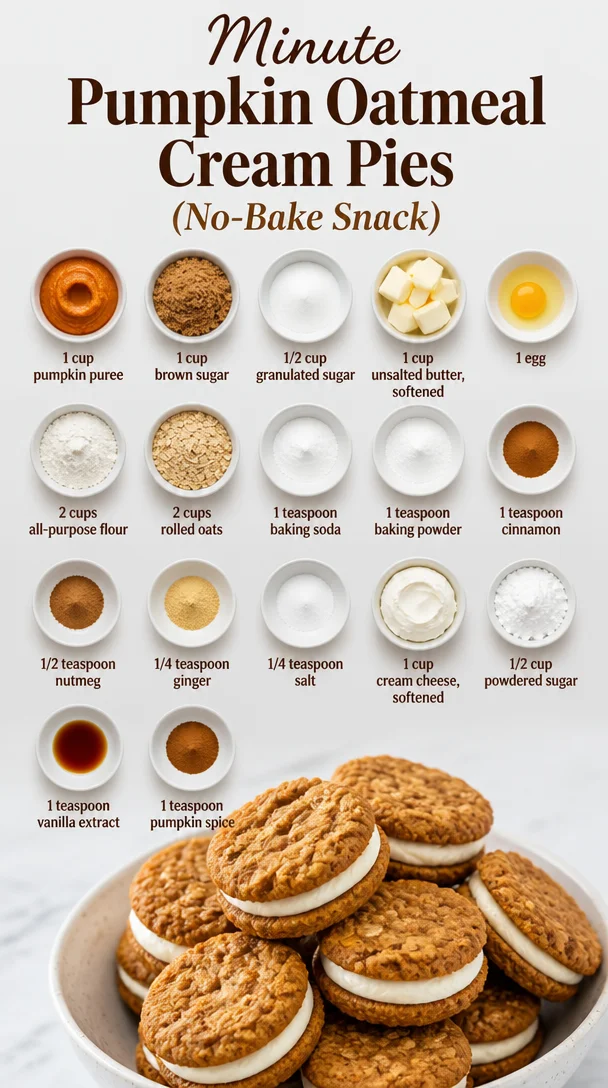
Minute Pumpkin Oatmeal Cream Pies (No-Bake Snack)
The Sweetest Fall Treat: Pumpkin Oatmeal Cream Pies
Hey there, food lovers! As the leaves turn golden and the air gets that crisp bite of autumn, there’s something truly special about the flavors of fall. Imagine biting into a soft, chewy cookie that tastes like autumn on a plate—spicy, sweet, and oh-so-comforting. That’s right, we’re diving into the world of Pumpkin Oatmeal Cream Pies today!
These delightful treats are not only packed with the warm spices of the season but also blessed with the rich taste of pumpkin. They make for the perfect afternoon pick-me-up or a cozy dessert after dinner. Plus, they come with a luscious cream cheese filling that will send your taste buds dancing. So, put on your favorite apron, and let’s embrace the kitchen magic!
A Slice of Nostalgia
The essence of these pumpkin oatmeal cream pies comes from my childhood, where the kitchen was a sanctuary filled with laughter and delicious aromas. Picture this: crisp autumn evenings, spent at my grandma’s house, where she’d whip up all sorts of goodies. One of my fondest memories is her baking with pumpkin while telling stories of her childhood in the south. Her kitchen would become a blend of chatter and sweet scents that seemed to wrap around you like a warm hug.
I remember the anticipation as the cookies would come out of the oven, their edges golden brown, while the center remained soft and gooey. I would sneak in a taste (or three) before they even made it to the cooling rack! As she pulled out her secret cream cheese filling recipe, she’d wink and say, “This is the trick, my dear.” Little did I know, this simple recipe would evolve into one of my favorites to share with you all.
Ingredients
Now, let’s gather our ingredients for these delightful pumpkin oatmeal cream pies. Here’s what you’ll need:
-
1 cup pumpkin puree
This is the star of the show! Perfectly sweet and packed with moisture, it’s what gives our cookies that tender bite. If you need a substitute, you can use applesauce or even mashed bananas, but the flavor will change a bit. -
1 cup brown sugar
For that lovely caramel flavor and added moisture. If you don’t have brown sugar on hand, you can use granulated sugar, though the cookies won’t have that lovely depth. -
1/2 cup granulated sugar
This will help balance the sweetness. For a healthier option, you can replace it with coconut sugar, but the texture might be slightly different! -
1 cup unsalted butter, softened
Makes the dough rich and flavorful. If you’re looking for a dairy-free version, feel free to use coconut oil or a vegan butter substitute. -
1 egg
Binds our ingredients together. If you need a vegan alternative, try a flax egg (1 tablespoon ground flaxseed mixed with 3 tablespoons water). -
2 cups all-purpose flour
This is the backbone of our cookies. You can swap half of this with whole wheat flour for added fiber. -
2 cups rolled oats
Provides that chewy texture we all love. Quick oats can be used in a pinch, but rolled oats give the best texture! -
1 teaspoon baking soda
Helps with the rise. Don’t skip this—unless you want flat cookies! -
1 teaspoon baking powder
A little lift to support our oatmeal cookies. It complements the baking soda for a perfect rise. -
1 teaspoon cinnamon
Because fall wouldn’t be fall without cinnamon! Feel free to use pumpkin pie spice here for an extra aromatic touch. -
1/2 teaspoon nutmeg
Just a pinch for added warmth and spice. If you’re not a fan, you can reduce this or skip it altogether. -
1/4 teaspoon ginger
Infuses a warm bite. Dried ginger works great, but freshly grated ginger brings a unique zing. -
1/4 teaspoon salt
Balances the sweetness. Every cookie needs this little kick! -
1 cup cream cheese, softened
The creaminess for our filling! If you need a dairy-free option, go for cashew cream or a vegan cream cheese. -
1/2 cup powdered sugar
Sweetens our filling. Feel free to swap with agave syrup, but it will change the consistency. -
1 teaspoon vanilla extract
Adds a warm depth of flavor. It’s hard to get a good substitution here, so use the real deal if you can! -
1 teaspoon pumpkin spice
For that signature fall flavor! You can create your own mix using cinnamon, nutmeg, and ginger.
Step-by-Step Instructions
Now that we’ve got all our ingredients together, let’s get baking! Follow these steps for a cookie experience that will remind you of cozy evenings by the fire.
-
Preheat Your Oven
Preheat your oven to 350°F (175°C). This ensures your cookies bake evenly and helps them fluff up nicely. -
Mix the Wet Ingredients
In a large mixing bowl, beat together the softened butter, brown sugar, and granulated sugar until creamy. This should take about 2-3 minutes. It’s your workout for the day—get in there and mix! -
Incorporate Pumpkin and Egg
Add in the pumpkin puree and the egg. Blend until fully combined. You’ll love the color this adds to your batter. -
Combine Dry Ingredients
In another bowl, whisk together the flour, rolled oats, baking soda, baking powder, cinnamon, nutmeg, ginger, and salt. Make sure it’s all well-mixed. You want those spices evenly spread to ensure each bite is packed with flavor! -
Join Forces
Gradually add the dry ingredient mixture to the wet mixture. Mix just until you see no flour streaks; overmixing can lead to tough cookies. Trust me, we want these soft! -
Scoop it Out
Using a cookie scoop or two spoons, drop the dough onto lined baking sheets. Leave some space in between because these little beauties will spread. -
Bake and Cool
Bake your cookies for about 12-15 minutes until they’re golden at the edges but still soft in the center. Let them cool for a few minutes on the baking sheet (very important for texture) before transferring to a cooling rack. -
Make the Creamy Filling
While the cookies are cooling, grab a new bowl and beat your softened cream cheese with the powdered sugar, vanilla extract, and pumpkin spice. Mix until smooth and fluffy. This part is like magic—so creamy! -
Sandwich Time
Once the cookies have cooled completely, spread a generous amount of the cream cheese filling on the flat side of one cookie and top it off with another cookie. You’re creating a sandwich, folks!
Serving Suggestions
Now that you have your pumpkin oatmeal cream pies all assembled, it’s time to serve them up! You could arrange them on a beautiful platter, dust a little powdered sugar over the top, and garnish with some cinnamon sticks for that extra fall flair.
For an appetizing twist, pair these cookies with a warm drink—like apple cider or a cozy cup of chai tea. They make fantastic gifts, too—wrap a few in kraft paper with some twine for those potluck gatherings.
Recipe Variations
While the classic version of our pumpkin oatmeal cream pies is simply divine, let’s chat about some creative twists you can try:
-
Chocolate Chips: Stir in a cup of chocolate chips into the cookie dough for a rich, sweet surprise in every bite.
-
Nutty Delight: Introduce chopped pecans or walnuts into the batter for an earthy crunch. Just toast them lightly beforehand for enhanced flavor!
-
Spiced Rum Cream: For the adult version, add a splash of spiced rum to your cream cheese filling for a fun twist.
-
Vegan Version: Use plant-based butter, a flax egg, and vegan cream cheese for a deliciously desirable vegan pumpkin oatmeal cream pie!
-
Cranberry Swirl: Fold in dried cranberries into the cookie dough for a tart contrast that balances the sweetness beautifully.
Chef’s Notes
As with any good recipe, this pumpkin oatmeal cream pie has its roots in evolution. My grandma, bless her heart, originally cooked these with a chocolate filling before I embarked on my quest to try a pumpkin twist! It was through countless experiments—some sticky, some catastrophically flat (never skip the baking soda, you guys!)—that I finally perfected this warm hug of a dessert.
And let me tell you, each bite evokes such nostalgia that I can’t resist making these every fall season. Trust me, the aroma of baking cookies will linger and bring people in from all around, just like it did in my grandma’s kitchen.
FAQs and Troubleshooting
-
Why are my cookies flat?
If your cookies turn out flat, you might have skipped the baking soda or baking powder, or perhaps your butter was too soft. Make sure to chill your dough for about 30 minutes before baking next time. -
Can I make the dough ahead of time?
Absolutely! You can chill the dough for up to a week or freeze it for about three months. Just let it sit at room temperature for a bit before scooping. -
How do I store leftovers?
Seal your cookies in an airtight container at room temperature for about 3-4 days, or in the fridge for up to a week. They also freeze beautifully—just make sure to layer them with parchment paper! -
What do I do if my cream cheese filling is too runny?
If your filling seems a bit too loose, add a bit more powdered sugar to thicken it up. And avoid over-mixing—this keeps the filling fluffy.
Nutritional Info
Not only do these delicious pumpkin oatmeal cream pies entice with their flavors, but they also offer some nutritional benefits thanks to pumpkin! Here’s a rough estimate per pie with filling:
- Calories: 250
- Total Fat: 11g
- Saturated Fat: 6g
- Cholesterol: 40mg
- Sodium: 140mg
- Total Carbohydrates: 36g
- Dietary Fiber: 2g
- Sugars: 16g
- Protein: 3g
This is a sweet treat, so enjoy them mindfully!
Final Thoughts
So there you have it, my dear foodies—the secret to making the ultimate Pumpkin Oatmeal Cream Pies! As you bake these delightful cookies, don’t forget to let your creativity shine. Get your loved ones involved, and don’t hold back on the laughter (or the taste-testing, let’s be real).
There’s something heartwarming about sharing good food and memories, and these cookies definitely deliver both in every fluffy bite. So grab your spatula, and let’s celebrate the flavors of fall! Happy baking! 🍂🍰
Print
Pumpkin Oatmeal Cream Pies
- Total Time: 35 minutes
- Yield: 12 servings 1x
- Diet: Vegetarian
Description
Delightful pumpkin oatmeal cream pies filled with luscious cream cheese frosting, embodying the warm flavors of fall.
Ingredients
- 1 cup pumpkin puree
- 1 cup brown sugar
- 1/2 cup granulated sugar
- 1 cup unsalted butter, softened
- 1 egg
- 2 cups all-purpose flour
- 2 cups rolled oats
- 1 teaspoon baking soda
- 1 teaspoon baking powder
- 1 teaspoon cinnamon
- 1/2 teaspoon nutmeg
- 1/4 teaspoon ginger
- 1/4 teaspoon salt
- 1 cup cream cheese, softened
- 1/2 cup powdered sugar
- 1 teaspoon vanilla extract
- 1 teaspoon pumpkin spice
Instructions
- Preheat your oven to 350°F (175°C).
- Mix the softened butter, brown sugar, and granulated sugar until creamy.
- Incorporate the pumpkin puree and egg into the mixture.
- Combine the flour, oats, baking soda, baking powder, cinnamon, nutmeg, ginger, and salt in another bowl.
- Join the dry ingredients gradually into the wet mixture.
- Scoop the dough onto lined baking sheets, leaving space.
- Bake for 12-15 minutes until golden at the edges.
- Make the filling with cream cheese, powdered sugar, vanilla extract, and pumpkin spice.
- Sandwich the filling between two cookies.
Notes
Feel free to customize with chocolate chips or nuts for added flavor.
- Prep Time: 20 minutes
- Cook Time: 15 minutes
- Category: Dessert
- Method: Baking
- Cuisine: American
Nutrition
- Serving Size: 1 cookie
- Calories: 250
- Sugar: 16g
- Sodium: 140mg
- Fat: 11g
- Saturated Fat: 6g
- Unsaturated Fat: 5g
- Trans Fat: 0g
- Carbohydrates: 36g
- Fiber: 2g
- Protein: 3g
- Cholesterol: 40mg
Keywords: pumpkin, oatmeal, cream pies, fall dessert, cookies
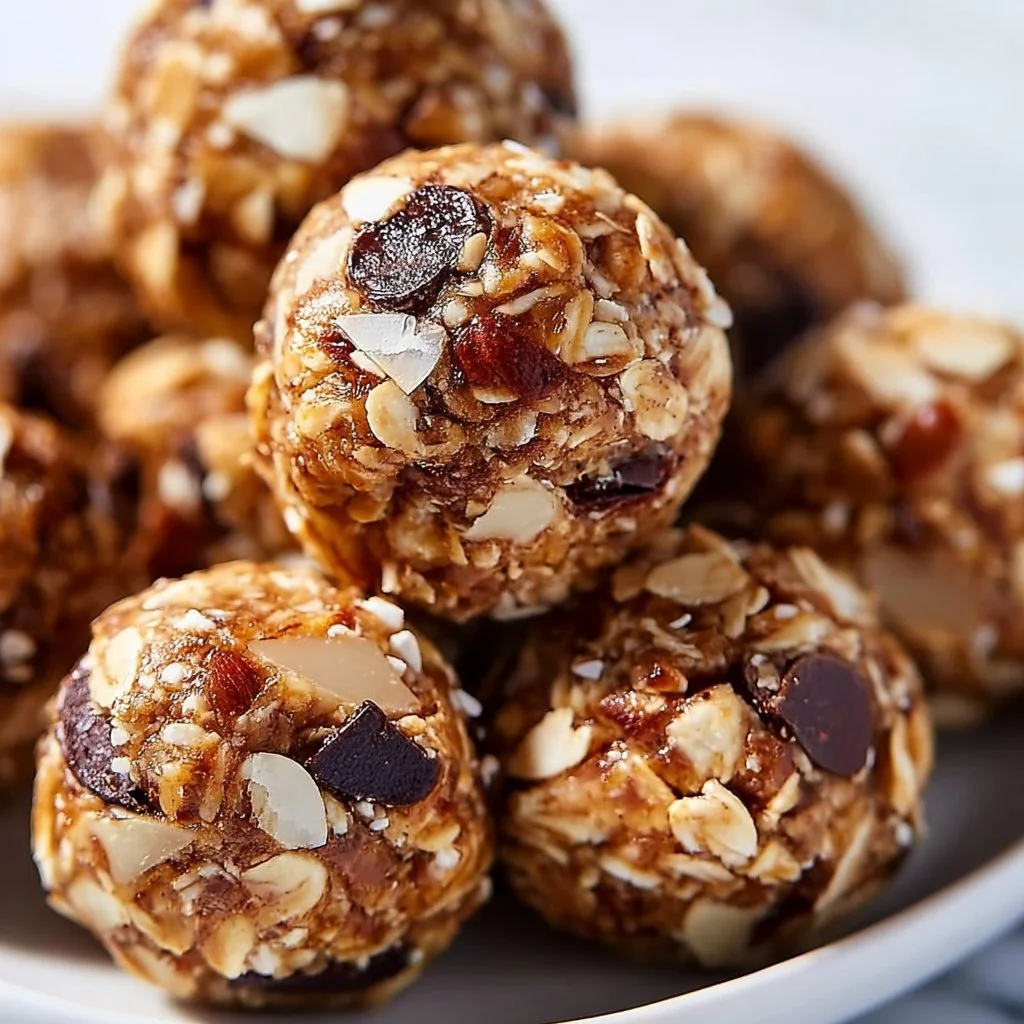
No-Bake Energy Bites
No-Bake Energy Bites: The Ultimate Snack for Busy Foodies
Hey there, fellow food enthusiasts! I’m Beau Collier, and today I’m thrilled to take you on a delicious journey with one of my all-time favorite snack recipes: No-Bake Energy Bites. If you’re anything like me, life can get a bit hectic. Between work, family, and social commitments, finding time to whip up nutritious snacks can feel like a Herculean effort. That’s where these energy bites come in! They’re not just quick and easy to make, but they are also packed with wholesome goodness to fuel your busy lifestyle.
Picture this: it’s a Thursday afternoon, and you’re powering through your to-do list. You need a little pick-me-up, but you don’t want to reach for that sugary granola bar that leaves you crashing in an hour. That’s when your homemade energy bites can swoop in to save the day! With just a handful of ingredients and minimal effort, you can create a delightful snack that satisfies your cravings without the guilt.
The beauty of these No-Bake Energy Bites is that they’re not just a grab-and-go option for busy days; they’re also a great choice for kids, and they make an excellent addition to lunchboxes or as a post-workout treat. Plus, you can tailor them to your taste! Whether you’re a chocolate lover or someone who enjoys a nutty crunch, these little bites of joy are customizable to fit your preferences.
Let’s roll up our sleeves, put on some fun music, and get ready to whip up a batch of these no-bake wonders. Trust me, once you try them, you’ll keep a stash in your fridge or freezer for those moments when you need a little energy boost. Are you ready? Let’s dig in!
Personal Story
I’ll never forget the first time I made these No-Bake Energy Bites. It was a chilly Saturday morning, and my two kids were bouncing around the kitchen, bursting with energy. “Dad, can we have something fun for a snack?” they begged. As I scanned our pantry, looking for a quick solution, I stumbled upon the perfect mix of ingredients. I decided to turn our ordinary morning into a cooking adventure.
As we combined the oats, nut butter, and honey in a big bowl, the kitchen filled with laughter and little voices shouting, “More chocolate chips!” It was a delightful chaos, one that inevitably ended with chocolate smeared on noses and giggles all around. When we finally rolled the mixture into shiny little balls, it felt like a mini celebration. The first bites were a revelation! Crunchy, chewy, and sweet all at once, these energy bites became a family favorite.
Fast forward to today, and this recipe has followed us through busy school mornings, road trips, and even movie nights. It’s become a family tradition to whip up a new batch every weekend, experimenting with different ingredients while reminiscing about that first adventurous Saturday. These bites aren’t just a tasty snack; they are a reminder of the joy of cooking together.
Ingredients
Before we dive into the cooking process, let’s gather our stars of the show! Here’s what you’ll need to whip up these fabulous No-Bake Energy Bites:
-
1 cup rolled oats
- Rolled oats are the backbone of these bites, providing a hearty base. They’re packed with fiber and help keep you full! If you’re gluten-free, make sure to choose certified gluten-free oats.
-
1/2 cup peanut butter
- Creamy or crunchy, the choice is yours! Peanut butter adds essential protein and healthy fats. Looking for alternatives? Almond butter or sunflower seed butter work beautifully too!
-
1/3 cup honey
- This natural sweetener binds the ingredients together while offering a touch of sweetness. If you prefer a vegan option, agave syrup or maple syrup can replace honey.
-
1/2 cup chocolate chips
- Chocolate makes everything better, right? Use semi-sweet for a classic flavor or dark chocolate chips for a richer taste. You can swap them for dried fruit or nuts if you’re feeling adventurous.
-
1/4 cup flaxseed meal
- A powerhouse of nutrients, flaxseed meal is loaded with omega-3 fatty acids and fiber. If you don’t have it on hand, chia seeds make a great substitute!
-
1/2 teaspoon vanilla extract
- This little ingredient adds a warm, inviting flavor that ties everything together. Feel free to use almond extract for a nutty twist!
Gather these ingredients together, and let’s get cookin’!
Step-by-Step Instructions
Now that we have everything ready, it’s time to transform these humble ingredients into delightful No-Bake Energy Bites. Follow these easy steps, and make sure to add your personal touch along the way!
Step 1: Mix the Dry Ingredients
- In a large mixing bowl, begin by combining the rolled oats and flaxseed meal. Use a wooden spoon or spatula to make sure they’re evenly mixed! This will give you a great base for your bites.
- Chef’s Tip: The more you mix it now, the less you’ll have to do later!
Step 2: Add the Wet Ingredients
- Add the peanut butter, honey, and vanilla extract to the bowl. It might look a bit messy at first, but don’t worry! The peanut butter and honey will soon work their magic.
- Chef’s Insight: If your peanut butter is a little stiff, warm it slightly in the microwave (10-15 seconds) so it blends more easily.
Step 3: Stir Until Combined
- Mix everything together vigorously until you have a thick, sticky dough. If it feels too dry, add a splash of water or a bit more honey. Conversely, if it’s too gooey, sprinkle in some more oats.
- Chef Hack: Using your hands to mix can be messy but also super fun! It’s like you’re working with edible clay.
Step 4: Fold in Chocolate Chips
- Gently fold in the chocolate chips. This step is essential—no skimping here! You want that chocolate goodness in every bite.
- Pro Tip: Reserve a few chocolate chips to sprinkle on top for that Instagram-worthy finish!
Step 5: Shape the Bites
- Now, it’s time to roll! Using your hands, scoop out tablespoon-sized portions of the mixture and roll them into balls. Place them on a parchment-lined baking sheet or plate.
- Chef’s Note: If the mixture is too sticky, wet your hands slightly or dust them with a bit of powdered sugar.
Step 6: Chill
- Pop them into the fridge for about 30 minutes to firm up. This will help them hold their shape for snacking later.
- Fun Fact: Chilling not only helps with texture but also makes the flavors meld together beautifully!
Serving Suggestions
Once your No-Bake Energy Bites have chilled, it’s time to enjoy them! You can serve them as a simple snack or elevate the experience. Here are a few serving suggestions:
- On a Snack Platter: Arrange your energy bites on a lovely platter, garnished with fresh fruits like strawberries or apple slices. This makes for a fun party snack.
- In a Jar: Layer them in a mason jar for a cute grab-and-go option. You can even label it as "Energy Boosts" for a personal touch!
- With Coffee or Tea: Pair your bites with a warm cup of coffee or herbal tea for an afternoon pick-me-up. Trust me, the combination is divine!
Recipe Variations
The best part about No-Bake Energy Bites is that they’re super adaptable! Here are some fun twists you can try to mix things up:
- Coconut Crunch: Add 1/4 cup of shredded coconut for a tropical flair.
- Nutty Flavors: Try adding 1/4 cup of chopped nuts, like almonds or walnuts, for an added crunch and nutritional boost.
- Spiced Up: Mix in a pinch of cinnamon or nutmeg to infuse warm, cozy flavors throughout.
- Fruit Burst: Toss in some dried fruits like cranberries, raisins, or apricots for a chewy surprise.
- Protein Boost: Replace half of the oats with protein powder for extra fuel—great for after a workout!
Chef’s Notes
I love that this recipe has evolved over time, and every batch is a little different. One time, my kids decided to add shredded carrots because they thought it would be "healthy." Surprisingly, it worked! We ended up calling them “Energizing Bunny Bites” for the fun factor.
It’s these experiences that make cooking so special—finding joy in the kitchen, trying new things, and sharing it all with loved ones. No matter how you tweak this recipe, I promise you’ll have a tasty and wholesome snack to enjoy!
FAQs and Troubleshooting
Here are some common questions I’ve encountered about No-Bake Energy Bites that’ll help you make this recipe with ease:
Q1: My energy bites are too sticky; how can I fix them?
If your mixture feels too sticky to roll, you can either chill it in the fridge for 10-15 minutes or add extra oats, a little at a time, until the texture feels right.
Q2: How long do these bites last?
Stored in an airtight container in the fridge, these energy bites will last up to a week. You can also freeze them for up to three months—just make sure to separate layers with parchment paper!
Q3: Can I use quick oats instead of rolled oats?
While rolled oats provide a nicer texture, you can use quick oats if that’s what you have on hand. The bites will be a tad firmer, but still delicious!
Q4: What if I’m allergic to nuts?
No worries! You can easily substitute the peanut butter with sunflower seed butter or omit the nut butter altogether and increase the binding agents slightly with more honey or syrup.
Nutritional Info
Now, let’s talk numbers for those of you keeping track of your nutrition. Each No-Bake Energy Bite contains approximately:
- Calories: 120
- Protein: 3g
- Carbohydrates: 12g
- Dietary Fiber: 2g
- Sugars: 5g
- Fat: 6g
These bites keep you satisfied without the sugar crash, thanks to the combination of fiber, protein, and healthy fats. They’re excellent for providing that mid-afternoon energy boost!
Final Thoughts
I hope you’re as excited as I am about these No-Bake Energy Bites! They’re simple, satisfying, and oh-so-delicious. Whether you’re busy with work, heading out on an adventure, or simply looking for a healthy snack for the family, this recipe has got your back.
Remember, cooking is all about experimentation and fun, so don’t hesitate to try new ingredients or tweak the recipe to suit your taste. I’d love to hear about your own variations and any cooking adventures that come from this recipe!
So, grab your mixing bowl, put on your favorite tunes, and enjoy the delightful experience of creating these bites of joy. Happy snacking, and until next time, keep cooking with love and a sprinkle of creativity!
And there you have it! A delightful journey through the creation of No-Bake Energy Bites with insight, tips, and love. Enjoy!
Print
No-Bake Energy Bites
- Total Time: 45 minutes
- Yield: 24 servings 1x
- Diet: Vegetarian
Description
Quick and easy no-bake energy bites packed with wholesome ingredients, perfect for busy lifestyles.
Ingredients
- 1 cup rolled oats
- 1/2 cup peanut butter
- 1/3 cup honey
- 1/2 cup chocolate chips
- 1/4 cup flaxseed meal
- 1/2 teaspoon vanilla extract
Instructions
- Mix the dry ingredients in a large mixing bowl: rolled oats and flaxseed meal.
- Add the wet ingredients: peanut butter, honey, and vanilla extract.
- Stir until combined, creating a thick, sticky dough.
- Fold in the chocolate chips gently.
- Shape tablespoon-sized portions into balls.
- Chill in the fridge for about 30 minutes to firm up.
Notes
These bites are customizable with various ingredients like nuts or dried fruits. Store in the fridge for up to a week or freeze for up to three months.
- Prep Time: 15 minutes
- Cook Time: 0 minutes
- Category: Snack
- Method: Chilling
- Cuisine: American
Nutrition
- Serving Size: 1 bite
- Calories: 120
- Sugar: 5g
- Sodium: 10mg
- Fat: 6g
- Saturated Fat: 1g
- Unsaturated Fat: 4g
- Trans Fat: 0g
- Carbohydrates: 12g
- Fiber: 2g
- Protein: 3g
- Cholesterol: 0mg
Keywords: no-bake, energy bites, healthy snacks, quick snacks, easy recipes