
One-Bowl 4-Ingredient Gluten-Free Pumpkin Oatmeal Cookies
Gluten-Free Pumpkin Oatmeal Cookies: A Cozy Treat
Hey there, fellow foodies! Today, we’re whipping up a batch of delightful Gluten-Free Pumpkin Oatmeal Cookies. These little wonders are not just a treat; they’re a warm hug in cookie form, perfect for snuggling up with a cup of tea or coffee. There’s something magical about the spices, the warmth of pumpkin, and, of course, the chocolate chips that can turn any day around—trust me on this one!
As the leaves begin to turn and the air fills with that famous fall scent—think cinnamon and nutmeg—I can’t help but think of the countless afternoons I spent baking with my grandmother. You see, she had this incredible knack for making the kitchen feel like home, and her pumpkin cookies were always the highlight of our fall gatherings. They were a simple mix of ingredients but felt like a celebration, especially when shared with family and friends.
Now, let me tell you, these gluten-free cookies come together with minimal fuss and maximum flavor. If you’ve ever struggled to find a cookie that checks all the boxes—delicious, easy to make, and a healthier choice—then you’re in for a treat. Let’s roll up our sleeves, don our aprons, and dive into this delightful recipe together!
A Little Taste of My Past
One of the fondest memories I have about baking came when I was about eight years old. I can vividly remember standing on a stool, peering over the counter where my grandmother prepped her famous pumpkin cookies. She would let me mix the dough with my tiny hands (which, let me tell you, felt like an absolute privilege). The moment the dough hit the oven, the scent filled the house, and we would have to restrain ourselves from stealing the first batch before the frosting had a chance to set!
Those afternoons weren’t just about baking; they were about lessons in patience, creativity, and the joy of cooking. And now, as I craft this gluten-free version of those beloved cookies, I can’t help but feel that same warmth spreading through my heart (and home). Each bite reminds me of those simpler times and how food can create lasting memories.
Ingredients
Now, let’s gather our ingredients for these gluten-free pumpkin oatmeal cookies. Here’s what you’ll need:
-
1 cup gluten-free oats: These will give your cookies that chewy texture. If you can’t find gluten-free oats, regular rolled oats could work, but make sure they’re certified gluten-free to avoid cross-contamination.
-
3/4 cup pumpkin puree: Pure pumpkin puree is the star of the show here! You can even use homemade pumpkin puree if you’re feeling adventurous! If you happen to be out of pumpkin, unsweetened applesauce can be a nice substitute—though you’ll lose that cozy pumpkin flavor.
-
1/4 cup maple syrup: This natural sweetener adds a delightful flavor. If you’re looking for a sugar-free option, try using monk fruit sweetener or stevia; just be mindful of the measurement conversions, as they vary.
-
1/2 cup chocolate chips: Because chocolate! Dark chocolate or dairy-free chocolate chips work perfectly here. If chocolate isn’t your thing, chopped nuts or dried fruit can add a lovely crunch or sweetness.
-
1 tsp cinnamon: This warm spice elevates the pumpkin flavor. Feel free to get creative—add a pinch of nutmeg or ginger for an extra kick!
-
A dash of salt: A little salt balances the sweetness and enhances all the flavors.
Step-by-Step Instructions
Alright, my culinary comrades, it’s time to roll up our sleeves and get cooking! Here’s how you make these scrumptious cookies:
-
Preheat your oven to 350°F (175°C). This is the perfect temperature for cookies: hot enough to get them fluffy but not so hot that they’ll burn.
-
Mix the dry ingredients: In a large mixing bowl, combine the gluten-free oats, cinnamon, and a dash of salt. Give it a gentle mix with a spoon or a whisk. This might sound a bit basic, but this ensures even distribution of the cinnamon!
-
Combine the wet ingredients: In a separate bowl, blend the pumpkin puree and maple syrup. If you want to give it even more flavor depth, consider adding a splash of vanilla extract!
-
Merge the mixtures: Pour the wet ingredients into the bowl with the dry ingredients. It’s a glorious mess at this stage—get in there and mix everything until just combined! A spatula or spoon works fine, but if you’re feeling cheeky, your hands will do a fantastic job.
-
Add chocolate chips: Now for the best part! Fold in those glorious chocolate chips until they’re evenly scattered. Is it just me, or does this part always feel like the cookie equivalent of adding sprinkles to ice cream?
-
Scoop and drop: Line a baking sheet with parchment paper (trust me, your future self will thank you for this). Use a cookie scoop or just two spoons to drop tablespoon-sized balls of dough onto the sheet. Leave some space between them; they’ll spread a little while baking.
-
Bake: Pop them in the oven and bake for 10-12 minutes. Keep an eye on them; you’re looking for the edges to turn golden brown. They will continue to firm up as they cool, so don’t worry if they seem a little soft coming out.
-
Cool and enjoy: Let them cool on the baking sheet for a few minutes before transferring to a wire rack. The aroma will be irresistible—you might just find it hard to resist one (or three) straight from the oven!
Serving Suggestions
Now that our cookies are baked to perfection, let’s talk about plating! These gluten-free pumpkin oatmeal cookies are fantastic on their own but can also be served in style.
-
Cookie Platter: Arrange them on a charming wooden board or a colorful plate. Add some fall-themed decorations like mini pumpkins or cinnamon sticks for that cozy vibe.
-
With a Drink: Pair these cookies with a warm chai latte, a cup of spiced apple cider, or even a simple glass of cold almond milk. The flavors will sing together, making for a delightful snack!
-
Store in Style: If you’re not devouring them all immediately (which, let’s be honest, is a real possibility), store them in an airtight container. Toss in a slice of bread to keep them fluffy and fresh.
Recipe Variations
Now, let’s get creative! Here are a few fun variations you might want to try:
-
Nutty Cinnamon Swirl: Add 1/2 cup of chopped walnuts or pecans for extra crunch and a boost of healthy fats. It gives a rustic vibe to your cookies!
-
Spiced Up Pumpkin: Add 1/4 teaspoon of nutmeg or ginger for a little more warmth. It’ll have your taste buds dancing!
-
Nut Butter Bliss: Stir in a couple of tablespoons of almond butter or peanut butter into the wet mixture for a creamier, richer cookie. It’s an absolute game-changer!
-
Coconut Cookie: Swap half of the oats for unsweetened shredded coconut. The combination of pumpkin and coconut is simply divine!
-
Vegan-Friendly: To cater to a vegan diet, ensure that the chocolate chips are dairy-free, and you can substitute maple syrup with agave syrup.
Chef’s Notes
Ah, the beauty of cookies is their adaptability. This particular recipe has evolved over the years. Initially, I thought I could only enjoy pumpkin in pie form. But after some trial and error (and more than a few cookie failures), I realized that pumpkin flourishes in cookies, too—especially gluten-free ones!
The moment I decided to incorporate oats into my pumpkin cookies was a game changer. Not only did it add heartiness, but it gave a wonderful chewy texture that holds up with each bite. Plus, let’s be real—who doesn’t want an excuse to have cookies that feel just a tad healthier?
If you have any kitchen adventures of your own using this recipe, please share! I love hearing about your baking tales and modifications!
FAQs and Troubleshooting
-
Why are my cookies dry? If you find your cookies are coming out dry, the culprit often lies in overmixing or over-baking. Keep an eye on them in the oven and take them out while they’re still slightly underdone; they’ll firm up as they cool.
-
Can I use pumpkin pie filling instead? While you can use pumpkin pie filling, it’s best to stick to pure pumpkin puree for this recipe to maintain control over sweetness and spices. The pre-seasoned filling may throw off the cookie flavor.
-
How do I prevent my cookies from sticking? Using parchment paper or a silicone baking mat on your baking sheet works wonders for preventing stickiness. Letting cookies cool slightly before moving them is also helpful.
-
What can I do with leftover pumpkin puree? Get creative! Mix pumpkin puree into smoothies, add it to oatmeal, or make a simple pumpkin soup. It freezes well, too, if you’re not ready to use it all at once.
Nutritional Info
These cookies are not only tasty but also packed with nutritious ingredients! Here’s a rough estimate of the nutritional breakdown for one cookie (assuming the recipe makes about 12 cookies):
- Calories: 120
- Protein: 2g
- Carbohydrates: 16g
- Fat: 5g
- Fiber: 2g
- Sugar: 5g
Of course, this can vary based on the specific brands and ingredients you use, but it highlights the fact that you’re indulging in a cookie that offers some nutritional value along with its delicious taste!
Final Thoughts
There you have it, my fellow bakers! A simple yet delightful recipe for gluten-free pumpkin oatmeal cookies that evokes warmth, nostalgia, and joy. Whether you’re making them for a cozy night in, a festive gathering, or just because it’s a Tuesday, they’re sure to brighten your day. Remember, cooking should be a joy—an experience to share, to experiment, and to create memories.
I hope you loved this recipe as much as I do! Don’t forget to share your baking adventures and variations with me. Until next time, happy baking, and may your kitchen always smell like cookies!
Print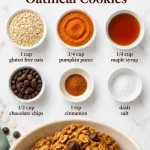
Gluten-Free Pumpkin Oatmeal Cookies
- Total Time: 27 minutes
- Yield: 12 cookies 1x
- Diet: Gluten-Free
Description
Delightful gluten-free pumpkin oatmeal cookies that evoke warmth and nostalgia, perfect for enjoying with a cup of tea or coffee.
Ingredients
- 1 cup gluten-free oats
- 3/4 cup pumpkin puree
- 1/4 cup maple syrup
- 1/2 cup chocolate chips
- 1 tsp cinnamon
- A dash of salt
Instructions
- Preheat your oven to 350°F (175°C).
- Mix the dry ingredients: In a large mixing bowl, combine the gluten-free oats, cinnamon, and a dash of salt.
- Combine the wet ingredients: In a separate bowl, blend the pumpkin puree and maple syrup.
- Merge the mixtures: Pour the wet ingredients into the bowl with the dry ingredients and mix until just combined.
- Add chocolate chips: Fold in the chocolate chips until evenly scattered.
- Scoop and drop: Line a baking sheet and drop tablespoon-sized balls of dough onto it, leaving some space.
- Bake: Pop them in the oven and bake for 10-12 minutes until edges turn golden brown.
- Cool and enjoy: Let them cool on the baking sheet for a few minutes before transferring to a wire rack.
Notes
These cookies are well enjoyed warm and can be stored in an airtight container with a slice of bread to keep them fluffy.
- Prep Time: 15 minutes
- Cook Time: 12 minutes
- Category: Dessert
- Method: Baking
- Cuisine: American
Nutrition
- Serving Size: 1 cookie
- Calories: 120
- Sugar: 5g
- Sodium: 50mg
- Fat: 5g
- Saturated Fat: 2g
- Unsaturated Fat: 3g
- Trans Fat: 0g
- Carbohydrates: 16g
- Fiber: 2g
- Protein: 2g
- Cholesterol: 0mg
Keywords: gluten-free, pumpkin cookies, oatmeal cookies, fall recipes, healthy desserts
Minute Pumpkin Oatmeal Cream Pies (No-Bake Snack)
The Sweetest Fall Treat: Pumpkin Oatmeal Cream Pies
Hey there, food lovers! As the leaves turn golden and the air gets that crisp bite of autumn, there’s something truly special about the flavors of fall. Imagine biting into a soft, chewy cookie that tastes like autumn on a plate—spicy, sweet, and oh-so-comforting. That’s right, we’re diving into the world of Pumpkin Oatmeal Cream Pies today!
These delightful treats are not only packed with the warm spices of the season but also blessed with the rich taste of pumpkin. They make for the perfect afternoon pick-me-up or a cozy dessert after dinner. Plus, they come with a luscious cream cheese filling that will send your taste buds dancing. So, put on your favorite apron, and let’s embrace the kitchen magic!
A Slice of Nostalgia
The essence of these pumpkin oatmeal cream pies comes from my childhood, where the kitchen was a sanctuary filled with laughter and delicious aromas. Picture this: crisp autumn evenings, spent at my grandma’s house, where she’d whip up all sorts of goodies. One of my fondest memories is her baking with pumpkin while telling stories of her childhood in the south. Her kitchen would become a blend of chatter and sweet scents that seemed to wrap around you like a warm hug.
I remember the anticipation as the cookies would come out of the oven, their edges golden brown, while the center remained soft and gooey. I would sneak in a taste (or three) before they even made it to the cooling rack! As she pulled out her secret cream cheese filling recipe, she’d wink and say, “This is the trick, my dear.” Little did I know, this simple recipe would evolve into one of my favorites to share with you all.
Ingredients
Now, let’s gather our ingredients for these delightful pumpkin oatmeal cream pies. Here’s what you’ll need:
-
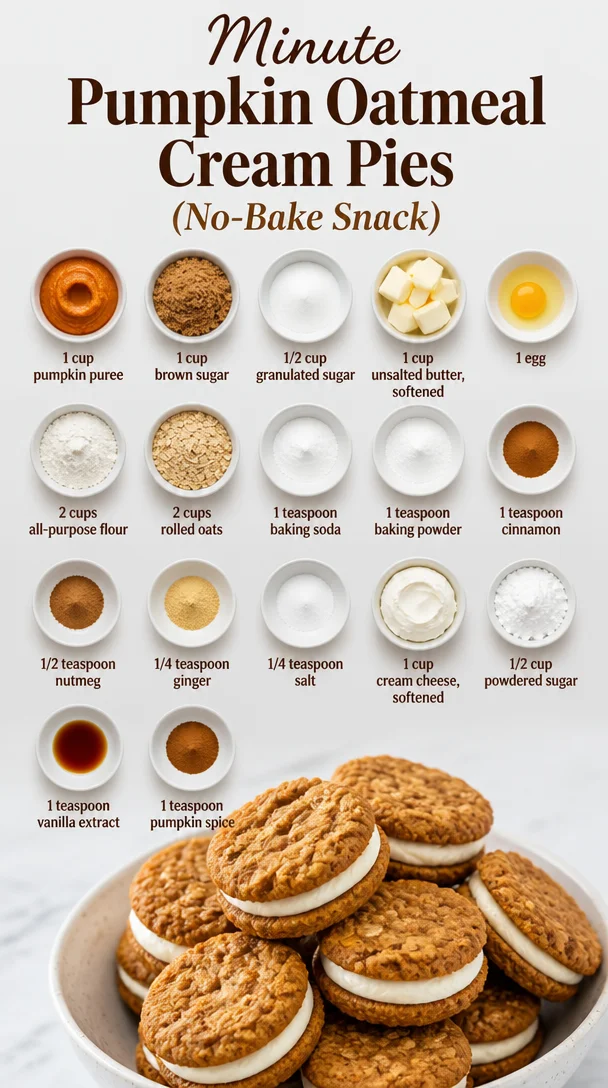
1 cup pumpkin puree
This is the star of the show! Perfectly sweet and packed with moisture, it’s what gives our cookies that tender bite. If you need a substitute, you can use applesauce or even mashed bananas, but the flavor will change a bit. -
1 cup brown sugar
For that lovely caramel flavor and added moisture. If you don’t have brown sugar on hand, you can use granulated sugar, though the cookies won’t have that lovely depth. -
1/2 cup granulated sugar
This will help balance the sweetness. For a healthier option, you can replace it with coconut sugar, but the texture might be slightly different! -
1 cup unsalted butter, softened
Makes the dough rich and flavorful. If you’re looking for a dairy-free version, feel free to use coconut oil or a vegan butter substitute. -
1 egg
Binds our ingredients together. If you need a vegan alternative, try a flax egg (1 tablespoon ground flaxseed mixed with 3 tablespoons water). -
2 cups all-purpose flour
This is the backbone of our cookies. You can swap half of this with whole wheat flour for added fiber. -
2 cups rolled oats
Provides that chewy texture we all love. Quick oats can be used in a pinch, but rolled oats give the best texture! -
1 teaspoon baking soda
Helps with the rise. Don’t skip this—unless you want flat cookies! -
1 teaspoon baking powder
A little lift to support our oatmeal cookies. It complements the baking soda for a perfect rise. -
1 teaspoon cinnamon
Because fall wouldn’t be fall without cinnamon! Feel free to use pumpkin pie spice here for an extra aromatic touch. -
1/2 teaspoon nutmeg
Just a pinch for added warmth and spice. If you’re not a fan, you can reduce this or skip it altogether. -
1/4 teaspoon ginger
Infuses a warm bite. Dried ginger works great, but freshly grated ginger brings a unique zing. -
1/4 teaspoon salt
Balances the sweetness. Every cookie needs this little kick! -
1 cup cream cheese, softened
The creaminess for our filling! If you need a dairy-free option, go for cashew cream or a vegan cream cheese. -
1/2 cup powdered sugar
Sweetens our filling. Feel free to swap with agave syrup, but it will change the consistency. -
1 teaspoon vanilla extract
Adds a warm depth of flavor. It’s hard to get a good substitution here, so use the real deal if you can! -
1 teaspoon pumpkin spice
For that signature fall flavor! You can create your own mix using cinnamon, nutmeg, and ginger.
Step-by-Step Instructions
Now that we’ve got all our ingredients together, let’s get baking! Follow these steps for a cookie experience that will remind you of cozy evenings by the fire.
-
Preheat Your Oven
Preheat your oven to 350°F (175°C). This ensures your cookies bake evenly and helps them fluff up nicely. -
Mix the Wet Ingredients
In a large mixing bowl, beat together the softened butter, brown sugar, and granulated sugar until creamy. This should take about 2-3 minutes. It’s your workout for the day—get in there and mix! -
Incorporate Pumpkin and Egg
Add in the pumpkin puree and the egg. Blend until fully combined. You’ll love the color this adds to your batter. -
Combine Dry Ingredients
In another bowl, whisk together the flour, rolled oats, baking soda, baking powder, cinnamon, nutmeg, ginger, and salt. Make sure it’s all well-mixed. You want those spices evenly spread to ensure each bite is packed with flavor! -
Join Forces
Gradually add the dry ingredient mixture to the wet mixture. Mix just until you see no flour streaks; overmixing can lead to tough cookies. Trust me, we want these soft! -
Scoop it Out
Using a cookie scoop or two spoons, drop the dough onto lined baking sheets. Leave some space in between because these little beauties will spread. -
Bake and Cool
Bake your cookies for about 12-15 minutes until they’re golden at the edges but still soft in the center. Let them cool for a few minutes on the baking sheet (very important for texture) before transferring to a cooling rack. -
Make the Creamy Filling
While the cookies are cooling, grab a new bowl and beat your softened cream cheese with the powdered sugar, vanilla extract, and pumpkin spice. Mix until smooth and fluffy. This part is like magic—so creamy! -
Sandwich Time
Once the cookies have cooled completely, spread a generous amount of the cream cheese filling on the flat side of one cookie and top it off with another cookie. You’re creating a sandwich, folks!
Serving Suggestions
Now that you have your pumpkin oatmeal cream pies all assembled, it’s time to serve them up! You could arrange them on a beautiful platter, dust a little powdered sugar over the top, and garnish with some cinnamon sticks for that extra fall flair.
For an appetizing twist, pair these cookies with a warm drink—like apple cider or a cozy cup of chai tea. They make fantastic gifts, too—wrap a few in kraft paper with some twine for those potluck gatherings.
Recipe Variations
While the classic version of our pumpkin oatmeal cream pies is simply divine, let’s chat about some creative twists you can try:
-
Chocolate Chips: Stir in a cup of chocolate chips into the cookie dough for a rich, sweet surprise in every bite.
-
Nutty Delight: Introduce chopped pecans or walnuts into the batter for an earthy crunch. Just toast them lightly beforehand for enhanced flavor!
-
Spiced Rum Cream: For the adult version, add a splash of spiced rum to your cream cheese filling for a fun twist.
-
Vegan Version: Use plant-based butter, a flax egg, and vegan cream cheese for a deliciously desirable vegan pumpkin oatmeal cream pie!
-
Cranberry Swirl: Fold in dried cranberries into the cookie dough for a tart contrast that balances the sweetness beautifully.
Chef’s Notes
As with any good recipe, this pumpkin oatmeal cream pie has its roots in evolution. My grandma, bless her heart, originally cooked these with a chocolate filling before I embarked on my quest to try a pumpkin twist! It was through countless experiments—some sticky, some catastrophically flat (never skip the baking soda, you guys!)—that I finally perfected this warm hug of a dessert.
And let me tell you, each bite evokes such nostalgia that I can’t resist making these every fall season. Trust me, the aroma of baking cookies will linger and bring people in from all around, just like it did in my grandma’s kitchen.
FAQs and Troubleshooting
-
Why are my cookies flat?
If your cookies turn out flat, you might have skipped the baking soda or baking powder, or perhaps your butter was too soft. Make sure to chill your dough for about 30 minutes before baking next time. -
Can I make the dough ahead of time?
Absolutely! You can chill the dough for up to a week or freeze it for about three months. Just let it sit at room temperature for a bit before scooping. -
How do I store leftovers?
Seal your cookies in an airtight container at room temperature for about 3-4 days, or in the fridge for up to a week. They also freeze beautifully—just make sure to layer them with parchment paper! -
What do I do if my cream cheese filling is too runny?
If your filling seems a bit too loose, add a bit more powdered sugar to thicken it up. And avoid over-mixing—this keeps the filling fluffy.
Nutritional Info
Not only do these delicious pumpkin oatmeal cream pies entice with their flavors, but they also offer some nutritional benefits thanks to pumpkin! Here’s a rough estimate per pie with filling:
- Calories: 250
- Total Fat: 11g
- Saturated Fat: 6g
- Cholesterol: 40mg
- Sodium: 140mg
- Total Carbohydrates: 36g
- Dietary Fiber: 2g
- Sugars: 16g
- Protein: 3g
This is a sweet treat, so enjoy them mindfully!
Final Thoughts
So there you have it, my dear foodies—the secret to making the ultimate Pumpkin Oatmeal Cream Pies! As you bake these delightful cookies, don’t forget to let your creativity shine. Get your loved ones involved, and don’t hold back on the laughter (or the taste-testing, let’s be real).
There’s something heartwarming about sharing good food and memories, and these cookies definitely deliver both in every fluffy bite. So grab your spatula, and let’s celebrate the flavors of fall! Happy baking! 🍂🍰
Print
Pumpkin Oatmeal Cream Pies
- Total Time: 35 minutes
- Yield: 12 servings 1x
- Diet: Vegetarian
Description
Delightful pumpkin oatmeal cream pies filled with luscious cream cheese frosting, embodying the warm flavors of fall.
Ingredients
- 1 cup pumpkin puree
- 1 cup brown sugar
- 1/2 cup granulated sugar
- 1 cup unsalted butter, softened
- 1 egg
- 2 cups all-purpose flour
- 2 cups rolled oats
- 1 teaspoon baking soda
- 1 teaspoon baking powder
- 1 teaspoon cinnamon
- 1/2 teaspoon nutmeg
- 1/4 teaspoon ginger
- 1/4 teaspoon salt
- 1 cup cream cheese, softened
- 1/2 cup powdered sugar
- 1 teaspoon vanilla extract
- 1 teaspoon pumpkin spice
Instructions
- Preheat your oven to 350°F (175°C).
- Mix the softened butter, brown sugar, and granulated sugar until creamy.
- Incorporate the pumpkin puree and egg into the mixture.
- Combine the flour, oats, baking soda, baking powder, cinnamon, nutmeg, ginger, and salt in another bowl.
- Join the dry ingredients gradually into the wet mixture.
- Scoop the dough onto lined baking sheets, leaving space.
- Bake for 12-15 minutes until golden at the edges.
- Make the filling with cream cheese, powdered sugar, vanilla extract, and pumpkin spice.
- Sandwich the filling between two cookies.
Notes
Feel free to customize with chocolate chips or nuts for added flavor.
- Prep Time: 20 minutes
- Cook Time: 15 minutes
- Category: Dessert
- Method: Baking
- Cuisine: American
Nutrition
- Serving Size: 1 cookie
- Calories: 250
- Sugar: 16g
- Sodium: 140mg
- Fat: 11g
- Saturated Fat: 6g
- Unsaturated Fat: 5g
- Trans Fat: 0g
- Carbohydrates: 36g
- Fiber: 2g
- Protein: 3g
- Cholesterol: 40mg
Keywords: pumpkin, oatmeal, cream pies, fall dessert, cookies
No-Bake Healthy Pumpkin Pie Bars: 5-Ingredient Recipe
Healthy Pumpkin Pie Bars: Comfort in Every Bite
Hey there, fellow foodies! It’s your friendly chef Beau Collier here, and today we’re diving into a deliciously healthy treat that’s perfect for the season—Healthy Pumpkin Pie Bars! 🍂✨ These bars are not just a dessert; they’re a hug in edible form, packed with warm spices and all the fall flavors you love, but with a wholesome twist that makes them perfect for any occasion.
Introduction
As the leaves turn golden and the cool breeze ushers in sweater weather, pumpkin-flavored everything makes its grand entrance. From lattes to pastries, there’s something about that rich, earthy taste that awakens our senses and makes us feel right at home. When I think of fall flavors, I can’t help but reminisce about the comforting pumpkin pies that would grace our dining table every Thanksgiving. But let’s face it—traditional pumpkin pie can sometimes feel heavy and loaded with sugar.
So, what’s a spice-loving, health-conscious foodie to do? Enter my Healthy Pumpkin Pie Bars! These tasty delights bring all the cozy, nostalgic flavors of pumpkin pie while being packed with nutritious ingredients. Ideal for a snack, dessert, or even breakfast (yes, you heard me right!), these bars are a game-changer. The best part? They’re incredibly easy to whip up, so you won’t be spending hours in the kitchen—just quick, straightforward steps to mouthwatering goodness.
The blend of coconut flour, sweet maple syrup, and creamy pumpkin puree creates a delightfully moist texture that’s hard to resist. Plus, with just a handful of ingredients, you’ll wonder why you didn’t make them sooner! So, grab your apron, let’s roll up our sleeves, and get baking these Healthy Pumpkin Pie Bars together!
Personal Story
You know, every time I whip up a batch of pumpkin pie bars, I can’t help but think back to my childhood kitchen adventures with my grandmother. She was the queen of cozy, soul-satisfying recipes, and her pumpkin pies were legendary. Every fall, I’d see her scurrying about the kitchen, the aroma of cinnamon and nutmeg swirling through the air like a warm welcome. I can still see the way she’d smile as she pulled that golden-brown pie from the oven, the perfectly crimped crust shining with delicious anticipation.
One sunny autumn afternoon, she handed me a small mixing bowl and invited me to help her make her famous filling. As we mashed the pumpkin, mixed in the spices, and giggled about our flour fights, I realized that cooking was so much more than just about food; it was about creating memories and sharing love. Those fun-filled afternoons with my grandmother still inspire me to this day. With these Healthy Pumpkin Pie Bars, I want to replicate that magic—simple ingredients, hearty flavors, and the joy of cooking together.
Ingredients
Let’s gather our ingredients for these scrumptious Healthy Pumpkin Pie Bars! Here’s what you’ll need:
-
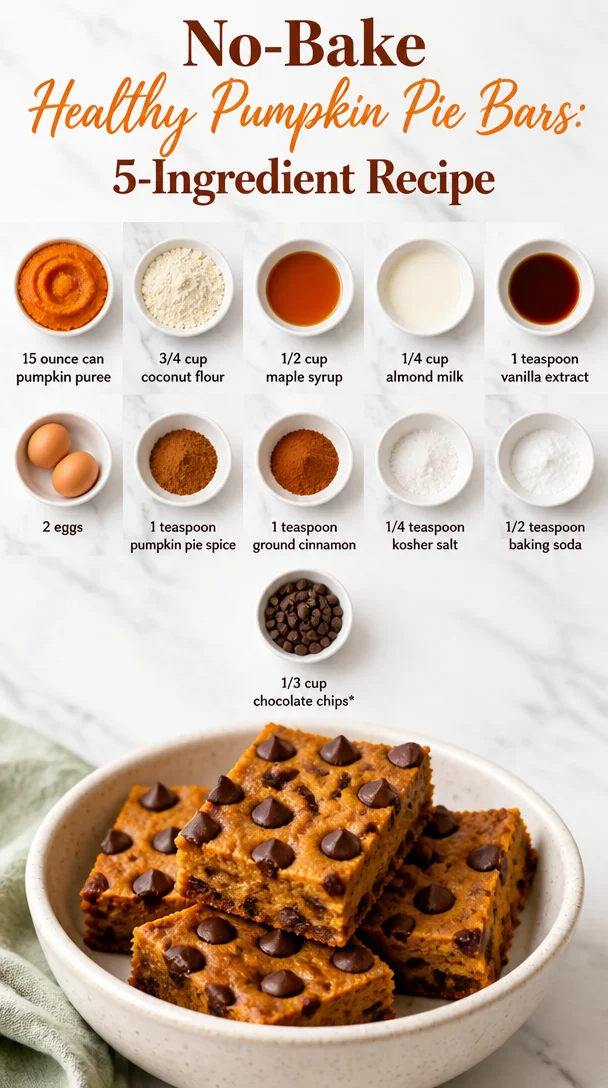
15-ounce can of pumpkin puree: The star of the show! This keeps our bars moist and packed with flavor. You can substitute with homemade pumpkin puree if you have it on hand.
-
3/4 cup coconut flour: This gluten-free flour adds a lovely texture and nutty flavor. If you don’t have coconut flour, almond flour is a great stand-in, but you may need to adjust the liquid slightly.
-
1/2 cup maple syrup: A natural sweetener that brings out the pumpkin’s flavor. You could use honey or agave syrup if you prefer, but the taste will vary slightly.
-
1/4 cup almond milk: This keeps things creamy without weighing it down. Any milk—dairy or non-dairy—works just as well here.
-
1 teaspoon vanilla extract: Vanilla enhances sweetness and adds depth of flavor. Keep it real with pure vanilla extract for the best results.
-
2 eggs: They’ll bind everything together and give a lovely texture. If you’re vegan, you can use flax eggs as a substitute (1 tablespoon ground flaxseed mixed with 3 tablespoons water per egg).
-
1 teaspoon pumpkin pie spice: This fragrant mix of spices will make your kitchen smell heavenly. If you don’t have pumpkin pie spice, a mix of cinnamon, nutmeg, and ginger will do the trick.
-
1 teaspoon ground cinnamon: Because you can never have too much cinnamon, right?
-
1/4 teaspoon kosher salt: This will enhance all the flavors and balance the sweetness.
-
1/2 teaspoon baking soda: It helps our bars rise and become fluffy. Make sure it’s fresh for the best results.
-
1/3 cup chocolate chips: Adding these gives a delightful melty surprise in every bite! Use dark chocolate for a healthier option or leave them out completely if you prefer.
With this lineup, we’re ready to create some heavenly pumpkin pie bars that everyone is sure to love!
Step-by-Step Instructions
Now that we’ve got our ingredients ready, let’s get cooking! Follow these simple steps for your Healthy Pumpkin Pie Bars:
-
Preheat Your Oven: First things first, preheat your oven to 350°F (175°C). This ensures your bars cook evenly and bake to golden perfection.
-
Prepare Your Baking Dish: Grab an 8×8 inch baking pan (or similar size) and line it with parchment paper or grease it lightly with cooking spray. This will make lifting the bars out a breeze once they’re done!
-
Mix the Wet Ingredients: In a large mixing bowl, whisk together the pumpkin puree, maple syrup, almond milk, vanilla extract, and eggs until fully combined and smooth. This is where the magic starts—watch how those flavors meld together!
-
Incorporate the Dry Ingredients: In a separate bowl, mix the coconut flour, pumpkin pie spice, ground cinnamon, kosher salt, and baking soda. Making sure to break up any clumps! Gradually add the dry ingredients to the wet ingredients, folding them in gently. It should create a thick batter that has a lovely aroma wafting through the kitchen.
-
Add the Chocolate Chips: Don’t forget this crucial step! Gently fold in those chocolate chips, distributing them evenly throughout the batter for delightful chocolatey pockets in every bite.
-
Transfer to Baking Dish: Pour the batter into the prepared baking dish. Use a spatula to ensure it’s evenly spread out, reaching all corners.
-
Bake to Perfection: Pop the dish into your preheated oven and let the bars bake for about 30-35 minutes. Keep an eye on them! They’re ready when a toothpick inserted in the center comes out clean.
-
Cool & Slice: Once they’re baked, remove the bars from the oven and let them cool in the pan for about 10 minutes, then transfer to a wire rack to cool completely. This waiting game is the hardest part, I know! But trust me, it’s worth it.
-
Cut & Enjoy: Once totally cooled, slice into bars, serve, and enjoy the heartfelt flavors bursting in every bite!
Serving Suggestions
These Healthy Pumpkin Pie Bars are versatile and can be served in various fun ways. For that café-style touch, consider serving them warm with a dollop of whipped coconut cream on top—seriously, it’s like fall in your mouth! If you’re feeling extra fancy, sprinkle some chopped pecans or walnuts on top for added crunch and presentation.
Another nifty serving tip is to place the bars on a lovely platter and dust them with a little extra cinnamon for an aromatic touch. You could also drizzle a bit of extra maple syrup or your favorite nut butter over the top for an indulgent twist. Pair them with a warm chai latte or a cup of spiced tea for an extra cozy experience.
Recipe Variations
Feeling adventurous? Here are some fun variations you can try out with these Healthy Pumpkin Pie Bars:
-
Pumpkin Chocolate Chip Pecan Bars: Stir in some chopped pecans along with the chocolate chips for delightful texture and added nutty flavor.
-
Maple Glaze Drizzle: Whip up a simple glaze using powdered sugar and a bit of maple syrup to drizzle over the cooled bars for a sweet finishing touch.
-
Coconut-Pumpkin Fusion: If you love coconut, add some shredded unsweetened coconut to the batter for a tropical twist.
-
Spiced Pumpkin Bars: Amp up the spice! Add a dash of cardamom or ginger for an extra burst of warmth.
-
Nut-Free Option: Omit the almond milk and chocolate chips, and replace them with oat milk or another nut-free alternative to make it entirely nut-free.
Chef’s Notes
As you bake these bars, I can’t help but think of the many ways recipes evolve over time. Just like my grandmother did, I find myself playing with flavors, substituting ingredients based on what I have, and making these recipes my own. When I first started making pumpkin bars, they were a decadent, sugar-laden dessert. But as I learned more about the health benefits of alternative ingredients, I realized you can still enjoy delicious treats without sacrificing your health goals. That’s the beauty of cooking—it’s all about making it your own and sharing what you love with others!
FAQs and Troubleshooting
1. Can I use fresh pumpkin instead of canned?
Absolutely! Just make sure to bake the pumpkin until tender and then puree it until smooth. Fresh pumpkin can give a wonderful, vibrant flavor.
2. My bars are too crumbly! What went wrong?
If your bars are crumbly, it could be due to too much coconut flour. Flour can vary in moisture absorption, so if yours is too dry, try adding a tablespoon more of almond milk.
3. Can I freeze these pumpkin bars?
Yes, indeed! Once cooled, cut them into bars and store them in an airtight container in the freezer. They can be enjoyed later—simply thaw them out at room temperature.
4. How do I know when they are done baking?
The best way to check is using a toothpick! Insert it in the center, and when it comes out clean, your bars are ready to enjoy!
Nutritional Info
Each serving of these Healthy Pumpkin Pie Bars provides a wholesome dose of nutrients. Thanks to the pumpkin, you’ll get a boost of vitamin A, fiber, and antioxidants. The coconut flour contributes healthy fats and protein, while the maple syrup adds a touch of natural sweetness without overwhelming your system with refined sugars. Depending on your specific ingredient choices, each bar can range from approximately 150-200 calories, making them a guilt-free treat or snack option you can feel great about enjoying!
Final Thoughts
There you have it, friends! A delightful journey from ingredients to the delicious Healthy Pumpkin Pie Bars that will make your taste buds celebrate. I hope this simple, straightforward recipe inspires you to create your own memories in the kitchen—just like I did with my grandmother. Whether you’re baking for yourself, your family, or even for a festive gathering, these bars are a sure way to bring smiles and warm nostalgia to the table.
Remember, cooking doesn’t have to be complicated. It’s about bringing people together and enjoying every flavorful moment. So, grab your ingredients, turn up some cozy tunes, and let’s bake up some love! Happy cooking, and until next time, keep spreading the joy of food! 🍴❤️
Print
Healthy Pumpkin Pie Bars
- Total Time: 50 minutes
- Yield: 9 servings 1x
- Diet: Vegetarian
Description
Deliciously healthy pumpkin pie bars packed with warm spices and wholesome ingredients, perfect for any occasion.
Ingredients
- 15-ounce can of pumpkin puree
- 3/4 cup coconut flour
- 1/2 cup maple syrup
- 1/4 cup almond milk
- 1 teaspoon vanilla extract
- 2 eggs
- 1 teaspoon pumpkin pie spice
- 1 teaspoon ground cinnamon
- 1/4 teaspoon kosher salt
- 1/2 teaspoon baking soda
- 1/3 cup chocolate chips
Instructions
- Preheat your oven to 350°F (175°C).
- Prepare your baking dish by lining it with parchment paper or greasing it lightly.
- Mix the wet ingredients in a large bowl until fully combined and smooth.
- Incorporate the dry ingredients in a separate bowl, and gradually add them to the wet ingredients.
- Add the chocolate chips to the batter.
- Transfer the batter to the prepared baking dish.
- Bake for about 30-35 minutes or until a toothpick comes out clean.
- Cool the bars for about 10 minutes in the pan, then transfer to a wire rack.
- Cut into bars and enjoy!
Notes
Serve warm with whipped coconut cream or a drizzle of maple syrup.
- Prep Time: 15 minutes
- Cook Time: 35 minutes
- Category: Dessert
- Method: Baking
- Cuisine: American
Nutrition
- Serving Size: 1 bar
- Calories: 175
- Sugar: 10g
- Sodium: 200mg
- Fat: 7g
- Saturated Fat: 3g
- Unsaturated Fat: 4g
- Trans Fat: 0g
- Carbohydrates: 23g
- Fiber: 3g
- Protein: 3g
- Cholesterol: 50mg
Keywords: pumpkin bars, healthy dessert, fall recipes, pumpkin pie, gluten-free
No-Bake Pumpkin Cheesecake Truffles: Creamy Autumn Bites
Indulge in the Sweetness: Pumpkin Cheesecake Truffles
Hey there, food lovers! Today, we’re diving into a treat that’s not only flavorful but also whispers cozy vibes with every bite. We’re talking about Pumpkin Cheesecake Truffles! These little bites of heaven combine the creaminess of cheesecake with the warm spices and flavors of fall, making for a delightful dessert that’s perfect year-round but especially enchanting during the cooler months.
But let’s be real—it’s not just about the incredible taste; it’s about the joy of creating memorable moments in the kitchen. So grab your apron, and let’s embark on this delicious journey together!
A Slice of Nostalgia
Let me take you back to a crisp autumn afternoon in my childhood kitchen. The leaves were turning, and the air smelled like cinnamon and nutmeg—a total sensory delight! My grandmother was up to her usual antics, and I remember her bustling around the kitchen with a mischievous twinkle in her eye. That day, we decided to whip up something special, and what better than an experiment with pumpkin?
We had a can of pumpkin puree sitting innocently in the pantry, so we decided to make a cheesecake. But halfway through mixing the ingredients, Grandma got this imaginative spark—why not turn it into bite-sized truffles? As we rolled those creamy bites in graham cracker crumbs, I felt like a little chef, filled with joy and laughter. The end result was a delicious mess of flavors that united our family around the dessert table.
Fast forward a few years, and that very memory sparked the inspiration for my Pumpkin Cheesecake Truffles recipe! Each time I whip up this treat, it’s as if I’m back in that warm kitchen, surrounded by love and laughter. Now, let’s create that magic together!
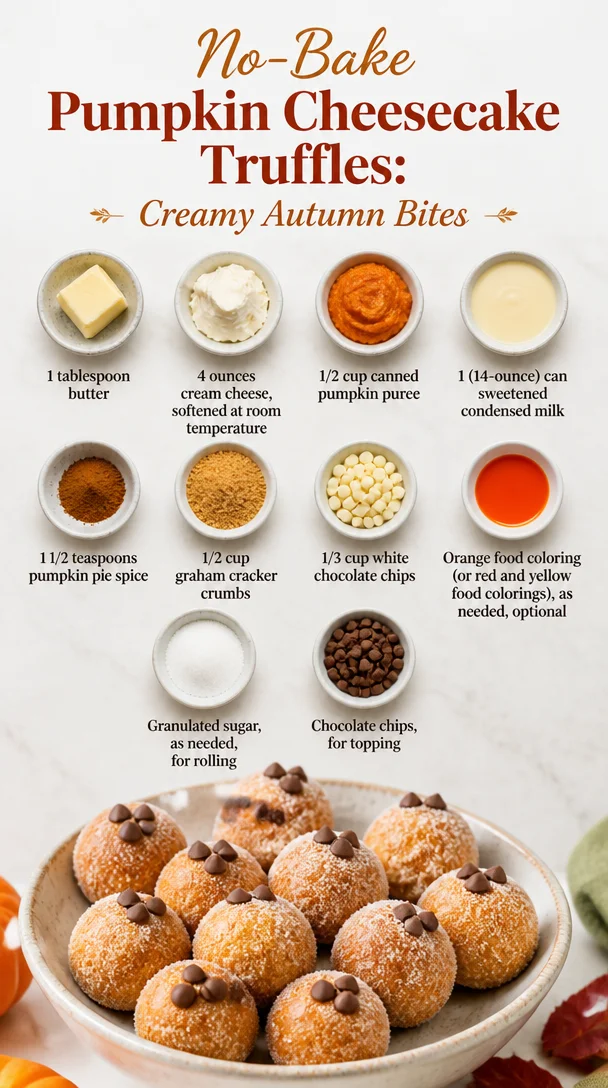
Ingredients
Here’s what you’ll need to conjure these delectable truffles:
-
1 tablespoon butter
A little butter brings richness to the truffles. If you need to swap, coconut oil works well for a dairy-free option! -
4 ounces cream cheese, softened at room temperature
Cream cheese lends that signature cheesecake creaminess. For a lighter option, consider using Greek yogurt (though it slightly alters that rich texture). -
1/2 cup canned pumpkin puree
Pure pumpkin puree is essential for this recipe, bringing in that cozy flavor. Avoid pumpkin pie filling—it’s too sweet and spiced! -
1 (14-ounce) can sweetened condensed milk
Sweetened condensed milk adds sweetness and a creamy texture. If you want a lighter version, use evaporated milk with a touch of sugar. -
1 1/2 teaspoons pumpkin pie spice
This spice blend is key! If you’re feeling adventurous, try making your own mix using cinnamon, nutmeg, ginger, and allspice. -
1/2 cup graham cracker crumbs
These give our truffles that cheesecake crust taste. For a gluten-free version, use gluten-free graham crackers or crushed nuts. -
1/3 cup white chocolate chips
Sweet and creamy, these will be melted into the mixture. No white chocolate? You can swap in semi-sweet chocolate! -
Orange food coloring (or red and yellow food colorings), as needed, optional
If you want your truffles to pop with color, feel free to add a few drops! -
Granulated sugar, as needed, for rolling
This adds a lovely touch of sweetness to the truffles when you roll them. You can skip this if you like them as-is! -
Chocolate chips, for topping
These finish off your truffles beautifully. Dark chocolate works great if you want that rich contrast!
Step-by-Step Instructions
Ready to roll those truffles? Let’s get cooking, my friend!
-
Prepare Your Mixing Bowl
Start by grabbing a medium-sized mixing bowl. This is where the magic happens! You’ll want to ensure your cream cheese is softened, as it mixes better this way. Let it sit at room temperature for about 30 minutes if you forgot to pull it out. -
Cream the Cream Cheese and Butter
Add the softened cream cheese and 1 tablespoon of butter to your mixing bowl. Use a hand mixer or a spatula to blend them together until the mixture is silky smooth. This is key for a luscious truffle! If you’re using a spatula, just put your back into it—it’ll pay off! -
Incorporate the Pumpkin
Next, stir in the 1/2 cup of canned pumpkin puree. Mix until well combined. The orange color will brighten your mixture! Take a moment to inhale that warm, comforting aroma. It’s pure bliss, isn’t it? -
Sweeten the Deal
Pour in the entire can of sweetened condensed milk. Trust me, this gives your truffles their dreamy texture. Mix until fully combined. You might need to scrape the sides of your bowl for anything that sticks. -
Spice It Up!
Add in your 1 1/2 teaspoons of pumpkin pie spice. If you’re feeling adventurous, throw in an extra pinch for good measure! Blend it well. You want to ensure that every bite brings that warm, cozy flavor. -
Fold in the Graham Cracker Crumbs
Now it’s time to fold in the graham cracker crumbs and the white chocolate chips. This is where your truffle mixture begins to take shape! Use a spatula to gently combine until everything is evenly distributed. Here’s a little chef tip: If the mixture is too soft, pop it into the fridge for about 15-20 minutes to firm up a bit before rolling. -
Roll Those Truffles
Once your mixture is at the right consistency, it’s time to roll! Take a tablespoon of the mixture and roll it into a ball. Aim for about 1 inch in diameter—just the right size for popping in your mouth! Repeat until the mixture is gone, placing each ball on a parchment-lined baking sheet. -
Chill Out
Now that your truffles are rolled, pop them into the fridge for at least an hour to set. This helps them maintain their shape and enhances the flavors. -
Finish and Decorate
Once your truffles are firm, it’s decoration time! If you’re using granulated sugar, roll them in a bowl of sugar until coated. Melt some chocolate chips in the microwave or on a double boiler, then drizzle or dip the truffles in the chocolate. Who can resist that brilliant finish? -
Serve and Enjoy!
Finally, plate your beautiful truffles and watch the magic happen as friends and family devour these little bites of heaven. Just remember to keep a few for yourself!
Serving Suggestions
When it comes to serving these Pumpkin Cheesecake Truffles, let your creativity shine! Arrange them on a beautiful platter with a dusting of powdered sugar or even a few sprigs of mint for an elegant touch. You could also nestle them in cupcake liners for a charming presentation.
For a fun twist, serve them alongside a warm cup of spiced chai or hot cider. The cozy flavors will complement each other perfectly, making for a delightful dessert experience.
Recipe Variations
Feeling inspired and want to try something different? Check out these creative twists:
-
Nutty Pumpkin Spice Truffles: Add finely chopped pecans or walnuts into the mixture for a delightful crunch!
-
Pumpkin Spice Latte Truffles: Infuse the truffle mixture with a shot of espresso. This twist adds depth and an extra layer of flavor that coffee lovers will adore.
-
Dairy-Free Option: Substitute the cream cheese for a dairy-free cream cheese alternative and use coconut milk sweetened condensed milk.
-
Different Chocolate Coating: Instead of white chocolate, dip your truffles in milk chocolate or even dark chocolate for a richer flavor experience.
-
Pumpkin Walnut Truffles: Mix in crushed graham crackers with pumpkin seeds, or even a hint of caramel, for a nutty delight!
Chef’s Notes
Oh, the times I’ve tried different variations of these truffles! I once went overboard with flavoring—let’s just say that a little too much nutmeg turned out to be an interesting learning experience! Over the years, I’ve perfected the balance of spices and sweetness, but I genuinely always encourage you to experiment. Every kitchen adventure creates a unique story, and you never know when you might stumble upon your next family favorite.
FAQs and Troubleshooting
1. My truffles are too sticky; what can I do?
If your mixture is too soft and sticky, popping them in the fridge for a bit helps firm it up. You can also lightly dust your hands with powdered sugar or cocoa powder when rolling.
2. Can I freeze these truffles?
Absolutely! They freeze beautifully. Just ensure they’re in an airtight container. Let them thaw in the fridge overnight before serving.
3. How long do these truffles last?
If stored in an airtight container in the fridge, they will last up to a week. But trust me; they’ll disappear way before that!
4. The chocolate coating won’t stick; what went wrong?
Oh no! Ensure your truffles are chilled before dipping; warm truffles can cause the chocolate to slide right off.
Nutritional Info
While these truffles are a decadent treat, they do bring some nutrition to the table! Packed with healthy doses of protein from the cream cheese and fiber from the pumpkin puree, each bite is a little powerhouse. Here’s a quick look at the nutritional breakdown per truffle (based on about 16 servings):
- Calories: Approximately 120
- Protein: 2g
- Carbohydrates: 12g
- Fat: 7g
- Fiber: 1g
- Sugars: 8g
Please remember that indulging is all about balance. These truffles are meant to be enjoyed as a sweet treat!
Final Thoughts
So there you have it—the delightful world of Pumpkin Cheesecake Truffles. I hope this recipe brings you as much joy as it has brought into my life. Every time I make these truffles, I’m reminded of the laughter, warmth, and love in the kitchen.
As always, don’t hesitate to get creative and make this recipe your own. Happy cooking and even happier munching—can’t wait to see you roll those truffles! Share your creations with your loved ones, and let’s keep spreading those good vibes, one delicious bite at a time. Cheers to sweet moments in the kitchen! 🍂💛
Print
Pumpkin Cheesecake Truffles
- Total Time: 90 minutes
- Yield: 16 servings 1x
- Diet: Vegetarian
Description
Delight in the creamy, spiced flavors of Pumpkin Cheesecake Truffles, perfect for cozy gatherings or year-round indulgence.
Ingredients
- 1 tablespoon butter
- 4 ounces cream cheese, softened at room temperature
- 1/2 cup canned pumpkin puree
- 1 (14-ounce) can sweetened condensed milk
- 1 1/2 teaspoons pumpkin pie spice
- 1/2 cup graham cracker crumbs
- 1/3 cup white chocolate chips
- Orange food coloring, as needed (optional)
- Granulated sugar, as needed for rolling
- Chocolate chips, for topping
Instructions
- Prepare your mixing bowl by ensuring your cream cheese is softened.
- Cream the cream cheese and butter together until silky smooth.
- Incorporate the pumpkin puree and mix until well combined.
- Pour in the sweetened condensed milk and mix until fully combined.
- Add the pumpkin pie spice and blend well.
- Fold in the graham cracker crumbs and white chocolate chips.
- Roll the mixture into 1-inch balls and place on a parchment-lined baking sheet.
- Chill the truffles in the fridge for at least an hour to set.
- Finish by rolling chilled truffles in granulated sugar and drizzling with melted chocolate chips.
- Serve and enjoy your delicious truffles!
Notes
For added flavor, consider variations like nutty pumpkin spice truffles or pumpkin spice latte truffles.
- Prep Time: 30 minutes
- Cook Time: 0 minutes
- Category: Dessert
- Method: Chilling
- Cuisine: American
Nutrition
- Serving Size: 1 truffle
- Calories: 120
- Sugar: 8g
- Sodium: 40mg
- Fat: 7g
- Saturated Fat: 4g
- Unsaturated Fat: 3g
- Trans Fat: 0g
- Carbohydrates: 12g
- Fiber: 1g
- Protein: 2g
- Cholesterol: 20mg
Keywords: pumpkin, cheesecake, truffles, fall dessert, easy dessert, no-bake dessert
Mini Apple Pies
Mini Apple Pies: A Delightful Bite of Nostalgia
Hey there, food enthusiasts! Welcome back to the cozy corner of the internet that is Feastical. Today, we’re diving into a recipe that is not only delicious but also crammed with memories: Mini Apple Pies! If you’ve ever found yourself lost in the warm scent of baked apples, butter, and spices, you know the magic that fills the air when these little pies are in the oven. Grab your favorite apron, and let’s get cooking!
A Nostalgic Dive into Apple Pie Heaven
When I think about apple pie, I’m instantly transported back to my grandmother’s kitchen. She always had a way of filling the house with the most incredible aromas, her laughter ringing through as we helped her prepare our favorite desserts. The best part? Those mini apple pies she used to make! Perfectly portioned and bursting with juicy apples, they were the highlight of every family gathering. I can still picture her, flour dusting the front of her apron, expertly rolling out the pastry to create those delightful mini crusts.
Every time we’d pull them out of the oven, the excitement was palpable. We’d gather around the table, waiting impatiently for them to cool, while the sweet smell of cinnamon and nutmeg danced around us like an inviting embrace. It’s these memories that inspire me to share this recipe with you. So, whether you need a cozy dessert for a gathering or a comforting snack, mini apple pies are the way to go!
Ingredients
Here’s what you’ll need to whip up these delectable mini apple pies:
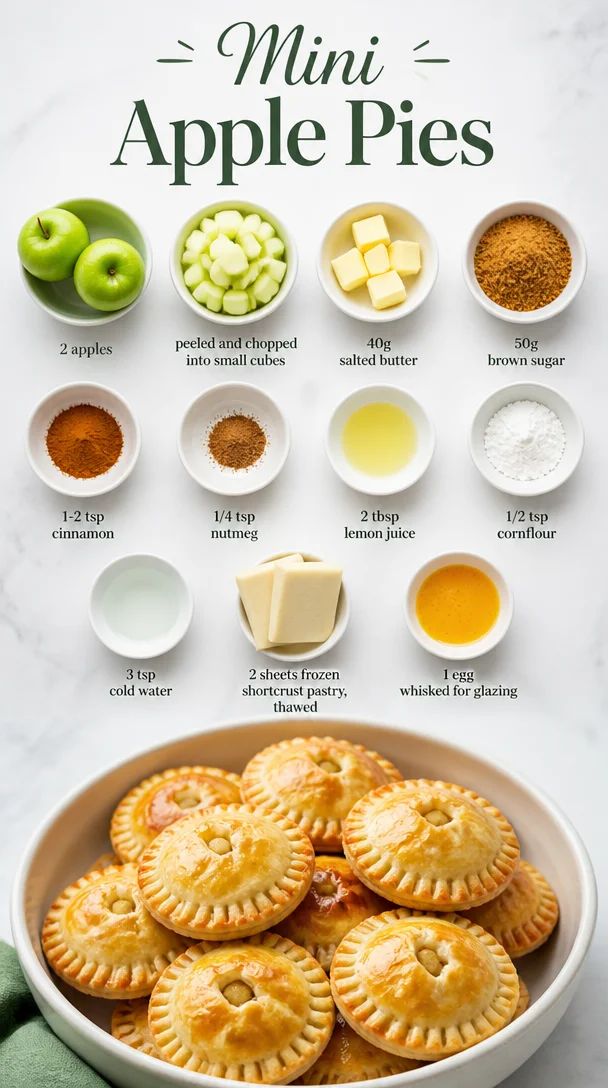
-
2 apples, peeled and chopped into small cubes
Use a crisp apple like Granny Smith or Honeycrisp for the perfect texture and flavor. If you find yourself without fresh apples, feel free to use canned pie filling! -
40g salted butter
Butter makes everything better! You can substitute with unsalted butter; just add a pinch of salt for balance. -
50g brown sugar
This adds that deep, rich flavor. If you want a lighter touch, granulated sugar works perfectly too. -
1-2 tsp cinnamon
What’s an apple pie without cinnamon? Feel free to season to your taste—more cinnamon makes it cozier! -
1/4 tsp nutmeg
Nutmeg adds a unique warmth. If you’re not a fan, simply omit it, but I highly recommend trying it! -
2 tbsp lemon juice
This brightens the filling and keeps the apples from browning. Don’t worry; the tang of lemon balances the sweetness beautifully! -
1/2 tsp cornflour
Cornflour thickens the filling, so it’s not too runny. If you don’t have it, try all-purpose flour as a substitute. -
3 tsp cold water
Cold water helps in the mixing process. It’s not much, but it makes a world of difference! -
2 sheets frozen shortcrust pastry, thawed
You can make your own pastry if you’re feeling adventurous, but ready-made works perfectly (and saves time!). -
1 egg, whisked for glazing
This gives the pies a beautiful golden color. If you prefer a vegan option, a little almond milk brushed on top will do just fine!
Step-by-Step Instructions
Now let’s get into the fun part—baking these beauties! Follow these steps closely to make sure your mini apple pies turn out perfectly golden and delicious.
-
Preheat the Oven
Preheat your oven to 180°C (350°F). A hot oven is crucial for getting that lovely flaky crust! -
Prepare the Apples
In a medium saucepan, melt your 40g of salted butter over medium heat. Once melted, toss in the peeled and chopped apples. Add the 50g of brown sugar, cinnamon, nutmeg, and lemon juice. Stir everything together until each apple piece is well coated. Allow it to cook for about 5-7 minutes until the apples are slightly tender. -
Thicken the Filling
In a small bowl, combine the cornflour and cold water. Mix until smooth and then stir it into the apple mixture. This helps to hold everything together! Cook for another minute until the filling starts to thicken, then remove it from the heat and allow it to cool slightly. -
Roll Out the Pastry
On a lightly floured surface, roll out the thawed shortcrust pastry. Make sure it’s about 3mm thick. Using a round cutter, cut out circles large enough to fit into the muffin tray you’re using. -
Assemble the Mini Pies
Grease your muffin tray, and gently press the pastry circles into the bottom of each muffin cup, creating small bowls. Spoon the cooled apple filling into each pastry shell, filling them about 3/4 full. -
Create Top Crusts
Using the remaining pastry, cut out smaller circles to top your pies. Alternatively, you can create a lattice top for a fancy touch! Gently place it over the filling. Seal the edges by crimping them with a fork then brush the top with the whisked egg for that beautiful golden finish. -
Bake Time!
Pop the muffin tray into your preheated oven and bake for 18-20 minutes or until the crust is golden brown and the filling is bubbly. Keep an eye on them! -
Cooling Down
Once baked, allow the mini pies to cool in the tray for about 5 minutes before transferring them to a wire rack. Patience is key here; let them cool to avoid burning your tongue in that first piping-hot bite!
Serving Suggestions
When it comes to serving these delightful mini apple pies, presentation matters! You can place them on a rustic wooden cutting board or a pretty white platter. Dust a little powdered sugar on top for added flair, or serve them warm with a scoop of vanilla ice cream melting over the top. Drizzle with a little caramel sauce, and watch the eyes of your guests light up! Pair with a cup of warm tea or coffee for that extra cozy feeling.
Recipe Variations
Want to switch things up a bit? Here are a few creative twists:
- Caramel Apple Mini Pies: Stir in some caramel bits along with the apple filling for a decadent twist.
- Spiced Pear & Apple Pies: Substitute one of the apples for ripe pears; they add a sweet, juicy twist to the filling.
- Nutty Crunch: Add some chopped walnuts or pecans into the apple mixture for an added crunch.
- Berry Boost: Mix in a handful of fresh or frozen berries like blueberries or raspberries for a colorful fruity blend.
- Cinnamon Roll Mini Pies: Swirl in some cinnamon sugar into the apple filling for a gooey, dessert-like experience.
Chef’s Notes
This recipe is deeply rooted in warmth and nostalgia for me, and I love how it brings family together. Over the years, I’ve played around with different fillings and crusts, even attempting savory versions with cheese! (Trust me, it’s a game-changer!) My grandmother’s magic was always in the simplicity, so I like to keep it uncomplicated and let the natural flavors shine through. Every time I bake these mini pies, I feel like I’m sharing a piece of my childhood with you!
FAQs and Troubleshooting
-
My crust is too thick; how can I fix it?
If you find that your crust is too thick, simply roll it out more thinly next time or ensure you’re using the correct size cutter to fit your muffin tray. -
The filling is runny. What happened?
If your filling is too runny, it could be because the apples released too much juice. Just be sure to thicken with cornflour and let it cool enough before filling the pies. -
How can I prevent my pie crust from puffing up?
You can prick the bottom of the pastry with a fork to prevent it from puffing up during baking, allowing steam to escape. -
Can I make these ahead of time?
Absolutely! You can prepare the filling and pastry a day in advance, just store them in the fridge. Assemble and bake when you’re ready to serve!
Nutritional Info
Mini apple pies are a comforting treat, and while they’re best enjoyed in moderation, here’s a quick look at what each pie might contain (based on a recipe serving 8 pies):
- Calories: Approximately 160-180 per pie
- Carbohydrates: 25g
- Fat: 8g
- Protein: 2g
- Fiber: 1g
Remember that adding ice cream or additional toppings will increase these values.
Final Thoughts
There you have it—a scrumptious recipe for Mini Apple Pies that will not only fill your kitchen with delightful aromas but also your hearts with warmth and nostalgia. Baking is more than just preparing food; it’s about creating moments and memories with those we cherish. So gather your loved ones around the table, share these mini pies, and relish the sweet connections they bring.
Happy baking, friends! Until next time, stay deliciously curious! 🍏🥧
Print
Mini Apple Pies
- Total Time: 40 minutes
- Yield: 8 servings 1x
- Diet: Vegetarian
Description
Delightful mini apple pies bursting with juicy apples and warm spices, perfect for gatherings or as a comforting snack.
Ingredients
- 2 apples, peeled and chopped into small cubes
- 40g salted butter
- 50g brown sugar
- 1–2 tsp cinnamon
- 1/4 tsp nutmeg
- 2 tbsp lemon juice
- 1/2 tsp cornflour
- 3 tsp cold water
- 2 sheets frozen shortcrust pastry, thawed
- 1 egg, whisked for glazing
Instructions
- Preheat your oven to 180°C (350°F).
- In a medium saucepan, melt your 40g of salted butter over medium heat.
- Add in the peeled and chopped apples along with the brown sugar, cinnamon, nutmeg, and lemon juice.
- Stir everything together until well coated and cook for about 5-7 minutes.
- In a small bowl, combine the cornflour and cold water, then mix until smooth.
- Stir the cornflour mixture into the apple mixture and cook for another minute.
- On a lightly floured surface, roll out the thawed shortcrust pastry to about 3mm thick.
- Using a round cutter, cut out circles large enough to fit into your muffin tray.
- Grease your muffin tray, and press the pastry circles into the bottom of each muffin cup.
- Spoon the cooled apple filling into each pastry shell, filling them about 3/4 full.
- Using the remaining pastry, cut out smaller circles for the tops or create lattice tops.
- Seal the edges by crimping them with a fork and brush with the whisked egg.
- Pop the muffin tray into your preheated oven and bake for 18-20 minutes.
- Once baked, allow them to cool for about 5 minutes before transferring to a wire rack.
Notes
For variations, you can add caramel bits, nuts, or mix in berries to the filling!
- Prep Time: 20 minutes
- Cook Time: 20 minutes
- Category: Dessert
- Method: Baking
- Cuisine: American
Nutrition
- Serving Size: 1 pie
- Calories: 170
- Sugar: 10g
- Sodium: 200mg
- Fat: 8g
- Saturated Fat: 3g
- Unsaturated Fat: 5g
- Trans Fat: 0g
- Carbohydrates: 25g
- Fiber: 2g
- Protein: 2g
- Cholesterol: 50mg
Keywords: mini apple pies, apple dessert, nostalgic recipes

Apple Bars
Apple Bars: A Slice of Nostalgia and Comfort
Hey there, food lovers! Today, I’m excited to share one of my all-time favorite recipes: homemade apple bars! There’s something about the sweet and tart aroma of baked apples mingling with warm spices that can instantly transport you to cozy moments in the kitchen. So, grab your apron and let’s whip up a batch of these delightful treats that not only taste good but also tell a beautiful story!
A Sweet Memory
One of my most cherished memories connected to apple bars goes all the way back to my childhood. Picture this: the smell of cinnamon drifting through my grandma’s kitchen as she prepared for our family gathering. I vividly remember sitting on the counter, swinging my legs, and eagerly waiting for my turn to help. Grandma would let me sprinkle the cinnamon and sugar over the apples, her wrinkled hands guiding me to cut just the right size. Those moments were pure magic—a blend of laughter, love, and, of course, lots of delicious bites.
Every time I bake these apple bars, I think of her loving smile and the simple joys of creating something special together. Now, it’s my turn to share that love, and I hope these apple bars bring you the same comfort they brought me.
Ingredients
Let’s gather our ingredients! Here’s what you’ll need to create these scrumptious apple bars, along with some chef insights to level up your baking game:
-
2 cups all-purpose flour
Perfect for structure! You can swap it with whole wheat flour for a nuttier flavor or gluten-free flour if you’re avoiding gluten. -
1 1/2 cups old-fashioned oats
These add a nice chewy texture. If you’re in a pinch, quick oats can be used, but they won’t give you the same hearty consistency. -
1/2 cup granulated sugar
Just enough to sweeten the deal! Feel free to reduce it or substitute with coconut sugar for a lower-glycemic option. -
3/4 cup brown sugar
Bringing in that rich molasses flavor! Light or dark brown sugar will work—dark brown will give a more robust taste. -
1 cup unsalted butter, cold and cubed
Cold butter is a must for a flaky crust. If you’re short on butter, you can use unsweetened applesauce as a healthier substitute (though the texture may vary). -
1/2 teaspoon salt
Balances the sweetness! If you plan to use salted butter, you can skip this. -
1 1/2 teaspoons ground cinnamon
The star of the show! This seasoning really flatters the apples. Add a pinch more if you really want that cozy flavor! -
1/4 teaspoon nutmeg (optional)
A little goes a long way! Nutmeg adds complexity; however, it’s not for everyone, so feel free to omit it. -
3 cups apples, peeled and chopped
Granny Smith or Honeycrisp are my faves for their perfect tart balance. You can mix and match your favorite varieties! -
1 tablespoon lemon juice
This helps keep the apples from browning—plus, it adds a fresh zing! -
1 tablespoon cornstarch
To thicken the apple filling. You can substitute with arrowroot powder for a grain-free option. -
1 teaspoon vanilla extract
A splash of vanilla enhances all the flavors beautifully! -
1/2 cup powdered sugar
For a simple glaze that adds a sweet finish. -
1–2 tablespoons milk (for glaze)
Adjust based on your desired consistency. Any milk will do, whether it’s dairy or plant-based!
Step-by-Step Instructions
Now that we have our ingredients, let’s get cooking! Follow these steps, and I promise you’ll have a delightful dessert on your hands.
-
Preheat the Oven
Preheat your oven to 350°F (175°C). Preheating ensures even baking—nobody likes a doughy center! -
Make the Crust
In a large mixing bowl, combine the flour, oats, granulated sugar, brown sugar, salt, cinnamon, and nutmeg. Mix until well incorporated. Add in the cold, cubed butter. Use a pastry cutter or your fingers to work the butter into the dry ingredients until the mixture resembles coarse crumbs. This step is crucial for achieving that flaky texture! -
Press the Crust
Reserve about 1 1/2 cups of the mixture for the topping. Press the remaining mixture into the bottom of a greased 9×13-inch baking dish, making sure it’s evenly spread. Bake the crust for about 10-12 minutes until it’s lightly golden. This pre-baking step ensures a solid base, so it doesn’t get soggy later! -
Prepare the Apple Filling
In a large bowl, combine the chopped apples, lemon juice, cornstarch, and vanilla extract. If you’re feeling adventurous, toss in a tablespoon of brown sugar for extra sweetness. Mix everything well so the delicious flavors meld together. -
Assemble the Bars
Once your crust has finished baking, remove it from the oven and spread the apple mixture evenly over the crust. Then, crumble the reserved crust mixture over the top of the apples. Don’t worry about it being perfect—rustic looks are totally in! -
Bake Until Golden
Return the baking dish to the oven and bake for an additional 25-30 minutes, or until the topping is golden and the apples are bubbly. The smell coming from the oven? Pure bliss! -
Cool and Glaze
Allow the apple bars to cool in the pan for about 15 minutes. While they cool, mix the powdered sugar and milk together to create a glaze. Drizzle this heavenly concoction over the top of the cooled bars. -
Slice and Serve
Cut into squares (or bars, if you’re feeling fancy) and serve warm or at room temperature. A scoop of vanilla ice cream on top takes it to the next level!
Serving Suggestions
When it comes to serving these apple bars, there are endless possibilities! You can plate them with a simple dusting of powdered sugar for an elegant touch, or make it a fun dessert night by serving them warm with a scoop of vanilla ice cream or a dollop of whipped cream. A sprinkle of additional cinnamon on top adds a lovely finishing touch! If you want to take it a step further, add a side of caramel sauce for drizzling. Talk about a party in your mouth!
Recipe Variations
Why not shake things up a bit? Here are some creative twists you can try with your apple bars:
-
Cranberry Apple Bars
Mix dried cranberries with the apples for a tart contrast and a pop of color! -
Nutty Apple Bars
Add chopped walnuts or pecans to the apple filling for a delightful crunch. -
Spiced Apple Bars
Experiment with spices! Try adding ginger or even a hint of allspice for a unique flavor profile. -
Gluten-Free Apple Bars
Substitute the all-purpose flour with a gluten-free blend, and use rolled oats labeled gluten-free. -
Maple Glaze
Instead of the powdered sugar glaze, drizzle with maple syrup for a deliciously sweet and healthier option!
Chef’s Notes
Over the years, this apple bar recipe has become a beloved staple in my home. I’ve laughed, cried, and celebrated many occasions with this dessert. The beauty of this recipe is its simplicity—the base and filling can evolve based on what’s in your pantry or what you’re craving. Always remember to taste as you go; food is about personal preference!
Oh, and a funny kitchen story: I once got so excited while baking these that I accidentally added a cup of salt instead of sugar! Let’s just say, a family picnic turned into an impromptu salt lick contest. Lesson learned: always double-check your ingredients, folks!
FAQs and Troubleshooting
1. Why are my apple bars too soggy?
If you find that your apple bars are soggy, it might be that the apples released too much moisture. Ensure you’re using a thickener like cornstarch and try to drain any excess liquid before assembling.
2. Can I use frozen apples?
Absolutely! Just make sure to thaw and drain them well before adding them to the mixture. Frozen apples release more liquid, so you might need a bit more cornstarch.
3. How do I store leftovers?
Store leftover apple bars in an airtight container at room temperature for up to three days, or refrigerate for up to a week. They also freeze well if you want to save some for later!
4. My crust is too crumbly. What did I do wrong?
If your crust is too crumbly, you may have not added enough butter or used too much flour. Make sure to measure accurately and consider adding a tiny splash of cold water to bring it together.
Nutritional Info
While I love indulging in delicious treats, I know we all care about balance too! Here’s a rough breakdown of the nutritional information per serving (based on a recipe yielding 12 squares):
- Calories: 240
- Total Fat: 12g
- Saturated Fat: 7g
- Carbohydrates: 34g
- Fiber: 2g
- Sugars: 12g
- Protein: 3g
Keep in mind that variations and serving sizes can affect these numbers!
Final Thoughts
There we have it—apple bars that not only taste divine but are steeped in warmth and nostalgia! Whether you’re baking for a special occasion, a family gathering, or just because it’s Tuesday, these bars are sure to impress. Remember, cooking is all about joy and creativity, so feel free to make this recipe your own.
Bring your loved ones into the kitchen, share some laughs, and let the aromas fill your home. Happy baking, my friends, and may each bite remind you of the beautiful memories that food can create!
So, are you ready to experience that warm hug from your oven? Let’s dig in!
Print
Homemade Apple Bars
- Total Time: 60 minutes
- Yield: 12 servings 1x
- Diet: Vegetarian
Description
Delicious homemade apple bars filled with sweet and tart apples and warm spices, perfect for cozy moments in the kitchen.
Ingredients
- 2 cups all-purpose flour
- 1 1/2 cups old-fashioned oats
- 1/2 cup granulated sugar
- 3/4 cup brown sugar
- 1 cup unsalted butter, cold and cubed
- 1/2 teaspoon salt
- 1 1/2 teaspoons ground cinnamon
- 1/4 teaspoon nutmeg (optional)
- 3 cups apples, peeled and chopped
- 1 tablespoon lemon juice
- 1 tablespoon cornstarch
- 1 teaspoon vanilla extract
- 1/2 cup powdered sugar
- 1–2 tablespoons milk (for glaze)
Instructions
- Preheat your oven to 350°F (175°C).
- In a large mixing bowl, combine the flour, oats, granulated sugar, brown sugar, salt, cinnamon, and nutmeg. Mix until well incorporated.
- Add in the cold, cubed butter. Use a pastry cutter or your fingers to work the butter into the dry ingredients until the mixture resembles coarse crumbs.
- Reserve about 1 1/2 cups of the mixture for the topping. Press the remaining mixture into the bottom of a greased 9×13-inch baking dish.
- Bake the crust for about 10-12 minutes until it’s lightly golden.
- In a large bowl, combine the chopped apples, lemon juice, cornstarch, and vanilla extract.
- Once your crust has finished baking, remove it from the oven and spread the apple mixture evenly over the crust.
- Return the baking dish to the oven and bake for an additional 25-30 minutes, or until the topping is golden and the apples are bubbly.
- Allow the apple bars to cool in the pan for about 15 minutes.
- Mix the powdered sugar and milk together to create a glaze and drizzle it over the top of the cooled bars.
- Cut into squares and serve warm or at room temperature.
Notes
Feel free to experiment with different varieties of apples or adjust spices to your liking.
- Prep Time: 20 minutes
- Cook Time: 40 minutes
- Category: Dessert
- Method: Baking
- Cuisine: American
Nutrition
- Serving Size: 1 square
- Calories: 240
- Sugar: 12g
- Sodium: 100mg
- Fat: 12g
- Saturated Fat: 7g
- Unsaturated Fat: 5g
- Trans Fat: 0g
- Carbohydrates: 34g
- Fiber: 2g
- Protein: 3g
- Cholesterol: 30mg
Keywords: apple bars, dessert, baking, American dessert, apple recipes

Simple Caramel Apple Pie Bombs
Simple Caramel Apple Pie Bombs: A Warm and Cozy Treat
Hey there, fellow foodies! If you’re in the mood for a delightful kitchen adventure, let me introduce you to a treat that’s not only fun to make but is also guaranteed to spark a big smile on your face — Caramel Apple Pie Bombs! These delectable bites are the lovechild of classic caramel apples and the nostalgia of apple pie, wrapped up in the flaky goodness of biscuit dough. Think crispy, gooey, and absolutely irresistible!
Growing up, fall was the time when everything apples reigned supreme. The orchards were bursting with crisp, juicy fruit just waiting to be picked. I remember racing my siblings through rows of trees, laughter ringing out as we fought for the biggest and juiciest apples. The spoils of our adventures would inevitably find their place in my mom’s kitchen, transforming into the most comforting apple pies and treats. And now, through the years, I’ve grown to appreciate putting a little twist on those traditional recipes.
These caramel apple pie bombs bring together the warmth of cinnamon-spiced apples, a generous drizzle of caramel, and the enchantment of flaky biscuit dough wrapped around it all. They’re ideal for sharing with family on a cozy autumn evening or serving at parties when you want to impress your friends with just how easy it is to create something delicious.
So, put on your favorite apron, preheat your oven, and let’s dive into the delightful world of these sweet treats. Get ready to experience that warm-hug-in-food-form feeling right in your kitchen!
Personal Story
Let me take you back to one of those most cherished autumn evenings. Picture this: the air was crisp outside, leaves danced in bold reds and yellows, and the scent of cinnamon wafted through our home as my mom busied herself in the kitchen. It was apple pie season, and we were all eagerly awaiting the magic that was about to happen.
One afternoon, I decided to step in and help (or, let’s be real, I was mostly there to snag a bite of whatever delicious things were coming my way). As Mom expertly peeled and sliced apples, she taught me the delicate balance of sweetness and spice — how a dash of cinnamon could transform the ordinary into the extraordinary.
Fast forward to my own kitchen filled with laughter and the chatter of friends. I found myself inspired by that memorable time. These Caramel Apple Pie Bombs are my little ode to those autumnal days spent with family. Each bite evokes that warm, cozy feeling, as if we are back in that kitchen, surrounded by love, laughter, and the delightful aroma of homemade treats.
Ingredients
Here’s a rundown of the key ingredients you’ll need to whip up these irresistible Caramel Apple Pie Bombs.
-
1 package of biscuit dough
This is the magic encasing our sweet filling! I often go for the flaky kind, but if you’re feeling adventurous, you can also try biscuit dough made from scratch! -
2 medium apples, peeled and diced
Granny Smith or Honeycrisp work wonders here! If you like a sweeter flavor, opt for Fuji apples. And if you’re looking for a lower-sugar option, consider using a tart apple like McIntosh. -
1/2 cup caramel sauce
Caramel makes everything better! You can use store-bought for convenience, but homemade will carry that special touch—because who doesn’t love fresh caramel drizzle? If you’re feeling bold, chocolate sauce could be a delicious substitute! -
1 teaspoon cinnamon
This spice adds depth and warmth to our filling. If you’re a fan of nutmeg or allspice, feel free to throw in a pinch for a unique twist on the standard recipe. -
1/4 cup sugar
Sugar enhances the apples’ sweetness and caramelizes beautifully during baking. If you prefer to reduce sugar, try using honey or maple syrup instead. -
Butter, for brushing
This step is all about achieving that golden-brown, flaky crust. Melted or softened butter works wonders here. -
Optional: whipped cream or vanilla ice cream for serving
You can’t go wrong with a dollop of whipped cream or a scoop of ice cream! They’ll add a sumptuous creaminess that perfectly balances the warm, gooey goodness of the bombs.
Step-by-Step Instructions
Alright my culinary adventurers, let’s dive into the details of making these Caramel Apple Pie Bombs! Follow along step by step, and I promise, you’ll have a delicious treat in no time.
Step 1: Preheat the Oven
First things first! Preheat your oven to 375°F (190°C). This is crucial to ensure your pie bombs cook evenly and come out golden and delicious. While you wait, grab your cookie sheet and line it with parchment paper to prevent any sticky mishaps.
Step 2: Prepare the Apples
As your oven heats up, let’s get those apples ready. Peel and dice the 2 medium apples. Aim for a uniform size to ensure even cooking. Toss them into a mixing bowl along with 1/4 cup sugar and 1 teaspoon cinnamon. Mix it up! The sugar helps draw out the natural juices from the apples, which makes for a flavorful filling.
Chef Hack: A squeeze of lemon juice will prevent your apple pieces from browning while you mix and prepare the rest of your ingredients.
Step 3: Get the Biscuit Dough Ready
Now, let’s turn our attention to the biscuit dough. Open your package and separate the biscuit rounds. You should have about 8 to 10 pieces of dough. Lightly flatten each round in your palm. We’re making little pockets for our delicious apple filling!
Step 4: Fill with Apple Mixture
Spoon a generous portion of the apple mixture into the center of each biscuit round. Don’t skimp out! These little goodies need to be full of flavor. Now, drizzle about a tablespoon of caramel sauce on top of the apple mixture. You might want to save a bit of caramel for drizzling later on top when you serve—trust me, it’s worth it!
Step 5: Seal Up Those Bombs
Now, for the fun part. Fold the edges of the biscuit dough over the filling to form a ball, ensuring it’s sealed tight. You can pinch them closed or roll them gently in your hands. This is what’ll create those delightful bursts of flavor when they bake!
Step 6: Brush and Bake
Place your filled biscuit balls onto the lined cookie sheet. Now, let’s make them shine! Brush the outside of each bomb with melted butter. This not only adds flavor but helps give that golden, crispy texture that we all crave.
Pop them into the preheated oven and bake for about 15-20 minutes or until they’re golden brown and look like little toasted treasures.
Chef Tip: Give your pie bombs some space on the baking sheet. They’ll puff up a bit, and we don’t want a sticky situation!
Step 7: Cool and Serve
Once they’re done, take them out of the oven and let them cool for a few minutes. Here’s where the smell becomes downright hypnotic! Serve these bombs warm, and don’t forget that optional drizzle of caramel sauce (or even chocolate—go wild!). Pair with whipped cream or a scoop of vanilla ice cream for a dessert that’s sure to impress.
Serving Suggestions
Serving these Caramel Apple Pie Bombs is all about the presentation, my friends! Consider plating them on a lovely platter or individual dessert plates for a more sophisticated touch.
Once baked, give each bomb a drizzle of warm caramel sauce and sprinkle with a dash of cinnamon for that delightful visual flair. If you’re feeling extra generous, you can also serve them with a dollop of whipped cream or a scoop of vanilla ice cream on the side.
Now, gather your friends and family around the table, and watch the smiles light up when they take their first bite! These sweet treasures are made for sharing.
Recipe Variations
Feeling adventurous? Here are a few fun twists on the classic Caramel Apple Pie Bombs:
-
Nutty Twist: Add some chopped pecans or walnuts to the apple filling for an extra crunch! It pairs beautifully with the caramel and adds lovely nutty flavors.
-
Spiced Up: Experiment with different spices! Try ginger or cardamom for an aromatic twist.
-
Chocolate Drizzle: For the chocolate lovers, drizzle some melted dark chocolate over the baked pie bombs for a decadent touch.
-
Salted Caramel: Sprinkle a bit of sea salt over the caramel before baking for that beautiful sweet-salty combo that’s all the rage!
-
Savory: If you want to swap sweet for savory, try filling them with caramelized onions and goat cheese for a unique appetizer!
Chef’s Notes
Whipping up these Caramel Apple Pie Bombs has become a cherished ritual in my kitchen! I love how versatile they are—whether I’m making them for a cozy night in by the fire or taking them to a potluck gathering. The recipe has evolved with me over the years, making use of whatever apples are in season and jazzing it up with new ingredients as I go.
And let’s be honest — I can’t possibly create a dessert without sneaking a taste of the filling along the way! Who can resist a spoonful of cinnamon-sugar apples?
FAQs and Troubleshooting
Here are some frequently asked questions that might pop up while you whip up these mouth-watering pie bombs:
-
Q: My pie bombs exploded while baking! What went wrong?
A: This usually happens when the filling is overstuffed or the dough isn’t sealed properly. Make sure to pinch the edges well and keep the filling modest! -
Q: Can I prepare these ahead of time?
A: Absolutely! You can fill the biscuit dough in advance and store them in the fridge for a few hours. Just make sure to let them sit at room temperature for a bit before baking. -
Q: How do I store leftovers?
A: If you have any leftovers (which is unlikely!), store them in an airtight container in the fridge for up to 2 days. Simply reheat before serving. -
Q: Can I use store-bought caramel sauce?
A: Yes, it’s a time-saver! However, making your caramel sauce is so easy. A simple mix of sugar, butter, and cream tends to blow store-bought varieties out of the water!
Nutritional Info
While the Caramel Apple Pie Bombs are an indulgent treat, let’s break down the nutritional value:
- Calories: Approximately 200-300 (depending on the size and ingredients)
- Fat: 9g (mostly from the biscuit dough and butter)
- Carbohydrates: 35g (from the biscuit dough and sugars)
- Sugars: About 10-15g (natural sugars from apples and added sugar)
- Protein: 2g
Remember, moderation is key when indulging in sweet treats! You can also try using lower-calorie ingredients or sugar substitutes to make a lighter version of these delicious bites.
Final Thoughts
And there you have it! Your very own homemade Caramel Apple Pie Bombs ready to warm the hearts of those you hold dear. These little bites embody all that is cozy and comforting about food. Perfect for chilly evenings or as a special treat on lazy weekends, they bridge the gap between simple and indulgent, making them a must-try in any home.
So, my kitchen companions, embrace your inner chef, let that creativity flow, and whip up a batch (or two!). You never know, these may just become a new family favorite—infusing your world with all the warmth of home and nostalgia just like my family did for me many moons ago.
Remember, good food brings people together and creates memories that last a lifetime. Happy cooking, and I can’t wait to hear how your pie bombs turn out! Cheers to making delicious moments in the kitchen and savoring every blissful bite!
Print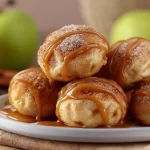
Caramel Apple Pie Bombs
- Total Time: 35 minutes
- Yield: 8 servings 1x
- Diet: Vegetarian
Description
Delightful bites that combine caramel apples and apple pie, wrapped in flaky biscuit dough.
Ingredients
- 1 package of biscuit dough
- 2 medium apples, peeled and diced
- 1/2 cup caramel sauce
- 1 teaspoon cinnamon
- 1/4 cup sugar
- Butter, for brushing
- Optional: whipped cream or vanilla ice cream for serving
Instructions
- Preheat your oven to 375°F (190°C) and line a cookie sheet with parchment paper.
- Prepare the apples by peeling and dicing them, then mixing with sugar and cinnamon.
- Get the biscuit dough ready by separating and flattening each round.
- Fill each biscuit round with a portion of the apple mixture and drizzle caramel on top.
- Seal the biscuit dough over the filling to form a ball.
- Brush the outside of each bomb with melted butter and place them on the cookie sheet.
- Bake for 15-20 minutes or until golden brown and serve warm.
Notes
A squeeze of lemon juice can prevent the apples from browning. Serve with whipped cream or ice cream for added deliciousness.
- Prep Time: 15 minutes
- Cook Time: 20 minutes
- Category: Dessert
- Method: Baking
- Cuisine: American
Nutrition
- Serving Size: 1 bomb
- Calories: 250
- Sugar: 10g
- Sodium: 350mg
- Fat: 9g
- Saturated Fat: 4g
- Unsaturated Fat: 4g
- Trans Fat: 0g
- Carbohydrates: 35g
- Fiber: 2g
- Protein: 2g
- Cholesterol: 15mg
Keywords: Caramel Apple, Pie Bombs, Fall Dessert, Cozy Treat, Baking