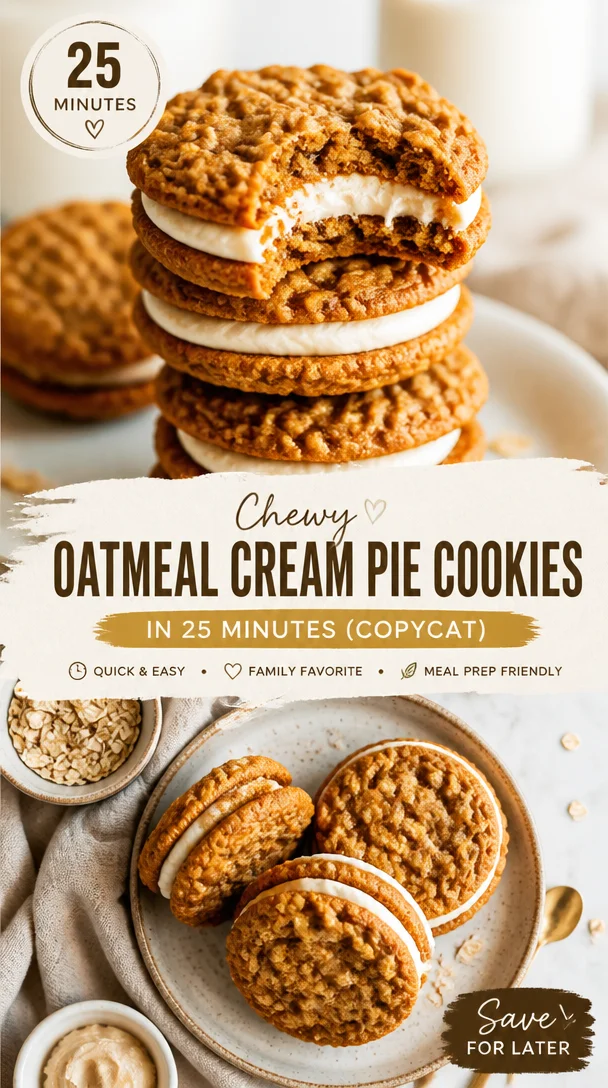
Minute Pumpkin Oatmeal Cream Pies (No-Bake Snack)
The Sweetest Fall Treat: Pumpkin Oatmeal Cream Pies
Hey there, food lovers! As the leaves turn golden and the air gets that crisp bite of autumn, there’s something truly special about the flavors of fall. Imagine biting into a soft, chewy cookie that tastes like autumn on a plate—spicy, sweet, and oh-so-comforting. That’s right, we’re diving into the world of Pumpkin Oatmeal Cream Pies today!
These delightful treats are not only packed with the warm spices of the season but also blessed with the rich taste of pumpkin. They make for the perfect afternoon pick-me-up or a cozy dessert after dinner. Plus, they come with a luscious cream cheese filling that will send your taste buds dancing. So, put on your favorite apron, and let’s embrace the kitchen magic!
A Slice of Nostalgia
The essence of these pumpkin oatmeal cream pies comes from my childhood, where the kitchen was a sanctuary filled with laughter and delicious aromas. Picture this: crisp autumn evenings, spent at my grandma’s house, where she’d whip up all sorts of goodies. One of my fondest memories is her baking with pumpkin while telling stories of her childhood in the south. Her kitchen would become a blend of chatter and sweet scents that seemed to wrap around you like a warm hug.
I remember the anticipation as the cookies would come out of the oven, their edges golden brown, while the center remained soft and gooey. I would sneak in a taste (or three) before they even made it to the cooling rack! As she pulled out her secret cream cheese filling recipe, she’d wink and say, “This is the trick, my dear.” Little did I know, this simple recipe would evolve into one of my favorites to share with you all.
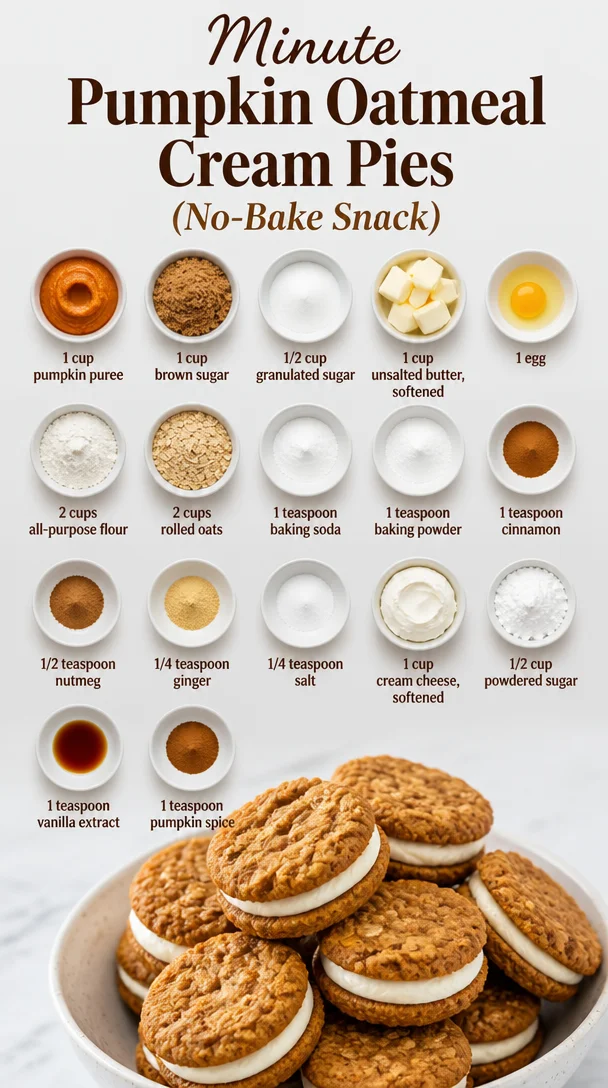
Ingredients
Now, let’s gather our ingredients for these delightful pumpkin oatmeal cream pies. Here’s what you’ll need:
-
1 cup pumpkin puree
This is the star of the show! Perfectly sweet and packed with moisture, it’s what gives our cookies that tender bite. If you need a substitute, you can use applesauce or even mashed bananas, but the flavor will change a bit. -
1 cup brown sugar
For that lovely caramel flavor and added moisture. If you don’t have brown sugar on hand, you can use granulated sugar, though the cookies won’t have that lovely depth. -
1/2 cup granulated sugar
This will help balance the sweetness. For a healthier option, you can replace it with coconut sugar, but the texture might be slightly different! -
1 cup unsalted butter, softened
Makes the dough rich and flavorful. If you’re looking for a dairy-free version, feel free to use coconut oil or a vegan butter substitute. -
1 egg
Binds our ingredients together. If you need a vegan alternative, try a flax egg (1 tablespoon ground flaxseed mixed with 3 tablespoons water). -
2 cups all-purpose flour
This is the backbone of our cookies. You can swap half of this with whole wheat flour for added fiber. -
2 cups rolled oats
Provides that chewy texture we all love. Quick oats can be used in a pinch, but rolled oats give the best texture! -
1 teaspoon baking soda
Helps with the rise. Don’t skip this—unless you want flat cookies! -
1 teaspoon baking powder
A little lift to support our oatmeal cookies. It complements the baking soda for a perfect rise. -
1 teaspoon cinnamon
Because fall wouldn’t be fall without cinnamon! Feel free to use pumpkin pie spice here for an extra aromatic touch. -
1/2 teaspoon nutmeg
Just a pinch for added warmth and spice. If you’re not a fan, you can reduce this or skip it altogether. -
1/4 teaspoon ginger
Infuses a warm bite. Dried ginger works great, but freshly grated ginger brings a unique zing. -
1/4 teaspoon salt
Balances the sweetness. Every cookie needs this little kick! -
1 cup cream cheese, softened
The creaminess for our filling! If you need a dairy-free option, go for cashew cream or a vegan cream cheese. -
1/2 cup powdered sugar
Sweetens our filling. Feel free to swap with agave syrup, but it will change the consistency. -
1 teaspoon vanilla extract
Adds a warm depth of flavor. It’s hard to get a good substitution here, so use the real deal if you can! -
1 teaspoon pumpkin spice
For that signature fall flavor! You can create your own mix using cinnamon, nutmeg, and ginger.
Step-by-Step Instructions
Now that we’ve got all our ingredients together, let’s get baking! Follow these steps for a cookie experience that will remind you of cozy evenings by the fire.
-
Preheat Your Oven
Preheat your oven to 350°F (175°C). This ensures your cookies bake evenly and helps them fluff up nicely. -
Mix the Wet Ingredients
In a large mixing bowl, beat together the softened butter, brown sugar, and granulated sugar until creamy. This should take about 2-3 minutes. It’s your workout for the day—get in there and mix! -
Incorporate Pumpkin and Egg
Add in the pumpkin puree and the egg. Blend until fully combined. You’ll love the color this adds to your batter. -
Combine Dry Ingredients
In another bowl, whisk together the flour, rolled oats, baking soda, baking powder, cinnamon, nutmeg, ginger, and salt. Make sure it’s all well-mixed. You want those spices evenly spread to ensure each bite is packed with flavor! -
Join Forces
Gradually add the dry ingredient mixture to the wet mixture. Mix just until you see no flour streaks; overmixing can lead to tough cookies. Trust me, we want these soft! -
Scoop it Out
Using a cookie scoop or two spoons, drop the dough onto lined baking sheets. Leave some space in between because these little beauties will spread. -
Bake and Cool
Bake your cookies for about 12-15 minutes until they’re golden at the edges but still soft in the center. Let them cool for a few minutes on the baking sheet (very important for texture) before transferring to a cooling rack. -
Make the Creamy Filling
While the cookies are cooling, grab a new bowl and beat your softened cream cheese with the powdered sugar, vanilla extract, and pumpkin spice. Mix until smooth and fluffy. This part is like magic—so creamy! -
Sandwich Time
Once the cookies have cooled completely, spread a generous amount of the cream cheese filling on the flat side of one cookie and top it off with another cookie. You’re creating a sandwich, folks!
Serving Suggestions
Now that you have your pumpkin oatmeal cream pies all assembled, it’s time to serve them up! You could arrange them on a beautiful platter, dust a little powdered sugar over the top, and garnish with some cinnamon sticks for that extra fall flair.
For an appetizing twist, pair these cookies with a warm drink—like apple cider or a cozy cup of chai tea. They make fantastic gifts, too—wrap a few in kraft paper with some twine for those potluck gatherings.
Recipe Variations
While the classic version of our pumpkin oatmeal cream pies is simply divine, let’s chat about some creative twists you can try:
-
Chocolate Chips: Stir in a cup of chocolate chips into the cookie dough for a rich, sweet surprise in every bite.
-
Nutty Delight: Introduce chopped pecans or walnuts into the batter for an earthy crunch. Just toast them lightly beforehand for enhanced flavor!
-
Spiced Rum Cream: For the adult version, add a splash of spiced rum to your cream cheese filling for a fun twist.
-
Vegan Version: Use plant-based butter, a flax egg, and vegan cream cheese for a deliciously desirable vegan pumpkin oatmeal cream pie!
-
Cranberry Swirl: Fold in dried cranberries into the cookie dough for a tart contrast that balances the sweetness beautifully.
Chef’s Notes
As with any good recipe, this pumpkin oatmeal cream pie has its roots in evolution. My grandma, bless her heart, originally cooked these with a chocolate filling before I embarked on my quest to try a pumpkin twist! It was through countless experiments—some sticky, some catastrophically flat (never skip the baking soda, you guys!)—that I finally perfected this warm hug of a dessert.
And let me tell you, each bite evokes such nostalgia that I can’t resist making these every fall season. Trust me, the aroma of baking cookies will linger and bring people in from all around, just like it did in my grandma’s kitchen.
FAQs and Troubleshooting
-
Why are my cookies flat?
If your cookies turn out flat, you might have skipped the baking soda or baking powder, or perhaps your butter was too soft. Make sure to chill your dough for about 30 minutes before baking next time. -
Can I make the dough ahead of time?
Absolutely! You can chill the dough for up to a week or freeze it for about three months. Just let it sit at room temperature for a bit before scooping. -
How do I store leftovers?
Seal your cookies in an airtight container at room temperature for about 3-4 days, or in the fridge for up to a week. They also freeze beautifully—just make sure to layer them with parchment paper! -
What do I do if my cream cheese filling is too runny?
If your filling seems a bit too loose, add a bit more powdered sugar to thicken it up. And avoid over-mixing—this keeps the filling fluffy.
Nutritional Info
Not only do these delicious pumpkin oatmeal cream pies entice with their flavors, but they also offer some nutritional benefits thanks to pumpkin! Here’s a rough estimate per pie with filling:
- Calories: 250
- Total Fat: 11g
- Saturated Fat: 6g
- Cholesterol: 40mg
- Sodium: 140mg
- Total Carbohydrates: 36g
- Dietary Fiber: 2g
- Sugars: 16g
- Protein: 3g
This is a sweet treat, so enjoy them mindfully!
Final Thoughts
So there you have it, my dear foodies—the secret to making the ultimate Pumpkin Oatmeal Cream Pies! As you bake these delightful cookies, don’t forget to let your creativity shine. Get your loved ones involved, and don’t hold back on the laughter (or the taste-testing, let’s be real).
There’s something heartwarming about sharing good food and memories, and these cookies definitely deliver both in every fluffy bite. So grab your spatula, and let’s celebrate the flavors of fall! Happy baking! 🍂🍰
Print
Pumpkin Oatmeal Cream Pies
- Total Time: 35 minutes
- Yield: 12 servings 1x
- Diet: Vegetarian
Description
Delightful pumpkin oatmeal cream pies filled with luscious cream cheese frosting, embodying the warm flavors of fall.
Ingredients
- 1 cup pumpkin puree
- 1 cup brown sugar
- 1/2 cup granulated sugar
- 1 cup unsalted butter, softened
- 1 egg
- 2 cups all-purpose flour
- 2 cups rolled oats
- 1 teaspoon baking soda
- 1 teaspoon baking powder
- 1 teaspoon cinnamon
- 1/2 teaspoon nutmeg
- 1/4 teaspoon ginger
- 1/4 teaspoon salt
- 1 cup cream cheese, softened
- 1/2 cup powdered sugar
- 1 teaspoon vanilla extract
- 1 teaspoon pumpkin spice
Instructions
- Preheat your oven to 350°F (175°C).
- Mix the softened butter, brown sugar, and granulated sugar until creamy.
- Incorporate the pumpkin puree and egg into the mixture.
- Combine the flour, oats, baking soda, baking powder, cinnamon, nutmeg, ginger, and salt in another bowl.
- Join the dry ingredients gradually into the wet mixture.
- Scoop the dough onto lined baking sheets, leaving space.
- Bake for 12-15 minutes until golden at the edges.
- Make the filling with cream cheese, powdered sugar, vanilla extract, and pumpkin spice.
- Sandwich the filling between two cookies.
Notes
Feel free to customize with chocolate chips or nuts for added flavor.
- Prep Time: 20 minutes
- Cook Time: 15 minutes
- Category: Dessert
- Method: Baking
- Cuisine: American
Nutrition
- Serving Size: 1 cookie
- Calories: 250
- Sugar: 16g
- Sodium: 140mg
- Fat: 11g
- Saturated Fat: 6g
- Unsaturated Fat: 5g
- Trans Fat: 0g
- Carbohydrates: 36g
- Fiber: 2g
- Protein: 3g
- Cholesterol: 40mg
Keywords: pumpkin, oatmeal, cream pies, fall dessert, cookies
Chewy Oatmeal Cream Pie Cookies in 25 Minutes (Copycat)
Oatmeal Cream Pie Cookies: A Sweet Nostalgic Delight
Hey there, fellow food lovers! I’m Beau Collier, and today we’re diving into a delightful treat that’s a true blast from the past: Oatmeal Cream Pie Cookies! These cookies are not just a dessert; they’re a warm hug that brings back memories of childhood snack time and good old-fashioned kitchens. So grab your apron, because we’re about to whip up some deliciousness!
Introduction: A Comforting Classic
Let’s set the scene. Picture this: it’s a chilly afternoon, the kind where you can feel the warmth radiating from the oven and the sweet aroma of baked treats filling your home. You pull a batch of oatmeal cookies from the oven, golden brown and slightly chewy, and you hear that addictive crunch as you take a bite.
Oatmeal cream pie cookies have long been a classic beloved by many. These scrumptious, chewy delights are not only comfort food, but they also double as a trip down memory lane when you sink your teeth into that gooey marshmallow fluff filling. They’re sweet enough to satisfy any craving but wholesome enough to make you feel like you’re treating yourself to something special.
The beauty of these cookies lies in their versatility. You can pack them full of goodness, or keep them simple and nostalgic—whatever mood strikes you! With just a few key ingredients and some basic techniques, you can bake up a storm that will impress your friends, family, or even just yourself on a quiet evening in. Ready to rekindle the joy of baking and indulge in some tasty nostalgia? Let’s roll up our sleeves and get started!
Personal Story: Memories in Every Bite
Growing up, my kitchen was always bustling with activity, especially on the weekends. My mom was a master baker, and every time I walked in after a long afternoon of playing outside, I was greeted by the warm, inviting smell of cookies in the oven. But there was one cookie that always held a special place in my heart: the oatmeal cream pie.
I remember helping her in the kitchen, where I stood on a stool to reach the counter, whisking the batter and sneaking bites of the marshmallow fluff whenever I thought she wasn’t looking. Those afternoons weren’t just about baking; they were about bonding. The thrill of watching the cookies puff up in the oven, only to cool them down with a dollop of cream filling, was pure magic. Even now, whenever I bake these cookies, I’m transported back to those sweet moments in my childhood, filled with laughter and love.
Ingredients
Here’s what you’ll need to create these delicious Oatmeal Cream Pie Cookies—let’s break it down:
-
1 cup unsalted butter, softened
The star of the show! Softened butter creates that rich, tender texture we all crave in cookies. If you don’t have unsalted, feel free to use salted butter and cut back on any added salt in the recipe for balance. -
1 cup brown sugar, packed
Brown sugar adds moisture and that coveted chewy texture to the cookies. If you’re in a pinch, you can substitute it with an equal amount of coconut sugar for a lovely hint of caramel flavor. -
1/2 cup granulated sugar
A little sugar goes a long way in giving our cookies that perfect sweetness and slight crispiness on the edges. -
2 large eggs
Eggs are essential for binding all our ingredients together while contributing to the cookie’s structure. You could swap them for ¼ cup of unsweetened applesauce for a healthier, egg-free option! -
1 teaspoon vanilla extract
The secret ingredient that elevates the flavor! If you want to explore, almond extract offers a unique twist. -
1 1/2 cups all-purpose flour
All-purpose flour gives our cookies the right amount of stability. For a gluten-free option, you can use a gluten-free flour blend—just make sure it contains xanthan gum to help with texture. -
1 teaspoon baking soda
This will give your cookies the nice rise we love! If you’re out, cream of tartar can also act as a leavening agent if paired with baking soda. -
1/2 teaspoon salt
A pinch of salt enhances all the flavors and balances the sweetness. -
1 teaspoon ground cinnamon
Cinnamon adds a lovely warmth to our oatmeal cookies that can’t be beaten! You can switch things up with pumpkin spice mix for a holiday twist! -
3 cups old-fashioned rolled oats
These add the chewy texture we’re looking for. Quick oats can be used in a pinch but may yield a slightly different texture. -
1 cup marshmallow fluff
This sweet, gooey filling is what elevates these cookies to cream pie status. If you’re looking for something with less sugar, consider homemade vanilla buttercream as a filling. -
1/2 cup powdered sugar
This gets mixed with the fluff for a smoother texture. If you want a more decadent flavor, replace it with chocolate icing.
Step-by-Step Instructions
Let’s get cooking! Follow these steps carefully, and you’ll have the most scrumptious Oatmeal Cream Pie Cookies ready in no time.
-
Preheat the oven: Start by preheating your oven to 350°F (175°C). Getting that little oven toasty is key for baking perfection!
-
Cream the butter and sugars: In a large mixing bowl, beat together the softened unsalted butter, brown sugar, and granulated sugar using a handheld mixer or stand mixer until light and fluffy. This step generally takes about 3-5 minutes! Not only does this create that fluffy texture we adore, but it also helps the sugar retain moisture.
-
Add eggs and vanilla: Next, mix in the eggs one at a time, making sure each is fully incorporated before the next. Then, add your vanilla extract. Let that smell wash over you—wonderful, right?
-
Combine dry ingredients: In another bowl, whisk together the flour, baking soda, salt, ground cinnamon, and rolled oats. This ensures an even distribution of the ingredients and makes for a consistent bake.
-
Combine wet and dry: Gradually add the dry mixture into the wet mixture. Be sure to mix until just combined—overmixing can lead to tough cookies!
-
Scoop the cookie dough: Use a cookie scoop or tablespoon to drop rounded tablespoons of dough onto lined baking sheets, spacing them about 2 inches apart. Each dollop should look like a lovely little mound of happiness!
-
Bake: Place the cookie sheets in your preheated oven and bake for 10-12 minutes until the edges are golden brown and the centers are still soft. They’ll firm up as they cool, so don’t worry if they seem a bit underbaked!
-
Cool: Remove from the oven and let the cookies cool on the sheets for about 5 minutes before transferring them to a cooling rack. This helps prevent them from falling apart; patience is key!
-
Prepare the filling: While the cookies cool, whip together the marshmallow fluff and powdered sugar in a mixing bowl until well combined. This creamy mixture will be the luxurious filling that brings it all together!
-
Assemble the cookies: Once the cookies are cool, slather on a generous dollop of fluff on the bottom of half the cookies and top with the remaining cookies to form a sandwich.
And voila! You’ve created magical Oatmeal Cream Pie Cookies that are begging to be devoured!
Serving Suggestions
Now that your Oatmeal Cream Pie Cookies are perfectly assembled, there are some delightful ways to serve them up! First of all, an inviting presentation creates all the difference. Set the cookies on a rustic wooden board, and sprinkle some cinnamon over them for that professional touch. You can even place a few cookies in a cute, seasonal tin for gifting or as party favors.
For an extra touch that enhances the experience, consider pairing these cookies with a tall glass of cold milk or a steaming cup of chamomile tea. The coolness of the milk beautifully complements the warmth of the cookies, while a cup of tea adds a soothing contrast.
Recipe Variations
There’s always room for creativity in the kitchen! Here are some fun twists to spice up your Oatmeal Cream Pie Cookies:
-
Add-ins Galore: Try incorporating chocolate chips, raisins, or dried cranberries for an extra burst of flavor and texture.
-
Nutty Goodness: Throw in some chopped walnuts or pecans for that crunch! Just be sure to chop them coarsely so they mix in nicely.
-
Flavor Boost: Swirl in a bit of peanut butter or Nutella into the marshmallow fluff! This tiny change can create a whole new dimension of flavor!
-
Spiced Variation: Experiment with different spices like nutmeg or allspice to give your cookies a seasonal kick. Think snickerdoodles but in oatmeal format!
-
Fruity Fun: Sliced bananas or pureed apples can bring that fun twist of flavor while keeping things moist and delicious.
Chef’s Notes
I always think of baking as a blend of science and love. Over the years, this recipe for Oatmeal Cream Pie Cookies has evolved so much. I’ve tried countless variations, from chunky to chewy, and even experimented with various types of fillings. Every version has its merits, but there’s a reason I keep coming back to this original recipe. It’s straightforward and comforting and allows for creativity, which is what cooking is all about!
Also, here’s a tip: if you find your cookie batter is a bit too wet or sticky, let it chill in the fridge for about 30 minutes. This little hack helps shape the cookies better and yields thicker tealicious treats.
FAQs and Troubleshooting
-
Why are my cookies flat?
Flat cookies can be a result of too much butter or not enough flour. Make sure to measure your ingredients accurately and consider chilling the dough before baking. -
How do I store the cookies?
Keep the cookies in an airtight container at room temperature for up to a week. They usually last about that much time because they get gobbled up quickly! -
Can I freeze these cookies?
Yes! They freeze beautifully. Just layer them between parchment paper in an airtight container, and they will stay delicious for up to three months. -
Can I make the filling ahead of time?
Absolutely! You can make the filling a day before. Just store it in the fridge, and when you’re ready to assemble the cookies, give it a quick stir.
Nutritional Info
While delicious things don’t always come with a health warning, I understand nutrition is important, too! Each Oatmeal Cream Pie Cookie (considering standard serving size) contains approximately:
- Calories: 210
- Total fat: 10g
- Saturated fat: 6g
- Cholesterol: 30mg
- Sodium: 100mg
- Carbohydrates: 28g
- Fiber: 1g
- Sugar: 12g
- Protein: 2g
While these cookies are a treat to enjoy, they can also form part of a balanced diet when enjoyed in moderation.
Final Thoughts
Baking is more than just following a recipe; it’s about creating connections and memories. These Oatmeal Cream Pie Cookies are perfect for sharing with friends or celebrating everyday moments. Whether you’re reminiscing about childhood or starting new traditions in your kitchen, this recipe is a reminder of the joys simple ingredients can bring.
So gather around the oven, invite friends over, and make these delicious cookies that promise a taste of home. Remember, every cookie has its story, and as you take that first heavenly bite, know that you too are creating your own kitchen narrative. Happy baking, and until next time, keep exploring and savoring those feel-good flavors! 🍪✨
Now, who’s ready for some cookies?
Print
Oatmeal Cream Pie Cookies
- Total Time: 32 minutes
- Yield: 24 cookies 1x
- Diet: Vegetarian
Description
Delicious oatmeal cream pie cookies with a gooey marshmallow filling that bring back childhood memories.
Ingredients
- 1 cup unsalted butter, softened
- 1 cup brown sugar, packed
- 1/2 cup granulated sugar
- 2 large eggs
- 1 teaspoon vanilla extract
- 1 1/2 cups all-purpose flour
- 1 teaspoon baking soda
- 1/2 teaspoon salt
- 1 teaspoon ground cinnamon
- 3 cups old-fashioned rolled oats
- 1 cup marshmallow fluff
- 1/2 cup powdered sugar
Instructions
- Preheat the oven: Start by preheating your oven to 350°F (175°C).
- Cream the butter and sugars: In a large mixing bowl, beat together the softened unsalted butter, brown sugar, and granulated sugar until light and fluffy.
- Add eggs and vanilla: Mix in the eggs one at a time, followed by the vanilla extract.
- Combine dry ingredients: In another bowl, whisk together flour, baking soda, salt, ground cinnamon, and rolled oats.
- Combine wet and dry: Gradually add dry mixture into the wet mixture and mix until just combined.
- Scoop the cookie dough: Drop rounded tablespoons of dough onto lined baking sheets, spacing them about 2 inches apart.
- Bake: Place the cookie sheets in the oven and bake for 10-12 minutes until golden brown.
- Cool: Let the cookies cool on the sheets for about 5 minutes before transferring them to a cooling rack.
- Prepare the filling: Whip together marshmallow fluff and powdered sugar until well combined.
- Assemble the cookies: Spread a dollop of fluff on the bottom of half the cookies and top with the remaining cookies to form a sandwich.
Notes
For a healthier option, you can substitute ¼ cup of unsweetened applesauce for the eggs.
- Prep Time: 20 minutes
- Cook Time: 12 minutes
- Category: Dessert
- Method: Baking
- Cuisine: American
Nutrition
- Serving Size: 1 cookie
- Calories: 210
- Sugar: 12g
- Sodium: 100mg
- Fat: 10g
- Saturated Fat: 6g
- Unsaturated Fat: 4g
- Trans Fat: 0g
- Carbohydrates: 28g
- Fiber: 1g
- Protein: 2g
- Cholesterol: 30mg
Keywords: oatmeal cookies, cream pie cookies, dessert, nostalgic treats

Minute Skillet Peach Cobbler for Busy Weeknights
How to Make Easy Peach Cobbler: A Comfort Food Classic
Hey there, fellow foodies! If you’ve got a sweet tooth and a love for that warm, fuzzy feeling that comes from sharing a delicious dessert, then you’re in for a treat. Today, we’re diving into one of the all-time comfort food classics—Peach Cobbler. It’s simple, satisfying, and bursting with flavor! Not to mention, it’s the perfect dessert to whip up when the cravings strike (and they often do!).
Introduction
Peach cobbler is more than just a dessert; it’s a warm hug on a plate! Picture this: it’s a lazy Sunday afternoon, the air is filled with the sweet aroma of fresh peaches, and the sun has just begun to set, casting a golden glow across your kitchen. This is when the magic happens. I can hardly ever resist the charm of a peach cobbler, and I bet you can’t either!
One of the best things about peach cobbler is its ability to bring people together. Whether it’s a potluck, a family gathering, or just a cozy night in, dolloping a generous scoop of peach cobbler into a bowl and passing it around is the perfect way to spread joy. Served warm with a scoop of vanilla ice cream on top? Oh, my friends, that’s heavenly magic right there!
What’s even better is that this recipe is incredibly easy. You don’t need to be a culinary expert to create this incredible treat. With just a few pantry staples and a can of peaches, you’ll have a beloved dessert that feels like a labor of love.
So, grab your aprons, roll up your sleeves, and let’s embark on this peachy journey together. Trust me; your kitchen is about to smell like a slice of summer paradise!
Personal Story
Let me take you back to my childhood for a moment. Growing up in a small town, summers meant spending time at my grandmother’s house, where the kitchen was my happy place. Every Saturday, she’d pull out her old, handwritten recipe book, filled with notes and stains from years of cooking for the family. My favorite entry? Her peach cobbler recipe!
I remember one summer, we had an abundance of fresh peaches from a local orchard. The sweet, juicy aroma filled the house as we prepared the cobbler together. We laughed and chatted, me sitting on the countertop, swinging my legs while she showed me how to combine the ingredients. The magic happened when it came out of the oven—golden brown and bubbly, with that irresistible crust just begging for a scoop of ice cream on top.
On that day, I learned not just how to make a dessert but also the importance of time spent in the kitchen with loved ones. Every bite of that cobbler took me back to those warm summer afternoons, where the love for good food was as rich as the flavors dancing on my palate. That’s what I aim to recreate every time I make this peach cobbler—a taste of nostalgia, comfort, and love.
Ingredients
Now, let’s gather our ingredients! Below is the list of what you’ll need to make this easy peach cobbler:
-
1 can of peaches (in syrup or juice): This is the star of the show! Using canned peaches saves time and ensures your cobbler is moist and flavorful. If you prefer fresh peaches, feel free to use them—just make sure they’re ripe!
-
1 cup all-purpose flour: This is the base for our cobbler crust. It provides the right structure. If you’re looking for a gluten-free option, try using a blend of gluten-free all-purpose flour.
-
1 cup sugar: We’ll use sugar to enhance the sweetness of the peaches and balance the dish. You can substitute with less sugar or use alternatives like honey or agave syrup for a lighter version.
-
1 cup milk: Provides moisture and helps create a tender batter. Any type of milk works—dairy or non-dairy alternatives like almond or oat milk are great too!
-
1/2 cup butter (melted): Butter adds richness and helps create that golden crust. If you’re looking for a healthier substitute, you can use coconut oil or a light margarine.
-
2 teaspoons baking powder: The secret ingredient that gives the batter its rise and fluffy texture!
-
1/4 teaspoon salt: Just a pinch! It balances the sweetness and enhances all the flavors.
-
1 teaspoon vanilla extract: This aromatic ingredient lifts the flavors and adds depth to the cobbler. Feel free to use almond extract for a different twist!
Step-by-Step Instructions
Alright, let’s roll up those sleeves and get cooking! Here’s how to make this heavenly peach cobbler in just a few simple steps:
-
Preheat the Oven: Start by preheating your oven to 350°F (175°C). This step is crucial for ensuring your cobbler bakes evenly and develops that crispy top we love so much.
-
Prepare the Baking Dish: Grab a 9-inch pie dish or a 9×9 inch square baking pan and grease it with a bit of butter or cooking spray. This helps prevent sticking and makes cleanup a breeze!
-
Drain the Peaches: Open the can of peaches and drain the syrup or juice into a bowl (you can save the juice for sipping!). Place these luscious peach slices at the bottom of your prepared baking dish. If you’re using fresh peaches, slice them up and add them to the dish.
-
Mix the Dry Ingredients: In a large mixing bowl, combine the flour, sugar, baking powder, and salt. Whisk these ingredients together until they’re well blended. This helps distribute the baking powder evenly, which is key for a fluffy cobbler.
-
Add the Wet Ingredients: Pour in the milk, melted butter, and vanilla extract. Stir gently until everything comes together into a smooth batter. Don’t overmix—just enough to combine!
-
Pour Over the Peaches: Now for the fun part! Carefully pour the batter over the peaches in the baking dish. Don’t worry if it looks a little lumpy; that’s part of the charm.
-
Bake to Perfection: Place your dish in the preheated oven and bake for about 30-35 minutes. Keep an eye on it! You’re looking for a golden-brown top that’s firm to the touch and a toothpick inserted into the center should come out clean.
-
Cool and Serve: Once baked, remove the cobbler from the oven and let it sit for about 10-15 minutes to cool down. This will help it set a bit and make for easier serving.
Serving Suggestions
Now that your peach cobbler is fresh out of the oven, it’s time to serve it up! Here’s how to present your delicious creation:
-
Serve Warm: Nothing beats peach cobbler straight from the oven! Use a large spoon to scoop it into bowls. You can serve it as is, or take it to the next level.
-
Add Ice Cream: I recommend a scoop of vanilla ice cream on top for that classic combination. The creaminess of the ice cream melting into the warm cobbler is a dessert dream come true!
-
Garnish with Mint: A sprig of fresh mint can add a lovely touch of color and a hint of freshness that contrasts beautifully with the sweet peaches.
-
Pair with Whipped Cream: If you’re feeling extra indulgent, a dollop of freshly whipped cream can add a light, airy element to the dish.
Recipe Variations
Now, let’s get creative! Here are a few fun twists you can try with this peach cobbler recipe:
-
Berry Bliss: Mix in some fresh or frozen berries (blueberries, raspberries, or blackberries) with the peaches for a berry-peach cobbler fusion.
-
Coconut Dreams: Replace half of the milk with coconut milk, and add toasted coconut flakes for a tropical spin on the classic.
-
Spiced Up: Add a pinch of cinnamon or nutmeg to the batter to warm up the flavors, or even a splash of bourbon or rum for an adult version.
-
Peachy Keen Oat Topping: Instead of a traditional crust, mix oats with some brown sugar and melted butter for a crunchy topping.
-
Gluten-Free Delight: Use a gluten-free flour blend to make this recipe suitable for those with gluten sensitivities.
Chef’s Notes
As I cook this cobbler, I can’t help but reminisce about those hot summer days spent in my grandmother’s kitchen. This recipe has evolved over the years, incorporating new flavors and twists as I’ve experimented. It’s versatile, forgiving, and simply delicious, making it one of my go-to recipes no matter the season. Trust me: once you try it, you’ll be hooked!
And remember, the beauty of cooking is in the love you pour into your food. Don’t be afraid to make this recipe your own!
FAQs and Troubleshooting
Q1: My cobbler is too wet; what did I do wrong?
A: If the filling appears too watery, it could be because the peaches were packed in syrup. Drain the peaches well, or reduce the amount of liquid added to the batter.
Q2: Can I use fresh peaches instead of canned?
A: Absolutely! Fresh peaches are delicious and add a wonderful flavor. Just make sure to slice and add them to the baking dish without too much excess juice.
Q3: How do I know when my cobbler is done?
A: Check for a golden brown topping and insert a toothpick into the center. If it comes out clean, your cobbler is ready!
Q4: How should I store leftovers?
A: Store leftover cobbler in an airtight container in the refrigerator for up to 3-4 days. You can reheat it in the microwave or oven to enjoy warm again!
Nutritional Info
If you’re curious about the nutritional aspect of this delightful cobbler, here’s an approximate breakdown per serving (based on an 8-serving dish):
- Calories: 220-250
- Total Fat: 10g
- Saturated Fat: 6g
- Carbohydrates: 33g
- Sugar: 15g
- Protein: 3g
Remember, nutritional values can vary based on the ingredients used, so if you’re counting calories, it’s always a good idea to calculate based on your specific ingredients.
Final Thoughts
And there you have it! A delicious easy peach cobbler that combines simplicity with heartwarming flavors. I hope you’re inspired to get into the kitchen and whip up this delightful dish that’s sure to bring smiles and a sprinkle of joy to your gatherings.
As you dig into that warm, baked goodness, remember—it’s not just about the flavors, but the memories and moments we create along the way. So, gather your loved ones, share a scoop (or two!), and let this peach cobbler bring a little sweetness to your life.
Happy baking, friends! Go on, dig in, and let’s make those kitchen memories together! 🍑✨
Print
Easy Peach Cobbler
- Total Time: 50 minutes
- Yield: 8 servings 1x
- Diet: Vegetarian
Description
A simple and satisfying peach cobbler recipe that’s perfect for any gathering, bursting with flavor and nostalgia.
Ingredients
- 1 can of peaches (in syrup or juice)
- 1 cup all-purpose flour
- 1 cup sugar
- 1 cup milk
- 1/2 cup butter (melted)
- 2 teaspoons baking powder
- 1/4 teaspoon salt
- 1 teaspoon vanilla extract
Instructions
- Preheat the oven to 350°F (175°C).
- Prepare a 9-inch pie dish or 9×9 inch square baking pan by greasing it with butter or cooking spray.
- Drain the canned peaches and place them at the bottom of the prepared baking dish.
- Mix the dry ingredients: flour, sugar, baking powder, and salt in a large mixing bowl.
- Add the wet ingredients: milk, melted butter, and vanilla extract. Stir until combined.
- Pour the batter over the peaches in the baking dish.
- Bake for about 30-35 minutes until golden brown and a toothpick comes out clean.
- Cool for 10-15 minutes before serving.
Notes
Serve warm with vanilla ice cream or whipped cream for a delightful treat.
- Prep Time: 15 minutes
- Cook Time: 35 minutes
- Category: Dessert
- Method: Baking
- Cuisine: American
Nutrition
- Serving Size: 1 serving
- Calories: 220
- Sugar: 15g
- Sodium: 200mg
- Fat: 10g
- Saturated Fat: 6g
- Unsaturated Fat: 4g
- Trans Fat: 0g
- Carbohydrates: 33g
- Fiber: 1g
- Protein: 3g
- Cholesterol: 30mg
Keywords: peach cobbler, dessert, easy recipes, comfort food, summer dessert

Minute Banana Cream Cheese Cobbler: Quick Comfort Dessert
Banana Cream Cheese Cobbler: A Recipe That’s a Slice of Sunshine
Hey there, food lovers! Beau Collier here, and today we’re diving into a comforting dessert that’s sure to warm your heart and tickle your taste buds—Banana Cream Cheese Cobbler! Sounds intriguing, right? If the very thought of juicy bananas nestled in a creamy, dreamy custard with a buttery cobbler crust makes you smile, then you’ve just stumbled onto a delicious treasure.
You know, cooking is about more than just the food; it’s about the memories we create in the kitchen and the people we get to share our culinary creations with. When I first whipped up this delightful cobbler, I was reminded of my grandmother’s cozy kitchen, where she’d serve up her famous banana pudding after family dinners. That sheer joy of sharing something so delicious and nostalgic is why I want to bring this recipe to you today.
So grab your favorite apron, roll up those sleeves, and let’s get baking together! This cobbler is not just a dish—it’s a journey down memory lane wrapped in flavor. Ready? Let’s do this!
A Sweet Memory
Growing up, my home was always filled with the luscious scent of baked goods. My grandmother, a self-taught dessert connoisseur, had this magical ability to transform simple, everyday ingredients into extravagant desserts that had everyone begging for seconds. One of her signature dishes was a classic banana pudding, layered high with Nilla wafers, fresh whipped cream, and, of course, the beloved bananas.
I remember the first time I tried to make her banana pudding. I was probably ten, with flour in my hair and a spatula that seemed bigger than my little hands. But the pride I felt when I presented my creation to my family was palpable! They loved it—well, after they stopped laughing at my flour-covered face, that is.
Years later, as I experimented with combining traditional flavors into new creations, I wanted to capture that same nostalgia but with a twist. That’s when the idea of Banana Cream Cheese Cobbler was born. It’s a heartfelt tribute to my grandmother, celebrating the unbeatable combination of bananas and cream cheese in a whole new light.
Ingredients
Let’s get down to the nitty-gritty of what you’ll need for this delicious cobbler! Here’s a complete list of ingredients:
-
4 ripe bananas, sliced: The riper, the better! Overripe bananas bring out that lovely sweetness and rich flavor. Can’t find ripe ones? Try leaving them in a paper bag for a day or two, or bake unpeeled bananas at 300°F (150°C) for 15-20 minutes until they’re soft and caramelized.
-
8 oz cream cheese, softened: This creamy delight adds richness and texture. If you’re dairy-free, try a vegan cream cheese alternative like cashew or tofu-based spreads.
-
1 cup all-purpose flour: The backbone of our cobbler—gluten-free flour like almond or oat can work in a pinch, but be aware that the texture will change.
-
1 cup granulated sugar: Just regular white sugar gives the best sweetness hit. Brown sugar can add a deeper caramel flavor, so feel free to swap!
-
½ cup unsalted butter, melted: The butter brings in that lovely fat flavor. You could also use coconut oil for a light coconut twist.
-
1 cup milk: Whole milk is best for that creamy custard texture, but you can also use almond milk or oat milk for a lighter alternative.
-
2 large eggs: The eggs provide the structure—flax eggs or applesauce can do the trick if you’re looking for an eggless recipe.
-
1 tablespoon baking powder: Our leavening agent that makes the cobbler rise beautifully.
-
1 teaspoon vanilla extract: This little splash of flavor is a must! For a twist, use almond extract instead for a nutty profile.
-
½ teaspoon salt: A pinch of salt balances out the sweetness; don’t skip it!
-
½ teaspoon ground cinnamon: This will make everything smell and taste like a cozy hug.
-
Powdered sugar, for dusting (optional): A light dusting of powdered sugar gives a finishing touch that elevates your cobbler—perfect for those Instagram-worthy shots!
Step-by-Step Instructions
Alright, let’s get that oven preheated to 350°F (175°C) and set the stage for baking success. Follow my step-by-step guide for making this scrumptious Banana Cream Cheese Cobbler:
-
Prepare Your Dish: Lightly grease a 9×13-inch baking dish with non-stick spray or butter. This ensures that our glorious cobbler comes out without a hitch and lets every bite shine.
-
Mix the Cream Cheese Layer: In a mixing bowl, whisk together the softened cream cheese, half of the granulated sugar (½ cup), and the vanilla extract until smooth and creamy. If you have an electric mixer, now’s the time to use it! This creates a tender, luscious layer that will be the star of your cobbler.
-
Beat the Eggs: In a separate bowl, beat the eggs until fluffy. Then, slowly add the remaining sugar (½ cup) and continue mixing until combined. You want to incorporate a bit of air here for a light texture.
-
Combine Wet Ingredients: Gradually add the melted butter and milk to the egg mixture, stirring gently. I always say to take your time with this step. It’s all about building layers of flavor!
-
Mix the Dry Ingredients: In another bowl, whisk together the flour, baking powder, salt, and ground cinnamon. This is where you bring in the cozy, comforting vibes. Slowly integrate the dry mix into the wet mixture until just combined, but don’t overmix—you want it to be soft and fluffy!
-
Add the Bananas: Gently fold in those luscious banana slices. You want to distribute them evenly without bruising them too much. This caramelizes during baking, creating pockets of sweetness throughout the cobbler.
-
Assemble: Pour the batter into the greased baking dish, ensuring it’s spread evenly. Then dollop spoonfuls of the cream cheese mixture over the batter. Use a knife or toothpick to swirl them nice and gently; this adds a beautiful marbled effect.
-
Bake: Pop your masterpiece into the preheated oven and bake for about 35-40 minutes, or until a toothpick inserted in the center comes out clean. The top should be golden brown, and the aroma? Well, it’ll make your whole kitchen smell like heaven.
-
Cool and Dust: Once out of the oven, let it cool slightly before dusting with powdered sugar, if using. Trust me, this added touch will make your banana cobbler look like something straight out of a bakery!
Serving Suggestions
Now that you’ve got this beautiful Banana Cream Cheese Cobbler proudly sitting on your counter, it’s time to serve! Here are a few ideas to elevate the dessert for your friends and family:
-
Serve Warm: Cut into generous squares and dish it up warm. The cream cheese layer will still be gooey and sumptuous.
-
Top it Off: Consider serving a scoop of vanilla ice cream or a dollop of whipped cream on top for an indulgent treat. The cold cream balances the warm cobbler perfectly.
-
Garnish: Add fresh banana slices or a sprinkle of cinnamon on top for an eye-catching finish.
-
Personal Touch: Drizzle a bit of caramel sauce over the top for that extra flair. Who doesn’t love a bit of indulgence?
Recipe Variations
Feeling creative? Here are a few fun twists and variations to try:
-
Nutty Addition: Add a cup of chopped pecans or walnuts in with the bananas for a crunchy texture contrast.
-
Chocolate Lovers: Incorporate half a cup of chocolate chips into the batter for a decadent chocolate-banana combo.
-
Tropical Twist: Mix in some shredded coconut or chopped pineapple for a tropical flavor journey.
-
Spiced Up: Add a dash of nutmeg along with the cinnamon for a spicier backdrop that complements the bananas beautifully.
-
Vegan Version: Substitute eggs with flaxseed meal mixed with water (1 tablespoon flaxseed meal + 2.5 tablespoons water = 1 egg) and use a non-dairy cream cheese option. Use almond or coconut milk, and you’re in business!
Chef’s Notes
You know, this Banana Cream Cheese Cobbler has quite a journey. It started as an afternoon experiment, and I honestly had no idea it would become such a family favorite! My niece, who claims to "not like bananas," begs for seconds every time I make it. I’ve learned to keep my baking skills sharp, especially with little critics around. It truly brings a smile to my face when I see others enjoying something I created from scratch.
In fact, the beauty of this recipe is how adaptable it is! Each time I’ve made it, I tweak little things here and there. Sometimes I’ll add a pinch of nutmeg for warmth, other times I’ll play around with the types of bananas (the more spotted, the better). It’s all part of my cooking philosophy—get creative, have fun, and don’t be afraid to experiment!
FAQs and Troubleshooting
Have questions? Don’t worry; I’ve got your back! Here are some common reader questions and potential mistakes:
-
What if my cobbler is too dense?
This can happen if you overmix the batter. Gentle folding is key to keep that lovely airy texture. Remember, we want fluffy, not brick-like! -
Can I make this ahead of time?
Absolutely! You can prepare the batter and cream cheese mixture separately, refrigerate them, and then bake when you’re ready to serve. -
What if my bananas are under-ripe?
Aim for ripe bananas, as they bring out sweetness and flavor. If you’re in a pinch, you can still use them, but the cobbler will taste less sweet. Maybe add a tad more sugar to balance it out! -
How do I store leftovers?
If you have any leftovers (which I doubt!), keep them in an airtight container in the refrigerator for up to 3-4 days. Reheat in the microwave or oven before serving.
Nutritional Info
While I believe in enjoying good food, being mindful can be part of the joy too! Here’s a general nutritional breakdown per serving (makes about 12 servings):
- Calories: Approx. 220
- Fat: 10g
- Carbohydrates: 30g
- Fiber: 1g
- Sugar: 10g
- Protein: 3g
Of course, this will vary based on swaps and portion sizes! Remember to enjoy it in moderation, savoring each delightful bite.
Final Thoughts
As we wrap up this delicious journey into the world of Banana Cream Cheese Cobbler, I hope you’re feeling inspired to dive into the kitchen and create something beautiful. More than just a recipe, this cobbler brings the warmth of home and the joy of sharing togetherness. It’s about creating memories and indulging in the simple yet profound pleasures of life.
So, why not gather your loved ones for a cozy dessert night? Bake up this cobbler and let the sweet aroma fill your home. As you slice into that golden crust and reveal the luscious banana and cream cheese layer, you’ll be able to relive my grandmother’s kitchen with a fresh twist of your own.
Until next time, happy baking, and remember—food is better when shared! Let me know how your baking adventure goes in the comments below, and keep spreading the love with every delicious bite. Bon appétit! 🥧
Print
Banana Cream Cheese Cobbler
- Total Time: 55 minutes
- Yield: 12 servings 1x
- Diet: Vegetarian
Description
A comforting dessert that features juicy bananas in a creamy custard with a buttery cobbler crust, inspired by nostalgic flavors of banana pudding.
Ingredients
- 4 ripe bananas, sliced
- 8 oz cream cheese, softened
- 1 cup all-purpose flour
- 1 cup granulated sugar
- ½ cup unsalted butter, melted
- 1 cup milk
- 2 large eggs
- 1 tablespoon baking powder
- 1 teaspoon vanilla extract
- ½ teaspoon salt
- ½ teaspoon ground cinnamon
- Powdered sugar, for dusting (optional)
Instructions
- Preheat your oven to 350°F (175°C).
- Prepare a 9×13-inch baking dish by greasing it lightly.
- Mix the cream cheese layer by whisking together cream cheese, half of the sugar, and vanilla extract until smooth.
- Beat the eggs until fluffy, then mix in the remaining sugar.
- Combine the melted butter and milk with the egg mixture, stirring gently.
- Mix the dry ingredients in another bowl, then gradually incorporate into the wet mixture.
- Add the banana slices and fold gently.
- Assemble by pouring batter into the baking dish and swirling dollops of the cream cheese mixture on top.
- Bake for about 35-40 minutes until golden brown and a toothpick comes out clean.
- Cool slightly and dust with powdered sugar before serving.
Notes
Serve warm with vanilla ice cream or whipped cream for an indulgent treat.
- Prep Time: 15 minutes
- Cook Time: 40 minutes
- Category: Dessert
- Method: Baking
- Cuisine: American
Nutrition
- Serving Size: 1 serving
- Calories: 220
- Sugar: 10g
- Sodium: 200mg
- Fat: 10g
- Saturated Fat: 5g
- Unsaturated Fat: 4g
- Trans Fat: 0g
- Carbohydrates: 30g
- Fiber: 1g
- Protein: 3g
- Cholesterol: 50mg
Keywords: banana cobbler, dessert, comfort food, baking, family recipe
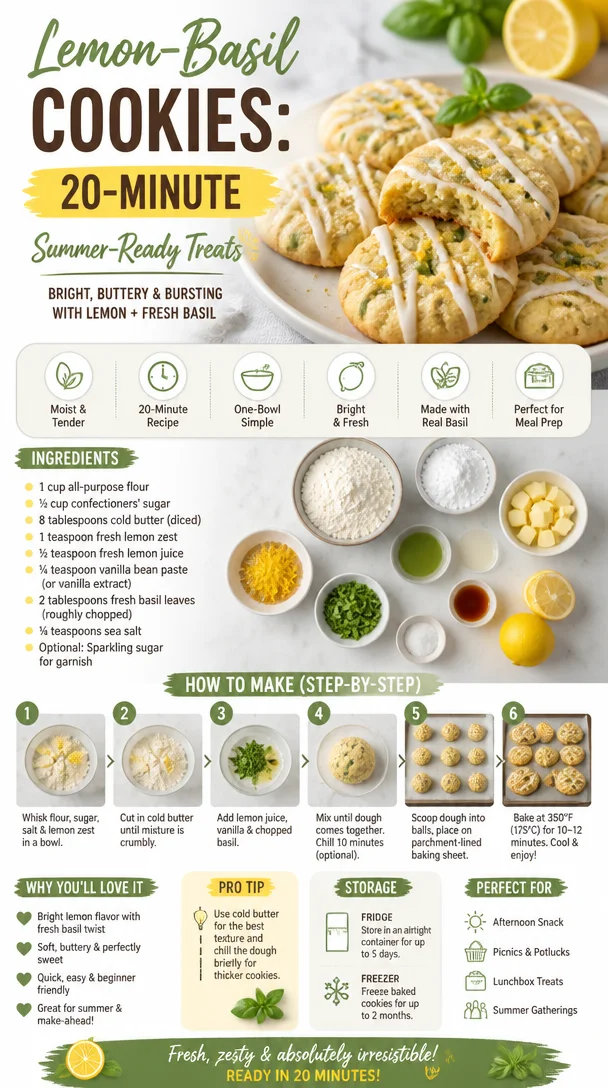
Lemon-Basil Cookies: 20-Minute Summer-Ready Treats
Lemon-Basil Cookies: A Refreshing Twist on a Classic Treat
Hey there, food lovers! I’m Beau Collier, your guide to all things delicious here at Feastical. Today, I’ve got something super special that’s perfect for any occasion—Lemon-Basil Cookies! Trust me, these cookies are a delightful mix of sweet and zesty, with a hint of herbaceous goodness from fresh basil. They’re not just your average cookie; they bring a bright twist to the traditional cookie lineup. Are you ready to dive into a recipe that’s sure to impress your friends and family? Grab your apron and let’s get started!
The Nostalgic Taste of Summer
Let me take you back a few summers ago when I first discovered the magical combination of lemon and basil. I was wandering through a local farmer’s market, soaking up the sun, when I stumbled upon a stall selling homemade cookies. The baker was sharing samples, and I was immediately hooked. One bite of their lemon-basil cookie transported me to a sun-drenched Italian kitchen where the aroma of fresh basil and lemons danced in the air. It was a match made in heaven!
That day sparked my passion for experimenting with flavors in the kitchen. I rushed home, determined to recreate that enchanting cookie. After a bit of trial and error (and a few too many taste tests), I finally settled on a recipe that had a delightful balance of sweetness and herbiness. Now, each time I whip up these cookies, I’m reminded of that sunny day and the creative spark it ignited in me. Let’s make some memories in your kitchen with these Lemon-Basil Cookies!
Ingredients You’ll Need
Before we dive into the mixing bowl, let’s gather our ingredients. Here’s your shopping list, along with some handy tips and substitutions:
-
1 cup all-purpose flour: This is the base for your cookies. You can substitute it with gluten-free flour if you’re looking to cut gluten.
-
½ cup confectioners’ sugar: The secret to that melt-in-your-mouth texture. If you don’t have confectioners’ sugar, you can blend regular sugar in a blender until fine.
-
8 tablespoons cold butter (diced): Butter adds richness. Ensure it’s cold for flakier cookies. For a dairy-free option, try using vegan butter or coconut oil.
-
1 teaspoon fresh lemon zest: This adds vibrant citrus notes. Always zest before juicing—it’s easier, and you won’t waste any fruit!
-
½ teaspoon fresh lemon juice: Brightens the flavor profile. Fresh is essential here; bottled lemon juice just doesn’t cut it.
-
¼ teaspoon vanilla bean paste (or vanilla extract): Vanilla enhances the overall flavor. If you only have extract, that’ll work fine too.
-
2 tablespoons fresh basil leaves (roughly chopped): The star ingredient! Use whole or torn leaves for a more rustic look. You can substitute with mint if you’re feeling adventurous.
-
¼ teaspoon sea salt: Elevates the flavors. If you’re using salted butter, you can skip this ingredient.
-
Optional: Sparkling sugar for garnish: Adds a delightful crunch and sparkle on top. If you don’t have it, granulated sugar works too!
Step-by-Step Instructions
Alright, here we go! Grab your mixing bowls, and let’s get baking.
-
Preheat the Oven: Begin by preheating your oven to 350°F (175°C). This ensures that your cookies bake evenly. Pro tip: If your oven tends to run hot, don’t hesitate to invest in an oven thermometer!
-
Combine Dry Ingredients: In a mixing bowl, whisk together the flour, confectioners’ sugar, and sea salt until well combined. This helps to evenly distribute the salt and sugar throughout the flour. No one wants a salted bite!
-
Add the Butter: Toss in the diced cold butter. Using your fingers or a pastry cutter, blend the butter into the flour mixture until it resembles coarse crumbs. This step is crucial; the cold butter is what gives your cookies that lovely tender texture.
-
Mix in the Flavorings: In a separate bowl, combine the lemon zest, lemon juice, vanilla paste, and chopped basil. Make sure to mix well—this magic blend is what really makes these cookies sing with flavor!
-
Combine Wet and Dry Ingredients: Gently pour the wet mixture into the dry ingredients. Stir until just combined. Don’t overmix; you want those cookies to stay wonderfully tender! A few floury patches are okay.
-
Shape the Cookies: Using a tablespoon, scoop out dough and roll it into balls. Place them on a baking sheet lined with parchment paper about 2 inches apart. They’ll spread a bit while baking.
-
Add the Sparkling Sugar: If you’re feeling fancy, sprinkle some sparkling sugar on top of each cookie. This adds a lovely crunch and shimmer that’s totally Instagram-worthy!
-
Bake: Pop the sheet in the preheated oven and bake for 12-15 minutes, or until the edges are lightly golden. Keep an eye on them—to achieve that perfect balance of chewy and crisp, you want them just set.
-
Cool: Once baked, remove from the oven and let the cookies cool on the baking sheet for a few minutes before transferring them to a wire rack. This helps them firm up and makes them easier to move without breaking.
-
Enjoy!: Once cooled, grab yourself a cup of tea or coffee (perhaps a glass of lemonade if you’re feeling extra zesty!) and enjoy these delightful cookies.
Serving Suggestions
When it comes to serving your Lemon-Basil Cookies, presentation is key! You can stack them on a beautiful plate to showcase their golden edges and vibrant green flecks of basil. Dust with a bit more confectioners’ sugar for that bakery feel. These cookies are fantastic alongside a refreshing glass of iced lemon tea or a chilled glass of prosecco for a summer soirée. If you’re serving them at a gathering, consider pairing them with a fresh fruit platter or a light salad to balance the flavors.
Recipe Variations
Now, let’s get creative! Here are a few delicious variations to try out:
-
Lemon-Basil Poppy Seed Cookies: Add a tablespoon of poppy seeds for a delightful crunch and a nutty flavor.
-
Lemon-Lavender Cookies: Swap out basil for culinary lavender for a fragrant twist that gives your cookies a flowery essence.
-
Lemon-Basil Shortbread Bars: Press the dough into a greased baking pan and bake as bars. Cut into squares for easy serving!
-
Chill for a Citrus Twist: For a refreshing twist, chill the cookie dough for an hour before baking. This helps with texture and intensifies the flavors!
-
Gluten-Free Option: Use a certified gluten-free flour blend to make these cookies gluten-free. They will still taste fabulous!
Chef’s Notes
As with any recipe, these Lemon-Basil Cookies have seen their fair share of tweaks and adaptations over the years. I remember baking these for the first time with my niece, who was only seven at the time. We had the most grand time making a mess—instead of zesting lemons, she promptly filled the bowl with basil leaves! We ended up with a very herb-friendly take on the cookies, proving that sometimes the best recipes come from accidental "kitchen catastrophes”!
FAQs and Troubleshooting
Here are a few common questions I often get about these cookies, along with some troubleshooting tips:
1. My cookies turned out too flat; what went wrong?
It sounds like your butter may have been too warm, or the dough wasn’t chilled. Make sure to use cold butter and let the dough chill in the fridge to firm it up before baking.
2. How do I know when the cookies are done?
Look for those golden edges! They might feel a bit soft at the center, but they will finish cooking as they cool on the baking sheet.
3. Can I freeze these cookies?
Absolutely! Once cool, place cookies in an airtight container. They’ll stay fresh in the freezer for up to three months. Just thaw them at room temperature before serving.
4. What if I don’t have fresh basil?
Fresh herbs make a big difference, but if you can’t find any, you could use a teaspoon of dried basil in a pinch. Just remember that dried herbs are more concentrated, so a little goes a long way!
Nutritional Information
Curious about the nutrition? Here’s a rough breakdown for one cookie (based on making about 12 cookies):
- Calories: 130
- Total Fat: 8g
- Saturated Fat: 5g
- Carbohydrates: 14g
- Sugars: 6g
- Protein: 1g
Of course, nutritional values can vary based on your ingredients and serving sizes, so be sure to adjust as needed!
Final Thoughts
And there you have it! Your very own batch of Lemon-Basil Cookies that brings a bit of sunshine to your kitchen. Whether you enjoy them fresh out of the oven or paired with tea on a rainy afternoon, these cookies are sure to become a favorite. Remember, cooking is all about experimenting and having fun, so don’t hesitate to make this recipe your own.
Get ready to share these zesty treats with the world, and don’t forget to leave a comment about your kitchen adventures with these cookies. Happy baking, and I can’t wait to share more yummy recipes with you soon! So, are you ready to take a bite of summer? Let’s bake!
PrintLemon-Basil Cookies
- Total Time: 30 minutes
- Yield: 12 cookies 1x
- Diet: Vegetarian
Description
A delightful mix of sweet and zesty cookies with a hint of fresh basil, perfect for any occasion.
Ingredients
- 1 cup all-purpose flour
- ½ cup confectioners’ sugar
- 8 tablespoons cold butter (diced)
- 1 teaspoon fresh lemon zest
- ½ teaspoon fresh lemon juice
- ¼ teaspoon vanilla bean paste (or vanilla extract)
- 2 tablespoons fresh basil leaves (roughly chopped)
- ¼ teaspoon sea salt
- Optional: Sparkling sugar for garnish
Instructions
- Preheat the oven: Begin by preheating your oven to 350°F (175°C).
- Combine dry ingredients: In a mixing bowl, whisk together the flour, confectioners’ sugar, and sea salt until well combined.
- Add the butter: Toss in the diced cold butter and blend until it resembles coarse crumbs.
- Mix in the flavorings: In a separate bowl, combine the lemon zest, lemon juice, vanilla paste, and chopped basil.
- Combine wet and dry ingredients: Gently pour the wet mixture into the dry ingredients and stir until just combined.
- Shape the cookies: Using a tablespoon, scoop out the dough and roll it into balls, placing them on a baking sheet lined with parchment paper.
- Add the sparkling sugar: Sprinkle some sparkling sugar on top of each cookie if desired.
- Bake: Bake for 12-15 minutes, or until the edges are lightly golden.
- Cool: Let the cookies cool on the baking sheet for a few minutes before transferring to a wire rack.
- Enjoy: Serve with tea or lemonade.
Notes
These cookies are fantastic alongside iced lemon tea or prosecco. Store in an airtight container for freshness.
- Prep Time: 15 minutes
- Cook Time: 15 minutes
- Category: Dessert
- Method: Baking
- Cuisine: Italian
Nutrition
- Serving Size: 1 cookie
- Calories: 130
- Sugar: 6g
- Sodium: 100mg
- Fat: 8g
- Saturated Fat: 5g
- Unsaturated Fat: 3g
- Trans Fat: 0g
- Carbohydrates: 14g
- Fiber: 0g
- Protein: 1g
- Cholesterol: 20mg
Keywords: cookies, lemon, basil, dessert, summer treats
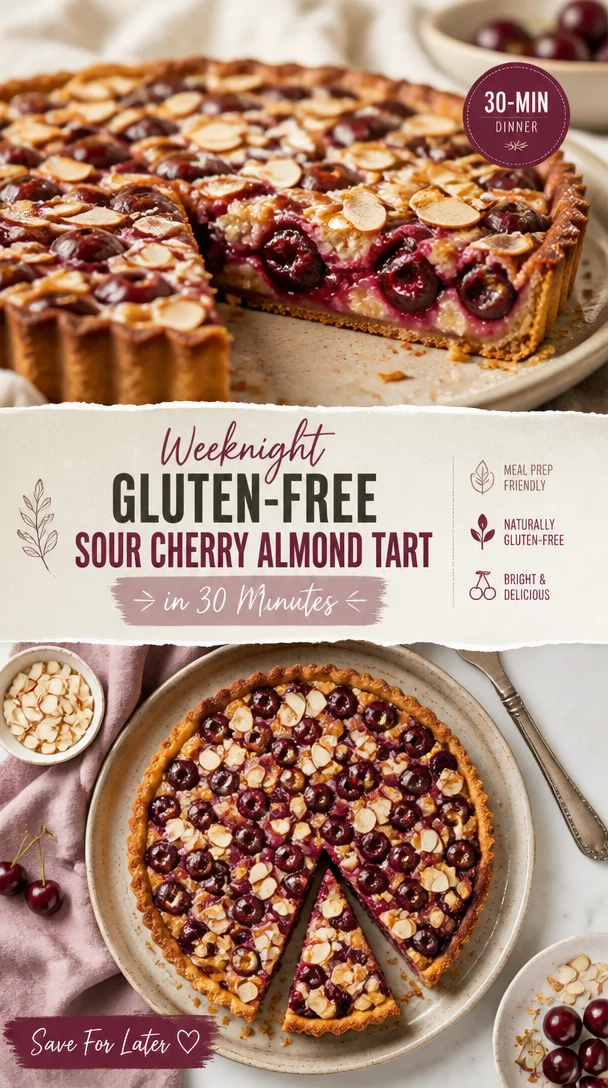
Weeknight Gluten-Free Sour Cherry Almond Tart in 30 Minutes
Gluten-Free Sour Cherry Almond Tart: A Deliciously Nostalgic Treat
Hey there, fellow food enthusiasts! Welcome back to Feastical, where the kitchen is always buzzing with joy, laughter, and mouth-watering delights. Today, we’re diving deep into a treat that not only captures the essence of summer but also sends a wave of nostalgia crashing over us like a warm hug from grandma. I’m excited to take you through the steps of making a Gluten-Free Sour Cherry Almond Tart! This beautifully vibrant tart is perfect for gatherings, or simply to spoil yourself (because you deserve it!).
A Bite of Nostalgia
Let me take you back to summers spent in my grandmother’s kitchen. The moment I walked through the door, the sweet tang of ripe cherries filled the air. She’d be bustling about, apron on, tossing flour and sugar like a painter splashes color across a canvas. “This batch is extra special,” she would say, raising an eyebrow with a cheeky grin.
Sour cherries have always had a place in my heart. You see, every summer, we’d visit the local orchard, picking bucketfuls of these tart gems, their vibrant red providing a bold contrast to the lush green leaves. We’d chatter about the flavors of the season, sampling sweet cherry treats and sharing recipes that had been passed down through generations.
One of my fondest memories is helping grandma make this very tart. While she expertly crafted the crust, I would sit on the counter, swinging my legs, eagerly waiting to drizzle that syrupy cherry concoction over the top. The smell wafting from the oven was pure magic, and nothing could compare to the taste of that tart with a scoop of vanilla ice cream melting into the crevices. It’s these wonderful memories and flavors that have inspired me to recreate this Gluten-Free Sour Cherry Almond Tart for you!
Ingredients
Let’s get our hands busy with the following ingredients, shall we? Each one plays a vital role in creating that dreamy tart:
-
1 cup almond flour (finely ground, packed)
Almond flour gives the tart a nutty flavor and a lovely texture that’s hard to resist. For a nut-free option, you could try sunflower seed flour, though the flavor will be slightly different. -
1 cup oat flour (gluten-free, if necessary)
Oat flour brings a subtle sweetness and helps bind everything together. If you can’t find oat flour, you can easily make your own by grinding rolled oats in a blender until fine—or sub in brown rice flour for a different flavor. -
1/4 cup butter or coconut oil (melted)
Rich and buttery, this fat provides the tart with a beautiful crumb. Coconut oil is a fantastic dairy-free substitute if you’re looking to keep it vegan. -
3 tbsp maple syrup
The maple syrup adds a natural sweetness that really complements those tart cherries. Honey can be used as a substitute for those who aren’t strict about vegan options. -
2 cups jarred, pitted sour cherries plus 1 1/4 cups juice from the jar (1-19 oz jar)
Ensure you choose quality cherries from a good source; they’re the star of our show! If you’re feeling adventurous, you could swap in fresh or frozen cherries when they’re in season, but adjust the sugar accordingly if they’re sweeter. -
2 tablespoons cornstarch
This is our thickening agent, giving our cherry filling a luscious, perfect consistency. For a substitute, you could use arrowroot for a similar result. -
1/4 teaspoon pure almond extract
This adds depth and enhances the almond flavor in the tart. If you’re not a fan of almond, vanilla extract works just fine too. -
1/2 cup sliced almonds
These provide fantastic crunch and an extra nutty flavor. Feel free to toast them lightly for additional richness! -
2 tablespoons sugar
This helps caramelize the tart’s top beautifully. If you’re looking to cut down on sugar, feel free to adjust the amount or opt for a sugar alternative. -
1 tablespoon beaten egg white
This acts as a glaze to give the tart a lovely golden finish. If you’re vegan, consider using a bit of non-dairy milk for a similar effect.
Step-by-Step Instructions
Alright, buckle up! Let’s get cooking. Here’s how to whip up your very own Gluten-Free Sour Cherry Almond Tart.
-
Preheat Your Oven
Preheat your oven to 350°F (175°C). Trust me, you don’t want to forget this crucial step. A properly heated oven ensures even baking and prevents the tart crust from getting soggy. -
Prepare Your Tart Pan
Grease a tart pan (9-inch works great) with a little butter or coconut oil. If you want a fool-proof release, consider lining the bottom with parchment paper. -
Make the Crust
In a mixing bowl, combine the almond flour and oat flour. Pour in the melted butter (or coconut oil) and maple syrup. Mix until it resembles coarse crumbs and starts to come together into a dough. If it feels a bit dry, add a spoonful of cold water until dough forms. -
Form the Crust
Press the dough evenly into the bottom and up the sides of your tart pan. Use a fork to poke a few holes in the bottom (this helps prevent bubbling). Pop it in the fridge for about 15-20 minutes to chill while you prepare the filling. -
Prepare the Cherry Filling
In a saucepan, combine the sour cherries, juice, and sugar over medium heat. Bring to a gentle simmer, then stir in the cornstarch mixed with a tablespoon of cold water to thicken. Add the almond extract. You’ll know it’s ready when it visibly thickens and coats the back of a spoon. -
Assemble the Tart
Pour the cherry mixture into the prepared crust, spreading it evenly. Sprinkle the sliced almonds on top; they’ll toast nicely while baking. -
Bake Your Tart
Bake in your preheated oven for about 30-35 minutes, or until the filling is bubbly, and the crust is golden brown. Keep an eye on it towards the end to prevent over-browning. -
Glaze the Tart
In the last few minutes of baking, brush the top of the tart with the beaten egg white for that glossy finish. This adds a lovely shine that makes your tart look even more irresistible! -
Let It Cool
Once done, allow it to cool in the pan for about 10-15 minutes before transferring it to a wire rack to cool completely. This cooling time is essential for the filling to set properly.
Serving Suggestions
Now that your tart is ready, it’s time to showcase your masterpiece! I suggest slicing it into generous wedges and serving it warm (or at room temperature) with a dollop of freshly whipped cream or a scoop of vanilla ice cream on the side. For an extra flourish, sprinkle some powdered sugar over the top for that café-style presentation. You can also serve it with a cup of coffee or tea—perfect for a cozy afternoon treat or a delightful brunch option!
Recipe Variations
Here are a few creative twists you can try with this tart:
-
Cherry-Almond-Lavender: Add a hint of dried culinary lavender to your cherry filling for a fragrant twist that elevates its flavor.
-
Chocolate Cherry Tart: Drizzle some melted dark chocolate over the top before serving for a decadent finish that pairs beautifully with the tart cherries.
-
Citrus Zing: Introduce a splash of orange or lemon juice to the cherry filling for a refreshing citrus kick.
-
Nut-Free Option: Swap out almond flour and sliced almonds for sunflower seed flour and pumpkin seeds for a nut-free delight.
-
Berry Blend: Use a mix of sour cherries and blueberries or raspberries for a berry explosion of flavor.
Chef’s Notes
Over the years, I’ve tweaked this recipe countless times, inspiring some fun kitchen experiments! There was one time I tried to make a savory twist by mixing in some cheese into the crust. Let’s just say it was… interesting! But that’s the beauty of cooking—you get to experiment and have fun while doing it. Each time I make this tart, I’m reminded of those sweet summer days with my grandma, and it reignites my passion for sharing food that brings joy.
FAQs and Troubleshooting
1. What if my tart crust crumbles?
If the crust crumbles, it might need a tad more moisture. Adding a small amount of cold water can help it hold together better.
2. How can I tell when my tart is done?
The filling should be bubbly, and the crust should be a lovely golden brown. If you’re unsure, a toothpick inserted into the crust can give you a good indication; if it comes out clean, it’s ready!
3. Can I freeze the tart?
Yes, you can freeze it! Just make sure it’s completely cooled and wrapped tightly in plastic wrap and then in foil. Thaw in the fridge overnight before serving.
4. How do I store leftovers?
Store any leftovers in an airtight container in the fridge for up to three days (if they last that long!). Reheat in the oven for a few minutes if you like it warm.
Nutritional Info
While I focus more on the love that goes into cooking rather than the nutritional facts, a slice of this tart clocks in around 250 calories (without toppings), primarily coming from healthy fats (thanks to the almond and coconut oil) and natural sugars from the cherries and maple syrup. It’s gluten-free and packed with good ingredients, making it a delightful treat you won’t feel guilty about.
Final Thoughts
So there you have it, food friends! A heartwarming, delightful recipe that’s sure to impress your guests or treat yourself on a quiet evening. Cooking should always be filled with joy, nostalgia, and the exploration of flavors. I hope this Gluten-Free Sour Cherry Almond Tart brings a sprinkle of sunshine to your kitchen and your taste buds!
Take a moment to savor the process, enjoy the flavors, and remember, it’s all about sharing love through food. Now, go grab that spatula, put on your favorite tunes, and let’s create culinary memories that will last a lifetime!
Happy cooking from me to you! 🍒✨
Print
Gluten-Free Sour Cherry Almond Tart
- Total Time: 55 minutes
- Yield: 8 servings 1x
- Diet: Gluten-Free
Description
A delightful tart that captures the essence of summer with the tartness of cherries and nuttiness of almond flour.
Ingredients
- 1 cup almond flour (finely ground, packed)
- 1 cup oat flour (gluten-free, if necessary)
- 1/4 cup butter or coconut oil (melted)
- 3 tbsp maple syrup
- 2 cups jarred, pitted sour cherries plus 1 1/4 cups juice from the jar (1–19 oz jar)
- 2 tablespoons cornstarch
- 1/4 teaspoon pure almond extract
- 1/2 cup sliced almonds
- 2 tablespoons sugar
- 1 tablespoon beaten egg white
Instructions
- Preheat your oven to 350°F (175°C).
- Grease a tart pan (9-inch works great) with a little butter or coconut oil.
- Combine the almond flour and oat flour in a mixing bowl. Pour in the melted butter (or coconut oil) and maple syrup. Mix until it resembles coarse crumbs and starts to form a dough.
- Press the dough evenly into the bottom and up the sides of your tart pan. Poke a few holes in the bottom and chill in the fridge for about 15-20 minutes.
- In a saucepan, combine the sour cherries, juice, and sugar over medium heat. Bring to a gentle simmer, then stir in the cornstarch mixed with a tablespoon of cold water.
- Add the almond extract to the thickened mixture.
- Pour the cherry mixture into the prepared crust, spreading it evenly. Sprinkle sliced almonds on top.
- Bake in your preheated oven for about 30-35 minutes, or until the filling is bubbly and the crust is golden brown.
- Brush the top of the tart with the beaten egg white for a glossy finish.
- Allow to cool in the pan for about 10-15 minutes before transferring to a wire rack to cool completely.
Notes
Serve warm or at room temperature with whipped cream or vanilla ice cream.
- Prep Time: 20 minutes
- Cook Time: 35 minutes
- Category: Dessert
- Method: Baking
- Cuisine: American
Nutrition
- Serving Size: 1 slice
- Calories: 250
- Sugar: 10g
- Sodium: 150mg
- Fat: 12g
- Saturated Fat: 3g
- Unsaturated Fat: 8g
- Trans Fat: 0g
- Carbohydrates: 30g
- Fiber: 3g
- Protein: 6g
- Cholesterol: 10mg
Keywords: gluten-free tart, cherry dessert, almond tart, summer dessert, nostalgic recipes
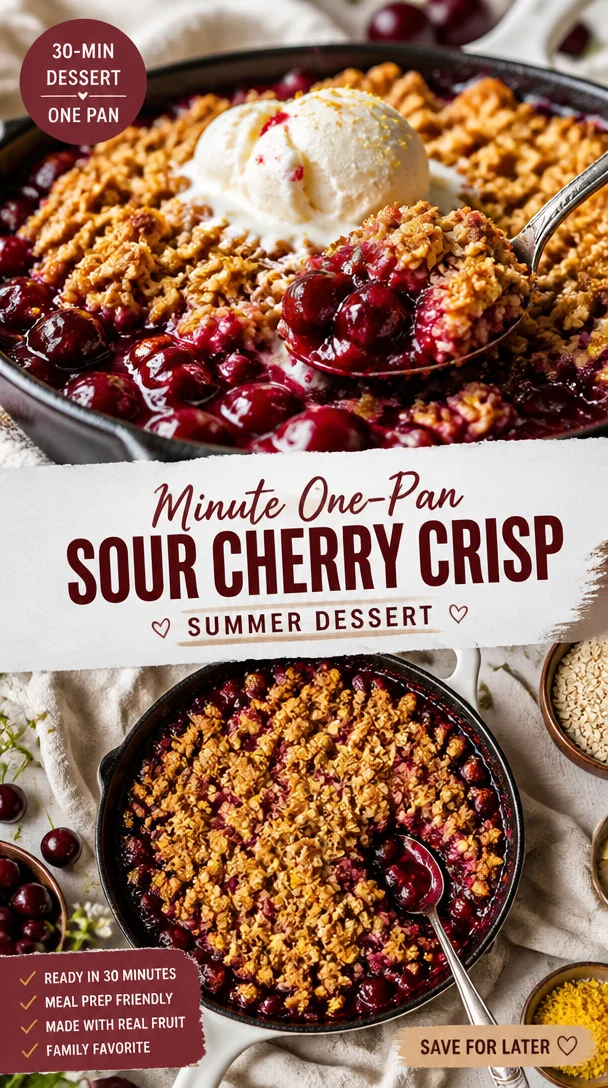
Minute One-Pan Sour Cherry Crisp (Summer Dessert)
Discovering Joy in a Tart: The Magic of Sour Cherry Crisp
Hey foodies! It’s Beau Collier here, and I’m so thrilled to dive into a dish that’s all about bringing warmth and happiness to your kitchen: Sour Cherry Crisp. If you ever needed a recipe that feels like a warm hug, this is it! Tart, sweet, and a bit nutty, this dessert is pure comfort in a bowl. Whether it’s a crisp fall evening or a bright summer day, a homemade crisp can turn any moment into a celebration.
Now, let me set the scene for you. Picture this: the air is filled with the sweet, tangy aroma of sour cherries baking in the oven, each juicy bite bursting with flavor. This dish isn’t just a scrumptious treat; it’s a mosaic of memories stitched together with love, laughter, and, of course, food.
Sour cherry season always feels like a mini-festival in my house. My family would head to the local orchard equipped with buckets the size of my eagerness to pick those bright red beauties. It became a cherished tradition—an opportunity to disconnect from the daily grind and reconnect with nature and each other. I can still hear my mother’s voice, laughter bubbling over as she recounted her favorite cherry-picking mishaps while my father expertly supervised our cherry collection efforts, ensuring we didn’t bite into too many along the way (not that I’d admit to snacking!).
Little did I know, those cherished cherries would often find their way into my kitchen, eventually leading to evenings spent making Sour Cherry Crisp. The laughter of family gatherings is woven through every spoonful, and I want to share that joyful experience with you!
Ingredients You’ll Need
Here’s a straightforward list of the ingredients you’ll need to whip up this delightful dish:
- 4 cups sour cherries, pitted: Fresh is best, but frozen can work in a pinch! Just be sure to thaw them completely.
- 1 cup rolled oats: These are crucial for that heartwarming crisp topping. If you need gluten-free, swap in gluten-free oats!
- 1 cup all-purpose flour: This gives structure to both the topping and filling. Substitute with almond flour for a nutty twist if you’re feeling adventurous!
- 1/2 cup brown sugar: It adds a lovely depth of flavor. You could use coconut sugar for a lighter option.
- 1/2 cup granulated sugar: This will sweeten up those tart cherries. If you’re watching your sugar, you can cut this down or use honey or maple syrup.
- 1/2 teaspoon cinnamon: A hint of spice brings out the fruitiness. Feel free to play with nutmeg or cardamom for a different flavor profile!
- 1/4 teaspoon salt: A little salt elevates all the sweet and tart notes.
- 1/2 cup unsalted butter, melted: This is the glue that brings that crumbly topping together. Margarine or coconut oil can work for a dairy-free alternative.
Step-by-Step Instructions
-
Preheat the Oven: Start by preheating your oven to 350°F (175°C). Getting your oven nice and warm ensures a perfectly baked crisp.
-
Prepare the Cherries: In a large bowl, combine your pitted sour cherries, 1/4 cup of granulated sugar, 1 tablespoon of flour (this will help thicken the juices), and a dash of cinnamon. Toss everything gently until the cherries are evenly coated. Let it sit while you prepare the topping.
Tip: If you find fresh cherries a bit tart, add another tablespoon of sugar. Taste-testing is key!
-
Make the Crisp Topping: In a separate bowl, whisk together the rolled oats, remaining flour, brown sugar, cinnamon, and salt. Add the melted butter, stirring until you see nice crumbly bits—this is where your crisp magic happens!
Little chef hack: Don’t overmix! We want to keep those crumbs golden and textured.
-
Assemble the Crisp: Fling those cherries into a greased baking dish (about 9×13 inches should do the trick!) and spread them evenly. Now, dust that glorious oat mixture over the top, ensuring you cover the cherries as evenly as possible.
-
Bake to Perfection: Pop your assembled crisp in the oven and bake for about 30-35 minutes, or until the topping is gorgeous and golden brown and the cherries are bubbling up around the edges.
Chef tip: If the topping gets too brown before the cherries are done, cover it loosely with foil.
-
Cool and Serve: Once baked, let your sour cherry crisp rest for a few minutes to cool slightly. This also helps those bubbly juices thicken a tad!
Important note: It’s always hard to wait, I know! Resist the urge to dig in right away; it’s worth it!
Serving Suggestions
Now that your kitchen smells like a cherry-laden dream, here’s how to serve this beauty! Scoop a generous portion into a lovely bowl (I recommend using a shallow one so you can get a good mix of topping and cherries in every bite). For a touch of decadence, add a scoop of vanilla ice cream or a dollop of whipped cream atop the warm crisp—this contrasts gorgeously with the tart cherries and crumbly topping.
Feeling a bit fancy? Drizzle a little balsamic reduction over your creation—seriously, it elevates the dish! Or sprinkle some chopped nuts for an extra crunch on top. Serve it family-style in the baking dish for a cozy, rustic presentation that encourages everyone to dig in!
Recipe Variations
Now, as much as I adore the classic sour cherry crisp, there are countless ways to mix things up! Here are a few variations to consider:
-
Mixed Berry Crisp: Swap half the sour cherries with blueberries or raspberries for an extra burst of flavor.
-
Nutty Crunch: For added texture, mix some chopped pecans or walnuts into your topping.
-
Tropical Twist: Add a splash of coconut in the topping and substitute some cherries with diced pineapple for a sunny vibe.
-
Gluten-Free Delight: Substitute the all-purpose flour with a mix of almond flour and gluten-free oats for a guilt-free indulgence.
-
Spice It Up: Experiment with different spices like ginger or cardamom mixed in with the cherries for a warm flavor profile.
Chef’s Notes
You know, this recipe has come a long way since those family orchard days! It started as just a way to deal with an abundance of cherries, and now it’s a staple in my home. I remember the first time I made it for friends; there was this gasp of excitement when they took their first bite.
Now, it’s my go-to dessert for potlucks, BBQs, and cozy nights in. The funny thing is, it’s so versatile! Most often, I find myself changing it depending on what’s in season or what I have on hand. That’s the beauty of a crisp—you can really make it your own!
FAQs and Troubleshooting
-
Can I use frozen cherries?
Absolutely! Just thaw them and drain excess liquid before mixing them with sugar and flour. -
Why does my topping burn during baking?
Your oven might be running hot, or your crisp is too close to the top heating element. Cover with foil if it browns too quickly! -
Can I make this ahead of time?
For sure! Assemble it the night before, cover with foil, and refrigerate. Just add a few extra minutes to your baking time. -
How should I store leftovers?
Store any leftovers in the fridge, covered. Reheat in the oven or microwave before serving; it’s just as delicious!
Nutritional Info
While I love comfort food, I also know many of you are conscious of your nutritional intake! So let’s break down the basic nutritional benefits of a serving of Sour Cherry Crisp (recipe serves about 8):
- Calories: ~250 (varies based on exact ingredients)
- Protein: 3g
- Fiber: 3g
- Carbohydrates: 40g
- Fat: 10g (varies based on butter and any added nuts)
Sour cherries are rich in antioxidants, and when you combine them with oats and a bit of whole grain flour, you’re indulging while still sneaking in some wholesome goodness.
Final Thoughts
There you have it, my dear foodies! Sour Cherry Crisp is more than just a dessert; it’s a link to tradition, a canvas for creativity, and a vehicle for joy! I hope you’ll create your own cherry-picking stories and share batches filled with love, laughter, and perhaps a little sticky-fingered mischief.
Remember, cooking is about exploration and connection. So grab your spatula, gather your loved ones, and dive into this delightful recipe! Can’t wait to see your takes on this favorite dish. Until next time, keep it delicious and soulful! 🍒✨
Print
Sour Cherry Crisp
- Total Time: 50 minutes
- Yield: 8 servings 1x
- Diet: Vegetarian
Description
A delightful and comforting dessert that blends tart sour cherries with a crunchy, nutty topping, perfect for any season.
Ingredients
- 4 cups sour cherries, pitted
- 1 cup rolled oats
- 1 cup all-purpose flour
- 1/2 cup brown sugar
- 1/2 cup granulated sugar
- 1/2 teaspoon cinnamon
- 1/4 teaspoon salt
- 1/2 cup unsalted butter, melted
Instructions
- Preheat the oven to 350°F (175°C).
- Combine sour cherries, 1/4 cup granulated sugar, 1 tablespoon flour, and a dash of cinnamon in a large bowl; toss gently.
- Whisk together rolled oats, remaining flour, brown sugar, cinnamon, and salt in a separate bowl.
- Add melted butter, stirring until crumbly.
- Spread cherries in a greased baking dish and cover with the oat mixture.
- Bake for 30-35 minutes, or until golden brown.
- Cool for a few minutes before serving.
Notes
For an extra touch, serve with vanilla ice cream or a drizzle of balsamic reduction.
- Prep Time: 15 minutes
- Cook Time: 35 minutes
- Category: Dessert
- Method: Baking
- Cuisine: American
Nutrition
- Serving Size: 1 serving
- Calories: 250
- Sugar: 20g
- Sodium: 200mg
- Fat: 10g
- Saturated Fat: 6g
- Unsaturated Fat: 4g
- Trans Fat: 0g
- Carbohydrates: 40g
- Fiber: 3g
- Protein: 3g
- Cholesterol: 30mg
Keywords: sour cherry crisp, dessert, baked, fruit crisp, family recipe
Beginner-Friendly Homemade Fig Newtons in 30 Minutes
How to Make Homemade Fig Newtons: A Nostalgic Treat That’s Easy and Delicious
Hey there, food lovers! Welcome back to Feastical! Today, I’m thrilled to share a recipe that’s not only delightful to the taste buds but also brings back a whirlwind of sweet nostalgia—Homemade Fig Newtons! These little pockets of joy are perfect for snacking, sharing, or savoring with your morning coffee!
I must confess, I have a soft spot for these sweet, chewy bars filled with luscious figs. They remind me of lazy afternoons spent in my grandmother’s kitchen, where the scent of freshly baked treats wafted through the air like a warm embrace. Fig Newtons were always a favorite when my sisters and I would visit her. She had a knack for transforming simple ingredients into something magical. Today, I feel empowered to carry on her tradition by whipping up these delightful homemade versions that taste ten times better than the store-bought kind. Not to mention, they offer a healthier twist since you know exactly what goes in them—a win-win!
So, if you’re ready to create some tasty memories and treat yourself to a delicious snack, gather your ingredients, roll up your sleeves, and let’s get baking!
A Sweet Memory: The Fig Newton Connection
My fondest memories of Fig Newtons take me right back to those summer afternoons spent with my grandma in her charming kitchen. I can still picture her standing at the counter, flour dusting her apron, humming softly to herself. With each slice of the delicate, golden-brown pastry, she would share a story about her childhood and how fig trees lined the streets of her neighborhood.
I loved the way she emphasized the word "fig" as if it held a treasured secret. My sisters and I would lick our fingers—the sticky sweetness only heightened our anticipation. The first bite was always a revelation: juicy figs embraced by a subtle buttery crust, their sweetness balanced by just a pinch of salt. Those moments always reminded me that food is more than just sustenance; it’s about connection, love, and the simple joy of coming together.
Now, as I make my own Homemade Fig Newtons, I carry those cherished memories with me, infusing each batch with the love and warmth I felt in her kitchen. So, grab those figs and let’s bake some bliss together!
Ingredients
Let’s take a look at the lovely ingredients you’ll need to make these fig-tastic treats.
-
1 cup dried figs, chopped: Figs are the star here! The sweetness and chewiness add amazing texture and flavor. If you can’t find dried figs, you can substitute with dried apricots or dates, but the flavor will change slightly.
-
1 cup water: This helps to soften the dried figs; you want them plump and luscious.
-
1 teaspoon vanilla extract: A dash of pure vanilla extract enhances the sweetness and brings depth to the flavor. If you’re out of vanilla, a sprinkle of almond extract can work wonders.
-
1/2 cup unsalted butter, softened: This adds richness and flavor to the cookie base. If you prefer a dairy-free option, coconut oil is a good substitute.
-
1/2 cup brown sugar: Brown sugar adds moisture and a rich, caramel-like sweetness. If you’re looking for a healthier option, consider using coconut sugar for a similar taste profile.
-
1 large egg: Eggs provide structure and help bind the ingredients together. For a vegan option, you can mix 1 tablespoon of ground flaxseed with 2.5 tablespoons of water to make a “flax egg.”
-
1 cup all-purpose flour: This forms the base of the dough, giving it that classic cookie texture. For a gluten-free option, try using almond flour or a gluten-free flour blend.
-
1/2 teaspoon baking powder: To create a light and fluffy texture. An alternative is to use baking soda, but you may want to add a bit more acid (like lemon juice) to activate it.
-
1/2 teaspoon salt: Just a pinch balances the sweetness and enhances the flavors.
-
1 cup whole wheat flour: This adds a nutty flavor and is a healthier option than the regular all-purpose flour. If you want a gluten-free twist, you can substitute this with additional almond flour or oat flour.
Step-by-Step Instructions
Step 1: Prepare the Figs
In a small saucepan, combine 1 cup of chopped dried figs and 1 cup of water. Bring to a gentle simmer over medium heat. Cook for about 8-10 minutes until the figs are softened and have absorbed most of the water. Once they are nice and mushy, remove from heat, stir in 1 teaspoon of vanilla extract, and let them cool a bit before blending.
Chef’s Tip: For a little extra flavor, you can add a squeeze of lemon juice or a pinch of cinnamon to the figs while they’re cooking!
Step 2: Make the Dough
In a big mixing bowl, cream together 1/2 cup of softened unsalted butter (make sure it’s not melted, just soft!) and 1/2 cup of brown sugar until light and fluffy. This should take about 2-3 minutes.
Now, crack in 1 large egg and mix until combined.
In another bowl, whisk together 1 cup of all-purpose flour, 1/2 teaspoon of baking powder, and 1/2 teaspoon of salt. Gradually add the dry ingredients to the wet mixture, mixing until just combined. Finally, fold in 1 cup of whole wheat flour until a soft dough forms.
Chef’s Hack: If the dough seems too sticky, you can chill it in the fridge for about 30 minutes before rolling.
Step 3: Roll It Out
On a lightly floured surface, divide the dough into two equal halves and roll each one out into a rectangle about 1/4 inch thick. You want them thin but not too fragile—they should hold the fig filling beautifully.
Step 4: Fill ‘Em Up
Spread half of the fig filling down the center of each dough rectangle. Leave some space along the edges so you can seal them properly. Then, fold the dough over the filling, pinching the edges to seal.
Step 5: Bake to Perfection
Preheat your oven to 350°F (175°C). Line a baking sheet with parchment paper. Transfer the filled dough onto the sheet, seam side down. Bake for about 25-30 minutes, or until the tops are golden brown.
Chef’s Tip: For an extra touch of sweetness, you can sprinkle a little brown sugar on top before baking!
Step 6: Cool and Slice
Once they are baked, let them cool for about 10 minutes on the sheet. Carefully transfer them to a cooling rack. Once completely cooled, slice them into bars or squares.
Step 7: Enjoy!
Grab a mug of your favorite beverage, and you’re all set to enjoy your Homemade Fig Newtons!
Serving Suggestions
These delectable bars are perfect for a cozy afternoon tea or as an on-the-go snack. To serve, plate them on a rustic wooden board, sprinkle with some icing sugar, and add a few fresh figs or berries for a pop of color. They look gorgeous and taste even better when shared with friends or family.
For a lovely brunch, you could even pair these Homemade Fig Newtons with yogurt and a drizzle of honey, creating an indulgent yet healthy treat!
Recipe Variations
Feeling adventurous? Here are a few creative twists to make your Fig Newtons even more exciting:
- Nutty Addition: Throw in some chopped nuts like walnuts or pecans into the fig filling for a delightful crunch.
- Cocoa Kick: Add 2 tablespoons of unsweetened cocoa powder to the dough for a chocolatey version.
- Spiced Up: A dash of ground cinnamon or nutmeg in the dough or filling can enhance the flavor profile beautifully.
- Fruit Fusion: Mix dried figs with other dried fruits like apricots or cranberries for a medley of flavors.
- Sugar-Free Needs: Substitute honey or maple syrup for the brown sugar to create a more natural sweetness.
Chef’s Notes
It’s always fun to reminisce about how a recipe evolves over time. This Homemade Fig Newtons recipe started as a simple attempt to recreate my grandma’s version, but through plenty of taste tests and experiments, it has transformed into something uniquely delicious! Occasionally, my friends join me in the kitchen for baking days, and we usually get sidetracked with random safety jokes or silly antics. Who knew baking could spark laughter alongside some great treats?
FAQs and Troubleshooting
Q: My dough is too sticky; what do I do?
A: If your dough is sticky, try chilling it in the fridge for 30 minutes. It should be easier to handle after that!
Q: Can I freeze Homemade Fig Newtons?
A: Absolutely! Wrap them well and store them in an airtight container in the freezer for up to three months. When you want to enjoy them, just let them thaw at room temperature.
Q: How can I tell when they’re done baking?
A: They should be golden brown on top and firm to the touch. A toothpick inserted in the center should come out clean.
Q: What can I do with leftover fig filling?
A: Use it as a delicious topping for yogurt, pancakes, or even spread it on toast. It’s versatile and scrumptious!
Nutritional Info
Per serving (1 bar):
- Calories: 150
- Total Fat: 6g
- Saturated Fat: 3g
- Cholesterol: 30mg
- Sodium: 50mg
- Total Carbohydrates: 22g
- Dietary Fiber: 2g
- Sugars: 8g
- Protein: 2g
Homemade Fig Newtons are not just a nostalgic treat but also a delightful combination of flavors that everyone will enjoy. With wholesome ingredients, you can savor every bite while still feeling good about your snack choice!
Final Thoughts
And there you have it—delicious, homemade Fig Newtons that are sure to bring a smile to your face and a happy dance in your heart! I hope you enjoy making and sharing these sweet snacks as much as I do. They’re perfect for family gatherings, lunchboxes, or simply as a treat to brighten your day.
Don’t forget to share your creations with us! You might just inspire someone else to whip up their own batch. As always, keep cooking from the heart, and remember, the kitchen is where the magic happens. Until next time, happy baking!
Print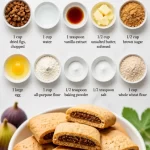
Homemade Fig Newtons
- Total Time: 45 minutes
- Yield: 12 servings 1x
- Diet: Vegetarian
Description
Delightful homemade Fig Newtons that blend nostalgia with a delicious flavor, perfect for snacking or sharing.
Ingredients
- 1 cup dried figs, chopped
- 1 cup water
- 1 teaspoon vanilla extract
- 1/2 cup unsalted butter, softened
- 1/2 cup brown sugar
- 1 large egg
- 1 cup all-purpose flour
- 1/2 teaspoon baking powder
- 1/2 teaspoon salt
- 1 cup whole wheat flour
Instructions
- Prepare the figs: In a small saucepan, combine chopped dried figs and water, simmer for 8-10 minutes until softened, stir in vanilla, and cool.
- Make the dough: Cream together softened butter and brown sugar, mix in the egg, then combine with dry ingredients until a soft dough forms.
- Roll it out: Divide the dough and roll each half into a rectangle about 1/4 inch thick.
- Fill ‘em up: Spread fig filling in the center of each rectangle, fold dough over, and seal edges.
- Bake to perfection: Preheat oven to 350°F (175°C), bake for 25-30 minutes until golden brown.
- Cool and slice: Let cool for 10 minutes, then transfer to a rack to cool completely before slicing.
- Enjoy! Pair with your favorite beverage and savor the homemade goodness.
Notes
For an extra touch of sweetness, sprinkle brown sugar on top before baking. You can also add nuts or spices for variations.
- Prep Time: 15 minutes
- Cook Time: 30 minutes
- Category: Snack
- Method: Baking
- Cuisine: American
Nutrition
- Serving Size: 1 bar
- Calories: 150
- Sugar: 8g
- Sodium: 50mg
- Fat: 6g
- Saturated Fat: 3g
- Unsaturated Fat: 2g
- Trans Fat: 0g
- Carbohydrates: 22g
- Fiber: 2g
- Protein: 2g
- Cholesterol: 30mg
Keywords: Fig Newtons, homemade snack, nostalgic treats, baking, dessert
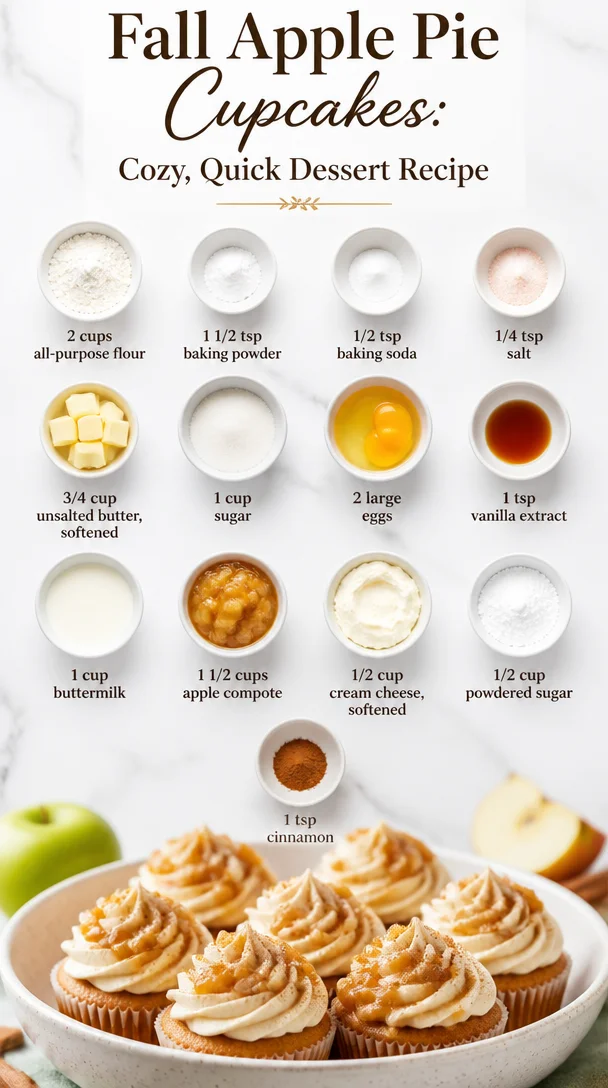
Fall Apple Pie Cupcakes: Cozy, Quick Dessert Recipe
Apple Pie Cupcakes: A Sweet Slice of Nostalgia
Hey food lovers! Welcome to the cozy world of Feastical, where flavors dance and every bite tells a story. Today, we’re diving into a delightful treat that fuses the comfort of classic apple pie with the convenience of a cupcake—introducing Apple Pie Cupcakes! These little gems are perfect for a cozy afternoon or to impress your friends at the next potluck. With a warm, spiced apple filling and a creamy frosting, these cupcakes will definitely bring a smile to your face.
A Memory from the Kitchen
Growing up, my grandmother had a knack for turning our kitchen into a magical place filled with the aroma of fresh-baked goods. One of my favorite memories was her annual apple pie-making session in the fall. We’d pick apples from the local orchard, each one better than the last. The entire house would transform into a warm haven filled with cinnamon and sugar.
I remember standing on a stool next to her, watching with wide eyes as she peeled and sliced the apples. The flour would fly as she worked the dough, and before long, we’d have a bubbling pie in the oven. And the best part? Sneaking bites of the apple filling when she wasn’t looking! Those memories inspired me to create these Apple Pie Cupcakes as a tribute to her delicious legacy. They capture not just the taste but the love and warmth that comes with each bite.
Ingredients
Before we roll up our sleeves and get baking, let’s gather our stars! Here’s what you’ll need:
-
2 cups all-purpose flour
The foundation of our cupcake—great for structural integrity! Substitute with a gluten-free blend if needed. -
1 1/2 tsp baking powder
This helps our cupcakes rise beautifully. Make sure it’s fresh for the best lift! -
1/2 tsp baking soda
Offers additional leavening power. Again, freshness is key! -
1/4 tsp salt
A little salt enhances sweetness—don’t skip it! -
3/4 cup unsalted butter, softened
The butter adds rich flavor and moisture. You can use coconut oil for a dairy-free version. -
1 cup sugar
Sweetness is essential! Consider using brown sugar for a deeper, caramel-like flavor. -
2 large eggs
Eggs help bind everything together. If you’re vegan, try flax eggs instead (1 tablespoon ground flaxseed + 3 tablespoons water per egg). -
1 tsp vanilla extract
Adds warmth and richness. Pure vanilla is always best, but imitation will work in a pinch. -
1 cup buttermilk
This ingredient makes for moist cupcakes. You can easily make your own by adding 1 tablespoon of vinegar or lemon juice to regular milk! -
1 1/2 cups apple compote
The star of the dish! Use homemade or store-bought—just make sure it’s spiced to your liking. -
1/2 cup cream cheese, softened
Perfect for our frosting. If you need a vegan option, try using a vegan cream cheese spread. -
1/2 cup powdered sugar
For sweetness and that fluffy frosting texture. You can adjust this based on how sweet you like your frosting. -
1 tsp cinnamon
For that cozy, aromatic flavor that makes these cupcakes taste like fall.
Step-by-Step Instructions
-
Preheat the oven: Start by preheating your oven to 350°F (175°C). Line a muffin pan with cupcake liners because nobody wants a cupcake disaster!
-
Mix the dry ingredients: In a large bowl, whisk together the flour, baking powder, baking soda, salt, and cinnamon until well combined. This ensures even distribution and prevents lumps. Set it aside.
-
Cream the butter and sugar: In another bowl, cream the softened unsalted butter and sugar together until light and fluffy—about 3-4 minutes. This step is essential as it incorporates air into the batter for a lighter texture. Tip: use a stand mixer if you have one; your arms will thank you!
-
Add eggs and vanilla: Beat in the eggs, one at a time, and stir in the vanilla extract until well combined. If you see any lumps of butter, don’t worry; they’ll disappear once we mix in the dry ingredients.
-
Combine wet and dry: Slowly add the dry ingredients to the butter mixture, alternating with the buttermilk, starting and ending with the dry ingredients. Mix until just combined. Overmixing can lead to tough cupcakes!
-
Fold in the apple compote: Gently fold the apple compote into the batter, distributing it evenly. Resist the urge to overmix; we want those delightful apple chunks to remain intact!
-
Scoop and bake: Divide the batter evenly among the cupcake liners, filling each about 2/3 full. Bake in the preheated oven for 18-22 minutes, or until a toothpick inserted into the center comes out clean.
-
Cool the cupcakes: Once baked, remove them from the oven and let them cool in the pan for about 5 minutes. Then, transfer them to a wire rack to cool completely. This step is super important if you want that frosting to sit pretty on top!
-
Make the frosting: While the cupcakes cool, it’s time to whip up the frosting. In a medium bowl, beat the cream cheese until smooth. Gradually add powdered sugar and mix until combined. If the frosting is too thick, add a splash of milk to reach your desired consistency.
-
Frost your cupcakes: Once the cupcakes are completely cool, use a piping bag (or a simple ziploc with the corner cut out) to frost them generously. Even a little swirl will do, so don’t stress about making it perfect!
Serving Suggestions
These Apple Pie Cupcakes are best served fresh, but they keep well for a couple of days in an airtight container. To elevate the presentation, sprinkle some extra cinnamon on top of the frosting or garnish with a thin slice of apple. These cupcakes will warm the hearts of your family and friends, making them perfect for gatherings or just as a sweet pick-me-up!
Recipe Variations
Looking to switch things up? Here are some fun variations to try:
-
Caramel Apple: Drizzle some caramel sauce over the frosting for an extra layer of sweetness and flavor.
-
Nutty Crunch: Fold in chopped nuts, such as walnuts or pecans, into the batter for a bit of crunch.
-
Spiced Up: Add a pinch of nutmeg or allspice to the batter for more spice complexity—perfect for those chilly autumn days.
-
Vegan Apple Pie Cupcakes: Substitute ingredients as mentioned, and you’ll have a delightful plant-based treat that everyone will adore!
-
Mini Cupcakes: Bake them in a mini muffin tin for bite-sized treats. Just adjust the baking time to around 10-12 minutes!
Chef’s Notes
These Apple Pie Cupcakes hold a special place in my heart because they’ve evolved over the years. Initially, I tried to recreate my grandmother’s apple pie flavor in a simple cupcake form. With several trials, sprinkles of love, and a few kitchen mishaps (hello, flour explosion!), I finally found the perfect balance of flavors and textures. It’s a fun journey every time I whip up a batch. Honestly, it’s hard to eat just one!
FAQs and Troubleshooting
1. Why do my cupcakes sink in the middle?
This can happen if you overmixed the batter or if your oven temperature is too low. Make sure to check your oven with an oven thermometer!
2. Can I use fresh apples instead of apple compote?
Absolutely! Just sauté chopped apples with a little sugar and cinnamon until tender, then fold them into the batter.
3. How do I store these cupcakes?
Keep them in an airtight container at room temperature for up to 3 days or in the fridge for a week. Keep in mind that refrigerated cupcakes may become a bit denser.
4. My frosting is too runny! What can I do?
If your frosting is too thin, simply add more powdered sugar until it reaches your desired consistency. A little cornstarch can help stabilize it too!
Nutritional Info
These Apple Pie Cupcakes are not just delightful; they also pack a fair punch of flavor without too much guilt. Here’s a quick breakdown per cupcake (assuming 12 servings):
- Calories: 250
- Total Fat: 10g
- Saturated Fat: 5g
- Cholesterol: 35mg
- Sodium: 150mg
- Total Carbohydrates: 38g
- Dietary Fiber: 1g
- Sugars: 18g
- Protein: 2g
Note: Values may vary based on substitutions and exact measurements.
Final Thoughts
There you have it—your go-to recipe for Apple Pie Cupcakes! Each bite is a nostalgic trip to grandma’s kitchen, wrapped in a sweet, spiced cupcake. Whether you’re sharing them with loved ones or just treating yourself, these cupcakes are sure to warm hearts and bring smiles.
So, let’s get baking! Remember, every cupcake has a story, and with this recipe, you’ll create delightful memories that will be cherished for years to come. Happy baking, and until next time at Feastical—keep those forks at the ready! 🍏🧁
Print
Apple Pie Cupcakes
- Total Time: 37 minutes
- Yield: 12 servings 1x
- Diet: Vegetarian
Description
A delightful fusion of classic apple pie and cupcakes, these Apple Pie Cupcakes feature a warm, spiced apple filling and creamy frosting for a sweet treat that brings nostalgia.
Ingredients
- 2 cups all-purpose flour
- 1 1/2 tsp baking powder
- 1/2 tsp baking soda
- 1/4 tsp salt
- 3/4 cup unsalted butter, softened
- 1 cup sugar
- 2 large eggs
- 1 tsp vanilla extract
- 1 cup buttermilk
- 1 1/2 cups apple compote
- 1/2 cup cream cheese, softened
- 1/2 cup powdered sugar
- 1 tsp cinnamon
Instructions
- Preheat the oven: Start by preheating your oven to 350°F (175°C). Line a muffin pan with cupcake liners.
- Mix the dry ingredients: In a large bowl, whisk together the flour, baking powder, baking soda, salt, and cinnamon until well combined.
- Cream the butter and sugar: In another bowl, cream the softened unsalted butter and sugar together until light and fluffy—about 3-4 minutes.
- Add eggs and vanilla: Beat in the eggs, one at a time, and stir in the vanilla extract until well combined.
- Combine wet and dry: Slowly add the dry ingredients to the butter mixture, alternating with the buttermilk, starting and ending with the dry ingredients.
- Fold in the apple compote: Gently fold the apple compote into the batter.
- Scoop and bake: Divide the batter evenly among the cupcake liners, filling each about 2/3 full. Bake in the preheated oven for 18-22 minutes.
- Cool the cupcakes: Once baked, remove them from the oven and let them cool in the pan for about 5 minutes, then transfer them to a wire rack.
- Make the frosting: In a medium bowl, beat the cream cheese until smooth. Gradually add powdered sugar and mix until combined.
- Frost your cupcakes: Once the cupcakes are completely cool, frost them generously using a piping bag.
Notes
These cupcakes are best served fresh but can be stored in an airtight container for a few days. Elevate presentations by sprinkling cinnamon on top of the frosting.
- Prep Time: 15 minutes
- Cook Time: 22 minutes
- Category: Dessert
- Method: Baking
- Cuisine: American
Nutrition
- Serving Size: 1 cupcake
- Calories: 250
- Sugar: 18g
- Sodium: 150mg
- Fat: 10g
- Saturated Fat: 5g
- Unsaturated Fat: 3g
- Trans Fat: 0g
- Carbohydrates: 38g
- Fiber: 1g
- Protein: 2g
- Cholesterol: 35mg
Keywords: cupcakes, apple pie, dessert, baking, nostalgia
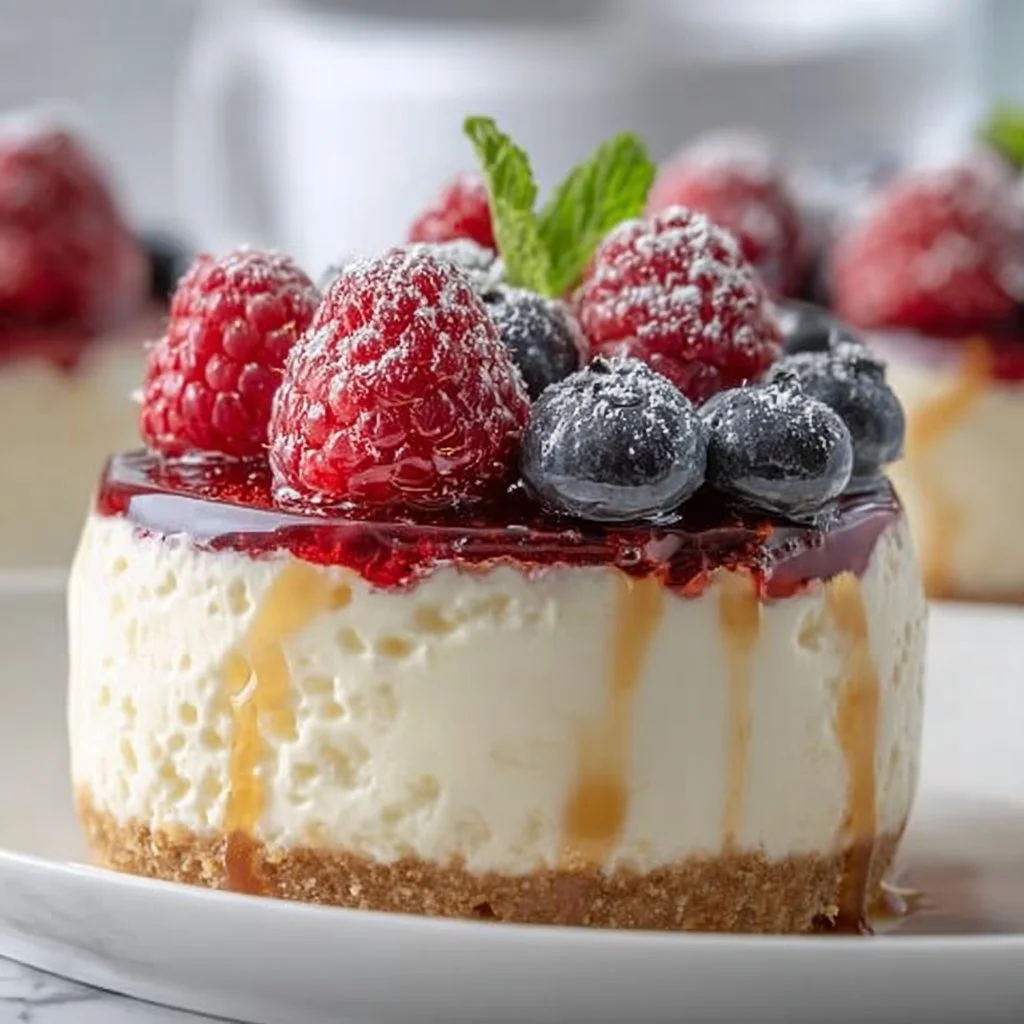
Quick Greek Yogurt Jello Cheesecake
Quick Greek Yogurt Jello Cheesecake: Whip It Up!
Hey there, fellow foodies! I’m Beau Collier, and today, we’re diving into a delightful dessert that’s sure to make your taste buds dance—Quick Greek Yogurt Jello Cheesecake! If you’re craving something creamy and fruity without all the fuss that usually comes with cheesecake, you’ve hit the jackpot! Think of this as the vibrant cousin of a classic cheesecake: light, fluffy, and a whole lot of fun. So, grab your mixing bowl, and let’s embark on this sweet journey together!
Whenever I think about desserts, it brings back a flood of warm memories from my childhood. Laughter around the kitchen, family gathered around the table, and the delightful scent of something delicious wafting through the air. There’s something magical about sharing food with loved ones; it transforms a meal into an experience.
Now, Greek yogurt jello cheesecake might sound like a new spin, but trust me—it’s as comforting as it is delicious. Picture this: a smooth, creamy filling infused with your favorite fruity jello, all snug in a crunchy graham cracker crust. And the best part? It’s so easy to whip up that you can get in and out of the kitchen before your favorite TV show starts!
This cheesecake isn’t just about flavors; it’s about nostalgia, creativity, and, most importantly, bringing people together. And while we might love indulging in a classic cheesecake from time to time, this version is perfectly balanced with that tangy Greek yogurt, keeping it light yet utterly satisfying—not to mention, it’s a fantastic way to sneak in some protein! Who says dessert can’t be healthy, right?
So, whether you’re hosting a summer party, celebrating a birthday, or simply want to treat yourself to something sweet, this Quick Greek Yogurt Jello Cheesecake is your secret weapon. Let’s tie on those aprons and get ready to bake some memories!
Personal Story
Before we dive into the ingredients, let me share a story. Growing up, my grandmother was the cheesecake queen. She had a recipe that was passed down through generations, and she would whip it up for every family gathering. The kitchen would fill with laughter, the clanging of mixing bowls, and my grandma’s gentle voice reminding me to “watch the mixer, Beau—you don’t want to end up in a flour cloud!”
One summer afternoon, I decided to experiment with her classic recipe. I was feeling adventurous and thought, “What if I added some jello for a fruity twist?” After a few tweaks, I ended up with a creamy, colorful dessert that everyone raved about. It became a family favorite, and my grandmother was proud that I’d taken her foundations and made them my own.
That’s how my love for creative twists on classic recipes blossomed! Now, every time I make this Greek Yogurt Jello Cheesecake, I think of my grandma and our time together in the kitchen, and I hope to inspire you to create your own delicious memories.
Ingredients
Here’s what you’ll need to whip up this delightful cheesecake. Easy peasy!
-
2 cups Greek yogurt
Greek yogurt is the star here! Its rich and creamy texture gives the cheesecake that velvety smoothness we crave. You can substitute it with regular yogurt, but the tanginess and thickness of Greek yogurt really take this recipe to the next level. -
1 cup Jello powder (flavor of your choice)
The flavor possibilities are endless—strawberry, raspberry, lime, or even a mix of flavors! Don’t forget that the color of the jello powder contributes to the final presentation—so get creative! If you want a sugar-free option, there are plenty of low-calorie varieties available. -
1 cup cream cheese, softened
This is essential for achieving that creamy, cheesecakey goodness we all love. Make sure it’s softened for easy mixing. You can use low-fat or even vegan cream cheese for a lighter, dairy-free version! -
1/2 cup sugar
A touch of sweetness! Feel free to use honey, maple syrup, or a sugar substitute if you’re looking for a low-sugar version. -
1 teaspoon vanilla extract
The flavor enhancer! It rounds out the cheesecake perfectly. Remember, always choose pure vanilla extract for the best taste. -
1 cup whipped cream or Cool Whip
A fluffy topping that adds lightness to the cheesecake! You can make your own whipped cream or use store-bought—it’s totally up to you. -
Graham cracker crust (pre-made or homemade)
The classic base! You can make one from scratch or buy a pre-made crust to save time. If you’re feeling adventurous, try using crushed Oreos or crushed nuts mixed with butter for a different flavor.
Step-by-Step Instructions
Now that we’ve gathered our ingredients, let’s get cooking! Follow these simple steps for a foolproof cheesecake experience.
-
Prepare the Crust: If you’re making your own graham cracker crust, preheat your oven to 350°F (175°C). In a mixing bowl, combine 1 ½ cups of crushed graham crackers, 1/4 cup of sugar, and 1/2 cup of melted butter. Mix well until combined. Press this mixture into the bottom of a 9-inch pie dish or springform pan. Bake for about 8 minutes until lightly golden. Let it cool completely before adding the filling. This step gives you a crunchy base!
-
Mix the Filling: In a large bowl, beat the softened cream cheese until smooth and creamy—this is where you get that luscious texture! You can use an electric mixer for ease or a good old-fashioned whisk if you’re feeling strong. Gradually add in your sugar and vanilla extract, mixing until fluffy. Make sure there are no lumps; no one likes a chunky cheesecake!
-
Add the Greek Yogurt: Once your cream cheese mixture is smooth, slowly fold in the Greek yogurt until well combined. This is the moment your cheesecake starts to take on that silky demeanor! Use a spatula to fold gently; we want to keep all that airiness.
-
Incorporate the Jello: Here’s where the fun begins! Sprinkle in your jello powder and mix until well incorporated. The color will start to pop, and you’ll be amazed at how vibrant your filling turns. If you have a favorite jello flavor combination, mix it up!
-
Fold in the Whipped Cream: Gently incorporate the whipped cream or Cool Whip into the mixture. This step is crucial for achieving that light and airy texture we all love. Use a folding motion, working from the bottom to top, until no streaks remain.
-
Pour and Chill: Once everything is blended, pour your cheesecake batter into the prepared graham cracker crust, smoothing out the top with a spatula. Cover with plastic wrap and pop it in the fridge for at least 3 hours, or until set. This waiting game is the hardest part, but it’s worth every second!
-
Serve Up: When you’re ready to indulge, cut into the cheesecake, and serve it with extra whipped cream or fresh fruit on top if you like! Get ready for compliments galore!
Serving Suggestions
Presentation can make all the difference, so let’s spruce this dessert up a bit! Here’s how I love to plate up this Quick Greek Yogurt Jello Cheesecake:
-
Garnish: Top slices with a dollop of whipped cream, a sprinkle of jello sprinkles, or a drizzle of fruit syrup. Fresh mixed berries or a slice of fruit that matches your jello flavor adds a pop of color and flavor!
-
Serving Dish: If you used a springform pan, you can showcase your cheesecake in its beautiful form. For a casual vibe, cut individual slices and place them on cute dessert plates.
-
Final Touch: A mint leaf or a sprinkle of crushed graham crackers can make your cheesecake all the more inviting. Remember, we eat with our eyes first!
Recipe Variations
Feeling a bit adventurous? Here are some creative twists you can try out with this cheesecake recipe:
-
Chocolate Lovers Delight: Swap out the fruity jello for chocolate pudding mix. Add a splash of coffee to enhance the chocolate flavor, and top with chocolate shavings for an indulgent dessert!
-
Zesty Lemon: Use lemon jello and fold in some lemon zest for a refreshing citrus twist. Top with a light lemon glaze for an extra zing!
-
Berry Bliss: Combine mixed berry jello with fresh blueberries and raspberries folded into the filling for a fruity explosion of flavor.
-
Nutty Crust: Change up the graham cracker crust by using crushed nuts like pecans or almonds mixed with a little melted butter. It adds a lovely crunch and nutty flavor.
-
Pumpkin Spice Dream: In the fall, take advantage of pumpkin spice jello! Add a sprinkle of cinnamon to the filling and serve with a dollop of whipped cream infused with cinnamon.
Chef’s Notes
As I’ve played with this recipe over the years, I’ve learned that baking is all about experimentation. The chemistry in the kitchen can lead to both flops and fabulous surprises! This specific Greek yogurt jello cheesecake recipe started as a way to use up leftover jello packets from a gathering, and it transformed into a go-to dessert for every occasion.
Sometimes, my kids will join in cooking, and the most fun chaos unfolds. They decorate it like a canvas, and the mess we make together becomes priceless memories!
FAQs and Troubleshooting
Let’s tackle some common questions and potential hiccups you might encounter along the way:
-
Can I make this cheesecake ahead of time?
Absolutely! This cheesecake actually tastes even better the next day after setting overnight. Just keep it covered in the fridge! -
My cheesecake didn’t set. What went wrong?
Not chilling it long enough can lead to a runny cheesecake. Make sure to allow ample chilling time! If you’re in a hurry, you can try sticking it in the freezer for an hour or so but keep an eye on it. -
Can I use low-fat or fat-free ingredients?
Yes! Feel free to swap some of the ingredients for low-fat or fat-free options. Just keep in mind that it may alter the taste and texture slightly. -
What can I do with leftovers?
You can enjoy it as a breakfast topping on pancakes or waffles, blend it into a smoothie, or simply take it to work for lunch!
Nutritional Info
Here’s a rough nutritional breakdown for a standard slice of Quick Greek Yogurt Jello Cheesecake, assuming a total of 12 servings:
- Calories: About 200
- Protein: 5g
- Fat: 9g
- Carbohydrates: 26g
- Sugar: 12g
- Fiber: 1g
Note: These values can vary based on ingredient choices, so be sure to calculate based on what you use!
Final Thoughts
So there you have it—Quick Greek Yogurt Jello Cheesecake, the dessert that’s as easy to make as it is to share! Every bite is a reminder of the joys of cooking, and I hope you feel inspired to whip this up for your next gathering (or just for yourself—you’ve earned it!).
As with all cooking, it’s about love, creativity, and connection. Share your version of this cheesecake with family and friends, swap out flavors, and make it your own. Remember, it’s all about making memories in the kitchen and, most importantly, having fun while doing it!
Until next time, happy cooking!
Print
Quick Greek Yogurt Jello Cheesecake
- Total Time: 180 minutes
- Yield: 12 servings 1x
- Diet: Vegetarian
Description
A light and creamy cheesecake made with Greek yogurt and fruity jello, perfect for any gathering.
Ingredients
- 2 cups Greek yogurt
- 1 cup Jello powder (flavor of your choice)
- 1 cup cream cheese, softened
- 1/2 cup sugar
- 1 teaspoon vanilla extract
- 1 cup whipped cream or Cool Whip
- Graham cracker crust (pre-made or homemade)
Instructions
- Prepare the crust: Preheat your oven to 350°F (175°C). In a mixing bowl, combine 1 ½ cups of crushed graham crackers, 1/4 cup of sugar, and 1/2 cup of melted butter. Mix well, then press into a 9-inch pie dish or springform pan. Bake for about 8 minutes until lightly golden. Let cool.
- Mix the filling: In a large bowl, beat the softened cream cheese until smooth. Gradually add sugar and vanilla extract, mixing until fluffy and smooth.
- Add the Greek yogurt: Slowly fold in the Greek yogurt until fully combined.
- Incorporate the Jello: Sprinkle in the jello powder and mix until well blended.
- Fold in the whipped cream: Gently mix in the whipped cream or Cool Whip until no streaks remain.
- Pour and chill: Pour the cheesecake batter into the crust and smooth the top. Cover and chill in the fridge for at least 3 hours, or until set.
- Serve up: Cut into slices and enjoy with extra whipped cream or fresh fruit on top!
Notes
This cheesecake tastes better the next day after setting overnight. Feel free to try different jello flavors for variety.
- Prep Time: 15 minutes
- Cook Time: 8 minutes
- Category: Dessert
- Method: Chilling
- Cuisine: American
Nutrition
- Serving Size: 1 slice
- Calories: 200
- Sugar: 12g
- Sodium: 180mg
- Fat: 9g
- Saturated Fat: 4g
- Unsaturated Fat: 2g
- Trans Fat: 0g
- Carbohydrates: 26g
- Fiber: 1g
- Protein: 5g
- Cholesterol: 30mg
Keywords: cheesecake, dessert, Greek yogurt, jello, no bake, light dessert