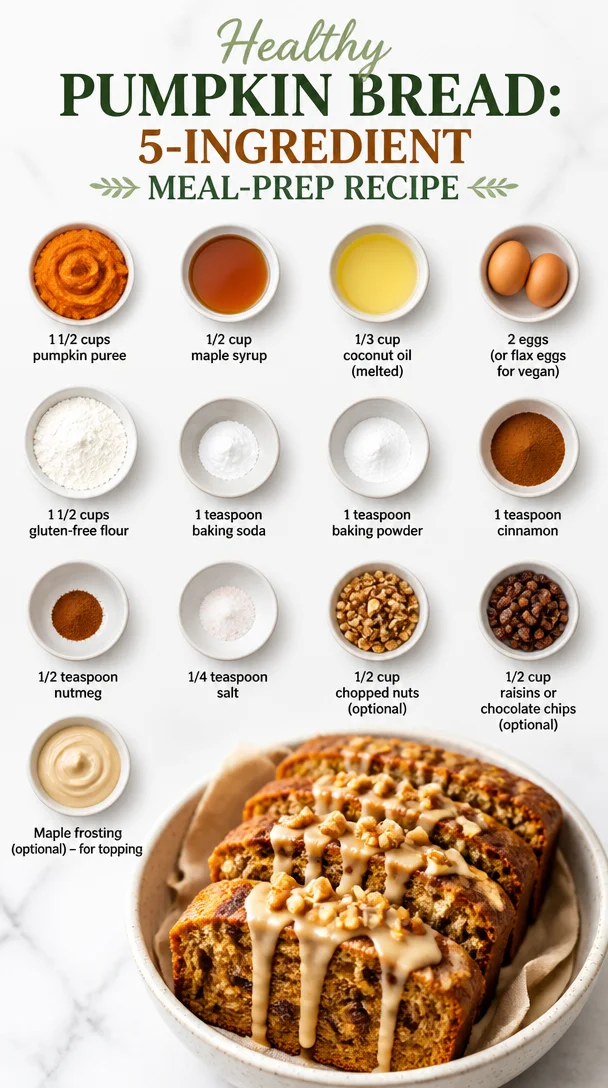
Healthy Pumpkin Bread: 5-Ingredient Meal-Prep Recipe
Healthy Pumpkin Bread: A Cozy Fall Favorite
Hey there, my fellow food enthusiasts! Welcome to Feastical, where the flavors are warm, inviting, and downright delicious. Today, I’m beyond excited to share a standout recipe that perfectly captures the spirit of fall: Healthy Pumpkin Bread. This delightfully moist and aromatic bread is not just a treat for your taste buds, but also packs a nutritious punch. Whether you’re cozying up with a cup of tea or sharing slices with friends at a gathering, this pumpkin bread is bound to elevate your day. So, grab your aprons, let’s roll up those sleeves, and dive into the kitchen!
The Magic of Pumpkin Bread
Pumpkin bread is more than just a recipe; it’s a celebration of comfort and nostalgia. It takes me back to my childhood in the kitchen with my grandmother, where the smell of cinnamon, nutmeg, and sugar danced through the air as we mixed up a batch. I remember the way she carefully measured out the pumpkin puree and talked about the importance of quality ingredients. It was a process filled with love, laughter, and the occasional flour fight.
One particular memory stands out: the first time I made pumpkin bread solo. I was about ten years old, and I decided to surprise my family with a homemade treat. I clumsily poured pumpkin puree all over the counter, whisked eggs like a mad scientist, and somehow managed to create an epic mess. But when that loaf came out of the oven, golden and fragrant, my family’s smiles were worth every spilled drop.
Now, as a cook and recipe creator, I love sharing this warm hug of a recipe with you. With just a few simple ingredients, you can whip up a loaf that not only satisfies cravings but also nurtures your body. So, let’s get started!
Ingredients
Here’s what you’ll need to make this delightful Healthy Pumpkin Bread:
-
1 1/2 cups pumpkin puree
Pumpkin is the star here! It lends moisture and a rich, earthy flavor. You can use canned pumpkin puree or make your own by roasting fresh pumpkins. Just remember to cool and blend it before using! -
1/2 cup maple syrup
Sweetener with a hint of flavor! I love using maple syrup for its unique taste, but feel free to substitute with honey or agave nectar if that’s what you have on hand. Adjust the sweetness based on your preference! -
1/3 cup coconut oil (melted)
This adds healthy fats and moisture. If you’re not a fan of coconut, you can easily replace it with olive oil or melted butter. Just make sure it’s cool before mixing! -
2 eggs (or flax eggs for vegan)
Eggs help bind everything together and keep your bread moist. If you’re going vegan, mix 2 tablespoons ground flaxseed with 6 tablespoons water and let it sit until it thickens! -
1 1/2 cups gluten-free flour
This bread is perfect for gluten-free eaters! You can use any gluten-free all-purpose flour blend. For a non-gluten-free version, just swap it with regular all-purpose flour. -
1 teaspoon baking soda
To help your bread rise and create that delightful texture. -
1 teaspoon baking powder
A must-have for extra fluffiness! -
1 teaspoon cinnamon
The essential fall spice! Feel free to experiment with pumpkin pie spice for an all-in-one flavor boost or add more cinnamon for a deeper profile. -
1/2 teaspoon nutmeg
A warm, aromatic spice that enhances the pumpkin flavor beautifully. -
1/4 teaspoon salt
A pinch of salt balances the sweetness and brings all the flavors together. -
1/2 cup chopped nuts (optional)
Walnuts or pecans add a delightful crunch! You can also leave them out if you prefer a smoother texture. -
1/2 cup raisins or chocolate chips (optional)
A fun add-in for sweetness and texture! Go with chocolate chips for a treat or raisins for a chewy bite. -
Maple frosting (optional)
Feel free to top it off with a simple maple frosting for a special touch. Mix powdered sugar with a bit of maple syrup and a splash of milk for a drizzle that takes it over the top!
Step-by-Step Instructions
Let’s transform those ingredients into something magical!
-
Preheat the Oven: First things first, preheat your oven to 350°F (175°C). This ensures it’s just the right temperature for baking your pumpkin bread to perfection.
-
Prep the Loaf Pan: Grease a loaf pan with coconut oil or line it with parchment paper. This will make it super easy to remove the bread later!
-
Mix the Wet Ingredients: In a large mixing bowl, whisk together the pumpkin puree, maple syrup, and melted coconut oil until combined. The mixture should look smooth and inviting! If you’re using eggs, add them one at a time, mixing well after each addition. If you’re using flax eggs, stir them in at this stage, too!
-
Incorporate the Dry Ingredients: In another bowl, combine the gluten-free flour, baking soda, baking powder, cinnamon, nutmeg, and salt. Mix these dry ingredients well. Then, gradually add the dry mix to the wet mixture, stirring gently until just combined. Remember, overmixing can lead to dense bread, so stir until there are no dry patches.
-
Add the Extras: If you’re using nuts, raisins, or chocolate chips, fold them into the batter now. This is where you can get creative—feel free to add extra goodies or spices.
-
Pour into the Pan: Pour the batter into your prepared loaf pan, smoothing out the top with a spatula. Don’t fret if it’s not perfect; that’s the beauty of homemade!
-
Bake: Place the loaf pan in the preheated oven and bake for about 50-60 minutes. Start checking at the 50-minute mark. Insert a toothpick into the center, and if it comes out clean or with just a few crumbs, it’s time to take it out!
-
Cool Time: Let your pumpkin bread cool in the pan for about 10 minutes before transferring it to a wire rack. This cooling step is essential; it helps the loaf set and keeps that lovely texture.
-
Serve: Once cooled, slice that beautiful loaf and serve! Whether you enjoy it plain, with a bit of butter, or drizzled with maple frosting, every bite will feel like a warm hug!
Serving Suggestions
Let’s talk about how to serve this enticing pumpkin bread! If you’re feeling extra fancy, plate your slices with a dollop of whipped cream or a smear of cream cheese. You can even get creative by adding a sprinkle of cinnamon or a drizzle of maple syrup on top. For gatherings, place the slices on a cute platter with a small bowl of chopped nuts and chocolate chips on the side, inviting everyone to top it their way!
For a cozy breakfast or brunch, serve it alongside a steaming cup of coffee or spiced chai. Trust me, the combination will feel like a moment of bliss on a chilly morning.
Recipe Variations
Let’s get those creative juices flowing! Here are a few delicious twists you can try with this pumpkin bread recipe:
-
Spiced Almond Pumpkin Bread: Swap out the regular spices for a mix of cardamom, ginger, and allspice for a different flavor profile that packs a punch!
-
Pumpkin Bread with Cream Cheese Swirl: Use cream cheese mixed with a little powdered sugar and vanilla. Swirl it into the batter right before baking for creamy, gooey goodness.
-
Gluten-Free Chocolate Chip Pumpkin Bread: Add dark chocolate chips instead of raisins or nuts for a decadent dessert version.
-
Pumpkin Banana Bread: Incorporate 1 mashed banana to add sweetness and flavor! This makes the bread extra moist and gives it a unique twist.
-
Maple Pecan Pumpkin Bread: Toss in chopped pecans and use maple syrup in the batter, and top it with a crunchy pecan streusel for added texture!
Chef’s Notes
Over the years, my pumpkin bread recipe has evolved. I started off with a heavily sweetened version but realized how wonderful it can be with less sugar. Every bite should celebrate the natural flavors of pumpkin and spices! I often find myself experimenting, tossing in what’s in my pantry, and each time someone tries my latest version, their smile is the best feedback I can get.
Oh, and let me tell you about the time I switched out the oil for applesauce in a desperate attempt to be healthier. It turned out fabulous, but my family was convinced I had a secret ingredient! Sometimes accidents in the kitchen lead to the best discoveries.
FAQs and Troubleshooting
-
Why is my pumpkin bread dense?
Overmixing can cause your bread to become dense. Be gentle when combining the wet and dry ingredients, and stop once everything is just combined. -
My bread is too dry. What happened?
This can happen if you overbaked it or if your measurements were slightly off. Make sure to check for doneness with a toothpick around the 50-minute mark! -
Can I use fresh pumpkin?
Absolutely! Just make sure to cook and puree it before using it in the recipe. Fresh pumpkin can add a wonderful texture and flavor. -
How should I store leftover pumpkin bread?
Keep it in an airtight container at room temperature for a couple of days or in the fridge for up to a week. You can also freeze slices for up to three months—just wrap them tightly!
Nutritional Info
While indulging in a cozy slice of pumpkin bread is lovely, let’s not forget the amazing nutritional benefits of our star ingredient, pumpkin! Pumpkin is loaded with vitamins A and C, fiber, and antioxidants. Plus, using maple syrup instead of refined sugar not only offers a unique flavor but also means you’re getting some essential minerals! With optional add-ins like nuts and raisins or chocolate chips, you can boost your bread with healthy fats and additional nutrients. A slice of pumpkin bread is a perfect balance of comfort and health—what could be more delightful?
Final Thoughts
And there you have it, my friends—a vibrant, Healthy Pumpkin Bread recipe that brings the essence of fall right to your kitchen. Whether you whip it up for a lazy Sunday brunch or cozy gatherings with friends, it’s bound to warm hearts and fill bellies. Remember, the best part about cooking is the memories you create—so don’t shy away from sharing a slice or two!
Make this recipe your own, and let the love you pour into it shine through every bite. Happy cooking, and as always, may your kitchen be filled with joy, laughter, and sweet aromas! Now, who’s ready to make some pumpkin bread? 🍞✨
Print
Healthy Pumpkin Bread
- Total Time: 75 minutes
- Yield: 8 servings 1x
- Diet: Vegetarian
Description
A moist and aromatic pumpkin bread that captures the spirit of fall, perfect for cozy moments and gatherings.
Ingredients
- 1 1/2 cups pumpkin puree
- 1/2 cup maple syrup
- 1/3 cup coconut oil (melted)
- 2 eggs (or flax eggs for vegan)
- 1 1/2 cups gluten-free flour
- 1 teaspoon baking soda
- 1 teaspoon baking powder
- 1 teaspoon cinnamon
- 1/2 teaspoon nutmeg
- 1/4 teaspoon salt
- 1/2 cup chopped nuts (optional)
- 1/2 cup raisins or chocolate chips (optional)
- Maple frosting (optional)
Instructions
- Preheat the oven: First things first, preheat your oven to 350°F (175°C).
- Prep the loaf pan: Grease a loaf pan with coconut oil or line it with parchment paper.
- Mix the wet ingredients: In a large mixing bowl, whisk together the pumpkin puree, maple syrup, and melted coconut oil until combined.
- Incorporate the dry ingredients: In another bowl, combine the gluten-free flour, baking soda, baking powder, cinnamon, nutmeg, and salt.
- Add the extras: Fold in nuts, raisins, or chocolate chips into the batter.
- Pour into the pan: Pour the batter into your prepared loaf pan.
- Bake: Place the loaf pan in the preheated oven and bake for about 50-60 minutes.
- Cool time: Let your pumpkin bread cool in the pan for about 10 minutes before transferring it to a wire rack.
- Serve: Once cooled, slice and serve with butter, or drizzled with maple frosting.
Notes
Feel free to experiment with add-ins like nuts and raisins or chocolate chips. This recipe is flexible for personal preferences.
- Prep Time: 15 minutes
- Cook Time: 60 minutes
- Category: Baked Goods
- Method: Baking
- Cuisine: American
Nutrition
- Serving Size: 1 slice
- Calories: 210
- Sugar: 10g
- Sodium: 200mg
- Fat: 9g
- Saturated Fat: 4g
- Unsaturated Fat: 5g
- Trans Fat: 0g
- Carbohydrates: 30g
- Fiber: 2g
- Protein: 3g
- Cholesterol: 50mg
Keywords: pumpkin bread, fall recipes, healthy baking, cozy desserts
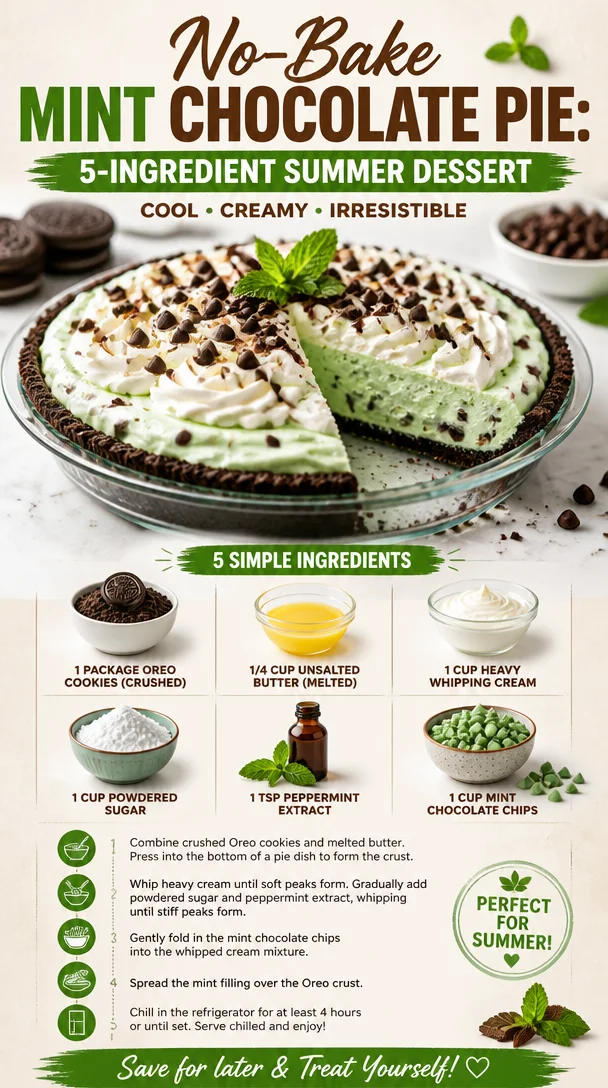
No-Bake Mint Chocolate Pie: 5-Ingredient Summer Dessert
No-Bake Mint Chocolate Pie: A Timeless Treat for Every Occasion
Hello, my fellow food lovers! I’m thrilled you’re here because today, we’re diving into a dessert that perfectly embodies the spirit of comfort food while also refreshing your taste buds—the delightful No-Bake Mint Chocolate Pie. Whether you’re hosting a summer picnic, celebrating a birthday, or just craving a sweet treat, this pie is bound to bring smiles and joy all around.
A Memory to Savor
Before I share my kitchen secrets, let me take you down memory lane for a moment. I vividly remember my childhood summers spent at my grandparents’ house. There was a tiny kitchen tucked away at the back of their charming cottage, where my grandma would often whip up her own version of a mint chocolate pie. It was a tried-and-true family favorite that seemed to vanish before our eyes!
Every summer, the air would be filled with laughter, and the sounds of my cousins battling in the backyard gave way to the sweet, unmistakable scent of mint and chocolate wafting from the kitchen. Those delicious moments, back-to-back with my grandma’s playful challenges to come help her mix the cream or crush the cookies, created lasting memories that still warm my heart today. You see, that’s the magic of food; it has a way of tethering us to our memories and making every bite feel special.
Ingredients: The Building Blocks of Bliss
Let’s break down the ingredients you’ll need for this luscious pie. Here’s the full lineup:
-
1 package Oreo cookies (crushed)
These are the perfect base for our crust. You can easily substitute with gluten-free Oreos or any chocolate cookie you love. -
1/4 cup unsalted butter (melted)
This helps bind the crust together. If you’re looking for a dairy-free option, coconut oil works beautifully. -
1 cup heavy whipping cream
This is crucial for our fluffy filling. If you want a lighter version, you can use coconut cream, but be ready for a bit of a flavor twist! -
1 cup powdered sugar
For that sweet touch! If you’re looking to cut down on sugar, consider using a powdered sugar substitute available at most grocery stores. -
1 tsp peppermint extract
This gives the pie its refreshing essence. You can play around with the amount depending on your minty preference! -
1 cup mint chocolate chips
These add that essential flavor kick. Feel free to swap them for dark chocolate chips if you want a richer taste.
Each ingredient plays a vital role in creating a sweet escape for the senses. So, let’s gather these goodies and get to work!
Step-by-Step Instructions: Your Culinary Adventure Awaits
Alright, time to roll up those sleeves and unleash your inner chef! Let’s walk through the process step-by-step.
-
Crush Those Oreos
Grab a large zip-top bag and fill it with your Oreos. Have some fun and crush them with a rolling pin, or get your kids involved! You want fine crumbs, almost like sand. Alternatively, you can use a food processor if you’re feeling fancy! -
Mix in the Melted Butter
In a bowl, combine the crushed Oreos with your melted butter. Stir until all the crumbs are coated. It’s like the sand on the beach, and you want it to stick together like a happy family! -
Form the Crust
Press this mixture evenly into the bottom and up the sides of a 9-inch pie pan. Use the flat bottom of a measuring cup or your fingers to pack it down tightly. The firmer it is, the better it’ll hold together when we cut into it! -
Refrigerate While You Make the Filling
Pop the crust into the fridge for about 15 minutes to set while we get to whipping. -
Whip the Cream
In a mixing bowl, beat the heavy whipping cream on medium speed until soft peaks form. This is where the magic really starts to happen! The cream will turn fluffy before your eyes! -
Add the Sugar and Mint Extract
Gradually mix in the powdered sugar and peppermint extract while continuing to whip. You’re going to achieve beautiful, billowy peaks that have a delightful sweetness and minty aroma. -
Fold in the Mint Chocolate Chips
Gently fold in the mint chocolate chips with a spatula. Remember, we don’t want to deflate our whipped cream. This step should feel light and airy! -
Fill the Crust
Spoon this fluffy mixture into your chilled Oreo crust, spreading it evenly. This is where you can feel like an artist, smoothing the top to your desired level of perfection. -
Chill Again
Cover your pie and refrigerate for at least 4 hours, but overnight is even better if you can wait! During this time, the flavors will meld together, and you’ll get a perfectly set pie. -
Serve and Enjoy
Before serving, you can add some extra mint chocolate chips or even shaved chocolate on top for that extra touch of decadence. Slice it up, and watch the smiles unfold!
Serving Suggestions: Let’s Get Creative!
Now that your pie is ready, let’s chat about how to make it a showstopper when serving. Presenting food is half the fun, right?
-
Pair with Fresh Mint Leaves: A few fresh mint leaves on top of each slice will elevate the presentation and add a burst of color.
-
Chocolate Drizzle: A drizzle of chocolate sauce over the pie gives it that extra hint of elegance.
-
Serve with Whipped Cream: A dollop of whipped cream on the side or even a full bowl for guest self-serve is always a hit.
-
Make Mini Pies: Use individual serving dishes to create mini pies! Not only are they cute, but they also make portion control a breeze.
-
Add Berries: Fresh raspberries or strawberries on the side complement the mint chocolate beautifully, adding a lovely tartness and a splash of color.
Recipe Variations: Spice Things Up!
The beauty of a No-Bake Mint Chocolate Pie is its adaptability! Here are a few variations to keep your taste buds excited:
-
Double Chocolate Delight: Use chocolate sandwich cookies for the crust instead of Oreos, and add more chocolate chips to the filling.
-
Peanut Butter Twist: Add some creamy peanut butter to the whipped cream filling for a delightful chocolate-peanut butter pairing.
-
Coffee Infusion: For the coffee lovers, add a teaspoon of instant coffee granules to the whipped cream for a mocha mint chocolate experience.
-
Fruit Fusion: Experiment by folding in fresh raspberries or crushed pineapple for a fruity twist. Just make sure to drain any excess liquid!
-
Dairy-Free Dreams: Use vegan whipped cream and dairy-free chocolate chips for a completely dairy-free version. You can even substitute coconut cream in place of heavy cream!
Chef’s Notes: A Dash of Personal Touch
What I love most about this recipe is how it has evolved over the years. I can still feel the warmth of those summer days in my grandparents’ kitchen, and once I was old enough to cook, I started experimenting. I remember one time, I accidentally left out the sugar but added an extra splash of peppermint extract—let’s just say it was a very minty evening! My family didn’t let me forget it, but it gave me a great lead-in to making this splendid dessert a family tradition.
I hope you give this No-Bake Mint Chocolate Pie a try—you’ll be the star of every gathering, and all your friends will be begging for the recipe.
FAQs and Troubleshooting: Your Questions Answered!
-
My filling didn’t set properly. What went wrong?
It’s crucial to whip the heavy cream to the right consistency! If it’s under-whipped, the filling may not hold its shape. Also, chilling time is essential—don’t rush it! -
How long will this pie last?
It should keep in the fridge for about 4-5 days, but trust me, it’s unlikely to last that long! -
Can I freeze this pie?
Absolutely! Just cover it tightly and freeze for up to a month. Let it thaw in the fridge before serving. -
Can I use other flavors instead of mint?
Certainly! You can experiment with different extracts like vanilla, almond, or citrus for a fresh twist.
Nutritional Info
This No-Bake Mint Chocolate Pie is indulgent, but here’s a general idea of what you’re looking at nutritionally per slice (based on a total of 8 slices):
- Calories: ~350
- Fat: 20g
- Carbohydrates: 40g
- Protein: 4g
- Sugar: 22g
Remember, nutrition varies with ingredient substitutions and portion sizes, so keep that in mind as you make this recipe your own.
Final Thoughts: Bringing It All Together
And there you have it! A No-Bake Mint Chocolate Pie that’s sure to become a household favorite, just like it did in my family. Everyone deserves a bite of something sweet and refreshing, and this pie delivers in spades—without a single stove top in sight!
So gather your ingredients, invite some loved ones into the kitchen, and let this pie bring you all together. I’d love to hear how your version turns out or any fun stories you create along the way. Feel free to share your experiences below or reach out to me through Feastical.com!
Until next time, happy cooking, and may every bite taste like a warm hug!
Print
No-Bake Mint Chocolate Pie
- Total Time: 240 minutes
- Yield: 8 servings 1x
- Diet: Vegetarian
Description
A delightful No-Bake Mint Chocolate Pie that combines refreshing mint and rich chocolate flavors. Perfect for any occasion, this pie is easy to make and sure to impress.
Ingredients
- 1 package Oreo cookies (crushed)
- 1/4 cup unsalted butter (melted)
- 1 cup heavy whipping cream
- 1 cup powdered sugar
- 1 tsp peppermint extract
- 1 cup mint chocolate chips
Instructions
- Crush those Oreos in a zip-top bag with a rolling pin or food processor.
- Mix in the melted butter until all crumbs are coated.
- Form the crust in a 9-inch pie pan, packing it tightly.
- Refrigerate the crust for 15 minutes.
- Whip the cream until soft peaks form.
- Add sugar and mint extract, mixing until billowy peaks form.
- Fold in the mint chocolate chips gently.
- Fill the crust with the cream mixture and smooth the top.
- Chill again for at least 4 hours or overnight.
- Serve and enjoy, optionally garnishing with mint chocolate chips or whipped cream.
Notes
For a dairy-free version, replace heavy cream with coconut cream and use dairy-free chocolate chips.
- Prep Time: 15 minutes
- Cook Time: 0 minutes
- Category: Dessert
- Method: No-Bake
- Cuisine: American
Nutrition
- Serving Size: 1 slice
- Calories: 350
- Sugar: 22g
- Sodium: 200mg
- Fat: 20g
- Saturated Fat: 12g
- Unsaturated Fat: 8g
- Trans Fat: 0g
- Carbohydrates: 40g
- Fiber: 2g
- Protein: 4g
- Cholesterol: 40mg
Keywords: mint chocolate pie, no-bake dessert, summer pie, chocolate pie, easy dessert

No-Bake Mint Chocolate Chip Truffles (5-Ingredient)
Mint Chocolate Chip Truffles Recipe: A Sweet Journey
Hey there, fellow food enthusiast! Welcome back to Feastical, where we whip up happiness, one delightful recipe at a time. Grab your aprons, because today we’re venturing into the land of indulgent sweets with a twist—the fabulous Mint Chocolate Chip Truffles! If you’re like me, mint and chocolate brings on the nostalgia, curling up on the couch with your favorite movie or holiday gatherings where sweet treats abound. These mouthwatering little bites capture that essence, combining creamy goodness and that refreshing zing of peppermint.
Imagine a world where crisp, velvety chocolate meets the invigorating scent of mint. Just think about how a single bite delivers a melody of flavors that dance on your palate, taking your taste buds on a delightful journey! Perfect for gifting or simply indulging on your own, these truffles are a joy to make (and eat!). So, whether you’re gearing up for a special occasion or just want a pick-me-up, you’ve landed at the right recipe.
I swear the process of rolling these little gems into shape is nearly therapeutic. It connects us back to the kitchen, to creativity, and to the simple pleasure that food brings into our lives. Plus, the magic of creating something delicious with your own hands is hard to beat. So let’s get those sweet senses tingling as we dive into this Mint Chocolate Chip Truffle adventure!
Personal Story
Let me take you back to a chilly winter evening a few years ago. I hosted a small holiday gathering with my closest friends, filled with laughter, delicious food, and endless fun. Amid the cozy ambiance and twinkling lights, I wanted to create something special for my guests. That’s when I decided to whip up these Mint Chocolate Chip Truffles, a recipe I had only just started experimenting with.
I remember the anticipation as I mixed the ingredients, shaping the truffles, and then chilling them in the fridge. As my friends arrived, the warm scent of peppermint wafted through the air, drawing them towards the kitchen like bees to honey. When they took their first bites, the joy on their faces was priceless! Each truffle sparked smiles and silly conversations, and they instantly became a tradition in our holiday gatherings. Those moments of happiness shared over sweet treats are what cooking is all about for me. So, here’s to creating beautiful memories one truffle at a time!
Ingredients
Here’s everything you need to make these delectable Mint Chocolate Chip Truffles:
-
4 ounces Cream Cheese (Softened)
The creamy base that binds everything together, giving the truffles a rich, velvety texture. If you want to lighten things up a bit, try using Greek yogurt for a tangy twist! -
1/2 cup Unsalted Butter (Softened)
This adds richness and flavor. Make sure it’s softened to room temperature for easy mixing. If you’re going dairy-free, you can substitute coconut oil. -
2 cups Powdered Sugar
The sweetener here gives our truffles that perfect melt-in-your-mouth quality. For a less sweet alternative, look for powdered monk fruit sweetener. -
1 teaspoon Peppermint Extract
This is the star of the show! It packs a minty punch that compliments the chocolate beautifully. Feel free to scale back to ½ teaspoon if you’re not a die-hard mint fan. -
1 drop Green Food Coloring Gel
Just a touch for that festive look—who doesn’t love a little pop of color? You can skip this if you prefer a more natural appearance or use spirulina for a green tint. -
1/2 cup Mini Semisweet Chocolate Chips
These add delightful little bursts of chocolate in each truffle. If you’re after a darker, richer taste, go for dark chocolate chips! -
12 ounces Ghirardelli Melting Chocolate (Melted)
This luscious coating takes our truffles to the next level. You can use either dark, milk, or white chocolate depending on your preference, or mix and match for a fun effect!
Step-by-Step Instructions
Ready to get your hands into something delicious? Let’s get rolling (literally!):
-
Soften the Cream Cheese and Butter:
Start by letting your cream cheese and butter hang out at room temperature for about 30 minutes. This makes them easier to blend and ensures a creamy, smooth mixture. If you forgot to take them out, you can microwave them in short bursts—just don’t overdo it! -
Mix It Up:
In a large mixing bowl, combine the softened cream cheese and unsalted butter. Grab your hand mixer and whip them together until light and fluffy, about 2-3 minutes. This step is essential; it creates the perfect base for the fluffy center of your truffles. -
Add the Sweetness:
Gradually add in the powdered sugar—trust me, it’s going to get a bit messy, so you might want to mix on a lower setting. Once combined, beat in the peppermint extract and food coloring until everything is well blended. -
Fold in Chocolate Chips:
Now for the best part! Gently fold in the mini chocolate chips using a spatula. Feel free to sneak a few chips for yourself; I won’t tell! This is what gives a delightful texture and surprise chocolate bursts in every bite. -
Chill the Mixture:
Cover the mixing bowl with plastic wrap and pop it in the fridge for about 30 minutes. Chilling makes it easier to roll into truffles and enhances the flavor. -
Roll into Balls:
Once chilled, scoop out about a tablespoon of the mixture and roll it into a ball between your palms. Aim for a smooth surface, and don’t stress about perfection—these are handmade treasures, after all! -
Melt the Chocolate:
While you roll the rest, melt your Ghirardelli melting chocolate in a microwave-safe bowl in 30-second increments, stirring in between until smooth. -
Coat the Truffles:
Dip each rolled ball in the melted chocolate, letting the excess drip back into the bowl. Place them on a parchment-lined baking sheet. If you’re feeling fancy, sprinkle a little crushed peppermint candy on top before the chocolate hardens. -
Chill Again:
Transfer the baking sheet to the fridge and chill until the chocolate coating is set—about 30 minutes will do the trick. -
Enjoy Your Masterpiece:
Now that your truffles are all set, it’s time to indulge! Enjoy them as bite-sized desserts or share (if you can resist).
Serving Suggestions
Let’s talk presentation! These Mint Chocolate Chip Truffles deserve a spot on the pedestals of your dessert table. Here are a few serving suggestions to dazzle your guests:
-
Perfect Platter: Arrange the truffles on a beautiful serving platter, perhaps embellished with a sprig of fresh mint and some cocoa powder dusting for a sophisticated touch.
-
Mason Jar Gifts: For a fun twist, fill up a mason jar with truffles and tie a ribbon around the lid. Such a sweet homemade gift for friends or co-workers!
-
Cupcake Wrapper Charm: Place each truffle in a colorful cupcake liner for a pop of color. You can mix and match liners for a playful vibe.
-
Coffee Pairing: Serve these truffles alongside a cozy mug of hot cocoa or coffee. The minty chocolate pairs beautifully with warm, rich beverages, enhancing the overall tasting experience.
Recipe Variations
Want to mix things up? Here are some creative twists to explore:
-
Chocolate Mint Swirls: Use white melting chocolate with peppermint extract for a delightful play on colors and flavors. You could create a striped effect by swirling the melted chocolate together.
-
Nutty Additions: Incorporate some chopped nuts, like walnuts or almonds, into your mixture for added crunch. Just be sure everyone is nut-aware if you’re serving guests!
-
Fruity Fun: Add a spoonful of crushed raspberries or strawberries to the mixture for a hint of fruitiness that complements the mint beautifully.
-
Dark Chocolate Decadence: Replace semi-sweet chocolate chips with dark chocolate chips for a richer, more indulgent truffle.
-
Dairy-Free Delight: Swap out cream cheese and butter with cashew cream and coconut oil for a completely vegan version that’s still creamy and delicious!
Chef’s Notes
As these truffles began to make their way into my kitchen routine, they morphed slightly over time. Initially, I used to coat them with just basic chocolate. But one day, as the holidays approached, I decided to sprinkle some crushed peppermint on top. That little addition transformed them into a festive favorite!
And let me highlight something essential here: don’t fret if your truffles aren’t perfectly round. I always remind my friends that food is meant to be enjoyed, not just aesthetically pleasing. Plus, the little imperfections tell a story—in their own way, they’re like handmade art!
FAQs and Troubleshooting
-
Can I freeze these truffles?
Absolutely! Just place them in an airtight container with layers of parchment paper between them. Thaw them in the fridge for a few hours before serving for the best taste and texture. -
Why are my truffles too soft?
If your mixture is too soft to roll, it might need more powdered sugar or a bit more time in the fridge to firm up. Just be patient; a little chill time can work wonders! -
What if my chocolate coating is not smooth?
Make sure to stir your melting chocolate until it’s completely smooth. If it’s too thick, add a teaspoon of coconut oil or shortening to help it glide better. -
Can I use regular chocolate instead of melting chocolate?
Yes! If you have regular chocolate bars, feel free to chop them up and melt them. Just keep in mind that melting chocolate is designed specifically for coating, so it tends to give a better finish.
Nutritional Info
While exact nutritional info can vary based on precise measurements and substitutions, here’s a rough idea per truffle (about 1 truffle in a batch of 24):
- Calories: 90
- Fat: 5g
- Carbohydrates: 9g
- Sugar: 7g
- Protein: 1g
These little gems are perfect for a treat! As with all desserts, moderation is key to enjoying them while maintaining a balanced diet.
Final Thoughts
I hope you’re just as excited about these Mint Chocolate Chip Truffles as I am! They’re simple, soul-soothing, and oh-so-delicious, perfect for making memories in the kitchen. Remember, food is a celebration, and it’s all about sharing love and joy with those around us.
As you bring these treats to life in your kitchen, don’t hesitate to make them your own. Play around with flavors, tweak proportions, and enjoy every second of the process. And most of all, savor those moments spent with family and friends because those are the true flavors of life.
Thanks for joining me on this minty journey today! Let me know how your truffles turn out in the comments below. Keep spreading the joy of cooking, and until next time, happy feasting!
Print
Mint Chocolate Chip Truffles
- Total Time: 60 minutes
- Yield: 24 truffles 1x
- Diet: Vegetarian
Description
Decadent Mint Chocolate Chip Truffles that combine creamy goodness with a refreshing mint zing.
Ingredients
- 4 ounces Cream Cheese (Softened)
- 1/2 cup Unsalted Butter (Softened)
- 2 cups Powdered Sugar
- 1 teaspoon Peppermint Extract
- 1 drop Green Food Coloring Gel
- 1/2 cup Mini Semisweet Chocolate Chips
- 12 ounces Ghirardelli Melting Chocolate (Melted)
Instructions
- Soften the cream cheese and butter by allowing them to sit at room temperature for 30 minutes.
- Mix the cream cheese and unsalted butter in a large bowl until light and fluffy.
- Add the powdered sugar gradually, then beat in the peppermint extract and food coloring.
- Fold in the mini chocolate chips gently with a spatula.
- Chill the mixture in the fridge for about 30 minutes.
- Roll the mixture into balls, about a tablespoon each.
- Melt the Ghirardelli melting chocolate until smooth.
- Coat each ball in melted chocolate and place on a parchment-lined baking sheet.
- Chill the coated truffles in the fridge until set, about 30 minutes.
- Enjoy your masterpiece!
Notes
These truffles can be made dairy-free and can be frozen for later enjoyment.
- Prep Time: 30 minutes
- Cook Time: 30 minutes
- Category: Dessert
- Method: Chilling and Melting
- Cuisine: American
Nutrition
- Serving Size: 1 truffle
- Calories: 90
- Sugar: 7g
- Sodium: 50mg
- Fat: 5g
- Saturated Fat: 3g
- Unsaturated Fat: 2g
- Trans Fat: 0g
- Carbohydrates: 9g
- Fiber: 0g
- Protein: 1g
- Cholesterol: 15mg
Keywords: mint chocolate truffles, dessert, sweets, holiday treats, dessert recipes

Green Apple Sorbet: 5-Ingredient Quick Summer Treat
Refreshingly Simple: Homemade Green Apple Sorbet Recipe
Hey there, food friends! Today, we’re diving into a delightful and refreshing homemade treat that’s perfect for any occasion: Green Apple Sorbet! There’s nothing quite like a scoop of chilled sorbet to cool you down on a hot day or to cleanse your palate between courses at a dinner party. Trust me; this is a simple, fun, and nostalgic recipe that will bring joy to your kitchen.
A Whiff of Nostalgia
Whenever I think of sorbet, I’m taken back to those sultry summer afternoons of my childhood. My family and I would pack up a cooler and head to the beach, our favorite playground of sun and saltwater. My mom would whip up her famous fruit sorbet—sweet, tangy, and ice-cold. She’d always let me pick the fruit, so I’d reach for those shiny green apples, their tartness singing in harmony with the sugar and lemon juice. The way the sorbet brightened our spirits while we built sandcastles and chased waves is a memory I cherish.
Now, I want to share this lovely tradition with all of you. Making your own sorbet is easier than pie (and trust me, pie can be pretty easy too!). Grab some green apples, and let’s turn up the fun in your kitchen!
Ingredients
Here’s what you’ll need for this delightfully zesty Green Apple Sorbet:
-
2 cups green apples, peeled and chopped
These crisp beauties bring all the tart flavor you need. I love Granny Smith apples! If you want a sweeter taste, feel free to mix in some red apples. -
1 cup granulated sugar
This sweetener helps balance out the tartness of the apples. For a lighter option, you can substitute with coconut sugar or a sugar alternative like Stevia (just check the conversion). -
1 cup water
It’s the base of our sorbet, essential for blending all the goodness together. You can use sparkling water if you’re feeling fancy for an extra fizz! -
1 tablespoon lemon juice
Freshly squeezed is always best! It adds a nice zippy flavor that brightens the sorbet. If you have lime on hand, that works beautifully, too. -
1 teaspoon vanilla extract
This will enhance the overall flavor profile and add a warm note to the tartness. You can replace it with almond extract for a different vibe.
Step-by-Step Instructions
Alright, my fellow kitchen adventurers! Let’s get swirling.
-
Prepare Your Apples
Peel and chop the green apples into small chunks (roughly 1-inch pieces). The smaller the pieces, the easier they will blend. Pro Tip: Try to keep them as uniform as possible for even cooking. -
Cook the Apples
In a medium saucepan, combine the chopped apples, sugar, and water. Bring it to a gentle simmer over medium heat, stirring occasionally, until the apples are soft (about 10-12 minutes). This step releases all those juicy flavors. Keep stirring to avoid sticking; you want a tasty compote! -
Add the Zing
Once the apples are soft, remove the saucepan from heat. Stir in the lemon juice and vanilla extract. This is when the magic starts; the aroma becomes heavenly! Let it cool for about 10-15 minutes before moving to the next step. -
Blend It Up
Transfer the apple mixture to a blender (or use an immersion blender) and blend until smooth. You can blend it to your desired texture—if you prefer a little chunky sorbet, feel free to keeping some bits of apple. Taste it, and adjust sugar or lemon, if needed! -
Chill Out
Pour the mixture into a shallow container, cover it, and pop it into the freezer. Let it freeze for about 4-6 hours or until solid. Remember to give it a stir every hour or so; this incorporates air into the sorbet for a light and fluffy texture. -
Scoop and Serve!
To serve, let it sit out for 5-10 minutes to soften before scooping. Use an ice cream scoop or a sturdy spoon, and get ready to enjoy your homemade Green Apple Sorbet!
Serving Suggestions
Presentation is key, right? Here are some fun ways to serve this delightful sorbet:
-
Classic Scoops: Serve in beautiful ice cream dishes or bowls. Add a sprig of mint or a slice of apple on top for that extra wow factor.
-
Sorbet Floats: Scoop some sorbet into a tall glass and pour sparkling water or ginger ale over it for a refreshing float!
-
With a Twist: Drizzle a bit of balsamic reduction over the top. It pairs so well with the tartness and looks oh-so-classy.
Recipe Variations
Feeling adventurous? Here are some fun twists and swaps to jazz up your Green Apple Sorbet:
-
Spiced Sorbet: Add a pinch of cinnamon or nutmeg for a cozy flavor that’s perfect for fall.
-
Herbal Infusion: Try adding fresh basil or mint during the cooking step for a refreshing herbal note.
-
Berry Blend: Mix in some smashed raspberries or strawberries before freezing for a vibrant color and new flavor.
-
Coconut Cream: Swap out half of the water for coconut milk to make a creamier, tropical sorbet.
Chef’s Notes
Over time, I’ve learned to embrace creativity in the kitchen, and this sorbet is versatile enough to experiment. Every summer, I find myself making this, tweaking the ingredients based on what’s in my pantry or what fruits are at their peak. My kids even love getting involved, especially when it’s time to taste test! Remember, your kitchen is your playground. Don’t shy away from making it your own!
FAQs and Troubleshooting
Q: What if my sorbet is too hard?
A: If your sorbet’s too hard, let it sit out for a bit before scooping. Or, blend it again with a splash of water to soften it up.
Q: Can I make this ahead of time?
A: Absolutely! It keeps well in the freezer for about 2 weeks, but trust me, it will likely disappear before that!
Q: My sorbet turned icy. What went wrong?
A: That can happen if there’s not enough sugar or if it was left un-stirred while freezing. Just remember to stir it every hour!
Q: Can I use other fruits?
A: Yes! Almost any fruit can be used—just blend it up and follow the same instructions. Just keep in mind that not all fruits provide the same tartness.
Nutritional Info
Let’s get down to the nitty-gritty. Each serving of this delightful Green Apple Sorbet (approximately 1/2 cup) contains:
- Calories: ~120
- Total Fat: 0g
- Carbohydrates: 32g (Sugars: 28g)
- Fiber: 1g
- Protein: 0g
Note: Nutritional values can vary based on the specific ingredients used and portion sizes.
Final Thoughts
And there you have it, friends! A simple, feel-good recipe for Green Apple Sorbet. It’s refreshing, easy to make, and a wonderful way to celebrate the fruity gems of the season. Not only is this sorbet a treat for your taste buds, but it also stirs up warm memories of shared joy and laughter in the kitchen. So the next time you’re in need of a cool-down or a simple dessert, remember: the kitchen is a place for both delicious creations and cherished memories.
Now grab those apples, get blending, and enjoy this vibrant, tangy sorbet that’s sure to please! Happy cooking, everyone!
Print
Homemade Green Apple Sorbet
- Total Time: 240 minutes
- Yield: 4 servings 1x
- Diet: Vegan
Description
A refreshing and simple homemade green apple sorbet that’s perfect for any occasion.
Ingredients
- 2 cups green apples, peeled and chopped
- 1 cup granulated sugar
- 1 cup water
- 1 tablespoon lemon juice
- 1 teaspoon vanilla extract
Instructions
- Prepare your apples by peeling and chopping them into small chunks.
- Cook the apples with sugar and water in a saucepan until soft, about 10-12 minutes.
- Add the lemon juice and vanilla to the mixture and let it cool.
- Blend the mixture until smooth and adjust flavor if necessary.
- Chill the mixture in the freezer for 4-6 hours, stirring every hour.
- Scoop and serve the sorbet after letting it sit for 5-10 minutes.
Notes
Feel free to experiment with different fruits or flavor additions. Check for sweetness before freezing.
- Prep Time: 15 minutes
- Cook Time: 12 minutes
- Category: Dessert
- Method: Freezing
- Cuisine: American
Nutrition
- Serving Size: 1/2 cup
- Calories: 120
- Sugar: 28g
- Sodium: 1mg
- Fat: 0g
- Saturated Fat: 0g
- Unsaturated Fat: 0g
- Trans Fat: 0g
- Carbohydrates: 32g
- Fiber: 1g
- Protein: 0g
- Cholesterol: 0mg
Keywords: sorbet, dessert, green apple, refreshing, vegan, homemade
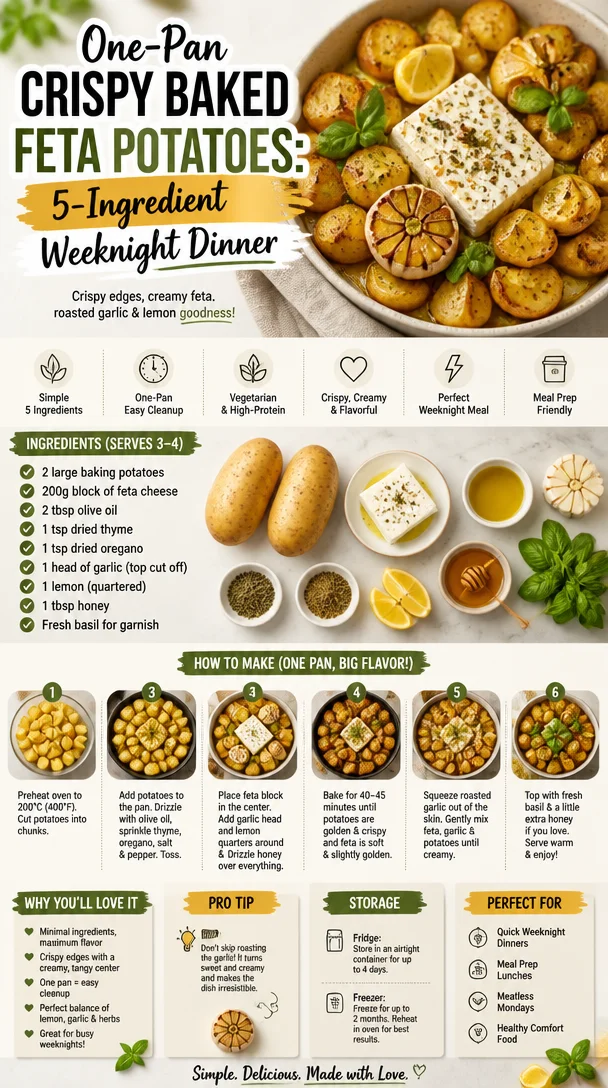
One-Pan Crispy Baked Feta Potatoes: 5-Ingredient Weeknight Dinner
Baked Feta Potatoes: A Cozy Comfort Dish Worth Sharing
Hey there, food lovers! If you’re on the hunt for a dish that’s cozy, incredibly delicious, and just begging to be shared, then buckle up because I’m about to take you on a flavor journey with my Baked Feta Potatoes. This dish isn’t just a recipe; it’s a little nostalgic trip down memory lane, the kind that wraps you in warmth like your favorite sweater on a chilly evening.
The Aroma of Home
Let me take you back to a rainy afternoon in my childhood kitchen. I remember the smell of roasted garlic wafting through the air, mixing with my mom’s laughter as she stirred pots filled with love. One of her go-to comfort dishes was a spin on Greek-style potatoes, but instead of just tossing in a bit of feta, she would make the whole experience dreamy. As kids, we could barely contain our excitement when the oven roasted its magic, transforming simple ingredients into a cheesy, golden delight.
It was the kind of dish that brought everyone together, each spoonful echoing stories, laughs, and the longing to go back to simpler times. As we sat down, the candor around the table reminded me that food is more than just nourishment; it’s a way of connecting with loved ones. That’s why this recipe is so close to my heart. Whenever I make Baked Feta Potatoes, I’m reminded of family bonding, joy, and oh-so-delicious moments that fill our bellies and souls.
Ingredients
Ready to whip up this crowd-pleaser? Here’s what you’ll need:
- 2 large baking potatoes: Choose russet or Yukon gold for their fluffy texture. Slice them in half for quicker cooking or leave them whole if you’re feeling rustic!
- 200g block of feta cheese: The star of the show! This tangy cheese will soften and melt, creating that dreamy, creamy goodness. Swap with goat cheese for a unique flavor twist.
- 2 tbsp olive oil: A drizzle of this liquid gold brings out the flavors in the dish. Extra virgin is the best choice; it’s heart-healthy and rich in antioxidants.
- 1 tsp dried thyme: Earthy and fragrant, thyme gives a lovely depth to the flavor. Fresh thyme works too—just double the amount!
- 1 tsp dried oregano: This adds that Mediterranean flair. If you want a different taste, consider trying dried rosemary or marjoram.
- 1 head of garlic (top cut off): Roasting garlic turns it buttery and sweet. Don’t shy away from using a whole head; the flavor mellows beautifully!
- 1 lemon (quartered): This adds a bright zing! Lemon juice elevates the dish. You can substitute it with lime if that’s what you have on hand.
- 1 tbsp honey: A touch of sweetness complements the saltiness of the feta perfectly. Maple syrup can be used if you’re in a pinch.
- Fresh basil for garnish: The fresh herbs will add color and a pop of flavor. Feel free to get creative—chives or parsley work well too!
Step-by-Step Instructions
Now, onto the best part—cooking! Are you ready? Let’s jump right in!
-
Preheat your oven: Start by setting your oven to 400°F (200°C). This way, it’s nice and hot when you’re ready to pop in those potatoes!
-
Prepare the potatoes: Scrub your baking potatoes thoroughly under water to remove any dirt. Pat them dry, then pierce each potato a few times with a fork. This helps steam escape and keeps them from exploding in the oven. Trust me, that’s a kitchen nightmare! (Funny story—I once had my roommate’s potato explode, and it was like a starchy bomb went off!)
-
Second cut: If you want quicker cooking time and extra crispy edges, slice those potatoes in half lengthwise. Drizzle each piece with olive oil and sprinkle with salt and pepper. Massage those ‘taters like you mean it; you want to coat them well!
-
Roast the potatoes: Place them cut side down on a baking sheet lined with parchment paper or foil. Roasting for about 25-30 minutes will help them get that beautiful, crispy exterior. Keep an eye on them—check for tenderness!
-
Make a feta nest: As the potatoes are roasting, grab a small baking dish and place your feta block in the center. Surround it with the garlic head, oregano, and thyme. Drizzle olive oil and honey over everything, and squeeze a bit of lemon juice from the quartered lemon all over the dish. Trust me, this mix will create a delightful aroma!
-
Combine and roast: When the potatoes are done, remove them from the oven and flip them over. Nestle your rosemary-infused feta dish right in the center. Return everything to the oven and roast for an additional 20-25 minutes until the feta is golden, and the garlic head has softened.
-
Garnish and serve: Once everything is beautifully roasted, give that garlic a good squeeze over the potatoes. The sweet, roasted garlic adds incredible flavor! Top with freshly torn basil leaves and another squeeze of lemon for extra freshness.
Serving Suggestions
Plating is where you can have a little fun! Serve these Baked Feta Potatoes on a vibrant platter with a sprinkle of fresh basil on top. Get creative—add in some colorful roasted vegetables like cherry tomatoes or zucchini around the edges to make your dish pop! If you’re feeling extra generous, serve it alongside a crisp side salad dressed in olive oil and lemon for a complete meal. You could even pair it with a light white wine, like a chilled Sauvignon Blanc. Cheers to that!
Recipe Variations
The best part about cooking is making a recipe your own, so let’s get playful!
-
Mediterranean flair: Add kalamata olives and sun-dried tomatoes for a briny, tangy punch. Toss them in with the feta before roasting!
-
Spicy twist: Add red pepper flakes to the olive oil drizzle for a hint of heat. Alternatively, slice up a fresh jalapeño and place it with the feta.
-
Veggie-packed: Toss in some halved cherry tomatoes or bell pepper slices to roast alongside the feta. They’ll soak up all those incredible flavors.
-
Gluten-free & vegan swap: Use tofu feta for a plant-based alternative. And if you’re serving a gluten-sensitive crowd, these potatoes are naturally gluten-free—because comfort shouldn’t come with restrictions!
-
Loaded: Try loading them with toppings post-roast! Think crispy bacon bits, sour cream, or even a sprinkle of your favorite cheese.
Chef’s Notes
I have to confess—Baked Feta Potatoes started as a way for me to use up ingredients in my fridge. One night, I had an extra block of feta and some potatoes that were getting a little too cozy in their bag, and voilà! The deliciousness that was born became a staple in my home. I remember having friends over for dinner, and we all gathered around the kitchen table. The first bite was met with silence, which then erupted into cheers. Since then, every dinner party has had a spot for this meal.
FAQs and Troubleshooting
-
What if my feta isn’t melting?
No worries! Sometimes the type of feta you use may not fully melt. Go for a softer feta, or heat it a little longer—just keep an eye on it so it doesn’t dry out! -
Can I roast the garlic differently?
Absolutely! If you want a deeper flavor, you can roast the garlic separately for about 30 minutes before everything else, or use minced raw garlic if you want a sharper taste. -
Can leftovers be stored?
Yes! Just store in an airtight container in the fridge for up to 3 days. Reheat in the oven for a crispier dish or the microwave for quick warming. -
What if I’m out of honey?
No biggie! You can substitute it with agave syrup or another sweetener. A touch of sugar mixed with water can work too!
Nutritional Info
While we all know that comfort food is for the soul, it’s nice to keep an eye on the nutritional side too! This Baked Feta Potatoes recipe is relatively wholesome, making use of roasted veggies, healthy fats from olive oil, and the benefits of feta cheese, which is lower in calories than many other cheeses. Made simply with clean ingredients, it’s packed with protein and calcium. Each serving offers a delightful balance of carbohydrates, proteins, and healthy fats, perfect for a comforting yet guilt-free indulgence!
Final Thoughts
Friends, let’s face it: we all need that comforting, soul-soothing dish in our lives that brings back happy memories and creates new ones. Baked Feta Potatoes do just that—they bridge the gap between nostalgia and culinary creativity. So roll up your sleeves and get cooking! And remember, whether it’s just you in the kitchen or you’ve got loved ones gathered around, make it a joyful experience. Grab that fork, share a laugh, and dive into that cheesy goodness. You’ve earned it!
Now tell me, what’s your favorite comfort food? Let’s keep this delicious conversation going!
PrintBaked Feta Potatoes
- Total Time: 70 minutes
- Yield: 4 servings 1x
- Diet: Vegetarian
Description
A cozy comfort dish featuring fluffy potatoes, creamy feta, and roasted garlic, perfect for sharing with loved ones.
Ingredients
- 2 large baking potatoes (russet or Yukon gold)
- 200g block of feta cheese
- 2 tbsp olive oil
- 1 tsp dried thyme
- 1 tsp dried oregano
- 1 head of garlic (top cut off)
- 1 lemon (quartered)
- 1 tbsp honey
- Fresh basil for garnish
Instructions
- Preheat your oven to 400°F (200°C).
- Prepare the potatoes by scrubbing, drying, and piercing them with a fork.
- Slice the potatoes in half lengthwise for quicker cooking.
- Drizzle each potato with olive oil and sprinkle with salt and pepper.
- Place potatoes cut side down on a baking sheet and roast for 25-30 minutes.
- Make a feta nest with feta, garlic, oregano, and thyme in a baking dish.
- Combine the roasted potatoes and feta dish, then return to the oven for an additional 20-25 minutes.
- Garnish with roasted garlic and fresh basil before serving.
Notes
Feel free to experiment with added ingredients like olives or cherry tomatoes for extra flavor.
- Prep Time: 15 minutes
- Cook Time: 55 minutes
- Category: Main Course
- Method: Baking
- Cuisine: Mediterranean
Nutrition
- Serving Size: 1 serving
- Calories: 350
- Sugar: 5g
- Sodium: 400mg
- Fat: 12g
- Saturated Fat: 4g
- Unsaturated Fat: 6g
- Trans Fat: 0g
- Carbohydrates: 45g
- Fiber: 3g
- Protein: 15g
- Cholesterol: 30mg
Keywords: baked potatoes, feta cheese, comfort food, Mediterranean dish, vegetarian recipe

Raspberry Swirl Brownies: 5-Ingredient, One-Bowl Recipe
Indulgent Raspberry Brownies: A Delicious Twist on Classic Comfort
Hey there, food lovers! It’s Beau Collier here, and today we’re diving into the delightful world of Raspberry Brownies. If you’re anything like me, brownies are that quintessential comfort food that just hits the spot. Rich, chocolatey, and soul-soothing, they remind us that life’s simplest pleasures can often be the most satisfying. But let me tell you, when you throw in a burst of fresh raspberries, you elevate the whole experience to another level! So let’s roll up our sleeves and get ready to create a dessert that not only fills our tummies but warms our hearts.
Growing up, my kitchen was always the buzzing hub of creativity, where the sweet aroma of chocolate often wafted through the air. I fondly recall watching my grandma whip up her famous brownies, her laughter spilling into the mix like a pinch of salt that deepened the flavor. It was during one of those sunny afternoons, talking about life and love while stuffing our faces with gooey treats, that I realized how food truly brings people together. To me, brownies were more than just a dessert; they were memories in the making. Fast forward to today, and I’ve taken that childhood joy and infused it with my love for bold flavors. Thus, the idea of adding fresh raspberries and raspberry jam was born. It’s all about making memories, and I can’t wait to create new ones with you!
Ingredients
Let’s gather everything we need to make these scrumptious Raspberry Brownies. Here’s what you’ll need:
-
1 box brownie mix
Easy and convenient! Go for a fudgy version if you can. You can also make homemade brownies if you prefer to skip the box! Just ensure the richness complements the fruit. -
1/2 cup fresh raspberries
These little gems add a tart burst of flavor. If you can’t find fresh raspberries, frozen ones work too—just thaw them first! -
1/4 cup raspberry jam
This adds a lovely sweetness and enhances the raspberry flavor. You can substitute with strawberry or any berry jam, but trust me, raspberry elevates this recipe! -
2 large eggs
The magic binding agent! If you’re vegan, you can replace eggs with a flax egg (1 tablespoon ground flaxseed mixed with 2.5 tablespoons water). -
1/3 cup vegetable oil
This adds moisture and richness. You can use melted coconut oil or applesauce as a healthier alternative! -
1 tablespoon water
Just a splash to mix everything perfectly. You can use milk for a creamier batter.
Step-by-Step Instructions
Let’s get cooking! Follow these steps, and we’ll have a batch of delicious Raspberry Brownies in no time.
-
Preheat Your Oven:
First things first! Preheat your oven to 350°F (175°C). This is crucial for even cooking, so don’t skip this step! Once it’s nice and toasty, prepare an 8×8 inch baking pan by greasing it or lining it with parchment paper for easy brownie removal. -
Mix the Brownie Batter:
In a large mixing bowl, combine the brownie mix, eggs, vegetable oil, and water. Give it a good stir until fully incorporated. The batter should be thick and glossy—this is where the magic happens! Pro tip: using a whisk instead of a spoon can help to eliminate any lumps for a smoother final texture. -
Add in the Raspberries:
Gently fold in the fresh raspberries, being careful not to squish them. This is what will make each bite a treasure trove of fruity goodness! I find that folding in the raspberries at this stage allows for even distribution without breaking them too much. -
Layer with Raspberry Jam:
Pour half the brownie batter into the prepared pan and smooth it out. Then, dollop the raspberry jam over this layer. Use a spatula to spread it slightly, but don’t worry about making it perfect; the chaos is part of the charm! Pour the remaining brownie batter over the jam layer and smooth the top. -
Swirl it Up:
Here comes the best part! Use a knife or a skewer to make a few gentle swirls to incorporate the jam into the brownie batter. Be artistic and have fun with it! -
Bake to Perfection:
Pop your brownies into the preheated oven and let them bake for 25-30 minutes. You want a toothpick inserted into the center to come out with a few moist crumbs—no one wants dry brownies! Keep an eye on them, as oven temperatures can vary. -
Cool and Cut:
Once your house is filled with that tantalizing chocolate aroma, it’s time to remove them from the oven. Let these beauties cool in the pan for about 15-20 minutes before you try to cut them—patience is a virtue! Carefully lift them out using the parchment paper and place them on a wire rack to cool completely.
Serving Suggestions
Presentation is everything! For a beautiful serving, cut your brownies into squares and place them on a plate. You could also sprinkle them with powdered sugar for a touch of elegance. If you’re feeling fancy, drizzle some warm raspberry sauce or chocolate ganache over the top. Pair them with a scoop of vanilla ice cream for an indulgent dessert or serve them alongside whipped cream and a few extra raspberries to make it pop. Your guests (or family) will think you’ve entered gourmet territory!
Recipe Variations
While the classic Raspberry Brownies are simply divine, here are some fun twists to keep things interesting:
-
Chocolate Chip Delight: Add a handful of chocolate chips to the batter for extra melty goodness.
-
Nutty Crunch: Toss in some chopped nuts such as walnuts or pecans for a delightful crunch that balances the softness of the brownie.
-
Minty Fresh: Add a few drops of mint extract for a refreshing surprise that complements the chocolate beautifully.
-
Vegan Version: Swap the eggs for flax eggs and use a dairy-free brownie mix for a plant-based alternative that everyone will love!
Chef’s Notes
These Raspberry Brownies are a personal favorite of mine for tons of reasons. Each time I make them, I’m reminded of those carefree afternoons with grandma. I’ve played around with the recipe over the years, and I have to admit, the raspberry twist was a game-changer! It adds that little zing that makes every bite feel like pure joy. And if you have leftover brownies (unlikely, but it can happen), they store well in an airtight container for a few days—or you can freeze them for a rainy day treat!
FAQs and Troubleshooting
Can I make my brownies ahead of time?
Absolutely! These brownies last well in an airtight container at room temperature for 3-4 days. You can also freeze them for up to 3 months—just let them thaw at room temperature when you’re ready to indulge!
What if my brownies are too gooey in the middle?
If they are too gooey, they might need a few extra minutes in the oven. Remember, appliance temperatures can vary, so keep an eye on them! If you’ve overbaked, they might be a bit dry; about 1-2 minutes makes all the difference!
Can I use frozen raspberries instead of fresh?
Definitely! Just make sure to let them thaw and drain excess moisture before adding them to the batter, otherwise, they can add too much liquid.
What’s the best way to cut brownies?
To get nice clean cuts, use a sharp knife that’s been warmed under hot water. Wipe the knife clean between cuts to keep your brownie squares looking good!
Nutritional Info
For those keeping an eye on their nutrition, here’s a rough estimate of the caloric content of the Raspberry Brownies (per serving—let’s say 12 servings for your 8×8 brownie pan):
- Calories: Approximately 200
- Total fat: 9g
- Saturated fat: 1g
- Carbohydrates: 29g
- Dietary fiber: 1g
- Sugars: 16g
- Protein: 2g
Please adjust based on your specific ingredients or if you substitute things out!
Final Thoughts
And there you have it! A batch of delectable Raspberry Brownies that’s sure to become a beloved addition to your dessert repertoire. As always, cooking is about enjoying the process and infusing a bit of love into every step. Whether you’re baking these for a special occasion or simply because it’s a Tuesday, I hope they bring as much joy to your home as they do to mine.
So, grab those ingredients and let’s bake some happy memories together! Thank you for tuning in to Feastical, and I can’t wait to see you whip up these delicious treats. Happy baking, my friends!
Print
Indulgent Raspberry Brownies
- Total Time: 45 minutes
- Yield: 12 servings 1x
- Diet: Vegetarian
Description
Rich and chocolatey brownies enhanced with a burst of fresh raspberries and raspberry jam, perfect for creating sweet memories.
Ingredients
- 1 box brownie mix
- 1/2 cup fresh raspberries
- 1/4 cup raspberry jam
- 2 large eggs
- 1/3 cup vegetable oil
- 1 tablespoon water
Instructions
- Preheat your oven to 350°F (175°C) and prepare an 8×8 inch baking pan.
- Mix the brownie mix, eggs, vegetable oil, and water until well combined.
- Add in the fresh raspberries, folding gently.
- Layer half the brownie batter into the pan and spread the raspberry jam over it. Pour the remaining batter on top.
- Swirl the jam into the brownie batter with a knife.
- Bake for 25-30 minutes until a toothpick comes out with a few moist crumbs.
- Cool the brownies in the pan for 15-20 minutes before transferring to a wire rack.
Notes
For a twist, add chocolate chips or nuts to mix-ins. These brownies can be stored for 3-4 days or frozen for up to 3 months.
- Prep Time: 15 minutes
- Cook Time: 30 minutes
- Category: Dessert
- Method: Baking
- Cuisine: American
Nutrition
- Serving Size: 1 brownie
- Calories: 200
- Sugar: 16g
- Sodium: 150mg
- Fat: 9g
- Saturated Fat: 1g
- Unsaturated Fat: 8g
- Trans Fat: 0g
- Carbohydrates: 29g
- Fiber: 1g
- Protein: 2g
- Cholesterol: 30mg
Keywords: brownies, raspberry, dessert, chocolate, easy baking