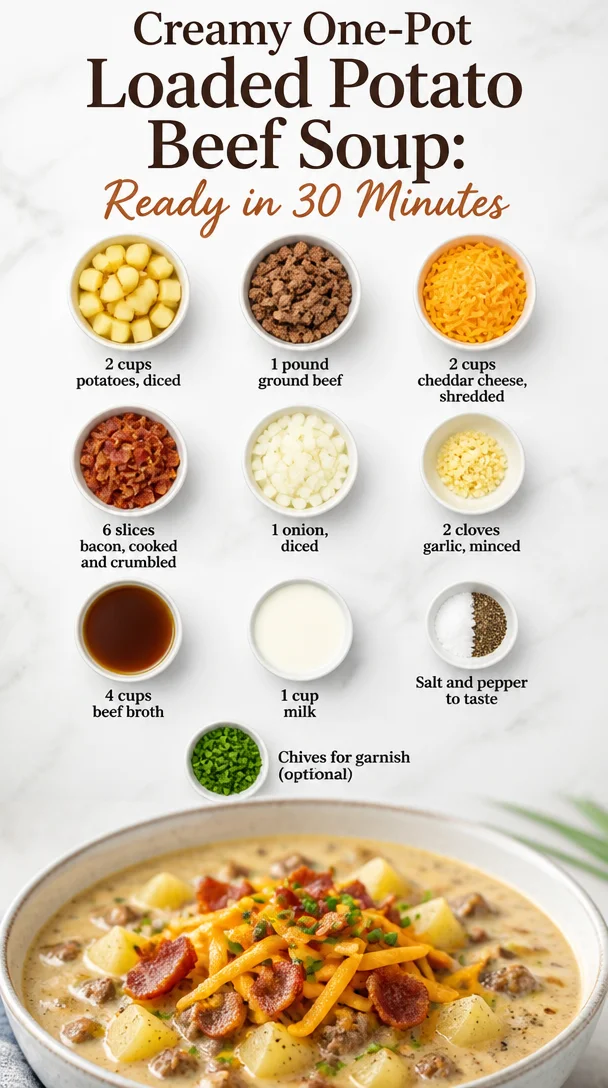
Creamy One-Pot Loaded Potato Beef Soup: Ready in 30 Minutes
Loaded Potato Beef Soup: A Deliciously Cozy Comfort Food
Hey there, foodie friends! Welcome back to Feastical! Today, I’m excited to share a hearty dish that’ll keep you cozy, satisfied, and coming back for seconds—Loaded Potato Beef Soup. Picture this: a steaming bowl of creamy, savory soup brimming with tender potatoes, savory ground beef, and a cheesy finish that warms both the belly and the heart. This recipe is like a warm hug in a bowl, perfect for those chilly evenings or when you need a little extra comfort after a long day. Let’s dig in!
A Nostalgic Memory
I’ll never forget the first time I made Loaded Potato Beef Soup. I was in my early twenties, living in a cozy apartment with some friends who had just moved away from home. We were all working hard and feeling a little homesick, and I decided it was time to recreate one of my childhood favorites that my mom used to make. There was something about her Loaded Potato Soup—the way it simmered on the stove, filling our small kitchen with mouthwatering aromas, and the laughter we shared over dinner.
The dish combined my two favorites at the time: potatoes and cheese! So, I called up my mom for her “secret” recipe, which she shared with me in a hushed tone (mostly the bacon part!). With a few adjustments, given what I had in my pantry, I whipped it up and invited my friends over. When the soup was finally ready to ladle into bowls, we gathered around the dining table, indulged in laughter, and shared our own stories. It marked the beginning of a tradition—soup nights! Each month, we’d try a different soup recipe, but this one remained our ultimate favorite.
As I ladle up this creamy concoction today, all those sweet memories flood back. So let’s get cooking—you’re in for a treat!
Ingredients
Here’s what you’ll need:
-
2 cups potatoes, diced
Use your favorite variety—Russets are great for creaminess, while Yukon Golds add a buttery touch. If you’re in a pinch, frozen diced potatoes work too! -
1 pound ground beef
I like to use lean beef for a healthier soup, but feel free to substitute with ground turkey or even a plant-based alternative for a meatless option. -
2 cups cheddar cheese, shredded
Sharp cheddar is my go-to for that rich flavor, but feel free to mix it up with Monterey Jack or even a spicy pepper jack for an extra kick. -
6 slices bacon, cooked and crumbled
Bacon adds a wonderful smoky flavor. If you’re avoiding pork, turkey bacon works just as well, or you can skip it entirely (but let’s be honest, why would you want to?). -
1 onion, diced
Onions bring a sweet depth to the flavor. Shallots are a great substitute if you prefer a milder taste. -
2 cloves garlic, minced
Fresh garlic is key for that aromatic base. If you’re out, garlic powder works in a pinch, but fresh is always best! -
4 cups beef broth
Use low-sodium if you’re watching your salt intake. Homemade broth elevates the flavor even further, but store-bought works great too. -
1 cup milk
For creaminess! You can swap this for heavy cream for a richer soup or a plant-based milk if you’re going dairy-free. -
Salt and pepper to taste
Essential for balancing flavors. Always season to your preference! -
Chives for garnish (optional)
Finely chopped chives add a fresh pop of flavor and color, but you can skip them if you don’t have any on hand.
Step-by-Step Instructions
Let’s get to the good part—cooking! Follow these steps to create your very own Loaded Potato Beef Soup:
-
Cook the bacon: In a large pot or Dutch oven, cook the bacon over medium heat until it’s crispy. This will take about 6-8 minutes. Once done, remove the bacon, crumble it, and set it aside. Don’t throw out that bacon grease yet—oh no! We’ll use it for flavor!
-
Cook the ground beef: In the same pot with the leftover bacon grease, add your ground beef. Break it up with a spoon, and cook until browned (about 5-7 minutes). Drain excess fat if necessary. A little grease adds flavor, but we don’t want a pool of it.
-
Add onions and garlic: Toss in the diced onion and minced garlic, and sauté until they’re soft and fragrant—about 3-4 minutes. Your kitchen will smell fantastic right about now!
-
Throw in the potatoes: Add the diced potatoes to the pot, followed by the beef broth. Bring everything to a boil, then reduce the heat to low. Let it simmer uncovered for about 15-20 minutes until the potatoes are tender. Stir occasionally to keep anything from sticking to the bottom.
-
Make it creamy: Once the potatoes are perfectly tender, stir in the milk. This creates that creamy texture we’re looking for. Feel free to add more milk if you like your soup a bit thinner!
-
Add the cheese: Gradually stir in the shredded cheddar cheese until it melts and blends into the soup. Look at that gooey goodness come to life!
-
Season it up: Give it a taste and add salt and pepper to your liking. The bacon, broth, and cheese will add some saltiness, so don’t overdo it at first!
-
Finish with toppings: Ladle the soup into bowls, top with crumbled bacon, and sprinkle with fresh chives for a vibrant finish.
And there you have it! A delightful bowl of Loaded Potato Beef Soup that is as comforting as your favorite childhood memories!
Serving Suggestions
To take your soup experience to the next level, serve it alongside some warm, crusty bread or buttery biscuits for dipping—trust me; that’s where the magic happens! You can even drizzle a little extra cheese over the top or add a dollop of sour cream for tanginess.
For a more gourmet touch, consider pairing your soup with a fresh green salad drizzled with a simple vinaigrette. The crispness will give a nice contrast to the creamy warmth of the soup. And don’t forget a glass of your favorite wine or a cozy hot drink to cozy up with afterward!
Recipe Variations
Keep this recipe fresh and exciting every time you make it by trying these creative twists:
-
Spicy Loaded Potato Beef Soup: Add diced jalapeños, crushed red pepper, or hot sauce during cooking for a spicy kick.
-
Veggie-Loaded Version: Toss in some carrots and celery with your onions for a more veggie-packed soup, or even throw in some frozen corn.
-
Dairy-Free Delight: Use coconut milk or an unsweetened almond milk instead of regular milk, and swap the cheese for a vegan alternative.
-
One-Pot Wonder: Cook the meat and vegetables in a pressure cooker to save time, then add broth and pressure cook again for a quick meal!
Chef’s Notes
One of the great things about this Loaded Potato Beef Soup is its versatility. Over the years, I’ve seen it evolve based on what’s in season or what I have on hand. It’s become a staple in my kitchen, evolving from a homesick comfort food to a go-to recipe for gatherings and family dinners. Who knew soup could bring so many people together?
FAQs and Troubleshooting
-
Why is my soup too thick?
If your soup turns out thicker than you like, simply add more broth or milk to reach your desired consistency. -
Can I freeze this soup?
Absolutely! This soup freezes well. Just be sure to let it cool completely before transferring it to an airtight container. Reheat it gently on the stove. -
What if I don’t have beef broth?
Chicken broth or vegetable broth can work in a pinch. It might alter the flavor slightly but will still deliver a hearty soup. -
What can I do if I over-salted my soup?
Add a little more milk or broth to dilute the saltiness. You can also toss in a peeled, raw potato and let it simmer for about 10 minutes; it can absorb some excess salt.
Nutritional Info
This Loaded Potato Beef Soup is not just delicious—it’s also packed with nutrition! Here’s a rough breakdown per serving (assuming about 6 servings per recipe):
- Calories: Approximately 450-500
- Protein: 24g
- Carbohydrates: 35g
- Fat: 25g
- Fiber: 3g
- Sodium: Varies (based on broth and added salt)
Of course, your actual nutritional values may vary based on the specific ingredients you use and any tweaks you make to this recipe.
Final Thoughts
There you have it, my friends! A recipe that brings nostalgia and warmth to your kitchen. The joy of cooking this Loaded Potato Beef Soup is not just in the delightful dish itself, but in the memories you’ll create around it. Whether reliving moments from your childhood or crafting new traditions with loved ones, this soup is perfect for every occasion.
So grab your pot, throw on your apron, and let’s make some memories together! Don’t forget to share your own kitchen stories and variations with me. Happy cooking, and may your soup always be loaded with love!
Print
Loaded Potato Beef Soup
- Total Time: 45 minutes
- Yield: 6 servings 1x
- Diet: Omnivore
Description
A hearty and creamy soup filled with tender potatoes, savory ground beef, and topped with cheese and bacon. Perfect for warming up on chilly evenings.
Ingredients
- 2 cups potatoes, diced
- 1 pound ground beef
- 2 cups cheddar cheese, shredded
- 6 slices bacon, cooked and crumbled
- 1 onion, diced
- 2 cloves garlic, minced
- 4 cups beef broth
- 1 cup milk
- Salt and pepper to taste
- Chives for garnish (optional)
Instructions
- Cook the bacon: In a large pot or Dutch oven, cook the bacon over medium heat until it’s crispy. This will take about 6-8 minutes. Once done, remove it, crumble it, and set it aside.
- Add the ground beef: In the same pot with the leftover bacon grease, add your ground beef. Break it up with a spoon, and cook until browned (about 5-7 minutes). Drain excess fat if necessary.
- Toss in the onions and garlic: Sauté until they’re soft and fragrant—about 3-4 minutes.
- Add the potatoes: Toss in the diced potatoes along with the beef broth. Bring everything to a boil, then reduce the heat to low and let it simmer uncovered for about 15-20 minutes until the potatoes are tender.
- Stir in the milk: Once the potatoes are tender, add the milk for creaminess.
- Gradually add the cheese: Stir in the shredded cheddar cheese until it melts.
- Season it up: Taste and add salt and pepper to your liking.
- Finish with toppings: Ladle soup into bowls, topping with crumbled bacon and chives.
Notes
Serve with warm crusty bread or biscuits for dipping. This soup is versatile; feel free to add vegetables or adjust the seasoning to your preference.
- Prep Time: 15 minutes
- Cook Time: 30 minutes
- Category: Soup
- Method: Stovetop
- Cuisine: American
Nutrition
- Serving Size: 1 serving
- Calories: 450
- Sugar: 4g
- Sodium: 800mg
- Fat: 25g
- Saturated Fat: 10g
- Unsaturated Fat: 8g
- Trans Fat: 0g
- Carbohydrates: 35g
- Fiber: 3g
- Protein: 24g
- Cholesterol: 70mg
Keywords: soup, comfort food, loaded potato, beef, cheese, bacon
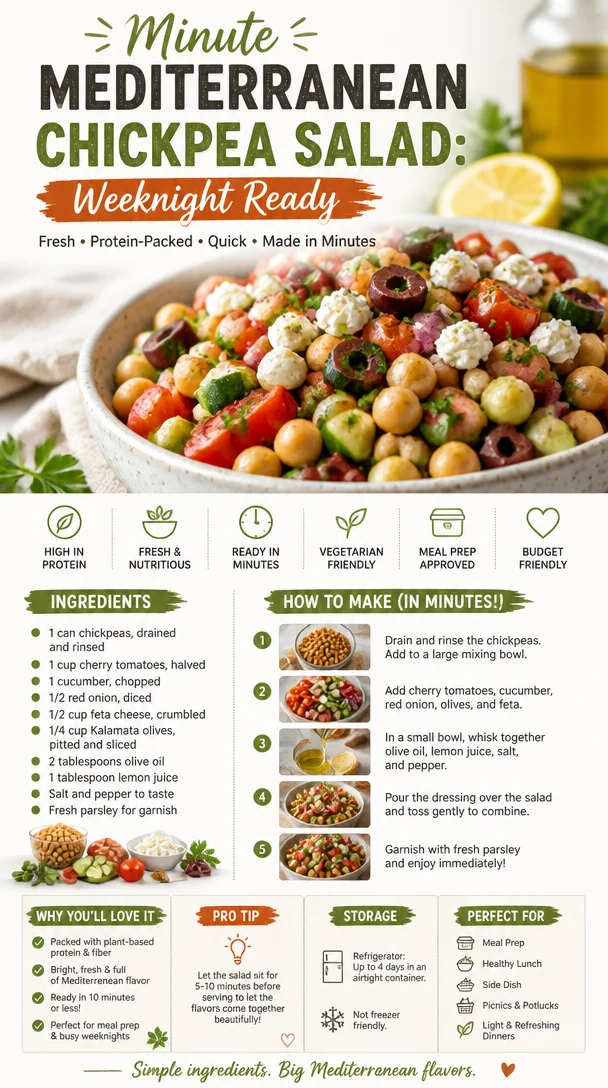
Minute Mediterranean Chickpea Salad: Weeknight Ready
Fresh Mediterranean Chickpea Salad: A Tasty Trip to the Mediterranean
Hey there, food lovers! Are you ready to dive into a dish that is not only vibrant and refreshing but also packed with nutrients? Let’s talk about the Fresh Mediterranean Chickpea Salad! This delightful salad is a celebration of flavors and textures, and trust me, it’s a dish that will have your taste buds dancing with joy.
Imagine this: It’s a sun-soaked afternoon, and you’re lounging in your garden, soaking up the rays. The scent of fresh veggies wafts through the air, and you know it’s time for a delicious, wholesome meal. Whether you’re hosting a summer picnic or simply want a quick and easy dinner after a long day, this chickpea salad checks all the boxes. It’s colorful, loaded with goodness, and takes mere minutes to whip up. The best part? You can customize it to suit your taste, so let’s get those kitchen vibes flowing!
This salad has a little Mediterranean magic to it—think sun-kissed tomatoes, crispy cucumbers, and tangy feta cheese—all wrapped up in a light olive oil and lemon dressing. It’s all about reminding us of those sun-drenched days spent near the Mediterranean coast, even if we’re just enjoying it at home.
Let’s take a trip down memory lane, shall we?
A Garlic-Infused Memory
One of my fondest culinary memories revolves around a family trip to Greece many years ago. We were exploring the colorful market in Athens, where the vibrant produce stole my heart: juicy tomatoes, glossy olives, crunchy cucumbers—the colors were simply breathtaking. My aunt, who I considered a culinary goddess, encouraged me to sample everything, from pungent olives to fragrant herbs.
As we wandered, we stumbled upon a hidden restaurant with tables adorned by rustic tablecloths and a stunning view of the Acropolis. While feasting on fresh salads and homemade pita, I tasted a chickpea salad that was bursting with flavor. It had a simplicity that felt almost profound. Each bite was a reminder of how little you actually need to create something beautiful. That experience sparked my lifelong love for Mediterranean cuisine, and this salad is my homage to my travels and those memorable petas filled with laughter and food.
Now, let’s channel that spirit as we whip up a bowl of Fresh Mediterranean Chickpea Salad!
Ingredients
Here’s what you’ll need to make this beautiful dish:
-
1 can chickpeas, drained and rinsed
Chickpeas (or garbanzo beans) are the star of this salad. They’re not only hearty but also a great plant-based protein source. If you want to use dried chickpeas, simply soak them overnight and boil until tender! -
1 cup cherry tomatoes, halved
Cherry tomatoes add a sweet pop of flavor and vibrant color. Feel free to use any tomato variety you prefer; just chop them up if they’re larger! -
1 cucumber, chopped
Cool, crunchy cucumbers bring hydration and a refreshing crunch. You can swap with Persian cucumbers for a sweeter profile or even use zucchinis if you want to experiment. -
1/2 red onion, diced
Red onion introduces a gentle bite that balances the salad’s freshness. Try using green onions for a milder flavor, or a sprinkle of shallots for something subtly sweet. -
1/2 cup feta cheese, crumbled
Feta cheese contributes a creamy, salty richness; it’s essential! Can’t eat dairy? Try using almond feta for a vegan alternative or omit it for a lighter version altogether. -
1/4 cup Kalamata olives, pitted and sliced
Kalamata olives give a briny depth that elevates the dish. If you’re not a fan, green olives can work too, just be mindful of their flavor strength! -
2 tablespoons olive oil
This is your dressing base. Use extra-virgin olive oil for the best flavor—it’s like liquid gold! If olive oil isn’t your jam, feel free to substitute with avocado oil. -
1 tablespoon lemon juice
Freshly squeezed lemon juice adds acidity and brightness to the salad. In a pinch? Bottled lemon juice works, but fresh is always best. -
Salt and pepper to taste
Essential for enhancing the flavors of your ingredients. Just taste as you go! -
Fresh parsley for garnish
Chopped parsley not only adds color but also a fresh herbal note. You could swap it for basil or mint if you like something aromatic!
Step-by-Step Instructions
Now that we have our ingredients ready, let’s get into the heart of the matter! Follow these simple steps:
-
Prep Your Ingredients:
Before you start throwing things into a bowl, take a moment to prep. Rinse the chickpeas under cold water to remove any canning liquid (this gets rid of that metallic taste). Chop the cherry tomatoes, cucumber, and red onion. The more uniform your chunks, the more beautiful your salad will be! -
Mix It Up:
Grab a large mixing bowl, and toss in the chickpeas, halved cherry tomatoes, chopped cucumber, diced red onion, crumbled feta, and sliced Kalamata olives. With this combo, you’re already off to a colorful start! -
Dress It Up:
Drizzle the olive oil and lemon juice over the salad. This is where the magic happens, as these ingredients help all the flavors come together. Sprinkle salt and pepper generously to taste; seasoning is key! -
Toss-o-Rama:
With your hands (or a spatula if you’re feeling fancy), gently toss the salad until everything is well combined. Try to be gentle with the feta so it doesn’t crumble too much; we want those beautiful chunks in our salad. -
Garnish & Serve:
Sprinkle freshly chopped parsley on top for that pop of freshness. You can even add a few extra olives or feta on top for presentation. -
Chill (Optional):
If time allows, let the salad sit for about 30 minutes to an hour! This lets the flavors meld together beautifully. But hey, if you’re too hungry to wait, dig in right away!
Serving Suggestions
Now, how to plate this beauty? You’ve got options! Serve this salad in deep bowls to emphasize its heartiness, or on a large platter for a communal vibe. Pair it with warm pita bread, a drizzle of yogurt dip, or even some grilled chicken or fish for a full Mediterranean feast. It can also stand alone as a light lunch or picnic lunch—just pack it up in a mason jar and shake it when you’re ready to eat.
For a little touch of elegance, you might want to drizzle some additional balsamic glaze over the top right before serving; it not only adds flavor but also a beautiful, glossy finish. Just a tip from yours truly!
Recipe Variations
The beauty of this salad lies in its versatility. Here are some creative twists you can try:
-
Add-Ins Galore:
Want some greens? Toss in a handful of baby spinach or arugula for added nutrition. -
Higher Protein:
Add diced grilled chicken, shrimp, or even some quinoa for an extra protein boost. -
Spice it Up:
Want a bit of heat? Dice up a jalapeño or sprinkle some red pepper flakes into the mix. -
Herbal Delight:
Consider adding fresh herbs like basil, mint, or even dill for a fragrant twist that will enhance the Mediterranean experience. -
Citrus Kick:
Besides lemon juice, try adding a splash of fresh orange juice or even lime for a zesty undertone!
Chef’s Notes
This Fresh Mediterranean Chickpea Salad has been a staple in my kitchen for years. It’s evolved through the seasons; sometimes I add what’s fresh from the garden, other times I just use what I have on hand. One time, I even made it with black beans instead of chickpeas—it was a fun twist and surprisingly tasty! My friends often tease me about how simple it is, but they all agree: sometimes the simplest things are the most comforting, just like food should be.
FAQs and Troubleshooting
-
Can I substitute the chickpeas?
Absolutely! You can use any bean or even lentils if you’re feeling adventurous. Just ensure they’re cooked and seasoned well. -
What if I can’t find Kalamata olives?
No problem! Any pitted olives will work. Just choose ones you enjoy eating! -
How long can I store leftovers?
This salad keeps well in the fridge for about 2-3 days. Just know that the cucumbers may lose some crunch, but the flavor will still be fabulous! -
Is this salad vegan?
It can easily be made vegan by omitting the feta cheese or substituting it with vegan-friendly cheese.
Nutritional Info
Now, who doesn’t want to know the goodness they’re putting into their bodies? This salad is not only delicious but also packed with nutrients. Here’s a quick breakdown per serving:
- Calories: Approx. 250
- Protein: 10g
- Carbohydrates: 30g
- Fat: 12g (predominantly from healthy fats in olive oil and feta)
- Fiber: 8g
Thanks to the chickpeas, you’ll get a solid hit of protein and fiber. Plus, tomatoes and cucumbers are hydrating and low in calories. It’s guilt-free eating at its finest!
Final Thoughts
There you go, my fellow foodies! A Fresh Mediterranean Chickpea Salad that is bursting with flavor, nutrition, and stories just waiting to unfold. Whether you decide to enjoy it on its own or pair it with something delightful, this salad is sure to elevate any meal. So why not gather some friends, whip up this recipe, and let the fresh flavors spark conversations? Remember, good food is all about creating moments, sharing laughter, and making lasting memories.
Don’t forget to tag me and show off your salad masterpieces on social media! I can’t wait to see how you make this dish your own. Happy cooking, and until next time, keep those flavors bright and beautiful! 🍽️❤️
PrintFresh Mediterranean Chickpea Salad
- Total Time: 10 minutes
- Yield: 4 servings 1x
- Diet: Vegetarian
Description
A vibrant and refreshing chickpea salad, loaded with Mediterranean flavors, perfect for a picnic or a light meal.
Ingredients
- 1 can chickpeas, drained and rinsed
- 1 cup cherry tomatoes, halved
- 1 cucumber, chopped
- 1/2 red onion, diced
- 1/2 cup feta cheese, crumbled
- 1/4 cup Kalamata olives, pitted and sliced
- 2 tablespoons olive oil
- 1 tablespoon lemon juice
- Salt and pepper to taste
- Fresh parsley for garnish
Instructions
- Prep your ingredients: Rinse the chickpeas under cold water, chop the tomatoes, cucumber, and onion.
- Mix it up: In a large mixing bowl, combine chickpeas, tomatoes, cucumber, onion, feta, and olives.
- Dress it up: Drizzle olive oil and lemon juice over the salad, then season with salt and pepper.
- Toss-o-Rama: Gently toss the salad until well combined, being careful with the feta.
- Garnish & serve: Top with freshly chopped parsley and enjoy!
- Chill (Optional): Let the salad sit for 30 minutes to meld flavors before serving.
Notes
Feel free to customize with your favorite veggies or proteins like grilled chicken or shrimp!
- Prep Time: 10 minutes
- Cook Time: 0 minutes
- Category: Salad
- Method: Mixing
- Cuisine: Mediterranean
Nutrition
- Serving Size: 1 serving
- Calories: 250
- Sugar: 5g
- Sodium: 400mg
- Fat: 12g
- Saturated Fat: 4g
- Unsaturated Fat: 6g
- Trans Fat: 0g
- Carbohydrates: 30g
- Fiber: 8g
- Protein: 10g
- Cholesterol: 30mg
Keywords: Mediterranean salad, chickpea salad, healthy salad, quick recipes, vegetarian recipes
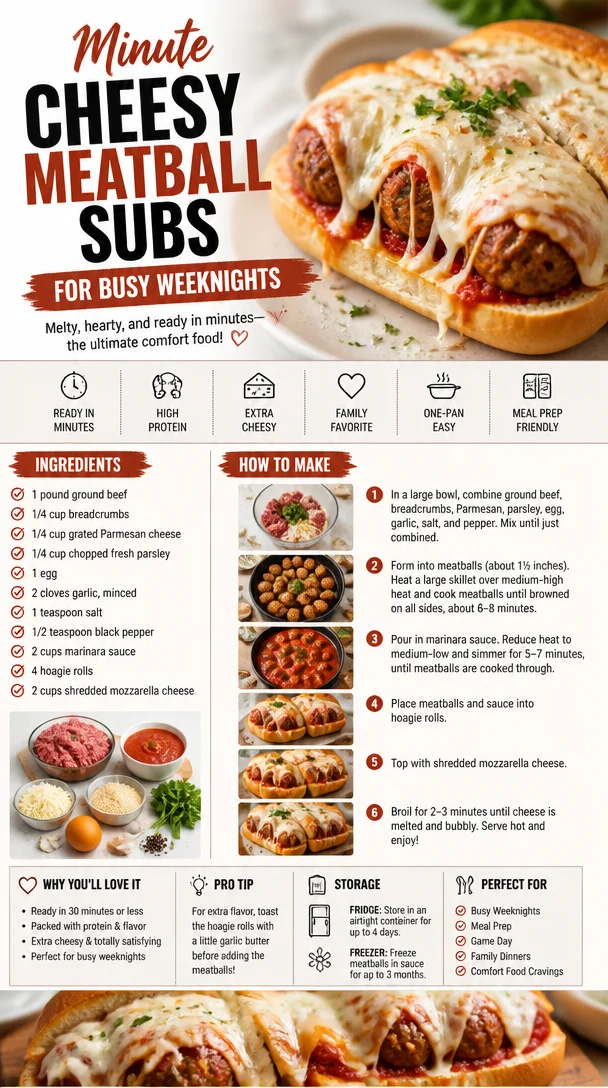
Minute Cheesy Meatball Subs for Busy Weeknights
Cheesy Meatball Subs: A Comfort Food Classic
Hey there! I’m Beau Collier, and welcome to Feastical! Today, I’m whipping up one of my all-time favorite comfort food creations: Cheesy Meatball Subs. There’s just something about a warm, gooey meatball sub that’s like a hug from the inside out. The way the meatballs bubble in marinara sauce, nestled in a hoagie roll and topped with melted mozzarella, is nothing short of magical. So, if you’re ready to roll up your sleeves, I promise you’ll want to savor every bite of these delectable sandwiches.
Like many cooking lovers, my journey began in my childhood kitchen, where my family gathered around the table for a Sunday feast. My mom always had a pot of marinara sauce simmering on the stove; its rich aroma made it impossible not to gather around. However, the star of our family meal was her meatball subs. She believed the secret ingredient was love, and her subs always tasted like it. The way she rolled those meatballs—so tender, so juicy—was an art form in itself. Fast forward a few decades later, and here I am, passing down that same joy and flavor to you. Let’s dive into this recipe and create some delicious memories together!
Ingredients
Here’s what you’ll need to bring your Cheesy Meatball Subs to life:
-
1 pound ground beef
The backbone of this recipe! You can also use a mixture of ground beef and ground pork for more flavor. For a leaner option, ground turkey or chicken works well. -
1/4 cup breadcrumbs
Ideal for that perfect meatball texture! Panko breadcrumbs are a great alternative if you want extra crunch. Gluten-free breadcrumbs are also available if you’re looking for a gluten-free option. -
1/4 cup grated Parmesan cheese
This adds a delightful umami savor to your meatballs. If you’re a fan of a stronger cheese flavor, try using Pecorino Romano instead. -
1/4 cup chopped fresh parsley
Fresh herbs elevate any dish! If parsley isn’t your thing, fresh basil or even cilantro will bring a unique flavor twist. -
1 egg
This is your binder to keep those meatballs together. You can use a flax egg (1 tablespoon ground flaxseed mixed with 2.5 tablespoons water) for a vegan option. -
2 cloves garlic, minced
Because garlic makes everything better! Use roasted garlic if you want a milder, sweeter taste. -
1 teaspoon salt
A must to enhance the flavors. Feel free to adjust for dietary needs or swap with garlic salt for an extra flavor kick. -
1/2 teaspoon black pepper
For that little punch! You can swap it with red pepper flakes for a spicy kick. -
2 cups marinara sauce
You can use homemade or store-bought. For extra depth, look for a brand with a blend of herbs. If you’re feeling adventurous, a spicy marinara adds a great twist. -
4 hoagie rolls
These are the vessel for our masterpiece! If hoagie rolls aren’t available, sub in any crusty bread or even baguettes. -
2 cups shredded mozzarella cheese
The gooey, melty star of our show! For a cheesy variation, try a blend of mozzarella and provolone cheese.
Step-by-Step Instructions
Now, let’s get cooking! Follow these easy steps for your Cheesy Meatball Subs:
-
Preheat the Oven
Preheat your oven to 375°F (190°C). This ensures that our meatballs will cook perfectly. If you have a convection oven, you can reduce the temperature by 25°F for a nice even cook. -
Prepare the Meatball Mixture
In a large mixing bowl, combine the ground beef, breadcrumbs, Parmesan cheese, chopped parsley, egg, minced garlic, salt, and black pepper. Get in there with your hands! Mixing with your hands helps you feel the texture and ensures everything is evenly combined. Pro Tip: Don’t overmix, or you’ll end up with tough meatballs. -
Shape the Meatballs
Roll the mixture into golf ball-sized meatballs – about 1 to 1.5 inches in diameter. Place them on a baking sheet lined with parchment paper. The parchment helps with easy cleanup. -
Bake the Meatballs
Pop those meatballs in the preheated oven for about 20–25 minutes, or until they’re golden brown and cooked through. You can multitask during this time—get your marinara sauce warming on low in a separate pot for an irresistible aroma. -
Simmer in Marinara Sauce
Once your meatballs are finished baking, add them to the warm marinara sauce. Let them simmer together for about 10 minutes. This step allows all those flavorful juices to mingle. -
Prepare the Rolls
While the meatballs are simmering, slice your hoagie rolls down the center, but not all the way through—think of it as creating a little pocket for the goodies! Place them on a baking tray. -
Assemble the Cheesy Subs
Spoon the meatballs and marinara sauce into each hoagie roll. Top generously with shredded mozzarella cheese. Chef Hack: If you want a delightful golden crust on the cheese, pop them under the broiler for 2-3 minutes. Just watch it—things can go from brown to burned quickly! -
Serve and Enjoy!
Once the cheese is melted and bubbly, remove the tray from the oven. Let them cool for a couple of minutes (if you can resist the smell!). Plate your subs and dive into cheesy deliciousness!
Serving Suggestions
For plating, serve your Cheesy Meatball Subs on a rustic wooden board or a simple white plate to let that gooey goodness shine. Dress it up with a sprinkle of extra parsley or basil on top for a pop of color. On the side, consider crispy, golden fries or a fresh garden salad to balance out the richness of the subs. And don’t forget a small bowl of extra marinara sauce for dipping!
Recipe Variations
Now, let’s shake things up a bit. Here are a few creative twists to make the recipe your own:
-
Spicy Meatball Subs: Add crushed red pepper flakes into the meat mixture for some heat. Serve with pickled jalapeños for an extra kick.
-
Veggie-Packed Meatballs: Swap half of the ground beef for finely grated zucchini or carrots. It adds moisture and a sneaky veggie boost!
-
Cheesy Garlic Bread Rolls: Brush the hoagie rolls with garlic butter before adding the filling for an extra layer of flavor.
-
Substitute Proteins: Use ground turkey, lamb, or even plant-based ground meat for a different flavor profile or for those following a specific diet.
-
Herbed Variations: Experiment by adding various herbs like oregano, thyme, or even a dash of Italian seasoning to the meatball mixture for a new twist on flavor.
Chef’s Notes
Every dish carries a piece of its creator’s heart, doesn’t it? This Cheesy Meatball Sub recipe is no exception. I’ve modified it over time—what started as mom’s secret sauce and infinite love has turned into a canvas for creativity. I’ve even experimented with homemade hoagie rolls; if you find yourself with some extra time, I highly recommend trying your hand at making them from scratch. The joy of biting into a chewy, fresh hoagie roll stuffed with these meatballs is simply unforgettable.
FAQs and Troubleshooting
1. Why are my meatballs falling apart?
This usually happens if there’s not enough binding agent. Make sure to use an egg and don’t skip the breadcrumbs!
2. How do I store leftovers?
Store any leftovers in an airtight container in the fridge for up to 3 days. Reheat in the oven for the best texture.
3. Can I freeze these?
Absolutely! You can freeze the uncooked meatballs on a baking tray and then transfer them to a freezer bag. They’ll keep for up to 3 months! Just thaw and bake when you’re ready.
4. What’s the best way to reheat the meatball subs?
For optimal gooeyness, reheat in the oven at 350°F (175°C) until warmed through and cheese is melted, about 10-15 minutes.
Nutritional Info
Serving size: 1 sub
- Calories: ~500
- Protein: 30g
- Fat: 25g
- Carbohydrates: 40g
- Fiber: 2g
- Sugar: 5g
(Nutritional values are estimates and may vary based on specific ingredients and serving sizes.)
Final Thoughts
There you have it, my friends! Your very own recipe for Cheesy Meatball Subs that’ll make your kitchen smell heavenly and your heart sing. It’s more than just food; it’s about gathering with friends, sharing stories, and creating memories over a dish that always brings everyone together. So, gather your ingredients, turn up your favorite playlist, and let’s get cooking. Remember, food is meant to be enjoyed, so don’t stress; have fun in the kitchen! Until next time, happy feasting!
Print
Cheesy Meatball Subs
- Total Time: 50 minutes
- Yield: 4 servings 1x
- Diet: None
Description
A comforting and delicious meatball sub recipe that features tender meatballs in marinara sauce, topped with gooey mozzarella cheese, all nestled in a warm hoagie roll.
Ingredients
- 1 pound ground beef
- 1/4 cup breadcrumbs
- 1/4 cup grated Parmesan cheese
- 1/4 cup chopped fresh parsley
- 1 egg
- 2 cloves garlic, minced
- 1 teaspoon salt
- 1/2 teaspoon black pepper
- 2 cups marinara sauce
- 4 hoagie rolls
- 2 cups shredded mozzarella cheese
Instructions
- Preheat your oven to 375°F (190°C).
- In a large mixing bowl, combine the ground beef, breadcrumbs, Parmesan cheese, chopped parsley, egg, minced garlic, salt, and black pepper.
- Roll the mixture into golf ball-sized meatballs and place them on a baking sheet lined with parchment paper.
- Pop those meatballs in the oven for about 20-25 minutes, until golden brown and cooked through.
- Once the meatballs are baked, add them to the warm marinara sauce and let them simmer for about 10 minutes.
- Slice your hoagie rolls down the center, but not all the way through.
- Spoon the meatballs and marinara into each hoagie roll and top with shredded mozzarella cheese.
- Pop them under the broiler for 2-3 minutes for a golden crust.
- Remove from the oven, let them cool for a couple of minutes, then serve and enjoy!
Notes
For variations, you can add spicy elements or swap out the ground meats, or brush the rolls with garlic butter for extra flavor.
- Prep Time: 15 minutes
- Cook Time: 35 minutes
- Category: Main Course
- Method: Baking
- Cuisine: Italian
Nutrition
- Serving Size: 1 sub
- Calories: 500
- Sugar: 5g
- Sodium: undefined
- Fat: 25g
- Saturated Fat: 10g
- Unsaturated Fat: 15g
- Trans Fat: 0g
- Carbohydrates: 40g
- Fiber: 2g
- Protein: 30g
- Cholesterol: 80mg
Keywords: meatball, sub, sandwich, comfort food, cheesy
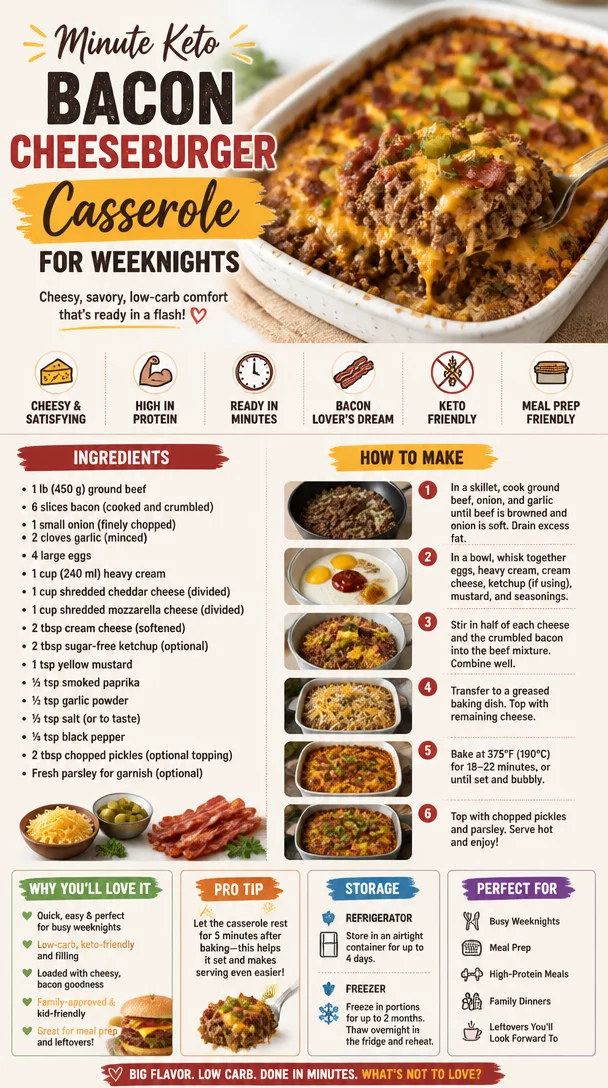
Minute Keto Bacon Cheeseburger Casserole for Weeknights
Low-Carb Bacon Cheeseburger Casserole: A Comfort Food Classic
Hey there, foodies! If you’ve landed here, you’re probably a fan of the cheesy, meaty goodness that is a bacon cheeseburger. But what if I told you that you could enjoy all those heavenly flavors in a delightful casserole, minus the carbs? That’s right! Today, I’m excited to share my Low-Carb Bacon Cheeseburger Casserole recipe with you.
Now, before we dive into this deliciousness, let’s talk about the magic of casseroles. There’s something utterly comforting about a steaming dish pulled from the oven, bubbling with promise and inviting you to dig in. Whether it’s a chilly evening or just an ordinary weeknight, this casserole will warm your heart and fill your belly with nostalgia.
A Little Slice of My Culinary Journey
Growing up, my family had a soft spot for comfort food, and cheeseburgers were a regular on our weeknight menu. My mom would whip up these doughy buns filled with juicy patties, crispy bacon, and all sorts of toppings. The kitchen would transform into a mini burger joint, filled with the sounds of sizzling meat and the amazing aroma of caramelized onions. But as I’ve navigated through the culinary world and discovered low-carb alternatives for a healthier lifestyle, reinventing those beloved flavors became a personal project.
A few years back, I experimented with a casserole version of our beloved burgers. On one particular rainy day, I threw together the ingredients I had on hand, and to my surprise, the combination was a total hit at the dinner table! My family went back for seconds and thirds, and I knew I had stumbled upon a recipe worth sharing.
Now, every time I whip up this Low-Carb Bacon Cheeseburger Casserole, I’m transported back to those cozy nights in my childhood kitchen, where love and laughter coexisted with the deliciousness of a good meal. Ready to create some magic of your own? Let’s get cooking!
Ingredients You’ll Need
Here’s what you’ll need for this fantastic Low-Carb Bacon Cheeseburger Casserole:
-
1 lb (450 g) ground beef: This forms the base of your casserole. You can also substitute with ground turkey or chicken for a lighter option.
-
6 slices of bacon (cooked and crumbled): Because bacon makes everything better! Feeling adventurous? Try turkey bacon or even pancetta if you want a different flavor profile.
-
1 small onion (finely chopped): Onions add sweetness and acidity. If you’re aiming for low FODMAP, you could swap in scallions instead.
-
2 cloves garlic (minced): A must-have for that aromatic kick! Depending on your preference, you could use garlic powder in a pinch.
-
4 large eggs: These will bind your casserole together, bringing a custardy texture. If you’re avoiding eggs, try a flaxseed mixture for a similar consistency.
-
1 cup (240 ml) heavy cream: This indulgent ingredient enriches the dish. For a lighter version, substitute with coconut cream.
-
1 cup shredded cheddar cheese (divided): Cheddar is a classic choice here. If you want a sharp flavor, use aged cheddar or swap with pepper jack for a spicy kick.
-
1 cup shredded mozzarella cheese (divided): Mozzarella melts beautifully, giving a gooey texture. Feel free to experiment with provolone or gouda for something unique.
-
2 tbsp cream cheese (softened): Cream cheese adds creaminess. If you’re dairy-free, look for vegan cream cheese.
-
2 tbsp sugar-free ketchup (optional): This is a nod to traditional burger flavors. You can skip it or use a homemade version to keep it clean.
-
1 tsp yellow mustard: Mustard contributes tanginess, but swap it for Dijon or spicy mustard for a zing.
-
½ tsp smoked paprika: Adds depth and a hint of smokiness. Paprika can be substituted with chili powder if you want extra heat.
-
½ tsp garlic powder: Complementary to the fresh garlic, but you can omit if you’re not a fan.
-
½ tsp salt (or to taste): Essential for flavor, but always taste your mix before diving in!
-
¼ tsp black pepper: A dash for a little kick! Add more if you enjoy heat.
-
2 tbsp chopped pickles (optional topping): For a crunch that mimics burgers! Dill or bread-and-butter pickles work beautifully here.
-
Fresh parsley for garnish (optional): A sprinkle of freshness to add color. Swap with scallions for a different look!
Step-by-Step Instructions
Now that you’re all prepped, let’s get into the nitty-gritty of making this delicious casserole:
-
Preheat the Oven: Set your oven to 350°F (175°C). Preheating is crucial as it ensures even cooking throughout.
-
Cook the Bacon: In a skillet over medium heat, cook your bacon until it’s crispy. Once done, remove it from the pan, let it cool, and crumble it into bits. Pro tip: Use kitchen scissors to chop up the bacon right in the pan for a super easy clean-up!
-
Brown the Beef: In the same skillet, add your ground beef and cook until browned. Using a wooden spoon, break it apart as it cooks. This adds flavor from the bacon drippings, which is pure magic. Don’t forget to drain excess grease – we want flavor, not grease!
-
Add Aromatics: Toss in your finely chopped onion and minced garlic to the beef. Cook for about 3-4 minutes until onions are translucent. Your kitchen should smell incredible right about now!
-
Mix It All Together: In a large bowl, whisk together the eggs, heavy cream, and cream cheese until smooth. Add in half of your cheddar and mozzarella along with the cooked beef mixture. Stir until everything is well combined.
-
Season It Up: Sprinkle in the smoked paprika, garlic powder, mustard, salt, and pepper. Adjust the seasoning according to your taste. Remember, a little taste test never hurt anyone!
-
Assemble the Casserole: Pour the mixture into a greased baking dish. Spread it out evenly and sprinkle the remaining cheddar and mozzarella on top for that glorious cheesy crust.
-
Bake: Pop it in the oven and bake for about 30-35 minutes until the cheese is bubbly and golden brown. You might want to just hang out by the oven while it bakes, as the smell will definitely make your mouth water!
-
Final Touches: Once it’s out of the oven, sprinkle crumbled bacon and chopped pickles. Let it rest for about 5-10 minutes before diving in. Trust me, that wait is worth it!
Serving Suggestions
When it comes to plating your masterpiece, keep it simple and inviting! Scoop out a generous portion of your Low-Carb Bacon Cheeseburger Casserole onto a rustic plate. For a pop of color, garnish with fresh parsley or chopped scallions. Want to keep the burger vibe going? Serve it alongside some crispy lettuce leaves as makeshift “buns,” or for the ultimate experience, pair with a side of roasted veggies. Yum!
Recipe Variations
Love getting creative in the kitchen? Here are some fun variations to help you customize this casserole to your tastes:
-
Vegetable Add-ins: Toss in some chopped bell peppers or zucchini for extra nutrients and color. They’ll soften beautifully in the baking process.
-
Texas Style: Add a teaspoon of chipotle powder and some diced jalapeños for a spicy kick!
-
BBQ Twist: Mix in a bit of sugar-free BBQ sauce for a tangy and smoky flavor. You can reduce the amount of ketchup or mustard to balance out the sweetness.
-
Cheesy Delight: Go wild with the cheese! Try adding some blue cheese for a stronger flavor profile or mixing half and half with Gouda for a decadent twist.
-
Herbaceous Spin: Stir in fresh herbs like basil or oregano to elevate the flavor, transporting your casserole from classic to gourmet.
Chef’s Notes
As with most recipes, this one has evolved over my culinary journey. Initially, I started with a more traditional approach, but through experimenting, I discovered that using cream and eggs as a binder made it extra fluffy and satisfying while maintaining that indulgent comfort! The bacon — oh, don’t get me started! It’s an absolute must if you want that authentic cheeseburger vibe.
And remember, cooking doesn’t have to be perfect. I once had a guest mistakenly add way too much mustard, and instead of a disaster, we ended up with a quirky tangy version that folks loved! Leverage those cooking mishaps as opportunities for creativity.
FAQs and Troubleshooting
1. Why is my casserole not setting?
If it appears watery or undercooked, it might need additional time in the oven, or you could try covering it with foil and returning it to cook further.
2. Can I make this ahead of time?
Absolutely! Prepare everything up to the baking stage, cover it tightly, and refrigerate. Just pop it in the oven when you’re ready!
3. What can I serve with this dish?
Consider a fresh salad with a tangy vinaigrette or some sautéed veggies to balance out the richness of the casserole.
4. Can I freeze this casserole?
Yes! Be sure to let it cool completely, then cover it tightly and freeze. When ready to eat, let it thaw overnight in the fridge and reheat!
Nutritional Info
This Low-Carb Bacon Cheeseburger Casserole recipe is not only delicious but also aligns beautifully with a low-carb lifestyle! With that in mind, here’s a rough breakdown of its nutritional content per serving (based on 8 servings):
- Calories: ~400
- Protein: ~28g
- Total Fat: ~30g
- Carbohydrates: ~5g
- Fiber: ~1g
- Net Carbs: ~4g
This makes it a fantastic option for those looking to enjoy a hearty meal without compromising on their carb intake.
Final Thoughts
Well, there you have it – my Low-Carb Bacon Cheeseburger Casserole that brings comfort food back to the dinner table without any of the guilt! I’d love to see how your casserole turns out. Share your culinary creations and any creative twists you come up with! Remember, cooking is all about joy and connection. So get in the kitchen, whip up some deliciousness, and gather those you love around the table. Until next time, happy cooking!
Print
Low-Carb Bacon Cheeseburger Casserole
- Total Time: 50 minutes
- Yield: 8 servings 1x
- Diet: Low-Carb
Description
Enjoy cheesy, meaty goodness in a low-carb casserole version of a bacon cheeseburger.
Ingredients
- 1 lb (450 g) ground beef
- 6 slices cooked bacon, crumbled
- 1 small onion, finely chopped
- 2 cloves garlic, minced
- 4 large eggs
- 1 cup (240 ml) heavy cream
- 1 cup shredded cheddar cheese, divided
- 1 cup shredded mozzarella cheese, divided
- 2 tbsp cream cheese, softened
- 2 tbsp sugar-free ketchup (optional)
- 1 tsp yellow mustard
- ½ tsp smoked paprika
- ½ tsp garlic powder
- ½ tsp salt (or to taste)
- ¼ tsp black pepper
- 2 tbsp chopped pickles (optional topping)
- Fresh parsley for garnish (optional)
Instructions
- Preheat the oven to 350°F (175°C).
- Cook the bacon in a skillet over medium heat until crispy. Remove and crumble.
- Brown the beef in the same skillet, breaking it apart. Drain excess grease.
- Add the onion and garlic to the beef, cooking until onions are translucent.
- Mix together eggs, heavy cream, and cream cheese in a bowl, then add half the cheddar and mozzarella along with the beef mixture.
- Season with smoked paprika, garlic powder, mustard, salt, and pepper.
- Assemble the mixture in a greased baking dish, topping with the remaining cheese.
- Bake for 30-35 minutes until cheese is bubbly and golden brown.
- Sprinkle crumbled bacon and pickles on top. Let it rest for 5-10 minutes before serving.
Notes
Feel free to swap in various cheeses or add vegetables like bell peppers for extra flavor!
- Prep Time: 15 minutes
- Cook Time: 35 minutes
- Category: Main Course
- Method: Baking
- Cuisine: American
Nutrition
- Serving Size: 1 serving
- Calories: 400
- Sugar: 2g
- Sodium: 750mg
- Fat: 30g
- Saturated Fat: 15g
- Unsaturated Fat: 10g
- Trans Fat: 0g
- Carbohydrates: 5g
- Fiber: 1g
- Protein: 28g
- Cholesterol: 120mg
Keywords: bacon, cheeseburger, casserole, low-carb, comfort food

Minute Mediterranean Pasta Salad for Busy Weeknights
Irresistible Mediterranean Pasta Salad
Hey there, food lovers! Today, we’re taking a sunny detour to the Mediterranean with a dish that’s as vibrant as the Mediterranean coast itself—Mediterranean Pasta Salad! It’s colorful, it’s fresh, and honestly, it’s packed with flavors that’ll make your taste buds dance like it’s a Mediterranean festival. Whether you’re planning a picnic, a summer gathering, or just want to elevate your weeknight dinners, this pasta salad is the perfect companion.
Now, I don’t know about you, but when I think of Mediterranean cuisine, I envision sun-soaked gatherings, laughter echoing through the air, and plates overflowing with delicious bites. This pasta salad captures that essence perfectly. It’s super simple to whip up, and it’s so versatile that it can beautifully adapt to whatever you have in your pantry or fridge. So grab your favorite apron, and let’s dive into this delicious journey!
Personal Story
Ah, pasta salad. The memories it stirs up are nothing short of delightful! I remember a summer back in my college days when my friends and I decided to host a “Taste of the World” potluck. Plates from different cuisines were spread across my small kitchen table, but the moment I unveiled my Mediterranean Pasta Salad, the whole scene shifted to a delightful frenzy.
Everyone was pouring over my pasta salad, asking for the recipe and raving about the flavors. I beamed with pride as they enjoyed each bite. I can still hear the laughter, feel that summer sun pouring through the window, and taste the perfect combination of fresh vegetables and zesty dressing. It taught me something profound about food: it’s not just about the ingredients; it’s about the moments created and shared around the table. That’s why I can’t wait to share this recipe with you. Trust me, it’s bound to bring smiles and happy memories!
Ingredients
Alright, let’s get to the juicy part! Here are the ingredients you’ll need for this Mediterranean Pasta Salad, along with some chef insights and best substitution tips to ensure your dish is as fabulous as possible:
-
14 oz pasta (Barilla rotini or penne): I love using rotini or penne for their grooves and curves that catch all that yummy dressing. If gluten-free is your jam, try chickpea or quinoa pasta for a delicious twist!
-
1 large cucumber: Peeled and sliced into 1/2-inch half-moons. Crisp and refreshing, cucumbers add a hydrating crunch. If you prefer a different cucumber vibe, try grape seed cucumbers!
-
18 oz cherry tomatoes: They add sweetness and color! You can replace them with diced heirloom tomatoes if you want to add a splash of colors.
-
3/4 cup olives (Mezzetta sliced kalamata olives): These babies bring a briny punch to the mix. If kalamata isn’t your thing, try green olives for a milder flavor.
-
5 oz feta: Crumbled feta adds a creamy and tangy finish. You can swap it for goat cheese if you’re feeling adventurous!
-
1/2 red onion: Sliced thin for that sharp zip. Don’t have red onion? Sweet onion or even green onions work in a pinch!
-
1/4 cup fresh parsley, chopped: Bright and herbaceous, parsley adds a pop of freshness. If you’re looking for something different, fresh mint or basil can bring a unique twist.
-
1/3 cup olive oil (extra-virgin): Rich in flavor and healthy fats, extra-virgin olive oil is the way to go here! You can substitute with avocado oil for a different richness.
-
4 tbsp red wine vinegar: This tangy component enhances all the flavors. You can use apple cider vinegar if that’s what you have on hand.
-
1 tbsp lemon juice: Freshly squeezed gives a bright zing! Bottled lemon juice works, but the freshness can’t be beat.
-
2 tsp oregano: This herb is a staple in Mediterranean cooking for a reason! Feel free to swap it with Italian seasoning for a varied flavor profile.
-
1 tsp honey: Just a touch adds a lovely balance to the dish. Agave syrup or even maple syrup can be good substitutes.
-
3 garlic cloves (freshly pressed): Fresh garlic gives that intense aroma we all love! If you’re in a pinch, garlic powder can work, but it’s not quite the same.
-
1/4 tsp pepper: Black pepper brings a subtle warmth to the dish. You can use white pepper for a milder flavor.
-
1/2 tsp salt: Essential for enhancing flavors! Remember, the feta and olives are already salty, so adjust as needed.
-
1/4 tsp red pepper flakes: For those who like a little kick! You can leave it out for a milder version.
Step-by-Step Instructions
Okay, my fellow kitchen adventurers, it’s time to get cooking! Here’s how we’ll put this Mediterranean Pasta Salad together in just a few simple steps.
-
Cook the pasta: Start by bringing a large pot of salted water to a boil. Add in your pasta (rotini or penne) and cook according to package instructions until al dente, usually about 8-10 minutes. Don’t forget to stir occasionally! A little tip: adding salt to the water enhances the flavor of the pasta.
-
Prep the veggies: While the pasta is cooking, let’s get chopping! Peel and slice your cucumber, halve your cherry tomatoes, slice your red onion, and chop the parsley. Having everything prepped before you start mixing makes the process smoother and more enjoyable!
-
Make the dressing: In a small bowl, whisk together the olive oil, red wine vinegar, lemon juice, oregano, honey, minced garlic, salt, pepper, and red pepper flakes. This is where the magic happens! Taste and adjust the seasoning as needed—maybe a sprinkle of more salt or a squeeze of lemon juice if you’re feeling bold.
-
Combine it all: Once the pasta is cooked, drain it well and rinse it under cool water to stop the cooking process. In a large mixing bowl, add the warm pasta, followed by the cucumber, cherry tomatoes, olives, red onion, feta, and parsley. Now, pour in that delicious dressing. Mix it all together gently until everything is nicely coated, making sure not to mush the feta too much—this is a salad, not a smoothie!
-
Chill and serve: Cover the bowl with plastic wrap or a lid and let the salad chill in the fridge for at least 30 minutes. This melding time is essential as it allows all those fabulous flavors to get acquainted! When you’re ready to serve, give it a good toss, adjust the seasoning again if necessary, and voilà! Your Mediterranean Pasta Salad is ready to impress!
Serving Suggestions
Now, let’s talk presentation! This salad is gorgeous in its colors, but a little extra love goes a long way. Consider serving it in a large, vibrant bowl or individual mason jars if you want to make it look extra festive. You can garnish with a sprinkle of extra feta, a drizzle of olive oil, or a few whole olives on top for that “wow” factor. If you want to take it up a notch, serve it alongside grilled chicken, shrimp, or even some warm pita bread to scoop it up. There’s no wrong way to enjoy this dish—it’s all about what makes your food-loving heart sing!
Recipe Variations
Feeling a little adventurous? Here are some creative twists to spice up your Mediterranean Pasta Salad:
-
Add protein: Toss in some grilled chicken, tuna, or chickpeas for added protein. This can easily transform the salad into a more filling meal!
-
Use different cheeses: Swap feta for mozzarella balls or even a peppery cheese like pepper jack for a kick.
-
Change the herbs: Experiment with different herbs like dill or basil. Fresh herbs can really change the game!
-
Add roasted veggies: Roasted bell peppers, zucchini, or artichokes can add another layer of flavor and texture!
-
Go Mediterranean-styled: Include ingredients like roasted eggplant or sun-dried tomatoes for a more rustic feel.
Chef’s Notes
Oh, how this recipe has evolved over time! I started with just a basic pasta, olive oil, and vinegar concoction in my college days—but it’s grown into a family favorite. I often tweak it based on what’s in my fridge or what I’m craving. The best part? It never disappoints. I’ve also had many mishaps, like accidentally pouring in too much vinegar or forgetting to salt the pasta water. Let’s just say I learned the hard way! But those experiences only made it more rewarding when everything comes together perfectly.
FAQs and Troubleshooting
Here are some common questions I get about this Mediterranean Pasta Salad, along with solutions for potential kitchen hiccups:
-
Can I make this pasta salad ahead of time?
Absolutely! This dish is perfect for meal prep. Just let it chill in the refrigerator, and it’ll only get tastier as the flavors meld together. -
What’s the best way to store leftovers?
Store any leftovers in an airtight container in the fridge. It’ll last about 3-4 days. Just give it a good toss before enjoying it again! -
Can I freeze this salad?
I wouldn’t recommend freezing it, as the veggies will get a bit mushy once thawed. It’s best enjoyed fresh! -
Why is my pasta salad watery?
If you find your salad is too watery, it may be due to water left in the veggies after rinsing. Make sure to pat them dry with a paper towel or cloth before mixing.
Nutritional Info
This Mediterranean Pasta Salad isn’t just a joy for your taste buds, it’s also packed with nutrients! Here’s a rough breakdown per serving (assuming 8 servings):
- Calories: ~220
- Protein: ~6g
- Carbohydrates: ~28g
- Dietary Fiber: ~2g
- Total Fat: ~10g (includes healthy fats from olives and olive oil)
- Saturated Fat: ~2g
- Sodium: ~200mg (adjust based on feta and olives)
With fresh vegetables, whole grains from the pasta, and healthy fats, this dish is a delicious and balanced option for any meal.
Final Thoughts
There you have it, friends—an irresistibly delicious recipe for Mediterranean Pasta Salad that’s perfect for any occasion! With its endless variations and hearty flavors, it’s a dish that’s sure to bring people together, just like the warmest memories of summer. So, whether you’re enjoying it at a potluck, on a picnic, or just at home with your family, know that every bite is filled with love and joy.
I can’t wait for you to give this recipe a whirl. So gather your ingredients, roll up your sleeves, and let those flavors take you on a Mediterranean getaway! And remember—when you cook with heart and passion, it always tastes better. Happy cooking, and bon appétit!
Print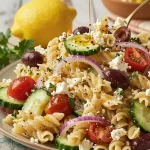
Irresistible Mediterranean Pasta Salad
- Total Time: 45 minutes
- Yield: 8 servings 1x
- Diet: Vegetarian
Description
A vibrant and flavorful Mediterranean Pasta Salad that’s perfect for picnics, gatherings, or weeknight dinners.
Ingredients
- 14 oz pasta (Barilla rotini or penne)
- 1 large cucumber, peeled and sliced into 1/2-inch half-moons
- 18 oz cherry tomatoes, halved
- 3/4 cup olives (Mezzetta sliced kalamata olives)
- 5 oz feta, crumbled
- 1/2 red onion, sliced thin
- 1/4 cup fresh parsley, chopped
- 1/3 cup olive oil (extra-virgin)
- 4 tbsp red wine vinegar
- 1 tbsp lemon juice
- 2 tsp oregano
- 1 tsp honey
- 3 garlic cloves, freshly pressed
- 1/4 tsp pepper
- 1/2 tsp salt
- 1/4 tsp red pepper flakes
Instructions
- Cook the pasta: Start by bringing a large pot of salted water to a boil. Add in your pasta and cook according to package instructions until al dente, usually about 8-10 minutes. Stir occasionally!
- Prep the veggies: While the pasta is cooking, peel and slice your cucumber, halve your cherry tomatoes, slice your red onion, and chop the parsley.
- Make the dressing: In a small bowl, whisk together the olive oil, red wine vinegar, lemon juice, oregano, honey, minced garlic, salt, pepper, and red pepper flakes.
- Combine it all: Once the pasta is cooked, drain it well and rinse it under cool water. In a large mixing bowl, add the warm pasta, veggies, feta, and dressing. Mix gently.
- Chill and serve: Cover the bowl and let the salad chill in the fridge for at least 30 minutes before serving.
Notes
This pasta salad can be made ahead of time and is ideal for meal prep. Store leftovers in an airtight container for up to 3-4 days.
- Prep Time: 15 minutes
- Cook Time: 10 minutes
- Category: Salad
- Method: Mixing
- Cuisine: Mediterranean
Nutrition
- Serving Size: 1 serving
- Calories: 220
- Sugar: 3g
- Sodium: 200mg
- Fat: 10g
- Saturated Fat: 2g
- Unsaturated Fat: 8g
- Trans Fat: 0g
- Carbohydrates: 28g
- Fiber: 2g
- Protein: 6g
- Cholesterol: 15mg
Keywords: Mediterranean pasta salad, summer salad, healthy salad

Chicken Caesar Pasta Salad
Chicken Caesar Pasta Salad: A Delicious and Easy Recipe to Savor
Hey there, food lovers! It’s your pal Beau Collier here, and I’m excited to share a fantastic recipe that perfectly blends the classic vibes of Caesar salad with the heartiness of pasta. Yes, you guessed it—I’m talking about Chicken Caesar Pasta Salad! If you’re looking to whip up something delightful and satisfying for lunch, dinner, or a potluck, this dish has got your back. It’s light yet filling, zesty, and super easy to make.
This salad stands out because it captures all the yummy flavors of a Caesar salad while transforming it into a comforting pasta dish. Whether you’re sitting down for a relaxed family meal or treating yourself to a lovely solo dinner, this Chicken Caesar Pasta Salad is everything you could want and more.
Let me tell you, there’s something downright heartwarming about salads. Growing up, my grandmother made a killer Caesar salad for our Sunday family dinners. I can still remember the aroma of garlic and anchovies wafting through the kitchen and her little secret twist that always made it pop. We’d pile our plates high, catch up on stories and just enjoy that meal together. Those dinners were the perfect blend of fun, laughter, and fantastic food, exactly what inspired me to dive deeper into the culinary world.
Now, combining that memory with pasta, I thought, “Why not take those flavors I adore and elevate them into a pasta salad?” And voilà! Here we are, ready to create a crowd-pleaser that’s confident in its deliciousness yet easy enough for even the kitchen novices among us. Grab your apron and let’s get cooking!
Personal Story
Every dish we create has a little piece of our heart in it, doesn’t it? For me, the memory of my grandmother making her famous Caesar salad brings an avalanche of nostalgia. I remember the warmth of her kitchen, the clinking of utensils, and the happiness that swirled around like the delicious scents wafting from the stove. One particular summer evening stands out; we had just finished a game of backyard frisbee, and my cousins and I were starving.
Grandma had her apron on, and with a wink, she got us all involved in prepping the meal. I remember mangling the romaine lettuce, while she’d laugh and say, “It’s not about perfection; it’s about enjoying what you make.” We tossed in the croutons and grated cheese, and, of course, everyone was sneaking bites of that creamy dressing. When dinner was finally served, we gathered around the rickety old table outside, with the sun setting, laughter ringing, and our plates overflowing. That dish became the star of every Sunday dinner, reminding me that food has this magical power to unite us.
As I developed the Chicken Caesar Pasta Salad, I channeled the essence of those unforgettable gatherings and went on a quest to recreate that joy. It’s about taking the simple pleasures of life, like a homemade salad, and sharing it with others, just like grandma did. So if you’re ready to put on your chef hat, let’s make something that can generate beautiful memories for you, too!
Ingredients
Before we dive in, here’s what you’ll need to make this scrumptious Chicken Caesar Pasta Salad. Let’s break it down:
-
2 cups cooked pasta (penne or rotini)
Any pasta works, but I adore penne for its shape and texture—it holds onto the dressing beautifully! You can substitute whole grain or gluten-free pasta if preferred. -
1 cup cooked chicken, diced
Use rotisserie chicken for the ultimate convenience—just shred and toss it in. If you want to keep it plant-based, opt for chickpeas or make it a vegetarian delight with seitan. -
2 cups romaine lettuce, chopped
Crisp and fresh, romaine holds up nicely in salads. If you’re feeling adventurous, you can use kale for a twist or even spinach for a softer bite. -
1/2 cup cherry tomatoes, halved
Juicy, sweet, and pop-in-your-mouth goodness! You can swap these with diced bell peppers for a more colorful option or roasted tomatoes for a caramelized flavor. -
1/4 cup grated Parmesan cheese
Cheese? Yes, please! This adds richness to your salad. If you’re lactose intolerant, try nutritional yeast or a dairy-free Parmesan cheese. -
1/4 cup Caesar dressing
Classic dressing brings it all together! You can either use store-bought or whip up a homemade version. For a lighter option, substitute with Greek yogurt-based dressing. -
Salt and pepper to taste
Don’t forget to season! The right balance pulls everything together. Feel free to add other herbs and spices to customize the flavor. -
Croutons (optional)
Crispy crunch is a winner! Make your own by baking bread cubes with olive oil and garlic for a delightful homemade touch.
Step-by-Step Instructions
Now, let’s get into the fun part: cooking! Follow these steps to create your delicious Chicken Caesar Pasta Salad.
Step 1: Cook the Pasta
Begin by bringing a large pot of salted water to a boil. Add your chosen pasta—penne or rotini—and cook according to the package instructions until al dente. This usually takes about 8-10 minutes. Why salted water, you ask? It flavors the pasta as it cooks! Drain and rinse under cold water for a minute to stop the cooking process and cool it down for your salad. Set it aside while you prep the other ingredients.
Step 2: Prepare the Chicken
If you haven’t already, dice your cooked chicken into bite-sized pieces. If you’re using rotisserie chicken, simply shred the meat using two forks or your hands. It makes everything so easy! Pro tip: You can grill up chicken breasts with simple seasoning (salt, pepper, and a squeeze of lemon) to add that smoky charred flavor if you’re in the mood for some extra effort.
Step 3: Chop the Veggies
Next, grab a chopping board and dice up the crisp romaine lettuce, halving the cherry tomatoes. Don’t sweat it if things get a little messy; that’s part of the fun! I love to use a large bowl to mix everything together as I go to save on dishes.
Step 4: Combine in the Bowl
In your large mixing bowl, combine the cooked pasta, diced chicken, chopped romaine, and halved cherry tomatoes. Give everything a gentle toss to combine. You want every piece of pasta to be coated with that Caesar dressing!
Step 5: Add Dressing and Cheese
Drizzle in the Caesar dressing and sprinkle the grated Parmesan cheese over the top. Now the fun begins! Using tongs or a spatula, gently toss until everything is evenly coated in that creamy, dreamy dressing. This is your chance to taste and adjust the seasoning. A splash of lemon juice or a sprinkle of pepper can take it to the next level!
Step 6: Final Touches and Serve
If you’re opting for croutons, sprinkle them on top just before serving, so they maintain that delightful crunch. Serve immediately or refrigerate for about 30 minutes to let the flavors mingle even more. If serving later, toss in a bit more dressing and croutons right before it hits the table.
Serving Suggestions
When it comes to serving, presentation matters! You can plate this Chicken Caesar Pasta Salad in a big bowl for family-style dining or serve individual portions in wide bowls. Add a few extra cherry tomato halves on top and a light sprinkle of more Parmesan for that appealing look.
Consider pairing it with some crusty garlic bread or grilled veggies on the side for an extra colorful touch! If you’re feeling fancy, garnish with fresh parsley or basil to elevate those visuals. Either way, ensure to have forks at the ready because this dish is about to become a new favorite!
Recipe Variations
Want to jazz things up? Here are some creative twists you can try:
-
Mediterranean Delight: Swap out Roman lettuce for spinach, add kalamata olives, diced cucumbers, and feta cheese. Toss in a lemon vinaigrette for a fresh vibe.
-
Spicy Kick: Incorporate some sliced jalapeños or a spicy Caesar dressing for those who enjoy a bit of heat. You can also toss in some roasted red peppers for an additional flavor burst!
-
Vegan-Friendly: Keep the salad plant-based by using chickpeas instead of chicken, vegan Parmesan, and a dairy-free Caesar dressing. It’s just as satisfying!
-
Whole Wheat Wonder: Utilize whole wheat pasta for added fiber and protein. It’s perfect for health-conscious individuals looking for a wholesome meal.
-
Pesto Caesar Twist: Add a swirl of basil pesto along with the dressing for a herby Italian twist and a pop of color!
Chef’s Notes
As much as I love this Chicken Caesar Pasta Salad, every time I make it, I’m reminded of how adaptable it is! I started this recipe to create a quick lunch option, but over time, I’ve turned it into a party favorite by mixing and matching ingredients. There was one memorable summer BBQ where I experimented by adding crispy bacon bits, and let me tell you, that was a hit!
Salads like this one remind us that cooking is all about happiness, love, and creativity. So, don’t be afraid to make it your own! The kitchen is your playground, and food is just a canvas waiting for your masterpiece!
FAQs and Troubleshooting
Let’s dive into some common questions and potential mishaps you might encounter while making this dish:
-
Can I make it ahead of time?
Absolutely! You can prep all the ingredients a day in advance. Just store the dressing separately so the pasta doesn’t get mushy before serving. -
What if my pasta is too soft?
No worries! You can use it as is, as long as it’s not mushy. Tossing the pasta with ice-cold water immediately after cooking locks in what’s left of that al dente texture. -
Is it healthy?
This dish has protein from the chicken and a good amount of veggies, making it relatively healthy! If you’re aiming for fewer calories, light dressings work wonders! -
How do I prevent the pasta salad from getting soggy?
To keep it fresh, use less dressing until you’re ready to serve. Toss in more as needed right before digging in!
Nutritional Info
A typical serving (about 1.5 cups) of your Chicken Caesar Pasta Salad contains approximately:
- Calories: 350
- Protein: 28g
- Carbohydrates: 40g
- Fat: 12g (mostly from the dressing and cheese)
- Fiber: 3g
Of course, these figures can vary based on the specific brands and ingredients you choose, but it’s generally a wholesome option packed with flavor and good-for-you components.
Final Thoughts
There you have it! Your very own Chicken Caesar Pasta Salad recipe, a harmonious blend of flavors and memories that brings joy to the table. Remember, the kitchen is a place for exploration—feel free to tweak this recipe to suit your tastes.
Maybe it’s a dish for your busy weekdays or a go-to at gatherings—you can’t go wrong with this crowd-pleaser! So grab a fork, invite your friends or family, and share those good vibes! Here’s to tasty food and the great moments it creates together. Bon appétit!
Hope you enjoyed this recipe just as much as I love sharing it. Whether it’s the tiny details or a dash of love, the meal you prepare can create unforgettable moments. Until next time, keep cooking, and stay fabulous!
Print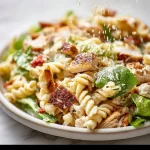
Chicken Caesar Pasta Salad
- Total Time: 25 minutes
- Yield: 4 servings 1x
- Diet: Gluten-Free
Description
A delicious and easy Chicken Caesar Pasta Salad that blends the classic flavors of Caesar salad with hearty pasta.
Ingredients
- 2 cups cooked pasta (penne or rotini)
- 1 cup cooked chicken, diced
- 2 cups romaine lettuce, chopped
- 1/2 cup cherry tomatoes, halved
- 1/4 cup grated Parmesan cheese
- 1/4 cup Caesar dressing
- Salt and pepper to taste
- Croutons (optional)
Instructions
- Cook the Pasta: Bring a large pot of salted water to a boil. Add pasta and cook according to package instructions until al dente. Drain and rinse under cold water.
- Prepare the Chicken: Dice or shred your cooked chicken into bite-sized pieces.
- Chop the Veggies: Dice romaine lettuce and halve the cherry tomatoes.
- Combine in the Bowl: In a large mixing bowl, combine cooked pasta, diced chicken, chopped romaine, and halved tomatoes.
- Add Dressing and Cheese: Drizzle Caesar dressing and sprinkle grated Parmesan cheese over the salad and toss gently.
- Final Touches and Serve: Top with croutons if desired and serve immediately, or refrigerate to let flavors mingle.
Notes
This salad is versatile and can be made ahead of time; just keep the dressing separate to prevent sogginess.
- Prep Time: 15 minutes
- Cook Time: 10 minutes
- Category: Salad
- Method: Mixing
- Cuisine: American
Nutrition
- Serving Size: 1 serving
- Calories: 350
- Sugar: 4g
- Sodium: 400mg
- Fat: 12g
- Saturated Fat: 4g
- Unsaturated Fat: 6g
- Trans Fat: 0g
- Carbohydrates: 45g
- Fiber: 3g
- Protein: 28g
- Cholesterol: 30mg
Keywords: Chicken Caesar Salad, Pasta Salad, Easy Salad Recipe, Quick Dinner
Chicken Bacon Ranch Pasta
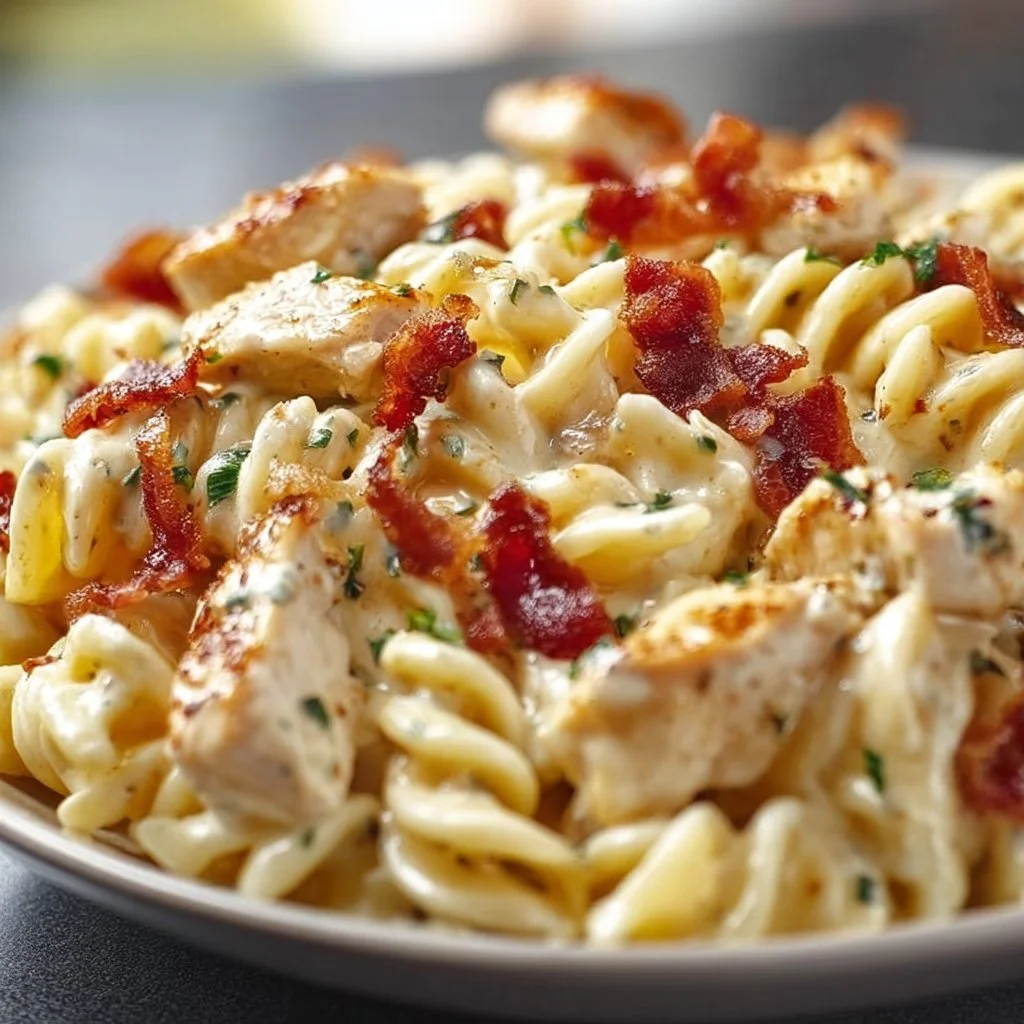
Chicken Bacon Ranch Pasta: A Comforting Mix of Flavors
Hey food lovers! I’m thrilled to have you here at Feastical, the place where kitchen stories and delicious recipes come together in a big, warm embrace! Today, we’re diving into one of my all-time favorites: Chicken Bacon Ranch Pasta. This dish has all the cozy vibes you crave, making it perfect for weeknight dinners, potlucks, or just when you want to pamper yourself with something comforting and delicious.
Imagine a creamy sauce hugging each piece of tender pasta, with bits of crispy, flavorful bacon and juicy chicken adding that perfect crunch and richness. I remember the first time I whipped up this recipe; it was a rainy Saturday afternoon, and I had one aim in mind – to create a dish that tasted like a big, warm hug. That’s exactly what this pasta delivers!
Whether you’re juggling work, family, or life’s other commitments, this Chicken Bacon Ranch Pasta keeps it real—quick to make and absolutely satisfying. Plus, it pairs wonderfully with a crisp green salad or a side of garlic bread for the ultimate comfort meal. So grab a fork and your favorite mug (I like to sip my lemonade while cooking!), and let’s get started on this scrumptious journey together!
Personal Story
Let me take you back to a cozy evening a few years ago. I had invited a few friends over for a game night, and I wanted to impress them with something special yet uncomplicated. I rifled through my pantry, excitedly gathering my ingredients as I envisioned hearty laughter echoing around my kitchen. That was when I decided to make Chicken Bacon Ranch Pasta.
The smell of cooking bacon permeated the air, pulling my friends into the kitchen like moths to a flame. I remember the giggles and banter, the playful bickering over who would get the biggest serving, and how every bite was met with nods of approval and delight. That evening, I realized cooking is not just about food; it’s about creating memories and sharing moments. This Chicken Bacon Ranch Pasta has since become a staple in my home, reminding me of the joy of togetherness every time I make it.
Ingredients
Let’s take a closer look at what you’ll need to create this delightful dish. Each ingredient plays a vital role, so let’s ensure we’re all set for a successful cook!
-
8 ounces pasta: Choose your favorite type—penne, fusilli, or rotini work great! If you want to make it gluten-free, opt for gluten-free pasta.
-
1 pound chicken breast, diced: Chicken breast is lean and quick to cook. For a twist, try using turkey or even rotisserie chicken for extra ease!
-
6 strips bacon, cooked and crumbled: Bacon adds a crispy, smoky flavor. If you’re looking for a healthier alternative, turkey bacon or even pancetta can do the trick.
-
1 cup ranch dressing: This creamy dressing is the star of the show! Feel free to use homemade ranch for a personal touch or Greek yogurt for a lighter option.
-
1 cup shredded cheese (cheddar or mozzarella): Cheese adds richness and gooey goodness. Mix and match different cheeses for a more complex flavor profile—think pepper jack for a kick!
-
2 tablespoons olive oil: Olive oil is perfect for sautéing and adds a rich flavor. You can substitute it with avocado oil if you like.
-
Salt and pepper to taste: Season to your preference! Fresh herbs can enhance flavor, too. A little fresh basil or chives, perhaps?
-
Chopped parsley for garnish: A sprinkle of this fresh herb not only adds color but also a fresh taste that brightens the dish. You can use fresh cilantro or green onions as alternatives.
Step-by-Step Instructions
Now that we’ve gathered our ingredients, let’s roll up our sleeves and get cooking! Here’s how to make this Chicken Bacon Ranch Pasta step by step:
-
Cook the Pasta: Start by bringing a large pot of salted water to a boil. Once boiling, add your pasta and cook according to package directions until it’s al dente. Chef’s Hint: Stir the pasta occasionally, and reserve a cup of pasta water before draining. It can help adjust the creaminess later!
-
Cook the Bacon: In a large skillet or frying pan, cook the bacon over medium heat until crispy. Remove the bacon from the pan and place it on a paper towel to absorb excess grease. Tip: Keep some of the bacon grease in the pan—it adds flavor to the chicken!
-
Sauté the Chicken: In the same skillet, add the diced chicken and season with salt and pepper. Sauté for 5-7 minutes until the chicken is cooked through and golden. Little Chef Hack: If you want extra flavor, toss in some minced garlic while the chicken cooks!
-
Combine and Add the Sauce: Once the chicken is cooked, add the cooked pasta directly to the skillet and pour in the ranch dressing. Stir everything together over low heat until well combined. Don’t forget to add that reserved pasta water a bit at a time if it looks too dry.
-
Mix in Bacon and Cheese: Stir in the crumbled bacon and cheese. As the cheese starts to melt, you’ll see everything becoming nice and creamy! Pro Tip: If you love an extra cheesy finish, add more cheese on top of the pasta and pop it under the broiler for a few minutes until bubbly and golden.
-
Finish and Serve: Once everything is beautifully mixed and heated through, remove the skillet from the heat. Serve it up hot and garnish with fresh parsley. Enjoy this hearty dish that’s just bursting with flavor!
Serving Suggestions
Plating is an art! For this Chicken Bacon Ranch Pasta, here’s how to wow your family or friends:
-
On the Plate: Serve the pasta in shallow bowls for a rustic, homey feel, or try a wider platter for family-style dining. Top with a sprinkle of extra cheese and fresh herbs to make it pop!
-
Sides: Pair it with a simple green salad lightly dressed with vinaigrette to balance the rich flavors. Garlic bread or some crusty baguette slices are perfect for soaking up that creamy saucy goodness.
-
Drink Pairing: A nice chilled lemonade or iced tea complements the flavors nicely. If you’re in the mood for something stronger, a light white wine would do wonders.
Recipe Variations
The beauty of Chicken Bacon Ranch Pasta is its versatility! Here are some fun variations to get those creative juices flowing:
-
Vegetarian Twist: Swap out the chicken and bacon for sautéed veggies like bell peppers, zucchini, and mushrooms. Use a plant-based ranch dressing to keep it creamy!
-
Spicy Kick: Add diced jalapeños or a dash of hot sauce to the mix for an extra kick. This gives it a smoky flavor that’ll leave everyone asking for more.
-
Texas Style: Toss in some cooked and drained black beans and corn, or top it off with some sliced avocado for a Tex-Mex angle.
-
Pasta Salad Version: Transform this dish into a pasta salad by using cold ingredients after chilling it in the fridge and swapping the ranch dressing for a lighter yogurt-based sauce.
-
Cheesy Blend: Experiment with different cheeses like gouda or pepper jack, or even throw in some blue cheese for a flavorful twist if you’re feeling adventurous!
Chef’s Notes
This Chicken Bacon Ranch Pasta has evolved over time in my kitchen. Initially, I created it with whatever I had on hand, and it quickly became a favorite! I remember a moment where I had no ranch dressing left, so I experimented with homemade mayo mixed with herbs, and it turned out amazing!
One tip I’ll always share is not to take cooking too seriously. Mistakes are often where the best creations blossom. Just like that one time I accidentally added cinnamon instead of oregano—the taste was unexpected but unforgettable!
FAQs and Troubleshooting
Here are answers to some common questions and potential cooking hiccups:
1. Why did my pasta become mushy?
Make sure to follow the cooking time on the package and occasionally stir. And don’t forget the key—drain it when it’s al dente to maintain that perfect texture!
2. Can I make this dish ahead of time?
Absolutely! Just prepare the dish, but don’t add the cheese until you’re ready to reheat. Store it in an airtight container in the fridge for up to three days.
3. How can I ensure my chicken stays juicy?
Sauté the chicken just until it’s cooked through and golden. If you’re worried, you can marinate the chicken in a bit of ranch dressing for added moisture before cooking!
4. What if it’s too thick?
If your pasta is too thick, gradually add in a tablespoon or two of reserved pasta water until you reach the desired consistency, just like you’re adjusting a cozy sweater!
Nutritional Info
If you’re curious about the nutritional value, let’s break it down a bit. Here’s a rough estimate per serving based on the ingredients listed (serving size is roughly 1 cup):
- Calories: ~550
- Protein: 35g
- Carbohydrates: 40g
- Fat: 30g (depending on the bacon and cheese used)
- Fiber: 2g
Keep in mind these values can vary widely based on ingredient choices, portion sizes, and if you add any fun extras!
Final Thoughts
And there you have it, my dear foodies! This Chicken Bacon Ranch Pasta combines simplicity, flavor, and heart—perfect for sharing with friends and family or enjoying all by yourself. Don’t forget, cooking is all about experimenting and having fun in the kitchen. The more you play with flavors, the more you’ll discover your own unique way to make it.
So, what are you waiting for? Roll up your sleeves, gather those ingredients, and get ready to create delicious memories. If you try this recipe, I’d love to hear your thoughts or see your mouth-watering photos! Share your creations with me on social media or in the comments below! Happy cooking! 🍽️
Print
Chicken Bacon Ranch Pasta
- Total Time: 30 minutes
- Yield: 4 servings 1x
- Diet: Non-Vegetarian
Description
A creamy and comforting pasta dish featuring tender chicken, crispy bacon, and rich ranch dressing.
Ingredients
- 8 ounces pasta (penne, fusilli, or rotini)
- 1 pound chicken breast, diced
- 6 strips bacon, cooked and crumbled
- 1 cup ranch dressing
- 1 cup shredded cheese (cheddar or mozzarella)
- 2 tablespoons olive oil
- Salt and pepper to taste
- Chopped parsley for garnish
Instructions
- Cook the pasta: Bring a large pot of salted water to a boil, add pasta, and cook according to package directions until al dente.
- Cook the bacon: In a large skillet, cook bacon over medium heat until crispy, then place on a paper towel.
- Sauté the chicken: In the same skillet, add diced chicken, season with salt and pepper, and sauté for 5-7 minutes until cooked through.
- Combine and add the sauce: Add cooked pasta and ranch dressing to the skillet and stir over low heat.
- Mix in bacon and cheese: Stir in crumbled bacon and cheese until melted and creamy.
- Finish and serve: Remove from heat, garnish with parsley, and enjoy!
Notes
For a twist, use turkey or rotisserie chicken; for lighter options, consider Greek yogurt instead of ranch dressing.
- Prep Time: 10 minutes
- Cook Time: 20 minutes
- Category: Main Course
- Method: Stovetop
- Cuisine: American
Nutrition
- Serving Size: 1 serving
- Calories: 550
- Sugar: 2g
- Sodium: 800mg
- Fat: 30g
- Saturated Fat: 10g
- Unsaturated Fat: 15g
- Trans Fat: 0g
- Carbohydrates: 40g
- Fiber: 2g
- Protein: 35g
- Cholesterol: 90mg
Keywords: pasta, chicken, bacon, ranch, comfort food
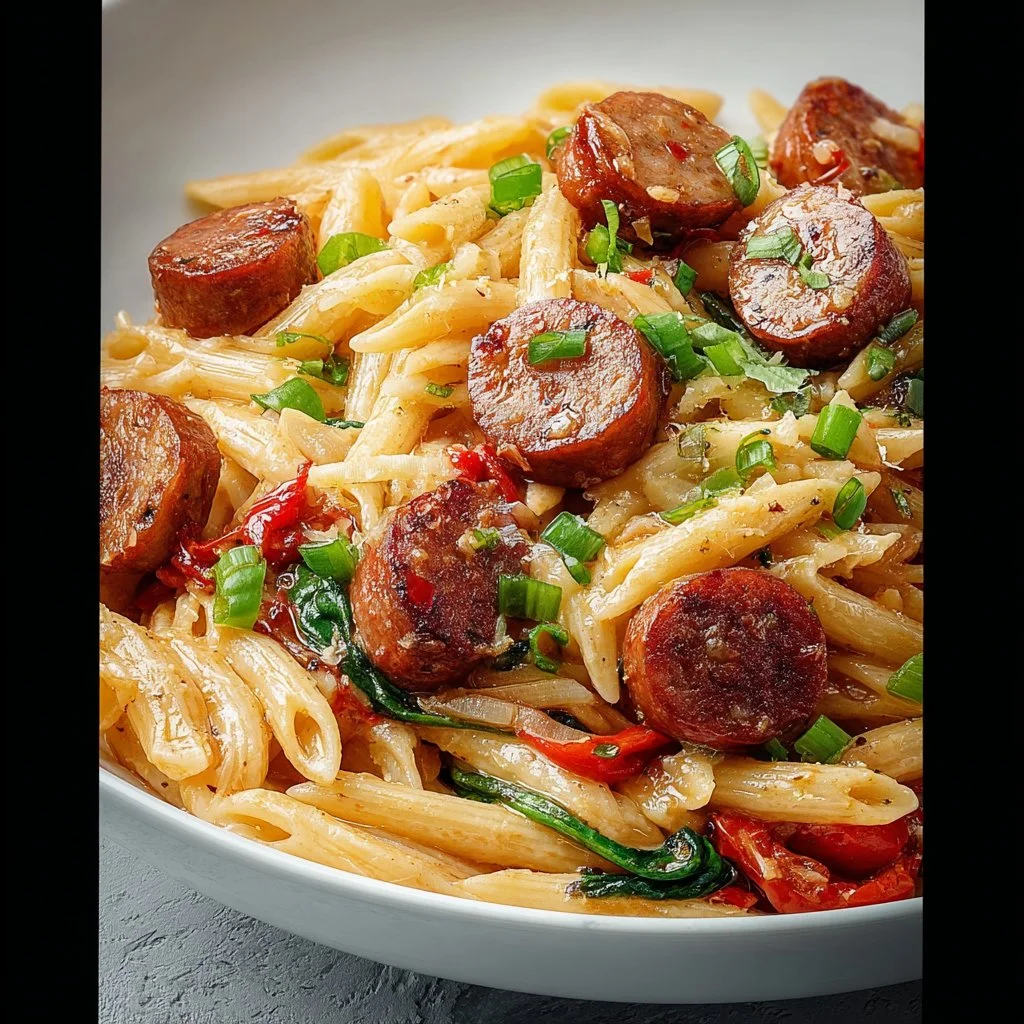
Cajun Sausage Pasta
Cajun Sausage Pasta: A Flavorful Adventure in Every Bite!
Hey there, fellow foodies! Welcome to the warm and savory world of Cajun Sausage Pasta—a dish that dances on your palate and wraps you in a cozy embrace of flavors. If you’re looking for a dinner recipe that’s easy enough to whip up on a busy weeknight yet impressive enough for a weekend gathering, you’ve just struck gold!
Now, let me take you back in time, to that wondrous moment when I first discovered the vibrant, bold flavors of Cajun cuisine— a delicious blend of spices that just sings in your mouth! I remember the first time I encountered it at a local food festival; the aroma wafted through the air, pulling me towards the lively stall with an enticing menu. I was handed a heaping plate of pasta, bursting with smoky sausage, fresh peppers, and creamy goodness. It wasn’t just a meal—it was an experience!
That day sparked a creative journey in my kitchen. I started experimenting, riffing off classic recipes and adding my personal touch, which eventually led me to develop this Cajun Sausage Pasta masterpiece. So, whether you’re sitting at your cozy kitchen table, ready to dive into a bowl of heartwarming pasta, or just browsing for your next culinary adventure, you’re going to absolutely love what’s coming up next!
Join me as we dive into this flavorful recipe that combines the silky smoothness of heavy cream with the spicy kick of Cajun seasoning. Let’s get started, shall we?
Personal Story
Ah, the memories of my first culinary experiment with Cajun flavors still make me smile! It was a rainy Saturday afternoon, and I was flipping through cookbooks looking for inspiration. My eyes landed on a classic pasta dish, and suddenly, I was craving something so flavorful it could practically dance off the plate!
I rummaged through my pantry, pulling out ingredients that sang that Cajun tune. As I sliced the sausage and seared it in the pan, the aroma filled the air, transporting me to a bustling New Orleans kitchen, where laughter mingle d with the sizzle of expertly crafted dishes. I dashed to the fridge for bell peppers and garlic and threw everything together with a splash of cream—and oh boy, did it come together beautifully!
That day, I not only made a delicious meal, but I also created a tradition that I still cherish; this dish became a staple for gatherings with family and friends. Piling bowls high, sharing stories, and relishing the burst of flavors created a symphony of joy. It’s those heartfelt moments that make cooking so special—an interconnectedness through culinary love. And I can’t wait for you to create your own memories with this dish!
Ingredients
Alright, my culinary friends, let’s gather our star players for this Cajun Sausage Pasta. Here’s what you’ll need:
- 8 oz pasta (penne or fettuccine): Choose whichever you fancy! Penne scoops up all that creamy goodness perfectly, while fettuccine gives you those lovely ribbons of flavor.
- 12 oz smoked sausage (sliced): This is where the magic happens! The smokiness adds depth—feel free to substitute with chorizo or turkey sausage if you need a lighter option.
- 1 onion (chopped): A classic flavor base. Sweet or yellow onions work well; red onions can offer a unique twist with extra sweetness!
- 1 bell pepper (chopped): Choose your favorite—red, green, or yellow. Each brings its own flavor palette, and it makes the dish pop with color!
- 3 cloves garlic (minced): A must-have! Garlic brings an aromatic punch to the dish. Fresh is always best—if you’re in a pinch, garlic powder works too.
- 1 can (14.5 oz) diced tomatoes (with juices): They add acidity and brightness; the juices also help create the sauce. Look for fire-roasted tomatoes for an extra touch of flavor!
- 1 cup heavy cream: This adds a luxurious richness. You can swap it for half-and-half for a lighter version, but hey, we’re living a little here, right?
- 1 cup shredded cheese (cheddar or mozzarella): Cheese makes everything better! Cheddar adds a bit of sharpness, while mozzarella offers a gooey texture.
- 2 tsp Cajun seasoning: The star of the show! Feel free to use store-bought or whip up your own with paprika, cayenne, thyme, and oregano.
- Salt and pepper to taste: Always season to make those flavors shine!
- Olive oil for cooking: A drizzle of quality extra virgin is all you need to get started.
- Fresh parsley (for garnish): Not just for looks, it adds a pop of freshness that balances the richness.
Now that we’ve got our ingredient lineup, let’s get cooking and create this culinary masterpiece!
Step-by-Step Instructions
Step 1: Boil Your Pasta
First things first, bring a large pot of salted water to a boil. Add your chosen pasta and cook according to package instructions until al dente. Give it a good stir to prevent sticking, and don’t forget to reserve about a cup of pasta water before draining! The starchy water can help thicken our sauce later if needed.
Step 2: Sauté the Sausage
In a large skillet or pot, heat a drizzle of olive oil over medium heat. Add the sliced smoked sausage and sauté for about 5 minutes, or until golden brown and fragrant. This step is crucial—it caramelizes the sausage, giving an outstanding depth to the final dish. Once nicely browned, remove the sausage from the skillet and set it aside.
Step 3: Cook the Veggies
In the same skillet, add the chopped onion and bell pepper. Sauté these beauties until they’re soft and translucent—about 4-5 minutes. The fond (those little brown bits left from the sausage) will add extra flavor to the vegetables as they cook. Toss in the minced garlic and sauté for another minute until it’s aromatic—oh, that smell is simply heavenly!
Step 4: Add Tomatoes and Cream
Pour in the can of diced tomatoes along with their juices. Stir it all together, scraping any leftover bits from the bottom of the pan. Let this simmer for about 3 minutes. Then, reduce the heat and add the heavy cream, continuously stirring to combine. If that sauce looks too thick, here’s where we can add just a bit of reserved pasta water to achieve the consistency you crave.
Step 5: Season and Combine
Now it’s time to bring in the flavors! Add the Cajun seasoning, salt, and pepper to taste. Stir in the sautéed sausage; let it cook together for another 3-4 minutes on low heat, allowing all those flavors to marry beautifully. Don’t be afraid to taste as you go—you want this dish to sing in harmony!
Step 6: Mix in Pasta & Cheese
Finally, add the drained pasta to the skillet. Toss everything together until the pasta is well coated in that creamy, spicy sauce. Then, stir in the shredded cheese until melted—this is the moment where you’ll start drooling! If needed, you can add a splash more of pasta water to get everything just right.
Step 7: Garnish and Serve
Plate your Cajun sausage pasta, garnishing generously with fresh parsley and maybe an extra sprinkle of cheese on top. Feel free to serve it hot alongside a crisp green salad or some crusty garlic bread for a complete meal.
Serving Suggestions
When it comes to serving Cajun Sausage Pasta, presentation can elevate your dish into a whole new realm of deliciousness! Here are some serving tips to make your dish pop:
- Use Wide Bowls: Serving pasta in wide, shallow bowls allows the vibrant colors and textures to shine through while keeping the dish casual.
- Add a Crusty Side: Pair it with some garlic bread or warm baguette slices to mop up every last bite of that delicious sauce.
- Fresh Herbs for Flair: Besides parsley, consider topping it with fresh basil or striking green onions for added flavor and color.
- Grated Parmesan: A sprinkle of freshly grated Parmesan or Pecorino Romano adds a briny touch that beautifully complements the creamy sauce.
With every perfect bite, your dinner table will surely sing with joy!
Recipe Variations
The beauty of Cajun Sausage Pasta lies in its versatility—don’t hesitate to get creative! Here are some variations to consider:
-
Vegetable Twist: Add in your favorite veggies such as spinach, zucchini, or mushrooms. Simply sauté them with the onion and bell pepper for added nutrition!
-
Heat it Up: For a spicier kick, toss in chopped jalapeños or an extra dash of cayenne to elevate that Cajun heat!
-
Protein Swap: Try chicken, shrimp, or even a plant-based sausage alternative to match your dietary preferences.
-
Creamy Options: Substitute heavy cream with a dairy-free option such as coconut cream, or make it lighter using Greek yogurt for a tangy twist.
-
Herb Boost: Fresh thyme or oregano can elevate the dish further with delightful aromatic notes that pair wonderfully with Cajun seasoning.
The possibilities are endless; let your creativity run wild!
Chef’s Notes
I have to confess—this recipe has evolved over time. Initially, I stuck strictly to the classic ingredients, but as I experimented and played around, I found that diverse flavors truly enrich this dish. Sometimes I throw in leftovers, be it chicken or veggies, and it always turns into a flavorful feast.
One fun story—once while preparing this dish, I accidentally spilled an entire jar of Cajun seasoning while trying to shake it into the pot. Instead of panicking, I embraced it and added a bit more cream to balance it out, creating a spicier version that became an instant favorite among friends! Those kitchen mishaps that turn into delicious surprises are what cooking is all about!
FAQs and Troubleshooting
1. My sauce is too thick; what should I do?
Don’t worry! A splash of reserved pasta water or a bit more cream can help loosen up that sauce and bring it back to a creamy consistency.
2. How do I store leftovers?
Store any leftover Cajun Sausage Pasta in an airtight container in the fridge for up to 3 days. Reheat on the stove or in a microwave, adding a splash of cream or broth to bring it back to life!
3. Can I freeze this dish?
Absolutely! To freeze, place cooled pasta in an airtight container or freezer bag, where it can stay fresh for up to 3 months. Just remember, the texture may slightly change upon thawing.
4. What if I don’t have Cajun seasoning?
No worries! You can create your own mix using paprika, cayenne pepper, oregano, and thyme—adjusting to your preferred spice level.
Nutritional Info
While Cajun Sausage Pasta is undeniably delicious, it’s also important to consider the nutritional aspects. Here’s a general breakdown per serving (based on typical ingredients):
- Calories: Approx. 550
- Protein: 25g
- Carbohydrates: 40g
- Fat: 30g (mostly from cream and cheese)
- Fiber: 3g
Keep in mind that variations and substitutions will alter the nutritional values, so feel free to customize it according to your dietary needs!
Final Thoughts
There you have it—a delightful and comforting bowl of Cajun Sausage Pasta that you can whip up with ease and finesse! Cooking shouldn’t be a chore; it’s a joyful adventure, a chance to combine flavors, share experiences, and create lasting memories around the dinner table.
So next time you’re yearning for something delicious that packs a flavorful punch, give this recipe a try! I can guarantee it will bring smiles, laughter, and perhaps a little dancing in the kitchen. Remember, the best part of any meal is the love you share with those around you. Now, grab your apron, put on some tunes, and let’s get cooking together! Happy feasting!
Print
Cajun Sausage Pasta
- Total Time: 35 minutes
- Yield: 4 servings 1x
- Diet: None
Description
A delightful and savory Cajun sausage pasta dish that combines bold flavors with creamy goodness. Perfect for a weeknight dinner or a weekend gathering!
Ingredients
- 8 oz pasta (penne or fettuccine)
- 12 oz smoked sausage (sliced)
- 1 onion (chopped)
- 1 bell pepper (chopped)
- 3 cloves garlic (minced)
- 1 can (14.5 oz) diced tomatoes (with juices)
- 1 cup heavy cream
- 1 cup shredded cheese (cheddar or mozzarella)
- 2 tsp Cajun seasoning
- Salt and pepper to taste
- Olive oil for cooking
- Fresh parsley (for garnish)
Instructions
- Bring a large pot of salted water to a boil. Add your chosen pasta and cook according to package instructions until al dente. Reserve about a cup of pasta water before draining.
- Heat olive oil in a large skillet over medium heat. Add the sliced smoked sausage and sauté for about 5 minutes, or until golden brown.
- In the same skillet, add the chopped onion and bell pepper. Sauté until soft and translucent—about 4-5 minutes. Add minced garlic and sauté for another minute.
- Pour in the diced tomatoes along with their juices. Let this simmer for about 3 minutes. Reduce heat and add the heavy cream, stirring continuously.
- Add Cajun seasoning, salt, and pepper to taste. Stir in the sautéed sausage and let it cook for another 3-4 minutes.
- Mix in the drained pasta, tossing everything together until well coated in the creamy sauce. Stir in the shredded cheese until melted.
- Plate your pasta, garnishing with fresh parsley and an extra sprinkle of cheese. Serve hot with your favorite sides.
Notes
Feel free to add your favorite vegetables or adjust the spice level to your liking. This dish is versatile and can easily be customized!
- Prep Time: 10 minutes
- Cook Time: 25 minutes
- Category: Main Course
- Method: Stovetop
- Cuisine: Cajun
Nutrition
- Serving Size: 1 serving
- Calories: 550
- Sugar: 5g
- Sodium: 800mg
- Fat: 30g
- Saturated Fat: 15g
- Unsaturated Fat: 10g
- Trans Fat: 0g
- Carbohydrates: 40g
- Fiber: 3g
- Protein: 25g
- Cholesterol: 100mg
Keywords: Cajun, pasta, sausage, comfort food, quick dinner