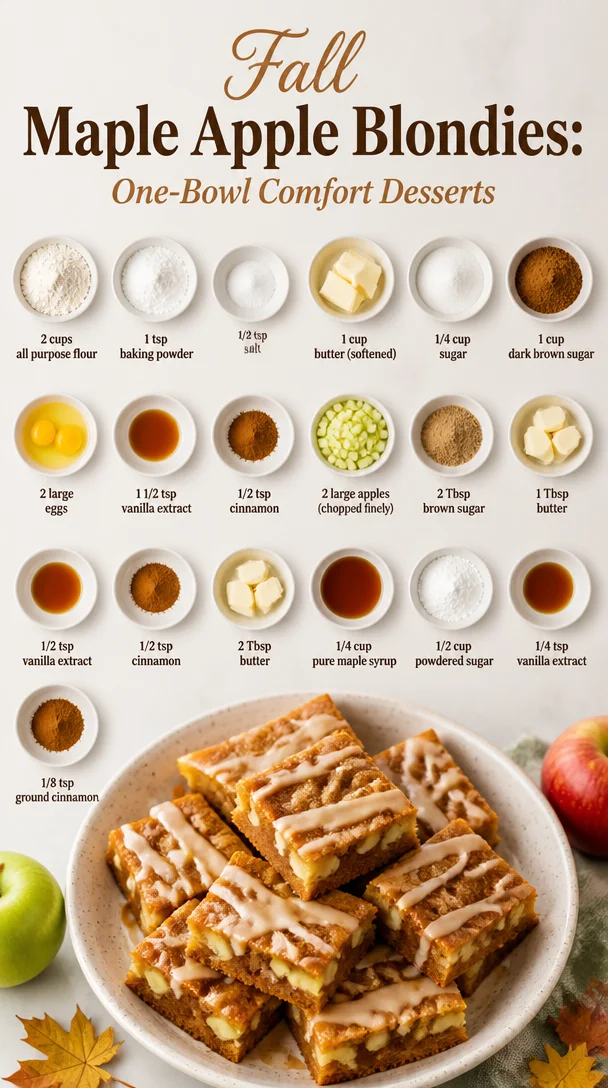
Fall Maple Apple Blondies: One-Bowl Comfort Desserts
Maple Glazed Apple Blondies: A Sweet Slice of Comfort
Hey food lovers! 🌟 It’s Beau Collier here, and I am so thrilled to share my Maple Glazed Apple Blondies with you. If there’s one thing that can instantly cozy up a kitchen, it’s the sweet, warm scent of baked apples mixed with a hint of maple syrup. These blondies are not just a dessert; they’re a delicious hug served on a plate! Now, I know what you might be thinking—“Blondies? What’s so special about that?” But let me tell you, these aren’t your ordinary blondies. We’re talking about a delightful combination of soft, chewy goodness topped with a luscious maple glaze that’ll keep you coming back for seconds (and maybe thirds).
A Sweet Slice of Nostalgia 🍏
Let me take you back to my childhood, where every fall meant one thing—apple picking season. My family would load up the car, and off we’d go to our favorite orchard. The anticipation of those ripe, juicy apples hanging off the trees was everything! I remember how my mom would fill our basket to the brim while sharing stories about which apples made the best pies or sauces.
But the real magic happened when we got home. While my dad handled the apple cider, my mom would whip up various treats, from classic apple pies to comforting apple bars. But it wasn’t until years later that I discovered the joys of blondies. My first batch was an experiment, trying to replicate the flavors of my family’s apple desserts but with a new twist. Tasting the warm, gooey center with the crunch of apples and a hint of cinnamon took me right back to autumn afternoons spent with family. That’s when I decided to create the Maple Glazed Apple Blondies—The perfect treat that combines nostalgia with a modern spin!
Ingredients 🥄
Here’s what you’ll need to whip up these delicious blondies, along with some helpful tips on substitutions and chef insights:
-
2 cups all-purpose flour: This is the base for your blondies. You can substitute with gluten-free flour if necessary; just make sure to use a blend that includes xanthan gum for structure.
-
1 tsp baking powder: This helps your blondies rise to that perfect chewy texture. Baking soda can be substituted in a pinch but adjust the quantity to 1/2 tsp.
-
1/2 tsp salt: Salt enhances flavor. Feel free to use sea salt for a bit of fancy flair!
-
1 cup butter (softened): Butter is essential for richness. If you want a lighter version, try using half butter and half applesauce.
-
1/4 cup sugar: Just a touch of white sugar brings out the sweetness! You can use coconut sugar for a deeper flavor.
-
1 cup dark brown sugar: The moisture from brown sugar creates a chewy texture. Light brown sugar works too; just keep in mind it will be slightly less flavorful.
-
2 large eggs: They bind everything together. You can replace the eggs with flax eggs (2 tbsp ground flaxseed mixed with 5 tbsp water) for a vegan version.
-
1 1/2 tsp vanilla extract: You can’t skip the vanilla—it’s the magic ingredient! Use pure vanilla for the best flavor.
-
1/2 tsp cinnamon: Perfect for that cozy autumn feel. You can add a pinch more if you’re a cinnamon lover like me!
-
2 large apples (chopped finely): Apples provide moisture and texture. Granny Smith or Honeycrisp work great, but feel free to use whatever you have on hand.
-
2 Tbsp brown sugar: This is for our apple topping, adding a caramelized, sweet finish.
-
1 Tbsp butter: A little butter goes a long way in achieving the perfect sautéed apples.
-
1/2 tsp vanilla extract (for the topping): Because more vanilla is always better!
-
1/2 tsp cinnamon (for the topping): To complement the apples.
-
2 Tbsp butter (for the glaze): It adds that extra level of richness.
-
1/4 cup pure maple syrup: The star of the glaze! Look for 100% pure maple syrup for maximum flavor.
-
1/2 cup powdered sugar: This is what makes the glaze sweet and spreadable.
-
1/4 tsp vanilla extract (for the glaze): Yep, one more dash of vanilla!
-
1/8 tsp ground cinnamon: Just a pinch to enhance the flavors of the glaze.
Step-by-Step Instructions 👨🍳
Now, let’s get our bake on! Follow these steps to create your Maple Glazed Apple Blondies. Don’t worry; I’ll sprinkle in some of my favorite chef hacks along the way!
-
Preheat your oven: Start by preheating your oven to 350°F (175°C). This step is crucial because you want your blondies to cook evenly. While the oven heats up, grab an 8×8-inch baking pan, line it with parchment paper, and lightly grease it with cooking spray or a little butter. This ensures your blondies will slide right out when they’re ready!
-
Mix your dry ingredients: In a medium bowl, whisk together the flour, baking powder, salt, and cinnamon until well combined. This step helps to distribute the baking powder evenly so your blondies rise like they should!
-
Cream the butter and sugars: In another bowl, beat together the softened butter, granulated sugar, and dark brown sugar until the mixture is light and fluffy—about 2-3 minutes. This is where the magic happens! The air you incorporate will give the blondies that nice chewy texture.
-
Add the eggs and vanilla: Beat in the eggs one at a time, followed by the vanilla extract. Make sure everything is mixed until smooth; this is your batter’s chance to come together.
-
Combine dry and wet ingredients: Gradually add your dry ingredients into the wet ingredients—mixing on low speed (or with a spatula) until just combined. Overmixing can lead to tough blondies, so once you see no flour streaks, stop!
-
Fold in the apples: Gently fold in the finely chopped apples until they are evenly distributed in the batter. And here’s a chef hack: if your apples are a little dry, you can toss them in a sprinkle of lemon juice to perk them up before adding them in!
-
Spread the batter in the pan: Pour your batter into the prepared baking pan, smoothing the top with a spatula. Bake it in your preheated oven for 25-30 minutes, or until the top is golden brown and a toothpick inserted in the center comes out with a few moist crumbs. This step is all about the perfect bake!
-
Make the apple topping: While your blondies are baking, melt 1 Tbsp of butter in a skillet over medium heat. Add the chopped apples and sprinkle 2 Tbsp of brown sugar over them, tossing to coat. Sauté until the apples are tender and caramelized, about 5-7 minutes. Set aside to cool.
-
Cool and glaze: Once your blondies are done baking, let them cool in the pan for about 10 minutes before transferring them to a wire rack. For the glaze, melt 2 Tbsp of butter in a bowl, and whisk in the maple syrup, powdered sugar, and a sprinkle of cinnamon. Drizzle it over the cooled blondies once they’re completely cool.
-
Slice and serve: Finally, cut into squares and serve those gorgeous blondies up! You can top each piece with some of those fabulous sautéed apples, and trust me, they look as good as they taste.
Serving Suggestions 🍽️
Now that you have your Maple Glazed Apple Blondies ready to go, let’s talk presentation! I love to serve these warm with a scoop of vanilla ice cream on top for that ultimate comforting dessert vibe. You can also sprinkle some crushed nuts—like walnuts or pecans—over the top for an added crunch. A dusting of powdered sugar or even a drizzle of extra maple syrup doesn’t hurt either!
For a cozy fall get-together, serve them alongside a steaming cup of coffee or a spiced apple cider. The warm flavors of apple and maple paired with the comforting spices are bound to keep everyone coming back for more!
Recipe Variations 🌈
Feeling creative? Here are a few variations you can try with this recipe:
-
Nutty Crunch: Fold in half a cup of chopped nuts like walnuts or pecans for an irresistible crunch.
-
Chocolate Chip Delight: Add a cup of semi-sweet chocolate chips to the batter for a sweet and savory combo.
-
Pumpkin Spice Twist: For a seasonal spin, substitute 1/2 cup of applesauce with pumpkin puree and add an extra teaspoon of pumpkin spice!
-
Caramel Sauce Drizzle: Instead of the maple glaze, drizzle warm caramel sauce over the blondies for a decadent dessert.
-
Vegan Version: Use flax eggs and substitute the butter with coconut oil or vegan butter for plant-based blondies!
Chef’s Notes 📝
These blondies are a personal favorite of mine, and I love that they remind me of those bustling fall days at the orchard. Fun fact: I initially made this recipe when I realized I had way too many apples from one of those picking adventures! What started as a way to use up excess fruit has turned into a household staple. Keep in mind, if you’re ever short on time, the blondies can be enjoyed without the glaze too—they’re still scrumptiously moist and packed with flavor on their own!
FAQs and Troubleshooting 🤔
-
Why are my blondies too cakey?
If your blondies are coming out cakey, it’s likely because they’ve been overmixed or overbaked. Always mix until just combined and keep an eye on them as they bake—each oven is different! -
What should I do if my blondies are dry?
If your blondies are dry, it could be a sign that you baked them too long. To fix this in the future, try reducing your baking time slightly, or add a tablespoon of applesauce for moisture. -
Can I freeze these blondies?
Absolutely! Let them cool completely, then wrap them tightly in plastic wrap before sealing them in an airtight container. They can last up to 3 months in the freezer! -
How do I know when my blondies are done?
Insert a toothpick in the center. If it comes out with a few moist crumbs, they’re perfect. If the toothpick is clean, they may be overcooked!
Nutritional Info 🥗
Here’s a sneak peek at the nutritional breakdown of each blondie (based on a 16-piece batch):
- Calories: 280
- Fat: 12g
- Carbohydrates: 40g
- Fiber: 1g
- Protein: 2g
Note that nutritional info may vary depending on ingredient brands and substitutions made. Don’t let the calories scare you; a little indulgence is all part of the fun, right?
Final Thoughts 💭
I hope you’ve enjoyed learning about my Maple Glazed Apple Blondies as much as I love making them! Remember, cooking is about more than just ingredients. It’s about the stories we share and the memories we create around the table. So next time you’re looking for a comforting dessert that evokes feelings of warmth and nostalgia, give these blondies a try. They’ll surely become a beloved recipe in your kitchen, just like they have in mine! Happy baking, everyone! 🍏✨
Print
Maple Glazed Apple Blondies
- Total Time: 45 minutes
- Yield: 16 servings 1x
- Diet: Vegetarian
Description
Delicious blondies with a soft, chewy texture, topped with a sweet maple glaze and chunks of apple, perfect for fall.
Ingredients
- 2 cups all-purpose flour
- 1 tsp baking powder
- 1/2 tsp salt
- 1 cup butter (softened)
- 1/4 cup sugar
- 1 cup dark brown sugar
- 2 large eggs
- 1 1/2 tsp vanilla extract
- 1/2 tsp cinnamon
- 2 large apples (chopped finely)
- 2 Tbsp brown sugar
- 1 Tbsp butter (for sautéing apples)
- 1/2 tsp vanilla extract (for the topping)
- 1/2 tsp cinnamon (for the topping)
- 2 Tbsp butter (for the glaze)
- 1/4 cup pure maple syrup
- 1/2 cup powdered sugar
- 1/4 tsp vanilla extract (for the glaze)
- 1/8 tsp ground cinnamon
Instructions
- Preheat your oven to 350°F (175°C) and line an 8×8-inch baking pan with parchment paper.
- Mix the flour, baking powder, salt, and cinnamon in a medium bowl.
- Cream the softened butter, granulated sugar, and dark brown sugar until light and fluffy.
- Add the eggs one at a time, followed by the vanilla extract.
- Combine the dry ingredients into the wet ingredients until just mixed.
- Fold in the chopped apples until evenly distributed.
- Spread the batter in the prepared baking pan and bake for 25-30 minutes.
- Make the apple topping by sautéing apples with brown sugar until tender.
- Cool the blondies in the pan for 10 minutes, then transfer to a wire rack.
- Glaze the cooled blondies with a mixture of melted butter, maple syrup, powdered sugar, and cinnamon.
- Slice into squares and serve.
Notes
Try serving warm with vanilla ice cream or crushed nuts for extra crunch.
- Prep Time: 15 minutes
- Cook Time: 30 minutes
- Category: Dessert
- Method: Baking
- Cuisine: American
Nutrition
- Serving Size: 1 blondie
- Calories: 280
- Sugar: 22g
- Sodium: 200mg
- Fat: 12g
- Saturated Fat: 7g
- Unsaturated Fat: 3g
- Trans Fat: 0g
- Carbohydrates: 40g
- Fiber: 1g
- Protein: 3g
- Cholesterol: 50mg
Keywords: blondies, apple dessert, fall recipes, maple glaze

Apple Bars
Apple Bars: A Slice of Nostalgia and Comfort
Hey there, food lovers! Today, I’m excited to share one of my all-time favorite recipes: homemade apple bars! There’s something about the sweet and tart aroma of baked apples mingling with warm spices that can instantly transport you to cozy moments in the kitchen. So, grab your apron and let’s whip up a batch of these delightful treats that not only taste good but also tell a beautiful story!
A Sweet Memory
One of my most cherished memories connected to apple bars goes all the way back to my childhood. Picture this: the smell of cinnamon drifting through my grandma’s kitchen as she prepared for our family gathering. I vividly remember sitting on the counter, swinging my legs, and eagerly waiting for my turn to help. Grandma would let me sprinkle the cinnamon and sugar over the apples, her wrinkled hands guiding me to cut just the right size. Those moments were pure magic—a blend of laughter, love, and, of course, lots of delicious bites.
Every time I bake these apple bars, I think of her loving smile and the simple joys of creating something special together. Now, it’s my turn to share that love, and I hope these apple bars bring you the same comfort they brought me.
Ingredients
Let’s gather our ingredients! Here’s what you’ll need to create these scrumptious apple bars, along with some chef insights to level up your baking game:
-
2 cups all-purpose flour
Perfect for structure! You can swap it with whole wheat flour for a nuttier flavor or gluten-free flour if you’re avoiding gluten. -
1 1/2 cups old-fashioned oats
These add a nice chewy texture. If you’re in a pinch, quick oats can be used, but they won’t give you the same hearty consistency. -
1/2 cup granulated sugar
Just enough to sweeten the deal! Feel free to reduce it or substitute with coconut sugar for a lower-glycemic option. -
3/4 cup brown sugar
Bringing in that rich molasses flavor! Light or dark brown sugar will work—dark brown will give a more robust taste. -
1 cup unsalted butter, cold and cubed
Cold butter is a must for a flaky crust. If you’re short on butter, you can use unsweetened applesauce as a healthier substitute (though the texture may vary). -
1/2 teaspoon salt
Balances the sweetness! If you plan to use salted butter, you can skip this. -
1 1/2 teaspoons ground cinnamon
The star of the show! This seasoning really flatters the apples. Add a pinch more if you really want that cozy flavor! -
1/4 teaspoon nutmeg (optional)
A little goes a long way! Nutmeg adds complexity; however, it’s not for everyone, so feel free to omit it. -
3 cups apples, peeled and chopped
Granny Smith or Honeycrisp are my faves for their perfect tart balance. You can mix and match your favorite varieties! -
1 tablespoon lemon juice
This helps keep the apples from browning—plus, it adds a fresh zing! -
1 tablespoon cornstarch
To thicken the apple filling. You can substitute with arrowroot powder for a grain-free option. -
1 teaspoon vanilla extract
A splash of vanilla enhances all the flavors beautifully! -
1/2 cup powdered sugar
For a simple glaze that adds a sweet finish. -
1–2 tablespoons milk (for glaze)
Adjust based on your desired consistency. Any milk will do, whether it’s dairy or plant-based!
Step-by-Step Instructions
Now that we have our ingredients, let’s get cooking! Follow these steps, and I promise you’ll have a delightful dessert on your hands.
-
Preheat the Oven
Preheat your oven to 350°F (175°C). Preheating ensures even baking—nobody likes a doughy center! -
Make the Crust
In a large mixing bowl, combine the flour, oats, granulated sugar, brown sugar, salt, cinnamon, and nutmeg. Mix until well incorporated. Add in the cold, cubed butter. Use a pastry cutter or your fingers to work the butter into the dry ingredients until the mixture resembles coarse crumbs. This step is crucial for achieving that flaky texture! -
Press the Crust
Reserve about 1 1/2 cups of the mixture for the topping. Press the remaining mixture into the bottom of a greased 9×13-inch baking dish, making sure it’s evenly spread. Bake the crust for about 10-12 minutes until it’s lightly golden. This pre-baking step ensures a solid base, so it doesn’t get soggy later! -
Prepare the Apple Filling
In a large bowl, combine the chopped apples, lemon juice, cornstarch, and vanilla extract. If you’re feeling adventurous, toss in a tablespoon of brown sugar for extra sweetness. Mix everything well so the delicious flavors meld together. -
Assemble the Bars
Once your crust has finished baking, remove it from the oven and spread the apple mixture evenly over the crust. Then, crumble the reserved crust mixture over the top of the apples. Don’t worry about it being perfect—rustic looks are totally in! -
Bake Until Golden
Return the baking dish to the oven and bake for an additional 25-30 minutes, or until the topping is golden and the apples are bubbly. The smell coming from the oven? Pure bliss! -
Cool and Glaze
Allow the apple bars to cool in the pan for about 15 minutes. While they cool, mix the powdered sugar and milk together to create a glaze. Drizzle this heavenly concoction over the top of the cooled bars. -
Slice and Serve
Cut into squares (or bars, if you’re feeling fancy) and serve warm or at room temperature. A scoop of vanilla ice cream on top takes it to the next level!
Serving Suggestions
When it comes to serving these apple bars, there are endless possibilities! You can plate them with a simple dusting of powdered sugar for an elegant touch, or make it a fun dessert night by serving them warm with a scoop of vanilla ice cream or a dollop of whipped cream. A sprinkle of additional cinnamon on top adds a lovely finishing touch! If you want to take it a step further, add a side of caramel sauce for drizzling. Talk about a party in your mouth!
Recipe Variations
Why not shake things up a bit? Here are some creative twists you can try with your apple bars:
-
Cranberry Apple Bars
Mix dried cranberries with the apples for a tart contrast and a pop of color! -
Nutty Apple Bars
Add chopped walnuts or pecans to the apple filling for a delightful crunch. -
Spiced Apple Bars
Experiment with spices! Try adding ginger or even a hint of allspice for a unique flavor profile. -
Gluten-Free Apple Bars
Substitute the all-purpose flour with a gluten-free blend, and use rolled oats labeled gluten-free. -
Maple Glaze
Instead of the powdered sugar glaze, drizzle with maple syrup for a deliciously sweet and healthier option!
Chef’s Notes
Over the years, this apple bar recipe has become a beloved staple in my home. I’ve laughed, cried, and celebrated many occasions with this dessert. The beauty of this recipe is its simplicity—the base and filling can evolve based on what’s in your pantry or what you’re craving. Always remember to taste as you go; food is about personal preference!
Oh, and a funny kitchen story: I once got so excited while baking these that I accidentally added a cup of salt instead of sugar! Let’s just say, a family picnic turned into an impromptu salt lick contest. Lesson learned: always double-check your ingredients, folks!
FAQs and Troubleshooting
1. Why are my apple bars too soggy?
If you find that your apple bars are soggy, it might be that the apples released too much moisture. Ensure you’re using a thickener like cornstarch and try to drain any excess liquid before assembling.
2. Can I use frozen apples?
Absolutely! Just make sure to thaw and drain them well before adding them to the mixture. Frozen apples release more liquid, so you might need a bit more cornstarch.
3. How do I store leftovers?
Store leftover apple bars in an airtight container at room temperature for up to three days, or refrigerate for up to a week. They also freeze well if you want to save some for later!
4. My crust is too crumbly. What did I do wrong?
If your crust is too crumbly, you may have not added enough butter or used too much flour. Make sure to measure accurately and consider adding a tiny splash of cold water to bring it together.
Nutritional Info
While I love indulging in delicious treats, I know we all care about balance too! Here’s a rough breakdown of the nutritional information per serving (based on a recipe yielding 12 squares):
- Calories: 240
- Total Fat: 12g
- Saturated Fat: 7g
- Carbohydrates: 34g
- Fiber: 2g
- Sugars: 12g
- Protein: 3g
Keep in mind that variations and serving sizes can affect these numbers!
Final Thoughts
There we have it—apple bars that not only taste divine but are steeped in warmth and nostalgia! Whether you’re baking for a special occasion, a family gathering, or just because it’s Tuesday, these bars are sure to impress. Remember, cooking is all about joy and creativity, so feel free to make this recipe your own.
Bring your loved ones into the kitchen, share some laughs, and let the aromas fill your home. Happy baking, my friends, and may each bite remind you of the beautiful memories that food can create!
So, are you ready to experience that warm hug from your oven? Let’s dig in!
Print
Homemade Apple Bars
- Total Time: 60 minutes
- Yield: 12 servings 1x
- Diet: Vegetarian
Description
Delicious homemade apple bars filled with sweet and tart apples and warm spices, perfect for cozy moments in the kitchen.
Ingredients
- 2 cups all-purpose flour
- 1 1/2 cups old-fashioned oats
- 1/2 cup granulated sugar
- 3/4 cup brown sugar
- 1 cup unsalted butter, cold and cubed
- 1/2 teaspoon salt
- 1 1/2 teaspoons ground cinnamon
- 1/4 teaspoon nutmeg (optional)
- 3 cups apples, peeled and chopped
- 1 tablespoon lemon juice
- 1 tablespoon cornstarch
- 1 teaspoon vanilla extract
- 1/2 cup powdered sugar
- 1–2 tablespoons milk (for glaze)
Instructions
- Preheat your oven to 350°F (175°C).
- In a large mixing bowl, combine the flour, oats, granulated sugar, brown sugar, salt, cinnamon, and nutmeg. Mix until well incorporated.
- Add in the cold, cubed butter. Use a pastry cutter or your fingers to work the butter into the dry ingredients until the mixture resembles coarse crumbs.
- Reserve about 1 1/2 cups of the mixture for the topping. Press the remaining mixture into the bottom of a greased 9×13-inch baking dish.
- Bake the crust for about 10-12 minutes until it’s lightly golden.
- In a large bowl, combine the chopped apples, lemon juice, cornstarch, and vanilla extract.
- Once your crust has finished baking, remove it from the oven and spread the apple mixture evenly over the crust.
- Return the baking dish to the oven and bake for an additional 25-30 minutes, or until the topping is golden and the apples are bubbly.
- Allow the apple bars to cool in the pan for about 15 minutes.
- Mix the powdered sugar and milk together to create a glaze and drizzle it over the top of the cooled bars.
- Cut into squares and serve warm or at room temperature.
Notes
Feel free to experiment with different varieties of apples or adjust spices to your liking.
- Prep Time: 20 minutes
- Cook Time: 40 minutes
- Category: Dessert
- Method: Baking
- Cuisine: American
Nutrition
- Serving Size: 1 square
- Calories: 240
- Sugar: 12g
- Sodium: 100mg
- Fat: 12g
- Saturated Fat: 7g
- Unsaturated Fat: 5g
- Trans Fat: 0g
- Carbohydrates: 34g
- Fiber: 2g
- Protein: 3g
- Cholesterol: 30mg
Keywords: apple bars, dessert, baking, American dessert, apple recipes