
Fall Cinnamon Oatmeal Stuffed Apples with Vanilla Custard
Cinnamon Oatmeal Stuffed Apples with Vanilla Custard Sauce: A Warm Hug from the Oven
Hey there, food friends! Welcome back to Feastical, where we whip up delicious comfort food with a sprinkle of joy. Today, I’m excited to share a recipe that marries nostalgic flavors with a pop of creativity. We’re diving into the sweet and cozy world of Cinnamon Oatmeal Stuffed Apples with Vanilla Custard Sauce. These little gems are not just desserts; they’re like a hug from the oven, ready to warm your heart and fill your belly.
When I think of autumn, I can almost hear the leaves crunching underfoot and the scent of crisp apples wafting through the air. This dish reminds me of my Grandma Mary, who had a knack for turning simple ingredients into pure magic. She often had a basket of apples on her kitchen counter, and I can still hear her voice, “Let’s make something special, Beau!” Those words were an open invitation to create something delicious, and nothing was off-limits. She loved to experiment, turning our family favorites into everything from pies to crisps.
While we’d make her famous apple pie, one day we decided to stuff apples themselves. The result was an explosion of warm cinnamon, nutty oats, and sweet apple goodness, all topped with a creamy vanilla custard that was just heavenly. It was as if we had captured the essence of fall in a dish. Fast forward to today, and I’ve taken that inspiration to craft something truly delightful and comforting — a cozy treat that’s perfect for dinner parties, holidays, or simply enjoying at home on a chilly day. Let’s get cooking!
Ingredients
Here’s what you’ll need to create these delicious Cinnamon Oatmeal Stuffed Apples:
-
6 large apples
Perfect for stuffing! Look for firm varieties like Granny Smith or Honeycrisp. If you prefer sweeter apples, go for Fuji or Gala. -
1 cup (115 g) old-fashioned rolled oats
These provide a lovely, chewy texture. If you’re gluten-free, feel free to swap these out for gluten-free oats. -
1/2 cup (65 g) all-purpose flour
This helps bind the filling together. For a gluten-free alternative, a 1:1 gluten-free flour blend works wonderfully! -
2/3 cup (138 g) brown sugar, packed
Adds depth and a caramel-like flavor. If you’re looking to cut down on sugar, coconut sugar is a great substitute. -
1/3 cup (66 g) granulated sugar
Balances the sweetness. You can use less if you prefer, especially if your apples are on the sweeter side. -
1 tsp ground cinnamon
The star spice here! If you want a little twist, try using cinnamon sugar for an extra kick. -
1/4 tsp ground nutmeg
This adds warmth and complexity to the dish. If you don’t have any, just use a bit more cinnamon. -
Pinch of kosher salt
A little salt brings out the sweetness beautifully. Don’t skip this! -
6 tbsp (87 g) salted butter, cubed
Adds richness. If you want to go dairy-free, substitute with coconut oil or a vegan butter. -
Cinnamon sticks, for garnish
Just a fun decorative touch, but it also contributes to the aroma. -
4 egg yolks
These will enrich the custard sauce. Vegan option: consider using cornstarch as a thickener instead. -
1/2 cup (100 g) granulated sugar
Sweetens the custard. You can use superfine sugar for a smoother texture if you like. -
1 cup (240 ml) whole milk
Whole milk gives a creamy mouthfeel; however, you can use almond milk or coconut milk for a lighter version. -
1 tsp vanilla extract
Because who doesn’t love the aroma of vanilla? You could even use fresh vanilla beans if you’re feeling fancy!
Step-by-Step Instructions
Let’s get to the good stuff! You’re just a few steps away from a comforting dessert that will make you feel right at home.
-
Preheat Your Oven
Start by preheating your oven to 350°F (175°C). This will ensure your apples bake evenly and get that lovely golden brown color. -
Prepare the Apples
Carefully core the apples, leaving the bottoms intact. This way, they hold all that ooey-gooey filling. An apple corer works magic here, but if you don’t have one, a sharp knife can do the trick. -
Make the Filling
In a mixing bowl, combine the oats, flour, brown sugar, granulated sugar, cinnamon, nutmeg, and salt. Mix it well. This dry mixture is going to provide a flavorful cushion for your apples. -
Add the Butter
Toss in the cubed butter and use your fingertips to rub it into the dry ingredients until it resembles coarse crumbs. This helps create that rich, buttery flavor. -
Fill the Apples
Gently spoon the oat mixture into the cored apples, packing it tight but not overflowing. Remember, those apples need space to puff and breathe as they cook! -
Bake the Apples
Place the apples upright in a baking dish. Pour a splash of water (about 1/4 cup) into the bottom of the dish to create steam. Cover with aluminum foil, and then pop them in the oven for about 25-30 minutes. -
Prepare the Vanilla Custard Sauce
While the apples bake, make the custard. In a medium saucepan, whisk the egg yolks and granulated sugar until smooth. Gradually whisk in the milk and vanilla extract. -
Cook the Custard
Over medium heat, cook the mixture, stirring constantly until it thickens slightly and coats the back of a spoon (about 7-10 minutes). Don’t let it boil or you’ll have scrambled eggs. If you want a quick tip: keep that spoon swirling to avoid lumps! -
Finish Baking the Apples
After 30 minutes, remove the foil from the baking dish and bake for another 10-15 minutes until the apples are tender and the tops are golden brown. They should be fragrant and looking mighty delicious! -
Serve and Enjoy
Plate those lovely apples and drizzle the velvety vanilla custard sauce over them. Garnish with a cinnamon stick for an Instagram-worthy finish. Dig in and enjoy that warm, comforting goodness!
Serving Suggestions
When it comes to plating, presentation is key! Here are a few fun ways to serve up your Cinnamon Oatmeal Stuffed Apples:
-
Individual Plates: Place one stuffed apple in the center of a plate and spoon a good amount of custard sauce around it. Add a sprinkle of cinnamon on top for an extra pop of flavor!
-
Family Style: Arrange a handful of stuffed apples on a large serving platter. Pour custard sauce in a small bowl on the side for guests to help themselves.
-
A la Mode: Top each apple with a scoop of vanilla ice cream before drizzling on the custard. It’s a decadent twist that’ll take your dessert to the next level!
No matter how you serve them, you’re bound to impress everyone — from your family to your friends.
Recipe Variations
Feeling adventurous? Here are a few twists to make this dish uniquely yours:
-
Nutty Delight: Add 1/2 cup of your favorite nuts (like pecans or walnuts) to the filling for that added crunch. They bring a great flavor and texture contrast!
-
Berry Patch: Toss in some dried cranberries or raisins into the filling for a sweet surprise. The tartness of cranberries pairs beautifully with the sweetness of apples.
-
Caramel Drizzle: Drizzle caramel sauce over the finished apples for an indulgent treat. You can make your own or take a shortcut with store-bought!
-
Spiced Up: Want more complexity? Add a pinch of allspice or ginger to the filling to enhance those warm flavors.
-
Vegan Twist: Substitute the egg yolks with cornstarch mixed with a splash of plant-based milk for the custard sauce. Use coconut milk for a rich and creamy flavor.
Chef’s Notes
These Cinnamon Oatmeal Stuffed Apples recipe has evolved over the years in my kitchen. I started out making them the traditional way, with just brown sugar and oats. However, after some experimenting and a few happy accidents (like the time I added almond extract instead of vanilla), they morphed into something quite special.
I remember making these for my friends at a cozy autumn gathering, and everyone was raving about them! For me, recipes like these are all about sharing joy and warmth. I hope they bring the same for you!
FAQs and Troubleshooting
Here are a few common questions and troubleshooting tips you might find helpful as you embark on your cooking adventure:
-
Can I prep these apples in advance?
Absolutely! You can core the apples and prep the filling a day ahead. Just store them separately in the refrigerator until you’re ready to bake. -
What if my apples are too soft?
If you accidentally picked soft apples, no worries! Just reduce the baking time to prevent them from turning mushy. -
My custard sauce didn’t thicken. What went wrong?
If your custard sauce isn’t thickening, it might not have cooked long enough. Just return it to the stovetop on medium-low heat and keep stirring until it coats the back of a spoon. -
Can I freeze the stuffed apples?
Yes, stuffed apples freeze well! Just bake them, let them cool, and then freeze in an airtight container. Reheat in the oven when you’re ready to enjoy them again.
Nutritional Info
While comfort food like this is all about indulgence, here’s a rough breakdown so you can enjoy without guilt:
- Calories: Approx. 280 per stuffed apple (including custard)
- Fat: 10g (mainly from the butter)
- Carbohydrates: 46g (natural sugars from apples and added sugars)
- Protein: 3g (from eggs and milk)
- Fiber: 5g (from oats and apples)
Of course, nutritional values will vary based on specific ingredient choices and any modifications you make.
Final Thoughts
There you have it, folks! A delicious journey wrapped in a warm, cinnamon-kissed apple. These Cinnamon Oatmeal Stuffed Apples with Vanilla Custard Sauce are bound to make your kitchen the heart and soul of your home, just like it did for my Grandma Mary and me. Whether enjoyed on a chilly evening or served at a festive gathering, this dish holds the power to create memories and fill hearts.
So gather your loved ones, get cozy in your kitchen, and let the delightful aroma of baked apples fill the air. I can’t wait to hear how yours turn out! Share your culinary creations with me on social media, and happy cooking, my friends! 🍏❤️
Print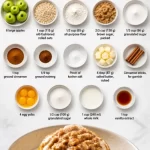
Cinnamon Oatmeal Stuffed Apples with Vanilla Custard Sauce
- Total Time: 55 minutes
- Yield: 6 servings 1x
- Diet: Vegetarian
Description
A warm, comforting dessert featuring apples stuffed with cinnamon oatmeal and topped with a creamy vanilla custard sauce.
Ingredients
- 6 large apples
- 1 cup (115 g) old-fashioned rolled oats
- 1/2 cup (65 g) all-purpose flour
- 2/3 cup (138 g) brown sugar, packed
- 1/3 cup (66 g) granulated sugar
- 1 tsp ground cinnamon
- 1/4 tsp ground nutmeg
- Pinch of kosher salt
- 6 tbsp (87 g) salted butter, cubed
- Cinnamon sticks, for garnish
- 4 egg yolks
- 1/2 cup (100 g) granulated sugar
- 1 cup (240 ml) whole milk
- 1 tsp vanilla extract
Instructions
- Preheat your oven to 350°F (175°C).
- Prepare the apples by carefully coring them, leaving the bottoms intact.
- Make the filling by combining oats, flour, brown sugar, granulated sugar, cinnamon, nutmeg, and salt in a bowl.
- Add the cubed butter and rub it into the dry ingredients until resembling coarse crumbs.
- Fill the apples with the oat mixture, packing it tight.
- Place the apples upright in a baking dish and add a splash of water to the bottom. Cover with aluminum foil and bake for 25-30 minutes.
- Prepare the vanilla custard sauce by whisking egg yolks and sugar until smooth, then gradually whisk in milk and vanilla extract.
- Cook the custard over medium heat, stirring constantly until thickened (about 7-10 minutes).
- Finish baking the apples by removing the foil and baking for another 10-15 minutes until tender.
- Serve the apples drizzled with custard sauce and garnish with a cinnamon stick.
Notes
You can prep the apples and filling a day in advance. These apples can also be frozen after baking.
- Prep Time: 15 minutes
- Cook Time: 40 minutes
- Category: Dessert
- Method: Baking
- Cuisine: American
Nutrition
- Serving Size: 1 apple
- Calories: 280
- Sugar: 34g
- Sodium: 150mg
- Fat: 10g
- Saturated Fat: 6g
- Unsaturated Fat: 4g
- Trans Fat: 0g
- Carbohydrates: 46g
- Fiber: 5g
- Protein: 3g
- Cholesterol: 120mg
Keywords: cinnamon apples, stuffed apples, dessert, comfort food, autumn recipe
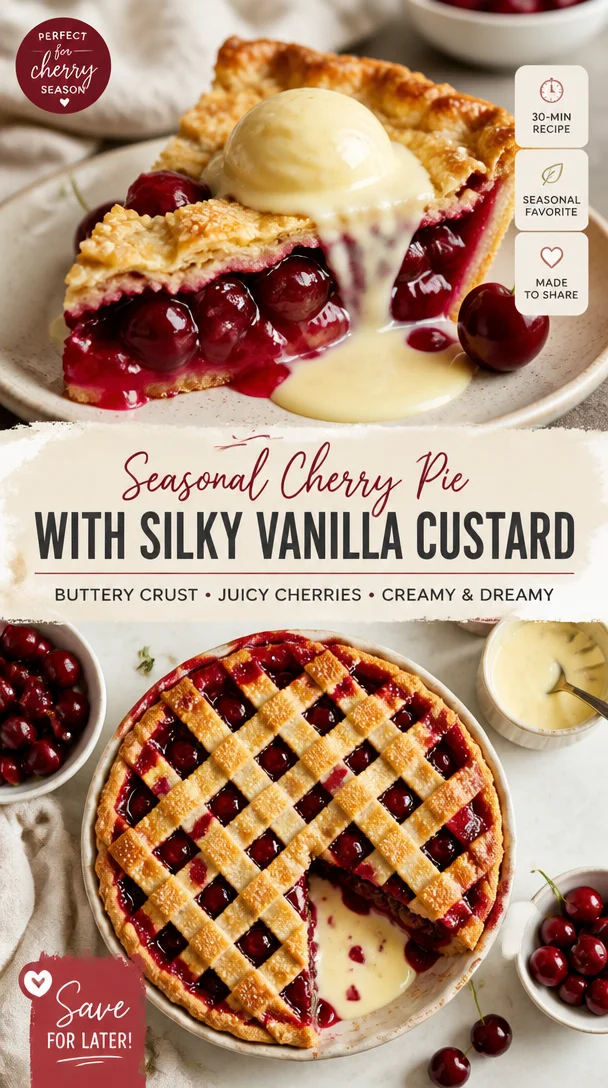
Seasonal Cherry Pie with Silky Vanilla Custard Recipe
Cherry Pie with Vanilla Custard: A Slice of Nostalgia
Hey there, fellow foodies! I’m so glad you’re here at Feastical, where we celebrate feel-good food that’s bound to make your heart sing. Today, we’re whipping up something truly special: a vibrant Cherry Pie with Vanilla Custard. Believe me when I say, this dish is more than just a dessert—it’s a warm hug served on a plate.
Picture this: It’s a sunny afternoon, and the air is filled with the sweet scent of cherries ripening on the tree. Growing up, summer meant a trip to my grandparents’ farm where we’d pick fresh fruit, and nothing was more exciting than those bright red cherries. They were so sweet, just waiting to be turned into something delicious. When the cherries came rolling in, my grandma would roll out the dough, and the whole kitchen would be filled with laughter and the clinking of measuring cups as we prepared one of her famous cherry pies. It wasn’t just about the food; it was about the memories made—a tradition that I cherish dearly.
This recipe brings that nostalgia to your kitchen—it’s straightforward, delicious, and perfect for impressing family and friends. With juicy sour cherries complemented by a silky vanilla custard, this pie is a heavenly blend of tart and sweet that will leave everyone clamoring for seconds. So grab your apron, and let’s dive into the wonderful world of cherry pie-making!
Personal Story
Ah, cherry pie! Just the thought of it takes me back to my childhood summers spent at my grandparents’ house, where the cherry tree in the yard was a staple. I still remember the way the branches would bend under the weight of those plump, red gems. My siblings and I would race to see who could fill their bucket first, our laughter echoing through the orchard as we fought over that last cherry.
Once we had gathered enough cherries, it was time for the real fun: working in the kitchen with Grandma. I can still hear her humming softly as she rolled out the dough, my job was to "help" by munching on some cherries and sneaking bites of sugar. Grandma taught me the secret to a perfect cherry filling—harmony between sugar, cornstarch, and a squeeze of lemon juice to balance the flavors. While the pie baked, the kitchen filled with a warm, inviting aroma that wrapped around me like a blanket. It was in those moments that I learned not just how to bake, but how to create memories.
Now, as I make this cherry pie for you, I hope you’ll feel inspired to create your own sweet memories. Let’s cherish those small moments that turn into cherished traditions, all while enjoying a slice of this heavenly pie!
Ingredients
-
2 cups sour cherries (pitted)
Fresh or frozen sour cherries work beautifully here. If fresh cherries aren’t available, thaw any frozen cherries, and make sure you drain them well before using. -
1 cup sugar
Granulated sugar brings a sweet balance to the tart cherries. For a twist, you can use brown sugar for a hint of caramel flavor or coconut sugar for a lower glycemic option. -
2 tablespoons cornstarch
This thickening agent ensures your cherry filling isn’t too runny. If you’re looking for a gluten-free alternative, you could also use arrowroot powder. -
1 tablespoon lemon juice
This zesty note brightens the flavors of the cherries. If you’re fresh out of lemons, white vinegar can serve as a substitute in a pinch! -
1 teaspoon vanilla extract
A touch of vanilla enhances the pie’s sweetness and adds depth to the filling. If you want to kick it up a notch, try using almond extract instead for a lovely nutty note. -
1 pre-made shortcrust pastry
To keep things simple, a store-bought shortcrust pastry saves time. Feel free to use a homemade pastry if you’re up for the challenge! -
1 cup vanilla quark (or vanilla pudding)
This creamy element adds richness to the pie. Yogurt can be used if you’re looking for something lighter, or you can opt for a dairy-free pudding if needed. -
1 egg (for egg wash)
Beaten egg gives your pie that luscious golden finish. If you prefer not to use eggs, a splash of milk or a dairy-free alternative can work just as well. -
Powdered sugar (for dusting, optional)
A light dusting of powdered sugar right before serving makes the pie look extra special!
Step-by-Step Instructions
-
Prepare the Cherries
Start by washing, pitting, and draining your cherries (if using frozen). Ensure they’re as dry as possible to prevent excess moisture in your pie. This is the moment to taste a cherry or two—it’s crucial work, trust me! -
Make the Cherry Filling
In a mixing bowl, combine the pitted cherries, sugar, cornstarch, lemon juice, and vanilla extract. Toss everything together gently with a spatula until the cherries are well-coated. Let this mixture sit for about 15 minutes to allow the flavors to meld and the sugar to draw out the juices. Oh, the anticipation! -
Preheat the Oven
Preheat your oven to 425°F (220°C). A hot oven means a beautifully baked pie with crisp crust and bubbling filling. -
Roll Out the Pastry
If you’re using a homemade pie crust, roll out your shortcrust pastry until it’s about ¼ inch thick. Fit it into your pie pan, making sure to leave a little overhang to seal the top. -
Add the Filling
Pour the cherry mixture into the prepared pastry shell. Speaking of which, take a moment to admire those vibrant cherries—they should look like a dazzling red jewel treasure trove! -
Prepare the Top Layer
If you’re going with a lattice top or want to create a full crust, it’s time to roll out the second piece of pastry. Roll it out, drape it over the filling, and make slits for ventilation or cut decorative shapes (you know I’m a sucker for making it pretty!). -
Seal and Brush the Pie
If using a full crust, gently tuck the overhang underneath, create a nice border to seal in the filling, and make some slits on top to allow steam to escape. Brush the top crust with the beaten egg for that golden finish. It’s your pie, make it shine! -
Bake
Pop your pie in the preheated oven and let it bake for about 20-25 minutes. You’re looking for the crust to be golden brown and the filling to be bubbling. My kitchen timer is usually my unofficial assistant—set it and get ready to drool! -
Cool and Prepare the Custard
After the pie is done, let it cool on the counter for at least 20 minutes. This helps set the filling. Now while it cools, whip up that vanilla custard (or grab your ready-made vanilla pudding). I like to fold in a little whipped cream for a fluffy texture! -
Serve
Slice the pie and serve with a generous dollop of vanilla custard. Take a moment to appreciate the beautiful juxtaposition of colors, textures, and flavors—life is beautiful, isn’t it?
Serving Suggestions
To plate your cherry pie, I recommend a simple yet elegant presentation. Start with a slice on a dessert plate and pour a generous amount of vanilla custard around it. You can use a tablespoon to create little pools artfully. For an extra special touch, garnish with a sprig of mint—its bright green adds a lovely contrast with the vibrant red of the cherries. If you’re feeling indulgent, why not add a scoop of vanilla ice cream on the side? This classic pairing is sure to make everyone’s hearts—and stomachs—happy!
Recipe Variations
Now, let’s get a little creative with our cherry pie! Here are some fun variations to consider:
-
Lattice-Topped Cherry Pie: Instead of a full top crust, weave strips of pastry together for a charming lattice to show off that beautiful filling underneath.
-
Almond Cherry Pie: Add a teaspoon of almond extract to the cherry filling for a delicious nutty twist.
-
Bourbon Cherry Pie: For the adults in the house, a splash of bourbon in the filling elevates the flavor, giving it a rich, deep profile.
-
Coconut Vanilla Custard: Swap out part of the vanilla quark for coconut creme. This tropical twist is perfect for summer!
-
Gluten-Free Version: Use a gluten-free shortcrust pastry. Substitute cornstarch with arrowroot for the filling if needed.
Chef’s Notes
One of my favorite things about this cherry pie recipe is how it has evolved over the years. What started as a simple summer tradition has grown into a family favorite that’s made its way onto our holiday table as well. Sometimes, I catch my kids sneaking bites of the filling before it hits the crust, and it reminds me of those carefree days with my grandma.
Another funny kitchen story comes from the first time I tried to make this recipe without the egg wash. Let’s just say it turned out looking like a pie that was afraid of getting baked! The crust didn’t have that glorious sheen, and while it still tasted amazing, it lacked that beautiful finish. Never again, dear friends!
FAQs and Troubleshooting
Q: Why is my pie filling runny?
A: This can happen if you didn’t let the mixture sit long enough for the cornstarch to activate, or if you used too much liquid from the cherries. Aim to soak up excess moisture, and don’t skimp on the cornstarch!
Q: Can I use sweet cherries instead?
A: While sour cherries are the star of this recipe, sweet cherries can work too! You may want to reduce the sugar a bit since they are already quite sweet.
Q: How do I know when my pie is done?
A: Look for a golden-brown crust and bubbling filling! If you notice the edges browning too quickly, cover them with strips of aluminum foil.
Q: Can I make this ahead of time?
A: Absolutely! You can bake the pie a day in advance. Just allow it to cool completely before storing it in the fridge. Condiments like the vanilla custard can also be made ahead and stored separately!
Nutritional Info
Let’s talk nutrition! While this cherry pie is undoubtedly a dessert treat, it does offer some merits. Sour cherries are packed with antioxidants and have anti-inflammatory properties, which may help in supporting your immune health.
On average, each slice of this pie contains roughly 350 calories, depending on the specific ingredients used and portion sizes. To lighten it up, consider reducing sugar and opting for a lighter custard or ice cream option.
Here’s the general nutrient breakdown for one slice of this pie:
- Calories: 350
- Carbohydrates: 54g
- Protein: 3g
- Fat: 15g
- Fiber: 2g
Keep in mind: desserts are meant to be enjoyed, so indulge wisely!
Final Thoughts
And there you have it—a delightful Cherry Pie with Vanilla Custard that’s bursting with flavor and packed with memories! I hope this recipe inspires you to create your own traditions and share your love for cooking with those around you. Remember, the kitchen is the heart of the home, where stories are shared, and memories are made.
So, whether you’re hosting a family gathering or just baking for yourself, don’t forget to savor every moment. Happy cooking, and may your kitchen always be filled with the warmth of good food and laughter! If you try this recipe, I’d love to hear how it turned out for you. Feel free to drop your comments and share your kitchen stories with me. Now, let’s make some cherry pie magic! 🍒✨
Print
Cherry Pie with Vanilla Custard
- Total Time: 40 minutes
- Yield: 8 servings 1x
- Diet: Vegetarian
Description
A vibrant Cherry Pie with silky Vanilla Custard, perfect for evoking sweet summer memories.
Ingredients
- 2 cups sour cherries (pitted)
- 1 cup sugar
- 2 tablespoons cornstarch
- 1 tablespoon lemon juice
- 1 teaspoon vanilla extract
- 1 pre-made shortcrust pastry
- 1 cup vanilla quark (or vanilla pudding)
- 1 egg (for egg wash)
- Powdered sugar (for dusting, optional)
Instructions
- Prepare the cherries by washing, pitting, and draining them. Ensure they’re dry.
- Make the cherry filling by combining cherries, sugar, cornstarch, lemon juice, and vanilla extract in a bowl.
- Preheat your oven to 425°F (220°C).
- Roll out the pastry if homemade and fit it into your pie pan.
- Add the cherry mixture into the prepared pastry shell.
- Prepare the top layer by rolling out another piece of pastry and placing it over the filling.
- Seal the pie and brush the top crust with the beaten egg.
- Bake in the preheated oven for about 20-25 minutes.
- Cool the pie on the counter for at least 20 minutes before serving.
- Slice and serve with a generous dollop of vanilla custard.
Notes
Feel free to use fresh or frozen cherries; if fresh aren’t available, make sure to drain frozen cherries well.
- Prep Time: 15 minutes
- Cook Time: 25 minutes
- Category: Dessert
- Method: Baking
- Cuisine: American
Nutrition
- Serving Size: 1 slice
- Calories: 350
- Sugar: 22g
- Sodium: 150mg
- Fat: 15g
- Saturated Fat: 6g
- Unsaturated Fat: 6g
- Trans Fat: 0g
- Carbohydrates: 54g
- Fiber: 2g
- Protein: 3g
- Cholesterol: 40mg
Keywords: cherry pie, vanilla custard, dessert, summer recipe, nostalgic cooking