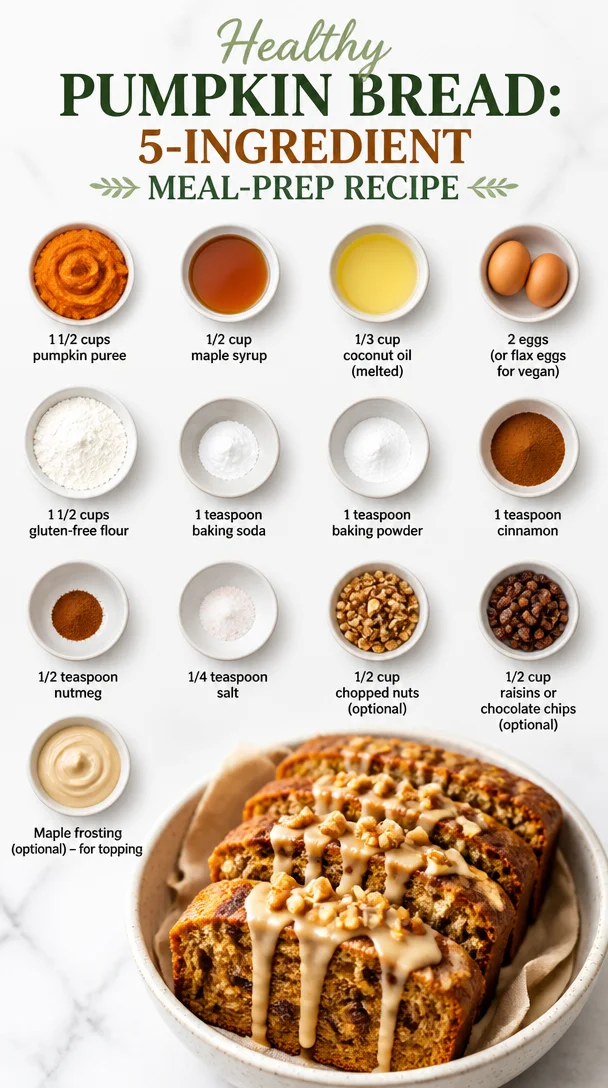
Healthy Pumpkin Bread: 5-Ingredient Meal-Prep Recipe
Healthy Pumpkin Bread: A Cozy Fall Favorite
Hey there, my fellow food enthusiasts! Welcome to Feastical, where the flavors are warm, inviting, and downright delicious. Today, I’m beyond excited to share a standout recipe that perfectly captures the spirit of fall: Healthy Pumpkin Bread. This delightfully moist and aromatic bread is not just a treat for your taste buds, but also packs a nutritious punch. Whether you’re cozying up with a cup of tea or sharing slices with friends at a gathering, this pumpkin bread is bound to elevate your day. So, grab your aprons, let’s roll up those sleeves, and dive into the kitchen!
The Magic of Pumpkin Bread
Pumpkin bread is more than just a recipe; it’s a celebration of comfort and nostalgia. It takes me back to my childhood in the kitchen with my grandmother, where the smell of cinnamon, nutmeg, and sugar danced through the air as we mixed up a batch. I remember the way she carefully measured out the pumpkin puree and talked about the importance of quality ingredients. It was a process filled with love, laughter, and the occasional flour fight.
One particular memory stands out: the first time I made pumpkin bread solo. I was about ten years old, and I decided to surprise my family with a homemade treat. I clumsily poured pumpkin puree all over the counter, whisked eggs like a mad scientist, and somehow managed to create an epic mess. But when that loaf came out of the oven, golden and fragrant, my family’s smiles were worth every spilled drop.
Now, as a cook and recipe creator, I love sharing this warm hug of a recipe with you. With just a few simple ingredients, you can whip up a loaf that not only satisfies cravings but also nurtures your body. So, let’s get started!
Ingredients
Here’s what you’ll need to make this delightful Healthy Pumpkin Bread:
-
1 1/2 cups pumpkin puree
Pumpkin is the star here! It lends moisture and a rich, earthy flavor. You can use canned pumpkin puree or make your own by roasting fresh pumpkins. Just remember to cool and blend it before using! -
1/2 cup maple syrup
Sweetener with a hint of flavor! I love using maple syrup for its unique taste, but feel free to substitute with honey or agave nectar if that’s what you have on hand. Adjust the sweetness based on your preference! -
1/3 cup coconut oil (melted)
This adds healthy fats and moisture. If you’re not a fan of coconut, you can easily replace it with olive oil or melted butter. Just make sure it’s cool before mixing! -
2 eggs (or flax eggs for vegan)
Eggs help bind everything together and keep your bread moist. If you’re going vegan, mix 2 tablespoons ground flaxseed with 6 tablespoons water and let it sit until it thickens! -
1 1/2 cups gluten-free flour
This bread is perfect for gluten-free eaters! You can use any gluten-free all-purpose flour blend. For a non-gluten-free version, just swap it with regular all-purpose flour. -
1 teaspoon baking soda
To help your bread rise and create that delightful texture. -
1 teaspoon baking powder
A must-have for extra fluffiness! -
1 teaspoon cinnamon
The essential fall spice! Feel free to experiment with pumpkin pie spice for an all-in-one flavor boost or add more cinnamon for a deeper profile. -
1/2 teaspoon nutmeg
A warm, aromatic spice that enhances the pumpkin flavor beautifully. -
1/4 teaspoon salt
A pinch of salt balances the sweetness and brings all the flavors together. -
1/2 cup chopped nuts (optional)
Walnuts or pecans add a delightful crunch! You can also leave them out if you prefer a smoother texture. -
1/2 cup raisins or chocolate chips (optional)
A fun add-in for sweetness and texture! Go with chocolate chips for a treat or raisins for a chewy bite. -
Maple frosting (optional)
Feel free to top it off with a simple maple frosting for a special touch. Mix powdered sugar with a bit of maple syrup and a splash of milk for a drizzle that takes it over the top!
Step-by-Step Instructions
Let’s transform those ingredients into something magical!
-
Preheat the Oven: First things first, preheat your oven to 350°F (175°C). This ensures it’s just the right temperature for baking your pumpkin bread to perfection.
-
Prep the Loaf Pan: Grease a loaf pan with coconut oil or line it with parchment paper. This will make it super easy to remove the bread later!
-
Mix the Wet Ingredients: In a large mixing bowl, whisk together the pumpkin puree, maple syrup, and melted coconut oil until combined. The mixture should look smooth and inviting! If you’re using eggs, add them one at a time, mixing well after each addition. If you’re using flax eggs, stir them in at this stage, too!
-
Incorporate the Dry Ingredients: In another bowl, combine the gluten-free flour, baking soda, baking powder, cinnamon, nutmeg, and salt. Mix these dry ingredients well. Then, gradually add the dry mix to the wet mixture, stirring gently until just combined. Remember, overmixing can lead to dense bread, so stir until there are no dry patches.
-
Add the Extras: If you’re using nuts, raisins, or chocolate chips, fold them into the batter now. This is where you can get creative—feel free to add extra goodies or spices.
-
Pour into the Pan: Pour the batter into your prepared loaf pan, smoothing out the top with a spatula. Don’t fret if it’s not perfect; that’s the beauty of homemade!
-
Bake: Place the loaf pan in the preheated oven and bake for about 50-60 minutes. Start checking at the 50-minute mark. Insert a toothpick into the center, and if it comes out clean or with just a few crumbs, it’s time to take it out!
-
Cool Time: Let your pumpkin bread cool in the pan for about 10 minutes before transferring it to a wire rack. This cooling step is essential; it helps the loaf set and keeps that lovely texture.
-
Serve: Once cooled, slice that beautiful loaf and serve! Whether you enjoy it plain, with a bit of butter, or drizzled with maple frosting, every bite will feel like a warm hug!
Serving Suggestions
Let’s talk about how to serve this enticing pumpkin bread! If you’re feeling extra fancy, plate your slices with a dollop of whipped cream or a smear of cream cheese. You can even get creative by adding a sprinkle of cinnamon or a drizzle of maple syrup on top. For gatherings, place the slices on a cute platter with a small bowl of chopped nuts and chocolate chips on the side, inviting everyone to top it their way!
For a cozy breakfast or brunch, serve it alongside a steaming cup of coffee or spiced chai. Trust me, the combination will feel like a moment of bliss on a chilly morning.
Recipe Variations
Let’s get those creative juices flowing! Here are a few delicious twists you can try with this pumpkin bread recipe:
-
Spiced Almond Pumpkin Bread: Swap out the regular spices for a mix of cardamom, ginger, and allspice for a different flavor profile that packs a punch!
-
Pumpkin Bread with Cream Cheese Swirl: Use cream cheese mixed with a little powdered sugar and vanilla. Swirl it into the batter right before baking for creamy, gooey goodness.
-
Gluten-Free Chocolate Chip Pumpkin Bread: Add dark chocolate chips instead of raisins or nuts for a decadent dessert version.
-
Pumpkin Banana Bread: Incorporate 1 mashed banana to add sweetness and flavor! This makes the bread extra moist and gives it a unique twist.
-
Maple Pecan Pumpkin Bread: Toss in chopped pecans and use maple syrup in the batter, and top it with a crunchy pecan streusel for added texture!
Chef’s Notes
Over the years, my pumpkin bread recipe has evolved. I started off with a heavily sweetened version but realized how wonderful it can be with less sugar. Every bite should celebrate the natural flavors of pumpkin and spices! I often find myself experimenting, tossing in what’s in my pantry, and each time someone tries my latest version, their smile is the best feedback I can get.
Oh, and let me tell you about the time I switched out the oil for applesauce in a desperate attempt to be healthier. It turned out fabulous, but my family was convinced I had a secret ingredient! Sometimes accidents in the kitchen lead to the best discoveries.
FAQs and Troubleshooting
-
Why is my pumpkin bread dense?
Overmixing can cause your bread to become dense. Be gentle when combining the wet and dry ingredients, and stop once everything is just combined. -
My bread is too dry. What happened?
This can happen if you overbaked it or if your measurements were slightly off. Make sure to check for doneness with a toothpick around the 50-minute mark! -
Can I use fresh pumpkin?
Absolutely! Just make sure to cook and puree it before using it in the recipe. Fresh pumpkin can add a wonderful texture and flavor. -
How should I store leftover pumpkin bread?
Keep it in an airtight container at room temperature for a couple of days or in the fridge for up to a week. You can also freeze slices for up to three months—just wrap them tightly!
Nutritional Info
While indulging in a cozy slice of pumpkin bread is lovely, let’s not forget the amazing nutritional benefits of our star ingredient, pumpkin! Pumpkin is loaded with vitamins A and C, fiber, and antioxidants. Plus, using maple syrup instead of refined sugar not only offers a unique flavor but also means you’re getting some essential minerals! With optional add-ins like nuts and raisins or chocolate chips, you can boost your bread with healthy fats and additional nutrients. A slice of pumpkin bread is a perfect balance of comfort and health—what could be more delightful?
Final Thoughts
And there you have it, my friends—a vibrant, Healthy Pumpkin Bread recipe that brings the essence of fall right to your kitchen. Whether you whip it up for a lazy Sunday brunch or cozy gatherings with friends, it’s bound to warm hearts and fill bellies. Remember, the best part about cooking is the memories you create—so don’t shy away from sharing a slice or two!
Make this recipe your own, and let the love you pour into it shine through every bite. Happy cooking, and as always, may your kitchen be filled with joy, laughter, and sweet aromas! Now, who’s ready to make some pumpkin bread? 🍞✨
Print
Healthy Pumpkin Bread
- Total Time: 75 minutes
- Yield: 8 servings 1x
- Diet: Vegetarian
Description
A moist and aromatic pumpkin bread that captures the spirit of fall, perfect for cozy moments and gatherings.
Ingredients
- 1 1/2 cups pumpkin puree
- 1/2 cup maple syrup
- 1/3 cup coconut oil (melted)
- 2 eggs (or flax eggs for vegan)
- 1 1/2 cups gluten-free flour
- 1 teaspoon baking soda
- 1 teaspoon baking powder
- 1 teaspoon cinnamon
- 1/2 teaspoon nutmeg
- 1/4 teaspoon salt
- 1/2 cup chopped nuts (optional)
- 1/2 cup raisins or chocolate chips (optional)
- Maple frosting (optional)
Instructions
- Preheat the oven: First things first, preheat your oven to 350°F (175°C).
- Prep the loaf pan: Grease a loaf pan with coconut oil or line it with parchment paper.
- Mix the wet ingredients: In a large mixing bowl, whisk together the pumpkin puree, maple syrup, and melted coconut oil until combined.
- Incorporate the dry ingredients: In another bowl, combine the gluten-free flour, baking soda, baking powder, cinnamon, nutmeg, and salt.
- Add the extras: Fold in nuts, raisins, or chocolate chips into the batter.
- Pour into the pan: Pour the batter into your prepared loaf pan.
- Bake: Place the loaf pan in the preheated oven and bake for about 50-60 minutes.
- Cool time: Let your pumpkin bread cool in the pan for about 10 minutes before transferring it to a wire rack.
- Serve: Once cooled, slice and serve with butter, or drizzled with maple frosting.
Notes
Feel free to experiment with add-ins like nuts and raisins or chocolate chips. This recipe is flexible for personal preferences.
- Prep Time: 15 minutes
- Cook Time: 60 minutes
- Category: Baked Goods
- Method: Baking
- Cuisine: American
Nutrition
- Serving Size: 1 slice
- Calories: 210
- Sugar: 10g
- Sodium: 200mg
- Fat: 9g
- Saturated Fat: 4g
- Unsaturated Fat: 5g
- Trans Fat: 0g
- Carbohydrates: 30g
- Fiber: 2g
- Protein: 3g
- Cholesterol: 50mg
Keywords: pumpkin bread, fall recipes, healthy baking, cozy desserts
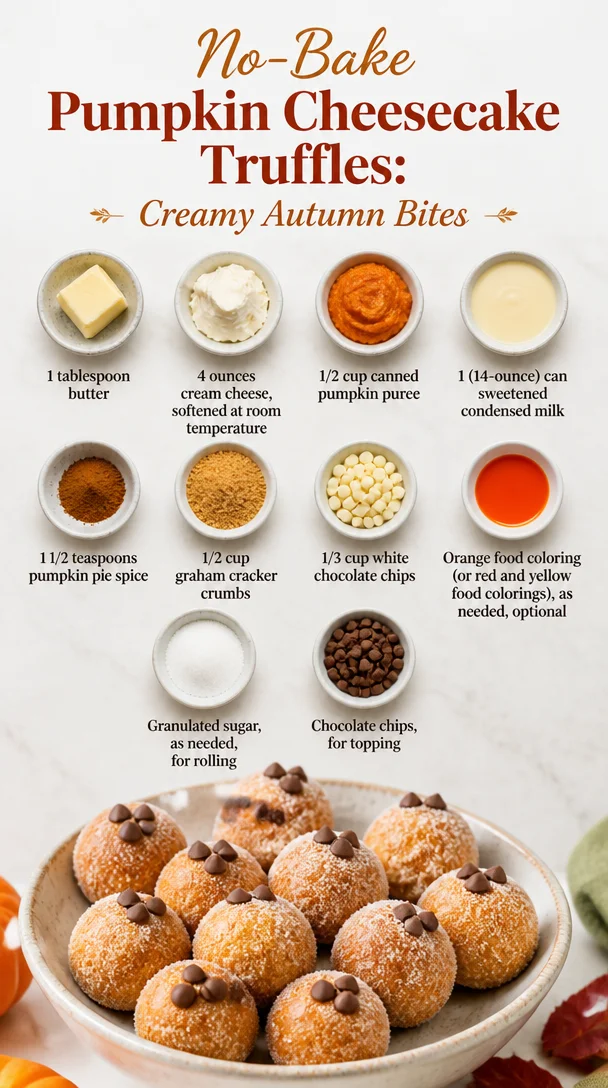
No-Bake Pumpkin Cheesecake Truffles: Creamy Autumn Bites
Indulge in the Sweetness: Pumpkin Cheesecake Truffles
Hey there, food lovers! Today, we’re diving into a treat that’s not only flavorful but also whispers cozy vibes with every bite. We’re talking about Pumpkin Cheesecake Truffles! These little bites of heaven combine the creaminess of cheesecake with the warm spices and flavors of fall, making for a delightful dessert that’s perfect year-round but especially enchanting during the cooler months.
But let’s be real—it’s not just about the incredible taste; it’s about the joy of creating memorable moments in the kitchen. So grab your apron, and let’s embark on this delicious journey together!
A Slice of Nostalgia
Let me take you back to a crisp autumn afternoon in my childhood kitchen. The leaves were turning, and the air smelled like cinnamon and nutmeg—a total sensory delight! My grandmother was up to her usual antics, and I remember her bustling around the kitchen with a mischievous twinkle in her eye. That day, we decided to whip up something special, and what better than an experiment with pumpkin?
We had a can of pumpkin puree sitting innocently in the pantry, so we decided to make a cheesecake. But halfway through mixing the ingredients, Grandma got this imaginative spark—why not turn it into bite-sized truffles? As we rolled those creamy bites in graham cracker crumbs, I felt like a little chef, filled with joy and laughter. The end result was a delicious mess of flavors that united our family around the dessert table.
Fast forward a few years, and that very memory sparked the inspiration for my Pumpkin Cheesecake Truffles recipe! Each time I whip up this treat, it’s as if I’m back in that warm kitchen, surrounded by love and laughter. Now, let’s create that magic together!
Ingredients
Here’s what you’ll need to conjure these delectable truffles:
-
1 tablespoon butter
A little butter brings richness to the truffles. If you need to swap, coconut oil works well for a dairy-free option! -
4 ounces cream cheese, softened at room temperature
Cream cheese lends that signature cheesecake creaminess. For a lighter option, consider using Greek yogurt (though it slightly alters that rich texture). -
1/2 cup canned pumpkin puree
Pure pumpkin puree is essential for this recipe, bringing in that cozy flavor. Avoid pumpkin pie filling—it’s too sweet and spiced! -
1 (14-ounce) can sweetened condensed milk
Sweetened condensed milk adds sweetness and a creamy texture. If you want a lighter version, use evaporated milk with a touch of sugar. -
1 1/2 teaspoons pumpkin pie spice
This spice blend is key! If you’re feeling adventurous, try making your own mix using cinnamon, nutmeg, ginger, and allspice. -
1/2 cup graham cracker crumbs
These give our truffles that cheesecake crust taste. For a gluten-free version, use gluten-free graham crackers or crushed nuts. -
1/3 cup white chocolate chips
Sweet and creamy, these will be melted into the mixture. No white chocolate? You can swap in semi-sweet chocolate! -
Orange food coloring (or red and yellow food colorings), as needed, optional
If you want your truffles to pop with color, feel free to add a few drops! -
Granulated sugar, as needed, for rolling
This adds a lovely touch of sweetness to the truffles when you roll them. You can skip this if you like them as-is! -
Chocolate chips, for topping
These finish off your truffles beautifully. Dark chocolate works great if you want that rich contrast!
Step-by-Step Instructions
Ready to roll those truffles? Let’s get cooking, my friend!
-
Prepare Your Mixing Bowl
Start by grabbing a medium-sized mixing bowl. This is where the magic happens! You’ll want to ensure your cream cheese is softened, as it mixes better this way. Let it sit at room temperature for about 30 minutes if you forgot to pull it out. -
Cream the Cream Cheese and Butter
Add the softened cream cheese and 1 tablespoon of butter to your mixing bowl. Use a hand mixer or a spatula to blend them together until the mixture is silky smooth. This is key for a luscious truffle! If you’re using a spatula, just put your back into it—it’ll pay off! -
Incorporate the Pumpkin
Next, stir in the 1/2 cup of canned pumpkin puree. Mix until well combined. The orange color will brighten your mixture! Take a moment to inhale that warm, comforting aroma. It’s pure bliss, isn’t it? -
Sweeten the Deal
Pour in the entire can of sweetened condensed milk. Trust me, this gives your truffles their dreamy texture. Mix until fully combined. You might need to scrape the sides of your bowl for anything that sticks. -
Spice It Up!
Add in your 1 1/2 teaspoons of pumpkin pie spice. If you’re feeling adventurous, throw in an extra pinch for good measure! Blend it well. You want to ensure that every bite brings that warm, cozy flavor. -
Fold in the Graham Cracker Crumbs
Now it’s time to fold in the graham cracker crumbs and the white chocolate chips. This is where your truffle mixture begins to take shape! Use a spatula to gently combine until everything is evenly distributed. Here’s a little chef tip: If the mixture is too soft, pop it into the fridge for about 15-20 minutes to firm up a bit before rolling. -
Roll Those Truffles
Once your mixture is at the right consistency, it’s time to roll! Take a tablespoon of the mixture and roll it into a ball. Aim for about 1 inch in diameter—just the right size for popping in your mouth! Repeat until the mixture is gone, placing each ball on a parchment-lined baking sheet. -
Chill Out
Now that your truffles are rolled, pop them into the fridge for at least an hour to set. This helps them maintain their shape and enhances the flavors. -
Finish and Decorate
Once your truffles are firm, it’s decoration time! If you’re using granulated sugar, roll them in a bowl of sugar until coated. Melt some chocolate chips in the microwave or on a double boiler, then drizzle or dip the truffles in the chocolate. Who can resist that brilliant finish? -
Serve and Enjoy!
Finally, plate your beautiful truffles and watch the magic happen as friends and family devour these little bites of heaven. Just remember to keep a few for yourself!
Serving Suggestions
When it comes to serving these Pumpkin Cheesecake Truffles, let your creativity shine! Arrange them on a beautiful platter with a dusting of powdered sugar or even a few sprigs of mint for an elegant touch. You could also nestle them in cupcake liners for a charming presentation.
For a fun twist, serve them alongside a warm cup of spiced chai or hot cider. The cozy flavors will complement each other perfectly, making for a delightful dessert experience.
Recipe Variations
Feeling inspired and want to try something different? Check out these creative twists:
-
Nutty Pumpkin Spice Truffles: Add finely chopped pecans or walnuts into the mixture for a delightful crunch!
-
Pumpkin Spice Latte Truffles: Infuse the truffle mixture with a shot of espresso. This twist adds depth and an extra layer of flavor that coffee lovers will adore.
-
Dairy-Free Option: Substitute the cream cheese for a dairy-free cream cheese alternative and use coconut milk sweetened condensed milk.
-
Different Chocolate Coating: Instead of white chocolate, dip your truffles in milk chocolate or even dark chocolate for a richer flavor experience.
-
Pumpkin Walnut Truffles: Mix in crushed graham crackers with pumpkin seeds, or even a hint of caramel, for a nutty delight!
Chef’s Notes
Oh, the times I’ve tried different variations of these truffles! I once went overboard with flavoring—let’s just say that a little too much nutmeg turned out to be an interesting learning experience! Over the years, I’ve perfected the balance of spices and sweetness, but I genuinely always encourage you to experiment. Every kitchen adventure creates a unique story, and you never know when you might stumble upon your next family favorite.
FAQs and Troubleshooting
1. My truffles are too sticky; what can I do?
If your mixture is too soft and sticky, popping them in the fridge for a bit helps firm it up. You can also lightly dust your hands with powdered sugar or cocoa powder when rolling.
2. Can I freeze these truffles?
Absolutely! They freeze beautifully. Just ensure they’re in an airtight container. Let them thaw in the fridge overnight before serving.
3. How long do these truffles last?
If stored in an airtight container in the fridge, they will last up to a week. But trust me; they’ll disappear way before that!
4. The chocolate coating won’t stick; what went wrong?
Oh no! Ensure your truffles are chilled before dipping; warm truffles can cause the chocolate to slide right off.
Nutritional Info
While these truffles are a decadent treat, they do bring some nutrition to the table! Packed with healthy doses of protein from the cream cheese and fiber from the pumpkin puree, each bite is a little powerhouse. Here’s a quick look at the nutritional breakdown per truffle (based on about 16 servings):
- Calories: Approximately 120
- Protein: 2g
- Carbohydrates: 12g
- Fat: 7g
- Fiber: 1g
- Sugars: 8g
Please remember that indulging is all about balance. These truffles are meant to be enjoyed as a sweet treat!
Final Thoughts
So there you have it—the delightful world of Pumpkin Cheesecake Truffles. I hope this recipe brings you as much joy as it has brought into my life. Every time I make these truffles, I’m reminded of the laughter, warmth, and love in the kitchen.
As always, don’t hesitate to get creative and make this recipe your own. Happy cooking and even happier munching—can’t wait to see you roll those truffles! Share your creations with your loved ones, and let’s keep spreading those good vibes, one delicious bite at a time. Cheers to sweet moments in the kitchen! 🍂💛
Print
Pumpkin Cheesecake Truffles
- Total Time: 90 minutes
- Yield: 16 servings 1x
- Diet: Vegetarian
Description
Delight in the creamy, spiced flavors of Pumpkin Cheesecake Truffles, perfect for cozy gatherings or year-round indulgence.
Ingredients
- 1 tablespoon butter
- 4 ounces cream cheese, softened at room temperature
- 1/2 cup canned pumpkin puree
- 1 (14-ounce) can sweetened condensed milk
- 1 1/2 teaspoons pumpkin pie spice
- 1/2 cup graham cracker crumbs
- 1/3 cup white chocolate chips
- Orange food coloring, as needed (optional)
- Granulated sugar, as needed for rolling
- Chocolate chips, for topping
Instructions
- Prepare your mixing bowl by ensuring your cream cheese is softened.
- Cream the cream cheese and butter together until silky smooth.
- Incorporate the pumpkin puree and mix until well combined.
- Pour in the sweetened condensed milk and mix until fully combined.
- Add the pumpkin pie spice and blend well.
- Fold in the graham cracker crumbs and white chocolate chips.
- Roll the mixture into 1-inch balls and place on a parchment-lined baking sheet.
- Chill the truffles in the fridge for at least an hour to set.
- Finish by rolling chilled truffles in granulated sugar and drizzling with melted chocolate chips.
- Serve and enjoy your delicious truffles!
Notes
For added flavor, consider variations like nutty pumpkin spice truffles or pumpkin spice latte truffles.
- Prep Time: 30 minutes
- Cook Time: 0 minutes
- Category: Dessert
- Method: Chilling
- Cuisine: American
Nutrition
- Serving Size: 1 truffle
- Calories: 120
- Sugar: 8g
- Sodium: 40mg
- Fat: 7g
- Saturated Fat: 4g
- Unsaturated Fat: 3g
- Trans Fat: 0g
- Carbohydrates: 12g
- Fiber: 1g
- Protein: 2g
- Cholesterol: 20mg
Keywords: pumpkin, cheesecake, truffles, fall dessert, easy dessert, no-bake dessert
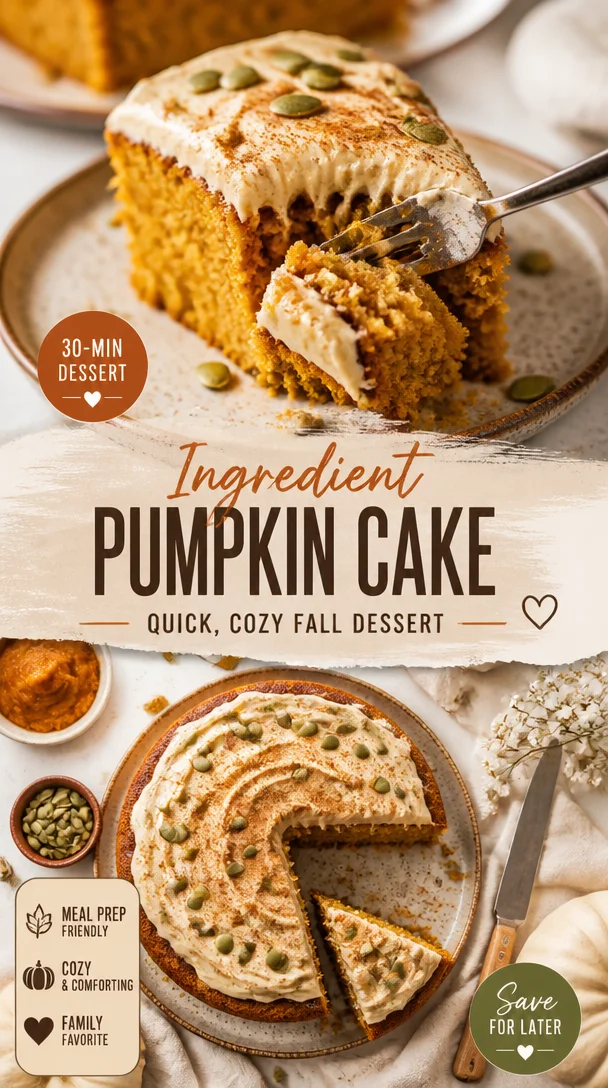
Ingredient Pumpkin Cake: Quick, Cozy Fall Dessert
The Ultimate Three-Ingredient Pumpkin Cake: Easy, Delicious, and Perfect for Fall!
Hey there, foodies! It’s Beau Collier, and I’m absolutely thrilled to be hanging out with you today. If you’re anything like me, fall is that magical time of year when everything seems to be drenched in warm spices, bursts of orange, and the comforting scents of baked goodies wafting through the air. There’s just something about pumpkin that makes me feel all warm and fuzzy inside.
That’s why I’m super excited to share my all-time favorite dessert with you: the Three-Ingredient Pumpkin Cake! Yes, you heard that right—just three simple ingredients come together to create a deliciously moist and wonderfully spiced cake that’ll have everyone begging for seconds. Trust me; this is the kind of recipe you’ll want to keep close to your heart (and your kitchen!) for many seasons to come.
Imagine this: It’s a crisp autumn afternoon, the leaves are turning, and you’re in your kitchen, dressed in your cozy sweater. You decide to whip up a cake that captures the essence of the season, and in under an hour, you’ve got a warm, pumpkiny delight ready to be devoured. No fussy steps, no long ingredient lists—just pure, unadulterated goodness. Got your spoons ready? Let’s dive in!
A Stroll Down Memory Lane
Every great dish has a story, and this pumpkin cake is no exception. I remember the first time I stumbled upon this recipe—back in college when I was trying to impress my friends with my culinary prowess (or lack thereof!). Armed with a bright orange can of pumpkin puree and a box of yellow cake mix, I thought, "How hard can it be?"
After all, I was notorious for burning toast and boiling spaghetti into a gooey mess. But I was determined! So, I mixed those ingredients with a generous splash of water and threw it in the oven. As the cake baked, the aroma of spices wafted through our tiny kitchen, tempting everyone to come closer.
When the timer buzzed and I took that first slice, I was astonished! The cake was fluffy, fragrant, and best of all—delicious! It was a huge hit at our little gathering, and that day changed my baking game forever. Who knew something so easy could spark joy and connection among friends? Ever since, I’ve been sharing this recipe with anyone who’ll listen, and it’s become a staple in my kitchen during the fall months.
Ingredients You’ll Need
Let’s get right into the ingredients. Here’s what you’ll need to whip up this scrumptious cake:
-
1 can of pumpkin puree
Not to be confused with pumpkin pie filling, pumpkin puree is the real deal! It’s packed with flavor and moisture, making your cake melt-in-your-mouth delicious. For a twist, try using roasted butternut squash puree or even sweet potato puree. -
1 box of cake mix (yellow or spice)
This is the beauty of the recipe—any brand will do! A yellow cake mix provides a lovely base while a spice cake mix adds an extra layer of warmth. Want something gluten-free? Substitute it with a gluten-free cake mix, and you’re all set! -
1 cup of water
Simple, right? This helps combine the ingredients and keeps your cake moist. If you want a richer flavor, you could swap this for milk or a non-dairy alternative like almond milk.
Step-by-Step Instructions
Now that you’ve gathered your ingredients, let’s get to the good stuff—the actual baking! Follow these easy steps, and let’s make magic happen in the kitchen:
-
Preheat the Oven
Start by preheating your oven to 350°F (175°C). This ensures that your cake will bake evenly and come out perfectly. Don’t forget this step—it’s as crucial as putting on your favorite apron! -
Mix It Up
In a large mixing bowl, combine the can of pumpkin puree and the box of cake mix. At this point, you might think it looks a little thick, and you’d be right! Don’t worry; that’s where the water comes in. -
Add Water
Gradually pour in the cup of water while mixing. I recommend using a spatula or a hand mixer. You’re aiming for a smooth, batter-like consistency, so don’t shy away from really mixing it well. Don’t be tempted to skip this step; that’s where the magic happens! -
Grease the Pan
Grab your favorite baking pan—9×13 inch works beautifully—and grease it generously with cooking spray or butter. You want to ensure that your cake lifts out effortlessly for that perfect presentation. -
Pour and Spread
Pour the batter into your greased pan. Use a spatula to spread it evenly. Pro tip: Try to make sure it’s all level; this will help it bake uniformly. -
Pop It in the Oven
Place the pan in the preheated oven and bake for about 30-35 minutes or until a toothpick comes out clean from the center. While it’s baking, the smell will make you impatient; don’t say I didn’t warn you! -
Cool Down
Once done, remove the cake from the oven and let it cool in the pan for about 10 minutes. Then transfer it to a wire rack to cool completely. Patience is key here—trust me, it’ll be worth it! -
Serve and Enjoy!
Once cooled, slice into squares and serve as is, or dress it up with a dusting of powdered sugar or a dollop of whipped cream. You could also grab a slice with a scoop of vanilla ice cream because, let’s be honest, everything’s better with ice cream!
Serving Suggestions
This Three-Ingredient Pumpkin Cake is super versatile when it comes to serving. You’ve got options! Here are some of my favorites:
-
Simple Slices
Serve the cake plain, straight out of the pan, for an easy grab-and-go snack. -
Add Whipped Cream
For a gourmet touch, top each slice with a dollop of freshly whipped cream. A sprinkle of cinnamon or nutmeg elevates it to a whole new level! -
A La Mode
Want to turn it into a fancy dessert? Serve a warm slice with a scoop of vanilla ice cream on top or on the side. The contrast of warm cake and cold ice cream is heavenly! -
Garnish with Nuts
For some added crunch and texture, sprinkle chopped pecans or walnuts on top before serving. They complement the pumpkin flavors nicely! -
Festive Flair
For fall gatherings, arrange the cake slices on a wooden board and decorate with mini pumpkins or autumn leaves for that festive touch. It’s all about creating warm, inviting vibes!
Recipe Variations
Feeling adventurous? Here are a few variations you can try to put your own spin on this classic recipe:
-
Chocolate Chip Pumpkin Cake
Add a cup of semi-sweet chocolate chips into the batter before transferring it to the pan. The combination of chocolate and pumpkin is a crowd-pleaser! -
Nutty Pumpkin Cake
Mix in ½ cup of chopped walnuts or pecans. They’re great for adding crunch and extra flavor. Plus, they make the cake feel more hearty! -
Gluten-Free Option
Substitute the cake mix with a gluten-free vanilla or spice cake mix. It’s just as tasty and perfect for any gluten-sensitive friends or family! -
Pumpkin Spice Cake
If you’re using yellow cake mix, add in a tablespoon of pumpkin pie spice to really amp up that fall flavor. -
Vegan Twist
Use a vegan cake mix and substitute the water with almond milk. You’ll still have that moist, flavorful cake without the eggs or dairy!
Chef’s Notes
Over the years, I’ve made this cake countless times, and every time I tweak it a little. It’s kind of like my go-to comfort food. I even remember one time I accidentally grabbed a spice cake mix that had been sitting in the back of the cupboard for ages. Guess what? It turned out to be one of the best versions I ever made!
The fun part about this recipe is its adaptability. It can become whatever you want it to be with just a few minor tweaks. Sometimes, I’ll even make two batches at once—one spiced and one with chocolate chips. Honestly, it’s hard to go wrong with this cake!
FAQs and Troubleshooting
1. What if my cake comes out too dense?
If your cake turns out dense, it might be because you didn’t mix it enough or overmixed it. Aim for a nice, smooth batter without any lumps, but don’t overdo it!
2. Can I use fresh pumpkin instead of canned?
Absolutely! Just make sure to roast and puree the pumpkin until smooth. You’ll want about a cup of pure pumpkin as a substitute.
3. How should I store leftovers?
This cake keeps beautifully at room temperature for a couple of days, or in the fridge for up to a week. Cover it in plastic wrap or store it in an airtight container to keep it fresh!
4. Can I freeze this cake?
You bet! To freeze, let it cool completely, then wrap slices in plastic before placing them in a freezer-safe container. It can last up to 3 months frozen!
Nutritional Info
While I always believe in enjoying treats, it’s good to be a little aware of what we’re putting in our bodies. Here’s a rough estimation for one slice (when serving 12):
- Calories: 160
- Total Fat: 3g
- Saturated Fat: 0.5g
- Sodium: 200mg
- Total Carbohydrates: 31g
- Dietary Fiber: 1g
- Sugars: 15g
- Protein: 2g
Keep in mind, these numbers can vary based on the cake mix brand and any additional ingredients you decide to add!
Final Thoughts
So there you have it, my fabulous food friends! The Three-Ingredient Pumpkin Cake is not just a dessert; it’s a morsel of happiness, bringing warmth and joy to every bite. It’s perfect for those spontaneous gatherings or cozy fall evenings, easy enough for a novice cook, and delightful enough to impress even the foodies among us.
I hope this recipe inspires you to embrace the magic of fall baking, to fill your kitchen with love and aromas that comfort the soul. So, what are you waiting for? Get in the kitchen, whip up that cake, and share it with your loved ones. Trust me, this will become a cherished recipe, just like it is in my heart.
Happy baking, and may your kitchens be filled with fragrant spices and laughter! 🍰✨
Print
Three-Ingredient Pumpkin Cake
- Total Time: 50 minutes
- Yield: 12 servings 1x
- Diet: Vegetarian
Description
A simple yet delightful pumpkin cake made with just three ingredients, capturing the essence of fall.
Ingredients
- 1 can of pumpkin puree
- 1 box of yellow or spice cake mix
- 1 cup of water
Instructions
- Preheat the oven to 350°F (175°C).
- Mix the pumpkin puree and cake mix in a large bowl.
- Add the water gradually while mixing until smooth.
- Grease a 9×13 inch baking pan with cooking spray or butter.
- Pour the batter into the prepared pan and level it out.
- Pop the pan in the oven and bake for 30-35 minutes.
- Cool the cake in the pan for about 10 minutes.
- Serve slices plain or topped with whipped cream or ice cream.
Notes
For variations, add chocolate chips, nuts, or use gluten-free cake mix for your dietary needs.
- Prep Time: 15 minutes
- Cook Time: 35 minutes
- Category: Dessert
- Method: Baking
- Cuisine: American
Nutrition
- Serving Size: 1 slice
- Calories: 160
- Sugar: 15g
- Sodium: 200mg
- Fat: 3g
- Saturated Fat: 0.5g
- Unsaturated Fat: 2g
- Trans Fat: 0g
- Carbohydrates: 31g
- Fiber: 1g
- Protein: 2g
- Cholesterol: 0mg
Keywords: pumpkin cake, fall dessert, easy recipe, three-ingredient cake, autumn baking
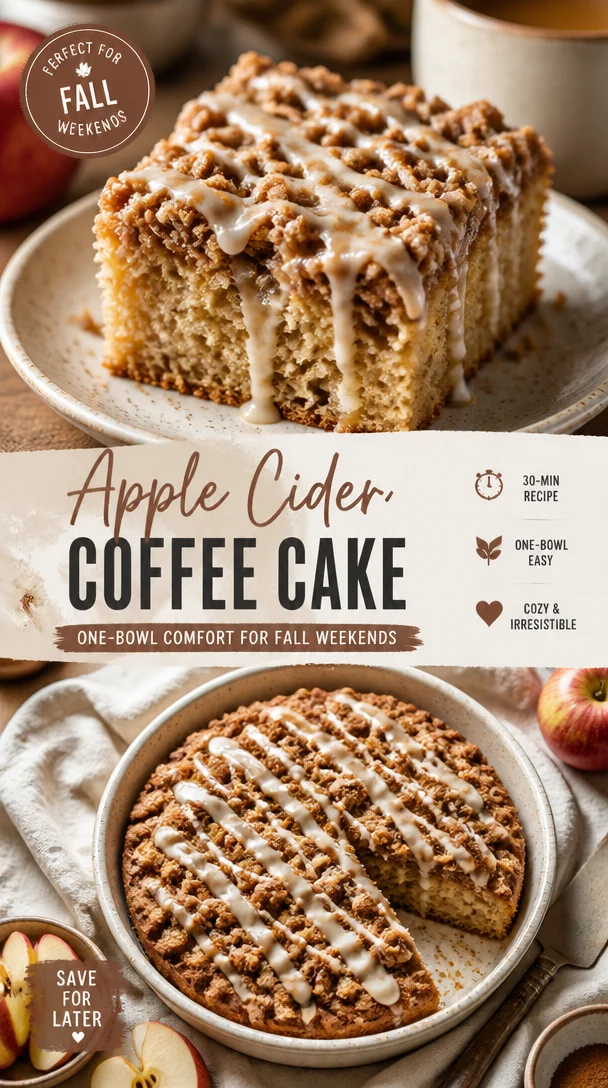
Apple Cider Coffee Cake: One-Bowl Comfort for Fall Weekends
A Slice of Nostalgia: Apple Cider Coffee Cake
Hey there, fellow food lovers! Today, I’m excited to whisk you away into the cozy world of autumn baking with a delightful and comforting recipe: Apple Cider Coffee Cake. There’s something incredibly inviting about the aroma of cinnamon and apples wafting through the kitchen. It’s like a warm hug after a brisk fall walk. So grab your favorite apron, and let’s put a delicious spin on a classic!
A Whiff of Memories
You know, as a kid, nothing quite topped the joy of returning home after a day of apple-picking. The air would be crisp, and the sunlight would dance through the golden leaves, making everything feel magical. One particular outing with my family led to a long afternoon in the kitchen, crafting the most divine apple cider coffee cake. I remember my mom standing by the counter, expertly mixing batter while my dad would lounge in the living room, eyeing the day’s haul of freshly picked apples.
It was more than just a recipe; it was a family tradition, a bonding experience where laughter and love intertwined with every stir and sprinkle. I’ll never forget the first slice we pulled from the oven—the crust was perfectly golden, and as we cut into it, the spiced apple filling revealed itself like a treasure inside. It became our go-to dish for chilly weekends, family gatherings, and those simple weekday mornings when a little warmth was all we needed.
Now that I’m sharing this homage to my childhood with you, I hope it evokes the same sense of comfort and joy. Let’s create some delicious memories together!
Ingredients
Here’s what you’ll need to create this scrumptious Apple Cider Coffee Cake.
-
1 cup fresh apple cider
The star of our cake! You can substitute with apple juice in a pinch, but the cider provides a richer flavor. -
2 cups all-purpose flour
This is your foundation! You can swap it with gluten-free flour if needed; just ensure it has a binding agent like xanthan gum. -
1 teaspoon baking powder
This helps the cake rise. Ensure it’s fresh, as old baking powder can lead to a dense cake. -
1/2 teaspoon baking soda
Paired with the acidic components (like cider), it gives extra lift. Again, freshness is key! -
1/2 teaspoon salt
Enhances all the flavors in this cake. Try using flaky sea salt for a gourmet touch. -
1/2 cup unsalted butter, softened
Adds moisture and richness. If you’re dairy-free, you can use coconut oil or a vegan butter substitute. -
3/4 cup granulated sugar
Sweetness is essential! For a deeper flavor, try substituting half for coconut sugar. -
2 large eggs
They bind everything together and provide structure. For a vegan option, you can use 1/2 cup of unsweetened applesauce. -
1/2 cup sour cream
This adds moisture and a hint of tang. Greek yogurt works well too if you’re watching the calories. -
1 teaspoon vanilla extract
A little splash of happiness! Make sure you’re using pure vanilla extract for the best flavor. -
1 cup peeled and diced apples
Go for a tart variety like Granny Smith for a nice balance against the sweetness. -
1/2 cup brown sugar
Adds a caramel-like flavor to our streusel topping. If you’re out, you can use granulated sugar in a pinch. -
1/4 cup all-purpose flour for streusel
Almost like creating a topping blanket; this helps achieve that crumbly texture. -
1 teaspoon ground cinnamon
The quintessential fall spice! If you’re feeling adventurous, try cardamom for a unique twist. -
2 tablespoons cold unsalted butter
Chill it for a crumbly streusel topping. Cold butter is key!
Step-by-Step Instructions
Let’s get to the fun part—mixing, baking, and waiting for that cake to fill the house with its heavenly scent!
-
Preheat your oven to 350°F (175°C)
Prepping your oven ahead of time ensures your cake bakes evenly. Set it to the correct temperature, then pop in your favorite playlist to get in the baking mood! -
Prepare the pan
Grease a 9×13 baking dish and lightly flour it. You can also use parchment paper for a fuss-free removal. -
Mix dry ingredients
In a medium bowl, whisk together the flour, baking powder, baking soda, salt, and cinnamon. Make sure there are no lumps. A light sift can also help! -
Cream the butter and sugar
In a large bowl, using an electric mixer, cream the softened butter and granulated sugar until it’s light and fluffy—about 3-4 minutes. The air you beat in will lend fluffiness to your cake. -
Beat in the eggs
Add in the eggs, one at a time, ensuring each is well incorporated before adding the next. This step is crucial for a fluffy texture. -
Incorporate the sour cream and cider
Stir in the sour cream and vanilla extract. Then, add the apple cider, mixing until just combined. Don’t over-mix; we want that tender crumb! -
Fold in the diced apples
With a spatula, gently fold in those crispy apple chunks, making sure they’re evenly distributed throughout the batter. -
Combine the dry with the wet
Gradually add the dry mixture to the wet ingredients. This is where the magic happens! Mix just until incorporated—again, don’t overdo it! -
Prepare the streusel topping
In a small bowl, combine the brown sugar, 1/4 cup flour, ground cinnamon, and the cold butter. Using your fingers (yep, this is where you get to be a kid again!), rub the butter into the sugar and flour mixture until it resembles coarse crumbs. -
Pour the batter into the prepared pan
Spread it out evenly with a spatula, then top generously with that delicious streusel mixture. It should look inviting—like a cozy blanket of sweetness! -
Bake and enjoy the smell
Pop your creation in the oven and bake for about 35-40 minutes, or until a toothpick inserted into the center comes out clean. Trust me, the aroma will have you dancing around the kitchen! -
Cool it down
Once it’s baked, allow it to cool in the pan for about 10 minutes before transferring it to a wire rack. Try not to slice it too soon; the flavors need a moment to settle.
Serving Suggestions
Now for the best part—serving your lovely cake! Allow it to cool completely if you’re planning to frost it for a more indulgent twist, but if you want it simple, just dust a little powdered sugar on top.
Slice it into squares and serve with a dollop of whipped cream or a scoop of vanilla ice cream for a luxurious treat. Pair it with a cup of freshly brewed coffee or some hot apple cider to really embrace the season!
Recipe Variations
Want to keep things interesting? Here’s how you can give this classic a fun twist:
-
Nutty Delight: Add 1/2 cup of chopped walnuts or pecans to the batter for a delightful crunch. Toasting them lightly beforehand really brings out their flavor!
-
Spice It Up: Try adding a pinch of nutmeg or ginger for extra warmth. This is a fun way to customize it according to your seasonal wish!
-
Chocolate Swirl: Feeling indulgent? Fold in some mini chocolate chips to the batter or layer them in before the streusel for a sweet surprise.
-
Fruity Twist: Mix in 1/2 cup of dried cranberries or raisins. These not only add flavor but a beautiful pop of color.
-
Gluten-Free Option: Swap in a 1:1 gluten-free baking flour mix, and make sure your apple cider is entirely gluten-free.
Chef’s Notes
Every time I whip up this cake, I’m reminded of those lovely fall evenings spent with family. Over the years, I’ve played around with this recipe, swapping in different fruits and types of sugar. Each variation adds a new layer of warmth and memory.
One amusing kitchen memory? I once got carried away with the streusel, and it ended up being a mountain on top! My family was skeptical, but once we tasted it, we decided that a little more of the good stuff never hurt anyone!
FAQs and Troubleshooting
-
Why is my cake dense?
Make sure you’re using fresh baking powder and baking soda. Over-mixing can also lead to a dense texture, so mix just until combined. -
Can I use store-bought apple cider?
Absolutely! Just look for a high-quality brand without additives. Homemade is always great, but we need convenience sometimes, too! -
How do I store leftovers?
Place them in an airtight container at room temperature for up to 3 days, or refrigerate for a week. You can freeze slices in a freezer-safe bag for up to 3 months. -
What if my streusel is too dry?
If it doesn’t clump together, add a bit more cold butter and mix gently until it forms crumbs. Don’t be shy about getting your hands in there!
Nutritional Info
While this Apple Cider Coffee Cake is a treat to savor, here’s a rough estimate of its nutritional profile per slice (based on a 12-slice cake):
- Calories: 220
- Total Fat: 10g
- Saturated Fat: 5g
- Cholesterol: 40mg
- Sodium: 180mg
- Carbohydrates: 32g
- Dietary Fiber: 1g
- Sugars: 14g
- Protein: 2g
It’s a delightful treat, but try to enjoy it in moderation. After all, balance is key in any diet!
Final Thoughts
There you have it—my heartwarming recipe for Apple Cider Coffee Cake! I hope it brings as much joy to your kitchen as it has to mine. Whether you’re sharing it during a family gathering or enjoying it solo with a warm cup of coffee, I’m certain that this cake will leave you feeling cozy and content.
Happy baking, and may your kitchen always be filled with good food and great memories! Don’t forget to share the love and let me know how yours turns out. Until next time, keep that oven warm and your spirits higher! 🍏☕️✨
Print
Apple Cider Coffee Cake
- Total Time: 55 minutes
- Yield: 12 servings 1x
- Diet: Vegetarian
Description
A delightful and comforting recipe for Apple Cider Coffee Cake, filled with the warm aromas of cinnamon and apples.
Ingredients
- 1 cup fresh apple cider
- 2 cups all-purpose flour
- 1 teaspoon baking powder
- 1/2 teaspoon baking soda
- 1/2 teaspoon salt
- 1/2 cup unsalted butter, softened
- 3/4 cup granulated sugar
- 2 large eggs
- 1/2 cup sour cream
- 1 teaspoon vanilla extract
- 1 cup peeled and diced apples
- 1/2 cup brown sugar
- 1/4 cup all-purpose flour for streusel
- 1 teaspoon ground cinnamon
- 2 tablespoons cold unsalted butter
Instructions
- Preheat your oven to 350°F (175°C).
- Prepare the pan by greasing a 9×13 baking dish and lightly flouring it.
- Mix dry ingredients in a medium bowl: whisk together flour, baking powder, baking soda, salt, and cinnamon.
- Cream the butter and sugar in a large bowl until light and fluffy, about 3-4 minutes.
- Beat in the eggs, one at a time, ensuring each is well incorporated.
- Incorporate the sour cream and vanilla extract, then add the apple cider, mixing until just combined.
- Fold in the diced apples until evenly distributed in the batter.
- Combine the dry mixture with the wet ingredients, mixing just until incorporated.
- Prepare the streusel topping by combining brown sugar, 1/4 cup flour, ground cinnamon, and cold butter. Rub until coarse crumbs form.
- Pour the batter into the prepared pan, spreading evenly and topping with the streusel mixture.
- Bake for about 35-40 minutes, or until a toothpick inserted comes out clean.
- Cool in the pan for about 10 minutes before transferring to a wire rack.
Notes
Serve with powdered sugar, whipped cream, or vanilla ice cream. Enjoy with coffee or hot apple cider.
- Prep Time: 15 minutes
- Cook Time: 40 minutes
- Category: Dessert
- Method: Baking
- Cuisine: American
Nutrition
- Serving Size: 1 slice
- Calories: 220
- Sugar: 14g
- Sodium: 180mg
- Fat: 10g
- Saturated Fat: 5g
- Unsaturated Fat: 4g
- Trans Fat: 0g
- Carbohydrates: 32g
- Fiber: 1g
- Protein: 2g
- Cholesterol: 40mg
Keywords: apple, coffee cake, fall baking, dessert, cinnamon
This Fall Dinner: A Cozy, Family-Approved Weeknight Favorite
The Fall Dinner Everyone Looks Forward to Every Year Awaits!
Ah, fall—the season that wraps you in its cozy embrace and invites you to indulge in the warm flavors of comfort food. As the leaves turn golden and the air becomes crisp, there’s one dinner that everyone eagerly anticipates year after year. Yes, you guessed it—it’s the beloved Thanksgiving feast!
There’s something magical about gathering around a table overflowing with delicious dishes, laughter, and cherished memories. Whether you’re a seasoned chef or just dipping your toes into the culinary waters, this is the time when everyone becomes an avid cook. It’s a culinary stage where everyone shines, from Grandma’s secret stuffing recipe to that pumpkin pie that makes the world go ’round.
So, grab your apron, and let’s dive into this year’s Thanksgiving dinner that will have everyone begging for seconds—and maybe even thirds! With the perfect turkey at its center, accompanied by rich stuffing, creamy mashed potatoes, crisp green beans, tangy cranberry sauce, and a slice of heavenly pumpkin pie, this meal is as much about the food as it is about the love it brings to our hearts.
This blog post will take you through the steps of preparing this stunning spread, share my personal memories tied to these dishes, offer some clever kitchen tips, and explore variations that will keep things exciting. Together, we’ll turn this fall dinner into an unforgettable experience loved by all.
Personal Story
I still remember the first Thanksgiving I ever helped cook. I was around 10 years old, standing on a stool to reach the counter, excitement bubbling in my chest. My mom had decided this was my year to learn how to prepare the turkey—our family’s centerpiece dish. I can still see her guiding my hands, showing me how to carefully rub the bird with spices, introducing flavors that would dance together in the oven.
As the turkey roasted, the tantalizing aroma filled our home, wrapping us in warmth and comfort. We played games in the living room while sneaking bites of stuffing, our giggles mingling with the sizzling sounds from the kitchen. Once dinner was served, the table was breathtaking: a feast fit for kings and queens!
That year, I learned not just how to cook a meal, but created a rhythm of family gatherings that I carry into my own home today. Those meals were not just about food, but shared joy, love, and the wonderful connections that come from sitting around the dinner table. That experience ignited my passion for cooking and made me realize that food is not just sustenance; it’s an experience, a story, and a hug in the form of deliciousness. So, let’s carry this tradition into our own kitchens!
Ingredients
To recreate the Thanksgiving classic that everyone dreams about, here’s what you’ll need:
-
2 lbs of turkey: The star of the show! Choose a fresh turkey if possible, which tends to be juicier than frozen. If you’re serving a smaller gathering, feel free to adjust the size accordingly, usually about 1 pound per person is a safe bet.
-
1 cup of stuffing: You can opt for store-bought or make your own from bread, herbs, and vegetables. Bread cubes such as sourdough or whole wheat add depth. If you prefer gluten-free, substitute with gluten-free breadcrumbs or quinoa.
-
4 cups of mashed potatoes: Creamy and buttery, these are the ultimate comfort food. Use russet or Yukon Gold potatoes for the best texture. For a twist, try substituting some of the butter with sour cream or buttermilk for extra creaminess.
-
2 cups of green beans: Fresh green beans bring a vibrant pop of color and crunch. Snap off the ends before cooking. Want a gourmet touch? Blanch them lightly before sautéing with garlic and olive oil.
-
1 cup of cranberry sauce: A tart and sweet counterpoint to the savory dishes. You can certainly buy a can of it, but homemade is always a delightful surprise. For a twist, try adding orange zest or a splash of balsamic vinegar.
-
1 pumpkin pie: The iconic Thanksgiving dessert! You can make it from scratch using fresh or canned pumpkin, or quickly whip up a store-bought version (no judgment here!). Add a dollop of whipped cream for the perfect finish!
Step-by-Step Instructions
Now that you have your ingredients, let’s break this down into simple, easy-to-follow steps!
Preparing the Turkey
-
Preheat the Oven: Start by preheating your oven to 325°F (165°C). Setting the stage for that beautiful golden bird!
-
Prep the Turkey: Gently pat your turkey dry with paper towels to help crisp the skin. Rub a generous amount of salt and pepper all over the turkey, including the cavity. This will enhance the flavor tremendously!
-
Seasoning: For an extra special touch, add herbs like rosemary, thyme, and sage under the skin and in the cavity. These flavors will perfume the meat as it roasts, creating a sensational aroma.
-
Stuff the Turkey: If you’re using stuffing, fill the cavity of the turkey, but don’t pack it too tightly. The stuffing needs room to expand as it cooks (and trust me, it will soak up those turkey juices like a sponge).
-
Roasting: Place the turkey breast side up on a roasting pan. Pour a bit of broth or water into the pan to keep the environment humid (which equals juicy turkey!). Roast for about 13-15 minutes per pound. A meat thermometer inserted into the thickest part of the thigh should read 165°F (74°C).
-
Baste: Halfway through cooking, baste the turkey with the pan juices. This helps to keep the meat moist and gives it that perfect golden brown color.
-
Resting: Once done, let the turkey rest for at least 20-30 minutes before carving. This step is crucial! Resting allows the juices to redistribute throughout the meat.
Making the Mashed Potatoes
-
Prep and Boil: Peel the potatoes and cut them into similar-sized chunks for even cooking. Place them in a pot, cover with cold water, salt, and boil until fork-tender (about 15-20 minutes).
-
Draining: Once cooked, drain the potatoes well and return them to the pot. This helps steam evaporate, preventing watery mashed potatoes!
-
Mashing: Add a generous scoop of butter, a splash of milk, and a pinch of salt and pepper before mashing away. For added creaminess, consider using sour cream or cream cheese. Mash until smooth and creamy, but don’t overdo it—lumpy is part of the charm!
Cooking the Green Beans
-
Prep: Wash and trim the ends off your green beans.
-
Sautéing: Heat a tablespoon of olive oil in a skillet over medium heat. Add minced garlic (if using), and sauté until fragrant. Toss your green beans in and cook until they’re just tender, about 5-7 minutes. Season with salt and pepper to taste.
Assembling your Feast
-
Cranberry Sauce: If making homemade cranberry sauce, simmer fresh cranberries with sugar and water for about 10-15 minutes until they burst and create a thickened sauce. Let cool before serving.
-
Pumpkin Pie: If you’re baking your pumpkin pie, follow the recipe on the pie crust or pumpkin filling carefully. Let it chill in the fridge for a couple of hours—this improves the flavor and texture.
-
Plating: Now, for the grand finale! Carve the turkey and arrange the slices beautifully on a large platter. Next, scoop generous servings of mashed potatoes, stuffing, and green beans around the turkey. Don’t forget a bowl of cranberry sauce and a beautiful slice of pumpkin pie to complete the table!
Serving Suggestions
Your Thanksgiving table should be a feast for the eyes as well as the stomach! Arrange the turkey in the center, with colorful sides cascading around it. Consider garnishing the turkey platter with fresh herbs or fruit slices for an eye-pleasing arrangement.
For serving utensil suggestions, use large serving spoons for mashed potatoes, and a ladle for your cranberry sauce—because nobody wants a messy serving experience! Encourage your guests to build their own plates, creating the perfect combination of savory and sweet that suits their taste buds.
Recipe Variations
-
Flavorful Stuffing: Swap out traditional bread stuffing for cornbread or wild rice stuffing. You can even add in sautéed apples or cranberries for a sweet twist.
-
Savory Mashed Potatoes: Experiment with garlic or roasted cauliflower added to your mashed potatoes. For an indulgent twist, try adding truffle oil or cheese!
-
Green Bean Almondine: Add toasted almonds to your green beans for a delightful crunch and a flavor upgrade.
-
Zesty Cranberry Sauce: Add jalapeños for a spicy kick or orange zest and ginger for a citrusy flair to your cranberry sauce.
-
Pumpkin Cheesecake: For a twist on the traditional pumpkin pie, whip up a rich pumpkin cheesecake topped with whipped cream. Your guests will love it!
Chef’s Notes
Over the years, this Thanksgiving recipe has come to resemble a family tradition and it has evolved beautifully. My mom’s original turkey recipe inspired my adjustments. I had fun experimenting with different flavor profiles, added spices, and butter tricks until I found the balance everyone loves today.
Sometimes, the cooking process has its silly moments, like the time my dog stole a chunk of turkey while my back was turned. But those funny moments in the kitchen are what make the experience unforgettable. I encourage you to embrace imperfection in your cooking—those moments become cherished stories and laughs during the holiday gatherings!
FAQs and Troubleshooting
-
What if my turkey is undercooked?: If you find your turkey isn’t at the right internal temperature when you’re ready to serve, quickly return it to the oven, tent with foil, and keep an eye on it until cooked through.
-
How do I fix gluey mashed potatoes?: If you find yourself with gluey potatoes, it’s likely they were over-mashed or overcooked. Unfortunately, there’s no totally foolproof fix, but try adding sour cream or crème fraîche to lighten the texture.
-
What’s the best way to reheat leftovers?: The best way to reheat turkey is to slice it and place it in a baking dish with a little broth, covering it with foil to keep moisture in. For mashed potatoes, stir in a splash of milk and reheat in the oven or on the stovetop to revive creaminess.
-
Can I prepare dishes ahead of time?: Absolutely! You can prep the stuffing days in advance and store it in the fridge until it’s time to bake. For the mashed potatoes, consider making them the day before, storing in an airtight container, and reheating on the day of.
Nutritional Info
Thanksgiving dinner is often indulgent, but you can balance your plate for a healthier twist! Here’s a rough estimate of nutritional information per serving (assuming 1/6 of a turkey and respective sides):
- Calories: 900-1200 (depending largely on portion and added ingredients)
- Protein: 50-60g (from turkey, stuffing, and any added proteins)
- Carbohydrates: 70-90g (primarily from potatoes and stuffing)
- Fat: 40-50g (largely from the turkey skin, butter, and creamy sides)
- Fiber: 5-7g (thanks to those green beans and whole grains in stuffing)
Remember, this meal is meant to be enjoyed! With balance and moderation, you can savor every delicious bite.
Final Thoughts
Thanksgiving dinner is more than just a meal; it’s an experience steeped in love, laughter, and tradition. As a friendly reminder, allow yourself to enjoy the cooking process just as much as the meal itself. Burnt edges and overcooked vegetables are all part of the journey!
In gathering around the table with your family and friends, you’re not just filling bellies—you’re creating lasting memories that will be shared for years to come. From my kitchen to yours, I hope this guide inspires you to create a fall feast that is cherished by all. Happy cooking and happy eating!
Print
Thanksgiving Dinner
- Total Time: 180 minutes
- Yield: 6 servings 1x
- Diet: None
Description
A classic Thanksgiving feast featuring turkey, stuffing, mashed potatoes, green beans, cranberry sauce, and pumpkin pie.
Ingredients
- 2 lbs of turkey
- 1 cup of stuffing
- 4 cups of mashed potatoes
- 2 cups of green beans
- 1 cup of cranberry sauce
- 1 pumpkin pie
Instructions
- Preheat the oven to 325°F (165°C).
- Prep the turkey by patting it dry and rubbing it with salt and pepper.
- Season with herbs like rosemary, thyme, and sage.
- Stuff the turkey with stuffing if using.
- Roast the turkey for 13-15 minutes per pound until it reaches 165°F (74°C).
- Baste halfway through cooking with pan juices.
- Rest the turkey for 20-30 minutes before carving.
- Prep the potatoes by peeling and cutting them into chunks.
- Boil the potatoes until fork-tender, about 15-20 minutes.
- Drain and return the potatoes to the pot, then mash with butter and milk.
- Wash and trim the green beans.
- Sauté green beans with garlic in olive oil until just tender, about 5-7 minutes.
- Prepare homemade cranberry sauce if desired.
- Bake the pumpkin pie following recipe instructions.
- Plate the turkey and side dishes on a serving platter for the grand finale.
Notes
Feel free to add your own favorite sides or variations!
- Prep Time: 60 minutes
- Cook Time: 120 minutes
- Category: Main Course
- Method: Roasting
- Cuisine: American
Nutrition
- Serving Size: 1 serving
- Calories: 1000
- Sugar: 20g
- Sodium: 600mg
- Fat: 50g
- Saturated Fat: 20g
- Unsaturated Fat: 25g
- Trans Fat: 0g
- Carbohydrates: 90g
- Fiber: 7g
- Protein: 60g
- Cholesterol: 120mg
Keywords: Thanksgiving, turkey, stuffing, mashed potatoes, pumpkin pie
Minute Pumpkin Pie Cupcakes for Cozy Fall Comfort
Pumpkin Pie Cupcakes: A Cozy Treat for Any Occasion
Hey there, food enthusiasts! Fall is in the air, and that can only mean one thing: it’s pumpkin season! There’s nothing quite like the warm, spicy aroma of pumpkin pie wafting through the kitchen. But wait—what if I told you that you could enjoy all that deliciousness in cupcake form? Oh yes, folks! Today, we are diving into the delightful world of Pumpkin Pie Cupcakes. These little morsels are perfect for breakfast, dessert, or whenever you just need a sweet pick-me-up. Let’s whip up a batch of these delightful treats that are sure to bring a smile to everyone’s face!
A Slice of Nostalgia
Let me take you back to a crisp November afternoon from my childhood. I remember bustling around my grandma’s kitchen, the air thick with the scent of spices and sweet pumpkin. She would pull out her massive mixing bowl and whisk together the ingredients—this was her specialty. As a little kid, I would sit atop the counter, swinging my legs, wide-eyed watching as she poured in the pumpkin puree, a cloud of flour dusting the air. Those moments were magic, wrapped in warmth and laughter. We would always fight over who got to lick the spoon, and more often than not, I’d win. Grandma’s pumpkin pie was a given at every Thanksgiving, and I could never get enough!
When I finally ventured into my own kitchen years later, the challenge was on—I had to recreate that iconic flavor. However, I wanted something a little different, something that would capture not just the flavor but the spirit of those cozy memories. Thus, the idea of Pumpkin Pie Cupcakes was born! Imagine individual portions of that holiday classic, with a delightful cream cheese frosting on top! Trust me, it’s like a warm hug wrapped in a cupcake.
Ingredients
Let’s gather up the essentials for these delightful pumpkin pie cupcakes!
-
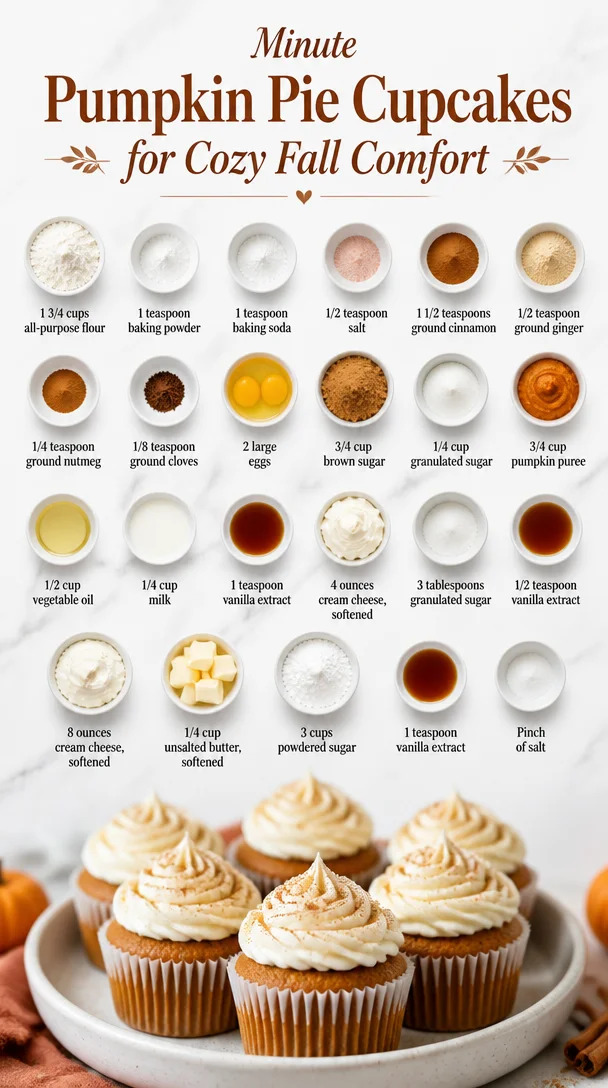
1 3/4 cups all-purpose flour
This is the foundation of our cupcakes. If you want to make them gluten-free, you can swap this out for a 1:1 gluten-free flour blend. -
1 teaspoon baking powder
This lifts up the cupcakes, creating that light and fluffy texture we all love. Just remember, don’t let your baking powder sit too long—it loses potency! -
1 teaspoon baking soda
A perfect companion to our baking powder. It plays a role in providing that wonderful rise! -
1/2 teaspoon salt
Enhances the sweetness of our cupcakes. Trust me, you don’t want to skip this ingredient! -
1 1/2 teaspoons ground cinnamon
The classic fall spice that makes pumpkin goodies so irresistible! Feel free to substitute with pumpkin pie spice if you like. -
1/2 teaspoon ground ginger
Adds a delightful warmth to our treats. If ginger is too spicy for your taste, you can reduce this or omit it altogether. -
1/4 teaspoon ground nutmeg
You can go with fresh nutmeg for an extra kick or just stock up on the pre-ground. Both work wonders! -
1/8 teaspoon ground cloves
This spice adds a bit of complexity to the flavor profile. -
2 large eggs
These create a binding agent, giving texture and fluffiness. -
3/4 cup brown sugar
Brings sweetness and a hint of caramel flavor. Dark brown sugar will give you even richer notes. -
1/4 cup granulated sugar
Just a touch of extra sweetness—feel free to swap for coconut sugar for a healthier option. -
3/4 cup pumpkin puree
The star of the show! Make sure it’s pure pumpkin puree, not pie filling, as the latter has added sugars. -
1/2 cup vegetable oil
This keeps our cupcakes moist but feel free to swap it out for melted coconut oil or applesauce for a lighter option. -
1/4 cup milk
Whole milk is preferred for richness, but any non-dairy alternative will do just fine! -
1 teaspoon vanilla extract
This adds a wonderful depth of flavor. -
4 ounces cream cheese, softened
Used in our frosting, it adds creaminess and tang. -
3 tablespoons granulated sugar (for frosting)
Sweetens up our frosting nicely. You can also use maple syrup for a twist! -
1/2 teaspoon vanilla extract (for frosting)
To keep the flavor consistent, you can use the same vanilla extract. -
8 ounces cream cheese, softened (for frosting)
A creamy dream that pairs perfectly with our cupcakes! -
1/4 cup unsalted butter, softened
For that rich texture in the frosting, it brings everything together. -
3 cups powdered sugar
This sweetens and thickens our frosting. If you want to decrease the sugar, start with 2 cups and adjust based on your taste! -
1 teaspoon vanilla extract (for frosting)
Because a little bit of vanilla in frosting never hurt anybody! -
Pinch of salt
Balances the sweetness in frosting.
Now that we’re all stocked up, it’s time to get our hands dirty!
Step-by-Step Instructions
Step 1: Prepare Your Baking Array
Preheat your oven to 350°F (175°C) and line a cupcake pan with paper liners. This is the fun part—choose liners that make your heart sing!
Step 2: Mix the Dry Ingredients
In a medium bowl, whisk together the flour, baking powder, baking soda, salt, cinnamon, ginger, nutmeg, and cloves. This will ensure that all those warm spices are evenly distributed throughout your cupcakes. Pro tip: Sifting the dry ingredients can help eliminate clumps, though it’s optional.
Step 3: Whisk the Wet Ingredients
In a large bowl, whisk together the eggs, brown sugar, granulated sugar, pumpkin puree, vegetable oil, milk, and vanilla extract until well combined. Picture this… golden orange goodness all swirling together! This is where you’ll get a breath of autumn nostalgia.
Step 4: Combine Wet and Dry
Gradually add the dry ingredients into the wet mixture, stirring gently until just combined. Be careful not to overmix; that can lead to tough cupcakes! Think gentle folds rather than vigorous stirring.
Step 5: Scoop and Fill
Spoon the batter into the lined cupcake pan, filling each cup about 2/3 full. This will allow room for them to rise without overflowing.
Step 6: Bake!
Pop the filled cupcake pan into the oven and bake for 18-22 minutes, or until a toothpick comes out clean when inserted into the center of a cupcake. The smell wafting from your oven will have you humming all those pumpkin-loving songs!
Step 7: Cool and Prepare the Frosting
Allow the cupcakes to cool in the pan for 5 minutes before transferring them to a wire rack to cool completely. While they cool, let’s whip up our creamy frosting!
In a bowl, mix the softened cream cheese, butter, and sugar until light and fluffy. Add in the pinch of salt and the vanilla extract, and continue to mix until creamy. Remember: the longer you beat, the more air you’ll incorporate, making your frosting lighter!
Step 8: Frost Away
Once the cupcakes have cooled, generously frost each one with your delicious cream cheese frosting! You can use a piping bag for that classic bakery look or just slather it on with a knife.
Step 9: Serve and Enjoy!
Now, here’s where you can get creative with toppings. Mini pumpkin pie spices, a sprinkling of crushed nuts, or even a drizzle of caramel sauce will take these cupcakes to the next level!
Serving Suggestions
To serve your pumpkin pie cupcakes in style, arrange them on a decorative cake stand for a beautiful display. You could sprinkle a bit of cinnamon on top of the frosting for an extra flair or garnish with bits of candied pecans. Pair these little delights with a steaming cup of coffee or a spiced chai tea for the ultimate cozy vibe. You’ll have your friends and family singing praises before they even take a bite!
Recipe Variations
- Gluten-Free: Use gluten-free flour for a healthier version.
- Vegan Swap: Replace eggs with flaxseed eggs (1 tbsp flaxseed meal + 2.5 tbsp water per egg) and the milk with almond or oat milk, and use a vegan cream cheese for the frosting!
- Nutty Touch: Add toasted walnuts or pecans into the batter for additional texture.
- Spiced-Up Flavor: Add a little pinch of cayenne or a splash of bourbon to take the flavor profile to a new level.
- Miniature Treats: Make mini versions of these cupcakes for bite-sized treats, perfect for parties!
Chef’s Notes
Every time I whip up a batch of these cupcakes, I can’t help but reminisce about those kitchen escapades with Grandma. It’s funny how food can transport you back in time! Over the years, I’ve adapted this recipe to suit my ever-evolving palate. The original was a bit heavier on the sugar, but I love to play around with spices and flavor combinations—much like my grandma did—taking her spirited approach but adding my twist.
FAQs and Troubleshooting
Q: Why are my cupcakes dense?
A: This could be from overmixing the batter. Remember, mix until just combined—the fluffiness comes from not overworking the batter.
Q: Can I replace the pumpkin with sweet potato?
A: Absolutely! Sweet potato puree can be a fantastic substitute that adds a different flavor profile while still delivering that autumn feel.
Q: What if I don’t have baking powder?
A: You can substitute 1/2 teaspoon baking soda and 1 teaspoon vinegar (like apple cider vinegar) for the baking powder. The acid will react and create bubbles, helping to rise!
Q: Can I freeze these cupcakes?
A: Yes! Just make sure they’re completely cooled, and frost them after defrosting. Store them in an airtight container or ziplock bag.
Nutritional Info
Each Pumpkin Pie Cupcake has approximately:
- Calories: 250
- Protein: 3g
- Carbohydrates: 38g
- Fat: 10g
- Sugar: 18g
Just remember, these are treats meant for indulgence, so enjoy them in moderation!
Final Thoughts
There you have it, my fellow foodies—your new go-to recipe for a delightful autumn treat! Whether you’re sharing these with family, friends, or treating yourself (hey, we all deserve a little self-love!), these Pumpkin Pie Cupcakes are sure to bring joy and warm memories back to your kitchen. Get those ingredients ready, embrace the season, and let the aromatic journey of baking fill your home with love, laughter, and nostalgia. Happy baking! 🍂🧁
Print
Pumpkin Pie Cupcakes
- Total Time: 40 minutes
- Yield: 12 servings 1x
- Diet: Vegetarian
Description
Delightful pumpkin pie cupcakes that capture the warmth of fall with a cream cheese frosting.
Ingredients
- 1 3/4 cups all-purpose flour
- 1 teaspoon baking powder
- 1 teaspoon baking soda
- 1/2 teaspoon salt
- 1 1/2 teaspoons ground cinnamon
- 1/2 teaspoon ground ginger
- 1/4 teaspoon ground nutmeg
- 1/8 teaspoon ground cloves
- 2 large eggs
- 3/4 cup brown sugar
- 1/4 cup granulated sugar
- 3/4 cup pumpkin puree
- 1/2 cup vegetable oil
- 1/4 cup milk
- 1 teaspoon vanilla extract
- 4 ounces cream cheese, softened
- 3 tablespoons granulated sugar (for frosting)
- 1/2 teaspoon vanilla extract (for frosting)
- 8 ounces cream cheese, softened (for frosting)
- 1/4 cup unsalted butter, softened
- 3 cups powdered sugar
- 1 teaspoon vanilla extract (for frosting)
- Pinch of salt
Instructions
- Preheat your oven to 350°F (175°C) and line a cupcake pan with paper liners.
- Mix the dry ingredients: In a medium bowl, whisk together the flour, baking powder, baking soda, salt, cinnamon, ginger, nutmeg, and cloves.
- Whisk the wet ingredients: In a large bowl, whisk together the eggs, brown sugar, granulated sugar, pumpkin puree, vegetable oil, milk, and vanilla extract until well combined.
- Combine the wet and dry mixtures, stirring gently until just combined.
- Scoop the batter into the lined cupcake pan, filling each cup about 2/3 full.
- Bake for 18-22 minutes, or until a toothpick comes out clean when inserted into the center of a cupcake.
- Cool the cupcakes in the pan for 5 minutes before transferring them to a wire rack to cool completely.
- Frost each cupcake with a cream cheese frosting made from mixed softened cream cheese, butter, and sugar until light and fluffy.
- Serve and enjoy with creative toppings like mini pumpkin pie spices or a drizzle of caramel sauce!
Notes
Make sure to use pure pumpkin puree, not pumpkin pie filling, for best results.
- Prep Time: 20 minutes
- Cook Time: 20 minutes
- Category: Dessert
- Method: Baking
- Cuisine: American
Nutrition
- Serving Size: 1 cupcake
- Calories: 250
- Sugar: 18g
- Sodium: 250mg
- Fat: 10g
- Saturated Fat: 4g
- Unsaturated Fat: 5g
- Trans Fat: 0g
- Carbohydrates: 38g
- Fiber: 2g
- Protein: 3g
- Cholesterol: 30mg
Keywords: pumpkin, cupcakes, fall, dessert, Thanksgiving
Fall Apple Pie Cupcakes: Cozy, Quick Dessert Recipe
Apple Pie Cupcakes: A Sweet Slice of Nostalgia
Hey food lovers! Welcome to the cozy world of Feastical, where flavors dance and every bite tells a story. Today, we’re diving into a delightful treat that fuses the comfort of classic apple pie with the convenience of a cupcake—introducing Apple Pie Cupcakes! These little gems are perfect for a cozy afternoon or to impress your friends at the next potluck. With a warm, spiced apple filling and a creamy frosting, these cupcakes will definitely bring a smile to your face.
A Memory from the Kitchen
Growing up, my grandmother had a knack for turning our kitchen into a magical place filled with the aroma of fresh-baked goods. One of my favorite memories was her annual apple pie-making session in the fall. We’d pick apples from the local orchard, each one better than the last. The entire house would transform into a warm haven filled with cinnamon and sugar.
I remember standing on a stool next to her, watching with wide eyes as she peeled and sliced the apples. The flour would fly as she worked the dough, and before long, we’d have a bubbling pie in the oven. And the best part? Sneaking bites of the apple filling when she wasn’t looking! Those memories inspired me to create these Apple Pie Cupcakes as a tribute to her delicious legacy. They capture not just the taste but the love and warmth that comes with each bite.
Ingredients
Before we roll up our sleeves and get baking, let’s gather our stars! Here’s what you’ll need:
-
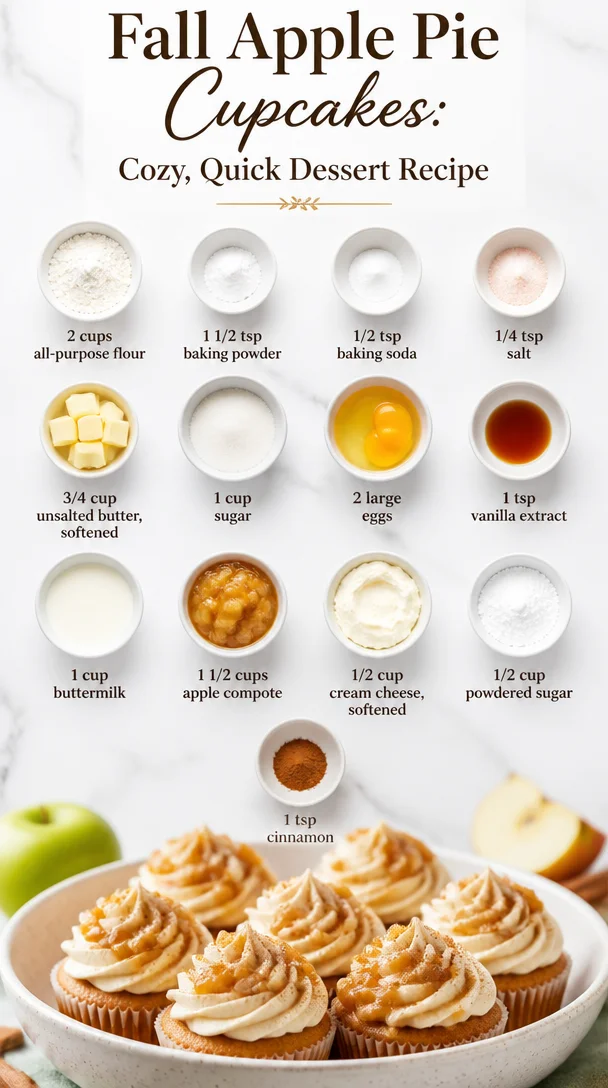
2 cups all-purpose flour
The foundation of our cupcake—great for structural integrity! Substitute with a gluten-free blend if needed. -
1 1/2 tsp baking powder
This helps our cupcakes rise beautifully. Make sure it’s fresh for the best lift! -
1/2 tsp baking soda
Offers additional leavening power. Again, freshness is key! -
1/4 tsp salt
A little salt enhances sweetness—don’t skip it! -
3/4 cup unsalted butter, softened
The butter adds rich flavor and moisture. You can use coconut oil for a dairy-free version. -
1 cup sugar
Sweetness is essential! Consider using brown sugar for a deeper, caramel-like flavor. -
2 large eggs
Eggs help bind everything together. If you’re vegan, try flax eggs instead (1 tablespoon ground flaxseed + 3 tablespoons water per egg). -
1 tsp vanilla extract
Adds warmth and richness. Pure vanilla is always best, but imitation will work in a pinch. -
1 cup buttermilk
This ingredient makes for moist cupcakes. You can easily make your own by adding 1 tablespoon of vinegar or lemon juice to regular milk! -
1 1/2 cups apple compote
The star of the dish! Use homemade or store-bought—just make sure it’s spiced to your liking. -
1/2 cup cream cheese, softened
Perfect for our frosting. If you need a vegan option, try using a vegan cream cheese spread. -
1/2 cup powdered sugar
For sweetness and that fluffy frosting texture. You can adjust this based on how sweet you like your frosting. -
1 tsp cinnamon
For that cozy, aromatic flavor that makes these cupcakes taste like fall.
Step-by-Step Instructions
-
Preheat the oven: Start by preheating your oven to 350°F (175°C). Line a muffin pan with cupcake liners because nobody wants a cupcake disaster!
-
Mix the dry ingredients: In a large bowl, whisk together the flour, baking powder, baking soda, salt, and cinnamon until well combined. This ensures even distribution and prevents lumps. Set it aside.
-
Cream the butter and sugar: In another bowl, cream the softened unsalted butter and sugar together until light and fluffy—about 3-4 minutes. This step is essential as it incorporates air into the batter for a lighter texture. Tip: use a stand mixer if you have one; your arms will thank you!
-
Add eggs and vanilla: Beat in the eggs, one at a time, and stir in the vanilla extract until well combined. If you see any lumps of butter, don’t worry; they’ll disappear once we mix in the dry ingredients.
-
Combine wet and dry: Slowly add the dry ingredients to the butter mixture, alternating with the buttermilk, starting and ending with the dry ingredients. Mix until just combined. Overmixing can lead to tough cupcakes!
-
Fold in the apple compote: Gently fold the apple compote into the batter, distributing it evenly. Resist the urge to overmix; we want those delightful apple chunks to remain intact!
-
Scoop and bake: Divide the batter evenly among the cupcake liners, filling each about 2/3 full. Bake in the preheated oven for 18-22 minutes, or until a toothpick inserted into the center comes out clean.
-
Cool the cupcakes: Once baked, remove them from the oven and let them cool in the pan for about 5 minutes. Then, transfer them to a wire rack to cool completely. This step is super important if you want that frosting to sit pretty on top!
-
Make the frosting: While the cupcakes cool, it’s time to whip up the frosting. In a medium bowl, beat the cream cheese until smooth. Gradually add powdered sugar and mix until combined. If the frosting is too thick, add a splash of milk to reach your desired consistency.
-
Frost your cupcakes: Once the cupcakes are completely cool, use a piping bag (or a simple ziploc with the corner cut out) to frost them generously. Even a little swirl will do, so don’t stress about making it perfect!
Serving Suggestions
These Apple Pie Cupcakes are best served fresh, but they keep well for a couple of days in an airtight container. To elevate the presentation, sprinkle some extra cinnamon on top of the frosting or garnish with a thin slice of apple. These cupcakes will warm the hearts of your family and friends, making them perfect for gatherings or just as a sweet pick-me-up!
Recipe Variations
Looking to switch things up? Here are some fun variations to try:
-
Caramel Apple: Drizzle some caramel sauce over the frosting for an extra layer of sweetness and flavor.
-
Nutty Crunch: Fold in chopped nuts, such as walnuts or pecans, into the batter for a bit of crunch.
-
Spiced Up: Add a pinch of nutmeg or allspice to the batter for more spice complexity—perfect for those chilly autumn days.
-
Vegan Apple Pie Cupcakes: Substitute ingredients as mentioned, and you’ll have a delightful plant-based treat that everyone will adore!
-
Mini Cupcakes: Bake them in a mini muffin tin for bite-sized treats. Just adjust the baking time to around 10-12 minutes!
Chef’s Notes
These Apple Pie Cupcakes hold a special place in my heart because they’ve evolved over the years. Initially, I tried to recreate my grandmother’s apple pie flavor in a simple cupcake form. With several trials, sprinkles of love, and a few kitchen mishaps (hello, flour explosion!), I finally found the perfect balance of flavors and textures. It’s a fun journey every time I whip up a batch. Honestly, it’s hard to eat just one!
FAQs and Troubleshooting
1. Why do my cupcakes sink in the middle?
This can happen if you overmixed the batter or if your oven temperature is too low. Make sure to check your oven with an oven thermometer!
2. Can I use fresh apples instead of apple compote?
Absolutely! Just sauté chopped apples with a little sugar and cinnamon until tender, then fold them into the batter.
3. How do I store these cupcakes?
Keep them in an airtight container at room temperature for up to 3 days or in the fridge for a week. Keep in mind that refrigerated cupcakes may become a bit denser.
4. My frosting is too runny! What can I do?
If your frosting is too thin, simply add more powdered sugar until it reaches your desired consistency. A little cornstarch can help stabilize it too!
Nutritional Info
These Apple Pie Cupcakes are not just delightful; they also pack a fair punch of flavor without too much guilt. Here’s a quick breakdown per cupcake (assuming 12 servings):
- Calories: 250
- Total Fat: 10g
- Saturated Fat: 5g
- Cholesterol: 35mg
- Sodium: 150mg
- Total Carbohydrates: 38g
- Dietary Fiber: 1g
- Sugars: 18g
- Protein: 2g
Note: Values may vary based on substitutions and exact measurements.
Final Thoughts
There you have it—your go-to recipe for Apple Pie Cupcakes! Each bite is a nostalgic trip to grandma’s kitchen, wrapped in a sweet, spiced cupcake. Whether you’re sharing them with loved ones or just treating yourself, these cupcakes are sure to warm hearts and bring smiles.
So, let’s get baking! Remember, every cupcake has a story, and with this recipe, you’ll create delightful memories that will be cherished for years to come. Happy baking, and until next time at Feastical—keep those forks at the ready! 🍏🧁
Print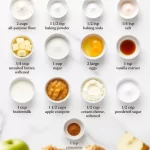
Apple Pie Cupcakes
- Total Time: 37 minutes
- Yield: 12 servings 1x
- Diet: Vegetarian
Description
A delightful fusion of classic apple pie and cupcakes, these Apple Pie Cupcakes feature a warm, spiced apple filling and creamy frosting for a sweet treat that brings nostalgia.
Ingredients
- 2 cups all-purpose flour
- 1 1/2 tsp baking powder
- 1/2 tsp baking soda
- 1/4 tsp salt
- 3/4 cup unsalted butter, softened
- 1 cup sugar
- 2 large eggs
- 1 tsp vanilla extract
- 1 cup buttermilk
- 1 1/2 cups apple compote
- 1/2 cup cream cheese, softened
- 1/2 cup powdered sugar
- 1 tsp cinnamon
Instructions
- Preheat the oven: Start by preheating your oven to 350°F (175°C). Line a muffin pan with cupcake liners.
- Mix the dry ingredients: In a large bowl, whisk together the flour, baking powder, baking soda, salt, and cinnamon until well combined.
- Cream the butter and sugar: In another bowl, cream the softened unsalted butter and sugar together until light and fluffy—about 3-4 minutes.
- Add eggs and vanilla: Beat in the eggs, one at a time, and stir in the vanilla extract until well combined.
- Combine wet and dry: Slowly add the dry ingredients to the butter mixture, alternating with the buttermilk, starting and ending with the dry ingredients.
- Fold in the apple compote: Gently fold the apple compote into the batter.
- Scoop and bake: Divide the batter evenly among the cupcake liners, filling each about 2/3 full. Bake in the preheated oven for 18-22 minutes.
- Cool the cupcakes: Once baked, remove them from the oven and let them cool in the pan for about 5 minutes, then transfer them to a wire rack.
- Make the frosting: In a medium bowl, beat the cream cheese until smooth. Gradually add powdered sugar and mix until combined.
- Frost your cupcakes: Once the cupcakes are completely cool, frost them generously using a piping bag.
Notes
These cupcakes are best served fresh but can be stored in an airtight container for a few days. Elevate presentations by sprinkling cinnamon on top of the frosting.
- Prep Time: 15 minutes
- Cook Time: 22 minutes
- Category: Dessert
- Method: Baking
- Cuisine: American
Nutrition
- Serving Size: 1 cupcake
- Calories: 250
- Sugar: 18g
- Sodium: 150mg
- Fat: 10g
- Saturated Fat: 5g
- Unsaturated Fat: 3g
- Trans Fat: 0g
- Carbohydrates: 38g
- Fiber: 1g
- Protein: 2g
- Cholesterol: 35mg
Keywords: cupcakes, apple pie, dessert, baking, nostalgia