Pumpkin Bread Truffles
Pumpkin Bread Truffles: A Deliciously Fun Treat
Hey there, feast lovers! I’m Beau Collier, and today, I’m thrilled to share a cozy recipe that elegantly bridges the comforting vibes of autumn with a playful twist—Pumpkin Bread Truffles! These delightful little bites bring together the warm, spicy notes of pumpkin bread with the creaminess of cream cheese and a sweet chocolate finish. Trust me, once you take a bite, you’ll be transported back to your favorite fall memories, all while enjoying a fun treat that’s perfect for any occasion. Grab your apron, and let’s dive right in!
The Magic of Pumpkin Bread
Before we get into the nitty-gritty of our truffles, let me take you on a lil’ trip down memory lane. Growing up, there was something magical about the aroma of pumpkin bread wafting through my grandma’s kitchen on crisp autumn mornings. She had a knack for infusing love into every loaf, adding just the right amount of spices to create a symphony of flavors. I’d sneak bites straight from the cooling rack, my fingers sticky with sugar and spices, blissfully unaware of the culinary artist I would come to be.
One year, grandma decided to elevate her traditional recipe by making little bites of joy from leftover pumpkin bread. Not only did we reduce waste, but we also created a treat that was gloriously rich with flavor. Little did I know, that day would inspire me to innovate and create my own version of those cherished truffles. Fast forward to today, and I’m excited to share my recipe with you, a nostalgic nod to the past wrapped in a fun, modern twist!
Ingredients
Gather these delightful ingredients to create your batch of Pumpkin Bread Truffles:
-
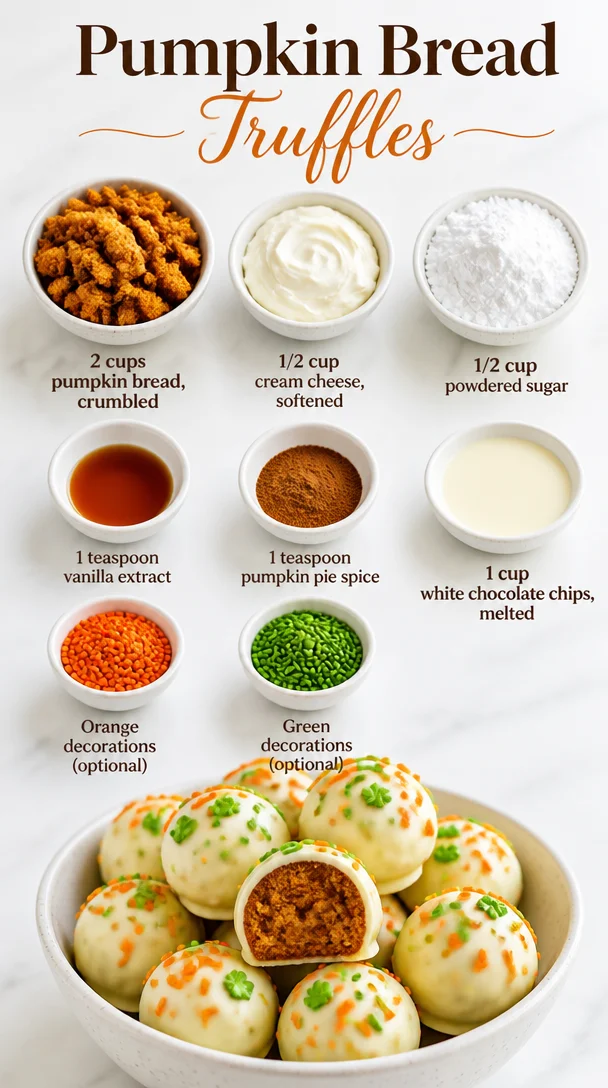
2 cups homemade pumpkin bread, crumbled
Use your favorite recipe or even store-bought pumpkin bread in a pinch. If you opt for homemade, you can control the sweetness and spice levels. -
1/2 cup cream cheese, softened
This rich ingredient adds a creamy texture. For a dairy-free option, feel free to use a vegan cream cheese alternative. -
1/2 cup powdered sugar
This sweetener provides sweetness without the grittiness of granulated sugar. You can adjust the amount depending on your sweet tooth! -
1 teaspoon vanilla extract
Vanilla brings depth to our truffles; use pure vanilla extract for a more intense flavor. If you’re in a pinch, imitation will do, but it’s not quite the same! -
1 teaspoon pumpkin pie spice
A must-have when working with pumpkin! If you don’t have it on hand, you can mix cinnamon, nutmeg, and ginger as a substitute. -
1 cup white chocolate chips, melted
These will coat our tasty truffles. For a darker, richer flavor, consider using semi-sweet chocolate chips instead! -
Orange and green edible decorations (optional)
Bring out your inner artist! These decorations add personality and fun to your truffles, making them perfect for gatherings or celebrations.
Step-by-Step Instructions
Let’s get cooking! We’re about to turn those humble ingredients into something scrumptious. Here’s how to make Pumpkin Bread Truffles step by step:
-
Crumble the Pumpkin Bread
Start by breaking your pumpkin bread into fine crumbs. It should feel like the texture of wet sand. You can use your hands or a food processor to get the job done! Chef Tip: If you have a dry loaf, a few minutes in the oven can help crisp it up, making it easier to crumble. -
Mix the Ingredients
In a large mixing bowl, combine the crumbled pumpkin bread, softened cream cheese, powdered sugar, vanilla extract, and pumpkin pie spice. Use a spatula to fold the ingredients together until everything is well incorporated. Chef Hack: If it feels a bit dry, a splash of milk can help bring the mixture together. -
Chill the Mixture
Cover your bowl with plastic wrap and place it in the refrigerator for about 30 minutes. This helps the mixture firm up, making it easier to scoop and shape later. Tip: If you’re impatient like me, you can pop it in the freezer for 10-15 minutes! -
Form the Truffles
Once chilled, use a tablespoon to scoop out portions of the mixture and roll them into bite-sized balls. Make sure they are uniform in size for even coating! Chef Tip: Wet your hands slightly to prevent the mixture from sticking to your palms. -
Melt the Chocolate
While you’re shaping the truffles, melt your white chocolate chips in a microwave-safe bowl. Heat them in 30-second intervals, stirring in between until smooth. Be careful not to overheat—nobody likes burnt chocolate! -
Coat the Truffles
Dip each truffle into the melted chocolate, allowing the excess to drip off. Place them on a parchment-lined baking sheet. Good to Know: If you want a fun design, sprinkle edible decorations on top while the coating is still wet! -
Let Them Set
Refrigerate the coated truffles for about 30 minutes to an hour until the chocolate has set. The aroma will be heavenly, filling your kitchen with a cozy, sweet scent.
And there you have it—a batch of delightful Pumpkin Bread Truffles that are ready to impress your friends and family!
Serving Suggestions
When it comes to serving these scrumptious truffles, presentation is key! Arrange them on a festive platter lined with parchment paper for a rustic touch. You can get a bit crafty with your serving by placing them in little cupcake liners for extra flair! Drizzle melted chocolate over the top for a gourmet look, or garnish with crushed nuts or sprinkles for added texture. Pair them with a cozy chai latte or a pumpkin spice coffee for the ultimate autumn treat!
Recipe Variations
Here are a few fun twists you can try with this base recipe:
- Nutty Pumpkin Truffles: Add 1/2 cup of chopped walnuts or pecans to the mixture for a crunchy surprise.
- Chocolatey Delight: Use dark chocolate chips instead of white chocolate for a richer flavor.
- Spiced to Perfection: Add a pinch of cayenne for a warm, spicy kick that will surprise your taste buds.
- Pumpkin Spice Latte Truffles: Mix in a tablespoon of espresso powder for a delicious coffee-infused treat!
- Vegan Pumpkin Truffles: Swap the cream cheese for a vegan alternative and use dairy-free chocolate for a yummy vegan treat.
Chef’s Notes
This recipe has evolved a lot over the years. I started off trying to use leftover pumpkin bread, but I quickly realized that some spice combinations could elevate the taste and texture to a whole new level. Now, I love experimenting with different toppings or flavor additions. Each time I make these truffles, they remind me of those autumn mornings with my grandma, inspiring me every time. Pro tip: they also freeze beautifully, making them perfect for a last-minute dessert!
FAQs and Troubleshooting
1. My truffle mixture is too crumbly; what can I do?
If your mixture isn’t holding together, try adding an extra tablespoon of cream cheese or a splash of milk. This should help everything stick together more cohesively!
2. How can I prevent the chocolate from seizing?
Always ensure your bowls and utensils are completely dry. Even a tiny bit of water can cause the chocolate to seize, so be cautious when melting your chocolate.
3. Can I make these gluten-free?
Absolutely! Just substitute your pumpkin bread with a gluten-free variety, and you’re all set!
4. How do I store leftover truffles?
Store them in an airtight container in the refrigerator for up to a week. You can also freeze them for longer storage—just thaw in the fridge when you’re ready to enjoy!
Nutritional Info
Each Pumpkin Bread Truffle is not only delicious but can also be a delightful treat in moderation. Here’s a breakdown of each truffle’s nutritional info:
- Calories: ~120
- Fat: 6g (Saturated Fat: 3g)
- Carbohydrates: 15g
- Protein: 1g
- Sugar: 8g
Of course, these values may vary based on specific ingredient choices, and it’s always good to enjoy treats like these in moderation!
Final Thoughts
I hope you enjoyed this journey into the world of Pumpkin Bread Truffles! Remember, cooking is not just about following a recipe; it’s about sharing stories, creating memories, and making delicious treats with a pinch of love. Whether you’re serving them at a fall gathering or simply enjoying them as an afternoon snack with a cup of tea, these truffles will warm your heart and delight your taste buds.
I can’t wait to see your takes on this recipe! Don’t forget to share your truffle adventures with me on social media. Happy cooking, my friends, and let the pumpkin spice flows and laughter rings in your kitchen. Let’s keep feasting together!
Print
Pumpkin Bread Truffles
- Total Time: 45 minutes
- Yield: 24 truffles 1x
- Diet: Vegetarian
Description
These delightful Pumpkin Bread Truffles combine the warm flavors of pumpkin bread with creamy cream cheese and a sweet chocolate coating, making for a perfect autumn treat.
Ingredients
- 2 cups homemade pumpkin bread, crumbled
- 1/2 cup cream cheese, softened
- 1/2 cup powdered sugar
- 1 teaspoon vanilla extract
- 1 teaspoon pumpkin pie spice
- 1 cup white chocolate chips, melted
- Orange and green edible decorations (optional)
Instructions
- Crumble the Pumpkin Bread: Start by breaking your pumpkin bread into fine crumbs.
- Mix the Ingredients: In a large mixing bowl, combine the crumbled pumpkin bread, softened cream cheese, powdered sugar, vanilla extract, and pumpkin pie spice.
- Chill the Mixture: Cover your bowl with plastic wrap and place it in the refrigerator for about 30 minutes.
- Form the Truffles: Once chilled, scoop out portions of the mixture and roll them into bite-sized balls.
- Melt the Chocolate: Melt your white chocolate chips in a microwave-safe bowl in 30-second intervals.
- Coat the Truffles: Dip each truffle into the melted chocolate and place them on a parchment-lined baking sheet.
- Let Them Set: Refrigerate the coated truffles for about 30 minutes to an hour until set.
Notes
These truffles can be frozen for later enjoyment, and serve well with a cozy beverage.
- Prep Time: 15 minutes
- Cook Time: 30 minutes
- Category: Dessert
- Method: Chilling, Melting
- Cuisine: American
Nutrition
- Serving Size: 1 truffle
- Calories: 120
- Sugar: 8g
- Sodium: 100mg
- Fat: 6g
- Saturated Fat: 3g
- Unsaturated Fat: 2g
- Trans Fat: 0g
- Carbohydrates: 15g
- Fiber: 1g
- Protein: 1g
- Cholesterol: 10mg
Keywords: pumpkin, truffles, dessert, fall treat, pumpkin spice
Minute Fall Pumpkin Biscuits: Flaky, Tender & Cozy
Pumpkin Biscuits: The Comfort of Fall in Every Bite
Hey there, fellow food lovers! Welcome back to Feastical, where every recipe tells a story, and every dish is an invitation to gather around the table. Today, we’re diving into a delightful recipe that perfectly captures the essence of fall—Pumpkin Biscuits! Why pumpkin, you ask? Well, there’s just something magical about this versatile ingredient that adds warmth, flavor, and just the right amount of comfort to our plates. Whether you’re looking for a cozy breakfast option or a delightful accompaniment to dinner, these biscuits will warm your heart and fill your belly.
Let me take you on a little journey back in time. I can still remember the aroma wafting through the kitchen at my grandma’s house when autumn rolled in. With leaves turning golden and the air getting crisp, she would whip up batches of her scrumptious pumpkin biscuits. Packed with savory herbs and a hint of sweetness, those biscuits were our family’s beloved tradition! Each bite felt like a soft hug, and they always paired beautifully with homemade soup or simply slathered with butter.
Now, you might be thinking, “Beau, I love a good biscuit, but can I really pull this off?” Fear not! With this ridiculously easy recipe, I’m here to guide you every step of the way. Get ready to channel your inner fall spirit!
The Ingredients: What You’ll Need
Let’s get down to business. Here are the ingredients you’ll need to create these mouthwatering pumpkin biscuits:
-
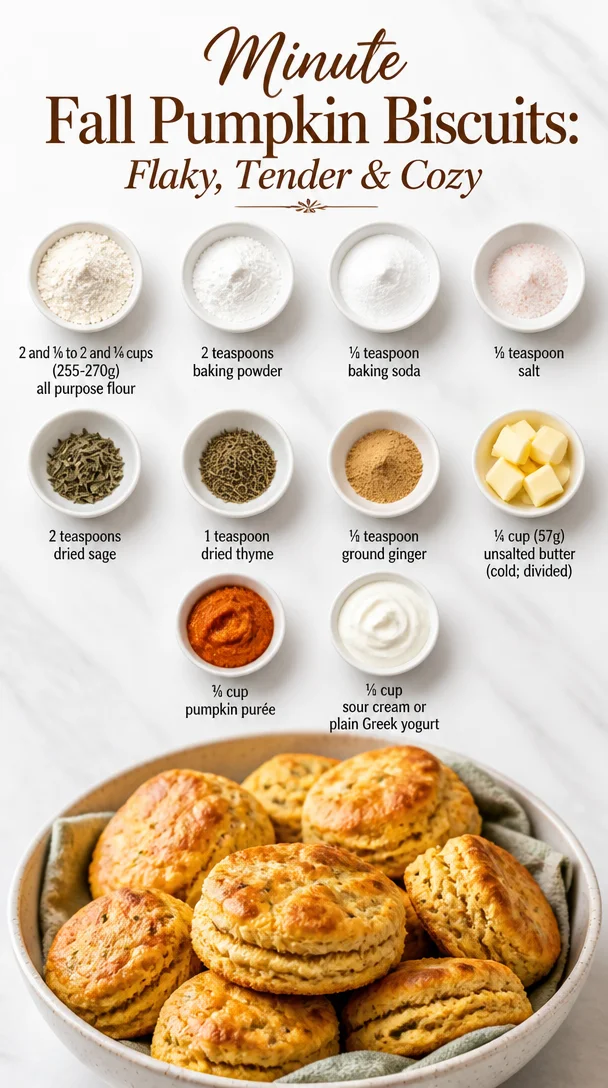
2 and ⅛ to 2 and ¼ cups (255-270g) all-purpose flour: This is your base! Feel free to substitute with whole wheat flour for a healthier twist or gluten-free flour if needed.
-
1-2 teaspoons baking powder: This is what gives our biscuits that lovely rise! Just make sure it’s fresh; old baking powder can lead to flat biscuits.
-
½ teaspoon baking soda: Works with the pumpkin puree to help the biscuits rise further and achieve a soft, fluffy texture.
-
½ teaspoon salt: A little salt enhances all the flavors and balances the sweetness of the pumpkin. You could use sea salt for a different taste.
-
2 teaspoons dried sage: The earthiness of sage pairs marvelously with pumpkin. If sage isn’t your thing, try rosemary or even Italian seasoning for a fun twist.
-
1 teaspoon dried thyme: Another herb that boosts the biscuit’s flavor. Just like with sage, if you’re running low, oregano works too!
-
½ teaspoon ground ginger: Adds a warm, spicy note! You could swap this for cinnamon if you prefer a sweeter biscuit.
-
¼ cup (57g) unsalted butter (cold; divided): Butter is key to making flaky biscuits! Preferably keep it cold and cut into small cubes for the best texture.
-
¾ cup pumpkin purée: The star of the show! You can use canned pumpkin puree or roast and mash your own pumpkin—easy-peasy!
-
½ cup sour cream or plain Greek yogurt: This adds richness and moisture. If you’re after a lighter version, use low-fat yogurt or even unsweetened applesauce.
Now that we’ve gathered our ingredients, let’s get cooking!
Step-by-Step Instructions: Let’s Make It Happen!
-
Preheat that Oven: Start by preheating your oven to 400°F (200°C). This is crucial for that golden-brown finish we all crave!
-
Mix the Dry Ingredients: In a large mixing bowl, whisk together the flour, baking powder, baking soda, salt, sage, thyme, and ground ginger. This step blends the flavors and ensures an even rise as our biscuits bake.
-
Cut in Butter: Add the cold, cubed butter to the flour mixture. Here’s the fun part—use a pastry cutter or two forks to mix until the mixture resembles coarse crumbs. If you have chilly hands, this is the time to employ them! The key is to keep the butter cold to ensure flakiness.
-
Stir in Wet Ingredients: In another bowl, combine the pumpkin purée, sour cream (or yogurt), and mix until smooth. Gradually add this mixture to your flour blend. Use a spatula to fold everything together gently—over-mixing can lead to tough biscuits!
-
Knead and Roll: Dust a clean surface with a little flour and turn out the dough. Lightly knead it just a few times—think of it as a gentle massage rather than a full workout. Roll it out to about ¾ inch thick.
-
Cut Out Your Biscuits: Use a biscuit cutter or a simple glass to punch out your biscuits. Place them on a baking sheet lined with parchment paper. Give them a little space to expand!
-
Brush with Butter: Melt a tablespoon of butter and brush it over the tops of the biscuits for that delicious golden glow.
-
Bake: Pop your biscuits in the oven for about 15-20 minutes, or until they are risen and golden brown. Keep an eye on them, as oven times can vary.
-
Cool and Enjoy: Let your biscuits cool on the baking sheet for a few minutes before transferring them to a wire rack. They’re fabulous served warm!
Tip from the Chef: For extra flavor, consider adding some grated cheese or chopped nuts right into your dough!
Serving Suggestions: How to Plate Your Biscuits
Presentation is everything, right? To serve your pumpkin biscuits, I recommend placing them in a beautiful basket lined with a clean linen napkin. This not only keeps them warm but also gives that homey vibe we all love.
Serve them alongside a steaming bowl of your favorite soup, like a creamy tomato basil or a rustic butternut squash soup. Or, go the breakfast route and whip up some scrambled eggs and crispy bacon for a hearty morning treat. Don’t forget to set out some flavored butter or homemade jams to spread onto the warm biscuits—you’ll thank me later!
Recipe Variations: Spice It Up!
Now we know classic is great, but if you’re feeling adventurous, here are a few creative twists to your pumpkin biscuits:
-
Sweet and Savory: Add a handful of chopped walnuts or pecans for texture and a bit of sweetness!
-
Herbal Delight: Swap the dried herbs for fresh ones—just double the amount for that garden-fresh taste.
-
Cheesy Pumpkin Biscuits: Mix in shredded cheese (cheddar, gouda, or even feta) for a cheesy surprise in every bite.
-
Spicy Kick: Turn up the heat by adding a pinch of cayenne pepper to the dry ingredients.
-
Gluten-Free Bliss: Use a 1:1 gluten-free flour blend in place of the all-purpose flour for a gluten-free version that still tastes fantastic!
Chef’s Notes: My Journey with Pumpkin Biscuits
Ah, pumpkin biscuits hold a special place in my heart. Over the years, I’ve played with this recipe, adding tidbits of nostalgia and experimenting with new flavors. One time, I even tried adding chocolate chips to the dough just for fun—while it was a tasty creation, I decided to keep this one classic, letting the pumpkin shine through.
A funny story: one autumn, I was hosting a brunch and forgot to buy enough pumpkin! I improvised with some sweet potato mash I had on hand, and you know what? It turned out just as delightful! This kitchen adventure taught me that cooking is all about being flexible and having fun!
FAQs and Troubleshooting: Answers to Your Questions
-
My biscuits turned out flat—what went wrong?
- Double-check your baking powder and baking soda are fresh. Also, ensure you’re measuring the flour correctly; too little can lead to flat biscuits.
-
Can I freeze the biscuits?
- Absolutely! Once baked and cooled, store them in an airtight container or freezer bag. Reheat in the oven or microwave when you’re ready to enjoy!
-
What if I don’t have sour cream?
- No problem! You can substitute with buttermilk, plain yogurt, or even unsweetened applesauce.
-
How do I know when my biscuits are done?
- Besides the lovely golden color, if you tap the bottom of a biscuit and it sounds hollow, it’s a sign they’re perfectly baked!
Nutritional Info
While the comfort of these pumpkin biscuits can’t be beat, here’s a quick overview of its nutritional aspects to keep you in the know:
- Serving Size: 1 biscuit
- Calories: Approximately 150–200 calories
- Total Fat: Around 8–10 grams
- Saturated Fat: About 4 grams (largely from the butter)
- Carbohydrates: 20–25 grams
- Fiber: 1–2 grams (thanks to the pumpkin!)
- Protein: 3–4 grams
These biscuits are a delightful way to brighten up your day without sabotaging your dietary goals!
Final Thoughts
There you have it, my friends—easy, delicious pumpkin biscuits that will undoubtedly become a staple in your kitchen this fall and beyond. Each bite captures the cozy, comforting essence of autumn, perfect for gatherings or quiet evenings at home.
I hope you enjoy making and sharing these biscuits as much as I do. Remember, cooking should always feel good! So roll up those sleeves, get your hands a little messy, and, most importantly, enjoy every moment spent in the kitchen.
Until next time, keep the good vibes and delicious food flowing! Happy baking!
Print
Pumpkin Biscuits
- Total Time: 35 minutes
- Yield: 12 biscuits 1x
- Diet: Vegetarian
Description
Delightful pumpkin biscuits that capture the essence of fall, perfect for breakfast or as an accompaniment to dinner.
Ingredients
- 2 and ⅛ to 2 and ¼ cups (255-270g) all-purpose flour
- 1–2 teaspoons baking powder
- ½ teaspoon baking soda
- ½ teaspoon salt
- 2 teaspoons dried sage
- 1 teaspoon dried thyme
- ½ teaspoon ground ginger
- ¼ cup (57g) unsalted butter (cold; divided)
- ¾ cup pumpkin purée
- ½ cup sour cream or plain Greek yogurt
Instructions
- Preheat your oven to 400°F (200°C).
- Mix the dry ingredients: In a large mixing bowl, whisk together the flour, baking powder, baking soda, salt, sage, thyme, and ground ginger.
- Cut in the cold, cubed butter until the mixture resembles coarse crumbs.
- Stir in the wet ingredients: Combine the pumpkin purée, sour cream (or yogurt), and mix until smooth.
- Knead the dough lightly on a floured surface and roll it out to about ¾ inch thick.
- Cut out biscuits using a biscuit cutter or glass.
- Brush the tops with melted butter.
- Bake for 15-20 minutes, or until risen and golden brown.
- Cool on the baking sheet for a few minutes before transferring to a wire rack.
Notes
For extra flavor, consider adding grated cheese or chopped nuts.
- Prep Time: 15 minutes
- Cook Time: 20 minutes
- Category: Baking
- Method: Baking
- Cuisine: American
Nutrition
- Serving Size: 1 biscuit
- Calories: 175
- Sugar: 3g
- Sodium: 250mg
- Fat: 8g
- Saturated Fat: 4g
- Unsaturated Fat: 3g
- Trans Fat: 0g
- Carbohydrates: 24g
- Fiber: 1g
- Protein: 4g
- Cholesterol: 15mg
Keywords: pumpkin, biscuits, fall baking, comfort food
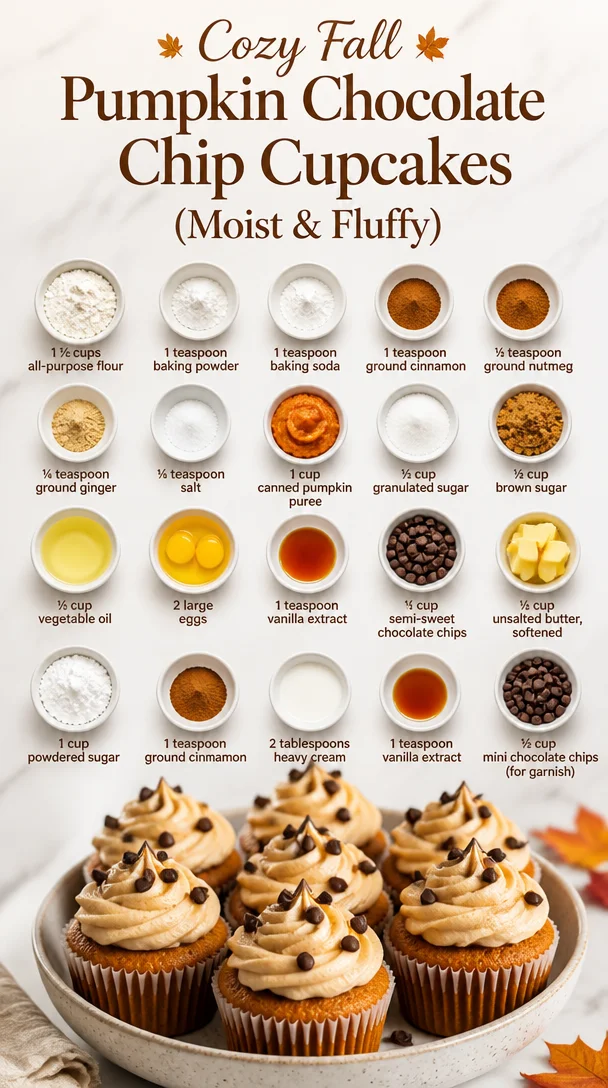
Cozy Fall Pumpkin Chocolate Chip Cupcakes (Moist & Fluffy)
Pumpkin Chocolate Chip Cupcakes: A Cozy Treat for Autumn
Hey there, fellow food lovers! As the leaves turn golden and the crisp autumn breeze sweeps in, there’s something truly magical about this time of year. We swap out our flip-flops for cozy socks and start craving those warm, comforting flavors that make our hearts sing. And you know what embodies that seasonal warmth perfectly? Pumpkin! So grab your apron and let’s dive into the delightful world of Pumpkin Chocolate Chip Cupcakes—a treat that brings together the best of both worlds: autumn spice and chocolatey goodness!
I can still remember the first time I baked with pumpkin as a kid. I was maybe seven or eight, and my grandmother would invite me into her cozy kitchen every fall. The air would fill with the rich aroma of cinnamon and nutmeg, contrasting beautifully with the sweet scent of chocolate chips. As we mixed our ingredients, she would tell me stories about how pumpkin had been a cherished ingredient in her family for generations. That kitchen became our playground, a place where laughter and love mingled with flour and sugar. I knew from those tender moments that I wanted to carry on that legacy.
Now, years later, I’m here to share the joy of pumpkin baking with you. These cupcakes are not only simple and fun to make, but they also carry that nostalgic essence that turns an ordinary day into a warm celebration. They’re perfect for anything from casual family gatherings to festive holiday parties. Trust me, you’re going to want to add this recipe to your culinary repertoire!
So, let’s get comfy and preheat that oven! It’s time to create some muffins that taste like a hug and smile all wrapped into one.
Personal Story
As I mentioned earlier, my cherished memories of baking pumpkin treats with my grandma have always inspired my own love for the kitchen. One particular autumn evening stands out vividly in my mind. We decided it was time to bake up a storm—her famous pumpkin pie would usually steal the spotlight, but this time, I persuaded her to let me take the lead on cupcakes.
We filled the kitchen with laughter, flour, and a little friendly competition over who could get the perfect swirl of frosting on top. I still giggle thinking about how my first attempts got swiped off the table by our rascally cat, Whiskers, who seemed to mistake the little treats for his toys! But that night, with my grandma cheering me on, I finally created a batch of cupcakes that not only looked good but tasted divine. Each cupcake was a delightful reminder of joy, family, and love.
To this day, I hold that warm and fuzzy feeling close to my heart, and it shines through every time I whip up a batch of Pumpkin Chocolate Chip Cupcakes. Whether it’s for a fall fest, a cozy gathering of friends, or simply a treat for myself on a chilly evening, this recipe is the perfect way to savor those sweet memories while creating new ones.
Ingredients
Here’s what you’ll need to whip up a batch of these decadent pumpkin chocolate chip cupcakes:
-
1 ½ cups all-purpose flour
The foundation of our cupcakes! You can swap this for whole wheat flour for added nutrition, but you may find the texture to be denser. -
1 teaspoon baking powder
A must for giving your cupcakes their lovely rise! Always check the expiration date; stale powder can leave your cupcakes flat. -
1 teaspoon baking soda
Acts as a leavening agent, balancing out the density of pumpkin. You can use baking powder instead if you’re in a pinch—just double the amount. -
1 teaspoon ground cinnamon
This spice brings warmth and depth. Consider experimenting with other spices like cardamom for a unique flavor twist! -
½ teaspoon ground nutmeg
Perfect for adding that classic autumn essence! Don’t skip it—it makes a world of difference! -
¼ teaspoon ground ginger
A subtle zing to elevate the flavors. Fresh ginger would also work great if you grate it finely. -
¼ teaspoon salt
Enhances all the flavors! It’s a key ingredient in balancing sweetness. -
1 cup canned pumpkin puree
The star of the show! Make sure it’s pure pumpkin, not pumpkin pie filling. You can homemade puree, too, if you’re feeling adventurous! -
½ cup granulated sugar
For that base sweetness. If you want a lower sugar version, feel free to reduce it by a quarter! -
½ cup brown sugar
Adds moisture and a richer flavor. For a caramel note, try using dark brown sugar instead! -
½ cup vegetable oil
Keeps these cupcakes ultra moist! You can substitute with melted coconut oil for a tropical twist. -
2 large eggs
Provides structure and richness. For a vegan version, you can use flax eggs (1 tablespoon ground flaxseed mixed with 2.5 tablespoons water). -
1 teaspoon vanilla extract
For a lovely aroma and sweetness; hence why you need to use high-quality vanilla! -
1 cup semi-sweet chocolate chips
Chocolate makes everything better! You can swap for dark chocolate or even white chocolate if you prefer a different vibe. -
½ cup unsalted butter, softened
For the frosting! Room temperature is crucial for a smooth texture. You can replace this with vegan butter for a dairy-free version. -
1 cup powdered sugar
Sweetens and thickens the frosting! If you run low on powdered sugar, feel free to blitz regular granulated sugar in a high-speed blender until it turns fine. -
1 teaspoon ground cinnamon
For flavoring the frosting, it ties everything together beautifully! -
2 tablespoons heavy cream
Gives that luscious texture to the frosting. If you’re vegan, coconut cream would work like a dream! -
1 teaspoon vanilla extract (for the frosting)
Just brings it all to another level! Again, use the good stuff. -
½ cup mini chocolate chips (for garnish)
Because you can never have too much chocolate! They are great for decoration and an extra sweet treat on top.
Step-by-Step Instructions
Okay, my friend, it’s GO time! Let’s bring these Pumpkin Chocolate Chip Cupcakes to life! Follow these simple steps:
-
Preheat Your Oven
Preheat your oven to 350°F (170°C) and line a muffin tin with paper liners. This is where the magic is going to happen, and trust me, you don’t want to miss it! -
Mix the Dry Ingredients
In a medium bowl, whisk together the flour, baking powder, baking soda, cinnamon, nutmeg, ginger, and salt. This helps to distribute everything evenly, ensuring each cupcake is packed with flavor. -
Combine the Wet Ingredients
In a large bowl, mix together the pumpkin puree, granulated sugar, brown sugar, vegetable oil, eggs, and vanilla extract until you have a smooth mixture. I always suggest using a hand mixer or whisk because the less air you incorporate into your batter, the denser the cupcake will be. -
Combine the Mixtures
Gradually add the dry mixture to the wet mixture until just combined. Don’t overmix or your cupcakes will be tough. It’s totally fine if there are a few lumps; we’re going for tender cupcakes here! -
Fold in the Chocolate Chips
Gently fold in the semi-sweet chocolate chips, allowing them to mix evenly throughout the batter—this is when the fun starts! You can save a few chips to sprinkle on top before baking if you wish. -
Fill the Muffin Cups
Spoon the batter into the prepared muffin tin, filling each cup about ¾ full. This allows room for the cupcakes to rise without overflowing. You want to create those perfectly dome-shaped tops! -
Bake
Pop them in the oven for about 18-22 minutes, or until a toothpick inserted into the center comes out clean. Oh, the sweet aroma will fill your kitchen—it’s just heavenly! -
Cool
Let them cool in the tin for about 5 minutes before transferring them to a wire rack to cool completely. This step is essential if you want to frost them nicely. -
Prepare the Frosting
While they cool, let’s whip up that dreamy frosting! In a mixing bowl, beat the softened butter until creamy, then gradually add in the powdered sugar, vanilla extract, and ground cinnamon, mixing until smooth. If it’s too thick, add the heavy cream a tablespoon at a time until you reach your desired consistency. -
Frost Your Cupcakes
Once cooled, frost each cupcake generously! You can use a piping bag for a fancy swirl or just a simple spatula for a homemade feel. Top with mini chocolate chips because, well, why not? They add that extra crunch and cuteness to your cupcakes! -
Serve and Enjoy
Place them on a beautiful platter, gather your friends and family, and watch the magic happen. These cupcakes are not just treats; they’re moments of joy!
Serving Suggestions
To serve these delightful Pumpkin Chocolate Chip Cupcakes, consider arranging them on a festive cake stand, or even a rustic wooden board, to accentuate that autumn vibe. You could sprinkle a little powdered sugar or a dusting of cinnamon on top for that extra touch of charm. Pair them with a warm mug of spiced cider or a cup of pumpkin spice latte for a truly seasonal experience.
Imagine a cozy setting with soft lighting—maybe some flickering candles—and the laughter of loved ones filling the air. Your pumpkin cupcakes will not only shine on the table but also warm the hearts of everyone who takes a bite.
Feel free to package a few as sweet gifts to friends, neighbors, or coworkers in adorable fall-themed boxes or treat bags. Nothing says “I appreciate you!” quite like homemade baked goodies!
Recipe Variations
Now, let’s talk about how you can make these cupcakes your own! These variations are great for those who want to experiment a little:
-
Spiced Pumpkin Chocolate Chip: Add some chopped pecans or walnuts to the batter for extra texture and a nutty flavor.
-
Pumpkin Spice Latte Cupcakes: Infuse your batter with a tablespoon of instant espresso powder for that delightful coffee kick.
-
Vegan and Gluten-Free: Swap out the eggs for flax eggs, use almond flour instead of all-purpose flour, and coconut oil instead of vegetable oil.
-
Pumpkin Cream Cheese Frosting: For a tangy twist, mix in some softened cream cheese into your frosting instead of butter for a rich flavor.
-
Fill with Ganache: Create a surprise inside by filling your cupcakes with a chocolate ganache before frosting! Just carefully hollow out a small portion, fill it with ganache, and then frost as usual.
No matter how you twist it, these cupcakes will surely be a crowd-pleaser!
Chef’s Notes
Oh, and let me share a little secret about these cupcakes—they’re just as tasty the next day (if they last that long, of course!). If you find you have leftovers, simply store them covered at room temperature. However, if you’re like me and always on the lookout for the next baking adventure, I encourage you to try out variations to this recipe.
I once hosted a pumpkin-themed potluck, and I decided to make a giant version of these cupcakes in a bundt pan. It was an absolute hit! Sometimes, playing around leads to delightful surprises, so don’t be afraid to experiment and have fun in the kitchen!
FAQs and Troubleshooting
1. My cupcakes fell in the middle, what happened?
This usually occurs if the batter was overmixed or if they were taken out of the oven too soon. Always use the toothpick test—insert it, and if it comes out clean, they’re ready!
2. Can I use fresh pumpkin instead of canned?
Absolutely! Just make sure to cook and puree the pumpkin until it’s smooth and thick—just like the canned version!
3. How can I store them for freshness?
Keep your cupcakes in an airtight container at room temperature for up to three days. For longer storage, pop them in the freezer; just thaw when you’re ready to enjoy again!
4. What if my frosting is too runny?
If your frosting is too runny, add a little more powdered sugar until it reaches your desired consistency. There’s always a solution in the kitchen!
Nutritional Info
Per cupcake, these delightful treats pack in approximately:
- Calories: 180
- Total Fat: 8g
- Saturated Fat: 2g
- Cholesterol: 38mg
- Sodium: 150mg
- Total Carbohydrates: 25g
- Dietary Fiber: 1g
- Sugars: 12g
- Protein: 2g
These are estimates, of course, and can change depending on ingredient variations. They’re certainly a treat, so enjoy them in moderation as part of a balanced diet.
Final Thoughts
So there you have it—a recipe to make some unforgettable Pumpkin Chocolate Chip Cupcakes packed with love, nostalgia, and tons of flavor! Whether you’re whipping them up for family, friends, or a late-night snack just for you, I guarantee these little delights will bring smiles all around.
Just as my grandma did with me, I encourage you to share the joy of baking, get a little flour on your nose, and let the kitchen be a place of laughter and love. Remember, cooking doesn’t have to be complicated—it should be a delightful experience that nourishes our souls as much as our tummies.
Now, go ahead and turn on that oven, mix up that batter, and create some magical memories! I can’t wait to hear about your baking adventures with these Pumpkin Chocolate Chip Cupcakes. Until next time, happy baking, friends!
Print
Pumpkin Chocolate Chip Cupcakes
- Total Time: 35 minutes
- Yield: 12 servings 1x
- Diet: Vegetarian
Description
Cozy and comforting cupcakes combining pumpkin and chocolate chips, perfect for autumn gatherings.
Ingredients
- 1 ½ cups all-purpose flour
- 1 teaspoon baking powder
- 1 teaspoon baking soda
- 1 teaspoon ground cinnamon
- ½ teaspoon ground nutmeg
- ¼ teaspoon ground ginger
- ¼ teaspoon salt
- 1 cup canned pumpkin puree
- ½ cup granulated sugar
- ½ cup brown sugar
- ½ cup vegetable oil
- 2 large eggs
- 1 teaspoon vanilla extract
- 1 cup semi-sweet chocolate chips
- ½ cup unsalted butter, softened
- 1 cup powdered sugar
- 1 teaspoon ground cinnamon (for frosting)
- 2 tablespoons heavy cream
- 1 teaspoon vanilla extract (for frosting)
- ½ cup mini chocolate chips (for garnish)
Instructions
- Preheat your oven to 350°F (170°C) and line a muffin tin with paper liners.
- Mix the dry ingredients: In a medium bowl, whisk together the flour, baking powder, baking soda, cinnamon, nutmeg, ginger, and salt.
- Combine the wet ingredients: In a large bowl, mix together the pumpkin puree, granulated sugar, brown sugar, vegetable oil, eggs, and vanilla extract until smooth.
- Combine the mixtures: Gradually add the dry mixture to the wet mixture until just combined.
- Fold in the chocolate chips gently.
- Fill the muffin cups about ¾ full with batter.
- Bake for 18-22 minutes or until a toothpick comes out clean.
- Cool for 5 minutes in the tin before transferring to a wire rack.
- Prepare the frosting: Beat softened butter, then gradually add powdered sugar, vanilla extract, and ground cinnamon until smooth. Add heavy cream as needed.
- Frost each cupcake generously, topping with mini chocolate chips.
- Serve and enjoy!
Notes
These cupcakes are just as tasty the next day. Store in an airtight container at room temperature.
- Prep Time: 15 minutes
- Cook Time: 20 minutes
- Category: Dessert
- Method: Baking
- Cuisine: American
Nutrition
- Serving Size: 1 cupcake
- Calories: 180
- Sugar: 12g
- Sodium: 150mg
- Fat: 8g
- Saturated Fat: 2g
- Unsaturated Fat: 5g
- Trans Fat: 0g
- Carbohydrates: 25g
- Fiber: 1g
- Protein: 2g
- Cholesterol: 38mg
Keywords: pumpkin, cupcakes, chocolate chips, fall desserts, autumn baking
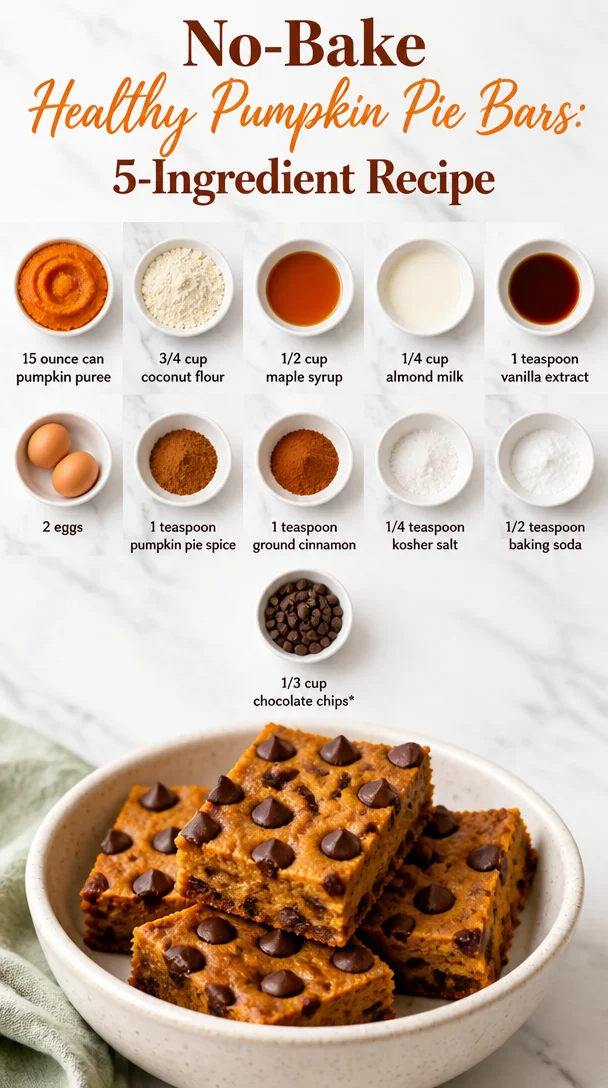
No-Bake Healthy Pumpkin Pie Bars: 5-Ingredient Recipe
Healthy Pumpkin Pie Bars: Comfort in Every Bite
Hey there, fellow foodies! It’s your friendly chef Beau Collier here, and today we’re diving into a deliciously healthy treat that’s perfect for the season—Healthy Pumpkin Pie Bars! 🍂✨ These bars are not just a dessert; they’re a hug in edible form, packed with warm spices and all the fall flavors you love, but with a wholesome twist that makes them perfect for any occasion.
Introduction
As the leaves turn golden and the cool breeze ushers in sweater weather, pumpkin-flavored everything makes its grand entrance. From lattes to pastries, there’s something about that rich, earthy taste that awakens our senses and makes us feel right at home. When I think of fall flavors, I can’t help but reminisce about the comforting pumpkin pies that would grace our dining table every Thanksgiving. But let’s face it—traditional pumpkin pie can sometimes feel heavy and loaded with sugar.
So, what’s a spice-loving, health-conscious foodie to do? Enter my Healthy Pumpkin Pie Bars! These tasty delights bring all the cozy, nostalgic flavors of pumpkin pie while being packed with nutritious ingredients. Ideal for a snack, dessert, or even breakfast (yes, you heard me right!), these bars are a game-changer. The best part? They’re incredibly easy to whip up, so you won’t be spending hours in the kitchen—just quick, straightforward steps to mouthwatering goodness.
The blend of coconut flour, sweet maple syrup, and creamy pumpkin puree creates a delightfully moist texture that’s hard to resist. Plus, with just a handful of ingredients, you’ll wonder why you didn’t make them sooner! So, grab your apron, let’s roll up our sleeves, and get baking these Healthy Pumpkin Pie Bars together!
Personal Story
You know, every time I whip up a batch of pumpkin pie bars, I can’t help but think back to my childhood kitchen adventures with my grandmother. She was the queen of cozy, soul-satisfying recipes, and her pumpkin pies were legendary. Every fall, I’d see her scurrying about the kitchen, the aroma of cinnamon and nutmeg swirling through the air like a warm welcome. I can still see the way she’d smile as she pulled that golden-brown pie from the oven, the perfectly crimped crust shining with delicious anticipation.
One sunny autumn afternoon, she handed me a small mixing bowl and invited me to help her make her famous filling. As we mashed the pumpkin, mixed in the spices, and giggled about our flour fights, I realized that cooking was so much more than just about food; it was about creating memories and sharing love. Those fun-filled afternoons with my grandmother still inspire me to this day. With these Healthy Pumpkin Pie Bars, I want to replicate that magic—simple ingredients, hearty flavors, and the joy of cooking together.
Ingredients
Let’s gather our ingredients for these scrumptious Healthy Pumpkin Pie Bars! Here’s what you’ll need:
-
15-ounce can of pumpkin puree: The star of the show! This keeps our bars moist and packed with flavor. You can substitute with homemade pumpkin puree if you have it on hand.
-
3/4 cup coconut flour: This gluten-free flour adds a lovely texture and nutty flavor. If you don’t have coconut flour, almond flour is a great stand-in, but you may need to adjust the liquid slightly.
-
1/2 cup maple syrup: A natural sweetener that brings out the pumpkin’s flavor. You could use honey or agave syrup if you prefer, but the taste will vary slightly.
-
1/4 cup almond milk: This keeps things creamy without weighing it down. Any milk—dairy or non-dairy—works just as well here.
-
1 teaspoon vanilla extract: Vanilla enhances sweetness and adds depth of flavor. Keep it real with pure vanilla extract for the best results.
-
2 eggs: They’ll bind everything together and give a lovely texture. If you’re vegan, you can use flax eggs as a substitute (1 tablespoon ground flaxseed mixed with 3 tablespoons water per egg).
-
1 teaspoon pumpkin pie spice: This fragrant mix of spices will make your kitchen smell heavenly. If you don’t have pumpkin pie spice, a mix of cinnamon, nutmeg, and ginger will do the trick.
-
1 teaspoon ground cinnamon: Because you can never have too much cinnamon, right?
-
1/4 teaspoon kosher salt: This will enhance all the flavors and balance the sweetness.
-
1/2 teaspoon baking soda: It helps our bars rise and become fluffy. Make sure it’s fresh for the best results.
-
1/3 cup chocolate chips: Adding these gives a delightful melty surprise in every bite! Use dark chocolate for a healthier option or leave them out completely if you prefer.
With this lineup, we’re ready to create some heavenly pumpkin pie bars that everyone is sure to love!
Step-by-Step Instructions
Now that we’ve got our ingredients ready, let’s get cooking! Follow these simple steps for your Healthy Pumpkin Pie Bars:
-
Preheat Your Oven: First things first, preheat your oven to 350°F (175°C). This ensures your bars cook evenly and bake to golden perfection.
-
Prepare Your Baking Dish: Grab an 8×8 inch baking pan (or similar size) and line it with parchment paper or grease it lightly with cooking spray. This will make lifting the bars out a breeze once they’re done!
-
Mix the Wet Ingredients: In a large mixing bowl, whisk together the pumpkin puree, maple syrup, almond milk, vanilla extract, and eggs until fully combined and smooth. This is where the magic starts—watch how those flavors meld together!
-
Incorporate the Dry Ingredients: In a separate bowl, mix the coconut flour, pumpkin pie spice, ground cinnamon, kosher salt, and baking soda. Making sure to break up any clumps! Gradually add the dry ingredients to the wet ingredients, folding them in gently. It should create a thick batter that has a lovely aroma wafting through the kitchen.
-
Add the Chocolate Chips: Don’t forget this crucial step! Gently fold in those chocolate chips, distributing them evenly throughout the batter for delightful chocolatey pockets in every bite.
-
Transfer to Baking Dish: Pour the batter into the prepared baking dish. Use a spatula to ensure it’s evenly spread out, reaching all corners.
-
Bake to Perfection: Pop the dish into your preheated oven and let the bars bake for about 30-35 minutes. Keep an eye on them! They’re ready when a toothpick inserted in the center comes out clean.
-
Cool & Slice: Once they’re baked, remove the bars from the oven and let them cool in the pan for about 10 minutes, then transfer to a wire rack to cool completely. This waiting game is the hardest part, I know! But trust me, it’s worth it.
-
Cut & Enjoy: Once totally cooled, slice into bars, serve, and enjoy the heartfelt flavors bursting in every bite!
Serving Suggestions
These Healthy Pumpkin Pie Bars are versatile and can be served in various fun ways. For that café-style touch, consider serving them warm with a dollop of whipped coconut cream on top—seriously, it’s like fall in your mouth! If you’re feeling extra fancy, sprinkle some chopped pecans or walnuts on top for added crunch and presentation.
Another nifty serving tip is to place the bars on a lovely platter and dust them with a little extra cinnamon for an aromatic touch. You could also drizzle a bit of extra maple syrup or your favorite nut butter over the top for an indulgent twist. Pair them with a warm chai latte or a cup of spiced tea for an extra cozy experience.
Recipe Variations
Feeling adventurous? Here are some fun variations you can try out with these Healthy Pumpkin Pie Bars:
-
Pumpkin Chocolate Chip Pecan Bars: Stir in some chopped pecans along with the chocolate chips for delightful texture and added nutty flavor.
-
Maple Glaze Drizzle: Whip up a simple glaze using powdered sugar and a bit of maple syrup to drizzle over the cooled bars for a sweet finishing touch.
-
Coconut-Pumpkin Fusion: If you love coconut, add some shredded unsweetened coconut to the batter for a tropical twist.
-
Spiced Pumpkin Bars: Amp up the spice! Add a dash of cardamom or ginger for an extra burst of warmth.
-
Nut-Free Option: Omit the almond milk and chocolate chips, and replace them with oat milk or another nut-free alternative to make it entirely nut-free.
Chef’s Notes
As you bake these bars, I can’t help but think of the many ways recipes evolve over time. Just like my grandmother did, I find myself playing with flavors, substituting ingredients based on what I have, and making these recipes my own. When I first started making pumpkin bars, they were a decadent, sugar-laden dessert. But as I learned more about the health benefits of alternative ingredients, I realized you can still enjoy delicious treats without sacrificing your health goals. That’s the beauty of cooking—it’s all about making it your own and sharing what you love with others!
FAQs and Troubleshooting
1. Can I use fresh pumpkin instead of canned?
Absolutely! Just make sure to bake the pumpkin until tender and then puree it until smooth. Fresh pumpkin can give a wonderful, vibrant flavor.
2. My bars are too crumbly! What went wrong?
If your bars are crumbly, it could be due to too much coconut flour. Flour can vary in moisture absorption, so if yours is too dry, try adding a tablespoon more of almond milk.
3. Can I freeze these pumpkin bars?
Yes, indeed! Once cooled, cut them into bars and store them in an airtight container in the freezer. They can be enjoyed later—simply thaw them out at room temperature.
4. How do I know when they are done baking?
The best way to check is using a toothpick! Insert it in the center, and when it comes out clean, your bars are ready to enjoy!
Nutritional Info
Each serving of these Healthy Pumpkin Pie Bars provides a wholesome dose of nutrients. Thanks to the pumpkin, you’ll get a boost of vitamin A, fiber, and antioxidants. The coconut flour contributes healthy fats and protein, while the maple syrup adds a touch of natural sweetness without overwhelming your system with refined sugars. Depending on your specific ingredient choices, each bar can range from approximately 150-200 calories, making them a guilt-free treat or snack option you can feel great about enjoying!
Final Thoughts
There you have it, friends! A delightful journey from ingredients to the delicious Healthy Pumpkin Pie Bars that will make your taste buds celebrate. I hope this simple, straightforward recipe inspires you to create your own memories in the kitchen—just like I did with my grandmother. Whether you’re baking for yourself, your family, or even for a festive gathering, these bars are a sure way to bring smiles and warm nostalgia to the table.
Remember, cooking doesn’t have to be complicated. It’s about bringing people together and enjoying every flavorful moment. So, grab your ingredients, turn up some cozy tunes, and let’s bake up some love! Happy cooking, and until next time, keep spreading the joy of food! 🍴❤️
Print
Healthy Pumpkin Pie Bars
- Total Time: 50 minutes
- Yield: 9 servings 1x
- Diet: Vegetarian
Description
Deliciously healthy pumpkin pie bars packed with warm spices and wholesome ingredients, perfect for any occasion.
Ingredients
- 15-ounce can of pumpkin puree
- 3/4 cup coconut flour
- 1/2 cup maple syrup
- 1/4 cup almond milk
- 1 teaspoon vanilla extract
- 2 eggs
- 1 teaspoon pumpkin pie spice
- 1 teaspoon ground cinnamon
- 1/4 teaspoon kosher salt
- 1/2 teaspoon baking soda
- 1/3 cup chocolate chips
Instructions
- Preheat your oven to 350°F (175°C).
- Prepare your baking dish by lining it with parchment paper or greasing it lightly.
- Mix the wet ingredients in a large bowl until fully combined and smooth.
- Incorporate the dry ingredients in a separate bowl, and gradually add them to the wet ingredients.
- Add the chocolate chips to the batter.
- Transfer the batter to the prepared baking dish.
- Bake for about 30-35 minutes or until a toothpick comes out clean.
- Cool the bars for about 10 minutes in the pan, then transfer to a wire rack.
- Cut into bars and enjoy!
Notes
Serve warm with whipped coconut cream or a drizzle of maple syrup.
- Prep Time: 15 minutes
- Cook Time: 35 minutes
- Category: Dessert
- Method: Baking
- Cuisine: American
Nutrition
- Serving Size: 1 bar
- Calories: 175
- Sugar: 10g
- Sodium: 200mg
- Fat: 7g
- Saturated Fat: 3g
- Unsaturated Fat: 4g
- Trans Fat: 0g
- Carbohydrates: 23g
- Fiber: 3g
- Protein: 3g
- Cholesterol: 50mg
Keywords: pumpkin bars, healthy dessert, fall recipes, pumpkin pie, gluten-free
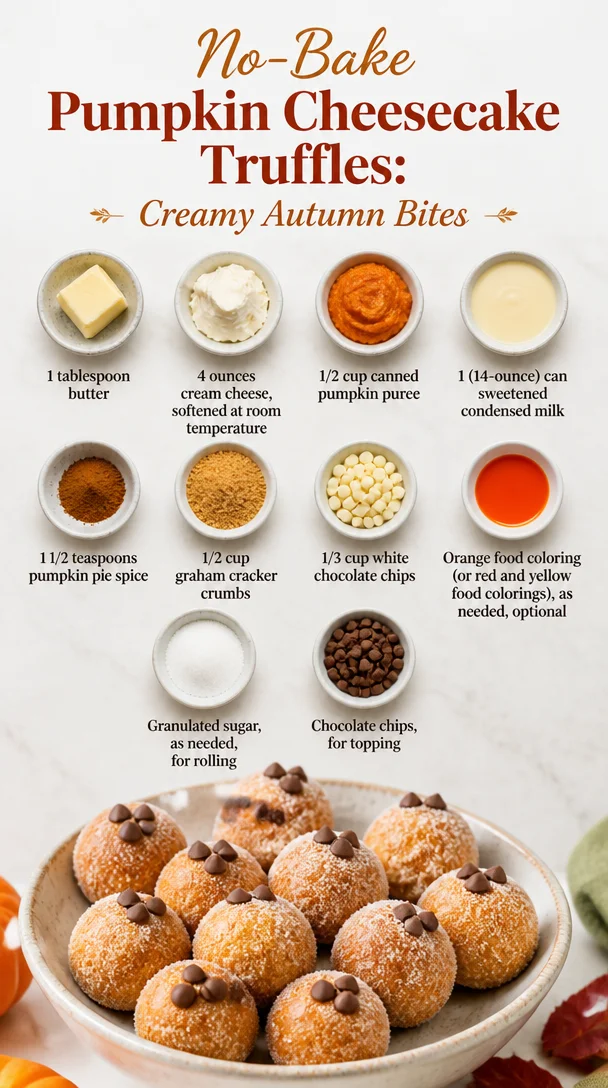
No-Bake Pumpkin Cheesecake Truffles: Creamy Autumn Bites
Indulge in the Sweetness: Pumpkin Cheesecake Truffles
Hey there, food lovers! Today, we’re diving into a treat that’s not only flavorful but also whispers cozy vibes with every bite. We’re talking about Pumpkin Cheesecake Truffles! These little bites of heaven combine the creaminess of cheesecake with the warm spices and flavors of fall, making for a delightful dessert that’s perfect year-round but especially enchanting during the cooler months.
But let’s be real—it’s not just about the incredible taste; it’s about the joy of creating memorable moments in the kitchen. So grab your apron, and let’s embark on this delicious journey together!
A Slice of Nostalgia
Let me take you back to a crisp autumn afternoon in my childhood kitchen. The leaves were turning, and the air smelled like cinnamon and nutmeg—a total sensory delight! My grandmother was up to her usual antics, and I remember her bustling around the kitchen with a mischievous twinkle in her eye. That day, we decided to whip up something special, and what better than an experiment with pumpkin?
We had a can of pumpkin puree sitting innocently in the pantry, so we decided to make a cheesecake. But halfway through mixing the ingredients, Grandma got this imaginative spark—why not turn it into bite-sized truffles? As we rolled those creamy bites in graham cracker crumbs, I felt like a little chef, filled with joy and laughter. The end result was a delicious mess of flavors that united our family around the dessert table.
Fast forward a few years, and that very memory sparked the inspiration for my Pumpkin Cheesecake Truffles recipe! Each time I whip up this treat, it’s as if I’m back in that warm kitchen, surrounded by love and laughter. Now, let’s create that magic together!
Ingredients
Here’s what you’ll need to conjure these delectable truffles:
-
1 tablespoon butter
A little butter brings richness to the truffles. If you need to swap, coconut oil works well for a dairy-free option! -
4 ounces cream cheese, softened at room temperature
Cream cheese lends that signature cheesecake creaminess. For a lighter option, consider using Greek yogurt (though it slightly alters that rich texture). -
1/2 cup canned pumpkin puree
Pure pumpkin puree is essential for this recipe, bringing in that cozy flavor. Avoid pumpkin pie filling—it’s too sweet and spiced! -
1 (14-ounce) can sweetened condensed milk
Sweetened condensed milk adds sweetness and a creamy texture. If you want a lighter version, use evaporated milk with a touch of sugar. -
1 1/2 teaspoons pumpkin pie spice
This spice blend is key! If you’re feeling adventurous, try making your own mix using cinnamon, nutmeg, ginger, and allspice. -
1/2 cup graham cracker crumbs
These give our truffles that cheesecake crust taste. For a gluten-free version, use gluten-free graham crackers or crushed nuts. -
1/3 cup white chocolate chips
Sweet and creamy, these will be melted into the mixture. No white chocolate? You can swap in semi-sweet chocolate! -
Orange food coloring (or red and yellow food colorings), as needed, optional
If you want your truffles to pop with color, feel free to add a few drops! -
Granulated sugar, as needed, for rolling
This adds a lovely touch of sweetness to the truffles when you roll them. You can skip this if you like them as-is! -
Chocolate chips, for topping
These finish off your truffles beautifully. Dark chocolate works great if you want that rich contrast!
Step-by-Step Instructions
Ready to roll those truffles? Let’s get cooking, my friend!
-
Prepare Your Mixing Bowl
Start by grabbing a medium-sized mixing bowl. This is where the magic happens! You’ll want to ensure your cream cheese is softened, as it mixes better this way. Let it sit at room temperature for about 30 minutes if you forgot to pull it out. -
Cream the Cream Cheese and Butter
Add the softened cream cheese and 1 tablespoon of butter to your mixing bowl. Use a hand mixer or a spatula to blend them together until the mixture is silky smooth. This is key for a luscious truffle! If you’re using a spatula, just put your back into it—it’ll pay off! -
Incorporate the Pumpkin
Next, stir in the 1/2 cup of canned pumpkin puree. Mix until well combined. The orange color will brighten your mixture! Take a moment to inhale that warm, comforting aroma. It’s pure bliss, isn’t it? -
Sweeten the Deal
Pour in the entire can of sweetened condensed milk. Trust me, this gives your truffles their dreamy texture. Mix until fully combined. You might need to scrape the sides of your bowl for anything that sticks. -
Spice It Up!
Add in your 1 1/2 teaspoons of pumpkin pie spice. If you’re feeling adventurous, throw in an extra pinch for good measure! Blend it well. You want to ensure that every bite brings that warm, cozy flavor. -
Fold in the Graham Cracker Crumbs
Now it’s time to fold in the graham cracker crumbs and the white chocolate chips. This is where your truffle mixture begins to take shape! Use a spatula to gently combine until everything is evenly distributed. Here’s a little chef tip: If the mixture is too soft, pop it into the fridge for about 15-20 minutes to firm up a bit before rolling. -
Roll Those Truffles
Once your mixture is at the right consistency, it’s time to roll! Take a tablespoon of the mixture and roll it into a ball. Aim for about 1 inch in diameter—just the right size for popping in your mouth! Repeat until the mixture is gone, placing each ball on a parchment-lined baking sheet. -
Chill Out
Now that your truffles are rolled, pop them into the fridge for at least an hour to set. This helps them maintain their shape and enhances the flavors. -
Finish and Decorate
Once your truffles are firm, it’s decoration time! If you’re using granulated sugar, roll them in a bowl of sugar until coated. Melt some chocolate chips in the microwave or on a double boiler, then drizzle or dip the truffles in the chocolate. Who can resist that brilliant finish? -
Serve and Enjoy!
Finally, plate your beautiful truffles and watch the magic happen as friends and family devour these little bites of heaven. Just remember to keep a few for yourself!
Serving Suggestions
When it comes to serving these Pumpkin Cheesecake Truffles, let your creativity shine! Arrange them on a beautiful platter with a dusting of powdered sugar or even a few sprigs of mint for an elegant touch. You could also nestle them in cupcake liners for a charming presentation.
For a fun twist, serve them alongside a warm cup of spiced chai or hot cider. The cozy flavors will complement each other perfectly, making for a delightful dessert experience.
Recipe Variations
Feeling inspired and want to try something different? Check out these creative twists:
-
Nutty Pumpkin Spice Truffles: Add finely chopped pecans or walnuts into the mixture for a delightful crunch!
-
Pumpkin Spice Latte Truffles: Infuse the truffle mixture with a shot of espresso. This twist adds depth and an extra layer of flavor that coffee lovers will adore.
-
Dairy-Free Option: Substitute the cream cheese for a dairy-free cream cheese alternative and use coconut milk sweetened condensed milk.
-
Different Chocolate Coating: Instead of white chocolate, dip your truffles in milk chocolate or even dark chocolate for a richer flavor experience.
-
Pumpkin Walnut Truffles: Mix in crushed graham crackers with pumpkin seeds, or even a hint of caramel, for a nutty delight!
Chef’s Notes
Oh, the times I’ve tried different variations of these truffles! I once went overboard with flavoring—let’s just say that a little too much nutmeg turned out to be an interesting learning experience! Over the years, I’ve perfected the balance of spices and sweetness, but I genuinely always encourage you to experiment. Every kitchen adventure creates a unique story, and you never know when you might stumble upon your next family favorite.
FAQs and Troubleshooting
1. My truffles are too sticky; what can I do?
If your mixture is too soft and sticky, popping them in the fridge for a bit helps firm it up. You can also lightly dust your hands with powdered sugar or cocoa powder when rolling.
2. Can I freeze these truffles?
Absolutely! They freeze beautifully. Just ensure they’re in an airtight container. Let them thaw in the fridge overnight before serving.
3. How long do these truffles last?
If stored in an airtight container in the fridge, they will last up to a week. But trust me; they’ll disappear way before that!
4. The chocolate coating won’t stick; what went wrong?
Oh no! Ensure your truffles are chilled before dipping; warm truffles can cause the chocolate to slide right off.
Nutritional Info
While these truffles are a decadent treat, they do bring some nutrition to the table! Packed with healthy doses of protein from the cream cheese and fiber from the pumpkin puree, each bite is a little powerhouse. Here’s a quick look at the nutritional breakdown per truffle (based on about 16 servings):
- Calories: Approximately 120
- Protein: 2g
- Carbohydrates: 12g
- Fat: 7g
- Fiber: 1g
- Sugars: 8g
Please remember that indulging is all about balance. These truffles are meant to be enjoyed as a sweet treat!
Final Thoughts
So there you have it—the delightful world of Pumpkin Cheesecake Truffles. I hope this recipe brings you as much joy as it has brought into my life. Every time I make these truffles, I’m reminded of the laughter, warmth, and love in the kitchen.
As always, don’t hesitate to get creative and make this recipe your own. Happy cooking and even happier munching—can’t wait to see you roll those truffles! Share your creations with your loved ones, and let’s keep spreading those good vibes, one delicious bite at a time. Cheers to sweet moments in the kitchen! 🍂💛
Print
Pumpkin Cheesecake Truffles
- Total Time: 90 minutes
- Yield: 16 servings 1x
- Diet: Vegetarian
Description
Delight in the creamy, spiced flavors of Pumpkin Cheesecake Truffles, perfect for cozy gatherings or year-round indulgence.
Ingredients
- 1 tablespoon butter
- 4 ounces cream cheese, softened at room temperature
- 1/2 cup canned pumpkin puree
- 1 (14-ounce) can sweetened condensed milk
- 1 1/2 teaspoons pumpkin pie spice
- 1/2 cup graham cracker crumbs
- 1/3 cup white chocolate chips
- Orange food coloring, as needed (optional)
- Granulated sugar, as needed for rolling
- Chocolate chips, for topping
Instructions
- Prepare your mixing bowl by ensuring your cream cheese is softened.
- Cream the cream cheese and butter together until silky smooth.
- Incorporate the pumpkin puree and mix until well combined.
- Pour in the sweetened condensed milk and mix until fully combined.
- Add the pumpkin pie spice and blend well.
- Fold in the graham cracker crumbs and white chocolate chips.
- Roll the mixture into 1-inch balls and place on a parchment-lined baking sheet.
- Chill the truffles in the fridge for at least an hour to set.
- Finish by rolling chilled truffles in granulated sugar and drizzling with melted chocolate chips.
- Serve and enjoy your delicious truffles!
Notes
For added flavor, consider variations like nutty pumpkin spice truffles or pumpkin spice latte truffles.
- Prep Time: 30 minutes
- Cook Time: 0 minutes
- Category: Dessert
- Method: Chilling
- Cuisine: American
Nutrition
- Serving Size: 1 truffle
- Calories: 120
- Sugar: 8g
- Sodium: 40mg
- Fat: 7g
- Saturated Fat: 4g
- Unsaturated Fat: 3g
- Trans Fat: 0g
- Carbohydrates: 12g
- Fiber: 1g
- Protein: 2g
- Cholesterol: 20mg
Keywords: pumpkin, cheesecake, truffles, fall dessert, easy dessert, no-bake dessert

One-Bowl 30-Min Pumpkin Blondies: Gooey, Spiced Fall Bars
Pumpkin Blondies: A Cozy Fall Treat with a Twist
Hey there, friends! As the leaves turn golden and that crisp autumn breeze starts to whisper through the trees, there’s nothing quite like celebrating the season with a delicious batch of pumpkin blondies. I mean, how can you resist the warm, spicy aroma that fills your kitchen and beckons your loved ones to gather? These beauties are more than just a dessert; they’re an experience, a memory in the making, and a way to bring a little joy to your day.
A Little Slice of Nostalgia
Let me take you back to my childhood for a moment—a time filled with the warmth of my grandmother’s kitchen. Fall was always my favorite season because of the smell of pumpkin baking wafting through our house. My grandma had this magical recipe that would make even the pickiest eaters swoon. I remember sneaking into the kitchen when she wasn’t looking, stealing little spoonfuls of batter and trying not to get caught—what a thrill! It was my first taste of creating something from scratch and feeling like I was part of the kitchen magic.
These pumpkin blondies capture that same spirit! They’re rich and cozy, and every bite feels like a celebration of fall. A perfect mix of sweetness, warmth, and nostalgia all wrapped up in a chewy, delicious dessert. So, are you ready to make some memories of your own? Let’s dive right in!
Ingredients: What You’ll Need
Before we get into the good stuff, let’s gather our ingredients! Here’s what you’ll need to whip up these delightful pumpkin blondies:
-
½ cup salted butter (melted)
This adds richness and body to your blondies. You can substitute with unsalted butter if you prefer, just remember to sprinkle in a tiny pinch of salt! -
1 ½ cups light brown sugar (packed)
This gives that coveted molasses flavor and moisture. If you’re in a pinch, you can use granulated sugar, but you’ll miss that deep, sweet undertone. -
1 cup pure pumpkin puree
Make sure it’s 100% pumpkin and not the pie filling! You can make your own by roasting pumpkin, or use store-bought for convenience. -
2 eggs (room temperature)
Room temperature eggs blend better into your batter. If you’ve forgotten, place cold eggs in warm water for about 10 minutes. -
2 tsp vanilla extract
Adds a lovely depth of flavor. You could experiment with almond extract for a different twist! -
2 cups all-purpose flour
Essential for structure! For gluten-free options, consider using a 1:1 gluten-free flour blend. -
2 tsp pumpkin pie spice
This is the magic mix of cinnamon, nutmeg, and clove; you can make your own if you’re feeling adventurous or just buy a ready-mixed jar. -
2 tbsp salted butter (softened)
This will be used to enhance the topping. Soften it at room temperature or give it a quick zap in the microwave (but just enough so it’s not melted). -
¼ cup light brown sugar
For that sweet crumble on top! If you’re looking for an alternative, coconut sugar will work for a different flavor profile. -
1 tsp pumpkin pie spice for topping
Adds that final touch of warmth on top of the blondies.
Step-by-Step Instructions: Creating Your Masterpiece
Alright, folks, let’s roll up our sleeves and get cooking! Here’s how to make these sweet pumpkin blondies step by step:
-
Preheat Your Oven
First things first, let’s preheat that oven to 350°F (175°C). This is essential because we want our blondies to bake evenly and become just the right amount of gooey. -
Prepare Your Baking Dish
Grease a 9×13-inch baking dish with cooking spray or line it with parchment paper. This will help with easy removal and cleanup—trust me, you want your blondies to come out without any fuss! -
Mix the Wet Ingredients
In a large mixing bowl, whisk together the melted salted butter and light brown sugar until combined. This will take about a minute. You want the mixture to be smooth and slightly glossy. Add in the pumpkin puree, eggs, and vanilla extract. Keep whisking until everything is well combined. Don’t be shy; the more blended, the better! -
Combine the Dry Ingredients
In a separate bowl, mix the all-purpose flour, pumpkin pie spice, and any other dry ingredients you have. Now, gradually fold this dry mixture into the wet mixture using a spatula. Don’t overmix—just until you see no more flour! This keeps those blondies chewy and tender. -
Pour and Spread
Pour the batter into your prepared baking dish. Use a spatula to smooth it out evenly. This helps with even baking, and trust me, even blondies make a difference in the final presentation. -
Make the Topping
In another bowl, take the softened butter, light brown sugar, and pumpkin pie spice for the topping. Mix them until crumbly. Sprinkle this mix over your blondie batter. This will add a lovely sweet crunch to the top! -
Bake!
Pop the dish into the preheated oven and let it bake for about 25–30 minutes. Your kitchen will smell AMAZING! You’ll know they’re done when you can insert a toothpick in the center, and it comes out with just a few moist crumbs. -
Cool and Serve
Once baked, remove the blondies from the oven and let them cool in the pan for at least 10 minutes before transferring them to a wire rack. Slice them into squares, and they’re ready to delight!
Serving Suggestions
These pumpkin blondies can be served in a variety of joyful ways! For an extra-special treat, serve them warm with a scoop of vanilla ice cream on top—a match made in heaven! Drizzle some caramel sauce over, or even dust with powdered sugar for a touch of elegance.
Plating them with a side of whipped cream, or garnishing with chopped pecans or walnuts, adds that gourmet touch! You could even serve them with a warm cup of chai or spiced latte to create the ultimate cozy vibe. Trust me; your friends and family will be begging for more.
Recipe Variations
Feeling adventurous? Here are a few creative twists you can try with this pumpkin blondie recipe:
-
Chocolate Chip Pumpkin Blondies
Stir in a cup of chocolate chips for a rich, sweet contrast to the pumpkin flavor. Dark chocolate chips would add a lovely depth. -
Nutty Pumpkin Blondies
Add in chopped nuts like pecans or walnuts for extra crunch and that celebrated nutty flavor combo with pumpkin. -
Pumpkin Spice Swirl
Create a cream cheese swirl by mixing 4 oz of softened cream cheese with a bit of sugar and vanilla, then swirl it through the batter before baking. -
Maple-Infused Blondies
Replace the brown sugar with an equal amount of maple syrup for a rich maple flavor throughout. -
Dairy-Free Delight
Swap the butter for coconut oil and use a non-dairy milk option. These blondies will be just as chewy and delicious!
Chef’s Notes
Over the years, this recipe has become a staple in my kitchen, gathering charm and flavor with each adaptation! I once added a pinch of cayenne for a surprising kick, creating a delightful contrast to the sweetness—an unexpected find! Each time I make these blondies, they bring back those fond memories of baking with Grandma, and I can’t help but chuckle at the time I turned the batter into a cake! It flopped hard, but we laughed it off and made an even bigger mess in the kitchen, and what fun memories we created!
FAQs and Troubleshooting
Q1: Why did my blondies turn out too dense?
A: This can happen if you overmix the batter or if the flour is packed too tightly in the measuring cup. Remember to fold gently!
Q2: Can I make these blondies ahead of time?
A: Absolutely! You can bake them a day in advance and store them covered at room temperature, or even freeze them for longer storage. Just let them thaw before serving—if you can wait that long!
Q3: What if I don’t have pumpkin puree?
A: You might give butternut squash puree a whirl as a substitute—it works wonderfully and has a similar flavor profile.
Q4: How do I know when my blondies are done baking?
A: Look for the edges to be set and the top to be slightly golden. A toothpick inserted in the center should come out with a few moist crumbs (not wet batter).
Nutritional Info
Each serving of these delectable pumpkin blondies (assuming 16 servings per batch) contains approximately:
- Calories: 180
- Total Fat: 7g
- Saturated Fat: 4g
- Cholesterol: 35mg
- Sodium: 100mg
- Total Carbohydrates: 27g
- Dietary Fiber: 1g
- Sugars: 12g
- Protein: 2g
These are just estimates based on ingredient averages. If you’re looking to keep things lighter, reducing sugar or butter can help, and you might opt for whole wheat flour for added fiber.
Final Thoughts
And there you have it, friends! A cozy recipe that captures the essence of fall in each bite. These pumpkin blondies are perfect for gatherings, potlucks, or simply enjoying at home with a loved one. The process of crafting them becomes a lovely ritual in itself—bringing people together, sharing laughter, and creating sweet memories.
So, as you embark on this baking adventure, remember: It’s about the experience just as much as it’s about the end result. Don’t stress over perfection; every attempt teaches you something—and we’re all just trying to create a little warmth in our kitchens. Now, grab that spatula and let’s make some pumpkin blondies that will steal the show. Happy baking!
Print
Pumpkin Blondies
- Total Time: 45 minutes
- Yield: 16 servings 1x
- Diet: Vegetarian
Description
Delicious pumpkin blondies that capture the spirit of fall, rich and cozy with a delightful blend of sweetness and warmth.
Ingredients
- ½ cup salted butter (melted)
- 1 ½ cups light brown sugar (packed)
- 1 cup pure pumpkin puree
- 2 eggs (room temperature)
- 2 tsp vanilla extract
- 2 cups all-purpose flour
- 2 tsp pumpkin pie spice
- 2 tbsp salted butter (softened)
- ¼ cup light brown sugar
- 1 tsp pumpkin pie spice for topping
Instructions
- Preheat your oven to 350°F (175°C).
- Prepare a 9×13-inch baking dish by greasing it with cooking spray or lining it with parchment paper.
- Mix the melted salted butter and light brown sugar together in a large mixing bowl until smooth and glossy. Add in the pumpkin puree, eggs, and vanilla extract, whisking until well combined.
- Combine the all-purpose flour, pumpkin pie spice, and other dry ingredients in a separate bowl, then fold them into the wet mixture until just combined.
- Pour the batter into the prepared baking dish and smooth it out evenly.
- Make the topping by mixing the softened butter, light brown sugar, and pumpkin pie spice until crumbly, then sprinkle it over the batter.
- Bake for 25–30 minutes or until a toothpick inserted in the center comes out with a few moist crumbs.
- Cool in the pan for at least 10 minutes before transferring to a wire rack to slice into squares and serve.
Notes
These blondies can be served warm with ice cream or drizzled with caramel sauce for an extra special treat.
- Prep Time: 15 minutes
- Cook Time: 30 minutes
- Category: Dessert
- Method: Baking
- Cuisine: American
Nutrition
- Serving Size: 1 blondie
- Calories: 180
- Sugar: 12g
- Sodium: 100mg
- Fat: 7g
- Saturated Fat: 4g
- Unsaturated Fat: 2g
- Trans Fat: 0g
- Carbohydrates: 27g
- Fiber: 1g
- Protein: 2g
- Cholesterol: 35mg
Keywords: pumpkin, blondies, fall dessert, cozy treat, baking
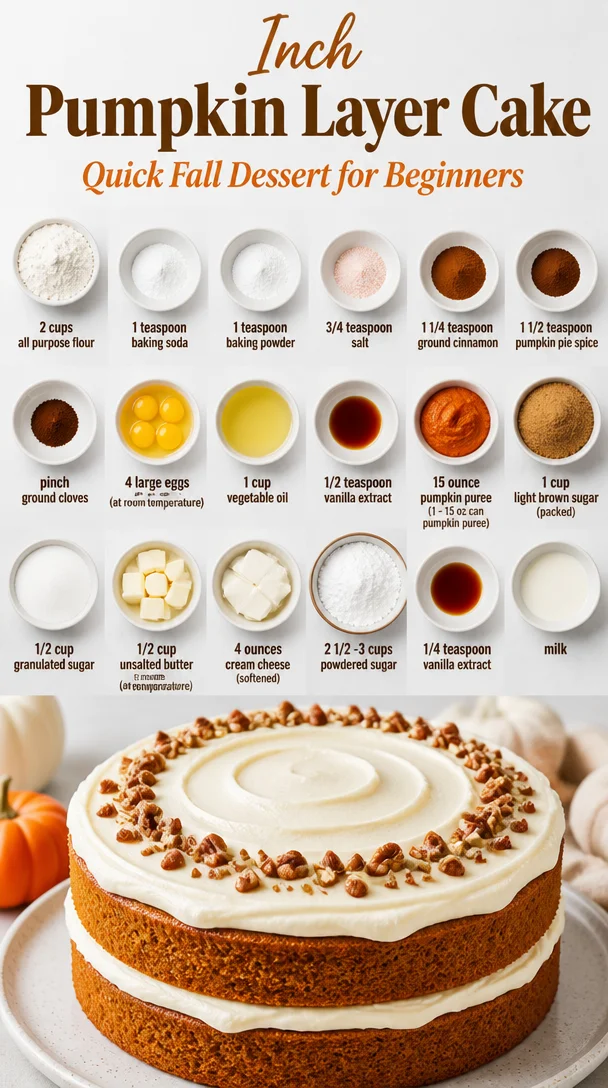
Inch Pumpkin Layer Cake: Quick Fall Dessert for Beginners
The Ultimate 6-Inch Pumpkin Layer Cake Recipe
Hey there, I’m Beau Collier – welcome to Feastical! Today, we’re diving into a delightful treat that feels just like autumn on a plate: a scrumptious 6-inch pumpkin layer cake. Perfect for fall gatherings, a cozy evening at home, or simply to make your kitchen smell like a pumpkin patch, this cake will surely be your new go-to sweet. So, grab your apron, and let’s embark on this delicious journey together!
Introduction
Pumpkin season evokes memories of crisp leaves, warm sweaters, and the unmistakable scent of cinnamon wafting through the air. There’s something magical about this time of year, and what better way to celebrate it than with a charming 6-inch pumpkin layer cake? Whether you’re whipping it up for a friend’s birthday, a fall get-together, or just because you’re craving a slice of fluffy goodness, this cake embodies comfort and joy.
What makes this recipe even more special is that it’s crafted perfectly for smaller gatherings—no need to worry about leftover cake (although you might want to keep some in case you need a midnight snack). This cake boasts layers of spiced pumpkin goodness topped with a luscious cream cheese frosting that’s a total crowd-pleaser.
In my kitchen, food is not just about recipes—it’s about stories, emotions, and the shared experience of creating something beautiful. So, let’s channel that vibe as we dive into this pumpkin cake adventure. Ready? Let’s get started!
Personal Story
I fondly remember the first time I made this pumpkin layer cake. It was a cool October weekend filled with the vibrant colors of fall and the sweet aroma of freshly baked treats. I was visiting my grandmother, who always had a magical way of turning our kitchen into a warm and inviting place. She started showing me her famous pumpkin cake recipe, and we laughed together, trying to remember all the little steps she’d perfected over the years.
As we mixed the ingredients, she regaled me with stories of family gatherings, how her friends would gab over slices of cake, and how it always brought everyone together. It’s one of those moments I’ll treasure forever: laughing, baking, and enjoying every little mishap—like flour explosions and a sneaky spatula lick!
Now, every time I make this 6-inch pumpkin layer cake, I feel like Grandma is right there with me, sharing that joyful spirit of cooking. Plus, this compact size makes it easier to share those memories without feeling overwhelmed!
Ingredients
Let’s talk about the magic that brings this cake to life. Here’s what you’ll need:
-
2 cups all-purpose flour
Keeps the cake sturdy while allowing it to rise beautifully. Want a gluten-free option? Swap it with a 1-to-1 gluten-free baking blend. -
1 teaspoon baking soda
This leavening agent gives the cake that fluffy texture we all love. Don’t skip it! -
1 teaspoon baking powder
Works alongside the baking soda for perfect rise—ensuring your cake doesn’t fall flat! -
3/4 teaspoon salt
A little salt enhances the flavors. Plus, it balances sweetness beautifully! -
1 1/4 teaspoon ground cinnamon
Provides that warm, comforting flavor that screams fall. Feel free to add a touch more if you’re a cinnamon lover! -
1 1/2 teaspoon pumpkin pie spice
A blend of delightful spices that amplify the pumpkin essence. You can also make your own mix using nutmeg, ginger, and allspice. -
Pinch ground cloves
Just a hint goes a long way in creating layers of flavor. -
4 large eggs (at room temperature)
Eggs help bind everything together for a moist cake. Let them sit out before baking for optimal blending. -
1 cup vegetable oil
Keeps the cake moist and tender. You can substitute with applesauce for a lighter option! -
1/2 teaspoon vanilla extract
Adds a sweet note to the cake. Always go for pure vanilla over imitation for the best results. -
15 oz pumpkin puree (1 can)
The star of the show! Ensure you’re using pure pumpkin puree, not pumpkin pie filling, to keep things from getting too sweet. -
1 cup light brown sugar (packed)
Gives depth and a slight chewiness, perfect for pumpkin flavors! -
1/2 cup granulated sugar
Balances the brown sugar and gives the cake rise. -
1/2 cup unsalted butter (at room temperature)
For that creamy texture in the frosting—don’t go for margarine here! -
4 ounces cream cheese (softened)
A fluffy frosting starts with softened cream cheese, allowing it to blend beautifully. -
2 1/2-3 cups powdered sugar
This will sweeten your frosting. Start with 2 1/2 cups and add more for extra sweetness if desired. -
1/4 teaspoon vanilla extract
Just to enrich the cream cheese frosting! -
Milk
For adjusting the frosting to your desired consistency—always add it gradually!
Step-by-Step Instructions
Now that we have our ingredients ready, let’s get cooking! Follow these steps for a fabulous cake:
-
Preheat Your Oven
Set your oven to 350°F (175°C) and grease two 6-inch cake pans. Line the bottoms with parchment paper for easy removal. Trust me, you don’t want your beautiful layers to stick! -
Mix Dry Ingredients
In a bowl, whisk together the flour, baking powder, baking soda, salt, cinnamon, pumpkin pie spice, and cloves. This extra step ensures that your leavening agents are evenly distributed throughout the cake. It’s all about that uniform rise! -
Beat Eggs and Sugar
In a separate large bowl, beat the eggs, brown sugar, and granulated sugar until light and fluffy. I love using an electric mixer here to save time and elbow grease! -
Add Oils and Pumpkin Puree
Gradually mix in the vegetable oil and pure pumpkin puree until well combined. The mixture should be smooth and inviting—don’t you just love that rich orange color? -
Combine Wet and Dry
Gently fold in the dry ingredients into the wet mixture until just combined. Overmixing is a common mistake; we want to keep those fluffy bubbles intact for a light cake! -
Divide and Bake
Pour the batter evenly into the prepared cake pans. Bake for 25-30 minutes, or until a toothpick inserted into the center comes out clean. The smell of this cake will have everyone flocking to the kitchen! -
Cool the Cakes
Once baked, allow the cakes to cool in the pans for 10 minutes before transferring them to a wire rack. It’s essential for preventing soggy bottoms—nobody wants that! -
Make the Cream Cheese Frosting
While the cakes cool, soften the cream cheese and butter in a bowl. Beat them together until creamy, then add the powdered sugar and vanilla extract. If your frosting is too thick, add a little milk until you get that spreadable consistency. -
Assemble
Once your cakes have cooled completely, place one layer on a serving plate and spread a generous amount of frosting on top. Add the second layer, and cover the whole cake in frosting, making it as pretty as you’d like.
Serving Suggestions
Now that your 6-inch pumpkin layer cake looks like a masterpiece, let’s talk about how to serve it. I love changing things up based on the occasion! You can slice it into cute wedges, topped with a sprinkle of cinnamon and perhaps a dollop of whipped cream. If you’re feeling extra fancy, a drizzle of caramel can elevate this beauty—nothing says fall like caramel and pumpkin together!
Feel free to serve it alongside a steaming cup of coffee or a hot apple cider. Trust me, it’s the perfect match for those cozy autumn vibes.
Recipe Variations
Every chef loves a twist, right? Here are some creative options to personalize your pumpkin layer cake:
-
Chocolate Drizzle: Melt dark chocolate and drizzle it on top of the frosted cake for a decadent touch. The combination of chocolate and pumpkin is surprisingly divine!
-
Nuts Galore: Add chopped walnuts or pecans into the batter for an inviting crunch. They add a lovely texture and complement the spices beautifully.
-
Spiced Rum Glory: For an adult twist, add a splash of spiced rum to your frosting. It’s a game-changer!
-
Marble Effect: Swirl in some chocolate cake batter with the pumpkin batter before baking for an eye-catching marbled cake.
-
Vegan Option: Replace the eggs with flax eggs (1 tablespoon ground flax meal with 3 tablespoons water per egg) and the vegetable oil with applesauce for a delicious vegan cake!
Chef’s Notes
This recipe has evolved over the years, blending different spices and adjusting for moisture. You could say it reflects my journey in the kitchen! I’ve also had my fair share of baking disasters (like the time I forgot to add sugar!), but each flop taught me something new. So, if things don’t go as planned, don’t worry! Just remember: every great chef has a few kitchen blunders in their cookbook. It’s all about the fun and the flavor!
FAQs and Troubleshooting
1. My cake didn’t rise. What went wrong?
Make sure your baking powder and baking soda are fresh. Old leavening agents can lead to flat cakes. Always check the expiration date!
2. Why did my cake crack on top?
This can happen if the oven is too hot or if the cake was overmixed. Make sure to follow the temperature settings closely and mix gently.
3. How do I store leftover cake?
Store it in an airtight container in the refrigerator for up to a week. You can also freeze it wrapped tightly in plastic, and it’ll stay good for up to 3 months.
4. Can I make this in a different size pan?
Absolutely! Just adjust the baking time accordingly. A 9-inch pan will take a bit longer, while cupcakes can bake faster—check for doneness along the way!
Nutritional Info
While I like to emphasize joy over numbers, it’s good to be aware! On average, a slice of this 6-inch pumpkin layer cake (assuming 8 slices) contains about 320 calories, with 15g of fat, 45g of carbs, 3g of protein, and a moderate amount of sugar. Depending on your dietary needs or indulgence level, feel free to tweak the ingredients as mentioned above!
Final Thoughts
And there you have it! Your very own 6-inch pumpkin layer cake—soft, spiced, and crowned with luscious cream cheese frosting. This recipe holds a special place in my heart, and I hope it brings a smile to your face and warmth to your kitchen too.
Remember, food is about joy and connection. So, whether you’re baking alone or with loved ones, cherish the process and the delicious memories you’re creating. Enjoy every slice, and don’t forget to share your pumpkin cake stories with me! Happy baking!
Print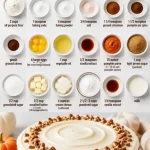
The Ultimate 6-Inch Pumpkin Layer Cake
- Total Time: 50 minutes
- Yield: 8 servings 1x
- Diet: Vegetarian
Description
A delightful 6-inch pumpkin layer cake, perfect for autumn gatherings, featuring layers of spiced pumpkin and luscious cream cheese frosting.
Ingredients
- 2 cups all-purpose flour
- 1 teaspoon baking soda
- 1 teaspoon baking powder
- 3/4 teaspoon salt
- 1 1/4 teaspoon ground cinnamon
- 1 1/2 teaspoon pumpkin pie spice
- Pinch ground cloves
- 4 large eggs (at room temperature)
- 1 cup vegetable oil
- 1/2 teaspoon vanilla extract
- 15 oz pumpkin puree (1 can)
- 1 cup light brown sugar (packed)
- 1/2 cup granulated sugar
- 1/2 cup unsalted butter (at room temperature)
- 4 ounces cream cheese (softened)
- 2 1/2–3 cups powdered sugar
- 1/4 teaspoon vanilla extract
- Milk (for consistency)
Instructions
- Preheat your oven to 350°F (175°C) and grease two 6-inch cake pans. Line the bottoms with parchment paper.
- Mix the dry ingredients: flour, baking powder, baking soda, salt, cinnamon, pumpkin pie spice, and cloves in a bowl.
- Beat the eggs, brown sugar, and granulated sugar together until light and fluffy.
- Add the vegetable oil and pumpkin puree gradually and mix until well combined.
- Combine the wet and dry ingredients gently until just combined.
- Divide the batter evenly between the prepared cake pans and bake for 25-30 minutes.
- Cool the cakes in the pans for 10 minutes before transferring them to a wire rack.
- Make the cream cheese frosting by beating softened cream cheese and butter together, then add powdered sugar and vanilla extract.
- Assemble the cake by placing one layer on a serving plate, spreading frosting on top, then adding the second layer and frosting the entire cake.
Notes
Consider adding nuts, chocolate drizzle, or spiced rum for variations. Store leftovers in an airtight container in the refrigerator.
- Prep Time: 20 minutes
- Cook Time: 30 minutes
- Category: Dessert
- Method: Baking
- Cuisine: American
Nutrition
- Serving Size: 1 slice
- Calories: 320
- Sugar: 20g
- Sodium: 400mg
- Fat: 15g
- Saturated Fat: 5g
- Unsaturated Fat: 8g
- Trans Fat: 0g
- Carbohydrates: 45g
- Fiber: 3g
- Protein: 4g
- Cholesterol: 50mg
Keywords: pumpkin cake, fall dessert, layer cake, autumn baking, cream cheese frosting
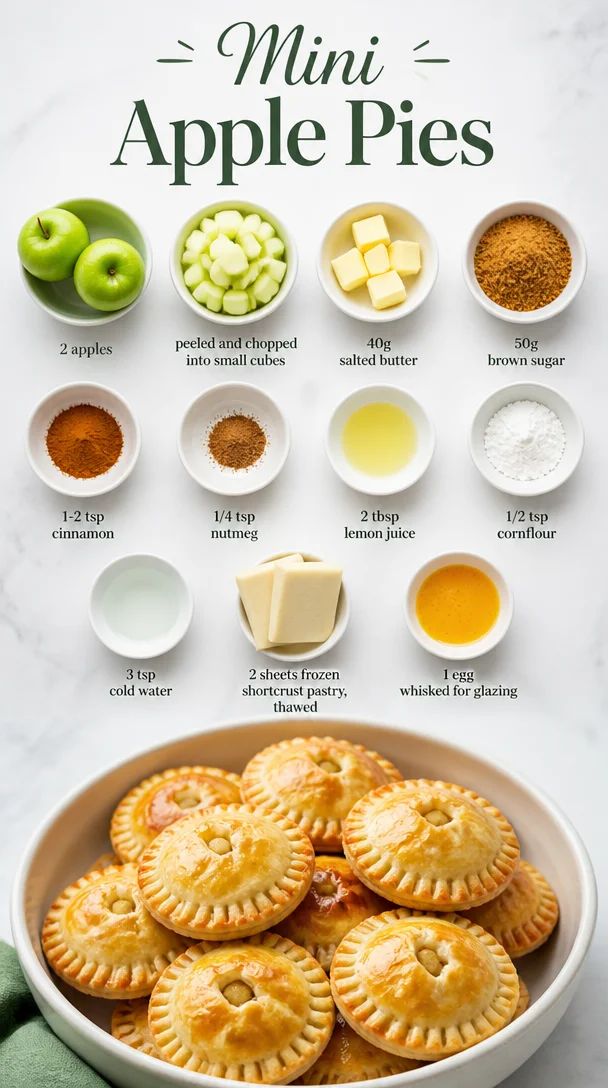
Mini Apple Pies
Mini Apple Pies: A Delightful Bite of Nostalgia
Hey there, food enthusiasts! Welcome back to the cozy corner of the internet that is Feastical. Today, we’re diving into a recipe that is not only delicious but also crammed with memories: Mini Apple Pies! If you’ve ever found yourself lost in the warm scent of baked apples, butter, and spices, you know the magic that fills the air when these little pies are in the oven. Grab your favorite apron, and let’s get cooking!
A Nostalgic Dive into Apple Pie Heaven
When I think about apple pie, I’m instantly transported back to my grandmother’s kitchen. She always had a way of filling the house with the most incredible aromas, her laughter ringing through as we helped her prepare our favorite desserts. The best part? Those mini apple pies she used to make! Perfectly portioned and bursting with juicy apples, they were the highlight of every family gathering. I can still picture her, flour dusting the front of her apron, expertly rolling out the pastry to create those delightful mini crusts.
Every time we’d pull them out of the oven, the excitement was palpable. We’d gather around the table, waiting impatiently for them to cool, while the sweet smell of cinnamon and nutmeg danced around us like an inviting embrace. It’s these memories that inspire me to share this recipe with you. So, whether you need a cozy dessert for a gathering or a comforting snack, mini apple pies are the way to go!
Ingredients
Here’s what you’ll need to whip up these delectable mini apple pies:
-
2 apples, peeled and chopped into small cubes
Use a crisp apple like Granny Smith or Honeycrisp for the perfect texture and flavor. If you find yourself without fresh apples, feel free to use canned pie filling! -
40g salted butter
Butter makes everything better! You can substitute with unsalted butter; just add a pinch of salt for balance. -
50g brown sugar
This adds that deep, rich flavor. If you want a lighter touch, granulated sugar works perfectly too. -
1-2 tsp cinnamon
What’s an apple pie without cinnamon? Feel free to season to your taste—more cinnamon makes it cozier! -
1/4 tsp nutmeg
Nutmeg adds a unique warmth. If you’re not a fan, simply omit it, but I highly recommend trying it! -
2 tbsp lemon juice
This brightens the filling and keeps the apples from browning. Don’t worry; the tang of lemon balances the sweetness beautifully! -
1/2 tsp cornflour
Cornflour thickens the filling, so it’s not too runny. If you don’t have it, try all-purpose flour as a substitute. -
3 tsp cold water
Cold water helps in the mixing process. It’s not much, but it makes a world of difference! -
2 sheets frozen shortcrust pastry, thawed
You can make your own pastry if you’re feeling adventurous, but ready-made works perfectly (and saves time!). -
1 egg, whisked for glazing
This gives the pies a beautiful golden color. If you prefer a vegan option, a little almond milk brushed on top will do just fine!
Step-by-Step Instructions
Now let’s get into the fun part—baking these beauties! Follow these steps closely to make sure your mini apple pies turn out perfectly golden and delicious.
-
Preheat the Oven
Preheat your oven to 180°C (350°F). A hot oven is crucial for getting that lovely flaky crust! -
Prepare the Apples
In a medium saucepan, melt your 40g of salted butter over medium heat. Once melted, toss in the peeled and chopped apples. Add the 50g of brown sugar, cinnamon, nutmeg, and lemon juice. Stir everything together until each apple piece is well coated. Allow it to cook for about 5-7 minutes until the apples are slightly tender. -
Thicken the Filling
In a small bowl, combine the cornflour and cold water. Mix until smooth and then stir it into the apple mixture. This helps to hold everything together! Cook for another minute until the filling starts to thicken, then remove it from the heat and allow it to cool slightly. -
Roll Out the Pastry
On a lightly floured surface, roll out the thawed shortcrust pastry. Make sure it’s about 3mm thick. Using a round cutter, cut out circles large enough to fit into the muffin tray you’re using. -
Assemble the Mini Pies
Grease your muffin tray, and gently press the pastry circles into the bottom of each muffin cup, creating small bowls. Spoon the cooled apple filling into each pastry shell, filling them about 3/4 full. -
Create Top Crusts
Using the remaining pastry, cut out smaller circles to top your pies. Alternatively, you can create a lattice top for a fancy touch! Gently place it over the filling. Seal the edges by crimping them with a fork then brush the top with the whisked egg for that beautiful golden finish. -
Bake Time!
Pop the muffin tray into your preheated oven and bake for 18-20 minutes or until the crust is golden brown and the filling is bubbly. Keep an eye on them! -
Cooling Down
Once baked, allow the mini pies to cool in the tray for about 5 minutes before transferring them to a wire rack. Patience is key here; let them cool to avoid burning your tongue in that first piping-hot bite!
Serving Suggestions
When it comes to serving these delightful mini apple pies, presentation matters! You can place them on a rustic wooden cutting board or a pretty white platter. Dust a little powdered sugar on top for added flair, or serve them warm with a scoop of vanilla ice cream melting over the top. Drizzle with a little caramel sauce, and watch the eyes of your guests light up! Pair with a cup of warm tea or coffee for that extra cozy feeling.
Recipe Variations
Want to switch things up a bit? Here are a few creative twists:
- Caramel Apple Mini Pies: Stir in some caramel bits along with the apple filling for a decadent twist.
- Spiced Pear & Apple Pies: Substitute one of the apples for ripe pears; they add a sweet, juicy twist to the filling.
- Nutty Crunch: Add some chopped walnuts or pecans into the apple mixture for an added crunch.
- Berry Boost: Mix in a handful of fresh or frozen berries like blueberries or raspberries for a colorful fruity blend.
- Cinnamon Roll Mini Pies: Swirl in some cinnamon sugar into the apple filling for a gooey, dessert-like experience.
Chef’s Notes
This recipe is deeply rooted in warmth and nostalgia for me, and I love how it brings family together. Over the years, I’ve played around with different fillings and crusts, even attempting savory versions with cheese! (Trust me, it’s a game-changer!) My grandmother’s magic was always in the simplicity, so I like to keep it uncomplicated and let the natural flavors shine through. Every time I bake these mini pies, I feel like I’m sharing a piece of my childhood with you!
FAQs and Troubleshooting
-
My crust is too thick; how can I fix it?
If you find that your crust is too thick, simply roll it out more thinly next time or ensure you’re using the correct size cutter to fit your muffin tray. -
The filling is runny. What happened?
If your filling is too runny, it could be because the apples released too much juice. Just be sure to thicken with cornflour and let it cool enough before filling the pies. -
How can I prevent my pie crust from puffing up?
You can prick the bottom of the pastry with a fork to prevent it from puffing up during baking, allowing steam to escape. -
Can I make these ahead of time?
Absolutely! You can prepare the filling and pastry a day in advance, just store them in the fridge. Assemble and bake when you’re ready to serve!
Nutritional Info
Mini apple pies are a comforting treat, and while they’re best enjoyed in moderation, here’s a quick look at what each pie might contain (based on a recipe serving 8 pies):
- Calories: Approximately 160-180 per pie
- Carbohydrates: 25g
- Fat: 8g
- Protein: 2g
- Fiber: 1g
Remember that adding ice cream or additional toppings will increase these values.
Final Thoughts
There you have it—a scrumptious recipe for Mini Apple Pies that will not only fill your kitchen with delightful aromas but also your hearts with warmth and nostalgia. Baking is more than just preparing food; it’s about creating moments and memories with those we cherish. So gather your loved ones around the table, share these mini pies, and relish the sweet connections they bring.
Happy baking, friends! Until next time, stay deliciously curious! 🍏🥧
Print
Mini Apple Pies
- Total Time: 40 minutes
- Yield: 8 servings 1x
- Diet: Vegetarian
Description
Delightful mini apple pies bursting with juicy apples and warm spices, perfect for gatherings or as a comforting snack.
Ingredients
- 2 apples, peeled and chopped into small cubes
- 40g salted butter
- 50g brown sugar
- 1–2 tsp cinnamon
- 1/4 tsp nutmeg
- 2 tbsp lemon juice
- 1/2 tsp cornflour
- 3 tsp cold water
- 2 sheets frozen shortcrust pastry, thawed
- 1 egg, whisked for glazing
Instructions
- Preheat your oven to 180°C (350°F).
- In a medium saucepan, melt your 40g of salted butter over medium heat.
- Add in the peeled and chopped apples along with the brown sugar, cinnamon, nutmeg, and lemon juice.
- Stir everything together until well coated and cook for about 5-7 minutes.
- In a small bowl, combine the cornflour and cold water, then mix until smooth.
- Stir the cornflour mixture into the apple mixture and cook for another minute.
- On a lightly floured surface, roll out the thawed shortcrust pastry to about 3mm thick.
- Using a round cutter, cut out circles large enough to fit into your muffin tray.
- Grease your muffin tray, and press the pastry circles into the bottom of each muffin cup.
- Spoon the cooled apple filling into each pastry shell, filling them about 3/4 full.
- Using the remaining pastry, cut out smaller circles for the tops or create lattice tops.
- Seal the edges by crimping them with a fork and brush with the whisked egg.
- Pop the muffin tray into your preheated oven and bake for 18-20 minutes.
- Once baked, allow them to cool for about 5 minutes before transferring to a wire rack.
Notes
For variations, you can add caramel bits, nuts, or mix in berries to the filling!
- Prep Time: 20 minutes
- Cook Time: 20 minutes
- Category: Dessert
- Method: Baking
- Cuisine: American
Nutrition
- Serving Size: 1 pie
- Calories: 170
- Sugar: 10g
- Sodium: 200mg
- Fat: 8g
- Saturated Fat: 3g
- Unsaturated Fat: 5g
- Trans Fat: 0g
- Carbohydrates: 25g
- Fiber: 2g
- Protein: 2g
- Cholesterol: 50mg
Keywords: mini apple pies, apple dessert, nostalgic recipes
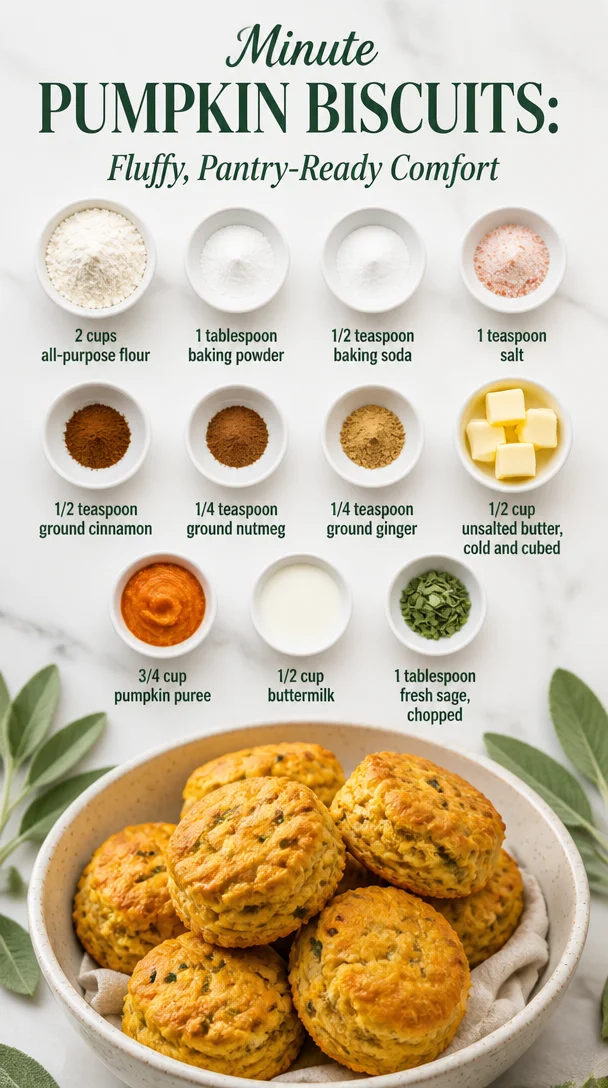
Minute Pumpkin Biscuits: Fluffy, Pantry-Ready Comfort
The Ultimate Pumpkin Biscuits: A Cozy Fall Treat
Hey there, food lovers! Beau Collier here, and we’re diving into the world of warm, delectable Pumpkin Biscuits. As the leaves turn their brilliant colors and the air gets crisper, there’s nothing quite like the aroma of freshly baked biscuits wafting through your kitchen. These little heavenly bites, infused with the essence of pumpkin and warm spices, are perfect for any occasion—from a cozy breakfast at home to a fancy holiday gathering.
Biscuit-making might seem daunting to some, but trust me, they’re a breeze when you get the hang of it! And once you’ve mastered the art of biscuit-making, you’ll be hooked. They’re simple, satisfying, and can be tweaked to fit any flavor profile you fancy. So, grab an apron, and let’s roll up our sleeves!
Personal Story: A Taste of Home
Growing up, the autumn season was always extra special in my house. The first hint of chill in the air meant it was time for my grandma to break out her secret collection of fall recipes. Among the classics like pumpkin pie and spicy apple cider, her pumpkin biscuits stood out as the ultimate comfort food. I remember rushing to her warm kitchen, the fragrant mix of cinnamon and nutmeg wrapping around me like a cozy blanket.
One of my fondest memories is the day she let me take the reins. I was around ten, eager to impress, but a little nervous. I mixed the dry ingredients and then contemplated the size of the butter pieces—too small and they wouldn’t make the biscuits fluffy. After some trial and error, something magical happened: those biscuits rose perfectly! We slathered them in butter and watched the joy spread across my family’s faces as they took that first bite. It wasn’t just a recipe; it was love, laughter, and memories shared over a delicious dish, and that’s what cooking is all about. Let’s create our own memories with these comforting pumpkin biscuits!
Ingredients
Here’s what you’ll need to whip up a batch of these fantastic pumpkin biscuits:
-
2 cups all-purpose flour
A staple in any kitchen! You can use whole wheat flour for a nuttier flavor or gluten-free flour if you’re going gluten-free. Just make sure to measure properly for best results! -
1 tablespoon baking powder
This little guy is the secret to those fluffy biscuits! If you’re out, try using 1 teaspoon baking soda combined with 1 tablespoon of white vinegar (but it might change the flavor slightly). -
1/2 teaspoon baking soda
This balances the acidity from the buttermilk. If you’re in a pinch, you could increase the baking powder, but it’s best to stick to the original recipe. -
1 teaspoon salt
Salt enhances all the flavors—don’t skip it! If you’re watching your sodium intake, reduce to 1/2 teaspoon. -
1/2 teaspoon ground cinnamon
The cozy warmth of cinnamon is a must-have in pumpkin recipes. Try using fresh ground if you can; the flavor is unbeatable! -
1/4 teaspoon ground nutmeg
Nutmeg adds depth and a lovely aromatic quality. You can substitute with allspice if you don’t have nutmeg on hand. -
1/4 teaspoon ground ginger
Adds a zesty kick! Use fresh ginger for an extra punch if you feel adventurous. -
1/2 cup unsalted butter, cold and cubed
This is crucial for achieving that tender flakiness. If you’re short on butter, you can use coconut oil as a dairy-free option. -
3/4 cup pumpkin puree
Make sure it’s pure pumpkin puree, not pie filling. You can swap it with sweet potato puree or butternut squash puree if you like. -
1/2 cup buttermilk
Buttermilk is essential for that fluffy texture. You can make a quick substitute using regular milk with a dash of vinegar or lemon juice. -
1 tablespoon fresh sage, chopped
Sage adds a unique herby flavor that complements the pumpkin beautifully. Feel free to experiment with other herbs like thyme or rosemary.
Step-by-Step Instructions
-
Preheat Your Oven:
Preheat your oven to 425°F (220°C). This is the perfect temperature for baking biscuits! Plus, it fills your kitchen with warmth. Who doesn’t love that? -
Mix the Dry Ingredients:
In a large mixing bowl, whisk together the flour, baking powder, baking soda, salt, cinnamon, nutmeg, and ginger. Make sure everything is well combined; this is key to evenly baked biscuits! As you’re whisking, think of all the cozy vibes this mixture will bring. -
Cut in the Butter:
Add the cold, cubed butter to the dry mixture. Using a pastry cutter or your fingers, blend the butter until it resembles coarse crumbs. You want some small chunks of butter remaining—that’s what gives us those delightful flaky layers! -
Add the Pumpkin and Buttermilk:
In a separate bowl, mix together the pumpkin puree and buttermilk until fully combined. Then, pour this mixture into the dry ingredients. Gently fold it all together with a spatula or a wooden spoon until just combined. Avoid overmixing, as that will yield tough biscuits! -
Incorporate the Sage:
Gently fold in the chopped fresh sage. The aroma will make your heart sing! If you’re feeling adventurous, you can even mix in some shredded cheese for a savory twist. -
Knead the Dough:
Lightly flour a clean surface and turn the dough out onto it. Knead it gently about 4-5 times until it forms a cohesive ball. Remember, we want to keep that tenderness, so be gentle! -
Roll and Cut:
Pat the dough down to about 1-inch thickness and use a biscuit cutter (or a glass) to cut out biscuits. Place them on an ungreased baking sheet, leaving a bit of space between them for rising. -
Bake:
Pop those bad boys into the preheated oven and bake for 12-15 minutes, or until they’re golden brown on top. This is the part where you should be devouring that heavenly aroma wafting through your kitchen! -
Cool and Serve:
Once they’re golden and perfect, take them out and let them cool for a few minutes on a wire rack (if you can resist!). But honestly, slathering warm biscuits with butter right out of the oven is totally acceptable!
Serving Suggestions
To serve your pumpkin biscuits, consider placing them on a beautiful wooden board or a colorful platter. You can accompany them with a side of honey butter or a savory herbed spread for an extra level of satisfaction. For breakfast, serve them with scrambled eggs and crispy bacon, or simply enjoy them with a steaming cup of coffee or hot apple cider. Trust me; there’s nothing more delightful than sharing these biscuits among friends and family.
Recipe Variations
-
Cheesy Pumpkin Biscuits: Add 1 cup shredded cheese, like sharp cheddar or gouda, to the dough for an irresistible cheesy flavor that complements the pumpkin beautifully.
-
Pumpkin Spice with a Twist: Include a dash of cloves and allspice for an even warmer flavor profile—perfect for fall gatherings!
-
Maple-Glazed Biscuits: Whip up a quick maple glaze (just mix powdered sugar with maple syrup) and drizzle over the warm biscuits for a sweet finish.
-
Herb-Infused: Experiment with different fresh herbs! Just imagine basil or rosemary blending with the pumpkin—it’s simply divine.
-
Savory Bacon Spinach: Add cooked and crumbled bacon along with fresh spinach for a savory treat that’s perfect as an appetizer or side.
Chef’s Notes
I can’t help but chuckle thinking about the first time I tried to make these biscuits on my own. Let’s just say it was more than a little chaotic! I mismeasured the flour, thinking, “A little extra won’t hurt!” Well, they turned into more of a pumpkin brick than biscuits! Live and learn, right? That’s the beauty of cooking: each mistake teaches us something new. These biscuits have evolved over the years as I refined the recipe, but the love and warmth they bring to the table will always remain the same.
FAQs and Troubleshooting
-
Why are my biscuits tough?
Tough biscuits usually stem from overmixing the dough or adding too much flour. Remember, gentleness is key—mix until just combined! -
Can I use pumpkin pie filling instead of puree?
No, pumpkin pie filling has added spices and sugars that can alter the final product’s flavor and texture. Stick with pure pumpkin puree! -
What should I do if my dough is too sticky?
If the dough feels overly sticky, feel free to sprinkle in a little more flour, one tablespoon at a time, until you achieve the right consistency. -
How can I store leftover biscuits?
Store any leftovers in an airtight container at room temperature for up to two days, or freeze them for up to a month. Just reheat in the oven when you’re ready to enjoy!
Nutritional Info
While each biscuit is a delight, it’s good to know what you’re feeding your body. Here’s a rough estimate of the nutritional breakdown per biscuit (based on a batch of 12):
- Calories: 150
- Total fat: 7g
- Saturated fat: 4g
- Cholesterol: 20mg
- Sodium: 200mg
- Total Carbohydrates: 20g
- Dietary Fiber: 1g
- Sugars: 1g
- Protein: 3g
Feel free to tweak the recipe for healthier alternatives—like substituting half of the butter with Greek yogurt!
Final Thoughts
There you have it, my fellow foodies! With these scrumptious pumpkin biscuits, you’re all set to impress yourself and anyone lucky enough to share them with you. Baking is an adventure filled with love, warmth, and a sprinkle of creativity. So don’t be afraid to make these biscuits your own with your own twists and flavors!
As you gather around the table with loved ones, remember that every bite is more than just food; it’s a moment captured in time, filled with memories, laughter, and stories. So preheat that oven, grab those ingredients, and let’s make some kitchen magic happen! Happy baking!
Print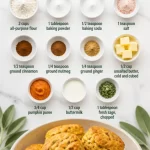
The Ultimate Pumpkin Biscuits
- Total Time: 30 minutes
- Yield: 12 biscuits 1x
- Diet: Vegetarian
Description
Warm, delectable pumpkin biscuits infused with cozy spices—perfect for fall celebrations.
Ingredients
- 2 cups all-purpose flour
- 1 tablespoon baking powder
- 1/2 teaspoon baking soda
- 1 teaspoon salt
- 1/2 teaspoon ground cinnamon
- 1/4 teaspoon ground nutmeg
- 1/4 teaspoon ground ginger
- 1/2 cup unsalted butter, cold and cubed
- 3/4 cup pumpkin puree
- 1/2 cup buttermilk
- 1 tablespoon fresh sage, chopped
Instructions
- Preheat your oven to 425°F (220°C).
- Mix the flour, baking powder, baking soda, salt, cinnamon, nutmeg, and ginger in a bowl.
- Cut in the cold, cubed butter until it resembles coarse crumbs.
- Add pumpkin puree and buttermilk, mixing until just combined.
- Incorporate the chopped fresh sage.
- Knead the dough gently about 4-5 times.
- Roll the dough to 1-inch thickness and cut out biscuits.
- Bake for 12-15 minutes until golden brown.
- Cool on a wire rack before serving.
Notes
Serve with honey butter or herbed spreads. Perfect for gatherings or a cozy breakfast.
- Prep Time: 15 minutes
- Cook Time: 15 minutes
- Category: Baking
- Method: Baking
- Cuisine: American
Nutrition
- Serving Size: 1 biscuit
- Calories: 150
- Sugar: 1g
- Sodium: 200mg
- Fat: 7g
- Saturated Fat: 4g
- Unsaturated Fat: 2g
- Trans Fat: 0g
- Carbohydrates: 20g
- Fiber: 1g
- Protein: 3g
- Cholesterol: 20mg
Keywords: pumpkin biscuits, fall baking, cozy recipes
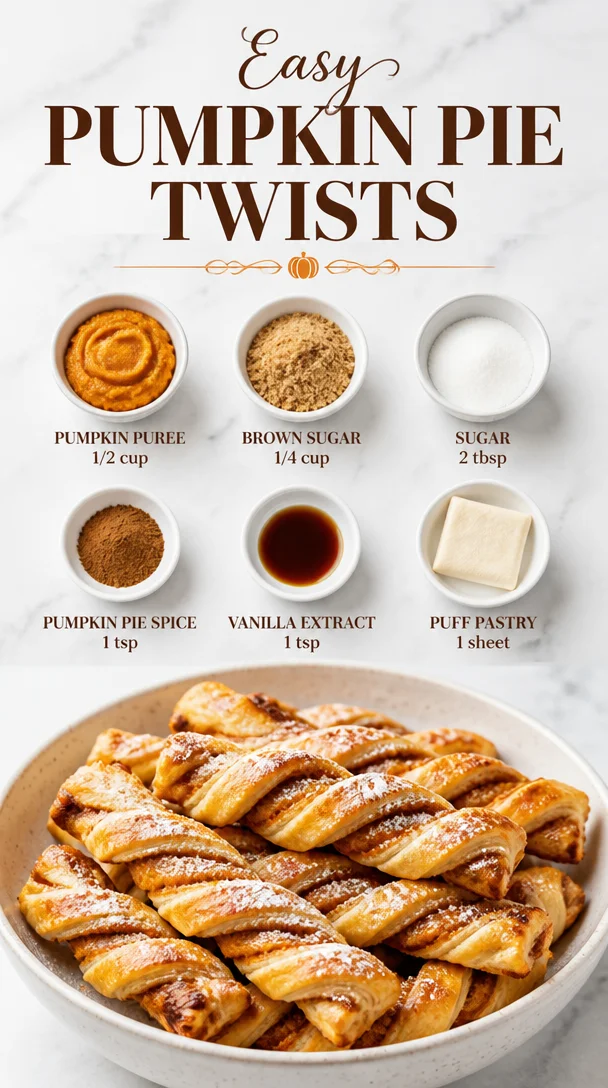
Easy Pumpkin Pie Twists
Easy Pumpkin Pie Twists: A Cozy Fall Treat
Hey, fellow foodies! I’m so excited to share one of my all-time favorite recipes with you today: Easy Pumpkin Pie Twists! With autumn in the air, there’s nothing quite like sinking your teeth into a delicious, flaky pastry that’s warmly spiced and oh-so-comforting. I mean, who doesn’t get a little misty-eyed at the thought of pumpkin pie? Well, how about giving your classic dessert a fun twist (literally!)?
Let me take you on a little journey through this delightful treat. Imagine the sweet aroma of cinnamon, nutmeg, and pumpkin wafting through your kitchen while the golden-brown twists come out of the oven, just begging to be devoured. This recipe combines the traditional flavors of pumpkin pie with a fun and visually appealing shape that makes it perfect for holiday gatherings, cozy evenings, or just a treat for yourself (no judgment here!). So, grab your apron, and let’s dive into this delicious adventure together!
A Slice of Nostalgia
Before we jump to the ingredients and instructions, let me tell you about the first time I made these pumpkin pie twists. It was one of those crisp autumn afternoons—the kind that makes you want to cuddle up with a good book. I was feeling nostalgic for my grandmother’s kitchen, where the air was always filled with sweetness and laughter. She had this incredible knack for transforming simple ingredients into magic.
One day, while reminiscing about her famous pumpkin pie, I wanted to create something that would honor her memory but also add a little twist. So, I decided to play around with puff pastry and pumpkin filling. The first batch came out a little wonky, and let me tell you, my family had a hilarious time trying to guess what I was going for! But alas, they were delicious, and from that moment on, these pumpkin pie twists became a family favorite. They’re now a staple at our fall gatherings, and each bite takes me back to her warm kitchen.
Ingredients You’ll Need
Here’s what you’ll need to make your own Easy Pumpkin Pie Twists, along with some helpful insights for each ingredient:
-
Puff Pastry (2 sheets)
This flaky pastry acts as the perfect vessel for our pumpkin filling. If you’re in a pinch, you can substitute with phyllo dough, but the texture will be a bit different. -
Pumpkin Puree (1 cup)
Go for 100% pure pumpkin puree, not the spiced pie filling! If cans aren’t your thing, feel free to make your own by roasting a sugar pumpkin and pureeing the flesh. -
Brown Sugar (1/2 cup)
This adds a richer, deeper sweetness compared to regular sugar. If you’re looking for a healthier option, coconut sugar works great too! -
Cinnamon (1 teaspoon)
This classic spice brings warmth to our filling. Got a cinnamon blend? That works too, just keep an eye on the measurements! -
Nutmeg (1/2 teaspoon)
A little nutmeg goes a long way in making this treat feel cozy and festive. If you’re fresh out, don’t fret! You can skip it or use allspice for a different spin. -
Ginger (1/4 teaspoon)
Adds a slight zing that complements the pumpkin beautifully. Dried ginger works nice, but fresh minced ginger would take this to the next level. -
Cloves (1/4 teaspoon)
A pinch of cloves packs a punch of flavor! If you’re not a fan, feel free to leave it out. -
Egg (1) for egg wash
This will give our twists that beautiful golden shine! Need a vegan option? Almond milk or oat milk will work for a non-dairy wash. -
Sugar for sprinkling
Just a little sprinkle of sugar goes a long way in enhancing that delectable crust. Try coarse sugar for added crunch!
Step-by-Step Instructions
Now that we’ve got our ingredients, let’s roll up our sleeves and get started!
-
Preheat Your Oven
First things first, preheat your oven to 400°F (200°C). This ensures your twists will puff up beautifully and bake evenly. -
Prepare Your Filling
In a medium bowl, combine the pumpkin puree, brown sugar, cinnamon, nutmeg, ginger, and cloves. Mix until well combined, making sure no lumps remain. You want a smooth and creamy filling that’s bursting with autumn flavors! -
Roll Out the Puff Pastry
On a lightly floured surface, roll out your puff pastry sheets. Just a quick roll to flatten them a bit will do! If they’re already thawed and pliable, you can skip this step. -
Cut the Pastry Into Strips
Using a sharp knife or pizza cutter, slice each sheet into about 6 strips (depending on how big you want your twists). Aim for about 1-inch wide. -
Fill and Twist
Take a generous tablespoon of the pumpkin mixture and spread it along the center of each strip. Leave some space at the edges for sealing. Now, grab the sides and twist them over the filling, folding them over as you go to enclose that delightful filling. -
Arrange on a Baking Sheet
Place your twists onto a parchment-lined baking sheet, making sure to leave space in between. They’ll puff up, and we don’t want any sad, stuck-together pastries! -
Egg Wash and Add Sugar
In a small bowl, whisk your egg. Brush the tops of each twist with the egg wash, and then sprinkle a little sugar on top. This creates that lovely golden color and a sweet crunch. -
Bake Until Golden
Pop those bad boys in the oven and bake for about 15-20 minutes, or until they’re golden brown and puffed up! You’ll know when they’re ready—the smell will fill your home with warm, cozy vibes. -
Cool and Serve
Once baked, take them out and let them cool for a few minutes. They’ll be piping hot, so patience is a virtue here!
Serving Suggestions
Okay, friends, it’s time to dig in! These Easy Pumpkin Pie Twists are perfect warm, but if you want to elevate the experience, plate them up with a dollop of whipped cream or a scoop of vanilla ice cream. If you’re feeling extra fancy, drizzle a bit of caramel sauce on top!
You could also serve them alongside a cozy cup of apple cider or a spiced chai latte. I mean, is there anything better than drinking autumn in a mug? For added flair, arrange the twists on a rustic wooden platter for a beautiful presentation, garnished with a sprinkle of cinnamon or a few festive leaves.
Recipe Variations
Why not get a little creative with your pumpkin pie twists? Here are some tasty variations you can try:
-
Choco-Pumpkin Dreams: Add chocolate chips to the pumpkin filling for a sweet twist that will satisfy any chocoholic!
-
Nutty Delight: Mix in some chopped pecans or walnuts with the filling for a delightful crunch and more nutty flavor.
-
Spiced Apple Twists: Substitute half the pumpkin puree for apple pie filling and add some cinnamon for a delicious autumn duo.
-
Maple Pumpkin: Instead of brown sugar, use maple syrup for a natural sweetness. Just reduce the moisture slightly in the filling.
-
Savory Spices: Spice things up with a pinch of cayenne or smoked paprika to give your twists a little kick!
Chef’s Notes
These Easy Pumpkin Pie Twists are not just a recipe; they’re a canvas for creativity! Over the years, I’ve played with different spices and fillings. Each tweak brings back memories and flavor profiles that remind me of family, friends, and cozy gatherings. I remember one time trying to sneak in some kale (yes, I went there!). Let’s just say, my family was not impressed—I learned the hard way that some recipes are best left as classics!
FAQs and Troubleshooting
-
What if my puff pastry is falling apart?
Ensure it’s fully thawed but still cold when you’re working with it—it keeps its structure. If it’s too warm, it can get mushy! -
Can I freeze leftover twists?
Absolutely! You can freeze them before baking. Just thaw and pop them in the oven when you’re ready to enjoy. -
What if I overstuff my twists?
Don’t panic! If they oozed out during baking, the taste will still be delicious. Just make sure to seal the edges tightly next time! -
How do I store leftovers?
Keep them in an airtight container for up to 3 days at room temperature or in the fridge. They taste delicious cold too!
Nutritional Info
While we like to indulge now and then, it’s also nice to know what we’re eating! Each pumpkin pie twist is around 200 calories (give or take, depending on size and additional toppings). They contain about 10g of fat, 25g of carbs, and 2g of protein. You can lighten the recipe by using less sugar or swapping puff pastry for a whole wheat version.
Final Thoughts
Thanks for joining me in this delightful adventure of making Easy Pumpkin Pie Twists! I hope this recipe brings a little autumn magic into your home, just like it has in mine. Remember, cooking is all about joy and creativity, so don’t be afraid to experiment or make it your own. Share it with loved ones and let those cozy vibes flow!
So, what are you waiting for? Grab that pumpkin puree and puff pastry, and let’s make some memories in the kitchen together! Happy cooking!
Print
Easy Pumpkin Pie Twists
- Total Time: 35 minutes
- Yield: 12 servings 1x
- Diet: Vegetarian
Description
A cozy and delightful twist on classic pumpkin pie, these Easy Pumpkin Pie Twists are made with flaky pastry and warm autumn spices, perfect for holiday gatherings.
Ingredients
- 2 sheets Puff Pastry
- 1 cup Pumpkin Puree
- 1/2 cup Brown Sugar
- 1 teaspoon Cinnamon
- 1/2 teaspoon Nutmeg
- 1/4 teaspoon Ginger
- 1/4 teaspoon Cloves
- 1 Egg (for egg wash)
- Sugar for sprinkling
Instructions
- Preheat your oven to 400°F (200°C).
- Combine the pumpkin puree, brown sugar, cinnamon, nutmeg, ginger, and cloves in a medium bowl.
- Roll out your puff pastry sheets on a lightly floured surface.
- Cut each sheet into about 6 strips, aiming for 1-inch wide.
- Spread a generous tablespoon of the pumpkin mixture along the center of each strip.
- Twist the sides of each strip over the filling to enclose it.
- Arrange the twists on a parchment-lined baking sheet.
- Brush the tops of each twist with the egg wash and sprinkle sugar on top.
- Bake for 15-20 minutes, until golden brown and puffed up.
- Let cool for a few minutes before serving.
Notes
Serve warm with whipped cream or ice cream. For added flavor, drizzle caramel sauce on top.
- Prep Time: 15 minutes
- Cook Time: 20 minutes
- Category: Dessert
- Method: Baking
- Cuisine: American
Nutrition
- Serving Size: 1 twist
- Calories: 200
- Sugar: 8g
- Sodium: 100mg
- Fat: 10g
- Saturated Fat: 4g
- Unsaturated Fat: 6g
- Trans Fat: 0g
- Carbohydrates: 25g
- Fiber: 2g
- Protein: 2g
- Cholesterol: 30mg
Keywords: pumpkin pie, fall dessert, easy recipe, holiday treat, pumpkin twists