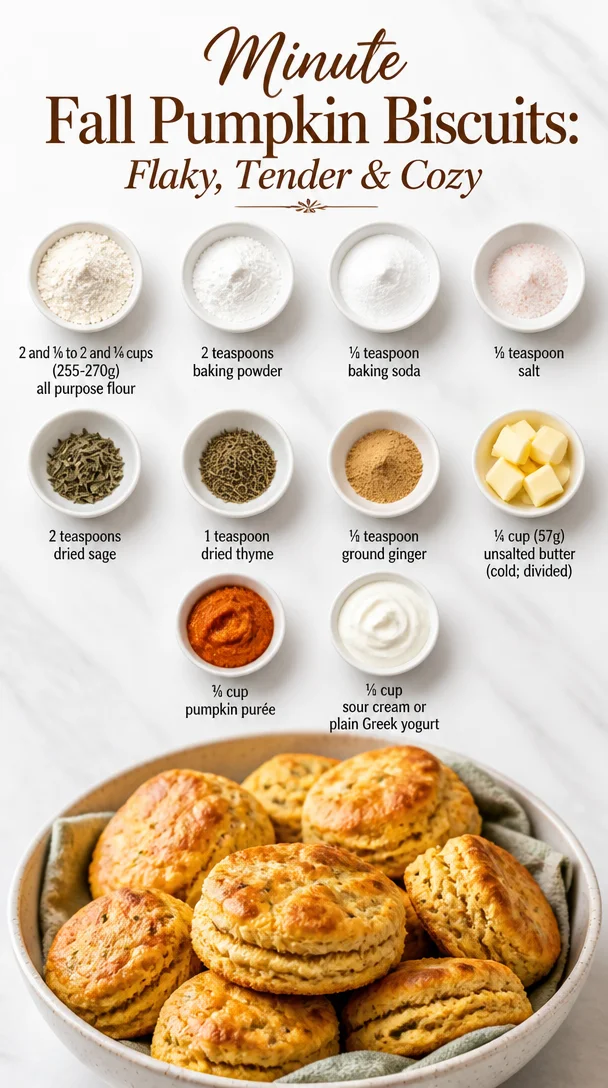
Minute Fall Pumpkin Biscuits: Flaky, Tender & Cozy
Pumpkin Biscuits: The Comfort of Fall in Every Bite
Hey there, fellow food lovers! Welcome back to Feastical, where every recipe tells a story, and every dish is an invitation to gather around the table. Today, we’re diving into a delightful recipe that perfectly captures the essence of fall—Pumpkin Biscuits! Why pumpkin, you ask? Well, there’s just something magical about this versatile ingredient that adds warmth, flavor, and just the right amount of comfort to our plates. Whether you’re looking for a cozy breakfast option or a delightful accompaniment to dinner, these biscuits will warm your heart and fill your belly.
Let me take you on a little journey back in time. I can still remember the aroma wafting through the kitchen at my grandma’s house when autumn rolled in. With leaves turning golden and the air getting crisp, she would whip up batches of her scrumptious pumpkin biscuits. Packed with savory herbs and a hint of sweetness, those biscuits were our family’s beloved tradition! Each bite felt like a soft hug, and they always paired beautifully with homemade soup or simply slathered with butter.
Now, you might be thinking, “Beau, I love a good biscuit, but can I really pull this off?” Fear not! With this ridiculously easy recipe, I’m here to guide you every step of the way. Get ready to channel your inner fall spirit!
The Ingredients: What You’ll Need
Let’s get down to business. Here are the ingredients you’ll need to create these mouthwatering pumpkin biscuits:
-
2 and ⅛ to 2 and ¼ cups (255-270g) all-purpose flour: This is your base! Feel free to substitute with whole wheat flour for a healthier twist or gluten-free flour if needed.
-
1-2 teaspoons baking powder: This is what gives our biscuits that lovely rise! Just make sure it’s fresh; old baking powder can lead to flat biscuits.
-
½ teaspoon baking soda: Works with the pumpkin puree to help the biscuits rise further and achieve a soft, fluffy texture.
-
½ teaspoon salt: A little salt enhances all the flavors and balances the sweetness of the pumpkin. You could use sea salt for a different taste.
-
2 teaspoons dried sage: The earthiness of sage pairs marvelously with pumpkin. If sage isn’t your thing, try rosemary or even Italian seasoning for a fun twist.
-
1 teaspoon dried thyme: Another herb that boosts the biscuit’s flavor. Just like with sage, if you’re running low, oregano works too!
-
½ teaspoon ground ginger: Adds a warm, spicy note! You could swap this for cinnamon if you prefer a sweeter biscuit.
-
¼ cup (57g) unsalted butter (cold; divided): Butter is key to making flaky biscuits! Preferably keep it cold and cut into small cubes for the best texture.
-
¾ cup pumpkin purée: The star of the show! You can use canned pumpkin puree or roast and mash your own pumpkin—easy-peasy!
-
½ cup sour cream or plain Greek yogurt: This adds richness and moisture. If you’re after a lighter version, use low-fat yogurt or even unsweetened applesauce.
Now that we’ve gathered our ingredients, let’s get cooking!
Step-by-Step Instructions: Let’s Make It Happen!
-
Preheat that Oven: Start by preheating your oven to 400°F (200°C). This is crucial for that golden-brown finish we all crave!
-
Mix the Dry Ingredients: In a large mixing bowl, whisk together the flour, baking powder, baking soda, salt, sage, thyme, and ground ginger. This step blends the flavors and ensures an even rise as our biscuits bake.
-
Cut in Butter: Add the cold, cubed butter to the flour mixture. Here’s the fun part—use a pastry cutter or two forks to mix until the mixture resembles coarse crumbs. If you have chilly hands, this is the time to employ them! The key is to keep the butter cold to ensure flakiness.
-
Stir in Wet Ingredients: In another bowl, combine the pumpkin purée, sour cream (or yogurt), and mix until smooth. Gradually add this mixture to your flour blend. Use a spatula to fold everything together gently—over-mixing can lead to tough biscuits!
-
Knead and Roll: Dust a clean surface with a little flour and turn out the dough. Lightly knead it just a few times—think of it as a gentle massage rather than a full workout. Roll it out to about ¾ inch thick.
-
Cut Out Your Biscuits: Use a biscuit cutter or a simple glass to punch out your biscuits. Place them on a baking sheet lined with parchment paper. Give them a little space to expand!
-
Brush with Butter: Melt a tablespoon of butter and brush it over the tops of the biscuits for that delicious golden glow.
-
Bake: Pop your biscuits in the oven for about 15-20 minutes, or until they are risen and golden brown. Keep an eye on them, as oven times can vary.
-
Cool and Enjoy: Let your biscuits cool on the baking sheet for a few minutes before transferring them to a wire rack. They’re fabulous served warm!
Tip from the Chef: For extra flavor, consider adding some grated cheese or chopped nuts right into your dough!
Serving Suggestions: How to Plate Your Biscuits
Presentation is everything, right? To serve your pumpkin biscuits, I recommend placing them in a beautiful basket lined with a clean linen napkin. This not only keeps them warm but also gives that homey vibe we all love.
Serve them alongside a steaming bowl of your favorite soup, like a creamy tomato basil or a rustic butternut squash soup. Or, go the breakfast route and whip up some scrambled eggs and crispy bacon for a hearty morning treat. Don’t forget to set out some flavored butter or homemade jams to spread onto the warm biscuits—you’ll thank me later!
Recipe Variations: Spice It Up!
Now we know classic is great, but if you’re feeling adventurous, here are a few creative twists to your pumpkin biscuits:
-
Sweet and Savory: Add a handful of chopped walnuts or pecans for texture and a bit of sweetness!
-
Herbal Delight: Swap the dried herbs for fresh ones—just double the amount for that garden-fresh taste.
-
Cheesy Pumpkin Biscuits: Mix in shredded cheese (cheddar, gouda, or even feta) for a cheesy surprise in every bite.
-
Spicy Kick: Turn up the heat by adding a pinch of cayenne pepper to the dry ingredients.
-
Gluten-Free Bliss: Use a 1:1 gluten-free flour blend in place of the all-purpose flour for a gluten-free version that still tastes fantastic!
Chef’s Notes: My Journey with Pumpkin Biscuits
Ah, pumpkin biscuits hold a special place in my heart. Over the years, I’ve played with this recipe, adding tidbits of nostalgia and experimenting with new flavors. One time, I even tried adding chocolate chips to the dough just for fun—while it was a tasty creation, I decided to keep this one classic, letting the pumpkin shine through.
A funny story: one autumn, I was hosting a brunch and forgot to buy enough pumpkin! I improvised with some sweet potato mash I had on hand, and you know what? It turned out just as delightful! This kitchen adventure taught me that cooking is all about being flexible and having fun!
FAQs and Troubleshooting: Answers to Your Questions
-
My biscuits turned out flat—what went wrong?
- Double-check your baking powder and baking soda are fresh. Also, ensure you’re measuring the flour correctly; too little can lead to flat biscuits.
-
Can I freeze the biscuits?
- Absolutely! Once baked and cooled, store them in an airtight container or freezer bag. Reheat in the oven or microwave when you’re ready to enjoy!
-
What if I don’t have sour cream?
- No problem! You can substitute with buttermilk, plain yogurt, or even unsweetened applesauce.
-
How do I know when my biscuits are done?
- Besides the lovely golden color, if you tap the bottom of a biscuit and it sounds hollow, it’s a sign they’re perfectly baked!
Nutritional Info
While the comfort of these pumpkin biscuits can’t be beat, here’s a quick overview of its nutritional aspects to keep you in the know:
- Serving Size: 1 biscuit
- Calories: Approximately 150–200 calories
- Total Fat: Around 8–10 grams
- Saturated Fat: About 4 grams (largely from the butter)
- Carbohydrates: 20–25 grams
- Fiber: 1–2 grams (thanks to the pumpkin!)
- Protein: 3–4 grams
These biscuits are a delightful way to brighten up your day without sabotaging your dietary goals!
Final Thoughts
There you have it, my friends—easy, delicious pumpkin biscuits that will undoubtedly become a staple in your kitchen this fall and beyond. Each bite captures the cozy, comforting essence of autumn, perfect for gatherings or quiet evenings at home.
I hope you enjoy making and sharing these biscuits as much as I do. Remember, cooking should always feel good! So roll up those sleeves, get your hands a little messy, and, most importantly, enjoy every moment spent in the kitchen.
Until next time, keep the good vibes and delicious food flowing! Happy baking!
Print
Pumpkin Biscuits
- Total Time: 35 minutes
- Yield: 12 biscuits 1x
- Diet: Vegetarian
Description
Delightful pumpkin biscuits that capture the essence of fall, perfect for breakfast or as an accompaniment to dinner.
Ingredients
- 2 and ⅛ to 2 and ¼ cups (255-270g) all-purpose flour
- 1–2 teaspoons baking powder
- ½ teaspoon baking soda
- ½ teaspoon salt
- 2 teaspoons dried sage
- 1 teaspoon dried thyme
- ½ teaspoon ground ginger
- ¼ cup (57g) unsalted butter (cold; divided)
- ¾ cup pumpkin purée
- ½ cup sour cream or plain Greek yogurt
Instructions
- Preheat your oven to 400°F (200°C).
- Mix the dry ingredients: In a large mixing bowl, whisk together the flour, baking powder, baking soda, salt, sage, thyme, and ground ginger.
- Cut in the cold, cubed butter until the mixture resembles coarse crumbs.
- Stir in the wet ingredients: Combine the pumpkin purée, sour cream (or yogurt), and mix until smooth.
- Knead the dough lightly on a floured surface and roll it out to about ¾ inch thick.
- Cut out biscuits using a biscuit cutter or glass.
- Brush the tops with melted butter.
- Bake for 15-20 minutes, or until risen and golden brown.
- Cool on the baking sheet for a few minutes before transferring to a wire rack.
Notes
For extra flavor, consider adding grated cheese or chopped nuts.
- Prep Time: 15 minutes
- Cook Time: 20 minutes
- Category: Baking
- Method: Baking
- Cuisine: American
Nutrition
- Serving Size: 1 biscuit
- Calories: 175
- Sugar: 3g
- Sodium: 250mg
- Fat: 8g
- Saturated Fat: 4g
- Unsaturated Fat: 3g
- Trans Fat: 0g
- Carbohydrates: 24g
- Fiber: 1g
- Protein: 4g
- Cholesterol: 15mg
Keywords: pumpkin, biscuits, fall baking, comfort food
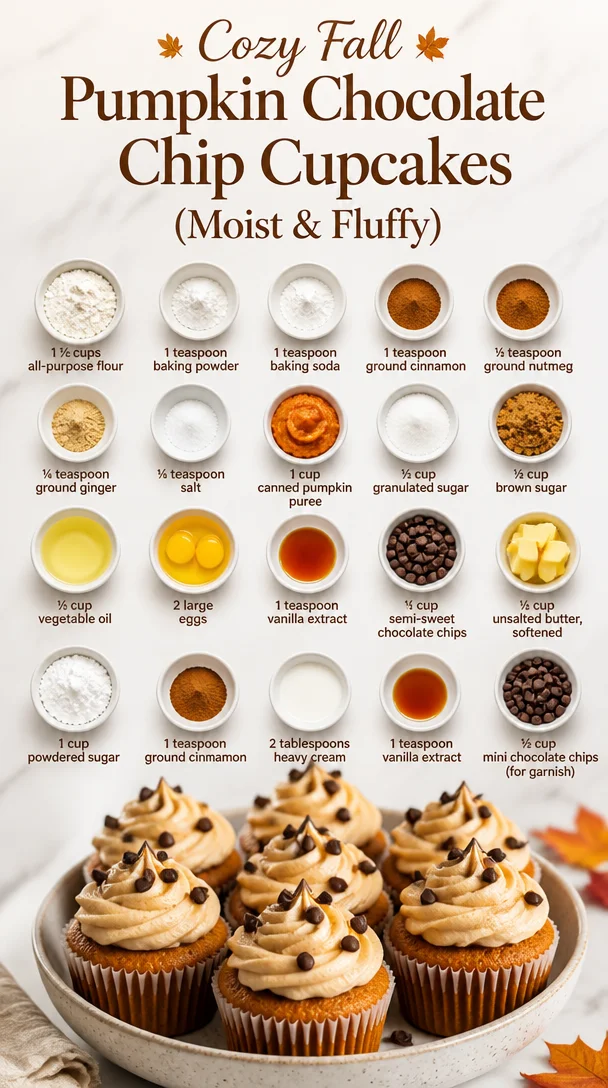
Cozy Fall Pumpkin Chocolate Chip Cupcakes (Moist & Fluffy)
Pumpkin Chocolate Chip Cupcakes: A Cozy Treat for Autumn
Hey there, fellow food lovers! As the leaves turn golden and the crisp autumn breeze sweeps in, there’s something truly magical about this time of year. We swap out our flip-flops for cozy socks and start craving those warm, comforting flavors that make our hearts sing. And you know what embodies that seasonal warmth perfectly? Pumpkin! So grab your apron and let’s dive into the delightful world of Pumpkin Chocolate Chip Cupcakes—a treat that brings together the best of both worlds: autumn spice and chocolatey goodness!
I can still remember the first time I baked with pumpkin as a kid. I was maybe seven or eight, and my grandmother would invite me into her cozy kitchen every fall. The air would fill with the rich aroma of cinnamon and nutmeg, contrasting beautifully with the sweet scent of chocolate chips. As we mixed our ingredients, she would tell me stories about how pumpkin had been a cherished ingredient in her family for generations. That kitchen became our playground, a place where laughter and love mingled with flour and sugar. I knew from those tender moments that I wanted to carry on that legacy.
Now, years later, I’m here to share the joy of pumpkin baking with you. These cupcakes are not only simple and fun to make, but they also carry that nostalgic essence that turns an ordinary day into a warm celebration. They’re perfect for anything from casual family gatherings to festive holiday parties. Trust me, you’re going to want to add this recipe to your culinary repertoire!
So, let’s get comfy and preheat that oven! It’s time to create some muffins that taste like a hug and smile all wrapped into one.
Personal Story
As I mentioned earlier, my cherished memories of baking pumpkin treats with my grandma have always inspired my own love for the kitchen. One particular autumn evening stands out vividly in my mind. We decided it was time to bake up a storm—her famous pumpkin pie would usually steal the spotlight, but this time, I persuaded her to let me take the lead on cupcakes.
We filled the kitchen with laughter, flour, and a little friendly competition over who could get the perfect swirl of frosting on top. I still giggle thinking about how my first attempts got swiped off the table by our rascally cat, Whiskers, who seemed to mistake the little treats for his toys! But that night, with my grandma cheering me on, I finally created a batch of cupcakes that not only looked good but tasted divine. Each cupcake was a delightful reminder of joy, family, and love.
To this day, I hold that warm and fuzzy feeling close to my heart, and it shines through every time I whip up a batch of Pumpkin Chocolate Chip Cupcakes. Whether it’s for a fall fest, a cozy gathering of friends, or simply a treat for myself on a chilly evening, this recipe is the perfect way to savor those sweet memories while creating new ones.
Ingredients
Here’s what you’ll need to whip up a batch of these decadent pumpkin chocolate chip cupcakes:
-
1 ½ cups all-purpose flour
The foundation of our cupcakes! You can swap this for whole wheat flour for added nutrition, but you may find the texture to be denser. -
1 teaspoon baking powder
A must for giving your cupcakes their lovely rise! Always check the expiration date; stale powder can leave your cupcakes flat. -
1 teaspoon baking soda
Acts as a leavening agent, balancing out the density of pumpkin. You can use baking powder instead if you’re in a pinch—just double the amount. -
1 teaspoon ground cinnamon
This spice brings warmth and depth. Consider experimenting with other spices like cardamom for a unique flavor twist! -
½ teaspoon ground nutmeg
Perfect for adding that classic autumn essence! Don’t skip it—it makes a world of difference! -
¼ teaspoon ground ginger
A subtle zing to elevate the flavors. Fresh ginger would also work great if you grate it finely. -
¼ teaspoon salt
Enhances all the flavors! It’s a key ingredient in balancing sweetness. -
1 cup canned pumpkin puree
The star of the show! Make sure it’s pure pumpkin, not pumpkin pie filling. You can homemade puree, too, if you’re feeling adventurous! -
½ cup granulated sugar
For that base sweetness. If you want a lower sugar version, feel free to reduce it by a quarter! -
½ cup brown sugar
Adds moisture and a richer flavor. For a caramel note, try using dark brown sugar instead! -
½ cup vegetable oil
Keeps these cupcakes ultra moist! You can substitute with melted coconut oil for a tropical twist. -
2 large eggs
Provides structure and richness. For a vegan version, you can use flax eggs (1 tablespoon ground flaxseed mixed with 2.5 tablespoons water). -
1 teaspoon vanilla extract
For a lovely aroma and sweetness; hence why you need to use high-quality vanilla! -
1 cup semi-sweet chocolate chips
Chocolate makes everything better! You can swap for dark chocolate or even white chocolate if you prefer a different vibe. -
½ cup unsalted butter, softened
For the frosting! Room temperature is crucial for a smooth texture. You can replace this with vegan butter for a dairy-free version. -
1 cup powdered sugar
Sweetens and thickens the frosting! If you run low on powdered sugar, feel free to blitz regular granulated sugar in a high-speed blender until it turns fine. -
1 teaspoon ground cinnamon
For flavoring the frosting, it ties everything together beautifully! -
2 tablespoons heavy cream
Gives that luscious texture to the frosting. If you’re vegan, coconut cream would work like a dream! -
1 teaspoon vanilla extract (for the frosting)
Just brings it all to another level! Again, use the good stuff. -
½ cup mini chocolate chips (for garnish)
Because you can never have too much chocolate! They are great for decoration and an extra sweet treat on top.
Step-by-Step Instructions
Okay, my friend, it’s GO time! Let’s bring these Pumpkin Chocolate Chip Cupcakes to life! Follow these simple steps:
-
Preheat Your Oven
Preheat your oven to 350°F (170°C) and line a muffin tin with paper liners. This is where the magic is going to happen, and trust me, you don’t want to miss it! -
Mix the Dry Ingredients
In a medium bowl, whisk together the flour, baking powder, baking soda, cinnamon, nutmeg, ginger, and salt. This helps to distribute everything evenly, ensuring each cupcake is packed with flavor. -
Combine the Wet Ingredients
In a large bowl, mix together the pumpkin puree, granulated sugar, brown sugar, vegetable oil, eggs, and vanilla extract until you have a smooth mixture. I always suggest using a hand mixer or whisk because the less air you incorporate into your batter, the denser the cupcake will be. -
Combine the Mixtures
Gradually add the dry mixture to the wet mixture until just combined. Don’t overmix or your cupcakes will be tough. It’s totally fine if there are a few lumps; we’re going for tender cupcakes here! -
Fold in the Chocolate Chips
Gently fold in the semi-sweet chocolate chips, allowing them to mix evenly throughout the batter—this is when the fun starts! You can save a few chips to sprinkle on top before baking if you wish. -
Fill the Muffin Cups
Spoon the batter into the prepared muffin tin, filling each cup about ¾ full. This allows room for the cupcakes to rise without overflowing. You want to create those perfectly dome-shaped tops! -
Bake
Pop them in the oven for about 18-22 minutes, or until a toothpick inserted into the center comes out clean. Oh, the sweet aroma will fill your kitchen—it’s just heavenly! -
Cool
Let them cool in the tin for about 5 minutes before transferring them to a wire rack to cool completely. This step is essential if you want to frost them nicely. -
Prepare the Frosting
While they cool, let’s whip up that dreamy frosting! In a mixing bowl, beat the softened butter until creamy, then gradually add in the powdered sugar, vanilla extract, and ground cinnamon, mixing until smooth. If it’s too thick, add the heavy cream a tablespoon at a time until you reach your desired consistency. -
Frost Your Cupcakes
Once cooled, frost each cupcake generously! You can use a piping bag for a fancy swirl or just a simple spatula for a homemade feel. Top with mini chocolate chips because, well, why not? They add that extra crunch and cuteness to your cupcakes! -
Serve and Enjoy
Place them on a beautiful platter, gather your friends and family, and watch the magic happen. These cupcakes are not just treats; they’re moments of joy!
Serving Suggestions
To serve these delightful Pumpkin Chocolate Chip Cupcakes, consider arranging them on a festive cake stand, or even a rustic wooden board, to accentuate that autumn vibe. You could sprinkle a little powdered sugar or a dusting of cinnamon on top for that extra touch of charm. Pair them with a warm mug of spiced cider or a cup of pumpkin spice latte for a truly seasonal experience.
Imagine a cozy setting with soft lighting—maybe some flickering candles—and the laughter of loved ones filling the air. Your pumpkin cupcakes will not only shine on the table but also warm the hearts of everyone who takes a bite.
Feel free to package a few as sweet gifts to friends, neighbors, or coworkers in adorable fall-themed boxes or treat bags. Nothing says “I appreciate you!” quite like homemade baked goodies!
Recipe Variations
Now, let’s talk about how you can make these cupcakes your own! These variations are great for those who want to experiment a little:
-
Spiced Pumpkin Chocolate Chip: Add some chopped pecans or walnuts to the batter for extra texture and a nutty flavor.
-
Pumpkin Spice Latte Cupcakes: Infuse your batter with a tablespoon of instant espresso powder for that delightful coffee kick.
-
Vegan and Gluten-Free: Swap out the eggs for flax eggs, use almond flour instead of all-purpose flour, and coconut oil instead of vegetable oil.
-
Pumpkin Cream Cheese Frosting: For a tangy twist, mix in some softened cream cheese into your frosting instead of butter for a rich flavor.
-
Fill with Ganache: Create a surprise inside by filling your cupcakes with a chocolate ganache before frosting! Just carefully hollow out a small portion, fill it with ganache, and then frost as usual.
No matter how you twist it, these cupcakes will surely be a crowd-pleaser!
Chef’s Notes
Oh, and let me share a little secret about these cupcakes—they’re just as tasty the next day (if they last that long, of course!). If you find you have leftovers, simply store them covered at room temperature. However, if you’re like me and always on the lookout for the next baking adventure, I encourage you to try out variations to this recipe.
I once hosted a pumpkin-themed potluck, and I decided to make a giant version of these cupcakes in a bundt pan. It was an absolute hit! Sometimes, playing around leads to delightful surprises, so don’t be afraid to experiment and have fun in the kitchen!
FAQs and Troubleshooting
1. My cupcakes fell in the middle, what happened?
This usually occurs if the batter was overmixed or if they were taken out of the oven too soon. Always use the toothpick test—insert it, and if it comes out clean, they’re ready!
2. Can I use fresh pumpkin instead of canned?
Absolutely! Just make sure to cook and puree the pumpkin until it’s smooth and thick—just like the canned version!
3. How can I store them for freshness?
Keep your cupcakes in an airtight container at room temperature for up to three days. For longer storage, pop them in the freezer; just thaw when you’re ready to enjoy again!
4. What if my frosting is too runny?
If your frosting is too runny, add a little more powdered sugar until it reaches your desired consistency. There’s always a solution in the kitchen!
Nutritional Info
Per cupcake, these delightful treats pack in approximately:
- Calories: 180
- Total Fat: 8g
- Saturated Fat: 2g
- Cholesterol: 38mg
- Sodium: 150mg
- Total Carbohydrates: 25g
- Dietary Fiber: 1g
- Sugars: 12g
- Protein: 2g
These are estimates, of course, and can change depending on ingredient variations. They’re certainly a treat, so enjoy them in moderation as part of a balanced diet.
Final Thoughts
So there you have it—a recipe to make some unforgettable Pumpkin Chocolate Chip Cupcakes packed with love, nostalgia, and tons of flavor! Whether you’re whipping them up for family, friends, or a late-night snack just for you, I guarantee these little delights will bring smiles all around.
Just as my grandma did with me, I encourage you to share the joy of baking, get a little flour on your nose, and let the kitchen be a place of laughter and love. Remember, cooking doesn’t have to be complicated—it should be a delightful experience that nourishes our souls as much as our tummies.
Now, go ahead and turn on that oven, mix up that batter, and create some magical memories! I can’t wait to hear about your baking adventures with these Pumpkin Chocolate Chip Cupcakes. Until next time, happy baking, friends!
Print
Pumpkin Chocolate Chip Cupcakes
- Total Time: 35 minutes
- Yield: 12 servings 1x
- Diet: Vegetarian
Description
Cozy and comforting cupcakes combining pumpkin and chocolate chips, perfect for autumn gatherings.
Ingredients
- 1 ½ cups all-purpose flour
- 1 teaspoon baking powder
- 1 teaspoon baking soda
- 1 teaspoon ground cinnamon
- ½ teaspoon ground nutmeg
- ¼ teaspoon ground ginger
- ¼ teaspoon salt
- 1 cup canned pumpkin puree
- ½ cup granulated sugar
- ½ cup brown sugar
- ½ cup vegetable oil
- 2 large eggs
- 1 teaspoon vanilla extract
- 1 cup semi-sweet chocolate chips
- ½ cup unsalted butter, softened
- 1 cup powdered sugar
- 1 teaspoon ground cinnamon (for frosting)
- 2 tablespoons heavy cream
- 1 teaspoon vanilla extract (for frosting)
- ½ cup mini chocolate chips (for garnish)
Instructions
- Preheat your oven to 350°F (170°C) and line a muffin tin with paper liners.
- Mix the dry ingredients: In a medium bowl, whisk together the flour, baking powder, baking soda, cinnamon, nutmeg, ginger, and salt.
- Combine the wet ingredients: In a large bowl, mix together the pumpkin puree, granulated sugar, brown sugar, vegetable oil, eggs, and vanilla extract until smooth.
- Combine the mixtures: Gradually add the dry mixture to the wet mixture until just combined.
- Fold in the chocolate chips gently.
- Fill the muffin cups about ¾ full with batter.
- Bake for 18-22 minutes or until a toothpick comes out clean.
- Cool for 5 minutes in the tin before transferring to a wire rack.
- Prepare the frosting: Beat softened butter, then gradually add powdered sugar, vanilla extract, and ground cinnamon until smooth. Add heavy cream as needed.
- Frost each cupcake generously, topping with mini chocolate chips.
- Serve and enjoy!
Notes
These cupcakes are just as tasty the next day. Store in an airtight container at room temperature.
- Prep Time: 15 minutes
- Cook Time: 20 minutes
- Category: Dessert
- Method: Baking
- Cuisine: American
Nutrition
- Serving Size: 1 cupcake
- Calories: 180
- Sugar: 12g
- Sodium: 150mg
- Fat: 8g
- Saturated Fat: 2g
- Unsaturated Fat: 5g
- Trans Fat: 0g
- Carbohydrates: 25g
- Fiber: 1g
- Protein: 2g
- Cholesterol: 38mg
Keywords: pumpkin, cupcakes, chocolate chips, fall desserts, autumn baking
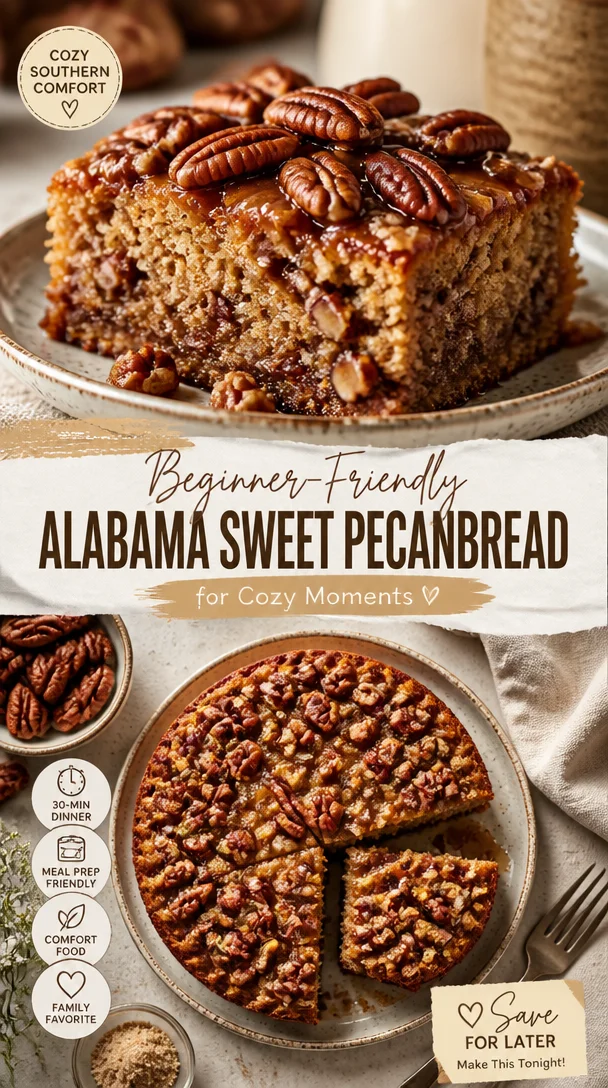
Beginner-Friendly Alabama Sweet Pecanbread for Cozy Moments
Irresistible Sweet Alabama Pecanbread for Cozy Moments
Hey there, fellow food lovers! I’m Beau Collier, and I’m thrilled to welcome you back to Feastical, your friendly space for all things delicious and comforting. Today, I’m about to take you on a cozy ride through a recipe that’s close to my heart and sure to warm your soul: Sweet Alabama Pecanbread. This delightful treat is perfect for those lazy Sunday mornings or any time you need a bit of comfort food that feels like a hug.
Introduction
Now, picture this: a chilly afternoon, the scent of something buttery and sweet wafting through the air, and a cozy kitchen filled with laughter and chatter. Sounds nice, right? That’s exactly the vibe I’m aiming for with Sweet Alabama Pecanbread! This recipe has become a staple in my kitchen, embodying everything I love about food—it’s simple to make, seriously delicious, and has the magical ability to bring people together.
Sweet Alabama Pecanbread is more than just your average quick bread; it’s a recipe packed with richness from sugars, nuttiness from pecans, and that all-important touch of love baked right in. Whether you’re enjoying a slice with your morning coffee, serving it as an afternoon snack, or bringing it to a gathering, this pecanbread will steal the spotlight.
And guess what? It’s incredibly easy to whip up! With just a handful of ingredients that you likely have on hand, you’ll be amazed at how quickly and effortlessly you can create this masterpiece. So don your apron, roll up your sleeves, and let’s get to baking!
Personal Story
Let me share a little story with you about how Sweet Alabama Pecanbread entered my life. I was visiting my beloved aunt in Alabama during the summer, the kind of sultry summer that makes you seek refuge in air conditioning while sipping on iced tea. She welcomed me with open arms and treated me to her renowned pecanbread—a recipe handed down through generations in her family.
The moment I took the first bite, I was transported to memories of my childhood, sitting on the porch, listening to the cicadas while enjoying a fresh slice of pecanbread slathered with butter. That first mouthful was pure magic! The moist, sweet bread combined with the crunchy pecans created a symphony of flavors and textures that I couldn’t resist.
From then on, every visit to Auntie’s house included a fresh batch of this delightful treat. So, in homage to those heartfelt moments, I had to adapt her beloved recipe, infusing my voice and flair, and now, I’m excited to share it with all of you!
Ingredients
Let’s dive into the deliciousness that is Sweet Alabama Pecanbread! Here’s what you’ll need:
-
1 cup Granulated Sugar
A classic sweetener that adds that irresistible sweetness. For a deeper flavor, you can swap this for brown sugar—trust me, it’s worth it! -
1/2 cup Brown Sugar
Optional but highly recommended! It brings out that rich, caramel-like flavor and adds moisture. Plus, who doesn’t love the richness of brown sugar? -
1/2 cup Vegetable Oil or Melted Butter
This is essential for adding that lovely moisture to your bread. If you’re feeling fancy, go for melted butter for a buttery taste! -
2 large Eggs
Make sure they’re at room temperature to help with a smooth batter. Fresh eggs equal a fluffier texture! -
2 cups All-Purpose Flour
Spoon and level this to avoid excess. This is the backbone of your bread; it soaks up all the goodness. -
2 teaspoons Baking Powder
This little powerhouse acts as a leavening agent, making your pecanbread nice and fluffy. -
1/2 teaspoon Salt
A tiny pinch goes a long way in balancing the flavors! Don’t skip it! -
1 teaspoon Vanilla Extract
This infuses warmth and depth. Go for pure vanilla extract if you can; it really makes a difference. -
1 cup Chopped Pecans
Toasting them beforehand unlocks even more flavor! You’ll love that crunch against the soft bread.
Step-by-Step Instructions
Alright, my kitchen friends, time to get down to business and make this pecanbread! Follow these easy steps, and I promise you’ll create something special.
-
Preheat the Oven
Begin by preheating your oven to 350°F (175°C). This is crucial; a well-preheated oven ensures your bread bakes evenly. -
Mix the Sugars and Wet Ingredients
In a large mixing bowl, combine the granulated sugar and brown sugar. Add in the vegetable oil (or melted butter) and whisk until combined. Make sure to mix well to incorporate air; this will help with fluffiness! -
Add the Eggs
Crack the eggs into the bowl and whisk them in thoroughly. The mixture should become a nice, smooth batter. Pro tip: if your eggs are cold from the fridge, you can place them in warm water for a few minutes to bring them to room temp! -
Combine the Dry Ingredients
In another bowl, whisk together the all-purpose flour, baking powder, and salt. This helps evenly distribute the baking powder throughout the flour, preventing lumps. Slowly add this to your wet ingredients, stirring gently until just combined. Don’t overmix; a few lumps are perfectly okay! -
Add the Vanilla and Pecans
Stir in the vanilla extract and chopped pecans until they’re distributed evenly in the batter. If you want an extra layer of flavor, toast your pecans in a dry skillet over medium heat for about 5 minutes before adding them in. Simply delightful! -
Prepare the Baking Pan
Grease a loaf pan (9 x 5 inches) or line it with parchment paper for easy removal. Pour the batter into the prepared pan and smooth the top with a spatula. -
Bake It Up
Place the pan in your preheated oven and bake for 55-65 minutes, or until a toothpick inserted into the center comes out clean. Keep an eye on it towards the last 15 minutes—if the top starts browning too much, just tent it with foil to prevent burning. -
Cool and Serve
Once baked, allow the pecanbread to cool in the pan for about 10 minutes before transferring it to a wire rack. Let it cool completely before slicing. I know this part is tough, but trust me, the texture is worth the wait!
Serving Suggestions
Now that your Sweet Alabama Pecanbread is ready, how do you plan to enjoy it? Slice it thick and serve it with a melting pat of butter on top, or maybe a drizzle of honey for some pizzazz. You can also pair it with a cup of coffee or tea—perfect for those slow, quiet mornings. Feeling a bit more adventurous? Toast the slices in a skillet or toaster for a crispy outside, and serve it with a side of cream cheese or whipped cream for a little indulgence!
Recipe Variations
Let’s get creative! Here are some fun variations you can try to give your Sweet Alabama Pecanbread a twist:
-
Chocolate Chip Pecanbread: Add a cup of semi-sweet chocolate chips for a rich, decadent treat. Chocolate and pecans are a match made in heaven!
-
Banana Pecanbread: Incorporate mashed bananas into the batter for a moist and fruity flavor. Just use one cup of ripe mashed bananas, and reduce the oil slightly.
-
Spiced Pecanbread: Add a teaspoon of cinnamon and a pinch of nutmeg to your dry ingredients for a warm, spicy kick. This is especially cozy in the fall!
-
Coconut Pecanbread: Toss in half a cup of shredded coconut for a tropical flair. Toasted coconut on top for garnish? Count me in!
-
Gluten-Free Option: Substitute the all-purpose flour with a 1:1 gluten-free baking mix to accommodate your gluten-free friends without sacrificing flavor.
Chef’s Notes
Let’s chat for a moment about the beauty of this recipe’s evolution. I’ve played around with different sugar combinations and really honed in on the perfect balance of moistness and flavor. You can say I’ve “set the bar” for the bread world—pun intended! Just the other day, I had a friend tell me they added a hint of maple syrup, and honestly, I can’t wait to try that next time!
A little secret? I love this pecanbread for breakfast, but I have also indulged in it as a late-night snack—that’s what makes it irresistible!
FAQs and Troubleshooting
Q: My pecanbread turned out dense; what did I do wrong?
A: Denseness often comes from overmixing the batter or using too much flour. Remember, gently fold the dry ingredients into the wet until just combined!
Q: Can I freeze the pecanbread?
A: Absolutely! Slice the bread and wrap it tightly in plastic wrap or aluminum foil, then place it in an airtight container. It can last for up to three months in the freezer.
Q: What if I don’t have pecans? Can I use other nuts?
A: Of course! Walnuts or hazelnuts are great substitutes. Just ensure you adjust the chopping size accordingly.
Q: How do I know when it’s done baking?
A: A toothpick inserted in the center should come out clean or with just a few moist crumbs. If you notice it browning too quickly, cover it with foil for the last few minutes!
Nutritional Info
Eating nourishing food doesn’t have to feel heavy, and this Sweet Alabama Pecanbread manages to strike that balance. Each slice (roughly 1 inch thick) contains approximately:
- Calories: 170
- Total Fat: 7g
- Saturated Fat: 1g
- Cholesterol: 30mg
- Sodium: 150mg
- Total Carbohydrates: 25g
- Dietary Fiber: 1g
- Sugars: 12g
- Protein: 3g
It’s a treat that’s indulgent yet satisfying, and it’s perfect for sharing or keeping all to yourself. Just remember, moderation is key!
Final Thoughts
I hope you loved this journey into the world of Sweet Alabama Pecanbread! It’s more than just a recipe; it’s a way to cherish the little moments in life, filled with flavor and warmth. The heart of a good dish lies not just in its ingredients, but the love and memories created around it.
So, gather your family and friends, and dig in together. Share a slice, tell a story, and make new memories. Whether it’s the charming aroma that fills your kitchen or the laughter shared over a sweet treat, may this pecanbread bring you as much joy as it has brought me. Until next time, keep cooking, keep creating, and always remember: good food is about good company! Happy baking!
Print
Sweet Alabama Pecanbread
- Total Time: 70 minutes
- Yield: 8 servings 1x
- Diet: Vegetarian
Description
A delightful quick bread packed with sweetness and nuttiness, perfect for cozy moments.
Ingredients
- 1 cup Granulated Sugar
- 1/2 cup Brown Sugar
- 1/2 cup Vegetable Oil or Melted Butter
- 2 large Eggs
- 2 cups All-Purpose Flour
- 2 teaspoons Baking Powder
- 1/2 teaspoon Salt
- 1 teaspoon Vanilla Extract
- 1 cup Chopped Pecans
Instructions
- Preheat the oven to 350°F (175°C).
- Mix the granulated sugar and brown sugar in a large mixing bowl. Add vegetable oil (or melted butter) and whisk until combined.
- Add the eggs into the bowl and whisk thoroughly to create a smooth batter.
- Combine the all-purpose flour, baking powder, and salt in another bowl. Gradually add to wet ingredients and stir gently until just combined.
- Add the vanilla extract and chopped pecans, stirring to distribute evenly.
- Prepare a greased loaf pan (9 x 5 inches) or line with parchment paper. Pour the batter into the pan and smooth the top.
- Bake for 55-65 minutes, or until a toothpick inserted into the center comes out clean.
- Cool in the pan for 10 minutes, then transfer to a wire rack to cool completely before slicing.
Notes
Serve with butter or honey, and try toasting slices for added texture.
- Prep Time: 10 minutes
- Cook Time: 60 minutes
- Category: Dessert
- Method: Baking
- Cuisine: American
Nutrition
- Serving Size: 1 slice
- Calories: 170
- Sugar: 12g
- Sodium: 150mg
- Fat: 7g
- Saturated Fat: 1g
- Unsaturated Fat: 4g
- Trans Fat: 0g
- Carbohydrates: 25g
- Fiber: 1g
- Protein: 3g
- Cholesterol: 30mg
Keywords: pecan bread, sweet bread, comfort food, baking, dessert
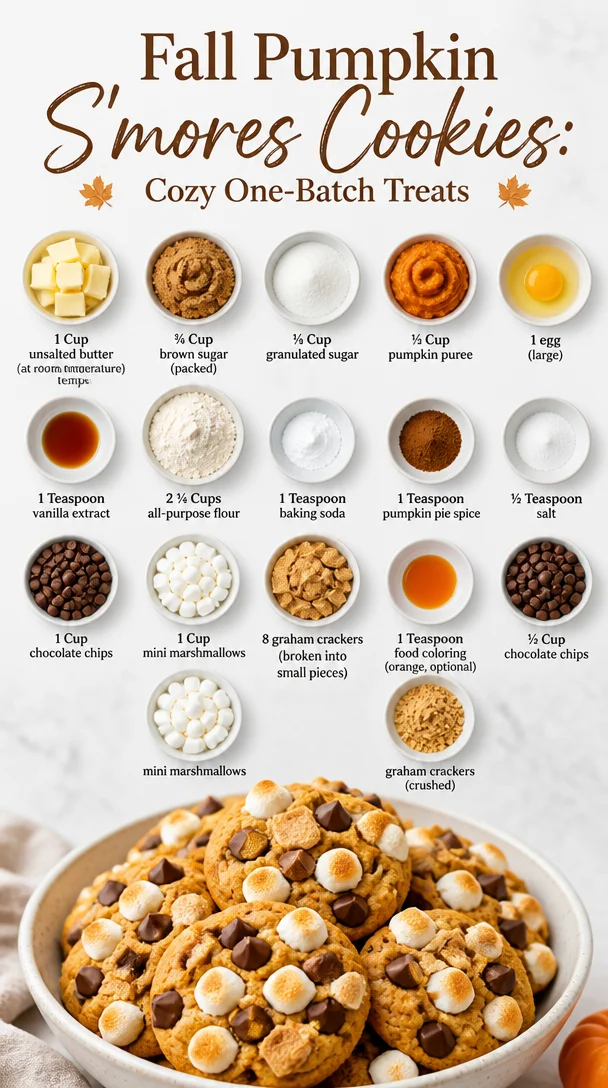
Fall Pumpkin S’mores Cookies: Cozy One-Batch Treats
Pumpkin S’mores Cookies: A Cozy Autumn Treat
Hey there, fellow food lovers! Today, I’m beyond excited to share a recipe that wraps all the warmth and comfort of fall into a cute little package: Pumpkin S’mores Cookies. Imagine sinking your teeth into a soft, chewy cookie that’s not just sweet but also packed with the flavors of spiced pumpkin and gooey marshmallows! If that doesn’t sound like a warm hug for your taste buds, I don’t know what does!
As the leaves change colors and the air turns crisp, there’s something profoundly comforting about baking with pumpkin and spices. This recipe is not just about feeding your craving; it’s a celebration of those cozy moments. The great news? These cookies are incredibly easy to make, even if you’re not exactly a baking whiz. So, whether you’re whipping them up on a chilly afternoon or preparing a batch for a get-together, I promise they’ll be the star of the show.
Now, gather your ingredients, put on your favorite playlist, and let’s get baking! You’re about to create something truly special that will not only make your kitchen smell heavenly but also have everyone asking for seconds.
My Pumpkin S’mores Journey
You know, every great recipe has a story, and this one is no exception. The inspiration for these Pumpkin S’mores Cookies came to me during a late-night conversation around a campfire with friends last autumn. Picture this: the stars twinkling overhead, laughter filling the air, and the smell of roasted marshmallows wafting through the night. We were reminiscing about our childhood camping trips, when the simple act of toasting marshmallows was like a rite of passage.
I remember my first attempt at making s’mores—things went hilariously wrong when my marshmallow caught fire! But in the end, what a treat it was! Fast forward to last fall, and I found myself playing with the idea of turning that nostalgic memory into something that could be baked instead of toasted. Combining the classic graham cracker, gooey marshmallows, and rich chocolate with the seasonal delight of pumpkin was a no-brainer. The first batch came out golden, perfectly soft, and just like the warmth of those campfire nights. Trust me, you won’t want to miss out on making this cozy treat yourself!
Ingredients
Let’s dive into what you’ll need to whip up these delightful cookies. Don’t worry if you don’t have everything on hand; I’ve included some substitution tips to keep you in the game!
-
1 Cup unsalted butter (at room temperature): Using unsalted butter allows you to control the amount of salt in your recipe. If you only have salted, just skip the additional salt in the recipe!
-
¾ Cup brown sugar (packed): Brown sugar adds a lovely moisture and richness. If you’re in a pinch, you can substitute with granulated sugar, but you might miss that caramel-like flavor.
-
¼ Cup granulated sugar: This gives your cookies a nice sweetness. You can adjust the amount based on your taste preference!
-
½ Cup pumpkin puree: Use canned pumpkin puree for convenience or roast and puree some fresh pumpkin if you’re feeling adventurous. Just make sure it’s pure pumpkin and not pumpkin pie filling for the best results.
-
1 egg (large): The egg helps bind the ingredients together. You can swap it with a flax egg (1 tablespoon ground flaxseed + 2.5 tablespoons water) for a vegan option.
-
1 Teaspoon vanilla extract: A splash of vanilla elevates the flavor! If you’re out, a teaspoon of almond extract could work, too.
-
2 ¼ Cups all-purpose flour: The backbone of your cookies! For a gluten-free option, you can use a 1:1 gluten-free flour blend.
-
1 Teaspoon baking soda: Ensures your cookies rise nicely! If you run out, baking powder can be a substitute (use 3 teaspoons of baking powder for 1 teaspoon of baking soda).
-
1 Teaspoon pumpkin pie spice: This blend adds that cozy fall flavor; this typically includes cinnamon, nutmeg, and ginger. You can always mix up your own blend if you’re missing any spices!
-
½ Teaspoon salt: Balances the sweetness. Feel free to adjust based on your taste.
-
1 Cup chocolate chips: Semi-sweet is classic, but why not get daring and use dark chocolate? If you want a dairy-free option, there are plenty of great vegan chocolate chips available.
-
1 Cup mini marshmallows: These little bursts of sweetness create the “s’mores” magic! If you can’t find minis, regular marshmallows cut in half will work, too.
-
8 graham crackers (broken into small pieces): You can use most types of graham crackers; if you’re gluten-free, look for gluten-free graham crackers instead.
-
1 Teaspoon food coloring (orange, optional): Want to give your cookies an extra pop of pumpkin color? This is optional for those extra fall vibes!
-
½ Cup chocolate chips, mini marshmallows, graham crackers (crushed): These are for topping and will really elevate your cookie game!
Now that we’ve got our ingredients in place, let’s move on to making these luscious cookies.
Step-by-Step Instructions
Alright, foodies, it’s time to roll up those sleeves and start baking! Here’s how you’ll transform those ingredients into pumpkin s’mores magic:
-
Preheat your oven to 350°F (175°C). This ensures that your cookies bake evenly and gives them that perfect golden color.
-
Cream the butter and sugars: In a large mixing bowl, combine the softened unsalted butter, brown sugar, and granulated sugar. Beat them together with a hand mixer or a sturdy wooden spoon until the mixture is light and fluffy. This should take about 2-3 minutes. The goal here is to get as much air into the mixture as possible for soft, fluffy cookies!
-
Add in the pumpkin and egg: Mix in the pumpkin puree and the large egg to the creamed mixture. Don’t forget the vanilla extract! Blend until everything is nicely combined. The pumpkin will add moisture and a beautiful color to the cookies. If the mixture looks a bit lumpy at this stage, don’t worry; that’s just the pumpkin being itself.
-
Combine the dry ingredients: In a separate bowl, whisk together the all-purpose flour, baking soda, pumpkin pie spice, and salt until evenly mixed. Gradually add this dry mixture to your wet ingredients, mixing until just combined. Overmixing here could result in tough cookies, so don’t get too carried away!
-
Fold in the goodies: Now for the fun part! Gently fold in the chocolate chips, mini marshmallows, and broken graham cracker pieces into your dough. This is where the s’mores charm really comes to life! You can reserve some of the mix-ins to sprinkle on top of the cookies later for a gorgeous presentation.
-
Scoop and bake: Use a cookie scoop or tablespoon to drop dollops of cookie dough onto a lined baking sheet, spacing them about 2 inches apart. Gently press the tops down if they look too rounded. Bake for 10-12 minutes, or until the edges are lightly golden. Your kitchen will start smelling like a cozy fall wonderland!
-
Add toppings: If you reserved any chocolate chips, mini marshmallows, or graham cracker pieces, sprinkle them on top of the cookies in the last minute of baking. This gives them that extra wow factor!
-
Cool down: Once baked, remove the cookies from the oven, and let them cool on the baking sheet for about 5 minutes before transferring them to a wire rack. This’ll help them set and stay gooey in the middle.
Serving Suggestions
Now that your decadent Pumpkin S’mores Cookies are cool, what’s next? I recommend stacking them on a pretty plate for a presentation that screams, “Please eat me!” For that extra fall flair, you can serve them alongside a warm cup of cider or your favorite herbal tea.
Want to make it a little more indulgent? Drizzle some melted chocolate over the cookies before you serve them. If you’re feeling extra festive, consider garnishing with a sprinkle of crushed graham crackers or even some pumpkin seeds for a delightful crunch!
Feel free to whip out those cute little airtight containers and gift a batch to friends or family. Just be sure to grab a few for yourself—they’ll disappear faster than you can say “Pumpkin S’mores!”
Recipe Variations
One of the best things about baking is the creativity you can unleash! Here are a few delicious twists you can try:
-
Add nuts: Chopped pecans or walnuts add great texture and nutty flavor. Just make sure to chop them finely to avoid overpowering the cookies.
-
Spice it up: If you like a kick, add a pinch of cayenne pepper or cinnamon for some heat or warmth.
-
Vegan swap: To make this recipe vegan, use coconut oil instead of butter, a flax egg instead of a regular egg, and make sure to use dairy-free chocolate chips and marshmallows.
-
Pumpkin Chocolate Chip: If you’re a chocolate lover, feel free to double the amount of chocolate chips. You can also substitute half the pumpkin with mashed bananas for a banana-pumpkin hybrid cookie.
-
Frosting drizzle: Why stop at just cookies? Make a simple cream cheese or vanilla glaze to drizzle over the top for an indulgent finish!
Chef’s Notes
As I developed this recipe, I had a blast reminiscing about those campfire nights with friends. Funny enough, I once tried adding crushed candy corn into the dough… let’s just say that attempt ended in laughter and went straight to the “not recommended” category! But that’s the beauty of cooking—it’s all about learning, experimenting, and enjoying the process.
You also might notice that these cookies surprisingly remain soft for days! But let’s be real; the only downside is that they might disappear before you even get a chance to store them!
FAQs and Troubleshooting
-
Why are my cookies spreading too much?
- This can happen if the butter is too soft or melted. Make sure your butter is just room temperature and not too gooey! Additionally, chilling the dough for about 30 minutes before baking can help prevent spreading.
-
Can I use fresh pumpkin instead of canned?
- Absolutely! Just ensure you roast and puree the pumpkin properly. Be careful not to add too much moisture as fresh pumpkin can sometimes be wetter than canned.
-
What if my cookies are too dry?
- This typically happens with overbaking. Keep an eye on your cookies towards the end of baking and remove them when they’re still a tad soft—they’ll firm up as they cool.
-
How can I make these gluten-free?
- Replace all-purpose flour with a gluten-free flour blend. I also recommend adding a few extra tablespoons of pumpkin puree if you’re using a gluten-free blend, as they can be a touch drier.
Nutritional Info
While indulging in these tasty cookies, it’s handy to know what you’re munching on! Here’s an approximate breakdown per cookie, assuming you make 24 cookies from this recipe:
- Calories: 180
- Protein: 2g
- Fat: 8g
- Carbohydrates: 25g
- Fiber: 1g
- Sugar: 12g
Keep in mind that these values can vary depending on specific ingredients, but hey, a little indulgence never hurt anyone, right?
Final Thoughts
And there you have it! Pumpkin S’mores Cookies that not only channel your inner kid at the campfire but also warm your heart with every bite. Cooking is all about creating memories, and I hope this recipe helps you craft some delicious moments in your own kitchen.
Whether you bake a batch for yourself or share them with loved ones, these cookies are bound to become a favorite. Enjoy the process, let the aroma fill your home, and remember that good food is meant to be shared. Now, go forth and bake these magical cookies; I can’t wait to hear how your baking adventures go!
Until next time, keep it delicious and stay cozy!
Print
Pumpkin S’mores Cookies
- Total Time: 27 minutes
- Yield: 24 cookies 1x
- Diet: Vegetarian
Description
Delightfully soft and chewy cookies bursting with spiced pumpkin, chocolate, and gooey marshmallows, perfect for autumn.
Ingredients
- 1 Cup unsalted butter (at room temperature)
- ¾ Cup brown sugar (packed)
- ¼ Cup granulated sugar
- ½ Cup pumpkin puree
- 1 large egg
- 1 Teaspoon vanilla extract
- 2 ¼ Cups all-purpose flour
- 1 Teaspoon baking soda
- 1 Teaspoon pumpkin pie spice
- ½ Teaspoon salt
- 1 Cup chocolate chips
- 1 Cup mini marshmallows
- 8 graham crackers (broken into small pieces)
- 1 Teaspoon food coloring (orange, optional)
- ½ Cup chocolate chips, mini marshmallows, graham crackers (crushed) for topping
Instructions
- Preheat your oven to 350°F (175°C).
- Cream the butter and sugars together until light and fluffy.
- Add in the pumpkin, egg, and vanilla extract, and blend until combined.
- Combine the dry ingredients in a separate bowl, then gradually add to the wet mixture until just combined.
- Fold in the chocolate chips, mini marshmallows, and graham cracker pieces.
- Scoop dollops of cookie dough onto a lined baking sheet, spacing them about 2 inches apart.
- Bake for 10-12 minutes or until edges are lightly golden.
- Add reserved toppings during the last minute of baking.
- Cool on a wire rack after removing from oven.
Notes
For a vegan version, substitute coconut oil for butter and a flax egg for the regular egg. To make gluten-free, use a gluten-free flour blend and consider additional pumpkin puree.
- Prep Time: 15 minutes
- Cook Time: 12 minutes
- Category: Dessert
- Method: Baking
- Cuisine: American
Nutrition
- Serving Size: 1 cookie
- Calories: 180
- Sugar: 12g
- Sodium: 100mg
- Fat: 8g
- Saturated Fat: 4g
- Unsaturated Fat: 4g
- Trans Fat: 0g
- Carbohydrates: 25g
- Fiber: 1g
- Protein: 2g
- Cholesterol: 30mg
Keywords: cookies, pumpkin, s'mores, fall, dessert
Fluffy Pumpkin Butter Cinnamon Rolls (Make-Ahead, Cozy)
Indulge in Delight: Pumpkin Butter Cinnamon Rolls
Hey there, friends! If you’re looking to add a touch of warmth and sweetness to your mornings or elevate your brunch game, you’ve landed in the right place. Today, I’m sharing a recipe that’s not just a treat; it’s a whole experience! We’re diving into the delightful world of Pumpkin Butter Cinnamon Rolls. Imagine fluffy rolls bursting with pumpkin goodness, swirled with a heavenly cinnamon filling, and finished off with a creamy glaze that’ll make your taste buds dance. Trust me, each bite feels like a hug from the inside!
A Warm Slice of Nostalgia
When I think of pumpkin rolls, my mind drifts back to crisp autumn mornings. The scent of cinnamon wafting through the air, the leaves crunching underfoot, and the warmth of a sunbeam spilling through the kitchen window. Growing up, my family had a tradition of making break the fast on Sunday mornings. We’d gather around the kitchen table, laughter echoing as we shared stories and all enjoyed a big, messy platter of warm cinnamon rolls.
One fall morning, my grandma surprised us with her twist—pumpkin butter instead of the usual brown sugar filling. I’ll never forget that first bite. The rolls were incredibly fluffy, luscious with the rich essence of pumpkin, and elevated to a whole new level with added spices. The whole family devoured them in minutes, and a new tradition was born in our household. Now, every time I make these rolls, I can hear grandma’s laugh, and I feel that same warmth wrapping around me like a cozy blanket. It’s more than just a recipe; it’s a cherished memory I’m excited to share with you!
Ingredients That Make Sweet Magic
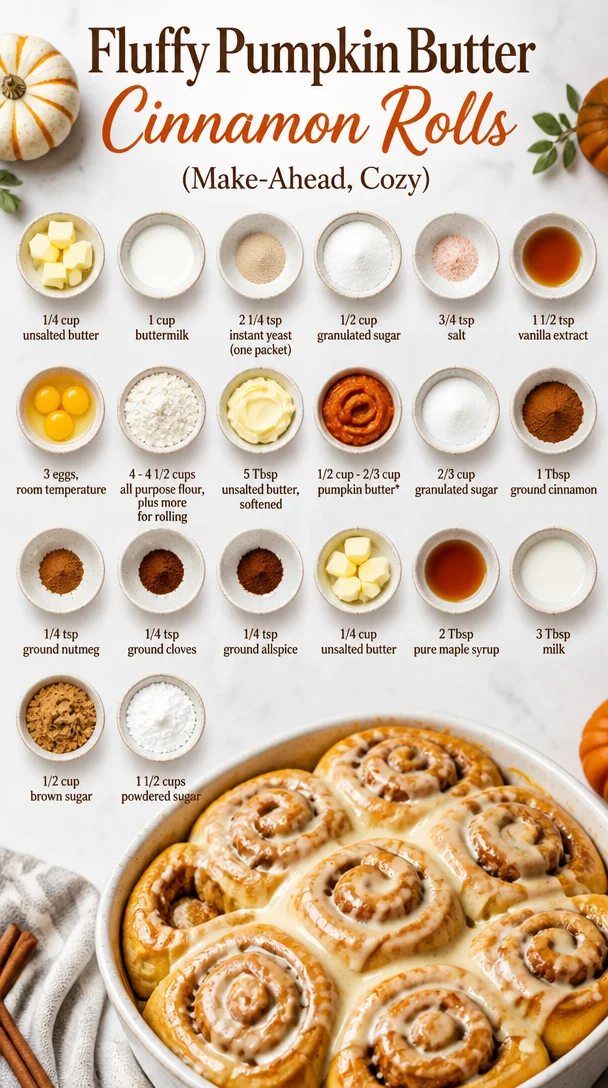
Let’s gather the star players for our Pumpkin Butter Cinnamon Rolls! Here’s what you’ll need:
- 1/4 cup unsalted butter: Adds richness. If you’re dairy-free, you can use coconut oil as a substitute.
- 1 cup buttermilk: This gives the rolls that soft, tender texture. No buttermilk? Mix a cup of milk with a tablespoon of vinegar and let it sit for 5 minutes.
- 2 1/4 tsp instant yeast (one yeast packet): Our magic rising agent! If you’re using active dry yeast instead, dissolve it in warm water before adding.
- 1/2 cup granulated sugar: This sweetens the dough and helps with browning. You could swap it with honey or maple syrup if you want a natural sweetener.
- 3/4 tsp salt: Enhances flavor; don’t skip it! You can reduce it slightly if you’re on a low-sodium diet, but a pinch goes a long way in brightening flavors.
- 1 1/2 tsp vanilla extract: For that warm, aromatic background. If you’re out of vanilla, almond extract can be a fun alternative.
- 3 eggs, room temperature: These provide structure and richness. If you need an egg-free option, try using 1/4 cup of unsweetened applesauce instead of each egg.
- 4 – 4 1/2 cups all-purpose flour, plus more for rolling: This gives our rolls a sturdy body. For a healthier twist, half the white flour with whole wheat flour.
- 5 Tbsp unsalted butter, softened: For the filling, this helps everything stick together beautifully.
- 1/2 cup – 2/3 cup pumpkin butter: The star ingredient! You can find pumpkin butter in stores or make your own by cooking down pumpkin puree with spices and sugar.
- 2/3 cup granulated sugar: For that classic sweet cinnamon filling.
- 1 Tbsp ground cinnamon: The quintessential spice that brings warmth.
- 1/4 tsp ground nutmeg: For a nutty depth of flavor.
- 1/4 tsp ground cloves: Adds a warm, earthy flavor.
- 1/4 tsp ground allspice: For a hint of sweetness and aroma—this is optional but oh-so-good!
- 1/4 cup unsalted butter: More of that lovely richness for our glaze.
- 2 Tbsp pure maple syrup: For an additional depth of flavor.
- 3 Tbsp milk: You can use any milk you have, even plant-based milk.
- 1/2 cup brown sugar: Sweet and caramelly; perfect for the final touch.
- 1 1/2 cups powdered sugar: This gives us a creamy glaze that ties it all together.
Let’s Roll into Action: Step-by-Step Instructions
1. Prepare the Dough: Start by melting the 1/4 cup of unsalted butter in a microwave-safe bowl. Once melted, add the buttermilk, sugar, and salt. Stir until combined. Let it cool to a warm temperature—just warm to the touch, about 110°F. Now, sprinkle in the instant yeast, and let it rest for a few minutes until you see some bubbles forming. This means your yeast is alive and ready to work its magic!
2. Add the Eggs and Flour: Beat in the eggs and vanilla extract. Gradually add 4 cups of flour, mixing until a soft dough forms. If the dough is very sticky, sprinkle in an extra 1/4 cup flour at a time until it’s manageable but not too dry. Knead the dough on a floured surface for about 5–7 minutes until it’s smooth and elastic.
3. Let It Rise: Place the dough in a greased bowl, cover it with a clean kitchen towel, and allow it to rise in a warm place until it doubles in size—this should take about 1 hour. A little tip: Turning your oven to its lowest setting for a minute and then turning it off creates a warm, draft-free spot for the dough to rise!
4. Make the Filling: While the dough is rising, mix the softened butter, pumpkin butter, granulated sugar, cinnamon, nutmeg, cloves, and allspice until smooth and well-combined. This filling is where the magic happens—the addition of pumpkin butter makes it incredibly flavorful!
5. Roll it Out: Once the dough has risen, punch it down to remove any air bubbles. On a floured surface, roll it out to a rectangle about 14×24 inches. Spread the pumpkin filling evenly over the dough, leaving a small border around the edges.
6. Roll Up & Cut: Starting at one long side, roll up the dough tightly into a log. Use a sharp knife or a pizza cutter to slice the log into 12 equal pieces. Place them cut-side up into a greased 9×13 inch baking pan.
7. Second Rise: Cover the rolls with a towel again and let them rise for another 30 minutes, or until fluffy.
8. Bake: Preheat your oven to 350°F (175°C). Once the rolls have risen, bake them for 25-30 minutes until golden brown. You might want to cover them loosely with a piece of foil halfway through to prevent over-browning.
9. Glaze Time: While the rolls are baking, prepare the glaze! Melt the remaining butter, and stir in the maple syrup, milk, brown sugar, and powdered sugar. Whisk until you have a creamy, smooth texture. Once the rolls are out of the oven and still warm, drizzle this heavenly glaze all over those fluffy beauties, allowing it to seep into all the nooks and crannies.
Serving Suggestions
Now that you have a beautiful batch of Pumpkin Butter Cinnamon Rolls, it’s time to serve them up! These rolls are best enjoyed warm, straight out of the oven. Here’s how to do it right:
- Placemats and Plates: Use colorful placemats for a cheerful display, and set them on rustic wooden boards to enhance that homemade feel.
- Glazing Galore: Don’t be shy with that glaze! Drizzling it over the warm rolls, letting it flow off the edges, looks delightful (and appetizing).
- Top it Off: Serve with a dollop of whipped cream or a scoop of vanilla ice cream for an extra indulgent touch!
- Beverage Pairing: Pair these rolls with a hot cup of apple cider or a pumpkin spice latte for a flavorful fall breakfast or brunch experience.
- Garnish Ideas: A sprinkle of crushed pecans or walnuts on top of the glaze adds an elegant touch and a nice crunch!
Recipe Variations
Feeling adventurous? Here are a few fun twists and variations to make this recipe your own:
- Nutty Rolls: Add chopped pecans or walnuts into the filling for a delightful crunch.
- Maple Pecan Glaze: Replace the brown sugar glaze with pure maple syrup and crushed nuts for a unique topping.
- Cream Cheese Filling: Swap out the pumpkin butter with a cream cheese filling mixed with a hint of vanilla and powdered sugar for a tangy twist.
- Gluten-Free Option: Use a 1:1 gluten-free flour blend to make these cinnamon rolls gluten-free.
- Dairy-Free Delight: Swap both the buttermilk and butter with plant-based alternatives for a dairy-free version that still packs the flavor.
Chef’s Notes
As much as this recipe is about making delicious rolls, it’s also about the joy of baking and sharing. There’ve been times in my kitchen where things didn’t go as planned—like that time I accidentally switched salt for sugar (don’t worry, I lived to tell the tale). It was a learning lesson that taught me everything is fixable, and sometimes the best creations come from happy accidents. I love how this recipe has evolved over the years, with friends requesting their variations and flavors. It’s always a delight to see how it brings people together, just like it did in my childhood.
FAQs and Troubleshooting
1. Why didn’t my rolls rise?
- This could be due to inactive yeast or the dough being too cold. Always ensure your yeast is fresh and that the dough has a warm place to rise.
2. Can I make these ahead of time?
- Absolutely! You can make the rolls up to the second rise, cover them, and refrigerate overnight. Let them come to room temperature before baking.
3. How can I prevent my rolls from getting hard?
- Make sure you don’t overbake them! The rolls should be soft when you take them out of the oven. Also, store them in an airtight container after they’ve cooled down.
4. What other fillings can I use?
- Get creative! You can try using Nutella, almond paste, or even fruit preserves for a unique flavor profile.
Nutritional Info
Now, talking about nutrition—while these Pumpkin Butter Cinnamon Rolls are a treat, they also contain some nifty nutrients! Pumpkin is packed with vitamins A and C, and spices like cinnamon and nutmeg offer antioxidants. A typical roll (without glaze) has approximately 250 calories and is high in carbohydrates. With the added glaze, expect a delightful increase in rich flavors and sweetness. Moderation is key here; think of these as an indulgent treat rather than an everyday meal, and balance it out with nutritious meals throughout the day.
Final Thoughts
There you have it! A delightful recipe for Pumpkin Butter Cinnamon Rolls that brings comfort and warmth to every bite. Baking always holds a special place in my heart, and I hope this recipe allows you to create some new memories filled with love and laughter, just as my family did. So roll up your sleeves, don that apron, and immerse yourself in a world of sweet, pumpkin-spiced goodness. And remember—no matter how they turn out, what matters most is that you shared them with love. Now, who’s ready to bake some cinnamon rolls? Let’s dig in!
Print
Pumpkin Butter Cinnamon Rolls
- Total Time: 45 minutes
- Yield: 12 servings 1x
- Diet: Vegetarian
Description
Fluffy rolls bursting with pumpkin goodness, swirled with cinnamon filling, and finished off with a creamy glaze.
Ingredients
- 1/4 cup unsalted butter
- 1 cup buttermilk
- 2 1/4 tsp instant yeast
- 1/2 cup granulated sugar
- 3/4 tsp salt
- 1 1/2 tsp vanilla extract
- 3 eggs, room temperature
- 4 – 4 1/2 cups all-purpose flour, plus more for rolling
- 5 Tbsp unsalted butter, softened (for filling)
- 1/2 cup – 2/3 cup pumpkin butter
- 2/3 cup granulated sugar (for filling)
- 1 Tbsp ground cinnamon
- 1/4 tsp ground nutmeg
- 1/4 tsp ground cloves
- 1/4 tsp ground allspice
- 1/4 cup unsalted butter (for glaze)
- 2 Tbsp pure maple syrup
- 3 Tbsp milk
- 1/2 cup brown sugar
- 1 1/2 cups powdered sugar
Instructions
- Prepare the dough: Melt 1/4 cup unsalted butter, then add buttermilk, sugar, and salt. Let cool to warm, sprinkle in yeast, and let rest.
- Add the eggs and vanilla. Gradually mix in 4 cups of flour until a soft dough forms. Knead for 5–7 minutes until smooth.
- Let it rise: Place dough in a greased bowl, cover, and allow to double in size (about 1 hour).
- Make the filling: Combine softened butter, pumpkin butter, sugar, cinnamon, nutmeg, cloves, and allspice until smooth.
- Roll it out: Punch down dough, roll it to a rectangle (14 x 24 inches), and spread filling evenly.
- Roll tight and cut into 12 pieces. Place in greased baking pan.
- Second rise: Cover and let rolls rise for another 30 minutes.
- Bake at 350°F (175°C) for 25-30 minutes until golden.
- Glaze: Melt remaining butter, mix with maple syrup, milk, brown sugar, and powdered sugar until creamy. Drizzle over warm rolls.
Notes
These rolls are best enjoyed warm. Pair with whipped cream or vanilla ice cream for extra indulgence.
- Prep Time: 15 minutes
- Cook Time: 30 minutes
- Category: Dessert
- Method: Baking
- Cuisine: American
Nutrition
- Serving Size: 1 roll
- Calories: 350
- Sugar: 18g
- Sodium: 400mg
- Fat: 16g
- Saturated Fat: 8g
- Unsaturated Fat: 6g
- Trans Fat: 0g
- Carbohydrates: 45g
- Fiber: 2g
- Protein: 6g
- Cholesterol: 70mg
Keywords: pumpkin cinnamon rolls, fall recipes, indulgent brunch
Pumpkin Scones
The Cozy Embrace of Pumpkin Scones: A Feel-Good Recipe for Fall
Hey there, food friends! As the leaves begin to turn and the air gets that unmistakable crispness, it’s time to embrace all things pumpkin. If you’re on the hunt for a recipe that’s as comforting as a warm blanket and as easy as pie (well, easier than pie!), then you’ve landed in the right spot. Today, we’re diving into the world of Pumpkin Scones—these little gems are bursting with fall flavor and are perfect for those cozy mornings at home or gatherings with family and friends.
You know, there’s something truly magical about the smell of baked goods wafting through the house. It has this incredible power to create warmth and community. Some of my fondest memories growing up involve the kitchen—a sacred space where my family would gather, elbows propped on the counters, flour dusting our noses while we baked together. I remember one particular Saturday morning when my mom decided we’d whip up a batch of pumpkin scones to enjoy with steaming cups of cocoa. The joy on our faces as those scones baked was only matched by the first bite, fluffy and slightly sweet, drizzled with a simple glaze that was oh-so-satisfying.
These scones are not just a recipe; they are a bridge to connection, laughter, and cozy moments. So grab your apron, and let’s take a journey through the flavors of fall!
A Nostalgic Taste of Home
While diving deep into recipes, I often find myself reminiscing about my childhood Saturdays spent beside my mom in our tiny kitchen. The cheerful clinking of bowls and the soft thud of the sifter dusting powdered sugar over our creations set the mood for what would become a delightful family tradition.
One rainy day, while the outside world shrouded in grey, my mom decided it was the perfect day for pumpkin scones. We turned on our favorite tunes, and as the rich smell of cinnamon and nutmeg filled our home, the rain outside became just a distant pitter-patter. It was in those moments—between laughs and flour-covered hands—that I learned not just to follow a recipe, but to create joy and share love through food. It was our way of embracing the season, and each warm bite was like wrapping ourselves in a cozy blanket. Fast forward to today, and I hope to share that same warmth and joy with all of you!
Ingredients for Pumpkin Scones
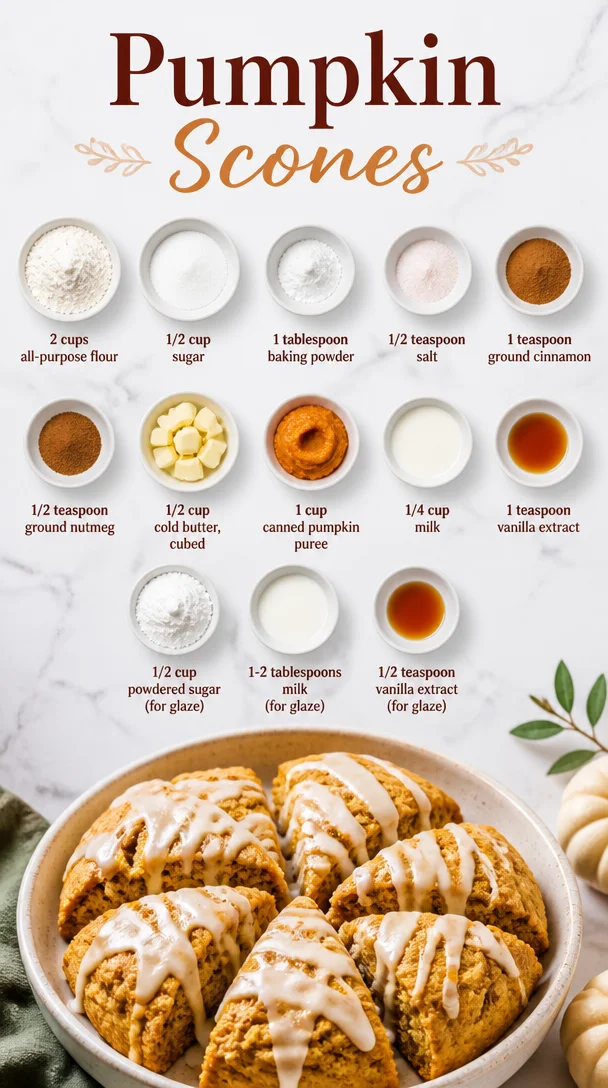
Let’s gather everything we need to whip up these delicious scones. Here’s what you’ll need:
-
2 cups all-purpose flour: This is the backbone of our scones. If you’re looking for a gluten-free option, feel free to substitute it with your favorite gluten-free flour blend or almond flour.
-
1/2 cup sugar: This adds just the right amount of sweetness to balance our pumpkin and spices. You can swap it with coconut sugar or brown sugar for a deeper flavor.
-
1 tablespoon baking powder: This is our trusty leavener, helping the scones rise to fluffy perfection. Make sure it’s fresh; stale baking powder won’t give us the lift we want.
-
1/2 teaspoon salt: A little pinch of salt elevates the sweetness and balances all the flavors.
-
1 teaspoon ground cinnamon: A warm hug of spice that screams fall! You can also use pumpkin pie spice for a more complex flavor.
-
1/2 teaspoon ground nutmeg: Another seasonal favorite that brings a wonderful aromatic flavor. Freshly grated nutmeg can take your scones to the next level!
-
1/2 cup cold butter, cubed: This butter adds richness and flakiness. Be sure to keep it cold to get that perfect scone texture—trust me!
-
1 cup canned pumpkin puree: Not just for pies, this adds moisture and flavor. Feel free to use homemade pumpkin puree if you’re feeling adventurous.
-
1/4 cup milk: This helps bind everything together. You can substitute with almond milk or oat milk if you prefer a dairy-free option.
-
1 teaspoon vanilla extract: A splash of vanilla enhances sweetness and depth.
-
1/2 cup powdered sugar (for glaze): We need this for a sweet finish on our scones.
-
1-2 tablespoons milk (for glaze): This will help us reach that perfect drizzling consistency for our glaze.
-
1/2 teaspoon vanilla extract (for glaze): Because why not add a little extra flavor to the glaze?
Sounds simple, right? That’s the beauty of these scones! Now, let’s get into the fun part—actually making them!
Step-by-Step Instructions
Preheat the Oven
Step 1: Start by preheating your oven to 400°F (200°C). This ensures a great rise in your scones and gets that lovely golden crust on the outside!
Mix Your Dry Ingredients
Step 2: In a large bowl, whisk together the flour, sugar, baking powder, salt, cinnamon, and nutmeg until well combined. (Tip: I like to do this with a whisk to incorporate as much air as possible for fluffier scones!).
Cut in the Butter
Step 3: Next, it’s time to cut in the cold, cubed butter. Using a pastry cutter (or your fingers if you’re feeling adventurous), work the butter into the dry ingredients until it resembles pebbly crumbs. (Chef’s note: Cold butter is key for flaky scones, so don’t skip this buttery love!)
Combine Wet Ingredients
Step 4: In another bowl, mix the pumpkin puree, milk, and vanilla extract until combined.
Joining Forces: Dry and Wet
Step 5: Pour the wet ingredients into the dry ingredients and gently stir until just combined. The dough should be slightly sticky but pull away from the sides of the bowl. (Tip: Be careful not to overmix—scones can get tough if you’re too eager!).
Shape Your Scones
Step 6: Turn the dough out onto a floured surface and lightly knead it a few times until it’s manageable. Pat it into a circle about 1-inch thick. Using a sharp knife or a pizza cutter, slice it into 8 wedges.
Bake to Perfection
Step 7: Transfer the wedges onto a lined baking sheet, leaving a little space between each one. Bake for about 15-20 minutes or until they turn a lovely golden brown. (Pro tip: Bake in batches if your oven is small—don’t overcrowd!).
Glaze Your Scones
Step 8: While they’re baking, it’s time to whip up our glaze! In a small bowl, combine the powdered sugar, milk, and vanilla extract until smooth. Once the scones are out of the oven and cooled for a bit, drizzle the glaze over the top.
And there you have it! In just a few simple steps, you’ve created a fantastic treat that’s as heartwarming as it is delicious!
Serving Suggestions
When it comes to serving these beauties, keep it simple. Arrange them on a pretty plate and maybe add a little sprig of rosemary or mint for visual flair. Pair them with a cozy beverage like a maple latte or a warm cup of tea, and you’ve got the ultimate fall experience.
You can also serve them with spreads like cream cheese or a pumpkin spice butter for an indulgent twist. These scones aren’t just a treat; they’re an experience!
Recipe Variations
Every great recipe deserves a little creativity. Here are a few variations to keep things fresh:
-
Chocolate Chip Pumpkin Scones: Stir in a cup of semi-sweet chocolate chips for a delightful sweet surprise in each bite.
-
Cranberry Pumpkin Scones: Toss in some dried cranberries for a little tartness that complements the sweet pumpkin beautifully.
-
Maple Pecan Scones: Use maple syrup instead of sugar and fold in chopped pecans for a nutty crunch.
-
Spiced Orange Scones: Add zesty orange zest to the dough for a bright, citrusy twist that pairs wonderfully with pumpkin.
-
Vegan Pumpkin Scones: Use a dairy-free butter alternative and substitute the milk with almond or oat milk to make a vegan-friendly version.
Play around; there’s no right or wrong way to enjoy pumpkin scones!
Chef’s Notes
As with many cherished family recipes, these pumpkin scones have evolved over time. I’ve experimented with different spices, ingredients, and even shapes. Sometimes, I use a cookie cutter to make them fun and festive, especially around the holidays. And truth be told, the best part of baking is making it your own—there’s creativity in every splash of vanilla and pinch of spice.
Oh, and for a hilarious kitchen story: I once forgot to put in the baking powder during a bake-off. Let’s just say, flat scones aren’t quite as charming!
FAQs and Troubleshooting
Q: Why are my scones dense?
A: The most common culprit is overmixing. Scones should be gently combined to maintain their light texture, so be sure to mix just until the ingredients come together.
Q: Can I freeze the scone dough?
A: Absolutely! You can shape the scones and freeze them before baking. Just pop them in the oven straight from the freezer, adding a few extra minutes to the bake time.
Q: How do I know when my scones are done?
A: They should be golden brown on the edges and a toothpick inserted in the center should come out clean.
Q: Can I make the glaze ahead of time?
A: Yes! Just store it in the fridge until you’re ready to drizzle it on. You might need to adjust the consistency with a splash of milk before using.
Nutritional Info
If you’re keeping an eye on nutritional info, here’s a rough breakdown per scone (assuming you get 8 scones per recipe):
- Calories: Approximately 220
- Carbohydrates: 30g
- Protein: 3g
- Fat: 10g
- Sugar: 8g
Remember, these numbers can vary based on ingredient swaps and specifics, so it’s always best to check your own brands if you’re counting calories!
Final Thoughts
And there you have it, my friends—deliciously fluffy pumpkin scones that are bound to fill your home with warmth and joy. Baking is not just about the end result; it’s about the laughter, the mess, and all the love that you put into the process.
So don your apron, invite over a friend or two (or just enjoy them solo while you binge-watch your favorite show), and celebrate those cozy moments this fall. Don’t forget to share your scone-making adventures with me on social media; I love seeing your creations!
Happy baking, and remember—life is short. Eat the scones!
Stay cool and keep creating flavorful memories,
Beau Collier
Pumpkin Scones
- Total Time: 35 minutes
- Yield: 8 servings 1x
- Diet: Vegetarian
Description
Deliciously fluffy pumpkin scones that capture the essence of fall, perfect for cozy mornings or gatherings.
Ingredients
- 2 cups all-purpose flour
- 1/2 cup sugar
- 1 tablespoon baking powder
- 1/2 teaspoon salt
- 1 teaspoon ground cinnamon
- 1/2 teaspoon ground nutmeg
- 1/2 cup cold butter, cubed
- 1 cup canned pumpkin puree
- 1/4 cup milk
- 1 teaspoon vanilla extract
- 1/2 cup powdered sugar (for glaze)
- 1–2 tablespoons milk (for glaze)
- 1/2 teaspoon vanilla extract (for glaze)
Instructions
- Preheat your oven to 400°F (200°C).
- In a large bowl, whisk together flour, sugar, baking powder, salt, cinnamon, and nutmeg until well combined.
- Cut in the cold, cubed butter until it resembles pebbly crumbs.
- Mix the pumpkin puree, milk, and vanilla extract in another bowl.
- Pour the wet ingredients into the dry ingredients and gently stir until just combined.
- Turn the dough onto a floured surface, lightly knead, and pat into a circle about 1-inch thick. Slice into 8 wedges.
- Transfer the wedges onto a lined baking sheet and bake for 15-20 minutes or until golden brown.
- While they bake, combine powdered sugar, milk, and vanilla extract for the glaze.
- Drizzle the glaze over scones once cooled slightly.
Notes
For variations, consider adding chocolate chips, dried cranberries, maple syrup, or adjusting spices to your preference.
- Prep Time: 15 minutes
- Cook Time: 20 minutes
- Category: Snack
- Method: Baking
- Cuisine: American
Nutrition
- Serving Size: 1 scone
- Calories: 220
- Sugar: 8g
- Sodium: 150mg
- Fat: 10g
- Saturated Fat: 6g
- Unsaturated Fat: 4g
- Trans Fat: 0g
- Carbohydrates: 30g
- Fiber: 1g
- Protein: 3g
- Cholesterol: 30mg
Keywords: pumpkin scones, fall recipes, baking, cozy treats