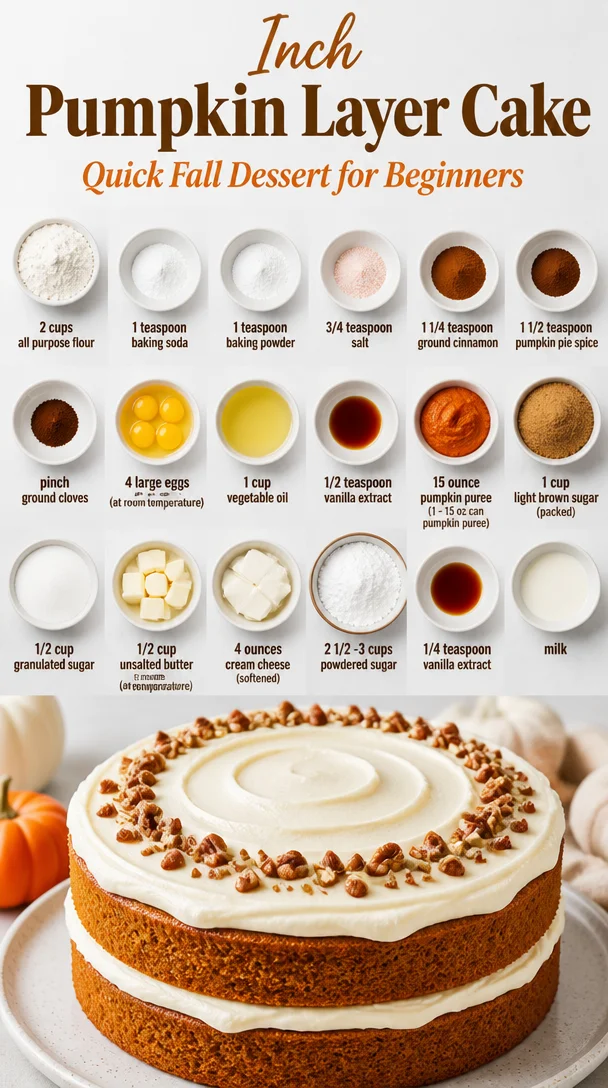
Inch Pumpkin Layer Cake: Quick Fall Dessert for Beginners
The Ultimate 6-Inch Pumpkin Layer Cake Recipe
Hey there, I’m Beau Collier – welcome to Feastical! Today, we’re diving into a delightful treat that feels just like autumn on a plate: a scrumptious 6-inch pumpkin layer cake. Perfect for fall gatherings, a cozy evening at home, or simply to make your kitchen smell like a pumpkin patch, this cake will surely be your new go-to sweet. So, grab your apron, and let’s embark on this delicious journey together!
Introduction
Pumpkin season evokes memories of crisp leaves, warm sweaters, and the unmistakable scent of cinnamon wafting through the air. There’s something magical about this time of year, and what better way to celebrate it than with a charming 6-inch pumpkin layer cake? Whether you’re whipping it up for a friend’s birthday, a fall get-together, or just because you’re craving a slice of fluffy goodness, this cake embodies comfort and joy.
What makes this recipe even more special is that it’s crafted perfectly for smaller gatherings—no need to worry about leftover cake (although you might want to keep some in case you need a midnight snack). This cake boasts layers of spiced pumpkin goodness topped with a luscious cream cheese frosting that’s a total crowd-pleaser.
In my kitchen, food is not just about recipes—it’s about stories, emotions, and the shared experience of creating something beautiful. So, let’s channel that vibe as we dive into this pumpkin cake adventure. Ready? Let’s get started!
Personal Story
I fondly remember the first time I made this pumpkin layer cake. It was a cool October weekend filled with the vibrant colors of fall and the sweet aroma of freshly baked treats. I was visiting my grandmother, who always had a magical way of turning our kitchen into a warm and inviting place. She started showing me her famous pumpkin cake recipe, and we laughed together, trying to remember all the little steps she’d perfected over the years.
As we mixed the ingredients, she regaled me with stories of family gatherings, how her friends would gab over slices of cake, and how it always brought everyone together. It’s one of those moments I’ll treasure forever: laughing, baking, and enjoying every little mishap—like flour explosions and a sneaky spatula lick!
Now, every time I make this 6-inch pumpkin layer cake, I feel like Grandma is right there with me, sharing that joyful spirit of cooking. Plus, this compact size makes it easier to share those memories without feeling overwhelmed!
Ingredients
Let’s talk about the magic that brings this cake to life. Here’s what you’ll need:
-
2 cups all-purpose flour
Keeps the cake sturdy while allowing it to rise beautifully. Want a gluten-free option? Swap it with a 1-to-1 gluten-free baking blend. -
1 teaspoon baking soda
This leavening agent gives the cake that fluffy texture we all love. Don’t skip it! -
1 teaspoon baking powder
Works alongside the baking soda for perfect rise—ensuring your cake doesn’t fall flat! -
3/4 teaspoon salt
A little salt enhances the flavors. Plus, it balances sweetness beautifully! -
1 1/4 teaspoon ground cinnamon
Provides that warm, comforting flavor that screams fall. Feel free to add a touch more if you’re a cinnamon lover! -
1 1/2 teaspoon pumpkin pie spice
A blend of delightful spices that amplify the pumpkin essence. You can also make your own mix using nutmeg, ginger, and allspice. -
Pinch ground cloves
Just a hint goes a long way in creating layers of flavor. -
4 large eggs (at room temperature)
Eggs help bind everything together for a moist cake. Let them sit out before baking for optimal blending. -
1 cup vegetable oil
Keeps the cake moist and tender. You can substitute with applesauce for a lighter option! -
1/2 teaspoon vanilla extract
Adds a sweet note to the cake. Always go for pure vanilla over imitation for the best results. -
15 oz pumpkin puree (1 can)
The star of the show! Ensure you’re using pure pumpkin puree, not pumpkin pie filling, to keep things from getting too sweet. -
1 cup light brown sugar (packed)
Gives depth and a slight chewiness, perfect for pumpkin flavors! -
1/2 cup granulated sugar
Balances the brown sugar and gives the cake rise. -
1/2 cup unsalted butter (at room temperature)
For that creamy texture in the frosting—don’t go for margarine here! -
4 ounces cream cheese (softened)
A fluffy frosting starts with softened cream cheese, allowing it to blend beautifully. -
2 1/2-3 cups powdered sugar
This will sweeten your frosting. Start with 2 1/2 cups and add more for extra sweetness if desired. -
1/4 teaspoon vanilla extract
Just to enrich the cream cheese frosting! -
Milk
For adjusting the frosting to your desired consistency—always add it gradually!
Step-by-Step Instructions
Now that we have our ingredients ready, let’s get cooking! Follow these steps for a fabulous cake:
-
Preheat Your Oven
Set your oven to 350°F (175°C) and grease two 6-inch cake pans. Line the bottoms with parchment paper for easy removal. Trust me, you don’t want your beautiful layers to stick! -
Mix Dry Ingredients
In a bowl, whisk together the flour, baking powder, baking soda, salt, cinnamon, pumpkin pie spice, and cloves. This extra step ensures that your leavening agents are evenly distributed throughout the cake. It’s all about that uniform rise! -
Beat Eggs and Sugar
In a separate large bowl, beat the eggs, brown sugar, and granulated sugar until light and fluffy. I love using an electric mixer here to save time and elbow grease! -
Add Oils and Pumpkin Puree
Gradually mix in the vegetable oil and pure pumpkin puree until well combined. The mixture should be smooth and inviting—don’t you just love that rich orange color? -
Combine Wet and Dry
Gently fold in the dry ingredients into the wet mixture until just combined. Overmixing is a common mistake; we want to keep those fluffy bubbles intact for a light cake! -
Divide and Bake
Pour the batter evenly into the prepared cake pans. Bake for 25-30 minutes, or until a toothpick inserted into the center comes out clean. The smell of this cake will have everyone flocking to the kitchen! -
Cool the Cakes
Once baked, allow the cakes to cool in the pans for 10 minutes before transferring them to a wire rack. It’s essential for preventing soggy bottoms—nobody wants that! -
Make the Cream Cheese Frosting
While the cakes cool, soften the cream cheese and butter in a bowl. Beat them together until creamy, then add the powdered sugar and vanilla extract. If your frosting is too thick, add a little milk until you get that spreadable consistency. -
Assemble
Once your cakes have cooled completely, place one layer on a serving plate and spread a generous amount of frosting on top. Add the second layer, and cover the whole cake in frosting, making it as pretty as you’d like.
Serving Suggestions
Now that your 6-inch pumpkin layer cake looks like a masterpiece, let’s talk about how to serve it. I love changing things up based on the occasion! You can slice it into cute wedges, topped with a sprinkle of cinnamon and perhaps a dollop of whipped cream. If you’re feeling extra fancy, a drizzle of caramel can elevate this beauty—nothing says fall like caramel and pumpkin together!
Feel free to serve it alongside a steaming cup of coffee or a hot apple cider. Trust me, it’s the perfect match for those cozy autumn vibes.
Recipe Variations
Every chef loves a twist, right? Here are some creative options to personalize your pumpkin layer cake:
-
Chocolate Drizzle: Melt dark chocolate and drizzle it on top of the frosted cake for a decadent touch. The combination of chocolate and pumpkin is surprisingly divine!
-
Nuts Galore: Add chopped walnuts or pecans into the batter for an inviting crunch. They add a lovely texture and complement the spices beautifully.
-
Spiced Rum Glory: For an adult twist, add a splash of spiced rum to your frosting. It’s a game-changer!
-
Marble Effect: Swirl in some chocolate cake batter with the pumpkin batter before baking for an eye-catching marbled cake.
-
Vegan Option: Replace the eggs with flax eggs (1 tablespoon ground flax meal with 3 tablespoons water per egg) and the vegetable oil with applesauce for a delicious vegan cake!
Chef’s Notes
This recipe has evolved over the years, blending different spices and adjusting for moisture. You could say it reflects my journey in the kitchen! I’ve also had my fair share of baking disasters (like the time I forgot to add sugar!), but each flop taught me something new. So, if things don’t go as planned, don’t worry! Just remember: every great chef has a few kitchen blunders in their cookbook. It’s all about the fun and the flavor!
FAQs and Troubleshooting
1. My cake didn’t rise. What went wrong?
Make sure your baking powder and baking soda are fresh. Old leavening agents can lead to flat cakes. Always check the expiration date!
2. Why did my cake crack on top?
This can happen if the oven is too hot or if the cake was overmixed. Make sure to follow the temperature settings closely and mix gently.
3. How do I store leftover cake?
Store it in an airtight container in the refrigerator for up to a week. You can also freeze it wrapped tightly in plastic, and it’ll stay good for up to 3 months.
4. Can I make this in a different size pan?
Absolutely! Just adjust the baking time accordingly. A 9-inch pan will take a bit longer, while cupcakes can bake faster—check for doneness along the way!
Nutritional Info
While I like to emphasize joy over numbers, it’s good to be aware! On average, a slice of this 6-inch pumpkin layer cake (assuming 8 slices) contains about 320 calories, with 15g of fat, 45g of carbs, 3g of protein, and a moderate amount of sugar. Depending on your dietary needs or indulgence level, feel free to tweak the ingredients as mentioned above!
Final Thoughts
And there you have it! Your very own 6-inch pumpkin layer cake—soft, spiced, and crowned with luscious cream cheese frosting. This recipe holds a special place in my heart, and I hope it brings a smile to your face and warmth to your kitchen too.
Remember, food is about joy and connection. So, whether you’re baking alone or with loved ones, cherish the process and the delicious memories you’re creating. Enjoy every slice, and don’t forget to share your pumpkin cake stories with me! Happy baking!
Print
The Ultimate 6-Inch Pumpkin Layer Cake
- Total Time: 50 minutes
- Yield: 8 servings 1x
- Diet: Vegetarian
Description
A delightful 6-inch pumpkin layer cake, perfect for autumn gatherings, featuring layers of spiced pumpkin and luscious cream cheese frosting.
Ingredients
- 2 cups all-purpose flour
- 1 teaspoon baking soda
- 1 teaspoon baking powder
- 3/4 teaspoon salt
- 1 1/4 teaspoon ground cinnamon
- 1 1/2 teaspoon pumpkin pie spice
- Pinch ground cloves
- 4 large eggs (at room temperature)
- 1 cup vegetable oil
- 1/2 teaspoon vanilla extract
- 15 oz pumpkin puree (1 can)
- 1 cup light brown sugar (packed)
- 1/2 cup granulated sugar
- 1/2 cup unsalted butter (at room temperature)
- 4 ounces cream cheese (softened)
- 2 1/2–3 cups powdered sugar
- 1/4 teaspoon vanilla extract
- Milk (for consistency)
Instructions
- Preheat your oven to 350°F (175°C) and grease two 6-inch cake pans. Line the bottoms with parchment paper.
- Mix the dry ingredients: flour, baking powder, baking soda, salt, cinnamon, pumpkin pie spice, and cloves in a bowl.
- Beat the eggs, brown sugar, and granulated sugar together until light and fluffy.
- Add the vegetable oil and pumpkin puree gradually and mix until well combined.
- Combine the wet and dry ingredients gently until just combined.
- Divide the batter evenly between the prepared cake pans and bake for 25-30 minutes.
- Cool the cakes in the pans for 10 minutes before transferring them to a wire rack.
- Make the cream cheese frosting by beating softened cream cheese and butter together, then add powdered sugar and vanilla extract.
- Assemble the cake by placing one layer on a serving plate, spreading frosting on top, then adding the second layer and frosting the entire cake.
Notes
Consider adding nuts, chocolate drizzle, or spiced rum for variations. Store leftovers in an airtight container in the refrigerator.
- Prep Time: 20 minutes
- Cook Time: 30 minutes
- Category: Dessert
- Method: Baking
- Cuisine: American
Nutrition
- Serving Size: 1 slice
- Calories: 320
- Sugar: 20g
- Sodium: 400mg
- Fat: 15g
- Saturated Fat: 5g
- Unsaturated Fat: 8g
- Trans Fat: 0g
- Carbohydrates: 45g
- Fiber: 3g
- Protein: 4g
- Cholesterol: 50mg
Keywords: pumpkin cake, fall dessert, layer cake, autumn baking, cream cheese frosting
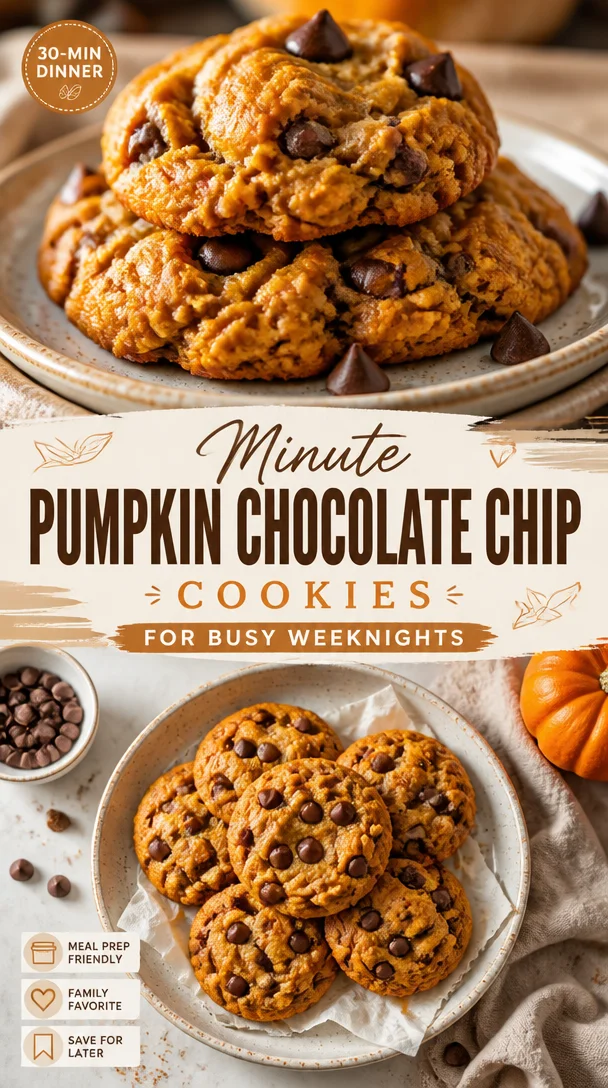
Minute Pumpkin Chocolate Chip Cookies for Busy Weeknights
The Cozy Comfort of Pumpkin Chocolate Chip Cookies
Hey there, fellow foodies! Today, we’re diving headfirst into the cozy world of pumpkin chocolate chip cookies. There’s something magical about the combination of warm spices, velvety pumpkin, and pockets of gooey chocolate that makes these cookies an absolute must-have in your baking arsenal. Whether you’re serving them up at a festive gathering or just indulging in a sweet treat at home, these cookies are sure to bring a smile to your face.
As the leaves change and the air becomes crisp, I can’t help but feel the call of the kitchen. It’s that time of year when the aroma of baking fills the home, and the urge to create something special gnaws at my soul. With each spoonful of pumpkin puree and sprinkle of chocolate chips, I’m taken back to all the cozy moments spent in the kitchen with my loved ones – piecing together a recipe that feels as comforting as a warm hug. So, roll up those sleeves, grab your mixing bowls, and let’s create something wonderful together!
A Sweet Slice of Nostalgia
Growing up, my family had a tradition: every fall, we would head to the local pumpkin patch, pick out the most perfect pumpkins, and bring them home to transform into all sorts of goodies. One particular year, I remember my Aunt Linda introducing me to the concept of pumpkin chocolate chip cookies. At first, I was skeptical – how could pumpkin possibly belong in a cookie? But the moment I took my first bite, all doubt melted away like ice cream on a hot summer day.
I remember sitting cross-legged on the kitchen floor, helping her mix together the ingredients. It was messy, magical, and full of laughter. The best part? When the warm cookies came out of the oven, we would gobble them down while they were still slightly warm, washing them down with cold glasses of milk. Fast forward to today, those memories inspire me to whip up these cookies every fall, and I can’t wait to share my version with you!
Ingredients That Make Magic Happen
Now, let’s gather our ingredients! Here’s what you’ll need to make these delightful pumpkin chocolate chip cookies:
-
1 cup canned pumpkin: This is the star of the show! Canned pumpkin puree is not only convenient but also adds moisture and flavor. If you prefer, you can use homemade pumpkin puree.
-
1 cup sugar: Just the right amount of sweetness! You can swap some of this out for brown sugar for a deeper flavor.
-
1/2 cup butter, softened: This adds richness. If you’re looking for a dairy-free alternative, coconut oil works wonders too!
-
1 teaspoon vanilla extract: A splash of vanilla rounds out the flavors. You can use almond extract for a different twist.
-
2 cups all-purpose flour: The backbone of your cookie dough. For a gluten-free option, try using a 1:1 gluten-free flour blend.
-
1 teaspoon baking soda: This helps the cookies rise. Make sure it’s fresh for best results!
-
1 teaspoon baking powder: Another leavening agent for fluffy cookies.
-
1 teaspoon ground cinnamon: The quintessential fall spice. You can also experiment with pumpkin spice mix!
-
1/2 teaspoon salt: Just a pinch to balance the sweetness.
-
1 cup chocolate chips: Use semi-sweet for classic cookies. Try dark chocolate or even white chocolate for a fun twist!
Step-by-Step Instructions to Cookie Heaven
Alright, now that we’ve gathered our ingredients, let’s dive into the baking magic. Follow these step-by-step instructions for killer pumpkin chocolate chip cookies!
-
Preheat Your Oven: First things first, preheat your oven to 350°F (175°C). This ensures those cookies bake evenly and beautifully.
-
Cream the Butter and Sugar: In a large mixing bowl, beat together the softened butter and sugar until creamy (about 2-3 minutes will do). This step is crucial! The more air you incorporate here, the fluffier your cookies will be.
-
Add Pumpkin and Vanilla: Add the canned pumpkin and vanilla extract to the bowl, mixing until smooth. Don’t rush this part; the pumpkin needs to become one with the mixture!
-
Mix the Dry Ingredients: In another bowl, whisk together the flour, baking soda, baking powder, cinnamon, and salt. This ensures even distribution of the leavening agents and spices.
-
Combine Wet and Dry Mix: Gradually add the dry ingredients to the wet ingredients, mixing gently until just combined. Overmixing can lead to tough cookies, so be gentle, my friend.
-
Stir in the Chocolate Chips: Fold in those yummy chocolate chips! Feel free to taste-test the dough at this point (all in the name of quality control, right?).
-
Scoop and Bake: Drop spoonfuls of dough onto a lined baking sheet, leaving space for the cookies to spread. Bake in your preheated oven for 12-15 minutes, or until the edges are golden brown.
-
Cool and Enjoy: Once out of the oven, let the cookies cool on the baking sheet for about 5 minutes, then transfer them to a wire rack to cool completely (if you can resist the temptation!).
Serving Suggestions: Make It Special
Once those delicious cookies are all baked and cooled, it’s time to serve! Stack them in a rustic basket lined with a cozy kitchen towel for a homey touch. You could also place them on a decorative plate, dusting a bit of powdered sugar on top for flair. Pair these cookies with a warm beverage, like spiced cider or hot chocolate, for the ultimate cozy vibe. Want to make it extra special? Try serving them with a scoop of vanilla ice cream on the side!
Recipe Variations to Keep it Fresh
Now, let’s mix things up a bit! Here are some creative twists and variations to make your pumpkin chocolate chip cookies stand out:
-
Oatmeal Pumpkin Chocolate Chip Cookies: Add 1 cup of rolled oats for a chewy texture and extra fiber.
-
Nutty Crunch: Mix in 1/2 cup of chopped nuts, such as walnuts or pecans, for a delightful crunch.
-
Cranberry Goodness: Throw in 1/2 cup of dried cranberries for a tart contrast to the sweet chocolate.
-
Spicy Kick: Add a pinch of nutmeg or allspice for an extra layer of warmth and spice.
-
Vegan Twist: Replace the butter with coconut oil and use a flax egg (1 tablespoon ground flaxseed mixed with 3 tablespoons water) instead of the egg for a vegan-friendly option!
Chef’s Notes: Memories and Musings
These pumpkin chocolate chip cookies have evolved beautifully over time. Originally, I experimented with different spices and ratios, but I’ve landed on this beloved recipe. It perfectly balances the flavors I adore while keeping things cozy and inviting. A fun fact? The dough is also fantastic as a base for breakfast muffins! Just spoon it into muffin tins, and you’ve got yourself a delicious treat that can be enjoyed any time of day.
FAQs and Troubleshooting
Q: Why are my cookies flat?
A: This could happen if your butter was too warm or if you over-mixed the dough. Make sure your butter is softened but not melted, and mix gently.
Q: Can I freeze the cookie dough?
A: Absolutely! You can freeze the dough for up to three months. Just scoop it onto a baking sheet, freeze, then transfer to a freezer bag. Bake from frozen, adding a couple of extra minutes.
Q: How do I store these cookies?
A: Keep them in an airtight container at room temperature for up to five days. If you want them to last a bit longer, refrigerate them to maintain freshness.
Q: Can I make these cookies gluten-free?
A: You sure can! Swap out the all-purpose flour for a 1:1 gluten-free baking mix, and you’ll be golden.
Nutritional Info
For those of you keeping tabs on your nutritional intake, here’s a rough estimate for one pumpkin chocolate chip cookie (assuming 24 cookies per batch):
- Calories: 150
- Total Fat: 7g
- Saturated Fat: 4g
- Carbohydrates: 22g
- Fiber: 1g
- Sugar: 10g
- Protein: 2g
These cookies are perfect for treating yourself, but always enjoy in moderation!
Final Thoughts: A Cookie Like No Other
In a world full of trends and fleeting food fads, the comforting embrace of a warm pumpkin chocolate chip cookie is timeless. It’s more than just a treat; it’s a vessel for memories, connection, and joy. So as you bake your way through these delicious bites, remember to savor not just the flavor but the moments that come with it. Share them with family and friends, lest you find yourself eating them all in one sitting (no judgment here – I’ve been there!).
Thanks for joining me on this sweet journey today! Now get out there, let the aroma fill your home, and most importantly, share the love baked into every cookie. Happy baking! 🍪
Print
Pumpkin Chocolate Chip Cookies
- Total Time: 30 minutes
- Yield: 24 cookies 1x
- Diet: Vegetarian
Description
Delicious pumpkin chocolate chip cookies filled with warm spices and gooey chocolate, perfect for fall.
Ingredients
- 1 cup canned pumpkin
- 1 cup sugar
- 1/2 cup butter, softened
- 1 teaspoon vanilla extract
- 2 cups all-purpose flour
- 1 teaspoon baking soda
- 1 teaspoon baking powder
- 1 teaspoon ground cinnamon
- 1/2 teaspoon salt
- 1 cup chocolate chips
Instructions
- Preheat your oven to 350°F (175°C).
- Cream the butter and sugar until creamy.
- Add pumpkin and vanilla, mixing until smooth.
- Mix the dry ingredients in another bowl.
- Combine wet and dry ingredients gently.
- Stir in the chocolate chips.
- Scoop dough onto a lined baking sheet.
- Bake for 12-15 minutes until edges are golden.
- Cool on a wire rack before serving.
Notes
Serve with a warm beverage for the ultimate cozy vibe.
- Prep Time: 15 minutes
- Cook Time: 15 minutes
- Category: Dessert
- Method: Baking
- Cuisine: American
Nutrition
- Serving Size: 1 cookie
- Calories: 150
- Sugar: 10g
- Sodium: 100mg
- Fat: 7g
- Saturated Fat: 4g
- Unsaturated Fat: 2g
- Trans Fat: 0g
- Carbohydrates: 22g
- Fiber: 1g
- Protein: 2g
- Cholesterol: 30mg
Keywords: pumpkin cookies, chocolate chip cookies, fall baking, cozy desserts
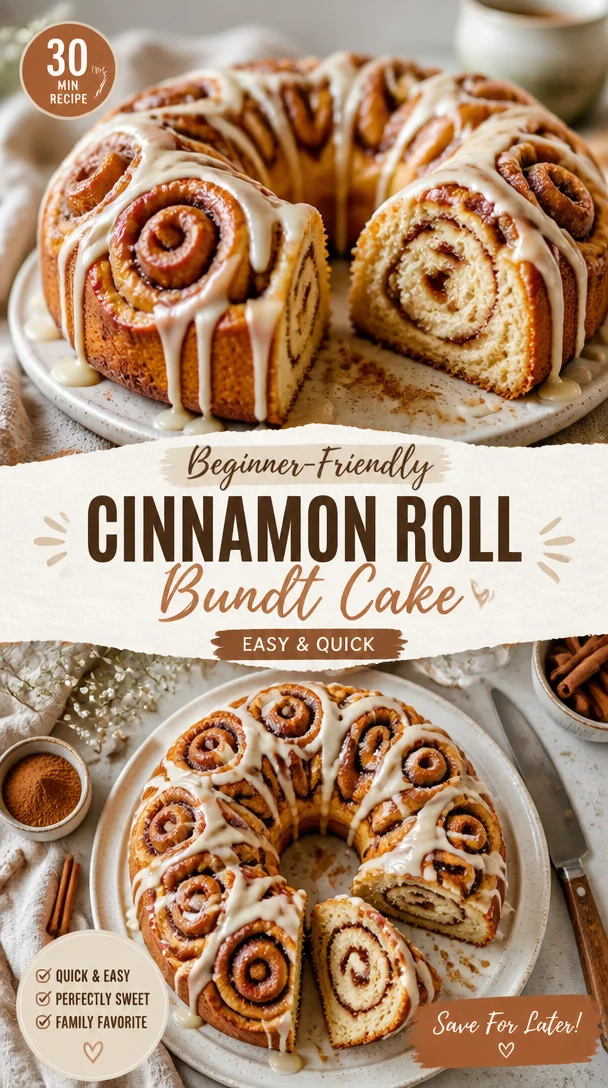
Beginner-Friendly Cinnamon Roll Bundt Cake (Easy & Quick)
Simple & Easy Homemade Cinnamon Roll Bundt Cake: A Cozy Recap of Home and Flavor
Hey there, friends! I’m so excited to share one of my absolute favorites with you today—a delightful dish that combines the classic comfort of cinnamon rolls with the fuss-free charm of a Bundt cake. You guessed it, it’s the Simple & Easy Homemade Cinnamon Roll Bundt Cake! This sweet treat brings a cozy aroma to your kitchen, elevating any day into a special occasion.
Now, picture this: a lazy Sunday morning, the sun peeking through the kitchen window, and the smell of cinnamon wafting through the air. That’s the magic of this cake! Each slice is a wonderful hybrid of soft cake and sticky cinnamon goodness, making it the perfect crowd-pleaser or indulgent treat for yourself. And what could be better than a dessert that not only looks stunning but tastes like a warm hug? I can practically hear the applause from family and friends as they cheer for another round of this delightful cake.
The beauty of this recipe lies in its simplicity. With just a handful of ingredients that you probably already have in your pantry, you can whip up this delightful cake in no time. Whether you’re serving brunch, looking for an afternoon pick-me-up, or simply treating yourself, this cake has your back!
Let’s dive into all the delicious details, and I’ll share my personal story behind this delightful creation, tips and tricks, and of course, how you can customize it to fit your own culinary style.
A Sweet Memory: The Birth of the Cinnamon Roll Bundt Cake
Growing up, Sundays at my grandma’s house were always a treat. She had this magical ability to turn ordinary mornings into festive brunches. The air would be thick with the scent of cinnamon and fresh coffee, and there would always be a batch of freshly baked cinnamon rolls, their gooey centers oozing precious, sweet goodness.
One Sunday, as I was helping her in the kitchen—my favorite place to be—we decided to try something a little different. Instead of rolling and slicing dough like usual, we poured the cinnamon roll mixture into a Bundt pan, a twist that was born from pure curiosity and a pinch of daring! The result? Pure magic! That cake cooked to golden perfection, and when we turned it out onto the serving platter, our hearts danced with delight. As we enjoyed that first slice, it became clear that we’d stumbled onto something special, igniting my love for creating simple yet comforting recipes.
From that day on, the Cinnamon Roll Bundt Cake became a Sunday tradition—a wonderful way to enjoy the comforting flavors of cinnamon rolls without the mess of rolling. I’m excited to share this recipe with you so you can create your own magical moments in the kitchen!
Delicious Ingredients
Before we get to the baking, let’s chat about the ingredients you’ll need to create this scrumptious cake. Here’s what’s on the list:
-
2 cups all-purpose flour: The backbone of the cake! For a gluten-free option, you can substitute with a 1:1 gluten-free flour blend.
-
1 cup granulated sugar: This sweetens the cake and helps achieve that lovely light texture. If you’re reducing sugar, try using a natural sweetener like maple syrup or honey, but adjust the wet ingredients accordingly.
-
1 teaspoon baking powder: This helps our Bundt cake rise beautifully. Make sure it’s fresh for the best results!
-
1/2 teaspoon baking soda: A little extra lift! If you’re out, you can replace it with more baking powder, but remember to adjust the amount.
-
1/2 teaspoon salt: A pure necessity! It enhances the flavors all around.
-
1 teaspoon ground cinnamon: The star of the show! For a twist, try using fresh grated nutmeg alongside the cinnamon.
-
1/2 cup unsalted butter, softened: Adds richness and flavor. If you prefer a dairy-free option, substituting with coconut oil works great!
-
1 cup sour cream: This adds moisture and softness to the cake. If you don’t have sour cream, plain yogurt is an excellent alternative.
-
2 large eggs: They bind everything together. Vegan? Flax eggs come to the rescue (1 tablespoon ground flaxseed mixed with 2.5 tablespoons water makes one egg)!
-
1 teaspoon vanilla extract: A touch of vanilla always elevates flavors. Make your own for an extra special homemade touch!
-
1/2 cup brown sugar: For that lovely, caramel-like sweetness with just a bit more depth. Coconut sugar is a good substitute if you’re looking for a healthier option.
-
1/2 cup chopped pecans or walnuts (optional): Add some crunch! You can swap these for sunflower seeds for a nut-free version.
-
Icing for drizzling (powdered sugar and milk): A sweet finish! You can customize the icing with flavors like almond or maple extract for an extra kick.
Step-by-Step Instructions
Now, roll up those sleeves; it’s time to bake up some joy! Here’s a step-by-step guide to ensuring your Cinnamon Roll Bundt Cake turns out just right.
Step 1: Preheat the Oven
First things first—preheat your oven to 350°F (175°C). A well-tempered oven makes all the difference in achieving that lovely, baked evenness.
Step 2: Prepare the Bundt Pan
Grease your Bundt pan generously with butter or spray oil. I like to use a mix of both to ensure it comes out perfectly. You can also dust it lightly with flour to prevent sticking—this way, we can avoid those sad, broken cake moments.
Step 3: Combine Dry Ingredients
In a large mixing bowl, whisk together your flour, granulated sugar, baking powder, baking soda, salt, cinnamon, and chopped nuts, if using. This helps ensure even distribution of your leavening agents and spices, which is crucial for a well-risen cake.
Step 4: Cream the Butter and Sugar
In a mixing bowl, cream the softened butter and brown sugar together using a hand mixer or stand mixer on medium speed until light and fluffy. This process usually takes about 2-3 minutes. The air you incorporate now will make your cake light and fluffy!
Step 5: Add the Wet Ingredients
Add in the eggs, sour cream, and vanilla extract to the creamed butter and sugar, mixing until combined. That’s right—let the mixer do the work while you daydream of all the delicious slices to come!
Step 6: Mix in the Dry Ingredients
Gently fold the dry mixture into the wet batter just until combined. Overmixing is a no-no! We want a tender crumb, so don’t be shy—leave a few lumps!
Step 7: Layering with Cinnamon Sugar
In a small bowl, combine any remaining cinnamon and granulated sugar—this is what we’ll use to create that beloved swirl throughout the cake!
Now, pour half of the batter into the prepared Bundt pan, spreading it out evenly. Sprinkle generously with the cinnamon-sugar mix, followed by the remaining batter on top. If you’re feeling adventurous, create a marbled effect by lightly swirling a knife through the batter.
Step 8: Bake
Time for the magic to happen! Bake the cake in your preheated oven for about 40-45 minutes or until a toothpick inserted into the center comes out clean. Your kitchen will smell heavenly—it’s like a warm embrace!
Step 9: Cool and Icing Time
Once baked to perfection, remove it from the oven and allow it to cool in the pan for about 10 minutes. Then, carefully invert it onto a wire rack to cool completely. While it cools, prepare your icing by mixing powdered sugar with a splash of milk. Drizzle that creamy icing all over the top for that WOW factor!
Serving Suggestions
Slice your Bundt cake into generous wedges and serve it warm or at room temperature. It’s equally delightful on its own or paired with a scoop of vanilla ice cream or a dollop of whipped cream. For an extra flair, garnish with a sprinkle of chopped nuts or a dusting of cinnamon powder.
If you really want to impress your guests, consider garnishing with fresh berries or serving alongside a piping hot cup of coffee or tea. The warm cake with a hot beverage creates a cozy experience that’s hard to beat!
Creative Recipe Variations
Now that you have the base recipe down, let’s mix things up a bit! Here are some fun variations to put your own twist on this delicious Bundt cake:
-
Apple Cinnamon Bundt: Fold in 1 cup of finely chopped apples for a delightful fruit twist. They’ll soften up during baking and add juicy bursts of flavor!
-
Chocolate Swirl Cinnamon Roll Cake: Add dollops of chocolate hazelnut spread to the batter and swirl it in for a decadent treat. You can never go wrong with chocolate!
-
Pumpkin Spice Cinnamon Roll Cake: Replace half of the sour cream with pumpkin puree, and add 1 teaspoon of pumpkin spice for a seasonal favorite that screams autumn.
-
Lavender Honey Glaze: Infuse your icing with a touch of culinary lavender and drizzle it over for a fragrant floral finish—this adds a touch of elegance to your sweet cake.
-
Bourbon Maple Icing: Elevate your drizzle with a splash of bourbon and maple syrup. It makes for a sophisticated dessert that offers a unique taste experience!
Chef’s Notes
This recipe has truly grown with me over the years! I love how many memories it holds, and every time I make it, I feel like I’m reaching back into those cozy Sunday mornings with my grandma. Plus, it’s become a bit of a conversation piece! Friends often ask how I get that perfect cinnamon swirl, and I tell them it’s as easy as enjoying the process and letting love be the secret ingredient.
Remember, the fun of cooking is to explore, create, and add your personal touch. Don’t shy away from experimenting; after all, every little exploration in the kitchen brings us one step closer to discovering our hidden culinary treasures.
FAQs and Troubleshooting
1. Why did my cake come out dense?
Ah, the dreaded dense cake! This usually happens due to overmixing the batter or too much flour. Make sure you’re measuring out flour accurately (spoon it into the measuring cup rather than scooping directly!) and folding the ingredients gently.
2. How can I tell when my Bundt cake is done?
Keep an eye on your cake during the last 10 minutes of baking. Insert a toothpick into the center—if it comes out clean or with just a few crumbs, it’s ready! A little underdone is better than overdone.
3. Can I make this ahead of time?
Absolutely! This cake tastes even better the next day. Just make sure to wrap it well in plastic wrap, or store it in an airtight container at room temperature. The cake lasts about 3 days—if it lasts that long!
4. What should I do if my cake sticks to the pan?
If it happens, don’t fret! Gently run a thin spatula around the edges to loosen it. If it still won’t budge, place the pan in a warm-water bath for a few minutes—sometimes a little heat helps it release.
Nutritional Info
While I always believe in enjoying food without counting every calorie, it’s good to know a bit about what we’re indulging in. A slice of this delightful Cinnamon Roll Bundt Cake (about 1/12th of the cake) typically has:
- Calories: 320
- Carbohydrates: 48g
- Protein: 4g
- Total Fat: 14g
- Saturated Fat: 8g
- Sugars: 22g
- Fiber: 1g
As always, feel free to adjust the recipe based on dietary preferences or restrictions!
Final Thoughts
So there you have it—my Simple & Easy Homemade Cinnamon Roll Bundt Cake! I hope it brings as much joy to your kitchen as it has to mine. Whether you’re baking for a special occasion or indulging in a cozy afternoon treat, this cake covers all the bases.
Remember, cooking is an adventure, and each dish tells a story. Share your own experiences with this recipe, and don’t be afraid to make it your own. Grab your favorite fork (or a spoon for that icing!) and dive into this delightful creation, because like any good recipe, it’s all about the moments we create around it.
Until next time, happy baking and enjoy every bite! 🍴💖
Print
Simple & Easy Homemade Cinnamon Roll Bundt Cake
- Total Time: 60 minutes
- Yield: 12 servings 1x
- Diet: Vegetarian
Description
A delightful dish combining the classic comfort of cinnamon rolls with the fuss-free charm of a Bundt cake, perfect for any special occasion.
Ingredients
- 2 cups all-purpose flour
- 1 cup granulated sugar
- 1 teaspoon baking powder
- 1/2 teaspoon baking soda
- 1/2 teaspoon salt
- 1 teaspoon ground cinnamon
- 1/2 cup unsalted butter, softened
- 1 cup sour cream
- 2 large eggs
- 1 teaspoon vanilla extract
- 1/2 cup brown sugar
- 1/2 cup chopped pecans or walnuts (optional)
- Icing for drizzling (powdered sugar and milk)
Instructions
- Preheat the oven to 350°F (175°C).
- Grease the Bundt pan generously with butter or spray oil.
- Combine the flour, granulated sugar, baking powder, baking soda, salt, cinnamon, and chopped nuts in a large mixing bowl.
- Cream the softened butter and brown sugar together until light and fluffy.
- Add the eggs, sour cream, and vanilla extract to the creamed mixture, mixing until combined.
- Fold the dry mixture into the wet batter just until combined.
- Layer half of the batter into the prepared Bundt pan, sprinkle with cinnamon-sugar mix, and top with remaining batter.
- Bake for about 40-45 minutes or until a toothpick inserted comes out clean.
- Cool in the pan for 10 minutes, then invert onto a wire rack to cool completely.
- Prepare icing by mixing powdered sugar with milk and drizzle over the cooled cake.
Notes
This cake tastes even better the next day. It can be wrapped and stored for up to 3 days.
- Prep Time: 15 minutes
- Cook Time: 45 minutes
- Category: Dessert
- Method: Baking
- Cuisine: American
Nutrition
- Serving Size: 1 slice
- Calories: 320
- Sugar: 22g
- Sodium: 400mg
- Fat: 14g
- Saturated Fat: 8g
- Unsaturated Fat: 2g
- Trans Fat: 0g
- Carbohydrates: 48g
- Fiber: 1g
- Protein: 4g
- Cholesterol: 30mg
Keywords: cinnamon roll, Bundt cake, dessert, easy baking, cozy recipe
Ingredient Pumpkin Cake: Quick, Cozy Fall Dessert
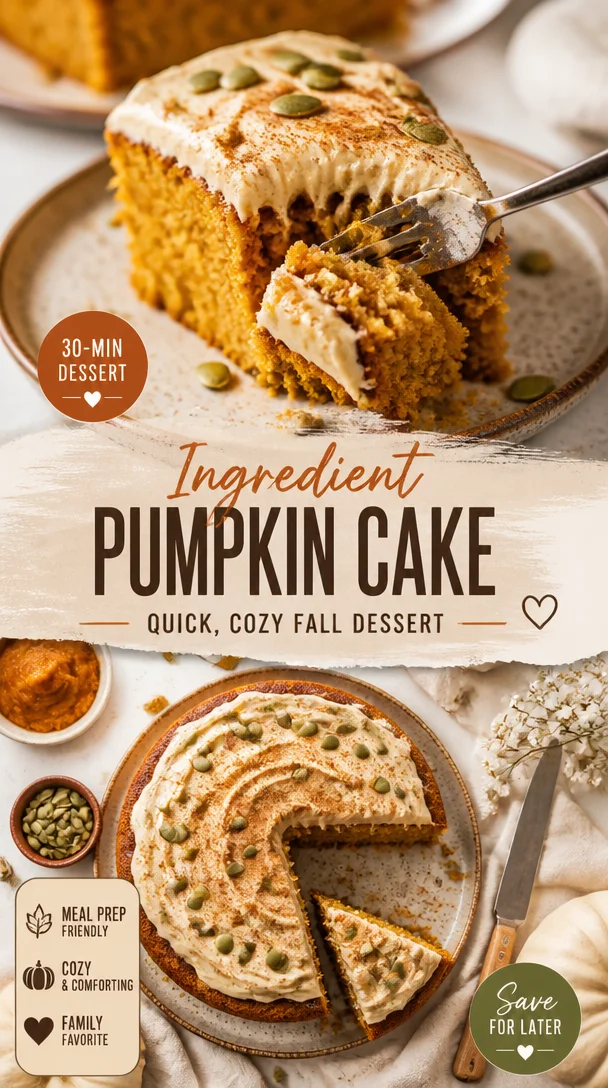
The Ultimate Three-Ingredient Pumpkin Cake: Easy, Delicious, and Perfect for Fall!
Hey there, foodies! It’s Beau Collier, and I’m absolutely thrilled to be hanging out with you today. If you’re anything like me, fall is that magical time of year when everything seems to be drenched in warm spices, bursts of orange, and the comforting scents of baked goodies wafting through the air. There’s just something about pumpkin that makes me feel all warm and fuzzy inside.
That’s why I’m super excited to share my all-time favorite dessert with you: the Three-Ingredient Pumpkin Cake! Yes, you heard that right—just three simple ingredients come together to create a deliciously moist and wonderfully spiced cake that’ll have everyone begging for seconds. Trust me; this is the kind of recipe you’ll want to keep close to your heart (and your kitchen!) for many seasons to come.
Imagine this: It’s a crisp autumn afternoon, the leaves are turning, and you’re in your kitchen, dressed in your cozy sweater. You decide to whip up a cake that captures the essence of the season, and in under an hour, you’ve got a warm, pumpkiny delight ready to be devoured. No fussy steps, no long ingredient lists—just pure, unadulterated goodness. Got your spoons ready? Let’s dive in!
A Stroll Down Memory Lane
Every great dish has a story, and this pumpkin cake is no exception. I remember the first time I stumbled upon this recipe—back in college when I was trying to impress my friends with my culinary prowess (or lack thereof!). Armed with a bright orange can of pumpkin puree and a box of yellow cake mix, I thought, "How hard can it be?"
After all, I was notorious for burning toast and boiling spaghetti into a gooey mess. But I was determined! So, I mixed those ingredients with a generous splash of water and threw it in the oven. As the cake baked, the aroma of spices wafted through our tiny kitchen, tempting everyone to come closer.
When the timer buzzed and I took that first slice, I was astonished! The cake was fluffy, fragrant, and best of all—delicious! It was a huge hit at our little gathering, and that day changed my baking game forever. Who knew something so easy could spark joy and connection among friends? Ever since, I’ve been sharing this recipe with anyone who’ll listen, and it’s become a staple in my kitchen during the fall months.
Ingredients You’ll Need
Let’s get right into the ingredients. Here’s what you’ll need to whip up this scrumptious cake:
-
1 can of pumpkin puree
Not to be confused with pumpkin pie filling, pumpkin puree is the real deal! It’s packed with flavor and moisture, making your cake melt-in-your-mouth delicious. For a twist, try using roasted butternut squash puree or even sweet potato puree. -
1 box of cake mix (yellow or spice)
This is the beauty of the recipe—any brand will do! A yellow cake mix provides a lovely base while a spice cake mix adds an extra layer of warmth. Want something gluten-free? Substitute it with a gluten-free cake mix, and you’re all set! -
1 cup of water
Simple, right? This helps combine the ingredients and keeps your cake moist. If you want a richer flavor, you could swap this for milk or a non-dairy alternative like almond milk.
Step-by-Step Instructions
Now that you’ve gathered your ingredients, let’s get to the good stuff—the actual baking! Follow these easy steps, and let’s make magic happen in the kitchen:
-
Preheat the Oven
Start by preheating your oven to 350°F (175°C). This ensures that your cake will bake evenly and come out perfectly. Don’t forget this step—it’s as crucial as putting on your favorite apron! -
Mix It Up
In a large mixing bowl, combine the can of pumpkin puree and the box of cake mix. At this point, you might think it looks a little thick, and you’d be right! Don’t worry; that’s where the water comes in. -
Add Water
Gradually pour in the cup of water while mixing. I recommend using a spatula or a hand mixer. You’re aiming for a smooth, batter-like consistency, so don’t shy away from really mixing it well. Don’t be tempted to skip this step; that’s where the magic happens! -
Grease the Pan
Grab your favorite baking pan—9×13 inch works beautifully—and grease it generously with cooking spray or butter. You want to ensure that your cake lifts out effortlessly for that perfect presentation. -
Pour and Spread
Pour the batter into your greased pan. Use a spatula to spread it evenly. Pro tip: Try to make sure it’s all level; this will help it bake uniformly. -
Pop It in the Oven
Place the pan in the preheated oven and bake for about 30-35 minutes or until a toothpick comes out clean from the center. While it’s baking, the smell will make you impatient; don’t say I didn’t warn you! -
Cool Down
Once done, remove the cake from the oven and let it cool in the pan for about 10 minutes. Then transfer it to a wire rack to cool completely. Patience is key here—trust me, it’ll be worth it! -
Serve and Enjoy!
Once cooled, slice into squares and serve as is, or dress it up with a dusting of powdered sugar or a dollop of whipped cream. You could also grab a slice with a scoop of vanilla ice cream because, let’s be honest, everything’s better with ice cream!
Serving Suggestions
This Three-Ingredient Pumpkin Cake is super versatile when it comes to serving. You’ve got options! Here are some of my favorites:
-
Simple Slices
Serve the cake plain, straight out of the pan, for an easy grab-and-go snack. -
Add Whipped Cream
For a gourmet touch, top each slice with a dollop of freshly whipped cream. A sprinkle of cinnamon or nutmeg elevates it to a whole new level! -
A La Mode
Want to turn it into a fancy dessert? Serve a warm slice with a scoop of vanilla ice cream on top or on the side. The contrast of warm cake and cold ice cream is heavenly! -
Garnish with Nuts
For some added crunch and texture, sprinkle chopped pecans or walnuts on top before serving. They complement the pumpkin flavors nicely! -
Festive Flair
For fall gatherings, arrange the cake slices on a wooden board and decorate with mini pumpkins or autumn leaves for that festive touch. It’s all about creating warm, inviting vibes!
Recipe Variations
Feeling adventurous? Here are a few variations you can try to put your own spin on this classic recipe:
-
Chocolate Chip Pumpkin Cake
Add a cup of semi-sweet chocolate chips into the batter before transferring it to the pan. The combination of chocolate and pumpkin is a crowd-pleaser! -
Nutty Pumpkin Cake
Mix in ½ cup of chopped walnuts or pecans. They’re great for adding crunch and extra flavor. Plus, they make the cake feel more hearty! -
Gluten-Free Option
Substitute the cake mix with a gluten-free vanilla or spice cake mix. It’s just as tasty and perfect for any gluten-sensitive friends or family! -
Pumpkin Spice Cake
If you’re using yellow cake mix, add in a tablespoon of pumpkin pie spice to really amp up that fall flavor. -
Vegan Twist
Use a vegan cake mix and substitute the water with almond milk. You’ll still have that moist, flavorful cake without the eggs or dairy!
Chef’s Notes
Over the years, I’ve made this cake countless times, and every time I tweak it a little. It’s kind of like my go-to comfort food. I even remember one time I accidentally grabbed a spice cake mix that had been sitting in the back of the cupboard for ages. Guess what? It turned out to be one of the best versions I ever made!
The fun part about this recipe is its adaptability. It can become whatever you want it to be with just a few minor tweaks. Sometimes, I’ll even make two batches at once—one spiced and one with chocolate chips. Honestly, it’s hard to go wrong with this cake!
FAQs and Troubleshooting
1. What if my cake comes out too dense?
If your cake turns out dense, it might be because you didn’t mix it enough or overmixed it. Aim for a nice, smooth batter without any lumps, but don’t overdo it!
2. Can I use fresh pumpkin instead of canned?
Absolutely! Just make sure to roast and puree the pumpkin until smooth. You’ll want about a cup of pure pumpkin as a substitute.
3. How should I store leftovers?
This cake keeps beautifully at room temperature for a couple of days, or in the fridge for up to a week. Cover it in plastic wrap or store it in an airtight container to keep it fresh!
4. Can I freeze this cake?
You bet! To freeze, let it cool completely, then wrap slices in plastic before placing them in a freezer-safe container. It can last up to 3 months frozen!
Nutritional Info
While I always believe in enjoying treats, it’s good to be a little aware of what we’re putting in our bodies. Here’s a rough estimation for one slice (when serving 12):
- Calories: 160
- Total Fat: 3g
- Saturated Fat: 0.5g
- Sodium: 200mg
- Total Carbohydrates: 31g
- Dietary Fiber: 1g
- Sugars: 15g
- Protein: 2g
Keep in mind, these numbers can vary based on the cake mix brand and any additional ingredients you decide to add!
Final Thoughts
So there you have it, my fabulous food friends! The Three-Ingredient Pumpkin Cake is not just a dessert; it’s a morsel of happiness, bringing warmth and joy to every bite. It’s perfect for those spontaneous gatherings or cozy fall evenings, easy enough for a novice cook, and delightful enough to impress even the foodies among us.
I hope this recipe inspires you to embrace the magic of fall baking, to fill your kitchen with love and aromas that comfort the soul. So, what are you waiting for? Get in the kitchen, whip up that cake, and share it with your loved ones. Trust me, this will become a cherished recipe, just like it is in my heart.
Happy baking, and may your kitchens be filled with fragrant spices and laughter! 🍰✨
Print
Three-Ingredient Pumpkin Cake
- Total Time: 50 minutes
- Yield: 12 servings 1x
- Diet: Vegetarian
Description
A simple yet delightful pumpkin cake made with just three ingredients, capturing the essence of fall.
Ingredients
- 1 can of pumpkin puree
- 1 box of yellow or spice cake mix
- 1 cup of water
Instructions
- Preheat the oven to 350°F (175°C).
- Mix the pumpkin puree and cake mix in a large bowl.
- Add the water gradually while mixing until smooth.
- Grease a 9×13 inch baking pan with cooking spray or butter.
- Pour the batter into the prepared pan and level it out.
- Pop the pan in the oven and bake for 30-35 minutes.
- Cool the cake in the pan for about 10 minutes.
- Serve slices plain or topped with whipped cream or ice cream.
Notes
For variations, add chocolate chips, nuts, or use gluten-free cake mix for your dietary needs.
- Prep Time: 15 minutes
- Cook Time: 35 minutes
- Category: Dessert
- Method: Baking
- Cuisine: American
Nutrition
- Serving Size: 1 slice
- Calories: 160
- Sugar: 15g
- Sodium: 200mg
- Fat: 3g
- Saturated Fat: 0.5g
- Unsaturated Fat: 2g
- Trans Fat: 0g
- Carbohydrates: 31g
- Fiber: 1g
- Protein: 2g
- Cholesterol: 0mg
Keywords: pumpkin cake, fall dessert, easy recipe, three-ingredient cake, autumn baking
Minute Tequila Sunrise Cupcakes for Summer Parties
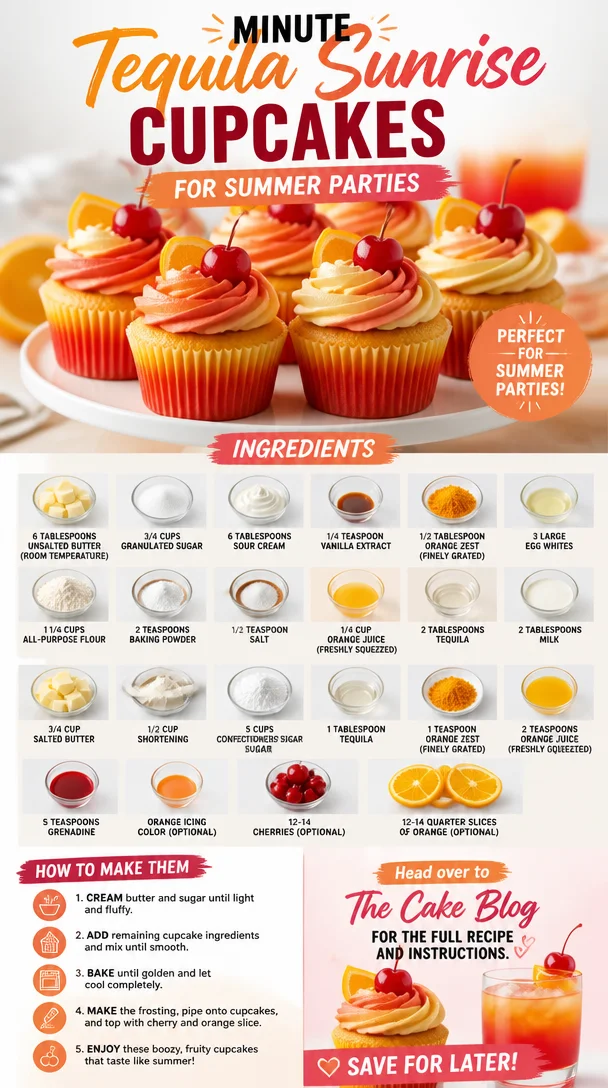
Tequila Sunrise Cupcakes: A Sweet Twist on a Classic Cocktail
Hey there, fellow food lovers! Welcome back to Feastical, where we whip up the most delicious and heartwarming recipes that bring joy and flavor to every kitchen. Today, I’m thrilled to share a fun and flavorful treat that captures the vibrant spirit of one of my favorite cocktails: Tequila Sunrise Cupcakes!
Imagine indulging in a moist, tender cupcake that’s infused with the sunny flavors of orange and tequila, all crowned with a fluffy, dreamy icing. Sounds like a party, right? Whether you’re hosting a festive gathering, celebrating a birthday, or just want to treat yourself to something delicious, these Tequila Sunrise Cupcakes are the perfect way to brighten up your day and sweeten your table.
Now, I know what you might be thinking—cupcakes and tequila? How did these two come together? Well, strap in, because I’ve got a story that will take you back to my days experimenting in the kitchen and discovering the joy of mixing flavors, especially when it comes to dessert!
A Shot of Nostalgia
Let me take you back to a warm summer evening a few years ago when my friends and I gathered at a local beach. We had set up picnic tables under the stars, and someone had brought along a bottle of tequila for the ultimate sunset toast. That magical moment was made even sweeter by the delicious cupcake my friend had baked as a little treat to celebrate our summer adventures.
As we sipped on our refreshing Tequila Sunsrises, the vivid colors of the sky above mirrored the hues of our drinks, and the taste of orange, grenadine, and tequila filled the air with laughter and love. It sparked an idea: what if I could bottle that nostalgic moment and turn it into a dessert? And voila! The Tequila Sunrise Cupcake recipe was born. Sharing this with you feels like a big hug, and it allows me to relive those cherished memories every time I bake them.
Ingredients
Let’s gather our essentials for these Tequila Sunrise Cupcakes! Here’s what you’ll need:
Cupcake Batter
- 6 tablespoons unsalted butter (room temperature): This adds moisture and a rich flavor to your cupcakes. If you’re looking to cut back on dairy, feel free to substitute with a plant-based butter.
- 3/4 cup granulated sugar: This sweetens the cupcakes perfectly, creating that tender crumb. Brown sugar can be used for a deeper flavor.
- 6 tablespoons sour cream: This ingredient keeps the cupcakes moist and adds a delightful tang. Greek yogurt makes an excellent substitute!
- 1/4 teaspoon vanilla extract: A hint of vanilla enhances all the flavors beautifully. Don’t skip it!
- 1/2 tablespoon orange zest (finely grated): Adds a bright, citrus note. If fresh oranges aren’t on hand, lemon zest can work too.
- 3 large egg whites: These keep our cupcakes light and fluffy. If you’re vegan, use aquafaba as a fabulous egg substitute.
- 1 1/4 cups all-purpose flour: The foundation for our cupcake batter. Make sure to spoon it into the measuring cup for accuracy!
- 2 teaspoons baking powder: This helps our cupcakes rise. Make sure it’s fresh for best results.
- 1/2 teaspoon salt: Just a pinch enhances all the flavors. Don’t skip it!
- 1/4 cup orange juice (freshly squeezed): Brings the freshness of citrus to each bite. Store-bought works too if you’re in a pinch.
- 2 tablespoons tequila: The star of our show! If you’re feeling adventurous, try using flavored tequila, like jalapeño or orange.
Frosting
- 3/4 cup salted butter: Provides a creamy base for our frosting. You can use unsalted butter if you prefer more control over salt levels.
- 1/2 cup shortening: This helps the frosting maintain its shape. If you want a purely butter-based frosting, that’s perfectly fine too!
- 5 cups confectioners’ sugar: This will make our frosting sweet and fluffy. You may want to adjust the amount based on how sweet you like your frosting.
- 1 tablespoon tequila: A little splash of pizzazz! It ties in the cupcake’s flavor nicely.
- 1 teaspoon orange zest (finely grated): For an extra zing in our icing.
- 2 teaspoons orange juice (freshly squeezed): To soften the frosting and add flavor.
- 5 teaspoons grenadine: Regular or a cherry syrup version for that lovely sunset color!
- Orange icing color (optional): For fun added color and visual appeal!
- 12-14 cherries (optional): For garnishing on top—can’t resist a cherry!
- 12-14 quarter slices of orange (optional): Adds a festive touch to your cupcakes.
Step-by-Step Instructions
Alright, my eager bakers, let’s get those aprons on! We’re about to create some mouthwatering Tequila Sunrise Cupcakes.
-
Preheat your oven: Set your oven to 350°F (175°C) so it’s nice and hot when our cupcakes are ready to go.
-
Prep your muffin tins: Line your cupcake pans with paper liners. This makes for easy clean-up and adds a pop of color!
-
Cream the butter and sugar: In a large bowl, beat together the unsalted butter and granulated sugar until light and fluffy. This process is essential for creating a light cupcake. It can take about 3-5 minutes. Pro tip: Use a handheld or stand mixer for the best results!
-
Add the sour cream and vanilla: Mix in the sour cream, vanilla extract, and orange zest until well combined. These ingredients will help create a tender cupcake and infuse it with flavor.
-
Incorporate the egg whites: Add the egg whites in one at a time, mixing just until blended after each addition. Don’t overmix; we want to keep it airy!
-
Combine dry ingredients: In a separate bowl, whisk together the flour, baking powder, and salt. This helps ensure even distribution and prevents clumps.
-
Gradually mix it all: Alternately add the dry ingredients and the freshly squeezed orange juice to the wet mixture. I usually start and end with the dry ingredients. Gently fold everything together with a spatula until just combined. Don’t worry if a few lumps remain!
-
Fold in the tequila: Now comes the fun part! Add in those 2 tablespoons of tequila and gently fold until combined. Trust me; this adds a delicious kick!
-
Fill the cupcake liners: Using an ice cream scoop or a spoon, fill the liners about two-thirds full—this allows room for the cupcakes to rise beautifully.
-
Bake those beauties: Pop them into the preheated oven and bake for 18-20 minutes, or until a toothpick inserted in the center comes out clean. Bake them until they’re just golden on top—this ensures the moistness inside.
-
Cool the cupcakes: Once done, let them cool in the pans for a few minutes, then carefully transfer them to a wire rack to cool completely.
Frosting Time!
-
Beat the butter and shortening: In a large bowl, cream together the salted butter and shortening until light and fluffy. This can take about 3-5 minutes too!
-
Add the confectioners’ sugar: Gradually add in your confectioners’ sugar, mixing on low to prevent a sugary cloud. Once combined, increase to medium speed until smooth and creamy.
-
The flavorings: Combine the tequila, orange zest, and orange juice, and add it to the frosting mixture. Mix until well blended.
-
Adjust consistency: If your frosting is too thick, add a splash more of orange juice. If it seems too thin, adding more powdered sugar should do the trick!
-
Add the grenadine: Finally, fold in those five teaspoons of grenadine for an added swirl of color and flavor. You can also put some in a piping bag for decoration!
-
Decorate your cupcakes: Use a piping bag with a star nozzle to give those cupcakes a beautiful, swirled finish. You can also spread it on with a knife for a rustic look.
Serving Suggestions
Once your gorgeous Tequila Sunrise Cupcakes are iced, it’s time to present them! An ideal way to serve is to place them on a decorative cake stand or platter. This adds that wow factor for guests and elevates the whole dessert experience.
To make it even more festive, garnish each cupcake with a cherry or a quarter slice of orange on top. For an Instagram-worthy touch, you can drizzle more grenadine over the top just before serving. Your guests will love the presentation almost as much as the flavor!
Recipe Variations
Now that you’ve got the classic Tequila Sunrise Cupcakes down, let’s jazz things up with some fun variations! Here are a few ideas:
-
Spicy Twist: Add a pinch of cayenne or chili powder to the batter for a spicy kick! It pairs surprisingly well with the sweetness.
-
Fruit Infusion: Instead of using just orange juice, try mixing in some pineapple or mango juice for a tropical flair!
-
Mini Cupcakes: Got a party? Make these as mini cupcakes for bite-sized treats. Just reduce the baking time to about 10-12 minutes!
-
Vegan Delight: Swap out the eggs for aquafaba, the butter for plant-based alternatives, and use coconut cream for the frosting to make this recipe vegan!
-
Get Creative with Icing: Try a different-flavored frosting, like key lime or coconut. The possibilities are endless!
Chef’s Notes
Baking is all about joy, creativity, and a sprinkle of love. I remember the first time I tried these cupcakes at a summer BBQ; everyone was buzzing over how delightful they were! Over the years, I’ve made tweaks and substitutions depending on my audience and preferences, and that’s the best part about baking—make it your own!
Fun fact: the idea of turning a cocktail into a dessert was a “lightbulb” moment for me, and it inspired several other boozy dessert recipes! Who knew cocktails and cupcakes could get along so well?
FAQs and Troubleshooting
-
What if my cupcakes are too dense?
- This usually happens if overmixed. Always mix until just combined, especially after adding dry ingredients.
-
Can I make these cupcakes ahead of time?
- Absolutely! You can bake them a day or two ahead. Just store them in an airtight container. Frost them the day you plan to serve.
-
Is the alcohol content high?
- Not at all! The alcohol cooks out during baking, leaving just the flavors behind. However, if you prefer, you can eliminate the tequila entirely and still have delicious cupcakes!
-
Can I freeze these cupcakes?
- Yes, you can! Either freeze the unfrosted cupcakes or frost them first. Just wrap tightly and they’ll stay fresh for up to 3 months.
Nutritional Info
Now, let’s break down the nutritional aspects of our delicious Tequila Sunrise Cupcakes. Each cupcake (without frosting) contains approximately:
- Calories: 180-220
- Total Fat: 8g
- Saturated Fat: 4g
- Cholesterol: 40mg
- Sodium: 50mg
- Total Carbohydrates: 30g
- Dietary Fiber: 0g
- Sugars: 15g
- Protein: 2g
Keep in mind that adding the frosting will increase the calorie count, so treat yourself in moderation, or share with friends!
Final Thoughts
Well, friends, that wraps up another exhilarating culinary adventure here at Feastical. I hope you’re as excited to make these Tequila Sunrise Cupcakes as I am to share them with you! They’re not just cupcakes; they’re a celebration in each bite, a memory on your plate, and a treat for the soul.
Remember, every great recipe can be adapted, personalized, and—most importantly—shared with the people you love. So now, go grab those ingredients and get baking! Don’t forget to snap a pic of your creations and tag me so I can see your delicious handiwork. Until next time, happy baking and cheers to your next kitchen adventure!
Print
Tequila Sunrise Cupcakes
- Total Time: 50 minutes
- Yield: 12 servings 1x
- Diet: Vegetarian
Description
Delicious cupcakes infused with orange and tequila flavors, topped with fluffy frosting and garnished with cherries and orange slices.
Ingredients
- 6 tablespoons unsalted butter (room temperature)
- 3/4 cup granulated sugar
- 6 tablespoons sour cream
- 1/4 teaspoon vanilla extract
- 1/2 tablespoon orange zest (finely grated)
- 3 large egg whites
- 1 1/4 cups all-purpose flour
- 2 teaspoons baking powder
- 1/2 teaspoon salt
- 1/4 cup orange juice (freshly squeezed)
- 2 tablespoons tequila
- 3/4 cup salted butter
- 1/2 cup shortening
- 5 cups confectioners’ sugar
- 1 tablespoon tequila (for frosting)
- 1 teaspoon orange zest (finely grated, for frosting)
- 2 teaspoons orange juice (freshly squeezed, for frosting)
- 5 teaspoons grenadine
- 12–14 cherries (optional, for garnish)
- 12–14 quarter slices of orange (optional, for garnish)
Instructions
- Preheat your oven: Set your oven to 350°F (175°C).
- Prep your muffin tins: Line your cupcake pans with paper liners.
- Cream the butter and sugar: In a large bowl, beat together the unsalted butter and granulated sugar until light and fluffy.
- Add the sour cream and vanilla: Mix in the sour cream, vanilla extract, and orange zest until well combined.
- Incorporate the egg whites: Add the egg whites in one at a time, mixing just until blended.
- Combine dry ingredients: In a separate bowl, whisk together the flour, baking powder, and salt.
- Gradually mix it all: Alternately add the dry ingredients and orange juice to the wet mixture.
- Fold in the tequila: Add in the 2 tablespoons of tequila and gently fold until combined.
- Fill the cupcake liners: Fill the liners about two-thirds full.
- Bake those beauties: Bake for 18-20 minutes, until a toothpick comes out clean.
- Cool the cupcakes: Let them cool in the pans for a few minutes, then transfer them to a wire rack.
- Beat the butter and shortening for frosting: In a large bowl, cream together the salted butter and shortening until light and fluffy.
- Add the confectioners’ sugar: Gradually mix in the sugar until smooth and creamy.
- The flavorings: Combine the tequila, orange zest, and orange juice, and add to the frosting mixture.
- Adjust consistency: If too thick, add more orange juice; if too thin, add more powdered sugar.
- Add the grenadine: Fold in the grenadine for color and flavor.
- Decorate your cupcakes: Use a piping bag for decoration.
Notes
For an extra festive touch, garnish each cupcake with a cherry or orange slice. Adjust the sweetness of the frosting by modifying the confectioners’ sugar to your liking.
- Prep Time: 30 minutes
- Cook Time: 20 minutes
- Category: Dessert
- Method: Baking
- Cuisine: Mexican
Nutrition
- Serving Size: 1 cupcake
- Calories: 250
- Sugar: 16g
- Sodium: 200mg
- Fat: 10g
- Saturated Fat: 5g
- Unsaturated Fat: 3g
- Trans Fat: 0g
- Carbohydrates: 35g
- Fiber: 0g
- Protein: 2g
- Cholesterol: 40mg
Keywords: tequila cupcakes, dessert, festive dessert, cupcakes, cocktail-inspired desserts
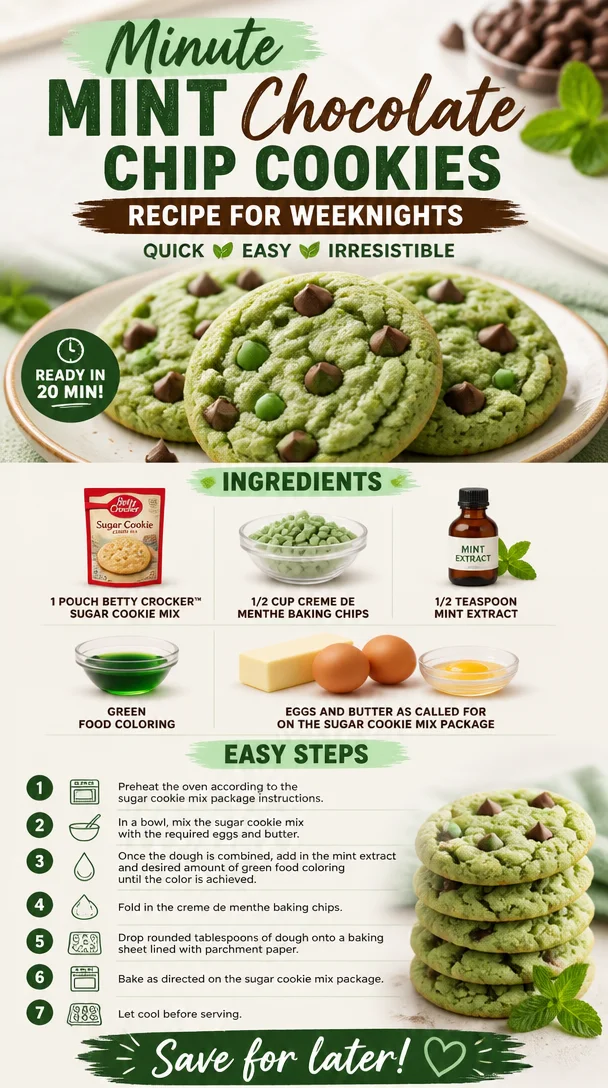
Minute Mint Chocolate Chip Cookies Recipe for Weeknights
Mint Chocolate Chip Cookies: A Sweet Adventure Awaits!
Welcome to Feastical, my culinary playground! Today, we’re diving into the whimsical world of cookies with a delightful twist: Mint Chocolate Chip Cookies. Picture this: chewy and soft sugar cookies bursting with vibrant minty goodness, studded with creamy chocolate morsels that make every bite a celebration. If that doesn’t make your sweet tooth dance, I don’t know what will!
Baking is one of those magical experiences that always brings a smile to my face. These cookies, in particular, have a special place in my heart. They remind me of my childhood kitchen adventures with my mom, where we would create tasty memories that lingered long after the last cookie was devoured. The mint chocolate chip combination becomes an instant classic in my home, and I can’t wait to share this vibrant recipe with you all!
The best part about these cookies is how easy they are to whip up! You’ll be left with a batch of cookies that not only taste amazing but also fill your kitchen with the sweet aroma of mint and chocolate—perfect for any occasion, from holiday parties to cozy nights in. So, preheat your oven, gather your ingredients, and let’s get baking!
A Flavorful Memory
Ah, the nostalgia! I still vividly remember the first time I tasted mint chocolate chip cookies. It was a chilly winter afternoon, and I was at my best friend’s house. Her mom was baking cookies, and the scent wafting through the air was nothing short of heavenly. As soon as those golden delights came out of the oven, I was hooked! The bright green hue and chocolate specks looked enticing, and the first bite sent me straight to dessert heaven.
Baking those cookies with my mom is where my love for the kitchen truly blossomed. We would add a dash of mint extract and sneak in extra chocolate chips when my mom wasn’t looking. Those moments spent mixing and rolling dough created countless memories that shaped my culinary journey. Now, I’m thrilled to bring that experience to you with my Mint Chocolate Chip Cookies!
Ingredients You’ll Need
Before we get into the nitty-gritty of baking, let’s gather the ingredients. Here’s what you’ll need for our minty masterpiece:
-
1 pouch Betty Crocker™ sugar cookie mix
This convenient mix makes for a quick and easy cookie base, offering a soft sweetness. If you’re feeling adventurous, you can switch to homemade sugar cookie dough. Just make sure it has a similar consistency! -
1/2 cup creme de menthe baking chips
These gems give our cookies a deliciously minty flavor that’s both refreshing and indulgent. You can substitute them with chocolate chips or even white chocolate chips if you prefer a creamier flavor. -
1/2 teaspoon mint extract
This ingredient amplifies the minty notes in our cookies. If you’re not a mint fan, feel free to swap this out for vanilla extract for a classic flavor twist. -
Green food coloring
A few drops of this will transform our cookies into a festive treat. You can omit it if you want a more natural look (or if you’re just not feeling the green!). -
Eggs and butter (as directed on the sugar cookie mix package)
These fundamental ingredients bring richness and moisture to the cookies. For a dairy-free version, you can use applesauce instead of butter and egg substitutes like flax eggs.
Step-by-Step Instructions
Alright, it’s time to get our hands a little floury! Follow these step-by-step instructions for Mint Chocolate Chip Cookies that will have everyone asking for your secret recipe.
-
Preheat Your Oven
First things first—preheat your oven to 350°F (175°C). This heat is crucial for achieving that perfectly baked cookie texture. -
Mix the Dry Ingredients
In a large mixing bowl, combine the contents of the sugar cookie mix with the mint extract. This step helps ensure the flavors meld together beautifully. -
Add the Wet Ingredients
Now, it’s time to add the required eggs and softened butter (or your chosen substitutes). Mix everything with a spatula or a hand mixer until combined. Make sure not to overmix—this keeps our cookies nice and tender! -
Get Your Green On
Add a few drops of green food coloring to the mix. Use a spatula or a whisk to evenly distribute the color. Stop when you reach your desired minty hue—bright and cheerful is the aim here! -
Fold in the Chips
Gently fold in the creme de menthe baking chips until they are distributed evenly throughout the dough. This will ensure every bite is packed with minty chocolate goodness. -
Scoop the Dough
Use a cookie scoop or a tablespoon to portion out the dough onto a baking sheet lined with parchment paper. Leave space between the cookies—about 2 inches—as they will spread while baking. -
Bake
Bake in the preheated oven for 10-12 minutes, or until the bottoms are golden brown. You want them to look just set—don’t worry; they’ll firm up as they cool! -
Cool Down
Allow the cookies to cool for a few minutes on the baking sheet before transferring them to a wire rack. This helps them hold their shape perfectly.
Serving Suggestions
Now that your cookies are baked to perfection, let’s talk about how to serve these beauties. You can plate them up simply on a decorative platter, or for a fun twist, stack several cookies with some mint chocolate ice cream in between for an impromptu cookie ice cream sandwich!
For a little extra flair, dust the cookies with powdered sugar or drizzle melted chocolate on top. A sprinkle of crushed mint leaves can add a lovely touch of freshness and color. If you’re serving these for a get-together, consider placing them on a cake stand to elevate your dessert display.
Recipe Variations
Get ready to experiment! Here are some fun twists and variations you can try with the Mint Chocolate Chip Cookies:
-
Double Chocolate Mint Cookies: Add cocoa powder to your sugar cookie mix to make it a double chocolate delight.
-
Mint Oreo Delight: Chop up some mint Oreos and fold them into your cookie dough for a crunchy surprise.
-
Sugar-Free Option: Use a sugar-free sugar cookie mix and sugar-free chocolate chips to create a guilt-free version.
-
Nuts About Mint: Add some crushed walnuts or pecans for an added crunch and flavor contrast.
-
Chocolate Drizzle: Drizzle melted dark chocolate over the cooled cookies for an elegant touch.
Chef’s Notes
These cookies have a special place in my baking repertoire. I remember the first time I tried to bake them for a holiday party—let’s just say I had a small disaster! I accidentally swapped the amounts of butter and sugar and ended up with a gooey mess. But it was a learning moment; I realized how important it is to double-check your measurements.
As I perfected this recipe over the years, I’ve come to appreciate how versatile it is. Whether you enjoy them at Christmas, St. Patrick’s Day, or just because, these cookies are always a hit. Whenever I bake them, I can’t help but smile, remembering those cozy kitchens and fun moments!
FAQs and Troubleshooting
Got questions? I’ve got answers! Here are some common queries you might have about baking Mint Chocolate Chip Cookies:
-
Why are my cookies flat?
This can happen if the dough is too warm or you didn’t use enough flour. Make sure to chill the dough for about 30 minutes before scooping, and check your measurements carefully! -
Can I freeze these cookies?
Absolutely! You can freeze the cookie dough for up to three months. Just scoop them onto a baking sheet, freeze until solid, and store them in an airtight container. Bake from frozen, adding an extra 1-2 minutes to the bake time. -
What if I don’t have mint extract?
If you don’t have mint extract on hand, using vanilla extract will impart a wonderful flavor, though it won’t have that minty kick we love. -
How do I know when the cookies are done?
Look for the edges to be lightly golden while the center appears slightly soft—this is key for that perfect chewy texture!
Nutritional Info
When it comes to enjoying cookies, you might wonder about the nutritional value. Here’s a breakdown per cookie (based on 24 cookies):
- Calories: 120
- Total Fat: 5g
- Saturated Fat: 3g
- Cholesterol: 25mg
- Sodium: 60mg
- Carbohydrates: 18g
- Fiber: 0g
- Sugar: 8g
- Protein: 1g
Keep in mind that these values are approximate and can vary based on portion size and ingredient choices.
Final Thoughts
There you have it—Mint Chocolate Chip Cookies that are sure to bring joy to any occasion! Whether you’re enjoying them solo with a glass of milk or sharing them with friends and family, these cookies are a delightful treat packed with flavor and fond memories.
Let your creativity flow as you explore variations, serving options, and flavors. Every batch is an opportunity for a special moment, a shared smile, or a nostalgic reminder of your culinary adventures. Now go on, unleash your inner cookie artist, and have fun baking up these delightful treats! And, as always, don’t forget to grab a fork (or your favorite mug) to dig in. Happy baking!
Print
Mint Chocolate Chip Cookies
- Total Time: 27 minutes
- Yield: 24 cookies 1x
- Diet: Vegetarian
Description
Delightful and chewy Mint Chocolate Chip Cookies filled with creamy chocolate morsels and refreshing mint flavors.
Ingredients
- 1 pouch Betty Crocker™ sugar cookie mix
- 1/2 cup creme de menthe baking chips
- 1/2 teaspoon mint extract
- Green food coloring
- Eggs and butter (as directed on the sugar cookie mix package)
Instructions
- Preheat your oven to 350°F (175°C).
- Mix the contents of the sugar cookie mix with the mint extract in a large mixing bowl.
- Add the required eggs and softened butter, then mix until combined.
- Get a few drops of green food coloring and add to the mix, then combine.
- Fold in the creme de menthe baking chips gently.
- Scoop the dough onto a baking sheet lined with parchment paper, leaving some space between the cookies.
- Bake for 10-12 minutes until the bottoms are golden brown.
- Cool on the baking sheet for a few minutes before transferring to a wire rack.
Notes
For a fun serving suggestion, stack cookies with mint chocolate ice cream for an ice cream sandwich!
- Prep Time: 15 minutes
- Cook Time: 12 minutes
- Category: Dessert
- Method: Baking
- Cuisine: American
Nutrition
- Serving Size: 1 cookie
- Calories: 120
- Sugar: 8g
- Sodium: 60mg
- Fat: 5g
- Saturated Fat: 3g
- Unsaturated Fat: 2g
- Trans Fat: 0g
- Carbohydrates: 18g
- Fiber: 0g
- Protein: 1g
- Cholesterol: 25mg
Keywords: mint cookies, chocolate chip cookies, dessert, baking, holiday treats

Strawberry Cheesecake Dump Cake Recipe
Strawberry Cheesecake Dump Cake Recipe
Introduction
Hey there, food lovers! It’s your pal Beau Collier, back in the kitchen with another feel-good recipe that’s bound to put a smile on your face and a delicious treat in your belly. Today, we’re diving into the wonderful world of desserts with my crowd-pleasing Strawberry Cheesecake Dump Cake. If you’ve ever found yourself wrestling with multiple bowls, spoons, and flaming hopes for dessert, this recipe is for you.
Imagine a dessert that combines the creamy richness of cheesecake with the sweet bursts of juicy strawberries—all in one easy, breezy baking dish. That’s what this dump cake is all about! I love a good cheesecake, but sometimes the whole process can feel like climbing a culinary mountain. With this recipe, we’re taking the frustration out of dessert preparation, focusing instead on the joy of sharing something sweet with the people we love.
One of the great things about this dump cake is that it captures all the nostalgic vibes of summer picnics and birthday celebrations, without any complicated steps. If you’re confused about what a dump cake is, let me break it down—it’s as simple as dumping all the ingredients into a pan, letting them mingle, and baking them into something truly magical. That’s my kind of kitchen wizardry!
And let’s not forget about the versatility of this dish. Whether you have fresh strawberries from the farmer’s market or frozen ones languishing in your freezer, you can whip up this delight any time of the year. Plus, the ingredients are super simple and easy to find, so get ready to roll up your sleeves and scoop out some yumminess.
Alright, let’s gather our ingredients and get started because this Strawberry Cheesecake Dump Cake is calling your name!
Personal Story
I’ll never forget the summer family barbecues at my grandma’s house growing up. She was quite the chef, and her desserts always stole the show. I can still hear the girls giggling as we waited for her to bring out the desserts, the sweet smell of strawberry pie wafting through the air. But it was her no-fuss dump cakes that got everyone buzzing with anticipation.
One particular summer, she shared her loved strawberry dump cake recipe with me. I remember standing beside her, captivated as she explained how easy it was to mix and match flavors. It was our little secret, and not just because she was a culinary influence; it pretty much symbolized the joy and togetherness that food brings.
Since then, I’ve created my twist on it, incorporating cheesecake flavors while still keeping it effortlessly delicious. Making this dish reminds me of those warm summer afternoons spent laughing and loving. It’s a recipe that evokes deep nostalgia while also being perfect for sharing new memories with friends and family. Now, my goal is to pass this love and laughter along to you, so let’s make some magic in the kitchen!
Ingredients
Here, I’m breaking down the ingredient list for you. Each ingredient plays a significant role, so let’s take a closer look.
-
2 cups fresh strawberries (sliced): Fresh strawberries bring vibrant flavor and natural sweetness to this dessert. If you don’t have fresh strawberries, frozen strawberries work too—just be sure to thaw and drain them before adding.
-
1 (8 oz) package cream cheese (softened): This is where we get that creamy cheesecake flavor. Low-fat cream cheese works well too. If you’re going dairy-free, try using a vegan cream cheese alternative!
-
1 cup granulated sugar: This sweetens the cream cheese mixture just right. If you’re looking for a healthier option, coconut sugar can be a great substitute.
-
1 teaspoon vanilla extract: This adds depth of flavor and enhances the sweetness of the strawberries. Feel free to use pure vanilla to make it even better!
-
1 box yellow cake mix: The backbone of our dump cake. You can easily swap this out for a gluten-free cake mix without losing that yummy flavor.
-
1/2 cup unsalted butter (melted): This adds richness to the cake mix. If you’re looking for a dairy-free alternative, coconut oil works beautifully!
-
1 cup milk: This gives moisture to the batter. Almond milk or oat milk are excellent substitutes for a dairy-free version.
-
1/2 teaspoon salt: Balances out the sweetness from the sugar and enhances the overall flavor.
-
Powdered sugar (for dusting, optional): This is the delightful finishing touch if you want to add some visual flair.
Step-by-Step Instructions
Now comes the fun part—baking! Follow these steps, and you’ll have a mouthwatering Strawberry Cheesecake Dump Cake ready to serve in no time.
-
Preheat your oven: First things first, preheat your oven to 350°F (175°C). This ensures the cake bakes evenly and gives you that perfect golden color.
-
Prepare your baking dish: Grab a 9×13 inch baking dish and grease it lightly with some butter or cooking spray. This will prevent any sticky situations later on.
-
Slice the strawberries: If you’re using fresh strawberries, wash and slice them. If you’re using frozen, remember to thaw them and discard any excess liquid. Evenly distribute the sliced strawberries across the bottom of your prepared baking dish.
-
Mix that cream cheese: In a mixing bowl, beat the softened cream cheese until it’s smooth and creamy. Add in the granulated sugar and vanilla extract, mixing until all the ingredients are well incorporated. This sweet, creamy layer is going to be the star of our dessert!
-
Spread the cream cheese mixture: Once it’s mixed well, spread the cream cheese mixture evenly over the fresh strawberry layer in your baking dish. Don’t fret if it’s not perfect; it’ll spread and blend as it bakes.
-
Combine cake mix and butter: In another bowl, pour in the yellow cake mix and melted butter. Mix until you get crumbly, coarse crumbs. This is where the magic starts; those crumbles will create a lovely topping.
-
Sprinkle the cake mix topping: Evenly sprinkle the buttery cake mix over the cream cheese layer. It doesn’t have to be meticulous—just ensure it covers it nicely. You want it to be rustic and cozy!
-
Pour the milk: Now pour the cup of milk evenly over the topping. This is what keeps everything moist and delicious. You might notice some liquid pooling; that’s okay—the oven will work its magic.
-
Bake your cake: Pop that glorious creation in the oven and bake for 45-50 minutes. You want the top to be golden and crisping nicely, and this will fill your kitchen with the most incredible aroma!
-
Cool and serve: Once it’s out of the oven, let it cool for about 10-15 minutes before serving. You can dust the top with powdered sugar, but that’s totally optional. Dive in warm with maybe a scoop of ice cream on the side, and I promise, you won’t regret it!
Serving Suggestions
Plating this beauty is all about making it look as delightful as it tastes. Here’s how I like to serve the Strawberry Cheesecake Dump Cake:
-
Individual servings: Use a scoop or spoon to serve portions onto dessert plates or bowls. For a fun touch, top with whipped cream or a generous scoop of vanilla ice cream!
-
Garnish with fresh strawberries: Add a few fresh slices (or whole strawberries) on top for that extra pop of color.
-
Dust with powdered sugar: A light sprinkle of powdered sugar adds the perfect finishing touch and gives a café-like vibe to your presentation.
-
Pair with drinks: Serve it alongside a refreshing glass of lemonade, sweet tea, or even a cup of coffee to balance the sweetness. Perfect for entertaining or enjoying a cozy evening at home!
Recipe Variations
The beauty of a dump cake is that it’s super versatile. Here are a few creative twists you can try:
-
Berry mix: Swap out the strawberries for a mix of berries like blueberries, raspberries, or blackberries for a colorful berry medley dumping flavor.
-
Nutty crunch: Add chopped nuts like pecans or almonds into the cake mix topping before baking for a delightful crunchy texture.
-
Chocolate lovers: For a chocolatier version, incorporate chocolate chips into the cream cheese layer, or substitute chocolate cake mix for the yellow cake mix.
-
Coconut twist: Stir in unsweetened shredded coconut into the cake mix for an island flair. Topped with toasted coconut, it’ll feel like a tropical getaway.
-
Banana cheesecake dump cake: Layer sliced bananas along with the strawberries for a unique banana-strawberry combo! Super smooth and creamy, it’ll take comfort food to another level.
Chef’s Notes
This recipe has certainly evolved over time. I used to make it using lots of heavy ingredients and complicated techniques, but I realized that the magic is in keeping it simple and creative. One of my favorite kitchen stories is about the first time I decided to make this for a gathering. I was a little nervous since baking isn’t normally my forte, but when I pulled it out of the oven and saw my friends devouring it, I knew I had struck gold.
Now, I whip this up whenever there’s an occasion, a gathering, or just a Tuesday that feels too ordinary. It’s become a staple in my recipe repertoire, always reminding me of family gatherings filled with laughter and love.
FAQs and Troubleshooting
-
What if my dump cake is soggy?: Ensure you didn’t add too much liquid accidentally. If it’s soggy after baking, let it cool completely; it may set up as it cools.
-
Can I make this ahead of time?: Absolutely! You can prep the ingredients and store them separately in the fridge one day ahead of time. Just assemble and bake when you’re ready.
-
What if I can’t find cream cheese?: You can substitute with mascarpone for a creamier texture or even a vegan cream alternative if you’re looking for a dairy-free option.
-
Can I double the recipe?: Sure thing! Just use a bigger baking dish, and you may need to add a few minutes to the baking time.
Nutritional Info
While I don’t focus too much on nutrition when baking (because, let’s be real, dessert is meant to be indulgent), here’s a breakdown. This Strawberry Cheesecake Dump Cake yields around 12 servings:
- Calories per serving: Approximately 275 calories
- Total Fat: 13g
- Saturated Fat: 7g
- Cholesterol: 40mg
- Sodium: 210mg
- Total Carbohydrates: 40g
- Dietary Fiber: 1g
- Sugars: 25g
- Protein: 2g
Final Thoughts
There you have it, folks—my go-to Strawberry Cheesecake Dump Cake recipe is a culinary hug that everyone is sure to love! It’s simple, satisfying, and a guaranteed way to bring sweetness into your day or night.
So gather your ingredients, invite your friends or family, and create some happy memories over this delicious dessert! Remember, cooking is all about joy, so don’t stress—just enjoy the experience! I’d love to hear how yours turns out and any fun twists you try—drop a comment or send me a message! Until next time, happy cooking, lovelies! 🍓❤️
Print
Strawberry Cheesecake Dump Cake
- Total Time: 60 minutes
- Yield: 12 servings 1x
- Diet: Vegetarian
Description
A simple and delicious dessert that combines the creamy richness of cheesecake with fresh strawberries, all in one easy dump cake.
Ingredients
- 2 cups fresh strawberries (sliced)
- 1 (8 oz) package cream cheese (softened)
- 1 cup granulated sugar
- 1 teaspoon vanilla extract
- 1 box yellow cake mix
- 1/2 cup unsalted butter (melted)
- 1 cup milk
- 1/2 teaspoon salt
- Powdered sugar (for dusting, optional)
Instructions
- Preheat your oven to 350°F (175°C).
- Prepare a 9×13 inch baking dish and grease it lightly.
- Slice the strawberries and evenly distribute them across the bottom of the dish.
- Mix cream cheese in a bowl until smooth; add sugar and vanilla extract, mixing until well incorporated.
- Spread the cream cheese mixture over the strawberry layer.
- Combine yellow cake mix and melted butter until crumbly.
- Sprinkle the cake mix topping over the cream cheese layer.
- Pour milk evenly over the topping.
- Bake for 45-50 minutes until golden and crisp.
- Cool for 10-15 minutes before serving. Dust with powdered sugar if desired.
Notes
Serve warm with whipped cream or vanilla ice cream. This dessert can be made ahead of time by prepping ingredients separately.
- Prep Time: 15 minutes
- Cook Time: 45 minutes
- Category: Dessert
- Method: Baking
- Cuisine: American
Nutrition
- Serving Size: 1 serving
- Calories: 275
- Sugar: 25g
- Sodium: 210mg
- Fat: 13g
- Saturated Fat: 7g
- Unsaturated Fat: 6g
- Trans Fat: 0g
- Carbohydrates: 40g
- Fiber: 1g
- Protein: 2g
- Cholesterol: 40mg
Keywords: Dump Cake, Strawberry, Cheesecake, Dessert, Easy Recipe

Coconut Cloud Cake: 5-Ingredient Fluffy Dessert Recipe
Coconut Cloud Cake Recipe: A Slice of Paradise
Hey there, food lovers! It’s Beau Collier here, and today we’re diving into the delightful world of coconut treats with a recipe that’s sure to make your taste buds do the happy dance: our Coconut Cloud Cake! This cake is not just a dessert; it’s an experience—a slice of fluffy, cloud-like bliss that brings warmth and joy wherever it’s shared.
Picture this: It’s a sunny Sunday afternoon, and I’m in the kitchen with a mix of excitement and nostalgia. The aroma of coconut, sugar, and vanilla fills the air, transporting me back to my childhood, where every family gathering was incomplete without a coconut cake on the table. My grandma, with her flowered apron and infectious laughter, would whip up her famous coconut cake, slathered in creamy frosting and topped with a generous sprinkle of toasted coconut. It was a ritual, a bonding moment we all cherished.
Those sunny afternoons shaped my love for baking, especially when it came to coconut. The texture, the flavor, and the sheer joy of creating and sharing something delicious—it’s all wrapped up in this cake. It’s a recipe that not only fills your belly but also your heart. So, are you ready to create some sweet memories in your kitchen? Let’s get started!
Personal Story
Growing up in a small town, we didn’t have fancy restaurants or trendy desserts, but what we lacked in variety, we made up for in family traditions—and coconut cake was at the top of that list! Every spring, as the flowers bloomed and cheer filled the air, my grandma would pull out her mixer and baking pans, announcing it was time for her legendary Coconut Cloud Cake.
I can still hear her humming old tunes as she worked her magic. The thrill of waiting for the cake to come out of the oven was almost unbearable. "Patience, Beau," she would chuckle. "Good things come to those who wait." And oh, how I waited! When that gorgeous, fluffy cake finally emerged, it was my job to help her layer on the frosting and sprinkle the coconut on top. Each bite was like a delicious hug, and today, I want to pass that embrace on to you through this recipe. Let’s create our own sweet memories!
Ingredients
Here’s what you’ll need to create your Coconut Cloud Cake:
For the Cake:
-
2 1/2 cups all-purpose flour
This is the backbone of our cake, providing structure. For a gluten-free version, substitute with a 1:1 gluten-free flour blend. -
2 1/2 teaspoons baking powder
This helps our cake rise! Make sure it’s fresh for the best results—old baking powder can leave you flat. -
1/2 teaspoon salt
A pinch of salt enhances the flavor. Don’t skip it! -
1 cup unsalted butter, softened
The star of the show! Butter adds richness. If you’re in a pinch, you can substitute with coconut oil for a dairy-free twist. -
2 cups granulated sugar
Sugar not only sweetens but also helps to create that fluffy texture. You could use coconut sugar for a less processed option. -
4 large eggs, room temperature
Eggs bind everything together and help lift the cake. Room temperature eggs blend more easily into the batter. -
1 teaspoon vanilla extract
Adds depth of flavor. Feel free to use a quality brand or homemade vanilla extract for a personal touch. -
1 teaspoon coconut extract
This is where the magic happens! It intensifies that heavenly coconut flavor. -
1 cup coconut milk
Adds moisture and richness. For a lighter version, you can use almond milk or even oat milk if you’re avoiding dairy.
For the Frosting:
-
1 1/2 cups heavy whipping cream
We’re going for a luscious frosting here, and heavy cream is essential. If you need a lighter option, you could use whipped topping. -
8 oz cream cheese, softened
Cream cheese gives that perfect tang to balance the sweetness. For dairy-free, try using a vegan cream cheese. -
1/2 cup powdered sugar
This helps sweeten the frosting and give it that soft finish. Sift for a smooth texture. -
1 teaspoon vanilla extract
You know the drill! It enhances the overall flavor. -
1 teaspoon coconut extract
More coconut goodness? Yes, please!
For the Topping:
- 1 cup sweetened shredded coconut (toasted or fresh)
This adds that beautiful texture and flavor to finish your creation. Toasted coconut gives a lovely crunch and a deeper flavor.
Step-by-Step Instructions
Let’s get down to business and cook up this magic!
-
Preheat Your Oven
Start by preheating your oven to 350°F (175°C). Trust me, you want your oven nice and hot when the cake batter is ready! -
Prepare Your Baking Pans
Grease and flour two 9-inch round cake pans. You can also line them with parchment paper for easier removal later. No one likes a cake that sticks! -
Mix the Dry Ingredients
In a bowl, whisk together the flour, baking powder, and salt. This helps distribute the leavening agents evenly throughout the flour. Set aside for now! -
Cream the Butter and Sugar
In a large mixing bowl, beat the softened butter and granulated sugar together until light and fluffy—about 3-5 minutes. This step is crucial for a nice texture, so don’t rush it. -
Add the Eggs
Gradually add the eggs, one at a time, mixing well after each addition. This helps to incorporate air into the batter, making it fluffier. Add the vanilla and coconut extracts, and mix until just combined. -
Combine Wet and Dry Ingredients
Alternately add the dry flour mixture and coconut milk to the butter mixture, starting and ending with the flour. Mix until just blended to avoid over-mixing, which can lead to a dense cake. -
Bake the Cakes
Divide the batter evenly between the prepared pans. Bake in the preheated oven for 25-30 minutes or until a toothpick inserted in the center comes out clean. Your kitchen should smell amazing right about now! -
Cool the Cakes
Once baked, let the cakes cool in the pans for about 10 minutes, then transfer them to a wire rack to cool completely. Cooling is key; you want fluffy frosting, not a melted mess! -
Frost the Cake
While your cakes are cooling, let’s whip up that frosting! Beat the heavy cream until it forms stiff peaks. In another bowl, combine the softened cream cheese and powdered sugar until smooth. Fold in the whipped cream gently until all is well combined. -
Assemble the Cake
Once the cakes are completely cool, it’s time to put them together. Place one cake layer on a serving plate, spread a generous amount of frosting on top, then add the second layer. Frost the top and sides of the whole cake. Don’t be shy—go for it! -
Top with Coconut
Finally, sprinkle the sweetened shredded coconut over the top. You can toast the coconut beforehand in a skillet over medium heat for a few minutes until golden, adding an extra layer of deliciousness.
Serving Suggestions
Now that your Coconut Cloud Cake looks absolutely stunning, it’s time to serve it up! Slice pieces generously and pair them with a scoop of vanilla ice cream for an extra indulgent treat. Drizzle with a bit of warm coconut milk or a light fruit compote to elevate the experience.
If you’re feeling fancy, top each slice with a maraschino cherry or a sprinkle of dark chocolate shavings—trust me, it makes a visually captivating difference! For gatherings, consider serving on a beautiful cake stand with fresh tropical fruits like mango or pineapple surrounding it. Your cake will be the life of the party!
Recipe Variations
Here are a few fun twists on the classic Coconut Cloud Cake:
-
Lemon-Coconut Cake
Add the zest of one lemon to the batter for a zesty zing. Lemon pairs beautifully with coconut! -
Chocolate-Coconut Cake
Swap out a cup of flour with cocoa powder for a rich chocolate variant. You could also swirl some melted chocolate into the batter for an extra treat. -
Pineapple Coconut Cake
Add crushed pineapple (drained) to the batter for an island-inspired delight. It adds moisture and a lovely flavor. -
Nutty Coconut Cake
Incorporate chopped macadamia nuts or almonds into the batter for extra crunch. Just be sure to account for the added mass in the wet ingredients. -
Vegan Coconut Cake
Substitute with almond milk, coconut oil, and a flaxseed mixture instead of eggs for a plant-based version without sacrificing flavor.
Chef’s Notes
Over the years, I have played around with this recipe, adding my little twists and personal touches. I remember the time I accidentally forgot to add the eggs; the cake turned out denser but still delicious! It’s amazing how a little mistake can lead to a new favorite recipe. Each version tells a story, and that’s the beauty of cooking—embracing the imperfections and celebrating each creation.
Cooking is like writing a story; each ingredient and step is a word or sentence that brings everything together. And remember, the best moments often come from experimentation and a sprinkle of love!
FAQs and Troubleshooting
1. My cake didn’t rise! What went wrong?
This can happen if your baking powder is old or if the batter was over-mixed. Always check the freshness of your leavening agents.
2. My frosting is too runny. What should I do?
Ensure the heavy cream is very cold when whipping, and that the cream cheese is fully softened. If it’s too soft, you can add more powdered sugar to thicken it.
3. How do I store leftovers?
Keep the cake in an airtight container in the refrigerator for up to a week. If you want to freeze it, wrap slices well in plastic wrap and foil.
4. Can I make this cake ahead of time?
Absolutely! You can bake the cakes a day in advance, cool them, and wrap them tightly. Frost just before serving for the freshest taste!
Nutritional Info
Each slice of Coconut Cloud Cake comes with a delightful burst of flavor! Here’s a rough estimate of nutritional information per serving (1 slice, assuming 12 servings):
- Calories: 420
- Total Fat: 28g
- Saturated Fat: 17g
- Cholesterol: 90mg
- Sodium: 180mg
- Total Carbohydrates: 43g
- Dietary Fiber: 1g
- Sugars: 24g
- Protein: 4g
Note: Nutritional content may vary based on ingredient substitutions and serving sizes.
Final Thoughts
And there you have it—your very own Coconut Cloud Cake that is not just a treat, but a heartfelt slice of joy. I hope this recipe brings as much warmth and happiness to your kitchen as it has to mine. So, next time you’re looking for a dessert that feels like a big, comforting hug, remember this Coconut Cloud Cake.
Embrace the process, share it with friends and family, and create some sweet memories together! If you try this recipe, I’d love to hear about your experiences, variations, or favorite moments in the kitchen. So grab that fork and dig in—let’s celebrate the magic of food together!
Stay delicious, and until next time, keep cooking with love!
Now, don’t forget to check out more on Feastical for tips, hacks, and other awesome recipes that will keep your culinary passions alive! Happy baking!
Print
Coconut Cloud Cake
- Total Time: 1 hour
- Yield: 12 servings 1x
- Diet: Vegetarian
Description
A fluffy, cloud-like coconut cake that brings warmth and joy, perfect for any gathering.
Ingredients
- 2 1/2 cups all-purpose flour
- 2 1/2 teaspoons baking powder
- 1/2 teaspoon salt
- 1 cup unsalted butter, softened
- 2 cups granulated sugar
- 4 large eggs, room temperature
- 1 teaspoon vanilla extract
- 1 teaspoon coconut extract
- 1 cup coconut milk
- 1 1/2 cups heavy whipping cream
- 8 oz cream cheese, softened
- 1/2 cup powdered sugar
- 1 teaspoon vanilla extract (for frosting)
- 1 teaspoon coconut extract (for frosting)
- 1 cup sweetened shredded coconut (toasted or fresh)
Instructions
- Preheat your oven to 350°F (175°C).
- Prepare two 9-inch round cake pans by greasing and flouring them.
- Mix the flour, baking powder, and salt in a bowl, then set aside.
- Cream the butter and granulated sugar together until light and fluffy.
- Add the eggs one at a time, mixing well after each addition. Mix in the vanilla and coconut extracts.
- Combine the dry ingredients and coconut milk alternately into the butter mixture.
- Bake in the preheated oven for 25-30 minutes or until a toothpick comes out clean.
- Cool the cakes in the pans for 10 minutes, then transfer to a wire rack.
- Frost the cake by beating the heavy cream until stiff peaks form and combining with softened cream cheese and powdered sugar.
- Assemble the cake by layering and frosting between the cooled cake layers.
- Top with sweetened shredded coconut.
Notes
For variations, try adding lemon zest or incorporating chocolate or pineapple into the batter.
- Prep Time: 30 minutes
- Cook Time: 30 minutes
- Category: Dessert
- Method: Baking
- Cuisine: American
Nutrition
- Serving Size: 1 slice
- Calories: 420
- Sugar: 24g
- Sodium: 180mg
- Fat: 28g
- Saturated Fat: 17g
- Unsaturated Fat: 9g
- Trans Fat: 0g
- Carbohydrates: 43g
- Fiber: 1g
- Protein: 4g
- Cholesterol: 90mg
Keywords: coconut, cake, dessert, baking, fluffy
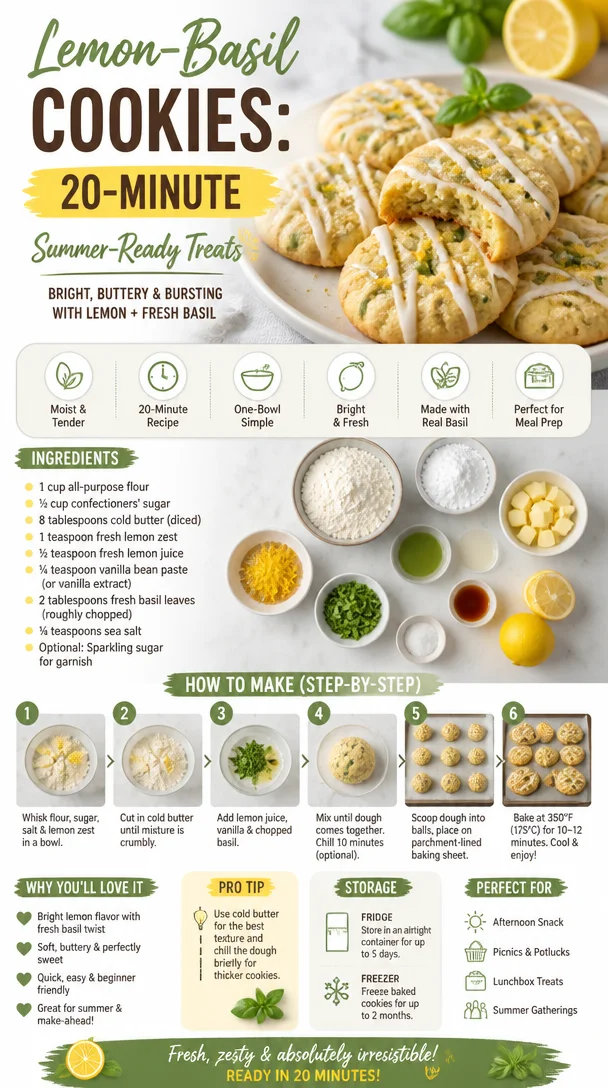
Lemon-Basil Cookies: 20-Minute Summer-Ready Treats
Lemon-Basil Cookies: A Refreshing Twist on a Classic Treat
Hey there, food lovers! I’m Beau Collier, your guide to all things delicious here at Feastical. Today, I’ve got something super special that’s perfect for any occasion—Lemon-Basil Cookies! Trust me, these cookies are a delightful mix of sweet and zesty, with a hint of herbaceous goodness from fresh basil. They’re not just your average cookie; they bring a bright twist to the traditional cookie lineup. Are you ready to dive into a recipe that’s sure to impress your friends and family? Grab your apron and let’s get started!
The Nostalgic Taste of Summer
Let me take you back a few summers ago when I first discovered the magical combination of lemon and basil. I was wandering through a local farmer’s market, soaking up the sun, when I stumbled upon a stall selling homemade cookies. The baker was sharing samples, and I was immediately hooked. One bite of their lemon-basil cookie transported me to a sun-drenched Italian kitchen where the aroma of fresh basil and lemons danced in the air. It was a match made in heaven!
That day sparked my passion for experimenting with flavors in the kitchen. I rushed home, determined to recreate that enchanting cookie. After a bit of trial and error (and a few too many taste tests), I finally settled on a recipe that had a delightful balance of sweetness and herbiness. Now, each time I whip up these cookies, I’m reminded of that sunny day and the creative spark it ignited in me. Let’s make some memories in your kitchen with these Lemon-Basil Cookies!
Ingredients You’ll Need
Before we dive into the mixing bowl, let’s gather our ingredients. Here’s your shopping list, along with some handy tips and substitutions:
-
1 cup all-purpose flour: This is the base for your cookies. You can substitute it with gluten-free flour if you’re looking to cut gluten.
-
½ cup confectioners’ sugar: The secret to that melt-in-your-mouth texture. If you don’t have confectioners’ sugar, you can blend regular sugar in a blender until fine.
-
8 tablespoons cold butter (diced): Butter adds richness. Ensure it’s cold for flakier cookies. For a dairy-free option, try using vegan butter or coconut oil.
-
1 teaspoon fresh lemon zest: This adds vibrant citrus notes. Always zest before juicing—it’s easier, and you won’t waste any fruit!
-
½ teaspoon fresh lemon juice: Brightens the flavor profile. Fresh is essential here; bottled lemon juice just doesn’t cut it.
-
¼ teaspoon vanilla bean paste (or vanilla extract): Vanilla enhances the overall flavor. If you only have extract, that’ll work fine too.
-
2 tablespoons fresh basil leaves (roughly chopped): The star ingredient! Use whole or torn leaves for a more rustic look. You can substitute with mint if you’re feeling adventurous.
-
¼ teaspoon sea salt: Elevates the flavors. If you’re using salted butter, you can skip this ingredient.
-
Optional: Sparkling sugar for garnish: Adds a delightful crunch and sparkle on top. If you don’t have it, granulated sugar works too!
Step-by-Step Instructions
Alright, here we go! Grab your mixing bowls, and let’s get baking.
-
Preheat the Oven: Begin by preheating your oven to 350°F (175°C). This ensures that your cookies bake evenly. Pro tip: If your oven tends to run hot, don’t hesitate to invest in an oven thermometer!
-
Combine Dry Ingredients: In a mixing bowl, whisk together the flour, confectioners’ sugar, and sea salt until well combined. This helps to evenly distribute the salt and sugar throughout the flour. No one wants a salted bite!
-
Add the Butter: Toss in the diced cold butter. Using your fingers or a pastry cutter, blend the butter into the flour mixture until it resembles coarse crumbs. This step is crucial; the cold butter is what gives your cookies that lovely tender texture.
-
Mix in the Flavorings: In a separate bowl, combine the lemon zest, lemon juice, vanilla paste, and chopped basil. Make sure to mix well—this magic blend is what really makes these cookies sing with flavor!
-
Combine Wet and Dry Ingredients: Gently pour the wet mixture into the dry ingredients. Stir until just combined. Don’t overmix; you want those cookies to stay wonderfully tender! A few floury patches are okay.
-
Shape the Cookies: Using a tablespoon, scoop out dough and roll it into balls. Place them on a baking sheet lined with parchment paper about 2 inches apart. They’ll spread a bit while baking.
-
Add the Sparkling Sugar: If you’re feeling fancy, sprinkle some sparkling sugar on top of each cookie. This adds a lovely crunch and shimmer that’s totally Instagram-worthy!
-
Bake: Pop the sheet in the preheated oven and bake for 12-15 minutes, or until the edges are lightly golden. Keep an eye on them—to achieve that perfect balance of chewy and crisp, you want them just set.
-
Cool: Once baked, remove from the oven and let the cookies cool on the baking sheet for a few minutes before transferring them to a wire rack. This helps them firm up and makes them easier to move without breaking.
-
Enjoy!: Once cooled, grab yourself a cup of tea or coffee (perhaps a glass of lemonade if you’re feeling extra zesty!) and enjoy these delightful cookies.
Serving Suggestions
When it comes to serving your Lemon-Basil Cookies, presentation is key! You can stack them on a beautiful plate to showcase their golden edges and vibrant green flecks of basil. Dust with a bit more confectioners’ sugar for that bakery feel. These cookies are fantastic alongside a refreshing glass of iced lemon tea or a chilled glass of prosecco for a summer soirée. If you’re serving them at a gathering, consider pairing them with a fresh fruit platter or a light salad to balance the flavors.
Recipe Variations
Now, let’s get creative! Here are a few delicious variations to try out:
-
Lemon-Basil Poppy Seed Cookies: Add a tablespoon of poppy seeds for a delightful crunch and a nutty flavor.
-
Lemon-Lavender Cookies: Swap out basil for culinary lavender for a fragrant twist that gives your cookies a flowery essence.
-
Lemon-Basil Shortbread Bars: Press the dough into a greased baking pan and bake as bars. Cut into squares for easy serving!
-
Chill for a Citrus Twist: For a refreshing twist, chill the cookie dough for an hour before baking. This helps with texture and intensifies the flavors!
-
Gluten-Free Option: Use a certified gluten-free flour blend to make these cookies gluten-free. They will still taste fabulous!
Chef’s Notes
As with any recipe, these Lemon-Basil Cookies have seen their fair share of tweaks and adaptations over the years. I remember baking these for the first time with my niece, who was only seven at the time. We had the most grand time making a mess—instead of zesting lemons, she promptly filled the bowl with basil leaves! We ended up with a very herb-friendly take on the cookies, proving that sometimes the best recipes come from accidental "kitchen catastrophes”!
FAQs and Troubleshooting
Here are a few common questions I often get about these cookies, along with some troubleshooting tips:
1. My cookies turned out too flat; what went wrong?
It sounds like your butter may have been too warm, or the dough wasn’t chilled. Make sure to use cold butter and let the dough chill in the fridge to firm it up before baking.
2. How do I know when the cookies are done?
Look for those golden edges! They might feel a bit soft at the center, but they will finish cooking as they cool on the baking sheet.
3. Can I freeze these cookies?
Absolutely! Once cool, place cookies in an airtight container. They’ll stay fresh in the freezer for up to three months. Just thaw them at room temperature before serving.
4. What if I don’t have fresh basil?
Fresh herbs make a big difference, but if you can’t find any, you could use a teaspoon of dried basil in a pinch. Just remember that dried herbs are more concentrated, so a little goes a long way!
Nutritional Information
Curious about the nutrition? Here’s a rough breakdown for one cookie (based on making about 12 cookies):
- Calories: 130
- Total Fat: 8g
- Saturated Fat: 5g
- Carbohydrates: 14g
- Sugars: 6g
- Protein: 1g
Of course, nutritional values can vary based on your ingredients and serving sizes, so be sure to adjust as needed!
Final Thoughts
And there you have it! Your very own batch of Lemon-Basil Cookies that brings a bit of sunshine to your kitchen. Whether you enjoy them fresh out of the oven or paired with tea on a rainy afternoon, these cookies are sure to become a favorite. Remember, cooking is all about experimenting and having fun, so don’t hesitate to make this recipe your own.
Get ready to share these zesty treats with the world, and don’t forget to leave a comment about your kitchen adventures with these cookies. Happy baking, and I can’t wait to share more yummy recipes with you soon! So, are you ready to take a bite of summer? Let’s bake!
PrintLemon-Basil Cookies
- Total Time: 30 minutes
- Yield: 12 cookies 1x
- Diet: Vegetarian
Description
A delightful mix of sweet and zesty cookies with a hint of fresh basil, perfect for any occasion.
Ingredients
- 1 cup all-purpose flour
- ½ cup confectioners’ sugar
- 8 tablespoons cold butter (diced)
- 1 teaspoon fresh lemon zest
- ½ teaspoon fresh lemon juice
- ¼ teaspoon vanilla bean paste (or vanilla extract)
- 2 tablespoons fresh basil leaves (roughly chopped)
- ¼ teaspoon sea salt
- Optional: Sparkling sugar for garnish
Instructions
- Preheat the oven: Begin by preheating your oven to 350°F (175°C).
- Combine dry ingredients: In a mixing bowl, whisk together the flour, confectioners’ sugar, and sea salt until well combined.
- Add the butter: Toss in the diced cold butter and blend until it resembles coarse crumbs.
- Mix in the flavorings: In a separate bowl, combine the lemon zest, lemon juice, vanilla paste, and chopped basil.
- Combine wet and dry ingredients: Gently pour the wet mixture into the dry ingredients and stir until just combined.
- Shape the cookies: Using a tablespoon, scoop out the dough and roll it into balls, placing them on a baking sheet lined with parchment paper.
- Add the sparkling sugar: Sprinkle some sparkling sugar on top of each cookie if desired.
- Bake: Bake for 12-15 minutes, or until the edges are lightly golden.
- Cool: Let the cookies cool on the baking sheet for a few minutes before transferring to a wire rack.
- Enjoy: Serve with tea or lemonade.
Notes
These cookies are fantastic alongside iced lemon tea or prosecco. Store in an airtight container for freshness.
- Prep Time: 15 minutes
- Cook Time: 15 minutes
- Category: Dessert
- Method: Baking
- Cuisine: Italian
Nutrition
- Serving Size: 1 cookie
- Calories: 130
- Sugar: 6g
- Sodium: 100mg
- Fat: 8g
- Saturated Fat: 5g
- Unsaturated Fat: 3g
- Trans Fat: 0g
- Carbohydrates: 14g
- Fiber: 0g
- Protein: 1g
- Cholesterol: 20mg
Keywords: cookies, lemon, basil, dessert, summer treats
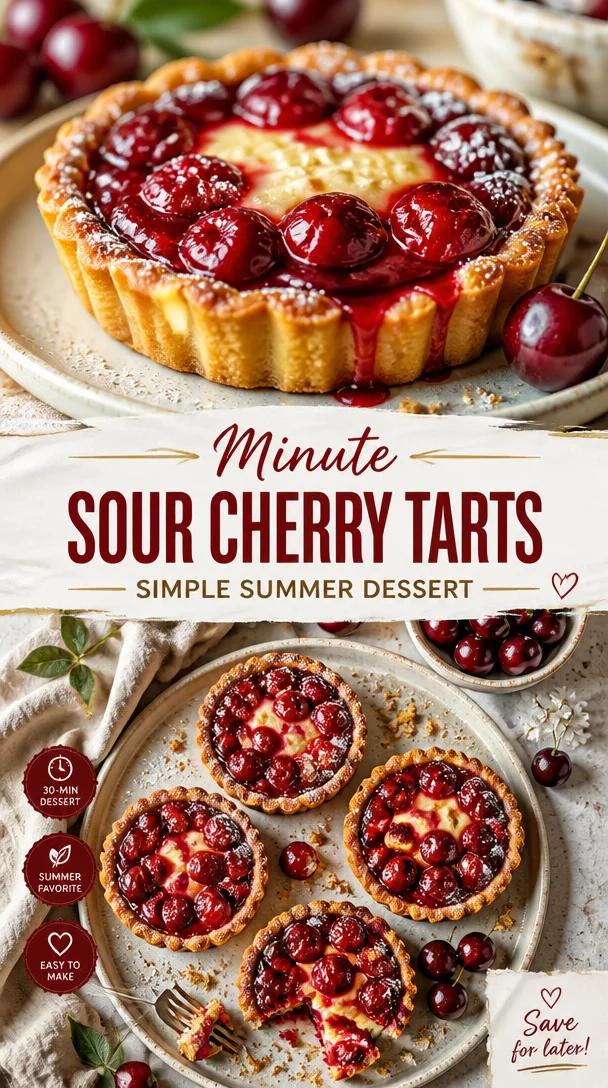
Minute Sour Cherry Tarts: Simple Summer Dessert
Easy Sour Cherry Tarts: A Sweet Treat with a Tart Twist!
Hey there, fellow food lovers! Today, I’m feeling a bit nostalgic as I share a delightful recipe that warms my heart and brings back some of my fondest memories: Easy Sour Cherry Tarts. Picture this: sun-drenched orchards, the sweet-and-sour aroma of cherries wafting through the air, and laughter filling the kitchen as family members gather to whip up something delicious. That’s the magic of cherries—sweet on some days and a tad tart on others, just like life!
In my world, sour cherries are underrated gems that deserve a spotlight. These vibrant little fruits are perfect for desserts that strike a balance between sweet indulgence and zesty freshness. Whether it’s a casual get-together or a fancy dinner party, these Easy Sour Cherry Tarts will have everyone asking for seconds (and maybe even thirds)! So, put on your apron, roll up your sleeves, and let’s embark on this cherry adventure together!
A Cherry Memory
Let me take you back to a summer long ago, back when my grandmother had an expansive cherry tree in her backyard. Those arms of green would be filled to the brim with the brightest, juiciest sour cherries you could imagine. The air would buzz with excitement as my cousins and I would have friendly cherry-picking contests, trying to outdo each other on who could gather the most. Sun-soaked faces, sticky fingers, and the joy of biting into a fresh cherry was always the best part of summer.
After our cherry-picking escapades, Grandma would lead us back into her cozy kitchen, where the delightful aroma of baked goods was a constant invitation. Together, we would mix, stir, and bake, turning those tart gems into the most scrumptious pies and tarts. I can still hear Grandma’s laughter as she caught us sneaking a few cherries to munch on while we worked. Those Easy Sour Cherry Tarts were the highlight of our family gatherings, and now, they’re a cherished tradition that I love sharing with you all!
Ingredients for Easy Sour Cherry Tarts
Here’s what you’ll need to make these delightful tarts:
- 6 cups pitted sour cherries: Fresh, frozen, or canned—just make sure they’re pitted! If you’re using frozen cherries, there’s no need to thaw them; they’ll cook down beautifully.
- 2 cups white sugar: Essential for balancing the tartness of the cherries! You can adjust this based on your sweetness preference or swap it out for brown sugar for a deeper flavor.
- 1 heaping tbsp cornstarch: This is our thickening agent! It helps the cherry filling hold together nicely. If you don’t have cornstarch, you can use arrowroot or all-purpose flour, but you may need to adjust the quantity.
- 2-3 tbsp water: Helps create the syrupy mixture with sugar and cherries. Use as needed to achieve the right consistency.
- 1 package pastry tart shells (approximately 30 in a package): Store-bought or homemade—save time with pre-made shells or impress your friends with a homemade version!
- Whipped cream to garnish: The perfect light and airy topping! You can use store-bought or whip up some fresh cream by mixing heavy cream and sugar until it forms soft peaks.
- Optional: Edible flowers and thyme for garnish: These add a beautiful touch! Look for flowers like nasturtiums or violets, and fresh thyme for a lovely herbal contrast.
Step-by-Step Instructions for Making Your Tarts
Now that we’ve gathered our ingredients, let’s get started on these delightful Easy Sour Cherry Tarts.
Step 1: Prepare the Filling
-
In a large pot, combine the pitted sour cherries and sugar over medium heat. Stir them gently until the cherries begin to release their juices and the sugar starts to dissolve.
Chef Tip: To enhance the flavor, consider adding a dash of vanilla extract or a sprinkle of cinnamon for an unexpected twist!
-
Once the mixture is simmering, sprinkle the cornstarch over the cherries and stir to combine. This will help thicken the filling. If it looks too thick, add a bit of water to loosen it up. Let this cook for about 5-7 minutes until it thickens and bubbles.
Pro Tip: If you notice clumps of cornstarch, whisk it with a bit of cold water first to create a slurry before adding it to the hot filling.
Step 2: Fill the Tart Shells
-
Preheat your oven to 350°F (175°C). While it preheats, take your prepared tart shells and place them on a baking sheet.
-
Once the filling is ready, carefully spoon the tart cherry mixture into the prepared tart shells, filling each one generously.
Chef Insight: Don’t be shy! A heaping spoonful of filling in each shell makes for an irresistible tart.
Step 3: Bake the Tarts
-
Place the filled tart shells in the oven and bake for approximately 20-25 minutes or until the tart shells are golden and the cherry filling is bubbling.
Baker’s Pro Tip: Keep an eye on the tarts towards the end of baking! If you see that the shells are browning too quickly, you can cover them with aluminum foil to prevent burning.
Step 4: Cool and Serve
-
Once baked, remove the tarts from the oven and let them cool on a wire rack for at least 15-20 minutes. This will allow the filling to set a bit more.
-
Before serving, top each tart with a dollop of whipped cream and, if you’re feeling fancy, a sprinkling of edible flowers or thyme!
Serving Suggestion: Arrange the tarts on a beautiful platter, perhaps with a few fresh cherries scattered around for a pop of color!
Recipe Variations to Try
-
Mixed Cherry Tarts: Combine sour cherries with sweet cherries or other fruits like blueberries or raspberries for a mixed berry experience!
-
Almond Cherry Tarts: Add a teaspoon of almond extract to the filling for a nutty twist that complements the cherry flavor beautifully.
-
Savory Cherry Tarts: For a unique take, incorporate goat cheese into the filling and sprinkle a bit of fresh rosemary on top before baking!
-
Chocolate Cherry Tarts: Drizzle some melted dark chocolate over the tarts either before or after baking for a rich, decadent dessert.
-
Gluten-Free Tarts: Use gluten-free pastry shells or make your own with almond flour for a gluten-free version that everyone can enjoy!
Chef’s Notes
These Easy Sour Cherry Tarts are truly a labor of love. The recipe has evolved over the years as I’ve played with different variations, discovering that the tartness of the cherries complements so many flavors. I remember the first time I added a bit of almond extract to the filling; it was like a light bulb moment in my kitchen! The creativity goes on forever!
And let me tell you, there’s nothing quite like pulling these fresh tarts out of the oven—it fills the air with a scent that makes everyone gather around, just waiting for their first bite!
FAQs and Troubleshooting
1. How do I know when the tarts are baked properly?
Look for a bubbling filling and a golden-brown crust. If your tarts are browning too quickly, use foil to cover them.
2. Can I use fresh cherries instead of frozen?
Absolutely! Just make sure to pit them first. Fresh cherries add a lovely texture!
3. My filling is too runny; what did I do wrong?
If your filling is too runny, it may be due to not enough cornstarch or cooking time. Let it cook a bit longer to thicken up.
4. How can I store leftover tarts?
Keep them in an airtight container in the fridge for up to three days. They’re perfect for a quick snack!
Nutritional Info
While exact values can vary based on the specific ingredients you use, here’s a general breakdown for each tart based on serving size:
- Calories: Approximately 200 calories per tart
- Total Fat: 8g
- Saturated Fat: 4g
- Cholesterol: 30mg
- Sodium: 150mg
- Total Carbohydrates: 30g
- Fiber: 2g
- Sugars: 18g
- Protein: 2g
Keep in mind that these tarts are a delightful indulgence meant to be enjoyed in moderation—the fresh cherries bring a load of vitamins and antioxidants, making them a slightly healthier choice than other dessert options!
Final Thoughts
Creating Easy Sour Cherry Tarts is more than just a recipe; it’s about celebrating the connections we make over good food. It’s about the laughter shared while baking and the memories created around the dinner table. Whether you’re whipping these up for a family gathering, a potluck, or just a Tuesday night treat for yourself, I promise they’ll bring a little sweetness and tart joy to your day!
So there you have it! These Easy Sour Cherry Tarts are not just a dessert—they are a tradition, a moment, and an experience all wrapped in a delightful flaky shell. Get in that kitchen, have fun, and enjoy every bite! Happy baking!
Print
Easy Sour Cherry Tarts
- Total Time: 45 minutes
- Yield: 30 tarts 1x
- Diet: Vegetarian
Description
Delightful Easy Sour Cherry Tarts that perfectly balance sweet and tart flavors, making them a favorite for any occasion.
Ingredients
- 6 cups pitted sour cherries (fresh, frozen, or canned)
- 2 cups white sugar
- 1 heaping tbsp cornstarch
- 2–3 tbsp water (as needed)
- 1 package pastry tart shells (approximately 30)
- Whipped cream (for garnish)
- Optional: Edible flowers and thyme for garnish
Instructions
- Combine the pitted sour cherries and sugar in a large pot over medium heat to release juices.
- Sprinkle the cornstarch over the mixture and stir until combined, cooking for 5-7 minutes until thickened.
- Preheat your oven to 350°F (175°C) and arrange tart shells on a baking sheet.
- Spoon the cherry mixture into the tart shells generously.
- Bake for 20-25 minutes or until shells are golden and filling is bubbling.
- Cool the tarts on a wire rack for 15-20 minutes before serving.
- Top each tart with whipped cream and optional edible flowers or thyme.
Notes
Experiment with different variations by adding almond extract or mixing in different fruit for a unique twist.
- Prep Time: 20 minutes
- Cook Time: 25 minutes
- Category: Dessert
- Method: Baking
- Cuisine: American
Nutrition
- Serving Size: 1 tart
- Calories: 200
- Sugar: 18g
- Sodium: 150mg
- Fat: 8g
- Saturated Fat: 4g
- Unsaturated Fat: 4g
- Trans Fat: 0g
- Carbohydrates: 30g
- Fiber: 2g
- Protein: 2g
- Cholesterol: 30mg
Keywords: sour cherry, tarts, dessert, easy recipe, baking, cherry recipe