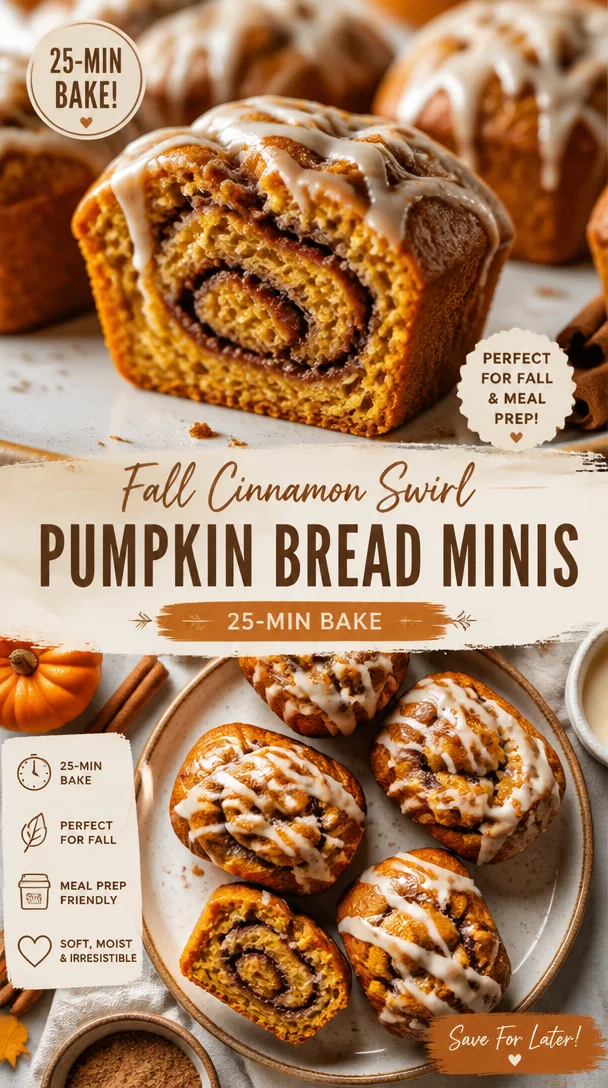
Fall Cinnamon Swirl Pumpkin Bread Minis (25-Min Bake)
Cinnamon Swirl Pumpkin Bread Minis: A Cozy Fall Treat
Hey there, fellow food lovers! With the crispness of autumn in the air and pumpkin spice everything taking over our favorite cafes, I can’t help but get a bit sentimental and inspired in the kitchen. I’m super excited to share a delicious recipe that captures all the warm and cozy vibes of fall: Cinnamon Swirl Pumpkin Bread Minis. These little lovelies are not just cute; they embody everything comforting about the season—rich pumpkin flavor, a sweet cinnamon swirl, and that mouthwatering aroma wafting through the house.
Imagine waking up on a chilly morning, wrapping your hands around a warm mug of coffee, and sinking your teeth into one of these delightful mini loaves. It’s pure bliss! What’s even better? They freeze beautifully, which means you can whip up a batch now and savor the flavors of fall throughout the year.
But before we dive into making these cinnamon-packed treats, let me take you back for a moment. There’s a funny story tied to pumpkin bread in my life, one that transformed an ordinary baked good into a legendary family tradition.
Personal Story
Growing up, my mom was the queen of the kitchen, and her pumpkin bread was the stuff of legends. One autumn afternoon, I remember her bustling in the kitchen while I attempted to “help.” As a kid, my idea of assisting often meant sneaking in extra sugar and cinnamon when she wasn’t looking. Well, that fateful day, I learned firsthand that the difference between a sweet treat and a sugar bomb is a delicate balance!
As my mom pulled her freshly baked loaf from the oven, I was practically hovering with excitement. The moment she sliced into it, the soft, pillowy bread crackled slightly, and the intoxicating scent of cinnamon filled the air. But when it hit my taste buds, I realized I might have overdone it on the sugar. What was supposed to be the perfect blend of warmth and sweetness turned into a laughable “sweet tooth explosion.”
Mom just chuckled, shook her head, and said, “Beau, sometimes less is more!” We all laughed, and from that day on, I vowed to perfect the pumpkin bread recipe with my own flair, which eventually led to these adorable mini versions. So, whether you’re nostalgic for fall or just in need of a cozy treat, I guarantee these Cinnamon Swirl Pumpkin Bread Minis will win your heart just like they did mine!
Ingredients
Here’s what you’ll need to bring this recipe to life:
-
1 cup canned pumpkin
The star of the show! Canned pumpkin is super convenient, but if you’re feeling adventurous, you can roast and puree your own pumpkin. You’ll get a fresher taste, but canned works perfectly for this recipe. -
1/2 cup granulated sugar
This is the sweet base of your bread. Feel free to swap with coconut sugar or a sugar alternative if you’re looking for a lighter option. -
1/4 cup brown sugar
The molasses in brown sugar adds a rich depth of flavor. If you don’t have brown sugar, you can make your own by mixing granulated sugar with a bit of molasses. -
1/2 cup vegetable oil
This keeps our bread moist. You can substitute it with melted coconut oil for a hint of tropical flavor. -
2 large eggs
The eggs help bind everything together. For a vegan option, substitute each egg with 1/4 cup of unsweetened applesauce or mashed bananas. -
1 1/2 cups all-purpose flour
The foundation for our mini loaves. Whole wheat flour can be used for a nuttier flavor and added nutrition. -
1 tsp baking powder
This is our leavening agent to help the bread rise. Don’t skip this! -
1/2 tsp baking soda
Works in tandem with the baking powder. Ensure it’s fresh for the best rise! -
1/2 tsp salt
Just a pinch to balance the flavors. A little salt goes a long way in baked goods. -
1 tsp ground cinnamon
Adds warmth and spice! You can also add a dash of cardamom for an extra punch. -
1/2 tsp ground nutmeg
A lovely addition for that cozy fall flavor. Use fresh nutmeg if you have it; it makes a difference! -
1/4 tsp ground ginger
It adds a subtle warmth that complements the pumpkin beautifully. -
1/4 cup granulated sugar (for topping)
Extra sweetness on top gives our minis that bakery-style finish. -
1 tsp ground cinnamon (for topping)
Enhances the sweetness and adds visual appeal. You’ll want to sprinkle this generously!
Step-by-Step Instructions
Step 1: Preheat Your Oven
First things first—preheat your oven to 350°F (175°C) and line your mini loaf pans with parchment paper or spray them well with non-stick spray. This is crucial to prevent our scrumptious minis from sticking.
Step 2: Mix the Wet Ingredients
In a large mixing bowl, combine the canned pumpkin, granulated sugar, brown sugar, and vegetable oil. Whisk them together until well blended. This takes about a minute. Look for a smooth consistency—this will give your bread that moist, tender crumb we’re aiming for.
Step 3: Add the Eggs
Next, crack in those two large eggs. Whisk them in until the mixture is fluffy. You’ll see a beautiful golden hue emerge, inviting and luscious!
Step 4: Combine the Dry Ingredients
In another bowl, sift together the all-purpose flour, baking powder, baking soda, salt, cinnamon, nutmeg, and ginger. Sifting helps eliminate any lumps and ensures even distribution of the dry ingredients—something I can’t emphasize enough!
Step 5: Mix It All Together
Slowly incorporate the dry ingredients into the wet mixture. Use a spatula or wooden spoon to fold them together gently, just until combined. A few lumps are okay; we don’t want to overmix, or we risk a dense loaf.
Step 6: Prepare the Cinnamon Swirl
In a small bowl, mix the 1/4 cup granulated sugar and 1 tsp ground cinnamon together. This will be our glorious swirl!
Step 7: Assemble the Mini Loaves
Now, here’s where it gets fun! Divide the batter evenly among your prepared mini loaf pans, filling each about halfway. Sprinkle some of the cinnamon-sugar mixture on top of the batter. Use a toothpick or a knife to swirl it gently into the batter. Don’t overdo it; you want to see beautiful ribbons of cinnamon throughout.
Step 8: Bake
Pop those pans in your preheated oven and bake for 25-30 minutes, or until a toothpick comes out clean when inserted in the center. Your kitchen should smell like heaven at this point!
Step 9: Cool
Once baked, remove the pans from the oven and let them cool for about 10 minutes. Then, transfer the loaves to a wire rack to cool completely. Resist the urge to slice right away—the flavors will deepen as they cool!
Serving Suggestions
So, you’ve got your fabulous Cinnamon Swirl Pumpkin Bread Minis cooling down. Now, how to serve? Honestly, they’re delightful all on their own, but if you want to elevate the experience, here are some suggestions:
- With Butter: Spread a bit of softened butter on a warm slice. The butter melts into the bread—pure magic!
- Cream Cheese Spread: Whip up a creamy spread with some cream cheese, a little bit of sugar, and a dash of vanilla extract. It’s to-die-for!
- Garnish: Dust with powdered sugar for a pretty presentation. You’ll impress your friends on any brunch table!
- Coffee Pairing: Serve these beauties alongside your favorite coffee or chai latte. The spices harmonize perfectly, creating a symphony of autumnal flavors.
- As Gifts: If you’re feeling generous, package them up with a cute ribbon. Homemade treats always carry a personal touch that store-bought goodies lack.
Recipe Variations
Feeling experimental? Here are a few ideas to shake things up!
-
Chocolate Chip Twist: Add 1/2 cup of chocolate chips to the batter before pouring it into the pans. Yes, chocolate and pumpkin are a match made in heaven!
-
Nutty Delight: Stir in 1/2 cup of chopped pecans or walnuts for some crunch and added flavor.
-
Gluten-Free Option: Substitute all-purpose flour with a gluten-free flour blend to accommodate any dietary needs.
-
Dairy-Free: Use unsweetened almond milk instead of eggs (1/4 cup applesauce per egg) and make sure your butter is dairy-free.
-
Spiced Pumpkin Bread: Want to amp up the spice? Add a pinch of cloves and allspice for a more intense autumn flavor.
Chef’s Notes
Just a little nugget from my kitchen adventures—this recipe has transformed over the years. My initial attempt featured a few disastrous flavors, largely due to my overzealous use of spices and sweetness. Let’s just say my sweet tooth got the better of me more than once, but hey, that’s how we learn!
Each time I made it, I learned something valuable, and eventually, these mini delights became one of my go-to recipes. As pumpkin season rolls around, I love to prep them ahead of time for gatherings or cozy nights in. The best part? They freeze incredibly well! Make a double batch, wrap them up, and you’ll have a taste of fall whenever you need a pick-me-up.
FAQs and Troubleshooting
1. Why did my bread sink in the middle?
This could be due to underbaking or overmixing. Ensure you’re measuring your flour correctly and don’t skip the toothpick test!
2. Can I use fresh pumpkin instead of canned?
Absolutely! Just make sure it’s well-pureed and free of excess moisture to maintain the texture.
3. My bread is too dry. What went wrong?
Too much flour, baking too long, or not enough oil could be the culprit. Ensure you’re using the right measurements and keeping an eye on the baking time.
4. How do I store leftovers?
Once cooled, wrap each mini loaf in plastic wrap, and they’ll keep in the fridge for about a week. For longer storage, pop them in the freezer for up to 3 months!
Nutritional Info
While I usually focus on the deliciousness of a recipe, I know many of us keep an eye on what we’re eating. So, here’s a rough breakdown per mini loaf (based on standard ingredients and 12 loaves total):
- Calories: 150
- Protein: 2g
- Fat: 6g
- Carbohydrates: 22g
- Fiber: 1g
- Sugar: 8g
These minis are perfect for an indulgent snack or a sweet breakfast treat, especially when you account for the wholesome pumpkin and spices packed in!
Final Thoughts
Well, there you have it, folks—a delightful recipe that not only fills your kitchen with heavenly aromas but also fills your heart with cozy fall feelings. Cinnamon Swirl Pumpkin Bread Minis will undoubtedly be the star of your kitchen, a treat to share, or even keep all to yourself (I won’t tell!).
So, grab your mixing bowls and get ready to whip up a batch. Trust me, once you take that first bite, you’ll feel like you’re wrapped in a warm hug! Happy baking, and until next time, keep cooking up those good vibes!
Print
Cinnamon Swirl Pumpkin Bread Minis
- Total Time: 45 minutes
- Yield: 12 minis 1x
- Diet: Vegetarian
Description
These adorable mini loaves capture the essence of fall with rich pumpkin flavor, a sweet cinnamon swirl, and a delightful aroma.
Ingredients
- 1 cup canned pumpkin
- 1/2 cup granulated sugar
- 1/4 cup brown sugar
- 1/2 cup vegetable oil
- 2 large eggs
- 1 1/2 cups all-purpose flour
- 1 tsp baking powder
- 1/2 tsp baking soda
- 1/2 tsp salt
- 1 tsp ground cinnamon
- 1/2 tsp ground nutmeg
- 1/4 tsp ground ginger
- 1/4 cup granulated sugar (for topping)
- 1 tsp ground cinnamon (for topping)
Instructions
- Preheat your oven to 350°F (175°C) and line your mini loaf pans with parchment paper or spray them well with non-stick spray.
- Mix the canned pumpkin, granulated sugar, brown sugar, and vegetable oil in a large mixing bowl until well blended.
- Add the eggs and whisk until the mixture is fluffy.
- Combine the flour, baking powder, baking soda, salt, cinnamon, nutmeg, and ginger in another bowl.
- Mix the dry ingredients into the wet mixture until just combined.
- Prepare the cinnamon swirl by mixing the 1/4 cup granulated sugar and 1 tsp ground cinnamon together.
- Assemble the mini loaves by dividing the batter among the prepared pans, sprinkling the cinnamon-sugar mixture on top, and swirling it gently into the batter.
- Bake for 25-30 minutes, or until a toothpick comes out clean.
- Cool for about 10 minutes in the pans before transferring to a wire rack to cool completely.
Notes
These mini loaves freeze beautifully, making them perfect for a cozy treat anytime.
- Prep Time: 15 minutes
- Cook Time: 30 minutes
- Category: Dessert
- Method: Baking
- Cuisine: American
Nutrition
- Serving Size: 1 mini loaf
- Calories: 150
- Sugar: 8g
- Sodium: 200mg
- Fat: 6g
- Saturated Fat: 1g
- Unsaturated Fat: 5g
- Trans Fat: 0g
- Carbohydrates: 22g
- Fiber: 1g
- Protein: 2g
- Cholesterol: 30mg
Keywords: pumpkin bread, fall recipes, cinnamon, cozy baking, dessert
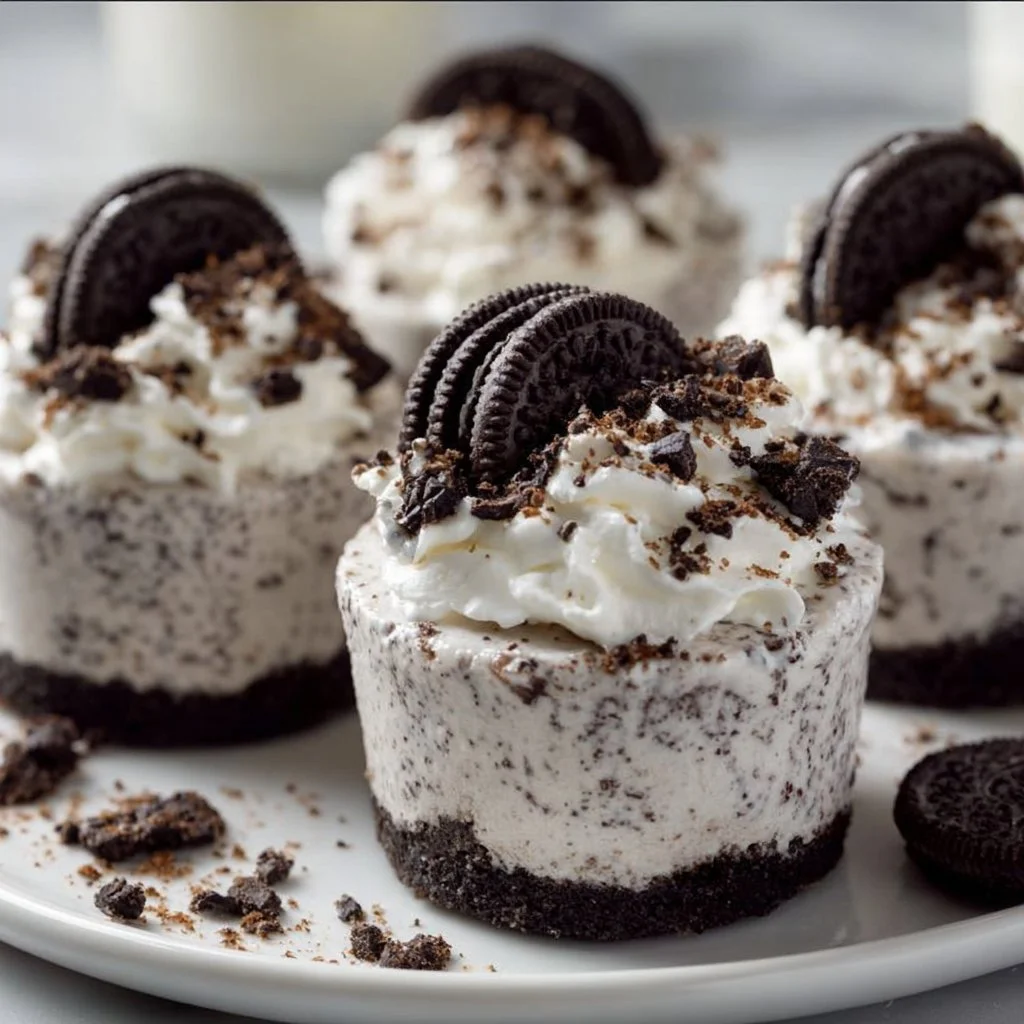
Oreo No-Bake Cheesecake Cups
Oreo No-Bake Cheesecake Cups: A Sweet Escape into Nostalgic Delights
Hey food lovers! Welcome back to Feastical, where every recipe brings a smile and every spoonful is a taste of home. Today, we’re diving into a beloved dessert that pairs the classic crunch of Oreo cookies with the creamy goodness of cheesecake. That’s right, we’re talking about Oreo No-Bake Cheesecake Cups! This dish is not just a dessert; it’s a ticket to flavor town, filled with nostalgia, warmth, and a pinch of culinary magic.
No-bake cheesecakes are truly the superheroes of the dessert world, don’t you think? They arrive with minimal fuss and maximum flavor, swooping in to save us from our midnight cravings or those impromptu dinner parties. The best part? They’re incredibly easy to whip up, meaning you can look like a seasoned chef without breaking a sweat!
My love for this particular dessert started years ago when I first visited a friend’s house for a summer barbecue. Picture this: the sun shining, laughter echoing, and then bam—she brings out a platter of no-bake cheesecake cups, each adorned with a mini Oreo on top. I swear, the moment I took a bite, it felt akin to a warm hug after a long day. It was love at first bite, and I knew I had to recreate that magic in my own kitchen. Fast forward to today, and I’ve made these little cups more times than I can count, tweaking and perfecting them along the way. Trust me; once you try them, they’ll quickly become a staple in your recipe collection too!
So, put on your apron and get ready to impress your friends or simply treat yourself to an easy yet divine dessert. Whether you’re planning an elegant gathering or just craving a simple yet indulgent treat, these Oreo No-Bake Cheesecake Cups are just what the doctor ordered. Let’s get our hands dirty and dive into the delightful world of creamy, dream-like desserts!
Personal Story
I still remember the first time I tried making these Oreo No-Bake Cheesecake Cups. I was just a teenager, trying to impress my family for a holiday dinner. With some serious determination and a hefty dose of optimism, I marched into the kitchen, armed with bags of Oreos, a block of cream cheese, and a wild culinary enthusiasm that only a teenager could possess.
As I mixed and layered, I felt like a true pastry chef in a bustling café! But let me tell you, the really funny part was when I realized I had forgotten to properly seal one of my Tupperware containers, and when I opened it the next day, half the dessert had mysteriously disappeared. A family of fruit flies had declared it their own! Nonetheless, this minor kitchen mishap didn’t deter me; rather, it became a legendary story in our family that still gets plenty of laughs to this day. After that first attempt, I learned the importance of proper storage and the magic of sharing good food!
So here we are, years later, and I still make these cups regularly. Each time, I’m reminded of that early kitchen experiment and how far I’ve come in my cooking journey. Let’s make some great memories together as we whip up these fantastic little desserts!
Ingredients
Here’s what you’ll need to create these delectable Oreo No-Bake Cheesecake Cups:
-
1 8 oz block of cream cheese, softened
- This forms the creamy base of your cheesecake! If you’re looking for a lighter option, you can substitute this with Neufchâtel cheese, which offers a similar taste with less fat.
-
1 8 oz Cool Whip or whipped topping
- A great shortcut to achieving that light, airy texture! If you prefer homemade, you can whip heavy cream with a bit of sugar until soft peaks form and fold it in magic-style!
-
2/3 cup powdered sugar
- This adds sweetness without the graininess of regular sugar. If you want a sugar-free version, powdered erythritol works like a charm!
-
1 tsp vanilla extract
- For that warm, inviting flavor! You can swap it out for almond extract for a fun nutty kick if you’re feeling adventurous.
-
24-26 Oreo cookies (more as desired)
- The star of the show! Don’t hesitate to use double-stuffed Oreos for an even creamier experience. If you need a gluten-free version, the gluten-free Oreo option will do just fine!
With these ingredients, you’re well on your way to creating a treat that’ll make your friends and family swoon with delight— and trust me, you’ll want to have some extra Oreos on hand for snacking while you cook!
Step-by-Step Instructions
Step 1: Prepare Your Ingredients
Before diving in, make sure all your ingredients are at room temperature, especially the cream cheese. This will help achieve that smooth, luscious texture we all crave!
Step 2: Beat the Cream Cheese
In a medium-sized mixing bowl, use an electric mixer to beat your softened cream cheese until creamy and smooth. This step is crucial! You want to eliminate any lumps for a luxurious finish in your cheesecake mixture. If you’re using a stand mixer, it makes this step super easy—just let it do the work for you!
Step 3: Add Sweetness and Flavor
Now, add in the powdered sugar and vanilla extract. Beat it together until it’s well combined. You should have a fluffy mixture that is pure bliss! Don’t forget to taste a spoonful (or two) to ensure it’s sweet enough for your liking—don’t worry, I won’t tell if you sneak in a few extra bites.
Step 4: Fold in the Whipped Topping
Next, it’s time to gently fold in the Cool Whip. Use a spatula to incorporate it without deflating the mixture. Fold it in until everything is just blended—this will give your cheesecake that light, airy quality that makes it so incredible!
Step 5: Crush the Oreos
Grab the Oreo cookies and throw them into a zip-top bag. If you have a rolling pin handy, it’s time to unleash your inner baker and smash those Oreos into crumbs! You could also use a food processor for a quicker result. Save a few for garnish on top later!
Step 6: Layer Your Cups
Now comes the fun part—layering! Start with a spoonful of your cheesecake mixture at the bottom of each serving cup. Follow with a layer of crushed Oreos. Repeat until you fill the cups, making sure the top layer finishes with that luscious cheesecake.
Step 7: Chill and Set
Cover your cups with plastic wrap and pop them in the fridge for at least 4 hours, but if you can resist, allowing them to chill overnight is the golden ticket to rich flavors.
Step 8: Garnish and Serve
Once they’re set, dig into your stash of reserved Oreos and crumble them over the top of each cup for extra flair. Feel free to add a dollop of whipped topping on top or a sprinkle of chocolate shavings to elevate the presentation.
And voilà! You’ve just crafted a batch of mesmerizing Oreo No-Bake Cheesecake Cups that are ready to bring smiles to your table!
Serving Suggestions
Serving is a breeze with these dessert cups! Place them on a beautiful serving platter or let each guest help themselves from a dessert station. Add in some fresh berries or mint leaves for a pop of color. If you’re feeling extra fancy, you might even consider drizzling a bit of chocolate sauce over the top to complete the look.
For an extra touch:
- Mini spoons: Consider using cute mini spoons for serving your cheesecake cups, adding a whimsical charm to the experience.
- Labeled Name Tags: If you’re having a gathering, label each cup with a name tag, including flavors or personalized messages. Your guests will love it!
Recipe Variations
Feeling adventurous? Here are some creative twists you can try with your Oreo No-Bake Cheesecake Cups:
-
Mint Chocolate Chip: Add 1-2 teaspoons of peppermint extract to the cream cheese mixture for a refreshing minty flavor—perfect for mint Oreo lovers!
-
Peanut Butter Delight: Swirl in a couple of tablespoons of creamy or crunchy peanut butter for a nutty, luscious addition that pairs delightfully with the Oreos.
-
Cheesecake Cheesecake: For a classic cheesecake flavor, swap out a few Oreos in your layers for a fresh fruit topping, like strawberries or blueberries.
-
Mocha Madness: Add a tablespoon of instant coffee granules to your cream cheese mixture for a mocha-inspired kick—you’ll be brewing up tons of compliments!
-
Nutty Crunch: Incorporate crushed nuts (like walnuts or pecans) within the layers or sprinkle them on top for a delightful crunch.
Chef’s Notes
Over the years, I’ve had plenty of fun experimenting with this recipe. I can’t tell you how many flavors and textures I’ve fallen in love with! There was that time I added orange zest, and another time I went all out with a chocolate ganache drizzle on top. With this recipe, the world is truly your oyster (or should I say Oreo?).
So don’t be afraid to get creative. Trust your instincts, and remember: cooking is all about having fun and sharing joy with others. If you have a crazy idea for a twist, give it a shot! And if it flops, laugh, learn, and try again—trust me, that’s just part of the journey.
FAQs and Troubleshooting
Q1: My cheesecake doesn’t seem to be setting. How can I fix it?
- Make sure you let these cups chill long enough—4 hours is a must, but overnight is even better. If it’s still too soft after that, adding a bit more whipped topping next time can help.
Q2: Can I use a different type of cookie?
- Absolutely! Feel free to swap in any cookie you love. Chocolate wafer cookies or even graham crackers could create exciting flavors and textures!
Q3: What if I’m short on time?
- While chilling is important for the best results, if you’re in a pinch, try placing the cups in the freezer for about 30 minutes to speed up the setting process.
Q4: How long can I keep these in the fridge?
- They’re best consumed within 3-4 days, but good luck keeping them around that long! Just ensure they’re covered well.
Nutritional Info
Each Oreo No-Bake Cheesecake Cup is a delightful balance of creamy flavors and indulgent textures. While the exact nutritional values depend on portion sizes and specific brands, here’s a rough estimate per serving:
- Calories: ~300
- Carbohydrates: ~30g
- Fat: ~18g
- Protein: ~3g
- Sugar: ~16g
Keep in mind these cups are definitely a treat, so enjoying them in moderation is key. Share them with friends or family to add to the joy!
Final Thoughts
And there you have it—a delightful recipe for Oreo No-Bake Cheesecake Cups that’s not just about taste but also about the joyful memories made while creating them. Whether you’re diving into this dessert alone or sharing it with loved ones, these cups are bound to bring smiles and sweet moments.
Remember, as you create these treats, infuse them with your personality and a sprinkle of love. That’s the secret ingredient that turns a simple dessert into something truly special. So grab your ingredients, unleash that creative spirit, and let your kitchen become a place of joy and comfort!
Happy cooking, everyone! Until next time, keep it delicious and keep it soulful here at Feastical. Can’t wait to see you back for more feel-good food adventures! 🍽️❤️
Print
Oreo No-Bake Cheesecake Cups
- Total Time: 240 minutes
- Yield: 4 servings 1x
- Diet: Vegetarian
Description
A delightful no-bake dessert combining the classic crunch of Oreo cookies with creamy cheesecake goodness.
Ingredients
- 1 8 oz block of cream cheese, softened
- 1 8 oz Cool Whip or whipped topping
- 2/3 cup powdered sugar
- 1 tsp vanilla extract
- 24–26 Oreo cookies (more as desired)
Instructions
- Prepare Your Ingredients by ensuring all are at room temperature.
- Beat the cream cheese until creamy and smooth.
- Add powdered sugar and vanilla extract, beating until well combined.
- Fold in the Cool Whip gently to maintain its airy texture.
- Crush the Oreo cookies in a zip-top bag or food processor.
- Layer your cups starting with cheesecake, followed by crushed Oreos.
- Chill in the fridge for at least 4 hours, preferably overnight.
- Garnish with reserved Oreo crumbs before serving.
Notes
These cheesecake cups can be personalized with various flavors and toppings like mint extract or chocolate sauce.
- Prep Time: 15 minutes
- Cook Time: 0 minutes
- Category: Dessert
- Method: No-Bake
- Cuisine: American
Nutrition
- Serving Size: 1 cup
- Calories: 300
- Sugar: 16g
- Sodium: 150mg
- Fat: 18g
- Saturated Fat: 10g
- Unsaturated Fat: 6g
- Trans Fat: 0g
- Carbohydrates: 30g
- Fiber: 1g
- Protein: 3g
- Cholesterol: 30mg
Keywords: no-bake, cheesecake, easy dessert, Oreo, quick recipe