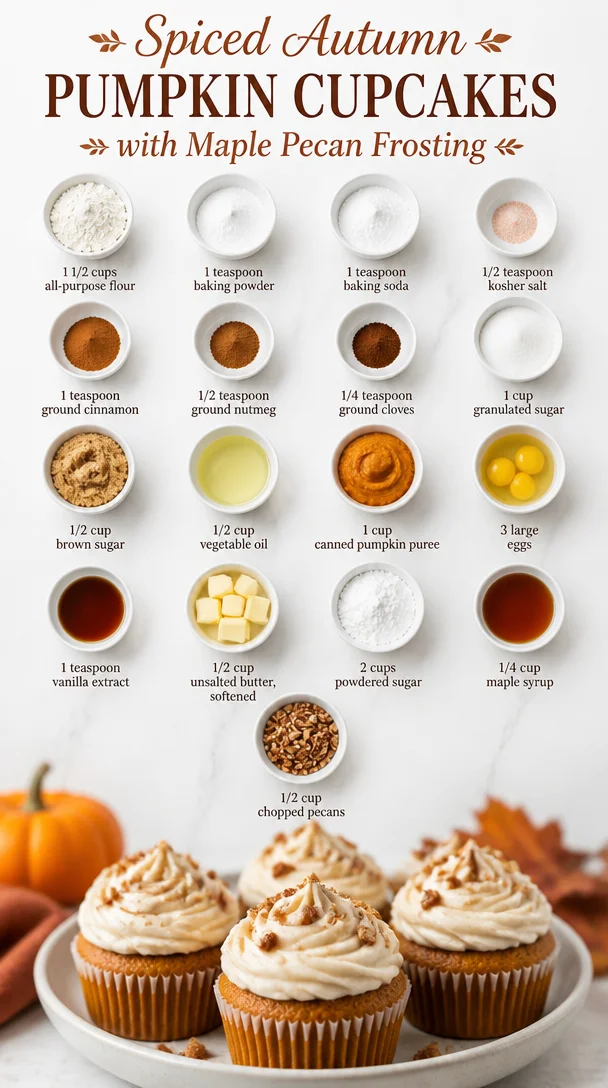
Spiced Autumn Pumpkin Cupcakes with Maple Pecan Frosting
Irresistible Pumpkin Cupcakes with Maple Pecan Frosting: A Sweet Fall Treat
Hey there, friends! It’s Beau Collier here, and I’m absolutely thrilled to share one of my most cherished fall recipes with you today: Pumpkin Cupcakes with Maple Pecan Frosting. As soon as autumn rolls around, I find myself daydreaming of those vibrant orange pumpkins, cozy sweaters, and, of course, the irresistible aroma of freshly baked pumpkin treats wafting through the kitchen. There’s something about these cupcakes that brings a warm, fuzzy feeling to my heart and a delicious smile to my face. Let’s dive into this delightful recipe that’s sure to make your kitchen smell like a slice of fall!
A Little Slice of Nostalgia
I remember the first time I made pumpkin cupcakes. It was a chilly October afternoon, and my childhood best friend, Sarah, came over for a baking session. We had our playlist blasting, the leaves were rustling outside, and there was a sense of magic in the air as we tackled our mission of creating the most delicious fall dessert imaginable. We decided on pumpkin cupcakes, inspired by our favorite coffee shop that always sold out too quickly.
As we mixed the velvety pumpkin puree with spices that smelled like autumn—cinnamon, nutmeg, and cloves—I couldn’t help but reminisce about the many family gatherings we had where dishes overflowing with pumpkin treats took center stage. The joy we felt that day was palpable, and despite a few flour fights and giggles filling the kitchen, we managed to whip up a batch of the fluffiest cupcakes topped with the silkiest maple pecan frosting.
Those cupcakes were a hit! Friends and family couldn’t get enough of them, and from that day on, they became a staple at every gathering. So, let’s recreate that joy in your kitchen and bring some of this pumpkin magic to your home!
Ingredients
Here’s what you’re going to need to whip up your scrumptious pumpkin cupcakes:
-
1 1/2 cups all-purpose flour
- Great for a classic cupcake structure! If you prefer a gluten-free option, use a 1:1 gluten-free flour blend.
-
1 teaspoon baking powder
- This is your rising agent! Ensure it’s fresh for the best puff.
-
1 teaspoon baking soda
- Another leavening hero that gives your cupcakes that airy lightness.
-
1/2 teaspoon kosher salt
- A little salt enhances all the flavors—don’t skip it!
-
1 teaspoon ground cinnamon
- The quintessential spice of fall! You can also use pumpkin pie spice if you have it handy.
-
1/2 teaspoon ground nutmeg
- Adds a warm, nutty flavor. Freshly grated nutmeg makes a world of difference!
-
1/4 teaspoon ground cloves
- Just a hint of clove lends an aromatic punch for that cozy feeling.
-
1 cup granulated sugar
- Sweetness is key! Brown sugar can give a deeper flavor if mixed half and half.
-
1/2 cup brown sugar
- For that moist texture! It also enhances the caramel notes.
-
1/2 cup vegetable oil
- Keeps these cupcakes fluffy and moist. Can be substituted with melted coconut oil for a tropical twist!
-
1 cup canned pumpkin puree
- The star of the show! Make sure it’s pure pumpkin, not pumpkin pie filling.
-
3 large eggs
- Binding and fluffing agents—room temperature eggs work best!
-
1 teaspoon vanilla extract
- A splash of vanilla elevates everything; opt for pure for more flavor.
-
1/2 cup unsalted butter, softened
- Provides creaminess to the frosting. Margarine can work in a pinch.
-
2 cups powdered sugar
- For that sweet, dreamy frosting!
-
1/4 cup maple syrup
- Adds depth and a beautiful, subtly sweet flavor to the frosting.
-
1/2 cup chopped pecans
- Toast them for an extra flavor boost! Pecans complete the frosting beautifully.
Step-by-Step Instructions
-
Preheat the Oven: Start by preheating your oven to 350°F (175°C). This way, your cupcakes will be ready to go as soon as you’re done mixing.
-
Prepare the Muffin Tin: Line a muffin tin with cupcake liners or grease it well with non-stick spray. I love the festive feel of colorful liners—pick your favorite!
-
Mix Dry Ingredients: In a medium bowl, whisk together the all-purpose flour, baking powder, baking soda, salt, cinnamon, nutmeg, and cloves. This not only combines them evenly, but also helps incorporate air for fluffier cupcakes.
-
Combine Wet Ingredients: In a large bowl, mix the granulated and brown sugars with the vegetable oil until it’s light and fluffy. Slowly add in the canned pumpkin, eggs, and vanilla extract, beating until well combined. It’s like a warm embrace for your spatula!
-
Combine the Mixtures: Gradually add the dry ingredients into the wet mixture, folding gently until just combined. Avoid overmixing, as we want these beauties to be light and airy!
-
Fill the Cupcake Liners: Fill the muffin tin about two-thirds full with the batter. Sip on your favorite beverage while it bakes; it’s time to let the oven work its magic!
-
Bake: Place your pan in the preheated oven and bake for 18-20 minutes, or until a toothpick inserted in the center comes out clean. This is the moment of truth!
-
Cool: Once baked, allow the cupcakes to cool in the pan for about 5 minutes. Then transfer them to a wire rack to cool completely before frosting.
-
Make the Frosting: In a mixing bowl, beat the softened butter and powdered sugar until fluffy. Add the maple syrup and continue to beat until smooth and creamy. For a fun challenge, try spreading the frosting with a spatula for a rustic look!
-
Frost and Garnish: Once your cupcakes are cool, slather on that velvety maple pecan frosting and sprinkle chopped pecans on top for that extra crunch.
Serving Suggestions
Time to serve up those heavenly pumpkin cupcakes! Place them on a vibrant serving platter, and if you’re feeling fancy, arrange a few additional pecans around the edges for a beautiful presentation. Pair them with a hot cup of coffee or tea for an ultimate fall treat, or serve them at gatherings for a delightful dessert. Why not take them to your next potluck? I guarantee they’ll be the star of the show!
Recipe Variations
Feel free to get creative with these pumpkin cupcakes! Here are a few ideas to spark your imagination:
-
Chocolate Chip Pumpkin Cupcakes: Fold in a cup of semi-sweet chocolate chips into the batter for a decadent twist!
-
Spiced Rum Frosting: Add a splash of spiced rum to your frosting for a grown-up flavor.
-
Gluten-Free Option: Use a gluten-free flour blend and a gluten-free baking powder for a delicious alternative.
-
Vegan Version: Replace the eggs with flax eggs (1 tablespoon ground flaxseed mixed with 2.5 tablespoons water = 1 egg) and use coconut oil instead of vegetable oil.
-
Cream Cheese Frosting: Swap in cream cheese for a tangier topping that pairs beautifully with pumpkin.
Chef’s Notes
As with all good recipes, this one has evolved over the years. I’ve played with flavors, tried different frostings, and experimented with various mix-ins. The simplest, purest version of these pumpkin cupcakes always brings me back to that cozy kitchen with Sarah. So here’s my open invitation: invite your friends or family to bake with you! It turns the task of cooking into a cherished memory—much like it did for me.
FAQs and Troubleshooting
1. Why are my cupcakes dense?
Overmixing the batter can cause this. Mix just until the dry is incorporated, and use room-temperature ingredients!
2. Can I use fresh pumpkin?
Absolutely! Just make sure it’s well-cooked and blended until smooth before using it in your mix.
3. What’s the best way to store these?
Store them in an airtight container at room temperature for up to 3 days or refrigerate for a week (if they last that long!)
4. My frosting is too runny. What can I do?
If your frosting is too runny, simply add more powdered sugar until you reach your desired consistency.
Nutritional Info
For those keeping an eye on their nutritional intake, each pumpkin cupcake with frosting is approximately:
- Calories: 250
- Total fat: 12g
- Saturated fat: 4g
- Carbohydrates: 35g
- Fiber: 1g
- Sugar: 20g
- Protein: 2g
Of course, if you make any of the variations, keep in mind that the nutrition might differ a bit—especially if you add chocolate chips or different frostings.
Final Thoughts
There you have it, my friends! These Pumpkin Cupcakes with Maple Pecan Frosting capture the essence of fall in each fluffy bite. I hope this recipe not only fills your kitchen with delectable aromas but also brings a smile to your face, just like it does for me. Don’t forget to share your cupcake creations on social media and tag me at @Feastical, because I can’t wait to see your beautiful versions!
Now, grab your apron, gather your ingredients, and start baking—your taste buds are in for a treat! Happy baking! 🍂🧁
Print
Irresistible Pumpkin Cupcakes with Maple Pecan Frosting
- Total Time: 35 minutes
- Yield: 12 servings 1x
- Diet: Vegetarian
Description
Delicious pumpkin cupcakes topped with creamy maple pecan frosting, perfect for fall celebrations.
Ingredients
- 1 1/2 cups all-purpose flour
- 1 teaspoon baking powder
- 1 teaspoon baking soda
- 1/2 teaspoon kosher salt
- 1 teaspoon ground cinnamon
- 1/2 teaspoon ground nutmeg
- 1/4 teaspoon ground cloves
- 1 cup granulated sugar
- 1/2 cup brown sugar
- 1/2 cup vegetable oil
- 1 cup canned pumpkin puree
- 3 large eggs
- 1 teaspoon vanilla extract
- 1/2 cup unsalted butter, softened
- 2 cups powdered sugar
- 1/4 cup maple syrup
- 1/2 cup chopped pecans
Instructions
- Preheat the oven to 350°F (175°C).
- Prepare a muffin tin with cupcake liners or grease it.
- Mix dry ingredients in a medium bowl: flour, baking powder, baking soda, salt, cinnamon, nutmeg, and cloves.
- Combine wet ingredients in a large bowl: sugars and vegetable oil until fluffy. Add pumpkin, eggs, and vanilla, and mix well.
- Combine the dry ingredients with the wet mixture, folding gently until just combined.
- Fill muffin tin liners about two-thirds full with batter.
- Bake for 18-20 minutes, or until a toothpick comes out clean.
- Cool cupcakes in the pan for 5 minutes, then transfer to a wire rack.
- Make the frosting by beating butter and powdered sugar until fluffy, then add maple syrup.
- Frost cooled cupcakes with maple pecan frosting and garnish with pecans.
Notes
Store cupcakes in an airtight container at room temperature for up to 3 days or refrigerate for a week.
- Prep Time: 15 minutes
- Cook Time: 20 minutes
- Category: Dessert
- Method: Baking
- Cuisine: American
Nutrition
- Serving Size: 1 cupcake
- Calories: 250
- Sugar: 20g
- Sodium: 250mg
- Fat: 12g
- Saturated Fat: 4g
- Unsaturated Fat: 6g
- Trans Fat: 0g
- Carbohydrates: 35g
- Fiber: 1g
- Protein: 2g
- Cholesterol: 30mg
Keywords: pumpkin cupcakes, fall dessert, maple pecan frosting, autumn recipes
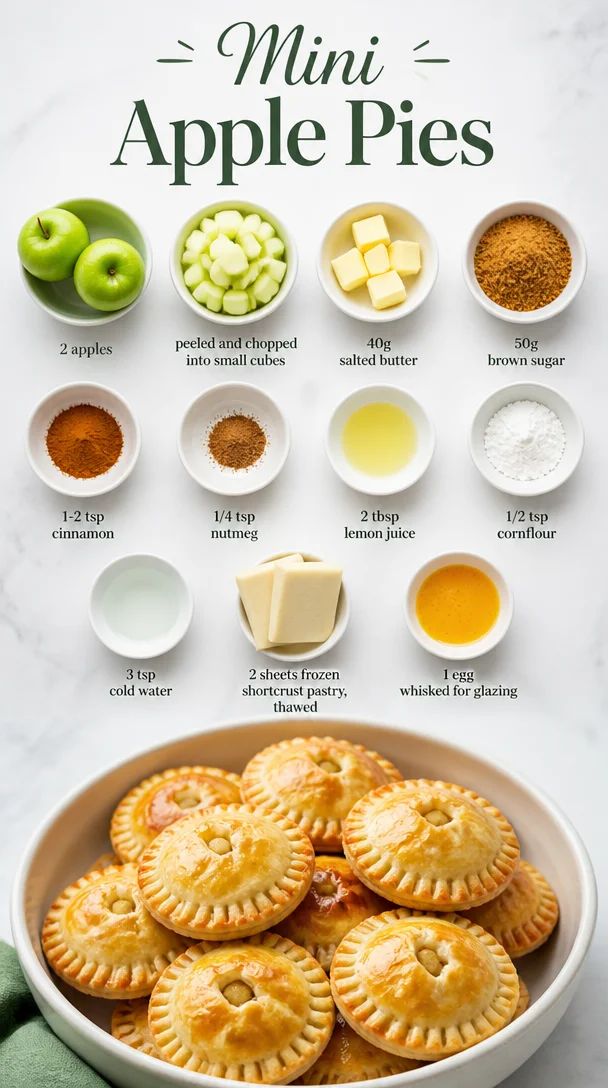
Mini Apple Pies
Mini Apple Pies: A Delightful Bite of Nostalgia
Hey there, food enthusiasts! Welcome back to the cozy corner of the internet that is Feastical. Today, we’re diving into a recipe that is not only delicious but also crammed with memories: Mini Apple Pies! If you’ve ever found yourself lost in the warm scent of baked apples, butter, and spices, you know the magic that fills the air when these little pies are in the oven. Grab your favorite apron, and let’s get cooking!
A Nostalgic Dive into Apple Pie Heaven
When I think about apple pie, I’m instantly transported back to my grandmother’s kitchen. She always had a way of filling the house with the most incredible aromas, her laughter ringing through as we helped her prepare our favorite desserts. The best part? Those mini apple pies she used to make! Perfectly portioned and bursting with juicy apples, they were the highlight of every family gathering. I can still picture her, flour dusting the front of her apron, expertly rolling out the pastry to create those delightful mini crusts.
Every time we’d pull them out of the oven, the excitement was palpable. We’d gather around the table, waiting impatiently for them to cool, while the sweet smell of cinnamon and nutmeg danced around us like an inviting embrace. It’s these memories that inspire me to share this recipe with you. So, whether you need a cozy dessert for a gathering or a comforting snack, mini apple pies are the way to go!
Ingredients
Here’s what you’ll need to whip up these delectable mini apple pies:
-
2 apples, peeled and chopped into small cubes
Use a crisp apple like Granny Smith or Honeycrisp for the perfect texture and flavor. If you find yourself without fresh apples, feel free to use canned pie filling! -
40g salted butter
Butter makes everything better! You can substitute with unsalted butter; just add a pinch of salt for balance. -
50g brown sugar
This adds that deep, rich flavor. If you want a lighter touch, granulated sugar works perfectly too. -
1-2 tsp cinnamon
What’s an apple pie without cinnamon? Feel free to season to your taste—more cinnamon makes it cozier! -
1/4 tsp nutmeg
Nutmeg adds a unique warmth. If you’re not a fan, simply omit it, but I highly recommend trying it! -
2 tbsp lemon juice
This brightens the filling and keeps the apples from browning. Don’t worry; the tang of lemon balances the sweetness beautifully! -
1/2 tsp cornflour
Cornflour thickens the filling, so it’s not too runny. If you don’t have it, try all-purpose flour as a substitute. -
3 tsp cold water
Cold water helps in the mixing process. It’s not much, but it makes a world of difference! -
2 sheets frozen shortcrust pastry, thawed
You can make your own pastry if you’re feeling adventurous, but ready-made works perfectly (and saves time!). -
1 egg, whisked for glazing
This gives the pies a beautiful golden color. If you prefer a vegan option, a little almond milk brushed on top will do just fine!
Step-by-Step Instructions
Now let’s get into the fun part—baking these beauties! Follow these steps closely to make sure your mini apple pies turn out perfectly golden and delicious.
-
Preheat the Oven
Preheat your oven to 180°C (350°F). A hot oven is crucial for getting that lovely flaky crust! -
Prepare the Apples
In a medium saucepan, melt your 40g of salted butter over medium heat. Once melted, toss in the peeled and chopped apples. Add the 50g of brown sugar, cinnamon, nutmeg, and lemon juice. Stir everything together until each apple piece is well coated. Allow it to cook for about 5-7 minutes until the apples are slightly tender. -
Thicken the Filling
In a small bowl, combine the cornflour and cold water. Mix until smooth and then stir it into the apple mixture. This helps to hold everything together! Cook for another minute until the filling starts to thicken, then remove it from the heat and allow it to cool slightly. -
Roll Out the Pastry
On a lightly floured surface, roll out the thawed shortcrust pastry. Make sure it’s about 3mm thick. Using a round cutter, cut out circles large enough to fit into the muffin tray you’re using. -
Assemble the Mini Pies
Grease your muffin tray, and gently press the pastry circles into the bottom of each muffin cup, creating small bowls. Spoon the cooled apple filling into each pastry shell, filling them about 3/4 full. -
Create Top Crusts
Using the remaining pastry, cut out smaller circles to top your pies. Alternatively, you can create a lattice top for a fancy touch! Gently place it over the filling. Seal the edges by crimping them with a fork then brush the top with the whisked egg for that beautiful golden finish. -
Bake Time!
Pop the muffin tray into your preheated oven and bake for 18-20 minutes or until the crust is golden brown and the filling is bubbly. Keep an eye on them! -
Cooling Down
Once baked, allow the mini pies to cool in the tray for about 5 minutes before transferring them to a wire rack. Patience is key here; let them cool to avoid burning your tongue in that first piping-hot bite!
Serving Suggestions
When it comes to serving these delightful mini apple pies, presentation matters! You can place them on a rustic wooden cutting board or a pretty white platter. Dust a little powdered sugar on top for added flair, or serve them warm with a scoop of vanilla ice cream melting over the top. Drizzle with a little caramel sauce, and watch the eyes of your guests light up! Pair with a cup of warm tea or coffee for that extra cozy feeling.
Recipe Variations
Want to switch things up a bit? Here are a few creative twists:
- Caramel Apple Mini Pies: Stir in some caramel bits along with the apple filling for a decadent twist.
- Spiced Pear & Apple Pies: Substitute one of the apples for ripe pears; they add a sweet, juicy twist to the filling.
- Nutty Crunch: Add some chopped walnuts or pecans into the apple mixture for an added crunch.
- Berry Boost: Mix in a handful of fresh or frozen berries like blueberries or raspberries for a colorful fruity blend.
- Cinnamon Roll Mini Pies: Swirl in some cinnamon sugar into the apple filling for a gooey, dessert-like experience.
Chef’s Notes
This recipe is deeply rooted in warmth and nostalgia for me, and I love how it brings family together. Over the years, I’ve played around with different fillings and crusts, even attempting savory versions with cheese! (Trust me, it’s a game-changer!) My grandmother’s magic was always in the simplicity, so I like to keep it uncomplicated and let the natural flavors shine through. Every time I bake these mini pies, I feel like I’m sharing a piece of my childhood with you!
FAQs and Troubleshooting
-
My crust is too thick; how can I fix it?
If you find that your crust is too thick, simply roll it out more thinly next time or ensure you’re using the correct size cutter to fit your muffin tray. -
The filling is runny. What happened?
If your filling is too runny, it could be because the apples released too much juice. Just be sure to thicken with cornflour and let it cool enough before filling the pies. -
How can I prevent my pie crust from puffing up?
You can prick the bottom of the pastry with a fork to prevent it from puffing up during baking, allowing steam to escape. -
Can I make these ahead of time?
Absolutely! You can prepare the filling and pastry a day in advance, just store them in the fridge. Assemble and bake when you’re ready to serve!
Nutritional Info
Mini apple pies are a comforting treat, and while they’re best enjoyed in moderation, here’s a quick look at what each pie might contain (based on a recipe serving 8 pies):
- Calories: Approximately 160-180 per pie
- Carbohydrates: 25g
- Fat: 8g
- Protein: 2g
- Fiber: 1g
Remember that adding ice cream or additional toppings will increase these values.
Final Thoughts
There you have it—a scrumptious recipe for Mini Apple Pies that will not only fill your kitchen with delightful aromas but also your hearts with warmth and nostalgia. Baking is more than just preparing food; it’s about creating moments and memories with those we cherish. So gather your loved ones around the table, share these mini pies, and relish the sweet connections they bring.
Happy baking, friends! Until next time, stay deliciously curious! 🍏🥧
Print
Mini Apple Pies
- Total Time: 40 minutes
- Yield: 8 servings 1x
- Diet: Vegetarian
Description
Delightful mini apple pies bursting with juicy apples and warm spices, perfect for gatherings or as a comforting snack.
Ingredients
- 2 apples, peeled and chopped into small cubes
- 40g salted butter
- 50g brown sugar
- 1–2 tsp cinnamon
- 1/4 tsp nutmeg
- 2 tbsp lemon juice
- 1/2 tsp cornflour
- 3 tsp cold water
- 2 sheets frozen shortcrust pastry, thawed
- 1 egg, whisked for glazing
Instructions
- Preheat your oven to 180°C (350°F).
- In a medium saucepan, melt your 40g of salted butter over medium heat.
- Add in the peeled and chopped apples along with the brown sugar, cinnamon, nutmeg, and lemon juice.
- Stir everything together until well coated and cook for about 5-7 minutes.
- In a small bowl, combine the cornflour and cold water, then mix until smooth.
- Stir the cornflour mixture into the apple mixture and cook for another minute.
- On a lightly floured surface, roll out the thawed shortcrust pastry to about 3mm thick.
- Using a round cutter, cut out circles large enough to fit into your muffin tray.
- Grease your muffin tray, and press the pastry circles into the bottom of each muffin cup.
- Spoon the cooled apple filling into each pastry shell, filling them about 3/4 full.
- Using the remaining pastry, cut out smaller circles for the tops or create lattice tops.
- Seal the edges by crimping them with a fork and brush with the whisked egg.
- Pop the muffin tray into your preheated oven and bake for 18-20 minutes.
- Once baked, allow them to cool for about 5 minutes before transferring to a wire rack.
Notes
For variations, you can add caramel bits, nuts, or mix in berries to the filling!
- Prep Time: 20 minutes
- Cook Time: 20 minutes
- Category: Dessert
- Method: Baking
- Cuisine: American
Nutrition
- Serving Size: 1 pie
- Calories: 170
- Sugar: 10g
- Sodium: 200mg
- Fat: 8g
- Saturated Fat: 3g
- Unsaturated Fat: 5g
- Trans Fat: 0g
- Carbohydrates: 25g
- Fiber: 2g
- Protein: 2g
- Cholesterol: 50mg
Keywords: mini apple pies, apple dessert, nostalgic recipes

Coconut Dream Bars
Coconut Dream Bars: A Slice of Tropical Bliss
Hey there, fellow food lovers! Today, we’re diving into a heavenly treat that will surely make your taste buds dance—Coconut Dream Bars! I’m thrilled to share this delightful dessert that’s perfect for any occasion, from a sunny picnic to a cozy family movie night. What’s not to love about a buttery, sweet, and totally dreamy concoction of coconut goodness?
Picture this: you walk into your kitchen, and the aroma of sweet coconut fills the air. It’s like being transported to a tropical paradise right in your own home! These Coconut Dream Bars are everything you could wish for in a dessert and more. They’re rich, satisfying, and incredibly easy to whip up. With just a handful of ingredients, you’ll create a treat that will have your friends and family begging for the recipe!
But first, let’s talk about why I adore these bars. Growing up, my family had a special tradition where we would gather at my Aunt Linda’s house for Sunday brunch. It was a cozy ritual filled with laughter, heartwarming conversations, and, of course, delicious food. Aunt Linda was famous for her Coconut Dream Bars—she made them with love, and they were always the highlight of our brunch spread. The crispy graham cracker base combined with the sweet, gooey coconut filling was simply irresistible.
I can still remember my little cousin Matthew trying to sneak away with the last piece, and Aunt Linda playfully scolding him. As we savored every bite, she would share stories about her adventures in the kitchen, explaining the importance of not just cooking but doing it with flair. That’s the spirit I try to embody in my cooking, and I hope to inspire you to infuse your kitchen with joy and creativity as well.
So, grab your apron and let’s get started on these Coconut Dream Bars that are sure to create their own little slice of joy in your life!
Ingredients
Let’s gather what we need to bring these Coconut Dream Bars to life. You might already have some of these in your pantry! Here’s the lineup:
-
1 cup unsweetened shredded coconut
This is the star of our show! Unsweetened coconut gives the bars a delectable texture and depth of flavor. If you can’t find shredded coconut, you can use flaked coconut for a similar effect—just keep an eye on the texture! -
1/2 cup unsalted butter, melted
Butter is the magic ingredient here, providing richness and a luscious mouthfeel. If you’re looking for a dairy-free option, coconut oil works like a charm too. Just make sure it’s melted and cooled before mixing! -
1 cup sweetened condensed milk
This adds a creaminess that holds everything together. If you want to reduce sugar, consider using a low-sugar or sugar-free version of sweetened condensed milk, but keep in mind the texture may change slightly. -
1 cup graham cracker crumbs
The base of our bars! You can make your own crumbs by crushing graham crackers in a food processor or purchase pre-made ones to save time. For a gluten-free version, try using gluten-free graham crackers or crushed almond flour. -
1/2 cup powdered sugar
To sweeten things up just a notch! This ingredient also helps with the texture. If you’re avoiding sugar, powdered erythritol can be a great substitute—just note that the sweetness level might differ. -
1 teaspoon vanilla extract
A little splash of vanilla elevates the flavors beautifully. For an extra kick, you could experiment with coconut extract—a delightful twist that’ll take these bars to the next level!
Step-by-Step Instructions
Now that we’ve gathered our ingredients, let’s dive into the nitty-gritty of making these mouthwatering Coconut Dream Bars. Follow these steps, and you’ll be delighting in your creation in no time!
-
Preheat Your Oven:
Start by preheating your oven to 350°F (175°C). This is crucial as it ensures the bars bake evenly. A hot oven means golden-brown edges and a beautifully set center. -
Prepare Your Pan:
Line an 8×8 inch baking dish with parchment paper, leaving some overhang for easy removal later. This simple step saves you from the dreaded sticky situation when you’re trying to cut the bars! -
Mix the Base:
In a large mixing bowl, combine the graham cracker crumbs, melted butter, and powdered sugar. Stir until everything is well incorporated. The mixture should resemble damp sand—when squeezed, it should hold together nicely! -
Press the Mixture:
Pour the crumb mixture into the prepared baking dish and use the back of a measuring cup to press it down firmly. This creates a solid foundation for our dreamy filling. Pro tip: the firmer you press, the better the bars will hold together! -
Make the Filling:
In another bowl, mix the shredded coconut, sweetened condensed milk, and vanilla extract. Stir until all the ingredients are well combined. You should have a sticky, sweet mixture that looks like a tropical island in a bowl! -
Spread It Out:
Pour the coconut mixture over the pressed graham cracker base, spreading it evenly with a spatula. Don’t be shy—make sure to cover every corner! -
Bake the Bars:
Pop the baking dish into the preheated oven and let the bars bake for 25-30 minutes, or until the top is golden brown. The smell wafting through your kitchen will be enough to make anyone’s mouth water! -
Cool and Chill:
Once baked, remove the bars from the oven and let them cool in the pan at room temperature for about 10 minutes. Then, carefully lift them out using the parchment overhang and allow them to cool completely on a wire rack. For a cleaner cut, chill the bars in the refrigerator for a bit before slicing. -
Slice and Serve:
Use a sharp knife to cut the bars into squares or rectangles. I like to dust mine with a little extra powdered sugar for presentation!
Serving Suggestions
When it comes to enjoying your Coconut Dream Bars, the possibilities are endless! Here are some delightful serving suggestions to elevate your dessert experience:
-
Garnish with Fresh Fruit: Top the bars with slices of fresh pineapple or mango for an extra burst of tropical flavor. You can also add a sprinkle of toasted coconut flakes for that extra crunch.
-
Drizzle of Chocolate: Melt some dark or white chocolate and drizzle it over the sliced bars for a rich, decadent touch. The combination of coconut and chocolate is simply divine!
-
Pair with Ice Cream: Serve a warm piece of your Coconut Dream Bar alongside a scoop of vanilla ice cream. As it melts a little, it creates a creamy, dreamy experience that’s hard to beat.
-
Add Some Whipped Cream: A dollop of freshly whipped cream on top makes for a beautiful presentation and enhances the creamy texture.
Recipe Variations
Versatility is key in the kitchen, and these Coconut Dream Bars are no exception! Here are some fun variations to shake things up:
-
Chocolate Coconut Bars: Mix in chocolate chips with the coconut filling for a chocolatey twist. You’ll get pockets of melted chocolate that turn every bite into a flavor explosion!
-
Nutty Twist: Add chopped nuts, like pecans or almonds, into the crust or filling for an added crunch. The nutty flavor will complement the sweetness of the coconut beautifully.
-
Lemon Zest: For a zingy surprise, add a teaspoon of lemon zest to the coconut filling. It adds a refreshing brightness that balances the rich sweetness.
-
Almond Joy Variation: Mix in some chopped almonds and a few dark chocolate chips for an homage to the famous candy bar. Everyone will enjoy this nostalgic flavor combo!
-
Vegan Version: Replace the butter with coconut oil, use a plant-based sweetened condensed milk, and swap out powdered sugar for a vegan alternative. You won’t believe how scrumptious they still taste!
Chef’s Notes
As someone who loves experimenting in the kitchen, I can tell you that each batch of Coconut Dream Bars carries a little piece of my heart. Originally, I learned to make these delightful bars from Aunt Linda, but over the years, I’ve really made them my own by adding my favorite twists.
One of my funniest kitchen stories involves the time I accidentally mixed up the salty and sweet ingredients. I thought I was adding salt to the butter, but it turned out to be sugar! The mix-up produced the most unexpectedly delicious batch of bars. Now, I sometimes add a pinch of sea salt on top just to keep that surprise element alive!
FAQs and Troubleshooting
Here are some common questions you might have when making your Coconut Dream Bars, along with solutions to any potential hiccups:
1. My bars are too crumbly; what went wrong?
If your bars are falling apart and crumbling, it could be due to not packing the crust tightly enough. Use the back of a measuring cup to press it down firmly. Also, make sure your butter is fully melted and incorporated well!
2. Can I use sweetened shredded coconut instead?
Absolutely! If you prefer a sweeter filling, using sweetened shredded coconut can work, but reduce or omit the powdered sugar to balance the sweetness.
3. How do I store leftovers?
Keep your Coconut Dream Bars covered in the refrigerator for up to a week. You could also freeze them wrapped tightly in plastic wrap and aluminum foil, perfect for a sweet treat later on!
4. Why did my bars puff up while baking?
If your bars puff up during baking, it may be due to excess air trapped in the mixture. When mixing, be gentle but thorough. If they deflate after cooling, that’s completely normal!
Nutritional Info
While desserts are often more about enjoyment than counting calories, here’s a general breakdown of the Coconut Dream Bars per square (1/16th of the recipe):
- Calories: 180
- Total Fat: 10g
- Saturated Fat: 7g
- Cholesterol: 20mg
- Sodium: 50mg
- Total Carbohydrate: 22g
- Dietary Fiber: 1g
- Sugars: 10g
- Protein: 1g
Note that these values may vary based on the specific brands and substitutes you use, so always check your product labels if you have dietary restrictions.
Final Thoughts
There you have it, folks—a deliciously easy recipe for Coconut Dream Bars that’s bound to become a favorite in your household. Cooking is all about love and creativity, and I hope this recipe inspires you to make something delicious while creating your dreamy moments in the kitchen.
So next time you find yourself with a craving for something sweet or want to impress your friends, whip up a batch of these Coconut Dream Bars! They’re so simple to make, and trust me, the compliments will be pouring in.
I can’t wait to hear how yours turn out! Share your kitchen adventures with me, and remember, it’s all about having fun and making memories in the kitchen. Happy baking, and may your days be filled with coconut bliss!
Print
Coconut Dream Bars
- Total Time: 45 minutes
- Yield: 16 servings 1x
- Diet: Vegetarian
Description
Delightful Coconut Dream Bars that combine a buttery graham cracker base with a sweet, gooey coconut filling, perfect for any occasion.
Ingredients
- 1 cup unsweetened shredded coconut
- 1/2 cup unsalted butter, melted
- 1 cup sweetened condensed milk
- 1 cup graham cracker crumbs
- 1/2 cup powdered sugar
- 1 teaspoon vanilla extract
Instructions
- Preheat your oven to 350°F (175°C).
- Line an 8×8 inch baking dish with parchment paper.
- Mix the graham cracker crumbs, melted butter, and powdered sugar in a large bowl.
- Press the mixture into the prepared baking dish.
- Mix the shredded coconut, sweetened condensed milk, and vanilla extract in another bowl.
- Spread the coconut mixture over the pressed graham cracker base.
- Bake for 25-30 minutes, or until the top is golden brown.
- Cool in the pan for about 10 minutes before transferring to a wire rack to cool completely.
- Slice into squares and serve.
Notes
For a cleaner cut, chill the bars in the refrigerator for a bit before slicing. You can also garnish with fresh fruit or a drizzle of chocolate for extra flavor.
- Prep Time: 15 minutes
- Cook Time: 30 minutes
- Category: Dessert
- Method: Baking
- Cuisine: American
Nutrition
- Serving Size: 1 square
- Calories: 180
- Sugar: 10g
- Sodium: 50mg
- Fat: 10g
- Saturated Fat: 7g
- Unsaturated Fat: 2g
- Trans Fat: 0g
- Carbohydrates: 22g
- Fiber: 1g
- Protein: 1g
- Cholesterol: 20mg
Keywords: Coconut Dream Bars, dessert, tropical dessert, easy dessert recipe, sweet treats

One-Bowl Strawberry Lemon Blondies Recipe (Fresh Summer Treat)
Strawberry Lemon Blondies: A Sweet Treat with a Citrus Twist
Hey there, fellow foodies! Welcome back to Feastical! Today, we’re diving into a dessert that’s not just a treat for the taste buds but also a feast for the eyes—Strawberry Lemon Blondies! Think of these as the sunshine on a cloudy day, combining the sweetness of strawberries with that zesty burst of lemon. These blondies are rich, chewy, and oh-so-satisfying, making them the perfect addition to any gathering or a sweet pick-me-up for your afternoon snack.
When I first whipped up a batch of these gorgeous treats, I was transported back to my childhood summers spent at my grandparents’ house. My grandmother was a master in the kitchen, always looking for ways to incorporate seasonal fruits into her baked goods. I remember the excitement as we’d pick fresh strawberries from the garden, their sweet and fragrant aroma filling the air. After a day of picking, we’d come back inside, hands stained from the juice, and watch as Grandma transformed our harvest into something magical. This recipe is a tribute to those fond memories, blending nostalgia with a modern twist that you can easily recreate at home.
So, roll up your sleeves, and let’s create some beautiful Strawberry Lemon Blondies together! They’re perfect for sharing with friends, a sweet surprise for your family, or just indulging in all by yourself (no judgment here!).
Ingredients
Before you get started, let’s gather all the delicious ingredients you’ll need for these Strawberry Lemon Blondies. Here’s what you’ll need:
-
1 cup unsalted butter, melted
Butter is the base of our blondies. It adds richness and moisture. You can substitute this with coconut oil or a plant-based butter if you’re going for a dairy-free option. -
1 cup brown sugar
Brown sugar gives these blondies that wonderful caramel flavor. If you’re in a pinch, you can swap it for white sugar, but the flavor will be a bit less deep. -
2 large eggs
Eggs act as a binding agent and contribute to the structure of your blondies. For a vegan version, use flax eggs (1 tablespoon ground flaxseed mixed with 2.5 tablespoons water per egg) as a substitute. -
1 teaspoon vanilla extract
A splash of vanilla elevates the flavors, adding warmth and sweetness. If you’re feeling adventurous, try using almond extract for a nutty twist! -
2 cups all-purpose flour
This is the backbone of your blondies. If you need a gluten-free option, almond flour or a 1:1 gluten-free flour blend should do the trick! -
1/2 teaspoon baking powder
This little leavening agent is what gives your blondies that perfect, chewy texture. -
1/4 teaspoon salt
Salt enhances all the flavors in the dessert. Don’t skip it! -
1 cup fresh strawberries, diced
Fresh strawberries add natural sweetness and a pop of color! If strawberries aren’t in season, feel free to use frozen, just make sure they’re thawed and drained. -
1 tablespoon lemon zest
This is where the magic happens! Lemon zest brightens up the flavor. Don’t have fresh lemons? You can use bottled lemon zest in a pinch, but fresh is always best. -
1/4 cup lemon juice
Lemon juice provides the tangy kick that complements the sweetness of the strawberries beautifully. Again, fresh is ideal, but bottled juice works, too!
Step-by-Step Instructions
Alright, let’s get baking! Here’s how to make these Strawberry Lemon Blondies step by step:
-
Preheat your oven to 350°F (175°C)
This is key to ensuring your blondies bake evenly and nicely! While the oven warms up, prepare your baking dish. -
Grease your baking dish
You can use cooking spray or line it with parchment paper for easy removal later. I like to use a 9×13 inch pan for this recipe, but you could also use smaller pans for thicker blondies—just adjust the baking time. -
Melt the butter
In a large mixing bowl, melt your butter. You can do this in the microwave or on the stovetop. Let it cool slightly before mixing in the sugar to avoid cooking the eggs later. -
Mix in the sugars
Add your brown sugar to the melted butter and stir until combined. You want the mixture to be smooth and slightly glossy. Pro tip: Using the back of your spatula to press down on the sugar can help dissolve any lumps! -
Add the eggs and vanilla
Now, crack in your eggs and add the vanilla extract. Beat the mixture until it’s light and fluffy. This step helps to incorporate air, which will give your blondies that lovely chewy texture we all crave. -
Sift in the dry ingredients
Now it’s time to bring it all together! Add the flour, baking powder, and salt to the wet ingredients. Gently fold this in to avoid overmixing. We want to keep that airy texture! -
Stir in the strawberries and lemon
Gently fold in the diced strawberries, lemon zest, and lemon juice. This is where the magic happens, as bright flavors combine with sweet berries. Just be careful not to crush the strawberries too much! -
Spread the mixture into your prepared pan
Pour your blondie mixture into the greased pan, smoothing it out with a spatula. Don’t worry about it being perfect; a rustic look is part of the charm! -
Bake
Pop your blondies into the oven and bake for 25–30 minutes, or until the edges are golden and a toothpick inserted in the center comes out with a few moist crumbs. Keep an eye on them during the last few minutes—every oven is a bit different! -
Let cool
Once out of the oven, allow the blondies to cool in the pan for about 10 minutes. Then, transfer them to a wire rack to cool completely. This waiting period is torture, I know, but trust me, it’s worth it!
Serving Suggestions
When it comes to serving these Strawberry Lemon Blondies, presentation is everything! Here’s how to plate them up beautifully:
-
Cut into squares
Use a sharp knife to cut your blondies into squares or rectangles. Try to cut them while they’re still slightly warm to avoid crumbling. -
Dust with powdered sugar
For that professional touch, dust a light coating of powdered sugar over the top. It not only looks beautiful but adds a little extra sweetness. -
Serve with whipped cream or ice cream
A dollop of whipped cream or a scoop of ice cream adds a creamy contrast to the chewy blondies. You could even add a sprinkle of lemon zest on top to carry through those fresh flavors! -
Fresh strawberries on the side
A few whole or sliced strawberries alongside the blondies not only enhances the presentation but also takes the flavor to the next level.
Recipe Variations
Now that you’ve mastered the classic version, here are some creative twists to keep things exciting:
-
Blueberry Lemon Blondies
Swap out the strawberries for fresh or frozen blueberries for a different fruity flavor. The tartness of blueberries pairs beautifully with lemon! -
Coconut Lemon Blondies
Add shredded coconut to the batter for a tropical flair. You could also top them with a sprinkle of toasted coconut before baking for an extra crunch. -
Lemon Poppy Seed Blondies
Incorporate a tablespoon of poppy seeds into the batter for a delightful crunch and a nod to classic lemon poppy seed muffins. -
White Chocolate Raspberry Blondies
Replace the strawberries with raspberries and toss in a handful of white chocolate chips for a rich and flavorful twist! -
Vegan Lemon Blondies
Use flax eggs, plant-based butter, and substitute the regular sugar for coconut sugar to make a vegan-friendly version that doesn’t compromise on taste!
Chef’s Notes
Creating these Strawberry Lemon Blondies is not just about following a recipe; it’s about capturing the essence of homemade goodness. The first time I made these, I remembered how my grandmother would always say, “Cooking is like love; it should be entered into with abandon or not at all.” It’s that philosophy that keeps me going in the kitchen!
As I adapted the recipe over time, I discovered that substituting fruits and playing with flavors makes each batch uniquely delicious. The best part? Each variation has become a little story, tied to the season or the company I’ve shared it with!
FAQs and Troubleshooting
Here are some common questions you might have while making your Strawberry Lemon Blondies:
-
Why are my blondies too cake-like?
If your blondies turned out more like a cake, it might be due to overmixing the batter or adding too much flour. Remember to mix just until combined! -
How do I know when they’re done baking?
Check for golden edges and a toothpick test. If it comes out with a few moist crumbs, they’re ready! Don’t wait until it comes out completely clean, or they may dry out. -
Can I freeze these blondies?
Absolutely! Once cooled, wrap the blondies tightly in plastic wrap and store them in an airtight container. They’ll keep well in the freezer for up to 3 months. Just thaw them at room temperature before serving. -
What if I can’t find fresh strawberries?
No worries! You can use frozen strawberries. Be sure to thaw and drain them well to prevent excess moisture in your blondies.
Nutritional Info
Now, let’s chat a bit about the nutrition of these delightful bars! While these Strawberry Lemon Blondies are definitely a treat, here’s a rough breakdown of what you can expect from a typical blondie (assuming the batch is cut into 16 squares):
- Calories: ~170 per blondie
- Fat: 7g
- Carbohydrates: 24g
- Sugar: 10g
- Protein: 2g
Keep in mind that nutritional values can vary based on specific ingredients and portion sizes. Enjoying these blondies as a part of a balanced diet is key!
Final Thoughts
And there you have it! Strawberry Lemon Blondies that are not only delicious but also filled with love and memories. Whether you’re celebrating a special occasion or just treating yourself to a little something sweet, these blondies are sure to delight.
So grab some fresh strawberries, preheat your oven, and get ready to create your own delicious memories in the kitchen. Remember, food isn’t just about sustenance; it’s about connection, warmth, and joy. Let’s spread that love, one blondie at a time!
Thanks for joining me today at Feastical! I can’t wait to hear about your kitchen adventures. Happy baking!
Print
Strawberry Lemon Blondies
- Total Time: 45 minutes
- Yield: 16 servings 1x
- Diet: Vegetarian
Description
Delicious, chewy blondies filled with fresh strawberries and a zesty lemon twist, perfect for any gathering or a sweet snack.
Ingredients
- 1 cup unsalted butter, melted
- 1 cup brown sugar
- 2 large eggs
- 1 teaspoon vanilla extract
- 2 cups all-purpose flour
- 1/2 teaspoon baking powder
- 1/4 teaspoon salt
- 1 cup fresh strawberries, diced
- 1 tablespoon lemon zest
- 1/4 cup lemon juice
Instructions
- Preheat your oven to 350°F (175°C).
- Grease your baking dish.
- Melt the butter.
- Mix in the sugars.
- Add the eggs and vanilla.
- Sift in the dry ingredients.
- Stir in the strawberries and lemon.
- Spread the mixture into your prepared pan.
- Bake for 25–30 minutes.
- Let cool.
Notes
Dust with powdered sugar before serving and serve with whipped cream or ice cream for an added touch.
- Prep Time: 15 minutes
- Cook Time: 30 minutes
- Category: Dessert
- Method: Baking
- Cuisine: American
Nutrition
- Serving Size: 1 blondie
- Calories: 170
- Sugar: 10g
- Sodium: 200mg
- Fat: 7g
- Saturated Fat: 4g
- Unsaturated Fat: 3g
- Trans Fat: 0g
- Carbohydrates: 24g
- Fiber: 1g
- Protein: 2g
- Cholesterol: 30mg
Keywords: blondies, dessert, strawberry, lemon, baking
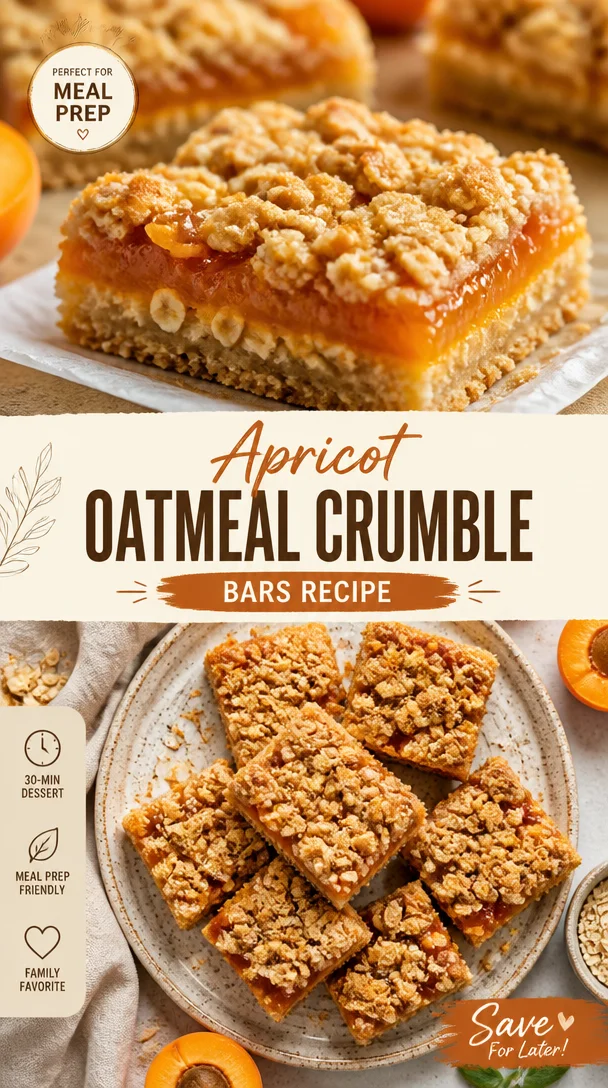
Apricot Oatmeal Crumble Bars Recipe
Apricot Oatmeal Crumble Bars: A Sweet Nostalgic Delight
Hey there, Foodie Friends! I’m so excited to have you here at Feastical, where we turn simple ingredients into soul-warming dishes. Today, we’re diving into a recipe that’s near and dear to my heart: Apricot Oatmeal Crumble Bars. These bars are not just a treat for your taste buds; they’re a delicious reminder of cozy afternoons spent in the kitchen with loved ones.
When I think back to my childhood, one of my fondest memories is baking with my grandmother during summer break. Armed with her trusty apron and a sense of adventure, we’d whip up all sorts of goodies. There was always a pint of apricot preserves involved for at least one of our creations. The aroma of sweet apricots and warm oats filled the air, inviting my siblings and me to gather around the kitchen table, eager to devour whatever we had baked.
These Apricot Oatmeal Crumble Bars are inspired by those afternoons. They’re super easy to make and perfect for sharing. Whether you’re prepping for a potluck, looking for a delicious snack, or simply wanting to indulge in a little nostalgia, these bars will hit the spot. Let’s roll up our sleeves and make some kitchen magic happen!
My Personal Oatmeal Story
One summer afternoon, when I was about ten years old, I was given the “big kid” task of mixing the ingredients while my grandmother prepared the apricot filling. The kitchen was bustling, with pots clanging and the sweet sounds of laughter echoing through the air. I still remember the first time I tasted these Apricot Oatmeal Crumble Bars as they came out of the oven—golden, crumbly, and drizzled with a hint of warmth. My grandma smiled as I took a huge bite, and my eyes widened in delight.
That moment sparked my lifelong love for cooking and baking! My grandmother always said that cooking is like giving someone a hug—and these bars were just that. I continue to make these delightful treats to this day, sharing them with friends and family. Now, I can’t wait for you to bake them too, and create your own warm memories in the kitchen!
Ingredients
Here’s what you’ll need to whip up these delightful Apricot Oatmeal Crumble Bars:
- 1 ¼ cups rolled oats: Rolled oats give these bars a chewy texture. If you need gluten-free options, look for certified gluten-free oats.
- ¾ cup all-purpose flour: This gives the crumble a sturdy base. You can use whole wheat flour for a nuttier flavor or almond flour for a gluten-free version.
- 1 cup apricot preserves: The star of the show! Feel free to substitute with any fruit preserves you have on hand, such as peach or raspberry, for a different twist.
- ½ cup butter, softened to room temperature: Butter adds richness. For a dairy-free option, you can swap in coconut oil or vegan butter.
- ½ cup packed brown sugar: This sweetener adds depth and a bit of moisture. If you’re watching sugar intake, you can reduce it or use coconut sugar for a healthier option.
- ¼ teaspoon baking soda: This creates slight leavening in the bars, giving them a nice texture. If you run out, you can skip it, but the bars will be denser.
With these simple yet versatile ingredients, you’ll create a treat that warms the heart!
Step-by-Step Instructions
Let’s get cooking! Follow these steps to create your scrumptious Apricot Oatmeal Crumble Bars:
-
Preheat your oven to 350°F (175°C). Preparing your oven is key to a perfect bake. Preheating ensures that everything cooks evenly from the get-go!
-
Grease a 9×9-inch baking pan. Using a bit of cooking spray or butter, coat the bottom and sides of the pan, so your bars don’t stick. It’s a little detail that makes a big difference!
-
Mix the dry ingredients in a bowl. In a large mixing bowl, combine the rolled oats, all-purpose flour, brown sugar, and baking soda. Stir until well-combined. Feel free to add a pinch of salt to enhance the sweetness; it’s a chef’s secret weapon!
-
Incorporate the butter. Add the softened butter to your dry mixture. Using your fingers or a pastry cutter, mix until the mixture resembles coarse crumbs. This is the fun part! Get your hands in there and feel the texture; you want some nice, crumbly bits!
-
Set aside a cup for the topping. Remember to reserve about a cup of this crumble mixture for the topping later. It’s like keeping a little piece of magic for the final touch!
-
Press the remaining mixture into the pan. Use a spatula or your fingers to press the crumble into an even layer at the bottom of the baking pan. It should be compact enough to hold together when baked.
-
Spread the apricot preserves evenly. Spoon the apricot preserves over the pressed crumble, spreading it gently to ensure every bite has a lovely fruit filling. The sweetness will remind you of childhood!
-
Top with the reserved crumble. Sprinkle the remaining mixture evenly over the apricot preserves. This will create a lovely crust on top, giving your bars that signature crumble.
-
Bake for 25-30 minutes. Place the pan into the preheated oven and bake until the top is golden brown and fragrant. Keep an eye on it—because no one likes burnt bars!
-
Cool and cut. Once baked, remove from the oven and let the bars cool in the pan for about 10-15 minutes. This makes them easier to cut. Slice them into squares or bars, depending on your mood!
There you have it—a beautifully baked batch of Apricot Oatmeal Crumble Bars, with an irresistible aroma wafting through your kitchen.
Serving Suggestions
It’s time to enjoy those beautiful bars! You can serve them warm, straight from the oven, or at room temperature. They are delightful on their own, but if you want to elevate the experience, here are a few serving ideas:
-
Top with a scoop of vanilla ice cream: You can never go wrong with warm crumble bars and a scoop of ice cream! The creaminess perfectly balances the sweetness.
-
Dust with powdered sugar: A light dusting gives them an elegant touch and a hint of sweetness!
-
Pair with a cup of tea or coffee: These bars are perfect for afternoon tea or a coffee break. The flavors complement each other beautifully.
-
Add some fresh fruit: Slicing up some fresh strawberries or peaches adds a lively burst of flavor and freshness!
With these serving suggestions, you’re set to impress anyone lucky enough to indulge!
Recipe Variations
One of the best parts about baking is that there’s always room for creativity. Here are some tasty twists on the classic Apricot Oatmeal Crumble Bars:
-
Nutty Additions: Stir in ½ cup of chopped nuts like almonds or walnuts for extra crunch and flavor.
-
Spiced Up: Add a teaspoon of cinnamon or nutmeg to the dry mixture for a warm spice note.
-
Chocolate Lovers: Fold in ½ cup of chocolate chips into the crumble mix for a decadent twist on the classic bars.
-
Fruit Fiesta: Mix it up by using a combination of fruit preserves. Try adding raspberry or peach for a layered fruit flavor!
-
Healthy Alternative: Swap the butter with coconut oil, use a sugar substitute, and incorporate flaxseed or chia seeds for added nutrition.
These variations keep the recipe fresh while still providing that comfort-food vibe!
Chef’s Notes
Every recipe tells a story, and this one is no different. Over the years, I’ve tweaked the original recipe to fit my taste and the occasions I bake for. I remember a particularly hilarious attempt when I accidentally used salt instead of sugar—let’s just say the reactions from my family were unforgettable!
Fortunately, I quickly became a pro at knowing exactly how much of each ingredient brings the best flavor. These bars have evolved into a go-to comfort food item for family gatherings. My friends affectionately refer to them as “Beau’s baked magic.” I love that a simple recipe can turn into something that spreads joy.
FAQs and Troubleshooting
To ensure your baking adventure goes smoothly, here are some common questions and answers about the Apricot Oatmeal Crumble Bars:
-
Why did my crumble bars fall apart?
If your bars are crumbling and falling apart, it might be that they needed a bit more baking time to firm up or that they didn’t cool long enough before cutting. Also, make sure to compact the base mixture well before spreading the preserves. -
Can I make these bars ahead of time?
Absolutely! You can prepare them a day in advance, store them in an airtight container, and enjoy them the next day. Just reheat them in a microwave for a few seconds to warm them up! -
What if I don’t have apricot preserves?
You can easily swap the apricot preserves with any fruit spread you love! Raspberry, strawberry, or even a mixed berry blend will work wonderfully! -
How do I store leftovers?
Keep these bars in an airtight container in the fridge for up to a week. They can also be frozen for up to three months—just make sure to wrap them well!
Nutritional Info
Here’s a little insight into the nutritional side of these delicious Apricot Oatmeal Crumble Bars (per serving, approximately):
- Calories: 200
- Protein: 2g
- Carbohydrates: 30g
- Dietary Fiber: 2g
- Sugars: 10g
- Fats: 10g
These bars may not be “health food” per se, but they provide a delightful balance of sweetness and wholesome oats. As with all things—enjoy them in moderation!
Final Thoughts
And there you have it! Apricot Oatmeal Crumble Bars, full of nostalgia, flavor, and a whole lot of love. This recipe is a wonderful way to celebrate the little things in life—a simple mix of ingredients transforming into something magical in the kitchen.
Whether you’re whipping them up for a family gathering, a special event, or just a cozy night in, I hope these bars become a beloved recipe in your home too. Remember, cooking is all about bringing people together and sharing happiness—and there’s nothing like a homemade treat to do just that!
So grab your ingredients, turn up some music, and let’s create some sweet kitchen memories! If you make these bars, feel free to tag me on social media. I’d love to see your creations!
Happy baking, Foodie Friends! 🍑✨
Print
Apricot Oatmeal Crumble Bars
- Total Time: 45 minutes
- Yield: 16 servings 1x
- Diet: Vegetarian
Description
Delightful Apricot Oatmeal Crumble Bars inspired by childhood baking memories, perfect for sharing and indulging.
Ingredients
- 1 ¼ cups rolled oats
- ¾ cup all-purpose flour
- 1 cup apricot preserves
- ½ cup butter, softened to room temperature
- ½ cup packed brown sugar
- ¼ teaspoon baking soda
Instructions
- Preheat your oven to 350°F (175°C).
- Grease a 9×9-inch baking pan.
- Mix the dry ingredients in a bowl.
- Incorporate the butter.
- Set aside a cup for the topping.
- Press the remaining mixture into the pan.
- Spread the apricot preserves evenly.
- Top with the reserved crumble.
- Bake for 25-30 minutes.
- Cool and cut.
Notes
For a healthier option, consider swapping butter with coconut oil and using a sugar substitute.
- Prep Time: 15 minutes
- Cook Time: 30 minutes
- Category: Dessert
- Method: Baking
- Cuisine: American
Nutrition
- Serving Size: 1 bar
- Calories: 200
- Sugar: 10g
- Sodium: 150mg
- Fat: 10g
- Saturated Fat: 6g
- Unsaturated Fat: 4g
- Trans Fat: 0g
- Carbohydrates: 30g
- Fiber: 2g
- Protein: 2g
- Cholesterol: 30mg
Keywords: apricot bars, oatmeal crumble, dessert, baking, nostalgic treats
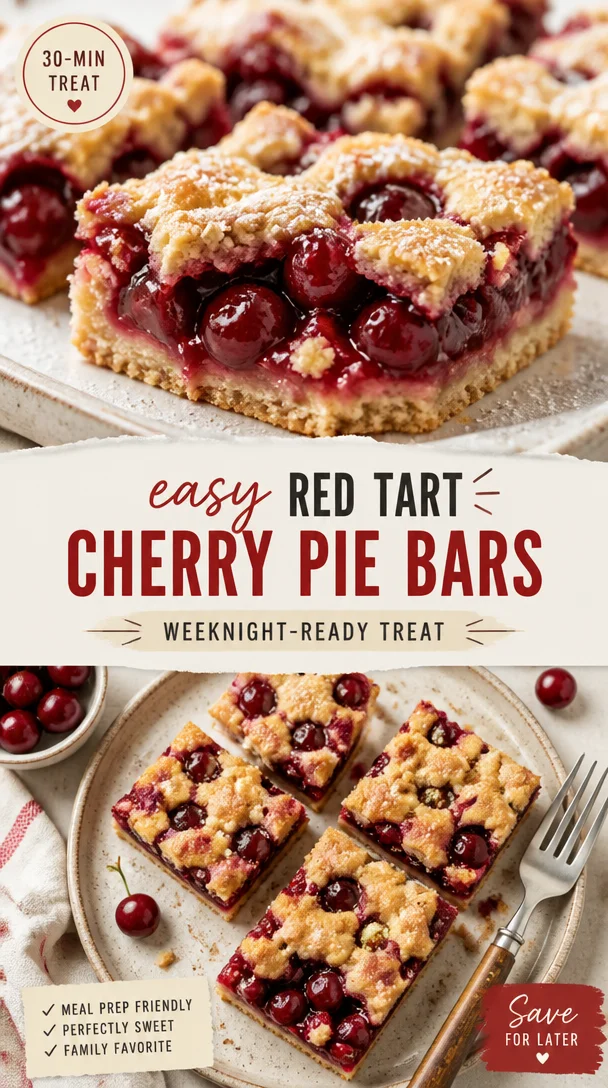
Easy Red Tart Cherry Pie Bars (Weeknight-Ready Treat)
The Sweet and Tart Symphony of Red Tart Cherry Pie Bars
Hey there, fellow food lovers! Today we’re diving into a delightful treat that’s sure to tickle your taste buds and create a little magic in your kitchen: Red Tart Cherry Pie Bars. Picture this: a buttery crust, a vibrant cherry filling bursting with flavor, and a sprinkle of coconut for that extra touch. Sounds divine, right? Trust me, these bars are the ultimate comfort dessert that’ll have everyone coming back for seconds.
When I first stumbled upon red tart cherries, I was instantly captivated. Their sweet yet slightly tart flavor spoke to me, and I knew they would be the star of a scrumptious recipe. Fast forward to many at-home baking sessions, and these cherry pie bars quickly became a staple in my kitchen—perfect for potlucks, picnics, or just a cozy night in with family. Let’s embark on this dreamy culinary journey together and create something memorable!
A Slice of Nostalgia
Let me take you back to one of my fondest childhood memories. Every summer, my family would pile into the car and head to our favorite local orchard. The air was filled with the fragrant aroma of ripe cherries, and I could barely contain my excitement. My mom would hand me a small bucket, and we’d race through the orchard, plucking the brightest red cherries we could find. The experience was thrilling, as I enjoyed the one-of-a-kind sweetness of those tart cherries fresh from the tree.
Later, my mom would whip up her famous cherry pie, filling the house with the most delightful aroma. The buttery crust, vibrant cherry filling, and sweet-tart flavor combination created a sense of warmth and joy. As we gathered around the dining table after dinner, I always savored that first bite. Fast forward to today, and those cherished memories inspired my rendition of cherry pie—just in a more portable and fun form: Red Tart Cherry Pie Bars. Now, every time I bake these bars, I relive those sweet summer days, and I can’t wait for you to create your own beautiful memories!
Ingredients
Let’s gather our ingredients and prepare to create these spectacular cherry pie bars. Here’s what you’ll need:
-
2 cans (14 ounces each) Oregon Fruit Red Tart Cherries: The star of the show! These canned cherries save us time while packing in loads of flavor. If you’re feeling adventurous, you can easily swap them with fresh cherries when they’re in season, just be sure to adjust the sweetness accordingly!
-
1/2 cup (100 grams) sugar: This will balance the tartness of the cherries. Feel free to reduce the sugar for a less sweet filling or substitute with a natural sweetener, like honey or maple syrup.
-
2 tablespoons (18 grams) cornstarch: Cornstarch acts as a thickener for our cherry filling. If you find yourself out of cornstarch, you can use flour, but keep in mind it may alter the texture a bit.
-
1/4 teaspoon kosher salt: A pinch of salt brings all the flavors to life. You can use regular table salt if that’s what you have, but kosher salt is my go-to for a more delicate touch.
-
1 tablespoon lemon juice: Just a splash brightens the flavors and enhances the cherries’ natural tartness. If you prefer, you can use lime juice for a fun twist.
-
1 teaspoon vanilla extract: Because, let’s be honest, everything is better with a hint of vanilla. If you’re feeling fancy, consider using a high-quality vanilla bean or vanilla paste.
-
2 5/8 cups (336 grams) unbleached all-purpose flour: This forms the base of our buttery crust. You can substitute whole wheat flour for a nuttier flavor or gluten-free flour for a dietary adjustment.
-
3/4 cup (150 grams) granulated sugar: More sweetness for our crust, which creates a lovely contrast with the tart filling.
-
1/2 teaspoon kosher salt: Just like before, this balances the sweetness.
-
1/4 teaspoon baking powder: A bit of leavening agent for that perfect texture.
-
16 tablespoons (227 grams) unsalted butter: Melted down, this will create a rich and delicious crust. If you’re looking for a dairy-free option, coconut oil works wonderfully!
-
3 tablespoons sweetened shredded coconut: This adds a delightful texture and tropical flair to our crust. If you prefer a classic flavor, feel free to omit it.
Step-by-Step Instructions
Ready to get baking? Let’s roll up our sleeves and dive into the detailed steps for creating these fabulous Red Tart Cherry Pie Bars!
-
Preheat the Oven: Preheat your oven to 350°F (175°C). Preheating helps ensure a uniform baking temperature from the start, resulting in even cooking.
-
Prepare the Pan: Grab a 9×13-inch baking pan (that’s the perfect size for bar recipes!) and brush the sides and bottom with melted butter. This will help prevent sticking.
-
Create the Crust:
- In a large mixing bowl, combine the flour, granulated sugar, salt, and baking powder.
- Next, stir in the melted butter until it forms a crumbly mixture. You can use a fork or your hands for that homestyle vibe. If you like a thicker crust, you can reserve a little of the mixture to sprinkle on top of the cherry filling later.
-
Press the Crust: Pour the crumbly crust mixture into the prepared pan and press it evenly across the bottom with your fingers or a spatula. This will create a solid foundation for our juicy filling!
-
Bake the Crust: Pop the crust into the preheated oven and bake for about 15-20 minutes or until it’s lightly golden. Keep an eye on it, as we want a lovely golden hue without overbaking.
-
Prepare the Filling: While the crust is baking, it’s time to whip up the cherry filling!
- In a mixing bowl, combine the drained red tart cherries, sugar, cornstarch, salt, lemon juice, and vanilla extract. Gently toss until the cherries are coated well, letting those flavors meld beautifully.
-
Assemble the Bars: Once your crust is done baking and has cooled for just a moment, pour the cherry filling over the warm crust. Spread it evenly, making sure every inch is covered with luscious cherry goodness.
-
Add Toppings (if desired): If you saved a bit of the crust mixture, sprinkle it over the cherry filling for a crumble topping! Alternatively, you can sprinkle shredded coconut over the cherries for that extra delicious touch.
-
Bake Again: Return the pan to the oven and bake for an additional 25-30 minutes. The filling should be bubbling, and the top should be lightly golden.
-
Cool and Slice: Once out of the oven, let the pie bars cool completely in the pan. I know it’s tough to wait, but trust me—it’ll be worth it! Once cooled, slice them into generous squares or rectangles, and get ready for the taste explosion.
Serving Suggestions
These Red Tart Cherry Pie Bars are perfect for any occasion! Here are some fun ways to plate and serve them:
-
Classic Presentation: Simply serve the bars as is, dusted with powdered sugar for a charming touch. It adds an enchanting visual and a hint of sweetness with every bite.
-
À la Mode: Get decadent by serving warm bars with a scoop of vanilla ice cream on top. The creamy ice cream beautifully balances the tart cherries and buttery crust.
-
Tart Cherry Drizzle: For an extra burst of flavor, drizzle a simple sauce made from reduced cherry juice over the bars before serving.
-
Pair with Coffee or Tea: These bars are perfect for a cozy afternoon treat. Serve them alongside a steaming cup of coffee or tea, and enjoy the delightful combination of flavors.
Recipe Variations
Why stop at just one version? Here are some fun twists you can explore with your Red Tart Cherry Pie Bars:
-
Almond Joy Bars: Add sliced almonds and use almond extract instead of vanilla for a nutty flavor.
-
Chocolate Cherry Bars: Incorporate chocolate chips into the crust for a chocolatey complement to the cherries.
-
Cranberry Cherry Combo: Mix in some fresh cranberries with the red tart cherries for a festive red-and-white bar, perfect for the holidays!
-
Vegan Friendly: Substitute the butter with coconut oil or vegan butter and use a flax egg to bind the crust for a plant-based take.
-
Spicy Kick: Add a sprinkle of cayenne pepper or cinnamon to the filling for a little bit of heat that pairs beautifully with the tartness.
Chef’s Notes
These Red Tart Cherry Pie Bars have evolved over the years in my kitchen. Initially, I only used fresh cherries, but life has a way of steering us toward simplicity—canned cherries are now my go-to! They save time and still deliver an amazing flavor. And don’t get me started on how helpful they are during cherry off-seasons. I’ll never forget the first time I made these for a summer gathering. Everyone dove in and schooled me on not reserving enough for leftovers. It was that good!
FAQs and Troubleshooting
1. Why did my cherry filling turn out runny?
If your filling is runny, it could be because the cherries released too much juice, or you didn’t use enough cornstarch. Make sure to drain canned cherries well before mixing or add a little extra cornstarch next time.
2. Can I use frozen cherries instead of canned?
Absolutely! Just be sure to thaw them and drain off excess liquid before using. You might need to adjust the sugar and cornstarch, depending on your taste.
3. My crust didn’t bake evenly; what happened?
Make sure your oven temperature is accurate—an oven thermometer can help you check this. Also, ensure the crust mixture is pressed down evenly in the pan.
4. Can I make these bars ahead of time?
Yes! These bars can be made a day in advance. Just store them in an airtight container in the fridge. The flavors often deepen, making them even more delicious!
Nutritional Info
When it comes to baking, it’s essential to balance indulgence with nutritional awareness. Here’s a rough breakdown per serving (if you cut the batch into 12 bars):
- Calories: Approximately 250-300
- Total Fat: 13g (saturated fat approx. 8g)
- Cholesterol: 30mg
- Sodium: 80mg
- Total Carbohydrates: 34g (fiber approx. 1g, sugars approx. 20g)
- Protein: 2g
Remember, these numbers can vary based on the specific ingredients you choose. Enjoy these bars in moderation—every bite is worth it!
Final Thoughts
There you have it—your guide to creating delightful Red Tart Cherry Pie Bars! I hope this recipe inspires you to get into the kitchen and whip up something delectable that also holds a part of your heart, just as it does for me. Whether you share these bars with friends and family or savor them solo on a cozy evening, the joy they bring is sure to warm your soul.
So, let’s keep the oven warm and the cherries rolling! I can’t wait to hear your own stories and twists on this recipe. After all, every memorable meal has a story, and I’m thrilled to have shared this one with you. Happy baking, foodies! 🥧✨
Print
Red Tart Cherry Pie Bars
- Total Time: 70 minutes
- Yield: 12 servings 1x
- Diet: Vegetarian
Description
Delicious and portable cherry pie bars with a buttery crust and vibrant cherry filling, sprinkled with coconut.
Ingredients
- 2 cans (14 ounces each) Oregon Fruit Red Tart Cherries
- 1/2 cup (100 grams) sugar
- 2 tablespoons (18 grams) cornstarch
- 1/4 teaspoon kosher salt
- 1 tablespoon lemon juice
- 1 teaspoon vanilla extract
- 2 5/8 cups (336 grams) unbleached all-purpose flour
- 3/4 cup (150 grams) granulated sugar
- 1/2 teaspoon kosher salt
- 1/4 teaspoon baking powder
- 16 tablespoons (227 grams) unsalted butter, melted
- 3 tablespoons sweetened shredded coconut
Instructions
- Preheat your oven to 350°F (175°C).
- Prepare a 9×13-inch baking pan by brushing it with melted butter.
- In a large mixing bowl, combine flour, sugar, salt, and baking powder.
- Stir in melted butter until the mixture is crumbly.
- Pour the crust mixture into the prepared pan and press it evenly across the bottom.
- Bake in the preheated oven for 15-20 minutes until golden.
- Combine drained cherries, sugar, cornstarch, salt, lemon juice, and vanilla extract in a mixing bowl.
- Pour the cherry filling over the warm crust and spread evenly.
- Sprinkle reserved crust mixture or coconut over the filling, if desired.
- Bake again for 25-30 minutes until bubbly and golden.
- Cool completely in the pan before slicing into bars.
Notes
Serve with powdered sugar, vanilla ice cream, or a drizzle of cherry sauce for added flavor.
- Prep Time: 20 minutes
- Cook Time: 50 minutes
- Category: Dessert
- Method: Baking
- Cuisine: American
Nutrition
- Serving Size: 1 bar
- Calories: 275
- Sugar: 20g
- Sodium: 100mg
- Fat: 13g
- Saturated Fat: 8g
- Unsaturated Fat: 5g
- Trans Fat: 0g
- Carbohydrates: 36g
- Fiber: 2g
- Protein: 3g
- Cholesterol: 30mg
Keywords: cherry pie bars, dessert recipe, baking, sweet treat
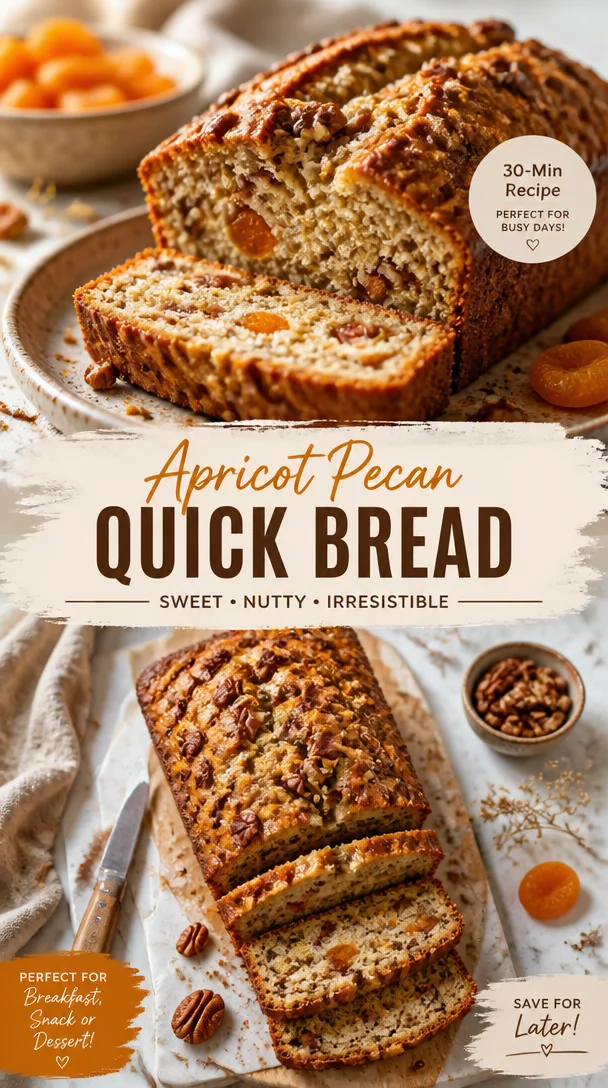
Apricot Pecan Quick Bread Recipe
Apricot Pecan Quick Bread Recipe
Hey there, food lovers! Welcome back to Feastical! Today, we’re diving into a delightful, cozy recipe that’s about to become your new favorite: Apricot Pecan Quick Bread. If you’re looking for something that fills your kitchen with warmth and sweet aroma, you’re in the right place. Imagine slicing into a moist, buttery loaf, the sweet-tart apricots punctuating each bite, with a satisfying crunch from the pecans. This isn’t just a recipe; it’s an experience that beckons you to slow down, savor, and share.
Quick breads are my go-to for baking enthusiasts and novices alike. They’re forgiving, no fuss, and you get quick satisfaction (which often includes warm bread slathered in butter!). Plus, there’s something so comforting about the act of baking—especially when it results in something that will make your friends and family gather around the table, reminiscing about their favorite meals.
Let’s grab our aprons, put on our favorite tunes, and get started on this incredible Apricot Pecan Quick Bread. You’ll love how this recipe shines a spotlight on the humble yet vibrant flavors of dried apricots and crunchy pecans. Whether it’s for breakfast, dessert, or just an afternoon snack, this bread is sure to be the highlight of your day.
Personal Story
I remember the first time I pulled a loaf of apricot pecan bread from the oven. It was a chilly Sunday morning, and I was on a bit of a baking spree. My family, most of whom had not turned on their coffee makers yet, were greeted by the mouthwatering aroma wafting through the house. As I sliced the bread, the sunlight streamed through the kitchen windows, highlighting the glistening apricots and golden-brown crust.
With each bite, we couldn’t help but share our memories—of growing up with grandma’s apricot jams, winter picnics, and holiday gatherings where sweets were a must. That day, it felt like food had superpowers; with every slice, it sparked joy and nostalgia. Now, that memory is etched in my heart, motivating me to share this recipe with you. I hope you create your own memories, just as I did that sunny Sunday morning!
Ingredients
To whip up this Apricot Pecan Quick Bread, gather the following ingredients:
-
2 cups (480 ml) all-purpose flour: The backbone of your bread! You can substitute with whole wheat flour for a nuttier flavor or gluten-free flour for a gluten-free option.
-
1 cup (200 g) granulated sugar: Adds sweetness and moisture. If you’re looking to cut down on sugar, coconut sugar or a sugar substitute can work (though you’ll need to adjust the quantity!).
-
1 cup (100 g) dried apricots, chopped: These sweet bites are the star of the show! If apricots aren’t your jam, substitute with dried cranberries or cherries for a different twist.
-
1 cup (100 g) pecans, chopped: They bring a beautiful crunch! You can swap these with walnuts or almonds if you’d like a change or even omit the nuts for a nut-free version.
-
2 large eggs: They’re essential for binding everything together, but you could use flax eggs for a vegan approach.
-
1 teaspoon baking powder: The leavening agent that helps your bread rise. Make sure it’s fresh for the best results.
-
1/2 teaspoon baking soda: This goes hand in hand with baking powder for a well-risen bread.
-
1/2 teaspoon salt: Balances the sweetness. Remember, a little salt enhances flavor!
-
1 teaspoon ground cinnamon: Adds a warm, cozy flavor. Nutmeg or pumpkin spice can also create an aromatic twist if you’re feeling adventurous.
-
1/2 cup (113 g) unsalted butter, softened: Use the real deal for richness! In a pinch, coconut oil or a plant-based butter can work.
-
1/2 cup (120 ml) buttermilk: For that touch of tanginess. You can use plain yogurt diluted with milk or even almond milk mixed with a dash of vinegar as substitutes.
-
1 teaspoon vanilla extract: It adds a delightful depth of flavor. Homemade vanilla extract is always a winner!
Step-by-Step Instructions
Ready to get baking? Here’s how to make this scrumptious bread!
-
Preheat the Oven: Start by preheating your oven to 350°F (175°C). Prepare your 9×5-inch loaf pan by greasing it with butter or cooking spray, or lining it with parchment paper. This ensures the bread slides right out when it’s done.
-
Mix Dry Ingredients: In a medium-sized bowl, whisk together your all-purpose flour, baking powder, baking soda, salt, and ground cinnamon. This not only combines the ingredients but also aerates the flour, helping your bread rise perfectly.
-
Cream the Butter and Sugar: In a large mixing bowl, beat together the softened unsalted butter and granulated sugar until the mixture is light and fluffy. This usually takes about 3 to 5 minutes. The air pockets you’re creating will give your bread a lovely texture!
-
Add the Eggs and Vanilla: Now, mix in the eggs one at a time until fully incorporated. Then, add the vanilla extract. This step helps bring all those flavors together.
-
Combine Wet and Dry Ingredients: Gradually add the dry ingredients into the butter mixture, alternating with buttermilk. You’ll want to mix gently until just combined. Overmixing can lead to tough bread, and nobody wants that!
-
Fold in the Goodies: Gently fold in the chopped dried apricots and pecans. Take a moment to appreciate how beautiful the mixture looks—those vibrant apricot pieces are like little gems!
-
Pour and Bake: Transfer your beautifully combined batter into the prepared loaf pan. Use a spatula to smooth out the top. Bake in the preheated oven for about 60 minutes, or until a toothpick inserted in the center comes out clean.
-
Cool: Once done, don’t forget to let it cool in the pan for about 10 minutes before transferring it to a wire rack. This helps prevent it from becoming soggy on the bottom.
-
Slice and Serve: After it has cooled enough to handle, slice it up and serve! A pat of butter on top is perfection, and coffee would be a great companion too!
Serving Suggestions
When it comes to serving your Apricot Pecan Quick Bread, the options are limitless! This bread can shine in so many ways:
- Breakfast Delight: Enjoy a warm slice with butter or cream cheese and a hot cup of coffee or tea.
- Brunch Star: Serve alongside fresh fruit, yogurt, and a drizzle of honey for a delightful brunch spread.
- Snack Time: Mid-afternoon, pair it with a strong cup of tea or a glass of milk to recharge your spirit.
- Dessert with a Twist: Slice it warm and serve with vanilla ice cream for a cozy dessert after dinner.
No matter how you serve it, this bread is sure to bring smiles all around.
Recipe Variations
Feeling adventurous? Here are a few creative twists you can try:
-
Spicy Ginger Apricot: Add some chopped crystallized ginger for a spicy kick that complements the sweetness of the apricots.
-
Chocolate Chip Delight: Fold in some chocolate chips (dark or white) along with the apricots for a chocolatey twist.
-
Fruit Medley: Substitute dried apricots with a mix of dried fruits like cherries, blueberries, or strawberries to provide a colorful array of flavors.
-
Nut-Free Version: Simply omit the pecans to cater to nut allergies, and you’ll still have a beautiful loaf!
-
Citrus Zest: Add a teaspoon of orange or lemon zest to the batter for a refreshing citrus flavor that brightens the bread!
Chef’s Notes
This Apricot Pecan Quick Bread has evolved over the years in my kitchen. What started as a simple recipe from a dusty old cookbook has turned into a family favorite that I make for special occasions. Every time I bake it, I think of the laughter shared and the memories created. Plus, I love experimenting with different fruits and nuts, making it a versatile recipe that never gets boring!
And hey, I’ve had my fair share of baking disasters—there was one time I accidentally used baking powder instead of baking soda. Let’s just say the bread exploded in my oven! But hey, every mishap taught me something new, and I love sharing those laughs with friends in the kitchen. That’s what makes cooking so beautifully imperfect!
FAQs and Troubleshooting
1. My bread came out dense. What happened?
Dense bread could be a result of overmixing the batter or not measuring the flour correctly. Make sure to spoon your flour into the measuring cup rather than scooping it directly, as that can lead to too much flour.
2. How do I store my bread?
Store the bread in an airtight container at room temperature for up to three days. If you want to keep it longer, slice it, wrap it in plastic wrap, and freeze it for up to three months!
3. Can I make this gluten-free?
Absolutely! Substitute the all-purpose flour with a gluten-free 1:1 baking mix, and you’re good to go! Just be mindful that the texture might differ slightly.
4. Can I use fresh apricots instead of dried?
While you can, fresh apricots have a higher water content, so you’d need to adjust the amount of liquid in the recipe. Dried apricots work best for this quick bread.
Nutritional Info
This Apricot Pecan Quick Bread not only tastes scrumptious but is also a good source of energy and nutrients. Each slice is packed with carbohydrates for quick energy, and the nuts provide healthy fats and protein. Dried apricots contribute fiber, potassium, and various vitamins, making this bread not just a delightful treat, but also a satisfying one for your taste buds!
Estimated Nutrition per Slice (based on 10 slices):
- Calories: 180
- Protein: 3g
- Total Fat: 7g
- Carbohydrates: 25g
- Fiber: 1g
- Sugar: 8g
Bear in mind that these are rough estimates, and variations will occur based on specific ingredient choices and portion sizes.
Final Thoughts
And there you have it—the soul-warming, utterly delectable Apricot Pecan Quick Bread! I hope you can’t wait to get into your kitchen and whip up your loaf, filling your home with those irresistible aromas. There’s a certain joy that comes from sharing homemade goodies with those you love, and this recipe encapsulates that perfectly.
Don’t forget to have fun and put your unique spin on the recipe! After all, cooking is about creativity, exploration, and love. And if you get a moment and feel inclined to share – show me your baking adventures on social media! Tag me @Feastical, and let’s celebrate the art of cooking together. Happy baking, friends! 🍞💖
Print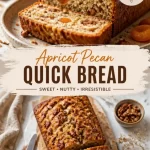
Apricot Pecan Quick Bread
- Total Time: 75 minutes
- Yield: 10 servings 1x
- Diet: Vegetarian
Description
A delightful, cozy recipe that blends the sweet-tart flavor of dried apricots with crunchy pecans in a moist, buttery loaf.
Ingredients
- 2 cups (480 ml) all-purpose flour
- 1 cup (200 g) granulated sugar
- 1 cup (100 g) dried apricots, chopped
- 1 cup (100 g) pecans, chopped
- 2 large eggs
- 1 teaspoon baking powder
- 1/2 teaspoon baking soda
- 1/2 teaspoon salt
- 1 teaspoon ground cinnamon
- 1/2 cup (113 g) unsalted butter, softened
- 1/2 cup (120 ml) buttermilk
- 1 teaspoon vanilla extract
Instructions
- Preheat the oven to 350°F (175°C). Prepare a 9×5-inch loaf pan by greasing it.
- Mix the dry ingredients in a medium bowl: flour, baking powder, baking soda, salt, and cinnamon.
- Cream the butter and sugar in a large bowl until light and fluffy.
- Add the eggs one at a time, mixing well after each, then incorporate the vanilla.
- Combine the dry ingredients with the butter mixture alternately with buttermilk until just mixed.
- Fold in the chopped dried apricots and pecans gently.
- Pour the batter into the prepared loaf pan and smooth the top.
- Bake for about 60 minutes, or until a toothpick comes out clean.
- Cool in the pan for 10 minutes before transferring to a wire rack.
- Slice and serve!
Notes
For a nut-free version, simply omit the pecans. Feel free to substitute dried apricots with cranberries or cherries.
- Prep Time: 15 minutes
- Cook Time: 60 minutes
- Category: Bread
- Method: Baking
- Cuisine: American
Nutrition
- Serving Size: 1 slice
- Calories: 180
- Sugar: 8g
- Sodium: 150mg
- Fat: 7g
- Saturated Fat: 4g
- Unsaturated Fat: 2g
- Trans Fat: 0g
- Carbohydrates: 25g
- Fiber: 1g
- Protein: 3g
- Cholesterol: 75mg
Keywords: quick bread, apricot, pecan, baking, comfort food
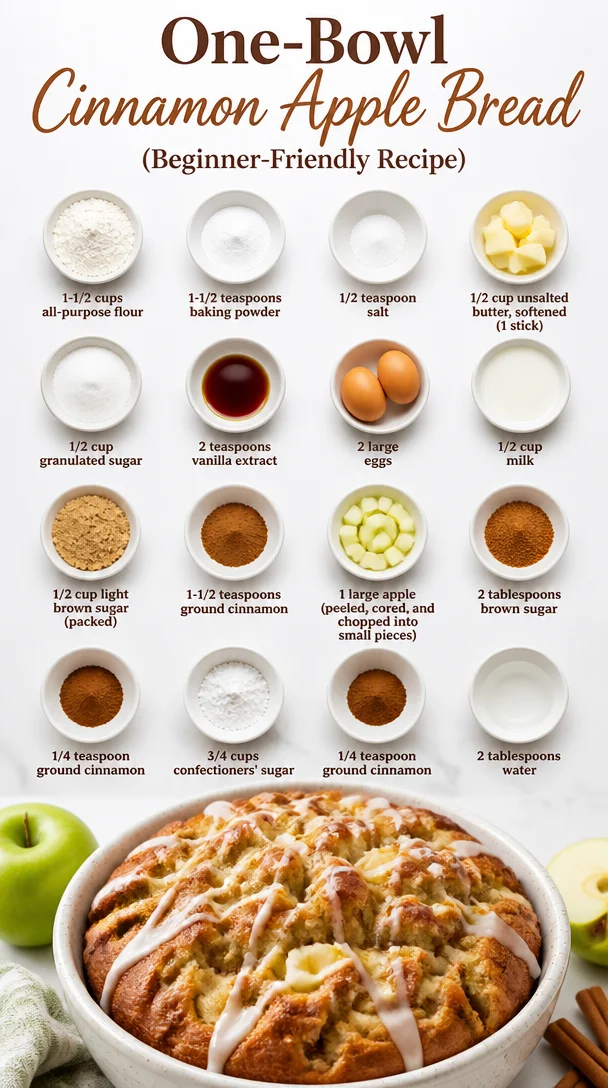
One-Bowl Cinnamon Apple Bread (Beginner-Friendly Recipe)
Hey there, fellow food enthusiasts! I’m Beau Collier, and today I’m thrilled to welcome you back to Feastical, where our kitchens turn into magical places full of flavor and heartwarming memories! If there’s one thing I love more than whipping up delicious meals, it’s sharing the stories behind those recipes. Today, I want to take you on a cozy journey with my all-time favorite comfort dish: Cinnamon Apple Bread.
Imagine this: a golden-brown loaf, warm and inviting, with sweet, juicy apples mingling with the rich aroma of cinnamon. The first slice reveals a soft, tender crumb that beckons you for more. Each bite tastes like a warm hug wrapped in nostalgia, whether you’re savoring it for breakfast, an afternoon snack, or dessert!
This recipe has roots in my childhood, where my grandmother would bake this delightful bread as we gathered around the kitchen table, sharing stories and laughter. She taught me that cooking is not just about the final product but about the love and joy infused into each step. As we mix ingredients and blend flavors, we weave memories that last a lifetime. So grab your apron, preheat that oven, and let’s dive into the world of cinnamon-sugar goodness! Get ready to impress everyone at your next gathering or just enjoy a quiet moment with a warm slice and a steaming cup of your favorite brew.
Personal Story
Growing up in the Midwest, fall was always a magical time. Leaves turned vibrant shades of gold and crimson, and the scent of apples wafted through the air as cider mills busy with people pressed fresh juice. My grandmother, the ultimate kitchen queen of the family, celebrated this season by baking her famous Cinnamon Apple Bread.
I remember the afternoons spent “helping” her in the kitchen—with more enthusiasm than skill, I assure you! She’d let me measure flour (which often ended up on my nose, much to her amusement), while she expertly peeled and cored apples. The moment the loaf came out of the oven wasn’t just about the delicious smell that filled the air; it was about the love shared as we gathered around the table to savor a slice.
Those afternoons were overflowing with laughter, stories of family, and yes—the occasional sprinkle fight with cinnamon! This cinnamon-infused loaf became more than food; it was a way to connect with loved ones, celebrate the season, and create cherished memories. I hope to bring that magic to your kitchen because every slice of this bread is an invitation to pause and enjoy life’s sweetest moments.
Ingredients
Here’s what you’ll need to create this glorious bread, plus some handy tips for each ingredient:
-
1-1/2 cups all-purpose flour
The backbone of our bread! For a gluten-free option, substitute with almond flour or a 1-to-1 gluten-free baking blend. -
1-1/2 teaspoons baking powder
This helps our bread rise beautifully. Make sure it’s fresh; an expired baking powder means flat bread! -
1/2 teaspoon salt
Don’t skip the salt; it enhances the flavors! You can also use sea salt for a more nuanced taste. -
1/2 cup unsalted butter, softened (1 stick)
Butter adds richness and moisture. If you’re in a pinch, coconut oil or applesauce can work as a substitute, though you’ll miss that buttery flavor. -
1/2 cup granulated sugar
Classic sugar sweetness! Consider using coconut sugar for a lower glycemic index alternative, or honey if you’d like a different flavor profile. -
2 teaspoons vanilla extract
Pure vanilla extract enhances all the sweet flavors. I recommend using real vanilla for the best taste, though artificial will work in a pinch. -
2 large eggs
They bind our ingredients and add moisture. If you’re vegan, flax eggs or applesauce can substitute. -
1/2 cup milk
For creaminess! Any milk (dairy or plant-based) will do; just watch for added sugars in non-dairy options. -
1/2 cup light brown sugar (packed)
This gives our bread that delicious caramel note. Dark brown sugar works too, just a bit more robust in flavor. -
1-1/2 teaspoons ground cinnamon
The star of our show! Freshly ground cinnamon amplifies the flavor exponentially, but store-bought works well too. -
1 large apple (peeled, cored, and chopped into small pieces)
For maximum sweetness, use Honeycrisp or Granny Smith apples—each gives a delightful contrast of sweet and tart. -
2 tablespoons brown sugar
Used for a sweet cinnamon topping, this brings a lovely crunch on top. If you want it healthier, consider coconut sugar! -
1/4 teaspoon ground cinnamon
A sprinkle of this on top enhances the flavor profile and looks beautiful. -
3/4 cups confectioners’ sugar
This is for our glaze to finish things off! Feel free to make a sugar-free glaze if you want a healthier option. -
1/4 teaspoon ground cinnamon
For adding to the glaze. A little spice always pairs well with sweetness! -
2 tablespoons water
To mix with our confectioners’ sugar for the glaze. You can also use milk for a creamier glaze.
Step-by-Step Instructions
Now, let’s bring everything together to create this mouthwatering Cinnamon Apple Bread! I promise that you’ll be amazed at how simple and rewarding this recipe is.
-
Preheat the Oven
First things first, preheat your oven to 350°F (175°C). This ensures that the bread cooks evenly. Don’t just throw it in while the oven is still warming up—trust me, you want that golden-brown crust! -
Prepare the Pan
Grease a 9×5-inch loaf pan with butter or cooking spray. You can also line it with parchment paper for easy removal. This little step is vital; nobody wants their lovely loaf stuck to the pan! -
Mix the Dry Ingredients
In a large bowl, whisk together the flour, baking powder, salt, and ground cinnamon—this ensures the baking powder is evenly dispersed & gives our bread a uniform rise. Set this aside. -
Cream the Butter and Sugars
In another mixing bowl, beat together the softened butter, granulated sugar, and light brown sugar using an electric mixer on medium speed until the mixture is light and fluffy. This usually takes about 2-3 minutes. This step is key for that rich texture! -
Add Vanilla and Eggs
Scrape down the sides of the bowl, and mix in the vanilla extract, then add the eggs one at a time. Beat until fully combined; you want those eggs to add some moisture magic! -
Pour in Milk
Gradually add the milk while mixing on low speed until everything is well combined. Don’t overdo it; just blend until you no longer see clumps of flour. -
Combine Wet and Dry Mixtures
Now, gently fold the dry ingredients into the wet mixture. Use a spatula or wooden spoon; we don’t want to overmix! Stop as soon as the flour disappears. -
Add Apples
Fold in the chopped apples until evenly distributed throughout the batter. This is where the apple flavor shines—lumps of cinnamon-sugar goodness await in each bite! -
Transfer to the Loaf Pan
Pour the batter into the prepared loaf pan, spreading it out evenly. Now’s the time to sprinkle the reserved 2 tablespoons of brown sugar and 1/4 teaspoon of cinnamon on top for a crunchy crust! -
Bake!
Place in the preheated oven and bake for 50-60 minutes. Check for doneness by inserting a toothpick into the center—the toothpick should come out clean with just a few crumbs attached. -
Cool and Glaze
Once baked, remove from the oven and let it cool in the pan for about 10 minutes. Carefully turn it out onto a wire rack to cool completely. Meanwhile, whisk together the confectioners’ sugar, additional ground cinnamon, and water to create a smooth glaze, adjusting the water as needed to achieve your desired consistency. -
Glaze the Bread
Once the bread is cool, drizzle the glaze over the top. Don’t be shy—let it cascade down the sides!
Believe me, the warm cinnamon apple scent will be irresistible, not just in your kitchen but throughout your home!
Serving Suggestions
When it comes to plating or serving your Cinnamon Apple Bread, keep it simple and inviting. Slice the bread into thick, lovely pieces and arrange them on a rustic wooden board or a cute cake stand.
For an even more delectable experience, serve it warm, maybe with a dollop of fresh whipped cream or a scoop of vanilla ice cream on the side. A dusting of extra cinnamon or a sprinkle of chopped nuts can add a nice finishing touch, too.
And don’t forget to pair your slices with a hot cup of coffee or tea—nothing beats the cozy combo of warm bread and your favorite brew! Gather your friends or family around, and don’t be surprised when they ask for a second slice!
Recipe Variations
Want to mix it up a bit? Here are some fun twists for your Cinnamon Apple Bread:
-
Nutty Delight: Stir in 1/2 cup of chopped walnuts or pecans into the batter for added crunch and flavor!
-
Dried Fruits: Add a handful of dried cranberries or raisins for a little sweetness and texture contrast to the fresh apples.
-
Pumpkin Spice: For an autumn-inspired version, swap out half the flour for pumpkin puree and adjust the spices, adding nutmeg and ginger for a cozy twist.
-
Chocolate Chip: Mix in 1/2 cup of mini chocolate chips for a decadent chocolate-cinnamon combo that will make your taste buds dance!
-
Sugar-Free Option: Substitute both sugars for your preferred low-calorie sweetener to make a guilt-free version without compromising flavor!
Feel free to get creative and adapt this recipe to suit your taste—there’s nothing quite like making a dish your own!
Chef’s Notes
As with any recipe passed down through generations, this Cinnamon Apple Bread has evolved over the years. I’ve tried incorporating different types of apples, experimenting with spices, and even testing out alternate glazes! One particularly funny memory I have is when I mistakenly used salt instead of sugar in one of my early attempts—it was a flat-out disaster! But those mishaps only made me appreciate the intentionality behind cooking even more.
I love that every time I make it, I’m taken back to those magical kitchen moments with my grandmother. This bread brings so much joy, and I encourage you to create your own memories in the process!
FAQs and Troubleshooting
-
Why is my bread too dense?
This usually happens if the batter is overmixed or if there’s too much flour. Make sure to mix just until combined and measure flour accurately. -
How do I know when my bread is done?
A toothpick inserted in the center should come out clean or with just a few crumbs. Remember to watch the baking time; every oven can vary! -
Can I freeze this bread?
Absolutely! Let it cool completely, then wrap it in plastic wrap and aluminum foil, or use a freezer-safe bag. It should last for up to 3 months. -
What if I don’t have apples?
You can substitute with bananas for a banana cinnamon bread or use canned apples (drained) if you’re in a pinch—just adjust the liquid in the recipe as necessary.
Nutritional Info
While I usually don’t focus too much on calories and macros (because we all deserve some deliciousness!), here’s a rough estimate per slice (assuming 12 slices):
- Calories: 180
- Total Fat: 7g
- Saturated Fat: 4g
- Cholesterol: 35mg
- Sodium: 150mg
- Total Carbohydrate: 25g
- Dietary Fiber: 1g
- Sugars: 10g
- Protein: 2g
Note: These numbers will vary based on exact ingredients and portion sizes, so feel free to adjust and suit your needs!
Final Thoughts
There you have it, folks—a full-hearted dive into the world of Cinnamon Apple Bread! Not only is it a comforting dish staunchly rooted in cherished memories, but it’s also an incredibly versatile recipe that welcomes all of your creative spins. I hope this recipe inspires you to share joyful moments in your kitchen and at your table, because cooking is as much about connection as it is about food.
Whether you craft your own memory or share a loaf with a friend just because, I can’t wait for you to discover the warmth of this delightful bread. And hey, if you give it a try, be sure to tag me or leave a comment—nothing makes my day quite like seeing your kitchen creations.
Now, go on, put on your apron and bake something wonderful. Remember, every loaf tells a story—let this one be yours. Happy baking, friends! 🍏🍞✨
Print
Cinnamon Apple Bread
- Total Time: 75 minutes
- Yield: 12 servings 1x
- Diet: Vegetarian
Description
A warm and inviting loaf with sweet apples and rich cinnamon—perfect for breakfast or dessert!
Ingredients
- 1–1/2 cups all-purpose flour
- 1–1/2 teaspoons baking powder
- 1/2 teaspoon salt
- 1/2 cup unsalted butter, softened (1 stick)
- 1/2 cup granulated sugar
- 2 teaspoons vanilla extract
- 2 large eggs
- 1/2 cup milk
- 1/2 cup light brown sugar (packed)
- 1–1/2 teaspoons ground cinnamon
- 1 large apple (peeled, cored, and chopped into small pieces)
- 2 tablespoons brown sugar
- 1/4 teaspoon ground cinnamon
- 3/4 cups confectioners’ sugar
- 1/4 teaspoon ground cinnamon
- 2 tablespoons water
Instructions
- Preheat the oven to 350°F (175°C).
- Grease a 9×5-inch loaf pan with butter or cooking spray.
- Mix the dry ingredients: flour, baking powder, salt, and ground cinnamon in a large bowl.
- Cream the butter and sugars in another bowl until light and fluffy.
- Add vanilla extract and eggs one at a time, mixing until fully combined.
- Pour in the milk gradually while mixing on low speed until combined.
- Combine the dry and wet mixtures gently with a spatula.
- Add the chopped apples and fold them into the batter.
- Transfer the batter to the prepared loaf pan and sprinkle brown sugar and cinnamon on top.
- Bake for 50-60 minutes, or until a toothpick comes out clean.
- Cool the bread in the pan for 10 minutes, then on a wire rack.
- Glaze by mixing confectioners’ sugar, additional cinnamon, and water; drizzle over the cooled bread.
Notes
Serve warm with whipped cream or ice cream. For variations, consider adding nuts or chocolate chips.
- Prep Time: 15 minutes
- Cook Time: 60 minutes
- Category: Dessert
- Method: Baking
- Cuisine: American
Nutrition
- Serving Size: 1 slice
- Calories: 180
- Sugar: 10g
- Sodium: 150mg
- Fat: 7g
- Saturated Fat: 4g
- Unsaturated Fat: 2g
- Trans Fat: 0g
- Carbohydrates: 25g
- Fiber: 1g
- Protein: 2g
- Cholesterol: 35mg
Keywords: cinnamon apple bread, dessert, baking, comfort food, quick bread
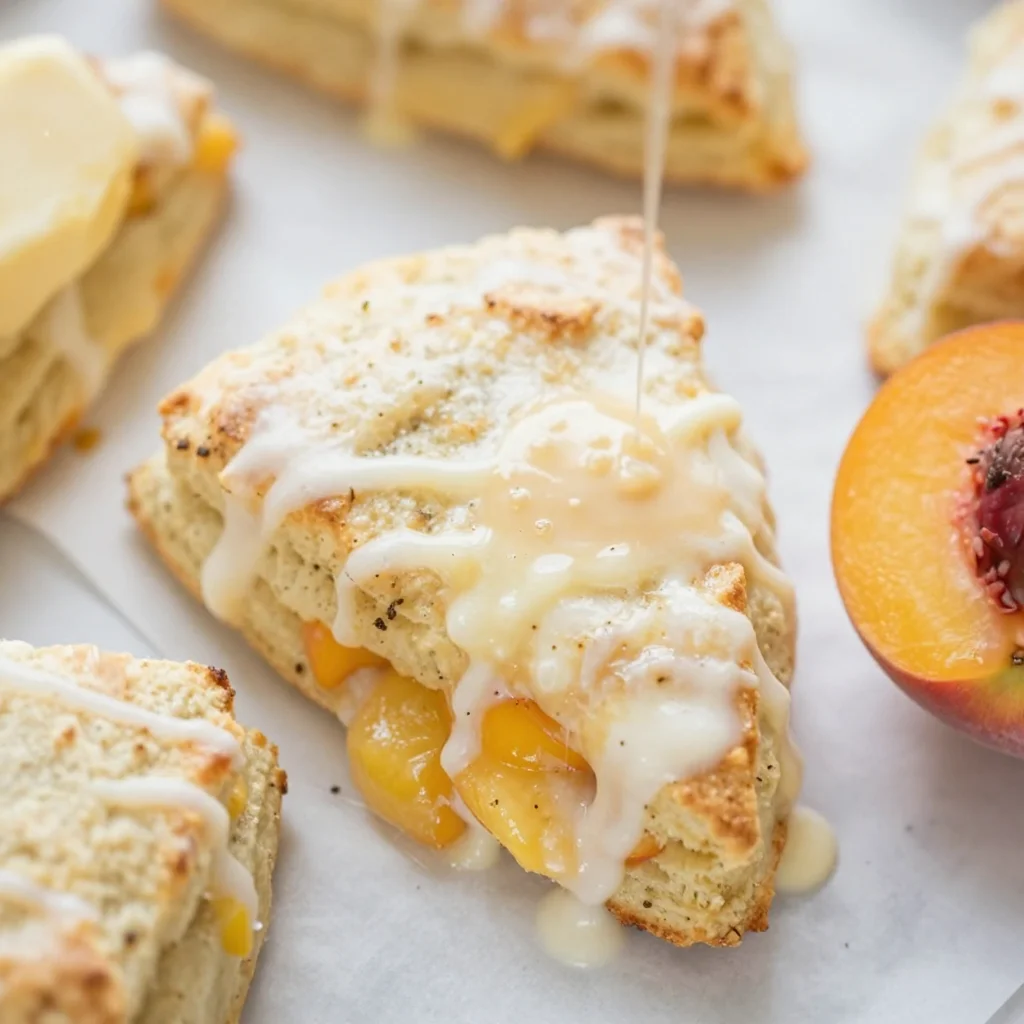
Peach Scones
Peach Scones: Baked Memories in Every Bite
Hey there, food lover! Let’s chat about one of my absolute favorite treats in the world of baking: peach scones. There’s something so comforting and delightful about biting into a warm, flaky scone filled with juicy peaches, especially when the sun is rising, and the aroma dances through the kitchen. Just the thought of it makes me smile! Now pull up a chair and let’s dive into the sweet and buttery world of peach scones together.
A Slice of Nostalgia
Back in my childhood, summer meant one thing: fresh peaches were in season. My family would take annual trips to the local orchard, where we’d spend the day picking the ripest peaches we could find. I still remember the joy of selecting the fruit, and of course, that meaningful competition with my siblings—who could pick the biggest and juiciest peach? Those summer days were filled with laughter, sun, and the sweet scent of peaches in the air.
Once we returned home, my mom would whip up peach scones that made the entire house smell heavenly. The scones emerged from the oven, golden and warm, and each bite was a delightful mix of tender dough and ripe peaches. It’s one of those traditions that stuck with me, a little slice of my past that I still cherish today. This recipe isn’t just for baking—it’s a way to keep those warm memories alive. Now let’s get baking!
Ingredients
To create your own batch of delicious peach scones, you’ll need the following ingredients:
-
2 cups all-purpose flour
This is the base of your scones. If you want a lighter texture, you can substitute half with cake flour. -
1/4 cup sugar
Adds just the right amount of sweetness. Feel free to swap it with honey or maple syrup (reducing the liquid content elsewhere slightly). -
2 teaspoons baking powder
This is your leavening agent, making those scones fluffy! Be sure it’s fresh for the best rise. -
1/2 teaspoon baking soda
Adds tenderness to the scone, especially when paired with the buttermilk. -
1/2 teaspoon salt
Enhances flavor beautifully—don’t skip it! -
1/2 cup unsalted butter, chilled and cubed
Cold butter is essential for creating that flaky texture. If you’re dairy-free, coconut oil can work as a substitute—just make sure it’s solid! -
3/4 cup buttermilk
Adds richness and flavor. You can make a quick substitute by mixing 3/4 cup milk with 1 tablespoon vinegar and letting it sit for a few minutes. -
1 cup fresh peaches, diced
The star of the show! Choose ripe peaches for maximum sweetness. For a twist, try using blueberries or strawberries instead. -
1 teaspoon vanilla extract
Adds depth to the flavor. You could experiment with almond extract for a unique spin!
Step-by-Step Instructions
Now, let’s get you to the fun part—baking your peach scones! Follow these steps to create something magical:
-
Preheat your oven to 400°F (200°C). This is the perfect temperature for baking scones, ensuring they rise beautifully and become golden brown.
-
Whisk the dry ingredients together. In a large mixing bowl, combine the flour, sugar, baking powder, baking soda, and salt. Stir until everything is evenly mixed. This step is crucial; it helps distribute the leavening agents evenly so every bite is perfect!
-
Add the butter. Toss those chilled, cubed chunks of unsalted butter right into the flour mixture. Using a pastry cutter or your fingers, work the butter into the mix until it resembles coarse crumbs. You want those bits of butter to stay cold and chunky for that lovely, flaky texture.
-
Pour in the buttermilk and vanilla. Gently mix these liquids into the dry ingredients until just combined. Here’s a pro tip: overmixing can lead to tough scones, which we definitely want to avoid, so be gentle!
-
Fold in the peaches. Carefully incorporate your diced fresh peaches into the dough. Use a spatula or your hands, being mindful not to crush those lovely peach pieces.
-
Shape the dough. Lightly flour a clean work surface and turn the dough out. Gather it into a ball, then flatten it into a disk about 1-inch thick. Use a knife (or pizza cutter) to slice the disk into wedges, like a pizza!
-
Transfer to a baking sheet. Line a baking sheet with parchment paper and arrange the scone wedges on it, leaving space between each piece. Brush the tops with a bit of buttermilk for that perfect golden finish.
-
Bake those beauties! Pop your tray into the preheated oven and bake for 15-20 minutes or until the scones are puffed up and golden brown. Your kitchen will smell incredible during these minutes!
-
Cool and enjoy. Once baked, let them cool for a few minutes on a wire rack. A little patience here is worth it—those warm, flaky scones are coming your way!
Serving Suggestions
Now that your peach scones are baked to perfection, let’s talk about serving them. They shine brightest when served warm, maybe with a little dab of butter or a drizzle of honey. If you’re feeling extra indulgent, whip up some fresh whipped cream or pair them with a side of clotted cream for a touch of elegance.
You could also serve these scones alongside a cup of tea or coffee for a cozy afternoon treat. Arrange them on a pretty platter or even within a rustic basket lined with a linen napkin. They’ll be the star of any brunch table!
Recipe Variations
While peach scones are divine as they are, let me tempt you with a few creative twists to keep things exciting:
-
Spicy Peach Scones: Add a 1/2 teaspoon of ground cinnamon or ginger to the dry ingredients for a warm, spicy kick that perfectly complements the sweetness of the peaches.
-
Cream Cheese Peach Scones: Incorporate small chunks of cream cheese into the dough for a richer, creamier texture. You can replace 1/4 cup of butter with room temperature cream cheese.
-
Savory Peaches: Go unexpected by adding crumbled feta or sharp cheddar cheese along with some fresh herbs (like thyme or basil) for a delicious savory twist!
-
Chilled Peach Scones: For summer, you could experiment by adding lemon zest and a touch of lemon juice, making the flavors refreshing and perfect for warm-weather eating.
-
Vegan Version: Substitute the butter with coconut oil and use almond milk mixed with vinegar instead of buttermilk for a vegan-friendly scone.
Chef’s Notes
As I’ve cooked and shared this recipe over the years, I’ve found a few tweaks that you might find amusing. The best scones often come from a bit of improvisation! There was one time when I accidentally added too much flour and turned out a batch that resembled boulders instead of scones. A little laughter ensued, and my friends and I jokingly called them ‘rock scones’. We ended up scooping out the insides to save the flavor and left the ‘rocks’ behind—kitchen mishaps can bring joy too!
FAQs and Troubleshooting
Here are a few common questions you might have while whipping up these peach scones:
1. My scones didn’t rise much—what went wrong?
Ensure that your baking powder and baking soda are fresh! Age can diminish their effectiveness. Also, avoid overmixing the dough, as it needs to be tender for that lovely rise.
2. Can I use frozen peaches?
Absolutely! Just be sure to thaw and drain some of the excess moisture before adding them to your dough, to avoid sogginess.
3. What’s the best way to store leftover scones?
Let them cool completely, then store them in an airtight container at room temperature. They’re best enjoyed fresh but will last for a couple of days.
4. Can I freeze the dough?
Definitely! You can shape the scones and freeze them before baking. Just pop them directly into the oven from the freezer—just add a few extra minutes to the baking time.
Nutritional Info
These delightful peach scones can vary in nutrition based on the specific ingredients used, but let’s break down an average serving (one scone):
- Calories: Approximately 200-250
- Total Fat: 10-12g
- Carbohydrates: 28-30g
- Fiber: 1-2g
- Sugar: 4-6g
- Protein: 3-4g
Remember, the fresh peaches infuse some essential vitamins, and baking treats like this is all about balance and enjoyment!
Final Thoughts
Baking peach scones is so much more than just following a recipe—it’s about the memories, the love, and the joy of bringing people together around good food. With each delicious bite, you’ll be reminded of summer days spent under the sun. So whether you’re savoring these scones on a leisurely weekend or surprising a friend with a warm batch, your kitchen will be filled with warmth, love, and a hint of nostalgia.
So, what are you waiting for? Grab those ingredients, preheat the oven, and embrace the sweet aroma of peach scones filling your home. Let those flavors come together, and enjoy every moment—both in the kitchen and around the table. Happy baking, my friends! 🍑
Print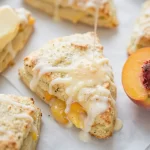
Peach Scones
- Total Time: 35 minutes
- Yield: 8 servings 1x
- Diet: Vegetarian
Description
Delightful peach scones that evoke memories of summer days with a warm and flaky texture complemented by juicy peaches.
Ingredients
- 2 cups all-purpose flour
- 1/4 cup sugar
- 2 teaspoons baking powder
- 1/2 teaspoon baking soda
- 1/2 teaspoon salt
- 1/2 cup unsalted butter, chilled and cubed
- 3/4 cup buttermilk
- 1 cup fresh peaches, diced
- 1 teaspoon vanilla extract
Instructions
- Preheat your oven to 400°F (200°C).
- Whisk the dry ingredients together in a large mixing bowl.
- Add the chilled, cubed unsalted butter to the flour mixture and mix until coarse crumbs form.
- Pour in the buttermilk and vanilla, gently mixing until just combined.
- Fold in the diced peaches, being careful not to crush them.
- Shape the dough into a disk about 1-inch thick, and slice into wedges.
- Transfer the wedges to a lined baking sheet, brushing tops with buttermilk.
- Bake for 15-20 minutes or until golden brown.
- Cool on a wire rack for a few minutes before serving.
Notes
Serve warm with butter or honey. Great for brunch or as an afternoon treat with tea or coffee.
- Prep Time: 15 minutes
- Cook Time: 20 minutes
- Category: Breakfast
- Method: Baking
- Cuisine: American
Nutrition
- Serving Size: 1 scone
- Calories: 225
- Sugar: 5g
- Sodium: 300mg
- Fat: 11g
- Saturated Fat: 6g
- Unsaturated Fat: 4g
- Trans Fat: 0g
- Carbohydrates: 30g
- Fiber: 1g
- Protein: 3g
- Cholesterol: 30mg
Keywords: peach, scones, breakfast, baking, dessert, summer

Apple Bars
Apple Bars: A Slice of Nostalgia and Comfort
Hey there, food lovers! Today, I’m excited to share one of my all-time favorite recipes: homemade apple bars! There’s something about the sweet and tart aroma of baked apples mingling with warm spices that can instantly transport you to cozy moments in the kitchen. So, grab your apron and let’s whip up a batch of these delightful treats that not only taste good but also tell a beautiful story!
A Sweet Memory
One of my most cherished memories connected to apple bars goes all the way back to my childhood. Picture this: the smell of cinnamon drifting through my grandma’s kitchen as she prepared for our family gathering. I vividly remember sitting on the counter, swinging my legs, and eagerly waiting for my turn to help. Grandma would let me sprinkle the cinnamon and sugar over the apples, her wrinkled hands guiding me to cut just the right size. Those moments were pure magic—a blend of laughter, love, and, of course, lots of delicious bites.
Every time I bake these apple bars, I think of her loving smile and the simple joys of creating something special together. Now, it’s my turn to share that love, and I hope these apple bars bring you the same comfort they brought me.
Ingredients
Let’s gather our ingredients! Here’s what you’ll need to create these scrumptious apple bars, along with some chef insights to level up your baking game:
-
2 cups all-purpose flour
Perfect for structure! You can swap it with whole wheat flour for a nuttier flavor or gluten-free flour if you’re avoiding gluten. -
1 1/2 cups old-fashioned oats
These add a nice chewy texture. If you’re in a pinch, quick oats can be used, but they won’t give you the same hearty consistency. -
1/2 cup granulated sugar
Just enough to sweeten the deal! Feel free to reduce it or substitute with coconut sugar for a lower-glycemic option. -
3/4 cup brown sugar
Bringing in that rich molasses flavor! Light or dark brown sugar will work—dark brown will give a more robust taste. -
1 cup unsalted butter, cold and cubed
Cold butter is a must for a flaky crust. If you’re short on butter, you can use unsweetened applesauce as a healthier substitute (though the texture may vary). -
1/2 teaspoon salt
Balances the sweetness! If you plan to use salted butter, you can skip this. -
1 1/2 teaspoons ground cinnamon
The star of the show! This seasoning really flatters the apples. Add a pinch more if you really want that cozy flavor! -
1/4 teaspoon nutmeg (optional)
A little goes a long way! Nutmeg adds complexity; however, it’s not for everyone, so feel free to omit it. -
3 cups apples, peeled and chopped
Granny Smith or Honeycrisp are my faves for their perfect tart balance. You can mix and match your favorite varieties! -
1 tablespoon lemon juice
This helps keep the apples from browning—plus, it adds a fresh zing! -
1 tablespoon cornstarch
To thicken the apple filling. You can substitute with arrowroot powder for a grain-free option. -
1 teaspoon vanilla extract
A splash of vanilla enhances all the flavors beautifully! -
1/2 cup powdered sugar
For a simple glaze that adds a sweet finish. -
1–2 tablespoons milk (for glaze)
Adjust based on your desired consistency. Any milk will do, whether it’s dairy or plant-based!
Step-by-Step Instructions
Now that we have our ingredients, let’s get cooking! Follow these steps, and I promise you’ll have a delightful dessert on your hands.
-
Preheat the Oven
Preheat your oven to 350°F (175°C). Preheating ensures even baking—nobody likes a doughy center! -
Make the Crust
In a large mixing bowl, combine the flour, oats, granulated sugar, brown sugar, salt, cinnamon, and nutmeg. Mix until well incorporated. Add in the cold, cubed butter. Use a pastry cutter or your fingers to work the butter into the dry ingredients until the mixture resembles coarse crumbs. This step is crucial for achieving that flaky texture! -
Press the Crust
Reserve about 1 1/2 cups of the mixture for the topping. Press the remaining mixture into the bottom of a greased 9×13-inch baking dish, making sure it’s evenly spread. Bake the crust for about 10-12 minutes until it’s lightly golden. This pre-baking step ensures a solid base, so it doesn’t get soggy later! -
Prepare the Apple Filling
In a large bowl, combine the chopped apples, lemon juice, cornstarch, and vanilla extract. If you’re feeling adventurous, toss in a tablespoon of brown sugar for extra sweetness. Mix everything well so the delicious flavors meld together. -
Assemble the Bars
Once your crust has finished baking, remove it from the oven and spread the apple mixture evenly over the crust. Then, crumble the reserved crust mixture over the top of the apples. Don’t worry about it being perfect—rustic looks are totally in! -
Bake Until Golden
Return the baking dish to the oven and bake for an additional 25-30 minutes, or until the topping is golden and the apples are bubbly. The smell coming from the oven? Pure bliss! -
Cool and Glaze
Allow the apple bars to cool in the pan for about 15 minutes. While they cool, mix the powdered sugar and milk together to create a glaze. Drizzle this heavenly concoction over the top of the cooled bars. -
Slice and Serve
Cut into squares (or bars, if you’re feeling fancy) and serve warm or at room temperature. A scoop of vanilla ice cream on top takes it to the next level!
Serving Suggestions
When it comes to serving these apple bars, there are endless possibilities! You can plate them with a simple dusting of powdered sugar for an elegant touch, or make it a fun dessert night by serving them warm with a scoop of vanilla ice cream or a dollop of whipped cream. A sprinkle of additional cinnamon on top adds a lovely finishing touch! If you want to take it a step further, add a side of caramel sauce for drizzling. Talk about a party in your mouth!
Recipe Variations
Why not shake things up a bit? Here are some creative twists you can try with your apple bars:
-
Cranberry Apple Bars
Mix dried cranberries with the apples for a tart contrast and a pop of color! -
Nutty Apple Bars
Add chopped walnuts or pecans to the apple filling for a delightful crunch. -
Spiced Apple Bars
Experiment with spices! Try adding ginger or even a hint of allspice for a unique flavor profile. -
Gluten-Free Apple Bars
Substitute the all-purpose flour with a gluten-free blend, and use rolled oats labeled gluten-free. -
Maple Glaze
Instead of the powdered sugar glaze, drizzle with maple syrup for a deliciously sweet and healthier option!
Chef’s Notes
Over the years, this apple bar recipe has become a beloved staple in my home. I’ve laughed, cried, and celebrated many occasions with this dessert. The beauty of this recipe is its simplicity—the base and filling can evolve based on what’s in your pantry or what you’re craving. Always remember to taste as you go; food is about personal preference!
Oh, and a funny kitchen story: I once got so excited while baking these that I accidentally added a cup of salt instead of sugar! Let’s just say, a family picnic turned into an impromptu salt lick contest. Lesson learned: always double-check your ingredients, folks!
FAQs and Troubleshooting
1. Why are my apple bars too soggy?
If you find that your apple bars are soggy, it might be that the apples released too much moisture. Ensure you’re using a thickener like cornstarch and try to drain any excess liquid before assembling.
2. Can I use frozen apples?
Absolutely! Just make sure to thaw and drain them well before adding them to the mixture. Frozen apples release more liquid, so you might need a bit more cornstarch.
3. How do I store leftovers?
Store leftover apple bars in an airtight container at room temperature for up to three days, or refrigerate for up to a week. They also freeze well if you want to save some for later!
4. My crust is too crumbly. What did I do wrong?
If your crust is too crumbly, you may have not added enough butter or used too much flour. Make sure to measure accurately and consider adding a tiny splash of cold water to bring it together.
Nutritional Info
While I love indulging in delicious treats, I know we all care about balance too! Here’s a rough breakdown of the nutritional information per serving (based on a recipe yielding 12 squares):
- Calories: 240
- Total Fat: 12g
- Saturated Fat: 7g
- Carbohydrates: 34g
- Fiber: 2g
- Sugars: 12g
- Protein: 3g
Keep in mind that variations and serving sizes can affect these numbers!
Final Thoughts
There we have it—apple bars that not only taste divine but are steeped in warmth and nostalgia! Whether you’re baking for a special occasion, a family gathering, or just because it’s Tuesday, these bars are sure to impress. Remember, cooking is all about joy and creativity, so feel free to make this recipe your own.
Bring your loved ones into the kitchen, share some laughs, and let the aromas fill your home. Happy baking, my friends, and may each bite remind you of the beautiful memories that food can create!
So, are you ready to experience that warm hug from your oven? Let’s dig in!
Print
Homemade Apple Bars
- Total Time: 60 minutes
- Yield: 12 servings 1x
- Diet: Vegetarian
Description
Delicious homemade apple bars filled with sweet and tart apples and warm spices, perfect for cozy moments in the kitchen.
Ingredients
- 2 cups all-purpose flour
- 1 1/2 cups old-fashioned oats
- 1/2 cup granulated sugar
- 3/4 cup brown sugar
- 1 cup unsalted butter, cold and cubed
- 1/2 teaspoon salt
- 1 1/2 teaspoons ground cinnamon
- 1/4 teaspoon nutmeg (optional)
- 3 cups apples, peeled and chopped
- 1 tablespoon lemon juice
- 1 tablespoon cornstarch
- 1 teaspoon vanilla extract
- 1/2 cup powdered sugar
- 1–2 tablespoons milk (for glaze)
Instructions
- Preheat your oven to 350°F (175°C).
- In a large mixing bowl, combine the flour, oats, granulated sugar, brown sugar, salt, cinnamon, and nutmeg. Mix until well incorporated.
- Add in the cold, cubed butter. Use a pastry cutter or your fingers to work the butter into the dry ingredients until the mixture resembles coarse crumbs.
- Reserve about 1 1/2 cups of the mixture for the topping. Press the remaining mixture into the bottom of a greased 9×13-inch baking dish.
- Bake the crust for about 10-12 minutes until it’s lightly golden.
- In a large bowl, combine the chopped apples, lemon juice, cornstarch, and vanilla extract.
- Once your crust has finished baking, remove it from the oven and spread the apple mixture evenly over the crust.
- Return the baking dish to the oven and bake for an additional 25-30 minutes, or until the topping is golden and the apples are bubbly.
- Allow the apple bars to cool in the pan for about 15 minutes.
- Mix the powdered sugar and milk together to create a glaze and drizzle it over the top of the cooled bars.
- Cut into squares and serve warm or at room temperature.
Notes
Feel free to experiment with different varieties of apples or adjust spices to your liking.
- Prep Time: 20 minutes
- Cook Time: 40 minutes
- Category: Dessert
- Method: Baking
- Cuisine: American
Nutrition
- Serving Size: 1 square
- Calories: 240
- Sugar: 12g
- Sodium: 100mg
- Fat: 12g
- Saturated Fat: 7g
- Unsaturated Fat: 5g
- Trans Fat: 0g
- Carbohydrates: 34g
- Fiber: 2g
- Protein: 3g
- Cholesterol: 30mg
Keywords: apple bars, dessert, baking, American dessert, apple recipes