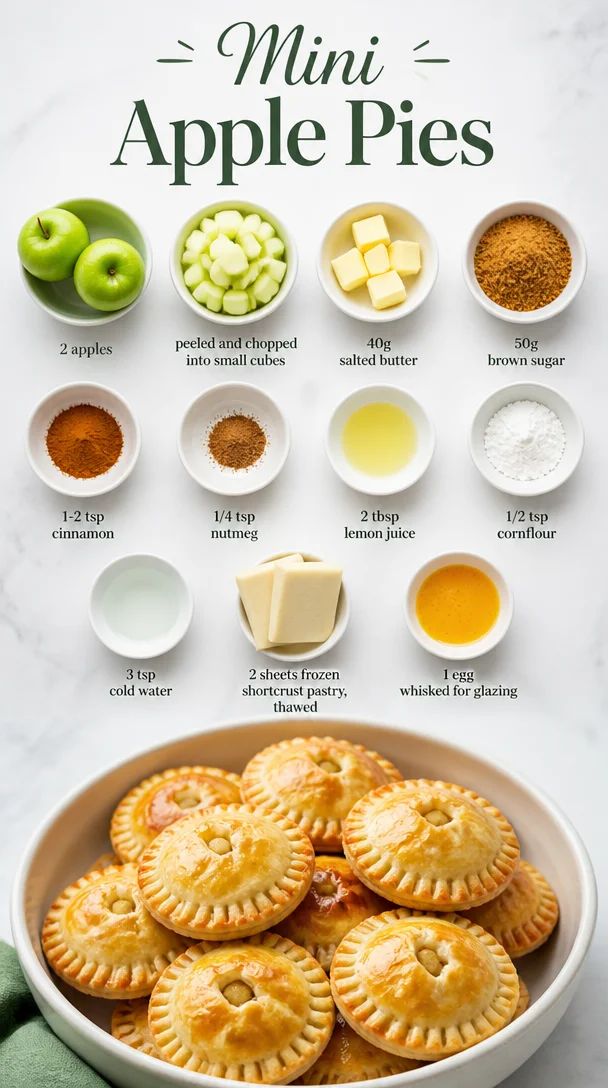
Mini Apple Pies
Mini Apple Pies: A Delightful Bite of Nostalgia
Hey there, food enthusiasts! Welcome back to the cozy corner of the internet that is Feastical. Today, we’re diving into a recipe that is not only delicious but also crammed with memories: Mini Apple Pies! If you’ve ever found yourself lost in the warm scent of baked apples, butter, and spices, you know the magic that fills the air when these little pies are in the oven. Grab your favorite apron, and let’s get cooking!
A Nostalgic Dive into Apple Pie Heaven
When I think about apple pie, I’m instantly transported back to my grandmother’s kitchen. She always had a way of filling the house with the most incredible aromas, her laughter ringing through as we helped her prepare our favorite desserts. The best part? Those mini apple pies she used to make! Perfectly portioned and bursting with juicy apples, they were the highlight of every family gathering. I can still picture her, flour dusting the front of her apron, expertly rolling out the pastry to create those delightful mini crusts.
Every time we’d pull them out of the oven, the excitement was palpable. We’d gather around the table, waiting impatiently for them to cool, while the sweet smell of cinnamon and nutmeg danced around us like an inviting embrace. It’s these memories that inspire me to share this recipe with you. So, whether you need a cozy dessert for a gathering or a comforting snack, mini apple pies are the way to go!
Ingredients
Here’s what you’ll need to whip up these delectable mini apple pies:
-
2 apples, peeled and chopped into small cubes
Use a crisp apple like Granny Smith or Honeycrisp for the perfect texture and flavor. If you find yourself without fresh apples, feel free to use canned pie filling! -
40g salted butter
Butter makes everything better! You can substitute with unsalted butter; just add a pinch of salt for balance. -
50g brown sugar
This adds that deep, rich flavor. If you want a lighter touch, granulated sugar works perfectly too. -
1-2 tsp cinnamon
What’s an apple pie without cinnamon? Feel free to season to your taste—more cinnamon makes it cozier! -
1/4 tsp nutmeg
Nutmeg adds a unique warmth. If you’re not a fan, simply omit it, but I highly recommend trying it! -
2 tbsp lemon juice
This brightens the filling and keeps the apples from browning. Don’t worry; the tang of lemon balances the sweetness beautifully! -
1/2 tsp cornflour
Cornflour thickens the filling, so it’s not too runny. If you don’t have it, try all-purpose flour as a substitute. -
3 tsp cold water
Cold water helps in the mixing process. It’s not much, but it makes a world of difference! -
2 sheets frozen shortcrust pastry, thawed
You can make your own pastry if you’re feeling adventurous, but ready-made works perfectly (and saves time!). -
1 egg, whisked for glazing
This gives the pies a beautiful golden color. If you prefer a vegan option, a little almond milk brushed on top will do just fine!
Step-by-Step Instructions
Now let’s get into the fun part—baking these beauties! Follow these steps closely to make sure your mini apple pies turn out perfectly golden and delicious.
-
Preheat the Oven
Preheat your oven to 180°C (350°F). A hot oven is crucial for getting that lovely flaky crust! -
Prepare the Apples
In a medium saucepan, melt your 40g of salted butter over medium heat. Once melted, toss in the peeled and chopped apples. Add the 50g of brown sugar, cinnamon, nutmeg, and lemon juice. Stir everything together until each apple piece is well coated. Allow it to cook for about 5-7 minutes until the apples are slightly tender. -
Thicken the Filling
In a small bowl, combine the cornflour and cold water. Mix until smooth and then stir it into the apple mixture. This helps to hold everything together! Cook for another minute until the filling starts to thicken, then remove it from the heat and allow it to cool slightly. -
Roll Out the Pastry
On a lightly floured surface, roll out the thawed shortcrust pastry. Make sure it’s about 3mm thick. Using a round cutter, cut out circles large enough to fit into the muffin tray you’re using. -
Assemble the Mini Pies
Grease your muffin tray, and gently press the pastry circles into the bottom of each muffin cup, creating small bowls. Spoon the cooled apple filling into each pastry shell, filling them about 3/4 full. -
Create Top Crusts
Using the remaining pastry, cut out smaller circles to top your pies. Alternatively, you can create a lattice top for a fancy touch! Gently place it over the filling. Seal the edges by crimping them with a fork then brush the top with the whisked egg for that beautiful golden finish. -
Bake Time!
Pop the muffin tray into your preheated oven and bake for 18-20 minutes or until the crust is golden brown and the filling is bubbly. Keep an eye on them! -
Cooling Down
Once baked, allow the mini pies to cool in the tray for about 5 minutes before transferring them to a wire rack. Patience is key here; let them cool to avoid burning your tongue in that first piping-hot bite!
Serving Suggestions
When it comes to serving these delightful mini apple pies, presentation matters! You can place them on a rustic wooden cutting board or a pretty white platter. Dust a little powdered sugar on top for added flair, or serve them warm with a scoop of vanilla ice cream melting over the top. Drizzle with a little caramel sauce, and watch the eyes of your guests light up! Pair with a cup of warm tea or coffee for that extra cozy feeling.
Recipe Variations
Want to switch things up a bit? Here are a few creative twists:
- Caramel Apple Mini Pies: Stir in some caramel bits along with the apple filling for a decadent twist.
- Spiced Pear & Apple Pies: Substitute one of the apples for ripe pears; they add a sweet, juicy twist to the filling.
- Nutty Crunch: Add some chopped walnuts or pecans into the apple mixture for an added crunch.
- Berry Boost: Mix in a handful of fresh or frozen berries like blueberries or raspberries for a colorful fruity blend.
- Cinnamon Roll Mini Pies: Swirl in some cinnamon sugar into the apple filling for a gooey, dessert-like experience.
Chef’s Notes
This recipe is deeply rooted in warmth and nostalgia for me, and I love how it brings family together. Over the years, I’ve played around with different fillings and crusts, even attempting savory versions with cheese! (Trust me, it’s a game-changer!) My grandmother’s magic was always in the simplicity, so I like to keep it uncomplicated and let the natural flavors shine through. Every time I bake these mini pies, I feel like I’m sharing a piece of my childhood with you!
FAQs and Troubleshooting
-
My crust is too thick; how can I fix it?
If you find that your crust is too thick, simply roll it out more thinly next time or ensure you’re using the correct size cutter to fit your muffin tray. -
The filling is runny. What happened?
If your filling is too runny, it could be because the apples released too much juice. Just be sure to thicken with cornflour and let it cool enough before filling the pies. -
How can I prevent my pie crust from puffing up?
You can prick the bottom of the pastry with a fork to prevent it from puffing up during baking, allowing steam to escape. -
Can I make these ahead of time?
Absolutely! You can prepare the filling and pastry a day in advance, just store them in the fridge. Assemble and bake when you’re ready to serve!
Nutritional Info
Mini apple pies are a comforting treat, and while they’re best enjoyed in moderation, here’s a quick look at what each pie might contain (based on a recipe serving 8 pies):
- Calories: Approximately 160-180 per pie
- Carbohydrates: 25g
- Fat: 8g
- Protein: 2g
- Fiber: 1g
Remember that adding ice cream or additional toppings will increase these values.
Final Thoughts
There you have it—a scrumptious recipe for Mini Apple Pies that will not only fill your kitchen with delightful aromas but also your hearts with warmth and nostalgia. Baking is more than just preparing food; it’s about creating moments and memories with those we cherish. So gather your loved ones around the table, share these mini pies, and relish the sweet connections they bring.
Happy baking, friends! Until next time, stay deliciously curious! 🍏🥧
Print
Mini Apple Pies
- Total Time: 40 minutes
- Yield: 8 servings 1x
- Diet: Vegetarian
Description
Delightful mini apple pies bursting with juicy apples and warm spices, perfect for gatherings or as a comforting snack.
Ingredients
- 2 apples, peeled and chopped into small cubes
- 40g salted butter
- 50g brown sugar
- 1–2 tsp cinnamon
- 1/4 tsp nutmeg
- 2 tbsp lemon juice
- 1/2 tsp cornflour
- 3 tsp cold water
- 2 sheets frozen shortcrust pastry, thawed
- 1 egg, whisked for glazing
Instructions
- Preheat your oven to 180°C (350°F).
- In a medium saucepan, melt your 40g of salted butter over medium heat.
- Add in the peeled and chopped apples along with the brown sugar, cinnamon, nutmeg, and lemon juice.
- Stir everything together until well coated and cook for about 5-7 minutes.
- In a small bowl, combine the cornflour and cold water, then mix until smooth.
- Stir the cornflour mixture into the apple mixture and cook for another minute.
- On a lightly floured surface, roll out the thawed shortcrust pastry to about 3mm thick.
- Using a round cutter, cut out circles large enough to fit into your muffin tray.
- Grease your muffin tray, and press the pastry circles into the bottom of each muffin cup.
- Spoon the cooled apple filling into each pastry shell, filling them about 3/4 full.
- Using the remaining pastry, cut out smaller circles for the tops or create lattice tops.
- Seal the edges by crimping them with a fork and brush with the whisked egg.
- Pop the muffin tray into your preheated oven and bake for 18-20 minutes.
- Once baked, allow them to cool for about 5 minutes before transferring to a wire rack.
Notes
For variations, you can add caramel bits, nuts, or mix in berries to the filling!
- Prep Time: 20 minutes
- Cook Time: 20 minutes
- Category: Dessert
- Method: Baking
- Cuisine: American
Nutrition
- Serving Size: 1 pie
- Calories: 170
- Sugar: 10g
- Sodium: 200mg
- Fat: 8g
- Saturated Fat: 3g
- Unsaturated Fat: 5g
- Trans Fat: 0g
- Carbohydrates: 25g
- Fiber: 2g
- Protein: 2g
- Cholesterol: 50mg
Keywords: mini apple pies, apple dessert, nostalgic recipes
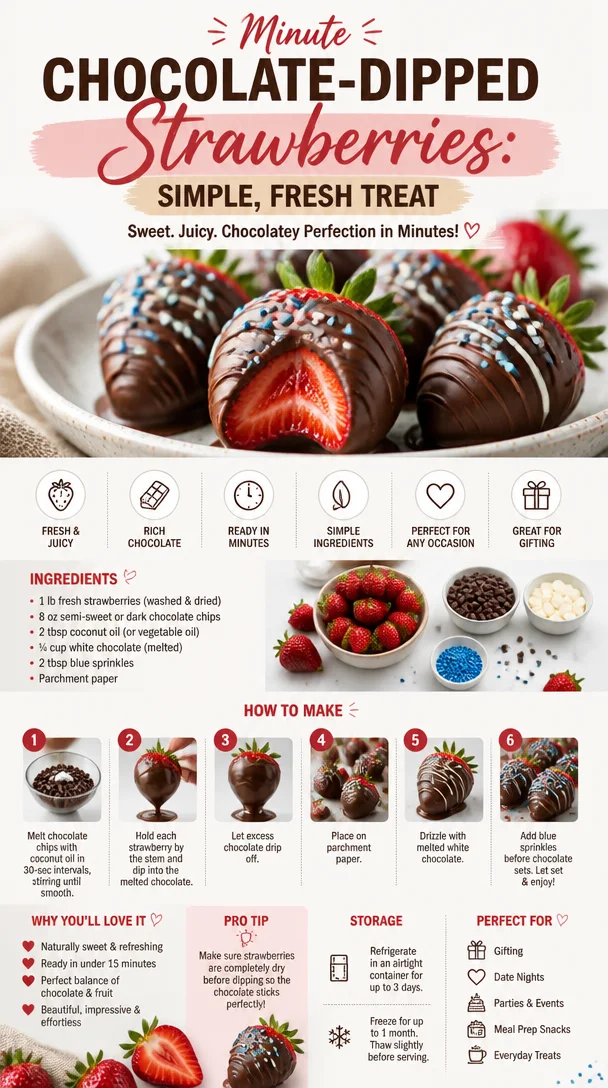
Minute Chocolate-Dipped Strawberries: Simple, Fresh Treat
Dive into Delight: Chocolate Dipped Strawberries
Hey there, fellow food lovers! Today, we’re plunging into the delectable world of chocolate-dipped strawberries. This sweet treat is not just an indulgence; it’s a celebration of simplicity, love, and a touch of nostalgia. Whether you’re looking to impress someone special, dress up a party platter, or simply satisfy your sweet tooth, these strawberries are here to save the day!
I remember the first time I made chocolate-dipped strawberries. It was a sunny afternoon in my grandmother’s cozy kitchen. She was whipping up a batch for a family gathering, and I was her eager little sous chef. The air was filled with laughter, and as we melted the chocolate, she shared stories of her own childhood baking adventures. Those strawberries weren’t just a dessert; they were a bridge connecting generations, rich with memories and love.
Now, I like to believe that anyone can recreate that moment, and I’m here to guide you through it! So, roll up your sleeves, and let’s get to work on these scrumptious treats that come together in a snap but carry a whole lot of joy!
Ingredients
Here’s what you’ll need to whip up these delightful treats:
-
Fresh Strawberries:
- Look for plump, ripe strawberries with a bright red hue. The fresher, the better! If strawberries aren’t in season, you can swap them for other fruits like bananas or pineapple.
-
White Chocolate:
- I prefer using high-quality white chocolate chips because they melt smoothly and taste heavenly. If you want to keep things dairy-free, look for plant-based options!
-
Blue Sprinkles:
- These add a fun pop of color! Feel free to get creative—switch it up with different colored sprinkles to match any theme or occasion.
The combination of these ingredients makes for not just a treat but a canvas for creativity. They’re perfect for romantic date nights, birthday bashes, or just a fun Saturday in with your best friends!
Step-by-Step Instructions
Let’s get down to the nitty-gritty, shall we? Here’s how to make those chocolate-dipped strawberries:
-
Preparation:
- Rinse your strawberries gently under cold water, pat them dry with a clean towel, and leave the green tops intact. This helps with handling them later and adds a rustic touch to your presentation.
- Chef’s Tip: Ensure the strawberries are completely dry. Any moisture can make the chocolate seize up!
-
Melt the White Chocolate:
- Place the white chocolate chips in a microwave-safe bowl and pop them in the microwave. Start with 30 seconds on high and stir. Continue in 15-second intervals until it’s smooth.
- Chef’s Tip: Stirring often will help avoid any burning, and using a glass bowl can give you an even melt!
-
Dipping Time:
- Hold a strawberry by its green stem and dip it into the melted white chocolate, swirling to coat it evenly. Don’t forget to scrape off the excess chocolate on the bowl’s edge before setting it down!
- Chef’s Tip: For a chic finish, dip the strawberry at an angle for a beautiful tapered look.
-
Adding Sprinkles:
- While the chocolate is still warm and gooey, sprinkle those blue sprinkles on top. Feel free to go wild—there’s no such thing as too much joy here!
- Chef’s Note: If you want a two-tone effect, allow the first layer of white chocolate to harden before dipping the strawberry into a contrasting chocolate.
-
Chill:
- Place your strawberries on a lined tray or cooling rack and pop them into the fridge for at least 30 minutes. This will help the chocolate set perfectly into a shiny coat of goodness.
- Chef’s Tip: For an extra smoothing effect, you can gently warm the chocolate again if it starts to thicken.
-
Serve and Enjoy:
- Once the chocolate is firmly set, arrange the strawberries on a festive platter or serve them in individual cups.
- Chef’s Suggestion: Pair them with whipped cream or a drizzle of dark chocolate for a delightful contrast!
Serving Suggestions
Now that you’ve made these beauties, let’s talk presentation! The way you serve your chocolate-dipped strawberries can elevate the whole experience.
-
Festive Platter:
- Arrange them on a decorative plate with mint leaves for a pop of color. Use a mix of berries around them for a beautiful berry medley!
-
In a Glass:
- Serve them upright in a tall glass filled with colored candies or rice. They’ll look like a bouquet that’s both edible and gorgeous!
-
On a Stick:
- For a fun twist, consider inserting a skewer into each strawberry and arranging them like a fruit bouquet. Kids and adults alike will love this playful option!
Recipe Variations
Get ready to shake things up! Here are some creative twists you can try with this recipe:
-
Chocolate Combo:
- Instead of just using white chocolate, dip half the strawberry in dark chocolate for a beautiful contrast and an added flavor twist.
-
Nutty Crunch:
- After dipping in white chocolate, roll the strawberries in crushed nuts like almonds or pistachios for a crunchy layer.
-
Caramel Drizzle:
- Drizzle melt caramel over the dipped strawberries for an extra layer of sweetness—who doesn’t love caramel?
-
Spicy Kick:
- Mix a dash of cayenne pepper into your white chocolate for a surprising kick!
-
Fruit Variety:
- Swap strawberries for other fruits like apples or grapes for a fun fruit fondue night!
Chef’s Notes
These chocolate-dipped strawberries have become a staple in my kitchen. They have evolved over the years, but one thing remains true: they bring people together. I remember the first batch I made for my best friend’s surprise birthday party; it was a hit! Not only was it a delicious dessert, but it also sparked a night full of laughter and memorable moments.
Sometimes, I play around with the chocolate flavors depending on the season or occasion. Remember, cooking is all about the journey and the stories we create along the way!
FAQs and Troubleshooting
Here are some common questions I often receive about chocolate-dipped strawberries:
-
Why does my chocolate seize?
- If even a drop of water gets into your chocolate, it can seize. Always make sure the bowl, strawberries, and utensils are completely dry.
-
How can I store chocolate-dipped strawberries?
- Store them in the fridge in a single layer in an airtight container. They’re best consumed within 1-2 days for optimal freshness!
-
What if the chocolate doesn’t coat well?
- If your chocolate is too thick, you can reheat it slightly and add a teaspoon of vegetable oil to thin it out!
-
Can I use milk chocolate instead?
- Absolutely! Feel free to experiment with any type of chocolate you love.
Nutritional Info
Here’s a quick breakdown of the nutritional info (per serving of 3 strawberries):
- Calories: Approximately 150
- Fat: 8g
- Carbohydrates: 20g
- Sugar: 15g
- Protein: 1g
These figures may vary based on the exact type of chocolate and strawberries used, so feel free to calculate based on your specific ingredients. Just remember, moderation is key—indulge guilt-free!
Final Thoughts
Chocolate-dipped strawberries are such a simple yet profound treat that can spark joy on any occasion. From the first bite to the last, they remind us of shared moments and sweet memories. With just a few ingredients and simple techniques, you can create something truly beautiful. So, gather your friends, whip up a batch, and dig in. I can’t wait to hear your stories—let’s keep the joy of cooking alive!
Happy dipping, foodies! 🍓🍫
PrintChocolate Dipped Strawberries
- Total Time: 20 minutes
- Yield: 12 servings
- Diet: Vegetarian
Description
Sweet and simple chocolate-dipped strawberries perfect for any occasion.
Ingredients
- Fresh strawberries
- High-quality white chocolate chips
- Blue sprinkles
Instructions
- Rinse your strawberries gently under cold water, pat them dry with a clean towel, and leave the green tops intact.
- Place the white chocolate chips in a microwave-safe bowl and pop them in the microwave. Start with 30 seconds on high and stir, continuing in 15-second intervals until smooth.
- Hold a strawberry by its green stem and dip it into the melted white chocolate, swirling to coat it evenly.
- While the chocolate is still warm, sprinkle blue sprinkles on top.
- Place your strawberries on a lined tray and pop them into the fridge for at least 30 minutes.
- Once the chocolate is firmly set, arrange the strawberries on a festive platter or serve them in individual cups.
Notes
Store chocolate-dipped strawberries in the fridge in a single layer for best freshness. Enjoy within 1-2 days.
- Prep Time: 15 minutes
- Cook Time: 5 minutes
- Category: Dessert
- Method: Chilling
- Cuisine: American
Nutrition
- Serving Size: 3 strawberries
- Calories: 150
- Sugar: 15g
- Sodium: 0mg
- Fat: 8g
- Saturated Fat: 5g
- Unsaturated Fat: 3g
- Trans Fat: 0g
- Carbohydrates: 20g
- Fiber: 1g
- Protein: 1g
- Cholesterol: 0mg
Keywords: chocolate, strawberries, dessert, easy recipe, party treat, sweet treats

No-Bake Cookie Dough Bites: Fast, Creamy Dessert in Minutes
Indulgent No-Bake Cookie Dough Bites Recipe: Easy Dessert Bliss
Hey there, fellow food lovers! If you’re anything like me, the mere thought of cookie dough can make your heart race with excitement. There’s just something so delightful about that creamy, slightly sweet dough that brings us back to our childhood days of sneaking spoonfuls straight from the mixing bowl. Today, I’m so thrilled to share a recipe that combines that nostalgic joy with the grown-up bliss of indulgent treats: No-Bake Cookie Dough Bites. Trust me, these are as easy to whip up as they are to devour!
A Little Taste of Nostalgia
You know, I can’t help but smile when I think back to my childhood kitchen adventures with my mom. Every Saturday, we’d bake chocolate chip cookies, and like clockwork, I’d sneakily scoop up a spoonful of cookie dough when she wasn’t looking. I remember her chuckling and shaking her head, reminding me that raw flour and eggs weren’t exactly the healthiest choice, but that never stopped me from indulging in a little cookie dough heaven!
Fast forward a few years, and I found myself in a bit of a dilemma. I still craved that incredible taste of cookie dough but wanted something safe to snack on. Enter my No-Bake Cookie Dough Bites! They are perfect for satisfying your sweet tooth without any of the risks of traditional cookie dough—no eggs and heat-treated flour make this treat a total win! Plus, they’re easy to customize, allowing you to experiment with flavors and fillings. Let’s get rolling!
Ingredients
Here’s a quick rundown of the ingredients for these heavenly No-Bake Cookie Dough Bites:
-
1 stick Unsalted Butter (Softened)
The star ingredient! Butter adds a rich flavor and smooth texture. If you want to keep it vegan, feel free to swap in dairy-free butter. -
1/2 cup Light Brown Sugar
This brings the perfect sweetness and caramel-like depth to your bites. If you prefer not to use brown sugar, coconut sugar is a great alternative! -
2 tablespoons Milk
Just a splash for moisture! Use any milk you like—almond, soy, or oat milk work brilliantly for a dairy-free version. -
1 teaspoon Vanilla Extract
A must for that warm, comforting flavor! Homemade vanilla extract is easy to make and super tasty if you’re feeling adventurous. -
1 cup All-Purpose Flour (Must be heat-treated)
Heat-treating eliminates any potential pathogens in flour, making it safe to eat raw. You can also use gluten-free flour if needed! -
1/4 teaspoon Salt
A pinch of salt intensifies the sweetness and balances out all the flavors. Trust me, it’s a crucial step! -
1/2 cup Mini Chocolate Chips
Because who can resist more chocolate? Mini chips meld perfectly into the dough and give those delightful bites a perfect pop! -
1 cup Semisweet or Milk Chocolate
This is for coating the cookie dough bites. Use whichever chocolate suits your taste buds—dark chocolate would be divine too! -
1 tablespoon Coconut Oil or Vegetable Oil (Optional)
If you want a smoother chocolate coating, adding a bit of oil can help thin it out. Coconut oil lends a subtle flavor and sheen, making everything look extra gourmet!
Step-by-Step Instructions
Alright, my foodie friends, let’s get down to the fun part—making these delightful bites! Follow me as we craft these little pieces of cookie dough bliss.
-
Prep Your Kitchen: First thing’s first, we’ll want to make sure our kitchen is ready for action. Grab a mixing bowl, a spatula, and a baking sheet lined with parchment paper. The parchment makes clean-up so much easier!
-
Cream the Butter and Sugar: In your mixing bowl, combine the softened unsalted butter and brown sugar. Use your spatula or an electric mixer to beat them together until it’s creamy and smooth—about 2-3 minutes. Tip: The softer your butter, the easier this will be, so let it sit out for a bit before starting.
-
Add Milk and Vanilla: Pour in the milk and vanilla extract, and mix it all together until combined. If you like your dough on the sweeter side, you can always taste and adjust with a little more vanilla!
-
Mix in the Flour and Salt: Now for the magic! Gradually add in your heat-treated flour and the salt. I like to do this a little at a time, mixing as I go to avoid a flour explosion! Your mixture should come together into a lovely, thick dough.
-
Fold in the Chocolate Chips: Grab your mini chocolate chips and fold them into the dough using a spatula. You want to have an even distribution so every bite has those chocolatey bits we all love!
-
Form the Bites: Once your dough is ready, it’s time to form them into bites. Use your hands to roll out about 1-inch balls and place them on your prepared baking sheet. I find it helps to slightly dampen my hands, making the rolling process easier and less sticky!
-
Chill Out: Pop those cookie dough balls in the fridge for about 30 minutes. This will help them firm up and be less likely to fall apart when coating them in chocolate.
-
Melt the Chocolate: While they’re chilling, melt your semisweet or milk chocolate. You can do this in the microwave in 30-second intervals, stirring after each session until it’s completely smooth. If using, mix in the coconut oil for that ultra-smooth coating.
-
Coat the Dough Bites: Once your cookie dough bites are chilled, it’s time for the fun part! Dip each ball into the melted chocolate, making sure it’s fully coated. Return to the parchment-lined sheet afterward.
-
Set Them Up: Once all your bites are coated, pop them back into the fridge for another 15-20 minutes until the chocolate hardens. Then, it’s finally time to enjoy your incredible creation!
Serving Suggestions
Now that you’ve made these sensational No-Bake Cookie Dough Bites, here are a few fun ways to serve them up:
-
On a Dessert Platter: Arrange them on a pretty serving tray and dust with a sprinkle of sea salt for an extra touch of flair. They’ll shine bright among your favorite desserts!
-
Coffee Companion: Pair your bites with a cup of coffee or hot cocoa for the ultimate cozy treat. The chocolatey goodness complements that warm beverage perfectly!
-
Gift Them: Pack these bites into a mason jar tied with a ribbon for a sweet gift. They make great presents for friends, family, or anyone with a sweet tooth!
Recipe Variations
Love to mix things up? Here are some fun variations and twists you can try with your No-Bake Cookie Dough Bites:
-
Peanut Butter Lovers: Add ¼ cup of creamy peanut butter to your dough mixture for a delicious nutty flavor. You can also roll them in crushed peanuts for an added crunch!
-
Add Some Crunch: Mix in ¼ cup of chopped nuts, like walnuts, pecans, or almonds, to add a delightful texture to your cookie dough bites.
-
Spiced Up Dough: Looking for something a little different? Add a pinch of cinnamon or a sprinkle of nutmeg to the butter-sugar mix. It gives your bites a warm, cozy flavor that’s perfect for fall!
-
Nut-Free Version: If you want these bites to be nut-free, swap any nut products for sunflower seed butter, and be sure your chocolate chips are nut-free as well!
-
S’mores Style: Mix in mini marshmallows and crushed graham crackers, and use a blend of milk chocolate. A fun twist that’ll take you back to campfire nights!
Chef’s Notes
Ah, the journey of recipe creation is always full of delightful surprises! I’ve played around with this cookie dough bites recipe a ton over the years. From adding different mix-ins to experimenting with various chocolate coats, each trial has brought me closer to the perfect bite. One of my favorite iterations was adding a layer of crushed Oreos into the dough—it was a total game-changer!
Every aspiring chef has their mishaps in the kitchen, and trust me, I’ve had my fair share! The time I tried melting chocolate with butter on the stovetop led to a delightful disaster of burnt chocolate. Lesson learned: always use low heat, or better yet, melt in the microwave for a safer option!
FAQs and Troubleshooting
-
Can I use regular flour instead of heat-treated?
Nope! Use heat-treated flour to ensure it’s safe to eat raw. You can find it pre-heat-treated or easily make your own by baking it in a preheated oven at 350°F for about 5-7 minutes. -
Why did my dough come out crumbly?
If your dough is too crumbly, it might be due to too much flour. Next time, reduce the flour slightly or add a splash more milk to bring it all together. -
How do I store these bites?
Store in an airtight container in the fridge for up to a week. If you find you have extras, you can freeze them for longer storage. Just thaw them in the fridge when you’re ready to indulge! -
Can I sub the chocolate?
Absolutely! You can use white chocolate, dark chocolate, or even carob chips if you’re looking for a healthier option. Just keep the ratios consistent!
Nutritional Info
While I always recommend indulging in moderation, here’s a rough estimate of the nutritional value per No-Bake Cookie Dough Bite (assuming you make around 20 bites total):
- Calories: Approximately 120
- Fat: 7g
- Carbohydrates: 12g
- Sugar: 8g
- Protein: 1g
Feel free to make swaps or adjustments depending on dietary preferences, like using dairy-free options or different sweeteners, to make your bites fit your nutritional needs!
Final Thoughts
Creating these No-Bake Cookie Dough Bites is not just about satisfying that sweet tooth; it’s about reliving those cherished moments from my kitchen while creating new ones with you. This fun recipe invites you to take your first step into the world of no-bake desserts and embrace the joys of improvisation in the kitchen.
Gather your loved ones, roll up those sleeves, and whip up these delicious bites that practically scream comfort! Whether it’s an afternoon snack, a party treat, or a late-night indulgence, you won’t be able to resist their charm. Now, let’s give yourself a hearty hug in the form of indulgent bites and keep spreading the love through feel-good food, one bite at a time! Happy cooking!
Print
No-Bake Cookie Dough Bites
- Total Time: 45 minutes
- Yield: 20 bites 1x
- Diet: Vegetarian
Description
Indulge in these delightful No-Bake Cookie Dough Bites, combining the nostalgic taste of cookie dough with a safe twist—no eggs and heat-treated flour!
Ingredients
- 1 stick Unsalted Butter (Softened)
- 1/2 cup Light Brown Sugar
- 2 tablespoons Milk
- 1 teaspoon Vanilla Extract
- 1 cup All-Purpose Flour (Must be heat-treated)
- 1/4 teaspoon Salt
- 1/2 cup Mini Chocolate Chips
- 1 cup Semisweet or Milk Chocolate (for coating)
- 1 tablespoon Coconut Oil or Vegetable Oil (Optional)
Instructions
- Prep Your Kitchen: Prepare your mixing bowl, spatula, and a baking sheet lined with parchment paper.
- Cream the Butter and Sugar: In a mixing bowl, combine softened unsalted butter and brown sugar and beat until creamy—about 2-3 minutes.
- Add Milk and Vanilla: Mix in the milk and vanilla until combined.
- Mix in the Flour and Salt: Gradually add heat-treated flour and salt, mixing until a thick dough forms.
- Fold in the Chocolate Chips: Incorporate mini chocolate chips into the dough for even distribution.
- Form the Bites: Roll out 1-inch balls and place them on the prepared baking sheet.
- Chill Out: Refrigerate the cookie dough balls for about 30 minutes.
- Melt the Chocolate: Melt semisweet or milk chocolate in the microwave until smooth, adding coconut oil if desired.
- Coat the Dough Bites: Dip each ball into melted chocolate, ensuring it’s fully coated, and return to the lined sheet.
- Set Them Up: Chill again for 15-20 minutes until the chocolate hardens.
Notes
Store in an airtight container in the fridge for up to a week. Optional variations include adding peanut butter or nuts.
- Prep Time: 15 minutes
- Cook Time: 0 minutes
- Category: Dessert
- Method: No-Bake
- Cuisine: American
Nutrition
- Serving Size: 1 bite
- Calories: 120
- Sugar: 8g
- Sodium: 50mg
- Fat: 7g
- Saturated Fat: 4g
- Unsaturated Fat: 3g
- Trans Fat: 0g
- Carbohydrates: 12g
- Fiber: 0g
- Protein: 1g
- Cholesterol: 30mg
Keywords: cookie dough, no-bake dessert, easy treat, snack, indulgent, sweet bites