
Minute Sour Cherry Tarts: Simple Summer Dessert
Easy Sour Cherry Tarts: A Sweet Treat with a Tart Twist!
Hey there, fellow food lovers! Today, I’m feeling a bit nostalgic as I share a delightful recipe that warms my heart and brings back some of my fondest memories: Easy Sour Cherry Tarts. Picture this: sun-drenched orchards, the sweet-and-sour aroma of cherries wafting through the air, and laughter filling the kitchen as family members gather to whip up something delicious. That’s the magic of cherries—sweet on some days and a tad tart on others, just like life!
In my world, sour cherries are underrated gems that deserve a spotlight. These vibrant little fruits are perfect for desserts that strike a balance between sweet indulgence and zesty freshness. Whether it’s a casual get-together or a fancy dinner party, these Easy Sour Cherry Tarts will have everyone asking for seconds (and maybe even thirds)! So, put on your apron, roll up your sleeves, and let’s embark on this cherry adventure together!
A Cherry Memory
Let me take you back to a summer long ago, back when my grandmother had an expansive cherry tree in her backyard. Those arms of green would be filled to the brim with the brightest, juiciest sour cherries you could imagine. The air would buzz with excitement as my cousins and I would have friendly cherry-picking contests, trying to outdo each other on who could gather the most. Sun-soaked faces, sticky fingers, and the joy of biting into a fresh cherry was always the best part of summer.
After our cherry-picking escapades, Grandma would lead us back into her cozy kitchen, where the delightful aroma of baked goods was a constant invitation. Together, we would mix, stir, and bake, turning those tart gems into the most scrumptious pies and tarts. I can still hear Grandma’s laughter as she caught us sneaking a few cherries to munch on while we worked. Those Easy Sour Cherry Tarts were the highlight of our family gatherings, and now, they’re a cherished tradition that I love sharing with you all!
Ingredients for Easy Sour Cherry Tarts
Here’s what you’ll need to make these delightful tarts:
- 6 cups pitted sour cherries: Fresh, frozen, or canned—just make sure they’re pitted! If you’re using frozen cherries, there’s no need to thaw them; they’ll cook down beautifully.
- 2 cups white sugar: Essential for balancing the tartness of the cherries! You can adjust this based on your sweetness preference or swap it out for brown sugar for a deeper flavor.
- 1 heaping tbsp cornstarch: This is our thickening agent! It helps the cherry filling hold together nicely. If you don’t have cornstarch, you can use arrowroot or all-purpose flour, but you may need to adjust the quantity.
- 2-3 tbsp water: Helps create the syrupy mixture with sugar and cherries. Use as needed to achieve the right consistency.
- 1 package pastry tart shells (approximately 30 in a package): Store-bought or homemade—save time with pre-made shells or impress your friends with a homemade version!
- Whipped cream to garnish: The perfect light and airy topping! You can use store-bought or whip up some fresh cream by mixing heavy cream and sugar until it forms soft peaks.
- Optional: Edible flowers and thyme for garnish: These add a beautiful touch! Look for flowers like nasturtiums or violets, and fresh thyme for a lovely herbal contrast.
Step-by-Step Instructions for Making Your Tarts
Now that we’ve gathered our ingredients, let’s get started on these delightful Easy Sour Cherry Tarts.
Step 1: Prepare the Filling
-
In a large pot, combine the pitted sour cherries and sugar over medium heat. Stir them gently until the cherries begin to release their juices and the sugar starts to dissolve.
Chef Tip: To enhance the flavor, consider adding a dash of vanilla extract or a sprinkle of cinnamon for an unexpected twist!
-
Once the mixture is simmering, sprinkle the cornstarch over the cherries and stir to combine. This will help thicken the filling. If it looks too thick, add a bit of water to loosen it up. Let this cook for about 5-7 minutes until it thickens and bubbles.
Pro Tip: If you notice clumps of cornstarch, whisk it with a bit of cold water first to create a slurry before adding it to the hot filling.
Step 2: Fill the Tart Shells
-
Preheat your oven to 350°F (175°C). While it preheats, take your prepared tart shells and place them on a baking sheet.
-
Once the filling is ready, carefully spoon the tart cherry mixture into the prepared tart shells, filling each one generously.
Chef Insight: Don’t be shy! A heaping spoonful of filling in each shell makes for an irresistible tart.
Step 3: Bake the Tarts
-
Place the filled tart shells in the oven and bake for approximately 20-25 minutes or until the tart shells are golden and the cherry filling is bubbling.
Baker’s Pro Tip: Keep an eye on the tarts towards the end of baking! If you see that the shells are browning too quickly, you can cover them with aluminum foil to prevent burning.
Step 4: Cool and Serve
-
Once baked, remove the tarts from the oven and let them cool on a wire rack for at least 15-20 minutes. This will allow the filling to set a bit more.
-
Before serving, top each tart with a dollop of whipped cream and, if you’re feeling fancy, a sprinkling of edible flowers or thyme!
Serving Suggestion: Arrange the tarts on a beautiful platter, perhaps with a few fresh cherries scattered around for a pop of color!
Recipe Variations to Try
-
Mixed Cherry Tarts: Combine sour cherries with sweet cherries or other fruits like blueberries or raspberries for a mixed berry experience!
-
Almond Cherry Tarts: Add a teaspoon of almond extract to the filling for a nutty twist that complements the cherry flavor beautifully.
-
Savory Cherry Tarts: For a unique take, incorporate goat cheese into the filling and sprinkle a bit of fresh rosemary on top before baking!
-
Chocolate Cherry Tarts: Drizzle some melted dark chocolate over the tarts either before or after baking for a rich, decadent dessert.
-
Gluten-Free Tarts: Use gluten-free pastry shells or make your own with almond flour for a gluten-free version that everyone can enjoy!
Chef’s Notes
These Easy Sour Cherry Tarts are truly a labor of love. The recipe has evolved over the years as I’ve played with different variations, discovering that the tartness of the cherries complements so many flavors. I remember the first time I added a bit of almond extract to the filling; it was like a light bulb moment in my kitchen! The creativity goes on forever!
And let me tell you, there’s nothing quite like pulling these fresh tarts out of the oven—it fills the air with a scent that makes everyone gather around, just waiting for their first bite!
FAQs and Troubleshooting
1. How do I know when the tarts are baked properly?
Look for a bubbling filling and a golden-brown crust. If your tarts are browning too quickly, use foil to cover them.
2. Can I use fresh cherries instead of frozen?
Absolutely! Just make sure to pit them first. Fresh cherries add a lovely texture!
3. My filling is too runny; what did I do wrong?
If your filling is too runny, it may be due to not enough cornstarch or cooking time. Let it cook a bit longer to thicken up.
4. How can I store leftover tarts?
Keep them in an airtight container in the fridge for up to three days. They’re perfect for a quick snack!
Nutritional Info
While exact values can vary based on the specific ingredients you use, here’s a general breakdown for each tart based on serving size:
- Calories: Approximately 200 calories per tart
- Total Fat: 8g
- Saturated Fat: 4g
- Cholesterol: 30mg
- Sodium: 150mg
- Total Carbohydrates: 30g
- Fiber: 2g
- Sugars: 18g
- Protein: 2g
Keep in mind that these tarts are a delightful indulgence meant to be enjoyed in moderation—the fresh cherries bring a load of vitamins and antioxidants, making them a slightly healthier choice than other dessert options!
Final Thoughts
Creating Easy Sour Cherry Tarts is more than just a recipe; it’s about celebrating the connections we make over good food. It’s about the laughter shared while baking and the memories created around the dinner table. Whether you’re whipping these up for a family gathering, a potluck, or just a Tuesday night treat for yourself, I promise they’ll bring a little sweetness and tart joy to your day!
So there you have it! These Easy Sour Cherry Tarts are not just a dessert—they are a tradition, a moment, and an experience all wrapped in a delightful flaky shell. Get in that kitchen, have fun, and enjoy every bite! Happy baking!
Print
Easy Sour Cherry Tarts
- Total Time: 45 minutes
- Yield: 30 tarts 1x
- Diet: Vegetarian
Description
Delightful Easy Sour Cherry Tarts that perfectly balance sweet and tart flavors, making them a favorite for any occasion.
Ingredients
- 6 cups pitted sour cherries (fresh, frozen, or canned)
- 2 cups white sugar
- 1 heaping tbsp cornstarch
- 2–3 tbsp water (as needed)
- 1 package pastry tart shells (approximately 30)
- Whipped cream (for garnish)
- Optional: Edible flowers and thyme for garnish
Instructions
- Combine the pitted sour cherries and sugar in a large pot over medium heat to release juices.
- Sprinkle the cornstarch over the mixture and stir until combined, cooking for 5-7 minutes until thickened.
- Preheat your oven to 350°F (175°C) and arrange tart shells on a baking sheet.
- Spoon the cherry mixture into the tart shells generously.
- Bake for 20-25 minutes or until shells are golden and filling is bubbling.
- Cool the tarts on a wire rack for 15-20 minutes before serving.
- Top each tart with whipped cream and optional edible flowers or thyme.
Notes
Experiment with different variations by adding almond extract or mixing in different fruit for a unique twist.
- Prep Time: 20 minutes
- Cook Time: 25 minutes
- Category: Dessert
- Method: Baking
- Cuisine: American
Nutrition
- Serving Size: 1 tart
- Calories: 200
- Sugar: 18g
- Sodium: 150mg
- Fat: 8g
- Saturated Fat: 4g
- Unsaturated Fat: 4g
- Trans Fat: 0g
- Carbohydrates: 30g
- Fiber: 2g
- Protein: 2g
- Cholesterol: 30mg
Keywords: sour cherry, tarts, dessert, easy recipe, baking, cherry recipe
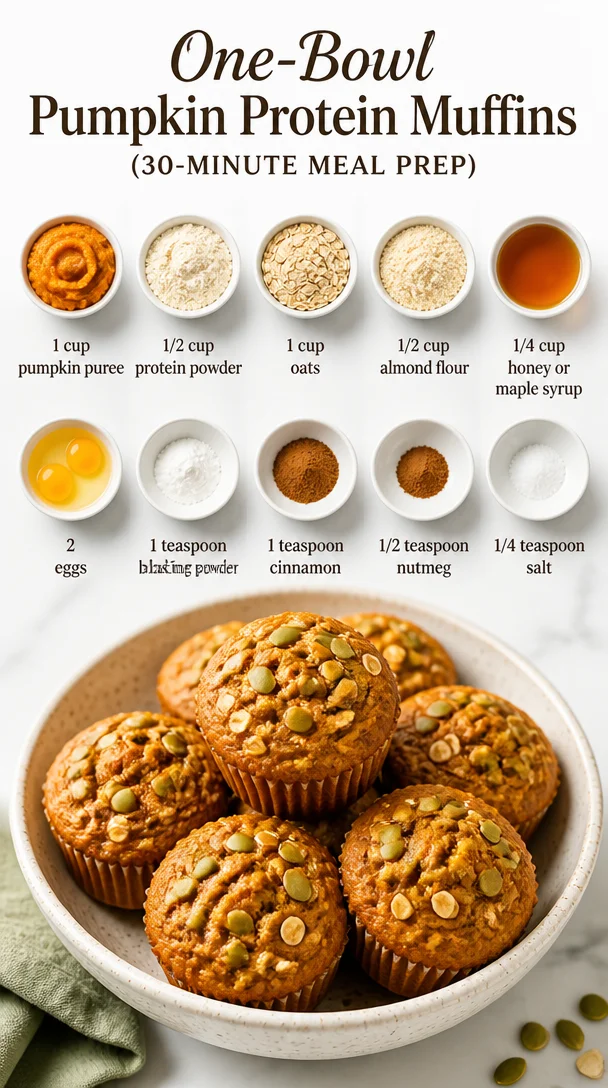
One-Bowl Pumpkin Protein Muffins (30-Minute Meal Prep)
Pumpkin Protein Muffins: A Cozy Culinary Journey to Deliciousness
Hey there, food enthusiasts! It’s Beau Collier, your friendly kitchen buddy with a knack for whipping up comfort food that’s not just satisfying but also good for you. Today, we’re diving into the world of Pumpkin Protein Muffins—a scrumptious treat that’s perfect for breakfast, a snack, or even a post-workout boost.
As the leaves begin to turn and pumpkin-flavored everything floods our favorite cafes, it’s time to embrace something homemade that captures all the warm, cozy vibes of the season—without forgetting our health goals! By melding wholesome ingredients with that lovely pumpkin goodness, we can create delightful muffins that are perfect for the entire family. Ready to roll up your sleeves and bake some goodness? Let’s get started!
A Dash of Nostalgia: My Pumpkin Muffin Memory
Picture this: it’s a crisp autumn morning, and the air is filled with the scent of cinnamon and nutmeg. My grandma, a true kitchen guru, would spend weekends crafting her famous pumpkin muffins, filling our home with a cozy aroma that made even the grumpiest of souls smile. She was a true believer that food brings family together, and her secret ingredient was always a generous helping of love mixed with laughter.
I’ll never forget the way she taught me to stir the batter with a flick of the wrist while shaking her head at my clumsy juggling of flour containers. Those muffins were more than just a snack; they symbolized togetherness and the warmth of family tradition. Fast forward to today, and I’ve taken that cherished recipe and added a fun twist—more protein and wholesome elements to fuel our busy lives!
So, grab your apron as we explore the comforting world of Pumpkin Protein Muffins. Trust me, your kitchen will be the next cozy corner of fall magic!
Ingredients: The Building Blocks of Deliciousness
Let’s gather our ingredients! These muffins are packed with nutrients while still delivering on flavor. Here’s what you’ll need:
-
1 cup pumpkin puree: You can use canned or homemade. If using fresh, ensure it’s well-cooked and blended until smooth. Don’t worry; a little extra pumpkin won’t hurt! This ingredient is key for moisture and that wonderful fall flavor.
-
1/2 cup protein powder: I favor a vanilla or chocolate plant-based powder, but your preference will work just fine. Feel free to use whey or pea protein too! It’s a fantastic way to boost the protein content without compromising on taste.
-
1 cup oats: Rolled oats add texture and heartiness. If you’re gluten-sensitive, opt for certified gluten-free oats. You can even pulse them in a blender to create oat flour if you fancy a smoother texture.
-
1/2 cup almond flour: This lends a nutty flavor and moistness. Can’t find almond flour? Substitutes include coconut flour (but use less, as it’s super absorbent) or whole wheat flour for a heartier muffin.
-
1/4 cup honey or maple syrup: Choose your sweetener! Honey gives a floral sweetness, while maple syrup infuses a uniquely rich flavor. If you’d rather skip the sweet stuff, you could use mashed bananas or applesauce as natural sweeteners.
-
2 eggs: They bind our mixture and add fluffiness. You can replace them with flax eggs (1 tablespoon of ground flaxseed mixed with 2.5 tablespoons of water per egg) for a vegan option.
-
1 teaspoon baking powder: Essential for rising! Make sure it’s fresh for maximum fluffiness.
-
1 teaspoon cinnamon: The warming spice we all adore. You can also experiment with pumpkin pie spice blends for an extra kick.
-
1/2 teaspoon nutmeg: A little pep in your step! Nutmeg offers an earthy warmth and a flavor boost.
-
1/4 teaspoon salt: Balances the flavors and enhances the sweetness.
Let’s gather these beautiful ingredients together and create some muffin magic!
Step-by-Step Instructions: Baking with Love
Now that we have our ingredients in check, it’s time to turn our kitchen into a muffin-making paradise! Here are the steps to create your delicious Pumpkin Protein Muffins:
-
Preheat your oven: Start by preheating your oven to 350°F (175°C). This ensures a beautifully even bake!
-
Prepare the muffin tin: Grab your muffin tin and either grease it with cooking spray or line it with paper liners. Greasing helps them pop out easily, while liners make for a fun presentation!
-
Mix the dry ingredients: In a large mixing bowl, whisk together the oats, almond flour, protein powder, baking powder, cinnamon, nutmeg, and salt. This step is essential to distribute all those lovely spices evenly.
-
Combine the wet ingredients: In a separate bowl, mix the pumpkin puree, honey (or maple syrup), and eggs until smooth. You want the mixture to be creamy and comforting. The pumpkin here adds so much flavor and moisture!
-
Blend the ingredients: Pour the wet ingredients into the dry mixture, gently folding it together with a spatula. Be careful not to over-mix; we want fluffy muffins, not tough ones! If the batter seems too thick, add a splash of almond milk or water to loosen it.
-
Scoop your batter: Using a scoop or spoon, evenly distribute the batter into the muffin tins, filling each cup about ¾ full. You can even sprinkle a few oats on top for added texture!
-
Bake to perfection: Slide your muffin tin into the oven and bake for 20–25 minutes, or until a toothpick inserted into the center comes out clean. The scent wafting through your kitchen will make it hard to wait patiently!
-
Cool and enjoy: Once baked, remove the muffins from the oven and let them cool in the pan for 5 minutes, then transfer them to a wire rack to cool completely. If you can resist, let them cool a bit—trust me, it’ll be worth it!
And just like that, your kitchen is filled with the delicious aroma of Pumpkin Protein Muffins! Each muffin is a cozy bite of happiness that nourishes both body and soul.
Serving Suggestions: Mmm, Muffin Time!
Once you’ve baked your muffins to golden perfection, it’s time to dig in! Serve them still warm, perhaps with a little smear of almond butter or a dollop of Greek yogurt for added creaminess. You can also dust them lightly with powdered sugar for a touch of elegance.
For a fun twist, turn your muffin time into a mini brunch gathering. Arrange the muffins on a platter with an assortment of spreads like honey, a drizzle of maple syrup, and even a selection of fresh fruits. Think sliced strawberries, bananas, or a sprinkle of walnuts for that crunchy texture.
Enjoy them fresh out of the oven, or wrap them up for a tasty on-the-go option! Trust me; they make for a delightful snack that you won’t want to miss!
Recipe Variations: Spice it Up
Now that you’ve mastered the classic Pumpkin Protein Muffins, let’s explore a few fun variations to keep things fresh and exciting in your kitchen:
-
Chocolate Chip Pumpkin Protein Muffins: Fold in a handful of dark chocolate chips for a sweet surprise! It’s a delightful combination that will satisfy your sweet tooth while keeping the nutritious profile.
-
Nutty Pumpkin Muffins: Add a handful of chopped walnuts or pecans for a crunchy twist. You could even swap out some of the almond flour for peanut butter to add that delightful nutty flavor!
-
Cranberry Pumpkin Muffins: Toss in some dried cranberries to give that tart sweetness contrasting with the pumpkin’s richness. It adds a pop of color and flavor that’s simply delightful.
-
Spiced Pumpkin Muffins: Double down on your spices! Add some ginger or allspice to amp up the warmth and fall flavors.
-
Gluten-Free Version: Substitute the oats and almond flour for a gluten-free blend, and use flax eggs instead of regular eggs for a vegan take.
The beauty of these muffins is their versatility—mix it, match it, make it your own!
Chef’s Notes: A Recipe for Traditions
As I like to think, every recipe tells a story! My journey with pumpkin muffins started in my grandma’s cozy kitchen, but it has evolved beautifully over the years. I experimented with healthier options to fit my lifestyle and also wanted to introduce a few fun twists inspired by my kitchen adventures.
Every time I whip up these muffins, I’m reminded of family gatherings and laughter, the joy each bite brings, and it fuels my mission at Feastical. Baking is about connecting with others, sharing our wins (and mishaps!), and spreading joy one muffin at a time.
And hey, if the batter seems a little thick or your muffins aren’t rising as fantastically as you’d hoped, don’t fret! Sometimes a touch of extra baking powder or fine-tuning your oven’s temperature can bring those muffins to life.
FAQs and Troubleshooting
-
Why are my muffins dense?
- A common culprit is over-mixing the batter, which can lead to tough muffins. Stick to gentle folds when combining wet and dry ingredients!
-
Can I use an egg substitute?
- Absolutely! Try a flax egg or a chia egg for a vegan alternative. Just mix 1 tablespoon of ground flaxseed or chia seeds with 2.5 tablespoons of water and let it sit for 5 minutes before adding it to the mixture.
-
How do I store leftover muffins?
- Once cooled, store them in an airtight container at room temperature for 2-3 days or in the refrigerator for up to a week. You can also freeze them for up to 3 months—simply thaw and enjoy!
-
How do I know when the muffins are done?
- Stick a toothpick in the center of a muffin; if it comes out clean or with only a few crumbs attached, they’re ready to be devoured!
Nutritional Info: Health Meets Happiness
These Pumpkin Protein Muffins are designed for nourishing your body while providing that cozy comfort we all love!
Approximate Nutrition Values per Muffin (based on 12 servings):
- Calories: 150
- Protein: 7g
- Carbohydrates: 20g
- Fiber: 3g
- Sugar: 5g
- Fat: 5g
With wholesome ingredients like pumpkin puree and oats, plus protein powder, these muffins are an excellent source of energy—perfect for fueling your morning, afternoon pick-me-up, or post-workout snack!
Final Thoughts: Bake Some Joy!
As we wrap up our adventure into the world of Pumpkin Protein Muffins, I invite you to bring a little joy into your kitchen. You don’t need to be a professional chef to create something delectable—it’s about the love you put into each bite!
So, gather your ingredients, invite a friend to join, and share some laughs as you bake together. These muffins are more than just a recipe; they’re an experience, a hug in muffin form!
Now that the fall season is upon us, make these muffins your go-to treat, and don’t hesitate to experiment with new flavors. Remember, cooking is all about creativity, so let your culinary spirit shine!
Can’t wait to hear how your baking adventure goes! Happy baking, friends! 🍂💛
Print
Pumpkin Protein Muffins
- Total Time: 40 minutes
- Yield: 12 muffins 1x
- Diet: Vegetarian
Description
Delicious and nutritious pumpkin muffins packed with protein, perfect for breakfast or a snack.
Ingredients
- 1 cup pumpkin puree
- 1/2 cup protein powder
- 1 cup oats
- 1/2 cup almond flour
- 1/4 cup honey or maple syrup
- 2 eggs
- 1 teaspoon baking powder
- 1 teaspoon cinnamon
- 1/2 teaspoon nutmeg
- 1/4 teaspoon salt
Instructions
- Preheat your oven to 350°F (175°C).
- Prepare the muffin tin by greasing it or lining it with paper liners.
- Mix the dry ingredients: whisk oats, almond flour, protein powder, baking powder, cinnamon, nutmeg, and salt in a large bowl.
- Combine the wet ingredients: mix pumpkin puree, honey (or maple syrup), and eggs in a separate bowl until smooth.
- Blend the wet and dry ingredients together, folding gently to avoid over-mixing.
- Scoop the batter into the muffin tins, filling each cup about ¾ full.
- Bake for 20–25 minutes, or until a toothpick inserted comes out clean.
- Cool for 5 minutes in the pan, then transfer to a wire rack to cool completely.
Notes
For variations, try adding chocolate chips, nuts, or dried cranberries.
- Prep Time: 15 minutes
- Cook Time: 25 minutes
- Category: Snack
- Method: Baking
- Cuisine: American
Nutrition
- Serving Size: 1 muffin
- Calories: 150
- Sugar: 5g
- Sodium: 150mg
- Fat: 5g
- Saturated Fat: 0.5g
- Unsaturated Fat: 4.5g
- Trans Fat: 0g
- Carbohydrates: 20g
- Fiber: 3g
- Protein: 7g
- Cholesterol: 30mg
Keywords: pumpkin muffins, protein muffins, healthy snacks
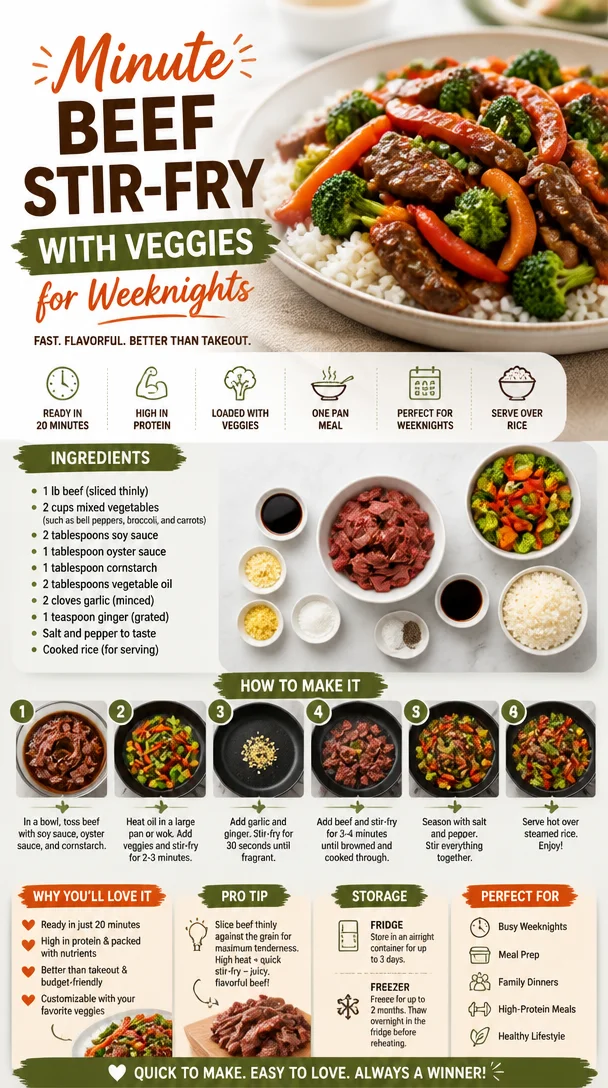
Minute Beef Stir-Fry with Veggies for Weeknights
Stir Up Some Flavor: Beef Stir Fry with Vegetables
Hey there, food lovers! Today, we’re diving into the world of quick, vibrant, and oh-so-delicious beef stir fry! This dish is not just a meal; it’s a celebration of colors, textures, and delightful flavors that come together in minutes. If you’re worried about spending hours in the kitchen or dealing with complicated recipes, fear not! This beef stir fry is here to kick your culinary skills up a notch while keeping it simple and fun.
Stir fry dishes hold a special place in my heart. They remind me of family dinners, where everyone would gather around the table, chopsticks ready, and share laughter amidst the sizzling sounds of stir-frying. That’s the magic of this dish—it brings people together! You can customize your ingredients based on what you have on hand, making it the perfect solution for those “what do I cook tonight?” dilemmas. Plus, the health benefits of loading up on fresh veggies while indulging in savory beef make it a win-win.
So, grab your apron, and let’s explore this easy, flavorful recipe that will have your family begging for seconds!
A Moment to Remember: Cooking with Family
I vividly remember the first time I made a beef stir fry. I was about ten, standing on my tiptoes to reach the stovetop, my mom beside me guiding my hands as we tossed fresh vegetables and juicy beef together. The kitchen was filled with the welcoming aroma of garlic sizzling in vegetable oil, and my little heart raced with excitement. We chopped bell peppers, broccoli, and carrots, laughing at my attempt to master the knife skills that still elude me today (seriously, who can handle a chef’s knife without a few nicks?).
As we cooked, my mom would share stories about her childhood in a bustling kitchen where stir-fry was a staple. She told me about the family gatherings, the clang of pots and pans, and the joy of sharing meals together. That day, I learned that cooking is an act of love, a way to create bonds with those we cherish most. It wasn’t just about the food; it was about the smiles, the laughter, and the memories we’d make.
Fast forward to today, and you can often find me in my own kitchen whipping up beef stir fry, carrying on that cherished tradition. And just like that memorable evening with my mom, I’m excited to share this delightful recipe with you, allowing you to make your own precious moments around the dining table.
Ingredients to Make Your Stir Fry Shine
Here’s what you’ll need to create this delicious beef stir fry:
-
1 lb Beef (sliced thinly): Use flank steak, sirloin, or your favorite cut. Thinly slicing it against the grain ensures tenderness. If you’re watching your budget, chuck steak works too.
-
2 cups Mixed Vegetables: You can use any combo of bell peppers, broccoli, carrots—whatever you have lurking in the fridge! Frozen veggies are a great time-saver.
-
2 tablespoons Soy Sauce: This salty, umami-rich sauce enhances the flavor. For a gluten-free alternative, try tamari.
-
1 tablespoon Oyster Sauce: This adds a rich depth of flavor. If you’re vegan, consider using mushroom soy sauce for a similar taste.
-
1 tablespoon Cornstarch: Used to thicken the sauce. You can substitute it with arrowroot powder or a gluten-free flour mix.
-
2 tablespoons Vegetable Oil: A neutral oil is best for high-heat cooking. Avoid extra virgin olive oil, as it can burn easily.
-
2 cloves Garlic (minced): Fresh garlic is a must! But if you’re out, garlic powder can work in a pinch—just adjust to taste.
-
1 teaspoon Ginger (grated): Fresh ginger adds a zingy warmth. You can use ground ginger if that’s what you have, but fresh is always best.
-
Salt and Pepper to taste: Season according to your preference!
-
Cooked Rice (for serving): Serve it over steaming white rice, brown rice, or even cauliflower rice for a lighter option.
Each ingredient plays a crucial role in this dish. From the tender beef to the vibrant crunch of vegetables, every bite tells a story. So, even if it seems simple, take a moment to appreciate the magic that happens when you combine these elements.
Step-by-Step Instructions to Sizzle Your Beef
Now, let’s get cooking! Follow these simple steps, and I promise you’ll have a fabulous beef stir fry whipped up in no time.
-
Prep Your Ingredients:
Start by gathering everything you need. This cuts down on stress while cooking. Thinly slice the beef (if not pre-sliced). Chop your veggies into bite-sized pieces. My favorite tip? Keep them on the bigger side! It adds texture and makes for a satisfying crunch. -
Marinate the Beef:
In a bowl, combine the sliced beef with 1 tablespoon of soy sauce, 1 tablespoon of cornstarch, and a pinch of salt and pepper. Let it marinate for about 15 minutes while you prep other ingredients. This step helps the beef absorb flavor and tenderizes it—sooo worth it! -
Heat the Oil:
Heat a large skillet or wok over medium-high heat and add your vegetable oil. When the oil starts to shimmer (but before it smokes), you’re ready to go! -
Sear the Beef:
Add the marinated beef slices in a single layer. Let them sear without moving them for about 2-3 minutes until browned. Resist the urge to stir right away; this allows that delicious crust to form! Then use a spatula to stir-fry for another 1-2 minutes until cooked through. Remove and set aside. -
Stir-Fry the Vegetables:
In the same pan, add the minced garlic and grated ginger. Sauté for about 30 seconds until fragrant. Then toss in your mixed vegetables. Stir fry for 4-5 minutes until the veggies are vibrant and tender-crisp. If they’re starting to get too brown, add a splash of water to steam them up a bit! -
Bring It All Together:
Return the beef to the pan and add the oyster sauce and remaining soy sauce. Mix everything well by tossing it around the hot pan for another 2-3 minutes. The key here is to coat everything evenly. -
Finish Off:
Taste and adjust seasoning by adding salt and pepper. If you want more sauce, mix a little water with extra soy sauce and cornstarch into a slurry and add that in.
And voilà! You have a gorgeous beef stir fry that’s ready to be served.
Plating and Serving Suggestions
Now that your stir fry masterpiece is complete, let’s talk about how to serve it up! For presentation, consider these tips:
-
Use a Bowl or Plate: A shallow bowl really shows off all those colors.
-
Scoop it Over Rice: Spoon the beef stir fry generously over a bed of rice. Let some of the sauce cascade over the grains—those juicy flavors will soak in!
-
Garnish for Flair: A sprinkle of sesame seeds or sliced green onions adds a professional touch and an extra layer of flavor.
-
Add Some Crunch: For texture, serve it with crispy prawn crackers or top with crushed peanuts.
No matter how you plate it, your family will certainly appreciate the effort that went into creating this delicious, homemade dish!
Recipe Variations to Elevate Your Stir Fry Game
While this beef stir fry is fantastic on its own, why not switch it up a bit? Here are a few creative twists and variations:
-
Add More Proteins: Ditch the beef and use chicken, shrimp, or tofu for a protein-packed update. If using shrimp, toss them in just before the vegetables so they cook quickly!
-
Change Up the Veggies: Go seasonal! Swap out broccoli for snap peas, add baby corn, or throw in some water chestnuts for crunch.
-
Spice It Up: Want some heat? Toss in some red pepper flakes or a drizzle of sriracha for a spicy kick!
-
Sauce It Differently: Experiment with different sauces like teriyaki, hoisin, or even a bit of sweet chili sauce for a sweet and spicy flavor infusion.
-
Make it a Grain Bowl: Serve this stir fry atop quinoa or barley instead of rice for a unique twist and added nutrients.
The beauty of stir fry is its versatility. Feel free to make it your own and let your creativity shine in the kitchen!
Chef’s Notes: Memories that Flavored the Journey
Over the years, my beef stir fry recipe has evolved, just like my skills! Initially, I was all about the basics—beef, broccoli, and soy sauce—nothing fancy. But as I started experimenting with new ingredients and flavors, my dish transformed, and I discovered a passion for creating the ultimate stir fry.
Oh, I have a chuckle every time I think about those early attempts where I might have mistakenly added way too much soy sauce in a rush. Talk about a salt explosion! But every trial and error in the kitchen led me to refine techniques, and now, I can get that balance just right every time.
When I share this dish with friends and family, I often hear the same delightful comments: “Wow, it tastes like the takeout, but better!” And isn’t that what we all want? The satisfaction of creating a dish that echoes those memories of home-cooked love.
FAQs and Troubleshooting
Here are some common questions you might have while whipping up your stir fry:
-
Why is my beef chewy?
- It’s crucial to slice the beef thinly against the grain and marinate it. Also, don’t overcook it, as this can lead to tough meat.
-
My sauce is too salty; how can I fix it?
- You can balance salty flavors with a bit of sugar or honey. Adding more vegetables can also help dilute the saltiness.
-
How do I keep my stir fry from getting soggy?
- Make sure your vegetables are dry before adding them to the pan. High heat is essential for quick cooking without overcooking veggies.
-
Can I make this ahead of time?
- Yes, you can prep the veggies and marinate the meat ahead of time. However, I recommend cooking it fresh to maintain the crunch of the vegetables.
Nutritional Info (Approximate)
Let’s talk nutrition! This beef stir fry packs a punch of flavors and healthy ingredients:
- Calories: About 400 per serving
- Protein: Roughly 30g, fantastic for muscle repair and sustaining energy
- Carbs: About 40g, primarily from rice and vegetables
- Fat: Around 15g, courtesy of the vegetable oil
- Fiber: Approximately 4g, great for digestion
This dish is not just a feast for your taste buds but also provides essential nutrients. If you swap rice for riced cauliflower, you’ll lower the calorie count and amp up those veggies!
Final Thoughts: Cook, Share, Enjoy!
As we wrap this up, I hope you’re feeling inspired to try this beef stir fry recipe in your kitchen. Remember, it’s all about finding joy in the cooking process, trying new flavors, and, most importantly, sharing those experiences with loved ones.
Whether you’re cooking for family on a busy weeknight or hosting a fun dinner party, this dish will impress. I encourage you to embrace the spontaneity of cooking—add your personal touches, experiment, and make this dish truly yours.
Thank you for joining me on this culinary adventure! I can’t wait to hear about your stir fry stories and the memories you create while cooking. Now, grab that spatula, strike up the heat, and let’s make some memories—one delicious bite at a time! Happy cooking!
Print
Beef Stir Fry with Vegetables
- Total Time: 30 minutes
- Yield: 4 servings 1x
- Diet: Non-Vegetarian
Description
A quick, vibrant beef stir fry loaded with fresh vegetables that brings family together around the table.
Ingredients
- 1 lb Beef (sliced thinly)
- 2 cups Mixed Vegetables (bell peppers, broccoli, carrots)
- 2 tablespoons Soy Sauce
- 1 tablespoon Oyster Sauce
- 1 tablespoon Cornstarch
- 2 tablespoons Vegetable Oil
- 2 cloves Garlic (minced)
- 1 teaspoon Ginger (grated)
- Salt and Pepper to taste
- Cooked Rice (for serving)
Instructions
- Prep your ingredients by gathering everything needed and slicing the beef and veggies.
- Marinate the beef with soy sauce, cornstarch, salt, and pepper for 15 minutes.
- Heat a large skillet or wok over medium-high heat with vegetable oil.
- Sear the beef slices in a single layer without moving them for 2-3 minutes, then stir-fry until cooked through.
- Stir-Fry the vegetables with garlic and ginger for 4-5 minutes until tender-crisp.
- Bring it all together by adding the beef back with oyster sauce and remaining soy sauce, mixing well.
- Finish off with seasoning adjustments and serve over rice.
Notes
For added flavor, garnish with sesame seeds or sliced green onions.
- Prep Time: 15 minutes
- Cook Time: 15 minutes
- Category: Main Course
- Method: Stir-Frying
- Cuisine: Asian
Nutrition
- Serving Size: 1 serving
- Calories: 400
- Sugar: 5g
- Sodium: 600mg
- Fat: 15g
- Saturated Fat: 3g
- Unsaturated Fat: 12g
- Trans Fat: 0g
- Carbohydrates: 40g
- Fiber: 4g
- Protein: 30g
- Cholesterol: 70mg
Keywords: beef stir fry, quick dinner, healthy stir fry, family meal
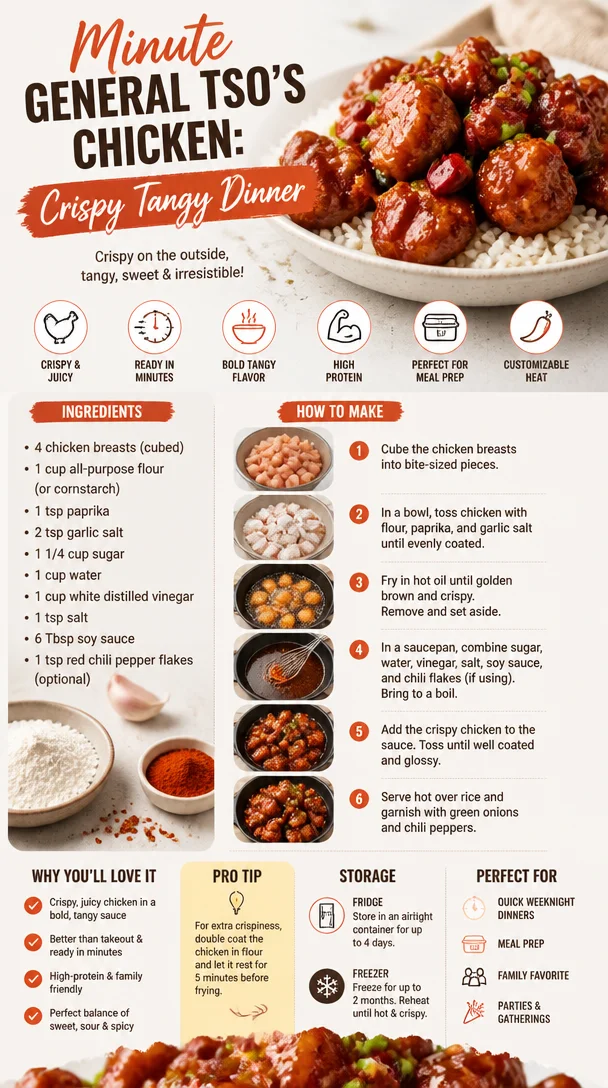
Minute General Tso’s Chicken: Crispy Tangy Dinner
Let’s Create the Perfect General Tso’s Chicken Together!
Hey food lovers! I’m Beau Collier, and today we’re diving deep into the delicious world of General Tso’s Chicken. If you’ve ever ordered this finger-licking dish from your favorite takeout spot and thought, “I wish I could make this at home,” you’re in for a treat! This recipe is all about comfort food with a vibrant twist— crispy, sweet, tangy chicken coated in a flavor-packed sauce that’ll have you coming back for seconds (and thirds!).
Cooking is like a dance, and trust me, once you get your feet moving with this recipe, you won’t want to stop! I’ll be sharing personal anecdotes, my chef insights, and tons of helpful tips to ensure you nail this dish. So, grab your apron, and let’s get those spatulas swinging!
A Taste of Nostalgia
I can vividly remember the first time I tasted General Tso’s Chicken. I was a wide-eyed teenager, sitting at a corner table of a local Chinese restaurant, engulfed in the aromas wafting from the kitchen. That night, I had a colorful medley of food that left me enchanted. My eyes sparkled as I took my first bite—the chicken was perfectly crisp on the outside, glistening in a rich, sticky sauce that sent my taste buds soaring.
But it was the moment I’d unwittingly transformed my parents’ seemingly uneventful Wednesday dinner into my first attempt at recreating that memorable dish. I pulled out a mixing bowl, flour everywhere, accompanied by my childhood best friend who somehow managed to burn her hand on the hot oil—classic! Our laughter and creative chaos led to a glorious, albeit uneven, rendition that wasn’t exactly a Michelin-star meal but was filled with love and good vibes. That’z when I learned that cooking is more than just following a recipe; it’s about bringing people together. Let’s bring that same spirit into your kitchen!
Ingredients
Here’s what you’ll need to whip up this delightful dish:
-
4 Chicken Breasts (Cubed)
Chicken breasts are perfect for this dish due to their lean nature. For a healthier twist, you can substitute with turkey breast or tofu for a plant-based version. -
1 Cup All-Purpose Flour (or Cornstarch)
This is key to getting that beautiful crunch. If you want to go gluten-free, substituting with cornstarch will still give you that crispy exterior. -
1 tsp Paprika
This adds a mild smokiness and a beautiful color. Feel free to swap it with cayenne pepper if you want an extra kick! -
2 tsp Garlic Salt
Garlic salt brings a burst of flavor that perfectly complements chicken. You can easily substitute it with regular salt and a clove of fresh minced garlic. -
1 1/4 Cup Sugar
Here’s the star of the sauce! The sugar balances the tangy vinegar perfectly. If you’re looking for a healthier option, try using honey or a sugar substitute. -
1 Cup Water
Water is crucial for balancing the consistency of the sauce. No substitutions needed here, just ensure it’s fresh! -
1 Cup White Distilled Vinegar
This component gives the sauce its signature tanginess. If you prefer a milder flavor, you might switch to rice vinegar. -
1 tsp Salt
Basic but essential for flavor enhancement. -
6 Tbsp Soy Sauce
It adds depth, umami, and that wonderful savory quality. For a gluten-free option, use tamari. -
1 tsp Red Chili Pepper Flakes (Optional)
Spice it up! If you love heat, go for it! Otherwise, feel free to leave it out.
Step-by-Step Instructions
Now, let’s get down to business. Here’s how to whip up this incredible dish:
-
Prep Your Chicken
Start by cutting your chicken breasts into bite-sized cubes. Use a sharp knife and cutting board. This ensures uniform cooking. If you have time, marinating the chicken for about 30 minutes with soy sauce and garlic salt will make them even more flavorful! -
Coat the Chicken
In a mixing bowl, combine flour (or cornstarch) with paprika and a pinch of salt. Dredging the chicken pieces in this mixture creates that crispy exterior. Make sure to coat them evenly—if you want an extra crunchy bite, double-dip your chicken! -
Heat Your Oil
Over medium-high heat, pour enough oil into a large skillet to cover the bottom (about half an inch). When the oil is hot enough (you can test this by dropping in a tiny bit of flour—it should sizzle), it’s time to fry! -
Fry the Chicken
Carefully add the chicken in batches to avoid overcrowding the pan. Allow the chicken to get golden brown on all sides (about 5-7 minutes). Don’t rush this step; that crispiness is golden! -
Make the Sauce
While the chicken is frying, the magic happens in a separate saucepan! Combine sugar, vinegar, water, soy sauce, and a pinch of salt over medium heat. Stir until the sugar is dissolved. If you’re using the chili flakes, add them now. Simmer for a few minutes until it thickens slightly. -
Combine
Once the chicken is cooked, remove it from the pan and drain excess oil. In the same skillet, pour in your prepared sauce, add the fried chicken, and toss well until each piece is beautifully coated. This is where the real magic happens! -
Serve Hot
Once everything is mixed, let it simmer for another minute or so to soak in all those amazing flavors. Your General Tso’s Chicken is ready to serve!
Serving Suggestions
Plating is crucial for elevating any dish! Serve your General Tso’s Chicken over a bed of fluffy white rice or stir-fried veggies. Garnish with chopped green onions or sesame seeds for an extra pop of flavor and color! If you want to impress your guests, consider placing it inside a fresh lettuce wrap. This gives a lovely crunch and freshness that pairs beautifully with the sticky sauce.
Recipe Variations
Now that you’ve learned the basics, here are some fun twists and variations you can try:
-
Spicy General Tso’s
Add more red chili flakes or drizzle some chili oil over the finished dish to give it serious heat! -
Sweet and Sour General Tso’s
Toss in some pineapple chunks when combining the chicken and sauce for a tropical flair. -
Vegetarian General Tso’s
Swap out chicken for crispy tofu or cauliflower florets to create a plant-based version that still satisfies those umami cravings! -
Add Vegetables
For added nutrition, throw in some diced bell peppers, green beans, or broccoli at the last minute of cooking. They brighten up the dish and add a satisfying crunch. -
Tangy Orange Sauce
Replace half of your vinegar with fresh orange juice and add some zest for a citrusy twist!
Chef’s Notes
Over the years, I’ve experimented with General Tso’s Chicken in countless ways—changing up spices, using different proteins, and even creating a glorious vegetarian version. Once, I accidentally used too much chili oil and my friends’ faces were pure comedy! It taught me to always taste as I go. So, remember, cooking is a journey filled with little “oops” moments that will turn into glorious deliciousness overall!
FAQs and Troubleshooting
Q1: Why isn’t my chicken crispy?
A: Ensure your oil is hot enough before frying. If it’s too cold, the chicken will absorb oil instead of getting crispy!
Q2: Can I use frozen chicken?
A: Fresh chicken works best, but if using frozen, make sure to thaw it completely before cooking.
Q3: What if my sauce is too thick?
A: If it’s too thick, add a splash of water or soy sauce to loosen it up until you achieve the desired consistency.
Q4: How can I store leftovers?
A: If you have leftovers (which rarely happen!), you can store them in an airtight container in the fridge for up to 3 days. To reheat, zap it in the microwave or on the stovetop!
Nutritional Info
General Tso’s Chicken is packed with flavor, but let’s talk about the nutritional aspect. On average, one serving of this dish contains approximately:
- Calories: 400-500 (depending on portion size)
- Protein: 30g
- Carbohydrates: 50g
- Fat: 15g
- Sodium: 800mg
For healthier swaps, consider using less sugar, opting for a leaner protein, or serving over quinoa instead of rice to amp up your fiber intake!
Final Thoughts
And there you have it! You’ve crafted a beautiful plate of General Tso’s Chicken that rivals that takeout you used to crave! Cooking is such a beautiful way to connect with food and with each other. I hope this recipe becomes a beloved staple in your kitchen just like it has in mine.
Remember, it’s not just about food; it’s about creating memories. So, gather your loved ones, put on some fun music, and enjoy the laughter, love, and warmth that comes from sharing a great meal. I can’t wait to hear all about your adventures in the kitchen! Happy cooking, friends! 🍽️❤️
Print
General Tso’s Chicken
- Total Time: 50 minutes
- Yield: 4 servings 1x
- Diet: Gluten-Free Option
Description
A deliciously crispy and tangy dish featuring chicken coated in a flavorful sauce, perfect for a comforting meal at home.
Ingredients
- 4 Chicken Breasts (Cubed)
- 1 Cup All-Purpose Flour (or Cornstarch)
- 1 tsp Paprika
- 2 tsp Garlic Salt
- 1 1/4 Cup Sugar
- 1 Cup Water
- 1 Cup White Distilled Vinegar
- 1 tsp Salt
- 6 Tbsp Soy Sauce
- 1 tsp Red Chili Pepper Flakes (Optional)
Instructions
- Prep Your Chicken: Cut your chicken breasts into bite-sized cubes. Marinate with soy sauce and garlic salt for about 30 minutes for more flavor.
- Coat the Chicken: In a mixing bowl, combine flour (or cornstarch) with paprika and a pinch of salt. Dredge the chicken pieces in this mixture.
- Heat Your Oil: Pour enough oil into a large skillet to cover the bottom and heat over medium-high.
- Fry the Chicken: Add the chicken in batches, cooking until golden brown on all sides (about 5-7 minutes).
- Make the Sauce: In a separate saucepan, combine sugar, vinegar, water, soy sauce, and salt over medium heat until sugar dissolves and simmers until thickened.
- Combine: Remove the chicken and drain excess oil. Pour the prepared sauce into the skillet, add chicken, and toss until coated.
- Serve Hot: Let simmer for a minute to absorb flavors, then serve over rice or veggies.
Notes
For extra crunch, double-dip your chicken in the flour mixture. Adjust the spice level by adding more chili flakes if desired.
- Prep Time: 30 minutes
- Cook Time: 20 minutes
- Category: Main Course
- Method: Frying
- Cuisine: Chinese
Nutrition
- Serving Size: 1 serving
- Calories: 450
- Sugar: 15g
- Sodium: 800mg
- Fat: 15g
- Saturated Fat: 3g
- Unsaturated Fat: 10g
- Trans Fat: 0g
- Carbohydrates: 50g
- Fiber: 1g
- Protein: 30g
- Cholesterol: 80mg
Keywords: General Tso's Chicken, Chinese Chicken Recipe, Comfort Food

Minute Tomato Cracker Salad with Tangy Vinaigrette
Tomato Cracker Salad: A Nostalgic Delight
Hey food lovers! I’m Beau Collier, and today we’re diving into a dish that holds so much warmth and nostalgia in my heart: Tomato Cracker Salad. Now, I can hear you thinking, “Tomato? Salad? Cracker?” Yes, my friends, this delightful concoction combines the brightness of fresh tomatoes, the crunch of crackers, and a creamy dressing that will take you straight back to simpler times.
There’s something magical about food that ties us to our memories. The vibrant, juicy tomatoes paired with the crispy saltines and creamy dressing evoke memories of summer picnics, family gatherings, and the joy of simple, heartfelt cooking. In a world that often seems obsessed with complicated recipes and culinary perfection, the Tomato Cracker Salad serves as a reminder that food can be uncomplicated yet packed with flavor and love.
When I was a kid, my mom would whip this up on lazy summer afternoons. One bite transported me to our sun-drenched patio, surrounded by friends and family, laughter echoing in the warm breeze. We’d sit together, tearing into a big bowl of this salad, refreshing our spirits and fueling our playfulness. It’s amazing how a simple dish can create such vibrancy in our lives.
Fast forward to today, and each time I make this salad, it brings all those beautiful memories flooding back. So whether you’re preparing this salad for a casual lunch, a barbecue, or just for yourself, trust me, this Tomato Cracker Salad will wrap you in a warm hug of nostalgia while also being oh-so-delicious!
Let’s get started and whip up this delightful dish. You won’t regret it!
Ingredients
Here’s what you’ll need to create this comforting Tomato Cracker Salad:
-
Tomatoes: Opt for ripe, juicy tomatoes, preferably heirloom for that vibrant flavor. If tomatoes are out of season, cherry or grape tomatoes work great too.
-
Salt: Don’t be shy with the salt! A sprinkle enhances the natural sweetness of the tomatoes.
-
Pepper: Freshly cracked black pepper adds a lovely hint of spice and depth.
-
Mayonnaise: This forms the creamy base. If you’re looking for a lighter option, Greek yogurt or sour cream can be excellent substitutes!
-
Crackers: Classic saltines are the go-to, but feel free to experiment! Whole grain or flavored crackers can add a unique twist.
-
Onion (optional): Finely chopped onion adds a delightful bite. Red onions are milder, while sweet onions offer a lovely flavor.
-
Fresh herbs (optional): Parsley or basil can elevate the dish, adding freshness and color. Fresh herbs are a great way to customize this recipe based on what you have on hand.
Step-by-Step Instructions
Ready to bring this Tomato Cracker Salad to life? Let’s get cooking!
-
Prepare the Tomatoes: Start by rinsing your tomatoes under cool, running water. Chop them into bite-sized pieces. If you’re using larger tomatoes, consider removing some of the seeds to prevent excess moisture. Trust me, you don’t want a soggy salad!
-
Season the Tomatoes: Place the chopped tomatoes in a large mixing bowl. Sprinkle with salt and pepper. Gently toss, allowing the seasoning to marry with the tomatoes. Let them rest for about 10-15 minutes. This step helps draw out their wonderful juices, making your salad even tastier!
-
Mix the Dressing: In a separate bowl, combine about ½ cup of mayo (or your chosen substitute). Customize it by adding a dash of lemon juice or a sprinkle of garlic powder for an added flavor kick. If you love a bit of sweetness, a touch of honey can also work wonders!
-
Combine Ingredients: After the tomatoes have rested, add the seasoned tomatoes into the bowl with your dressing. Stir everything together gently, being sure to coat the tomatoes evenly.
-
Add the Crackers: Here’s where the fun begins! Crush your saltines into rough pieces (they shouldn’t be dust, just a delightful crunch). Gently fold in the crackers, being careful not to break them down too much. You want those crunchy bits to shine!
-
Toss in Optional Ingredients: If you’re using onions or fresh herbs, add them now and give it a final gentle toss. The colors and aromas at this point will have you grinning ear to ear!
-
Chill & Serve: For best results, allow your salad to chill in the fridge for about 30 minutes. This lets all the flavors mingle beautifully. When you’re ready to serve, give it a quick stir, and you’re good to go!
Serving Suggestions
Plating this Tomato Cracker Salad is as enjoyable as making it! Here are a few ideas on how to serve:
-
Chilled Bowl: For casual dining, serve this salad in a generous-sized bowl, perfect for passing around.
-
Individual Cups: For a stylish touch (great for parties!), portion out the salad into small cups or jars. This is fun, easy, and encourages everyone to dig in!
-
Garnish: Sprinkle a few extra herbs on top or even some crumbled feta or goat cheese for an added gourmet touch.
-
Accompaniments: Serve it alongside grilled meats, fish, or as a refreshing side to sandwiches. It also pairs beautifully with a cold drink on a hot day!
Recipe Variations
Feel like mixing things up? Here are some delicious variations for your Tomato Cracker Salad:
-
Spicy Twist: Add diced jalapeños or a splash of hot sauce for a spicy kick.
-
Mediterranean Flair: Incorporate olives, chopped cucumbers, and feta cheese for a classic Mediterranean vibe.
-
Herbed Up: Experiment with different fresh herbs like dill or cilantro for a unique flavor profile.
-
Creamy Avocado: Throw in ripe avocado chunks for a creamier texture and added nutrition.
-
Vegan Version: Swap the mayo for avocado or a creamy vegan dressing to cater to plant-based diets, keeping all that delightful creaminess!
Chef’s Notes
Ah, where do I begin? This recipe has been a staple in my home for as long as I can remember! I once tried to make it for a fancy dinner party, and let’s just say it ended up being the star of the night! Everyone was amazed at how something so simple could taste so indulgent. And you know what? It taught me an invaluable lesson: sometimes, it’s all about the basics.
The most beautiful part about cooking is that it evolves. Every time I make this dish, it feels like a new adventure. I might toss in leftovers from the fridge or tweak the ratios based on what I’m feeling that day. So, feel free to personalize it and make it your own!
FAQs and Troubleshooting
Q: Why does my Tomato Cracker Salad get watery?
A: The most common culprit is too much moisture from the tomatoes or not allowing them to drain before mixing. After chopping, give them time with salt to release some liquid—this helps prevent a soggy salad!
Q: Can I make this salad ahead of time?
A: Absolutely, but for the freshest experience, wait to add the crackers until just before serving. They soften over time if mixed in too early.
Q: What if I don’t like mayonnaise?
A: No worries! Greek yogurt, sour cream, or even a vinaigrette can work beautifully in place of mayo.
Q: How long can I store leftovers?
A: Store any leftovers in an airtight container in the fridge for 2-3 days max. Just know that the crackers will lose their crunch over time.
Nutritional Info
While the nutritional value depends on ingredient specifics and portion size, here’s a rough estimate for a serving of Tomato Cracker Salad using standard ingredients:
- Calories: 250–300
- Protein: 4–6g
- Fat: 15–20g (mainly from the mayonnaise)
- Carbohydrates: 30–35g
- Fiber: 2g
This salad is a fun dish that satisfies hunger while offering a burst of freshness. Enjoy it as a side or a light meal, and know you’re experiencing a nostalgic favorite with a nutritious twist.
Final Thoughts
As we wrap up this delightful journey through the world of Tomato Cracker Salad, I hope you feel inspired to create this comforting dish. Cooking is not just about the food; it’s about the memories we create and the connections we forge with those we share it with.
So, gather your favorite people, whip up this Tomato Cracker Salad, and reminisce about your favorite memories around home-cooked meals. Each bite sings of love, nostalgia, and the joy of simply being together.
Thanks for joining me today! Until next time, keep cooking with heart and joy. Let’s continue to create memories, one recipe at a time. Happy cooking, friends! 🍅🥗
Print
Tomato Cracker Salad
- Total Time: 45 minutes
- Yield: 4 servings 1x
- Diet: Vegetarian
Description
A nostalgic dish combining juicy tomatoes, crispy crackers, and a creamy dressing, perfect for any gathering.
Ingredients
- Ripe tomatoes (preferably heirloom)
- Salt
- Freshly cracked black pepper
- ½ cup mayonnaise (or Greek yogurt/sour cream)
- Classic saltine crackers
- Finely chopped onion (optional)
- Fresh herbs (parsley or basil, optional)
Instructions
- Prepare the tomatoes by rinsing them under cool, running water and chopping them into bite-sized pieces.
- Season the chopped tomatoes in a large mixing bowl with salt and pepper, gently tossing to combine. Let sit for 10-15 minutes.
- Mix the dressing in a separate bowl by combining the mayonnaise and optional flavorings such as lemon juice or garlic powder.
- Combine the rested tomatoes with the dressing, stirring gently to coat.
- Add the crushed saltines and carefully fold them into the mixture.
- Toss in any optional ingredients like onions or herbs, giving a final gentle mix.
- Chill the salad in the fridge for about 30 minutes before serving.
Notes
For best results, add the crackers just before serving to maintain their crunch. Feel free to experiment with different herbs and vegetable add-ins.
- Prep Time: 15 minutes
- Cook Time: 0 minutes
- Category: Salad
- Method: Mixing
- Cuisine: American
Nutrition
- Serving Size: 1 serving
- Calories: 275
- Sugar: 4g
- Sodium: 500mg
- Fat: 18g
- Saturated Fat: 3g
- Unsaturated Fat: 5g
- Trans Fat: 0g
- Carbohydrates: 30g
- Fiber: 3g
- Protein: 6g
- Cholesterol: 15mg
Keywords: Tomato, salad, nostalgic, summer, picnic, vegetarian, easy recipe

Creamy Avocado Pesto Zucchini Noodles: 15-Minute Dinner
Avocado Pesto Zucchini Noodles: A Fresh Twist on Tradition
Hey there, fellow food lovers! Welcome back to Feastical, where we blend creativity, comfort, and the joys of cooking into every flavorful bite. Today, we’re diving into a vibrant dish that sings of summer—Avocado Pesto Zucchini Noodles. This recipe is packed with wholesome ingredients that are bursting with flavor, and it’s a real showstopper for both weeknight dinners and special gatherings. Plus, it’s a fantastic way to enjoy a lighter, healthier meal without compromising on taste!
Zucchini noodles, affectionately known as “zoodles,” have taken the culinary world by storm for good reason. They’re not only gluten-free and low-carb, but they also soak up flavors beautifully, making them every bit as satisfying as traditional pasta—with a refreshing twist! And when you combine them with creamy avocado and fragrant basil, you have a dish that will make your taste buds sing.
Imagine: a warm evening, the sun dipping on the horizon, and the delightful aroma of fresh basil wafting through your kitchen while you whip up this easy, delicious meal. Avocado Pesto Zucchini Noodles are perfect for a light lunch, an impressive dinner party main, or just a treat for yourself after a long day. Ready to dig in and discover this delightful recipe? Let’s go!
A Memory in Every Bite
Now, every dish has a story, and this one is no exception! I remember the first time I experimented with zucchini noodles. It was a sunny afternoon in my little kitchen, and I was hosting a casual get-together with friends. As the laughter rang out and the glasses clinked, my culinary gears began to turn. I wanted a dish that was a delightful surprise—something that would wow my friends but also bring a wave of nostalgia.
That day, I reached for the freshest ingredients I could find at the local farmer’s market, including plump, green zucchinis and the most fragrant basil I’d ever smelled. As I tossed the ingredients together, the rich green hue of the avocado spoke to me. “This is going to be special," I thought. When the zoodles hit the plate, their vibrant color was a feast for the eyes.
The first bite was a revelation! Creamy, lush, and tangy—this dish took me straight back to my childhood evenings, where family dinners were the highlight of the day. It was a wholesome, feel-good meal, just like the ones my mom used to whip up, yet with an exciting modern twist. That day marked the beginning of my love affair with zoodles, and ever since, they’ve had a special place in my heart—and in my kitchen!
Ingredients You’ll Need
Let’s gather all the ingredients for our Avocado Pesto Zucchini Noodles. Here’s what you’ll need:
-
2 medium zucchinis
(Perfect for spiralizing! If you don’t have a spiralizer, a julienne peeler will work great too. For a different texture feel, you can also use yellow squash.) -
1 ripe avocado
(Makes for a creamy base. Make sure it’s perfectly ripe for the best flavor. If you don’t have avocado, try using Greek yogurt for a different twist!) -
1 cup fresh basil leaves
(Fresh basil brings a fragrant flavor. If basil isn’t available, try fresh spinach or arugula for a new flair.) -
2 tablespoons lemon juice
(Adds a zesty brightness to balance the richness of the avocado. Freshly squeezed is always best, but bottled will do in a pinch.) -
1 garlic clove
(For that aromatic kick. If you’re not a fan of raw garlic, try roasted garlic for a sweeter flavor.) -
2 tablespoons pine nuts (or walnuts)
(These provide a wonderful crunch! If you’re nut-free, sunflower seeds work well as a substitute.) -
Salt and pepper to taste
(Essential for enhancing flavors. Remember, you can always add more, but you can’t take it out!)
Step-by-Step Instructions
Alright, let’s get to the cooking! Here are your detailed cooking steps to create this beautiful dish.
-
Spiralize the Zucchini:
Start by washing your zucchinis thoroughly. Using a spiralizer, transform your zucchinis into lovely zoodles. If you don’t have a spiralizer, you can simply slice the zucchini into thin strips using a vegetable peeler. Don’t forget to reserve the ends; they make a great addition to your vegetable stock! -
Prep Your Avocado Pesto:
In a food processor, add the ripe avocado, fresh basil leaves, lemon juice, garlic, and pine nuts. A quick tip: if you want to add a hint of heat, throw in a pinch of red pepper flakes! Pulse everything until you achieve a smooth, creamy pesto. If it’s too thick, feel free to drizzle in a little olive oil or water to loosen it up. -
Season to Taste:
Taste your avocado pesto and season with salt and pepper. Every palate is different, so adjust it according to your liking. Try to let the flavors meld together for just a minute before the next step! -
Combine Pesto and Zoodles:
In a large bowl, toss the spiralized zucchini with your avocado pesto until they are beautifully coated. This is where the magic happens; the warmth from the zoodles will help the pesto adhere perfectly. -
Lightly Sauté (Optional):
If you prefer your zoodles warm, you can lightly sauté them in a non-stick skillet over medium heat for about 2-3 minutes. Just be careful not to overcook them; we want them to remain vibrant and have a slight crunch! -
Serve It Up:
You can either plate the zoodles immediately or store them in the fridge for a cold salad later. Top with extra crushed nuts or a sprinkle of parmesan cheese for a richer flavor. Seriously, this dish is all about personal taste, and there are no hard rules! -
Enjoy:
Gather your friends or family around, grab a fork, and dig into this bowl of green goodness together. Enjoy every bite!
Serving Suggestions
Presentation is key to enjoying your meal, and that’s where you can get creative! Here are a few suggestions for serving your Avocado Pesto Zucchini Noodles:
-
Plating: Twirl your zoodles onto the plate for that elegant restaurant-style look. You can use a large fork or tongs for this.
-
Garnishing: Consider a sprinkle of microgreens or additional fresh basil leaves for a pop of color on top. A drizzle of high-quality olive oil can add an extra touch of elegance.
-
Add More Texture: For an even more delightful experience, top your dish with a handful of cherry tomatoes or roasted vegetables. This not only adds color, but it also amplifies the flavor.
-
Fresh Squeeze: A final squeeze of lemon just before serving elevates the dish’s freshness, adding that perfect tangy finish!
Recipe Variations
As a cool chef, you know that creativity in the kitchen is endless. Here are some fun twists you can try with your Avocado Pesto Zucchini Noodles:
-
Protein Boost: Add grilled chicken, shrimp, or chickpeas to make this meal heartier. Just toss them in right before serving!
-
Colorful Veggies: Incorporate other veggies like bell peppers, cherry tomatoes, or sautéed spinach for added nutrition and a vibrant mix.
-
Herb Swap: Experiment with different herbs! Swap out basil for cilantro or dill for a unique flavor.
-
Cheesy Goodness: Add crumbled feta or shredded mozzarella on top—because let’s be real, cheese makes everything better!
-
Nut-Free Pesto: If allergies are a concern, try using sunflower seeds or pumpkin seeds instead of nuts. They’ll lend a lovely texture and flavor too!
Chef’s Notes
Over the years, I’ve played with this recipe, evolving it to fit different palates and occasions. One of my most memorable moments was during a summer cookout where I served this as a side dish, and it ended up stealing the show! People were surprised at how simple it was and couldn’t get enough.
Another fun fact: I once had a friend throw in a splash of soy sauce to the avocado pesto, looking for a different kick, and surprisingly, it added an umami depth that I hadn’t anticipated! Food really is all about experimenting and finding what works for you.
FAQs and Troubleshooting
-
Can I make the pesto in advance?
Absolutely! Just store it in an airtight container with a thin layer of olive oil on top to prevent browning. -
Why are my zoodles soggy?
If zoodles sit too long before serving, they can release water. To avoid this, either sauté for a shorter time or serve immediately after tossing with pesto. -
Is it possible to freeze Zoodles?
While you can freeze zoodles, they tend to lose their texture. It’s best to enjoy them fresh! -
What if my avocado isn’t ripe enough?
If it’s too hard, simply wrap it in a paper bag with a banana and place it in a warm spot; the ethylene gas will speed up the ripening process!
Nutritional Info
This avocado pesto dish is not only delicious, but it’s also packed with nutrients! Here’s a quick breakdown for one serving:
- Calories: Approximately 250
- Carbohydrates: 15g
- Protein: 4g
- Fat: 21g (mostly heart-healthy fats from the avocado and nuts)
- Fiber: 7g
It’s a great source of vitamins A, C, and potassium, making it a nutritious choice for any meal.
Final Thoughts
Creating Avocado Pesto Zucchini Noodles is more than just cooking; it’s about bringing people together, sharing laughter, and enjoying every mouthful. This dish is a testament to the beauty of simple ingredients elevated by a little creativity and love.
I hope you’ll give this recipe a try and make it your own! Share it with your friends, invite them into the kitchen, and let the good times roll. After all, food isn’t just about nourishment—it’s about connections, memories, and joyful moments spent around the table.
Thanks for stopping by Feastical today! Keep your passion for food alive, and remember, the kitchen is your playground. Until next time—happy cooking!
Print
Avocado Pesto Zucchini Noodles
- Total Time: 13 minutes
- Yield: 2 servings 1x
- Diet: Vegetarian
Description
Enjoy a vibrant and healthy twist on traditional pasta with Avocado Pesto Zucchini Noodles, packed with flavor and perfect for any meal.
Ingredients
- 2 medium zucchinis
- 1 ripe avocado
- 1 cup fresh basil leaves
- 2 tablespoons lemon juice
- 1 garlic clove
- 2 tablespoons pine nuts (or walnuts)
- Salt and pepper to taste
Instructions
- Spiralize the Zucchini: Wash the zucchinis and spiralize them into zoodles or slice into thin strips.
- Prep Your Avocado Pesto: In a food processor, combine avocado, basil, lemon juice, garlic, and pine nuts; pulse until smooth.
- Season to Taste: Taste the pesto and add salt and pepper as needed.
- Combine Pesto and Zoodles: Toss spiralized zucchini with the avocado pesto until coated.
- Lightly Sauté (Optional): Sauté zoodles in a skillet over medium heat for 2-3 minutes if you prefer them warm.
- Serve It Up: Plate zoodles and add garnishes like crushed nuts or parmesan cheese if desired.
- Enjoy: Gather around and enjoy this flavorful dish with loved ones!
Notes
Consider garnishing with microgreens or a drizzle of olive oil for extra flavor.
- Prep Time: 10 minutes
- Cook Time: 3 minutes
- Category: Main Course
- Method: Raw
- Cuisine: Italian
Nutrition
- Serving Size: 1 serving
- Calories: 250
- Sugar: 1g
- Sodium: 200mg
- Fat: 21g
- Saturated Fat: 3g
- Unsaturated Fat: 18g
- Trans Fat: 0g
- Carbohydrates: 15g
- Fiber: 7g
- Protein: 4g
- Cholesterol: 0mg
Keywords: zucchini noodles, avocado pesto, healthy pasta, gluten-free, vegetarian meal

Ingredient Raspberry Bars: Quick, No-Bake Summer Treats
Indulge in Sweet Simplicity: Fabulous Five Ingredient Raspberry Bars
Hey there, fellow food enthusiasts! Today, we’re diving into something delightfully simple yet fabulously tasty: Fabulous Five Ingredient Raspberry Bars. As a chef who adores whipping up kitchen magic with minimal fuss—and maximum flavor—I’m thrilled to share this creamy, fruity delight that is perfect for any occasion. Whether you’re looking to impress guests at a gathering or simply want a sweet treat to enjoy while binge-watching your favorite show, these raspberry bars are the answer.
I mean, who doesn’t love the sweet and tart balance of raspberry jam enveloped in a buttery, melt-in-your-mouth crust? It’s like a warm hug from your grandma, mixed with the perks of modern convenience. If you’re new to the world of baking or you’re a seasoned pro, these bars are accessible yet strikingly delicious. Plus, with only five ingredients, you won’t have to wrestle with an overflowing grocery cart or a complicated recipe. Let’s get those aprons on and embark on this sweet adventure together!
A Bite of Nostalgia
When I think of raspberry bars, I’m transported back to my childhood kitchen, where the air buzzed with chatter and laughter, and the smell of something delicious baked in the oven was like a siren call. My mom used to whip up her own version of berry bars every summer when the raspberries were at their sweetest. I remember lurking by the kitchen, eager to sneak a taste while she warned me not to “spoil my appetite.” As if!
Those summer days were filled with friends running in and out of the house, all of us enveloped in the warmth of the sun and the delicious aroma that wafted through the open windows. My friends and I would tear into those bars just as soon as they cooled, the sweet raspberry filling smeared across our fingers and faces, punctuated by bouts of giggles and joy. It’s a memory I cherish, and it’s the backdrop for my recipe today—summoning the simplicity and delight of good food shared among friends.
So, grab a seat and a cup of coffee (or tea, no judgment here!), as we get into the nitty-gritty of whipping up these fabulous raspberry bars!
Ingredients to Gather
Here’s what you’ll need to create your own batch of scrumptious raspberry bars:
-
1 cup unsalted butter, softened
This forms the base of your crust, lending that rich flavor and melt-in-your-mouth texture. If you’re short on time, you can use margarine, but I highly recommend butter for the best taste. -
2 1/4 cups all-purpose flour
A staple in almost all baking recipes, this will give your bars the structure they need. Need a gluten-free option? Try using a gluten-free all-purpose flour blend. -
1 cup granulated sugar
This adds sweetness and a delightful crunch to the topping. For a lower-calorie alternative, you can experiment with coconut sugar or a sugar substitute, but keep in mind the final texture might vary slightly. -
1 large egg, room temperature
The egg helps bind everything together, giving these bars their lovely texture. If you’re vegan or egg-free, you can substitute with flaxseed meal mixed with water as a binding agent. -
1 jar seedless raspberry jam (9-12 ounces)
The star of the show! Look for high-quality jam for the best flavor, and don’t hesitate to switch it up with a different flavor, like blackberry or strawberry, if you prefer.
Step-by-Step Instructions
Let’s get cooking! Follow these detailed steps to create your fabulous raspberry bars.
-
Preheat the Oven
Start by preheating your oven to 350°F (175°C). This ensures that your raspberry bars bake evenly right from the get-go. -
Prepare Your Baking Dish
Grease a 9×9-inch baking dish or line it with parchment paper for easy removal. If you’re using parchment, make sure it hangs over the edges a bit so you can lift the bars out easily later—like a cozy food hammock. -
Mixing the Crust
In a large mixing bowl, cream the softened butter and granulated sugar together. I like to use an electric mixer for this step. Beat it until fluffy and light—about 2-3 minutes should do the trick. This is where the magic starts! -
Incorporate the Egg
Add in the egg and mix until just combined. Don’t overdo it! Overmixing can lead to tougher bars; we want them to be tender. -
Add Flour
Gradually add in the flour. Mix just until the flour disappears—again, we’re looking for a tender texture here, not a tough one! -
Spread the Base
Press about two-thirds of the mixture firmly into the bottom of your prepared baking dish to form the base crust. Really press down; we want this to be sturdy enough to hold the juicy raspberry filling. -
Layer the Jam
Spread the raspberry jam evenly over the crust. Don’t be shy—make sure you cover it! This is where all the deliciousness lies. -
Crumble the Topping
Now, take the remaining dough and crumble it over the jam layer. It’s okay if some jam peeks through—those little bits of jam are going to be heavenly! -
Bake
Pop your dish in the preheated oven and bake for about 30-35 minutes, or until the top is golden brown. The aroma will fill your kitchen and have your stomach grumbling in no time! -
Cool and Slice
Once baked, remove your bars from the oven and let them cool in the dish for about 10-15 minutes. Then, lift them out using the parchment paper (if you used it) and let them cool completely on a wire rack. Once cooled, slice them into bars and get ready to dig in!
Serving Suggestions
These raspberry bars are perfect for nearly any occasion! Here’s how I love to serve them:
-
Dust with Powdered Sugar
For that classic touch, lightly dust the cooled bars with powdered sugar. It adds a lovely presentation and a touch of sweetness. -
Pair with Ice Cream
Serve warm raspberry bars alongside a scoop of vanilla or raspberry sorbet for a delightful dessert that’s sure to impress. -
Add Fresh Berries
Don’t stop at just bars! Garnish your serving plate with fresh raspberries or even a sprig of mint for a pop of color. -
Perfect for Picnics
These bars are portable and easy to pack for picnics. Just cut them into squares, wrap them in parchment, and enjoy them on the go!
Recipe Variations
Why not mix things up? Here are some fun variations you can try with your raspberry bars:
-
Different Jams
Get creative with flavors! Switch the raspberry jam for other fruit jams like blueberry, apricot, or even lemon curd for a zingy twist. -
Nutty Addition
Incorporate chopped nuts, like almonds or walnuts, into the crust or crumble topping for added texture and flavor. -
Chocolate Chips
Stir in some semi-sweet or dark chocolate chips into the crumble topping for a rich chocolatey surprise. -
Lemon Zest
Add lemon zest to the butter-sugar mixture for a refreshing hint of citrus that pairs fabulously with raspberries.
Chef’s Notes
Oh, where do I even begin? This recipe has been a staple in my kitchen for years, and I can honestly say everyone who tries it goes insane for it! I’ve experimented with different variations, like almond and chocolate, and they always come out delicious.
One of my fondest memories involves a bake sale I participated in during my culinary school days where I brought these raspberry bars. They were the first item to sell out, and I ran back home to bake another batch. The joy of creating something that brings smiles is unmatched, and that’s what cooking is all about, folks!
FAQs and Troubleshooting
Here are a few common questions and potential pitfalls to avoid while making your raspberry bars:
-
Why are my bars falling apart?
If they crumble too easily, it could be that the crust isn’t pressed firmly enough. Make sure to really compact the base and crumble topping. -
Can I use fresh raspberries instead of jam?
Fresh raspberries can be used, but you’ll need to add some sugar and maybe a thickening agent to keep the filling from being too runny. -
What if I don’t have raspberry jam?
Any seedless fruit jam will work. If you prefer a fresh alternative, consider making your own fruit compote. -
How do I store leftovers?
Store these delicious bars in an airtight container at room temperature for about 2-3 days. They can also be refrigerated for longer freshness.
Nutritional Info
Here’s the breakdown for each fabulous raspberry bar (based on a standard recipe serving of 16):
- Calories: Approximately 210
- Total Fat: 10g (Saturated Fat: 6g)
- Cholesterol: 30mg
- Sodium: 60mg
- Total Carbohydrates: 30g (Dietary Fiber: 0.5g, Sugars: 10g)
- Protein: 2g
Keep in mind, nutritional values may vary based on ingredient brands and exact quantities used. Modifications may change the overall nutrition, too!
Final Thoughts
And there you have it—fabulous five ingredient raspberry bars that are not only easy to make but also steal the show wherever they go! Whether you’re crafting these delectable treats for yourself or to share with friends and family, I hope this recipe brings you as much joy as it has brought me over the years.
Remember, cooking is all about exploration; don’t hesitate to experiment and make this recipe your own. I can’t wait to hear about your culinary adventures! So go ahead, bring out those ingredients and bake a batch of joy today. Until next time, happy cooking!
Print
Fabulous Five Ingredient Raspberry Bars
- Total Time: 50 minutes
- Yield: 16 servings 1x
- Diet: Vegetarian
Description
Delight in easy-to-make raspberry bars that provide a perfect balance of sweet and tart with just five ingredients.
Ingredients
- 1 cup unsalted butter, softened
- 2 1/4 cups all-purpose flour
- 1 cup granulated sugar
- 1 large egg, room temperature
- 1 jar seedless raspberry jam (9–12 ounces)
Instructions
- Preheat the oven to 350°F (175°C).
- Grease a 9×9-inch baking dish or line it with parchment paper.
- Mix the softened butter and granulated sugar together until fluffy, about 2-3 minutes.
- Add the egg and mix until just combined.
- Gradually add the flour and mix until it disappears.
- Press two-thirds of the mixture firmly into the bottom of the prepared baking dish.
- Spread the raspberry jam evenly over the crust.
- Crumble the remaining dough over the jam layer.
- Bake for 30-35 minutes, or until golden brown.
- Cool in the dish for 10-15 minutes before slicing.
Notes
These bars can be garnished with powdered sugar, fresh berries, or paired with ice cream for serving.
- Prep Time: 15 minutes
- Cook Time: 35 minutes
- Category: Dessert
- Method: Baking
- Cuisine: American
Nutrition
- Serving Size: 1 bar
- Calories: 210
- Sugar: 10g
- Sodium: 60mg
- Fat: 10g
- Saturated Fat: 6g
- Unsaturated Fat: 4g
- Trans Fat: 0g
- Carbohydrates: 30g
- Fiber: 0.5g
- Protein: 2g
- Cholesterol: 30mg
Keywords: raspberry bars, dessert, easy baking, five ingredient recipe, sweet treat
Minute BBQ Chicken Coleslaw Wraps for Busy Weeknights
BBQ Chicken Coleslaw Wraps: A Flavorful Feast!
Hey there, fellow food lovers! If you’re looking for a recipe that bursts with flavor, brings a smile to your face, and is easy to whip up—let me introduce you to my ultimate BBQ Chicken Coleslaw Wraps! These wraps perfectly blend tender, shredded chicken tossed in savory barbecue sauce with the crunch of fresh coleslaw, all wrapped snugly in a warm tortilla.
Now, I don’t know about you, but for me, the kitchen is a happy place—a space filled with good vibes, laughter, and, of course, delicious aromas. Cooking has a magical way of bringing people together, and there’s something remarkably heartwarming about gathering around a table filled with simple yet comforting food. My BBQ Chicken Coleslaw Wraps are all about that vibe: easy, fun, and downright delicious!
Let me take you back to a summer evening when my family decided to throw a backyard barbecue. Picture this: the sun is setting, the grill is sizzling, and laughter fills the air. As the family gathered around, we tossed ideas back and forth about what to make. Someone suggested wraps, and just like that, my BBQ Chicken Coleslaw Wraps were born! The vibrant colors of the coleslaw against the golden tortillas were enough to make anyone’s mouth water.
What I love about this dish is not just the flavor; it’s the memories you create while making it. The joy of putting together simple ingredients and transforming them into something everyone can enjoy fills my heart. So grab your spatula, and let’s dive into this delicious adventure!
A Nostalgic Memory
I still remember the first time I whipped up these BBQ Chicken Coleslaw Wraps for a group of friends. We were having one of those epic summer get-togethers where the food flows like the laughter and stories. I had just returned from a trip to a smoky barbecue joint, and my cravings were at an all-time high. I thought, “Why not recreate that magic?” So, I rounded up the gang, and we commandeered my kitchen together.
As we shredded chicken, mixed coleslaw, and slathered BBQ sauce, the kitchen turned into a friendly chaos. It wasn’t long before we were all hovering around the counter, piling our wraps high with toppings and arguing over whose creation was the best. The combination of smoky BBQ and crunchy, creamy coleslaw elevating the wraps made it a runaway hit!
That evening was not just about food—it was about connection, laughter, and memories made in the kitchen. I’ve made countless BBQ Chicken Coleslaw Wraps since then, yet that night remains one of my favorites. It’s a reminder that the best dishes are those that bring us together.
Ingredients
Here’s what you’ll need to create these delightful wraps:
-
2 cups cooked chicken breast, shredded: Use rotisserie chicken for convenience, or cook your chicken breast in advance. If you’re looking for a plant-based twist, try shredding jackfruit or using chickpea salad!
-
1/2 cup BBQ sauce: Choose your favorite flavor! Whether you like it tangy, smoky, or sweet, BBQ sauce is the star of the show here. If you’re feeling adventurous, make your own homemade version!
-
4 large flour tortillas: Soft flour tortillas are perfect for wrapping. You can swap them for whole wheat or corn tortillas to switch things up!
-
2 cups coleslaw mix: This mix usually contains shredded cabbage and carrots, providing color and crunch. Look for pre-packaged mixes to save time or make your own by shredding fresh vegetables. For a cauliflower-friendly swap, try using finely chopped cauliflower to mimic the crunch!
-
1/4 cup mayonnaise: This adds a creamy element to your coleslaw. If you want to lighten it up, swap it with Greek yogurt or a dairy-free alternative.
-
1 tablespoon apple cider vinegar: This balances the richness of the mayo and BBQ sauce. Feel free to use lemon juice if that’s what you have on hand!
-
1 tablespoon sugar: A hint of sweetness tames the tanginess of the vinegar. For a healthier option, try honey or maple syrup.
-
Salt and pepper to taste: These are simple yet essential seasonings. Don’t be shy; taste as you go!
-
1/4 cup chopped fresh cilantro (optional): Adds a refreshing flavor. If you’re not a fan, skip it or use parsley instead!
-
1/4 cup sliced green onions (optional): These add a nice kick! You can easily replace green onions with diced shallots for a subtler flavor.
With these ingredients, you’re just a few steps away from creating a flavor fiesta!
Step-by-Step Instructions
Now that we have our ingredients ready, let’s get right into the cooking action:
-
Prep the Chicken: If you’re using rotisserie chicken, shred it into bite-sized pieces. If you’re cooking your chicken, simply poach it in simmering water for 15-20 minutes until cooked through, then shred it. You can add a pinch of salt while cooking to infuse some flavor into the chicken.
Chef Hack: If you want maximum flavor, consider marinating the chicken in BBQ sauce for a couple of hours before cooking!
-
Mix the BBQ Sauce: In a medium bowl, mix the shredded chicken with 1/2 cup BBQ sauce until well-coated. Feel free to taste and adjust—some folks like it saucier than others.
-
Make the Coleslaw: In another bowl, combine the coleslaw mix, mayo, apple cider vinegar, sugar, salt, and pepper. Toss everything together until the veggies are evenly coated—get your hands in there if you need to!
Tip: For a zesty twist, add some diced jalapeños or a sprinkle of chili flakes to the coleslaw mix.
-
Warm the Tortillas: To make wrapping easier, warm the flour tortillas in a dry skillet over medium heat for about 20 seconds on each side, just until pliable. Don’t overdo it, or they’ll become crispy!
-
Assemble the Wraps: Lay a warm tortilla flat, spoon some BBQ chicken and top with a generous amount of coleslaw mixture. If you’re using cilantro and green onions, sprinkle them on top at this stage.
-
Wrap It Up: Fold in the sides of the tortilla and then roll it up from the bottom to the top, enclosing the filling. Tuck it in as you roll to keep things nice and snug.
Chef’s Insight: If you want to serve them as a platter, slice the wraps in half diagonally for that perfect presentation!
-
Serve & Enjoy: You can serve them as is or slice them for sharing—or not! These wraps are perfect for a casual meal or even a picnic outdoors.
Serving Suggestions
Serving food is as important as cooking it! To plate your BBQ Chicken Coleslaw Wraps, arrange them neatly on a large platter, and don’t forget to garnish. Here are a couple of serving suggestions to elevate the experience:
-
Garnish with Fresh Herbs: Add a sprinkle of chopped cilantro or parsley on top to add a pop of color.
-
** Serve with Dips:** Offer ranch dressing, extra BBQ sauce, or even hot sauce on the side for those who like a bit of extra kick.
-
Side Dishes: Pair them with crispy sweet potato fries, or serve alongside a simple fruit salad for a fresh contrast.
These wraps can also be set up as a make-your-own wrap station, allowing guests to customize their fillings. The more, the merrier!
Recipe Variations
Feeling creative? Here are a few fun twists you can try to switch up the flavors:
-
Spicy BBQ Chicken Wraps: Add diced jalapeños or a few dashes of hot sauce to the BBQ chicken mixture for some serious heat.
-
Tropical Twist: Swap the BBQ sauce for a sweet and tangy mango salsa, and add pineapple chunks to your coleslaw for a tropical flair.
-
Mediterranean Style: Use shredded rotisserie chicken tossed in garlic and herb vinaigrette, and replace the coleslaw mix with chopped cucumbers, tomatoes, and feta cheese.
-
Vegan Version: Substitute the chicken with shredded jackfruit mixed with your favorite vegan BBQ sauce and use a vegan mayo in the coleslaw.
-
Breakfast Wraps: Use scrambled eggs instead of chicken, and mix in crumbled bacon for a hearty breakfast or brunch option!
Chef’s Notes
As with any recipe, this one has evolved over time! The first iterations were simple, but as I tested different flavor profiles, I became more adventurous. Sometimes I’d add a twist like a spicy BBQ sauce or even a hint of chipotle to make it smoky! What I love most is how adaptable this recipe is. It allows for creativity, making it a dish that evolves with each gathering.
And speaking of gatherings, I always remember one instance where I accidentally overdid it on the sugar while experimenting. Instead of panicking, I decided to go with the flow. I transformed them into dessert BBQ wraps by adding some fresh fruit and whipped cream! The laughter that ensued made for a fabulous memory—proof that mistakes in the kitchen can sometimes lead to delightful discoveries!
FAQs and Troubleshooting
Here are some common questions and troubleshooting tips:
-
What if my chicken is dry?
- If you find that the chicken is a bit dry, mix in a little extra BBQ sauce. This will help moisten it up and add flavor.
-
Can I make this ahead of time?
- Definitely! You can prepare the chicken, coleslaw, and wrap components in advance. Just store them separately in the fridge. Assemble just before serving for the freshest taste.
-
How do I store leftovers?
- Wrap any leftovers tightly in plastic wrap or store them in airtight containers in the fridge. They’ll keep well for about 2-3 days.
-
Can I freeze these wraps?
- While it’s best to eat them fresh, you can freeze the unassembled wraps. Just be sure to wrap them tightly before freezing. When ready to enjoy, thaw overnight in the fridge and warm them up.
Nutritional Info
Each wrap is a balanced combination of protein from the chicken, fiber from the coleslaw, and healthy carbs from the tortillas. Here’s a rough nutritional breakdown per wrap, based on typical ingredients:
- Calories: Approximately 300-350
- Protein: 20-25g
- Carbohydrates: 30-35g
- Fat: 12-15g
- Fiber: 2-3g
Of course, this can vary based on the specific ingredients you choose, especially if you mix and match some substitutions.
Final Thoughts
There you have it! My BBQ Chicken Coleslaw Wraps—perfect for any occasion, whether you’re trying to impress guests or treating yourself to a fun meal at home. Cooking should be joyful, and with this recipe, you’ll hopefully create not just a delightful dish but also wonderful memories!
I encourage you to make these wraps, customize, and share them with friends and family. Remember, food is more than just nourishment; it’s about connection, laughter, and love. Don’t forget to share your own stories as you create these wraps. Whether for a summer picnic, a cozy weeknight dinner, or a fun gathering, I’m sure you’ll find that these wraps bring smiles all around. So, get into the kitchen, and let’s feast together!
Until next time, happy cooking!
Print
BBQ Chicken Coleslaw Wraps
- Total Time: 35 minutes
- Yield: 4 servings 1x
- Diet: Non-Vegetarian
Description
Delicious wraps filled with tender BBQ chicken and crunchy coleslaw, perfect for summer gatherings.
Ingredients
- 2 cups cooked chicken breast, shredded
- 1/2 cup BBQ sauce
- 4 large flour tortillas
- 2 cups coleslaw mix
- 1/4 cup mayonnaise
- 1 tablespoon apple cider vinegar
- 1 tablespoon sugar
- Salt and pepper to taste
- 1/4 cup chopped fresh cilantro (optional)
- 1/4 cup sliced green onions (optional)
Instructions
- Prep the Chicken: Shred cooked chicken into bite-sized pieces. If cooking, poach in simmering water for 15-20 minutes, then shred.
- Mix the BBQ Sauce: Combine shredded chicken with BBQ sauce in a bowl until well-coated.
- Make the Coleslaw: In another bowl, mix coleslaw, mayo, vinegar, sugar, salt, and pepper until veggies are coated.
- Warm the Tortillas: Heat tortillas in a skillet for 20 seconds on each side until pliable.
- Assemble the Wraps: Spoon BBQ chicken and coleslaw onto a tortilla, adding cilantro and green onions if desired.
- Wrap It Up: Fold in the sides and roll from the bottom to top, enclosing the filling.
- Serve & Enjoy: Plate the wraps and garnish with fresh herbs or serve with dips.
Notes
For extra flavor, marinate chicken in BBQ sauce before cooking. Customize with additional toppings as desired.
- Prep Time: 15 minutes
- Cook Time: 20 minutes
- Category: Main Course
- Method: Wrapping
- Cuisine: American
Nutrition
- Serving Size: 1 wrap
- Calories: 350
- Sugar: 6g
- Sodium: 800mg
- Fat: 15g
- Saturated Fat: 3g
- Unsaturated Fat: 9g
- Trans Fat: 0g
- Carbohydrates: 45g
- Fiber: 3g
- Protein: 25g
- Cholesterol: 60mg
Keywords: BBQ chicken, coleslaw wraps, summer recipes, easy meals, family gatherings
Minute Elote Pasta Salad with Creamy Greek Yogurt
Tasty Elote Pasta Salad with Greek Yogurt: A Flavorful Fiesta in a Bowl
Hey there, fellow food lovers! I’m Beau Collier, and I’m thrilled to welcome you to another delicious adventure on Feastical! Today we’re diving into a vibrant and satisfying dish that’s perfect for gatherings, potlucks, or simply a cozy meal at home – Tasty Elote Pasta Salad with Greek Yogurt.
Imagine digging into a bowl of creamy pasta salad that bursts with flavor; sweet corn, a hint of spice, and that delightful tang from Greek yogurt – it’s comfort food with a twist! And the best part? It’s super easy to whip up, making it great for anyone, whether you’re a kitchen wizard or just starting your culinary journey.
I can’t wait to share my favorite memories tied to this dish, and all the little cooking tips that will help you shine in the kitchen. Grab your apron, get your spatula ready, and let’s make some magic happen!
A Taste of Nostalgia
Every great recipe has a story, and this Elote Pasta Salad is no exception. I remember one summer, not too long ago, finding myself at a lively cookout at my buddy Javier’s house. The sun was shining, and the air was filled with the irresistible smell of grilled corn. Javier’s mom was famous for her elote, the traditional Mexican street corn slathered in mayo, cheese, and chili powder – pure bliss!
As I savored every bite, I thought about how I could bring those bold flavors into a dish that was just as easy to enjoy in a casual setting as it was uniquely delicious. That’s when the idea for this pasta salad hit me like a wave of nostalgia. Combining creamy Greek yogurt with those classic elote flavors created something special that felt familiar, yet fresh. Fast forward to now, and I’ve perfected this recipe into a beloved dish that’s shared among friends and family.
Ingredients
Let’s gather our ingredients! Here’s what you’ll need to bring your Tasty Elote Pasta Salad to life:
-
1 cup Greek yogurt: My go-to is Fage Total 5% for that luscious creaminess. If you want a lighter option, 0% or fat-free will work too, but may lack the rich texture.
-
3 tbsp mayo: Adds that classic creaminess. You can swap it out for more Greek yogurt if you prefer a lighter salad.
-
1.5 tsp chili powder: This gives our dish that gentle kick! For less heat, consider using smoked paprika instead.
-
1/2 tsp garlic powder: A must for flavor! Fresh minced garlic can substitute, but you might want to adjust according to your preference.
-
1/4 tsp salt: Essential for bringing out flavors. Always taste as you go!
-
1.5 limes (zested and juiced): The zest and juice together bring an incredible citrus punch that brightens the dish.
-
6.7 oz rotini: My favorite pasta for this dish is Barilla; it holds onto the creamy goodness perfectly. You can choose gluten-free pasta or another shape you love.
-
2.5 cups corn: Fresh off the cob is delightful in summer, but you can use frozen or canned if that’s what you have on hand.
-
2 tsp avocado oil: This oil adds a buttery flavor. Feel free to use olive oil or any neutral oil you like!
-
1/4 tsp chili powder: Another layer of flavor for the corn.
-
2.5 cups chicken (shredded): Chicken, shredded into bite-sized nuggets, keeps this salad hearty. You can use rotisserie chicken or swap it for black beans for a vegetarian twist.
-
1 cup cotija: Crumble this rich cheese to distribute its tasty flavor throughout. Feta can be a good substitution if you can’t find cotija.
-
1/2 cup cilantro: Fresh herbs add a finishing touch of brightness. Chop finely, and if you’re not a cilantro fan, use parsley instead.
-
Lime wedges for serving: These are a must for extra citrus bursts right before that first bite!
Step-by-Step Instructions
Now that we have all of our ingredients prepped and ready to go, let’s dive into the cooking steps! Remember, cooking should be fun, so don’t worry if things get a little messy. Here’s how to make your Tasty Elote Pasta Salad:
-
Cook the Pasta:
- Bring a large pot of salted water to a boil and add the rotini. Cook according to the package instructions until al dente (usually around 8-10 minutes).
- Tip: Make sure to stir occasionally to prevent sticking!
-
Prepare the Corn:
- In a medium skillet over medium heat, drizzle in the avocado oil and add the corn. Sprinkle with a bit of chili powder and sauté for about 5-7 minutes until heated through and slightly caramelized.
- Chef’s hack: If you’re using fresh corn, you can grill it for an incredible smoky flavor!
-
Make the Dressing:
- In a large bowl, combine the Greek yogurt, mayo, chili powder, garlic powder, salt, lime zest, and lime juice. Whisk until smooth and creamy.
- Pro tip: You can adjust the lime juice and chili powder to suit your taste, so feel free to experiment!
-
Combine Ingredients:
- Once the rotini is cooked, drain and rinse under cool water to halt the cooking process. Add it to the bowl with the dressing, followed by the sautéed corn and shredded chicken.
- Remember to toss gently so you don’t break up the pasta too much.
-
Finishing Touches:
- Stir in the cotija cheese and chopped cilantro, reserving a bit for garnishing later. Mix until everything is well coated.
- Taste and season if needed – you want this to be just right!
-
Chill:
- Cover your bowl with plastic wrap and let it chill in the fridge for at least 30 minutes. Chilling helps the flavors meld beautifully.
- If you’re pressed for time, you could enjoy it right away, but trust me—the wait is worth it!
-
Serve:
- When you’re ready to dig in, give the salad a quick stir and plate it up. Garnish with the remaining cotija, cilantro, and lime wedges for guests to sprinkle on top.
- Enjoy the colorful presentation – it’s like a fiesta on a plate!
Serving Suggestions
This Elote Pasta Salad is a true crowd-pleaser and pairs wonderfully with a variety of dishes. Serve it alongside grilled chicken, fish tacos, or a refreshing green salad for a balanced meal. If it’s a potluck, serve it in a large bowl with plenty of serving spoons available for guests to help themselves. Don’t forget vibrant garnishes like lime wedges and extra cilantro to keep things fresh and exciting.
And remember, this is a dish made for sharing! Invite friends over for a casual gathering, and let them be the judges of your culinary skills. Trust me; they won’t be disappointed!
Recipe Variations
Feeling creative? Here are some fun ways to mix things up and make this recipe your own:
-
Spicy ELote Pasta: If spice is your thing, add diced jalapeños or a splash of hot sauce to the dressing for an extra kick.
-
Black Bean Twist: Swap shredded chicken for black beans or chickpeas for a vegetarian option that’s still hearty and satisfying.
-
Mexican Street Corn-Inspired: Fold in diced bell peppers or red onion for added crunch and sweetness, mirroring those classic elote flavors even more closely.
-
Herbed Twist: Try adding other herbs like dill or green onions for a fresh twist that adds layers of flavor.
-
Cheese Galore: Experiment with different cheeses like pepper jack or even mozzarella for a creamier texture with a bit of stretch.
Chef’s Notes
Over time, this recipe has evolved into something I hold near and dear to my heart. It started as a dish inspired by memories of summer cookouts and laughter among friends. As I introduced it to various potlucks and BBQs, I fine-tuned it to accommodate preferences and dietary restrictions.
A little funny kitchen story to share: the first time I made it for a large crowd, I accidentally doubled the lime juice, leading to a zesty explosion of flavor that had everyone talking about my ‘bold choice’ for days!
The beauty of cooking is that it’s all about finding your voice; trust your instincts and don’t be afraid to play with flavors!
FAQs and Troubleshooting
Let’s address some common questions folks may have when making this dish or troubleshooting along the way:
-
What if my pasta is too mushy?
- Overcooked pasta can happen! Always set a timer and taste as it nears the cooking time. If it’s too soft, try using fresh or dry pasta with a slightly shorter cooking time next time.
-
Can I make this salad ahead of time?
- Absolutely! In fact, it tastes even better after a day of resting as flavors meld. Just hold off on adding the fresh cilantro until serving.
-
How can I store leftovers?
- Keep any leftovers in an airtight container in the fridge. It usually lasts about 3-4 days, but the fresher, the better!
-
Why does my dressing seem too runny?
- If you find your dressing is too thin, you may add more Greek yogurt for creaminess or chill the salad longer to help everything bind together better.
Nutritional Info
If you’re watching your nutritional intake but don’t want to skimp on flavor or fun, here’s a quick overview of what you can expect from a serving of this Tasty Elote Pasta Salad:
- Calories: Approximately 300-400 per serving, depending on exact ingredients used.
- Protein: Around 20-25g from the Greek yogurt and chicken.
- Fat: About 15-20g, with healthy fats from the avocado oil and Greek yogurt.
- Carbohydrates: Roughly 30-35g, mainly from the rotini and corn.
This salad packs a punch of flavor while being a balanced source of protein and carbs – a perfect fuel-up for any occasion!
Final Thoughts
There’s something special about bringing people together through food. This Tasty Elote Pasta Salad with Greek Yogurt is the epitome of that sentiment, an easy and delightful dish that shows how simple ingredients can lead to unforgettable moments. So whether you share it at a summer BBQ or enjoy it on a cozy weeknight, know that every bite is infused with love and warmth.
Thanks for joining me on this delicious journey! I hope you’re excited to give this recipe a try and make it a staple in your kitchen. Remember, cooking is all about having fun and making it your own. So grab your ingredients, whip up this salad, and let’s create more beautiful memories around the table. Happy cooking! 🍽️
Print
Tasty Elote Pasta Salad with Greek Yogurt
- Total Time: 55 minutes
- Yield: 4 servings 1x
- Diet: Vegetarian
Description
A vibrant and satisfying pasta salad that combines creamy Greek yogurt with the flavors of elote, featuring sweet corn, lime, and spices.
Ingredients
- 1 cup Greek yogurt
- 3 tbsp mayo
- 1.5 tsp chili powder
- 1/2 tsp garlic powder
- 1/4 tsp salt
- 1.5 limes (zested and juiced)
- 6.7 oz rotini
- 2.5 cups corn
- 2 tsp avocado oil
- 1/4 tsp chili powder (for corn)
- 2.5 cups chicken (shredded)
- 1 cup cotija cheese
- 1/2 cup cilantro (chopped)
- Lime wedges for serving
Instructions
- Cook the Pasta: Bring a large pot of salted water to a boil and add the rotini. Cook according to the package instructions until al dente (usually around 8-10 minutes). Stir occasionally to prevent sticking.
- Prepare the Corn: In a medium skillet over medium heat, drizzle in the avocado oil and add the corn. Sprinkle with a bit of chili powder and sauté for 5-7 minutes until heated through and slightly caramelized.
- Make the Dressing: In a large bowl, combine the Greek yogurt, mayo, chili powder, garlic powder, salt, lime zest, and lime juice. Whisk until smooth and creamy.
- Combine Ingredients: Once the rotini is cooked, drain and rinse under cool water to halt the cooking process. Add it to the bowl with the dressing, followed by the sautéed corn and shredded chicken. Toss gently.
- Finishing Touches: Stir in the cotija cheese and chopped cilantro, reserving a bit for garnishing later. Mix until well coated and season if needed.
- Chill: Cover your bowl with plastic wrap and let it chill in the fridge for at least 30 minutes.
- Serve: When ready, give the salad a quick stir, plate it up, and garnish with remaining cotija, cilantro, and lime wedges.
Notes
You can add diced jalapeños for extra spice or substitute chicken with black beans for a vegetarian option.
- Prep Time: 15 minutes
- Cook Time: 10 minutes
- Category: Salad
- Method: Chilling
- Cuisine: Mexican
Nutrition
- Serving Size: 1 serving
- Calories: 350
- Sugar: 5g
- Sodium: 400mg
- Fat: 15g
- Saturated Fat: 4g
- Unsaturated Fat: 8g
- Trans Fat: 0g
- Carbohydrates: 30g
- Fiber: 3g
- Protein: 20g
- Cholesterol: 40mg
Keywords: pasta salad, elote, Greek yogurt, Mexican flavors, summer dish, potluck

Minute Bang Bang Chicken Skewers for Busy Weeknights
Bang Bang Chicken Skewers: A Flavorful Adventure!
Hey there, food lovers! If you’re ready to embark on a culinary journey that’s bound to tickle your taste buds and bring a smile to your face, you’ve landed in the right place! Today, we’re diving into the delicious world of Bang Bang Chicken Skewers. This recipe is not just a meal; it’s a celebration of flavors, a memory-maker at gatherings, and an easy way to impress your friends and family. So grab your spatula and let’s unleash the chef in you!
Introduction
I don’t know about you, but I think skewers are like the rock stars of the food world. They’re fun to eat, easy to share, and they make for a stunning presentation at any meal. The delightful Bang Bang Chicken Skewers are a perfect example of this. These delectable bites are succulent chicken pieces coated in a creamy, spicy sauce that packs a punch, thanks in part to the classic Asian-inspired flavors.
What’s better? This dish is ideal for any occasion—be it a cozy family dinner, a summer backyard barbecue, or a casual get-together with friends. And the best part? You can whip them up in a flash! That’s right—simple doesn’t have to mean boring. With the right ingredients and a touch of love, we’re going to create a dish that’s sure to impress.
If you’re craving a bit of zing and some comforting flavors, you’re going to want to stick around. The combination of marinated chicken, skewered and grilled, along with that irresistible bang bang sauce, makes for an unforgettable gastronomic experience. Let’s get started and take those taste buds on an adventure!
Personal Story
Now, let me take you back to a warm summer evening a few years ago. I remember the vibrant colors of the sunset spilling over my parents’ backyard as the grill crackled and hissed, igniting a sense of excitement in my soul. It was one of those magical nights filled with laughter, good company, and, of course, incredible food. My friends and I had come together for an impromptu feast that would stick in my memory for years.
Among the various dishes served, those unwitting Bang Bang Chicken Skewers stole the show. The flavors were explosive, and as we gathered around the table, we couldn’t stop talking about how good they were. I remember my best buddy, Jake, inhaling a skewer and exclaiming, “This should be illegal! It’s too good!” Our laughter permeated the warm air, and in that moment, I realized the true essence of food—it’s about connection, joy, and shared experiences.
Fast forward to today, and I’ve mastered the art of these skewers, crafting a dish that can take you back to that warm summer night wherever you are. So let’s crank up your kitchen skills and recreate that magic!
Ingredients
Here’s what you’ll need to create these delightful Bang Bang Chicken Skewers:
-
Chicken breast: The star of our show! Skinless, boneless chicken breasts are the best choice for skewers, as they are lean and cook uniformly. Pro tip: You can substitute chicken thighs if you prefer a juicier cut.
-
Bang Bang Sauce: This is what gives the dish its kick! The sauce typically includes mayonnaise, sweet chili sauce, and sriracha. If you’re looking for a lighter version, Greek yogurt makes a great swap for mayonnaise—but remember to taste as you go!
-
Skewers: Either wooden or metal skewers work. If you choose wooden skewers, make sure to soak them in water for about 30 minutes before grilling to prevent them from burning. Metal skewers add a modern touch and can be reused for many grilling sessions!
-
Rice: A fluffy bed of rice pairs beautifully with our skewers, soaking up all that creamy sauce. Jasmine or basmati are excellent options. If you’re looking for a healthier alternative, try cauliflower rice!
-
Vegetables: Your choice of colorful veggies can add crunch and freshness. Bell peppers, zucchini, cherry tomatoes, and red onions are fantastic options. Plus, they help round out the meal!
Step-by-Step Instructions
Are you excited yet? Let’s get those chicken skewers cooking!
-
Prep the chicken: Begin by cutting your chicken breast into bite-sized pieces—about 1 to 1.5 inches. Dice them evenly for consistent cooking. Trust me; you want them to be the same size!
-
Make the marinade: In a mixing bowl, combine ½ cup of Bang Bang sauce (I’ll share the recipe shortly!). Add the chicken pieces and mix until they are well-coated. Feel free to add a splash of soy sauce or garlic for an extra flavor kick. Let the chicken marinate in the fridge for at least 30 minutes. If you’re in a rush, even 15 minutes will do!
-
Skewer the chicken: Once the chicken is marinated, it’s time to skewer! Grab your skewers and alternate threading chicken pieces with your choice of vegetables. A fun design keeps things interesting, and you’ll get to enjoy all those flavors mingling as they cook!
-
Get grilling: Preheat your grill (or grill pan) to medium-high heat. Lightly oil the grates to ensure your skewers don’t stick. Grill your skewers for about 5-7 minutes on each side or until the chicken is cooked through and has nice grill marks. Remember, you want that juicy goodness!
-
Final touches: Just before serving, brush some extra Bang Bang sauce over the skewers for an extra flavor layer. It’s like adding the cherry on top—totally worth it!
Serving Suggestions
Time to plate up! Place a fluffy mound of rice on a plate, artfully position your skewers atop the rice, and drizzle some more of that luscious Bang Bang sauce over everything. Garnish with fresh cilantro or green onions for a pop of color and freshness. You could even add a lime wedge on the side for that zesty squeeze just before digging in—ah, perfection!
Recipe Variations
Love to be creative in the kitchen? Here are some fun tips and variations for your Bang Bang Chicken Skewers:
-
Spice it up: For a spicy twist, add jalapeños or peppers directly onto the skewers before grilling. They’ll infuse some heat!
-
Veggie option: Swap the chicken for tofu or tempeh for a plant-based sensation. Marinate as usual for the same mouthwatering flavor.
-
Fruit-infused: Brighten up your skewers by adding chunks of pineapple or mango. The sweetness will balance beautifully with the sauce!
-
Asian flair: Add in some baby corn or water chestnuts for a little crunch. They’ll complement the flavors and textures wonderfully.
-
Dipping delight: Serve with some additional sides for dipping—consider a cucumber salad, grilled corn, or even a zesty coleslaw.
Chef’s Notes
I’ll let you in on a little secret—these Bang Bang Chicken Skewers weren’t an overnight hit for me. The first time I made them, I accidentally overcooked the chicken, and let me tell you, it was a dry disaster! However, that served as an important lesson. Cooking is all about trial and error, and each attempt helps you improve. Now they’ve evolved into a family favorite, enjoyed during epic summer cookouts or themed tailgate parties. Comedy + food = magic!
FAQs and Troubleshooting
-
Q: My chicken came out dry! What happened?
- A: Overcooking is the usual nemesis! Keep an eye on your skewers while grilling and use a meat thermometer to check for doneness at 165°F.
-
Q: Can I prepare the skewers ahead of time?
- A: Absolutely! You can marinate the chicken and assemble the skewers in advance; just store them in the fridge until you’re ready to grill. Planning ahead can save tons of time!
-
Q: What can I serve alongside these skewers?
- A: A fresh salad with mixed greens, a tangy cucumber salad, or a side of grilled veggies complements the flavors perfectly and rounds out the meal.
-
Q: I’m not a fan of spicy food, can I tone down the sauce?
- A: Of course! Adjust the ratio of sweet chili sauce and mayonnaise in the Bang Bang sauce to suit your palate. You can even leave out the sriracha for a milder dip.
Nutritional Info
If you’re counting calories or looking for a nutritious balance, here’s a rough estimate of what one serving of Bang Bang Chicken Skewers contains:
- Calories: Approximately 350-400 calories (including rice and sauce)
- Protein: Around 30 grams from the chicken
- Carbohydrates: About 40 grams largely from the rice and vegetables
- Fats: 10-15 grams, depending on the sauce
These skewers are packed with protein and present a great balance if paired with wholesome sides!
Final Thoughts
Whether you’re cooking for family, friends, or just treating yourself, Bang Bang Chicken Skewers are a heartwarming dish that brings everyone to the table. Simple, delicious, and bursting with flavor—they really have it all! Remember, cooking should be fun, creative, and filled with love. So get in there, let loose, and make this recipe your own!
Can’t wait to hear how your Bang Bang Chicken Skewers turn out! Share your stories and photos with me on Feastical, and let’s create a community of passionate foodies together. Happy cooking, and remember, you’ve got this!
Print
Bang Bang Chicken Skewers
- Total Time: 30 minutes
- Yield: 4 servings 1x
- Diet: Paleo
Description
Delicious and easy-to-make Bang Bang Chicken Skewers, perfect for gatherings and packed with flavorful Asian-inspired tastes.
Ingredients
- 1 lb chicken breast, skinless and boneless, cut into 1-inch pieces
- ½ cup Bang Bang Sauce (mayonnaise, sweet chili sauce, sriracha)
- Skewers (wooden or metal)
- 1 cup jasmine or basmati rice
- Variety of vegetables (bell peppers, zucchini, cherry tomatoes, red onions)
Instructions
- Prep the chicken: Cut the chicken breast into bite-sized pieces for even cooking.
- Make the marinade: Combine ½ cup Bang Bang sauce with the chicken pieces in a bowl.
- Let the chicken marinate in the fridge for at least 15 minutes.
- Skewer the chicken: Thread marinated chicken pieces and vegetables onto the skewers.
- Get grilling: Preheat your grill to medium-high heat, oil the grates, then grill skewers for 5-7 minutes on each side.
- Brush additional Bang Bang sauce over skewers before serving.
Notes
For added flavor, consider adding jalapeños or fruits like pineapple. You can substitute chicken with tofu for a vegetarian option.
- Prep Time: 15 minutes
- Cook Time: 15 minutes
- Category: Main Course
- Method: Grilling
- Cuisine: Asian
Nutrition
- Serving Size: 1 skewer with rice
- Calories: 375
- Sugar: 8g
- Sodium: 450mg
- Fat: 14g
- Saturated Fat: 3g
- Unsaturated Fat: 8g
- Trans Fat: 0g
- Carbohydrates: 40g
- Fiber: 2g
- Protein: 30g
- Cholesterol: 70mg
Keywords: Bang Bang Chicken, Chicken Skewers, Grilled Chicken, Easy Recipes, Asian Cuisine