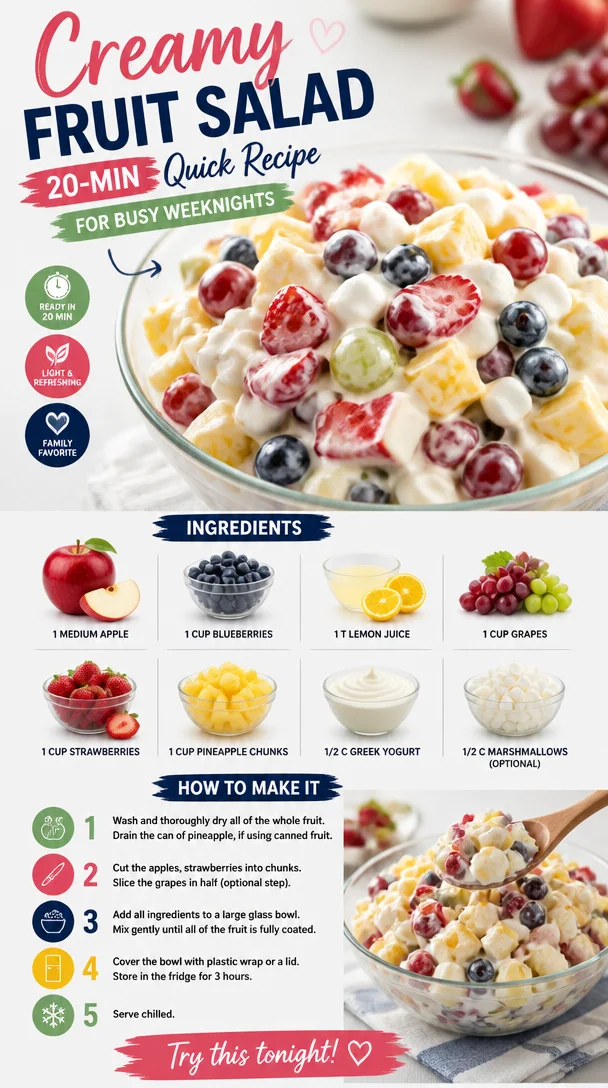
Creamy Fruit Salad: 20-Min Quick Recipe for Busy Weeknights
Creamy Fruit Salad: A Bowl of Sunshine
Welcome back to Feastical, my foodie friends! Today, we’re diving into a dish that’s as vibrant and delightful as a summer day: Creamy Fruit Salad! This isn’t just any ol’ fruit salad; oh no! We’re talking about a colorful medley of fruity goodness, drizzled in a smooth, creamy dressing that is guaranteed to transport your taste buds straight to happyville. Whether it’s a potluck, picnic, or simply a fresh addition to your everyday meals, this creamy fruit salad is a showstopper that brings joy with every bite.
A Dash of Nostalgia
Isn’t it funny how food has a way of bringing back memories? For me, my love affair with fruit salad began in my grandma’s kitchen during hot summer afternoons. The little wooden table was often piled high with fresh fruits from her garden: juicy strawberries, plump blueberries, and the sweetest grapes you could ever imagine. As a kid, I loved to help her chop up the fruit. We had this simple yet delightful ritual: she’d whip up a creamy dressing using yogurt and a splash of lemon juice, and together, we’d toss the fruit together like the perfect harmony of flavors. I still remember how the sun poured through the window, lighting up the colorful fruit like jewels, and how my grandma would wink and say, “Food tastes better when you make it with love!” That’s the spirit I’ve captured in this recipe!
A Rainbow of Ingredients
Let’s gather the ingredients for our Creamy Fruit Salad—trust me when I say, it’s as easy-peasy as it gets!
-
1 medium apple: A crunchy addition. Use a sweet variety like Fuji or Gala for extra flavor, or swap in pears for a twist!
-
1 cup blueberries: Bursting with antioxidants and flavor. If you’re out of blueberries, just include another berry like raspberries or blackberries for a similar vibe.
-
1 tablespoon lemon juice: Adds zing and helps keep the fruit fresh. You can use lime juice if you’re looking for a different citrus kick!
-
1 cup grapes: Juicy and bite-sized—perfect for salad! Red, green, or even a mix work beautifully. No grapes? Chopped kiwi would be a fun alternative.
-
1 cup strawberries: Sweet and bright; cut them into halves or quarters. If strawberries are out of season, consider using diced mango instead—they’re both tropical and fun!
-
1 cup pineapple chunks: Adds a tropical flair that’ll leave you daydreaming about the beach! You can opt for canned in juice (drained) if fresh isn’t available.
-
1/2 cup Greek yogurt: This is the creaminess factor! Full-fat or low-fat works too. If you’re after a vegan option, coconut yogurt is a fabulous substitute to create that luscious mouthfeel.
-
1/2 cup marshmallows (optional): For those wanting a bit of nostalgia and fluffiness! You can skip these if you prefer a less sweet salad or want to keep things healthy.
Step-by-Step Instructions
Alright, let’s make this magic happen! Follow these steps, and watch as your kitchen transforms into a fruity wonderland:
-
Prepare the Fruit: Start by washing all your fruits thoroughly. Pat them dry with a clean kitchen towel or paper towels. This step is essential—no one likes a soggy fruit salad!
-
Chop the Apple: Dice your apple into bite-sized pieces. There’s no need to peel; the peel adds color and nutrients. Plus, it’s quicker! Just remember to core it. If you’re worried about browning, toss the pieces in a teeny splash of lemon juice right after cutting.
-
Slice the Strawberries: Remove the green tops and slice them into halves or quarters depending on their size. This allows for an even mix with the other fruits while showcasing their gorgeous color.
-
Prep the Grapes and Blueberries: For grapes, simply wash them and remove from the stem. Keep them whole for pops of juice in each bite! Wash the blueberries too—no fuss here. They can just join the party!
-
Tropical Vibes with Pineapple: If you’re using fresh pineapple, cut off the skin and core, then chop into uniform chunks. If canned, drain well and give them a quick rinse.
-
Make the Creamy Dressing: In a medium bowl, combine your Greek yogurt, the tablespoon of lemon juice, and mix well until creamy and smooth. This is where the magic happens! Feel free to add a drizzle of honey or maple syrup if you prefer it sweeter.
-
Combine the Ingredients: In a large mixing bowl, combine all your freshly cut fruits with the creamy dressing. Gently fold everything together with a spatula so as not to mush the delicate fruits!
-
Add Marshmallows: If you’re going the extra sweet route and adding marshmallows, now’s the time. Fold them through the salad for a delightful surprise.
-
Chill and Serve: Cover the bowl with cling wrap or a lid, and let it chill in the refrigerator for about 30 minutes. This allows the flavors to meld beautifully and keeps it refreshingly cool!
Plating and Serving Suggestions
Now that your creamy fruit salad is all ready to go, let’s talk about how to present this beauty! A large glass bowl allows the colors to shine through—think of it as showing off a delightful gem. Serve it alongside your favorite brunch dishes, as a vibrant side at barbecues, or even as a delightful dessert.
For an elegant touch, consider serving it in individual glasses or bowls. You can even garnish each serving with a sprig of mint or sprinkle some crushed nuts on top for texture. Pair with homemade granola for an added crunch, or serve it as part of a larger brunch spread with pancakes or waffles. Each scoop should feel like a little burst of summer!
Recipe Variations
Get ready to switch things up! Here are a few creative variations to jazz up your creamy fruit salad:
-
Citrus Melange: Swap the pineapple and apples for oranges and grapefruit for a refreshing citrus take. Do keep the creamy dressing for balance!
-
Nutty Addition: Toss in some walnuts or almonds for added crunch and healthy fats.
-
Tropical Paradise: Add diced kiwi and papaya instead of apples and pineapple for a true island experience.
-
Berry Blast: Make it a berry medley! Combine strawberries, blueberries, raspberries, and blackberries for a double-dose of fruit flavor.
-
Vegan Delight: Use your favorite non-dairy yogurt and add chia seeds for extra nutrition!
A Few Chef’s Notes
As with any beloved recipe, this creamy fruit salad has its roots in the desire for simplicity and heartiness. Back in Grandma’s kitchen, we didn’t have fancy ingredients—just whatever she had in her pantry. That’s part of what’s so special about this dish: it evolves with what’s on hand and your taste preferences. Plus, have I mentioned how forgiving this recipe is? Feel free to play around with the fruits; there’s no right or wrong here!
Oh, and I must confess: I once made this salad for a potluck, and instead of marshmallows, I accidentally grabbed a bag of jelly beans. Let’s just say the kids loved it, and it became a ‘Dessert Salad’ instead!
FAQs and Troubleshooting
Q: Can I make this salad ahead of time?
A: Yes, you can! Just prepare the fruits and dressing separately and combine them a few hours before serving. This keeps everything fresh and prevents the fruit from getting too mushy.
Q: My dressing is too thick; what do I do?
A: No worries! You can thin it out with a splash of milk or almond milk. Stir until you reach your desired consistency!
Q: Can I use frozen fruit?
A: Absolutely! Just thaw it out first, pat it dry, and use it the same way. Keep in mind it might release more juice into the salad.
Q: What if I’m allergic to one of the fruits?
A: Substitute it with any other fruit you enjoy! The beauty of a fruit salad is its versatility—there’s always room for your favorites.
Nutritional Information
While this creamy fruit salad is a treat for your taste buds, it’s also packed with nutrition! Here’s a general breakdown per serving, though it can vary based on your exact fruit choices:
- Calories: Approximately 180
- Protein: 6g (thanks to Greek yogurt!)
- Carbohydrates: 30g
- Dietary Fiber: 3g
- Sugars: 12g (natural sugars from fruits)
- Fat: 3g
Loaded with vitamins, antioxidants, and healthy fats, this salad is not only a delicious dish but also a nutritious one!
Final Thoughts
So there you have it, friends! Just a bowl of simple pleasures that brings a smile to your face and some sunshine to your day. This creamy fruit salad isn’t just about the flavors; it’s about the memories, the laughter, and the connections we make around the table. As you gather your fruits and whip up this delightful dish, I hope it sparks joy and maybe a few nostalgic moments of your own!
Go ahead, dig in, and remember: life’s too short for boring salads! Keep it colorful, keep it creamy, and above all, keep it delicious. Until next time, happy cooking!
Print
Creamy Fruit Salad
- Total Time: 30 minutes
- Yield: 4 servings 1x
- Diet: Vegetarian
Description
A colorful medley of fruity goodness drizzled in a smooth, creamy dressing, perfect for potlucks and picnics.
Ingredients
- 1 medium apple (Fuji or Gala)
- 1 cup blueberries
- 1 tablespoon lemon juice
- 1 cup grapes
- 1 cup strawberries
- 1 cup pineapple chunks
- 1/2 cup Greek yogurt
- 1/2 cup marshmallows (optional)
Instructions
- Prepare the Fruit: Wash all your fruits thoroughly and pat them dry.
- Chop the Apple: Dice your apple into bite-sized pieces without peeling it.
- Slice the Strawberries: Remove green tops and slice them into halves or quarters.
- Prep the Grapes and Blueberries: Wash the grapes and blueberries and keep them whole.
- Tropical Vibes with Pineapple: Chop fresh pineapple or drain canned pineapple.
- Make the Creamy Dressing: Combine Greek yogurt and lemon juice until creamy.
- Combine the Ingredients: In a large mixing bowl, mix fruits with the creamy dressing.
- Add Marshmallows: Fold in marshmallows if desired.
- Chill and Serve: Cover and chill for about 30 minutes before serving.
Notes
Serve in a large glass bowl or individual glasses, garnished with mint or nuts for added texture.
- Prep Time: 15 minutes
- Cook Time: 0 minutes
- Category: Side Dish
- Method: No-Cook
- Cuisine: American
Nutrition
- Serving Size: 1 serving
- Calories: 180
- Sugar: 12g
- Sodium: 30mg
- Fat: 3g
- Saturated Fat: 1g
- Unsaturated Fat: 2g
- Trans Fat: 0g
- Carbohydrates: 30g
- Fiber: 3g
- Protein: 6g
- Cholesterol: 10mg
Keywords: fruit salad, creamy salad, summer recipe, potluck dish, healthy dessert
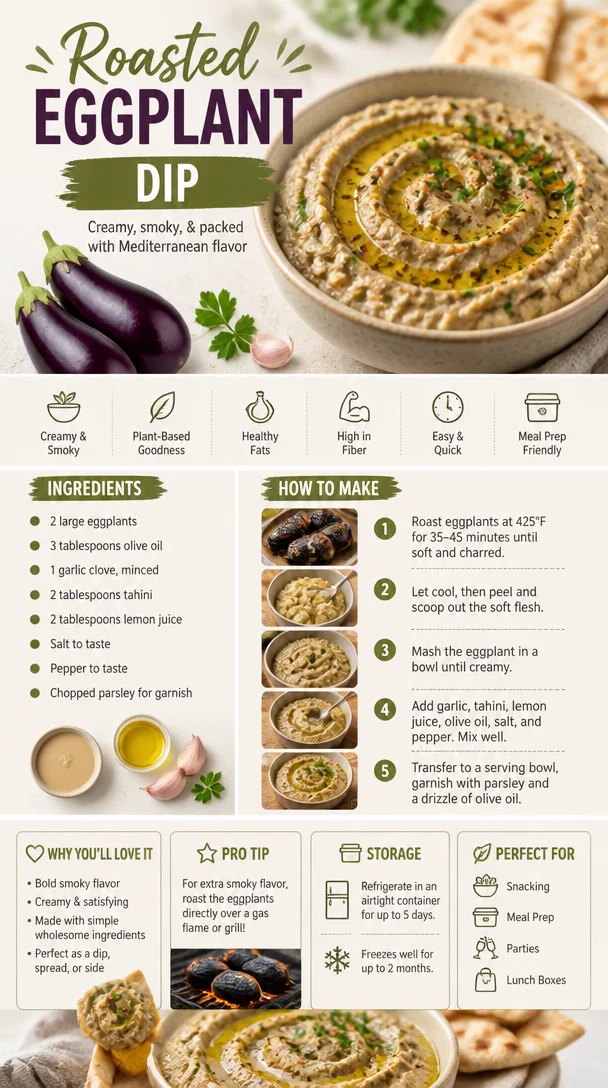
Roasted Eggplant Dip
The Ultimate Guide to Roasted Eggplant Dip: Comfort on a Plate
Hey there, fellow foodies! Today, we’re diving into something that’s as rich as it is delicious: Roasted Eggplant Dip. If you’ve ever tasted that smooth, smoky goodness that seems to shimmer under the sunlight of your favorite summer picnic, you know exactly what I’m talking about. There’s something truly magical about the way eggplants transform when roasted, taking on a tender, caramelized texture that just begs to be whipped into the perfect dip.
This isn’t just any dip; it’s the kind that brings friends together over shared crackers and wine, the kind you spread on fresh pita and savor while laughing around a table. It’s a feel-good food that embodies everything I love about cooking—simple ingredients, straightforward techniques, and an explosion of flavor that feels utterly rewarding.
When I think about eggplants, I can’t help but reminisce about summers spent with my grandma in her garden. She always had the most vibrant vegetable patch, and eggplants were her favorite. We’d pick them fresh, their glossy indigo skin shining in the sun, and later that day, she’d roast them over an open flame, filling our kitchen with an irresistible smoky aroma. She taught me that cooking isn’t just about feeding the body; it’s about nourishing the soul, and this Roasted Eggplant Dip is exactly that. It’s easy to make, perfect for gatherings, or just a cozy night in. So let’s get started!
A Lovingly Nostalgic Story
I remember one summer evening so vividly. It was a classic family gathering—laughter ringing through the air, kids running wild, and the delicious smell of grilled vegetables wafting from the BBQ. My grandma welcomed everyone with her signature eggplant dip, served with warm, fluffy pita bread. The way she rolled up her sleeves and chased after my little cousins with a spoon, insisting they try “just one more bite,” was a scene stitched together by love and warmth.
Gathered around her table, my uncles and aunts debated over whose version of the recipe was most authentic. Meanwhile, I was just mesmerized by that smoky, creamy dip, which seemed to connect everyone in that moment. As the sun set and the stars began to twinkle, I realized that recipes have a life of their own—they evolve with us, bind us together, and remind us of where we come from. That eggplant dip wasn’t just food; it was a memory, a family tradition, and a piece of my heart.
Ingredients: What You’ll Need
Let’s get to the good stuff. Here’s what you’ll need to whip up this Roasted Eggplant Dip, along with some tips and insights for each ingredient:
-
2 large eggplants: The stars of our show! Look for firm, shiny eggplants without soft spots. If you can’t find eggplants, feel free to substitute with zucchini or roasted red peppers for a different flavor profile.
-
3 tablespoons olive oil: A must-have for giving our dip that luscious texture. Extra virgin olive oil is ideal for its rich flavor, but any good quality olive oil works. Trying to keep it light? Swap some of the oil for vegetable broth.
-
1 garlic clove, minced: Garlic adds that zing and warmth. Feel free to throw in more if you love garlic—after all, it’s your kitchen adventure! If you’re sensitive to garlic, try roasted garlic for a sweeter, mellower taste.
-
2 tablespoons tahini: A creamy sesame paste that brings nuttiness and depth to the dip. If you’re out of tahini, you can use peanut butter or sunflower seed butter, but the flavor will alter slightly.
-
2 tablespoons lemon juice: It brightens everything up! Fresh lemon juice elevates the dip, but if you don’t have lemons, white wine vinegar can work as a substitute.
-
Salt and pepper to taste: Essential for rounding out the flavors. Trust your taste buds—season as needed!
-
Chopped parsley for garnish: This fresh herb adds a pop of color and flavor on top!
With this lineup, you’ll create a dip that’s not only delicious but also packed with nutrition. Ready to dive into the prep?
Step-by-Step Instructions: Whipping It Up
-
Preheat Your Oven: Start by preheating your oven to 400°F (200°C). This is key for getting that beautiful roasted flavor and texture!
-
Prepare the Eggplant: Wash the eggplants and slice them in half lengthwise. Score the flesh in a crisscross pattern; this allows the olive oil and flavors to seep in as they roast. You don’t need to go too deep—just about 1/4 inch is perfect.
-
Drizzle with Olive Oil: Place the eggplant halves on a baking sheet, cut side up. Drizzle them generously with olive oil and sprinkle with salt and pepper. Massage the oil and seasoning into the flesh for maximum flavor. Chef’s tip: If you find your basting technique a bit messy, consider using a pastry brush!
-
Roast Away: Pop the eggplants in the oven once it’s hot. Roast for about 30-40 minutes or until the flesh is soft and golden brown. Keep an eye on them; every oven is a bit different!
-
Sauté the Garlic: While the eggplants are roasting, heat a small pan over medium heat. Add a splash of olive oil and toss in the minced garlic. Sauté for about 1-2 minutes until fragrant but not burnt. This will give your dip an extra layer of flavor.
-
Let Them Cool: Once the eggplants are done roasting, remove them from the oven and let them cool for a few minutes. This will make handling them easier.
-
Scoop and Blend: Once cool, scoop out the flesh from the eggplants, placing it into a food processor along with the sautéed garlic, tahini, lemon juice, and a pinch of salt. Blend until smooth and creamy. Taste and adjust seasoning as necessary!
-
Serve It Up: Transfer the dip to a serving bowl, drizzle with a bit more olive oil, and garnish with chopped parsley. You can even add a sprinkle of paprika for an extra touch!
And voilà! You’ve just created a dip that’s sure to impress your friends and family while being a total delight to your taste buds. And the best part? It’s super simple and doesn’t require fancy tools or techniques. You got this!
Serving Suggestions: Dress It Up!
When it comes to serving this Roasted Eggplant Dip, the possibilities are endless. I love serving it with warm pita bread—there’s just something delightful about that warm, fluffy pocket of yum. You can also pair it with crispy vegetables like cucumber slices, bell peppers, or carrot sticks for a fresh, crunchy contrast.
For a more substantial spread, try serving it with a charcuterie board. Add some olives, feta cheese, and roasted nuts for an impressive display that’ll wow any crowd. If you’re feeling adventurous, you can even use this dip as a spread for sandwiches or wraps—trust me, it’s a game-changer. Just grab your fork (or spoon!) and dig in!
Recipe Variations: Get Creative!
Now, let’s spice things up a little! Here are a few creative twists and variations you can try with this Roasted Eggplant Dip:
-
Spicy Roasted Eggplant Dip: Add a kick by mixing in some red pepper flakes or even a diced jalapeño before blending. You can also drizzle some chili oil on top for that fiery flavor.
-
Mediterranean Twist: Mix in some pitted olives, sun-dried tomatoes, or even chopped artichokes before blending. It’ll take your dip on a delicious Mediterranean vacation!
-
Herbed Eggplant Dip: Instead of just parsley, try mixing in fresh herbs like dill, basil, or cilantro for a burst of freshness.
-
Creamy Avocado Addition: Blend in a ripe avocado for a creamier texture and added richness. This is perfect if you want a more decadent dip!
-
Roasted Garlic Eggplant Dip: Instead of just using one garlic clove, roast a whole head of garlic alongside the eggplants. Squeeze those deliciously sweet garlic cloves into the dip for an amazing depth of flavor.
Experimenting in the kitchen is one of the best parts of cooking! You never know what flavorful creation you might stumble upon.
Chef’s Notes: A Journey Through Flavors
I’ve been making this Roasted Eggplant Dip for years, and it’s been a staple at gatherings and special occasions. Over time, I’ve learned to embrace different flavors that work just as well. For example, the first time I added roasted red pepper, my friends couldn’t get enough! The way this recipe has evolved has really made it feel like it belongs in my culinary repertoire.
Another fun story—one Thanksgiving, I brought this dip instead of the usual holiday fare, and it became an instant hit amongst my family. If there’s anything that can bring a diverse group of people together more than a fiery turkey, it’s a bowl of creamy, smoky roasted eggplant dip!
FAQs and Troubleshooting: Your Questions Answered
-
My eggplants turned out bitter. What did I do wrong?
This can happen sometimes, especially with larger or overripe eggplants. Try sprinkling salt on the cut sides and letting them sit for about 30 minutes before rinsing; this draws out some of the bitterness. -
What if my dip is too thick?
Just add a splash of water or more olive oil while blending until you reach your desired consistency. It should be creamy but not too runny! -
Can I make this dip in advance?
Absolutely! In fact, the flavors deepen and improve overnight. Store it in an airtight container in the fridge until ready to serve—just give it a good stir beforehand. -
How can I ensure my dip is smooth?
Make sure to blend it long enough in your food processor. If it looks chunky, give it an extra minute or two of blending time.
Nutritional Info: A Healthy Treat
This Roasted Eggplant Dip is not only delicious but also packed with nutrition! Here’s a quick breakdown (per serving, about 2 tablespoons):
- Calories: Approx. 80
- Protein: 1.5g
- Fat: 7g (mostly healthy fats from olive oil and tahini)
- Carbohydrates: 4g
- Fiber: 2g
Eggplants are low in calories and high in fiber, which helps keep you full and satisfied. Plus, they’re rich in antioxidants, making this dip not just tasty but nutritious too. Enjoy guilt-free!
Final Thoughts: Digging In
There you have it—a complete guide to making and serving your very own Roasted Eggplant Dip! I hope this post has inspired you to create something delicious that not only fills your belly but also warms your heart. Whether you’re hosting a party or simply treating yourself to a cozy evening, this dip will surely bring smiles and warmth around your table.
So grab some eggplants, preheat that oven, and let the roasting magic begin! I can’t wait for you to experience the comforting flavors of this cherished dish. As always, if you have any twists or stories about your eggplant adventures, drop them in the comments below—I love hearing your kitchen tales.
Happy cooking, friends! Let’s keep the flavor alive and the good times rolling!
PrintRoasted Eggplant Dip
- Total Time: 45 minutes
- Yield: 4 servings 1x
- Diet: Vegan
Description
A smoky and creamy dip made with roasted eggplants, perfect for gatherings or cozy nights in.
Ingredients
- 2 large eggplants
- 3 tablespoons olive oil
- 1 garlic clove, minced
- 2 tablespoons tahini
- 2 tablespoons lemon juice
- Salt and pepper to taste
- Chopped parsley for garnish
Instructions
- Preheat your oven to 400°F (200°C).
- Wash the eggplants and slice them in half lengthwise, scoring the flesh.
- Drizzle the eggplant halves with olive oil and season with salt and pepper.
- Roast the eggplants for 30-40 minutes until soft and golden brown.
- Sauté the minced garlic in olive oil for 1-2 minutes until fragrant.
- Let the eggplants cool for a few minutes.
- Scoop out the flesh and combine with garlic, tahini, lemon juice, and salt in a food processor; blend until smooth.
- Transfer to a serving bowl, drizzle with olive oil, and garnish with parsley.
Notes
For a spicy kick, add red pepper flakes or roasted red pepper. This dip can be made in advance and tastes even better the next day.
- Prep Time: 15 minutes
- Cook Time: 30 minutes
- Category: Appetizer
- Method: Roasting
- Cuisine: Mediterranean
Nutrition
- Serving Size: 2 tablespoons
- Calories: 80
- Sugar: 2g
- Sodium: 50mg
- Fat: 7g
- Saturated Fat: 1g
- Unsaturated Fat: 6g
- Trans Fat: 0g
- Carbohydrates: 4g
- Fiber: 2g
- Protein: 1.5g
- Cholesterol: 0mg
Keywords: eggplant dip, roasted eggplant, Mediterranean dip, vegan appetizer, healthy snack
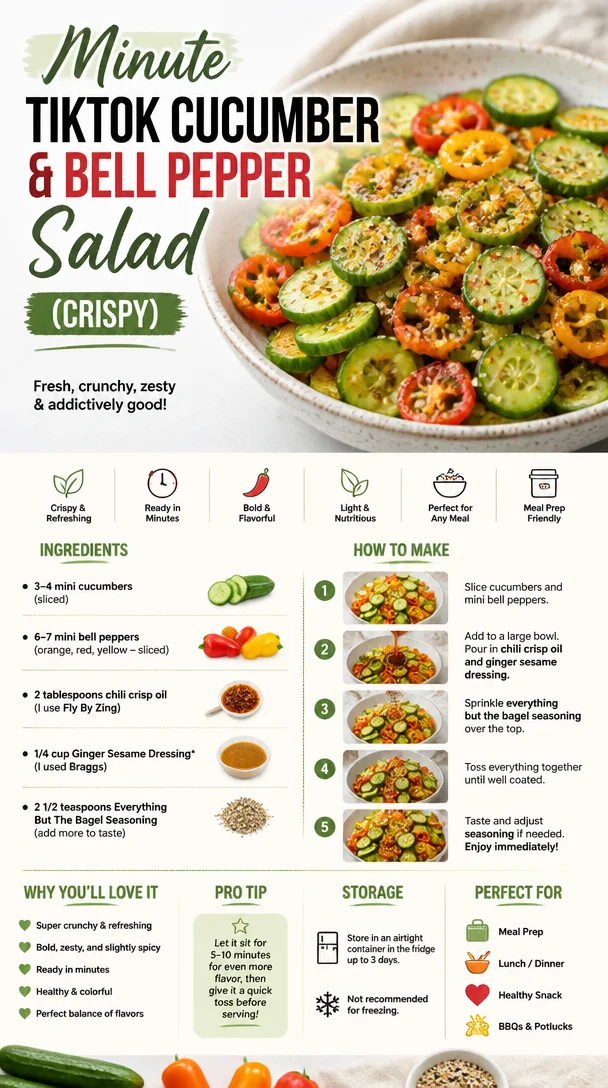
Minute TikTok Cucumber & Bell Pepper Salad (Crispy)
The Refreshing Delight of TikTok Cucumber & Bell Pepper Salad
Hey there, food lovers! Welcome back to Feastical, where we’re diving into a fresh, refreshing dish that’s taken TikTok by storm—Cucumber & Bell Pepper Salad with a touch of that oh-so-satisfying chili crisp oil. This salad speaks to the essence of what we love at Feastical: simple, bold flavors that make your taste buds dance and your kitchen feel oh-so-inviting!
If you’re tired of the same old greens or need a pop of color and crunch on your plate, this salad is just what you need. Picture this: crispy cucumbers paired with vibrant bell peppers, all drenched in a zingy Ginger Sesame Dressing, and topped off with a drizzle of chili crisp oil. It’s like a party for your mouth, and trust me, you’re going to want to show up hungry!
A Bite of Nostalgia
Let me take you back to a warm summer evening at my grandmother’s house. Her backyard was a melting pot of colors—flowers in full bloom and vegetables ripening in her lovingly tended garden. I remember her whipping up a simple, yet delightful salad much like this one. She’d pull cucumbers straight from the vine and gather bell peppers while we sat on the porch, chatting and laughing under the setting sun.
Those memories are what inspire this salad. It’s not just a dish; it’s a reminder of the joy that comes from simple, fresh ingredients and the love that binds us together. As a child, I’d tear into those crunchy bites of cucumbers and peppers, savoring every mouthful as if it were the most decadent treat. Now, as an adult, it gives me pure joy to recreate that magic, and share it with all of you!
Ingredients
Let’s gather our ingredients for this colorful salad:
-
3-4 mini cucumbers (sliced)
Crisp, refreshing, and hydrating! Mini cucumbers pack all the crunch without being too watery. Don’t have minis? Regular cucumbers work just fine; just peel them for easier slicing. -
6-7 mini bell peppers (orange, red, yellow; sliced)
A rainbow of flavors! These mini bell peppers are sweet and vibrant, making the dish pop visually and tastewise. Feel free to use any color combination you prefer, or switch to regular bell peppers if that’s what you have on hand. -
2 tablespoons chili crisp oil (I use Fly By Zing)
This is where the magic begins! The chili crisp oil adds a lovely depth of flavor and a bit of heat. If you’re looking for a milder option, olive oil combined with a sprinkle of red pepper flakes is a great substitute. -
1/4 cup Ginger Sesame Dressing
I swear by Bragg’s for a quick and flavorful touch. This dressing enhances the crisp veggies beautifully. If you’re feeling adventurous, you can whip up a homemade version using sesame oil, ginger, and rice vinegar. -
2 1/2 teaspoons Everything But The Bagel Seasoning
This seasoning mix adds that extra umami and toasty crunch we all love. Feel free to go heavier if you’re a fan of that robust flavor!
Step-by-Step Instructions
Now that we have our ingredients ready, let’s get cooking! Here’s how to bring this fabulous salad to life:
-
Slice the Cucumbers
Start by washing your mini cucumbers thoroughly. Slice them thinly to maximize crunch! If you prefer them a bit thicker, go ahead; just note that this could affect the refreshing bite. Arrange them in a medium-sized bowl and set aside. -
Prep the Bell Peppers
Next, take your mini bell peppers and slice them in half, removing any seeds. Then, cut them into good-sized strips or bite-sized pieces—whatever your heart desires! Add these colorful beauties to the bowl with the cucumbers.Chef’s Tip: The more varied your color palette, the more enticing your salad will be!
-
Drizzle the Dressings
Pour in the Ginger Sesame Dressing and chili crisp oil over the cucumber and pepper mixture. The flavors will mingle beautifully. Give everything a gentle toss with your hands or a spatula, ensuring every piece is coated in the zesty goodness. -
Season to Taste
Here’s where the magic happens! Sprinkle in the Everything But The Bagel Seasoning, starting with 2 1/2 teaspoons. Toss the salad again, and then taste. Adjust the seasoning as needed—don’t be shy! If you like more spice, feel free to throw in an extra splash of chili oil or additional seasoning. -
Chill It Out
For the best flavor, let your salad sit in the fridge for at least 10-15 minutes. This allows the vegetables to soak up those delicious dressings. Plus, it makes the salad refreshing and cool, perfect for those hot summer days!
Serving Suggestions
Plating is where you can really let your creativity shine. Grab your favorite serving bowl or a large platter to display this colorful salad. For an extra touch of presentation, you can garnish with a sprinkle of sesame seeds or some additional Everything But The Bagel Seasoning on top.
Serve it as a delightful side dish to grilled meats, or make it the star of a light lunch spread. Pour yourself a glass of something bubbly or iced tea, and enjoy the company of friends or family while you savor every crunchy bite!
Recipe Variations
Feeling creative? Here are a few variations to explore with this salad:
- Add Protein: Toss in some cooked shrimp, grilled chicken, or chickpeas to make it a heartier meal.
- Herb It Up: Chop fresh herbs like cilantro, mint, or parsley for an added freshness. Each herb will give a different twist, so pick what’s best for your taste buds.
- Fruit Twist: For a sweet surprise, toss in some diced mango or pineapple! The sweetness pairs excellently with the chili crisp oil.
- Noodle Addition: Love a crunchier texture? Add some cooked ramen noodles, chilled, or soba noodles to the mix.
- Dress It Differently: Swap the Ginger Sesame Dressing for a Tahini Dressing for a nutty flavor or a simple vinaigrette for lighter notes.
Chef’s Notes
One of my favorite things about this salad is how adaptable it is. Over the years, I’ve swapped ingredients based on what’s in season or what’s hanging out in my fridge. Experimenting is the heart of cooking!
I remember a summer where I had an abundance of zucchini. I decided to toss in some spiralized zucchini alongside my cucumbers and bell peppers. What was initially a salad turned into a veggie extravaganza that had friends raving. Kitchen adventures like these are what make cooking so much fun!
FAQs and Troubleshooting
Q: Can I make this salad ahead of time?
A: Absolutely! You can prep the veggies and keep them in an airtight container for a day. Just wait to add the dressing until you’re ready to serve to keep everything crunchy.
Q: What if I don’t have mini bell peppers?
A: No worries! Regular bell peppers will work just as well. Just make sure to cut them into bite-sized pieces!
Q: How spicy is this salad?
A: The spice level can be adjusted based on how much chili crisp oil you add. Start with a small amount and taste as you go along.
Q: Can I use another dressing?
A: For sure! Any vinaigrette or creamy dressing you enjoy could be a great base. Just remember to balance it with the chili crisp oil for that added kick!
Nutritional Info
This TikTok Cucumber & Bell Pepper Salad is not only delicious but also packed with nutrients. Each serving is low in calories and high in vitamins—perfect for a healthy snack or side dish!
- Calories: Around 60 per serving
- Protein: 1g
- Carbohydrates: 8g
- Dietary Fiber: 2g
- Fat: 3g
- Vitamin C: A hearty boost thanks to the peppers!
Feel free to adjust components based on your dietary preferences—this salad is great for various diets, including vegan and gluten-free!
Final Thoughts
There you have it, folks—my take on the viral TikTok Cucumber & Bell Pepper Salad! This dish embodies everything we love about cooking: simplicity, joy, and the ability to share delightful moments with others. As you dive into your next kitchen adventure, don’t forget that food is more than just sustenance; it’s a way to connect, celebrate, and create lasting memories.
So grab your spatula, pull up a chair, and let’s make cooking a joyous celebration. Here’s to fresh ingredients, vibrant flavors, and the delightful experience of creating something beautiful in the kitchen. Happy cooking, and until next time!
PrintRefreshing Cucumber & Bell Pepper Salad
- Total Time: 15 minutes
- Yield: 4 servings 1x
- Diet: Vegan
Description
A vibrant salad featuring crispy cucumbers and sweet bell peppers, drizzled with zesty Ginger Sesame Dressing and a touch of chili crisp oil.
Ingredients
- 3–4 mini cucumbers, sliced
- 6–7 mini bell peppers (orange, red, yellow), sliced
- 2 tablespoons chili crisp oil
- 1/4 cup Ginger Sesame Dressing
- 2 1/2 teaspoons Everything But The Bagel Seasoning
Instructions
- Slice the cucumbers. Wash and slice thinly; arrange in a bowl.
- Prep the bell peppers. Cut in half, remove seeds, and slice into strips. Add to the bowl.
- Drizzle the dressings. Pour the Ginger Sesame Dressing and chili crisp oil over veggies and toss gently.
- Season to taste. Add Everything But The Bagel Seasoning, adjust seasoning as desired.
- Chill it out. Let the salad sit in the fridge for 10-15 minutes for best flavor.
Notes
This adaptable salad can be customized with different veggies or proteins based on personal preference.
- Prep Time: 15 minutes
- Cook Time: 0 minutes
- Category: Salad
- Method: Mixing
- Cuisine: American
Nutrition
- Serving Size: 1 serving
- Calories: 60
- Sugar: 3g
- Sodium: 200mg
- Fat: 3g
- Saturated Fat: 0g
- Unsaturated Fat: 2g
- Trans Fat: 0g
- Carbohydrates: 8g
- Fiber: 2g
- Protein: 1g
- Cholesterol: 0mg
Keywords: cucumber salad, bell pepper salad, TikTok recipe, refreshing salad, healthy salad
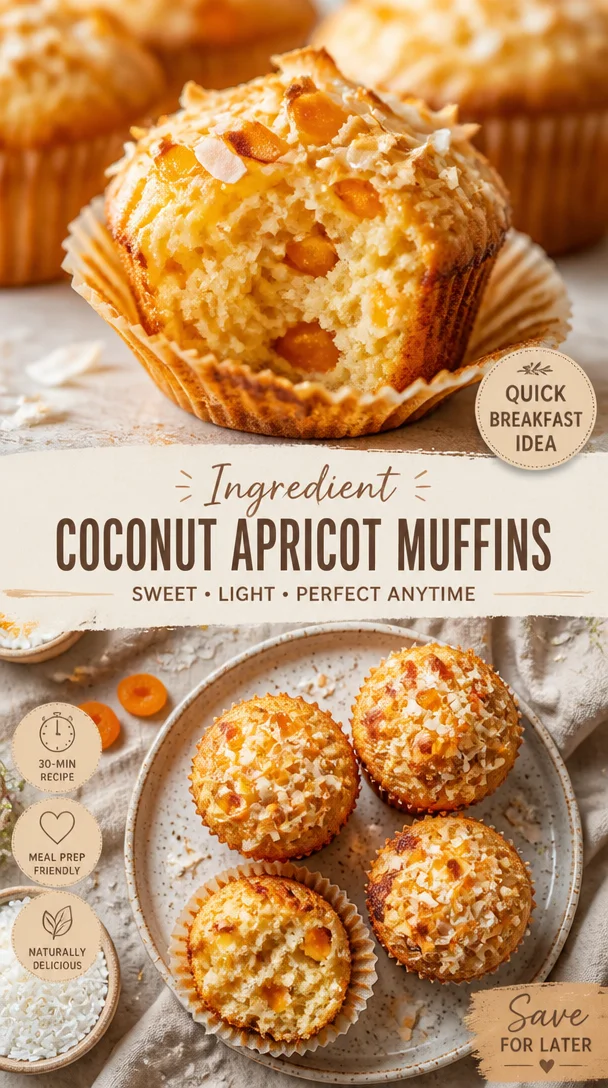
Ingredient Coconut Apricot Muffins: Quick Breakfast
Coconut and Fresh Apricot Muffins: A Taste of Summer
Hey there, fellow foodies! Today, I am thrilled to share with you a recipe that celebrates the sunny flavors of summer—Coconut and Fresh Apricot Muffins. If you’re anything like me, the scent of freshly baked goods wafting through your kitchen is pure magic. It transports you to better days filled with laughter, love, and sweet memories. So, grab your apron, and let’s whip up a batch of these delightful muffins that are bursting with tropical vibes and the luscious taste of apricots!
A Toast to Nostalgia
Let me take you back to a sun-soaked summer afternoon a few years ago, one that stands out among my fond kitchen memories. I was visiting my grandmother, who always seemed to have a secret stash of delicious treats tucked away in her pantry. One day, she handed me a basket filled with freshly picked apricots from her garden. The fragrance was intoxicating, sweet and tangy, and I could hardly wait to dive into a culinary adventure with them.
As we baked together, her sage advice filled the air—“Don’t rush, enjoy the process; cooking is as much about the journey as the destination.” We decided to create muffins instead of the usual cobbler. By combining those vibrant apricots with rich coconut, we nailed a taste that felt both comforting and exciting. It was one of those moments where the love of cooking transformed our kitchen into a magical place filled with laughter and happiness. Every bite of those muffins was a warm hug, reminding me that good food brings people together.
Now, let’s recreate that wonderful experience in your kitchen with these Coconut and Fresh Apricot Muffins!
The Perfect Ingredients for Muffin Perfection
Before we dive into the cooking, let’s gather our ingredients. Here’s what you need:
- 280 g plain flour: This serves as the muffin’s base. You can swap it for whole wheat flour for a nuttier flavor or a gluten-free blend if you’re going for a gluten-free option.
- 2 tsp baking powder: This leavening agent gives our muffins a delightful rise. Remember, baking powder loses its potency over time, so check the expiration date!
- 1/2 tsp bicarbonate of soda: Also known as baking soda, it adds extra fluffiness to our muffins. It works best when paired with acidic ingredients like buttermilk or yogurt.
- 1/2 tsp salt: Just a pinch enhances the flavors without making your muffins salty.
- 75 g sugar: For sweetness! You can substitute with coconut sugar or even a sugar alternative if you’re watching your intake.
- 50 g desiccated coconut (unsweetened): This adds a tropical flair. Feel free to use sweetened if you prefer a sweeter taste!
- 90 ml sunflower oil: A neutral oil that keeps our muffins moist. You can swap it for melted coconut oil for even more coconut flavor.
- 150 ml milk: I used oat milk, but any type of milk will do—dairy, almond, or even coconut milk for an extra flavor boost.
- 1 egg: For binding ingredients together. To make this vegan, use a flax egg (1 tbsp flaxseed meal + 2.5 tbsp water).
- 1 ripe banana: This will add natural sweetness and moisture to the muffins. The riper, the better—look for those lovely brown spots!
- 175 g apricots: Fresh, juicy apricots are the star here! If apricots aren’t in season, you can replace them with peaches or nectarines for a similar taste.
Step-By-Step Instructions to Muffin Nirvana
Are you excited yet? Let’s get our hands floury and dive into the steps!
-
Preheat Your Oven: Start by preheating your oven to 180°C (350°F) and lining a muffin tray with paper liners or greasing it lightly. This ensures our muffins don’t stick and makes cleanup a breeze!
-
Mix Dry Ingredients: In a large mixing bowl, combine the plain flour, baking powder, bicarbonate of soda, salt, sugar, and desiccated coconut. Mix it all up with a whisk and feel free to do a little dance—it makes cooking more fun!
-
Mash That Banana: In another bowl, mash the ripe banana until it’s a smooth puree. This is where the magic begins—the banana will provide natural sweetness, moisture, and make our muffins super fluffy!
-
Add Wet Ingredients: To the mashed banana, add the sunflower oil, milk, and the egg. Whisk until everything is combined and you see a beautiful blend of colors. Yum!
-
Combine Wet and Dry: Slowly pour the wet mixture into the bowl of dry ingredients. Gently fold them together using a spatula or wooden spoon. Be careful not to overmix—some lumps are okay! This will keep our muffins soft and tender.
-
Chop Those Apricots: Take your fresh apricots and chop them into bite-sized pieces. Gently fold them into the muffin batter. I like to keep a few pieces aside to place on top before baking for that extra pop of color!
-
Scoop it In: Using a large spoon or ice cream scoop, portion the batter into the prepared muffin tray, filling each liner about 2/3 full. This allows room for rising without overflowing.
-
Bake to Perfection: Pop your muffin tray into the preheated oven and bake for about 20-25 minutes or until they’re golden brown and a toothpick inserted in the center comes out clean. The aroma will have you salivating—trust me!
-
Cooling Down: Once they’re baked, take them out and let them cool in the tray for about 5 minutes before transferring them to a wire rack to cool completely. This step may feel excruciating, but trust me, it’s worth the wait!
Creating an Inviting Plating
Now that your Coconut and Fresh Apricot Muffins are ready, let’s talk about how to serve them. For a cozy presentation, arrange a few muffins on a rustic wooden board, possibly dusting them lightly with powdered sugar to elevate their appearance. You can accompany them with a small jar of homemade jam or a dollop of whipped cream cheese. If you’re feeling fancy, sprinkle some extra desiccated coconut on top for that tropical flair!
These muffins are perfect for breakfast, a brunch gathering, or simply a treat any time of day—trust me, they’ll disappear fast!
Recipe Variations to Keep It Fresh
Every recipe can be tweaked to fit your cravings or dietary preferences, and these muffins are no exception! Here are some variations and tips to keep things creative:
- Tropical Twist: Add some crushed pineapple along with the apricots for a true tropical muffin adventure!
- Nutty Delight: Toss in some chopped nuts like almonds or walnuts for a lovely crunch and added protein.
- Berry Goodness: Swap out apricots for blueberries or raspberries in the summer for a juicy and refreshing flavor.
- Vegan Option: As mentioned earlier, substitute the egg with a flax egg and use coconut milk for richness.
- Zesty Addition: Add a teaspoon of vanilla extract or a bit of grated lemon or orange zest for a citrus kick.
Chef’s Notes from the Kitchen
Here’s a little secret: the first batch of these muffins was actually inspired by a recipe I found in an old cookbook my grandmother passed down to me. Over time, though, I tweaked it to incorporate the tropical flavors we all love today. I remember the look on her face when she took that first bite—pure bliss! Sometimes our favorite recipes find their soul over generations, and it’s so rewarding to share them with friends and family.
FAQs and Troubleshooting
1. What if my muffins are too dense?
Difficulty in fluffiness might stem from overmixing the batter or not enough leavening agents. Keep mixing to a minimum, and double-check your baking powder and bicarbonate for freshness!
2. Can I make these muffins ahead of time?
Absolutely! Store them in an airtight container at room temperature for up to 2 days. You can also freeze them and defrost as needed; they’re just as delightful when reheated!
3. Why didn’t my muffins rise?
Check that your oven is at the right temperature. Also, make sure your baking powder is fresh and active. This is key for achieving fluffy muffins!
4. Can I add chocolate to the batter?
Why not! Feel free to fold in some chocolate chips for a delectable chocolate twist. It’s a great way to indulge even more!
Nutritional Info
Let’s talk about those delicious muffins—each one is packed with flavor as well as nourishment. Here’s a rough breakdown of the nutrition per muffin (based on 12 servings):
- Calories: Approximately 180 kcal
- Protein: 3 g
- Fat: 6 g
- Carbohydrates: 28 g
- Fiber: 2 g
- Sugar: 8 g
These muffins are a delightful treat that brings coconut and apricot goodness to your snack time while still being a reasonable option for a sweet break!
Final Thoughts
And there you have it, my dear food enthusiasts! Coconut and Fresh Apricot Muffins—soft, scrumptious, and so easy to whip up. They’re not just muffins; they’re a ticket to joyful memories, cozy moments, and a taste of summer that you can enjoy in any season.
As you bake these delightful treats, remember they aren’t just food; they’re experiences waiting to happen. So gather your friends and family around, share these muffins, and savor the delicious moments together. Because food is much more than just sustenance; it’s a bridge to connections, love, and joy.
Happy baking, everyone, and until next time, may your kitchens always be filled with warmth, laughter, and, of course, the delightful aroma of something delicious! Let’s dig in!
Print
Coconut and Fresh Apricot Muffins
- Total Time: 40 minutes
- Yield: 12 servings 1x
- Diet: Vegetarian
Description
Delight in the sunny flavors of summer with these Coconut and Fresh Apricot Muffins, perfect for breakfast or a sweet treat any time of day.
Ingredients
- 280 g plain flour
- 2 tsp baking powder
- 1/2 tsp bicarbonate of soda
- 1/2 tsp salt
- 75 g sugar
- 50 g desiccated coconut (unsweetened)
- 90 ml sunflower oil
- 150 ml milk
- 1 egg
- 1 ripe banana
- 175 g apricots
Instructions
- Preheat your oven to 180°C (350°F) and prepare a muffin tray.
- Mix the dry ingredients together: flour, baking powder, bicarbonate of soda, salt, sugar, and desiccated coconut.
- Mash the ripe banana until smooth in another bowl.
- Add the sunflower oil, milk, and egg to the banana and whisk until combined.
- Combine the wet and dry ingredients without overmixing.
- Chop fresh apricots and gently fold them into the muffin batter.
- Scoop the batter into the muffin tray, filling each liner about 2/3 full.
- Bake for 20-25 minutes or until golden brown.
- Cool in the tray for 5 minutes, then transfer to a wire rack.
Notes
For a vegan version, substitute the egg with a flax egg and use coconut milk for richness.
- Prep Time: 15 minutes
- Cook Time: 25 minutes
- Category: Breakfast
- Method: Baking
- Cuisine: American
Nutrition
- Serving Size: 1 muffin
- Calories: 180
- Sugar: 8g
- Sodium: 220mg
- Fat: 6g
- Saturated Fat: 3g
- Unsaturated Fat: 2g
- Trans Fat: 0g
- Carbohydrates: 28g
- Fiber: 2g
- Protein: 3g
- Cholesterol: 30mg
Keywords: coconut muffins, apricot muffins, summer recipes, baking, vegetarian treats

Minute Italian Bruschetta: Crispy, Fresh Flavor Boost
The Joy of Making Italian Bruschetta: A Taste of Love & Home
Hey there, food lover! Pull up a chair, grab a snack, and let’s chat about one of my all-time favorite appetizers: Italian Bruschetta. This dish is like a warm hug with a heirloom tomato on top, and trust me, once you get the hang of it, you’ll find yourself making it for every get-together or even just a cozy night in.
Bruschetta is not just about the vibrant colors of fresh tomatoes or the crunch of a perfectly toasted baguette; it’s about sharing. It’s about gathering with friends and family, laughing over a glass of wine, and forgetting the worries of the day, if only for a moment. The garden-fresh flavors of ripe tomatoes, fragrant basil, and sharp garlic mingle in a way that instantly transports you to a sun-drenched Italian hillside, even if you’re stuck at home.
Now, I’d be lying if I said I made this dish right the first time. I vividly remember my very first attempt—I had an abundance of tomatoes from my backyard garden, all begging to be used. I thought, "How hard can it be to make Bruschetta?" Fast forward to an overzealous amount of spices and soggy bread concern that left me a bit defeated. But, being the resilient foodie that I am, I bravely dusted myself off, adjusted my rhythm, and eventually found the magic balance. And oh boy, was it worth it!
What I love most about Bruschetta is that it feels sophisticated but is super easy to master. It’s a fantastic starting point for new cooks, and I promise, no culinary degree is needed! So, if you’re ready, let’s dive into the creation of this delightful dish together.
A Taste of Nostalgia
Picture it: I was a kid, maybe eight or nine years old, sitting at my grandmother’s wooden kitchen table. The sun streamed through the window, casting a warm glow over the room. My grandma was bustling around, preparing our family’s Sunday dinner. The fragrant aroma of roasted veggies and simmering sauce wafted through the air—it was pure magic.
On that particular day, she taught me how to make her famous Bruschetta. She demonstrated how to chop the tomatoes just right and how a pinch of salt really enhances those garden-fresh flavors. “Make sure you smell the basil, Beau,” she would say, her eyes twinkling with delight. And indeed, that first whiff of basil, so aromatic and uplifting, always felt like a promise of deliciousness. We laughed and shared stories, and as always, I melted into those moments—every bite of Bruschetta reminding me of love, family, and the joy of simple pleasures.
Her handmade loaf of bread, toasted just right, became the canvas for our fresh ingredients, sprinkled with a touch of olive oil and balsamic glaze. Even to this day, I can close my eyes and picture her soft hands nurturing those tomatoes—such simple, humble work and yet so profound. That’s the beauty of Bruschetta; it’s more than just an appetizer; it’s a vessel for cherished memories.
Ingredients That Sing
Let’s talk ingredients! Each element plays a special role in creating that deliciously fresh Bruschetta. Here’s what you’ll need:
-
4 cups tomatoes (diced or quartered)
The star of the show! Use ripe, flavorful tomatoes. I love heirlooms for their variety and richness, but feel free to use Roma or vine-ripened tomatoes too. If you can’t find fresh tomatoes, canned whole tomatoes in high-quality juice work as a decent substitute. Just make sure to drain them well! -
1/2 cup red onion (diced)
Gives a nice crunch and a touch of sharpness. If red onion is too strong for your taste, you can opt for sweet onion or shallots. For a milder flavor, soak diced red onion in cold water for about 10 minutes before use to tone down the bite. -
2 cloves garlic (minced)
A key flavor contributor! Fresh is always best, but if you’re in a pinch, pre-minced garlic, garlic powder, or even garlic-infused olive oil can add that beloved garlic essence. -
1/4 cup olive oil (divided)
Use good quality extra virgin olive oil for the best flavor. A little drizzled on the tomato mixture adds richness, while you’ll use some to brush on the bread for that delightful crunch. If you’re looking for alternatives, avocado oil does a nice job too! -
8 leaves fresh basil (chopped or thinly sliced)
Fresh basil invigorates the dish with its aromatic presence. If you don’t have basil, you could experiment with other herbs like parsley or even mint in a pinch. -
1/2 teaspoon coarse salt
Salt elevates the flavors, bringing everything together, so don’t skip it! Adjust according to your taste preferences, but I suggest starting with half a teaspoon and working your way from there. -
Black pepper (to taste)
A little freshly cracked pepper adds a pop of flavor. If you prefer heat, consider a sprinkle of red pepper flakes instead. -
1 large baguette (sliced)
The perfect vehicle for your delicious topping. Use a fresh, crusty French baguette or a ciabatta loaf for varied texture. If gluten-free is your jam, you can use gluten-free bread too! Just make sure it’s sturdy enough to hold up. -
1 tablespoon balsamic reduction (optional, for garnish)
A drizzle of balsamic reduction adds complexity and a touch of sweetness. If you lack a reduction, you can simmer balsamic vinegar until it thickens, or just serve it on the side for guests to add as they please!
Step-by-Step Instructions
Alright, let’s get down to business! Follow these steps, and you’ll craft a Bruschetta that’ll have everyone asking for your secret.
-
Prep Your Tomatoes
Start with those lovely tomatoes! Give them a good rinse and chop them into bite-sized pieces. If you’re using larger tomatoes, feel free to quarter them. The goal is to have about 4 cups total.Chef’s Tip: Make sure to remove any seeds or excess moisture for a less soggy topping.
-
Mix & Marinate
Place the chopped tomatoes into a mixing bowl. Add the diced red onion, minced garlic, half of the olive oil, chopped basil, and coarse salt. Gently toss to combine. Letting it sit for about 15-20 minutes allows those flavors to meld beautifully.Commentary: This is the moment to savor that fresh aroma! You can sneak a taste here too; just be careful to leave some for the final assembly.
-
Prepare the Baguette
While your tomato mixture is soaking up all that delicious goodness, let’s toast the bread. Preheat your oven to 400°F (200°C). Slice your baguette diagonally into 1-inch thick pieces. Arrange them on a baking sheet and brush each side with the remaining olive oil. Sprinkle a little salt on top.Little Hack: For extra flavor, rub each slice with a halved garlic clove before toasting!
-
Toast the Bread
Bake the baguette slices in the preheated oven for about 5-7 minutes, or until they are golden brown and crisp. Keep an eye on them to prevent burning!Chef’s Peek: You can also grill or toast the bread on a grill pan for beautiful grill marks and added smoky flavor.
-
Bring It All Together
Once your bread is nice and toasty, take them out of the oven and let them cool for a minute. To assemble, spoon a generous amount of the tomato mixture onto each slice of toast. Drizzle with the optional balsamic reduction for that gourmet touch.Final Touch: Add a sprinkle of fresh black pepper or additional basil on top for presentation.
-
Serve & Enjoy!
Arrange your Bruschetta on a serving platter, and voila! You’ve created a dish that looks as good as it tastes.
Serving Suggestions
Now, let’s talk presentation! Food should not only taste amazing but look stunning too. Arrange your bruschetta on a large platter with plenty of space, allowing guests to swoon over your creation. For an extra touch, garnish with a few whole basil leaves or drizzle a balsamic reduction artistically across the plate.
You might consider accompanying the Bruschetta with a light salad, olive tapenade, or even some quality cheeses like fresh mozzarella. Pair it with a chilled white wine, and you’ve got a simple yet elegant appetizer that’s totally Instagram-worthy!
Recipe Variations
Bruschetta is a canvas—so let your creative juices flow with these delightful variations!
-
Mediterranean Twist: Swap out the tomatoes for roasted red peppers and add crumbled feta cheese, olives, and a sprinkle of oregano for a Mediterranean flair.
-
Avocado Bruschetta: Trade tomatoes for ripe avocados for a creamy twist. Add lime juice and jalapeño for a refreshing and zesty flavor.
-
Caprese Style: Top with a slice of fresh mozzarella and a drizzle of pesto, transforming your Bruschetta into a Caprese masterpiece with a twist!
-
Fruit-Infused Delight: For summer gatherings, use diced peaches or strawberries in place of tomatoes, adding a sprinkle of mint for a fruity surprise.
-
Spicy Salsa Variation: Add diced jalapeños or a pinch of cayenne to the tomato mixture for a little kick. Hot sauce drizzled on top can also take things up a notch!
Chef’s Notes
Over the years, my Bruschetta has transformed and evolved alongside my ever-changing palate and the seasons. I recall a winter where I experimented with roasted tomatoes for a cozier flavor—absolutely divine!
And oh, the mishaps! I must share a funny kitchen quirk—once, I mistakenly grabbed powdered garlic instead of fresh. The result? Let’s say it wasn’t my finest hour as I nearly blinded my family with the intensity of the seasoning!
But those “oops” moments are what cooking is all about. Every error is simply an opportunity to learn. Embrace the culinary journey, dear foodies!
FAQs and Troubleshooting
1. Why is my Bruschetta soggy?
If your Bruschetta ends up soggy, it may be because of excess moisture from the tomatoes. Make sure to remove seeds and moisture before mixing, and avoid leaving it on the bread for too long. Serve it immediately!
2. What can I use instead of fresh basil?
If you can’t find fresh basil, you can substitute it with dried basil—just remember that dried herbs are stronger, so use only half the amount. Herbs like parsley, dill, or mint also provide a unique touch!
3. How long can I store leftover Bruschetta?
The assembled Bruschetta is best enjoyed fresh, but if you have leftovers, store the tomato mixture in the fridge and toast fresh bread only when ready to eat. It’ll keep for about a day.
4. Can I make Bruschetta ahead of time?
You can prepare the tomato topping in advance, but I recommend holding off on assembling it until just before serving. Toast the bread, add the toppings, and you’ll have a fresh and crisp appetizer ready in no time!
Nutritional Info
While Bruschetta is primarily a starter, it’s surprisingly nutritious! Tomatoes are loaded with vitamins C and K, while basil provides essential oils and antioxidants. The olive oil offers healthy fats, promoting heart health. If you enjoy them in moderation, you can indulge guilt-free!
Here’s a quick breakdown per serving (based on 8 servings):
- Calories: 180
- Protein: 2g
- Carbohydrates: 22g
- Fat: 9g
- Fiber: 2g
- Sugar: 2g
Nutritional Wisdom:
Of course, the nutritional values can vary widely depending on portion sizes and the specific ingredients you choose. Feel free to adjust the portions to suit dietary needs!
Final Thoughts
And there you have it—a quick journey through the wonderful world of Italian Bruschetta! It’s a dish that holds a special spot in my heart, born out of love, memories, and good times around the dinner table. I truly hope you enjoy creating this delightful treat as much as I do.
So, gather your ingredients, channel your inner chef, and let’s toast to good food, great company, and the simple pleasures in life. Until next time, happy cooking, friends! Here’s to delicious adventures in your kitchen—may your Bruschetta always be fresh and your hearts full!
Print
Italian Bruschetta
- Total Time: 25 minutes
- Yield: 8 servings 1x
- Diet: Vegetarian
Description
A delightful Italian appetizer featuring fresh tomatoes, basil, and toasted bread, perfect for gatherings or cozy nights in.
Ingredients
- 4 cups tomatoes (diced or quartered)
- 1/2 cup red onion (diced)
- 2 cloves garlic (minced)
- 1/4 cup olive oil (divided)
- 8 leaves fresh basil (chopped or thinly sliced)
- 1/2 teaspoon coarse salt
- Black pepper (to taste)
- 1 large baguette (sliced)
- 1 tablespoon balsamic reduction (optional, for garnish)
Instructions
- Prep your tomatoes by rinsing and chopping them into bite-sized pieces.
- Mix & marinate the chopped tomatoes with onion, garlic, half of the olive oil, basil, and salt.
- Prepare the baguette by slicing it and brushing each side with remaining olive oil.
- Toast the bread in the preheated oven at 400°F (200°C) for about 5-7 minutes until golden brown.
- Bring it all together by spooning the tomato mixture onto the toasted bread.
- Serve & enjoy your Bruschetta on a platter!
Notes
Remove seeds and moisture from tomatoes to prevent sogginess. Serve immediately for best results.
- Prep Time: 15 minutes
- Cook Time: 10 minutes
- Category: Appetizer
- Method: Baking
- Cuisine: Italian
Nutrition
- Serving Size: 1 serving
- Calories: 180
- Sugar: 2g
- Sodium: 300mg
- Fat: 9g
- Saturated Fat: 1g
- Unsaturated Fat: 7g
- Trans Fat: 0g
- Carbohydrates: 22g
- Fiber: 2g
- Protein: 2g
- Cholesterol: 0mg
Keywords: Bruschetta, appetizer, Italian, tomatoes, basil, easy recipes
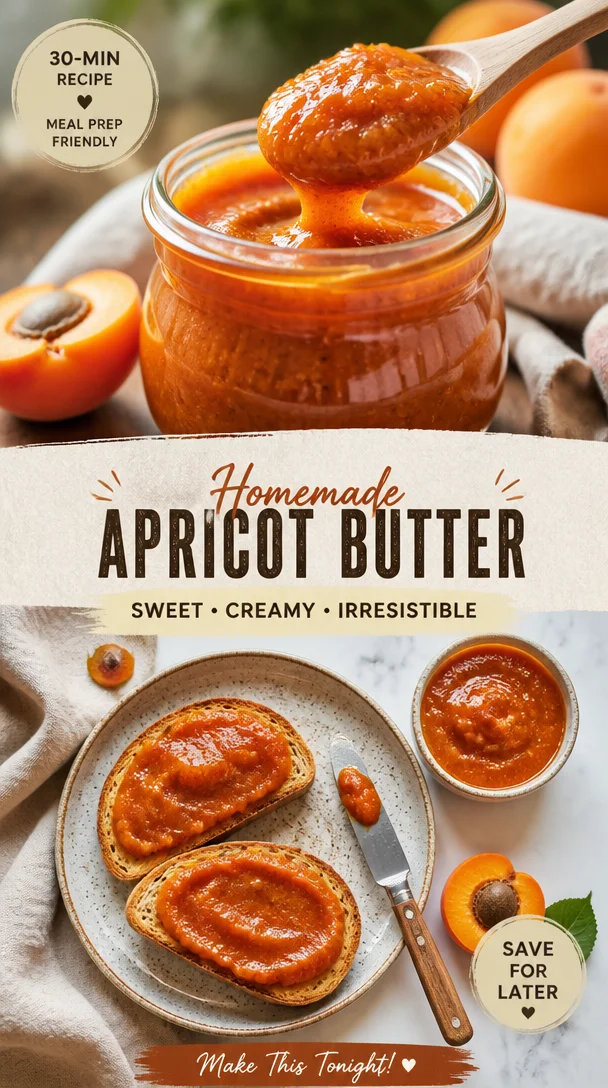
Apricot Butter
The Sweet Symphony of Apricot Butter: A Culinary Adventure
Hey there, food lovers! Whether you’re an experienced cook or still chasing down your spatula, you’ll find something delightful here at Feastical. Today, I’m thrilled to share with you a recipe that’s close to my heart—Apricot Butter. This isn’t just any spread; it’s a luscious, vibrant treat that captures the essence of summer in each velvety bite. Imagine spreading this on warm, buttery toast or dolloping it atop fresh scones as you sip your morning coffee—oh, the bliss!
A Toast to Nostalgia
Let me take you back to a warm July afternoon many years ago. Picture this: I’m standing in my grandmother’s sun-drenched kitchen, the sweet scent of ripe apricots wafting through the air. As a kid, those afternoons were magical. Grandma had this special knack for turning simple ingredients into something extraordinary. I remember her showing me how to pick the juiciest apricots from her tree, their bright orange skins glistening in the sunlight. We’d carefully pit and chop them, our hands sticky with sweet juice, laughter echoing off the walls.
She’d often pull out her trusty old pot and a wooden spoon, and together we’d transform those sun-kissed fruits into apricot butter. The bubbling concoction filled the kitchen with warmth and comfort, reminding me of the love that went into every spoonful. Fast forward to now, that cherished recipe has found a permanent place in my heart and kitchen. I invite you to join me on this flavorful journey, where we’ll recreate that same sense of joy and satisfaction.
Ingredients You’ll Need
Let’s gather our ingredients! Here’s what you’ll need to whip up this dreamy apricot butter:
-
4 cups apricots, pitted and chopped
The star of our show! Ripe apricots are crucial, as they give the butter its vibrant color and sweet-tart flavor. If you can’t find fresh apricots, feel free to use frozen ones—just make sure they’re thawed and pitted! -
1 cup sugar
This is what sweetens the deal. You can adjust the sugar based on how sweet your fruit is. For a healthier alternative, consider using honey or maple syrup—just keep in mind that it may slightly alter the final flavor. -
1/4 cup lemon juice
The zesty kick that brightens up the apricots! Freshly squeezed lemon juice really enhances the flavor of your butter, but you can use bottled juice if that’s what’s handy. -
1 teaspoon cinnamon
This aromatic spice adds warmth and depth to your apricot butter. If you’re not a huge cinnamon fan, feel free to swap it for allspice or nutmeg for a different flavor profile. -
1/2 teaspoon nutmeg
A little goes a long way! Nutmeg adds a warm, nutty flavor that complements the sweetness of apricots beautifully. If you want something a bit different, try using cardamom instead.
Step-by-Step Instructions
Now, let’s dive into the fun part—making the apricot butter! Follow these steps, and you’ll be spreading joy in no time.
-
Prepare the Apricots
Start by washing and pitting your apricots. Then, chop them into small pieces. This helps them cook down evenly. If you like a chunkier texture in your butter, feel free to leave some bigger pieces in the mix! -
Combine in a Pot
In a large saucepan, combine your chopped apricots, sugar, and lemon juice. Stir everything together, making sure the sugar is evenly distributed. Let this mixture sit for about 15-20 minutes. This step helps the apricots release their natural juices and makes for a more flavorful butter! -
Cook It Down
Place the saucepan over medium heat. Stir the mixture frequently and bring it to a gentle simmer. As it cooks, you’ll notice the apricots breaking down and forming a jam-like consistency. Keep stirring to prevent sticking—this is where the magic happens! Allow it to simmer for about 30-40 minutes, or until the butter reaches your desired thickness. -
Add the Spices
Once the mixture has thickened, add in your cinnamon and nutmeg. Give it a good stir to combine. At this stage, taste and adjust the sweetness if necessary. If you like a smoother texture, you can use an immersion blender to blend it to your desired consistency. -
Cool and Store
Remove the pot from the heat and let the apricot butter cool slightly. Transfer it to sterilized jars and store in the refrigerator. It’s that simple!
Serving Suggestions
Your apricot butter is now ready to shine! Here are a few delightful ways to serve it:
-
Spread it on Toast: A classic choice! Spread apricot butter generously on warm, toasted bread or bagels for a delicious breakfast.
-
Dollop it on Pancakes and Waffles: Elevate your breakfast game! It complements fluffy pancakes or crispy waffles beautifully.
-
Pair with Cheese: Create a stunning cheese platter with your apricot butter. It pairs wonderfully with creamy brie or sharp cheddar.
-
Use it in Baking: Add a dollop into your muffin or cake batter for a burst of flavor, or use it as a filling in pastries.
-
Gift it: Sweeten someone’s day by gifting a jar of your homemade apricot butter—they’ll love you for it!
Recipe Variations
Let’s get creative! Here are some exciting variations to shake things up:
-
Spicy Apricot Butter: Add a pinch of cayenne or some finely chopped fresh jalapeños for a sweet-spicy kick.
-
Jammy Apricot Butter: Stir in other fruits like peaches or plums for a mixed fruit version that’s bursting with flavor.
-
Vanilla Apricot Butter: Add a splash of vanilla extract during cooking for an extra layer of sweetness.
-
Herbed Apricot Butter: Incorporate fresh herbs, such as thyme or rosemary, for a unique savory twist.
-
Low-Sugar Version: Substitute with a low-sugar alternative sweetener to create a version that’s perfect for those watching their sugar intake.
Chef’s Notes
As I reflect on my journey with apricot butter, I can’t help but chuckle at the mishaps along the way! Once, I got so caught up in the cooking process that I accidentally grabbed salt instead of sugar. Let’s just say, no one wanted to taste that batch!
Over the years, I’ve experimented with different spice combinations, and I’ve come to adore the balanced warmth of cinnamon and nutmeg. Making apricot butter has also become a lovely tradition at our family summer picnics. It’s more than just a recipe; it’s a little piece of nostalgia that brings everyone together.
FAQs and Troubleshooting
1. Why is my apricot butter too runny?
If your apricot butter turned out too runny, it might need more cooking time. Just simmer it a little longer to evaporate the excess liquid. You can also mix in a small amount of cornstarch dissolved in water to thicken it up.
2. Can I can this recipe for storage?
Absolutely! If you want longer shelf life, consider canning your apricot butter in sterilized jars, making sure to follow proper canning guidelines.
3. What can I substitute for sugar?
You can replace the sugar with coconut sugar, honey, or even maple syrup. Just remember that different sweeteners may slightly change the flavor profile.
4. How long will this apricot butter last in the fridge?
When stored properly in the fridge, your apricot butter should last around 2-3 weeks. If you’ve canned it, it can last over a year in a cool, dark place.
Nutritional Info
Now, let’s break down the nutritional info! Per tablespoon of this delicious apricot butter, you can expect roughly:
- Calories: 50 calories
- Total Fat: 0g
- Sodium: 0mg
- Total Carbohydrates: 13g
- Sugars: 10g
- Protein: 0g
Final Thoughts
There you have it, food friends—your very own apricot butter! This vibrant, flavorful spread captures the essence of sunshine and love, all wrapped up in a jar. I hope this recipe fills your kitchen with warmth and sparks joy in your culinary adventures. Remember, cooking is an expression of love, so don’t be afraid to get a little creative in your kitchen!
So grab your apron, and let’s make some apricot magic. I can’t wait to hear about your own culinary journeys and stories that resonate with this recipe. Happy cooking!
Print
Apricot Butter
- Total Time: 55 minutes
- Yield: 4 servings 1x
- Diet: Vegetarian
Description
A luscious, vibrant spread that captures the essence of summer in each velvety bite, perfect for toast, pancakes, or as a gift.
Ingredients
- 4 cups apricots, pitted and chopped
- 1 cup sugar
- 1/4 cup lemon juice
- 1 teaspoon cinnamon
- 1/2 teaspoon nutmeg
Instructions
- Prepare the apricots: Wash and pit your apricots, then chop them into small pieces.
- Combine in a pot: In a large saucepan, combine chopped apricots, sugar, and lemon juice. Stir and let sit for 15-20 minutes.
- Cook it down: Place over medium heat, stirring frequently until it reaches a gentle simmer. Cook for 30-40 minutes.
- Add the spices: Once thickened, stir in cinnamon and nutmeg. Adjust sweetness if necessary.
- Cool and store: Remove from heat, let cool, then transfer to sterilized jars.
Notes
Perfect for spreading on toast, pancakes, or as a filling in pastries. Can also be canned for longer storage.
- Prep Time: 15 minutes
- Cook Time: 40 minutes
- Category: Condiment
- Method: Stovetop
- Cuisine: American
Nutrition
- Serving Size: 1 tablespoon
- Calories: 50
- Sugar: 10g
- Sodium: 0mg
- Fat: 0g
- Saturated Fat: 0g
- Unsaturated Fat: 0g
- Trans Fat: 0g
- Carbohydrates: 13g
- Fiber: 0g
- Protein: 0g
- Cholesterol: 0mg
Keywords: apricot butter, fruit spread, summer recipes, homemade condiments, easy recipes
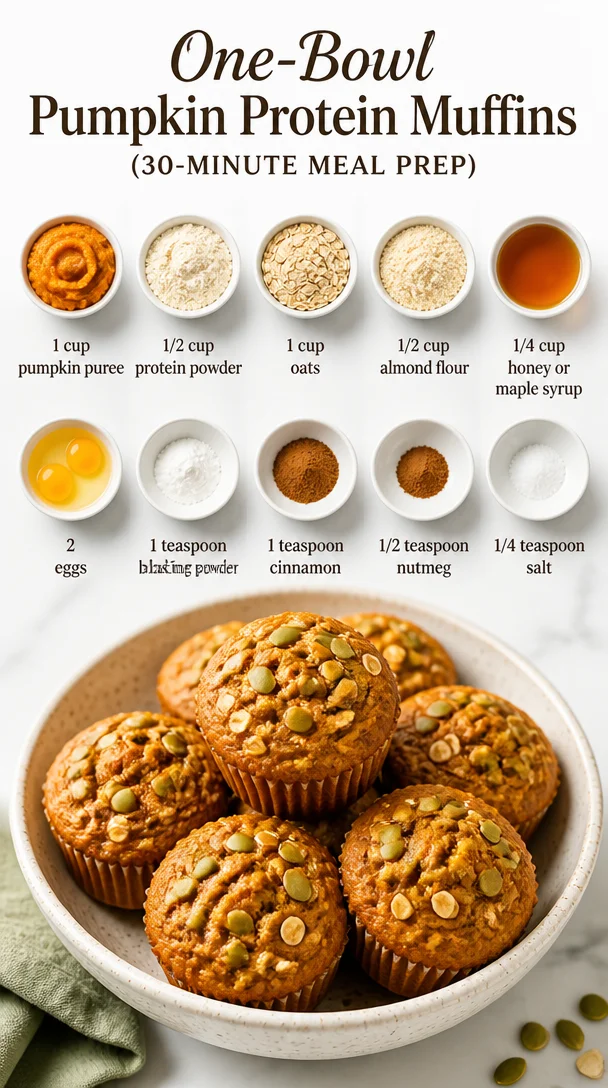
One-Bowl Pumpkin Protein Muffins (30-Minute Meal Prep)
Pumpkin Protein Muffins: A Cozy Culinary Journey to Deliciousness
Hey there, food enthusiasts! It’s Beau Collier, your friendly kitchen buddy with a knack for whipping up comfort food that’s not just satisfying but also good for you. Today, we’re diving into the world of Pumpkin Protein Muffins—a scrumptious treat that’s perfect for breakfast, a snack, or even a post-workout boost.
As the leaves begin to turn and pumpkin-flavored everything floods our favorite cafes, it’s time to embrace something homemade that captures all the warm, cozy vibes of the season—without forgetting our health goals! By melding wholesome ingredients with that lovely pumpkin goodness, we can create delightful muffins that are perfect for the entire family. Ready to roll up your sleeves and bake some goodness? Let’s get started!
A Dash of Nostalgia: My Pumpkin Muffin Memory
Picture this: it’s a crisp autumn morning, and the air is filled with the scent of cinnamon and nutmeg. My grandma, a true kitchen guru, would spend weekends crafting her famous pumpkin muffins, filling our home with a cozy aroma that made even the grumpiest of souls smile. She was a true believer that food brings family together, and her secret ingredient was always a generous helping of love mixed with laughter.
I’ll never forget the way she taught me to stir the batter with a flick of the wrist while shaking her head at my clumsy juggling of flour containers. Those muffins were more than just a snack; they symbolized togetherness and the warmth of family tradition. Fast forward to today, and I’ve taken that cherished recipe and added a fun twist—more protein and wholesome elements to fuel our busy lives!
So, grab your apron as we explore the comforting world of Pumpkin Protein Muffins. Trust me, your kitchen will be the next cozy corner of fall magic!
Ingredients: The Building Blocks of Deliciousness
Let’s gather our ingredients! These muffins are packed with nutrients while still delivering on flavor. Here’s what you’ll need:
-
1 cup pumpkin puree: You can use canned or homemade. If using fresh, ensure it’s well-cooked and blended until smooth. Don’t worry; a little extra pumpkin won’t hurt! This ingredient is key for moisture and that wonderful fall flavor.
-
1/2 cup protein powder: I favor a vanilla or chocolate plant-based powder, but your preference will work just fine. Feel free to use whey or pea protein too! It’s a fantastic way to boost the protein content without compromising on taste.
-
1 cup oats: Rolled oats add texture and heartiness. If you’re gluten-sensitive, opt for certified gluten-free oats. You can even pulse them in a blender to create oat flour if you fancy a smoother texture.
-
1/2 cup almond flour: This lends a nutty flavor and moistness. Can’t find almond flour? Substitutes include coconut flour (but use less, as it’s super absorbent) or whole wheat flour for a heartier muffin.
-
1/4 cup honey or maple syrup: Choose your sweetener! Honey gives a floral sweetness, while maple syrup infuses a uniquely rich flavor. If you’d rather skip the sweet stuff, you could use mashed bananas or applesauce as natural sweeteners.
-
2 eggs: They bind our mixture and add fluffiness. You can replace them with flax eggs (1 tablespoon of ground flaxseed mixed with 2.5 tablespoons of water per egg) for a vegan option.
-
1 teaspoon baking powder: Essential for rising! Make sure it’s fresh for maximum fluffiness.
-
1 teaspoon cinnamon: The warming spice we all adore. You can also experiment with pumpkin pie spice blends for an extra kick.
-
1/2 teaspoon nutmeg: A little pep in your step! Nutmeg offers an earthy warmth and a flavor boost.
-
1/4 teaspoon salt: Balances the flavors and enhances the sweetness.
Let’s gather these beautiful ingredients together and create some muffin magic!
Step-by-Step Instructions: Baking with Love
Now that we have our ingredients in check, it’s time to turn our kitchen into a muffin-making paradise! Here are the steps to create your delicious Pumpkin Protein Muffins:
-
Preheat your oven: Start by preheating your oven to 350°F (175°C). This ensures a beautifully even bake!
-
Prepare the muffin tin: Grab your muffin tin and either grease it with cooking spray or line it with paper liners. Greasing helps them pop out easily, while liners make for a fun presentation!
-
Mix the dry ingredients: In a large mixing bowl, whisk together the oats, almond flour, protein powder, baking powder, cinnamon, nutmeg, and salt. This step is essential to distribute all those lovely spices evenly.
-
Combine the wet ingredients: In a separate bowl, mix the pumpkin puree, honey (or maple syrup), and eggs until smooth. You want the mixture to be creamy and comforting. The pumpkin here adds so much flavor and moisture!
-
Blend the ingredients: Pour the wet ingredients into the dry mixture, gently folding it together with a spatula. Be careful not to over-mix; we want fluffy muffins, not tough ones! If the batter seems too thick, add a splash of almond milk or water to loosen it.
-
Scoop your batter: Using a scoop or spoon, evenly distribute the batter into the muffin tins, filling each cup about ¾ full. You can even sprinkle a few oats on top for added texture!
-
Bake to perfection: Slide your muffin tin into the oven and bake for 20–25 minutes, or until a toothpick inserted into the center comes out clean. The scent wafting through your kitchen will make it hard to wait patiently!
-
Cool and enjoy: Once baked, remove the muffins from the oven and let them cool in the pan for 5 minutes, then transfer them to a wire rack to cool completely. If you can resist, let them cool a bit—trust me, it’ll be worth it!
And just like that, your kitchen is filled with the delicious aroma of Pumpkin Protein Muffins! Each muffin is a cozy bite of happiness that nourishes both body and soul.
Serving Suggestions: Mmm, Muffin Time!
Once you’ve baked your muffins to golden perfection, it’s time to dig in! Serve them still warm, perhaps with a little smear of almond butter or a dollop of Greek yogurt for added creaminess. You can also dust them lightly with powdered sugar for a touch of elegance.
For a fun twist, turn your muffin time into a mini brunch gathering. Arrange the muffins on a platter with an assortment of spreads like honey, a drizzle of maple syrup, and even a selection of fresh fruits. Think sliced strawberries, bananas, or a sprinkle of walnuts for that crunchy texture.
Enjoy them fresh out of the oven, or wrap them up for a tasty on-the-go option! Trust me; they make for a delightful snack that you won’t want to miss!
Recipe Variations: Spice it Up
Now that you’ve mastered the classic Pumpkin Protein Muffins, let’s explore a few fun variations to keep things fresh and exciting in your kitchen:
-
Chocolate Chip Pumpkin Protein Muffins: Fold in a handful of dark chocolate chips for a sweet surprise! It’s a delightful combination that will satisfy your sweet tooth while keeping the nutritious profile.
-
Nutty Pumpkin Muffins: Add a handful of chopped walnuts or pecans for a crunchy twist. You could even swap out some of the almond flour for peanut butter to add that delightful nutty flavor!
-
Cranberry Pumpkin Muffins: Toss in some dried cranberries to give that tart sweetness contrasting with the pumpkin’s richness. It adds a pop of color and flavor that’s simply delightful.
-
Spiced Pumpkin Muffins: Double down on your spices! Add some ginger or allspice to amp up the warmth and fall flavors.
-
Gluten-Free Version: Substitute the oats and almond flour for a gluten-free blend, and use flax eggs instead of regular eggs for a vegan take.
The beauty of these muffins is their versatility—mix it, match it, make it your own!
Chef’s Notes: A Recipe for Traditions
As I like to think, every recipe tells a story! My journey with pumpkin muffins started in my grandma’s cozy kitchen, but it has evolved beautifully over the years. I experimented with healthier options to fit my lifestyle and also wanted to introduce a few fun twists inspired by my kitchen adventures.
Every time I whip up these muffins, I’m reminded of family gatherings and laughter, the joy each bite brings, and it fuels my mission at Feastical. Baking is about connecting with others, sharing our wins (and mishaps!), and spreading joy one muffin at a time.
And hey, if the batter seems a little thick or your muffins aren’t rising as fantastically as you’d hoped, don’t fret! Sometimes a touch of extra baking powder or fine-tuning your oven’s temperature can bring those muffins to life.
FAQs and Troubleshooting
-
Why are my muffins dense?
- A common culprit is over-mixing the batter, which can lead to tough muffins. Stick to gentle folds when combining wet and dry ingredients!
-
Can I use an egg substitute?
- Absolutely! Try a flax egg or a chia egg for a vegan alternative. Just mix 1 tablespoon of ground flaxseed or chia seeds with 2.5 tablespoons of water and let it sit for 5 minutes before adding it to the mixture.
-
How do I store leftover muffins?
- Once cooled, store them in an airtight container at room temperature for 2-3 days or in the refrigerator for up to a week. You can also freeze them for up to 3 months—simply thaw and enjoy!
-
How do I know when the muffins are done?
- Stick a toothpick in the center of a muffin; if it comes out clean or with only a few crumbs attached, they’re ready to be devoured!
Nutritional Info: Health Meets Happiness
These Pumpkin Protein Muffins are designed for nourishing your body while providing that cozy comfort we all love!
Approximate Nutrition Values per Muffin (based on 12 servings):
- Calories: 150
- Protein: 7g
- Carbohydrates: 20g
- Fiber: 3g
- Sugar: 5g
- Fat: 5g
With wholesome ingredients like pumpkin puree and oats, plus protein powder, these muffins are an excellent source of energy—perfect for fueling your morning, afternoon pick-me-up, or post-workout snack!
Final Thoughts: Bake Some Joy!
As we wrap up our adventure into the world of Pumpkin Protein Muffins, I invite you to bring a little joy into your kitchen. You don’t need to be a professional chef to create something delectable—it’s about the love you put into each bite!
So, gather your ingredients, invite a friend to join, and share some laughs as you bake together. These muffins are more than just a recipe; they’re an experience, a hug in muffin form!
Now that the fall season is upon us, make these muffins your go-to treat, and don’t hesitate to experiment with new flavors. Remember, cooking is all about creativity, so let your culinary spirit shine!
Can’t wait to hear how your baking adventure goes! Happy baking, friends! 🍂💛
Print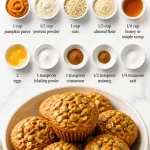
Pumpkin Protein Muffins
- Total Time: 40 minutes
- Yield: 12 muffins 1x
- Diet: Vegetarian
Description
Delicious and nutritious pumpkin muffins packed with protein, perfect for breakfast or a snack.
Ingredients
- 1 cup pumpkin puree
- 1/2 cup protein powder
- 1 cup oats
- 1/2 cup almond flour
- 1/4 cup honey or maple syrup
- 2 eggs
- 1 teaspoon baking powder
- 1 teaspoon cinnamon
- 1/2 teaspoon nutmeg
- 1/4 teaspoon salt
Instructions
- Preheat your oven to 350°F (175°C).
- Prepare the muffin tin by greasing it or lining it with paper liners.
- Mix the dry ingredients: whisk oats, almond flour, protein powder, baking powder, cinnamon, nutmeg, and salt in a large bowl.
- Combine the wet ingredients: mix pumpkin puree, honey (or maple syrup), and eggs in a separate bowl until smooth.
- Blend the wet and dry ingredients together, folding gently to avoid over-mixing.
- Scoop the batter into the muffin tins, filling each cup about ¾ full.
- Bake for 20–25 minutes, or until a toothpick inserted comes out clean.
- Cool for 5 minutes in the pan, then transfer to a wire rack to cool completely.
Notes
For variations, try adding chocolate chips, nuts, or dried cranberries.
- Prep Time: 15 minutes
- Cook Time: 25 minutes
- Category: Snack
- Method: Baking
- Cuisine: American
Nutrition
- Serving Size: 1 muffin
- Calories: 150
- Sugar: 5g
- Sodium: 150mg
- Fat: 5g
- Saturated Fat: 0.5g
- Unsaturated Fat: 4.5g
- Trans Fat: 0g
- Carbohydrates: 20g
- Fiber: 3g
- Protein: 7g
- Cholesterol: 30mg
Keywords: pumpkin muffins, protein muffins, healthy snacks
California Fig & Pistachio Crisps: 15-Minute Snack
California Fig and Pistachio Crisps: A Flavorful Crunch You Can’t Resist!
Hey there, fellow food lovers! Today, I’m bubbling with excitement to share an incredible recipe that’s sure to tickle your taste buds—California Fig and Pistachio Crisps. These delightful bites are not only a fantastic snack, but they also pack a flavorful punch that can transform any ordinary day into a festive one. Trust me, once you try these crisps, they’ll become your go-to offering for neighbors at holiday gatherings, parties, or just a cozy evening at home with loved ones.
Now, before we dive into the nitty-gritty of the recipe, let me take you on a little journey down memory lane, where the roots of my affection for figs and pistachios began.
A Walk Down Memory Lane
Growing up, my family cherished these special occasions when we’d gather around the table, sharing stories and laughter over homemade treats. One summer, my grandparents took me to a little local farmer’s market in our quaint town. I remember it vividly—rows of luscious fruits, aromatic herbs, and little stalls boasting homemade goodies. My eyes immediately zeroed in on a vendor with a colorful display of dried fruits and nuts, their vibrant colors almost calling out to me.
The vendor was selling the most succulent California figs and crunchy pistachios. The sweet scent of the figs wafting through the air hooked me from the start. I bought a tiny bag of those figs, and with every bite, I felt the essence of summer and sun-soaked afternoons. I couldn’t resist pairing them with pistachios, which provided this beautiful contrast of sweetness and crunch. That magical combination became the inspiration behind today’s recipe.
So, let’s get back to the present and whip up a batch of these California Fig and Pistachio Crisps that remind me so much of those sunny days filled with joy and delectable flavors.
Ingredients You’ll Need
Before we get cooking, here’s what you’ll need:
-
1 ½ cups coarsely chopped California Dried Figs: I used California Mission Figs, but feel free to explore any variety you enjoy. Dried figs are naturally sweet and lend a chewy texture to the crisps. If you’re in a pinch, you can substitute with dried dates or apricots, but the unique flavor of figs is unmatched.
-
1 cup whole wheat flour: This is our whole grain hero, giving the crisps a nutty flavor. If you need a gluten-free option, almond flour or oat flour works beautifully too.
-
1 cup all-purpose flour (2 tablespoons removed to coat figs): This will help bind the dough. You can use gluten-free all-purpose flour if you prefer.
-
2 teaspoons baking soda: This gives our crisps that lovely rise. Make sure it’s fresh; expired baking soda can compromise the texture.
-
1 ¼ teaspoons kosher salt: Just the right touch! You can substitute with table salt, but reduce the amount to about 1 teaspoon as table salt is saltier by volume.
-
⅓ cup brown sugar: This adds sweetness and depth. If you want to keep it sugar-free, consider using coconut sugar or a natural sweetener like stevia.
-
1 cup nonfat Greek yogurt: This adds moisture and tanginess. If you’re dairy-free, opt for coconut yogurt or a non-dairy alternative.
-
1 cup low-fat milk: To keep the dough nice and smooth. Any plant-based milk works just as well!
-
¼ cup honey: A marvel of nature that adds sweetness with a floral note. If you’re vegan, maple syrup is a delicious alternative!
-
1 cup golden raisins: Incorporating these gives pops of sweetness. You could swap these for dried cranberries or cherries for a tart twist.
-
1 ½ cups shelled pistachios: Crunchy and nutritious! You can use any unsalted nuts, but the creaminess of pistachios is hard to beat.
-
½ cup sunflower seeds: These give a lovely crunch while packing in nutrients. You can replace them with pumpkin seeds if you like.
-
¼ cup chia seeds: They help bind the dough and offer a boost of Omega-3s. If they’re not your thing, you could skip them or replace them with flax seeds.
-
¼ cup sesame seeds: Toasted sesame seeds sprinkle such delightful flavor! Feel free to use poppy seeds for a different profile.
-
¼ cup flax seed: This is a fantastic source of fiber and adds nuttiness. You can omit it if don’t have any on hand.
Step-by-Step Instructions
Now that we’ve gathered our ingredients, let’s roll up our sleeves and start cooking!
-
Preheat the Oven: Let’s set the stage first by preheating your oven to 350°F (175°C). This ensures the crisps bake evenly and get crispy without burning.
-
Prep the Figs: Toss the chopped California figs with 2 tablespoons of all-purpose flour. This prevents them from sinking to the bottom of the dough during baking. It’s one of my favorite little hacks to ensure even distribution throughout the crisps.
-
Mix Dry Ingredients: In a large mixing bowl, combine the whole wheat flour, remaining all-purpose flour, baking soda, kosher salt, and brown sugar. Stir well to integrate everything. This is a critical step—uniform mixing ensures every bite is just as scrumptious!
-
Combine Wet Ingredients: In another bowl, whisk together the Greek yogurt, low-fat milk, honey, and golden raisins. When you introduce these wet ingredients to the dry, they’ll create a beautifully cohesive dough.
-
Combine and Fold: Gradually pour the wet mixture into the dry ingredients, mixing gently until no flour streaks remain. Avoid over-mixing; we want our crisps to keep a chewy yet crumbly texture!
-
Incorporate Nuts and Seeds: Gently fold in the chopped pistachios, sunflower seeds, chia seeds, sesame seeds, and flax seeds. You’ll love how vibrant the mixture looks with all those colors and textures. Mix just until they’re evenly distributed.
-
Shape the Crisps: Line a baking sheet with parchment paper and scoop tablespoons of the mixture onto it, spacing them about 2 inches apart. Use the back of a spoon to flatten them gently. They won’t spread much while baking, so don’t worry about a perfect shape.
-
Bake to Perfection: Slide the baking sheet into your preheated oven and bake for about 20-25 minutes or until they’re golden brown and crisp on the edges. Keep an eye on them towards the end—nobody likes burnt crisps! When done, take a moment to inhale the irresistible aroma filling your kitchen.
-
Cool Down: Once out of the oven, let them cool on a baking rack for a few minutes before enjoying. This cooling period also allows them to harden up nicely for that perfect crunch!
-
Store and Enjoy: Store any leftovers in an airtight container. I promise they’ll stay fresh for days (if they even last that long)!
Serving Suggestions
Now that your California Fig and Pistachio Crisps are ready to shine, let’s talk about serving them. These crisps make a delightful snack on their own, but my favorite way to serve them is with a little spread!
Try pairing them with a creamy goat cheese or a delectable honey ricotta spread. The tang of cheese against the sweet fig and crunchy pistachio offers a taste experience that’ll leave everyone wanting more. You can also serve them alongside a fresh fruit platter—think slices of sweet pears or tart apples (yes, please!). They complement charcuterie boards beautifully too, inviting everyone to dig in.
For a unique twist, crumble some crisps over yogurt or a salad for an added crunch and sweetness. The possibilities are endless!
Recipe Variations
Just some constructive creativity here! Why not shake things up a bit? Here are a few variations on this delicious recipe:
-
Mediterranean Touch: Add chopped dried apricots and replace some pistachios with chopped walnuts or almonds.
-
Spicy and Sweet: Toss in some cinnamon and a pinch of cayenne pepper to the flour mix, giving your crisps a little kick.
-
Citrus Zing: Incorporate zest from an orange or lemon to the dough for a refreshing citrus twist!
-
Nut-Free Version: Swap out pistachios and sunflower seeds with pumpkin seeds or just skip the nuts—more room for extra figs, perhaps?
-
Choco Delight: Mix some dark chocolate chips into the dough for an indulgent treat! Who says you can’t have a little sweetness with your crunch?
Chef’s Notes
Oh, I have a few funny little stories about my kitchen adventures with these crisps! I remember the first time I made them for a brunch party. I thought I’d be super fancy and add a pinch of chili powder for a flair. Let’s just say my friends were wide-eyed, and I quickly learned that not every experiment turns out to be a hit! They graciously finished the entire batch, though. It was a lesson learned—sometimes simple is the way to go!
Over the years, I’ve honed this recipe, and it has transformed into my go-to quick snack. Every time I tweak it slightly, I’m reminded of that summer at the farmer’s market. It brings me joy knowing that these crisps can become a special bonding element in your kitchen too!
FAQs and Troubleshooting
Q1: Why did my crisps turn out too soft?
If your crisps turned out softer than you expected, it might be due to over-mixing or adding too much liquid. Make sure you’re measuring accurately and mixing gently.
Q2: How can I make these without dairy?
No problem! Just swap the Greek yogurt and milk with non-dairy alternatives like almond or coconut yogurt and your favorite plant-based milk.
Q3: Can I freeze these crisps?
Absolutely! Once cooled, you can freeze them in an airtight container. When you’re ready for a snack, just pop them in the oven to refresh their crispiness!
Q4: What should I do if my dough is too sticky?
If your dough feels too sticky, you can sprinkle a bit more flour to achieve a workable consistency, but be careful not to overdo it as it might change the texture of the crisps.
Nutritional Info (for one serving, about 2 crisps)
- Calories: Approximately 150
- Protein: 4g
- Fat: 6g
- Carbohydrates: 20g
- Fiber: 3g
- Sugar: 5g
Packed with fiber from the figs and seeds, and a hint of protein thanks to the Greek yogurt, these crisps provide a well-rounded snack, keeping your energy levels up throughout the day!
Final Thoughts
There you have it—California Fig and Pistachio Crisps that capture the essence of community, comfort, and creativity in every bite! These crisps are not just a recipe; they’re a story of fond memories and flavor connections that have stood the test of time.
So, whether you enjoyed them on a cozy afternoon or shared them with friends, I hope they bring you as much joy as they do to me. Food is meant to be shared and experienced together, and I can’t wait for you to make these in your kitchen. Grab your apron and start baking that batch of happiness today!
Let me know how your crisps turned out, share your adaptations, or simply drop a note about your own food memories. Until next time, happy cooking and see you at Feastical!
Print
California Fig and Pistachio Crisps
- Total Time: 40 minutes
- Yield: 4 servings 1x
- Diet: Vegetarian
Description
Delightful and crunchy California Fig and Pistachio Crisps, perfect for snacking or festive gatherings.
Ingredients
- 1 ½ cups coarsely chopped California Dried Figs
- 1 cup whole wheat flour
- 1 cup all-purpose flour (2 tablespoons removed to coat figs)
- 2 teaspoons baking soda
- 1 ¼ teaspoons kosher salt
- ⅓ cup brown sugar
- 1 cup nonfat Greek yogurt
- 1 cup low-fat milk
- ¼ cup honey
- 1 cup golden raisins
- 1 ½ cups shelled pistachios
- ½ cup sunflower seeds
- ¼ cup chia seeds
- ¼ cup sesame seeds
- ¼ cup flax seed
Instructions
- Preheat the oven to 350°F (175°C).
- Toss the chopped California figs with 2 tablespoons of all-purpose flour.
- Combine the whole wheat flour, remaining all-purpose flour, baking soda, kosher salt, and brown sugar in a large bowl.
- Whisk together the Greek yogurt, low-fat milk, honey, and golden raisins in another bowl.
- Pour the wet mixture into the dry ingredients, mixing gently.
- Fold in the chopped pistachios, sunflower seeds, chia seeds, sesame seeds, and flax seeds.
- Scoop tablespoons of the mixture onto a lined baking sheet, spacing them 2 inches apart.
- Bake for about 20-25 minutes until golden brown and crisp on the edges.
- Cool on a baking rack for a few minutes before enjoying.
Notes
These crisps are perfect with cheese or fresh fruit and can be crumbled over yogurt or salads for added crunch.
- Prep Time: 15 minutes
- Cook Time: 25 minutes
- Category: Snack
- Method: Baking
- Cuisine: American
Nutrition
- Serving Size: 2 crisps
- Calories: 150
- Sugar: 5g
- Sodium: 400mg
- Fat: 6g
- Saturated Fat: 1g
- Unsaturated Fat: 5g
- Trans Fat: 0g
- Carbohydrates: 20g
- Fiber: 3g
- Protein: 4g
- Cholesterol: 5mg
Keywords: figs, pistachios, snacks, healthy crisps

Ingredient Raspberry Bars: Quick, No-Bake Summer Treats
Indulge in Sweet Simplicity: Fabulous Five Ingredient Raspberry Bars
Hey there, fellow food enthusiasts! Today, we’re diving into something delightfully simple yet fabulously tasty: Fabulous Five Ingredient Raspberry Bars. As a chef who adores whipping up kitchen magic with minimal fuss—and maximum flavor—I’m thrilled to share this creamy, fruity delight that is perfect for any occasion. Whether you’re looking to impress guests at a gathering or simply want a sweet treat to enjoy while binge-watching your favorite show, these raspberry bars are the answer.
I mean, who doesn’t love the sweet and tart balance of raspberry jam enveloped in a buttery, melt-in-your-mouth crust? It’s like a warm hug from your grandma, mixed with the perks of modern convenience. If you’re new to the world of baking or you’re a seasoned pro, these bars are accessible yet strikingly delicious. Plus, with only five ingredients, you won’t have to wrestle with an overflowing grocery cart or a complicated recipe. Let’s get those aprons on and embark on this sweet adventure together!
A Bite of Nostalgia
When I think of raspberry bars, I’m transported back to my childhood kitchen, where the air buzzed with chatter and laughter, and the smell of something delicious baked in the oven was like a siren call. My mom used to whip up her own version of berry bars every summer when the raspberries were at their sweetest. I remember lurking by the kitchen, eager to sneak a taste while she warned me not to “spoil my appetite.” As if!
Those summer days were filled with friends running in and out of the house, all of us enveloped in the warmth of the sun and the delicious aroma that wafted through the open windows. My friends and I would tear into those bars just as soon as they cooled, the sweet raspberry filling smeared across our fingers and faces, punctuated by bouts of giggles and joy. It’s a memory I cherish, and it’s the backdrop for my recipe today—summoning the simplicity and delight of good food shared among friends.
So, grab a seat and a cup of coffee (or tea, no judgment here!), as we get into the nitty-gritty of whipping up these fabulous raspberry bars!
Ingredients to Gather
Here’s what you’ll need to create your own batch of scrumptious raspberry bars:
-
1 cup unsalted butter, softened
This forms the base of your crust, lending that rich flavor and melt-in-your-mouth texture. If you’re short on time, you can use margarine, but I highly recommend butter for the best taste. -
2 1/4 cups all-purpose flour
A staple in almost all baking recipes, this will give your bars the structure they need. Need a gluten-free option? Try using a gluten-free all-purpose flour blend. -
1 cup granulated sugar
This adds sweetness and a delightful crunch to the topping. For a lower-calorie alternative, you can experiment with coconut sugar or a sugar substitute, but keep in mind the final texture might vary slightly. -
1 large egg, room temperature
The egg helps bind everything together, giving these bars their lovely texture. If you’re vegan or egg-free, you can substitute with flaxseed meal mixed with water as a binding agent. -
1 jar seedless raspberry jam (9-12 ounces)
The star of the show! Look for high-quality jam for the best flavor, and don’t hesitate to switch it up with a different flavor, like blackberry or strawberry, if you prefer.
Step-by-Step Instructions
Let’s get cooking! Follow these detailed steps to create your fabulous raspberry bars.
-
Preheat the Oven
Start by preheating your oven to 350°F (175°C). This ensures that your raspberry bars bake evenly right from the get-go. -
Prepare Your Baking Dish
Grease a 9×9-inch baking dish or line it with parchment paper for easy removal. If you’re using parchment, make sure it hangs over the edges a bit so you can lift the bars out easily later—like a cozy food hammock. -
Mixing the Crust
In a large mixing bowl, cream the softened butter and granulated sugar together. I like to use an electric mixer for this step. Beat it until fluffy and light—about 2-3 minutes should do the trick. This is where the magic starts! -
Incorporate the Egg
Add in the egg and mix until just combined. Don’t overdo it! Overmixing can lead to tougher bars; we want them to be tender. -
Add Flour
Gradually add in the flour. Mix just until the flour disappears—again, we’re looking for a tender texture here, not a tough one! -
Spread the Base
Press about two-thirds of the mixture firmly into the bottom of your prepared baking dish to form the base crust. Really press down; we want this to be sturdy enough to hold the juicy raspberry filling. -
Layer the Jam
Spread the raspberry jam evenly over the crust. Don’t be shy—make sure you cover it! This is where all the deliciousness lies. -
Crumble the Topping
Now, take the remaining dough and crumble it over the jam layer. It’s okay if some jam peeks through—those little bits of jam are going to be heavenly! -
Bake
Pop your dish in the preheated oven and bake for about 30-35 minutes, or until the top is golden brown. The aroma will fill your kitchen and have your stomach grumbling in no time! -
Cool and Slice
Once baked, remove your bars from the oven and let them cool in the dish for about 10-15 minutes. Then, lift them out using the parchment paper (if you used it) and let them cool completely on a wire rack. Once cooled, slice them into bars and get ready to dig in!
Serving Suggestions
These raspberry bars are perfect for nearly any occasion! Here’s how I love to serve them:
-
Dust with Powdered Sugar
For that classic touch, lightly dust the cooled bars with powdered sugar. It adds a lovely presentation and a touch of sweetness. -
Pair with Ice Cream
Serve warm raspberry bars alongside a scoop of vanilla or raspberry sorbet for a delightful dessert that’s sure to impress. -
Add Fresh Berries
Don’t stop at just bars! Garnish your serving plate with fresh raspberries or even a sprig of mint for a pop of color. -
Perfect for Picnics
These bars are portable and easy to pack for picnics. Just cut them into squares, wrap them in parchment, and enjoy them on the go!
Recipe Variations
Why not mix things up? Here are some fun variations you can try with your raspberry bars:
-
Different Jams
Get creative with flavors! Switch the raspberry jam for other fruit jams like blueberry, apricot, or even lemon curd for a zingy twist. -
Nutty Addition
Incorporate chopped nuts, like almonds or walnuts, into the crust or crumble topping for added texture and flavor. -
Chocolate Chips
Stir in some semi-sweet or dark chocolate chips into the crumble topping for a rich chocolatey surprise. -
Lemon Zest
Add lemon zest to the butter-sugar mixture for a refreshing hint of citrus that pairs fabulously with raspberries.
Chef’s Notes
Oh, where do I even begin? This recipe has been a staple in my kitchen for years, and I can honestly say everyone who tries it goes insane for it! I’ve experimented with different variations, like almond and chocolate, and they always come out delicious.
One of my fondest memories involves a bake sale I participated in during my culinary school days where I brought these raspberry bars. They were the first item to sell out, and I ran back home to bake another batch. The joy of creating something that brings smiles is unmatched, and that’s what cooking is all about, folks!
FAQs and Troubleshooting
Here are a few common questions and potential pitfalls to avoid while making your raspberry bars:
-
Why are my bars falling apart?
If they crumble too easily, it could be that the crust isn’t pressed firmly enough. Make sure to really compact the base and crumble topping. -
Can I use fresh raspberries instead of jam?
Fresh raspberries can be used, but you’ll need to add some sugar and maybe a thickening agent to keep the filling from being too runny. -
What if I don’t have raspberry jam?
Any seedless fruit jam will work. If you prefer a fresh alternative, consider making your own fruit compote. -
How do I store leftovers?
Store these delicious bars in an airtight container at room temperature for about 2-3 days. They can also be refrigerated for longer freshness.
Nutritional Info
Here’s the breakdown for each fabulous raspberry bar (based on a standard recipe serving of 16):
- Calories: Approximately 210
- Total Fat: 10g (Saturated Fat: 6g)
- Cholesterol: 30mg
- Sodium: 60mg
- Total Carbohydrates: 30g (Dietary Fiber: 0.5g, Sugars: 10g)
- Protein: 2g
Keep in mind, nutritional values may vary based on ingredient brands and exact quantities used. Modifications may change the overall nutrition, too!
Final Thoughts
And there you have it—fabulous five ingredient raspberry bars that are not only easy to make but also steal the show wherever they go! Whether you’re crafting these delectable treats for yourself or to share with friends and family, I hope this recipe brings you as much joy as it has brought me over the years.
Remember, cooking is all about exploration; don’t hesitate to experiment and make this recipe your own. I can’t wait to hear about your culinary adventures! So go ahead, bring out those ingredients and bake a batch of joy today. Until next time, happy cooking!
Print
Fabulous Five Ingredient Raspberry Bars
- Total Time: 50 minutes
- Yield: 16 servings 1x
- Diet: Vegetarian
Description
Delight in easy-to-make raspberry bars that provide a perfect balance of sweet and tart with just five ingredients.
Ingredients
- 1 cup unsalted butter, softened
- 2 1/4 cups all-purpose flour
- 1 cup granulated sugar
- 1 large egg, room temperature
- 1 jar seedless raspberry jam (9–12 ounces)
Instructions
- Preheat the oven to 350°F (175°C).
- Grease a 9×9-inch baking dish or line it with parchment paper.
- Mix the softened butter and granulated sugar together until fluffy, about 2-3 minutes.
- Add the egg and mix until just combined.
- Gradually add the flour and mix until it disappears.
- Press two-thirds of the mixture firmly into the bottom of the prepared baking dish.
- Spread the raspberry jam evenly over the crust.
- Crumble the remaining dough over the jam layer.
- Bake for 30-35 minutes, or until golden brown.
- Cool in the dish for 10-15 minutes before slicing.
Notes
These bars can be garnished with powdered sugar, fresh berries, or paired with ice cream for serving.
- Prep Time: 15 minutes
- Cook Time: 35 minutes
- Category: Dessert
- Method: Baking
- Cuisine: American
Nutrition
- Serving Size: 1 bar
- Calories: 210
- Sugar: 10g
- Sodium: 60mg
- Fat: 10g
- Saturated Fat: 6g
- Unsaturated Fat: 4g
- Trans Fat: 0g
- Carbohydrates: 30g
- Fiber: 0.5g
- Protein: 2g
- Cholesterol: 30mg
Keywords: raspberry bars, dessert, easy baking, five ingredient recipe, sweet treat

Cinnamon-Sugar Air Fryer Banana Chips: Quick Crispy Snack
Quick & Easy Cinnamon-Sugar Air Fryer Banana Chips – Crispy Sweet Snack
Introduction
Hey there, fellow food lovers! It’s Beau Collier here, and today, we’re diving into the delicious world of crunchy snacks with a twist – or should I say, a crunch! If you’ve got a sweet tooth and a love for the crispy things in life, you’re going to adore these Quick & Easy Cinnamon-Sugar Air Fryer Banana Chips.
Bananas have always held a special place in my heart. I can remember summer days as a kid, running around with friends and enjoying the sun, while my mom would whip up snacks that made us feel like we were indulging in something special. Among those snacks were her delightful banana creations, but I wanted to give it a modern twist. Enter the air fryer—my kitchen superhero! It offers a fast and healthy way to get that satisfying crunch we all crave.
So why make your own banana chips? For starters, they eliminate the store-bought version’s additives and preservatives. Not only can you control the sugar (because let’s face it, we all know it’s easy to overdo it), but you can also customize them to fit your taste buds. Plus, these cinnamon-sugar delights are perfect for satisfying your sweet cravings guilt-free. Whether you’re snacking solo or sharing with friends and family, these chips are bound to be a hit at any gathering.
Are you ready to transform those humble bananas into crispy nuggets of joy? Let’s get munching by gathering our ingredients and diving into this fun recipe together!
Personal Story
Growing up, my family had a tradition of visiting the local farmer’s market every Saturday morning. It was an adventure where the vivid colors of fresh produce and the air filled with scents of herbs and spices awoke my culinary curiosity. My mom would always bring home a bunch of bananas, which we’d devour throughout the week. But often, there were a few lingering, perfectly ripe bananas left as the week came to an end.
One day, instead of making my usual banana bread (which I still adore), I decided to slice them up and toss them into the air fryer after being inspired by a cooking show. When those chips emerged, golden and crispy, I thought I’d struck gold in the kitchen! The aroma of cinnamon and sugar filling the air? Oh my goodness, it was pure bliss! That satisfying crunch followed by a sweet explosion in your mouth became an instant hit. Now, I find myself whipping up a batch regularly—not only for my family but also for spontaneous get-togethers. It’s amazing how a simple recipe can carry so much nostalgia and joy!
Ingredients
For our Cinnamon-Sugar Air Fryer Banana Chips, you’ll need:
-
2 firm, ripe bananas: The key here is to use bananas that are ripe but still firm enough to hold their shape during slicing. Overripe bananas may become mushy instead of crispy. If you only have overripe bananas, consider making banana bread or smoothies instead!
-
1 tbsp coconut oil (or melted butter): Coconut oil brings a hint of tropical flavor to these chips. You can substitute with melted butter if you prefer. Just remember, using butter will give it a different rich flavor.
-
1 tbsp granulated sugar (or coconut sugar): Regular granulated sugar works perfectly for a classic sweet touch. If you’re aiming for a less-refined sugar option, coconut sugar is a fantastic alternative, bringing a subtle caramel flavor.
-
½ tsp ground cinnamon: This spice adds warmth and sweetness. I like to use Ceylon cinnamon for its unique taste and health benefits, but any variety will work. Want to kick it up a notch? Try adding nutmeg for a little extra flair!
Step-by-Step Instructions
-
Preheat the Air Fryer: Before you dive into slicing bananas, let’s get that air fryer warmed up. Preheat it to 350°F (175°C) while you prep the bananas. A hot air fryer is your best friend for getting those crunchy chips just right!
-
Slice the Bananas: Peel your bananas and slice them into thin rounds. Aim for about 1/8 to 1/4 inches thick. Go too thick, and they won’t crisp up; too thin, and they might burn. If you’re unsure, err on the thinner side—better crispy than soggy!
-
Toss with Oil and Sugar: In a mixing bowl, combine banana slices with coconut oil (or melted butter), granulated sugar (or coconut sugar), and ground cinnamon. Toss until the banana slices are evenly coated. This step is crucial as it ensures every slice gets that delightful flavor and crunch!
-
Arrange in the Air Fryer: Lay the banana slices in a single layer in the air fryer basket. Avoid overcrowding! If necessary, work in batches to give each slice its moment to shine and crisp up beautifully.
-
Air Fry the Bananas: Cook for about 10 minutes, turning them halfway through. Keep an eye on them as cooking times may vary depending on your air fryer model. They should come out golden brown and crisp; take them out before they start to burn!
-
Cool and Crisp Up: Transfer the chips to a wire rack or a plate to cool. They will crisp up even more as they cool down, so resist the urge to munch immediately—well, for a minute or two, at least!
Serving Suggestions
Once cooled, it’s time to serve these crunchy delights! I love to arrange my crispy banana chips on a rustic wooden platter—it’s all about that presentation, folks! Drizzle with a bit of extra cinnamon sugar for a touch of glam or pair them with a side of creamy yogurt for dipping. They also make a fantastic addition to oatmeal or a crunchy topping on your favorite desserts.
For a fun twist, you can snack on them while catching up with friends or while binge-watching your favorite series. They even work as a healthier alternative to chips at parties—everyone will appreciate the effort!
Recipe Variations
Here are a few creative ideas to elevate your banana chips game:
-
Chocolate Drizzle: Once cooled, drizzle melted dark chocolate over your banana chips for a decadent treat that’s sure to impress!
-
Chili-Lime Twist: For a savory kick, sprinkle lime juice and chili powder over the banana slices before air frying. This tangy twist will surprise your taste buds!
-
Nutty Banana Chips: Add chopped nuts, like almonds or pecans, to the bowl for an added crunch and flavor. This makes for a more filling snack!
-
Caramelized Chips: Dip the banana slices in a mixture of brown sugar and butter before air frying for an indulgent caramelized flavor.
-
Coconut Flakes: Want to enhance that tropical vibe? Toss in some unsweetened shredded coconut with the bananas for that extra crunch and flavor.
Chef’s Notes
As with many recipes, I’ve found ways to adapt and grow this one. The first time I made these chips, they were a little too sweet for my taste, so I dialed back the sugar. Playing with flavors and experimenting is part of the fun, so don’t hesitate to make this recipe your own!
A funny moment happened the first time I served these banana chips to my friends. They ended up snagging the whole batch before I could get any! Lesson learned: always make extra for sharing—or don’t share at all!
FAQs and Troubleshooting
1. My banana chips turned out soggy. What went wrong?
If your banana chips are soggy, they might have been sliced too thick or packed too tightly in the air fryer. Make sure to slice them thinly and arrange them in a single layer during cooking.
2. Can I use frozen bananas for this recipe?
I wouldn’t recommend it! Frozen bananas tend to become mushy when thawed, so stick with fresh bananas for the best texture.
3. How do I store leftover banana chips?
If you have any leftovers (which is rare!), store them in an airtight container at room temperature. They’re best enjoyed within a couple of days for optimum crunch.
4. Can I make these in the oven instead?
Absolutely! Spread the banana slices on a baking sheet lined with parchment paper and bake at 175°F (80°C) for about 2-3 hours, flipping halfway through. Just know that it will take longer than in the air fryer!
Nutritional Info
Now, let’s chat nutrition! While these cinnamon-sugar air fryer banana chips are a tasty snack, they also bring along nutritional benefits of bananas, such as potassium and fiber, essential for heart health and digestion.
Depending on your ingredient swaps, one serving of these delightful snacks can be around 110 calories. That’s just enough to satisfy your snack cravings without the guilt!
And with the coconut oil, you’re also getting healthy fats while keeping it light and wonderful—just the way we love our snacks!
Final Thoughts
And there you have it, friends—your go-to recipe for Quick & Easy Cinnamon-Sugar Air Fryer Banana Chips! These delightful bites are not just a treat for the taste buds but bring back warm memories and a dash of creativity. Whether you enjoy them on a lazy afternoon or impress guests at your next gathering, I’m sure they will become a staple in your kitchen.
So, gather those ripe bananas, fire up that air fryer, and get ready to crunch your way through this delicious snack. Don’t forget to share your creations and thoughts with me; I love hearing your kitchen adventures!
Happy cooking, and see you next time at Feastical!
Print
Quick & Easy Cinnamon-Sugar Air Fryer Banana Chips
- Total Time: 20 minutes
- Yield: 2 servings 1x
- Diet: Vegan
Description
Deliciously crispy and sweet banana chips made easily in an air fryer, perfect for satisfying snack cravings.
Ingredients
- 2 firm, ripe bananas
- 1 tbsp coconut oil (or melted butter)
- 1 tbsp granulated sugar (or coconut sugar)
- ½ tsp ground cinnamon
Instructions
- Preheat the Air Fryer: Preheat it to 350°F (175°C).
- Slice the Bananas: Peel and slice bananas into thin rounds.
- Toss with Oil and Sugar: Combine banana slices with oil, sugar, and cinnamon, and toss.
- Arrange in the Air Fryer: Lay the slices in a single layer in the basket.
- Air Fry the Bananas: Cook for about 10 minutes, turning halfway through.
- Cool and Crisp Up: Transfer to a wire rack to cool and crisp up.
Notes
For variations, try chocolate drizzle, chili-lime twist, or adding nuts for extra crunch.
- Prep Time: 10 minutes
- Cook Time: 10 minutes
- Category: Snack
- Method: Air Frying
- Cuisine: American
Nutrition
- Serving Size: 1 serving
- Calories: 110
- Sugar: 5g
- Sodium: 0mg
- Fat: 6g
- Saturated Fat: 5g
- Unsaturated Fat: 1g
- Trans Fat: 0g
- Carbohydrates: 15g
- Fiber: 2g
- Protein: 1g
- Cholesterol: 0mg
Keywords: banana chips, air fryer snacks, cinnamon sugar, healthy snacks, vegan snacks