
One-Bowl Strawberry Lemon Blondies Recipe (Fresh Summer Treat)
Strawberry Lemon Blondies: A Sweet Treat with a Citrus Twist
Hey there, fellow foodies! Welcome back to Feastical! Today, we’re diving into a dessert that’s not just a treat for the taste buds but also a feast for the eyes—Strawberry Lemon Blondies! Think of these as the sunshine on a cloudy day, combining the sweetness of strawberries with that zesty burst of lemon. These blondies are rich, chewy, and oh-so-satisfying, making them the perfect addition to any gathering or a sweet pick-me-up for your afternoon snack.
When I first whipped up a batch of these gorgeous treats, I was transported back to my childhood summers spent at my grandparents’ house. My grandmother was a master in the kitchen, always looking for ways to incorporate seasonal fruits into her baked goods. I remember the excitement as we’d pick fresh strawberries from the garden, their sweet and fragrant aroma filling the air. After a day of picking, we’d come back inside, hands stained from the juice, and watch as Grandma transformed our harvest into something magical. This recipe is a tribute to those fond memories, blending nostalgia with a modern twist that you can easily recreate at home.
So, roll up your sleeves, and let’s create some beautiful Strawberry Lemon Blondies together! They’re perfect for sharing with friends, a sweet surprise for your family, or just indulging in all by yourself (no judgment here!).
Ingredients
Before you get started, let’s gather all the delicious ingredients you’ll need for these Strawberry Lemon Blondies. Here’s what you’ll need:
-
1 cup unsalted butter, melted
Butter is the base of our blondies. It adds richness and moisture. You can substitute this with coconut oil or a plant-based butter if you’re going for a dairy-free option. -
1 cup brown sugar
Brown sugar gives these blondies that wonderful caramel flavor. If you’re in a pinch, you can swap it for white sugar, but the flavor will be a bit less deep. -
2 large eggs
Eggs act as a binding agent and contribute to the structure of your blondies. For a vegan version, use flax eggs (1 tablespoon ground flaxseed mixed with 2.5 tablespoons water per egg) as a substitute. -
1 teaspoon vanilla extract
A splash of vanilla elevates the flavors, adding warmth and sweetness. If you’re feeling adventurous, try using almond extract for a nutty twist! -
2 cups all-purpose flour
This is the backbone of your blondies. If you need a gluten-free option, almond flour or a 1:1 gluten-free flour blend should do the trick! -
1/2 teaspoon baking powder
This little leavening agent is what gives your blondies that perfect, chewy texture. -
1/4 teaspoon salt
Salt enhances all the flavors in the dessert. Don’t skip it! -
1 cup fresh strawberries, diced
Fresh strawberries add natural sweetness and a pop of color! If strawberries aren’t in season, feel free to use frozen, just make sure they’re thawed and drained. -
1 tablespoon lemon zest
This is where the magic happens! Lemon zest brightens up the flavor. Don’t have fresh lemons? You can use bottled lemon zest in a pinch, but fresh is always best. -
1/4 cup lemon juice
Lemon juice provides the tangy kick that complements the sweetness of the strawberries beautifully. Again, fresh is ideal, but bottled juice works, too!
Step-by-Step Instructions
Alright, let’s get baking! Here’s how to make these Strawberry Lemon Blondies step by step:
-
Preheat your oven to 350°F (175°C)
This is key to ensuring your blondies bake evenly and nicely! While the oven warms up, prepare your baking dish. -
Grease your baking dish
You can use cooking spray or line it with parchment paper for easy removal later. I like to use a 9×13 inch pan for this recipe, but you could also use smaller pans for thicker blondies—just adjust the baking time. -
Melt the butter
In a large mixing bowl, melt your butter. You can do this in the microwave or on the stovetop. Let it cool slightly before mixing in the sugar to avoid cooking the eggs later. -
Mix in the sugars
Add your brown sugar to the melted butter and stir until combined. You want the mixture to be smooth and slightly glossy. Pro tip: Using the back of your spatula to press down on the sugar can help dissolve any lumps! -
Add the eggs and vanilla
Now, crack in your eggs and add the vanilla extract. Beat the mixture until it’s light and fluffy. This step helps to incorporate air, which will give your blondies that lovely chewy texture we all crave. -
Sift in the dry ingredients
Now it’s time to bring it all together! Add the flour, baking powder, and salt to the wet ingredients. Gently fold this in to avoid overmixing. We want to keep that airy texture! -
Stir in the strawberries and lemon
Gently fold in the diced strawberries, lemon zest, and lemon juice. This is where the magic happens, as bright flavors combine with sweet berries. Just be careful not to crush the strawberries too much! -
Spread the mixture into your prepared pan
Pour your blondie mixture into the greased pan, smoothing it out with a spatula. Don’t worry about it being perfect; a rustic look is part of the charm! -
Bake
Pop your blondies into the oven and bake for 25–30 minutes, or until the edges are golden and a toothpick inserted in the center comes out with a few moist crumbs. Keep an eye on them during the last few minutes—every oven is a bit different! -
Let cool
Once out of the oven, allow the blondies to cool in the pan for about 10 minutes. Then, transfer them to a wire rack to cool completely. This waiting period is torture, I know, but trust me, it’s worth it!
Serving Suggestions
When it comes to serving these Strawberry Lemon Blondies, presentation is everything! Here’s how to plate them up beautifully:
-
Cut into squares
Use a sharp knife to cut your blondies into squares or rectangles. Try to cut them while they’re still slightly warm to avoid crumbling. -
Dust with powdered sugar
For that professional touch, dust a light coating of powdered sugar over the top. It not only looks beautiful but adds a little extra sweetness. -
Serve with whipped cream or ice cream
A dollop of whipped cream or a scoop of ice cream adds a creamy contrast to the chewy blondies. You could even add a sprinkle of lemon zest on top to carry through those fresh flavors! -
Fresh strawberries on the side
A few whole or sliced strawberries alongside the blondies not only enhances the presentation but also takes the flavor to the next level.
Recipe Variations
Now that you’ve mastered the classic version, here are some creative twists to keep things exciting:
-
Blueberry Lemon Blondies
Swap out the strawberries for fresh or frozen blueberries for a different fruity flavor. The tartness of blueberries pairs beautifully with lemon! -
Coconut Lemon Blondies
Add shredded coconut to the batter for a tropical flair. You could also top them with a sprinkle of toasted coconut before baking for an extra crunch. -
Lemon Poppy Seed Blondies
Incorporate a tablespoon of poppy seeds into the batter for a delightful crunch and a nod to classic lemon poppy seed muffins. -
White Chocolate Raspberry Blondies
Replace the strawberries with raspberries and toss in a handful of white chocolate chips for a rich and flavorful twist! -
Vegan Lemon Blondies
Use flax eggs, plant-based butter, and substitute the regular sugar for coconut sugar to make a vegan-friendly version that doesn’t compromise on taste!
Chef’s Notes
Creating these Strawberry Lemon Blondies is not just about following a recipe; it’s about capturing the essence of homemade goodness. The first time I made these, I remembered how my grandmother would always say, “Cooking is like love; it should be entered into with abandon or not at all.” It’s that philosophy that keeps me going in the kitchen!
As I adapted the recipe over time, I discovered that substituting fruits and playing with flavors makes each batch uniquely delicious. The best part? Each variation has become a little story, tied to the season or the company I’ve shared it with!
FAQs and Troubleshooting
Here are some common questions you might have while making your Strawberry Lemon Blondies:
-
Why are my blondies too cake-like?
If your blondies turned out more like a cake, it might be due to overmixing the batter or adding too much flour. Remember to mix just until combined! -
How do I know when they’re done baking?
Check for golden edges and a toothpick test. If it comes out with a few moist crumbs, they’re ready! Don’t wait until it comes out completely clean, or they may dry out. -
Can I freeze these blondies?
Absolutely! Once cooled, wrap the blondies tightly in plastic wrap and store them in an airtight container. They’ll keep well in the freezer for up to 3 months. Just thaw them at room temperature before serving. -
What if I can’t find fresh strawberries?
No worries! You can use frozen strawberries. Be sure to thaw and drain them well to prevent excess moisture in your blondies.
Nutritional Info
Now, let’s chat a bit about the nutrition of these delightful bars! While these Strawberry Lemon Blondies are definitely a treat, here’s a rough breakdown of what you can expect from a typical blondie (assuming the batch is cut into 16 squares):
- Calories: ~170 per blondie
- Fat: 7g
- Carbohydrates: 24g
- Sugar: 10g
- Protein: 2g
Keep in mind that nutritional values can vary based on specific ingredients and portion sizes. Enjoying these blondies as a part of a balanced diet is key!
Final Thoughts
And there you have it! Strawberry Lemon Blondies that are not only delicious but also filled with love and memories. Whether you’re celebrating a special occasion or just treating yourself to a little something sweet, these blondies are sure to delight.
So grab some fresh strawberries, preheat your oven, and get ready to create your own delicious memories in the kitchen. Remember, food isn’t just about sustenance; it’s about connection, warmth, and joy. Let’s spread that love, one blondie at a time!
Thanks for joining me today at Feastical! I can’t wait to hear about your kitchen adventures. Happy baking!
Print
Strawberry Lemon Blondies
- Total Time: 45 minutes
- Yield: 16 servings 1x
- Diet: Vegetarian
Description
Delicious, chewy blondies filled with fresh strawberries and a zesty lemon twist, perfect for any gathering or a sweet snack.
Ingredients
- 1 cup unsalted butter, melted
- 1 cup brown sugar
- 2 large eggs
- 1 teaspoon vanilla extract
- 2 cups all-purpose flour
- 1/2 teaspoon baking powder
- 1/4 teaspoon salt
- 1 cup fresh strawberries, diced
- 1 tablespoon lemon zest
- 1/4 cup lemon juice
Instructions
- Preheat your oven to 350°F (175°C).
- Grease your baking dish.
- Melt the butter.
- Mix in the sugars.
- Add the eggs and vanilla.
- Sift in the dry ingredients.
- Stir in the strawberries and lemon.
- Spread the mixture into your prepared pan.
- Bake for 25–30 minutes.
- Let cool.
Notes
Dust with powdered sugar before serving and serve with whipped cream or ice cream for an added touch.
- Prep Time: 15 minutes
- Cook Time: 30 minutes
- Category: Dessert
- Method: Baking
- Cuisine: American
Nutrition
- Serving Size: 1 blondie
- Calories: 170
- Sugar: 10g
- Sodium: 200mg
- Fat: 7g
- Saturated Fat: 4g
- Unsaturated Fat: 3g
- Trans Fat: 0g
- Carbohydrates: 24g
- Fiber: 1g
- Protein: 2g
- Cholesterol: 30mg
Keywords: blondies, dessert, strawberry, lemon, baking
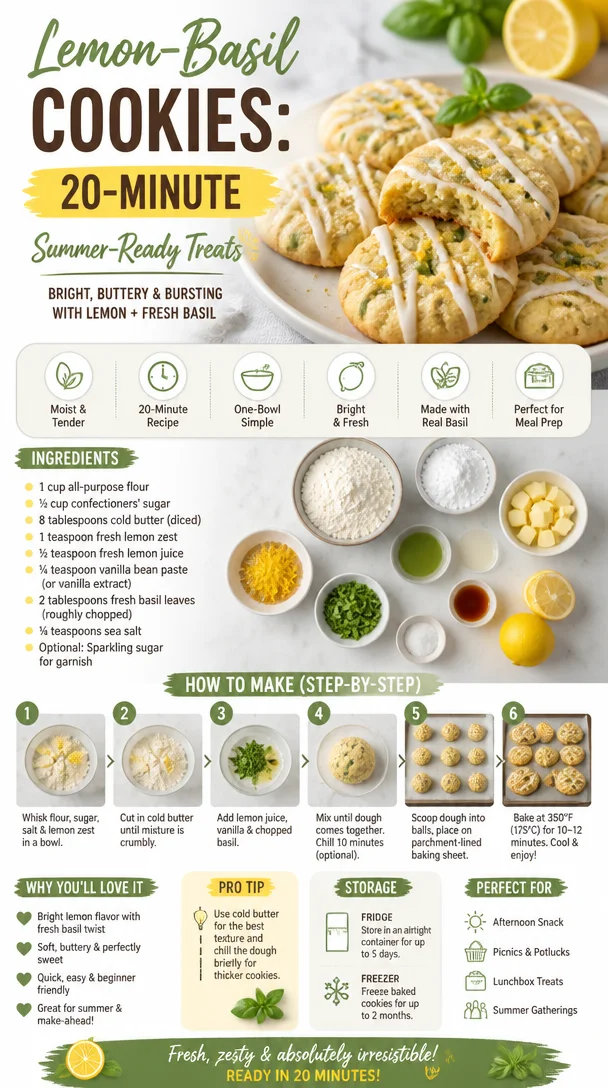
Lemon-Basil Cookies: 20-Minute Summer-Ready Treats
Lemon-Basil Cookies: A Refreshing Twist on a Classic Treat
Hey there, food lovers! I’m Beau Collier, your guide to all things delicious here at Feastical. Today, I’ve got something super special that’s perfect for any occasion—Lemon-Basil Cookies! Trust me, these cookies are a delightful mix of sweet and zesty, with a hint of herbaceous goodness from fresh basil. They’re not just your average cookie; they bring a bright twist to the traditional cookie lineup. Are you ready to dive into a recipe that’s sure to impress your friends and family? Grab your apron and let’s get started!
The Nostalgic Taste of Summer
Let me take you back a few summers ago when I first discovered the magical combination of lemon and basil. I was wandering through a local farmer’s market, soaking up the sun, when I stumbled upon a stall selling homemade cookies. The baker was sharing samples, and I was immediately hooked. One bite of their lemon-basil cookie transported me to a sun-drenched Italian kitchen where the aroma of fresh basil and lemons danced in the air. It was a match made in heaven!
That day sparked my passion for experimenting with flavors in the kitchen. I rushed home, determined to recreate that enchanting cookie. After a bit of trial and error (and a few too many taste tests), I finally settled on a recipe that had a delightful balance of sweetness and herbiness. Now, each time I whip up these cookies, I’m reminded of that sunny day and the creative spark it ignited in me. Let’s make some memories in your kitchen with these Lemon-Basil Cookies!
Ingredients You’ll Need
Before we dive into the mixing bowl, let’s gather our ingredients. Here’s your shopping list, along with some handy tips and substitutions:
-
1 cup all-purpose flour: This is the base for your cookies. You can substitute it with gluten-free flour if you’re looking to cut gluten.
-
½ cup confectioners’ sugar: The secret to that melt-in-your-mouth texture. If you don’t have confectioners’ sugar, you can blend regular sugar in a blender until fine.
-
8 tablespoons cold butter (diced): Butter adds richness. Ensure it’s cold for flakier cookies. For a dairy-free option, try using vegan butter or coconut oil.
-
1 teaspoon fresh lemon zest: This adds vibrant citrus notes. Always zest before juicing—it’s easier, and you won’t waste any fruit!
-
½ teaspoon fresh lemon juice: Brightens the flavor profile. Fresh is essential here; bottled lemon juice just doesn’t cut it.
-
¼ teaspoon vanilla bean paste (or vanilla extract): Vanilla enhances the overall flavor. If you only have extract, that’ll work fine too.
-
2 tablespoons fresh basil leaves (roughly chopped): The star ingredient! Use whole or torn leaves for a more rustic look. You can substitute with mint if you’re feeling adventurous.
-
¼ teaspoon sea salt: Elevates the flavors. If you’re using salted butter, you can skip this ingredient.
-
Optional: Sparkling sugar for garnish: Adds a delightful crunch and sparkle on top. If you don’t have it, granulated sugar works too!
Step-by-Step Instructions
Alright, here we go! Grab your mixing bowls, and let’s get baking.
-
Preheat the Oven: Begin by preheating your oven to 350°F (175°C). This ensures that your cookies bake evenly. Pro tip: If your oven tends to run hot, don’t hesitate to invest in an oven thermometer!
-
Combine Dry Ingredients: In a mixing bowl, whisk together the flour, confectioners’ sugar, and sea salt until well combined. This helps to evenly distribute the salt and sugar throughout the flour. No one wants a salted bite!
-
Add the Butter: Toss in the diced cold butter. Using your fingers or a pastry cutter, blend the butter into the flour mixture until it resembles coarse crumbs. This step is crucial; the cold butter is what gives your cookies that lovely tender texture.
-
Mix in the Flavorings: In a separate bowl, combine the lemon zest, lemon juice, vanilla paste, and chopped basil. Make sure to mix well—this magic blend is what really makes these cookies sing with flavor!
-
Combine Wet and Dry Ingredients: Gently pour the wet mixture into the dry ingredients. Stir until just combined. Don’t overmix; you want those cookies to stay wonderfully tender! A few floury patches are okay.
-
Shape the Cookies: Using a tablespoon, scoop out dough and roll it into balls. Place them on a baking sheet lined with parchment paper about 2 inches apart. They’ll spread a bit while baking.
-
Add the Sparkling Sugar: If you’re feeling fancy, sprinkle some sparkling sugar on top of each cookie. This adds a lovely crunch and shimmer that’s totally Instagram-worthy!
-
Bake: Pop the sheet in the preheated oven and bake for 12-15 minutes, or until the edges are lightly golden. Keep an eye on them—to achieve that perfect balance of chewy and crisp, you want them just set.
-
Cool: Once baked, remove from the oven and let the cookies cool on the baking sheet for a few minutes before transferring them to a wire rack. This helps them firm up and makes them easier to move without breaking.
-
Enjoy!: Once cooled, grab yourself a cup of tea or coffee (perhaps a glass of lemonade if you’re feeling extra zesty!) and enjoy these delightful cookies.
Serving Suggestions
When it comes to serving your Lemon-Basil Cookies, presentation is key! You can stack them on a beautiful plate to showcase their golden edges and vibrant green flecks of basil. Dust with a bit more confectioners’ sugar for that bakery feel. These cookies are fantastic alongside a refreshing glass of iced lemon tea or a chilled glass of prosecco for a summer soirée. If you’re serving them at a gathering, consider pairing them with a fresh fruit platter or a light salad to balance the flavors.
Recipe Variations
Now, let’s get creative! Here are a few delicious variations to try out:
-
Lemon-Basil Poppy Seed Cookies: Add a tablespoon of poppy seeds for a delightful crunch and a nutty flavor.
-
Lemon-Lavender Cookies: Swap out basil for culinary lavender for a fragrant twist that gives your cookies a flowery essence.
-
Lemon-Basil Shortbread Bars: Press the dough into a greased baking pan and bake as bars. Cut into squares for easy serving!
-
Chill for a Citrus Twist: For a refreshing twist, chill the cookie dough for an hour before baking. This helps with texture and intensifies the flavors!
-
Gluten-Free Option: Use a certified gluten-free flour blend to make these cookies gluten-free. They will still taste fabulous!
Chef’s Notes
As with any recipe, these Lemon-Basil Cookies have seen their fair share of tweaks and adaptations over the years. I remember baking these for the first time with my niece, who was only seven at the time. We had the most grand time making a mess—instead of zesting lemons, she promptly filled the bowl with basil leaves! We ended up with a very herb-friendly take on the cookies, proving that sometimes the best recipes come from accidental "kitchen catastrophes”!
FAQs and Troubleshooting
Here are a few common questions I often get about these cookies, along with some troubleshooting tips:
1. My cookies turned out too flat; what went wrong?
It sounds like your butter may have been too warm, or the dough wasn’t chilled. Make sure to use cold butter and let the dough chill in the fridge to firm it up before baking.
2. How do I know when the cookies are done?
Look for those golden edges! They might feel a bit soft at the center, but they will finish cooking as they cool on the baking sheet.
3. Can I freeze these cookies?
Absolutely! Once cool, place cookies in an airtight container. They’ll stay fresh in the freezer for up to three months. Just thaw them at room temperature before serving.
4. What if I don’t have fresh basil?
Fresh herbs make a big difference, but if you can’t find any, you could use a teaspoon of dried basil in a pinch. Just remember that dried herbs are more concentrated, so a little goes a long way!
Nutritional Information
Curious about the nutrition? Here’s a rough breakdown for one cookie (based on making about 12 cookies):
- Calories: 130
- Total Fat: 8g
- Saturated Fat: 5g
- Carbohydrates: 14g
- Sugars: 6g
- Protein: 1g
Of course, nutritional values can vary based on your ingredients and serving sizes, so be sure to adjust as needed!
Final Thoughts
And there you have it! Your very own batch of Lemon-Basil Cookies that brings a bit of sunshine to your kitchen. Whether you enjoy them fresh out of the oven or paired with tea on a rainy afternoon, these cookies are sure to become a favorite. Remember, cooking is all about experimenting and having fun, so don’t hesitate to make this recipe your own.
Get ready to share these zesty treats with the world, and don’t forget to leave a comment about your kitchen adventures with these cookies. Happy baking, and I can’t wait to share more yummy recipes with you soon! So, are you ready to take a bite of summer? Let’s bake!
PrintLemon-Basil Cookies
- Total Time: 30 minutes
- Yield: 12 cookies 1x
- Diet: Vegetarian
Description
A delightful mix of sweet and zesty cookies with a hint of fresh basil, perfect for any occasion.
Ingredients
- 1 cup all-purpose flour
- ½ cup confectioners’ sugar
- 8 tablespoons cold butter (diced)
- 1 teaspoon fresh lemon zest
- ½ teaspoon fresh lemon juice
- ¼ teaspoon vanilla bean paste (or vanilla extract)
- 2 tablespoons fresh basil leaves (roughly chopped)
- ¼ teaspoon sea salt
- Optional: Sparkling sugar for garnish
Instructions
- Preheat the oven: Begin by preheating your oven to 350°F (175°C).
- Combine dry ingredients: In a mixing bowl, whisk together the flour, confectioners’ sugar, and sea salt until well combined.
- Add the butter: Toss in the diced cold butter and blend until it resembles coarse crumbs.
- Mix in the flavorings: In a separate bowl, combine the lemon zest, lemon juice, vanilla paste, and chopped basil.
- Combine wet and dry ingredients: Gently pour the wet mixture into the dry ingredients and stir until just combined.
- Shape the cookies: Using a tablespoon, scoop out the dough and roll it into balls, placing them on a baking sheet lined with parchment paper.
- Add the sparkling sugar: Sprinkle some sparkling sugar on top of each cookie if desired.
- Bake: Bake for 12-15 minutes, or until the edges are lightly golden.
- Cool: Let the cookies cool on the baking sheet for a few minutes before transferring to a wire rack.
- Enjoy: Serve with tea or lemonade.
Notes
These cookies are fantastic alongside iced lemon tea or prosecco. Store in an airtight container for freshness.
- Prep Time: 15 minutes
- Cook Time: 15 minutes
- Category: Dessert
- Method: Baking
- Cuisine: Italian
Nutrition
- Serving Size: 1 cookie
- Calories: 130
- Sugar: 6g
- Sodium: 100mg
- Fat: 8g
- Saturated Fat: 5g
- Unsaturated Fat: 3g
- Trans Fat: 0g
- Carbohydrates: 14g
- Fiber: 0g
- Protein: 1g
- Cholesterol: 20mg
Keywords: cookies, lemon, basil, dessert, summer treats
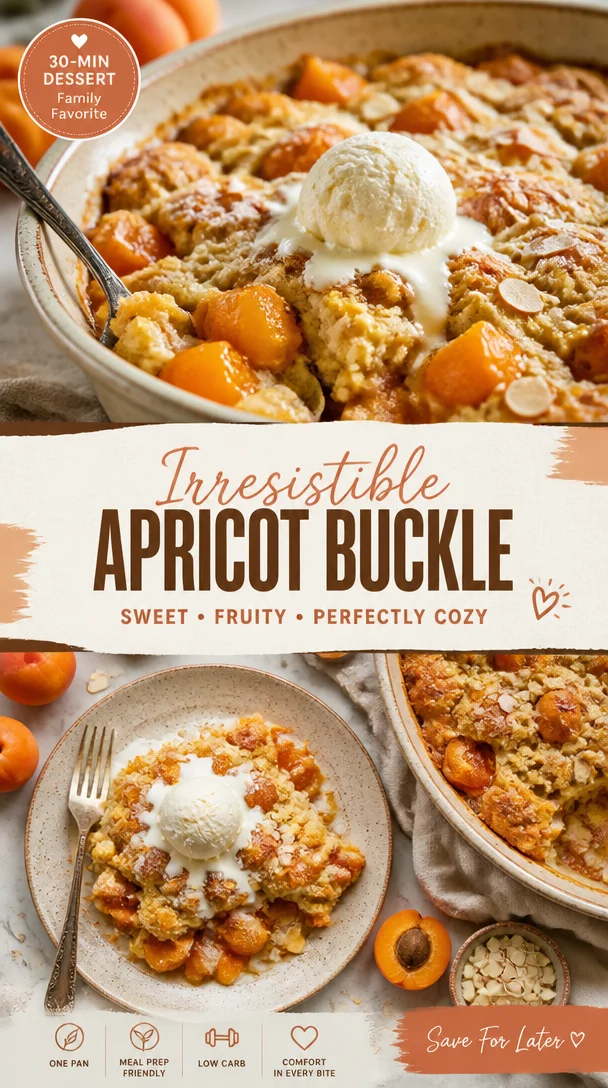
Apricot Buckle
Hey there, foodie friends! 🌟 Today, we’re diving into the sweet, sun-kissed world of apricots with a delightful dish that’s bound to become a superstar in your kitchen: Apricot Buckle! This cozy, comforting dessert is like a warm hug after a long day, and I can’t wait to share my love for it with you.
Now, if you’re wondering what a "buckle" is, it’s actually a type of fruit dessert that features a delicious cake base topped with fresh fruit— in this case, juicy apricots. As it bakes, the cake puffs around the fruit, creating a lovely buckled effect. With every bite, you’ll be treated to a perfect harmony of tender cake and sweet-tart apricot goodness.
Why do I love this dessert so much? It takes me right back to my childhood summers spent in my grandmother’s kitchen. She had an apricot tree in her backyard, and let me tell you, those fruits were little jewels of summer delight! We’d pick them fresh, their sweet fragrance mingling with the warm air, and turn them into something wonderful. Apricot Buckle was one of her signature recipes. The smell of it baking would draw everyone to the kitchen like moths to a flame.
So, if you’re ready to bring a bit of that nostalgia and a whole lot of deliciousness into your home, gather your apricots and let’s get baking! This dish is perfect for gatherings, cozy nights in, or just because you deserve a treat.
Personal Story
Let me paint a picture for you. It’s a sunny afternoon, and I’m around ten years old, running barefoot through my grandmother’s backyard. The grass prickles under my feet as I dash toward the apricot tree, its branches heavy with ripe, golden fruits. My grandma calls to me, “Beau! Come help me pick some apricots!” Those words spark pure joy within me!
Armed with a basket, we harvest bags of these plump beauties, laughter ringing through the air. Once we have our haul, we head into her warm kitchen, where the sunny light streams through the window, illuminating flour clouds and the tantalizing smell of vanilla.
Grandma would retreat into her calming rhythm, her hands dancing through the motions as she whipped up the batter for her famous Apricot Buckle. As the cake baked, we’d sneak bites of the raw apricot and giggle about the sticky sweetness. Nothing compared to the first slice pulled from the oven, still warm, with buttery crumbs and chunky apricot pieces. It’s a memory I cherish deeply, one that belongs to a simpler time when love was the main ingredient in every dish.
Ingredients
Here’s what you’ll need to capture that magical Apricot Buckle experience:
-
Fresh Apricots (about 2 cups): The star of the show! Juicy and sweet-tart, they’ll provide a burst of flavor. If fresh apricots aren’t available, try using canned in syrup—just drain them well.
-
All-Purpose Flour (2 cups): A good base for any cake, giving it structure. You can substitute with a gluten-free blend if you’re avoiding gluten.
-
Granulated Sugar (1 cup): This adds sweetness. For a healthier twist, feel free to use coconut sugar or a sugar substitute like monk fruit.
-
Unsalted Butter (1/2 cup or 1 stick): For tenderness and flavor. If you’re after a dairy-free version, coconut oil or a vegan butter can do the trick.
-
Baking Powder (2 teaspoons): The leavening agent to help your buckle rise and give it a light texture.
-
Salt (1/2 teaspoon): Just a pinch to balance the sweetness! Consider using sea salt for a more nuanced flavor.
-
Eggs (2 large): These bind the ingredients and add moisture. To make this vegan, you can use flax eggs (1 tablespoon ground flaxseed mixed with 2.5 tablespoons water per egg).
-
Milk (1/2 cup): For moisture and richness. You can opt for any milk—dairy, almond, oat… you name it!
-
Vanilla Extract (1 teaspoon): The secret ingredient that amplifies the flavors! A splash of almond extract can be a delightful alternative as well.
-
Optional Topping: Cinnamon Sugar: A mix of sugar and cinnamon for a delightful topping—isn’t that a cozy touch?
Easy peasy, right? Just a few staple ingredients, and you’ll be halfway to dessert heaven!
Step-by-Step Instructions
Alright, let’s get baking! Here’s how to create the most scrumptious Apricot Buckle, without a hitch:
-
Preheat Your Oven: Start by preheating your oven to 375°F (190°C). A hot oven is essential to getting that beautiful, golden-brown crust.
-
Prep Your Pan: Grease a 9×9-inch baking dish or an 8×8-inch square pan with butter or cooking spray. This will ensure that your buckle slides out easily when it’s time to serve.
-
Prepare the Apricots: Wash the apricots thoroughly. Slice them in half and remove the pits. If you’re feeling adventurous, cut each half into quarters for more bite-sized pieces and set them aside.
-
Make the Cake Batter:
- In a large mixing bowl, cream together the softened butter and sugar until light and fluffy. This should take about 3–5 minutes. (Chef tip: The fluffier the butter-sugar mixture, the lighter your cake will be!)
- Add the eggs one at a time, mixing well after each addition. Then, stir in the vanilla extract.
-
Combine Dry Ingredients: In another bowl, whisk together the flour, baking powder, and salt. Gradually add this dry mixture to the wet ingredients, alternating with the milk. Mix until just combined. (Pro tip: Avoid over-mixing to keep your cake tender!)
-
Fold in Apricots: Gently fold in half of the apricot pieces into the batter. This gives you that lovely fruity surprise in every bite!
-
Pour and Level: Pour the batter into your prepared baking dish and spread it evenly. If you’re feeling fancy, arrange the remaining apricot pieces on top for an inviting look.
-
Sprinkle the Topping: Add a generous sprinkle of cinnamon sugar over the top. This is optional, but it gives an extra layer of warmth and sweetness.
-
Bake!: Pop the buckle into the oven and let it bake for about 35–40 minutes, or until a toothpick inserted in the center comes out clean. You’re looking for a golden-brown top that’s slightly firm to the touch. (Kitchen hack: To prevent over-browning, place a piece of aluminum foil over the top if it gets too dark before it’s fully baked.)
-
Cool and Serve: Once it’s done, take the buckle out of the oven and allow it to cool in the pan for about 10 minutes. This will make it easier to slice. Scoop it out into generous squares and serve it warm or at room temperature.
-
Enjoy!: Top it with a dollop of whipped cream, a scoop of vanilla ice cream, or simply enjoy it as is. You can get creative here!
Serving Suggestions
Let’s talk about plating! Apricot Buckle is delightful when served warm, but you can add a personal touch. Here are a few serving ideas:
-
Classic Style: Serve your buckle squares on a charming plate, topped with a dollop of freshly whipped cream and a sprinkle of cinnamon for that extra pizazz.
-
À la Mode: For those who want to indulge, add a scoop of vanilla ice cream on the side—this contrast of warm cake and cold ice cream is heavenly!
-
Breakfast Twist: Why not have it for breakfast? Serve it up with a side of Greek yogurt drizzled with honey and berries for a nutritious start to your day.
-
Garnish with Fresh Herbs: A mint or basil leaf placed on top can freshen up the presentation. It might sound fancy, but it’s super easy!
Whatever your style, the key is to enjoy the process and dig in with family and friends!
Recipe Variations
Now, let’s get a little creative! Here are some fun twists to put your spin on Apricot Buckle:
-
Berry Good: Mix in some blueberries or raspberries along with the apricots. The tartness of berries complements the sweet apricots perfectly!
-
Nutty Delight: Add chopped walnuts or almonds to the batter. They give the buckle a lovely crunch that’ll keep you coming back for more.
-
Spiced Up: Try adding a touch of cardamom or ginger to the batter for an aromatic twist. It brings warmth that’s just right for colder seasons.
-
Chocolate Chunk: Who doesn’t love chocolate? Mix in some dark chocolate chunks for an indulgent treat. The melting chocolate with the juicy apricots is nothing short of magic!
-
Vegan Version: As mentioned earlier, substituting ingredients like flax eggs, almond milk, and vegan butter results in a vegan-friendly buckle that’s just as delicious!
Explore these variations and make the recipe your own—you can’t go wrong!
Chef’s Notes
This recipe holds a special place in my heart because it’s evolved over the years. There were times I experimented with different fruits, adding strawberries, peaches, and even plums. Each time, it was a delightful surprise!
I remember one summer, I had more apricots than I knew what to do with. My friends and I had a baking party, and we practically turned my kitchen into a fruit buckle factory! We laughed, danced, and made a complete mess of flour and batter. Those are moments I treasure, and they remind me that cooking is more than just about food—it’s about making memories.
So, don’t stress if things get a little messy in your kitchen—it’s part of the fun!
FAQs and Troubleshooting
-
Why did my buckle sink in the middle?
- That could be due to overmixing or underbaking. Make sure to mix just until incorporated and give it enough time in the oven for structure.
-
Can I freeze the buckle?
- Absolutely! Cool it completely, slice it, and layer it with parchment paper in an airtight container before freezing. It’ll last for about 2-3 months.
-
What if I don’t have apricots?
- No problem! This recipe is versatile—use any fruit you love or have on hand. Just make sure to adjust the sugar based on the fruit’s sweetness.
-
Can I make this gluten-free?
- Yes, use a 1:1 gluten-free flour blend, and you’re all set! Just check the other ingredients for gluten-friendly options.
Nutritional Info
I believe in enjoying delicious food without the guilt, but I also know many of you are mindful of nutritional details. Here’s a rough estimate for a single serving (based on the full recipe yielding about 9 squares):
- Calories: 240
- Total Fat: 10g
- Saturated Fat: 5g
- Cholesterol: 57mg
- Sodium: 150mg
- Total Carbohydrates: 36g
- Dietary Fiber: 1g
- Sugars: 12g
- Protein: 3g
Keep in mind, these values may vary based on specific ingredients, so adjust as you please!
Final Thoughts
And there you have it, folks! Your very own Apricot Buckle, packed with flavors and warm memories. Isn’t it incredible how food transcends generations and connects us to cherished moments?
As you whip this up in your kitchen, I hope you find joy in each step, whether you’re baking alone or sharing the experience with loved ones. Remember, it’s all about savoring those delightful bites and creating experiences that are just as sweet as the dessert itself.
So, roll up those sleeves, embrace the process, and let’s celebrate the joy of cooking together. Happy baking, and may your kitchen be filled with warmth, laughter, and Apricot Buckle goodness! 🍑💛
Print
Apricot Buckle
- Total Time: 55 minutes
- Yield: 9 servings
- Diet: Vegetarian
Description
A cozy dessert featuring a tender cake base topped with juicy apricots, perfect for any occasion.
Ingredients
- Fresh Apricots (about 2 cups)
- All-Purpose Flour (2 cups)
- Granulated Sugar (1 cup)
- Unsalted Butter (1/2 cup or 1 stick)
- Baking Powder (2 teaspoons)
- Salt (1/2 teaspoon)
- Eggs (2 large)
- Milk (1/2 cup)
- Vanilla Extract (1 teaspoon)
- Optional Topping: Cinnamon Sugar
Instructions
- Preheat your oven to 375°F (190°C).
- Grease a 9×9-inch baking dish or an 8×8-inch square pan with butter or cooking spray.
- Wash the apricots and slice them in half to remove the pits.
- Cream together the softened butter and sugar until light and fluffy.
- Add the eggs one at a time, mixing well after each addition, then stir in the vanilla extract.
- Whisk together the flour, baking powder, and salt in a separate bowl.
- Combine the dry mixture with the wet ingredients, alternating with the milk.
- Fold in half of the apricot pieces into the batter.
- Pour the batter into the prepared baking dish and level it out.
- Sprinkle cinnamon sugar over the top if desired.
- Bake for about 35–40 minutes, or until a toothpick comes out clean.
- Cool the buckle for about 10 minutes, then serve warm.
Notes
Pair with whipped cream or ice cream for a delightful treat.
- Prep Time: 15 minutes
- Cook Time: 40 minutes
- Category: Dessert
- Method: Baking
- Cuisine: American
Nutrition
- Serving Size: 1 square
- Calories: 240
- Sugar: 12g
- Sodium: 150mg
- Fat: 10g
- Saturated Fat: 5g
- Unsaturated Fat: 3g
- Trans Fat: 0g
- Carbohydrates: 36g
- Fiber: 1g
- Protein: 3g
- Cholesterol: 57mg
Keywords: apricot buckle, dessert, baking, sweet treats, fruit dessert

No-Bake Red White & Blue Lasagna: Patriotic Summer Dessert
Red, White, and Blue Dessert Lasagna: The Ultimate No-Bake Patriotic Treat
Hey there, fellow foodies! Welcome to Feastical, where we celebrate food that’s not just a recipe but an experience that brings joy, laughter, and a pinch of nostalgia into our kitchens. If you’re looking for something fantastic and eye-catching to make for your next barbecue or patriotic celebration, then let me introduce you to the delightful Red, White, and Blue Dessert Lasagna! This no-bake treat is not only a feast for the eyes but also a palate-pleaser that combines rich creaminess with fruity delights. So put your apron on, and let’s dive into the deliciousness!
A Slice of Nostalgia
I still remember the first time I indulged in a dessert lasagna. It was at my Aunt Linda’s Fourth of July picnic, and with every layer, I could taste the love and togetherness that filled her kitchen. Layers of chocolate cookies, sweet cream cheese, and fresh strawberries and blueberries all come together like a symphony of flavors. As kids, we devoured it in perfect harmony while the fireworks lit up the sky, and it became a tradition that I cherish. That dessert was more than just food; it was a canvas painted with happy memories of laughter and summer sunshine. Today, I’ll share my take on that beloved dish and help you create your own memorable moments with this spectacular no-bake dessert!
Ingredients
Let’s gather everything we need to whip up this fantastic dessert lasagna. Here’s what you’ll be using:
-
36 Chocolate Sandwich Cookies (Approx. 14.3 oz / 405g)
A crunchy base that adds depth and texture. You can swap these for chocolate graham crackers for a slightly different flavor profile! -
6 tbsp Unsalted Butter (85g, melted)
This helps bind the cookie crust together. If you need a dairy-free option, coconut oil works beautifully here! -
16 oz Cream Cheese (450g, softened)
The creamy heart of this dessert! You can use a dairy-free cream cheese if you’re looking for a vegan option. -
1/2 cup Powdered Sugar (60g)
Sweetness is essential! If you want a lower sugar option, consider using a sugar substitute like monk fruit sweetener. -
1 tsp Vanilla Extract (5ml)
A whisper of vanilla elevates all the flavors. No vanilla? Almond extract is a delightful substitute! -
2 cups Strawberries (300g, hulled)
Fresh and juicy strawberries add vibrant red layers. Frozen strawberries can be used, but make sure to drain excess liquid. -
1/4 cup Granulated Sugar (50g)
This will sweeten the berry mixture. Use less or a sugar alternative to taste. -
1 tbsp Cornstarch (8g)
This helps thicken the strawberry filling. You can substitute with arrowroot powder if you prefer something different. -
2 cups Blueberries (300g)
A burst of blueberry goodness! If you can’t find fresh blueberries, frozen ones work, but thaw and drain them first. -
1/4 cup Granulated Sugar (50g)
Another sweet touch for the blueberry layer. Again, feel free to switch it out for your preferred sweetener. -
1 tbsp Cornstarch (8g)
Used just like in the strawberry mixture. Arrowroot works great here too! -
2 cups Heavy Whipping Cream (480ml, chilled)
This is what makes the layers fluffy and dreamy! For a lighter version, you can substitute with whipped coconut cream. -
1/4 cup Powdered Sugar (30g)
To sweeten the whipped cream—because who doesn’t love a little extra sweetness? -
2 tbsp Star Sprinkles (Red, white, and blue)
These are for decoration, and they add a festive touch! You can use any sprinkles you have on hand if you prefer.
Step-by-Step Instructions
Now that we have our ingredients ready, let’s get to the fun part—making the dessert lasagna! Follow these steps, and you’ll be on your way to creating a delightful masterpiece.
-
Make the Cookie Crust
In a food processor, blend the chocolate sandwich cookies into fine crumbs. If you don’t have a food processor, you can put them in a zip-lock bag and crush them with a rolling pin—frustration-busting therapy included! Once you have crumbs, transfer them to a mixing bowl and stir in the melted butter. Press this mixture into the bottom of a 9×13 inch dish. Use the back of a measuring cup or your hands to ensure it’s packed tightly. This will give you a sturdy base for the layers above! -
Prepare the Strawberry Filling
In a medium bowl, combine the hulled strawberries, 1/4 cup granulated sugar, and 1 tbsp cornstarch. Toss them together to coat. Let this sit for about 10 to 15 minutes while the sugar works its magic on the strawberries. This will create a beautiful syrup that will intensify the strawberry flavor! -
Cream Cheese Mixture
In a separate large bowl, beat together the softened cream cheese, 1/2 cup powdered sugar, and 1 tsp vanilla extract with an electric mixer until smooth and creamy. If you want a little extra fluffiness, beat in 1 cup of heavy whipping cream until it forms soft peaks. This will make your cream layer light and luscious! -
Layer It Up
Start by spreading half of the cream cheese mixture evenly over the cookie crust. Next, spoon half of the strawberry filling over the top. Repeat these layers—first another layer of cream cheese mixture and then the rest of the strawberries. This creates a textural harmony as you dig in! -
Creating the Blueberry Layer
Repeat the same process with blueberries. Toss the blueberries with 1/4 cup granulated sugar and 1 tbsp cornstarch. Let this sit while you finish the layers. Portion out the remaining cream cheese mixture, spread it over the strawberries, then add your lovely blueberries on top. The colors are really coming together now! -
Whipped Topping
Whip the remaining 1 cup of heavy whipping cream with 1/4 cup powdered sugar until you reach stiff peaks. You want this whipped topping to be thick and fluffy. Spread it evenly over the blueberry layer, covering everything nicely. -
Final Touch
To finish off, sprinkle those fun star sprinkles on top for a festive touch! Feel free to go wild with the decoration—make it as fun and colorful as you like. -
Chill, Then Serve
Cover the lasagna with plastic wrap and pop it in the fridge for at least 4-6 hours, or ideally overnight. This will allow the flavors to meld beautifully together, and it’ll be easier to slice.
Serving Suggestions
When it’s time to serve, bring out this vibrant dessert lasagna and let it shine at your gathering! Slice it into squares, and for an extra touch, serve each piece with a dollop of extra whipped cream and a sprinkle of fresh berries on the side. You can also present it on a festive platter, garnishing with fresh mint leaves to give it that extra pop of color. Don’t forget to snap a few pics before everyone digs in—you’ll want to capture the comments of pure delight from your friends and family!
Recipe Variations
Here are a few fun twists you can try to make this recipe your own:
-
Brownie Base: Swap out the chocolate cookies for brownies! This adds a fudgy twist that chocolate lovers will adore.
-
Coconut Layer: Incorporate a layer of toasted shredded coconut in between the layers for a tropical vibe.
-
Peppermint Twist: For a winter celebration, add a few drops of peppermint extract to the cream cheese mixture and use crushed peppermint candies as a topping.
-
Seasonal Fruit: Feel free to change up the fruit based on the season. Peaches and blackberries make a delightful summer treat, while cranberries and orange zest are fantastic for fall or winter!
-
Dairy-Free Version: Use non-dairy cream cheese, whipped coconut cream, and your favorite dairy-free cookies for a deliciously inclusive dessert.
Chef’s Notes
As I’ve grown more comfortable in the kitchen, I’ve found that sharing recipes has become a way to connect with others. I love how a dish can tell a story. This dessert lasagna has gone from a simple creation to a family favorite, and I often hear requests for it during special occasions. You can truly make it your own by adding family traditions or even an unexpected ingredient. Every lasagna I make has a little piece of love in it—because that’s what food is all about.
FAQs and Troubleshooting
1. Can I use frozen fruit?
Absolutely! Just be sure to thaw and drain your frozen fruit completely, so the excess liquid doesn’t affect the dessert’s texture.
2. My whipped cream didn’t whip! What went wrong?
Make sure your whipping cream is cold and that you’re using heavy whipping cream. Be careful not to overbeat—it can turn grainy and become butter instead of whipped cream!
3. How long will this dessert last in the fridge?
It’s best enjoyed fresh, but it can last up to 3-4 days in the fridge. Just cover it tightly to keep it fresh.
4. Can I make this ahead of time?
Yes! This dessert is perfect for making ahead as it needs time to chill. It actually tastes better the next day after all the flavors meld together!
Nutritional Info
This delicious dessert can be enjoyed within a balanced diet, especially when shared with friends and family! Here’s a rough estimate of what’s in a slice (1/12th of the recipe):
- Calories: Approximately 290
- Total Fat: 19g
- Saturated Fat: 10g
- Carbohydrates: 28g
- Sugars: 15g
- Fiber: 1g
- Protein: 3g
Remember that nutritional values can change depending on substitutes and variations you make!
Final Thoughts
Cooking is not just about following a recipe; it’s about creating memories, sharing love, and making connections. This Red, White, and Blue Dessert Lasagna embodies all of that, just like my Aunt Linda’s cherished creation. As you gather around the table with your loved ones, I hope each slice represents laughter, joy, and most importantly, a love for food. So, roll up your sleeves, get creative, and let’s make every occasion a feast worth remembering!
Until next time, keep those forks ready—there’s always something delicious on the horizon here at Feastical!
Print
Red, White, and Blue Dessert Lasagna
- Total Time: 360 minutes
- Yield: 12 servings 1x
- Diet: Vegetarian
Description
A delightful no-bake dessert lasagna featuring layers of chocolate cookies, cream cheese, and fresh strawberries and blueberries, perfect for patriotic celebrations.
Ingredients
- 36 Chocolate Sandwich Cookies (Approx. 14.3 oz / 405g)
- 6 tbsp Unsalted Butter (85g, melted)
- 16 oz Cream Cheese (450g, softened)
- 1/2 cup Powdered Sugar (60g)
- 1 tsp Vanilla Extract (5ml)
- 2 cups Strawberries (300g, hulled)
- 1/4 cup Granulated Sugar (50g)
- 1 tbsp Cornstarch (8g)
- 2 cups Blueberries (300g)
- 1/4 cup Granulated Sugar (50g)
- 1 tbsp Cornstarch (8g)
- 2 cups Heavy Whipping Cream (480ml, chilled)
- 1/4 cup Powdered Sugar (30g)
- 2 tbsp Star Sprinkles (Red, white, and blue)
Instructions
- Make the cookie crust by blending chocolate sandwich cookies into fine crumbs. Stir in melted butter and press into the bottom of a 9×13 inch dish.
- Prepare the strawberry filling by combining hulled strawberries, 1/4 cup granulated sugar, and 1 tbsp cornstarch in a bowl.
- Cream the cream cheese with 1/2 cup powdered sugar and 1 tsp vanilla extract until smooth and creamy, adding 1 cup heavy whipping cream for fluffiness if desired.
- Layer half of the cream cheese mixture over the cookie crust followed by half of the strawberry filling. Repeat with remaining mixtures.
- Create the blueberry layer by tossing blueberries with 1/4 cup granulated sugar and 1 tbsp cornstarch, then add to the lasagna.
- Whip remaining 1 cup heavy whipping cream with 1/4 cup powdered sugar until stiff peaks form and spread over the blueberry layer.
- Finish with star sprinkles on top and refrigerate for 4-6 hours or overnight before serving.
Notes
For best results, allow chilling overnight. You can use different fruits and opt for dairy-free alternatives if desired.
- Prep Time: 30 minutes
- Cook Time: 0 minutes
- Category: Dessert
- Method: No-Bake
- Cuisine: American
Nutrition
- Serving Size: 1 serving
- Calories: 290
- Sugar: 15g
- Sodium: 150mg
- Fat: 19g
- Saturated Fat: 10g
- Unsaturated Fat: 8g
- Trans Fat: 0g
- Carbohydrates: 28g
- Fiber: 1g
- Protein: 3g
- Cholesterol: 60mg
Keywords: no-bake dessert, patriotic dessert, summer treat, dessert lasagna, Fourth of July

Ingredient Raspberry Bars: Quick, No-Bake Summer Treats
Indulge in Sweet Simplicity: Fabulous Five Ingredient Raspberry Bars
Hey there, fellow food enthusiasts! Today, we’re diving into something delightfully simple yet fabulously tasty: Fabulous Five Ingredient Raspberry Bars. As a chef who adores whipping up kitchen magic with minimal fuss—and maximum flavor—I’m thrilled to share this creamy, fruity delight that is perfect for any occasion. Whether you’re looking to impress guests at a gathering or simply want a sweet treat to enjoy while binge-watching your favorite show, these raspberry bars are the answer.
I mean, who doesn’t love the sweet and tart balance of raspberry jam enveloped in a buttery, melt-in-your-mouth crust? It’s like a warm hug from your grandma, mixed with the perks of modern convenience. If you’re new to the world of baking or you’re a seasoned pro, these bars are accessible yet strikingly delicious. Plus, with only five ingredients, you won’t have to wrestle with an overflowing grocery cart or a complicated recipe. Let’s get those aprons on and embark on this sweet adventure together!
A Bite of Nostalgia
When I think of raspberry bars, I’m transported back to my childhood kitchen, where the air buzzed with chatter and laughter, and the smell of something delicious baked in the oven was like a siren call. My mom used to whip up her own version of berry bars every summer when the raspberries were at their sweetest. I remember lurking by the kitchen, eager to sneak a taste while she warned me not to “spoil my appetite.” As if!
Those summer days were filled with friends running in and out of the house, all of us enveloped in the warmth of the sun and the delicious aroma that wafted through the open windows. My friends and I would tear into those bars just as soon as they cooled, the sweet raspberry filling smeared across our fingers and faces, punctuated by bouts of giggles and joy. It’s a memory I cherish, and it’s the backdrop for my recipe today—summoning the simplicity and delight of good food shared among friends.
So, grab a seat and a cup of coffee (or tea, no judgment here!), as we get into the nitty-gritty of whipping up these fabulous raspberry bars!
Ingredients to Gather
Here’s what you’ll need to create your own batch of scrumptious raspberry bars:
-
1 cup unsalted butter, softened
This forms the base of your crust, lending that rich flavor and melt-in-your-mouth texture. If you’re short on time, you can use margarine, but I highly recommend butter for the best taste. -
2 1/4 cups all-purpose flour
A staple in almost all baking recipes, this will give your bars the structure they need. Need a gluten-free option? Try using a gluten-free all-purpose flour blend. -
1 cup granulated sugar
This adds sweetness and a delightful crunch to the topping. For a lower-calorie alternative, you can experiment with coconut sugar or a sugar substitute, but keep in mind the final texture might vary slightly. -
1 large egg, room temperature
The egg helps bind everything together, giving these bars their lovely texture. If you’re vegan or egg-free, you can substitute with flaxseed meal mixed with water as a binding agent. -
1 jar seedless raspberry jam (9-12 ounces)
The star of the show! Look for high-quality jam for the best flavor, and don’t hesitate to switch it up with a different flavor, like blackberry or strawberry, if you prefer.
Step-by-Step Instructions
Let’s get cooking! Follow these detailed steps to create your fabulous raspberry bars.
-
Preheat the Oven
Start by preheating your oven to 350°F (175°C). This ensures that your raspberry bars bake evenly right from the get-go. -
Prepare Your Baking Dish
Grease a 9×9-inch baking dish or line it with parchment paper for easy removal. If you’re using parchment, make sure it hangs over the edges a bit so you can lift the bars out easily later—like a cozy food hammock. -
Mixing the Crust
In a large mixing bowl, cream the softened butter and granulated sugar together. I like to use an electric mixer for this step. Beat it until fluffy and light—about 2-3 minutes should do the trick. This is where the magic starts! -
Incorporate the Egg
Add in the egg and mix until just combined. Don’t overdo it! Overmixing can lead to tougher bars; we want them to be tender. -
Add Flour
Gradually add in the flour. Mix just until the flour disappears—again, we’re looking for a tender texture here, not a tough one! -
Spread the Base
Press about two-thirds of the mixture firmly into the bottom of your prepared baking dish to form the base crust. Really press down; we want this to be sturdy enough to hold the juicy raspberry filling. -
Layer the Jam
Spread the raspberry jam evenly over the crust. Don’t be shy—make sure you cover it! This is where all the deliciousness lies. -
Crumble the Topping
Now, take the remaining dough and crumble it over the jam layer. It’s okay if some jam peeks through—those little bits of jam are going to be heavenly! -
Bake
Pop your dish in the preheated oven and bake for about 30-35 minutes, or until the top is golden brown. The aroma will fill your kitchen and have your stomach grumbling in no time! -
Cool and Slice
Once baked, remove your bars from the oven and let them cool in the dish for about 10-15 minutes. Then, lift them out using the parchment paper (if you used it) and let them cool completely on a wire rack. Once cooled, slice them into bars and get ready to dig in!
Serving Suggestions
These raspberry bars are perfect for nearly any occasion! Here’s how I love to serve them:
-
Dust with Powdered Sugar
For that classic touch, lightly dust the cooled bars with powdered sugar. It adds a lovely presentation and a touch of sweetness. -
Pair with Ice Cream
Serve warm raspberry bars alongside a scoop of vanilla or raspberry sorbet for a delightful dessert that’s sure to impress. -
Add Fresh Berries
Don’t stop at just bars! Garnish your serving plate with fresh raspberries or even a sprig of mint for a pop of color. -
Perfect for Picnics
These bars are portable and easy to pack for picnics. Just cut them into squares, wrap them in parchment, and enjoy them on the go!
Recipe Variations
Why not mix things up? Here are some fun variations you can try with your raspberry bars:
-
Different Jams
Get creative with flavors! Switch the raspberry jam for other fruit jams like blueberry, apricot, or even lemon curd for a zingy twist. -
Nutty Addition
Incorporate chopped nuts, like almonds or walnuts, into the crust or crumble topping for added texture and flavor. -
Chocolate Chips
Stir in some semi-sweet or dark chocolate chips into the crumble topping for a rich chocolatey surprise. -
Lemon Zest
Add lemon zest to the butter-sugar mixture for a refreshing hint of citrus that pairs fabulously with raspberries.
Chef’s Notes
Oh, where do I even begin? This recipe has been a staple in my kitchen for years, and I can honestly say everyone who tries it goes insane for it! I’ve experimented with different variations, like almond and chocolate, and they always come out delicious.
One of my fondest memories involves a bake sale I participated in during my culinary school days where I brought these raspberry bars. They were the first item to sell out, and I ran back home to bake another batch. The joy of creating something that brings smiles is unmatched, and that’s what cooking is all about, folks!
FAQs and Troubleshooting
Here are a few common questions and potential pitfalls to avoid while making your raspberry bars:
-
Why are my bars falling apart?
If they crumble too easily, it could be that the crust isn’t pressed firmly enough. Make sure to really compact the base and crumble topping. -
Can I use fresh raspberries instead of jam?
Fresh raspberries can be used, but you’ll need to add some sugar and maybe a thickening agent to keep the filling from being too runny. -
What if I don’t have raspberry jam?
Any seedless fruit jam will work. If you prefer a fresh alternative, consider making your own fruit compote. -
How do I store leftovers?
Store these delicious bars in an airtight container at room temperature for about 2-3 days. They can also be refrigerated for longer freshness.
Nutritional Info
Here’s the breakdown for each fabulous raspberry bar (based on a standard recipe serving of 16):
- Calories: Approximately 210
- Total Fat: 10g (Saturated Fat: 6g)
- Cholesterol: 30mg
- Sodium: 60mg
- Total Carbohydrates: 30g (Dietary Fiber: 0.5g, Sugars: 10g)
- Protein: 2g
Keep in mind, nutritional values may vary based on ingredient brands and exact quantities used. Modifications may change the overall nutrition, too!
Final Thoughts
And there you have it—fabulous five ingredient raspberry bars that are not only easy to make but also steal the show wherever they go! Whether you’re crafting these delectable treats for yourself or to share with friends and family, I hope this recipe brings you as much joy as it has brought me over the years.
Remember, cooking is all about exploration; don’t hesitate to experiment and make this recipe your own. I can’t wait to hear about your culinary adventures! So go ahead, bring out those ingredients and bake a batch of joy today. Until next time, happy cooking!
Print
Fabulous Five Ingredient Raspberry Bars
- Total Time: 50 minutes
- Yield: 16 servings 1x
- Diet: Vegetarian
Description
Delight in easy-to-make raspberry bars that provide a perfect balance of sweet and tart with just five ingredients.
Ingredients
- 1 cup unsalted butter, softened
- 2 1/4 cups all-purpose flour
- 1 cup granulated sugar
- 1 large egg, room temperature
- 1 jar seedless raspberry jam (9–12 ounces)
Instructions
- Preheat the oven to 350°F (175°C).
- Grease a 9×9-inch baking dish or line it with parchment paper.
- Mix the softened butter and granulated sugar together until fluffy, about 2-3 minutes.
- Add the egg and mix until just combined.
- Gradually add the flour and mix until it disappears.
- Press two-thirds of the mixture firmly into the bottom of the prepared baking dish.
- Spread the raspberry jam evenly over the crust.
- Crumble the remaining dough over the jam layer.
- Bake for 30-35 minutes, or until golden brown.
- Cool in the dish for 10-15 minutes before slicing.
Notes
These bars can be garnished with powdered sugar, fresh berries, or paired with ice cream for serving.
- Prep Time: 15 minutes
- Cook Time: 35 minutes
- Category: Dessert
- Method: Baking
- Cuisine: American
Nutrition
- Serving Size: 1 bar
- Calories: 210
- Sugar: 10g
- Sodium: 60mg
- Fat: 10g
- Saturated Fat: 6g
- Unsaturated Fat: 4g
- Trans Fat: 0g
- Carbohydrates: 30g
- Fiber: 0.5g
- Protein: 2g
- Cholesterol: 30mg
Keywords: raspberry bars, dessert, easy baking, five ingredient recipe, sweet treat

Peach Sorbet
Cool Off with Homemade Peach Sorbet: A Summer Delight
Hey there, fellow foodies! Let me tell you, there’s no better way to soak up the summer sun than with a delightful bowl of homemade peach sorbet. If you’re like me, you can’t resist the sweet, juicy flavor of peaches. They’re the golden gems of summer, and when you transform them into sorbet, pure magic happens! So, grab a comfy seat and a cold drink because we’re diving into a simple, scrumptious recipe that’ll keep you refreshed and smiling during those hot days!
A Little Slice of Summer: A Personal Story
Growing up in the South, summer meant two things: sticky humidity and delicious peaches. Every year, my family would take a trip to the local peach orchard. I still remember the excitement of picking sun-ripened peaches from the trees, their fuzzy skins warm from the sun. We’d load up our basket, and after a day of picking, we’d head home, where my mom would whip up batches of peach everything – cobblers, jams, and especially sorbet.
Once, my cousin and I decided we could make our own sorbet to impress the adults. Armed with a few overripe peaches, a bag of sugar, and a dream, we boldly ventured into the kitchen. The blending, the pouring, and cheeky taste-testing filled the air with laughter and yummy smells. Though we got a bit too liberal with the sugar (sorry, Mom!), that first scoop was pure joy. We had created more than just frozen fruit; we made memories. Now, every time I make peach sorbet, it takes me back to those carefree summer days filled with laughter, sticky fingers, and, of course, that vibrant peach flavor. Let’s recreate some of that magic today!
Ingredients
Here’s what you’ll need to create your very own peach sorbet:
-
4 Peaches: Nothing says summer like fresh, ripe peaches. Opt for soft, juicy ones; they’re sweeter and will make your sorbet dreamy. If peaches are out of season, feel free to try this with frozen peaches—just thaw them first!
-
1 Cup Sugar: The sugar will help sweeten and balance the tartness (if any) of your peaches. You can replace it with honey or agave for a naturally sweetened version; just adjust to taste!
-
1 Cup Water: This helps dissolve the sugar and will lend a smooth texture to your sorbet. If you want an extra flavor boost, try using peach juice or a bit of peach schnapps instead.
-
1 Tablespoon Lemon Juice: A splash of lemon juice brightens up the flavors and adds a nice tang. You can also experiment with lime juice for a tropical twist!
With these simple ingredients, you’re already on your way to making something delightful!
Step-by-Step Instructions
Now that we have all our ingredients, let’s get cooking! (Or, in this case, blending and freezing!)
-
Prepare the Peaches: Start by washing your peaches under cool running water. Carefully slice them in half and remove the pits. Don’t worry about making it perfect; a little mushiness adds character! If you like a smooth sorbet, you can peel the skins, but I say keep them for extra flavor and nutrients.
-
Blend the Fruit: In a blender or food processor, toss the peaches, sugar, water, and lemon juice. Blend until you’ve got a smooth and creamy mixture. If you prefer a textural bite, blend just until combined, leaving some peach chunks.
-
Taste and Adjust: Before moving forward, take a quick taste! Feel free to adjust the sweetness with extra sugar or a splash more lemon juice if you want a bit more zing. Sometimes, a peach can throw you a surprise with its sweetness!
-
Freeze It: Pour the peach mixture into a shallow dish or a freezer-safe container. I love using a metal loaf pan—it freezes quicker and makes scooping easier later! Cover it tightly.
-
Initial Freeze: Let your mixture freeze for about 2 hours. Here’s a chef hack: scrape the mixture with a fork every 30 minutes while freezing to break up any ice crystals forming. This step helps achieve that perfectly scoopable texture you’re aiming for!
-
Final Freeze: After you’ve scraped it a few times, let it freeze completely—around 4–6 hours is ideal, but overnight works great if you’re prepping ahead.
-
Serve and Enjoy: When your sorbet is done, take it out about 10 minutes before serving. This helps soften it, making it easier to scoop. Serve in chilled bowls, and enjoy this refreshing treat!
Serving Suggestions
Let’s talk about serving! How you present your sorbet can take it from “delicious” to “wow!” Here are a few ideas:
-
Scoop into Bowls: Serve your sorbet in pretty dessert bowls. If you have fresh mint, a sprig on top makes it pop!
-
Waffle Cones or Cups: For a fun twist, serve scoops in waffle cones. Toss them in some chopped nuts or sprinkles for added crunch.
-
Garnish: Slice a peach or two and arrange them around your sorbet scoop. Drizzle with a little honey or even a splash of prosecco for an adults-only treat!
-
Sundae Style: Add chocolate or caramel sauce, crushed cookies, or vanilla yogurt for a fabulous sundae. You could even throw in a scoosh of whipped cream—yum!
Recipe Variations
Excited to experiment? Here are some creative twists and variations to satisfy your sorbet cravings:
-
Berry Peach Sorbet: Mix in a cup of frozen berries, like raspberries or strawberries, for a fruity blend. The vibrant colors will make it irresistible!
-
Coconut Peach Sorbet: Swap in a can of coconut milk (full-fat for creaminess) instead of water for a tropical flavor. The combination of peach and coconut will transport you to a beach!
-
Spiced Peach Sorbet: Add a pinch of cinnamon or nutmeg for a spicy kick. It’s like summer in a bowl with a cozy vibe!
-
Peach Basil Sorbet: Toss in fresh basil leaves while blending for a unique herby flavor. Basil helps elevate the natural sweetness of the peaches—so gourmet!
-
Peach Mojito Sorbet: Combine mint and a tiny splash of rum (okay, maybe a shot!) for an adult-only refreshing dessert that’ll take your taste buds to the next level.
Chef’s Notes
I can’t tell you how many times this peach sorbet has saved my summer gatherings! Friends often ask how I quickly whipped up such a treat, and the secret lies in the beautiful simplicity of it. This recipe started evolving over my years in the kitchen, inspired by everything from the seasons to my adventurous taste buds. Using different fruits, spices, and notes of sweetness has turned a summer classic into a year-round go-to. Keep it simple, and you’ll always find a crowd favorite!
FAQs and Troubleshooting
Q: How do I make sure my sorbet doesn’t become too icy?
A: The key is to mix often! Scraping with a fork periodically during the freezing process will help break up the ice crystals and keep your sorbet smooth.
Q: Can I use frozen peaches?
A: Absolutely! Just be sure to thaw them completely before blending so you achieve a smooth texture.
Q: My sorbet seems too hard to scoop. What should I do?
A: Let it rest at room temperature for 10-15 minutes before scooping. If it’s still rock-hard, you might have mixed in too much water. Adjust your sugar and water ratio next time!
Q: How long will this sorbet last in the freezer?
A: Stored in an airtight container, it’ll be good for up to a month. But trust me, it probably won’t last that long!
Nutritional Info
One serving (approximately 1/2 cup) of homemade peach sorbet contains:
- Calories: 120
- Total Fat: 0.5g
- Saturated Fat: 0g
- Cholesterol: 0mg
- Sodium: 0mg
- Total Carbohydrate: 30g
- Dietary Fiber: 1g
- Sugars: 24g
- Protein: 1g
Peach sorbet is a lighter dessert option and perfect for cooling off without the guilt. Just remember, a little moderation goes a long way!
Final Thoughts
There you have it, my delightful readers—the ultimate homemade peach sorbet recipe! With its vibrant flavors and uncomplicated steps, this is your go-to refresher for those warm days ahead. So, whether you’re savoring a scoop on a hot afternoon, serving it at a picnic, or whipping it up for guests, this peach sorbet is bound to steal the spotlight.
Don’t forget to experiment and make this recipe your own. Share your favorite variations and fond memories with peach sorbet in the comments! Now, get out there, grab a fork (or a spoon!), and let’s make summer memories one scoop at a time. Happy cooking, friends!
Print
Homemade Peach Sorbet
- Total Time: 135 minutes
- Yield: 4 servings 1x
- Diet: Vegan
Description
A refreshing and delightful peach sorbet perfect for summer to cool off while enjoying the sweet taste of peaches.
Ingredients
- 4 Peaches
- 1 Cup Sugar
- 1 Cup Water
- 1 Tablespoon Lemon Juice
Instructions
- Prepare the peaches: Wash and slice them in half, removing the pits.
- Blend the peaches, sugar, water, and lemon juice in a blender until smooth.
- Taste the mixture and adjust sweetness if needed.
- Freeze the peach mixture in a shallow dish or container.
- Initial freeze for 2 hours, scraping every 30 minutes.
- Final freeze completely for 4-6 hours or overnight.
- Serve in chilled bowls, scooping out as desired.
Notes
Use fresh mint for garnish or serve in waffle cones for a fun twist! Experiment with different flavors like coconut or berry.
- Prep Time: 15 minutes
- Cook Time: 120 minutes
- Category: Dessert
- Method: Freezing
- Cuisine: American
Nutrition
- Serving Size: 1/2 cup
- Calories: 120
- Sugar: 24g
- Sodium: 0mg
- Fat: 0.5g
- Saturated Fat: 0g
- Unsaturated Fat: 0g
- Trans Fat: 0g
- Carbohydrates: 30g
- Fiber: 1g
- Protein: 1g
- Cholesterol: 0mg
Keywords: peach sorbet, summer dessert, homemade sorbet, refreshing dessert, vegan dessert

Chocolate Milkshake
The Ultimate Chocolate Milkshake: A Creamy Indulgence to Satisfy Your Sweet Tooth
Hey there, fellow food lovers! I’m beyond thrilled to invite you into my kitchen today where we’re about to whip up something truly delightful: the ultimate chocolate milkshake. Let me tell you, this isn’t just any old milkshake; it’s a nostalgic blend of creamy, chocolatey goodness that encapsulates my childhood memories and has a special place in my heart.
Now, who doesn’t love a thick and frosty milkshake? Especially when it’s loaded with rich chocolate flavor that feels like a cozy hug with every sip! This is the kind of treat that takes me back to summer afternoons spent with friends at the local diner, where the ice cream was always perfectly scooped, and the laughter filled the air. It’s amazing how some flavors can transport you back in time, right?
As we make this dreamy milkshake together, I want you to feel the same joy that I experienced growing up. Whether you’re looking for a sweet treat to cool you down on a hot day, a fun dessert for your next gathering, or simply a self-care moment on a cozy night in, this chocolate milkshake is your ticket to happiness. So, grab a seat, and let’s dive into this sweet culinary adventure together!
Personal Story
I vividly remember being a kid with my best pals, running around the neighborhood on the hottest days of summer, our laughter echoing through the streets. After hours of playing tag and riding bikes, we’d make our way to the little ice cream shop just a few blocks away. It was a cozy spot with checkered floors and squeaky booths where the aroma of waffle cones filled the air.
Our ritual was simple but sweet: we’d order our chocolate milkshakes, double up on the whipped cream, and race to see who could finish theirs first. I can still picture us sitting there, straws in hand, chocolate mustaches dancing on our lips, and giggles spilling out uncontrollably. Those carefree days remind me of the beauty of simple pleasures and how food, in its most delicious form, has the power to create lasting memories.
Fast forward to today, and I still find joy in those same flavors. The thrill of blending ice cream with chocolate syrup, the anticipation of the first sip—it’s all part of the experience. With each milkshake I make, I not only recreate that magic but also pass it on! So, let’s do this and make some memories with our love for chocolate milkshakes!
Ingredients
Now that we’ve got our nostalgia flowing, let’s gather our ingredients! Here’s what you’ll need for that creamy, dreamy chocolate milkshake, along with a few tips from yours truly:
-
Ice Cream (2 cups): The star of our show! Use chocolate ice cream for a richer flavor or vanilla for a lighter base. You can also use dairy-free ice cream if you’re looking for a vegan option.
-
Milk (1 cup): Whole milk gives a creamy texture, but you can swap it for almond milk or oat milk for a lighter version. Remember to adjust the quantity depending on your desired thickness.
-
Chocolate Syrup (1/4 cup): Use store-bought or homemade. Drizzle some in the glass for a beautiful presentation before pouring in the shake!
-
Whipped Cream (for topping): A generous dollop of whipped cream can elevate your shake to new heights! You can try coconut whipped cream if you want a dairy-free version.
-
Chocolate Chips or Shaved Chocolate (optional, for garnish): Because you can never have too much chocolate, right?
-
Maraschino Cherry (for a classic touch): It’s like the icing on the cake! Plus, it adds a pop of color.
Step-by-Step Instructions
Ready to bring our chocolate milkshake to life? Let’s get shaking—literally! Follow these steps, and you’ll find it’s as easy as pie (or should I say milkshake?):
-
Start with the Ice Cream: Scoop 2 cups of your chosen ice cream into your blender. If you’re using chocolate ice cream, get ready for that rich chocolate flavor to take center stage! Want it extra thick? Try freezing your ice cream for a few minutes before blending!
-
Add the Milk: Pour in 1 cup of milk. Adjust the amount depending on how thick you want your shake to be. Less milk means a thicker shake, while more milk gives you a thinner, easier-to-sip version. A little chef hack: start with less milk and add more if needed!
-
Incorporate Chocolate Syrup: Add 1/4 cup of chocolate syrup to the blender. This will boost the chocolate flavor and make your shake irresistibly delicious. If you’re feeling adventurous, consider adding a pinch of sea salt to enhance the sweetness!
-
Blend: Secure the lid on the blender and blend everything until smooth and creamy, about 30-60 seconds. If you notice it’s getting stuck, pause and push the ice cream down to help it along. You want that beautiful, velvety texture!
-
Taste Test: Don’t be shy—give your milkshake a quick taste! Adjust the flavor by adding more chocolate syrup if you desire. This is the fun part where you can delight in your creation!
-
Serve it Up: Grab your favorite tall glass and drizzle some chocolate sauce inside the glass for a decadent look. Pour in your milkshake, leaving a little room at the top for whipped cream and garnishes.
-
Top it Off: Add a generous swirl of whipped cream and sprinkle chocolate chips or shaved chocolate over the top. And don’t forget the cherry for that classic touch!
And there you have it! A fabulous chocolate milkshake that looks as good as it tastes. You can feel the smiles already, can’t you?
Serving Suggestions
When it comes to serving your chocolate milkshake, presentation is key! Here are a few creative ideas to elevate your serving game:
-
Serve in Fun Glassware: Go for extra flair with colorful straws, or even mason jars! The visual appeal can enhance the experience, making it feel like a special treat.
-
Add a Side Dish: Pair your milkshake with homemade cookies or brownies for the ultimate dessert extravaganza. Think a warm brownie sundae alongside that icy shake.
-
Mix in Additional Toppings: Consider setting up a toppings bar for friends or family and let everyone add their favorite toppings, from crushed nuts to sprinkles!
Recipe Variations
Feeling a little adventurous? Here are some fantastic variations to put a unique spin on your classic chocolate milkshake:
-
Peanut Butter Chocolate Milkshake: Add a couple of tablespoons of creamy peanut butter to the blender for a delicious PB-choco combo.
-
Mint Chocolate Chip Shake: Swap out the chocolate ice cream for mint chocolate chip ice cream and a few drops of mint extract. Perfect for cooling off on a summer day!
-
Coffee Chocolate Milkshake: For a mocha twist, blend in a shot of espresso or a small amount of instant coffee granules. You’ll get a delightful coffee-flavored kick!
-
Dark Chocolate Shake: Use dark chocolate ice cream and drizzle some dark chocolate syrup for a richer taste. Perfect for chocolate lovers who enjoy a deeper flavor!
-
Cookies and Cream Milkshake: Blend in a few crushed Oreo cookies into your milkshake for a delightful crunch and texture.
Chef’s Notes
Let’s take a moment to share a little behind-the-scenes peek into my kitchen! Over the years, I’ve played around with countless milkshake recipes, and this chocolate version is timeless! There’ve been some memorable kitchen mishaps too—like the time I was so excited to try a new recipe that I accidentally grabbed salt instead of sugar. Luckily, I realized in time, and my taste buds were spared!
Through the years, I’ve learned that sometimes the simplest recipes bring the most joy and satisfaction. This chocolate milkshake is the perfect embodiment of that sentiment. It’s comforting, easy to make, and, best of all, it never fails to make you smile.
FAQs and Troubleshooting
You might have a few questions lurking in your mind as we start blending away. Here’s a quick FAQ section to address some common queries and potential hiccups:
-
Why is my milkshake too thick?
No worries! Just add a splash of milk, and blend again. Gradually adjusting is key to get the consistency you love. -
Can I make this in advance?
While it’s best enjoyed fresh, you can prep the ingredients in advance. Blend just before serving for the best flavor and texture. -
What if my milkshake is too thin?
If it turned out too thin, try adding a little more ice cream and blend again! -
Can I use non-dairy products?
Absolutely! There are countless delicious non-dairy ice creams available, and almond or coconut milk will work perfectly in this recipe.
Nutritional Info
While we all enjoy the delicious indulgence of dessert, it’s also nice to know what we’re consuming! A typical chocolate milkshake (around 16 ounces) will contain approximately:
- Calories: 600-800 kcal (depending on ice cream and other ingredients)
- Protein: 15-20g
- Fat: 20-30g
- Carbohydrates: 90-100g
- Sugar: 70-80g (keep in mind that this varies with toppings and syrups)
Remember, this is a treat, so enjoy it in moderation!
Final Thoughts
And there you have it, my dear foodie friends! The ultimate chocolate milkshake awaits you, ready to bring a smile to your face and a delightful taste to your palate. Whether you’re indulging on your own, hosting a gathering, or just enjoying a comforting moment, this recipe is bound to impress.
As you sip on your creamy shake, take a moment to savor not just the flavors but also the memories and connections that food can create. Here’s to many sweet moments ahead, filled with laughter, joy, and, of course, delicious chocolate milkshakes! Keep experimenting in the kitchen, share your creations, and remember: every meal tells a story. Cheers to your culinary adventures!
Print
The Ultimate Chocolate Milkshake
- Total Time: 5 minutes
- Yield: 2 servings 1x
- Diet: Vegetarian
Description
A creamy and indulgent chocolate milkshake that brings back nostalgic flavors for a sweet treat anytime.
Ingredients
- 2 cups Ice Cream
- 1 cup Milk
- 1/4 cup Chocolate Syrup
- Whipped Cream (for topping)
- Chocolate Chips or Shaved Chocolate (optional, for garnish)
- Maraschino Cherry (for a classic touch)
Instructions
- Start with the ice cream: Scoop 2 cups of your chosen ice cream into your blender.
- Add the milk: Pour in 1 cup of milk.
- Incorporate chocolate syrup: Add 1/4 cup of chocolate syrup to the blender.
- Blend: Secure the lid on the blender and blend everything until smooth and creamy, about 30-60 seconds.
- Taste test: Give your milkshake a quick taste and adjust the flavor if necessary.
- Serve it up: Grab your favorite tall glass and drizzle some chocolate sauce inside the glass.
- Top it off: Add a generous swirl of whipped cream and sprinkle chocolate chips or shaved chocolate over the top.
Notes
Serve in fun glassware; pair with cookies or brownies for a dessert extravaganza.
- Prep Time: 5 minutes
- Cook Time: 0 minutes
- Category: Dessert
- Method: Blending
- Cuisine: American
Nutrition
- Serving Size: 1 milkshake
- Calories: 700
- Sugar: 75g
- Sodium: 200mg
- Fat: 24g
- Saturated Fat: 14g
- Unsaturated Fat: 8g
- Trans Fat: 0g
- Carbohydrates: 92g
- Fiber: 1g
- Protein: 16g
- Cholesterol: 50mg
Keywords: chocolate milkshake, dessert, summer treat, nostalgia, creamy drink

The Ultimate Chocolate Milkshake
The Ultimate Chocolate Milkshake: A Delicious Dive into Decadence
Hey there, chocolate lovers! Welcome to the sweetest corner of Feastical! Today, we’re diving headfirst into a creamy, dreamy, chocolatey wonderland—the ultimate chocolate milkshake! This recipe isn’t just a drink; it’s an experience, a nostalgic journey back to those sunny days of summer, picnics, and the simpler joys of life. So, buckle up, grab your blender, and get ready to whip up something truly magical.
A Sweet Trip Down Memory Lane
Ah, the chocolate milkshake—my childhood’s liquid gold! I fondly remember hot summer afternoons spent at the local diner with my family. The air would be filled with the sounds of laughter and clinking glasses, and the aroma of fries and burgers would dance around me. I would plop down at the counter, looking forward to that cool, frothy shake that felt like a celebration in a glass.
I remember the thrill of watching the server expertly blend ice cream, milk, and chocolate syrup into a thick, luscious shake. The first sip was always a symphony of chocolatey bliss! The toppings would be a joyous surprise—whipped cream piled high and chocolate sprinkles adding just the right amount of crunch. It’s a memory that still brings a smile to my face every time I sip one of these heavenly creations. It was not just a dessert; it was a moment shared, a sweet memory made.
Now, let’s recreate that magic together! Are you ready to indulge? Let’s go!
Ingredients
Here’s your lineup for the ultimate chocolate milkshake. Trust me; you’re gonna want to grab a pen and jot these down!
-
1 cup Heavy Whipping Cream, cold
A key ingredient for that rich, velvety texture. You can substitute with coconut cream for a dairy-free version. -
5 Tbsp Confectioner’s Sugar
This sweetens the whipping cream for the perfect topper. If you need a healthier option, try using stevia or another sugar substitute! -
3 Tbsp Cocoa Powder, sifted
This bitter-sweet beauty enhances the chocolate flavor. Opt for Dutch-processed cocoa for a deeper taste. -
2 pt Chocolate Ice Cream
The star of the show! Want something different? Try using vanilla ice cream and mixing in chocolate syrup for a twist. -
1/3 cup Chocolate Milk
Extra chocolate? Yes, please! Use almond or soy chocolate milk for a non-dairy option. -
3 Tbsp Chocolate Syrup (plus more for drizzling)
This will make everything sweet and moist. For a gourmet touch, consider homemade syrup! -
Chocolate Sprinkles (to serve)
Because who doesn’t love a little crunch? Use rainbow sprinkles for a fun twist! -
Chocolate Shavings (to serve)
These add an elegant touch. You can shave dark chocolate bar for a richer flavor.
With these ingredients gathered and ready, let’s transform them into something unforgettable!
Step-by-Step Instructions
-
Whip the Cream
- In a large bowl, pour that cold heavy whipping cream. Add the confectioner’s sugar and cocoa powder.
- Using a hand mixer, whip on medium speed until soft peaks form (about 2-3 minutes).
- Chef’s Tip: Don’t overwhip! You want it fluffy, not dry.
-
Blend the Milkshake
- In a blender, combine the chocolate ice cream, chocolate milk, and chocolate syrup. Blend until smooth and creamy.
- Commentary: You can adjust the thickness by adding more milk for a thinner shake or more ice cream for a thicker indulgence.
-
Combine the Goodness
- Once smooth, carefully fold half of the whipped cream into the blender with the milkshake mixture. This step creates a marbled effect of creaminess!
- Chef Hack: Mixing in parts of the whipped cream also helps maintain that airy texture.
-
Prepare Your Glass
- Drizzle chocolate syrup on the insides of your glass. This little touch makes every sip feel like a celebration!
- Showing Off: Make swirls or zigzag patterns for an artistic flair! It’s also Instagram-worthy!
-
Serve It Up
- Pour your smooth chocolate milkshake into the prepared glass, adding a dollop of that delicious whipped cream on top.
- Extra Points: Garnish with chocolate sprinkles and chocolate shavings for that wow factor.
-
Enjoy it
- Grab a big straw, or a spoon if you’re feeling classy, and dig in—because you deserve every delicious sip!
Serving Suggestions
To serve your ultimate chocolate milkshake, consider pairing it with some freshly baked cookies or a slice of warm pie. You can also top it with a maraschino cherry for a traditional diner-style feel. Feeling adventurous? Serve alongside a small plate of salted pretzels for that sweet-salty combo that will have taste buds dancing!
When entertaining friends, create a little milkshake bar with various toppings like crushed Oreos, whipped cream flavors, or fresh fruits. Let them customize their shakes! It’s a fun experience that adds a special touch to any gathering.
Recipe Variations
-
Mint Chocolate Milkshake
- Add a few drops of peppermint extract for a refreshing twist. Top it with crushed peppermint candy for extra crunch!
-
Peanut Butter Chocolate Milkshake
- Mix in 2 tablespoons of creamy peanut butter before blending for a nutty richness. Garnish with crushed peanuts!
-
Spicy Chocolate Milkshake
- Add a pinch of cayenne pepper for a surprising kick. It’s unexpected, but trust me—it’s divine!
-
Mocha Milkshake
- Substitute half of the chocolate milk with brewed coffee. Perfect for coffee lovers!
-
Banana Chocolate Milkshake
- Blend in a ripe banana for added creaminess and natural sweetness. It’s like a delicious breakfast in a cup!
Chef’s Notes
The ultimate chocolate milkshake is not just a recipe; it’s a canvas! Over the years, I’ve tried countless variations based on seasons, holidays, and my mood. One of the funniest mishaps happened when I accidentally blended vanilla ice cream instead of chocolate. I panicked, but added a generous swirl of chocolate syrup, and guess what? It turned out fantastic! Never underestimate the power of improvisation in the kitchen!
FAQs and Troubleshooting
-
Why is my milkshake too thin?
- Simply add more ice cream to thicken it up. Blend again and see if it reaches your desired texture.
-
How can I make a dairy-free milkshake?
- Substitute heavy cream with coconut cream, use non-dairy chocolate ice cream, and chocolate milk made from almond, soy, or oat milk.
-
What if my whipped cream isn’t thickening?
- Ensure your heavy cream is cold, as the cold temperature allows it to whip better. If it still doesn’t thicken, try using a bowl chilled in the freezer beforehand.
-
Can I make this ahead of time?
- It’s best to enjoy it fresh, but you can prepare the whipped cream and blend the shake base separately. Store in the fridge until ready to combine!
Nutritional Info
Per serving (based on the recipe above), you’ll be treating yourself to approximately:
- Calories: 620
- Protein: 10g
- Fat: 36g
- Carbohydrates: 70g
- Sodium: 150mg
- Fiber: 2g
Keep in mind that these values can vary based on ingredient brands and portion sizes. Want a lighter treat? Consider using lower-fat ice cream or reducing the chocolate syrup!
Final Thoughts
In a world filled with complicated recipes and kitchen gadgets, sometimes, you just need to savor something simple yet extravagant. The ultimate chocolate milkshake is a true testament to that. It’s not just a recipe; it’s a celebration of flavors, nostalgia, and the joy of being in the kitchen. I hope you cherish every chocolatey sip and create your own beautiful memories, just like I did.
So, what are you waiting for? Grab your ingredients, make this delightful milkshake, and share it with someone who needs a little sweetness in their life. Remember, food is best when shared, and there’s always room for more joy in our lives. Cheers to tasty adventures! Let’s shake it up! 🍫🥤❤️
Print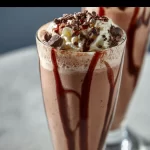
The Ultimate Chocolate Milkshake
- Total Time: 20 minutes
- Yield: 4 servings 1x
- Diet: Vegetarian
Description
A delicious and creamy chocolate milkshake that brings back nostalgic memories of summer days and family outings.
Ingredients
- 1 cup Heavy Whipping Cream, cold
- 5 Tbsp Confectioner’s Sugar
- 3 Tbsp Cocoa Powder, sifted
- 2 pt Chocolate Ice Cream
- 1/3 cup Chocolate Milk
- 3 Tbsp Chocolate Syrup (plus more for drizzling)
- Chocolate Sprinkles (to serve)
- Chocolate Shavings (to serve)
Instructions
- Whip the cream: In a large bowl, pour that cold heavy whipping cream. Add the confectioner’s sugar and cocoa powder. Using a hand mixer, whip on medium speed until soft peaks form (about 2-3 minutes).
- Blend the milkshake: In a blender, combine the chocolate ice cream, chocolate milk, and chocolate syrup. Blend until smooth and creamy.
- Combine the goodness: Once smooth, carefully fold half of the whipped cream into the blender with the milkshake mixture.
- Prepare your glass: Drizzle chocolate syrup on the insides of your glass.
- Serve it up: Pour your smooth chocolate milkshake into the prepared glass, adding a dollop of that delicious whipped cream on top.
- Enjoy it: Grab a big straw, or a spoon if you’re feeling classy, and indulge!
Notes
Pair with freshly baked cookies or a slice of warm pie. Consider creating a milkshake bar for a fun gathering experience.
- Prep Time: 15 minutes
- Cook Time: 5 minutes
- Category: Dessert
- Method: Blending
- Cuisine: American
Nutrition
- Serving Size: 1 serving
- Calories: 620
- Sugar: 70g
- Sodium: 150mg
- Fat: 36g
- Saturated Fat: 21g
- Unsaturated Fat: 10g
- Trans Fat: 0g
- Carbohydrates: 70g
- Fiber: 2g
- Protein: 10g
- Cholesterol: 130mg
Keywords: chocolate milkshake, dessert, creamy drink, nostalgic recipe, summer treat