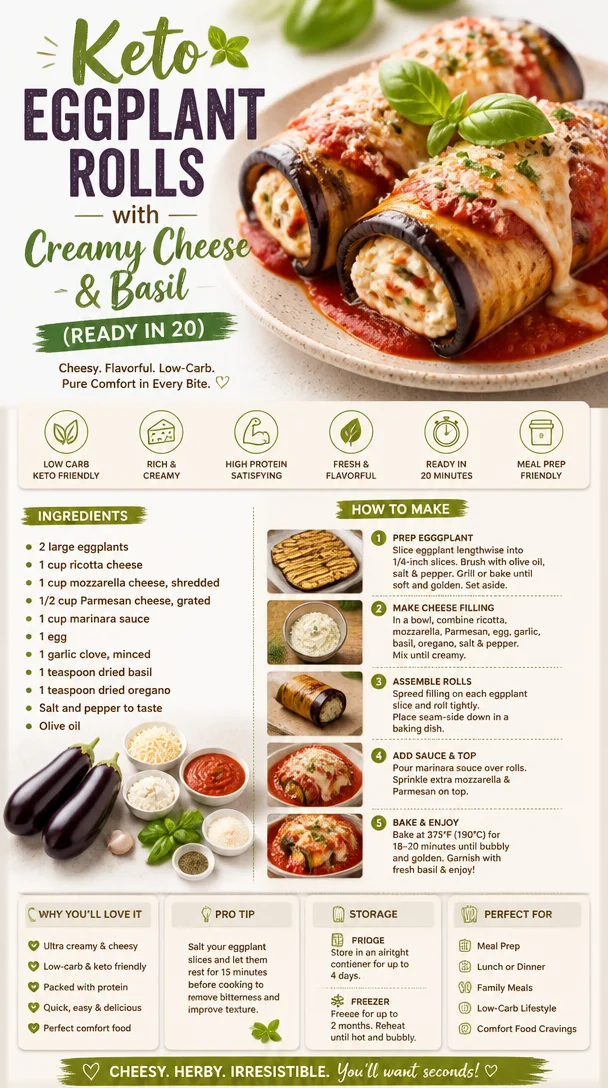
Keto Eggplant Rolls with Creamy Cheese & Basil (Ready in 20)
Cheesy Eggplant Rolls: A Comforting Dish to Savor
Hey there, food pals! It’s your buddy Beau Collier here, and today, we’re diving into something that’s not only delicious but also offers a huge dose of nostalgia—the Cheesy Eggplant Rolls! Picture this: layers of tender eggplant lovingly wrapped around a creamy, cheesy filling, all drenched in a rich marinara sauce. Little bites of heaven, I tell you! If you’re ready to indulge in a dish that’s as comforting as a warm hug on a chilly day, then you’ve come to the right place.
Eggplants may not be the star of every dish, but trust me, they deserve a spotlight. I remember my grandma used to grow the most beautiful eggplants in her garden every summer, and I’d visit her every weekend armed with an appetite and an eager heart. We would spend hours in the kitchen as she showed me how to make all sorts of dishes. But my absolute favorite was her eggplant rollatini. I still recall the aroma wafting through the kitchen as the cheese melted into gooey perfection.
Now, here’s where it gets exciting—today, I’m not just sharing my recipe. I’m inviting you into my kitchen to experience a culinary adventure inspired by those warm memories! So, roll up your sleeves, grab your apron, and let’s slice into some eggplant goodness!
A Bite of Nostalgia
I’ll let you in on a little secret: the first time I attempted to make Cheesy Eggplant Rolls on my own, I was nervous. I had been eyeing my grandma’s recipe for years, and I felt a wave of pressure to capture that same comforting flavor. I remember the kitchen full of laughter, the chatter bubbling around the stovetop, and the mishaps that turned into belly-aching laughter—like when I accidentally spilled half a jar of marinara all over the counter. That mess turned into a game of catch-up because, let’s face it, no matter how frantically we cleaned, we were inevitably going to taste-test every bit of sauce left behind.
When I finally plated my version of the eggplant rolls, I invited my family over for a dinner party. I was so nervous, but as soon as they took their first bite, their eyes lit up, and the kitchen was filled with “mmms” and delighted chatter. That’s when I realized that cooking is not just about following recipes; it’s about creating memories, sharing laughter, and, of course, pleasing the taste buds. So, let’s turn your kitchen into a haven of good vibes and flavors—starting with these Cheesy Eggplant Rolls!
Ingredients
Before we jump into the cooking magic, let’s gather our ingredients:
-
2 large eggplants: The star of our dish! Choose firm eggplants that feel heavy for their size, which indicates they have fewer seeds and a better texture. If you can, go for the darker variety; they tend to be less bitter.
-
1 cup ricotta cheese: Creamy and delicious, ricotta gives the filling a sweet, creamy base. If you’re looking for a lighter version, you can substitute it with cottage cheese, just blend it to get a smoother texture.
-
1 cup mozzarella cheese, shredded: Mozzarella brings that melty goodness we all crave! Got some leftover mozzarella? Feel free to use mixed cheese; it works beautifully!
-
1/2 cup Parmesan cheese, grated: This aged cheese adds a salty depth. If you’re in a pinch, Pecorino Romano is a solid substitute.
-
1 cup marinara sauce: Use your favorite store-bought brand or, better yet, make your own if you have the time! It gives the dish a tangy sweetness.
-
1 egg: Acts as a binder for our filling. It’s crucial for keeping everything together! Vegan? Substitute with a flax egg made with 1 tablespoon ground flaxseed mixed with 2.5 tablespoons warm water. Let it sit for a few minutes to thicken.
-
1 garlic clove, minced: Adds that aromatic flavor. Feel free to add more if garlic is your jam!
-
1 teaspoon dried basil: A classic herb that complements the dish perfectly. Fresh basil is a fabulous substitution if you have any on hand!
-
1 teaspoon dried oregano: Provides an earthy, warm flavor. Again, fresh is always better if you can snag some!
-
Salt and pepper to taste: Essentials for seasoning the filling right.
-
Olive oil: For drizzling and roasting our eggplant slices to perfection. Don’t skimp here—use quality oil for the best flavor.
Step-by-Step Instructions
Now that we’ve gathered our ingredients, let’s get cooking! Remember, take your time, enjoy the process, and don’t hesitate to add your personal flair. Here’s a step-by-step guide to crafting these eggplant rolls.
Step 1: Preparing the Eggplants
-
Slice and Salt the Eggplants: Begin by slicing each eggplant lengthwise into about 1/4-inch thick slices. Lay the slices on a baking sheet, sprinkle with salt, and let them sit for about 30 minutes. This helps draw out moisture and bitterness. Give ’em some time to sweat it out—it’s all about making them tender!
-
Preheat the Oven: While you wait, preheat your oven to 400°F (200°C). This way, it’s ready for action when the eggplants are done sweating.
Step 2: Roast the Eggplants
-
Rinse and Dry: Rinse the salted slices under cold water to remove excess salt and pat them dry with a clean paper towel. You want them to be flavorful but not overly salty!
-
Lay it Out: Arrange the eggplant slices on a baking sheet lined with parchment paper. Drizzle with olive oil and brush it on for even coverage to keep them from sticking. Bake for about 20 minutes, flipping halfway through until they’re golden and tender—but don’t let them char too much.
Step 3: Prepare the Filling
- Mix the Filling: In a large bowl, combine ricotta cheese, mozzarella cheese, grated Parmesan cheese, egg, minced garlic, dried basil, dried oregano, salt, and pepper. Mix thoroughly until everything is well incorporated. You should have a creamy, cheesy filling that’s bursting with flavor!
Step 4: Assemble the Rolls
- Fill and Roll: Once the eggplant slices are roasted, take one slice and spoon a generous amount of filling at one end. Roll it up gently but securely and place it seam-side down into a baking dish. Repeat this until all the filling is used up!
Step 5: Add the Sauce
- Top with Marinara: Pour the marinara sauce evenly over the top of the rolls, making sure they’re all covered in that luscious sauce. You want each bite to feel like a warm embrace!
Step 6: Bake to Perfection
- Final Bake: Sprinkle a little extra mozzarella and Parmesan on top for that cheesy goodness! Cover the dish with foil to prevent burning and bake for 25 minutes. Then remove the foil and bake for an additional 15 minutes until the cheese is bubbling and golden brown.
Serving Suggestions
When you pull the Cheesy Eggplant Rolls from the oven, the aroma will send everyone rushing to the kitchen! They’re best served hot, right out of the oven. Here are some ideas for delightful plating and serving:
-
Garnish with Fresh Herbs: Before serving, sprinkle some chopped fresh basil or parsley on top for a fresh, vibrant touch.
-
Side Dish Match: Pair it with a simple arugula salad drizzled with lemon vinaigrette for a refreshing contrast. The peppery greens balance the creamy rolls beautifully!
-
Serve with Crusty Bread: Don’t forget some crusty Italian bread or garlic bread on the side for that perfect carb accompaniment to mop up any leftover sauce.
Recipe Variations
Looking to switch things up or cater to specific dietary preferences? Here are some tasty variations you can try:
-
Spinach and Ricotta: To amp up nutrition, add a handful of sautéed spinach into the cheese mix. It adds a lovely emerald hue and loads of vitamins!
-
Meaty Touch: Mix in some cooked ground beef or Italian sausage into the cheese filling for a meaty twist—perfect for meat lovers!
-
Gluten-Free Option: For those avoiding gluten, make sure your marinara is gluten-free and serve with zucchini noodles instead of pasta.
-
Italian Herbs Galore: Excited about flavors? Add some sun-dried tomatoes and a sprinkle of red pepper flakes for an extra kick!
-
Vegan Alternative: Substitute dairy with cashew cheese or tofu ricotta, and use a plant-based egg option to make this dish vegan-friendly. Trust me, flavor won’t be sacrificed!
Chef’s Notes
As you navigate your way through this delightful recipe, remember that cooking is an adventure! Every cook’s journey is filled with learning experiences, and this dish is no exception. One time, I forgot to add the egg to my filling…and I only discovered it after the rolls were baked and served! The rolls still tasted awesome, albeit a little less sturdy! So, whether you follow my steps to the letter or make it your own, just remember to keep it light and fun.
FAQs and Troubleshooting
Q1: My eggplants turned out bitter; why?
A: That might happen if you skip the salting process. Salting helps remove bitterness and excess water. Don’t skip this crucial step!
Q2: Why did my eggplant rolls fall apart?
A: It’s likely due to insufficient binding. Make sure to use the egg per the recipe and don’t overstuff your rolls.
Q3: Can I make this dish in advance?
A: Absolutely! You can assemble the rolls and store them in the fridge for a day before baking. Just add extra time to the baking process when cooking straight from the fridge.
Q4: What can I do to make it less watery?
A: Make sure you perform the salting step properly, and if you’re using homemade marinara, let it simmer a while to thicken up before using.
Nutritional Info
While I won’t hold back on flavor, I also believe in balance! Each serving of Cheesy Eggplant Rolls comes packed with nutrients from the veggies and cheese but keep in mind it’s also rich and hearty. Here’s a general idea of the nutritional profile per serving (assuming makes about 6 rolls):
- Calories: ~320
- Protein: 18g
- Carbohydrates: 20g
- Fat: 18g
- Fiber: 4g
Remember, nutrition can vary based on your ingredient choice, so keep it flexible and adjust as needed!
Final Thoughts
There you have it—a hearty, comforting dish packed with love and flavor! Cheesy Eggplant Rolls are more than just a recipe; they’re a gateway to cherished memories and the perfect excuse to bring friends and family to the table. As you embark on your own culinary journey with this dish, keep in mind that cooking is an expression of creativity and passion. Explore, tweak, and make it your own!
I can’t wait to hear how your Cheesy Eggplant Rolls turn out and what creative twists you put into them! So, grab that fork, dig deep, and let the deliciousness unfold! Happy cooking, friends!
PrintCheesy Eggplant Rolls
- Total Time: 70 minutes
- Yield: 6 rolls 1x
- Diet: Vegetarian
Description
Delicious layers of tender eggplant wrapped around a creamy, cheesy filling, all drenched in rich marinara sauce. A comforting dish full of nostalgia.
Ingredients
- 2 large eggplants
- 1 cup ricotta cheese
- 1 cup mozzarella cheese, shredded
- 1/2 cup Parmesan cheese, grated
- 1 cup marinara sauce
- 1 egg
- 1 garlic clove, minced
- 1 teaspoon dried basil
- 1 teaspoon dried oregano
- Salt and pepper to taste
- Olive oil
Instructions
- Slice and salt the eggplants: Slice each eggplant lengthwise into 1/4-inch thick slices, sprinkle with salt, and let sit for 30 minutes.
- Preheat the oven to 400°F (200°C).
- Rinse the salted slices under cold water, pat them dry, and arrange on a baking sheet lined with parchment paper.
- Drizzle with olive oil, then bake for about 20 minutes, flipping halfway through.
- Mix the filling in a bowl: combine ricotta, mozzarella, Parmesan, egg, garlic, basil, oregano, salt, and pepper until well incorporated.
- Fill the roasted eggplant slices with a generous amount of filling, roll them up, and place seam-side down in a baking dish.
- Pour marinara sauce over the rolls, covering them completely.
- Sprinkle with extra mozzarella and Parmesan, cover with foil, and bake for 25 minutes. Remove foil and bake for an additional 15 minutes until bubbly and golden.
Notes
Cooking is about creating memories and having fun! Don’t hesitate to personalize this recipe to your taste.
- Prep Time: 30 minutes
- Cook Time: 40 minutes
- Category: Main Course
- Method: Baking
- Cuisine: Italian
Nutrition
- Serving Size: 1 roll
- Calories: 320
- Sugar: 6g
- Sodium: 600mg
- Fat: 18g
- Saturated Fat: 10g
- Unsaturated Fat: 6g
- Trans Fat: 0g
- Carbohydrates: 20g
- Fiber: 4g
- Protein: 18g
- Cholesterol: 60mg
Keywords: eggplant, rollatini, cheesy, vegetarian, Italian
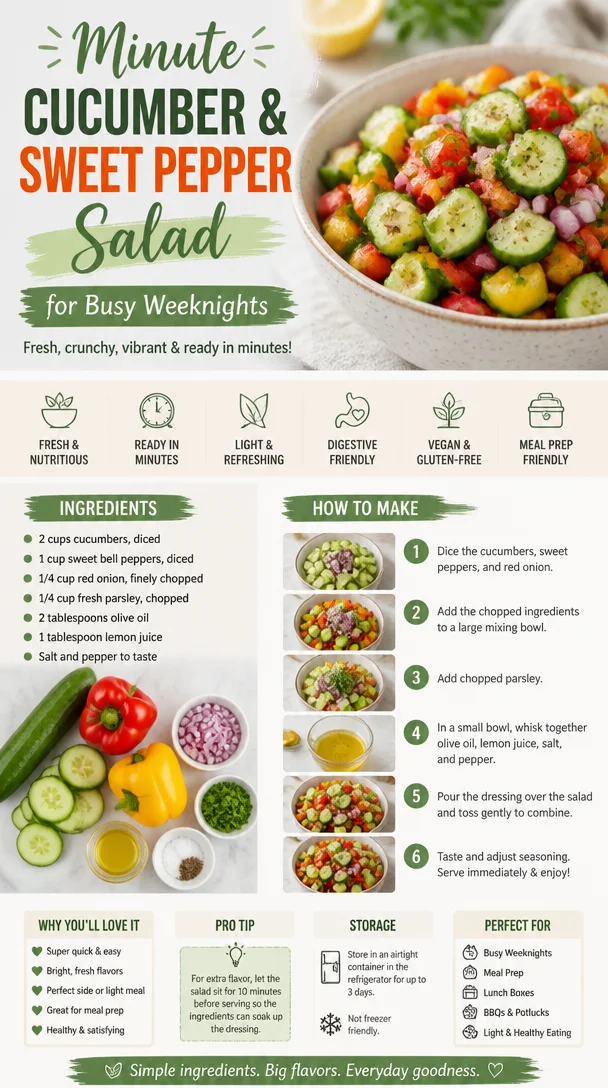
Minute Cucumber & Sweet Pepper Salad for Busy Weeknights
Cucumber Sweet Pepper Salad: A Refreshing Delight for Every Occasion
Hey there, food lovers! Beau Collier here, and today we’re diving into a dish that’s as colorful as it is crunchy – the Cucumber Sweet Pepper Salad. This vibrant salad is the ultimate fresh addition to your plate, whether it’s a sunny picnic, a potluck, or just a cozy dinner at home. We’re talking about a medley of crisp vegetables tossed with a zesty dressing that will have you coming back for seconds (or even thirds). So, if you’re ready to get your chop on, let’s dig into this delightful recipe!
A Salad for Every Mood
Cucumber Sweet Pepper Salad is more than just a dish; it’s a celebration of flavors and textures! This salad holds a special place in my heart, not just because of how refreshing and easy it is, but due to the sweet memories I have associated with it. Picture this: I’m about ten years old, hanging out in my grandmother’s kitchen during summertime. The sun shines through the window, illuminating the bright colors of the vegetables laid out on the counter. Grandma would let us help, with our little hands chopping cucumbers and peeling bell peppers, her laughter filling the air as she praised our efforts.
One day, she taught me a little trick – always choose the freshest ingredients you can find! She said it’s all about quality, and she was absolutely right. After we tossed this salad together, we’d sit outside, enjoying the simple pleasure of good food and great company. To this day, whenever I make a Cucumber Sweet Pepper Salad, I think back to those sunny afternoons spent with her, filled with love, laughter, and, of course, delicious food.
Ingredients
Let’s gather our ingredients, shall we? Here’s what you’ll need to make this refreshing Cucumber Sweet Pepper Salad:
-
2 cups cucumbers, diced: Pick firm, fresh cucumbers. If you want to switch it up, try English cucumbers – they have fewer seeds and a thinner skin!
-
1 cup sweet bell peppers, diced: A mix of colors (red, yellow, and orange) not only looks beautiful but also adds a variety of flavors to the salad.
-
1/4 cup red onion, finely chopped: Red onions offer a milder taste compared to yellow onions. If you’re not a fan, you can swap in green onions for a softer flavor.
-
1/4 cup fresh parsley, chopped: This adds a fresh herbaceous note. Don’t have parsley? Try cilantro for a different twist!
-
2 tablespoons olive oil: A good quality extra-virgin olive oil enhances flavor. If you’re looking for a lighter option, avocado oil works well too.
-
1 tablespoon lemon juice: Freshly squeezed is always best! If lemons aren’t available, vinegar (like apple cider or white wine) can serve as a substitute.
-
Salt and pepper to taste: Always season to your liking, as these simple ingredients elevate the flavors.
Step-by-Step Instructions
Now, let’s get cooking! Follow these steps for a perfect Cucumber Sweet Pepper Salad:
-
Prep Your Veggies: Grab a sharp chef’s knife and cutting board. Start by washing the cucumbers and sweet bell peppers under cold running water. Dice the cucumbers and peppers into bite-sized pieces and place them in a large mixing bowl. Chef tip: Use a serrated knife for the cucumbers; it helps slice through the skin with ease!
-
Chop the Onion: Finely chop the red onion. If you have sensitive eyes (like mine), soak the onion in cold water for a few minutes before chopping to reduce tears. Add to the mixing bowl with your diced veggies.
-
Toss in the Parsley: Chop your fresh parsley. It’s a great way to infuse an herbal note into the salad. Sprinkle the chopped parsley into the bowl; it’s like confetti for your salad!
-
Make the Dressing: In a small bowl, whisk together the olive oil and lemon juice. Season with salt and pepper. I love using a mason jar, so I can give it a good shake. The mix of oil and acidity really brings the salad to life!
-
Combine Everything: Pour the dressing over your chopped veggies. Use a wooden spoon to gently toss everything together until evenly coated. Be careful not to squish those delicate veggies!
-
Taste Test: Here’s the fun part! Taste the salad and adjust the seasoning as needed. This is your creation, so make it as zesty or mild as you like!
-
Chill & Serve: For the best flavor, let the salad chill in the fridge for about 30 minutes. This allows the flavors to meld beautifully. You can serve it as a side dish or a light lunch.
Serving Suggestions
Plating this salad can be a wonderful way to showcase its vibrant colors. Try serving it in a beautiful glass bowl to let the hues shine through! You can also consider these serving options:
- As a Side Dish: Pair it with grilled chicken or fish for a colorful and tasty accompaniment.
- Topped on Toast: Spoon it over crispy toasted bread for a crunchy starter or appetizer.
- In Lettuce Wraps: Use large lettuce leaves to create refreshing wraps for a fun, handheld meal.
Recipe Variations
Want to put your own spin on this salad? Here are some creative ideas to inspire your culinary creativity:
-
Feta Cheese Addition: Crumble some feta cheese on top for a creamy, tangy taste that pairs wonderfully with the freshness of the veggies.
-
Add Avocado: Toss in some diced avocado for a creamy texture and richness that complements the crunch of the cucumbers.
-
Make it Spicy: Add in diced jalapeños or a dash of red pepper flakes for a spicy kick.
-
Quinoa Booster: Amp up the protein content by mixing in cooked quinoa before serving. This makes it a filling meal on its own!
-
Fruit Fusion: For a sweet twist, try adding diced mango or peach for a fruity flavor that sings!
Chef’s Notes
Making this Cucumber Sweet Pepper Salad has always been one of my favorite things. It reminds me of those sunny days spent with Grandma, but I’ve also created it for countless gatherings since. This recipe has evolved over the years as I’ve experimented with flavors and ingredients, keeping the essence of refreshing simplicity at its core. Plus, it’s perfect for summer barbecues or backyard parties when veggies are in abundance!
FAQs and Troubleshooting
Q: Can I make this salad ahead of time?
A: Absolutely! It actually tastes even better after sitting for a while as the flavors meld. Just keep it covered in the fridge.
Q: My salad seems too watery. What can I do?
A: If you find that your salad is a bit watery, it may be due to excess moisture from the veggies. Make sure to pat them dry after washing. You can also drain off any liquid before serving.
Q: How long will leftovers last?
A: Store leftover salad in an airtight container in the fridge for up to 2 days. However, keep in mind that the cucumbers may soften over time.
Q: Can I add other vegetables?
A: Definitely! Feel free to mix in grated carrots, diced radishes, or even cherry tomatoes for added variety and flavor.
Nutritional Info
Now, let’s talk nourishment! This Cucumber Sweet Pepper Salad is packed with vitamins and minerals:
- Low-Calorie: Each serving is low in calories but high in flavor.
- Hydrating: With cucumbers being 95% water, they’re perfect for hydration.
- Nutrient-Rich: Bell peppers are high in Vitamin C, while parsley offers an array of essential nutrients and antioxidants.
Each ingredient contributes to a balanced dish that’s not only delicious but does wonders for your body!
Final Thoughts
Just like every great recipe, this Cucumber Sweet Pepper Salad is about connection – with food, memories, and the people we share it with. So grab your ingredients, make some memories in the kitchen, and savor every bite of this refreshing dish. Let it remind you of warmer days, simple joys, and the sweet flavor of togetherness. Thanks for joining me today at Feastical! Keep cooking and sharing the love, foodies!
PrintCucumber Sweet Pepper Salad
- Total Time: 30 minutes
- Yield: 4 servings 1x
- Diet: Vegetarian
Description
A vibrant salad with crisp cucumbers and sweet bell peppers, tossed in a zesty dressing. Perfect for any occasion!
Ingredients
- 2 cups cucumbers, diced
- 1 cup sweet bell peppers, diced
- 1/4 cup red onion, finely chopped
- 1/4 cup fresh parsley, chopped
- 2 tablespoons olive oil
- 1 tablespoon lemon juice
- Salt and pepper to taste
Instructions
- Prep Your Veggies: Wash the cucumbers and sweet bell peppers, then dice them and place in a large mixing bowl.
- Chop the Onion: Finely chop the red onion and add it to the bowl.
- Toss in the Parsley: Sprinkle the chopped parsley into the bowl.
- Make the Dressing: Whisk together olive oil and lemon juice, seasoning with salt and pepper.
- Combine Everything: Pour dressing over veggies and toss gently.
- Taste Test: Adjust seasoning as needed.
- Chill & Serve: Let salad chill in the fridge for about 30 minutes before serving.
Notes
This salad gets better as it sits, making it perfect for meal prep or gatherings.
- Prep Time: 15 minutes
- Cook Time: 0 minutes
- Category: Salad
- Method: Mixing
- Cuisine: Mediterranean
Nutrition
- Serving Size: 1 serving
- Calories: 120
- Sugar: 3g
- Sodium: 200mg
- Fat: 9g
- Saturated Fat: 1g
- Unsaturated Fat: 8g
- Trans Fat: 0g
- Carbohydrates: 10g
- Fiber: 3g
- Protein: 2g
- Cholesterol: 0mg
Keywords: salad, cucumber, bell peppers, healthy recipe, refreshing salad, summer dish
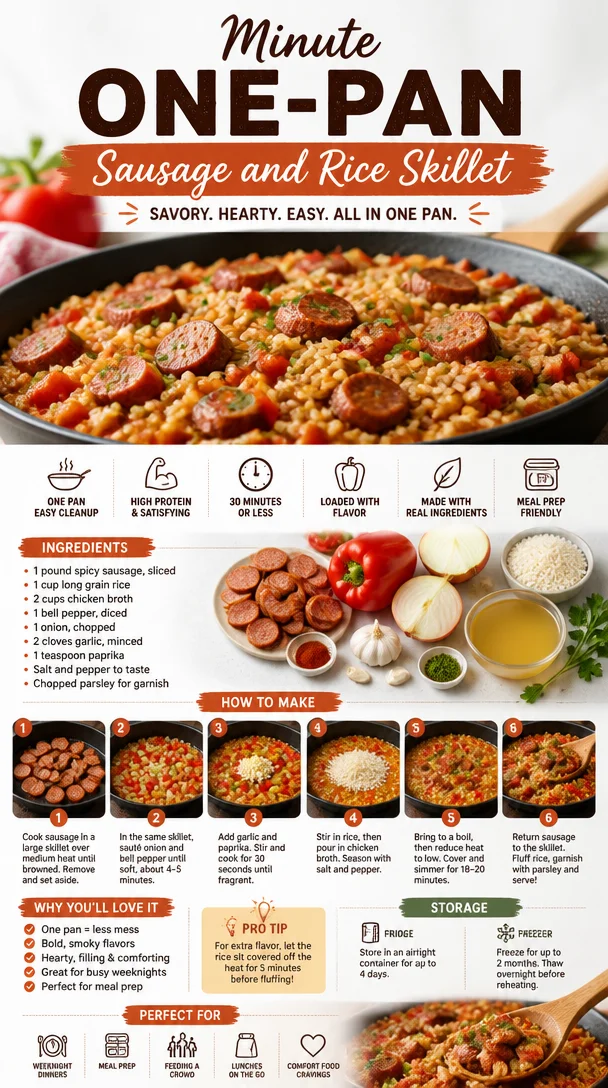
Minute One-Pan Sausage and Rice Skillet
Welcome to My Kitchen: A Flavorful Journey with Sausage and Rice Skillet!
Hey there, it’s Beau Collier! Today we’re diving into one of my absolute favorite comfort food dishes: the Sausage and Rice Skillet. This dish isn’t just about filling your belly; it’s about bringing warmth and family vibes right into your kitchen. There’s something about a skillet meal that feels cozy, right? It’s like a big hug with every bite!
When I think of the Sausage and Rice Skillet, I’m flooded with memories of cooking side by side with my family, always laughing, always dancing to some upbeat tunes while we chopped and sautéed. The aroma of spicy sausage sizzling in the pan mixed with the sweetness of the bell peppers and the savory garlic filled the air, creating anticipation that drew everyone into the kitchen. This dish embodies my philosophy that good food creates good times, whether it’s a weeknight meal or a weekend gathering with friends.
So, if you’re craving something hearty and delicious that’s packed with flavor yet simple enough for any cook, stick around! Let’s whip up this sensational Sausage and Rice Skillet that’ll leave you and your loved ones begging for seconds.
A Slice of My Kitchen Memory
Years ago, I decided to host friends for a cozy get-together at my place. I wanted to bring some warmth to what I thought would be a dreary night, so I made my beloved Sausage and Rice Skillet. I remember the laughter filling my tiny kitchen as we prepped the ingredients together. The banter was as hearty as the dish itself!
One of my friends was a vegetarian, so we had a little fun improvising with plant-based sausage, and somehow, it sparked an impromptu cooking class—with everyone’s knives clattering, bell peppers flying, and spices wafting in the air. By the end of the night, we not only relished our meal together but also created deeper connections. That night, amidst food and laughter, we forged beautiful memories and realizations: food is not just about eating; it’s about sharing, connecting, and simply celebrating life.
So let’s keep that spirit alive today and jump right into cooking our Sausage and Rice Skillet!
Ingredients
Before we sauté our hearts out, let’s gather the beautiful ingredients that will elevate our dish:
-
1 Pound Spicy Sausage, Sliced
Opt for your favorite sausage—Italian, Spanish, or any variant that tickles your taste buds! If you’re in the mood for lighter fare, turkey or chicken sausage works great too. -
1 Cup Long Grain Rice
This type of rice cooks up perfectly for skillet meals, but feel free to switch it up with brown rice for a nutty flavor and extra fiber—just adjust your cooking time accordingly! -
2 Cups Chicken Broth
The flavor enhancer! Use low-sodium broth to control the saltiness. For a vegetarian twist, opt for vegetable broth which will also lend a different depth to the dish. -
1 Bell Pepper, Diced
Any color works! Red, green, or yellow all offer their own unique sweetness and color pop. You could also substitute with other veggies like zucchini or even corn. -
1 Onion, Chopped
Onions are like the flavor base for almost any dish. I usually stick to yellow or white for their balance of sweetness and sharpness. Shallots can make a gourmet replacement if you’re feeling fancy! -
2 Cloves Garlic, Minced
Garlic provides that pungent kick that rounds everything out. If you’re a fellow garlic-lover, feel free to add more; it’s hard to go wrong here. -
1 Teaspoon Paprika
Paprika adds a smokiness and slight warmth to the dish. For an extra punch, consider using smoked paprika! -
Salt and Pepper to Taste
These classic add-ins will elevate your dish even further. Just remember to taste along the way so you can find that perfect seasoning balance. -
Chopped Parsley for Garnish
A sprinkle of fresh parsley not only adds color but a burst of freshness on top of the warm, hearty meal. If you like other herbs, cilantro or basil can bring unique flavors to the table too.
Step-by-Step Instructions
Alright, fellow food lovers, let’s get cooking! If you follow these steps, you’ll have a vibrant and flavor-packed Sausage and Rice Skillet in no time!
-
Sizzle the Sausage
In a large skillet, heat a drizzle of oil over medium heat. Add the sliced sausage and allow it to brown for about 5–7 minutes. You want it to get that nice crispy edge. This is the flavor foundation, folks! Pro tip: Don’t rush this process; a little caramelization can brighten the taste sky-high. -
Sauté the Veggies
Add the chopped onion and diced bell pepper to the skillet with the sausage. Sauté until they’re softened—about 3–4 minutes. This is where the aromas start to dance in your kitchen! -
Add Garlic
Toss in the minced garlic and paprika, cooking for an additional minute. Garlic burns quickly, so don’t stroll away—keep an eye on it! -
Stir in the Rice
Add the uncooked rice to the pan, stirring to coat it in all those juicy flavors. Allow it to toast for about 2 minutes. This step infuses the rice with lovely undertones right from the start. -
Pour in the Broth
Gradually add the chicken broth, stirring everything together. Bring it to a gentle boil. Once bubbling, reduce the heat to low, cover, and let it simmer. Cook until the rice is tender and has absorbed most of the liquid—about 15–20 minutes. Remember not to peek too often; we want that steam to work its magic! -
Season and Serve
Once the rice is fluffy and cooked through, taste and adjust seasoning with salt and pepper as necessary. Add chopped parsley for a fresh finish. Serve it warm straight from the skillet to your plates.
A little chef hack: You can keep the skillet warm on a low setting while you set the table!
Serving Suggestions
This Sausage and Rice Skillet is all about simplicity and flavor. For an inviting presentation, serve it straight from the skillet for that rustic charm. Here are a few serving ideas to elevate the experience:
- Garnish generously with extra parsley or even a sprinkle of red pepper flakes for an added kick.
- Pair it with a side salad—something fresh and crunchy, like a classic Caesar or a simple arugula salad with lemon vinaigrette will do wonders to balance the dish’s richness.
- You could also consider some warm, crusty bread on the side. It’s perfect for scooping up those last delicious bits of sausage and rice.
Recipe Variations
One of the beauties of this dish lies in its flexibility! Here are some fun variations you can play around with:
-
Vegetarian Twist
Swap out the sausage for plant-based options and use vegetable broth instead of chicken broth. -
Spicy Kick
Incorporate diced jalapeños or sprinkle in some cayenne pepper to take the heat up a notch! -
Cheesy Goodness
For the cheese lovers, stir in a generous handful of shredded cheese right before serving. Cheddar or pepper jack works wonders! -
Adding More Veggies
Mix in some spinach, kale, or even frozen peas during the last few minutes of cooking for added nutrition and color. -
Zesty Lemon Drizzle
A squeeze of fresh lemon juice over the finished dish will brighten it up beautifully.
Chef’s Notes
As with every recipe I share, the Sausage and Rice Skillet has evolved over time. I remember my early attempts at making it—so eager but perhaps a little too overzealous with spices! I learned that the balance of flavors is key. Now, I aim for simplicity and heartiness, which creates the perfect atmosphere most home cooks crave.
One warm memory I have of this dish is trying it out during my college years with a group of fellow aspiring chefs. Let’s just say there were some experimental results, but every mishap led to laughter and delicious conversations about what makes food memorable.
FAQs and Troubleshooting
Here are a few common questions you might have while whipping up this delight:
-
What if my rice is still crunchy?
If the rice isn’t tender yet after the recommended cooking time, add a splash more broth or water and cover the skillet to allow it to steam a bit longer. -
Can I use brown rice instead?
Absolutely! Just keep in mind that brown rice has a longer cooking time—about 40–45 minutes. -
How can I store leftovers?
Let the skillet cool completely, then transfer it into an airtight container. It’ll keep nicely in the fridge for about 3–4 days. -
Can I freeze this dish?
Yes! This meal freezes well for up to 3 months. To reheat, you can simply warm it on the stove with a splash of broth.
Nutritional Info
If you’re interested in the nutritional aspect, here’s a rough estimate per serving (includes 4 servings total):
- Calories: Approx. 450
- Protein: 22g
- Fat: 22g
- Carbohydrates: 46g
- Fiber: 2g
- Sodium: 600mg (depending on broth content)
For more specific dietary needs, feel free to adjust ingredients—switch to low-fat sausage, reduce sodium in broth, or increase veggies for a fiber boost!
Final Thoughts
And there you have it—the delectable Sausage and Rice Skillet! This is more than just a recipe; it’s a journey filled with memories, flavors, and fellowship. Each time I make it, I’m reminded of those cherished moments in my kitchen with family and friends. You can make this dish as simple or as adventurous as you like, yet it’s bound to please at any table.
So, what are you waiting for? Gather your ingredients, tie on that apron, and let’s create some delicious memories together! Bon appétit!
PrintSausage and Rice Skillet
- Total Time: 35 minutes
- Yield: 4 servings 1x
- Diet: Paleo
Description
A hearty Sausage and Rice Skillet packed with flavor, perfect for weeknight meals or gatherings with friends.
Ingredients
- 1 Pound Spicy Sausage, Sliced
- 1 Cup Long Grain Rice
- 2 Cups Chicken Broth
- 1 Bell Pepper, Diced
- 1 Onion, Chopped
- 2 Cloves Garlic, Minced
- 1 Teaspoon Paprika
- Salt and Pepper to Taste
- Chopped Parsley for Garnish
Instructions
- Sizzle the sausage in a large skillet over medium heat until browned, about 5–7 minutes.
- Sauté the onion and bell pepper until softened, about 3–4 minutes.
- Add minced garlic and paprika, cooking for 1 minute.
- Stir in uncooked rice and toast for 2 minutes.
- Pour in broth, bring to a boil, then cover and simmer until rice is tender, about 15–20 minutes.
- Season with salt and pepper, then add chopped parsley before serving.
Notes
For a vegetarian option, use plant-based sausage and vegetable broth. Adjust cooking times for brown rice.
- Prep Time: 10 minutes
- Cook Time: 25 minutes
- Category: Main Course
- Method: Sautéing
- Cuisine: American
Nutrition
- Serving Size: 1 serving
- Calories: 450
- Sugar: 3g
- Sodium: 600mg
- Fat: 22g
- Saturated Fat: 8g
- Unsaturated Fat: 10g
- Trans Fat: 0g
- Carbohydrates: 46g
- Fiber: 2g
- Protein: 22g
- Cholesterol: 60mg
Keywords: sausage, rice, skillet, comfort food, easy dinner

Creamy Elote Street-Corn Soup in 25 Minutes (Meal-Prep)
A Warm Welcome to the World of Mexican Street Corn Soup!
Hey there, food lovers! It’s Beau Collier, and today I’m absolutely thrilled to be sharing one of my all-time favorites: Mexican Street Corn Soup! If you are as obsessed with the delightful flavors of street corn as I am, this recipe will warm your soul and tantalize your taste buds. Imagine the smoky, sweet, and creamy essence of elote, transformed into a hearty soup that’s perfect for any season.
But wait, it gets better! This soup is not only packed with flavor but is super simple to whip up, making it suitable for any day of the week – even those busy weekdays when you feel like your spatula is running away from you! Trust me when I say, this dish is like getting a big, comforting hug, one spoonful at a time.
Now, let me set the scene for you. Picture yourself on a sunny afternoon at a lively street fair in Mexico. The air is filled with the aroma of roasted corn paired with zesty lime, spicy chili powder, and the delicious sizzle of street vendors at work. That’s the kind of vibe we’re going for with this Mexican Street Corn Soup. So, let’s dive in, shall we?
My Nostalgic Corner of Mexico
I’ll never forget my first taste of true Mexican street corn, or "elote," at a bustling outdoor market with my best friend. We wandered around, sampling everything from churros to tamales, but it was the elote that knocked me off my feet. The way the vendor charred the corn over open flames, then slathered it with crema, rolled it in crumbled cheese, and topped it with a sprinkle of chili powder made for an unforgettable experience. We devoured it together, laughing and wiping the spicy goodness from our faces. Fast forward to today, and I’ve transformed that joyous memory into this comforting soup recipe. It encapsulates all the flavors I cherished, bringing that street fair vibe right into your kitchen.
Ingredients
Here’s what you’ll need for this flavorful fiesta in a bowl:
-
1 tbsp olive oil
Olive oil is perfect for sautéing and adds a subtle depth of flavor. For a different taste, you can substitute it with avocado oil. -
1 small red onion, diced
Red onions add a touch of sweetness and vibrant color. If you don’t have them on hand, yellow or white onions work just as well. -
1 medium jalapeño, seeded and diced
This little guy brings the heat! If you prefer a milder soup, feel free to leave it out or use a bell pepper instead. -
3 cloves garlic, minced
Garlic is a must-have for depth and aroma. I mean, who can resist the smell of sautéed garlic? -
2 (12 oz.) boneless, skinless chicken breasts
Chicken adds protein and heartiness. If you’re vegetarian, you can skip this altogether or use canned beans for a protein boost. -
1 (12 oz.) package fire-roasted frozen corn (or fresh corn)
Fire-roasted corn brings incredible smoky flavor! Fresh corn can also be used—it’s equally delicious and adds sweetness. -
1 (4 oz.) can diced green chiles
These add a mild spicy kick. If you want to amp up the heat, diced jalapeños can be an exciting substitution. -
1 tbsp Tajín seasoning
This Mexican seasoning blend enhances the flavors beautifully. If you can’t find it, a mix of lime zest, chili powder, and salt will do just fine. -
2 tsp ground cumin
Cumin offers a warm, earthy flavor that rounds out the soup perfectly. -
2 tsp chili powder
Just the right amount of spice! If you’re feeling adventurous, you could even blend in some smoked paprika. -
½ tsp table salt and ¼ tsp finely ground black pepper
Essential for seasoning! Always taste as you go—you might need a pinch more or less. -
4 cups (32 oz.) chicken stock or low-sodium chicken broth
This forms the base of your delightful soup. You can also use vegetable broth if you prefer. -
2 cups sour cream (full-fat) or Greek yogurt (full-fat)
For creaminess, either option works wonderfully. Greek yogurt will give a tangier twist—it’s your call! -
½ cup shredded Monterey Jack cheese
This cheese melts beautifully and adds a rich flavor. Feel free to substitute with Cheddar or Pepper Jack for a kick! -
Juice of one lime
Fresh lime juice brightens everything up. Don’t skip it! -
¼ cup chopped cilantro
For that fresh, herbaceous note. If cilantro isn’t your jam, parsley is a great alternative. -
½ cup crumbled queso fresco
This crumbly cheese is a traditional topping. If it’s hard to find, feta cheese can be an excellent stand-in!
Step-by-Step Instructions
Let’s get cooking, shall we? Follow along, and I promise this will become a staple recipe in your household!
-
Heat the Olive Oil
In a large pot, heat the olive oil over medium heat. You want just enough sizzle to greet you when you dump in that onion. -
Sauté the Aromatics
Toss in the diced red onion and let it sweat for a couple of minutes until it turns translucent and lovely. This step creates a flavor-packed base! Then add the minced garlic and diced jalapeño. Stir for about a minute until fragrant—nothing beats that aroma. -
Add Chicken and Corn
Now, it’s time for the chicken breasts! Browning them slightly on each side ensures they lock in all the flavors. Once they’re golden, add the fire-roasted corn and green chiles. Stir to combine and enjoy that stunning color palette in your pot. -
Season It Up
Sprinkle in Tajín, cumin, chili powder, salt, and pepper. Mix it all together—make sure everything is coated in those spices because trust me, this is where the magic happens! -
Pour in the Stock
Pour in the chicken stock, turning up the heat slightly to bring it all to a boil. Once it boils, reduce the heat to a simmer and cover. Let it bubble gently for about 15-20 minutes, or until the chicken is cooked through. -
Shred the Chicken
Once your chicken is cooked, carefully remove it from the pot. Give it a few moments to cool and then shred it using two forks. Return the shredded chicken back to the soup—this adds a heartiness that makes it extra comforting. -
Add the Creaminess
Stir in the sour cream or Greek yogurt, and watch as it creates a creamy texture that enhances the soup’s richness. You’ll want to make sure everything is well incorporated, so give it a good stir. -
Finish It Off
Squeeze in the juice of one lime and fold in the shredded Monterey Jack cheese. This last bit makes it irresistibly creamy and flavorful. -
Garnish and Enjoy
Ladle the soup into bowls, top with crumbled queso fresco and fresh cilantro. A lively splash of lime juice on top just before serving can elevate it to new heights!
Serving Suggestions
I love to serve this soup with a side of warm tortilla chips for some satisfying crunch! Or you can even line the rim of your soup bowl with a little extra lime juice and Tajín for a tasty twist. For a more filling meal, add a side of Mexican rice or a simple avocado salad. You can even pair it with a refreshing margarita—because why not make it a fiesta?
Recipe Variations
-
Vegetarian Delight
Swap out chicken for canned black beans or chickpeas for a fabulous vegetarian option. Just make sure to skip the stock for vegetable broth! -
Spicy Kick
Add diced habanero or serrano peppers to the mix for those who like an extra kick. -
Cheesy Lovers
Stir in additional cheese varieties like Pepper Jack or even cream cheese for an incredibly rich flavor. -
Add Sweetness
For a hint of sweetness, try adding a cup of diced red bell pepper or even some roasted sweet potatoes. -
Dairy-Free Option
Use coconut milk in place of sour cream for a creamy texture that’s dairy-free. And for cheese lovers, nutritional yeast can add that cheesy note.
Chef’s Notes
This recipe has evolved over the years, finding its sweet spot between comforting and bold. It wasn’t always a soup; my original approach was to enjoy elote prepared on-the-cob. However, once the fall season rolled in, I knew I needed to create a cozy soup that captured those same vibes. And voila! Mexican Street Corn Soup was born, making family gatherings and cozy nights in feel super special.
Oh, and a funny little kitchen story: I once attempted to impress a date with this soup, and I may have gone a little overboard on the jalapeños. Let’s just say there were many glasses of milk consumed that night… Oops!
FAQs and Troubleshooting
1. My soup is too thick—what do I do?
Add more chicken stock or water, little by little until you reach your desired consistency. Always taste as you go!
2. How can I store it?
Cool it completely, then transfer it to an airtight container. It’s good in the fridge for about 3-4 days.
3. Can I freeze this soup?
Absolutely! It freezes beautifully. Just be sure to leave out the creamy ingredients until you reheat.
4. My soup is too spicy; what can I do?
To help tone down the spice, try adding more sour cream or Greek yogurt, which will help mellow out the heat.
Nutritional Info
This Mexican Street Corn Soup is packed with nutritional value! Each serving contains a healthy blend of protein from the chicken, healthy fats from the olive oil and cheese, plus a fantastic array of vitamins and minerals from the veggies. Each bowl is a delightful balance of around 350 calories, providing 25g of protein, 20g of carbs, and 15g of fat. Remember, nutritional values may vary, so feel free to adjust for your specific dietary needs!
Final Thoughts
There you have it, amigos! A cozy bowl of Mexican Street Corn Soup that’s sure to warm your heart and fill your belly with wonderful flavor. It’s a dish that not only satisfies your cravings but also brings back all those beautiful memories of laughter, sunny days, and good friends. Cooking is all about sharing stories and creating memories—so as you enjoy this recipe, know that you’re also a part of mine.
Now grab your spoons and dive in—you’ve got a warm hug waiting for you in every bite! Until next time, happy cooking and happy eating!
Print
Mexican Street Corn Soup
- Total Time: 45 minutes
- Yield: 4 servings 1x
- Diet: Paleo
Description
A comforting soup that captures the delightful flavors of Mexican street corn, perfect for any season.
Ingredients
- 1 tbsp olive oil
- 1 small red onion, diced
- 1 medium jalapeño, seeded and diced
- 3 cloves garlic, minced
- 2 (12 oz.) boneless, skinless chicken breasts
- 1 (12 oz.) package fire-roasted frozen corn (or fresh corn)
- 1 (4 oz.) can diced green chiles
- 1 tbsp Tajín seasoning
- 2 tsp ground cumin
- 2 tsp chili powder
- ½ tsp table salt
- ¼ tsp finely ground black pepper
- 4 cups (32 oz.) chicken stock or low-sodium chicken broth
- 2 cups sour cream (full-fat) or Greek yogurt (full-fat)
- ½ cup shredded Monterey Jack cheese
- Juice of one lime
- ¼ cup chopped cilantro
- ½ cup crumbled queso fresco
Instructions
- Heat the olive oil in a large pot over medium heat.
- Toss in the diced red onion and let it sweat for a couple of minutes.
- Add the minced garlic and diced jalapeño, stirring for a minute until fragrant.
- Add the chicken breasts and brown them slightly on each side.
- Add the fire-roasted corn and green chiles, stirring to combine.
- Sprinkle in Tajín, cumin, chili powder, salt, and pepper.
- Pour in the chicken stock, bring to a boil, then reduce to a simmer and cover.
- Shred the chicken after cooking it through, then return it to the soup.
- Stir in the sour cream or Greek yogurt.
- Squeeze in the lime juice and fold in the Monterey Jack cheese.
- Garnish with crumbled queso fresco and fresh cilantro before serving.
Notes
For a vegetarian version, substitute chicken with canned black beans or chickpeas. Adjust spice levels to your taste.
- Prep Time: 15 minutes
- Cook Time: 30 minutes
- Category: Soup
- Method: Stovetop
- Cuisine: Mexican
Nutrition
- Serving Size: 1 bowl
- Calories: 350
- Sugar: 5g
- Sodium: 400mg
- Fat: 15g
- Saturated Fat: 7g
- Unsaturated Fat: 6g
- Trans Fat: 0g
- Carbohydrates: 20g
- Fiber: 3g
- Protein: 25g
- Cholesterol: 70mg
Keywords: Mexican soup, corn soup, street corn, comfort food, easy recipe

Ingredient Coconut Apricot Muffins: Quick Breakfast
Coconut and Fresh Apricot Muffins: A Taste of Summer
Hey there, fellow foodies! Today, I am thrilled to share with you a recipe that celebrates the sunny flavors of summer—Coconut and Fresh Apricot Muffins. If you’re anything like me, the scent of freshly baked goods wafting through your kitchen is pure magic. It transports you to better days filled with laughter, love, and sweet memories. So, grab your apron, and let’s whip up a batch of these delightful muffins that are bursting with tropical vibes and the luscious taste of apricots!
A Toast to Nostalgia
Let me take you back to a sun-soaked summer afternoon a few years ago, one that stands out among my fond kitchen memories. I was visiting my grandmother, who always seemed to have a secret stash of delicious treats tucked away in her pantry. One day, she handed me a basket filled with freshly picked apricots from her garden. The fragrance was intoxicating, sweet and tangy, and I could hardly wait to dive into a culinary adventure with them.
As we baked together, her sage advice filled the air—“Don’t rush, enjoy the process; cooking is as much about the journey as the destination.” We decided to create muffins instead of the usual cobbler. By combining those vibrant apricots with rich coconut, we nailed a taste that felt both comforting and exciting. It was one of those moments where the love of cooking transformed our kitchen into a magical place filled with laughter and happiness. Every bite of those muffins was a warm hug, reminding me that good food brings people together.
Now, let’s recreate that wonderful experience in your kitchen with these Coconut and Fresh Apricot Muffins!
The Perfect Ingredients for Muffin Perfection
Before we dive into the cooking, let’s gather our ingredients. Here’s what you need:
- 280 g plain flour: This serves as the muffin’s base. You can swap it for whole wheat flour for a nuttier flavor or a gluten-free blend if you’re going for a gluten-free option.
- 2 tsp baking powder: This leavening agent gives our muffins a delightful rise. Remember, baking powder loses its potency over time, so check the expiration date!
- 1/2 tsp bicarbonate of soda: Also known as baking soda, it adds extra fluffiness to our muffins. It works best when paired with acidic ingredients like buttermilk or yogurt.
- 1/2 tsp salt: Just a pinch enhances the flavors without making your muffins salty.
- 75 g sugar: For sweetness! You can substitute with coconut sugar or even a sugar alternative if you’re watching your intake.
- 50 g desiccated coconut (unsweetened): This adds a tropical flair. Feel free to use sweetened if you prefer a sweeter taste!
- 90 ml sunflower oil: A neutral oil that keeps our muffins moist. You can swap it for melted coconut oil for even more coconut flavor.
- 150 ml milk: I used oat milk, but any type of milk will do—dairy, almond, or even coconut milk for an extra flavor boost.
- 1 egg: For binding ingredients together. To make this vegan, use a flax egg (1 tbsp flaxseed meal + 2.5 tbsp water).
- 1 ripe banana: This will add natural sweetness and moisture to the muffins. The riper, the better—look for those lovely brown spots!
- 175 g apricots: Fresh, juicy apricots are the star here! If apricots aren’t in season, you can replace them with peaches or nectarines for a similar taste.
Step-By-Step Instructions to Muffin Nirvana
Are you excited yet? Let’s get our hands floury and dive into the steps!
-
Preheat Your Oven: Start by preheating your oven to 180°C (350°F) and lining a muffin tray with paper liners or greasing it lightly. This ensures our muffins don’t stick and makes cleanup a breeze!
-
Mix Dry Ingredients: In a large mixing bowl, combine the plain flour, baking powder, bicarbonate of soda, salt, sugar, and desiccated coconut. Mix it all up with a whisk and feel free to do a little dance—it makes cooking more fun!
-
Mash That Banana: In another bowl, mash the ripe banana until it’s a smooth puree. This is where the magic begins—the banana will provide natural sweetness, moisture, and make our muffins super fluffy!
-
Add Wet Ingredients: To the mashed banana, add the sunflower oil, milk, and the egg. Whisk until everything is combined and you see a beautiful blend of colors. Yum!
-
Combine Wet and Dry: Slowly pour the wet mixture into the bowl of dry ingredients. Gently fold them together using a spatula or wooden spoon. Be careful not to overmix—some lumps are okay! This will keep our muffins soft and tender.
-
Chop Those Apricots: Take your fresh apricots and chop them into bite-sized pieces. Gently fold them into the muffin batter. I like to keep a few pieces aside to place on top before baking for that extra pop of color!
-
Scoop it In: Using a large spoon or ice cream scoop, portion the batter into the prepared muffin tray, filling each liner about 2/3 full. This allows room for rising without overflowing.
-
Bake to Perfection: Pop your muffin tray into the preheated oven and bake for about 20-25 minutes or until they’re golden brown and a toothpick inserted in the center comes out clean. The aroma will have you salivating—trust me!
-
Cooling Down: Once they’re baked, take them out and let them cool in the tray for about 5 minutes before transferring them to a wire rack to cool completely. This step may feel excruciating, but trust me, it’s worth the wait!
Creating an Inviting Plating
Now that your Coconut and Fresh Apricot Muffins are ready, let’s talk about how to serve them. For a cozy presentation, arrange a few muffins on a rustic wooden board, possibly dusting them lightly with powdered sugar to elevate their appearance. You can accompany them with a small jar of homemade jam or a dollop of whipped cream cheese. If you’re feeling fancy, sprinkle some extra desiccated coconut on top for that tropical flair!
These muffins are perfect for breakfast, a brunch gathering, or simply a treat any time of day—trust me, they’ll disappear fast!
Recipe Variations to Keep It Fresh
Every recipe can be tweaked to fit your cravings or dietary preferences, and these muffins are no exception! Here are some variations and tips to keep things creative:
- Tropical Twist: Add some crushed pineapple along with the apricots for a true tropical muffin adventure!
- Nutty Delight: Toss in some chopped nuts like almonds or walnuts for a lovely crunch and added protein.
- Berry Goodness: Swap out apricots for blueberries or raspberries in the summer for a juicy and refreshing flavor.
- Vegan Option: As mentioned earlier, substitute the egg with a flax egg and use coconut milk for richness.
- Zesty Addition: Add a teaspoon of vanilla extract or a bit of grated lemon or orange zest for a citrus kick.
Chef’s Notes from the Kitchen
Here’s a little secret: the first batch of these muffins was actually inspired by a recipe I found in an old cookbook my grandmother passed down to me. Over time, though, I tweaked it to incorporate the tropical flavors we all love today. I remember the look on her face when she took that first bite—pure bliss! Sometimes our favorite recipes find their soul over generations, and it’s so rewarding to share them with friends and family.
FAQs and Troubleshooting
1. What if my muffins are too dense?
Difficulty in fluffiness might stem from overmixing the batter or not enough leavening agents. Keep mixing to a minimum, and double-check your baking powder and bicarbonate for freshness!
2. Can I make these muffins ahead of time?
Absolutely! Store them in an airtight container at room temperature for up to 2 days. You can also freeze them and defrost as needed; they’re just as delightful when reheated!
3. Why didn’t my muffins rise?
Check that your oven is at the right temperature. Also, make sure your baking powder is fresh and active. This is key for achieving fluffy muffins!
4. Can I add chocolate to the batter?
Why not! Feel free to fold in some chocolate chips for a delectable chocolate twist. It’s a great way to indulge even more!
Nutritional Info
Let’s talk about those delicious muffins—each one is packed with flavor as well as nourishment. Here’s a rough breakdown of the nutrition per muffin (based on 12 servings):
- Calories: Approximately 180 kcal
- Protein: 3 g
- Fat: 6 g
- Carbohydrates: 28 g
- Fiber: 2 g
- Sugar: 8 g
These muffins are a delightful treat that brings coconut and apricot goodness to your snack time while still being a reasonable option for a sweet break!
Final Thoughts
And there you have it, my dear food enthusiasts! Coconut and Fresh Apricot Muffins—soft, scrumptious, and so easy to whip up. They’re not just muffins; they’re a ticket to joyful memories, cozy moments, and a taste of summer that you can enjoy in any season.
As you bake these delightful treats, remember they aren’t just food; they’re experiences waiting to happen. So gather your friends and family around, share these muffins, and savor the delicious moments together. Because food is much more than just sustenance; it’s a bridge to connections, love, and joy.
Happy baking, everyone, and until next time, may your kitchens always be filled with warmth, laughter, and, of course, the delightful aroma of something delicious! Let’s dig in!
Print
Coconut and Fresh Apricot Muffins
- Total Time: 40 minutes
- Yield: 12 servings 1x
- Diet: Vegetarian
Description
Delight in the sunny flavors of summer with these Coconut and Fresh Apricot Muffins, perfect for breakfast or a sweet treat any time of day.
Ingredients
- 280 g plain flour
- 2 tsp baking powder
- 1/2 tsp bicarbonate of soda
- 1/2 tsp salt
- 75 g sugar
- 50 g desiccated coconut (unsweetened)
- 90 ml sunflower oil
- 150 ml milk
- 1 egg
- 1 ripe banana
- 175 g apricots
Instructions
- Preheat your oven to 180°C (350°F) and prepare a muffin tray.
- Mix the dry ingredients together: flour, baking powder, bicarbonate of soda, salt, sugar, and desiccated coconut.
- Mash the ripe banana until smooth in another bowl.
- Add the sunflower oil, milk, and egg to the banana and whisk until combined.
- Combine the wet and dry ingredients without overmixing.
- Chop fresh apricots and gently fold them into the muffin batter.
- Scoop the batter into the muffin tray, filling each liner about 2/3 full.
- Bake for 20-25 minutes or until golden brown.
- Cool in the tray for 5 minutes, then transfer to a wire rack.
Notes
For a vegan version, substitute the egg with a flax egg and use coconut milk for richness.
- Prep Time: 15 minutes
- Cook Time: 25 minutes
- Category: Breakfast
- Method: Baking
- Cuisine: American
Nutrition
- Serving Size: 1 muffin
- Calories: 180
- Sugar: 8g
- Sodium: 220mg
- Fat: 6g
- Saturated Fat: 3g
- Unsaturated Fat: 2g
- Trans Fat: 0g
- Carbohydrates: 28g
- Fiber: 2g
- Protein: 3g
- Cholesterol: 30mg
Keywords: coconut muffins, apricot muffins, summer recipes, baking, vegetarian treats

Minute Sour Cherry Tarts: Simple Summer Dessert
Easy Sour Cherry Tarts: A Sweet Treat with a Tart Twist!
Hey there, fellow food lovers! Today, I’m feeling a bit nostalgic as I share a delightful recipe that warms my heart and brings back some of my fondest memories: Easy Sour Cherry Tarts. Picture this: sun-drenched orchards, the sweet-and-sour aroma of cherries wafting through the air, and laughter filling the kitchen as family members gather to whip up something delicious. That’s the magic of cherries—sweet on some days and a tad tart on others, just like life!
In my world, sour cherries are underrated gems that deserve a spotlight. These vibrant little fruits are perfect for desserts that strike a balance between sweet indulgence and zesty freshness. Whether it’s a casual get-together or a fancy dinner party, these Easy Sour Cherry Tarts will have everyone asking for seconds (and maybe even thirds)! So, put on your apron, roll up your sleeves, and let’s embark on this cherry adventure together!
A Cherry Memory
Let me take you back to a summer long ago, back when my grandmother had an expansive cherry tree in her backyard. Those arms of green would be filled to the brim with the brightest, juiciest sour cherries you could imagine. The air would buzz with excitement as my cousins and I would have friendly cherry-picking contests, trying to outdo each other on who could gather the most. Sun-soaked faces, sticky fingers, and the joy of biting into a fresh cherry was always the best part of summer.
After our cherry-picking escapades, Grandma would lead us back into her cozy kitchen, where the delightful aroma of baked goods was a constant invitation. Together, we would mix, stir, and bake, turning those tart gems into the most scrumptious pies and tarts. I can still hear Grandma’s laughter as she caught us sneaking a few cherries to munch on while we worked. Those Easy Sour Cherry Tarts were the highlight of our family gatherings, and now, they’re a cherished tradition that I love sharing with you all!
Ingredients for Easy Sour Cherry Tarts
Here’s what you’ll need to make these delightful tarts:
- 6 cups pitted sour cherries: Fresh, frozen, or canned—just make sure they’re pitted! If you’re using frozen cherries, there’s no need to thaw them; they’ll cook down beautifully.
- 2 cups white sugar: Essential for balancing the tartness of the cherries! You can adjust this based on your sweetness preference or swap it out for brown sugar for a deeper flavor.
- 1 heaping tbsp cornstarch: This is our thickening agent! It helps the cherry filling hold together nicely. If you don’t have cornstarch, you can use arrowroot or all-purpose flour, but you may need to adjust the quantity.
- 2-3 tbsp water: Helps create the syrupy mixture with sugar and cherries. Use as needed to achieve the right consistency.
- 1 package pastry tart shells (approximately 30 in a package): Store-bought or homemade—save time with pre-made shells or impress your friends with a homemade version!
- Whipped cream to garnish: The perfect light and airy topping! You can use store-bought or whip up some fresh cream by mixing heavy cream and sugar until it forms soft peaks.
- Optional: Edible flowers and thyme for garnish: These add a beautiful touch! Look for flowers like nasturtiums or violets, and fresh thyme for a lovely herbal contrast.
Step-by-Step Instructions for Making Your Tarts
Now that we’ve gathered our ingredients, let’s get started on these delightful Easy Sour Cherry Tarts.
Step 1: Prepare the Filling
-
In a large pot, combine the pitted sour cherries and sugar over medium heat. Stir them gently until the cherries begin to release their juices and the sugar starts to dissolve.
Chef Tip: To enhance the flavor, consider adding a dash of vanilla extract or a sprinkle of cinnamon for an unexpected twist!
-
Once the mixture is simmering, sprinkle the cornstarch over the cherries and stir to combine. This will help thicken the filling. If it looks too thick, add a bit of water to loosen it up. Let this cook for about 5-7 minutes until it thickens and bubbles.
Pro Tip: If you notice clumps of cornstarch, whisk it with a bit of cold water first to create a slurry before adding it to the hot filling.
Step 2: Fill the Tart Shells
-
Preheat your oven to 350°F (175°C). While it preheats, take your prepared tart shells and place them on a baking sheet.
-
Once the filling is ready, carefully spoon the tart cherry mixture into the prepared tart shells, filling each one generously.
Chef Insight: Don’t be shy! A heaping spoonful of filling in each shell makes for an irresistible tart.
Step 3: Bake the Tarts
-
Place the filled tart shells in the oven and bake for approximately 20-25 minutes or until the tart shells are golden and the cherry filling is bubbling.
Baker’s Pro Tip: Keep an eye on the tarts towards the end of baking! If you see that the shells are browning too quickly, you can cover them with aluminum foil to prevent burning.
Step 4: Cool and Serve
-
Once baked, remove the tarts from the oven and let them cool on a wire rack for at least 15-20 minutes. This will allow the filling to set a bit more.
-
Before serving, top each tart with a dollop of whipped cream and, if you’re feeling fancy, a sprinkling of edible flowers or thyme!
Serving Suggestion: Arrange the tarts on a beautiful platter, perhaps with a few fresh cherries scattered around for a pop of color!
Recipe Variations to Try
-
Mixed Cherry Tarts: Combine sour cherries with sweet cherries or other fruits like blueberries or raspberries for a mixed berry experience!
-
Almond Cherry Tarts: Add a teaspoon of almond extract to the filling for a nutty twist that complements the cherry flavor beautifully.
-
Savory Cherry Tarts: For a unique take, incorporate goat cheese into the filling and sprinkle a bit of fresh rosemary on top before baking!
-
Chocolate Cherry Tarts: Drizzle some melted dark chocolate over the tarts either before or after baking for a rich, decadent dessert.
-
Gluten-Free Tarts: Use gluten-free pastry shells or make your own with almond flour for a gluten-free version that everyone can enjoy!
Chef’s Notes
These Easy Sour Cherry Tarts are truly a labor of love. The recipe has evolved over the years as I’ve played with different variations, discovering that the tartness of the cherries complements so many flavors. I remember the first time I added a bit of almond extract to the filling; it was like a light bulb moment in my kitchen! The creativity goes on forever!
And let me tell you, there’s nothing quite like pulling these fresh tarts out of the oven—it fills the air with a scent that makes everyone gather around, just waiting for their first bite!
FAQs and Troubleshooting
1. How do I know when the tarts are baked properly?
Look for a bubbling filling and a golden-brown crust. If your tarts are browning too quickly, use foil to cover them.
2. Can I use fresh cherries instead of frozen?
Absolutely! Just make sure to pit them first. Fresh cherries add a lovely texture!
3. My filling is too runny; what did I do wrong?
If your filling is too runny, it may be due to not enough cornstarch or cooking time. Let it cook a bit longer to thicken up.
4. How can I store leftover tarts?
Keep them in an airtight container in the fridge for up to three days. They’re perfect for a quick snack!
Nutritional Info
While exact values can vary based on the specific ingredients you use, here’s a general breakdown for each tart based on serving size:
- Calories: Approximately 200 calories per tart
- Total Fat: 8g
- Saturated Fat: 4g
- Cholesterol: 30mg
- Sodium: 150mg
- Total Carbohydrates: 30g
- Fiber: 2g
- Sugars: 18g
- Protein: 2g
Keep in mind that these tarts are a delightful indulgence meant to be enjoyed in moderation—the fresh cherries bring a load of vitamins and antioxidants, making them a slightly healthier choice than other dessert options!
Final Thoughts
Creating Easy Sour Cherry Tarts is more than just a recipe; it’s about celebrating the connections we make over good food. It’s about the laughter shared while baking and the memories created around the dinner table. Whether you’re whipping these up for a family gathering, a potluck, or just a Tuesday night treat for yourself, I promise they’ll bring a little sweetness and tart joy to your day!
So there you have it! These Easy Sour Cherry Tarts are not just a dessert—they are a tradition, a moment, and an experience all wrapped in a delightful flaky shell. Get in that kitchen, have fun, and enjoy every bite! Happy baking!
Print
Easy Sour Cherry Tarts
- Total Time: 45 minutes
- Yield: 30 tarts 1x
- Diet: Vegetarian
Description
Delightful Easy Sour Cherry Tarts that perfectly balance sweet and tart flavors, making them a favorite for any occasion.
Ingredients
- 6 cups pitted sour cherries (fresh, frozen, or canned)
- 2 cups white sugar
- 1 heaping tbsp cornstarch
- 2–3 tbsp water (as needed)
- 1 package pastry tart shells (approximately 30)
- Whipped cream (for garnish)
- Optional: Edible flowers and thyme for garnish
Instructions
- Combine the pitted sour cherries and sugar in a large pot over medium heat to release juices.
- Sprinkle the cornstarch over the mixture and stir until combined, cooking for 5-7 minutes until thickened.
- Preheat your oven to 350°F (175°C) and arrange tart shells on a baking sheet.
- Spoon the cherry mixture into the tart shells generously.
- Bake for 20-25 minutes or until shells are golden and filling is bubbling.
- Cool the tarts on a wire rack for 15-20 minutes before serving.
- Top each tart with whipped cream and optional edible flowers or thyme.
Notes
Experiment with different variations by adding almond extract or mixing in different fruit for a unique twist.
- Prep Time: 20 minutes
- Cook Time: 25 minutes
- Category: Dessert
- Method: Baking
- Cuisine: American
Nutrition
- Serving Size: 1 tart
- Calories: 200
- Sugar: 18g
- Sodium: 150mg
- Fat: 8g
- Saturated Fat: 4g
- Unsaturated Fat: 4g
- Trans Fat: 0g
- Carbohydrates: 30g
- Fiber: 2g
- Protein: 2g
- Cholesterol: 30mg
Keywords: sour cherry, tarts, dessert, easy recipe, baking, cherry recipe
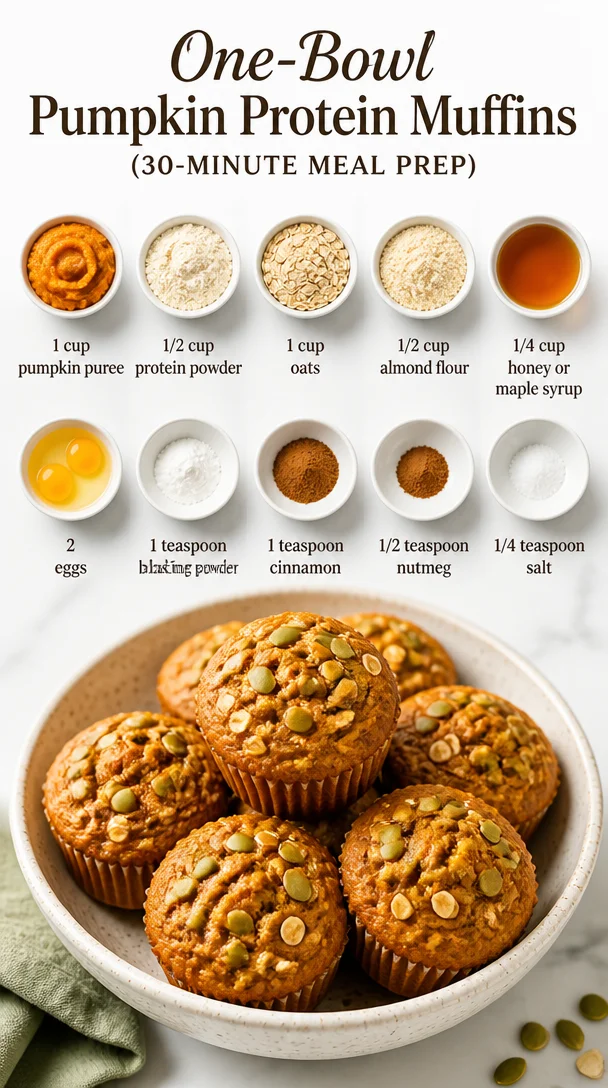
One-Bowl Pumpkin Protein Muffins (30-Minute Meal Prep)
Pumpkin Protein Muffins: A Cozy Culinary Journey to Deliciousness
Hey there, food enthusiasts! It’s Beau Collier, your friendly kitchen buddy with a knack for whipping up comfort food that’s not just satisfying but also good for you. Today, we’re diving into the world of Pumpkin Protein Muffins—a scrumptious treat that’s perfect for breakfast, a snack, or even a post-workout boost.
As the leaves begin to turn and pumpkin-flavored everything floods our favorite cafes, it’s time to embrace something homemade that captures all the warm, cozy vibes of the season—without forgetting our health goals! By melding wholesome ingredients with that lovely pumpkin goodness, we can create delightful muffins that are perfect for the entire family. Ready to roll up your sleeves and bake some goodness? Let’s get started!
A Dash of Nostalgia: My Pumpkin Muffin Memory
Picture this: it’s a crisp autumn morning, and the air is filled with the scent of cinnamon and nutmeg. My grandma, a true kitchen guru, would spend weekends crafting her famous pumpkin muffins, filling our home with a cozy aroma that made even the grumpiest of souls smile. She was a true believer that food brings family together, and her secret ingredient was always a generous helping of love mixed with laughter.
I’ll never forget the way she taught me to stir the batter with a flick of the wrist while shaking her head at my clumsy juggling of flour containers. Those muffins were more than just a snack; they symbolized togetherness and the warmth of family tradition. Fast forward to today, and I’ve taken that cherished recipe and added a fun twist—more protein and wholesome elements to fuel our busy lives!
So, grab your apron as we explore the comforting world of Pumpkin Protein Muffins. Trust me, your kitchen will be the next cozy corner of fall magic!
Ingredients: The Building Blocks of Deliciousness
Let’s gather our ingredients! These muffins are packed with nutrients while still delivering on flavor. Here’s what you’ll need:
-
1 cup pumpkin puree: You can use canned or homemade. If using fresh, ensure it’s well-cooked and blended until smooth. Don’t worry; a little extra pumpkin won’t hurt! This ingredient is key for moisture and that wonderful fall flavor.
-
1/2 cup protein powder: I favor a vanilla or chocolate plant-based powder, but your preference will work just fine. Feel free to use whey or pea protein too! It’s a fantastic way to boost the protein content without compromising on taste.
-
1 cup oats: Rolled oats add texture and heartiness. If you’re gluten-sensitive, opt for certified gluten-free oats. You can even pulse them in a blender to create oat flour if you fancy a smoother texture.
-
1/2 cup almond flour: This lends a nutty flavor and moistness. Can’t find almond flour? Substitutes include coconut flour (but use less, as it’s super absorbent) or whole wheat flour for a heartier muffin.
-
1/4 cup honey or maple syrup: Choose your sweetener! Honey gives a floral sweetness, while maple syrup infuses a uniquely rich flavor. If you’d rather skip the sweet stuff, you could use mashed bananas or applesauce as natural sweeteners.
-
2 eggs: They bind our mixture and add fluffiness. You can replace them with flax eggs (1 tablespoon of ground flaxseed mixed with 2.5 tablespoons of water per egg) for a vegan option.
-
1 teaspoon baking powder: Essential for rising! Make sure it’s fresh for maximum fluffiness.
-
1 teaspoon cinnamon: The warming spice we all adore. You can also experiment with pumpkin pie spice blends for an extra kick.
-
1/2 teaspoon nutmeg: A little pep in your step! Nutmeg offers an earthy warmth and a flavor boost.
-
1/4 teaspoon salt: Balances the flavors and enhances the sweetness.
Let’s gather these beautiful ingredients together and create some muffin magic!
Step-by-Step Instructions: Baking with Love
Now that we have our ingredients in check, it’s time to turn our kitchen into a muffin-making paradise! Here are the steps to create your delicious Pumpkin Protein Muffins:
-
Preheat your oven: Start by preheating your oven to 350°F (175°C). This ensures a beautifully even bake!
-
Prepare the muffin tin: Grab your muffin tin and either grease it with cooking spray or line it with paper liners. Greasing helps them pop out easily, while liners make for a fun presentation!
-
Mix the dry ingredients: In a large mixing bowl, whisk together the oats, almond flour, protein powder, baking powder, cinnamon, nutmeg, and salt. This step is essential to distribute all those lovely spices evenly.
-
Combine the wet ingredients: In a separate bowl, mix the pumpkin puree, honey (or maple syrup), and eggs until smooth. You want the mixture to be creamy and comforting. The pumpkin here adds so much flavor and moisture!
-
Blend the ingredients: Pour the wet ingredients into the dry mixture, gently folding it together with a spatula. Be careful not to over-mix; we want fluffy muffins, not tough ones! If the batter seems too thick, add a splash of almond milk or water to loosen it.
-
Scoop your batter: Using a scoop or spoon, evenly distribute the batter into the muffin tins, filling each cup about ¾ full. You can even sprinkle a few oats on top for added texture!
-
Bake to perfection: Slide your muffin tin into the oven and bake for 20–25 minutes, or until a toothpick inserted into the center comes out clean. The scent wafting through your kitchen will make it hard to wait patiently!
-
Cool and enjoy: Once baked, remove the muffins from the oven and let them cool in the pan for 5 minutes, then transfer them to a wire rack to cool completely. If you can resist, let them cool a bit—trust me, it’ll be worth it!
And just like that, your kitchen is filled with the delicious aroma of Pumpkin Protein Muffins! Each muffin is a cozy bite of happiness that nourishes both body and soul.
Serving Suggestions: Mmm, Muffin Time!
Once you’ve baked your muffins to golden perfection, it’s time to dig in! Serve them still warm, perhaps with a little smear of almond butter or a dollop of Greek yogurt for added creaminess. You can also dust them lightly with powdered sugar for a touch of elegance.
For a fun twist, turn your muffin time into a mini brunch gathering. Arrange the muffins on a platter with an assortment of spreads like honey, a drizzle of maple syrup, and even a selection of fresh fruits. Think sliced strawberries, bananas, or a sprinkle of walnuts for that crunchy texture.
Enjoy them fresh out of the oven, or wrap them up for a tasty on-the-go option! Trust me; they make for a delightful snack that you won’t want to miss!
Recipe Variations: Spice it Up
Now that you’ve mastered the classic Pumpkin Protein Muffins, let’s explore a few fun variations to keep things fresh and exciting in your kitchen:
-
Chocolate Chip Pumpkin Protein Muffins: Fold in a handful of dark chocolate chips for a sweet surprise! It’s a delightful combination that will satisfy your sweet tooth while keeping the nutritious profile.
-
Nutty Pumpkin Muffins: Add a handful of chopped walnuts or pecans for a crunchy twist. You could even swap out some of the almond flour for peanut butter to add that delightful nutty flavor!
-
Cranberry Pumpkin Muffins: Toss in some dried cranberries to give that tart sweetness contrasting with the pumpkin’s richness. It adds a pop of color and flavor that’s simply delightful.
-
Spiced Pumpkin Muffins: Double down on your spices! Add some ginger or allspice to amp up the warmth and fall flavors.
-
Gluten-Free Version: Substitute the oats and almond flour for a gluten-free blend, and use flax eggs instead of regular eggs for a vegan take.
The beauty of these muffins is their versatility—mix it, match it, make it your own!
Chef’s Notes: A Recipe for Traditions
As I like to think, every recipe tells a story! My journey with pumpkin muffins started in my grandma’s cozy kitchen, but it has evolved beautifully over the years. I experimented with healthier options to fit my lifestyle and also wanted to introduce a few fun twists inspired by my kitchen adventures.
Every time I whip up these muffins, I’m reminded of family gatherings and laughter, the joy each bite brings, and it fuels my mission at Feastical. Baking is about connecting with others, sharing our wins (and mishaps!), and spreading joy one muffin at a time.
And hey, if the batter seems a little thick or your muffins aren’t rising as fantastically as you’d hoped, don’t fret! Sometimes a touch of extra baking powder or fine-tuning your oven’s temperature can bring those muffins to life.
FAQs and Troubleshooting
-
Why are my muffins dense?
- A common culprit is over-mixing the batter, which can lead to tough muffins. Stick to gentle folds when combining wet and dry ingredients!
-
Can I use an egg substitute?
- Absolutely! Try a flax egg or a chia egg for a vegan alternative. Just mix 1 tablespoon of ground flaxseed or chia seeds with 2.5 tablespoons of water and let it sit for 5 minutes before adding it to the mixture.
-
How do I store leftover muffins?
- Once cooled, store them in an airtight container at room temperature for 2-3 days or in the refrigerator for up to a week. You can also freeze them for up to 3 months—simply thaw and enjoy!
-
How do I know when the muffins are done?
- Stick a toothpick in the center of a muffin; if it comes out clean or with only a few crumbs attached, they’re ready to be devoured!
Nutritional Info: Health Meets Happiness
These Pumpkin Protein Muffins are designed for nourishing your body while providing that cozy comfort we all love!
Approximate Nutrition Values per Muffin (based on 12 servings):
- Calories: 150
- Protein: 7g
- Carbohydrates: 20g
- Fiber: 3g
- Sugar: 5g
- Fat: 5g
With wholesome ingredients like pumpkin puree and oats, plus protein powder, these muffins are an excellent source of energy—perfect for fueling your morning, afternoon pick-me-up, or post-workout snack!
Final Thoughts: Bake Some Joy!
As we wrap up our adventure into the world of Pumpkin Protein Muffins, I invite you to bring a little joy into your kitchen. You don’t need to be a professional chef to create something delectable—it’s about the love you put into each bite!
So, gather your ingredients, invite a friend to join, and share some laughs as you bake together. These muffins are more than just a recipe; they’re an experience, a hug in muffin form!
Now that the fall season is upon us, make these muffins your go-to treat, and don’t hesitate to experiment with new flavors. Remember, cooking is all about creativity, so let your culinary spirit shine!
Can’t wait to hear how your baking adventure goes! Happy baking, friends! 🍂💛
Print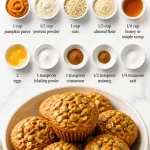
Pumpkin Protein Muffins
- Total Time: 40 minutes
- Yield: 12 muffins 1x
- Diet: Vegetarian
Description
Delicious and nutritious pumpkin muffins packed with protein, perfect for breakfast or a snack.
Ingredients
- 1 cup pumpkin puree
- 1/2 cup protein powder
- 1 cup oats
- 1/2 cup almond flour
- 1/4 cup honey or maple syrup
- 2 eggs
- 1 teaspoon baking powder
- 1 teaspoon cinnamon
- 1/2 teaspoon nutmeg
- 1/4 teaspoon salt
Instructions
- Preheat your oven to 350°F (175°C).
- Prepare the muffin tin by greasing it or lining it with paper liners.
- Mix the dry ingredients: whisk oats, almond flour, protein powder, baking powder, cinnamon, nutmeg, and salt in a large bowl.
- Combine the wet ingredients: mix pumpkin puree, honey (or maple syrup), and eggs in a separate bowl until smooth.
- Blend the wet and dry ingredients together, folding gently to avoid over-mixing.
- Scoop the batter into the muffin tins, filling each cup about ¾ full.
- Bake for 20–25 minutes, or until a toothpick inserted comes out clean.
- Cool for 5 minutes in the pan, then transfer to a wire rack to cool completely.
Notes
For variations, try adding chocolate chips, nuts, or dried cranberries.
- Prep Time: 15 minutes
- Cook Time: 25 minutes
- Category: Snack
- Method: Baking
- Cuisine: American
Nutrition
- Serving Size: 1 muffin
- Calories: 150
- Sugar: 5g
- Sodium: 150mg
- Fat: 5g
- Saturated Fat: 0.5g
- Unsaturated Fat: 4.5g
- Trans Fat: 0g
- Carbohydrates: 20g
- Fiber: 3g
- Protein: 7g
- Cholesterol: 30mg
Keywords: pumpkin muffins, protein muffins, healthy snacks
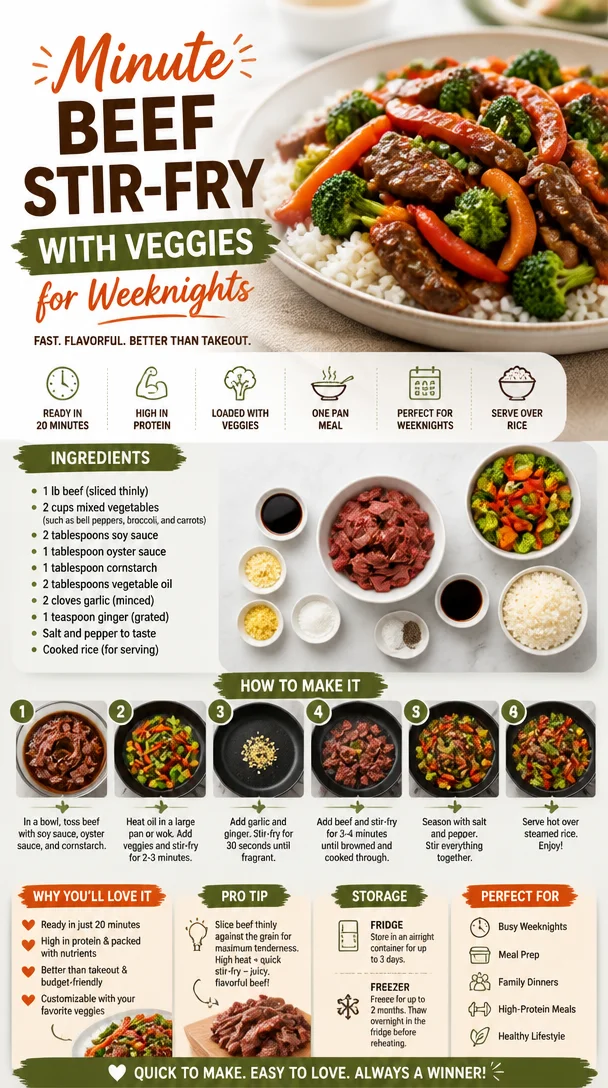
Minute Beef Stir-Fry with Veggies for Weeknights
Stir Up Some Flavor: Beef Stir Fry with Vegetables
Hey there, food lovers! Today, we’re diving into the world of quick, vibrant, and oh-so-delicious beef stir fry! This dish is not just a meal; it’s a celebration of colors, textures, and delightful flavors that come together in minutes. If you’re worried about spending hours in the kitchen or dealing with complicated recipes, fear not! This beef stir fry is here to kick your culinary skills up a notch while keeping it simple and fun.
Stir fry dishes hold a special place in my heart. They remind me of family dinners, where everyone would gather around the table, chopsticks ready, and share laughter amidst the sizzling sounds of stir-frying. That’s the magic of this dish—it brings people together! You can customize your ingredients based on what you have on hand, making it the perfect solution for those “what do I cook tonight?” dilemmas. Plus, the health benefits of loading up on fresh veggies while indulging in savory beef make it a win-win.
So, grab your apron, and let’s explore this easy, flavorful recipe that will have your family begging for seconds!
A Moment to Remember: Cooking with Family
I vividly remember the first time I made a beef stir fry. I was about ten, standing on my tiptoes to reach the stovetop, my mom beside me guiding my hands as we tossed fresh vegetables and juicy beef together. The kitchen was filled with the welcoming aroma of garlic sizzling in vegetable oil, and my little heart raced with excitement. We chopped bell peppers, broccoli, and carrots, laughing at my attempt to master the knife skills that still elude me today (seriously, who can handle a chef’s knife without a few nicks?).
As we cooked, my mom would share stories about her childhood in a bustling kitchen where stir-fry was a staple. She told me about the family gatherings, the clang of pots and pans, and the joy of sharing meals together. That day, I learned that cooking is an act of love, a way to create bonds with those we cherish most. It wasn’t just about the food; it was about the smiles, the laughter, and the memories we’d make.
Fast forward to today, and you can often find me in my own kitchen whipping up beef stir fry, carrying on that cherished tradition. And just like that memorable evening with my mom, I’m excited to share this delightful recipe with you, allowing you to make your own precious moments around the dining table.
Ingredients to Make Your Stir Fry Shine
Here’s what you’ll need to create this delicious beef stir fry:
-
1 lb Beef (sliced thinly): Use flank steak, sirloin, or your favorite cut. Thinly slicing it against the grain ensures tenderness. If you’re watching your budget, chuck steak works too.
-
2 cups Mixed Vegetables: You can use any combo of bell peppers, broccoli, carrots—whatever you have lurking in the fridge! Frozen veggies are a great time-saver.
-
2 tablespoons Soy Sauce: This salty, umami-rich sauce enhances the flavor. For a gluten-free alternative, try tamari.
-
1 tablespoon Oyster Sauce: This adds a rich depth of flavor. If you’re vegan, consider using mushroom soy sauce for a similar taste.
-
1 tablespoon Cornstarch: Used to thicken the sauce. You can substitute it with arrowroot powder or a gluten-free flour mix.
-
2 tablespoons Vegetable Oil: A neutral oil is best for high-heat cooking. Avoid extra virgin olive oil, as it can burn easily.
-
2 cloves Garlic (minced): Fresh garlic is a must! But if you’re out, garlic powder can work in a pinch—just adjust to taste.
-
1 teaspoon Ginger (grated): Fresh ginger adds a zingy warmth. You can use ground ginger if that’s what you have, but fresh is always best.
-
Salt and Pepper to taste: Season according to your preference!
-
Cooked Rice (for serving): Serve it over steaming white rice, brown rice, or even cauliflower rice for a lighter option.
Each ingredient plays a crucial role in this dish. From the tender beef to the vibrant crunch of vegetables, every bite tells a story. So, even if it seems simple, take a moment to appreciate the magic that happens when you combine these elements.
Step-by-Step Instructions to Sizzle Your Beef
Now, let’s get cooking! Follow these simple steps, and I promise you’ll have a fabulous beef stir fry whipped up in no time.
-
Prep Your Ingredients:
Start by gathering everything you need. This cuts down on stress while cooking. Thinly slice the beef (if not pre-sliced). Chop your veggies into bite-sized pieces. My favorite tip? Keep them on the bigger side! It adds texture and makes for a satisfying crunch. -
Marinate the Beef:
In a bowl, combine the sliced beef with 1 tablespoon of soy sauce, 1 tablespoon of cornstarch, and a pinch of salt and pepper. Let it marinate for about 15 minutes while you prep other ingredients. This step helps the beef absorb flavor and tenderizes it—sooo worth it! -
Heat the Oil:
Heat a large skillet or wok over medium-high heat and add your vegetable oil. When the oil starts to shimmer (but before it smokes), you’re ready to go! -
Sear the Beef:
Add the marinated beef slices in a single layer. Let them sear without moving them for about 2-3 minutes until browned. Resist the urge to stir right away; this allows that delicious crust to form! Then use a spatula to stir-fry for another 1-2 minutes until cooked through. Remove and set aside. -
Stir-Fry the Vegetables:
In the same pan, add the minced garlic and grated ginger. Sauté for about 30 seconds until fragrant. Then toss in your mixed vegetables. Stir fry for 4-5 minutes until the veggies are vibrant and tender-crisp. If they’re starting to get too brown, add a splash of water to steam them up a bit! -
Bring It All Together:
Return the beef to the pan and add the oyster sauce and remaining soy sauce. Mix everything well by tossing it around the hot pan for another 2-3 minutes. The key here is to coat everything evenly. -
Finish Off:
Taste and adjust seasoning by adding salt and pepper. If you want more sauce, mix a little water with extra soy sauce and cornstarch into a slurry and add that in.
And voilà! You have a gorgeous beef stir fry that’s ready to be served.
Plating and Serving Suggestions
Now that your stir fry masterpiece is complete, let’s talk about how to serve it up! For presentation, consider these tips:
-
Use a Bowl or Plate: A shallow bowl really shows off all those colors.
-
Scoop it Over Rice: Spoon the beef stir fry generously over a bed of rice. Let some of the sauce cascade over the grains—those juicy flavors will soak in!
-
Garnish for Flair: A sprinkle of sesame seeds or sliced green onions adds a professional touch and an extra layer of flavor.
-
Add Some Crunch: For texture, serve it with crispy prawn crackers or top with crushed peanuts.
No matter how you plate it, your family will certainly appreciate the effort that went into creating this delicious, homemade dish!
Recipe Variations to Elevate Your Stir Fry Game
While this beef stir fry is fantastic on its own, why not switch it up a bit? Here are a few creative twists and variations:
-
Add More Proteins: Ditch the beef and use chicken, shrimp, or tofu for a protein-packed update. If using shrimp, toss them in just before the vegetables so they cook quickly!
-
Change Up the Veggies: Go seasonal! Swap out broccoli for snap peas, add baby corn, or throw in some water chestnuts for crunch.
-
Spice It Up: Want some heat? Toss in some red pepper flakes or a drizzle of sriracha for a spicy kick!
-
Sauce It Differently: Experiment with different sauces like teriyaki, hoisin, or even a bit of sweet chili sauce for a sweet and spicy flavor infusion.
-
Make it a Grain Bowl: Serve this stir fry atop quinoa or barley instead of rice for a unique twist and added nutrients.
The beauty of stir fry is its versatility. Feel free to make it your own and let your creativity shine in the kitchen!
Chef’s Notes: Memories that Flavored the Journey
Over the years, my beef stir fry recipe has evolved, just like my skills! Initially, I was all about the basics—beef, broccoli, and soy sauce—nothing fancy. But as I started experimenting with new ingredients and flavors, my dish transformed, and I discovered a passion for creating the ultimate stir fry.
Oh, I have a chuckle every time I think about those early attempts where I might have mistakenly added way too much soy sauce in a rush. Talk about a salt explosion! But every trial and error in the kitchen led me to refine techniques, and now, I can get that balance just right every time.
When I share this dish with friends and family, I often hear the same delightful comments: “Wow, it tastes like the takeout, but better!” And isn’t that what we all want? The satisfaction of creating a dish that echoes those memories of home-cooked love.
FAQs and Troubleshooting
Here are some common questions you might have while whipping up your stir fry:
-
Why is my beef chewy?
- It’s crucial to slice the beef thinly against the grain and marinate it. Also, don’t overcook it, as this can lead to tough meat.
-
My sauce is too salty; how can I fix it?
- You can balance salty flavors with a bit of sugar or honey. Adding more vegetables can also help dilute the saltiness.
-
How do I keep my stir fry from getting soggy?
- Make sure your vegetables are dry before adding them to the pan. High heat is essential for quick cooking without overcooking veggies.
-
Can I make this ahead of time?
- Yes, you can prep the veggies and marinate the meat ahead of time. However, I recommend cooking it fresh to maintain the crunch of the vegetables.
Nutritional Info (Approximate)
Let’s talk nutrition! This beef stir fry packs a punch of flavors and healthy ingredients:
- Calories: About 400 per serving
- Protein: Roughly 30g, fantastic for muscle repair and sustaining energy
- Carbs: About 40g, primarily from rice and vegetables
- Fat: Around 15g, courtesy of the vegetable oil
- Fiber: Approximately 4g, great for digestion
This dish is not just a feast for your taste buds but also provides essential nutrients. If you swap rice for riced cauliflower, you’ll lower the calorie count and amp up those veggies!
Final Thoughts: Cook, Share, Enjoy!
As we wrap this up, I hope you’re feeling inspired to try this beef stir fry recipe in your kitchen. Remember, it’s all about finding joy in the cooking process, trying new flavors, and, most importantly, sharing those experiences with loved ones.
Whether you’re cooking for family on a busy weeknight or hosting a fun dinner party, this dish will impress. I encourage you to embrace the spontaneity of cooking—add your personal touches, experiment, and make this dish truly yours.
Thank you for joining me on this culinary adventure! I can’t wait to hear about your stir fry stories and the memories you create while cooking. Now, grab that spatula, strike up the heat, and let’s make some memories—one delicious bite at a time! Happy cooking!
Print
Beef Stir Fry with Vegetables
- Total Time: 30 minutes
- Yield: 4 servings 1x
- Diet: Non-Vegetarian
Description
A quick, vibrant beef stir fry loaded with fresh vegetables that brings family together around the table.
Ingredients
- 1 lb Beef (sliced thinly)
- 2 cups Mixed Vegetables (bell peppers, broccoli, carrots)
- 2 tablespoons Soy Sauce
- 1 tablespoon Oyster Sauce
- 1 tablespoon Cornstarch
- 2 tablespoons Vegetable Oil
- 2 cloves Garlic (minced)
- 1 teaspoon Ginger (grated)
- Salt and Pepper to taste
- Cooked Rice (for serving)
Instructions
- Prep your ingredients by gathering everything needed and slicing the beef and veggies.
- Marinate the beef with soy sauce, cornstarch, salt, and pepper for 15 minutes.
- Heat a large skillet or wok over medium-high heat with vegetable oil.
- Sear the beef slices in a single layer without moving them for 2-3 minutes, then stir-fry until cooked through.
- Stir-Fry the vegetables with garlic and ginger for 4-5 minutes until tender-crisp.
- Bring it all together by adding the beef back with oyster sauce and remaining soy sauce, mixing well.
- Finish off with seasoning adjustments and serve over rice.
Notes
For added flavor, garnish with sesame seeds or sliced green onions.
- Prep Time: 15 minutes
- Cook Time: 15 minutes
- Category: Main Course
- Method: Stir-Frying
- Cuisine: Asian
Nutrition
- Serving Size: 1 serving
- Calories: 400
- Sugar: 5g
- Sodium: 600mg
- Fat: 15g
- Saturated Fat: 3g
- Unsaturated Fat: 12g
- Trans Fat: 0g
- Carbohydrates: 40g
- Fiber: 4g
- Protein: 30g
- Cholesterol: 70mg
Keywords: beef stir fry, quick dinner, healthy stir fry, family meal
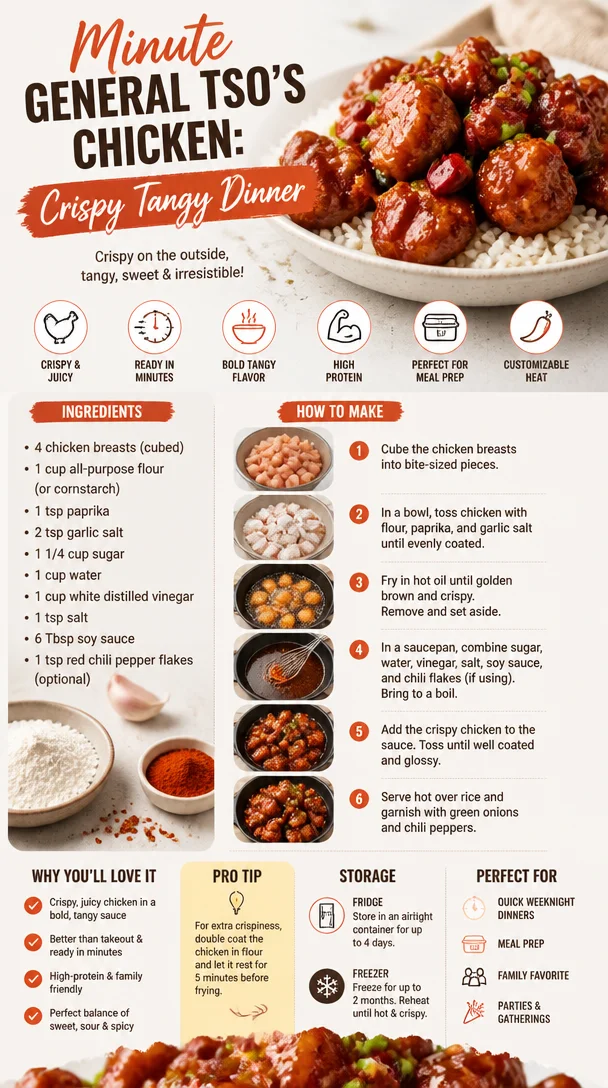
Minute General Tso’s Chicken: Crispy Tangy Dinner
Let’s Create the Perfect General Tso’s Chicken Together!
Hey food lovers! I’m Beau Collier, and today we’re diving deep into the delicious world of General Tso’s Chicken. If you’ve ever ordered this finger-licking dish from your favorite takeout spot and thought, “I wish I could make this at home,” you’re in for a treat! This recipe is all about comfort food with a vibrant twist— crispy, sweet, tangy chicken coated in a flavor-packed sauce that’ll have you coming back for seconds (and thirds!).
Cooking is like a dance, and trust me, once you get your feet moving with this recipe, you won’t want to stop! I’ll be sharing personal anecdotes, my chef insights, and tons of helpful tips to ensure you nail this dish. So, grab your apron, and let’s get those spatulas swinging!
A Taste of Nostalgia
I can vividly remember the first time I tasted General Tso’s Chicken. I was a wide-eyed teenager, sitting at a corner table of a local Chinese restaurant, engulfed in the aromas wafting from the kitchen. That night, I had a colorful medley of food that left me enchanted. My eyes sparkled as I took my first bite—the chicken was perfectly crisp on the outside, glistening in a rich, sticky sauce that sent my taste buds soaring.
But it was the moment I’d unwittingly transformed my parents’ seemingly uneventful Wednesday dinner into my first attempt at recreating that memorable dish. I pulled out a mixing bowl, flour everywhere, accompanied by my childhood best friend who somehow managed to burn her hand on the hot oil—classic! Our laughter and creative chaos led to a glorious, albeit uneven, rendition that wasn’t exactly a Michelin-star meal but was filled with love and good vibes. That’z when I learned that cooking is more than just following a recipe; it’s about bringing people together. Let’s bring that same spirit into your kitchen!
Ingredients
Here’s what you’ll need to whip up this delightful dish:
-
4 Chicken Breasts (Cubed)
Chicken breasts are perfect for this dish due to their lean nature. For a healthier twist, you can substitute with turkey breast or tofu for a plant-based version. -
1 Cup All-Purpose Flour (or Cornstarch)
This is key to getting that beautiful crunch. If you want to go gluten-free, substituting with cornstarch will still give you that crispy exterior. -
1 tsp Paprika
This adds a mild smokiness and a beautiful color. Feel free to swap it with cayenne pepper if you want an extra kick! -
2 tsp Garlic Salt
Garlic salt brings a burst of flavor that perfectly complements chicken. You can easily substitute it with regular salt and a clove of fresh minced garlic. -
1 1/4 Cup Sugar
Here’s the star of the sauce! The sugar balances the tangy vinegar perfectly. If you’re looking for a healthier option, try using honey or a sugar substitute. -
1 Cup Water
Water is crucial for balancing the consistency of the sauce. No substitutions needed here, just ensure it’s fresh! -
1 Cup White Distilled Vinegar
This component gives the sauce its signature tanginess. If you prefer a milder flavor, you might switch to rice vinegar. -
1 tsp Salt
Basic but essential for flavor enhancement. -
6 Tbsp Soy Sauce
It adds depth, umami, and that wonderful savory quality. For a gluten-free option, use tamari. -
1 tsp Red Chili Pepper Flakes (Optional)
Spice it up! If you love heat, go for it! Otherwise, feel free to leave it out.
Step-by-Step Instructions
Now, let’s get down to business. Here’s how to whip up this incredible dish:
-
Prep Your Chicken
Start by cutting your chicken breasts into bite-sized cubes. Use a sharp knife and cutting board. This ensures uniform cooking. If you have time, marinating the chicken for about 30 minutes with soy sauce and garlic salt will make them even more flavorful! -
Coat the Chicken
In a mixing bowl, combine flour (or cornstarch) with paprika and a pinch of salt. Dredging the chicken pieces in this mixture creates that crispy exterior. Make sure to coat them evenly—if you want an extra crunchy bite, double-dip your chicken! -
Heat Your Oil
Over medium-high heat, pour enough oil into a large skillet to cover the bottom (about half an inch). When the oil is hot enough (you can test this by dropping in a tiny bit of flour—it should sizzle), it’s time to fry! -
Fry the Chicken
Carefully add the chicken in batches to avoid overcrowding the pan. Allow the chicken to get golden brown on all sides (about 5-7 minutes). Don’t rush this step; that crispiness is golden! -
Make the Sauce
While the chicken is frying, the magic happens in a separate saucepan! Combine sugar, vinegar, water, soy sauce, and a pinch of salt over medium heat. Stir until the sugar is dissolved. If you’re using the chili flakes, add them now. Simmer for a few minutes until it thickens slightly. -
Combine
Once the chicken is cooked, remove it from the pan and drain excess oil. In the same skillet, pour in your prepared sauce, add the fried chicken, and toss well until each piece is beautifully coated. This is where the real magic happens! -
Serve Hot
Once everything is mixed, let it simmer for another minute or so to soak in all those amazing flavors. Your General Tso’s Chicken is ready to serve!
Serving Suggestions
Plating is crucial for elevating any dish! Serve your General Tso’s Chicken over a bed of fluffy white rice or stir-fried veggies. Garnish with chopped green onions or sesame seeds for an extra pop of flavor and color! If you want to impress your guests, consider placing it inside a fresh lettuce wrap. This gives a lovely crunch and freshness that pairs beautifully with the sticky sauce.
Recipe Variations
Now that you’ve learned the basics, here are some fun twists and variations you can try:
-
Spicy General Tso’s
Add more red chili flakes or drizzle some chili oil over the finished dish to give it serious heat! -
Sweet and Sour General Tso’s
Toss in some pineapple chunks when combining the chicken and sauce for a tropical flair. -
Vegetarian General Tso’s
Swap out chicken for crispy tofu or cauliflower florets to create a plant-based version that still satisfies those umami cravings! -
Add Vegetables
For added nutrition, throw in some diced bell peppers, green beans, or broccoli at the last minute of cooking. They brighten up the dish and add a satisfying crunch. -
Tangy Orange Sauce
Replace half of your vinegar with fresh orange juice and add some zest for a citrusy twist!
Chef’s Notes
Over the years, I’ve experimented with General Tso’s Chicken in countless ways—changing up spices, using different proteins, and even creating a glorious vegetarian version. Once, I accidentally used too much chili oil and my friends’ faces were pure comedy! It taught me to always taste as I go. So, remember, cooking is a journey filled with little “oops” moments that will turn into glorious deliciousness overall!
FAQs and Troubleshooting
Q1: Why isn’t my chicken crispy?
A: Ensure your oil is hot enough before frying. If it’s too cold, the chicken will absorb oil instead of getting crispy!
Q2: Can I use frozen chicken?
A: Fresh chicken works best, but if using frozen, make sure to thaw it completely before cooking.
Q3: What if my sauce is too thick?
A: If it’s too thick, add a splash of water or soy sauce to loosen it up until you achieve the desired consistency.
Q4: How can I store leftovers?
A: If you have leftovers (which rarely happen!), you can store them in an airtight container in the fridge for up to 3 days. To reheat, zap it in the microwave or on the stovetop!
Nutritional Info
General Tso’s Chicken is packed with flavor, but let’s talk about the nutritional aspect. On average, one serving of this dish contains approximately:
- Calories: 400-500 (depending on portion size)
- Protein: 30g
- Carbohydrates: 50g
- Fat: 15g
- Sodium: 800mg
For healthier swaps, consider using less sugar, opting for a leaner protein, or serving over quinoa instead of rice to amp up your fiber intake!
Final Thoughts
And there you have it! You’ve crafted a beautiful plate of General Tso’s Chicken that rivals that takeout you used to crave! Cooking is such a beautiful way to connect with food and with each other. I hope this recipe becomes a beloved staple in your kitchen just like it has in mine.
Remember, it’s not just about food; it’s about creating memories. So, gather your loved ones, put on some fun music, and enjoy the laughter, love, and warmth that comes from sharing a great meal. I can’t wait to hear all about your adventures in the kitchen! Happy cooking, friends! 🍽️❤️
Print
General Tso’s Chicken
- Total Time: 50 minutes
- Yield: 4 servings 1x
- Diet: Gluten-Free Option
Description
A deliciously crispy and tangy dish featuring chicken coated in a flavorful sauce, perfect for a comforting meal at home.
Ingredients
- 4 Chicken Breasts (Cubed)
- 1 Cup All-Purpose Flour (or Cornstarch)
- 1 tsp Paprika
- 2 tsp Garlic Salt
- 1 1/4 Cup Sugar
- 1 Cup Water
- 1 Cup White Distilled Vinegar
- 1 tsp Salt
- 6 Tbsp Soy Sauce
- 1 tsp Red Chili Pepper Flakes (Optional)
Instructions
- Prep Your Chicken: Cut your chicken breasts into bite-sized cubes. Marinate with soy sauce and garlic salt for about 30 minutes for more flavor.
- Coat the Chicken: In a mixing bowl, combine flour (or cornstarch) with paprika and a pinch of salt. Dredge the chicken pieces in this mixture.
- Heat Your Oil: Pour enough oil into a large skillet to cover the bottom and heat over medium-high.
- Fry the Chicken: Add the chicken in batches, cooking until golden brown on all sides (about 5-7 minutes).
- Make the Sauce: In a separate saucepan, combine sugar, vinegar, water, soy sauce, and salt over medium heat until sugar dissolves and simmers until thickened.
- Combine: Remove the chicken and drain excess oil. Pour the prepared sauce into the skillet, add chicken, and toss until coated.
- Serve Hot: Let simmer for a minute to absorb flavors, then serve over rice or veggies.
Notes
For extra crunch, double-dip your chicken in the flour mixture. Adjust the spice level by adding more chili flakes if desired.
- Prep Time: 30 minutes
- Cook Time: 20 minutes
- Category: Main Course
- Method: Frying
- Cuisine: Chinese
Nutrition
- Serving Size: 1 serving
- Calories: 450
- Sugar: 15g
- Sodium: 800mg
- Fat: 15g
- Saturated Fat: 3g
- Unsaturated Fat: 10g
- Trans Fat: 0g
- Carbohydrates: 50g
- Fiber: 1g
- Protein: 30g
- Cholesterol: 80mg
Keywords: General Tso's Chicken, Chinese Chicken Recipe, Comfort Food

Minute Tomato Cracker Salad with Tangy Vinaigrette
Tomato Cracker Salad: A Nostalgic Delight
Hey food lovers! I’m Beau Collier, and today we’re diving into a dish that holds so much warmth and nostalgia in my heart: Tomato Cracker Salad. Now, I can hear you thinking, “Tomato? Salad? Cracker?” Yes, my friends, this delightful concoction combines the brightness of fresh tomatoes, the crunch of crackers, and a creamy dressing that will take you straight back to simpler times.
There’s something magical about food that ties us to our memories. The vibrant, juicy tomatoes paired with the crispy saltines and creamy dressing evoke memories of summer picnics, family gatherings, and the joy of simple, heartfelt cooking. In a world that often seems obsessed with complicated recipes and culinary perfection, the Tomato Cracker Salad serves as a reminder that food can be uncomplicated yet packed with flavor and love.
When I was a kid, my mom would whip this up on lazy summer afternoons. One bite transported me to our sun-drenched patio, surrounded by friends and family, laughter echoing in the warm breeze. We’d sit together, tearing into a big bowl of this salad, refreshing our spirits and fueling our playfulness. It’s amazing how a simple dish can create such vibrancy in our lives.
Fast forward to today, and each time I make this salad, it brings all those beautiful memories flooding back. So whether you’re preparing this salad for a casual lunch, a barbecue, or just for yourself, trust me, this Tomato Cracker Salad will wrap you in a warm hug of nostalgia while also being oh-so-delicious!
Let’s get started and whip up this delightful dish. You won’t regret it!
Ingredients
Here’s what you’ll need to create this comforting Tomato Cracker Salad:
-
Tomatoes: Opt for ripe, juicy tomatoes, preferably heirloom for that vibrant flavor. If tomatoes are out of season, cherry or grape tomatoes work great too.
-
Salt: Don’t be shy with the salt! A sprinkle enhances the natural sweetness of the tomatoes.
-
Pepper: Freshly cracked black pepper adds a lovely hint of spice and depth.
-
Mayonnaise: This forms the creamy base. If you’re looking for a lighter option, Greek yogurt or sour cream can be excellent substitutes!
-
Crackers: Classic saltines are the go-to, but feel free to experiment! Whole grain or flavored crackers can add a unique twist.
-
Onion (optional): Finely chopped onion adds a delightful bite. Red onions are milder, while sweet onions offer a lovely flavor.
-
Fresh herbs (optional): Parsley or basil can elevate the dish, adding freshness and color. Fresh herbs are a great way to customize this recipe based on what you have on hand.
Step-by-Step Instructions
Ready to bring this Tomato Cracker Salad to life? Let’s get cooking!
-
Prepare the Tomatoes: Start by rinsing your tomatoes under cool, running water. Chop them into bite-sized pieces. If you’re using larger tomatoes, consider removing some of the seeds to prevent excess moisture. Trust me, you don’t want a soggy salad!
-
Season the Tomatoes: Place the chopped tomatoes in a large mixing bowl. Sprinkle with salt and pepper. Gently toss, allowing the seasoning to marry with the tomatoes. Let them rest for about 10-15 minutes. This step helps draw out their wonderful juices, making your salad even tastier!
-
Mix the Dressing: In a separate bowl, combine about ½ cup of mayo (or your chosen substitute). Customize it by adding a dash of lemon juice or a sprinkle of garlic powder for an added flavor kick. If you love a bit of sweetness, a touch of honey can also work wonders!
-
Combine Ingredients: After the tomatoes have rested, add the seasoned tomatoes into the bowl with your dressing. Stir everything together gently, being sure to coat the tomatoes evenly.
-
Add the Crackers: Here’s where the fun begins! Crush your saltines into rough pieces (they shouldn’t be dust, just a delightful crunch). Gently fold in the crackers, being careful not to break them down too much. You want those crunchy bits to shine!
-
Toss in Optional Ingredients: If you’re using onions or fresh herbs, add them now and give it a final gentle toss. The colors and aromas at this point will have you grinning ear to ear!
-
Chill & Serve: For best results, allow your salad to chill in the fridge for about 30 minutes. This lets all the flavors mingle beautifully. When you’re ready to serve, give it a quick stir, and you’re good to go!
Serving Suggestions
Plating this Tomato Cracker Salad is as enjoyable as making it! Here are a few ideas on how to serve:
-
Chilled Bowl: For casual dining, serve this salad in a generous-sized bowl, perfect for passing around.
-
Individual Cups: For a stylish touch (great for parties!), portion out the salad into small cups or jars. This is fun, easy, and encourages everyone to dig in!
-
Garnish: Sprinkle a few extra herbs on top or even some crumbled feta or goat cheese for an added gourmet touch.
-
Accompaniments: Serve it alongside grilled meats, fish, or as a refreshing side to sandwiches. It also pairs beautifully with a cold drink on a hot day!
Recipe Variations
Feel like mixing things up? Here are some delicious variations for your Tomato Cracker Salad:
-
Spicy Twist: Add diced jalapeños or a splash of hot sauce for a spicy kick.
-
Mediterranean Flair: Incorporate olives, chopped cucumbers, and feta cheese for a classic Mediterranean vibe.
-
Herbed Up: Experiment with different fresh herbs like dill or cilantro for a unique flavor profile.
-
Creamy Avocado: Throw in ripe avocado chunks for a creamier texture and added nutrition.
-
Vegan Version: Swap the mayo for avocado or a creamy vegan dressing to cater to plant-based diets, keeping all that delightful creaminess!
Chef’s Notes
Ah, where do I begin? This recipe has been a staple in my home for as long as I can remember! I once tried to make it for a fancy dinner party, and let’s just say it ended up being the star of the night! Everyone was amazed at how something so simple could taste so indulgent. And you know what? It taught me an invaluable lesson: sometimes, it’s all about the basics.
The most beautiful part about cooking is that it evolves. Every time I make this dish, it feels like a new adventure. I might toss in leftovers from the fridge or tweak the ratios based on what I’m feeling that day. So, feel free to personalize it and make it your own!
FAQs and Troubleshooting
Q: Why does my Tomato Cracker Salad get watery?
A: The most common culprit is too much moisture from the tomatoes or not allowing them to drain before mixing. After chopping, give them time with salt to release some liquid—this helps prevent a soggy salad!
Q: Can I make this salad ahead of time?
A: Absolutely, but for the freshest experience, wait to add the crackers until just before serving. They soften over time if mixed in too early.
Q: What if I don’t like mayonnaise?
A: No worries! Greek yogurt, sour cream, or even a vinaigrette can work beautifully in place of mayo.
Q: How long can I store leftovers?
A: Store any leftovers in an airtight container in the fridge for 2-3 days max. Just know that the crackers will lose their crunch over time.
Nutritional Info
While the nutritional value depends on ingredient specifics and portion size, here’s a rough estimate for a serving of Tomato Cracker Salad using standard ingredients:
- Calories: 250–300
- Protein: 4–6g
- Fat: 15–20g (mainly from the mayonnaise)
- Carbohydrates: 30–35g
- Fiber: 2g
This salad is a fun dish that satisfies hunger while offering a burst of freshness. Enjoy it as a side or a light meal, and know you’re experiencing a nostalgic favorite with a nutritious twist.
Final Thoughts
As we wrap up this delightful journey through the world of Tomato Cracker Salad, I hope you feel inspired to create this comforting dish. Cooking is not just about the food; it’s about the memories we create and the connections we forge with those we share it with.
So, gather your favorite people, whip up this Tomato Cracker Salad, and reminisce about your favorite memories around home-cooked meals. Each bite sings of love, nostalgia, and the joy of simply being together.
Thanks for joining me today! Until next time, keep cooking with heart and joy. Let’s continue to create memories, one recipe at a time. Happy cooking, friends! 🍅🥗
Print
Tomato Cracker Salad
- Total Time: 45 minutes
- Yield: 4 servings 1x
- Diet: Vegetarian
Description
A nostalgic dish combining juicy tomatoes, crispy crackers, and a creamy dressing, perfect for any gathering.
Ingredients
- Ripe tomatoes (preferably heirloom)
- Salt
- Freshly cracked black pepper
- ½ cup mayonnaise (or Greek yogurt/sour cream)
- Classic saltine crackers
- Finely chopped onion (optional)
- Fresh herbs (parsley or basil, optional)
Instructions
- Prepare the tomatoes by rinsing them under cool, running water and chopping them into bite-sized pieces.
- Season the chopped tomatoes in a large mixing bowl with salt and pepper, gently tossing to combine. Let sit for 10-15 minutes.
- Mix the dressing in a separate bowl by combining the mayonnaise and optional flavorings such as lemon juice or garlic powder.
- Combine the rested tomatoes with the dressing, stirring gently to coat.
- Add the crushed saltines and carefully fold them into the mixture.
- Toss in any optional ingredients like onions or herbs, giving a final gentle mix.
- Chill the salad in the fridge for about 30 minutes before serving.
Notes
For best results, add the crackers just before serving to maintain their crunch. Feel free to experiment with different herbs and vegetable add-ins.
- Prep Time: 15 minutes
- Cook Time: 0 minutes
- Category: Salad
- Method: Mixing
- Cuisine: American
Nutrition
- Serving Size: 1 serving
- Calories: 275
- Sugar: 4g
- Sodium: 500mg
- Fat: 18g
- Saturated Fat: 3g
- Unsaturated Fat: 5g
- Trans Fat: 0g
- Carbohydrates: 30g
- Fiber: 3g
- Protein: 6g
- Cholesterol: 15mg
Keywords: Tomato, salad, nostalgic, summer, picnic, vegetarian, easy recipe