
Minute Apricot Chicken Thighs: One-Pan Weeknight Dinner
Apricot Chicken Thighs: A Heartwarming Delight
Hey there, friends! Today, we’re diving into the vibrant world of flavors with a delightful dish that’s been making its rounds in kitchens for generations—Apricot Chicken Thighs! If you’re looking for a recipe that blends sweet, savory, and just a hint of tang, you’ve hit the jackpot. This dish is not only scrumptious but also incredibly easy to whip up, making it perfect for families or a cozy dinner with friends.
When it comes to food, I’ve always believed it bears the essence of love, tradition, and memories. Food is our connection, our celebration, and sometimes even a little nostalgia. I can’t tell you how many times I’ve gathered around the dinner table with family and friends, sharing laughter and stories over a wonderful meal. Apricot Chicken Thighs is one of those dishes that brings back some of my fondest memories in the kitchen.
A Journey Back in Time
Growing up, Sundays were sacred in my household. It was the day my mom would experiment with various recipes, but there was one dish she always returned to: Apricot Chicken Thighs. I remember coming home from school, the warm, sweet aroma of apricot mingling with savory chicken drifting through the front door, greeting me like an old friend. My sisters and I would rush to the kitchen, giddy with anticipation. It was never just about the food; it was about the love and care put into every bite.
After dinner, we would inevitably end up on the couch, laughter filling the room as my mom scrolled through her recipe box, planning the next week’s meals. This dish not only fed our bellies; it nurtured our hearts and brought us closer together. Now, I’m thrilled to share this cherished recipe with you, hoping it will bring the same joy and connection to your home.
Ingredient List
To prepare these heavenly Apricot Chicken Thighs, here’s what you’ll need:
-
1 cup apricot jam
A must-have for that luscious sweetness! If you’re looking for a lower sugar option, consider using fruit preserves or a homemade jam without added sugars. -
¼ cup finely diced onions
Onions add a nice layer of flavor. You can swap them for shallots or even green onions for a milder taste if preferred. -
2 tablespoons soy sauce
This salty ingredient brings depth to the dish. Tamari works as a gluten-free alternative if needed. -
1 tablespoon honey
Adds complexity! You can replace it with maple syrup for a vegan version or agave for a lighter alternative. -
1 tablespoon Dijon mustard
This gives a nice zing! If you’re out, regular yellow mustard works in a pinch, though it’s milder in flavor. -
1 tablespoon apple cider vinegar
This ingredient brightens the dish with acidity. Substitute with lemon juice if you prefer a fresh citrus twist. -
1 teaspoon minced garlic
Garlic is the MVP of flavor—adds a savory punch! You can use garlic powder (1/4 tsp) if you’re in a rush. -
1 teaspoon ground ginger
A warm spice that marries beautifully with chicken. Fresh ginger is a fantastic substitute if you have it on hand. -
⅛ teaspoon red pepper flakes (optional)
A touch of heat if you’re feeling adventurous! You can leave it out entirely for a milder flavor. -
6 chicken thighs
Juicy and flavorful, chicken thighs are perfect for this dish! Bone-in, skin-on adds more flavor, but boneless and skinless work too. -
Fresh parsley for garnish (optional)
Don’t underestimate the power of fresh herbs! They elevate the dish visually and add a fresh taste.
Step-by-Step Instructions
Now, let’s dig into the cooking process! Grab your apron and let’s get cooking!
Step 1: Preheat and Prepare
Preheat your oven to 375°F (190°C). While it’s heating up, grab a large mixing bowl to combine your sauce ingredients. This bowl will ensure that each chicken thigh gets the attention it deserves!
Step 2: Whisk That Sauce
In the bowl, combine the 1 cup of apricot jam, ¼ cup of finely diced onions, 2 tablespoons of soy sauce, 1 tablespoon of honey, 1 tablespoon of Dijon mustard, 1 tablespoon of apple cider vinegar, 1 teaspoon of minced garlic, and 1 teaspoon of ground ginger. If you’re adding heat, toss in ⅛ teaspoon of red pepper flakes too.
Use a whisk to blend everything together until it’s smooth and well-combined. This is where the magic begins, as the flavors will meld beautifully during cooking!
Step 3: Marinate the Chicken
Grab your chicken thighs and add them to your mixing bowl. Make sure they’re nicely coated in the sauce. If you have time, let them marinate for at least 30 minutes. This allows the meat to absorb all those incredible flavors. But if you’re in a hurry, you can skip this—just be sure to thoroughly coat them before cooking!
Step 4: Sear for Flavor
In a large oven-safe skillet (cast iron works great!), heat a tablespoon of olive oil over medium-high heat. Once it’s hot, carefully place the chicken thighs skin-side down. Sear them for about 5 minutes until they’re beautifully browned. This step adds a lovely crispy texture. Don’t be afraid to peek under them; you want a nice golden brown color!
Step 5: Saucy Transition
After searing both sides for about 5 minutes each, pour the leftover apricot sauce over the chicken in the skillet. For the ultimate flavor infusion, let it sizzle for a minute.
Step 6: Bake to Perfection
Transfer the skillet to your preheated oven. Bake for 30 to 35 minutes, or until the chicken reaches an internal temperature of 165°F (74°C). Your kitchen will fill with the heavenly aroma of sweet and savory goodness—seriously, your neighbors will be intrigued!
Step 7: Rest and Garnish
Once done, pull the skillet from the oven and allow the chicken to rest for about 5 minutes. This resting period is crucial as it allows the juices to settle. Sprinkle with fresh parsley for that added touch of vibrancy just before serving.
Serving Suggestions
Plate your Apricot Chicken Thighs by serving them on a bed of fluffy rice or with roasted vegetables on the side. Drizzling some of that luscious apricot sauce from the skillet on top? Oh yes, absolutely! For a fresh touch, consider adding a squeeze of lemon or a sprinkle of sesame seeds for added texture and flavor.
Pair this dish with a refreshing salad or even some crusty bread to soak up every last bit of sauce. Gather your friends or family around the table, pour a glass of wine, and enjoy the warmth of good food and company!
Recipe Variations
Feeling adventurous? Here are some variations to keep things exciting:
-
Tropical Twist: Add chunks of pineapple or mango to the apricot mixture for a fruity flavor explosion!
-
Herbed Delight: Experiment with fresh herbs like rosemary or thyme in the sauce for a fresh, fragrant take.
-
Spicy Kick: Increase the red pepper flakes for a hotter version or toss in some jalapeños.
-
Citrus Infusion: Mix in the zest of an orange or lemon to brighten the dish even further.
-
Sweet and Savory: Replace half the apricot jam with orange marmalade for a citrusy sweet delight.
Chef’s Notes
My journey with Apricot Chicken Thighs has been a delightful one. What started as my mom’s signature dish has evolved into my own creation, with a few personal touches along the way. One time, I decided to add a splash of bourbon to the sauce, thinking it might bring a new depth. Let’s just say… it didn’t last long! Not every kitchen experiment goes perfectly, but those mishaps often lead to the best laughter!
Over the years, I’ve found that using quality ingredients makes a huge difference. So, if you can find local apricot jam or organic chicken, grab them! They elevate this simple dish into a culinary masterpiece.
FAQs and Troubleshooting
-
What can I use if I don’t have apricot jam?
A fruit preserves or a homemade fruit spread can be substituted, but keep an eye on the sweetness level. -
Can I make this dish ahead of time?
Absolutely! You can marinate the chicken up to 24 hours in advance and then proceed with the recipe. -
What if my chicken is dry?
Ensure you’re cooking it at the right temperature and avoid overcooking. If dry, you can create a quick pan sauce by deglazing with chicken broth after cooking. -
Can I use chicken breasts instead?
Sure! Just keep an eye on the cooking time, as breasts will cook faster and can dry out if overdone.
Nutritional Info
Each serving of Apricot Chicken Thighs is packed with flavor and nutrition. Here’s a quick rundown of the approximate nutritional content (per serving):
- Calories: 350
- Protein: 27g
- Carbohydrates: 29g
- Fat: 15g
- Fiber: 1g
- Sugar: 18g
This dish is a great source of protein and balanced with a sweet touch from the apricot jam, making it a hearty and satisfying choice for any meal.
Final Thoughts
And there you have it, my lovely foodies! Apricot Chicken Thighs—a dish steeped in nostalgia, love, and deliciousness. I hope this recipe brings warmth to your kitchen and joy to your dinner table, just as it did for me growing up. Remember, the best meals are made with heart and shared with loved ones. So, gather around the table, enjoy, and make your own memories that will last a lifetime.
Thanks for joining me today in the kitchen! Until next time, keep cooking, keep sharing, and never stop experimenting—because every great dish begins with a pinch of courage and a spoonful of love. Happy cooking!
Print
Apricot Chicken Thighs
- Total Time: 50 minutes
- Yield: 4 servings 1x
- Diet: None
Description
A delightful dish that blends sweet, savory, and just a hint of tang, perfect for family gatherings and cozy dinners.
Ingredients
- 1 cup apricot jam
- ¼ cup finely diced onions
- 2 tablespoons soy sauce
- 1 tablespoon honey
- 1 tablespoon Dijon mustard
- 1 tablespoon apple cider vinegar
- 1 teaspoon minced garlic
- 1 teaspoon ground ginger
- ⅛ teaspoon red pepper flakes (optional)
- 6 chicken thighs
- Fresh parsley for garnish (optional)
Instructions
- Preheat your oven to 375°F (190°C). Grab a large mixing bowl to combine your sauce ingredients.
- Whisk together 1 cup of apricot jam, ¼ cup of finely diced onions, 2 tablespoons of soy sauce, 1 tablespoon of honey, 1 tablespoon of Dijon mustard, 1 tablespoon of apple cider vinegar, 1 teaspoon of minced garlic, and 1 teaspoon of ground ginger.
- Marinate the chicken thighs in the sauce, letting them soak for at least 30 minutes if possible.
- Sear the chicken thighs skin-side down in a hot skillet with olive oil for about 5 minutes until browned.
- Pour the leftover apricot sauce over the chicken in the skillet.
- Bake in the oven for 30 to 35 minutes, until the chicken reaches an internal temperature of 165°F (74°C).
- Rest the chicken for 5 minutes, then sprinkle with fresh parsley before serving.
Notes
Serve on a bed of rice or with roasted vegetables. Drizzle extra apricot sauce on top for added flavor.
- Prep Time: 15 minutes
- Cook Time: 35 minutes
- Category: Main Course
- Method: Baking
- Cuisine: American
Nutrition
- Serving Size: 1 serving
- Calories: 350
- Sugar: 18g
- Sodium: 500mg
- Fat: 15g
- Saturated Fat: 4g
- Unsaturated Fat: 8g
- Trans Fat: 0g
- Carbohydrates: 29g
- Fiber: 1g
- Protein: 27g
- Cholesterol: 70mg
Keywords: Apricot Chicken, Chicken Thighs, Easy Dinner Recipe, Family Recipe, Sweet and Savory Chicken
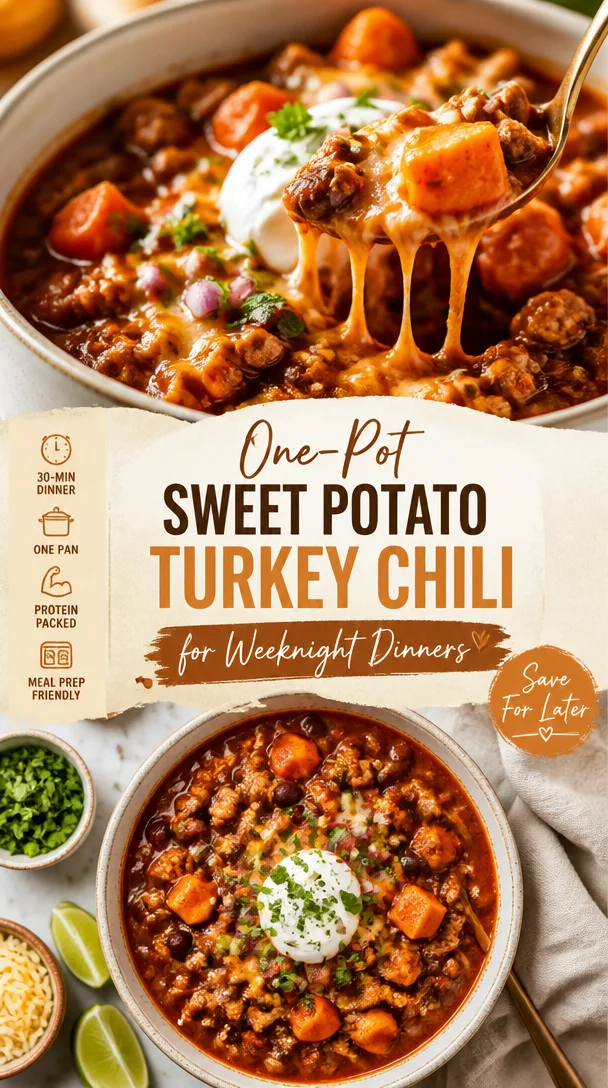
One-Pot Sweet Potato Turkey Chili for Weeknight Dinners
Sweet Potato Turkey Chili: A Heartwarming Comfort Food
Hey there, foodies! Welcome back to Feastical! Today, I’ve got something truly comforting for you: Sweet Potato Turkey Chili. This dish is like a warm hug on a chilly evening, and it’s packed full of flavor. Perfect for cozy nights in or when you want to impress your friends at dinner! And the best part? It’s easy to make and guarantees seconds—or maybe thirds!
A Bowl Full of Memories
Let me take you back to a crystal-clear autumn evening a few years ago. Picture this: I was in my kitchen, the aroma of chili bubbling away on the stovetop, while the leaves outside danced to the ground in shades of orange and gold. My roommate at the time, Sam, was prepping cornbread, adding just a touch of honey to the batter because, well, why not?
We had invited a bunch of friends over, and it was one of those laid-back gatherings where everyone felt at home. As the sun dipped below the horizon, we all gathered around the kitchen counter—my favorite place, where food and laughter flow.
When we finally dug into that Sweet Potato Turkey Chili, it was one of those magical moments where every bite felt like a celebration. The chili was filling, the sweet potato brought a lovely sweetness that balanced the spices perfectly, and the turkey gave it a heartiness that was just right. We topped it off with crispy tortilla chips, a dollop of sour cream, and a sprinkle of fresh cilantro. Can you say heaven on a plate?
That evening taught me something special: food isn’t just about nutrition; it’s about connection. It’s about gathering the people you love around a table and sharing stories, flavors, and laughter. And that’s exactly what this chili embodies!
Ingredients
Let’s dive into the ingredients that will transform your kitchen into flavor town while ensuring your sweet potato turkey chili is full of deliciousness.
-
1 lb ground turkey: A lean protein that’s perfect for keeping things light. If you’re not into turkey, feel free to swap in ground chicken or even plant-based crumbles for a vegetarian option!
-
2 large sweet potatoes, diced: These little beauties add sweetness and a creamy texture. Not a fan of sweet potatoes? Try using butternut squash or regular potatoes instead for that hearty base.
-
1 can diced tomatoes: The foundation of our chili. You can use fire-roasted diced tomatoes for an extra smokey flavor, or even crushed tomatoes if you’re after a thicker consistency.
-
1 cup corn (frozen or canned): Adds sweetness and texture. I love using frozen corn in the winter months; it tastes fresh and is super easy to grab from the freezer.
-
1 onion, chopped: Creates depth and sweetness. Sweet onions or red onions work wonderfully here.
-
2 cloves garlic, minced: Garlic is essential for flavor! If fresh garlic isn’t around, 1/2 tsp of garlic powder can work in a pinch.
-
2 cups chicken broth: This is the soul of the chili! Vegetable broth works too, and for a richer flavor, consider homemade broth or low-sodium styles.
-
1 tablespoon chili powder: This is where the magic happens! Add more for extra heat or use mild paprika if you’re sensitive to spice.
-
1 teaspoon cumin: Adds that warm, earthy flavor. Ground coriander could be a nice alternative for a different twist.
-
Salt and pepper to taste: Essential for flavor! Always season toward the end to adjust according to your liking.
-
Olive oil for cooking: A splash to get things sizzling! You could use avocado oil or even butter for a richer taste.
With these ingredients, you’re on your way to producing an aromatic pot of sweet potato turkey chili that will make your kitchen smell divine!
Step-by-Step Instructions
Now that we have our ingredients ready, let’s get down to cooking this delicious dish.
-
Prep Your Ingredients: Imagine you’re at a beautiful farmer’s market—take your time to chop your sweet potatoes and onions. Mindfulness in cooking is important!
-
Heat the Olive Oil: In a large pot or Dutch oven, pour in a tablespoon of olive oil over medium heat. Let it warm for a couple of minutes; you want it glistening, not smoking.
-
Sauté the Veggies: Toss the chopped onion into the pot and sauté for about 3-4 minutes until they’re translucent. Don’t rush this step! Let that sweetness develop! Add in the minced garlic and keep stirring for another minute—trust me, you want to smell that garlicky goodness wafting through your kitchen!
-
Brown the Turkey: Now, add in the ground turkey. Break it apart with your spoon and sauté until it’s fully cooked and browned, which takes about 5-7 minutes. Keep stirring to ensure even browning and that you don’t have any pink left.
-
Add the Sweet Potatoes: Stir in your diced sweet potatoes and cook for an additional 3 minutes. This pre-cooking step helps to slightly soften them before adding the liquids.
-
Pour in the Goodness: Now, it’s time for the chicken broth and diced tomatoes. Stir everything well, scraping up any bits that may have stuck to the bottom of the pot.
-
Spice it Up: Sprinkle in the chili powder, cumin, salt, and pepper. Stir and let it simmer for about 30 minutes. If it looks too thick, add a touch more broth; if it’s too soupy, let it simmer uncovered. You’re in charge of the consistency here!
-
Add the Corn: About 5 minutes before serving, toss in the corn. Stir it in and let it warm through for a wonderful pop of sweetness!
-
Final Taste Check: Give it a taste and adjust the seasoning if needed. Sometimes, adding a dash of lime juice or a pinch of cayenne can take it to the next level!
-
Serve: Once everything is perfectly cooked and flavorful, remove from heat and allow to cool slightly before serving.
With each step, take a moment to enjoy the aromas, maybe sip on a glass of something refreshing—this part is as crucial as the cooking itself!
Serving Suggestions
I love to serve this Sweet Potato Turkey Chili in hearty bowls! Top it with some crushed tortilla chips for that crunch, a dollop of sour cream or Greek yogurt for creaminess, and a sprinkle of fresh cilantro for a burst of freshness. If you’re feeling extra cheesy (who isn’t?), a handful of shredded cheese on top can make everything even more delightful.
Pair it with some warm cornbread or a side salad, and you’ve got yourself a fantastic meal. And let’s be honest—this dish is perfect for meal prep too! It tastes even better after a day in the fridge, and reheating it yields a comforting dinner in a snap.
Recipe Variations
Now, if you’re anything like me, you love to switch things up! Here are some fun variations to keep your chili game fresh:
-
Spicy Kick: Add in a diced jalapeño for a fiery twist. If you love heat, toss in some cayenne pepper or crushed red pepper flakes!
-
Beans Galore: Throw in a can of black beans or kidney beans to up the protein and fiber.
-
Vegan Delight: Swap the ground turkey for plant-based crumbles and use vegetable broth. I promise you won’t miss the meat!
-
Extra Veggies: Add in chopped bell peppers, zucchini, or any leftover veggies lurking in your fridge for more taste and nutrition.
-
Sweet & Savory: Drizzle a bit of maple syrup for a sweet contrast to the heat. It’s not expected, but it’s oh-so-good!
With all these variations, it’s like having a whole new dish every time you cook it! Love that versatility!
Chef’s Notes
I’ve been making this chili for a few years now, and it’s evolved beautifully over time. The first version was far too spicy—my friends still tease me about it! With every batch, I learned something new about balance and flavor.
Honestly, I just love the way this recipe brings people together. It’s perfect for casual dinners, game days, or even cozy nights on the couch. Plus, it’s a total crowd-pleaser. I once had a guest declare it the best chili they’d ever had, and that seriously made my day!
FAQs and Troubleshooting
1. Why is my chili too watery?
If your chili turns out too runny, let it simmer an additional 10-15 minutes uncovered to allow some of that liquid to evaporate. Alternatively, if you prefer it thicker, mash or blend a small portion of the sweet potatoes into the pot.
2. Can I freeze this chili?
Absolutely! Once cooled, transfer it to an airtight container or zip-top bag and freeze for up to 3 months. Just thaw it overnight in the fridge before reheating!
3. How can I make it spicier?
If you’re ready to bring the heat, add more chili powder or diced jalapeños. A dash of hot sauce can also work wonders. Just remember to taste as you go!
4. What do I do if I don’t have chicken broth?
No worries, my friend! You can use vegetable broth, water with a splash of soy or Worcestershire sauce, or even tomato juice for a unique twist.
Nutritional Info
Now let’s chat about nutrition! This Sweet Potato Turkey Chili is not just tasty but also nutrient-packed. Each serving offers an excellent balance of protein, fiber, and a variety of vitamins from the sweet potatoes and corn. Here’s a quick rundown for one serving:
- Calories: Approximately 350
- Protein: 25g
- Fat: 10g
- Carbohydrates: 40g
- Fiber: 8g
With all those immune-boosting ingredients, you can enjoy every spoonful knowing you’re nourishing your body as you feast!
Final Thoughts
There you have it, dear friends! A big ol’ pot of Sweet Potato Turkey Chili just waiting to find its way into your hearts and homes. Cooking is not just a task; it’s an experience, a chance to connect and share love through food. Each bowl tells a story, and I can’t wait to hear yours!
So gather your ingredients, roll up those sleeves, and let this recipe inspire you to create something wonderful. And remember, cooking doesn’t always look pretty, but it sure tastes divine. Don’t forget to tag me on social media when you whip up your own chili masterpiece. Happy cooking, and until next time—let the flavors shine!
Print
Sweet Potato Turkey Chili
- Total Time: 60 minutes
- Yield: 4 servings 1x
- Diet: Gluten-Free
Description
A heartwarming sweet potato turkey chili that’s perfect for cozy nights in or gatherings with friends, packed with flavor and nutritious ingredients.
Ingredients
- 1 lb ground turkey
- 2 large sweet potatoes, diced
- 1 can diced tomatoes
- 1 cup corn (frozen or canned)
- 1 onion, chopped
- 2 cloves garlic, minced
- 2 cups chicken broth
- 1 tablespoon chili powder
- 1 teaspoon cumin
- Salt and pepper to taste
- Olive oil for cooking
Instructions
- Prep your ingredients: chop your sweet potatoes and onions.
- Heat the olive oil in a large pot over medium heat.
- Sauté the chopped onion for 3-4 minutes until translucent, then add garlic and stir for another minute.
- Brown the ground turkey for 5-7 minutes until fully cooked.
- Add the sweet potatoes and cook for 3 minutes.
- Pour in the chicken broth and diced tomatoes, scraping up any bits stuck to the pot.
- Spice it up with chili powder, cumin, salt, and pepper, and let it simmer for 30 minutes.
- Add the corn 5 minutes before serving.
- Final taste check and adjust seasoning.
- Serve in bowls with toppings of choice.
Notes
Perfect for meal prepping; tastes even better the next day!
- Prep Time: 15 minutes
- Cook Time: 45 minutes
- Category: Main Course
- Method: Stovetop
- Cuisine: American
Nutrition
- Serving Size: 1 serving
- Calories: 350
- Sugar: 6g
- Sodium: 500mg
- Fat: 10g
- Saturated Fat: 2g
- Unsaturated Fat: 8g
- Trans Fat: 0g
- Carbohydrates: 40g
- Fiber: 8g
- Protein: 25g
- Cholesterol: 75mg
Keywords: chili, turkey, sweet potato, comfort food, easy recipes
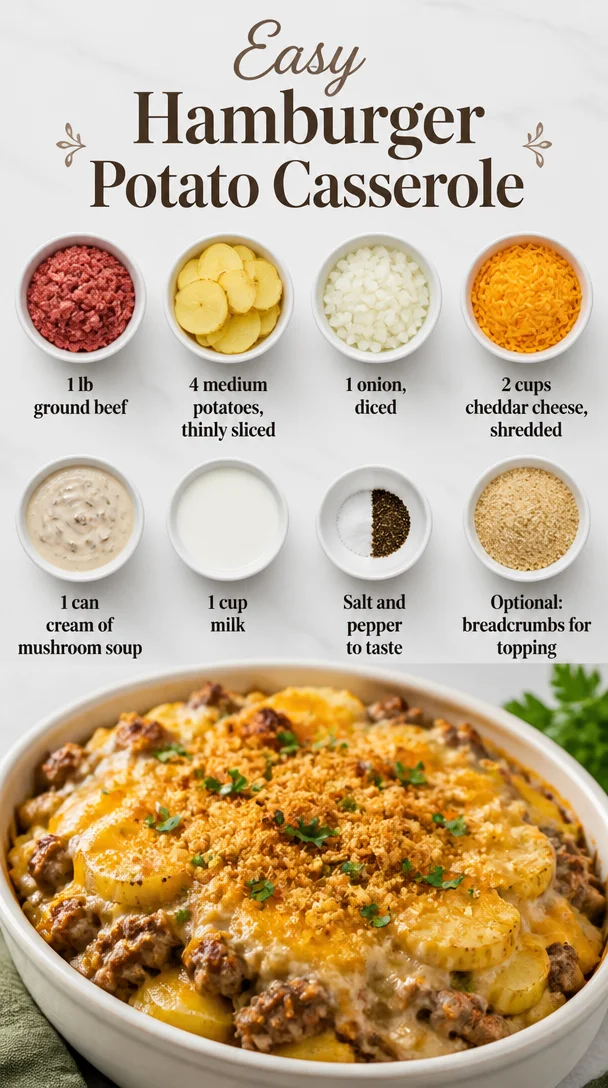
Easy Hamburger Potato Casserole
The Ultimate Easy Hamburger Potato Casserole: A Comfort Food Classic
Hey there, fellow food lovers! I’m so excited to share my latest culinary creation with you: the Easy Hamburger Potato Casserole. If you’re looking for a dish that’s not only delicious but also simple to whip up after a long day, you’ve hit the jackpot! This casserole is the epitome of comfort food, combining hearty ground beef, tender potatoes, and creamy cheese, all wrapped up in one warm, inviting dish that feels like a hug from your grandma. Grab your apron, and let’s dive into this flavor-packed experience together!
A Little Slice of Nostalgia
Growing up in my family’s kitchen, casseroles were a staple. My mom had a knack for creating meals that were both straightforward and soul-satisfying, and the Hamburger Potato Casserole was definitely at the top of her list. I remember coming home from school on chilly autumn days, the smell of bubbling cheese and simmering meat wafting through our house. It felt like my worries melted away as soon as I laid eyes on that comforting dish, bubbling away in the oven.
One particular time, I had a couple of friends over for a study session (or, more accurately, a silly hangout filled with laughter and too many snacks). With full bellies and a few minutes to spare before our next gaming adventure, Mom tossed together this casserole. While she expertly layered the ingredients in a casserole dish, I could hardly contain my excitement—but I was also slightly terrified I might ruin it by sneaking too many bites before it was done! When it finally came out of the oven, it was a glorious golden masterpiece, and there was more than enough to feed my friends and me. We savored every cheesy, meaty bite and shared stories, laughter, and friendship—a perfect recipe for unforgettable memories.
Ingredients You’ll Need
Let’s gather our ingredients! Here’s what you’ll need to make this delicious casserole:
-
1 lb ground beef
A classic choice for this dish. You can use turkey or a plant-based alternative if you prefer. Just be aware that different meats may change the flavor profile slightly! -
4 medium potatoes, thinly sliced
Yukon gold or russet potatoes work beautifully here, giving a great texture and flavor. If you’re short on time, you can use pre-packaged frozen sliced potatoes. -
1 onion, diced
Onions add depth to the flavor. If you’re not a fan, try substituting with shallots or green onions for a milder taste. -
2 cups cheddar cheese, shredded
Who doesn’t love cheese? Sharp cheddar brings a wonderful zing to the casserole, but feel free to mix it up with Monterey Jack or mozzarella for a creamier finish. -
1 can cream of mushroom soup
This is what lends that creamy goodness to the dish. If you’re looking for a healthier option, you can use a low-fat or homemade version. -
1 cup milk
This helps to thin out the soup and create a more cohesive texture. Almond milk or other plant-based milks can be used as substitutes. -
Salt and pepper to taste
Don’t skimp on seasoning! They elevate all the flavors. -
Optional: breadcrumbs for topping
For a crispy finish, sprinkle some breadcrumbs on top before baking. You could also add some grated Parmesan for an extra flavor punch.
Step-by-Step Instructions
Got everything ready? Let’s get cooking! Here’s your step-by-step guide to making the ultimate Easy Hamburger Potato Casserole:
-
Preheat Your Oven
Start by cranking up your oven to 375°F (190°C). This ensures that your casserole cooks evenly once it hits the oven! -
Brown the Beef
In a large skillet over medium-high heat, add your ground beef. Break it apart with a spatula, seasoning with salt and pepper as it cooks. You want to cook it until it’s browned and no longer pink, about 5-7 minutes. If you have excess grease, carefully drain it away to keep your casserole from becoming too greasy. -
Add Onions
Toss the diced onions into the meat mixture. Cook everything together for an additional 3-4 minutes until the onions become translucent. This will enhance the beef’s flavor while adding a lovely aroma! -
Mix Cream of Mushroom Soup and Milk
In a mixing bowl, combine the cream of mushroom soup and milk. This step blends the two together seamlessly, allowing for a creamy consistency that wraps around the potatoes beautifully. Give it a good stir, and set it aside. -
Layer It Up
Now, it’s time for the fun part! Grab a greased 9×13 inch baking dish and start layering. Begin with half of the sliced potatoes, followed by half of the beef and onion mixture. Then, pour half of the soup and milk mixture over this layer. Sprinkle with a generous amount of shredded cheddar cheese. Repeat the layers until all ingredients are used, finishing with cheese on top (we want a cheesy crust, after all!). -
Bake It
Cover the casserole with aluminum foil and pop it into the preheated oven. Bake for about 45-50 minutes. The steam will cook the potatoes perfectly, making sure they are tender and delicious. -
Get Crispy (Optional)
If you’re using breadcrumbs for an extra crunchy topping, carefully remove the foil during the last 10 minutes of baking and sprinkle the breadcrumbs on top. Pop it back in the oven until the topping is golden and crispy! -
Cool and Serve
Once it’s done, let the casserole cool for about 10-15 minutes before serving. This helps the layers set a bit, making it easier to serve. Trust me; your patience will be rewarded!
Serving Suggestions
To plate this mesmerizing dish, scoop a hearty portion onto a plate and consider topping it with fresh chopped parsley for a burst of color and flavor. You can also serve it alongside a simple green salad or some roasted veggies for a complete meal. For an extra cozy touch, why not serve it with warm, crusty bread? Guests will love it, and it balances out the hearty casserole perfectly!
Recipe Variations
Now, let’s get creative! Here are a few fun twists and adaptations to make this dish your own:
-
Mexican Twist
Add some taco seasoning to the beef and toss in some black beans and corn. Top with pepper jack cheese for a spicy finish. -
Vegetable Lover’s Delight
Layer in some steamed broccoli or sautéed bell peppers and zucchini for a healthy pop of color and flavor. -
Italian Style
Swap out the cream of mushroom soup for a marinara sauce, add Italian herbs, and use mozzarella cheese for a lasagna-style casserole. -
Breakfast Casserole
Make it a breakfast dish by adding scrambled eggs and breakfast sausage instead of ground beef. Perfect for brunch gatherings! -
Gluten-Free Option
Simply use gluten-free breadcrumbs or skip the topping altogether. This dish will still shine without it!
Chef’s Notes
As I’ve made this casserole over the years, I’ve discovered a few fun variations and personal touches that made it feel uniquely mine. One day, in a burst of creativity, I added leftover roasted veggies I had in the fridge. The result? A whole new level of flavor! I also love to experiment with different cheeses—sometimes a little feta crumbled on top adds a delightful tang. This dish, like all good comfort food, has a way of evolving based on what you have on hand and your personal flavor preferences.
FAQs and Troubleshooting
Q: My potatoes didn’t cook all the way through! What happened?
A: Make sure you’re cutting your potatoes thin enough for even cooking. Also, letting the casserole rest before serving allows it to firm up, which can help with serving.
Q: How do I make this ahead of time?
A: You can prepare everything a day ahead—just cover it and store it in the fridge. When you’re ready to bake, add about 10-15 extra minutes to the baking time.
Q: Can I freeze this casserole?
A: Absolutely! Just make sure to let it cool completely before wrapping it tightly in foil and plastic wrap. It can last in the freezer for 2-3 months, and you can thaw it in the fridge overnight before baking.
Q: What if I don’t have cream of mushroom soup?
A: You can easily substitute with cream of chicken soup or even make a homemade white sauce with butter, flour, and broth.
Nutritional Info
This Easy Hamburger Potato Casserole is comforting and hearty but also brings a satisfying balance of nutrients. Each serving contains a hefty amount of protein from the ground beef, essential vitamins and minerals from the potatoes and onions, and calcium from the cheese. To keep it on the healthier side, consider using lean ground beef, low-fat cheese, and serving it alongside a salad to round out your meal.
While I don’t specifically track the nutritional values, a typical serving should provide around:
- Calories: 450
- Protein: 30g
- Carbs: 35g
- Fat: 25g
(Do keep in mind that these numbers may vary based on the specifics of your ingredients and portion sizes!)
Final Thoughts
There you have it, my friends! The Easy Hamburger Potato Casserole—comfort food at its finest. This recipe embodies the warmth of home-cooked meals and the joyous moments shared around the dinner table. Whether it’s a weeknight dinner or a gathering with friends, this casserole always brings people together, creating memories worth savoring.
So, grab your favorite person to cook with, get those ingredients together, and let’s create some kitchen magic! I can’t wait to hear your stories and see how your casseroles turn out. And remember, cooking is all about love, a sprinkle of creativity, and, of course, enjoying the journey as you go. Happy cooking, everyone!
Print
Easy Hamburger Potato Casserole
- Total Time: 65 minutes
- Yield: 6 servings 1x
- Diet: Omnivore
Description
A delicious and comforting casserole combining ground beef, tender potatoes, and creamy cheese, perfect for a quick meal after a long day.
Ingredients
- 1 lb ground beef
- 4 medium potatoes, thinly sliced
- 1 onion, diced
- 2 cups cheddar cheese, shredded
- 1 can cream of mushroom soup
- 1 cup milk
- Salt and pepper to taste
- Optional: breadcrumbs for topping
Instructions
- Preheat your oven to 375°F (190°C).
- Brown the beef in a skillet over medium-high heat for 5-7 minutes. Drain excess grease if necessary.
- Add the diced onions and cook for an additional 3-4 minutes until translucent.
- Mix the cream of mushroom soup and milk in a bowl and set aside.
- Layer the potatoes, beef mixture, soup mixture, and cheese in a greased 9×13 inch baking dish.
- Bake covered with foil for 45-50 minutes or until potatoes are tender.
- Get crispy by removing the foil in the last 10 minutes and adding breadcrumbs if desired.
- Cool for 10-15 minutes before serving.
Notes
Can be prepared a day in advance and refrigerated. Great for freezing, just allow to cool completely before wrapping.
- Prep Time: 15 minutes
- Cook Time: 50 minutes
- Category: Main Course
- Method: Baking
- Cuisine: American
Nutrition
- Serving Size: 1 serving
- Calories: 450
- Sugar: 3g
- Sodium: 800mg
- Fat: 25g
- Saturated Fat: 12g
- Unsaturated Fat: 8g
- Trans Fat: 1g
- Carbohydrates: 35g
- Fiber: 4g
- Protein: 30g
- Cholesterol: 80mg
Keywords: casserole, comfort food, hamburger, potato, cheese, easy recipe
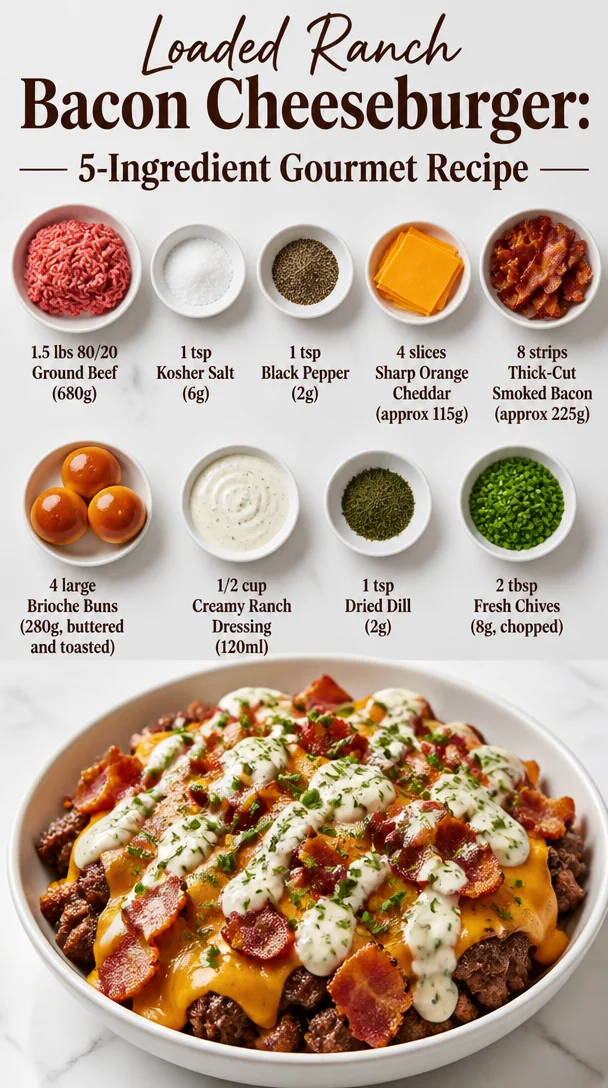
Loaded Ranch Bacon Cheeseburger: 5-Ingredient Gourmet Recipe
Crack Burgers: The Ultimate Loaded Ranch and Bacon Gourmet Cheeseburger
Hey there, food lovers! Are you ready to take your burger game to the next level? Today, I’m thrilled to share my secret recipe for Crack Burgers – a loaded ranch and bacon gourmet cheeseburger that’s sure to become your new favorite comfort food! Grab your apron, and let’s dive into this delicious adventure!
A Journey Back to My Burger Roots
Before we knead some dough—or in this case, mold some beef—I want to take you back in time to one of my fondest culinary memories. Picture this: I’m about ten years old, sprawled out in front of the television, with a classic cheesy ’90s sitcom blaring in the background. The smell wafting from the kitchen is intoxicating. My mom was grilling up burgers, and just the thought of sinking my teeth into one made my heart race.
She had this special apron she wore, and I always thought she was a superhero in the kitchen. Her burgers were never just plain old patties; they were flavor-packed, juicy masterpieces! I can still hear the sizzle of the beef hitting the grill and the sound of laughter as we all gathered to enjoy a meal together. That’s what burgers mean to me—connection, joy, and a whole lot of flavor.
Fast forward to today, and I’ve combined those childhood vibes with my love for gourmet ingredients. The Crack Burgers I’m about to share are a tribute to those carefree days and all the good times we’ve had around the dinner table. Let me take you through making a burger that will not only fill your stomach but also your heart!
Ingredients: Everything You Need for Crack Burgers
Let’s gather up everything you need for these mouth-watering, gourmet Crack Burgers. Here’s what’s on the menu for flavor bliss:
-
1.5 lbs 80/20 Ground Beef (680g)
- The perfect fat-to-lean ratio for juicy, flavorful burgers. If you want to cut back on fat, consider using 85/15 ground beef or even ground turkey!
-
1 tsp Kosher Salt (6g)
- Salt is essential for bringing out the flavors of the beef. Feel free to substitute with sea salt if that’s what you have on hand.
-
1 tsp Black Pepper (2g)
- Freshly ground black pepper adds a nice kick! Use white pepper if you’re after a subtler heat.
-
4 slices Sharp Orange Cheddar (approx 115g)
- Sharp cheddar gives that delicious umami punch. If you’re feeling adventurous, gouda or pepper jack can add nice flavor twists!
-
8 strips Thick-Cut Smoked Bacon (approx 225g)
- Because bacon makes everything better! You can swap it with turkey bacon or even skip it entirely if you’re looking for a lighter option.
-
4 large Brioche Buns (280g, buttered and toasted)
- That buttery, fluffy goodness! Don’t have brioche? Any good-quality burger bun will work, but toasting is key for that crispy texture.
-
1/2 cup Creamy Ranch Dressing (120ml)
- A drizzle of this and the flavor intensity skyrockets! You can go for a homemade version or use a store-bought one—both are great options.
-
1 tsp Dried Dill (2g)
- This herb adds a wonderful flavor that complements the ranch dressing. Fresh dill is also an excellent choice if you have it!
-
2 tbsp Fresh Chives (8g, chopped)
- Fresh chives bring a lovely oniony flavor. Feel free to swap them out for green onions or parsley for a fresh touch.
Step-by-Step Instructions: Crafting Your Crack Burger Masterpiece
Now that we have our ingredients lined up, let’s dive into the cooking process. Follow these steps, and you’ll be a Crack Burger champion in no time!
Step 1: Prepare Your Ingredients
Before we start cooking, let’s get organized! Chop your chives, measure out all your ingredients, and keep them within arm’s reach. This will make the cooking process flow smoothly—trust me!
Step 2: Forming the Patties
Place your ground beef in a mixing bowl and sprinkle the kosher salt and black pepper over it. Using your hands (the best tool in the kitchen!), gently mix the salt and pepper into the beef. Be careful not to overwork it, as we want those burgers to stay juicy!
Once seasoned, divide the beef into four equal portions. Roll them into balls, then flatten them into patties. Aim for about ¾ inch thick for that beautifully juicy bite every time!
Step 3: Bacon Bliss
While you’re forming the patties, grab a large skillet and cook your bacon. Crisp it up over medium heat, and don’t rush this step! You want it to turn golden brown—this is where a lot of your flavor comes from. Once cooked, transfer the bacon to paper towels to drain the excess fat.
Step 4: Grill Those Burgers!
Using the same skillet (or a grill if you’re feeling fancy!), crank up the heat to high. Sear your patties for about 4–5 minutes on one side without touching them! This way, they get that irresistible crust. Flip them gently with a spatula and add a slice of cheddar on each patty. Cook for another 3–4 minutes for medium-rare or longer depending on your preference.
Step 5: Toasting the Buns
While your burgers are finishing, let’s not forget the buns! Spread a little butter on the insides and toast them in the same skillet until golden brown. This not only enhances the flavor but also prevents the buns from becoming soggy.
Step 6: Assemble Your Crack Burger
Now comes the fun part! Start with the toasted bottom bun, then layer on the cheesy beef patty, followed by the crispy bacon, a generous drizzle of creamy ranch dressing, a sprinkle of dried dill, and a handful of chopped chives. Top it off with the crown of the bun, and voilà!
Serving Suggestions: Plating Up Your Crack Burgers
When it comes to serving your Crack Burgers, presentation is key! I love serving these on a large wooden board, surrounded by colorful pickle spears, crispy fries, or a fresh house salad. Place each burger on a separate plate with a dollop of extra ranch dressing on the side—it adds a delightful touch and lets your guests go wild with flavor!
Feel free to add toothpicks for easy handling, especially if you’re serving a crowd. Don’t forget to pair it with your favorite beverage—nothing beats a cold soda or a crisp beer while munching down on these hearty burgers!
Recipe Variations: Put Your Spin on It!
Now that you’ve mastered the classic Crack Burger, let’s explore some delicious variations to personalize your creation:
-
BBQ Crack Burger: Swap the ranch for BBQ sauce and add a slice of grilled pineapple for a sweet and tangy twist!
-
Mushroom & Swiss: Sauté some mushrooms and onions, pile them on top of your cheeseburger, and substitute Swiss cheese for a gourmet finish.
-
Spicy Jalapeño: Add sliced jalapeños to your burger or mix chipotle seasoning into the beef for an extra kick!
-
Veggie Delight: Use a grilled portobello mushroom cap instead of beef and top with avocado slices for a complete vegetarian option.
-
Breakfast Burger: Add a fried egg on top, breakfast sausage instead of beef, and a drizzle of hollandaise sauce for a brunch-inspired treat!
Chef’s Notes: The Heart Behind the Recipe
As I reflect on this recipe, I can’t help but smile at how it has evolved over the years. It started as just a simple burger, but with each family gathering, BBQ, or friendly cook-off, little tweaks made it better and better. Nowadays, whenever I take a bite, I’m transported back to my childhood, enjoying summer evenings with my family.
And let me tell you, the experimentation never stops! Recently, I swapped out the ranch dressing for a homemade avocado crema, and wow, that added a whole new layer of flavor! Always feel free to spark your creativity in the kitchen—after all, cooking should be fun!
FAQs and Troubleshooting: Common Questions Answered
1. What if my burger patties fall apart?
This can happen if you don’t add enough binding agents. A little egg or breadcrumbs can help hold the patty together better. Also, avoid overworking the beef; just mix lightly!
2. How do I prevent my burgers from being dry?
To keep your burgers juicy, avoid pressing down on them while they’re cooking. Let them sit on the grill, allowing the juices to lock in.
3. Can I make these burgers ahead of time?
Absolutely! You can form the patties and store them in the fridge for a day or two or freeze them for up to three months. Just make sure to separate them with parchment paper to avoid sticking!
4. What’s the best way to cook these burgers if I don’t have a grill?
Don’t worry! A stovetop skillet or grill pan works beautifully, and you can even use the oven or air fryer for cooking. The key is to ensure you get a nice sear on each side.
Nutritional Info
While I believe in enjoying food without guilt, here’s a quick nutritional breakdown to keep in mind if you’re tracking your intake:
- Calories per serving: Approx. 750
- Protein: 38g
- Fat: 50g
- Carbohydrates: 30g
- Fiber: 2g
Of course, these values can vary based on exact portion sizes and substitutions!
Final Thoughts: Let’s Get Cooking!
There you have it—my Crack Burgers recipe that encapsulates everything I love about food: joy, comfort, and the power to bring people together! It’s time to fire up your skillet or grill and create lasting memories around the table with friends and family.
So what are you waiting for? Get in the kitchen, embrace the joy of cooking, and don’t forget to share your burger adventures with me. I can’t wait to hear how your Crack Burgers turn out! Happy cooking, friends!
Print
Crack Burgers: The Ultimate Loaded Ranch and Bacon Gourmet Cheeseburger
- Total Time: 45 minutes
- Yield: 4 servings 1x
- Diet: None
Description
A juicy gourmet cheeseburger featuring ranch dressing, crispy bacon, and loaded with flavor.
Ingredients
- 1.5 lbs 80/20 Ground Beef (680g)
- 1 tsp Kosher Salt (6g)
- 1 tsp Black Pepper (2g)
- 4 slices Sharp Orange Cheddar (approx 115g)
- 8 strips Thick-Cut Smoked Bacon (approx 225g)
- 4 large Brioche Buns (280g, buttered and toasted)
- 1/2 cup Creamy Ranch Dressing (120ml)
- 1 tsp Dried Dill (2g)
- 2 tbsp Fresh Chives (8g, chopped)
Instructions
- Prepare your ingredients. Chop your chives, measure out all your ingredients, and keep them within arm’s reach.
- Forming the patties: Mix ground beef, kosher salt, and black pepper in a bowl. Divide into four portions, roll into balls, then flatten into patties.
- Bacon bliss: Cook bacon in a skillet over medium heat until crispy, then transfer to paper towels.
- Grill those burgers! Sear patties on high heat for about 4–5 minutes. Flip, add cheddar, and cook for another 3–4 minutes.
- Toasting the buns: Butter the insides of the buns and toast in the same skillet until golden brown.
- Assemble your Crack Burger: Layer the bottom bun with a cheeseburger patty, crispy bacon, ranch dressing, dill, and chives, then top with the bun.
Notes
Consider variations such as BBQ, mushroom & Swiss, or avocado crema for a twist on the classic recipe.
- Prep Time: 15 minutes
- Cook Time: 30 minutes
- Category: Main Course
- Method: Grilling
- Cuisine: American
Nutrition
- Serving Size: 1 burger
- Calories: 750
- Sugar: 4g
- Sodium: 1100mg
- Fat: 50g
- Saturated Fat: 20g
- Unsaturated Fat: 20g
- Trans Fat: 0g
- Carbohydrates: 30g
- Fiber: 2g
- Protein: 38g
- Cholesterol: 100mg
Keywords: burgers, cheeseburger, gourmet, ranch, bacon, comfort food
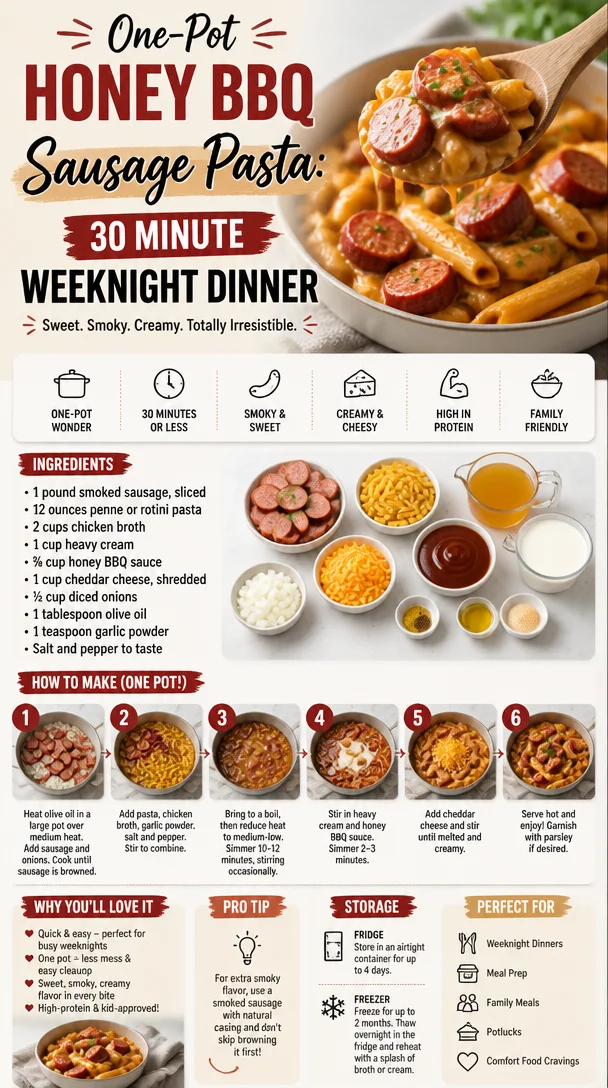
One-Pot Honey BBQ Sausage Pasta: 30 Minute Weeknight Dinner
One-Pot Bold Honey BBQ Sausage Pasta: Comfort Food Done Right
Hey there, friends! Welcome back to Feastical, where the heart of the home is the kitchen, and the flavors are always on point. Today, I’m thrilled to dive into a dish that has become a comfort staple in my kitchen: One-Pot Bold Honey BBQ Sausage Pasta. This dish is not only a breeze to make but also bursts with flavor that’ll have you and your taste buds dancing. Buckle up, because we’re about to whip up something special!
Introduction: Let’s Get Cooking!
If there’s one thing I love more than sharing recipes, it’s the stories and memories that accompany those meals. Growing up, weekends in my family were all about gathering around the kitchen table, enjoying hearty meals that not only filled our stomachs but also fueled our hearts. One of those meals was a simple, yet oh-so-delicious sausage pasta that my grandma used to whip up on busy weeknights. Fast forward to today, and I’ve given that dish a bold, modern twist with a honey BBQ flair that’ll have you asking for seconds!
Picture this: the aroma of sautéed sausage filling the air, mingling with the sweet smokiness of BBQ sauce and the creamy richness of pasta. It’s a dish that brings people together, whether it’s a casual family dinner or a get-together with friends. And the best part? It all comes together in just one pot! Talk about a win-win. So, grab your favorite apron and let’s dive into the exciting world of One-Pot Bold Honey BBQ Sausage Pasta!
Personal Story: A Nostalgic Twist
Let me take you back to a warm summer evening when I was just a little kitchen helper. I remember standing on a stool, peering over the counter as my grandma orchestrated our family meal. She had this incredible knack for making simple ingredients sing, and her homemade BBQ sauce was legendary. One Saturday, we decided to experiment, tossing in some smoked sausage and penne pasta while she hummed her favorite tunes. The vibrant flavors danced together in perfect harmony, and I could hardly wait to dig in.
That meal stuck with me, and as I grew up, I often found myself revisiting that moment in my own cooking adventures. Fast forward a few years—after culinary school and countless dinner parties later—and here I am, ready to share this updated version. It’s not just a recipe; it’s a tribute to the joy of cooking and the memories we create around the table. Are you ready to create your own flavorful memories? Let’s get started!
Ingredients: What You’ll Need
Got your apron on? Great! Here’s what you’ll need to recreate this deliciousness:
-
1 pound smoked sausage, sliced
This adds a wonderful depth of flavor to your dish. Feel free to substitute with turkey sausage or even vegetarian sausage for a lighter alternative! -
12 ounces penne or rotini pasta
These pasta shapes hold onto the sauce beautifully. If you’re gluten-free, go for a gluten-free pasta like chickpea or quinoa pasta. -
2 cups chicken broth
Homemade is always best, but store-bought works too! Use vegetable broth if you’re looking for a vegetarian option. -
1 cup heavy cream
This creates the creamy base of the sauce. You can swap it for half-and-half or coconut cream for a dairy-free version. -
¾ cup honey BBQ sauce
This is the star of the dish! I recommend a quality sauce that balances sweetness and smokiness. -
1 cup cheddar cheese, shredded
Cheddar adds a creamy texture and sharpness. Try pepper jack cheese for an extra kick! -
½ cup diced onions
A classic base for flavor. Green onions or shallots can be a nice alternative if you want something milder. -
1 tablespoon olive oil
This helps sauté the onions and sausage. Feel free to use avocado oil for a healthier twist. -
1 teaspoon garlic powder
A simple way to add flavor without the hassle of minced garlic. Fresh garlic can be substituted as well. -
Salt and pepper to taste
Essential for seasoning! A dash of smoked paprika can also add an extra layer of flavor.
Step-by-Step Instructions: Cooking Up a Storm
Alright, let’s roll up our sleeves and break this down step by step! Cooking should never feel intimidating; it should be fun and fulfilling. Here’s how we do it:
-
Sauté the Sausage and Onions
Heat a large pot over medium heat and drizzle in that olive oil. Toss in the sliced smoked sausage and diced onions. Sauté them for about 5-7 minutes until the onions become translucent and the sausage begins to brown. Don’t be afraid to let the sausage get a little crispy on the edges—those caramelized bits add incredible flavor! -
Add the Pasta
Once the sausage and onions are looking delicious, pour in the penne or rotini pasta. Give it a good stir to coat everything in that savory goodness. Trust me, you’ll want to get all those flavors mingling right from the start. -
Pour in the Broth and Cream
Now it’s time to bring all of that together! Pour in the chicken broth and heavy cream. Stir gently to combine and raise the heat just a touch until it’s bubbling away. This is the moment where the magic starts to happen, and your kitchen will start to smell heavenly. -
Add the Honey BBQ Sauce
Here comes the fun part! Add in that luscious honey BBQ sauce and stir until everything is well combined. The sauce will start to thicken and coat the pasta beautifully. Give it a taste—this is your chance to fine-tune the flavors! If you like it sweeter, add a bit more BBQ sauce. -
Mix in the Cheese
Once the pasta is al dente, reduce the heat and stir in the shredded cheddar cheese. Watch as it melts into the creamy sauce, creating a comforting, cheesy hug for your pasta. At this point, taste again and add salt and pepper as needed. -
Serve It Up
Turn off the heat and let it sit for a minute or two. This allows everything to settle, making it easier to serve. Plus, it gives you just enough time to take a quick taste test (as if you needed an excuse).
Serving Suggestions: Plating Perfection
Ah, the final touch! Plate your One-Pot Bold Honey BBQ Sausage Pasta in vibrant, shallow bowls. You can also use a big serving dish to keep it family-style. Finish it off with a sprinkle of chopped green onions or fresh parsley for that burst of color.
For an extra twist, consider serving it with a light side salad or some crusty garlic bread to soak up all that creamy goodness. And if you’re feeling adventurous, a drizzle of extra honey BBQ sauce on top can elevate the dish even further!
Recipe Variations: Get Creative
Now that you’ve mastered the basics, let’s talk variations! Here are a few creative twists to consider:
-
Vegetable Explosion
Toss in your favorite veggies—like bell peppers, zucchini, or spinach—when sautéing the onions. Not only do they add nutrients, but they’ll also bring a lovely pop of color. -
Spicy Sausage Kick
Use a spicy Italian sausage or add a pinch of cayenne pepper to the mix if you’re looking to ignite your taste buds. -
Cheesy Mozzarella Surprise
Replace the cheddar with fresh mozzarella for a gooey, cheesy delight. Just stir it in at the very end until it melts slightly. -
Pesto Infusion
Swap out the honey BBQ sauce for basil pesto to give it an herbaceous spin. Pair it with toasted pine nuts for added crunch! -
Plant-Based Swap
Use plant-based sausage and swap the heavy cream for cashew cream to make this dish entirely plant-based without sacrificing taste.
Chef’s Notes: A Bit of Kitchen Wisdom
Here’s a little kitchen tidbit from my own experience: this recipe is incredibly forgiving. Whether you are missing an ingredient or want to add something to the mix, don’t stress! Cooking is all about creativity and finding what flavors you love. I’ve had nights where I completely forgot to add the cheese, and it still turned out delicious! Remember, your unique touch is what makes each meal special.
FAQs and Troubleshooting: Your Prep Companion
-
What if my pasta is too mushy?
Make sure to keep an eye on your pasta. It should be al dente, meaning it should have a slight bite to it. It will continue cooking a bit even after you’ve turned off the heat. -
Can I make this in advance?
Absolutely! Feel free to prep it ahead and store it in the fridge. Just reheat it with a splash of extra broth or cream to keep it creamy. -
What if it’s too thick?
If your pasta dish becomes too thick during cooking or reheating, just add a splash of chicken broth or milk until you reach your desired consistency. -
Can I freeze leftovers?
Yes, you can freeze the remaining pasta. Just let it cool completely, then store in an airtight container for up to three months. Reheat it gently, adding a little extra cream if needed.
Nutritional Info: A Quick Breakdown
Per serving (based on eight servings), you’re looking at approximately:
- Calories: 550 kcal
- Protein: 20g
- Carbohydrates: 50g
- Fat: 30g
Keep in mind that these numbers may vary based on your ingredient choices. It’s all about balance; enjoy a delicious meal and savor every bite!
Final Thoughts: A Bow to You, the Home Cook
There you have it, friend—a comforting bowl of One-Pot Bold Honey BBQ Sausage Pasta that’s sure to become a favorite in your household. With every bite, you’ll taste the love and effort you put into making this dish, and the memories that come with it. So whether you’re dining solo, feeding the family, or hosting friends, know that this delicious pasta will bring smiles and warm hearts around the table.
Remember, cooking is a journey, and every recipe you explore is an opportunity to learn and grow. Embrace those moments, share your meals, and create connections through food. I can’t wait to hear about your adventures in the kitchen, so drop me a comment below and let me know how your pasta turns out!
Until next time, keep those pots stirring and those plates filled with love. Happy cooking!
Print
One-Pot Bold Honey BBQ Sausage Pasta
- Total Time: 30 minutes
- Yield: 4 servings 1x
- Diet: Non-Vegetarian
Description
A comforting one-pot pasta dish featuring smoked sausage and a sweet honey BBQ sauce, perfect for family dinners or gatherings.
Ingredients
- 1 pound smoked sausage, sliced
- 12 ounces penne or rotini pasta
- 2 cups chicken broth
- 1 cup heavy cream
- ¾ cup honey BBQ sauce
- 1 cup cheddar cheese, shredded
- ½ cup diced onions
- 1 tablespoon olive oil
- 1 teaspoon garlic powder
- Salt and pepper to taste
Instructions
- Sauté the sausage and onions: Heat a large pot over medium heat and drizzle in olive oil. Toss in sliced sausage and diced onions. Sautéfor about 5-7 minutes until onions become translucent and sausage begins to brown.
- Add the pasta: Pour in the penne or rotini pasta and stir to coat everything in the savory goodness.
- Pour in the broth and cream: Add chicken broth and heavy cream, and stir gently. Raise the heat until it starts bubbling.
- Add the honey BBQ sauce: Stir in the honey BBQ sauce until everything is well combined.
- Mix in the cheese: Once the pasta is al dente, reduce the heat and stir in shredded cheddar cheese until melted.
- Serve it up: Let it sit for a minute before serving. Plate and finish it off with chopped green onions or fresh parsley.
Notes
This recipe is flexible; feel free to add vegetables or substitute proteins as needed. You can also make it ahead of time and reheat with a splash of broth.
- Prep Time: 10 minutes
- Cook Time: 20 minutes
- Category: Main Course
- Method: Stovetop
- Cuisine: American
Nutrition
- Serving Size: 1 serving
- Calories: 550 kcal
- Sugar: 12g
- Sodium: 900mg
- Fat: 30g
- Saturated Fat: 12g
- Unsaturated Fat: 14g
- Trans Fat: 0g
- Carbohydrates: 50g
- Fiber: 2g
- Protein: 20g
- Cholesterol: 75mg
Keywords: one-pot pasta, honey BBQ, sausage pasta, comfort food, easy dinner
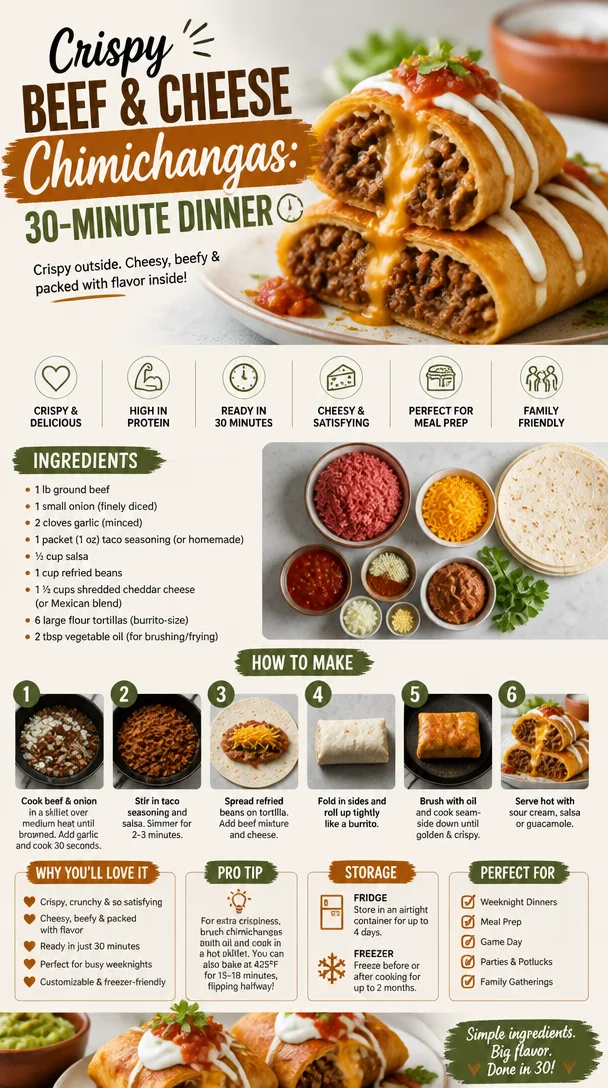
Crispy Beef & Cheese Chimichangas: 30-Minute Dinner
Bringing Comfort to the Table: Beef and Cheese Chimichangas
Hey there, food friends! If there’s one thing I love more than whipping up delicious dishes, it’s sharing the joy that good food brings to our lives. Today, we’re diving into the world of Beef and Cheese Chimichangas—a dish that’s not just about the flavors, but also about the memories and connections we create around the dinner table. Trust me, once you’ve mastered these crispy, cheesy delights, you’ll be the culinary hero of your household!
A Flavorful First Encounter
Let me take you back to the summer of my youth, when the sun was always shining, and the air was filled with the rich aroma of sizzling meats and spices from our backyard BBQs. Every Friday night, my family would gather around the table for our fiesta, a celebration of good food and great stories. One memorable Friday, my aunt, who was known for her culinary prowess, decided to surprise us with her version of chimichangas. I remember my little heart racing with excitement as she unveiled a platter of perfectly golden, crispy chimichangas stuffed to the brim with savory beef and gooey cheese.
With that first bite, I was transported into a world of flavor. The crunch of the tortilla mixed with the cheesy goodness and seasoned beef brought a smile to my face and warmth to my belly. It became an instant favorite family dish, a ritual we cherished and looked forward to every summer. Fast forward to today, and I’m here to share my take on this family classic—because everyone deserves a taste of that joy!
Ingredients: What You’ll Need
Let’s get into the nitty-gritty! Here’s what you’ll need to make these Beef and Cheese Chimichangas:
-
1 lb ground beef
The star of the show! You can substitute with ground turkey or a plant-based alternative for a healthier or vegetarian option. -
1 small onion (finely diced)
Adds sweetness and depth of flavor. If you prefer milder flavors, you can use green onions instead. -
2 cloves garlic (minced)
A must for that aromatic kick! Feel free to add more if you’re a garlic lover. -
1 packet (1 oz) taco seasoning (or homemade)
This is where the magic happens. Homemade seasoning allows for customization; try cumin, chili powder, paprika, and oregano! -
½ cup salsa
Choose your favorite kind—mild, medium, or hot. You can make fresh salsa or use jarred for convenience. -
1 cup refried beans
Creaminess at its finest! Take a can for a quick option or mash black beans for a healthier twist. -
1 ½ cups shredded cheddar cheese (or Mexican blend)
Cheesy goodness is non-negotiable! Add more for that ooey-gooey factor or go for pepper jack for some spice. -
6 large flour tortillas (burrito-size)
Flour tortillas are perfect for wrapping. Corn tortillas can work too but may require some extra care as they’re less pliable. -
2 tbsp vegetable oil (for brushing/frying)
The secret to that delightful crispiness! You can also use olive oil for a lighter flavor.
Step-by-Step Instructions: Let’s Get Cooking!
Now, let’s roll up our sleeves and make some magic happen in the kitchen! Here’s how to create these mouth-watering chimichangas:
-
Cook the Beef Mixture
In a large skillet over medium heat, add your ground beef, diced onion, and minced garlic. Cook until the beef is browned and the onion becomes translucent, about 5-7 minutes. Make sure to break up the beef with a wooden spoon for even cooking. Pro tip: Drain excess grease for a healthier option! -
Season It Up
Once your beef is fully cooked, sprinkle in the taco seasoning. Stir it in, and then add your salsa and refried beans. Mix everything together until combined and heated through, about 3-4 more minutes. Tasting is key—feel free to adjust the spice level! -
Prepare the Tortillas
Lay out your flour tortillas on a clean surface. If you feel your tortillas are a bit stiff, pop them in a microwave for 15-20 seconds to soften them up. -
Stuff the Tortillas
Spoon the beef mixture evenly onto each tortilla, keeping it towards the center, leaving a little space at the edges. Top with shredded cheese—cheese lovers rejoice! -
Roll ‘Em Up
Fold in the sides of the tortilla first over the filling, then roll it up tightly from the bottom. It’s like wrapping a present—simple and fun! Brush the top with vegetable oil for that golden finish. -
Fry to Perfection
Heat a skillet over medium-high heat and add a bit of oil so it glistens. Carefully place the chimichangas seam-side down, a few at a time, and fry until golden brown and crispy, about 2-3 minutes on each side. Flip carefully! For a healthier option, you can bake them at 425°F for about 20 minutes, flipping halfway through. -
Let Them Rest
After frying or baking, let the chimichangas rest on a paper towel-lined plate for a moment. This ensures any excess oil drips away, and they don’t turn soggy.
Serving Suggestions: Make it a Feast
The beauty of chimichangas is how versatile they are when it comes to serving! Place them on a colorful platter and sprinkle with fresh cilantro for a pop of color. Serve them alongside a fresh salad, guacamole, and sour cream for added flair. Don’t forget an extra scoop of salsa to drizzle, or if you’re feeling adventurous, try drizzling with a chipotle ranch dressing for a smoky twist. Your friends and family will be impressed with your presentation and, of course, the delightful flavors.
Recipe Variations: Get Creative!
Chimichangas are a canvas for your culinary creativity! Here are a few fun variations to consider:
-
Chicken or Pork Chimichangas
Swap out the ground beef for shredded chicken or pulled pork for a different take. Both meats absorb flavors beautifully! -
Vegetarian Delight
Use black beans, corn, and diced bell peppers for a hearty vegetarian option. Add some avocado for extra creaminess. -
Cheesy Spinach Chimichangas
Mix in spinach, cream cheese, and artichokes for a creamy, cheesy vegetarian delight. -
Crispy Baked Chimichangas
Brush with oil and bake instead of frying for a healthier but still satisfying crunch. They can turn out just as delicious! -
Southwestern Flavor Bomb
Add jalapeños, corn, and diced tomatoes for a burst of flavors that will transport your taste buds right down to the Southwest!
Chef’s Notes: A Dash of Nostalgia
Every recipe tells a story, and these chimichangas are no exception. Over the years, I’ve tweaked the original recipe a bit, adding my spin to make them even more enjoyable. Sometimes, I throw in leftover roasted vegetables or even a dash of hot sauce if I’m feeling bold! It’s all about making it your own and sharing those creations with the people you love. Kitchen adventures are what keep the spirit of cooking alive, and I hope you feel inspired to create your own memories with this recipe.
FAQs and Troubleshooting: Let’s Clear Things Up!
-
Can I use corn tortillas instead of flour?
Absolutely! Just be aware that they may tear more easily, so you’ll want to handle them with care. -
What if my chimichangas are soggy?
This usually happens if they’re filled too much or if they don’t have enough oil. Ensure they’re packed snugly and don’t skimp on brushing them with oil! -
How do I reheat leftover chimichangas?
The best way to reheat them is in an oven at 350°F for about 10-15 minutes until hot and crispy again. -
Can I freeze these?
Yes! Freeze before frying. Just thaw them in the fridge overnight before frying or baking.
Nutritional Info: Fueling Up Your Day
While comfort food is delicious, keeping an eye on the nutrition is also important. Here’s a rough breakdown of the nutritional values per chimichanga:
- Calories: 350-400 (depending on fillings and cooking method)
- Protein: 20-25g
- Carbohydrates: 30-35g
- Fat: 15-20g
- Fiber: 5-8g
These are just estimates, so if you’re counting macros or need specifics, feel free to adjust based on your ingredients.
Final Thoughts: A Culinary Adventure
Cooking isn’t just about the food; it’s about the experiences and memories that come with it. Every bite tells a story, and every chimichanga you make holds a piece of your culinary journey! I hope this Beef and Cheese Chimichanga recipe inspires you to gather your favorite people around the table, share stories, and enjoy the comfort food that brings your hearts and bellies together.
So, grab your spatula, turn on some music, and let’s create some delicious memories. Remember, cooking should always be fun and full of laughter—just like life! Happy cooking, friends!
Print
Beef and Cheese Chimichangas
- Total Time: 45 minutes
- Yield: 4 servings 1x
- Diet: Non-Vegetarian
Description
Deliciously crispy and cheesy beef chimichangas, perfect for family gatherings and a taste of nostalgia.
Ingredients
- 1 lb ground beef
- 1 small onion (finely diced)
- 2 cloves garlic (minced)
- 1 packet (1 oz) taco seasoning
- ½ cup salsa
- 1 cup refried beans
- 1 ½ cups shredded cheddar cheese
- 6 large flour tortillas (burrito-size)
- 2 tbsp vegetable oil (for brushing/frying)
Instructions
- Cook the Beef Mixture: In a large skillet over medium heat, add your ground beef, diced onion, and minced garlic. Cook until the beef is browned and the onion becomes translucent, about 5-7 minutes. Drain excess grease if desired.
- Season It Up: Sprinkle in taco seasoning, then add salsa and refried beans. Mix until combined and heated through, about 3-4 minutes.
- Prepare the Tortillas: Lay out tortillas and soften in the microwave for 15-20 seconds if needed.
- Stuff the Tortillas: Spoon the beef mixture onto each tortilla, keeping it toward the center. Top with shredded cheese.
- Roll ‘Em Up: Fold sides over the filling then roll tightly from the bottom. Brush with vegetable oil.
- Fry to Perfection: Heat a skillet over medium-high heat with oil. Fry chimichangas seam-side down until golden brown, about 2-3 minutes per side.
- Let Them Rest: Drain on paper towels to remove excess oil.
Notes
For healthier options, consider baking instead of frying. You can also customize fillings based on preference.
- Prep Time: 15 minutes
- Cook Time: 30 minutes
- Category: Main Course
- Method: Frying
- Cuisine: Mexican
Nutrition
- Serving Size: 1 chimichanga
- Calories: 375
- Sugar: 3g
- Sodium: 600mg
- Fat: 22g
- Saturated Fat: 9g
- Unsaturated Fat: 6g
- Trans Fat: 0g
- Carbohydrates: 30g
- Fiber: 4g
- Protein: 20g
- Cholesterol: 70mg
Keywords: chimichangas, beef chimichangas, Mexican food, comfort food, easy dinner

Tomato Pie Recipe for Busy Weeknights (30-Minute Prep)
The Ultimate Tomato Pie Recipe: A Slice of Comfort from My Kitchen to Yours
Hey there, food lovers! Today, we’re diving into a dish that’s not just a meal but a heartwarming slice of nostalgia: Tomato Pie. If you’re like me, there’s something about this savory delight that brings back memories of summer days spent in a sun-soaked garden, with juicy, red tomatoes dripping with flavor. So, roll up your sleeves and grab your apron; we’re going to whip up a dish that’s just as comforting as an old sweater and perfect for sharing with friends and family!
A Slice of Nostalgia
Let me take you back to a sweltering August afternoon in my grandmother’s kitchen. The air was thick with the scent of fresh tomatoes picked from her sprawling garden. I remember standing on a little stool, just tall enough to peek over the counter, while my grandma effortlessly transformed those ruby-red beauties into the most delicious Tomato Pie. We would laugh as she tossed in her secret ingredients, reminiscing about summers gone by and creating new memories in the process.
It was more than just cooking; it was a way of bonding—fingers sticky with tomato juice and flour as we crimped the edges of her flaky pie crust. The anticipation of that pie baking in the oven, its golden crust browning perfectly, was almost unbearable. Each time we dug in, it felt like we were diving into a treasure chest of flavors, with each slice unfolding layers of love and warmth.
And that’s exactly what I aim to recreate with my Tomato Pie recipe. It’s simple, delicious, and brings people together—just like Grandma’s did. Let’s get started on building our own delicious memories today!
Ingredients
We’re keeping it simple with a handful of fresh ingredients that you might already have in your pantry. Here’s what you’ll need:
-
1 Pie Crust
Whether you go for homemade or store-bought, this is the foundation of your Tomato Pie. If you’re short on time, a pre-made crust works wonders! Feeling adventurous? You can even use a savory biscuit crust for a fun twist. -
4 Beefsteak Tomatoes (peeled and sliced thin)
These large, juicy tomatoes are perfect for our pie. Not a fan of beefsteak? You can substitute with any ripe tomatoes or even heirloom varieties for a splash of color and flavor. -
Salt and Pepper (to taste)
These are your basic flavor enhancers! A dash of salt will help draw out the moisture in the tomatoes, making sure your pie isn’t soggy. -
1 tbsp Fresh Basil (or 1 tsp dried basil)
Fresh herbs elevate any dish! Basil pairs wonderfully with tomatoes but feel free to experiment with other herbs like oregano or thyme. -
2 tbsp Chopped Chives
Chives add a mild onion flavor that complements the tomatoes perfectly. If you don’t have chives, green onions or even parsley can work in a pinch. -
1 cup Heavy Mayonnaise (preferably Duke’s)
Mayonnaise might seem unusual, but it adds creaminess and depth to your pie. If you want a lighter version, Greek yogurt is a good substitute, although it’ll alter the flavor a bit. -
1 cup Grated Cheddar Cheese
Cheddar lends a rich, savory flavor to the pie. Experiment with other cheeses like mozzarella, goat cheese, or even a spicy pepper jack for something fun!
Step-by-Step Instructions
Now that we have our ingredients laid out, it’s time to bring it all together! Follow these steps for a Tomato Pie that will have your taste buds dancing.
-
Preheat your oven.
We want it nice and hot, so set your oven to 350°F (175°C). This ensures crispy edges for your pie. -
Prepare the pie crust.
If you’re using a store-bought crust, follow the package instructions. If homemade, roll it out and fit it into a 9-inch pie plate. Press it down gently to avoid any air pockets, then prick it with a fork to allow steam to escape. -
Layer the tomatoes.
Now, for the star of the show! Arrange the thinly sliced, peeled tomatoes in a single layer over the crust. Don’t worry if they overlap; this just makes for a more rustic, homey feel. Sprinkle salt and pepper over the top to enhance the flavor. -
Mix the delightful filling.
In a bowl, combine the mayonnaise, herbs, and half the cheese (saving the other half for later). Stir it all together until it’s creamy and well mixed. This is where the magic happens! -
Spread the filling over the tomatoes.
Carefully spoon the mayo mixture over the tomatoes, making sure to cover them nicely. This creamy layer adds richness and texture that’s simply irresistible. -
Top with cheese.
Sprinkle the remaining grated cheddar cheese over the top—you can never have too much cheese, am I right? It’s going to melt beautifully as the pie bakes. -
Bake to perfection.
Place your pie in the oven and bake for about 30-35 minutes or until the pie is bubbling and the cheese turns a golden brown. Your kitchen will smell like heaven, trust me! -
Cool and serve.
Once baked, let the pie cool for about 10 minutes before slicing. This will help the filling set up a bit, making your slices cleaner. The wait is agonizing, but it’s worth it!
Serving Suggestions
Serving your Tomato Pie can be just as creative as making it! Here are a few ideas to elevate your presentation:
-
Garnish with Fresh Herbs: Sprinkle fresh chives or basil on top for a pop of color and fresh flavor.
-
Perfect Pairings: Serve it with a simple green salad drizzled with balsamic vinaigrette or a light soup to round out the meal. This dish is fabulous alongside some crusty bread for soaking up any leftover juices.
-
Slice it Right: For a rustic touch, use a serrated knife to cut it into wedges. Each slice should reveal that gorgeous layering of tomatoes and creamy goodness.
-
Warm or Cold: This pie is delightful either warm or at room temperature, making it versatile for any occasion. It’s great as a main dish or even at a brunch buffet!
Recipe Variations
This Tomato Pie recipe is a fantastic canvas for creativity! Here are a few ideas to switch things up:
-
Add Proteins: Toss in cooked bacon bits or crumbled sausage for a heartier version. Who wouldn’t love the addition of some smoky flavor?
-
Spicy Kick: If you like a little heat, add red pepper flakes or diced jalapeños to the mayo mixture for an unexpected zing.
-
Cheesy Goodness: Swap out the cheddar for mozzarella and add in some parmesan for an Italian-inspired twist. You could even layer in some sautéed spinach!
-
Veggie Loaded: Mix in some sautéed bell peppers or mushrooms with the tomatoes for an earthy flavor explosion.
-
Gluten-Free Option: Use a gluten-free pie crust or even a cauliflower crust if you want to keep it lighter but still delicious!
Chef’s Notes
Over the years, my Tomato Pie recipe has gone through many transformations—kind of like me in the kitchen! There was that one time I accidentally grabbed expired mayo… let’s just say it didn’t turn out so well. But each failure taught me a valuable lesson: cooking is about experimenting and having fun. And the best part? Even mishaps often lead to surprisingly tasty outcomes!
So don’t be afraid to tweak this recipe and make it your own. It’s not just about following directions; it’s about letting your personality shine through your cooking. Who knows? You might just cook up your own family classic to be passed down for generations!
FAQs and Troubleshooting
Here are a few common questions and potential pitfalls to look out for:
-
Why is my Tomato Pie watery?
If your pie ends up soggier than expected, it might be due to the moisture content in the tomatoes. To avoid this, sprinkle some salt on the tomato slices before assembling, letting them sit for a bit to draw out excess liquid. -
Can I use other types of cheese?
Absolutely! Feel free to mix and match with your favorite cheeses. Just keep in mind that the flavor will change, so choose according to your taste preference. -
What can I do if I have leftovers?
Leftover Tomato Pie is a delicious treat the next day! Just store it in the fridge, and when you’re ready, reheat it in the oven for that freshly baked taste. It makes for a fantastic lunch or even a quick snack. -
How can I make this recipe vegetarian?
It’s already vegetarian-friendly! You can easily keep it meat-free by sticking to the original ingredients or swapping out cheese for a plant-based option if desired.
Nutritional Info
While I believe in enjoying every bite of our delicious Tomato Pie, it’s always good to be mindful of nutritional values. Here’s a quick breakdown of the calories and key nutrients per slice (assuming 8 slices):
- Calories: ~280
- Fat: 22g
- Carbohydrates: 16g
- Protein: 6g
- Fiber: 1g
This dish is packed with flavor and comfort, but like all good things, moderation is key!
Final Thoughts
So there you have it—the ultimate Tomato Pie recipe, brimming with love, nostalgia, and sunshine flavors. This pie isn’t just a meal; it’s a celebration of summer, simple ingredients, and the joy of cooking with family and friends. Remember, cooking is as much about the journey as it is about the destination; don’t rush it, and savor each slice.
I can’t wait for you to try out this recipe. I know it’ll become a cherished dish in your home just like it is in mine. So gather your favorite folks, dish out those slices, and create new memories around the dinner table. Happy cooking!
Print
The Ultimate Tomato Pie
- Total Time: 50 minutes
- Yield: 8 servings 1x
- Diet: Vegetarian
Description
A heartwarming Tomato Pie recipe that evokes memories of summer with fresh, juicy tomatoes and a creamy filling.
Ingredients
- 1 Pie Crust
- 4 Beefsteak Tomatoes (peeled and sliced thin)
- Salt and Pepper (to taste)
- 1 tbsp Fresh Basil (or 1 tsp dried basil)
- 2 tbsp Chopped Chives
- 1 cup Heavy Mayonnaise (preferably Duke’s)
- 1 cup Grated Cheddar Cheese
Instructions
- Preheat your oven to 350°F (175°C).
- Prepare the pie crust according to package instructions or roll it out and fit it into a 9-inch pie plate.
- Layer the thinly sliced, peeled tomatoes in a single layer over the crust, then sprinkle with salt and pepper.
- Mix the mayonnaise, herbs, and half the cheese in a bowl until creamy.
- Spread the mayo mixture over the tomatoes.
- Top with the remaining grated cheddar cheese.
- Bake for about 30-35 minutes until bubbling and golden brown.
- Cool for 10 minutes before slicing and serving.
Notes
This dish is delicious warm or at room temperature. It can also be served alongside a salad or soup.
- Prep Time: 15 minutes
- Cook Time: 35 minutes
- Category: Main Course
- Method: Baking
- Cuisine: American
Nutrition
- Serving Size: 1 slice
- Calories: 280
- Sugar: 4g
- Sodium: 550mg
- Fat: 22g
- Saturated Fat: 5g
- Unsaturated Fat: 15g
- Trans Fat: 0g
- Carbohydrates: 16g
- Fiber: 1g
- Protein: 6g
- Cholesterol: 30mg
Keywords: Tomato Pie, Comfort Food, Summer Recipe, Vegetarian Recipe, Heirloom Tomato
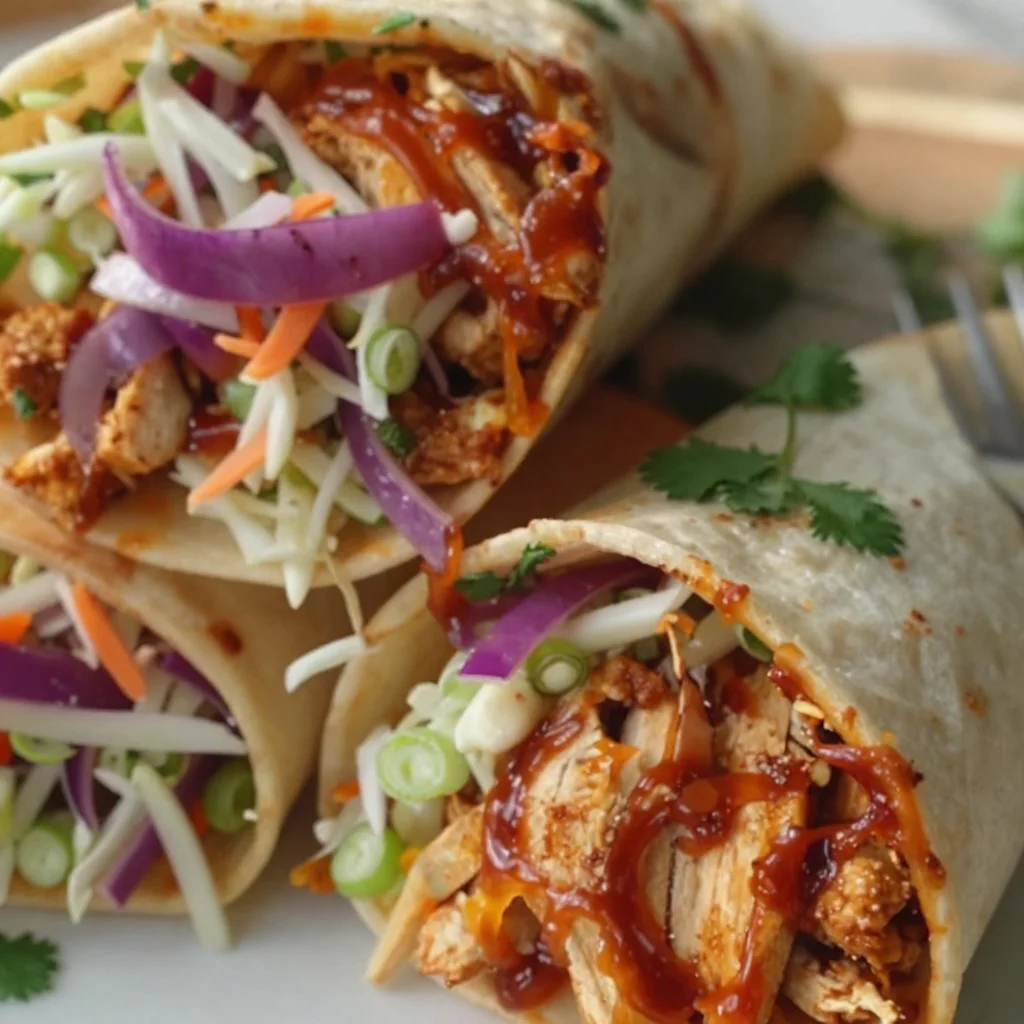
Minute BBQ Chicken Coleslaw Wraps for Busy Weeknights
BBQ Chicken Coleslaw Wraps: A Flavorful Feast!
Hey there, fellow food lovers! If you’re looking for a recipe that bursts with flavor, brings a smile to your face, and is easy to whip up—let me introduce you to my ultimate BBQ Chicken Coleslaw Wraps! These wraps perfectly blend tender, shredded chicken tossed in savory barbecue sauce with the crunch of fresh coleslaw, all wrapped snugly in a warm tortilla.
Now, I don’t know about you, but for me, the kitchen is a happy place—a space filled with good vibes, laughter, and, of course, delicious aromas. Cooking has a magical way of bringing people together, and there’s something remarkably heartwarming about gathering around a table filled with simple yet comforting food. My BBQ Chicken Coleslaw Wraps are all about that vibe: easy, fun, and downright delicious!
Let me take you back to a summer evening when my family decided to throw a backyard barbecue. Picture this: the sun is setting, the grill is sizzling, and laughter fills the air. As the family gathered around, we tossed ideas back and forth about what to make. Someone suggested wraps, and just like that, my BBQ Chicken Coleslaw Wraps were born! The vibrant colors of the coleslaw against the golden tortillas were enough to make anyone’s mouth water.
What I love about this dish is not just the flavor; it’s the memories you create while making it. The joy of putting together simple ingredients and transforming them into something everyone can enjoy fills my heart. So grab your spatula, and let’s dive into this delicious adventure!
A Nostalgic Memory
I still remember the first time I whipped up these BBQ Chicken Coleslaw Wraps for a group of friends. We were having one of those epic summer get-togethers where the food flows like the laughter and stories. I had just returned from a trip to a smoky barbecue joint, and my cravings were at an all-time high. I thought, “Why not recreate that magic?” So, I rounded up the gang, and we commandeered my kitchen together.
As we shredded chicken, mixed coleslaw, and slathered BBQ sauce, the kitchen turned into a friendly chaos. It wasn’t long before we were all hovering around the counter, piling our wraps high with toppings and arguing over whose creation was the best. The combination of smoky BBQ and crunchy, creamy coleslaw elevating the wraps made it a runaway hit!
That evening was not just about food—it was about connection, laughter, and memories made in the kitchen. I’ve made countless BBQ Chicken Coleslaw Wraps since then, yet that night remains one of my favorites. It’s a reminder that the best dishes are those that bring us together.
Ingredients
Here’s what you’ll need to create these delightful wraps:
-
2 cups cooked chicken breast, shredded: Use rotisserie chicken for convenience, or cook your chicken breast in advance. If you’re looking for a plant-based twist, try shredding jackfruit or using chickpea salad!
-
1/2 cup BBQ sauce: Choose your favorite flavor! Whether you like it tangy, smoky, or sweet, BBQ sauce is the star of the show here. If you’re feeling adventurous, make your own homemade version!
-
4 large flour tortillas: Soft flour tortillas are perfect for wrapping. You can swap them for whole wheat or corn tortillas to switch things up!
-
2 cups coleslaw mix: This mix usually contains shredded cabbage and carrots, providing color and crunch. Look for pre-packaged mixes to save time or make your own by shredding fresh vegetables. For a cauliflower-friendly swap, try using finely chopped cauliflower to mimic the crunch!
-
1/4 cup mayonnaise: This adds a creamy element to your coleslaw. If you want to lighten it up, swap it with Greek yogurt or a dairy-free alternative.
-
1 tablespoon apple cider vinegar: This balances the richness of the mayo and BBQ sauce. Feel free to use lemon juice if that’s what you have on hand!
-
1 tablespoon sugar: A hint of sweetness tames the tanginess of the vinegar. For a healthier option, try honey or maple syrup.
-
Salt and pepper to taste: These are simple yet essential seasonings. Don’t be shy; taste as you go!
-
1/4 cup chopped fresh cilantro (optional): Adds a refreshing flavor. If you’re not a fan, skip it or use parsley instead!
-
1/4 cup sliced green onions (optional): These add a nice kick! You can easily replace green onions with diced shallots for a subtler flavor.
With these ingredients, you’re just a few steps away from creating a flavor fiesta!
Step-by-Step Instructions
Now that we have our ingredients ready, let’s get right into the cooking action:
-
Prep the Chicken: If you’re using rotisserie chicken, shred it into bite-sized pieces. If you’re cooking your chicken, simply poach it in simmering water for 15-20 minutes until cooked through, then shred it. You can add a pinch of salt while cooking to infuse some flavor into the chicken.
Chef Hack: If you want maximum flavor, consider marinating the chicken in BBQ sauce for a couple of hours before cooking!
-
Mix the BBQ Sauce: In a medium bowl, mix the shredded chicken with 1/2 cup BBQ sauce until well-coated. Feel free to taste and adjust—some folks like it saucier than others.
-
Make the Coleslaw: In another bowl, combine the coleslaw mix, mayo, apple cider vinegar, sugar, salt, and pepper. Toss everything together until the veggies are evenly coated—get your hands in there if you need to!
Tip: For a zesty twist, add some diced jalapeños or a sprinkle of chili flakes to the coleslaw mix.
-
Warm the Tortillas: To make wrapping easier, warm the flour tortillas in a dry skillet over medium heat for about 20 seconds on each side, just until pliable. Don’t overdo it, or they’ll become crispy!
-
Assemble the Wraps: Lay a warm tortilla flat, spoon some BBQ chicken and top with a generous amount of coleslaw mixture. If you’re using cilantro and green onions, sprinkle them on top at this stage.
-
Wrap It Up: Fold in the sides of the tortilla and then roll it up from the bottom to the top, enclosing the filling. Tuck it in as you roll to keep things nice and snug.
Chef’s Insight: If you want to serve them as a platter, slice the wraps in half diagonally for that perfect presentation!
-
Serve & Enjoy: You can serve them as is or slice them for sharing—or not! These wraps are perfect for a casual meal or even a picnic outdoors.
Serving Suggestions
Serving food is as important as cooking it! To plate your BBQ Chicken Coleslaw Wraps, arrange them neatly on a large platter, and don’t forget to garnish. Here are a couple of serving suggestions to elevate the experience:
-
Garnish with Fresh Herbs: Add a sprinkle of chopped cilantro or parsley on top to add a pop of color.
-
** Serve with Dips:** Offer ranch dressing, extra BBQ sauce, or even hot sauce on the side for those who like a bit of extra kick.
-
Side Dishes: Pair them with crispy sweet potato fries, or serve alongside a simple fruit salad for a fresh contrast.
These wraps can also be set up as a make-your-own wrap station, allowing guests to customize their fillings. The more, the merrier!
Recipe Variations
Feeling creative? Here are a few fun twists you can try to switch up the flavors:
-
Spicy BBQ Chicken Wraps: Add diced jalapeños or a few dashes of hot sauce to the BBQ chicken mixture for some serious heat.
-
Tropical Twist: Swap the BBQ sauce for a sweet and tangy mango salsa, and add pineapple chunks to your coleslaw for a tropical flair.
-
Mediterranean Style: Use shredded rotisserie chicken tossed in garlic and herb vinaigrette, and replace the coleslaw mix with chopped cucumbers, tomatoes, and feta cheese.
-
Vegan Version: Substitute the chicken with shredded jackfruit mixed with your favorite vegan BBQ sauce and use a vegan mayo in the coleslaw.
-
Breakfast Wraps: Use scrambled eggs instead of chicken, and mix in crumbled bacon for a hearty breakfast or brunch option!
Chef’s Notes
As with any recipe, this one has evolved over time! The first iterations were simple, but as I tested different flavor profiles, I became more adventurous. Sometimes I’d add a twist like a spicy BBQ sauce or even a hint of chipotle to make it smoky! What I love most is how adaptable this recipe is. It allows for creativity, making it a dish that evolves with each gathering.
And speaking of gatherings, I always remember one instance where I accidentally overdid it on the sugar while experimenting. Instead of panicking, I decided to go with the flow. I transformed them into dessert BBQ wraps by adding some fresh fruit and whipped cream! The laughter that ensued made for a fabulous memory—proof that mistakes in the kitchen can sometimes lead to delightful discoveries!
FAQs and Troubleshooting
Here are some common questions and troubleshooting tips:
-
What if my chicken is dry?
- If you find that the chicken is a bit dry, mix in a little extra BBQ sauce. This will help moisten it up and add flavor.
-
Can I make this ahead of time?
- Definitely! You can prepare the chicken, coleslaw, and wrap components in advance. Just store them separately in the fridge. Assemble just before serving for the freshest taste.
-
How do I store leftovers?
- Wrap any leftovers tightly in plastic wrap or store them in airtight containers in the fridge. They’ll keep well for about 2-3 days.
-
Can I freeze these wraps?
- While it’s best to eat them fresh, you can freeze the unassembled wraps. Just be sure to wrap them tightly before freezing. When ready to enjoy, thaw overnight in the fridge and warm them up.
Nutritional Info
Each wrap is a balanced combination of protein from the chicken, fiber from the coleslaw, and healthy carbs from the tortillas. Here’s a rough nutritional breakdown per wrap, based on typical ingredients:
- Calories: Approximately 300-350
- Protein: 20-25g
- Carbohydrates: 30-35g
- Fat: 12-15g
- Fiber: 2-3g
Of course, this can vary based on the specific ingredients you choose, especially if you mix and match some substitutions.
Final Thoughts
There you have it! My BBQ Chicken Coleslaw Wraps—perfect for any occasion, whether you’re trying to impress guests or treating yourself to a fun meal at home. Cooking should be joyful, and with this recipe, you’ll hopefully create not just a delightful dish but also wonderful memories!
I encourage you to make these wraps, customize, and share them with friends and family. Remember, food is more than just nourishment; it’s about connection, laughter, and love. Don’t forget to share your own stories as you create these wraps. Whether for a summer picnic, a cozy weeknight dinner, or a fun gathering, I’m sure you’ll find that these wraps bring smiles all around. So, get into the kitchen, and let’s feast together!
Until next time, happy cooking!
Print
BBQ Chicken Coleslaw Wraps
- Total Time: 35 minutes
- Yield: 4 servings 1x
- Diet: Non-Vegetarian
Description
Delicious wraps filled with tender BBQ chicken and crunchy coleslaw, perfect for summer gatherings.
Ingredients
- 2 cups cooked chicken breast, shredded
- 1/2 cup BBQ sauce
- 4 large flour tortillas
- 2 cups coleslaw mix
- 1/4 cup mayonnaise
- 1 tablespoon apple cider vinegar
- 1 tablespoon sugar
- Salt and pepper to taste
- 1/4 cup chopped fresh cilantro (optional)
- 1/4 cup sliced green onions (optional)
Instructions
- Prep the Chicken: Shred cooked chicken into bite-sized pieces. If cooking, poach in simmering water for 15-20 minutes, then shred.
- Mix the BBQ Sauce: Combine shredded chicken with BBQ sauce in a bowl until well-coated.
- Make the Coleslaw: In another bowl, mix coleslaw, mayo, vinegar, sugar, salt, and pepper until veggies are coated.
- Warm the Tortillas: Heat tortillas in a skillet for 20 seconds on each side until pliable.
- Assemble the Wraps: Spoon BBQ chicken and coleslaw onto a tortilla, adding cilantro and green onions if desired.
- Wrap It Up: Fold in the sides and roll from the bottom to top, enclosing the filling.
- Serve & Enjoy: Plate the wraps and garnish with fresh herbs or serve with dips.
Notes
For extra flavor, marinate chicken in BBQ sauce before cooking. Customize with additional toppings as desired.
- Prep Time: 15 minutes
- Cook Time: 20 minutes
- Category: Main Course
- Method: Wrapping
- Cuisine: American
Nutrition
- Serving Size: 1 wrap
- Calories: 350
- Sugar: 6g
- Sodium: 800mg
- Fat: 15g
- Saturated Fat: 3g
- Unsaturated Fat: 9g
- Trans Fat: 0g
- Carbohydrates: 45g
- Fiber: 3g
- Protein: 25g
- Cholesterol: 60mg
Keywords: BBQ chicken, coleslaw wraps, summer recipes, easy meals, family gatherings
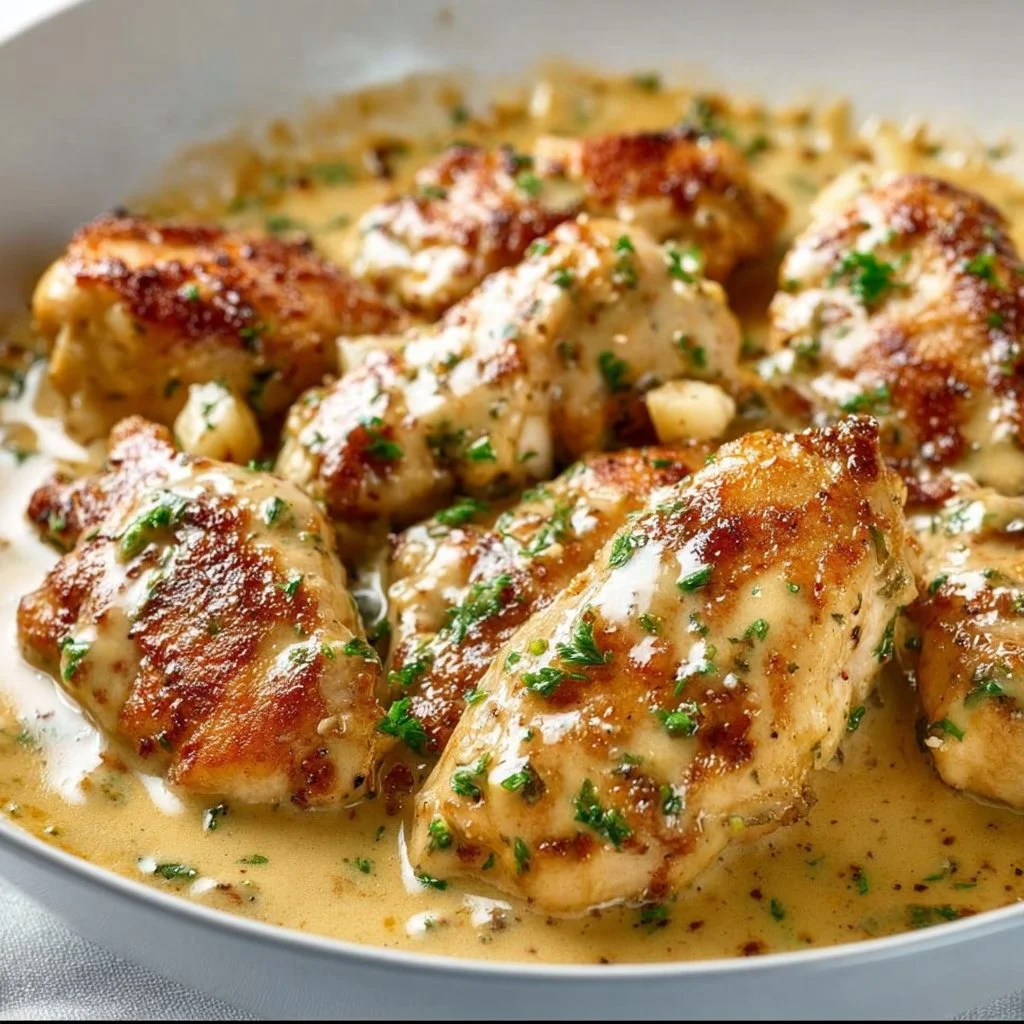
Creamy Garlic Chicken
Creamy Garlic Chicken: A Soul-Warming Dish for Every Occasion
Hey there, food family! 🍽️ Welcome back to Feastical, where we whip up feel-good recipes that stir your soul and warm your heart. Today, I’m excited to share one of my all-time favorites: Creamy Garlic Chicken. This dish has all the right flavors—creamy, garlicky goodness with a touch of indulgence that’ll have everyone at the table saying, "Mmm, what’s that?"
Picture this: It’s a chilly evening, and you’ve had a long day. You don your apron and fire up the stove, and as you chop fresh garlic and sizzle chicken in olive oil, the kitchen begins to fill with the most divine aroma. It’s more than just a meal; it’s a warm hug after a long day. Easy to make and even easier to enjoy, this creamy garlic chicken is perfect for a cozy night in or impressing guests at your next dinner party.
Now, I know what you might be thinking: “Is this going to take me hours in the kitchen?” Relax, my friend! This recipe is straightforward and can be whipped up in about 30 minutes. Just grab your favorite music playlist and let’s dance our way through the culinary creation. Are you ready? Let’s get cookin’!
Personal Story
I remember the first time I made creamy garlic chicken. I was living in my first apartment, a cozy little space with a mismatched collection of kitchen tools. My friends were coming over for a casual dinner, and I was determined to impress them with something hearty yet simple. I stumbled onto this recipe while browsing through a cookbook gifted to me by my grandma, whose cooking always filled our family gatherings with love and laughter.
With a few ingredients and a healthy dose of enthusiasm, I set the scene—my apartment filled with laughter, clinking glasses, and just a hint of competitiveness over who could guess my secret ingredient. The dish was a hit, and it became a staple for our gatherings! The creamy garlic chicken not only satisfied our bellies but also became a centerpiece of many unforgettable memories, bonding us together over shared plates and stories.
Ingredients
Here’s what you’ll need to make this delightful dish:
-
4 Chicken Breasts
Tender and juicy, boneless chicken breasts are perfect for soaking up all that creamy goodness. If you’re a fan of dark meat, feel free to swap in chicken thighs for a richer flavor! -
4 Cloves Garlic, Minced
Garlic is the star of this recipe! Don’t be shy; use fresh minced garlic for that amazing aroma. If you’re in a pinch, pre-minced garlic in a jar works too, but fresh is always better. -
1 Cup Heavy Cream
This is where the magic happens! Heavy cream adds a silky texture to the sauce. For a lighter version, you can substitute with half-and-half or a rich coconut milk, although the flavor will slightly vary. -
1 Cup Grated Parmesan Cheese
Parmesan adds that wonderful salty, nutty flavor. Feel free to swap in Pecorino Romano for a sharper taste or nutritional yeast for a dairy-free alternative. -
2 Tablespoons Olive Oil
This is essential for searing your chicken and adding flavor. You can use other oils like avocado or canola, but olive oil’s flavor profile adds a nice touch. -
Salt and Pepper to Taste
These two are your best friends in the kitchen, elevating every dish. Always taste as you go—you might want more seasoning than you think! -
Chopped Parsley for Garnish
A sprinkle of fresh parsley adds a pop of color and freshness. Fresh chives or basil also make an inviting alternative!
Making sure you have these ingredients ready will ensure a smooth cooking process. Are you excited yet? Let’s dive into the cooking!
Step-by-Step Instructions
-
Prep Your Ingredients
Start by gathering all your ingredients and placing them within reach. Mince your garlic, chop the parsley, and if you haven’t, pat your chicken breasts dry with a paper towel. This will help with that lovely golden crust when you sear them. -
Season the Chicken
Sprinkle salt and pepper generously over both sides of the chicken breasts. Imagine you’re in your favorite restaurant, and you want each bite to pack a punch! Allow your seasoned chicken to sit while you heat your skillet. -
Sear the Chicken
Heat the olive oil in a large skillet over medium-high heat. Once it’s shimmering (but not smoking), add the chicken breasts. Sear each side for about 5-7 minutes until they turn a gorgeous golden brown. Resist the urge to move them too much—let that crust form! -
Add the Garlic
Once your chicken is beautifully seared and cooked through, remove it from the skillet and set it aside on a plate. In the same skillet, lower the heat to medium and toss in the minced garlic. Sauté for about 30 seconds until fragrant—be careful not to let it burn since burnt garlic can be bitter. -
Pour in the Cream
Now it’s time to bring that creamy goodness to life! Pour the heavy cream into the skillet, stirring to combine with the garlic-infused oil. Bring it to a gentle simmer, and watch as it transforms into a luscious sauce. -
Add the Parmesan
Gradually whisk in the grated parmesan cheese, continuing to stir until it melts and blends seamlessly into the cream. This will take about 2-3 minutes. If your sauce is too thick, a splash of chicken broth or water can help adjust the consistency. -
Return the Chicken
Nestle the chicken breasts back into the skillet, spooning the creamy sauce over them. Let everything simmer together for about 2-3 more minutes to heat through and allow the chicken to absorb that heavenly garlic flavor. -
Finish with Parsley
Remove from heat and stir in about half of the parsley. Reserve the rest for garnish. -
Taste and Adjust
Give your creamy garlic chicken a taste! Adjust the seasoning with more salt and pepper if necessary.
That’s it! So simple, yet so satisfying. Your kitchen should smell heavenly by now!
Serving Suggestions
To plate this scrumptious creamy garlic chicken, start with a generous scoop of the creamy sauce on the bottom of each plate. Lay the chicken breasts on top, allowing that luscious sauce to cascade around them. For a pop of color, sprinkle some chopped parsley on top, creating a vibrant contrast against the creamy backdrop.
Pair your masterpiece with some perfectly sautéed veggies or a bed of fluffy mashed potatoes to soak up the sauce. If you’re feeling adventurous, garlic bread on the side is a must for those gill-and-sop rituals! A crisp green salad dressed in a light vinaigrette complements the richness of the dish beautifully.
Recipe Variations
Get ready to shake things up with some fun variations!
-
Spicy Garlic Chicken: Add a sprinkle of red pepper flakes while sautéing the garlic for a bit of heat, or drizzle in some sriracha to give your dish a kick.
-
Mushroom Chicken: Sauté sliced mushrooms with the garlic for added earthiness and texture. They soak up that delicious sauce like little sponges!
-
Lemon Herb Twist: For a brighter flavor, add a squeeze of fresh lemon juice and zest to the cream just before serving. Fresh basil would also work wonders for a refreshing herbal twist.
-
Vegetable Medley: Incorporate seasonal veggies like spinach, peas, or sun-dried tomatoes into the sauce for added nutrition and color.
-
Easy Gluten-Free Option: Swap in a gluten-free pasta if you want a creamy garlic chicken over a nest of noodles—perfect for a comforting, hearty meal!
Chef’s Notes
As a chef, nothing makes me smile quite like the transformative power of cooking. This creamy garlic chicken has traveled with me through many kitchens and evolved into my own hearty masterpiece. Over the years, I’ve played with flavors, adjusting garlic levels and swapping different cheeses based on what’s in the fridge. But one thing remains constant—the love I pour into every dish.
Just last week, I made this exact recipe for a gathering, and my friend’s kid declared it “the best chicken ever!” That’s the ultimate compliment, isn’t it? Cooking should always be about joy, whether you’re trying something new or creating a family tradition.
FAQs and Troubleshooting
-
What if my sauce is too thick?
If your sauce turns out thicker than you’d like, simply whisk in a splash of chicken broth or water until you reach the desired consistency. -
Can I use chicken tenders instead of breasts?
Absolutely! Chicken tenders will cook quicker, so adjust your cooking time accordingly, searing for about 3-4 minutes on each side. -
What if I don’t have parmesan?
No worries! You can use any hard cheese, or even cream cheese for a different taste. Nutritional yeast is a great substitute if you’re looking for a dairy-free option. -
How do I store leftovers?
This chicken holds up wonderfully! Let it cool completely, then transfer to an airtight container in the fridge for up to 3-4 days. Reheat gently on the stove with a splash of cream to bring back that creamy texture.
Nutritional Info
Serving Size: 1 Chicken Breast with Sauce
Calories: Approximately 450
Fat: 32g
Carbohydrates: 4g
Protein: 38g
Fiber: 0g
This is a hearty meal that offers a nice balance of proteins and fats; you can indulge while also feeling satisfied!
Final Thoughts
And there you have it, folks! Creamy Garlic Chicken is more than just a recipe; it’s a cozy creation filled with flavors and memories that bring people together. Whether you’re gathering friends for a feast or just whipping up dinner for yourself, this dish is sure to make your heart happy and your belly full.
I hope you’ve enjoyed cooking along with me today! Don’t forget to share your own experiences and tweaks—cooking is all about making it your own. I absolutely love seeing how you put your spin on my recipes! Until next time, keep your kitchen filled with laughter, love, and of course, lots of delicious food. Happy cooking, friends! 🥄✨
Print
Creamy Garlic Chicken
- Total Time: 40 minutes
- Yield: 4 servings 1x
- Diet: None
Description
A soul-warming dish with creamy, garlicky goodness that’s perfect for any occasion.
Ingredients
- 4 Chicken Breasts
- 4 Cloves Garlic, Minced
- 1 Cup Heavy Cream
- 1 Cup Grated Parmesan Cheese
- 2 Tablespoons Olive Oil
- Salt and Pepper to Taste
- Chopped Parsley for Garnish
Instructions
- Prep Your Ingredients: Start by gathering all your ingredients and placing them within reach. Mince your garlic, chop the parsley, and pat your chicken breasts dry with a paper towel.
- Season the Chicken: Sprinkle salt and pepper generously over both sides of the chicken breasts. Allow to sit while heating the skillet.
- Sear the Chicken: Heat olive oil in a large skillet over medium-high heat. Sear each side of the chicken for about 5-7 minutes until golden brown.
- Add the Garlic: Remove chicken and sauté minced garlic in the skillet for about 30 seconds until fragrant.
- Pour in the Cream: Add heavy cream to the skillet, stirring to combine with garlic-infused oil and bring to a gentle simmer.
- Add the Parmesan: Gradually whisk in grated parmesan cheese, stirring until melted and blended. Adjust consistency if needed.
- Return the Chicken: Nestle chicken breasts back into the skillet, spooning the sauce over them and letting them simmer together for 2-3 minutes.
- Finish with Parsley: Remove from heat and stir in half of the parsley, reserving the rest for garnish.
- Taste and Adjust: Give your creamy garlic chicken a taste and adjust seasoning if necessary.
Notes
Serve with sautéed veggies or mashed potatoes to soak up the sauce. Garlic bread on the side is a must!
- Prep Time: 10 minutes
- Cook Time: 30 minutes
- Category: Main Course
- Method: Searing
- Cuisine: American
Nutrition
- Serving Size: 1 chicken breast with sauce
- Calories: 450
- Sugar: 1g
- Sodium: 700mg
- Fat: 32g
- Saturated Fat: 16g
- Unsaturated Fat: 12g
- Trans Fat: 0g
- Carbohydrates: 4g
- Fiber: 0g
- Protein: 38g
- Cholesterol: 100mg
Keywords: chicken, creamy, garlic, comfort food, easy recipe

Brown Sugar Garlic Chicken Breasts
Brown Sugar Garlic Chicken Breasts: A Flavorful Delight
Hey there, food lovers! If you’re anything like me, you know that sometimes the simplest recipes pack the biggest punch. Today, we’re diving into a flavorful dish that’s sure to become a staple in your kitchen: Brown Sugar Garlic Chicken Breasts. This dish is all about that sweet-and-savory magic that makes your taste buds dance and your heart sing.
Picture this: it’s a bustling weekday evening, the kids are outdoors, and you’re searching for something easy yet delicious to whip up for dinner. You open your fridge and spot those beautiful chicken breasts just waiting for a little love. That’s when the idea strikes you—why not glaze them with a delightful mix of brown sugar and garlic? In under 30 minutes, you’ll have a meal that’ll make everyone feel like they’re dining in a five-star restaurant (and you’re the chef, of course!).
This recipe marries succulent chicken with a glossy, mouthwatering glaze that’s perfect when served with something simple like rice or a fresh green salad. But don’t worry—I’ll walk you through it step by step, leaving you with plenty of chef tips and hacks to make your cooking experience as enjoyable as a Sunday brunch with friends.
So, grab your apron, roll up those sleeves, and let’s dive into the delicious world of Brown Sugar Garlic Chicken Breasts!
Personal Story
Let me take you back to my childhood. I vividly remember the weekends spent at my grandmother’s house, where the air was always filled with sensational smells that made your stomach rumble. One of her all-time favorites was a sticky-sweet chicken dish that had us lining up at the table before it even hit the plate.
As we gathered around the dinner table, the laughter flowed just as freely as the sauces that glistened on the chicken. My grandma had a way of making every meal feel like a festive celebration. She would tell stories about her childhood while encouraging us to try new flavors. The best part? We all had a hand in cooking, whether it was stirring a pot or measuring out spices. Those moments taught me that food was more than just something to eat; it was about connection, love, and sharing life together.
Fast forward to today, and I find myself recreating that nostalgic dish with a twist. This Brown Sugar Garlic Chicken recipe hits all those nostalgic notes but with my personal flair. I can’t wait for you to share it with your loved ones and create your own batch of cherished memories. Let’s get cooking!
Ingredients
Here’s what you’ll need for this delicious Brown Sugar Garlic Chicken Breasts recipe:
-
4 chicken breasts
Tip: Look for breasts that are similar in size for even cooking. Boneless, skinless chicken thighs can be a tasty substitute! -
1/4 cup brown sugar
Insight: Brown sugar gives that rich sweetness along with a little moisture. You can also use coconut sugar for a healthier alternative. -
2 cloves garlic, minced
Tip: Fresh garlic is best, but if you’re in a pinch, garlic powder (1/2 teaspoon per clove) works too. -
2 tablespoons soy sauce
Insight: This adds depth to the dish. You can use low-sodium soy sauce or tamari for a gluten-free option. -
1 tablespoon olive oil
Tip: Olive oil adds a lovely richness. Feel free to swap in sesame oil for a different flavor profile! -
Salt and pepper to taste
Insight: Always remember to season your chicken! A pinch of pepper does wonders for flavor.
These ingredients come together beautifully to create a dish that’s not only quick and simple but also bursting with flavor. Now, let’s move on to the fun part—cooking!
Step-by-Step Instructions
Follow these steps, and you’ll have a glorious meal in no time!
-
Preheat Your Oven
First things first, preheat your oven to 400°F (200°C). This ensures that when we pop those chicken breasts in, they’ll start cooking evenly right away. No one likes a soggy chicken, right? -
Prepare the Marinade
In a small bowl, combine the brown sugar, minced garlic, soy sauce, and olive oil. Mix those ingredients well until you have a nice, gooey marinade. The sugar will caramelize beautifully as it cooks, giving the chicken that delicious shine. -
Season Your Chicken
Pat the chicken breasts dry with paper towels. This is key! Dry chicken gets that beautiful sear. Season both sides generously with salt and pepper. Imagine you’re giving them a little flavor hug before they take the plunge into the oven! -
Marinate the Chicken
Place the chicken breasts in a baking dish and pour that luscious marinade over them. Make sure each piece is well-coated. Let them sit for about 15-20 minutes. If you have time, let them marinate longer for an extra flavor infusion. But if you’re short on time—no stress, it’ll still be fabulous! -
Bake to Perfection
Pop the dish into the preheated oven. Set a timer for 20-25 minutes. The chicken is ready when it reaches an internal temperature of 165°F (75°C). If you want that caramelization to really shine, switch to broil for the last 2-3 minutes. Just keep an eye on it; we don’t want a burnt offering! -
Rest Before Serving
Once cooked, remove the chicken from the oven and let it rest for about five minutes. This is crucial for retaining juice. Cutting into it too soon? That’s a rookie mistake! -
Plate and Serve
Slice the chicken against the grain (this makes for tender bites), drizzle the remaining glaze from the baking dish on top, and voilà! Dinner is served!
There you have it—simple yet impressive!
Serving Suggestions
When it comes to serving Brown Sugar Garlic Chicken Breasts, let your creativity shine! Here are some delightful ideas:
-
Over a Bed of Rice: Serve the chicken on a plate of fluffy jasmine or basmati rice. Pour some of that delectable glaze over everything for a meal that screams comfort.
-
With Steamed Vegetables: Pair it with steamed broccoli or green beans tossed in a bit of sesame oil for a beautiful color contrast and nutritional boost.
-
Wrap It Up: Take some of the sliced chicken, add it to a tortilla with fresh veggies, avocado, and a squeeze of lime for a quick and tasty wrap.
-
On a Salad: For a lighter option, toss the warm chicken slices over a fresh salad with mixed greens, cherry tomatoes, and a simple vinaigrette.
Get ready for compliments, because your presentation will leave everyone raving!
Recipe Variations
The beauty of Brown Sugar Garlic Chicken is its versatility. Here are a few variations that can spice things up a bit:
-
Spicy-Sweet: Add a teaspoon of red pepper flakes or a dash of hot sauce to the marinade for those who like to spice things up!
-
Citrus Twist: Squeeze the juice of one lime or orange into the marinade for a fresh flavor. Zest that lime or orange, too—those little bits pack a punch!
-
Herb-Infused: Toss in some fresh herbs like thyme or rosemary to the glaze before baking. The aromatic herbs elevate the dish beautifully.
-
Pineapple Addition: Add pineapple rings in the baking dish during the last ten minutes of cooking. They’ll soak up the glaze and add a sweet twist!
-
Honey-Garlic Chicken: Swap the brown sugar for honey for a different sweet flavor. It’s equally delicious and has its own unique charm!
The potential is endless! Why not gather some friends and each make a different version for a tasting night?
Chef’s Notes
Over the years, I’ve tinkered with this Brown Sugar Garlic Chicken recipe quite a bit—experimenting with different flavors and cooking methods. I remember one time in college, I didn’t measure anything. I thought, “How hard can it be?” Well, let’s just say the fire alarm went off, and I became the laughingstock of my dorm!
But you know what? Mistakes in the kitchen often turn into the best learnings. That’s how I came up with the citrus twist version. Trying to salvage a burnt bottom led to a surprisingly delicious discovery! So don’t be afraid to get a little creative in the kitchen.
FAQs and Troubleshooting
Let’s go through a few common questions you might have while making this dish:
-
Why is my chicken dry?
Make sure you’re not overcooking it; always use a meat thermometer! Cooking it lengthy or at too high of a temperature can lead to dryness. -
What if my glaze didn’t thicken?
If your glaze is too runny, feel free to transfer it to a saucepan and simmer it on the stovetop while stirring. It’ll thicken right up! -
Can I use frozen chicken?
While it’s possible, I recommend thawing your chicken first for even cooking. If using straight from the freezer, adjust the cooking time accordingly. -
How do I store leftovers?
Store any leftovers in an airtight container in the fridge. They’ll keep well for up to three days—just reheat gently in the oven or microwave.
Nutritional Info
This recipe is packed with flavors, but what about the nutrition? Here’s a rough idea of the nutritional breakdown per serving (based on 4 servings):
- Calories: 275
- Protein: 32g
- Fat: 10g
- Carbohydrates: 16g
- Fiber: 0g
- Sugar: 10g
Feel free to adjust or pair with a healthy side to make a fuller meal balanced to your dietary needs!
Final Thoughts
And there you have it! Brown Sugar Garlic Chicken Breasts that are not only quick and easy but packed with flavor and nostalgic charm. I hope this recipe brings joy to your kitchen and warmth to your dining table, just like it does for me. The best part of cooking is sharing your creations, so I’d love to hear how it turns out for you!
As you embark on this culinary adventure, remember to make it your own and to always cook with love. Whether you’re cooking for a crowd or just a quiet dinner for yourself, this dish is sure to become a cherished part of your culinary repertoire. Happy cooking, and may your meals continue to bring people together—just like a warm hug!
Now, who’s ready to dig in?
Enjoy making this delightful dish, and don’t forget to invite your loved ones to join you at the table. Bon appétit!
Print
Brown Sugar Garlic Chicken Breasts
- Total Time: 40 minutes
- Yield: 4 servings 1x
- Diet: Gluten-Free
Description
A flavorful dish that marries succulent chicken with a glossy, mouthwatering glaze of brown sugar and garlic, perfect for a quick weeknight dinner.
Ingredients
- 4 chicken breasts
- 1/4 cup brown sugar
- 2 cloves garlic, minced
- 2 tablespoons soy sauce
- 1 tablespoon olive oil
- Salt and pepper to taste
Instructions
- Preheat your oven to 400°F (200°C).
- Combine the brown sugar, minced garlic, soy sauce, and olive oil to create a marinade.
- Pat the chicken breasts dry and season both sides with salt and pepper.
- Place the chicken breasts in a baking dish and pour the marinade over them, allowing them to marinate for about 15-20 minutes.
- Bake in the preheated oven for 20-25 minutes until the chicken reaches an internal temperature of 165°F (75°C).
- Remove from the oven and let rest for 5 minutes before slicing.
- Serve with the remaining glaze.
Notes
For variations, try adding red pepper flakes for heat, a splash of citrus, or fresh herbs for added flavor.
- Prep Time: 15 minutes
- Cook Time: 25 minutes
- Category: Main Course
- Method: Baking
- Cuisine: American
Nutrition
- Serving Size: 1 serving
- Calories: 275
- Sugar: 10g
- Sodium: 400mg
- Fat: 10g
- Saturated Fat: 1.5g
- Unsaturated Fat: 8.5g
- Trans Fat: 0g
- Carbohydrates: 16g
- Fiber: 0g
- Protein: 32g
- Cholesterol: 70mg
Keywords: chicken, garlic, brown sugar, easy recipe, quick dinner, glaze