
Minute Cucumber Guacamole Bites for Summer Entertaining
Cucumber Guacamole Appetizer Bites: A Refreshing Twist on a Classic Favorite
Hey there, foodie friends! 🌟 Today, I’m super excited to share one of my absolute favorite appetizers that’s not only easy to make but also packs a punch of flavor and freshness. I’m talking about Cucumber Guacamole Appetizer Bites! If you’re looking for a light, refreshing treat that’ll impress your guests (or just provide the perfect snack while binge-watching your favorite show), you’ve found it!
Picture this: a sunny afternoon gathering with friends on the patio, laughter filling the air, and the aroma of delicious food wafting through the breeze. You reached into the fridge and pulled out some creamy guacamole—because, let’s be honest, who doesn’t love guac? Now, instead of the usual tortilla chips, imagine crisp slices of European cucumber topped with that velvety goodness. Sounds heavenly, right? This dish combines simplicity with sophistication. Not only is it packed with wholesome ingredients, but it also looks like it’s straight out of your favorite bistro’s menu.
You don’t have to be a culinary expert to whip up these gorgeous bites. Seriously, if you can slice a cucumber and scoop some guacamole, you’re halfway there! Plus, the beauty of this dish is that it can be customized to fit any occasion or dietary preference. Whether you’re hosting a summer gathering, having a cozy date night, or just need a mid-afternoon snack, Cucumber Guacamole Appetizer Bites are here to save the day and delight your taste buds.
So, grab your apron and let’s dive into this deliciously fresh recipe that will surely become a staple in your kitchen!
A Nostalgic Twist on Creamy Goodness
Reflecting on my love for this recipe takes me back to the summer barbecues of my childhood. My grandparents had a stunning garden where they grew a variety of fruits and veggies, and, of course, cucumbers were always plentiful. They had this secret recipe for guacamole that was like no other—spicy, creamy, and oh-so-delicious. While my family would devour heaps of chips and guacamole, it was my imaginative cousin who decided to use cucumbers as a base instead. Watching her compose those little appetizer bites was pure magic.
From that moment, the combination of creamy guacamole and crisp cucumber became a summertime staple in our family. Not only did it add a light, refreshing crunch, but it also meant everyone could enjoy the snack without overindulging. Whether I was helping my cousin slice cucumber rounds or sneaking bites of guac before it ever made it to the table, those memories are forever etched in my heart. It’s amazing how simple ingredients can create such powerful memories and experiences. And that’s why I’m so excited to share this recipe with you! Let’s keep the tradition alive and bring some laughter and flavor into our kitchens.
Ingredients
Here’s what you’ll need to make these delightful Cucumber Guacamole Appetizer Bites. I’ll also throw in some quick insights for each ingredient!
-
1 large European cucumber: The star of the show! European cucumbers are ideal because they have fewer seeds and a thinner skin. If you can’t find one, you can substitute with regular cucumbers, just consider peeling them if you want a less bitter taste.
-
1 cup guacamole: Feel free to use store-bought or make your own homemade version! If you want to customize it, try adding diced tomatoes, jalapeños for some heat, or even a squeeze of lime for a zesty pop!
-
Chili powder (or Tajin seasoning): To sprinkle on top, adding a hint of spice and color. If you want something milder, a sprinkle of paprika or even just salt will do the trick.
Step-by-Step Instructions
Alright, let’s get down to the good stuff—making these beauties! Follow these detailed steps, and you’ll have a platter of Cucumber Guacamole Appetizer Bites ready in no time.
Step 1: Prepare the Cucumber
-
Slice your cucumber: Using a sharp knife, slice your European cucumber into rounds about ½ inch thick. This thickness gives them a satisfying crunch and provides a sturdy base for the guacamole.
-
Tip: If you want a bit of color, you can use a peeler to create stripes on the cucumber! Just run it down the length in a pattern, alternating between peeling and leaving the skin intact. Not only does it look fancy, but it also adds some visual flair to your dish.
Step 2: Make or Use Guacamole
-
If you’re going homemade: Start with ripe avocados. Cut them in half, remove the pits, and scoop the flesh into a bowl. Mash them with a fork or a potato masher until they reach your desired creaminess. Mix in lime juice, salt, diced onion, garlic powder, cilantro, and jalapeños as desired.
-
If using store-bought: Take that guacamole out of the fridge and give it a good stir! It’s always nice to add a few extras like fresh cilantro or a splash of lime juice for an elevating touch.
Step 3: Assemble the Bites
-
Scoop the guac: Use a spoon or a piping bag (fancy, huh?) to dollop or pipe a generous scoop of guacamole onto each cucumber round. Don’t be shy—this is the star flavor we want to shine!
-
Tip: If you’re planning to prepare these ahead of time, just assemble the cucumber and keep the guacamole separate until serving. It’ll maintain that fresh, vibrant color, and no browning will occur!
Step 4: Add Your Seasoning
-
Sprinkle it: To finish off these beauties, sprinkle a touch of chili powder or Tajin seasoning atop each bite. This adds a pop of color and a delightful kick!
-
Tip: Feel free to get creative! You could even add a small slice of jalapeño on top for an extra spicy bite.
Serving Suggestions
To serve these crisp, creamy trailers of joy, place them on a decorative platter, alternating between cucumber and guacamole to create a lovely visual arrangement. Garnishing with fresh cilantro leaves or a sprinkle of additional seasoning not only adds beauty but also a final touch of flavor.
These bites are perfect for any occasion—an appetizer for a garden party, snacks for a movie night, or even a light meal on a hot day. Pair them with fresh tortilla chips, margaritas, or your favorite beverage and you’ll have everything you need for a delightful gathering.
Recipe Variations
Here are some creative twists you can make to this recipe, just to keep things exciting:
-
Roasted Garlic Guacamole: Add roasted garlic into your guacamole for a rich and savory flavor.
-
Herbed Cream Cheese Spread: Swap guacamole for a creamy goat cheese or herbed cream cheese for a different but equally delicious topping!
-
Add Ins: For a bit of zing, incorporate diced tomatoes or mango into your guacamole for a sweet and tangy flavor burst.
-
Spicy Salsa: Instead of guacamole, top with your favorite salsa for a fresh, zippy option!
-
Veggie Wraps: Roll these cucumber bites with strips of bell pepper or carrots for added crunch and color—perfect for a summer picnic!
Chef’s Notes
Just a little secret here—I’ve been known to nibble on the leftovers of this dish way too many times! It’s a great post-workout snack or a guilty pleasure when you need a midday pick-me-up.
I’ve also experimented with varying levels of seasoning, so don’t be afraid to play it by ear! If you have a couple of friends who prefer something spicier or milder, aluminum foil can help keep some of the bites mild while the others pack a punch.
FAQs and Troubleshooting
-
Can I prepare these in advance?
- Absolutely! Just prepare the cucumber and guacamole separately. Assemble them right before serving for the best flavor and freshness.
-
What if my guacamole turns brown?
- Don’t panic! If you’ve made too much guacamole, just add a sprinkle of lime juice over the surface before covering it with plastic wrap to help prevent browning.
-
Can I use different types of cucumbers?
- Sure! Regular cucumbers work, but you might want to peel them to reduce bitterness and make them more appealing.
-
What’s the best way to store leftovers?
- If you have leftover cucumber rounds, store them in a sealed container in the fridge. Guacamole can be stored separately with plastic wrap pressed against its surface to prevent browning.
Nutritional Info
Let’s talk about how deliciously healthy these beauties are! Each Cucumber Guacamole Appetizer Bite is low in calories and packed with nutritious goodness.
On average, one cucumber slice topped with guacamole contains:
- Calories: ~50
- Carbohydrates: ~6g
- Healthy fats: ~4g (thanks to the avocado)
- Fiber: ~2g (cucumbers are surprisingly high in fiber!)
- Vitamins: Rich in Vitamin K, C, and E
These bites make for a guilt-free party snack, so feel free to enjoy them without holding back!
Final Thoughts
And there you have it, friends—Cucumber Guacamole Appetizer Bites that will transform any gathering into a flavor-packed fiesta! While these bites are undeniably simple, they remind us that the best meals usually come from the heart and highlight fresh, wholesome ingredients.
Whether you’re reminiscing about your own childhood memories in the kitchen, entertaining friends, or just feeding your cravings, I hope this recipe becomes a delightful addition to your culinary repertoire. Let’s keep the love of good food alive. Grab those cucumbers and guacamole, and let’s make some tasty memories! Happy cooking! 🍽️
Print
Cucumber Guacamole Appetizer Bites
- Total Time: 10 minutes
- Yield: 4 servings 1x
- Diet: Vegetarian
Description
A light and refreshing appetizer featuring crisp cucumber rounds topped with creamy guacamole.
Ingredients
- 1 large European cucumber
- 1 cup guacamole
- Chili powder (or Tajin seasoning) for garnish
Instructions
- Slice your cucumber into rounds about ½ inch thick.
- Make or use store-bought guacamole, mixing in lime juice and desired extras.
- Scoop a generous amount of guacamole onto each cucumber round.
- Sprinkle chili powder or Tajin seasoning on top of each bite.
Notes
These bites can be prepared ahead of time if you keep the guacamole separate until serving.
- Prep Time: 10 minutes
- Cook Time: 0 minutes
- Category: Appetizer
- Method: No-Cook
- Cuisine: Mexican
Nutrition
- Serving Size: 1 serving
- Calories: 50
- Sugar: 1g
- Sodium: 150mg
- Fat: 4g
- Saturated Fat: 0.5g
- Unsaturated Fat: 3g
- Trans Fat: 0g
- Carbohydrates: 6g
- Fiber: 2g
- Protein: 1g
- Cholesterol: 0mg
Keywords: cucumber bites, guacamole, appetizer, vegetarian snack, healthy snacks
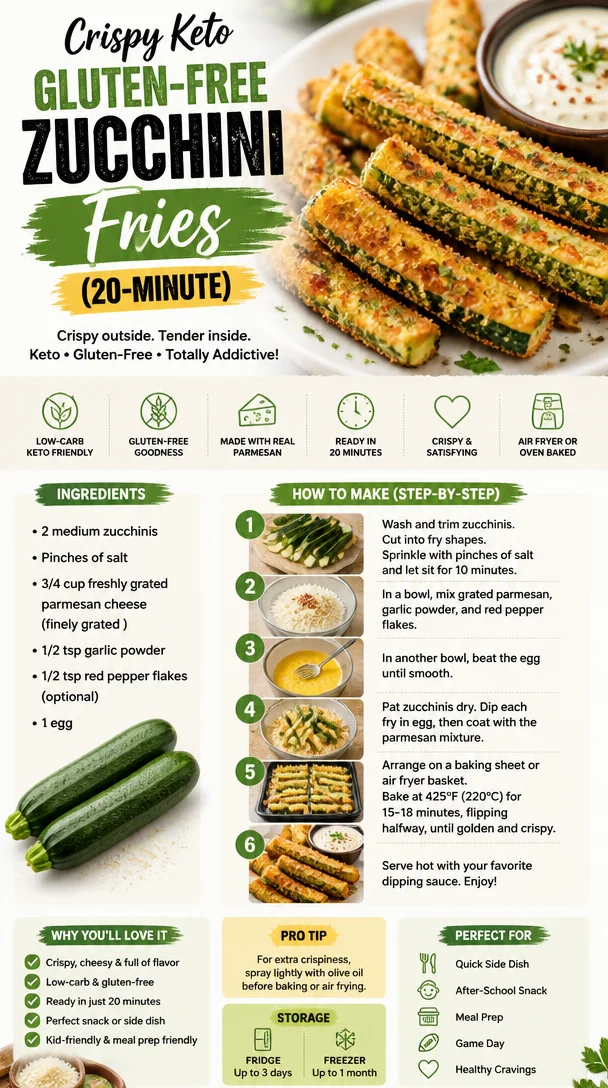
Crispy Keto Gluten-Free Zucchini Fries (20-Minute)
Zesty Keto Gluten-Free Zucchini Fries: A Delicious Journey
Hey there, fellow foodies, and welcome to the scrumptious world of Feastical! Today, we are diving into a dish that’s not only a crowd-pleaser but also a healthy option for those watching their carb intake: Keto Gluten-Free Zucchini Fries. These little green wonders are crispy on the outside, tender on the inside, and bursting with flavor that will make your taste buds dance.
Now, I have to tell you, I am beyond excited to share this recipe with you, not just because it’s a delicious treat, but also because it has a special place in my heart. Let’s roll up our sleeves and create something beautiful, shall we?
Personal Story: When Zucchini Ruled the Summer Kitchen
Growing up, summer was my favorite season, not just for the sunshine and long vacations but also for the abundance of fresh veggies from our garden. Zucchini was the star of the show! I remember those summer afternoons when the sun was setting just right, casting a golden hue over our backyard as my family gathered to enjoy a meal. My mom would whip up all sorts of dishes, but her zucchini fries were a standout. She’d slice those zucchinis into planks, coat them in an ultra-satisfying mix of Parmesan and spices, and send them off to the oven.
As we gathered around the table, the smell of crispy zucchini wafting through the air, we’d all eagerly await the first bite. They were always a hit—golden and crunchy, with that perfect cheesy finish. Zucchini fries became not just a dish but a cherished memory of laughter, stories, and good times with those I loved. Now, I’m thrilled to do my own twist on this classic for my fellow health-conscious friends. Let’s delve into making these keto-friendly and gluten-free!
Ingredients: The Good Stuff
Before we get cooking, let’s gather our ingredients. Here’s what you’ll need:
-
2 medium zucchinis: Choose firm and fresh zucchinis. If you can’t find zucchini, yellow squash works too! They’re both delightfully tender and make for equally crispy fries.
-
Pinches of salt: Salt draws out moisture and enhances flavor. Adjust the amount to your taste, or use a low-sodium alternative if that’s your jam.
-
3/4 cup freshly grated Parmesan cheese: Freshly grated works best for a wonderful melt and crispiness. If you’re looking for a dairy-free option, nutritional yeast can provide a cheesy flavor too.
-
1/2 tsp garlic powder: This adds a savory kick! Fresh minced garlic can also be used for a bolder flavor, but be cautious to use less since it can overpower the dish.
-
1/2 tsp red pepper flakes (optional): If you fancy a touch of heat, sprinkle this in! If spice isn’t your thing, feel free to skip it.
-
1 egg: This acts as a binder for your zucchini fries to keep everything together. For a vegan option, aquafaba (the liquid from canned chickpeas) works wonderfully too.
Step-by-Step Instructions: Let’s Get Cooking!
-
Preheat Your Oven: Start by heating your oven to 425°F (220°C). A hot oven is crucial for crispy fries. Meanwhile, line a baking sheet with parchment paper for easy cleanup.
-
Prep the Zucchini: Rinse and dry your zucchinis thoroughly. Cut off both ends, and then slice them into uniform planks (about 1/4 inch thick). The more even they are, the more consistent your cooking will be.
-
Salt the Zucchini: Place the zucchini planks in a bowl and sprinkle with salt. Let them sit for about 10-15 minutes. This step is essential—it draws out excess water, which helps achieve that golden crunch.
-
Make Your Coating: In a shallow bowl or plate, mix together the grated Parmesan cheese, garlic powder, and red pepper flakes. This cheesy mixture is what will create the crispy coating we all love.
-
Prepare the Egg Wash: In another bowl, beat the egg until it’s frothy. This will help the Parmesan adhere to our zucchini.
-
Pat Dry: After the zucchinis have sat in salt, pat them dry with paper towels to remove moisture. This is a little chef hack for keeping them crispy!
-
Coat the Zucchini: Dip each zucchini plank first into the egg wash, allowing any excess to drip off, then roll it into the Parmesan mixture. Make sure they’re fully coated!
-
Arrange on the Baking Sheet: Lay the coated zucchini fries in a single layer on the prepared baking sheet. Avoid overcrowding; you want air to circulate around each fry for maximum crispiness!
-
Bake Away: Pop your baking sheet in the preheated oven and bake for 20–25 minutes or until they are golden brown and crispy. Flip halfway through for even cooking.
-
Cool and Serve: Once they’re out of the oven, let them cool for a few minutes. Trust me, the wait will be worth it as they firm up and get even crispier!
Serving Suggestions: How to Plate Your Fries
Now that your Zucchini Fries are just out of the oven, it’s time to showcase your creation! Grab a large plate or a rustic wooden board for that lovely presentation.
Arrange the fries in a vertical or fan style for an eye-catching look. You can even sprinkle some extra Parmesan on top for that “wow” factor.
And let’s not forget dipping sauces! A homemade garlic aioli or a tangy marinara on the side would complement these fries beautifully. You want everyone at the table to feel invited to grab a fry and enjoy the experience. Visual appeal is just as important as taste, so have fun with it!
Recipe Variations: Get Creative!
One of the best parts of cooking is experimenting! Here are a few fun twists you can try to keep the flavors exciting:
-
Herb-Infused: Add dried herbs like oregano, parsley, or Italian seasoning into the Parmesan mixture for an herby touch. Fresh herbs work too but may not adhere as well.
-
Spicy Sriracha Glaze: Brush your zucchini fries with a bit of sriracha before baking for a hot and tangy flavor. You can also drizzle sriracha over the finished product for extra heat!
-
Bacon-Bit Boost: For a meatier option, sprinkle some crispy bacon bits into the coating mixture. The added flavor makes it indulgent while still keeping it keto-friendly.
-
Cheesy Vegan Option: Replace Parmesan with vegan cheese or nutrient-dense cashew cheese for a completely dairy-free experience while keeping it satisfying.
-
Zucchini-Corn Hybrid: Add in some fresh cornmeal to the coating for extra crunch and a slightly sweet flavor. This may not be strictly keto, but a little modification is allowed when aiming for deliciousness!
Chef’s Notes: My Thoughts in the Kitchen
As a chef who thrives on creativity, I’ve seen recipes evolve over time. This zucchini fries recipe is a fantastic blank canvas. What started as a simple summer staple has now turned into a versatile dish that accommodates various diets and personal tastes.
Whenever I whip these up and serve them to friends, I enjoy watching the joy on their faces as they take that first crispy bite. It’s like a little piece of nostalgia wrapped in deliciousness! No doubt, you’ll find your own little twists over time. Don’t hesitate to let your personality shine through these fries!
FAQs and Troubleshooting
-
Why are my zucchini fries soggy?
If your fries are soggy, it might be because they weren’t salt-dried enough! Always give them that time to sit and remove excess moisture before breading. -
Can I use frozen zucchini?
While frozen zucchini can be convenient, it tends to be more watery. I recommend using fresh zucchini for the best results for that crispy texture. -
What can I use as a substitute for Parmesan?
Nutritional yeast or vegan cheese melt versions work great. You can also try using a blend of almond flour and nutritional yeast for a cheesy taste. -
How do I store leftover fries?
Store any leftovers in an airtight container in the fridge for up to 2 days. Reheat in the oven for a few minutes to regain that crispiness.
Nutritional Info
For those who are keeping a close eye on their macros, here’s a rough idea of the nutritional breakdown per serving (approximately 4 fries):
- Calories: 150
- Protein: 9g
- Fat: 11g
- Carbohydrates: 5g
- Fiber: 2g
These Zucchini Fries are not just a guilt-free indulgence, but they also offer health benefits from the fresh vegetables while keeping things keto and delicious!
Final Thoughts: Let’s Celebrate Food Together
There you have it! Your very own recipe for crispy, flavorful Keto Gluten-Free Zucchini Fries. I hope you enjoyed the journey from the garden to your kitchen as much as I love sharing these experiences. Cooking is about connection, creativity, and, most importantly, having fun!
So as you take your first bite, remember the warmth that good food brings to our lives. Gather your loved ones around the table, share some laughs, and celebrate the delicious moments together. Until our next kitchen adventure, happy cooking! Grab a fork, and enjoy those fries!
Stay tuned to Feastical for more wonderful recipes and stories that connect us through the art of cooking. Cheers!
Print
Zesty Keto Gluten-Free Zucchini Fries
- Total Time: 40 minutes
- Yield: 4 servings 1x
- Diet: Keto, Gluten-Free
Description
Crispy on the outside, tender on the inside, these keto-friendly and gluten-free zucchini fries are bursting with flavor, making them a delicious treat for your taste buds.
Ingredients
- 2 medium zucchinis
- Pinches of salt
- 3/4 cup freshly grated Parmesan cheese
- 1/2 tsp garlic powder
- 1/2 tsp red pepper flakes (optional)
- 1 egg
Instructions
- Preheat your oven to 425°F (220°C) and line a baking sheet with parchment paper.
- Prep the zucchini by rinsing, drying, and slicing into uniform planks (about 1/4 inch thick).
- Salt the zucchini planks and let them sit for about 10–15 minutes to draw out excess water.
- Make the coating by mixing the Parmesan cheese, garlic powder, and red pepper flakes in a shallow bowl.
- Prepare the egg wash by beating the egg in another bowl until frothy.
- Pat the zucchini dry with paper towels after salting.
- Coat each zucchini plank in the egg wash then roll it into the Parmesan mixture, ensuring full coverage.
- Arrange the coated zucchini fries in a single layer on the prepared baking sheet.
- Bake for 20–25 minutes or until golden brown and crispy, flipping halfway through.
- Cool for a few minutes before serving.
Notes
Serve with homemade garlic aioli or marinara for dipping. Explore variations by adding herbs or spices to the coating.
- Prep Time: 15 minutes
- Cook Time: 25 minutes
- Category: Appetizer
- Method: Baking
- Cuisine: American
Nutrition
- Serving Size: 4 fries
- Calories: 150
- Sugar: 2g
- Sodium: 300mg
- Fat: 11g
- Saturated Fat: 4g
- Unsaturated Fat: 5g
- Trans Fat: 0g
- Carbohydrates: 5g
- Fiber: 2g
- Protein: 9g
- Cholesterol: 70mg
Keywords: zucchini fries, keto recipe, gluten-free snack, healthy appetizer, low-carb
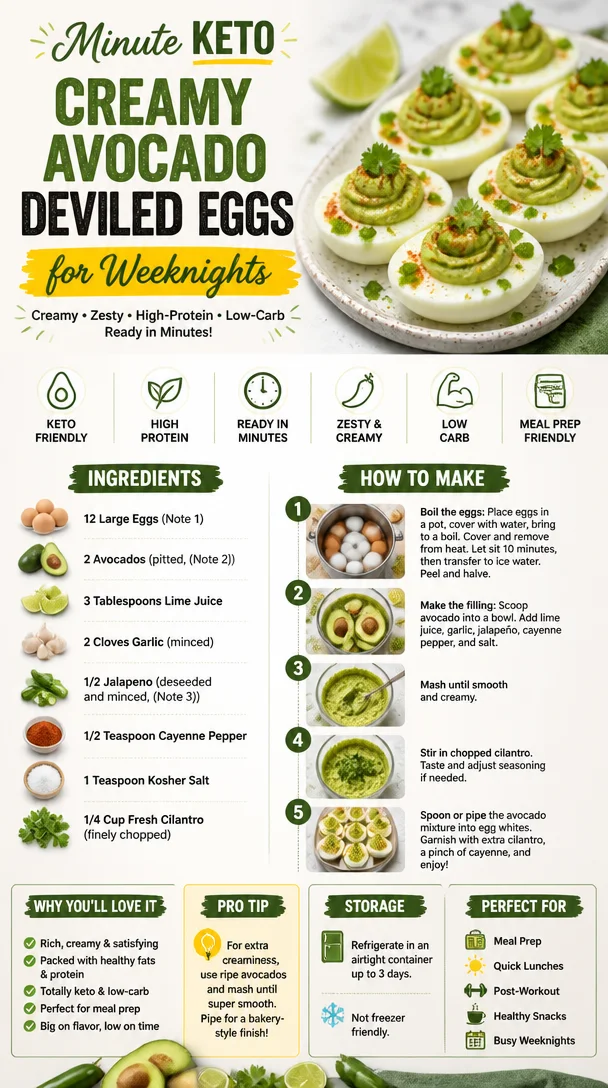
Minute Keto Creamy Avocado Deviled Eggs for Weeknights
Avocado Deviled Eggs: A Twist on a Classic!
Hey there, food lovers! Today, we’re diving into a recipe that’s not only packed full of flavor but also brings a healthy twist to a traditional favorite—Avocado Deviled Eggs! Imagine the creamy, rich texture of avocados blending beautifully with the classic deviled egg filling, all while adding a burst of color and nutrition.
Deviled eggs have long been a staple at gatherings, from potlucks to picnics, but they often find themselves swimming in a sea of mayo. What if I told you that you could whip up a batch that’s just as satisfying, but with the goodness of avocados instead? Trust me, this dish is bound to be a crowd-pleaser! Whether you’re serving these up for a holiday brunch, a summer BBQ, or just a chill weekend snack, they’re simple, fun, and utterly delicious.
Now, let me guide you through making the most scrumptious Avocado Deviled Eggs to impress your friends, family, or even just yourself! With vibrant flavors and a delightful texture, these beauties balance all the elements of a perfect appetizer. So roll up your sleeves and let’s make some magic in the kitchen!
A Delicious Memory
I still recall my first culinary love: deviled eggs at my grandmother’s Sunday brunches. As a kid, I would wiggle my way into the kitchen, eager to help her whip up these little treats. I remember standing on a stool, just tall enough to catch a peek at all the shenanigans in her bustling kitchen. Gran would always let me sprinkle the paprika on top, making me feel like a true chef.
Years later, I wanted to put a personal spin on her family recipe—something fresh that still held the nostalgia of those delightful gatherings. Avocados were my answer! They offered a creamy texture and healthy fats that turned classic deviled eggs into something new and exciting. So, here I am, happy to share this tasty twist with you. You’ll soon find that these avocadeo-packed delights might just become your new go-to recipe!
Ingredients
To create these Avocado Deviled Eggs, you’ll need the following ingredients:
-
12 Large Eggs
The base of our recipe! Use fresh eggs for better flavor and texture. If you need a quick protein boost, you can also opt for hard-boiled quail eggs! -
2 Avocados (pitted)
Creamy and nutritious, avocados provide a vibrant texture. If they’re a bit hard, just give them a day or two to ripen. In a pinch, Greek yogurt could be a healthier alternative! -
3 Tablespoons Lime Juice
This adds a zesty kick to your filling and prevents the avocado from browning. Fresh lime juice is best, but bottled is good too if that’s all you have. -
2 Cloves Garlic (minced)
Garlic brings depth and warmth to the dish. If you’re after something milder, roasted garlic works beautifully too! -
1/2 Jalapeno (deseeded and minced)
A little heat adds excitement! If you’re spice-averse, you can skip this or use a pinch of smoked paprika for a unique twist. -
1/2 Teaspoon Cayenne Pepper
This is optional but recommended for those who like a touch of spiciness. Adjust according to your heat preference! -
1 Teaspoon Kosher Salt
A must for enhancing flavors. Feel free to swap it out with sea salt or leave it out for a low-salt version. -
1/4 Cup Fresh Cilantro (finely chopped)
Adds lovely freshness and color. If cilantro isn’t your thing, swap it with chives or parsley for a different herbal dimension.
Step-by-Step Instructions
Now that we’ve got our ingredients ready, let’s jump into the fun part—making our Avocado Deviled Eggs!
-
Hard-Boil Your Eggs
Place the eggs in a pot and cover them with cold water. Bring the water to a gentle boil over medium heat. Once boiling, cover the pot and remove it from heat. Let the eggs sit for about 12-14 minutes. Transfer the eggs to an ice bath for a quick cool down. Chef Tip: Starting with room-temperature eggs can help minimize cracking! -
Peel Those Eggs
Once cooled, tap each egg gently on a hard surface and roll it to crack the shell. Under cool running water, carefully peel off the shells. Holding them under running water can help make peeling easier. Little hack: Older eggs peel more easily than fresh ones! -
Slice and Scoop
Now, cut each hard-boiled egg in half lengthwise. Scoop out the yolks into a bowl and set the whites aside. Tip: If you slightly angle your knife while cutting, you’ll get cleaner edges! -
Mix It Up
To the bowl with your egg yolks, add the pitted avocados, lime juice, minced garlic, jalapeño, cayenne pepper, and salt. Mash everything together with a fork until well combined and creamy. Chef Hack: A potato masher makes this task even easier! -
Taste Test
Give your mixture a taste! Adjust seasoning with more lime juice, salt, or spices as needed. This is where you get to personalize the flavor. -
Fill Those Whites
Using a spoon or a piping bag, fill each egg white half with the avocado mixture. If you want to be a little fancy, you can use a star tip on your piping bag for a decorative touch! Tip: Overfill a bit for a nice presentation. -
Garnish
Sprinkle the tops with chopped cilantro for that fresh finish and maybe more cayenne pepper if you’re feeling feisty! Serve chilled or at room temperature, and watch them disappear at your next gathering!
Serving Suggestions
These Avocado Deviled Eggs not only look gorgeous on a platter but are also incredibly versatile! I love serving them on a rustic wooden board with colorful veggies, like cherry tomatoes and cucumber slices, for that vibrant pop of color. Drizzle a bit of balsamic reduction around the platter for an upscale touch, and you’ll have a stunning centerpiece for any gathering. Honestly, they make a perfect addition to brunch spreads, appetizer trays, or even as a healthy snack throughout the week.
Recipe Variations
Now, let’s get creative! Here are some fun twists on this classic recipe that you can try out:
-
Bacon Avocado Deviled Eggs
Add crispy bacon bits to your avocado filling for an irresistible smoky flavor. -
Mediterranean Style
Toss in some chopped sun-dried tomatoes and feta cheese for a tangy, Mediterranean flair. -
Sriracha-Lime
Drizzle a bit of Sriracha sauce on top for a spicy kick, and garnish with green onions for added freshness. -
Curried Deviled Eggs
Stir in curry powder for an exotic flavor twist that pairs wonderfully with the creaminess of avocado. -
Smoked Salmon
Incorporate diced smoked salmon into the filling or simply top each egg half with a small piece for a delightful brunch treat.
Chef’s Notes
You know, it’s funny how recipes often evolve over time. When I first started making deviled eggs, I used a ton of mayo until I realized that avocados could ramp up both flavor and texture. The beauty of cooking is experimenting and adjusting to suit your palate. So, don’t be shy! Make this recipe your own. And who knows? You might just find a nostalgic twist that connects you to your cooking roots!
FAQs and Troubleshooting
1. Why are my eggs hard to peel?
Sometimes it’s just about the age of the eggs! Fresh eggs can be harder to peel, so opt for eggs that have been in your fridge for a week or so.
2. Can I make these ahead of time?
Absolutely! You can make them a few hours in advance. Just make sure to cover them with plastic wrap to prevent browning.
3. My filling is too chunky—what should I do?
If your avocado is hard or you’ve added too many chunks, just keep mashing until smooth. A little lime juice and a good fork or masher can fix that!
4. Can I use different herbs?
Of course! Fresh dill or even basil could add a lovely twist. Experimenting with fresh herbs is always a fun way to personalize recipes.
Nutritional Info
Now, let’s talk about the wonderful nutrition in these Avocado Deviled Eggs. They’re a great source of protein from the eggs, with healthy fats from the avocados to keep you satisfied. Each egg is low in carbs, creating a great option for those following a low-carb lifestyle. Not to mention, the jalapeños provide a boost of vitamins C and A, contributing to your daily nutritional needs. While a complete nutrition label can vary based on your specific ingredients and portion sizes, these beauties sure pack a nutritious punch without sacrificing flavor!
Final Thoughts
So there you have it, my friends—Avocado Deviled Eggs that are not only a joy to eat but also a delight to create. I hope this recipe brings you as much joy in the kitchen as it does in my home. Always remember, the art of cooking is about love, creativity, and sharing delicious bites with the people you care about most. I can’t wait to hear how your version turns out! So grab those ingredients and get cooking—let the flavors unfold, and most importantly, let the good times roll. Happy cooking, and see you at the next Feastical feast! 🍽️
Print
Avocado Deviled Eggs
- Total Time: 30 minutes
- Yield: 12 servings 1x
- Diet: Vegetarian
Description
A healthy twist on classic deviled eggs, combining creamy avocado with a zesty filling for a delicious appetizer.
Ingredients
- 12 Large Eggs
- 2 Avocados (pitted)
- 3 Tablespoons Lime Juice
- 2 Cloves Garlic (minced)
- 1/2 Jalapeno (deseeded and minced)
- 1/2 Teaspoon Cayenne Pepper
- 1 Teaspoon Kosher Salt
- 1/4 Cup Fresh Cilantro (finely chopped)
Instructions
- Hard-Boil your eggs: Place the eggs in a pot and cover with cold water. Bring to a gentle boil over medium heat. Cover and remove from heat, letting eggs sit for 12-14 minutes. Transfer to an ice bath to cool.
- Peel those eggs: Once cooled, gently tap each egg on a hard surface to crack the shell and peel under cool running water.
- Slice and scoop: Cut eggs in half lengthwise, scoop yolks into a bowl, and set the whites aside.
- Mix it up: Add avocados, lime juice, minced garlic, jalapeño, cayenne pepper, and salt to yolks. Mash until creamy.
- Taste test: Adjust seasoning with more lime juice, salt, or spices as desired.
- Fill those whites: Use a spoon or piping bag to fill each egg white half with the avocado mixture.
- Garnish: Sprinkle with chopped cilantro and more cayenne if desired. Serve chilled or at room temperature.
Notes
Feel free to experiment with different herbs or add bacon for extra flavor!
- Prep Time: 15 minutes
- Cook Time: 15 minutes
- Category: Appetizer
- Method: Boiling
- Cuisine: American
Nutrition
- Serving Size: 1 egg half
- Calories: 140
- Sugar: 1g
- Sodium: 200mg
- Fat: 10g
- Saturated Fat: 2g
- Unsaturated Fat: 8g
- Trans Fat: 0g
- Carbohydrates: 6g
- Fiber: 2g
- Protein: 6g
- Cholesterol: 160mg
Keywords: deviled eggs, avocado, healthy appetizer, party food, vegetarian

Minute Tomato Cracker Salad with Tangy Vinaigrette
Tomato Cracker Salad: A Nostalgic Delight
Hey food lovers! I’m Beau Collier, and today we’re diving into a dish that holds so much warmth and nostalgia in my heart: Tomato Cracker Salad. Now, I can hear you thinking, “Tomato? Salad? Cracker?” Yes, my friends, this delightful concoction combines the brightness of fresh tomatoes, the crunch of crackers, and a creamy dressing that will take you straight back to simpler times.
There’s something magical about food that ties us to our memories. The vibrant, juicy tomatoes paired with the crispy saltines and creamy dressing evoke memories of summer picnics, family gatherings, and the joy of simple, heartfelt cooking. In a world that often seems obsessed with complicated recipes and culinary perfection, the Tomato Cracker Salad serves as a reminder that food can be uncomplicated yet packed with flavor and love.
When I was a kid, my mom would whip this up on lazy summer afternoons. One bite transported me to our sun-drenched patio, surrounded by friends and family, laughter echoing in the warm breeze. We’d sit together, tearing into a big bowl of this salad, refreshing our spirits and fueling our playfulness. It’s amazing how a simple dish can create such vibrancy in our lives.
Fast forward to today, and each time I make this salad, it brings all those beautiful memories flooding back. So whether you’re preparing this salad for a casual lunch, a barbecue, or just for yourself, trust me, this Tomato Cracker Salad will wrap you in a warm hug of nostalgia while also being oh-so-delicious!
Let’s get started and whip up this delightful dish. You won’t regret it!
Ingredients
Here’s what you’ll need to create this comforting Tomato Cracker Salad:
-
Tomatoes: Opt for ripe, juicy tomatoes, preferably heirloom for that vibrant flavor. If tomatoes are out of season, cherry or grape tomatoes work great too.
-
Salt: Don’t be shy with the salt! A sprinkle enhances the natural sweetness of the tomatoes.
-
Pepper: Freshly cracked black pepper adds a lovely hint of spice and depth.
-
Mayonnaise: This forms the creamy base. If you’re looking for a lighter option, Greek yogurt or sour cream can be excellent substitutes!
-
Crackers: Classic saltines are the go-to, but feel free to experiment! Whole grain or flavored crackers can add a unique twist.
-
Onion (optional): Finely chopped onion adds a delightful bite. Red onions are milder, while sweet onions offer a lovely flavor.
-
Fresh herbs (optional): Parsley or basil can elevate the dish, adding freshness and color. Fresh herbs are a great way to customize this recipe based on what you have on hand.
Step-by-Step Instructions
Ready to bring this Tomato Cracker Salad to life? Let’s get cooking!
-
Prepare the Tomatoes: Start by rinsing your tomatoes under cool, running water. Chop them into bite-sized pieces. If you’re using larger tomatoes, consider removing some of the seeds to prevent excess moisture. Trust me, you don’t want a soggy salad!
-
Season the Tomatoes: Place the chopped tomatoes in a large mixing bowl. Sprinkle with salt and pepper. Gently toss, allowing the seasoning to marry with the tomatoes. Let them rest for about 10-15 minutes. This step helps draw out their wonderful juices, making your salad even tastier!
-
Mix the Dressing: In a separate bowl, combine about ½ cup of mayo (or your chosen substitute). Customize it by adding a dash of lemon juice or a sprinkle of garlic powder for an added flavor kick. If you love a bit of sweetness, a touch of honey can also work wonders!
-
Combine Ingredients: After the tomatoes have rested, add the seasoned tomatoes into the bowl with your dressing. Stir everything together gently, being sure to coat the tomatoes evenly.
-
Add the Crackers: Here’s where the fun begins! Crush your saltines into rough pieces (they shouldn’t be dust, just a delightful crunch). Gently fold in the crackers, being careful not to break them down too much. You want those crunchy bits to shine!
-
Toss in Optional Ingredients: If you’re using onions or fresh herbs, add them now and give it a final gentle toss. The colors and aromas at this point will have you grinning ear to ear!
-
Chill & Serve: For best results, allow your salad to chill in the fridge for about 30 minutes. This lets all the flavors mingle beautifully. When you’re ready to serve, give it a quick stir, and you’re good to go!
Serving Suggestions
Plating this Tomato Cracker Salad is as enjoyable as making it! Here are a few ideas on how to serve:
-
Chilled Bowl: For casual dining, serve this salad in a generous-sized bowl, perfect for passing around.
-
Individual Cups: For a stylish touch (great for parties!), portion out the salad into small cups or jars. This is fun, easy, and encourages everyone to dig in!
-
Garnish: Sprinkle a few extra herbs on top or even some crumbled feta or goat cheese for an added gourmet touch.
-
Accompaniments: Serve it alongside grilled meats, fish, or as a refreshing side to sandwiches. It also pairs beautifully with a cold drink on a hot day!
Recipe Variations
Feel like mixing things up? Here are some delicious variations for your Tomato Cracker Salad:
-
Spicy Twist: Add diced jalapeños or a splash of hot sauce for a spicy kick.
-
Mediterranean Flair: Incorporate olives, chopped cucumbers, and feta cheese for a classic Mediterranean vibe.
-
Herbed Up: Experiment with different fresh herbs like dill or cilantro for a unique flavor profile.
-
Creamy Avocado: Throw in ripe avocado chunks for a creamier texture and added nutrition.
-
Vegan Version: Swap the mayo for avocado or a creamy vegan dressing to cater to plant-based diets, keeping all that delightful creaminess!
Chef’s Notes
Ah, where do I begin? This recipe has been a staple in my home for as long as I can remember! I once tried to make it for a fancy dinner party, and let’s just say it ended up being the star of the night! Everyone was amazed at how something so simple could taste so indulgent. And you know what? It taught me an invaluable lesson: sometimes, it’s all about the basics.
The most beautiful part about cooking is that it evolves. Every time I make this dish, it feels like a new adventure. I might toss in leftovers from the fridge or tweak the ratios based on what I’m feeling that day. So, feel free to personalize it and make it your own!
FAQs and Troubleshooting
Q: Why does my Tomato Cracker Salad get watery?
A: The most common culprit is too much moisture from the tomatoes or not allowing them to drain before mixing. After chopping, give them time with salt to release some liquid—this helps prevent a soggy salad!
Q: Can I make this salad ahead of time?
A: Absolutely, but for the freshest experience, wait to add the crackers until just before serving. They soften over time if mixed in too early.
Q: What if I don’t like mayonnaise?
A: No worries! Greek yogurt, sour cream, or even a vinaigrette can work beautifully in place of mayo.
Q: How long can I store leftovers?
A: Store any leftovers in an airtight container in the fridge for 2-3 days max. Just know that the crackers will lose their crunch over time.
Nutritional Info
While the nutritional value depends on ingredient specifics and portion size, here’s a rough estimate for a serving of Tomato Cracker Salad using standard ingredients:
- Calories: 250–300
- Protein: 4–6g
- Fat: 15–20g (mainly from the mayonnaise)
- Carbohydrates: 30–35g
- Fiber: 2g
This salad is a fun dish that satisfies hunger while offering a burst of freshness. Enjoy it as a side or a light meal, and know you’re experiencing a nostalgic favorite with a nutritious twist.
Final Thoughts
As we wrap up this delightful journey through the world of Tomato Cracker Salad, I hope you feel inspired to create this comforting dish. Cooking is not just about the food; it’s about the memories we create and the connections we forge with those we share it with.
So, gather your favorite people, whip up this Tomato Cracker Salad, and reminisce about your favorite memories around home-cooked meals. Each bite sings of love, nostalgia, and the joy of simply being together.
Thanks for joining me today! Until next time, keep cooking with heart and joy. Let’s continue to create memories, one recipe at a time. Happy cooking, friends! 🍅🥗
Print
Tomato Cracker Salad
- Total Time: 45 minutes
- Yield: 4 servings 1x
- Diet: Vegetarian
Description
A nostalgic dish combining juicy tomatoes, crispy crackers, and a creamy dressing, perfect for any gathering.
Ingredients
- Ripe tomatoes (preferably heirloom)
- Salt
- Freshly cracked black pepper
- ½ cup mayonnaise (or Greek yogurt/sour cream)
- Classic saltine crackers
- Finely chopped onion (optional)
- Fresh herbs (parsley or basil, optional)
Instructions
- Prepare the tomatoes by rinsing them under cool, running water and chopping them into bite-sized pieces.
- Season the chopped tomatoes in a large mixing bowl with salt and pepper, gently tossing to combine. Let sit for 10-15 minutes.
- Mix the dressing in a separate bowl by combining the mayonnaise and optional flavorings such as lemon juice or garlic powder.
- Combine the rested tomatoes with the dressing, stirring gently to coat.
- Add the crushed saltines and carefully fold them into the mixture.
- Toss in any optional ingredients like onions or herbs, giving a final gentle mix.
- Chill the salad in the fridge for about 30 minutes before serving.
Notes
For best results, add the crackers just before serving to maintain their crunch. Feel free to experiment with different herbs and vegetable add-ins.
- Prep Time: 15 minutes
- Cook Time: 0 minutes
- Category: Salad
- Method: Mixing
- Cuisine: American
Nutrition
- Serving Size: 1 serving
- Calories: 275
- Sugar: 4g
- Sodium: 500mg
- Fat: 18g
- Saturated Fat: 3g
- Unsaturated Fat: 5g
- Trans Fat: 0g
- Carbohydrates: 30g
- Fiber: 3g
- Protein: 6g
- Cholesterol: 15mg
Keywords: Tomato, salad, nostalgic, summer, picnic, vegetarian, easy recipe