Cucumber Sorbet
Refreshing Cucumber Sorbet: A Cool Delight for Hot Days
Hey there, fellow food lovers! If you’re looking for a treat that’s not only delicious but also refreshingly light and utterly satisfying, you’ve arrived at the right spot. Today, let’s whip up something that’ll cool down even the hottest summer days—Cucumber Sorbet!
Imagine, if you will, a scorching day where the sun is blazing, and you’re searching for a way to satisfy your sweet tooth without overdoing it. This cucumber sorbet is precisely the answer! It’s not just about cooling down; it’s about enjoying a delightful fruit-based dessert that brings a splash of summertime flavor to your palate. With its subtle sweetness and the crisp, refreshing taste of cucumber, this sorbet will steal the show at any gathering.
But here’s the best part—making cucumber sorbet is not just easy; it’s a fun way to play in the kitchen! Join me as we dive into the world of sorbet-making, perfect for impressing your family and friends or just treating yourself to something special after a long day. So, let’s grab our aprons, dust off those mixing bowls, and create something fabulous!
A Slice of Nostalgia
Growing up in my grandmother’s kitchen, summer meant two things: juicy watermelons and the most refreshing cucumber salad you’ve ever tasted. But what really stuck in my mind was that one sultry afternoon when my cousin and I decided to take a creative twist on grandma’s classic recipe. Armed with her kitchen tools, we snuck a few ingredients out of the pantry and decided to blend cucumbers in an ice cream maker, hoping for something delightful.
To our surprise, we stumbled upon a version of what would someday become one of my go-to summer recipes: Cucumber Sorbet! We weren’t sure if it was a culinary miracle or just a fluke, but that icy, sweet concoction was everything we hoped for and more. Fast forward years later, and here I am, sharing that original spirit of summer exploration with you.
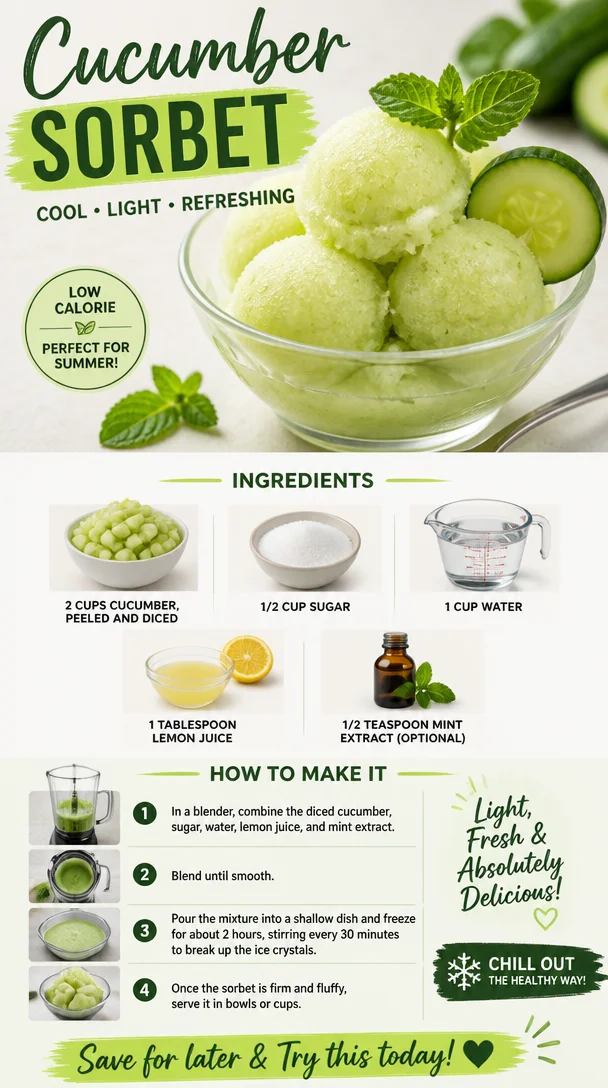
Ingredients for Cucumber Sorbet
Let’s break it down! Here’s what you’ll need to create your own batch of this delightful Cucumber Sorbet:
-
2 cups cucumber, peeled and diced:
The star of our sorbet! Use fresh, firm cucumbers to ensure a great texture. If you can find English cucumbers, they have fewer seeds and are perfect for this sorbet. -
1/2 cup sugar:
This helps balance the refreshing flavor of the cucumbers. If you’re looking for a healthier option, consider using a sugar substitute like stevia or agave syrup. -
1 cup water:
Essential for dissolving the sugar and creating a smooth base for your sorbet. No special tricks here—just good ol’ H2O! -
1 tablespoon lemon juice:
This adds a touch of acidity that brightens up the flavors. You can easily swap this for lime juice if you’re feeling adventurous! -
1/2 teaspoon mint extract (optional):
Mint provides an additional refreshing vibe. If mint isn’t your thing, you can leave it out or replace it with fresh mint leaves for a more vibrant taste.
Step-by-Step Instructions
Time to get cooking! Follow these simple steps to create your very own Cucumber Sorbet:
-
Prepare Your Cucumbers:
Start by peeling and dicing the cucumbers. In my experience, cutting them into smaller pieces makes them easier to blend and ensures a smoother sorbet. -
Blend It Up:
In a blender, combine the diced cucumbers, sugar, water, and lemon juice. If you’re adding mint extract, go ahead and toss that in too! Blend until everything is smooth and well combined. You want a mixture that’s completely free of lumps—think of it as cucumber bliss! -
Taste Test:
Here comes the fun part! Give your mixture a little taste. Adjust the sweetness by adding more sugar or acidity if necessary. If you want that extra refreshing punch, you can add a touch more lemon juice or mint extract. -
Chill It Down:
Pour the mixture into a shallow dish and pop it into the freezer. Let it chill for about 1 to 2 hours until it starts to firm up. -
Stir it Up:
After the initial chill period, take it out and give it a good stir using a fork. This will help break up any ice crystals that have formed. This is a trick I learned over the years to ensure a creamy texture! -
Freeze Again:
Place it back into the freezer for another 2-3 hours. If you can, give it a stir every hour. This little hack will ensure your sorbet stays fluffy and light! -
Serve and Enjoy:
Once fully frozen, scoop it into servings, and voila! You’ve made a tasty, refreshing dessert that’s sure to impress.
Serving Suggestions
Now that your cucumber sorbet is ready, how do we serve this eye-catching treat? Here are a few delightful ways to present it:
-
Chilled Bowls: Serve your sorbet in chilled bowls or elegant sorbet cups. The frostiness adds to the experience and keeps it refreshing for longer.
-
Garnish with Fresh Mint: A sprig of fresh mint on top will not only make it look appetizing but also add a touch of sophistication.
-
Pair with Fresh Fruits: This sorbet pairs beautifully with a medley of fresh fruits like strawberries, raspberries, or even a scoop of vanilla ice cream for a splendid dessert experience!
-
Cucumber Spiral: If you’re feeling particularly fancy, thinly slice your cucumbers and create a spiral to adorn your dishes. It’s all about the presentation!
Recipe Variations
Here are a few fun twists you could try to mix things up with your cucumber sorbet:
-
Cucumber-Mint Fusion: Add more fresh mint leaves instead of mint extract for a burst of herbaceous flavor. Muddle the leaves with the sugar and lemon juice before blending for a more aromatic kick.
-
Citrus Blast: Swap the lemon juice for grapefruit or orange juice for a zesty twist. This will brighten the flavor profile in a whole new way!
-
Green Tea Infusion: Brew a cup of green tea and replace the water in the recipe with a cooled version. This will impart a unique earthiness to the sorbet.
-
Spicy Kick: For those who like a little heat, add a pinch of cayenne pepper or finely diced jalapeño (just a little!) to your cucumber mixture for a spicy surprise.
-
Berry Blast: Add in some diced strawberries or blueberries before freezing for a refreshing and colorful sorbet that’s a hit at any party!
Chef’s Notes
It’s always fascinating to see how recipes evolve over time! I initially made this cucumber sorbet as a last-minute summer treat for impromptu family gatherings. What started as a simple, "I just want something refreshing!" has turned into a cherished recipe I share with friends each summer. I always encourage others to play around with flavors; it’s one of the best parts of being in the kitchen. Don’t be afraid to experiment, folks!
FAQs and Troubleshooting
How long will my sorbet last in the freezer?
Homemade cucumber sorbet typically lasts about a week in the freezer if stored properly. Just make sure to seal it in an airtight container to protect it from ice crystals and freezer burn.
My sorbet is too icy! What happened?
If your mixture gets too hard or icy, it might be because it needed more frequent stirring while it was freezing. On your next attempt, remember to stir it every hour for a smoother texture!
Can I make this sorbet without an ice cream maker?
Absolutely! The method I’ve shared here is designed for those without fancy equipment. Just remember to give it a good stir every hour as it freezes to prevent ice from forming.
What’s the best way to use leftover sorbet?
Using leftover sorbet is creative fun! You can blend it into smoothies, swirl it into yogurt, or even use it as a refreshing cocktail mixer!
Nutritional Info
Each serving of cucumber sorbet (about 1/2 cup) typically contains roughly:
- Calories: 90
- Total Fat: 0g
- Saturated Fat: 0g
- Carbohydrate: 22g
- Sugar: 17g
- Protein: 1g
This refreshing treat is low in calories and fat, making it an excellent guilt-free option. Plus, it’s hydrating due to the cucumber!
Final Thoughts
And there you have it—a cool and delicious Cucumber Sorbet recipe that’s sure to become a staple in your summertime repertoire! There’s something truly magical about enjoying a homemade treat that’s as refreshing as a summer breeze and as simple as a few fresh ingredients.
Whether you’re looking to impress guests or simply enjoy a dose of self-care, give this recipe a whirl. Remember, the best meals are made with joy, and there’s no wrong way to enjoy a little play in your kitchen. So, let your culinary creativity run wild, and may your summer always be filled with sweet, refreshing delights! Happy cooking, my friends!
Print
Refreshing Cucumber Sorbet
- Total Time: 120 minutes
- Yield: 4 servings 1x
- Diet: Vegan
Description
A light and refreshing Cucumber Sorbet that’s perfect for hot summer days.
Ingredients
- 2 cups cucumber, peeled and diced
- 1/2 cup sugar
- 1 cup water
- 1 tablespoon lemon juice
- 1/2 teaspoon mint extract (optional)
Instructions
- Prepare your cucumbers by peeling and dicing them into smaller pieces.
- Blend the diced cucumbers, sugar, water, and lemon juice until smooth.
- Taste the mixture and adjust sweetness as needed.
- Chill the mixture in a shallow dish in the freezer for about 1 to 2 hours.
- Stir the mixture with a fork to break up any ice crystals after the initial chill.
- Freeze again for 2-3 hours, stirring every hour if possible.
- Serve the sorbet in chilled bowls and enjoy!
Notes
For best results, stir the sorbet every hour while freezing for a creamy texture. Try variations by adding fresh mint leaves or citrus juice.
- Prep Time: 10 minutes
- Cook Time: 0 minutes
- Category: Dessert
- Method: Freezing
- Cuisine: American
Nutrition
- Serving Size: 1/2 cup
- Calories: 90
- Sugar: 17g
- Sodium: 0mg
- Fat: 0g
- Saturated Fat: 0g
- Unsaturated Fat: 0g
- Trans Fat: 0g
- Carbohydrates: 22g
- Fiber: 1g
- Protein: 1g
- Cholesterol: 0mg
Keywords: cucumber sorbet, refreshing dessert, summer treat

Minute Sour Cherry Tarts: Simple Summer Dessert
Easy Sour Cherry Tarts: A Sweet Treat with a Tart Twist!
Hey there, fellow food lovers! Today, I’m feeling a bit nostalgic as I share a delightful recipe that warms my heart and brings back some of my fondest memories: Easy Sour Cherry Tarts. Picture this: sun-drenched orchards, the sweet-and-sour aroma of cherries wafting through the air, and laughter filling the kitchen as family members gather to whip up something delicious. That’s the magic of cherries—sweet on some days and a tad tart on others, just like life!
In my world, sour cherries are underrated gems that deserve a spotlight. These vibrant little fruits are perfect for desserts that strike a balance between sweet indulgence and zesty freshness. Whether it’s a casual get-together or a fancy dinner party, these Easy Sour Cherry Tarts will have everyone asking for seconds (and maybe even thirds)! So, put on your apron, roll up your sleeves, and let’s embark on this cherry adventure together!
A Cherry Memory
Let me take you back to a summer long ago, back when my grandmother had an expansive cherry tree in her backyard. Those arms of green would be filled to the brim with the brightest, juiciest sour cherries you could imagine. The air would buzz with excitement as my cousins and I would have friendly cherry-picking contests, trying to outdo each other on who could gather the most. Sun-soaked faces, sticky fingers, and the joy of biting into a fresh cherry was always the best part of summer.
After our cherry-picking escapades, Grandma would lead us back into her cozy kitchen, where the delightful aroma of baked goods was a constant invitation. Together, we would mix, stir, and bake, turning those tart gems into the most scrumptious pies and tarts. I can still hear Grandma’s laughter as she caught us sneaking a few cherries to munch on while we worked. Those Easy Sour Cherry Tarts were the highlight of our family gatherings, and now, they’re a cherished tradition that I love sharing with you all!
Ingredients for Easy Sour Cherry Tarts
Here’s what you’ll need to make these delightful tarts:
- 6 cups pitted sour cherries: Fresh, frozen, or canned—just make sure they’re pitted! If you’re using frozen cherries, there’s no need to thaw them; they’ll cook down beautifully.
- 2 cups white sugar: Essential for balancing the tartness of the cherries! You can adjust this based on your sweetness preference or swap it out for brown sugar for a deeper flavor.
- 1 heaping tbsp cornstarch: This is our thickening agent! It helps the cherry filling hold together nicely. If you don’t have cornstarch, you can use arrowroot or all-purpose flour, but you may need to adjust the quantity.
- 2-3 tbsp water: Helps create the syrupy mixture with sugar and cherries. Use as needed to achieve the right consistency.
- 1 package pastry tart shells (approximately 30 in a package): Store-bought or homemade—save time with pre-made shells or impress your friends with a homemade version!
- Whipped cream to garnish: The perfect light and airy topping! You can use store-bought or whip up some fresh cream by mixing heavy cream and sugar until it forms soft peaks.
- Optional: Edible flowers and thyme for garnish: These add a beautiful touch! Look for flowers like nasturtiums or violets, and fresh thyme for a lovely herbal contrast.
Step-by-Step Instructions for Making Your Tarts
Now that we’ve gathered our ingredients, let’s get started on these delightful Easy Sour Cherry Tarts.
Step 1: Prepare the Filling
-
In a large pot, combine the pitted sour cherries and sugar over medium heat. Stir them gently until the cherries begin to release their juices and the sugar starts to dissolve.
Chef Tip: To enhance the flavor, consider adding a dash of vanilla extract or a sprinkle of cinnamon for an unexpected twist!
-
Once the mixture is simmering, sprinkle the cornstarch over the cherries and stir to combine. This will help thicken the filling. If it looks too thick, add a bit of water to loosen it up. Let this cook for about 5-7 minutes until it thickens and bubbles.
Pro Tip: If you notice clumps of cornstarch, whisk it with a bit of cold water first to create a slurry before adding it to the hot filling.
Step 2: Fill the Tart Shells
-
Preheat your oven to 350°F (175°C). While it preheats, take your prepared tart shells and place them on a baking sheet.
-
Once the filling is ready, carefully spoon the tart cherry mixture into the prepared tart shells, filling each one generously.
Chef Insight: Don’t be shy! A heaping spoonful of filling in each shell makes for an irresistible tart.
Step 3: Bake the Tarts
-
Place the filled tart shells in the oven and bake for approximately 20-25 minutes or until the tart shells are golden and the cherry filling is bubbling.
Baker’s Pro Tip: Keep an eye on the tarts towards the end of baking! If you see that the shells are browning too quickly, you can cover them with aluminum foil to prevent burning.
Step 4: Cool and Serve
-
Once baked, remove the tarts from the oven and let them cool on a wire rack for at least 15-20 minutes. This will allow the filling to set a bit more.
-
Before serving, top each tart with a dollop of whipped cream and, if you’re feeling fancy, a sprinkling of edible flowers or thyme!
Serving Suggestion: Arrange the tarts on a beautiful platter, perhaps with a few fresh cherries scattered around for a pop of color!
Recipe Variations to Try
-
Mixed Cherry Tarts: Combine sour cherries with sweet cherries or other fruits like blueberries or raspberries for a mixed berry experience!
-
Almond Cherry Tarts: Add a teaspoon of almond extract to the filling for a nutty twist that complements the cherry flavor beautifully.
-
Savory Cherry Tarts: For a unique take, incorporate goat cheese into the filling and sprinkle a bit of fresh rosemary on top before baking!
-
Chocolate Cherry Tarts: Drizzle some melted dark chocolate over the tarts either before or after baking for a rich, decadent dessert.
-
Gluten-Free Tarts: Use gluten-free pastry shells or make your own with almond flour for a gluten-free version that everyone can enjoy!
Chef’s Notes
These Easy Sour Cherry Tarts are truly a labor of love. The recipe has evolved over the years as I’ve played with different variations, discovering that the tartness of the cherries complements so many flavors. I remember the first time I added a bit of almond extract to the filling; it was like a light bulb moment in my kitchen! The creativity goes on forever!
And let me tell you, there’s nothing quite like pulling these fresh tarts out of the oven—it fills the air with a scent that makes everyone gather around, just waiting for their first bite!
FAQs and Troubleshooting
1. How do I know when the tarts are baked properly?
Look for a bubbling filling and a golden-brown crust. If your tarts are browning too quickly, use foil to cover them.
2. Can I use fresh cherries instead of frozen?
Absolutely! Just make sure to pit them first. Fresh cherries add a lovely texture!
3. My filling is too runny; what did I do wrong?
If your filling is too runny, it may be due to not enough cornstarch or cooking time. Let it cook a bit longer to thicken up.
4. How can I store leftover tarts?
Keep them in an airtight container in the fridge for up to three days. They’re perfect for a quick snack!
Nutritional Info
While exact values can vary based on the specific ingredients you use, here’s a general breakdown for each tart based on serving size:
- Calories: Approximately 200 calories per tart
- Total Fat: 8g
- Saturated Fat: 4g
- Cholesterol: 30mg
- Sodium: 150mg
- Total Carbohydrates: 30g
- Fiber: 2g
- Sugars: 18g
- Protein: 2g
Keep in mind that these tarts are a delightful indulgence meant to be enjoyed in moderation—the fresh cherries bring a load of vitamins and antioxidants, making them a slightly healthier choice than other dessert options!
Final Thoughts
Creating Easy Sour Cherry Tarts is more than just a recipe; it’s about celebrating the connections we make over good food. It’s about the laughter shared while baking and the memories created around the dinner table. Whether you’re whipping these up for a family gathering, a potluck, or just a Tuesday night treat for yourself, I promise they’ll bring a little sweetness and tart joy to your day!
So there you have it! These Easy Sour Cherry Tarts are not just a dessert—they are a tradition, a moment, and an experience all wrapped in a delightful flaky shell. Get in that kitchen, have fun, and enjoy every bite! Happy baking!
Print
Easy Sour Cherry Tarts
- Total Time: 45 minutes
- Yield: 30 tarts 1x
- Diet: Vegetarian
Description
Delightful Easy Sour Cherry Tarts that perfectly balance sweet and tart flavors, making them a favorite for any occasion.
Ingredients
- 6 cups pitted sour cherries (fresh, frozen, or canned)
- 2 cups white sugar
- 1 heaping tbsp cornstarch
- 2–3 tbsp water (as needed)
- 1 package pastry tart shells (approximately 30)
- Whipped cream (for garnish)
- Optional: Edible flowers and thyme for garnish
Instructions
- Combine the pitted sour cherries and sugar in a large pot over medium heat to release juices.
- Sprinkle the cornstarch over the mixture and stir until combined, cooking for 5-7 minutes until thickened.
- Preheat your oven to 350°F (175°C) and arrange tart shells on a baking sheet.
- Spoon the cherry mixture into the tart shells generously.
- Bake for 20-25 minutes or until shells are golden and filling is bubbling.
- Cool the tarts on a wire rack for 15-20 minutes before serving.
- Top each tart with whipped cream and optional edible flowers or thyme.
Notes
Experiment with different variations by adding almond extract or mixing in different fruit for a unique twist.
- Prep Time: 20 minutes
- Cook Time: 25 minutes
- Category: Dessert
- Method: Baking
- Cuisine: American
Nutrition
- Serving Size: 1 tart
- Calories: 200
- Sugar: 18g
- Sodium: 150mg
- Fat: 8g
- Saturated Fat: 4g
- Unsaturated Fat: 4g
- Trans Fat: 0g
- Carbohydrates: 30g
- Fiber: 2g
- Protein: 2g
- Cholesterol: 30mg
Keywords: sour cherry, tarts, dessert, easy recipe, baking, cherry recipe

Fresh Cherry Cake: Easy 30-Minute Summer Dessert Recipe
Discovering the Sweetness of Fresh Cherry Cake
Hey there, fellow foodies! It’s Beau Collier, and I’m so excited to share one of my all-time favorite recipes with you today – Fresh Cherry Cake! If you’re looking for a deliciously vibrant dessert that’ll leave your taste buds dancing and your friends begging for the recipe, you’ve hit the jackpot! Imagine biting into a moist, fluffy cake bursting with luscious cherries. It’s like summer on a plate, and your kitchen is the happy hub of this tasty adventure.
Fresh cherry cake isn’t just another dessert; it’s a slice of nostalgia for me. You see, I grew up in a family where baking was akin to art, and our kitchen was always filled with delightful scents and sounds – the whir of the mixer, the laughter of loved ones, and of course, the delightful “oohs” and “aahs” as desserts made their grand entrance.
Every summer, we’d visit a little cherry orchard not too far from our home, and I remember running around with my siblings, eyes wide in wonder as we picked the ripest cherries. The process was so magical: selecting the juiciest ones, filling our buckets (and our mouths), and then bringing our bounty back home to create everything from pies to preserves. One particular year, we decided to bake a cake with our freshly picked cherries, and the sweet aroma that filled our kitchen was unforgettable. That cake became an instant family classic and the star of many summer gatherings.
Now, I want to help recreate that magic in your kitchen with my twist on the original recipe. Everybody should get a taste of this cherry goodness because life is just sweeter with a slice of Fresh Cherry Cake!
Ingredients
Let’s get down to business and gather our ingredients for this delightful treat. Here’s what you need:
-
1 cup All-purpose flour
This is your go-to flour for building a solid cake structure. If you’re gluten-free, try using a gluten-free flour blend instead! -
¼ cup Almond flour
This nutty flour adds moisture and a lovely flavor. If you don’t have it, substituting with the same amount of finely ground oats can work in a pinch. -
½ cup Sugar
Regular granulated sugar works great, but feel free to experiment with raw or cane sugar for a deeper flavor. -
1 tsp Baking powder
This little magic powder helps your cake rise beautifully! -
¼ tsp Baking soda
A sprinkle of baking soda adds an extra boost; together with the baking powder, they ensure a fluffy cake. -
¼ tsp Salt
A pinch of salt enhances all the flavors and balances the sweetness. -
1 Egg
Eggs provide moisture and structure. You can swap it out for 1/4 cup of unsweetened applesauce if you’re looking for an egg-free option. -
½ cup Greek yogurt, plain
This secret ingredient not only keeps the cake moist but adds a lovely tang. Just ensure you use plain yogurt so it doesn’t alter the flavor! -
¼ cup Coconut oil
Coconut oil brings richness and a hint of tropical flair. Substitute with any neutral oil you love, such as canola or sunflower oil. -
1 tsp Vanilla extract
This classic flavor enhancer is a must! There’s nothing quite like the warmth of vanilla in baked goods. -
½ tsp Almond extract
Almond extract works its magic in this recipe, but if you’re not a fan, feel free to leave it out or increase the vanilla. -
1 cup Cherries, pitted and halved
Fresh, juicy cherries take the center stage in this cake. Tossing them in a little flour before adding helps prevent them from sinking to the bottom! -
Cherry halves and almond flakes for topping (Optional)
A decorative touch that looks as good as it tastes!
Step-by-Step Instructions
Now that we’ve gathered all our ingredients, let me guide you through the steps to create this lovely dessert. Get ready because it’s super easy, and I’ll sprinkle in a few chef hacks along the way!
-
Preheat Your Oven
Preheat your oven to 350°F (175°C). This step is crucial to ensure your cake cooks evenly from the get-go. You can pop in a baking sheet lined with parchment paper to catch any drips or excess batter. -
Prepare Your Cake Pan
Grease a 9-inch round cake pan with coconut oil or your favorite non-stick spray, and sprinkle a little flour in to coat. This will help your cake slide out easily once it’s baked. -
Mix Dry Ingredients
In a large bowl, whisk together the all-purpose flour, almond flour, sugar, baking powder, baking soda, and salt until fully combined. This ensures that all the leavening agents are evenly distributed. -
Combine Wet Ingredients
In another bowl, beat the egg until fluffy, then mix in the Greek yogurt, coconut oil, vanilla extract, and almond extract. Ensure everything is blended smoothly before combining it with the dry ingredients. -
Combine Wet and Dry
Gradually fold the wet mixture into the dry ingredients, just until combined. Overmixing can lead to a dense cake, and we want fluffy and cake-y goodness here! -
Prepare the Cherries
Toss your halved cherries in about 2 teaspoons of flour. This step is key to keeping them suspended in the batter. Fold in the floured cherries gently into your cake batter. -
Pour into Pan
Gently pour the batter into the prepared cake pan, smoothing the top with a spatula. If you like, add a few more cherry halves and almond flakes on top for a decorative touch. -
Bake
Place the cake in the oven for about 30-35 minutes. Keep an eye on it; the cake is done when a toothpick inserted in the center comes out clean. -
Cool It Down
Once baked, remove the cake from the oven and let it cool in the pan for about 10 minutes. Then, gently transfer it to a wire rack to cool completely. The smell in your kitchen is going to be irresistible!
Serving Suggestions
Alright, your Fresh Cherry Cake is cool and ready to serve! Here are a few ideas for making it even more fabulous:
-
Dust with Powdered Sugar
A light dusting of powdered sugar adds a lovely elegance and sweetness without being too overwhelming. -
Top with Whipped Cream
Serve generous dollops of fresh whipped cream or even a scoop of vanilla ice cream for an indulgent treat! -
Garnish with Fresh Cherries
You can never have too many cherries! Decorate your plated piece with a few fresh cherries on top for that pop of color and flavor. -
Pair with Coffee or Tea
Nothing complements a slice of cherry cake better than a hot cup of your favorite coffee or a nice chamomile tea.
Recipe Variations
Now that you’ve mastered the classic recipe, let’s spice things up with a few creative twists!
-
Cherry Almond Swirl
Create a marbled effect by swirling in some almond paste or by mixing a tablespoon of almond extract into half of the batter before combining! -
Chocolate Cherry Delight
Add about ½ cup of dark chocolate chips into the batter for an ooey-gooey chocolate surprise in every bite. Chocolate and cherries are a match made in heaven! -
Coconut Cherry Cake
Add shredded coconut into the batter for a tropical twist that complements those sweet cherries beautifully. -
Lemon Zest Punch
Zest a lemon into your batter for a zesty pop that adds brightness to the sweet cherries. It’s floral and fruity in the best way! -
Vegan Cherry Cake
Swap the egg for flaxseed meal mixed with water, use non-dairy yogurt, and coconut oil for a vegan-friendly version!
Chef’s Notes
Over the years, this Fresh Cherry Cake has seen many iterations in my kitchen, often inspired by the seasons. I first started making it during those sweet summer months when cherries are bursting with flavor. You know, the delicious kind that practically begs to be baked into a cake! One year, I was in a rush to celebrate a friend’s birthday and mixed up a batch in under 30 minutes. It became an instant hit, and I decided I had to share it with everyone!
And let me tell you, the joy of seeing my friends take that first bite and their expressions light up—it’s everything. Don’t be surprised if this cake becomes your go-to for gatherings and celebrations, too!
FAQs and Troubleshooting
1. My cake sank in the middle; what went wrong?
This can happen if the batter is overmixed, or there wasn’t enough leavening. Ensure to fold gently and measure your ingredients accurately!
2. Can I use frozen cherries instead of fresh ones?
Absolutely! Just make sure to thaw and drain them well before incorporating them into your batter, as excess moisture can affect the texture.
3. How can I tell when the cake is done?
A toothpick inserted into the center should come out clean or with only a few crumbs stuck to it. If it comes out sticky, it needs a bit longer in the oven.
4. The cake is too dry; how can I avoid this in the future?
Be careful not to overbake! Every oven is different, so check for doneness a few minutes before the recommended baking time.
Nutritional Info
Now that we’ve shared the love with this delicious Fresh Cherry Cake, let’s glance at the nutritional information (per serving, assuming you cut your cake into 8 slices):
- Calories: Approx. 220
- Total Fat: 10g (Saturated Fat: 4g)
- Cholesterol: 30mg
- Sodium: 135mg
- Total Carbohydrates: 30g (Dietary Fiber: 1g, Sugars: 12g)
- Protein: 4g
It’s always nice to indulge a little and enjoy the sweet things in life, isn’t it?
Final Thoughts
There you have it, friends! Your guide to creating a culinary masterpiece with Fresh Cherry Cake that’s equal parts delicious and nostalgic. This recipe is perfect for summer barbecues, birthday parties, or even quiet weekends when you want to treat yourself to something special.
Remember, the kitchen is not just a place to cook—it’s where memories are made, laughter is shared, and flavor takes the spotlight. So, gather those ingredients, roll up your sleeves, and let’s bake something truly memorable today. I can’t wait to hear how your Fresh Cherry Cake turns out and the stories you’ll share around it! Happy baking!
Print
Fresh Cherry Cake
- Total Time: 50 minutes
- Yield: 8 servings 1x
- Diet: Vegetarian
Description
A moist and fluffy cake bursting with fresh cherries, perfect for summer gatherings.
Ingredients
- 1 cup All-purpose flour
- ¼ cup Almond flour
- ½ cup Sugar
- 1 tsp Baking powder
- ¼ tsp Baking soda
- ¼ tsp Salt
- 1 Egg
- ½ cup Greek yogurt, plain
- ¼ cup Coconut oil
- 1 tsp Vanilla extract
- ½ tsp Almond extract
- 1 cup Cherries, pitted and halved
- Cherry halves and almond flakes for topping (optional)
Instructions
- Preheat your oven to 350°F (175°C).
- Grease a 9-inch round cake pan with coconut oil and sprinkle flour to coat.
- Whisk together flour, almond flour, sugar, baking powder, baking soda, and salt in a large bowl.
- Beat the egg in another bowl and mix in Greek yogurt, coconut oil, vanilla extract, and almond extract.
- Fold the wet mixture into the dry ingredients until just combined.
- Toss the halved cherries in about 2 teaspoons of flour and gently fold them into the batter.
- Pour the batter into the prepared cake pan, smoothing the top with a spatula.
- Bake for about 30-35 minutes, or until a toothpick comes out clean.
- Cool the cake in the pan for 10 minutes, then transfer to a wire rack to cool completely.
Notes
Serve with powdered sugar, whipped cream, fresh cherries, or pair with coffee or tea for the perfect accompaniment.
- Prep Time: 15 minutes
- Cook Time: 35 minutes
- Category: Dessert
- Method: Baking
- Cuisine: American
Nutrition
- Serving Size: 1 slice
- Calories: 220
- Sugar: 12g
- Sodium: 135mg
- Fat: 10g
- Saturated Fat: 4g
- Unsaturated Fat: 6g
- Trans Fat: 0g
- Carbohydrates: 30g
- Fiber: 1g
- Protein: 4g
- Cholesterol: 30mg
Keywords: cherry cake, summer dessert, baking recipes