
No-Bake Coconut Cream Pie Cups: Fresh Weeknight Dessert Bite
Homemade Coconut Cream Pie Cups: A Sweet Slice of Paradise
Hey there! I’m Beau Collier, and today we’re embarking on a tropical journey right in your kitchen with these delightful Homemade Coconut Cream Pie Cups! If you’ve been craving the light, creamy, and oh-so-satisfying taste of coconut, then you’re in for a treat. These cups are not only easy to whip up but also an absolute crowd-pleaser for any occasion—be it a family gathering, a cozy dinner party, or just a little indulgence after a long day.
Why Coconut Cream Pie Cups?
Let’s be honest; sometimes a whole pie feels like too much, and that’s where these cups shine! They’re the perfect individual servings, bringing elegance and fun to your dessert routine without the fuss. Plus, they’re a breeze to make, so you’ll have more time to enjoy your friends and family or to cozy up with a good book!
Picture this: you’ve just pulled a batch from the fridge, and the creamy coconut aroma wafts through the air. Each bite is like a mini vacation—smooth, rich, and utterly satisfying. Yes, please! Ready to dive in? Grab your spatula, let’s create!
A Sweet Memory with Coconut Cream
Coconut has always held a special place in my heart. As a kid, my family spent our summers at my grandmother’s beach house, which had the most incredible view of the ocean. Along with the salty breeze and the sound of waves crashing, there was also a delightful sweet treat that was always on the table—my grandma’s coconut cream pie.
I vividly remember standing on a chair, helping her mix the filling. I’d sneak spoonfuls of the creamy goodness when she wasn’t looking, and she’d laugh, saying that the true secret to a great pie is “a generous amount of love.” You can bet that those tasty bites came loaded with her affection. Now, I’m passing that love along to you with these Coconut Cream Pie Cups—miniature tributes to my grandmother’s nostalgic masterpiece. Each cup is filled with the same warmth and joy I felt back then, and with every bite, I hope to spread that happiness to your home, too.
Ingredients
Let’s gather what you need! This simple yet delightful recipe comes together with just a handful of ingredients. Here’s the lineup:
-
1 cup coconut milk
Dairy-free and rich in flavor, coconut milk adds that dreamy creaminess. You could use regular milk, but you’d miss that delicious coconut flavor! -
1/2 cup heavy cream
Whipping cream adds an extra layer of silkiness. If you’re looking to lighten things up, you could swap with coconut cream or a lighter whipping cream, but it might reduce the luxurious texture. -
1/2 cup sugar
To sweeten things up! Feel free to substitute with coconut sugar or a sugar alternative like stevia for a healthier version. -
1/4 cup cornstarch
This is our magical thickening agent that creates that lovely custard consistency. If you’re gluten-free, no worries, cornstarch is your friend here! -
1/4 teaspoon salt
Just a pinch balances the sweetness beautifully, enhancing all the flavors! -
1 teaspoon vanilla extract
For a warm flavor that rounds out the coconut. You could also use coconut extract for an extra punch! -
1 cup shredded coconut
Unsweetened shredded coconut gives texture and a great coconut kick. Want a little more sweetness? Use the sweetened version! -
1 pre-made pie crust or graham cracker crust
The base of your cups! You can buy one or make your own for a personal touch. If gluten is a concern, a nut-based crust works wonders, too! -
Whipped cream for topping
Nothing is complete without a dollop of whipped cream up on top, right? You can use store-bought or homemade—your choice! -
Toasted coconut for garnish
To bring out an extra depth of flavor. Toasting the coconut before garnishing gives a delightful crunch—it’s all in the details!
Step-by-Step Instructions
Alright, now that we have everything ready, let’s get cooking! Follow my lead with these step-by-step instructions, complete with some chef tips along the way to help you nail it.
-
Prepare Your Crust:
In a small pie dish or muffin tin (for cups), fit your pre-made pie or graham cracker crust. Press it firmly into the bottom and up the sides. Don’t worry if it’s not perfect; rustic is charming! Bake according to package directions until lightly golden, then let it cool as we prepare the filling. -
Heat the Coconut Milk and Cream:
In a medium saucepan over medium heat, combine 1 cup of coconut milk and 1/2 cup heavy cream. Heat until it’s warm but not boiling. Stir occasionally to prevent sticking. This step releases the coconut’s aromas—your kitchen is going to smell divine! -
Whisk the Dry Ingredients:
In a separate bowl, whisk together 1/2 cup sugar, 1/4 cup cornstarch, 1/4 teaspoon salt, and 1 teaspoon vanilla extract. This is an important bit—making sure the cornstarch and sugar are well combined means no lumps later on. -
Combine and Thicken:
Pour the warm coconut-milk mixture slowly into the sugar mix, whisking continuously. This tempering will keep your filling smooth. Transfer the mixture back to the saucepan and continue to cook over medium heat, whisking constantly until it thickens. You’ll know it’s ready when it coats the back of a spoon! -
Add Shredded Coconut:
Remove from heat and fold in 1 cup of shredded coconut. This adds flavor and a great texture! Let it sit for a few minutes—it’ll thicken up even more. Trust the process! -
Fill the Crusts:
Spoon the warm coconut mixture into your prepared crusts. Be generous! Those cups should be overflowing with that creamy goodness. Cover with plastic wrap and refrigerate until set, usually about an hour. -
Top it Off:
Once the cups are chilled and set, pipe or spoon whipped cream onto the tops of your coconut cups. Finish with a generous sprinkling of toasted coconut for that crunchy texture and beautiful presentation!
Serving Suggestions
When you’re ready to serve, here’s how to add a touch of flair to your presentation!
-
Individual Cups: Serve the cups directly in the molds or remove them and plate them on a decorative dish. Either way, they look fantastic!
-
Add Fresh Fruit: A little slice of fresh pineapple or a few raspberries on the side not only adds color but also complements the coconut perfectly.
-
Drizzle with Caramel or Chocolate Sauce: For an extra indulgence, a light drizzle of warm caramel or chocolate sauce can elevate your dessert experience. You deserve it!
-
Garnish with Mint: A sprig of fresh mint on top adds a lovely pop of color and freshness. It’s the little things, right?
Recipe Variations
Want to switch things up a bit? Here are some fun variations!
-
Chocolate Coconut Cream Cups: Add cocoa powder to the filling for a chocolate twist! The combination of coconut and chocolate is a match made in dessert heaven.
-
Pineapple Coconut Cream Cups: Mix in some crushed pineapple for a tropical explosion! This variant brings that extra fruity zing, reminiscent of a piña colada.
-
Almond Joy Cups: Throw in some chopped nuts like almonds or pecans to replicate the classic Almond Joy candy. Layering the nuts in with the coconut filling gives a satisfying crunch.
-
Vegan Option: Use full-fat coconut milk and make your own whipped coconut cream. This keeps it creamy and utterly delicious without any dairy!
-
Key Lime Coconut Cups: For a zesty twist, add a splash of key lime juice to the filling. The sweet and tangy pairing is refreshing and uniquely delightful.
Chef’s Notes
When I first started playing with coconut cream recipes, I must confess that I had a few kitchen disasters. The first time I made this dessert, let’s just say that my filling ended up looking more like scrambled eggs than custard. The trick is low and slow, folks! Keeping that temperature just right will prevent those dreaded lumps.
Over time, I’ve learned the beauty of making coconut cream desserts lies in experimenting and finding what flavors spark joy in your kitchen. And the truth is, every attempt brings back those warm memories of my grandma. So dive in, have fun, and don’t be afraid to add your own spins!
FAQs and Troubleshooting
1. My filling didn’t thicken. What went wrong?
This can happen if the mixture didn’t reach the right temperature, or if it was stirred too aggressively. Make sure you cook the filling over medium heat while constantly whisking until it coats the back of a spoon before pouring it into the crust.
2. Can I use fresh coconut?
Absolutely! Fresh coconut adds a fantastic texture and flavor but requires a bit more work. Just make sure to toast it beforehand for that perfect crunch.
3. How do I store these cups?
Keep them in an airtight container in the refrigerator for up to three days. They’re great for meal prep and can also be made ahead of time for gatherings!
4. What consistency should the filling be?
Aim for a thick, pudding-like consistency. When cooled, it should be creamy enough to hold its shape without being too stiff.
Nutritional Info
Each Coconut Cream Pie Cup is a delightful treat, perfect for indulging. Let’s break down the nutrition:
- Calories: Approximately 300 per serving (this can vary based on crust and toppings)
- Fat: 20 grams, with healthy fats from coconut milk and cream
- Carbohydrates: 32 grams, mainly from sugar and the crust
- Protein: 3 grams, thanks to the coconut and cream
- Fiber: 1 gram, offering a tiny boost to digestion!
While these delightful cups may not be diet food, they fulfill that sweet tooth in moderation!
Final Thoughts
There you have it—Homemade Coconut Cream Pie Cups that will transport you straight to dessert paradise! I hope you’re as excited to try this recipe as I am to share it with you. Every spoonful is an experience filled with warmth, nostalgia, and a bit of adventure.
Cooking is all about the journey, and I’m so glad to share this one with you! Remember, it’s not just about the end product. Take your time in the kitchen, enjoy the process, and let those memories—old and new—dance around as you create.
So grab your ingredients, infuse a little love into your cooking, and let’s make some magic with these Coconut Cream Pie Cups. Happy eating, my friends!
Print
Homemade Coconut Cream Pie Cups
- Total Time: 45 minutes
- Yield: 4 servings 1x
- Diet: Vegetarian
Description
Delightful individual servings of creamy coconut goodness, perfect for any occasion.
Ingredients
- 1 cup coconut milk
- 1/2 cup heavy cream
- 1/2 cup sugar
- 1/4 cup cornstarch
- 1/4 teaspoon salt
- 1 teaspoon vanilla extract
- 1 cup shredded coconut
- 1 pre-made pie crust or graham cracker crust
- Whipped cream for topping
- Toasted coconut for garnish
Instructions
- Prepare Your Crust: Fit your pre-made pie or graham cracker crust into a small dish. Bake according to package directions until lightly golden, then let it cool.
- Heat the Coconut Milk and Cream: In a medium saucepan, combine coconut milk and heavy cream. Heat until warm but not boiling, stirring occasionally.
- Whisk the Dry Ingredients: In a separate bowl, whisk together sugar, cornstarch, salt, and vanilla extract.
- Combine and Thicken: Slowly pour the warm coconut milk mixture into the sugar mix, whisking continuously. Return to saucepan and cook over medium heat until it thickens.
- Add Shredded Coconut: Fold in shredded coconut and let it sit for a few minutes.
- Fill the Crusts: Spoon the mixture into your prepared crusts and refrigerate until set, about an hour.
- Top it Off: Pipe or spoon whipped cream onto the tops and sprinkle with toasted coconut.
Notes
Experiment with variations like adding cocoa powder or fresh fruit to customize your cups.
- Prep Time: 15 minutes
- Cook Time: 30 minutes
- Category: Dessert
- Method: Baking
- Cuisine: American
Nutrition
- Serving Size: 1 serving
- Calories: 300
- Sugar: 22g
- Sodium: 150mg
- Fat: 20g
- Saturated Fat: 16g
- Unsaturated Fat: 4g
- Trans Fat: 0g
- Carbohydrates: 32g
- Fiber: 1g
- Protein: 3g
- Cholesterol: 30mg
Keywords: coconut, dessert, cream pie, cups, easy recipe

Ingredient Coconut Macaroon Cookies (No-Bake & Easy)
Coconut Macaroon Cookies: A Sweet Journey into Nostalgia
Hey there, lovely foodies! If there’s one treat that wraps you in warm memories and satisfies that sweet tooth, it’s got to be coconut macaroons. These delightful little cookies are more than just a simple dessert; they are pockets of nostalgia and joy. Today, I’m excited to share with you my go-to recipe for Coconut Macaroon Cookies, which not only taste like sunshine but also come with a heap of cherished stories.
A Sweet Personal Story
Let me take you back to a kitchen filled with laughter, flour-dusted countertops, and the sweet aroma of coconut. Many years ago, I experienced my first taste of coconut macaroons in my grandmother’s cozy kitchen. It was a magical Saturday afternoon, and grandma was busy whipping up her legendary cookies. She had a knack for turning ordinary ingredients into extraordinary moments.
I remember peeking over the counter, fascinated as she mixed sweetened shredded coconut, sugar, and egg whites, almost as if she were conducting a symphony. The best part? She always let me dip my fingers in the batter and sneak a bite! Those simple, crunchy-on-the-outside and chewy-on-the-inside cookies were always a hit, especially when we dipped them in melted dark chocolate. Every bite took me on a trip down memory lane, filled with warmth, love, and the best hugs from grandma. It’s this memory that inspires me to share my version of coconut macaroons. Let’s create some sweet kitchen magic together!
Ingredients
Here’s what you’ll need to whip up these irresistible Coconut Macaroon Cookies. Get ready—it’s a short but sweet list!
-
2 2/3 cups sweetened shredded coconut
This is the star of the show! Sweetened shredded coconut gives the macaroons their lovely chewiness and natural sweetness. If you’re looking for a healthier option, feel free to use unsweetened coconut, but you may need to increase the sugar a bit. -
1/2 cup granulated sugar
Just enough to add that perfect sweetness! You can substitute coconut sugar for a deeper flavor, or even use a sugar substitute for a lower-calorie version—just check the conversion ratio! -
2 egg whites
These little beauties act as the binding agent, giving the cookies their iconic structure. Don’t throw away those yolks; they’re great for making custard or adding to your breakfast omelet! -
1/4 teaspoon salt
A pinch of salt is essential! It enhances all the sweet flavors in the cookies and makes them so much more delicious. You could use sea salt for a more gourmet touch. -
1 teaspoon vanilla extract
This adds warmth and a hint of sophistication. Feel free to experiment with almond extract for a nutty twist on flavor!
Step-by-Step Instructions
Alright, kitchen warriors, let’s dive into the magic of creating our Coconut Macaroon Cookies! Follow these steps, and soon you’ll have a plate of these sweet treasures ready to enjoy.
-
Preheat Your Oven:
Preheat your oven to 325°F (160°C). This ensures that when you pop those cookies in, they’ll bake evenly and turn golden brown. Pro tip: Make sure your oven is fully preheated. It can make a world of difference in baking! -
Prepare Your Baking Sheet:
Line a baking sheet with parchment paper. This keeps your cookies from sticking and makes for an easy clean-up. If you don’t have parchment, a lightly greased baking sheet will do the trick too. -
Mix Dry Ingredients:
In a large bowl, combine the sweetened shredded coconut, granulated sugar, and salt. Stir them together until they’re well blended, and you see that lovely coconut fluff starting to form. I always love the texture of the coconut and sugar together; it’s the little things that make the process enjoyable! -
Add Wet Ingredients:
In a separate bowl, whisk the egg whites and vanilla extract until frothy but not peaked. You’re looking for a soft froth that will create the perfect binding mixture. Pour this frothy goodness into the dry mixture and mix well until everything is combined. Remember, it should be a little sticky! -
Shape the Cookies:
Using a tablespoon or a small ice cream scooper, scoop the mixture onto your prepared baking sheet. Keep them about 2 inches apart, as they will spread slightly. You can use your fingers to shape them into small mountain-like piles; this gives them that artisanal look! -
Bake:
Bake in your preheated oven for 20-25 minutes or until the tops are golden brown. Keep an eye on them; ovens can vary, and we want them perfectly baked, not burnt! Pro tip: Rotating the baking sheet halfway through can help ensure even baking. -
Cool Down:
Once baked, allow the cookies to cool on the baking sheet for about 10 minutes before transferring them to a wire rack. This helps them firm up a bit and makes them easier to move without crumbling.
Serving Suggestions
Now that your Coconut Macaroon Cookies are all baked and cooled, it’s time to celebrate! Here are some fun ways to serve them:
-
Platter Display: Arrange them on a beautiful platter, perhaps garnished with some fresh mint leaves or a sprinkle of shredded coconut for that extra flair.
-
Dipping Delight: Melt some dark or semi-sweet chocolate and dip half of each macaroon in it, then let them set on parchment. This adds a luxurious touch to the cookies!
-
Dessert Trio: Pair them with a scoop of vanilla ice cream and a drizzle of chocolate syrup for an indulgent dessert experience. Heaven in every bite!
Recipe Variations
Looking to shake things up a bit? Here are some fun twists and variations you can try with your coconut macaroons:
-
Chocolate Chip Surprise: Add 1/2 cup of mini chocolate chips to the mixture for a melty chocolate surprise within each cookie.
-
Nutty Coconut: Incorporate some chopped almonds or pecans into the mixture for added crunch and flavor.
-
Tropical Zest: Add the zest of one lime or orange to the mixture for a refreshing citrusy kick that pairs wonderfully with the coconut.
-
Coffee Lover’s Dream: Stir in 1 tablespoon of instant coffee granules for a delicious mocha flavor.
-
Gluten-Free Option: This recipe is already gluten-free, but you can also substitute some of the sugar with a low-carb sweetener for a keto-friendly version!
Chef’s Notes
Over the years, my coconut macaroon recipe has gone through some delightful tweaks and variations. I remember the first time I dared to dip them in chocolate—what a game changer! I’ve also experimented with different types of coconut, from finely shredded to even toasted, which adds a different dimension to the flavor.
One time, I cooked up a batch for a friend’s wedding, and it became the highlight of the dessert table. Watching everyone enjoy those cookies reminded me of my grandma’s kitchen and her joy in bringing people together through food. What a beautiful connection food creates!
FAQs and Troubleshooting
Here are some common questions you might have as you bake these delicious treats:
-
Why are my macaroons too dry?
If your batter seems dry before baking, it may need a bit more moisture. Consider adding an extra egg white or a splash of coconut milk for that perfect sticky texture. -
Can I freeze these cookies?
Absolutely! Once cooled, you can freeze them in an airtight container for up to three months. Just thaw them at room temperature when you’re ready to indulge. -
How can I make them crispier?
For crispier edges, bake them a few minutes longer until they are a deeper golden brown. Just be careful not to overdo it! -
What should I do if they spread too much?
If your coconut macaroons spread too much, it could be because you didn’t let the egg whites froth enough or the oven wasn’t hot enough. Make sure to follow the instructions closely for that perfect shape.
Nutritional Info
While these delightful cookies are a treat, it’s always good to know what you’re indulging in! Each macaroon is packed with the goodness of coconut and has approximately:
- Calories: 80-90
- Fat: 4g
- Carbohydrates: 10g
- Sugar: 7g
- Protein: 1g
As always, these figures can vary based on specific brands and portions used, but you can enjoy these little bites of joy guilt-free!
Final Thoughts
I hope you feel inspired to bake up a batch of Coconut Macaroon Cookies! There’s something truly special about creating something delicious from scratch, and sharing it with loved ones only makes it sweeter. So why wait? Grab those ingredients, and let’s create some memorable moments together in the kitchen!
Remember, cooking is all about joy, creativity, and togetherness. Let the warmth of those coconut macaroons embrace you, just like grandma’s hugs did. Until next time, happy baking and keep feeding your foodie soul! 🍪🥥
Print
Coconut Macaroon Cookies
- Total Time: 35 minutes
- Yield: 20 servings 1x
- Diet: Gluten-Free
Description
Delightful coconut macaroons that are crunchy on the outside and chewy on the inside, perfect for sweet nostalgia.
Ingredients
- 2 2/3 cups sweetened shredded coconut
- 1/2 cup granulated sugar
- 2 egg whites
- 1/4 teaspoon salt
- 1 teaspoon vanilla extract
Instructions
- Preheat your oven to 325°F (160°C).
- Line a baking sheet with parchment paper.
- Combine the sweetened shredded coconut, granulated sugar, and salt in a large bowl.
- Whisk the egg whites and vanilla extract in a separate bowl until frothy.
- Pour the egg white mixture into the dry ingredients and mix well until combined.
- Scoop the mixture onto the prepared baking sheet, keeping them about 2 inches apart.
- Bake for 20-25 minutes or until golden brown.
- Cool on the baking sheet for about 10 minutes before transferring to a wire rack.
Notes
Try dipping the macaroons in melted dark chocolate for a luxurious touch!
- Prep Time: 10 minutes
- Cook Time: 25 minutes
- Category: Dessert
- Method: Baking
- Cuisine: American
Nutrition
- Serving Size: 1 cookie
- Calories: 85
- Sugar: 7g
- Sodium: 100mg
- Fat: 4g
- Saturated Fat: 3g
- Unsaturated Fat: 1g
- Trans Fat: 0g
- Carbohydrates: 10g
- Fiber: 1g
- Protein: 1g
- Cholesterol: 0mg
Keywords: coconut macaroons, cookies, dessert, gluten-free, sweet treats

No-Bake Grasshopper Mint Chocolate Bark Recipe
Grasshopper Mint Chocolate Bark Recipe: A Sweet Journey into Flavor
Hey there, fellow food lovers! It’s your pal Beau Collier from Feastical, and today we’re diving into a delightfully nostalgic treat that’s bound to take your taste buds on a joyful ride: Grasshopper Mint Chocolate Bark. If you’re a fan of mint and chocolate—which let’s be real, who isn’t?—then you’re in for a real treat. This recipe is not only a feast for your senses but also a heartwarming slice of my culinary journey.
You see, whenever I think about this decadent treat, I’m reminded of my childhood days spent in my grandmother’s kitchen. She had this magical way of turning ordinary moments into extraordinary memories, and her mint chocolate bark was no exception. I remember standing on a little stool, trying to reach the countertop while she melted chocolate, and the entire kitchen filled with that enchanting scent. Each time she peeled open a box of Andes Crème de Menthe Thins, it was as if we were unwrapping little treasures! I would sneak pieces when I thought she wasn’t looking, only to be met with a quick chuckle and the playful challenge of “sneak all you want, but I know a baker’s dozen is coming for you!”
Fast forward to the present, and I still get that same giddy feeling when I whip up this delightful bark. The recipe has evolved over the years, but the spirit of fun and fond memories remains at the forefront. So, let’s stir up those nostalgic vibes together and make some Grasshopper Mint Chocolate Bark!
Ingredients
Gathering your ingredients is half the fun! Here’s what you’ll need:
-
16 oz. white chocolate chips
A creamy base for your bark, these white chocolate chips are sweet and melt beautifully. If you’re feeling adventurous, you can substitute them with white baking chocolate, but remember it may not melt as smoothly. -
16 oz. semi-sweet chocolate chips
Rich and slightly bitter, these balance the sweetness of the white chocolate. Alternatively, opt for dark chocolate chips if you prefer a more intense flavor. -
1 box Andes Crème de Menthe Thins
The true star of the show! These mint chocolate candies add a delightful crunch and a burst of minty flavor. If you can’t find them, think about using other mint chocolates, but the Andes’ texture and flavor are hard to beat. -
Green food coloring
A splash of fun! It’s optional, but a few drops can amp up the festive look. If you want a more natural tint, consider using spirulina powder or matcha. -
Optional: 1 teaspoon mint extract
For those who really love mint, a little mint extract adds an extra oomph! Just remember to go easy on it; a little goes a long way.
Step-by-Step Instructions
Now, let’s get down to business and make some mint chocolate magic!
Step 1: Melting the Chocolate
Start by breaking down the two types of chocolate. In separate microwave-safe bowls, add your white chocolate chips in one bowl and semi-sweet chocolate chips in the other. Microwave them individually. Heat each for about 30 seconds, then stir. Repeat this process until they’re both completely melted and smooth like a dream. Pro tip: Stirring in between helps prevent burning, and who wants burnt chocolate? Yikes!
Step 2: Pour the Semi-Sweet Layer
Line a baking sheet with parchment paper. Pour the melted semi-sweet chocolate onto the parchment and spread it evenly with a spatula. If you want precision, a rolling pin over the parchment paper helps to smooth it out.
Step 3: Add Andes Thins
Now comes the fun part! Take those precious Andes Crème de Menthe Thins, and place them evenly over the semi-sweet chocolate layer while it’s still warm. Give them a minute to soften, then gently press them in—this helps them stick.
Step 4: Tint the White Chocolate
While the Andes chocolates work their magic, add a few drops of green food coloring to your melted white chocolate and stir until you achieve your desired shade of minty green! Remember: if you’re adding mint extract, do it here for an extra minty kick.
Step 5: Pour the White Chocolate
Pour the tinted white chocolate over the Andes layer, covering them completely. Use your spatula to spread it out, ensuring every piece of mint is cozy beneath that creamy layer. This step is like tucking in a favorite blanket—just so satisfying!
Step 6: Chill to Perfection
Let it cool at room temperature for a few minutes, then pop the whole tray in the fridge for about 1-2 hours or until fully firm. While you wait, maybe treat yourself to a spoonful of peanut butter or have a mint tea!
Step 7: Cut and Serve
Once the bark is set, lift it out using the parchment paper. Break or cut it into pieces. You can trim the edges for a cleaner look or break it up for that rustic charm.
Serving Suggestions
When it comes to showing off your gorgeous Grasshopper Mint Chocolate Bark, keep it simple yet charming! Place the pieces in a beautiful bowl, maybe topped with a sprig of fresh mint for that extra flair. It also makes for a delightful gift during holidays or special occasions; just pack it up in a clear cellophane bag, tie it with a ribbon, and voilà! A sweet token of love.
Recipe Variations
Ready to get creative? Here are some fun twists you can add to the basic recipe:
-
Nutty Crunch: Add chopped nuts like pistachios or almonds atop the Andes layer for extra crunch and flavor.
-
S’mores Style: Alternate layers of graham cracker crumbles for a s’mores-inspired bark.
-
Fruit Fusion: Incorporate freeze-dried raspberries or strawberries for a fruity twist that pairs wonderfully with mint.
-
Peppermint Twist for the Holidays: Add crushed peppermint candies on top instead of Andes during the festive season for a holiday-themed treat.
-
Vegan Options: Substitute chocolate chips for vegan versions and ensure your mint chocolates are dairy-free. Chocolate lovers unite!
Chef’s Notes
Making this Grasshopper Mint Chocolate Bark has become a rite of passage in my kitchen. While it’s a fantastic recipe, it’s also a conversation starter, making everyone reminisce about their favorite mint chocolate moments. Each time I make this fabulous treat, I’m reminded of the legacy of love baked into food and how it brings people together.
One of my funniest kitchen stories involves a not-so-great melt of chocolate that turned into more of a chocolate football during my early attempts. You live, you learn, right? Now, I’m a pro at melting chocolate and feel like a wizard with a solid stirring magic spell.
FAQs and Troubleshooting
-
Why is my chocolate not melting properly?
Make sure you’re microwaving in short bursts and stirring often. If it clumps, it might be overheated. Try adding a teaspoon of oil to help with texture! -
How do I get perfect shards when breaking the bark?
Slightly score the surface with a sharp knife before chilling. This will give you guidance for cutting and help create clean pieces! -
What if my white chocolate hardens before pouring?
Just place it back in the microwave for a few seconds to gently reheat. Use sparingly; you want it liquid but not too hot. -
How long will my bark last?
In an airtight container, your bark can remain fresh for about two weeks. But trust me, it won’t last that long!
Nutritional Info
If you’re curious about the nutritional breakdown of this delightful bark, here’s a rough estimate for one piece (assuming 15 servings per batch):
- Calories: 200
- Fat: 10g
- Carbohydrates: 28g
- Sugar: 24g
- Protein: 2g
Keep in mind, these numbers can vary based on your ingredients, so this is just a ballpark!
Final Thoughts
And there you have it, my fellow food enthusiasts! A simple and scrumptious Grasshopper Mint Chocolate Bark recipe that’s brimming with flavors and nostalgia. Whether you savor a piece on a quiet night or share it with loved ones, I hope this treat warms your heart as much as it does your taste buds.
So, dust off that spatula, channel your inner chocolatier, and get ready to create some sweet memories! Remember, in the kitchen, it’s all about having fun and bringing joy with food. Until next time, happy cooking, and keep spreading that love through great dishes!
Print
Grasshopper Mint Chocolate Bark
- Total Time: 30 minutes
- Yield: 15 servings 1x
- Diet: Vegetarian
Description
A delightful and nostalgic mint chocolate bark that combines creamy white chocolate with rich semi-sweet chocolate and Andes Crème de Menthe Thins.
Ingredients
- 16 oz. white chocolate chips
- 16 oz. semi-sweet chocolate chips
- 1 box Andes Crème de Menthe Thins
- Green food coloring (optional)
- 1 teaspoon mint extract (optional)
Instructions
- Start by breaking down the two types of chocolate. In separate microwave-safe bowls, add your white chocolate chips in one bowl and semi-sweet chocolate chips in the other. Microwave them individually. Heat each for about 30 seconds, then stir. Repeat this process until they’re both completely melted and smooth.
- Line a baking sheet with parchment paper. Pour the melted semi-sweet chocolate onto the parchment and spread it evenly with a spatula.
- Take the Andes Crème de Menthe Thins and place them evenly over the semi-sweet chocolate layer while it’s still warm. Press them in gently.
- Add a few drops of green food coloring to your melted white chocolate and stir until you achieve your desired shade. If using mint extract, add it now.
- Pour the tinted white chocolate over the Andes layer, covering them completely.
- Let it cool at room temperature for a few minutes, then refrigerate for about 1-2 hours or until fully firm.
- Lift out the bark using the parchment paper and break or cut it into pieces.
Notes
This bark can be stored in an airtight container for about two weeks.
- Prep Time: 15 minutes
- Cook Time: 15 minutes
- Category: Dessert
- Method: No-Cook
- Cuisine: American
Nutrition
- Serving Size: 1 piece
- Calories: 200
- Sugar: 24g
- Sodium: 50mg
- Fat: 10g
- Saturated Fat: 6g
- Unsaturated Fat: 4g
- Trans Fat: 0g
- Carbohydrates: 28g
- Fiber: 1g
- Protein: 2g
- Cholesterol: 5mg
Keywords: mint chocolate, dessert, bark, holiday treat, sweet snack

Ingredient Raspberry Bars: Quick, No-Bake Summer Treats
Indulge in Sweet Simplicity: Fabulous Five Ingredient Raspberry Bars
Hey there, fellow food enthusiasts! Today, we’re diving into something delightfully simple yet fabulously tasty: Fabulous Five Ingredient Raspberry Bars. As a chef who adores whipping up kitchen magic with minimal fuss—and maximum flavor—I’m thrilled to share this creamy, fruity delight that is perfect for any occasion. Whether you’re looking to impress guests at a gathering or simply want a sweet treat to enjoy while binge-watching your favorite show, these raspberry bars are the answer.
I mean, who doesn’t love the sweet and tart balance of raspberry jam enveloped in a buttery, melt-in-your-mouth crust? It’s like a warm hug from your grandma, mixed with the perks of modern convenience. If you’re new to the world of baking or you’re a seasoned pro, these bars are accessible yet strikingly delicious. Plus, with only five ingredients, you won’t have to wrestle with an overflowing grocery cart or a complicated recipe. Let’s get those aprons on and embark on this sweet adventure together!
A Bite of Nostalgia
When I think of raspberry bars, I’m transported back to my childhood kitchen, where the air buzzed with chatter and laughter, and the smell of something delicious baked in the oven was like a siren call. My mom used to whip up her own version of berry bars every summer when the raspberries were at their sweetest. I remember lurking by the kitchen, eager to sneak a taste while she warned me not to “spoil my appetite.” As if!
Those summer days were filled with friends running in and out of the house, all of us enveloped in the warmth of the sun and the delicious aroma that wafted through the open windows. My friends and I would tear into those bars just as soon as they cooled, the sweet raspberry filling smeared across our fingers and faces, punctuated by bouts of giggles and joy. It’s a memory I cherish, and it’s the backdrop for my recipe today—summoning the simplicity and delight of good food shared among friends.
So, grab a seat and a cup of coffee (or tea, no judgment here!), as we get into the nitty-gritty of whipping up these fabulous raspberry bars!
Ingredients to Gather
Here’s what you’ll need to create your own batch of scrumptious raspberry bars:
-
1 cup unsalted butter, softened
This forms the base of your crust, lending that rich flavor and melt-in-your-mouth texture. If you’re short on time, you can use margarine, but I highly recommend butter for the best taste. -
2 1/4 cups all-purpose flour
A staple in almost all baking recipes, this will give your bars the structure they need. Need a gluten-free option? Try using a gluten-free all-purpose flour blend. -
1 cup granulated sugar
This adds sweetness and a delightful crunch to the topping. For a lower-calorie alternative, you can experiment with coconut sugar or a sugar substitute, but keep in mind the final texture might vary slightly. -
1 large egg, room temperature
The egg helps bind everything together, giving these bars their lovely texture. If you’re vegan or egg-free, you can substitute with flaxseed meal mixed with water as a binding agent. -
1 jar seedless raspberry jam (9-12 ounces)
The star of the show! Look for high-quality jam for the best flavor, and don’t hesitate to switch it up with a different flavor, like blackberry or strawberry, if you prefer.
Step-by-Step Instructions
Let’s get cooking! Follow these detailed steps to create your fabulous raspberry bars.
-
Preheat the Oven
Start by preheating your oven to 350°F (175°C). This ensures that your raspberry bars bake evenly right from the get-go. -
Prepare Your Baking Dish
Grease a 9×9-inch baking dish or line it with parchment paper for easy removal. If you’re using parchment, make sure it hangs over the edges a bit so you can lift the bars out easily later—like a cozy food hammock. -
Mixing the Crust
In a large mixing bowl, cream the softened butter and granulated sugar together. I like to use an electric mixer for this step. Beat it until fluffy and light—about 2-3 minutes should do the trick. This is where the magic starts! -
Incorporate the Egg
Add in the egg and mix until just combined. Don’t overdo it! Overmixing can lead to tougher bars; we want them to be tender. -
Add Flour
Gradually add in the flour. Mix just until the flour disappears—again, we’re looking for a tender texture here, not a tough one! -
Spread the Base
Press about two-thirds of the mixture firmly into the bottom of your prepared baking dish to form the base crust. Really press down; we want this to be sturdy enough to hold the juicy raspberry filling. -
Layer the Jam
Spread the raspberry jam evenly over the crust. Don’t be shy—make sure you cover it! This is where all the deliciousness lies. -
Crumble the Topping
Now, take the remaining dough and crumble it over the jam layer. It’s okay if some jam peeks through—those little bits of jam are going to be heavenly! -
Bake
Pop your dish in the preheated oven and bake for about 30-35 minutes, or until the top is golden brown. The aroma will fill your kitchen and have your stomach grumbling in no time! -
Cool and Slice
Once baked, remove your bars from the oven and let them cool in the dish for about 10-15 minutes. Then, lift them out using the parchment paper (if you used it) and let them cool completely on a wire rack. Once cooled, slice them into bars and get ready to dig in!
Serving Suggestions
These raspberry bars are perfect for nearly any occasion! Here’s how I love to serve them:
-
Dust with Powdered Sugar
For that classic touch, lightly dust the cooled bars with powdered sugar. It adds a lovely presentation and a touch of sweetness. -
Pair with Ice Cream
Serve warm raspberry bars alongside a scoop of vanilla or raspberry sorbet for a delightful dessert that’s sure to impress. -
Add Fresh Berries
Don’t stop at just bars! Garnish your serving plate with fresh raspberries or even a sprig of mint for a pop of color. -
Perfect for Picnics
These bars are portable and easy to pack for picnics. Just cut them into squares, wrap them in parchment, and enjoy them on the go!
Recipe Variations
Why not mix things up? Here are some fun variations you can try with your raspberry bars:
-
Different Jams
Get creative with flavors! Switch the raspberry jam for other fruit jams like blueberry, apricot, or even lemon curd for a zingy twist. -
Nutty Addition
Incorporate chopped nuts, like almonds or walnuts, into the crust or crumble topping for added texture and flavor. -
Chocolate Chips
Stir in some semi-sweet or dark chocolate chips into the crumble topping for a rich chocolatey surprise. -
Lemon Zest
Add lemon zest to the butter-sugar mixture for a refreshing hint of citrus that pairs fabulously with raspberries.
Chef’s Notes
Oh, where do I even begin? This recipe has been a staple in my kitchen for years, and I can honestly say everyone who tries it goes insane for it! I’ve experimented with different variations, like almond and chocolate, and they always come out delicious.
One of my fondest memories involves a bake sale I participated in during my culinary school days where I brought these raspberry bars. They were the first item to sell out, and I ran back home to bake another batch. The joy of creating something that brings smiles is unmatched, and that’s what cooking is all about, folks!
FAQs and Troubleshooting
Here are a few common questions and potential pitfalls to avoid while making your raspberry bars:
-
Why are my bars falling apart?
If they crumble too easily, it could be that the crust isn’t pressed firmly enough. Make sure to really compact the base and crumble topping. -
Can I use fresh raspberries instead of jam?
Fresh raspberries can be used, but you’ll need to add some sugar and maybe a thickening agent to keep the filling from being too runny. -
What if I don’t have raspberry jam?
Any seedless fruit jam will work. If you prefer a fresh alternative, consider making your own fruit compote. -
How do I store leftovers?
Store these delicious bars in an airtight container at room temperature for about 2-3 days. They can also be refrigerated for longer freshness.
Nutritional Info
Here’s the breakdown for each fabulous raspberry bar (based on a standard recipe serving of 16):
- Calories: Approximately 210
- Total Fat: 10g (Saturated Fat: 6g)
- Cholesterol: 30mg
- Sodium: 60mg
- Total Carbohydrates: 30g (Dietary Fiber: 0.5g, Sugars: 10g)
- Protein: 2g
Keep in mind, nutritional values may vary based on ingredient brands and exact quantities used. Modifications may change the overall nutrition, too!
Final Thoughts
And there you have it—fabulous five ingredient raspberry bars that are not only easy to make but also steal the show wherever they go! Whether you’re crafting these delectable treats for yourself or to share with friends and family, I hope this recipe brings you as much joy as it has brought me over the years.
Remember, cooking is all about exploration; don’t hesitate to experiment and make this recipe your own. I can’t wait to hear about your culinary adventures! So go ahead, bring out those ingredients and bake a batch of joy today. Until next time, happy cooking!
Print
Fabulous Five Ingredient Raspberry Bars
- Total Time: 50 minutes
- Yield: 16 servings 1x
- Diet: Vegetarian
Description
Delight in easy-to-make raspberry bars that provide a perfect balance of sweet and tart with just five ingredients.
Ingredients
- 1 cup unsalted butter, softened
- 2 1/4 cups all-purpose flour
- 1 cup granulated sugar
- 1 large egg, room temperature
- 1 jar seedless raspberry jam (9–12 ounces)
Instructions
- Preheat the oven to 350°F (175°C).
- Grease a 9×9-inch baking dish or line it with parchment paper.
- Mix the softened butter and granulated sugar together until fluffy, about 2-3 minutes.
- Add the egg and mix until just combined.
- Gradually add the flour and mix until it disappears.
- Press two-thirds of the mixture firmly into the bottom of the prepared baking dish.
- Spread the raspberry jam evenly over the crust.
- Crumble the remaining dough over the jam layer.
- Bake for 30-35 minutes, or until golden brown.
- Cool in the dish for 10-15 minutes before slicing.
Notes
These bars can be garnished with powdered sugar, fresh berries, or paired with ice cream for serving.
- Prep Time: 15 minutes
- Cook Time: 35 minutes
- Category: Dessert
- Method: Baking
- Cuisine: American
Nutrition
- Serving Size: 1 bar
- Calories: 210
- Sugar: 10g
- Sodium: 60mg
- Fat: 10g
- Saturated Fat: 6g
- Unsaturated Fat: 4g
- Trans Fat: 0g
- Carbohydrates: 30g
- Fiber: 0.5g
- Protein: 2g
- Cholesterol: 30mg
Keywords: raspberry bars, dessert, easy baking, five ingredient recipe, sweet treat

Healthy Twix Cups
Healthy Twix Cups: A Sweet Treat with a Guilt-Free Twist!
Hey there, fellow foodies! It’s your buddy, Beau Collier, back at it with another delicious twist on a classic treat that’s bound to tickle your taste buds—Healthy Twix Cups! When that sweet tooth kicks in, there’s no need to sacrifice health for flavor. With these cute little cups, you can revel in that rich, buttery caramel, crunchy “cookie,” and smooth chocolate you crave, minus the guilty pangs after.
Now, I know what you might be thinking: “Healthy and Twix? Can they really exist in the same sentence?” Well, my friend, put on your apron and let’s dive into this guilt-free indulgence that will leave you feeling good inside and out.
A Sweet Memory That Inspired Me
Let me take you back to my childhood when evenings were often wrapped in the warm embrace of my family kitchen. My mom and I would make sweet treats together for movie nights, and our favorite concoction was the ever-popular Twix bar. I distinctly remember the sound of the chocolate lightly cracking as we dug in. We loved that perfect balance of crunchy cookie, silky caramel, and decadent chocolate… Ahh, pure bliss!
Fast forward to now, when I realized I wanted to recreate that nostalgic joy but with a healthy spin. I wanted something delightful, yet made with wholesome ingredients, so I could indulge without feeling like I needed to jog five miles afterward. And that’s how the concept of these Healthy Twix Cups was born! With every bite, they bring back that sweet nostalgia and laughter-filled nights spent with loved ones. So, let’s whip up this delightful recipe together!
Essential Ingredients for Your Healthy Twix Cups
To create these scrumptiously healthy Twix Cups, you’ll need the following ingredients:
-
1 cup almond flour: This gluten-free flour gives our cups a wonderful, nutty flavor while serving as a great binder. If you need a substitution, you can use oat flour or coconut flour, though be cautious with the ratios as they tend to absorb more moisture.
-
1/4 cup coconut oil, melted: This healthy fat helps to create that luscious, melt-in-your-mouth texture. If you’re not a fan of coconut oil, go ahead and use unsalted butter or ghee—your choice!
-
2 tablespoons honey or maple syrup: This is our natural sweetener! Honey is a bit thicker, while maple syrup is runnier. Feel free to adjust the sweetness to your liking or substitute with agave syrup for a vegan option.
-
1/4 teaspoon sea salt: Just a pinch will enhance the sweet flavors and elevate the taste of the chocolate.
-
1/2 cup natural peanut butter: Creamy peanut butter adds protein and that delicious nutty flavor we all crave. If you’re looking for a nut-free option, almond butter or sunflower seed butter can do the trick!
-
1/4 cup dark chocolate chips: Look for chocolate with at least 70% cocoa for a richer flavor and less sugar. You can also melt a dark chocolate bar if you prefer.
-
1 tablespoon coconut milk: This will thin out our chocolate a bit for smooth drizzling. Have a can handy and make sure to shake it well! Almond milk would also work if you have that on hand!
With these simple ingredients, we’re about to create a treat that not only satisfies your sweet tooth but is also kind to your body. Let’s get cooking!
Step-by-Step Instructions to Make Healthy Twix Cups
Now that we have our ingredients all lined up and ready to go, let’s walk through the steps for creating these Healthy Twix Cups together.
Step 1: Prepare Your Pan
Start by lining a muffin tin with paper liners. This will make it easy to pop out the cups once they’ve set, so you don’t have to worry about sticking.
Step 2: Create the Cookie Base
In a medium bowl, combine the almond flour and melted coconut oil. Stir until it’s well mixed. Add in the honey (or maple syrup) and a pinch of the sea salt.
Chef Hack: Use a fork to mix everything together—it helps ensure there are no lumps and makes the process a tad quicker!
Step 3: Form the Cookie Cups
Now, take about 1 tablespoon of the dough mixture and press it firmly into the bottom of each muffin liner. Aim for an even layer to create that lovely cookie-like crust. I like to use the back of a small measuring cup to really pack it in!
Step 4: Add the Peanut Butter Layer
Next up, take your peanut butter and scoop about 1 tablespoon onto each pressed cookie base. Gently smooth it out, spreading it so that we have a nice layer of that creamy goodness.
Tip: If your peanut butter is too firm, give it a quick zap in the microwave for about 15 seconds. This will make it easier to spread!
Step 5: Time for the Chocolate
In a small microwave-safe bowl, combine the dark chocolate chips and coconut milk. Microwave in 30-second intervals, stirring in between until the chocolate is completely melted and smooth.
Pro Tip: Be careful not to overheat the chocolate; it can seize up really quickly!
Drizzle that luscious melted chocolate generously over the peanut butter layer. Try to cover all the peanut butter, so it’s hidden under a beautiful chocolate shell!
Step 6: Chill Until Firm
Pop the muffin tin in the refrigerator for about 1-2 hours, or until the cups are firm. Waiting might be the hardest part, but I promise it’s worth it!
Step 7: Serve and Enjoy!
Once they’re set, remove the cups from the muffin tin by pulling out the paper liners. If any chocolate has overflowed, simply trim with a knife!
Now, plate these delightful cups up, maybe with a sprinkle of sea salt on top for aesthetic appeal. Gather your friends and family, and indulge in these bites of heaven!
Serving Suggestions for Healthy Twix Cups
These Healthy Twix Cups not only taste amazing, but they also look stunning on the plate! To serve, arrange them on a beautiful platter. You can even drizzle some extra melted chocolate around them for a fun presentation.
Hint: Pair these cups with fresh fruit like strawberries or bananas to add a simple, colorful touch. You can also sprinkle some chopped nuts or coconut flakes on top for an added crunch and extra flavor burst!
Recipe Variations: Mix It Up Your Way!
While the original recipe is already a winner, don’t hesitate to get creative! Here are some fun variations you can try:
-
Mocha Twix Cups: Add a teaspoon of instant coffee granules to the melted chocolate for that perfect pick-me-up with cocoa.
-
Coconut Crunch: Incorporate shredded coconut into the peanut butter layer for delightful texture and flavor.
-
Nut-Free Version: Substitute the peanut butter with sunflower seed butter for a nut-free option that’s also school-safe!
-
Vegan Delight: Simply swap the honey with maple syrup and use dairy-free chocolate to make it fully vegan.
-
Spiced Twix Cups: Add a sprinkle of cinnamon or nutmeg to the almond flour mixture for a warming, cozy flavor.
Feel free to mix and match to discover your favorite combination!
Chef’s Notes: A Little Chef Wisdom
As a home cook, I’ve seen how recipes evolve over time. What started as a simple attempt to make Healthy Twix Cups became a family favorite that brings joy to everyone who tries them. There’s something magical about taking a classic recipe, giving it a little TLC, and transforming it into something new and healthier.
And sometimes, when I’m feeling adventurous, I throw in different ingredients based on what I have in the pantry. That’s the beauty of cooking! Embrace the freedom and let your creativity shine in the kitchen!
FAQs and Troubleshooting: Your Questions Answered!
1. My cups are too crumbly! What did I do wrong?
If your cups are crumbly, it might be that you didn’t use enough binding ingredients like coconut oil or peanut butter. Add a touch more melted coconut oil next time, or ensure you’re packing the ingredients well.
2. Can I leave these out at room temperature?
While they can sit out for a short time, I recommend keeping them refrigerated to maintain their firmness. The coconut oil will soften at room temperature.
3. How can I sweeten these without honey or maple syrup?
You can use mashed bananas, unsweetened applesauce, or stevia to keep your cups sweet while keeping the sugars low. Just adjust the consistency as needed!
4. Help! My chocolate seized when melting! What now?
No biggie! Melt some more chocolate and add a splash of oil (coconut or vegetable) to bring it back to life. Just remember to keep the heat gentle next time!
Nutritional Info for Healthy Twix Cups
Let’s take a peek at what makes these Healthy Twix Cups a smart choice! Here’s the approximate nutritional info per cup:
- Calories: 120
- Protein: 4g
- Fat: 9g
- Carbohydrates: 9g
- Fiber: 2g
- Sugar: 3g
These stats may vary slightly based on your specific ingredients and serving sizes, but overall, you can feel great about indulging in these treats. Packed with wholesome fats, fiber, and natural sweetness, they’re the perfect mix of delicious and nutritious!
Final Thoughts: Your Sweet Adventure Awaits!
There you have it—your very own guide to creating mouthwatering Healthy Twix Cups. I hope you enjoyed this recipe as much as I cherished bringing it to life for you. Whether you’re satisfying a sweet craving, hosting a fun get-together, or simply treating yourself (you totally deserve it!), these cups will surely delight.
Remember, cooking should always be fun— a way to express yourself, share love, and create memories. So gather your friends, pop on your favorite playlist, and get ready to whip up a batch of these delightful cups.
Until next time, happy cooking and scrumptiously sweet adventures await you—all with a little love and a pinch of creativity!
Now who’s ready for a bite? 🍫✨
Print
Healthy Twix Cups
- Total Time: 120 minutes
- Yield: 12 servings 1x
- Diet: Gluten-Free, Vegetarian
Description
Indulge in these Healthy Twix Cups, a guilt-free twist on the classic treat featuring a buttery caramel, crunchy cookie, and smooth chocolate.
Ingredients
- 1 cup almond flour
- 1/4 cup coconut oil, melted
- 2 tablespoons honey or maple syrup
- 1/4 teaspoon sea salt
- 1/2 cup natural peanut butter
- 1/4 cup dark chocolate chips
- 1 tablespoon coconut milk
Instructions
- Prepare your pan by lining a muffin tin with paper liners.
- Create the cookie base by combining almond flour and melted coconut oil, then stirring in honey and sea salt.
- Form the cookie cups by pressing 1 tablespoon of the mixture into the bottom of each muffin liner.
- Add the peanut butter layer by scooping 1 tablespoon onto each cookie base and smoothing it out.
- Microwave the dark chocolate chips and coconut milk in 30-second intervals, stirring until smooth.
- Drizzle the melted chocolate over the peanut butter layer.
- Chill the muffin tin in the refrigerator for 1-2 hours until firm.
- Serve and enjoy once firm, optionally sprinkling with sea salt.
Notes
Feel free to substitute ingredients to suit dietary preferences, such as using sunflower seed butter for a nut-free option.
- Prep Time: 15 minutes
- Cook Time: 0 minutes
- Category: Dessert
- Method: Chilling
- Cuisine: American
Nutrition
- Serving Size: 1 cup
- Calories: 120
- Sugar: 3g
- Sodium: 60mg
- Fat: 9g
- Saturated Fat: 6g
- Unsaturated Fat: 3g
- Trans Fat: 0g
- Carbohydrates: 9g
- Fiber: 2g
- Protein: 4g
- Cholesterol: 0mg
Keywords: Healthy Twix Cups, dessert, gluten-free, sweet treats, healthy snacks, guilt-free dessert
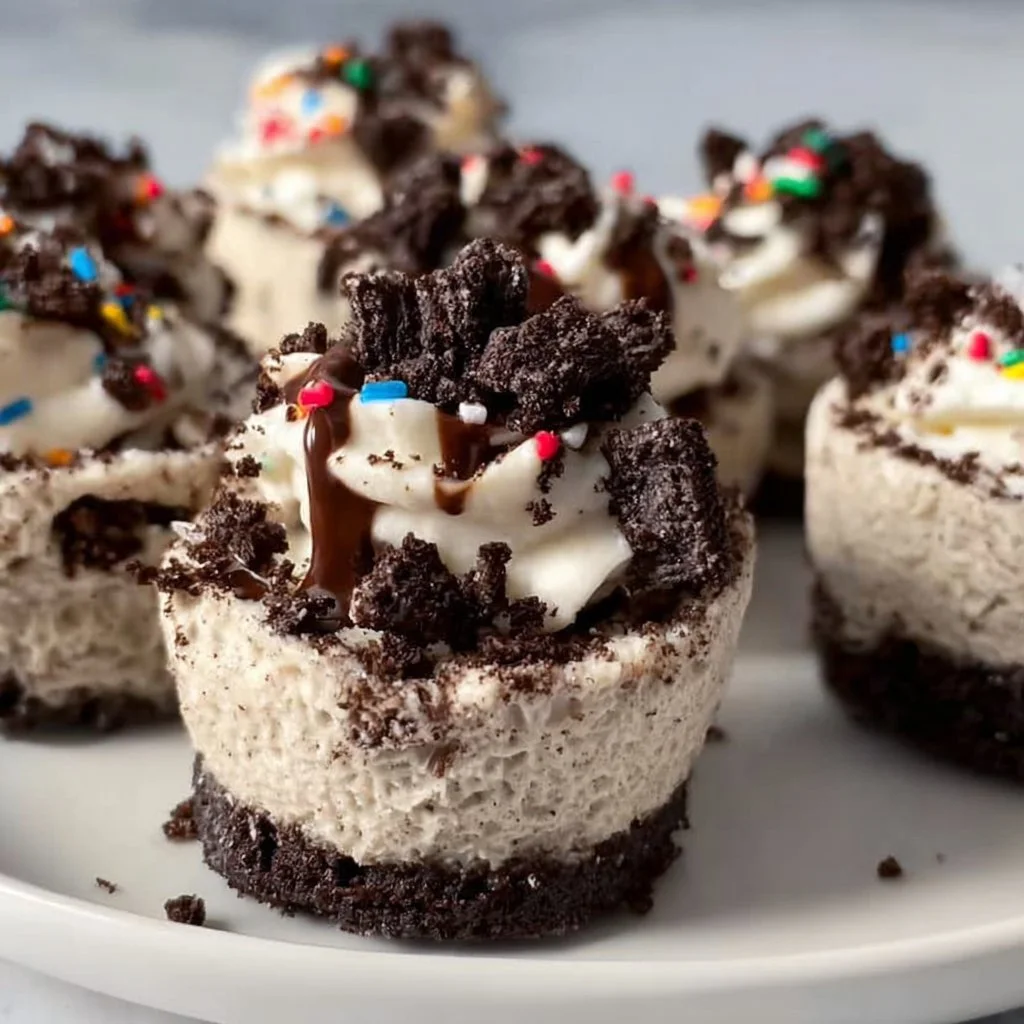
Healthy No-Bake Oreo Cheesecake Bites Recipe
Healthy No-Bake Oreo Cheesecake Bites Recipe
Hey there, fellow food lovers! I’m Beau Collier, and I’m thrilled you’re here at Feastical! Today, we’re diving into a recipe that’s not only a crowd-pleaser but also super easy to whip up—Healthy No-Bake Oreo Cheesecake Bites. Yep, you heard that right! These little gems pack all the flavors of a classic cheesecake but without the guilt. Plus, they require zero baking, which means more time for you to kick back with a cold drink while indulging your sweet tooth!
Now, before we get into the nitty-gritty of the recipe, let’s chat about what makes these cheesecake bites so special. First off, who doesn’t love cookies and cream? The rich, velvety texture of cream cheese, combined with the tanginess of Greek yogurt, creates a deliciously smooth filling that’s just begging to be devoured. And with the added crunch from those delightful Oreo Thins, you get the perfect balance of creamy and crunchy. The best part? These bites are healthier than traditional cheesecake, making them a fabulous choice for dessert lovers who want to stay on the lighter side.
Picture this: It’s a sunny Sunday afternoon, and you’re hosting a get-together with friends and family. You’ve spent the day laughing, reminiscing, and sharing stories, and just when you think everyone is full from the savory dishes you’ve laid out, you present these delightful cheesecake bites. The moment you see those smiles of delight as your guests sink their teeth into them is nothing short of magical. You might even hear “wow” repeated more times than you can count.
So grab your mixing bowl and let’s jump into this no-bake adventure that will leave your taste buds dancing and your heart full!
Personal Story
Ah, desserts have always held a special place in my heart. Growing up, my family had a tradition of Sunday dinners followed by something sweet. My grandmother, bless her heart, was the reigning queen of cheesecakes. She introduced me to the world of creamy delights and taught me the magic of blending flavors. I can still picture her in the kitchen, apron on, whisking away while I stood on a stool beside her, my little hands eager to help.
One of my fondest memories involves a particularly hot summer day. We’d spent the afternoon by the pool, and the idea of a heavy, baked cheesecake felt overwhelming. That’s when Grandma decided to get creative. She tossed together a no-bake version that became the star of our summer gatherings. Inspired by her genius, I’ve continued to play around with different flavors and ingredients, blending nostalgia with a modern twist.
When I recently discovered how to craft a healthier version of this childhood favorite—and I settled on these Healthy No-Bake Oreo Cheesecake Bites—I couldn’t help but feel like I was channeling Grandma’s spirit. This recipe brings me joy every time I create it, and I can’t wait for you to share that same experience.
Ingredients
Here’s what you’ll need for these scrumptious cheesecake bites:
-
8 oz. Fat-Free Cream Cheese
This provides a rich, creamy texture without loading on unnecessary calories. Low-fat cream cheese can work as a substitute, but it may alter the texture. -
1/2 cup Non-Fat Vanilla Greek Yogurt
Great for adding protein and a smooth consistency! If you want to switch things up, plain Greek yogurt works too—though it’ll be less sweet. -
1 tsp. Vanilla Extract
This little ingredient brings warmth and depth to all your desserts. Feel free to experiment with almond extract for a unique flavor twist! -
1/4 tsp. Salt
Don’t skip this! A touch of salt intensifies sweetness and balances flavors perfectly. If you’re watching your sodium, you can omit this, but it does enhance the overall taste. -
8 oz. Tub Low-Fat Cool Whip
This will give your cheesecake bites that airy, whipped texture. You can use whipped coconut cream for a dairy-free option, or make your own whipped cream if you prefer that fresh taste. -
24 Oreo Thins
These are key for crust and crunch! If you’re looking for a gluten-free option, there are gluten-free chocolate sandwich cookies available that work beautifully.
Now that we have our ingredients all lined up, it’s time to get cooking (well, kinda)!
Step-by-Step Instructions
Alright, let’s roll up our sleeves and get to work! Here’s how to create these fantastic no-bake cheesecake bites:
-
Prep Your Ingredients:
- Before anything, make sure your cream cheese is softened. Pull it out of the fridge about 30 minutes before you start mixing; room temperature cream cheese will blend seamlessly.
-
Mix Cream Cheese and Yogurt:
- In a large mixing bowl, combine the softened cream cheese and the Greek yogurt. Use an electric mixer on medium speed for about 2 minutes, just until it’s creamy and smooth. Here’s the chef hack: mixing these ingredients well will ensure there are no lumps—and we want a velvety texture!
-
Add Vanilla and Salt:
- Next up, add the vanilla extract and salt. Beat for another 30 seconds until fully incorporated. I always say this step is what truly elevates the flavor profile—it’s those small details that make all the difference!
-
Fold in the Cool Whip:
- Now gently fold in the Low-Fat Cool Whip using a spatula. This is where things get fluffy! Make sure to take your time with this step; stirring too vigorously can deflate the goodness we want. Your mixture should be light and airy.
-
Crush the Oreo Thins:
- Grab those Oreo Thins and crush them into fine crumbs. You can do this by placing them in a resealable plastic bag and giving them a whack with a rolling pin or by using a food processor if you have one handy. Just make sure they’re finely crushed for the best texture in your bites!
-
Combine Crumbs and Filling:
- Here’s a fun part: take about 1 cup of the crushed Oreo mixture and fold it into your cheesecake mixture. This adds that chocolatey goodness right into the filling! Set aside the remaining crumbs for topping.
-
Portion Out the Mixture:
- Now, using a cookie scoop (or just a spoon if you’re feeling adventurous), portion out the mixture into small, bite-sized rounds. The charm of these bites is all about the perfect size, so aim for around 1 inch in diameter.
-
Chill to Set:
- Place your cheesecake bites on a baking sheet lined with parchment paper. Once you’ve portioned all of them out, pop them in the fridge for at least 1 hour to let them firm up. Trust me, the wait is totally worth it!
-
Serve and Enjoy:
- Once they’ve chilled and set, serve them cold! If you want to make them extra special, sprinkle the reserved crushed Oreos on top just before serving to add a little crunch!
Serving Suggestions
These cheesecake bites are fantastic on their own, but let’s take it up a notch for presentation. Try arranging them on a charming platter, and drizzle some chocolate sauce around the edges. You could even dab a bit of whipped cream on the plate alongside the bites for a fun, restaurant-style aesthetic. Want to wow your guests? Use mini dessert cups and layer them—first a layer of the cheesecake mixture, followed by a sprinkle of crushed Oreo, then another layer of cheesecake, and top it off with whipped cream and a dusting of Oreos. It’s an impressive but easy way to elevate dessert!
Recipe Variations
Now, while these bites are undeniably delicious as is, let’s sprinkle in some ideas to give a fun twist or cater to different dietary needs:
-
Peanut Butter Chocolate Oreo Bites: Mix in 1/4 cup of creamy peanut butter into the cream cheese mixture for a nutty flair.
-
Minty Fresh Twist: Add a few drops of peppermint extract to the filling for a refreshing version. Perfect for mint lovers!
-
Fruit-Filled Delight: Fold in some fresh strawberries or raspberries into the cream cheese mix for a fruity contrast. This add-in also brightens up the flavor profile!
-
Sugar-Free Alternative: If you’re looking to cut down on sugar, opt for sugar-free cream cheese and a no-sugar-added Cool Whip. Just keep an eye on the sweetness—you may need to adjust it!
-
Cocoa Powder Add-In: For an extra chocolate kick, sift in a bit of cocoa powder into the batter. It’ll add depth and a beautiful richly dark color without being overwhelming.
Chef’s Notes
Let me tell you, creating this recipe has been quite the delightful journey! I’ve played around with different versions over the years, even experimenting with mix-ins like crushed nuts or toppings of fresh fruit. One of the funniest moments was when I made these bites for a potluck and accidentally grabbed the salt instead of sugar—I can still hear the collective “oops” when everyone tasted that first bite. Thankfully, everyone had a good laugh, and it gave me the idea for the salt in the recipe!
These bites have evolved from my grandma’s no-bake cheesecake into something uniquely mine, showcasing flavors while keeping it healthy. Just goes to show you, food is all about creativity and memories!
FAQs and Troubleshooting
-
Can I make these bites ahead of time?
Absolutely! These cheesecake bites can be made a day or two in advance. Just keep them in an airtight container in the fridge, and they’ll be ready when you are! -
What if my cream cheese isn’t soft enough?
If you forget to take it out of the fridge in advance, simply cut it into smaller cubes and microwave it for about 15 seconds—just be sure not to melt it! -
Can I use regular Oreos instead of Oreo Thins?
You can, but the texture and calorie content will change slightly. Regular Oreos are thicker and will give you a more substantial crust, but they’ll still taste incredible! -
What should I do if my filling is too runny?
If you find that your mixture is too soft, try chilling it for longer. If that doesn’t work, you can fold in a bit more crushed Oreo and/or a spoonful of Greek yogurt to help it set.
Nutritional Info
Here’s a rough breakdown of the nutritional info for one cheesecake bite (assuming you make 24 bites):
- Calories: 63
- Protein: 2g
- Fat: 2g
- Carbohydrates: 9g
- Fiber: 1g
- Sugar: 4g
These bites are not only less caloric than traditional cheesecake slices, but they’re also packed with some protein, thanks to the Greek yogurt and cream cheese. It’s a sweet way to indulge without the burden of excess calories!
Final Thoughts
There you have it! Your guide to whipping up delicious Healthy No-Bake Oreo Cheesecake Bites that will impress your friends, family, and even your stubborn sweet tooth. I hope you’ve enjoyed this culinary journey with me! Feel free to experiment, make this recipe your own, and let the memories flow. Food is more than just ingredients; it’s about connection, nostalgia, and making moments deliciously unforgettable.
So, next time you need a quick and delightful dessert, remember these bites. They’re perfect for any occasion—be it a casual family dinner or a fabulous summer soirée. I’m excited for you to savor every delicious bite!
Now, go grab those ingredients, and let’s make some magic happen in the kitchen. Happy cooking!
Print
Healthy No-Bake Oreo Cheesecake Bites
- Total Time: 75 minutes
- Yield: 24 bites 1x
- Diet: Vegetarian
Description
Delicious and healthier no-bake Oreo cheesecake bites that offer all the flavors of classic cheesecake without the guilt.
Ingredients
- 8 oz. Fat-Free Cream Cheese
- 1/2 cup Non-Fat Vanilla Greek Yogurt
- 1 tsp. Vanilla Extract
- 1/4 tsp. Salt
- 8 oz. Tub Low-Fat Cool Whip
- 24 Oreo Thins
Instructions
- Prep your ingredients: Soften the cream cheese by taking it out of the fridge 30 minutes before mixing.
- Mix cream cheese and yogurt in a large mixing bowl with an electric mixer on medium speed for 2 minutes until creamy.
- Add vanilla extract and salt; beat for an additional 30 seconds to incorporate.
- Fold in the Low-Fat Cool Whip gently with a spatula.
- Crush the Oreo Thins into fine crumbs using a resealable plastic bag or food processor.
- Combine about 1 cup of crushed Oreos into the cheesecake mixture, setting aside the rest for topping.
- Portion the mixture into small, bite-sized rounds using a cookie scoop.
- Chill the bites on a baking sheet lined with parchment paper for at least 1 hour.
- Serve cold and top with reserved crushed Oreos if desired.
Notes
These bites can be made ahead of time and stored in an airtight container in the fridge for a day or two.
- Prep Time: 15 minutes
- Cook Time: 0 minutes
- Category: Dessert
- Method: No-Bake
- Cuisine: American
Nutrition
- Serving Size: 1 bite
- Calories: 63
- Sugar: 4g
- Sodium: 100mg
- Fat: 2g
- Saturated Fat: 1g
- Unsaturated Fat: 1g
- Trans Fat: 0g
- Carbohydrates: 9g
- Fiber: 1g
- Protein: 2g
- Cholesterol: 10mg
Keywords: cheesecake, no-bake, dessert, Oreo, healthy

No-Bake Sugar-Free Lemon Pie Recipe
No-Bake Sugar-Free Lemon Pie Recipe
Hey there, food lovers! 🥧 If you’re anything like me, you have a special spot in your heart (and stomach) for desserts that feel like a joyful celebration in every bite. Today, we’re whipping up something fantastic that doesn’t require turning on the oven—yep, you heard me right! This No-Bake Sugar-Free Lemon Pie is the perfect treat for those warm sunny days when you crave something refreshing yet indulgent.
This pie is not just easy to make, but it’s also a guilt-free delight that satisfies your sweet tooth without any of the usual sugar-induced guilt. If you want to impress your friends at the next picnic or simply conjure up some sweet memories while enjoying a slice on your couch, this pie is calling your name. I mean, who doesn’t love a good lemon dessert? With its bright zest and creamy filling, it’s like sunshine on a plate!
In my kitchen, this pie has become a staple after learning a few tricks along the way. As someone who loves sharing kitchen magic, I’m thrilled to spill all my secrets to you in this guide. Grab your apron, and let’s dive into creating this zesty beauty!
Personal Story
Ah, lemons. Just saying the word brings back fragrant memories from my childhood. I remember standing on a stool in my grandmother’s cozy kitchen, helping her whip up lemon meringue pies from scratch. The air was filled with the tangy scent of fresh lemons and the sweet softness of meringue. It was our bonding time, filled with laughter and flour fights—my grandfather’s playful shenanigans always made the kitchen feel extra warm.
The meringue was a bit finicky, though, which made me long for a dessert that was both easy and delicious. Fast forward to my culinary adventures today, and I’ve found that no-bake treats are my jam! This No-Bake Sugar-Free Lemon Pie sums up those cheerful memories, wrapped up in a creamy, dreamy filling that reminds me of those blissful days in my grandma’s kitchen. Let me share this recipe that keeps those joyous flavors alive, minus the fuss of the oven!
Ingredients
To bring this delightful creation to life, gather the following ingredients:
-
1 1/2 cups almond flour
This nutty flour serves as a great base for the crust. It’s gluten-free and offers a light, pleasant texture. If you’re not a fan of almond flour, feel free to swap in your favorite nut flour or even gluten-free oat flour! -
1/4 cup melted butter
Butter adds richness to the crust, creating a buttery flavor that complements the pie. If you prefer a dairy-free version, coconut oil works beautifully too! -
2 tbsp powdered sugar substitute (like erythritol)
This is a sweetener that gives just the right touch of sweetness without the sugar rush. You can also use stevia powdered for a similar effect, just bear in mind that the sweetness levels may vary! -
1 package (8 oz) cream cheese (softened)
Cream cheese provides the rich and creamy texture we crave in a lemon pie. For a lighter option, consider using Greek yogurt, but keep in mind it may alter the flavor slightly! -
1/2 cup powdered sugar substitute
Another layer of sweetness for the filling! If you’re looking for a fun twist, try flavored sugar substitutes like vanilla or coconut! -
1/4 cup fresh lemon juice
Nothing beats fresh lemon juice for that bright, zesty flavor! Feel free to use bottled lemon juice in a pinch, but fresh is always best! -
1 tbsp lemon zest
The zest adds a punch of citrusiness; it amplifies the flavor and gives that aromatic quality. If you’re in a pinch, don’t worry, you can skip the zest, but I highly recommend it! -
1 tsp vanilla extract
A splash of vanilla rounds out the flavors and brings everything together. If you’re looking to experiment, almond extract provides a lovely twist too! -
1 container (8 oz) sugar-free whipped topping (like Cool Whip or homemade)
This heavenly addition provides that airy lightness we love. You can also make your own by whipping heavy cream with a sweetener of your choice!
Step-by-Step Instructions
Ready to dive in? Let’s get to work on this pie!
Step 1: Prepare the Crust
-
In a mixing bowl, combine 1 1/2 cups almond flour and 1/4 cup melted butter along with 2 tbsp powdered sugar substitute. Mix them together until the texture resembles wet sand.
- Chef’s tip: Ensure your butter is not too hot; otherwise, it could make the crust oily.
-
Press the mixture firmly into the bottom and up the sides of an 8-inch pie dish.
- Hack: Use a glass or measuring cup to compact the crust evenly and create a smooth surface.
-
Chill the crust in the fridge for at least 15 minutes to help it set.
- Chef’s tip: A chilled crust will slice beautifully later—patience is key!
Step 2: Create the Creamy Filling
-
In a separate large mixing bowl, beat together 1 package of softened cream cheese and 1/2 cup powdered sugar substitute using a hand mixer or a stand mixer until smooth and creamy.
- Pro tip: Make sure the cream cheese is softened for the best texture. You can microwave it for about 10 seconds if you forgot to take it out early!
-
Add in the 1/4 cup fresh lemon juice, 1 tbsp lemon zest, and 1 tsp vanilla extract. Continue beating until it’s fully combined.
- Little hack: For extra lemony goodness, add a dash of lemon extract if you have it on hand!
-
Gently fold in 1 container of sugar-free whipped topping until fully mixed.
- Tip: Use a spatula to fold; this method keeps the mixture airy and luscious—no deflating allowed!
Step 3: Assemble the Pie
-
Take your chilled crust out of the fridge and spoon the creamy filling into it, spreading it evenly with a spatula.
- Chef’s insight: If you want a beautiful swirl, use the back of a spoon to create a design!
-
Cover the pie with plastic wrap and refrigerate for at least 4 hours, but overnight is even better. This allows the flavors to meld beautifully.
- Tip: If you’re in a hurry, just aim for a minimum of 2 hours—good things come to those who wait, but we’ve all been there, right?
Serving Suggestions
When the time finally comes to enjoy your delightful No-Bake Sugar-Free Lemon Pie, there are a few ways to elevate the presentation! Consider these serving suggestions:
-
Slice It Up: When you’re ready to serve, use a sharp knife dipped in hot water for clean cuts. This produces that perfect slice to show off the filling’s gorgeous color!
-
Garnish: Top each slice with a bit of fresh whipped cream and lemon zest for a pop of color and flavor. Fresh berries, such as blueberries or raspberries, add a nice touch of sweetness and a bit of tartness that really plays well with the lemon!
-
Serving Bowl: If you want to get creative, try using small mason jars for individual servings. Not only do they look adorable, but everyone loves grabbing their own pie in a jar!
Recipe Variations
Feeling adventurous? Here are some fun twists you can try out with your No-Bake Lemon Pie:
-
Berry Bliss: Fold in fresh strawberries or blueberries into the filling for a fruity explosion.
-
Coconut Cream: Add shredded unsweetened coconut to the filling for a tropical vibe. You can even substitute coconut cream for some of the cream cheese for added richness!
-
Chocolate Drizzle: For a decadent touch, melt some sugar-free chocolate chips and drizzle on top before serving.
-
Ginger Snap Crust: Swap out the almond flour for crumbled sugar-free ginger snaps for a spicy, crunchy crust.
-
Matcha Layer: For a unique twist, create a matcha layer by mixing one teaspoon of matcha powder into a portion of the filling before pouring it into the crust.
Chef’s Notes
Throughout my journey as a home chef, this No-Bake Sugar-Free Lemon Pie has evolved from a simple dessert to a cherished family recipe. The joy it brings at gatherings reminds me that cooking doesn’t have to be tedious. I recall one quirky mishap where I accidentally mistook salt for sugar—I don’t recommend that! The look on everyone’s face when they took a bite was priceless! Now, I keep my sweetener close at hand and always double-check.
Cooking is about experimenting and having fun, and it’s okay to laugh at your mistakes! So, my fellow foodies, if you stray off the beaten path while making this pie, don’t sweat it—just embrace the process!
FAQs and Troubleshooting
Q1: Can I use a different sweetener?
Absolutely! You can experiment with your favorite sweeteners, but keep in mind that some alternatives may have varying levels of sweetness, so adjust to your taste!
Q2: Why is my filling a bit runny?
If your filling is runny, it could be due to overmixing. When folding in the whipped topping, remember to do it gently to preserve the airy texture.
Q3: How long will this pie last?
In the refrigerator, your No-Bake Sugar-Free Lemon Pie will last about 3–5 days. But I doubt it’ll last that long—it’s just too good!
Q4: Can I freeze the pie?
Yes, you can! Just be sure to wrap it tightly in plastic wrap and foil. When you’re ready to enjoy it, thaw it in the fridge overnight!
Nutritional Info
This No-Bake Sugar-Free Lemon Pie recipe is not only delicious but also has some impressive nutritional benefits:
- Low in carbs: Perfect for those following a low-carb or keto lifestyle.
- Packed with healthy fats: The almond flour and cream cheese provide healthy fats that can help keep you satisfied.
- Sugar-free: Enjoy it without the traditional guilt of added sugars; it’s a delightful indulgence that won’t spike your blood sugar levels.
Per serving (approximate):
- Calories: 160
- Total carbs: 4g
- Fiber: 2g
- Sugar: 1g (from natural ingredients)
- Fat: 14g
- Protein: 3g
Final Thoughts
There you have it—your guide to making a luscious No-Bake Sugar-Free Lemon Pie! I hope you’re just as excited as I am to whip this up in the kitchen. This pie serves as an invitation to share laughter, love, and deliciousness with those around you, all while keeping it healthy and enjoyable.
So, next time you’re in the mood for something sweet that brings a burst of sunshine into your day, reach for this lemon pie recipe. Remember, it’s all about the experience of cooking, enjoying, and, most importantly, sharing with the people you love. Cheers to more delicious memories—and my friends, happy baking, or rather, “no-baking!” 🍋✨
Print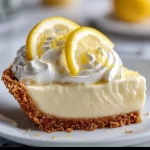
No-Bake Sugar-Free Lemon Pie
- Total Time: 255 minutes
- Yield: 8 servings 1x
- Diet: Sugar-Free
Description
A refreshing and indulgent no-bake lemon pie that is sugar-free and perfect for warm days.
Ingredients
- 1 1/2 cups almond flour
- 1/4 cup melted butter
- 2 tbsp powdered sugar substitute (like erythritol)
- 1 package (8 oz) cream cheese (softened)
- 1/2 cup powdered sugar substitute
- 1/4 cup fresh lemon juice
- 1 tbsp lemon zest
- 1 tsp vanilla extract
- 1 container (8 oz) sugar-free whipped topping (like Cool Whip or homemade)
Instructions
- Prepare the crust by mixing almond flour, melted butter, and powdered sugar substitute until resembling wet sand. Press into an 8-inch pie dish and chill for 15 minutes.
- Create the creamy filling by beating softened cream cheese and powdered sugar substitute until smooth. Add lemon juice, lemon zest, and vanilla; mix well. Fold in whipped topping gently.
- Assemble the pie by adding the filling to the crust. Cover with plastic wrap and refrigerate for at least 4 hours before serving.
Notes
For clean cuts, dip a knife in hot water while slicing. Garnish with fresh whipped cream, lemon zest, and berries for added flavor.
- Prep Time: 15 minutes
- Cook Time: 240 minutes
- Category: Dessert
- Method: No-Bake
- Cuisine: American
Nutrition
- Serving Size: 1 slice
- Calories: 160
- Sugar: 1g
- Sodium: 300mg
- Fat: 14g
- Saturated Fat: 7g
- Unsaturated Fat: 6g
- Trans Fat: 0g
- Carbohydrates: 4g
- Fiber: 2g
- Protein: 3g
- Cholesterol: 30mg
Keywords: no-bake dessert, sugar-free, lemon pie, refreshing dessert, healthy dessert
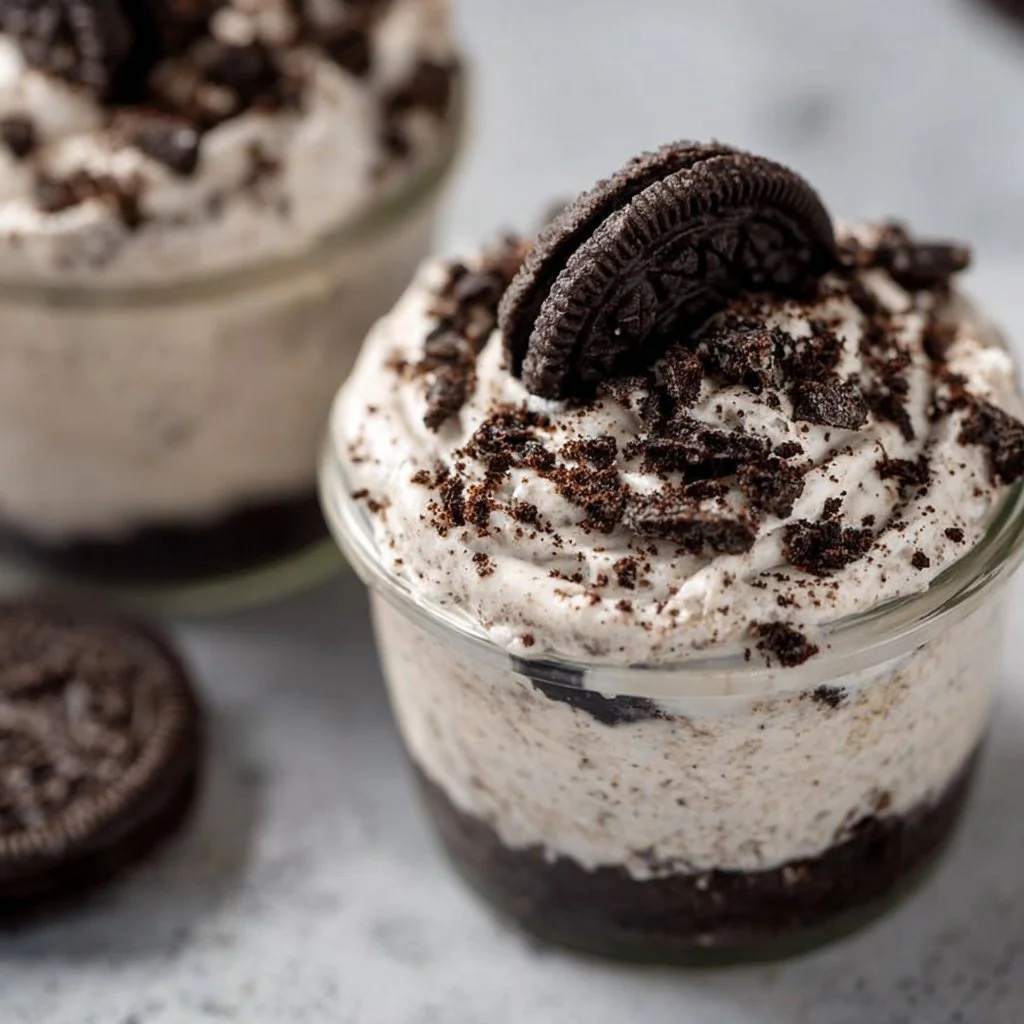
No Bake Oreo Cheesecake Cups
No-Bake Oreo Cheesecake Cups: A Delicious Journey to Sweetness
Hey there, fellow foodies! Are you ready to embark on a culinary adventure that requires zero baking and promises loads of flavor? Let me introduce you to the ultimate dessert: No-Bake Oreo Cheesecake Cups. These little jars of joy are not just about the creamy, dreamy cheesecake filling and the crunchy Oreo crust but also about the memories they create. Trust me, each spoonful is like unwrapping a present filled with sweetness and nostalgia.
As a chef who loves to whip up comforting treats, I can attest that the best recipes don’t always come from the oven. Sometimes, they come from moments shared around a table, laughter echoing in the air, and the sweet aroma of desserts tempting your taste buds. Whether it’s for a backyard barbecue, a movie night with friends, or simply a treat for yourself (hey, you deserve it!), these No-Bake Oreo Cheesecake Cups are the cherry on top of any gathering.
In this blog post, I’ll share how you can make these delightful cups easily at home. With just a handful of ingredients and a bit of love, you’ll be crafting a dessert that’ll leave everyone asking for seconds. So, grab your favorite mixing bowl, and let’s dive into this delicious recipe!
Personal Story
I still remember the summer I discovered my love for cheesecakes. It was a sun-drenched afternoon, and my grandma had decided it was the perfect day to teach me how to make her famous cheesecake. There were no fancy ingredients or complicated methods; just the simple joy of mixing cream cheese, sugar, and love in a bowl. She always had a way of turning ordinary days into memorable ones.
Fast forward a few years, and I found myself experimenting with different variations to keep the flavor alive. That’s when I stumbled upon the right twist: Oreo cookies! Combining my grandma’s classic recipe with these chocolatey delights created something magical. Every time I make these No-Bake Oreo Cheesecake Cups, I’m reminded of my grandma’s warm kitchen and the way she made cooking feel like a celebration. Each cup is a tribute to her legacy, bridging the gap between the past and the present, and reminding me of how food can connect us to our roots.
Ingredients
Here’s what you’ll need to whip up these scrumptious No-Bake Oreo Cheesecake Cups:
-
1 package Oreo cookies (about 15 cookies)
These iconic cookies will serve as the crunchy base. If you’re feeling fancy, you can use any brand of chocolate sandwich cookies or gluten-free versions for a dietary swap. -
8 oz cream cheese, softened
Cream cheese is the star of the show, giving the cheesecake its luscious texture. To lighten it up, try using Neufchâtel cheese, which has less fat but still gives you that creamy goodness. -
1/2 cup powdered sugar
This sweetener gives the filling that nice, smooth sweetness without any graininess. Feel free to use coconut sugar or a sugar substitute if you’re looking for a healthier option. -
1 cup whipped topping
This ingredient is what makes our cheesecake light and fluffy. You can substitute it with freshly whipped cream for a more homemade feel. Just make sure to sweeten it to your liking! -
1/2 cup chocolate chips (optional for garnish)
These are for those who crave an extra layer of chocolaty goodness. If you’re feeling adventurous, you might even use white chocolate or butterscotch chips instead.
Step-by-Step Instructions
Ready to create some magic? Follow my step-by-step guide to make these No-Bake Oreo Cheesecake Cups, and get ready to impress your friends and family!
-
Prepare Your Ingredients
Make sure your cream cheese is softened to room temperature. If time is short, you can microwave it for about 10-15 seconds—just be careful not to melt it! -
Crush the Oreo Cookies
In a zip-top bag, throw in the Oreo cookies, seal it tight, and use a rolling pin or your hands to crush them into fine crumbs. Aim for a texture similar to sand—some larger chunks will add a delightful crunch later! -
Make the Cookie Crust
In a mixing bowl, take about 3/4 of the crushed Oreos and mix them with 2 tablespoons of melted butter until combined. This will create your crust. Spoon a generous amount into the bottom of your serving cups and press it down with the back of a spoon to form an even base. -
Prepare the Cheesecake Filling
In another bowl, beat the softened cream cheese with an electric mixer until it’s nice and smooth. Gradually add in the powdered sugar and beat until well combined. -
Add the Whipped Topping
Gently fold in the whipped topping into the cream cheese mixture. Take your time—this step is crucial for creating that fluffy texture, so be gentle to keep the air in. -
Layer It Up
Spoon the cheesecake filling over the cookie crust in your cups—aim for about an inch-layer. Shake it a little to settle, and don’t worry if it gets a bit messy; that’s part of the fun! -
Top It Off
Sprinkle the remaining crushed Oreos on top of your cheesecake filling for that delicious finishing touch. If you’re using chocolate chips, now’s the time to add those too! -
Chill Out
Place your filled cups in the fridge for at least two hours (or overnight for maximum flavor infusion!). The longer, the better! -
Serve and Enjoy!
When you’re ready to serve, take them out, and if desired, add a dollop of whipped cream on top for that extra flair. Enjoy your creation, and don’t forget to share (or not!).
Serving Suggestions
The beauty of these No-Bake Oreo Cheesecake Cups is their versatility! Here are a few ideas on how to plate or serve them:
-
Individual Cups: Keep them in their cute little cups for a cozy, personal touch. It’s perfect for parties, picnics, or simply enjoying on your own.
-
Garnishing Goodness: Consider adding fresh raspberries or strawberries on top for a pop of color and flavor contrast. They not only look stunning but also add a refreshing zing to each bite.
-
Chocolate Drizzle: A drizzle of chocolate sauce can elevate the look and taste. Just warm some chocolate in the microwave and let it drizzle artistically over the top.
-
Layer Presentation: For a family gathering, consider using a large glass dish to show off layered beauty. Just alternate the layers of crust and cheesecake filling, finishing with crushed Oreos and chocolate chips.
Recipe Variations
Feeling adventurous? Here are a few creative twists and variations you can try:
-
Mint Chocolate Oreo Cheesecake: Use mint-flavored Oreo cookies for a refreshing minty twist!
-
Peanut Butter Delight: Add 1/3 cup of creamy peanut butter to the cheesecake filling for a nutty flavor explosion.
-
Caramel Sauce Swirl: Drizzle caramel sauce into the cheesecake filling before layering it over the crust for a sweeter variation.
-
Fruit-Infused: Mix in some pureed strawberries or blueberry puree into your filling. This will give a fruity essence and a burst of color!
-
Vegan Version: Substitute the cream cheese with a vegan cream cheese alternative and the whipped topping with coconut whipped cream for a delightful dairy-free treat.
Chef’s Notes
Bringing this No-Bake Oreo Cheesecake Cups recipe to life has been a joy! Over the years, I’ve played with various flavors, and the joy of seeing my friends’ faces when they take that first bite is priceless. I remember one time—trying to impress my date—I added a dash of espresso powder for an extra kick. Let’s just say it didn’t go exactly as planned, and I ended up with a rather awake evening! But, hey, each kitchen mishap teaches you something, right?
FAQs and Troubleshooting
1. Why is my cheesecake filling too runny?
If your filling is too runny, your cream cheese might not have been fully softened or beaten enough. Make sure to mix until completely smooth without lumps.
2. Can I make this dessert ahead of time?
Absolutely! These cups are great for prepping a day in advance. Just keep them covered in the fridge until you’re ready to serve.
3. My crust looks too dry/crumbly. What do I do?
If your Oreo crust is too crumbly, try adding a bit more melted butter. A moist crumb will help it stick together.
4. How long will these keep in the fridge?
They’ll stay fresh for about 3–5 days in the fridge. Just make sure they are covered properly!
Nutritional Info
While these delightful No-Bake Oreo Cheesecake Cups are a treat, they’re also a dessert to savor. Let’s break down the nutritional information per cup (this can vary based on exact ingredients and serving sizes):
- Calories: 300
- Total Fat: 16g
- Saturated Fat: 8g
- Cholesterol: 40mg
- Sodium: 190mg
- Total Carbohydrates: 34g
- Dietary Fiber: 1g
- Sugars: 20g
- Protein: 4g
These cups are rich and indulgent, so enjoy them as an occasional treat rather than a daily habit!
Final Thoughts
There you have it! A no-fuss, deliciously satisfying dessert that’s perfect for every occasion. My journey creating these No-Bake Oreo Cheesecake Cups has not only filled my kitchen with delightful aromas but also enriched my soul with love and laughter shared around the table.
Remember, cooking is as much about the process as it is about the outcome. Whether it’s a kitchen disaster or a stunning success, enjoy every moment and don’t forget to make it your own! I can’t wait for you to try this recipe and share your own stories and memories that come along with it.
Until next time, keep cooking, keep exploring, and keep feasting with joy! Bon appétit! 🍰
Print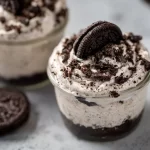
No-Bake Oreo Cheesecake Cups
- Total Time: 120 minutes
- Yield: 4 servings 1x
- Diet: Vegetarian
Description
Delicious No-Bake Oreo Cheesecake Cups featuring a creamy cheesecake filling and crunchy Oreo crust, perfect for any occasion.
Ingredients
- 1 package Oreo cookies (about 15 cookies)
- 8 oz cream cheese, softened
- 1/2 cup powdered sugar
- 1 cup whipped topping
- 1/2 cup chocolate chips (optional for garnish)
Instructions
- Prepare Your Ingredients: Make sure your cream cheese is softened to room temperature. If time is short, you can microwave it for about 10-15 seconds—just be careful not to melt it!
- Crush the Oreo Cookies: In a zip-top bag, throw in the Oreo cookies, seal it tight, and use a rolling pin or your hands to crush them into fine crumbs.
- Make the Cookie Crust: In a mixing bowl, take about 3/4 of the crushed Oreos and mix them with 2 tablespoons of melted butter until combined. Spoon into the bottom of your cups to form an even base.
- Prepare the Cheesecake Filling: Beat softened cream cheese with an electric mixer until smooth. Gradually add in the powdered sugar and beat until well combined.
- Add the Whipped Topping: Gently fold in the whipped topping into the cream cheese mixture.
- Layer It Up: Spoon the cheesecake filling over the cookie crust in your cups.
- Top It Off: Sprinkle the remaining crushed Oreos on top of your cheesecake filling and optionally add chocolate chips.
- Chill Out: Place your filled cups in the fridge for at least 120 minutes (or overnight for maximum flavor infusion!).
- Serve and Enjoy: Add a dollop of whipped cream on top before serving if desired.
Notes
These cups can be made a day in advance and stored in the fridge. Enjoy them cold!
- Prep Time: 15 minutes
- Cook Time: 0 minutes
- Category: Dessert
- Method: No-Bake
- Cuisine: American
Nutrition
- Serving Size: 1 cup
- Calories: 300
- Sugar: 20g
- Sodium: 190mg
- Fat: 16g
- Saturated Fat: 8g
- Unsaturated Fat: 0g
- Trans Fat: 0g
- Carbohydrates: 34g
- Fiber: 1g
- Protein: 4g
- Cholesterol: 40mg
Keywords: no-bake, cheesecake, Oreo, dessert, easy recipe