Beginner-Friendly Homemade Fig Newtons in 30 Minutes
How to Make Homemade Fig Newtons: A Nostalgic Treat That’s Easy and Delicious
Hey there, food lovers! Welcome back to Feastical! Today, I’m thrilled to share a recipe that’s not only delightful to the taste buds but also brings back a whirlwind of sweet nostalgia—Homemade Fig Newtons! These little pockets of joy are perfect for snacking, sharing, or savoring with your morning coffee!
I must confess, I have a soft spot for these sweet, chewy bars filled with luscious figs. They remind me of lazy afternoons spent in my grandmother’s kitchen, where the scent of freshly baked treats wafted through the air like a warm embrace. Fig Newtons were always a favorite when my sisters and I would visit her. She had a knack for transforming simple ingredients into something magical. Today, I feel empowered to carry on her tradition by whipping up these delightful homemade versions that taste ten times better than the store-bought kind. Not to mention, they offer a healthier twist since you know exactly what goes in them—a win-win!
So, if you’re ready to create some tasty memories and treat yourself to a delicious snack, gather your ingredients, roll up your sleeves, and let’s get baking!
A Sweet Memory: The Fig Newton Connection
My fondest memories of Fig Newtons take me right back to those summer afternoons spent with my grandma in her charming kitchen. I can still picture her standing at the counter, flour dusting her apron, humming softly to herself. With each slice of the delicate, golden-brown pastry, she would share a story about her childhood and how fig trees lined the streets of her neighborhood.
I loved the way she emphasized the word "fig" as if it held a treasured secret. My sisters and I would lick our fingers—the sticky sweetness only heightened our anticipation. The first bite was always a revelation: juicy figs embraced by a subtle buttery crust, their sweetness balanced by just a pinch of salt. Those moments always reminded me that food is more than just sustenance; it’s about connection, love, and the simple joy of coming together.
Now, as I make my own Homemade Fig Newtons, I carry those cherished memories with me, infusing each batch with the love and warmth I felt in her kitchen. So, grab those figs and let’s bake some bliss together!
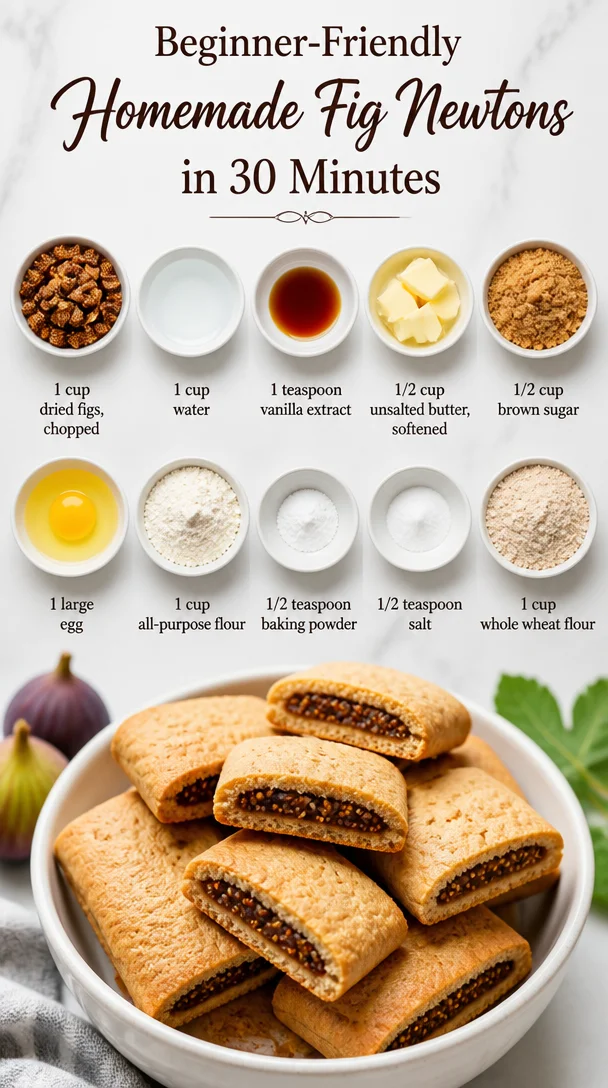
Ingredients
Let’s take a look at the lovely ingredients you’ll need to make these fig-tastic treats.
-
1 cup dried figs, chopped: Figs are the star here! The sweetness and chewiness add amazing texture and flavor. If you can’t find dried figs, you can substitute with dried apricots or dates, but the flavor will change slightly.
-
1 cup water: This helps to soften the dried figs; you want them plump and luscious.
-
1 teaspoon vanilla extract: A dash of pure vanilla extract enhances the sweetness and brings depth to the flavor. If you’re out of vanilla, a sprinkle of almond extract can work wonders.
-
1/2 cup unsalted butter, softened: This adds richness and flavor to the cookie base. If you prefer a dairy-free option, coconut oil is a good substitute.
-
1/2 cup brown sugar: Brown sugar adds moisture and a rich, caramel-like sweetness. If you’re looking for a healthier option, consider using coconut sugar for a similar taste profile.
-
1 large egg: Eggs provide structure and help bind the ingredients together. For a vegan option, you can mix 1 tablespoon of ground flaxseed with 2.5 tablespoons of water to make a “flax egg.”
-
1 cup all-purpose flour: This forms the base of the dough, giving it that classic cookie texture. For a gluten-free option, try using almond flour or a gluten-free flour blend.
-
1/2 teaspoon baking powder: To create a light and fluffy texture. An alternative is to use baking soda, but you may want to add a bit more acid (like lemon juice) to activate it.
-
1/2 teaspoon salt: Just a pinch balances the sweetness and enhances the flavors.
-
1 cup whole wheat flour: This adds a nutty flavor and is a healthier option than the regular all-purpose flour. If you want a gluten-free twist, you can substitute this with additional almond flour or oat flour.
Step-by-Step Instructions
Step 1: Prepare the Figs
In a small saucepan, combine 1 cup of chopped dried figs and 1 cup of water. Bring to a gentle simmer over medium heat. Cook for about 8-10 minutes until the figs are softened and have absorbed most of the water. Once they are nice and mushy, remove from heat, stir in 1 teaspoon of vanilla extract, and let them cool a bit before blending.
Chef’s Tip: For a little extra flavor, you can add a squeeze of lemon juice or a pinch of cinnamon to the figs while they’re cooking!
Step 2: Make the Dough
In a big mixing bowl, cream together 1/2 cup of softened unsalted butter (make sure it’s not melted, just soft!) and 1/2 cup of brown sugar until light and fluffy. This should take about 2-3 minutes.
Now, crack in 1 large egg and mix until combined.
In another bowl, whisk together 1 cup of all-purpose flour, 1/2 teaspoon of baking powder, and 1/2 teaspoon of salt. Gradually add the dry ingredients to the wet mixture, mixing until just combined. Finally, fold in 1 cup of whole wheat flour until a soft dough forms.
Chef’s Hack: If the dough seems too sticky, you can chill it in the fridge for about 30 minutes before rolling.
Step 3: Roll It Out
On a lightly floured surface, divide the dough into two equal halves and roll each one out into a rectangle about 1/4 inch thick. You want them thin but not too fragile—they should hold the fig filling beautifully.
Step 4: Fill ‘Em Up
Spread half of the fig filling down the center of each dough rectangle. Leave some space along the edges so you can seal them properly. Then, fold the dough over the filling, pinching the edges to seal.
Step 5: Bake to Perfection
Preheat your oven to 350°F (175°C). Line a baking sheet with parchment paper. Transfer the filled dough onto the sheet, seam side down. Bake for about 25-30 minutes, or until the tops are golden brown.
Chef’s Tip: For an extra touch of sweetness, you can sprinkle a little brown sugar on top before baking!
Step 6: Cool and Slice
Once they are baked, let them cool for about 10 minutes on the sheet. Carefully transfer them to a cooling rack. Once completely cooled, slice them into bars or squares.
Step 7: Enjoy!
Grab a mug of your favorite beverage, and you’re all set to enjoy your Homemade Fig Newtons!
Serving Suggestions
These delectable bars are perfect for a cozy afternoon tea or as an on-the-go snack. To serve, plate them on a rustic wooden board, sprinkle with some icing sugar, and add a few fresh figs or berries for a pop of color. They look gorgeous and taste even better when shared with friends or family.
For a lovely brunch, you could even pair these Homemade Fig Newtons with yogurt and a drizzle of honey, creating an indulgent yet healthy treat!
Recipe Variations
Feeling adventurous? Here are a few creative twists to make your Fig Newtons even more exciting:
- Nutty Addition: Throw in some chopped nuts like walnuts or pecans into the fig filling for a delightful crunch.
- Cocoa Kick: Add 2 tablespoons of unsweetened cocoa powder to the dough for a chocolatey version.
- Spiced Up: A dash of ground cinnamon or nutmeg in the dough or filling can enhance the flavor profile beautifully.
- Fruit Fusion: Mix dried figs with other dried fruits like apricots or cranberries for a medley of flavors.
- Sugar-Free Needs: Substitute honey or maple syrup for the brown sugar to create a more natural sweetness.
Chef’s Notes
It’s always fun to reminisce about how a recipe evolves over time. This Homemade Fig Newtons recipe started as a simple attempt to recreate my grandma’s version, but through plenty of taste tests and experiments, it has transformed into something uniquely delicious! Occasionally, my friends join me in the kitchen for baking days, and we usually get sidetracked with random safety jokes or silly antics. Who knew baking could spark laughter alongside some great treats?
FAQs and Troubleshooting
Q: My dough is too sticky; what do I do?
A: If your dough is sticky, try chilling it in the fridge for 30 minutes. It should be easier to handle after that!
Q: Can I freeze Homemade Fig Newtons?
A: Absolutely! Wrap them well and store them in an airtight container in the freezer for up to three months. When you want to enjoy them, just let them thaw at room temperature.
Q: How can I tell when they’re done baking?
A: They should be golden brown on top and firm to the touch. A toothpick inserted in the center should come out clean.
Q: What can I do with leftover fig filling?
A: Use it as a delicious topping for yogurt, pancakes, or even spread it on toast. It’s versatile and scrumptious!
Nutritional Info
Per serving (1 bar):
- Calories: 150
- Total Fat: 6g
- Saturated Fat: 3g
- Cholesterol: 30mg
- Sodium: 50mg
- Total Carbohydrates: 22g
- Dietary Fiber: 2g
- Sugars: 8g
- Protein: 2g
Homemade Fig Newtons are not just a nostalgic treat but also a delightful combination of flavors that everyone will enjoy. With wholesome ingredients, you can savor every bite while still feeling good about your snack choice!
Final Thoughts
And there you have it—delicious, homemade Fig Newtons that are sure to bring a smile to your face and a happy dance in your heart! I hope you enjoy making and sharing these sweet snacks as much as I do. They’re perfect for family gatherings, lunchboxes, or simply as a treat to brighten your day.
Don’t forget to share your creations with us! You might just inspire someone else to whip up their own batch. As always, keep cooking from the heart, and remember, the kitchen is where the magic happens. Until next time, happy baking!
Print
Homemade Fig Newtons
- Total Time: 45 minutes
- Yield: 12 servings 1x
- Diet: Vegetarian
Description
Delightful homemade Fig Newtons that blend nostalgia with a delicious flavor, perfect for snacking or sharing.
Ingredients
- 1 cup dried figs, chopped
- 1 cup water
- 1 teaspoon vanilla extract
- 1/2 cup unsalted butter, softened
- 1/2 cup brown sugar
- 1 large egg
- 1 cup all-purpose flour
- 1/2 teaspoon baking powder
- 1/2 teaspoon salt
- 1 cup whole wheat flour
Instructions
- Prepare the figs: In a small saucepan, combine chopped dried figs and water, simmer for 8-10 minutes until softened, stir in vanilla, and cool.
- Make the dough: Cream together softened butter and brown sugar, mix in the egg, then combine with dry ingredients until a soft dough forms.
- Roll it out: Divide the dough and roll each half into a rectangle about 1/4 inch thick.
- Fill ‘em up: Spread fig filling in the center of each rectangle, fold dough over, and seal edges.
- Bake to perfection: Preheat oven to 350°F (175°C), bake for 25-30 minutes until golden brown.
- Cool and slice: Let cool for 10 minutes, then transfer to a rack to cool completely before slicing.
- Enjoy! Pair with your favorite beverage and savor the homemade goodness.
Notes
For an extra touch of sweetness, sprinkle brown sugar on top before baking. You can also add nuts or spices for variations.
- Prep Time: 15 minutes
- Cook Time: 30 minutes
- Category: Snack
- Method: Baking
- Cuisine: American
Nutrition
- Serving Size: 1 bar
- Calories: 150
- Sugar: 8g
- Sodium: 50mg
- Fat: 6g
- Saturated Fat: 3g
- Unsaturated Fat: 2g
- Trans Fat: 0g
- Carbohydrates: 22g
- Fiber: 2g
- Protein: 2g
- Cholesterol: 30mg
Keywords: Fig Newtons, homemade snack, nostalgic treats, baking, dessert