Beginner-Friendly Homemade Fig Newtons in 30 Minutes
How to Make Homemade Fig Newtons: A Nostalgic Treat That’s Easy and Delicious
Hey there, food lovers! Welcome back to Feastical! Today, I’m thrilled to share a recipe that’s not only delightful to the taste buds but also brings back a whirlwind of sweet nostalgia—Homemade Fig Newtons! These little pockets of joy are perfect for snacking, sharing, or savoring with your morning coffee!
I must confess, I have a soft spot for these sweet, chewy bars filled with luscious figs. They remind me of lazy afternoons spent in my grandmother’s kitchen, where the scent of freshly baked treats wafted through the air like a warm embrace. Fig Newtons were always a favorite when my sisters and I would visit her. She had a knack for transforming simple ingredients into something magical. Today, I feel empowered to carry on her tradition by whipping up these delightful homemade versions that taste ten times better than the store-bought kind. Not to mention, they offer a healthier twist since you know exactly what goes in them—a win-win!
So, if you’re ready to create some tasty memories and treat yourself to a delicious snack, gather your ingredients, roll up your sleeves, and let’s get baking!
A Sweet Memory: The Fig Newton Connection
My fondest memories of Fig Newtons take me right back to those summer afternoons spent with my grandma in her charming kitchen. I can still picture her standing at the counter, flour dusting her apron, humming softly to herself. With each slice of the delicate, golden-brown pastry, she would share a story about her childhood and how fig trees lined the streets of her neighborhood.
I loved the way she emphasized the word "fig" as if it held a treasured secret. My sisters and I would lick our fingers—the sticky sweetness only heightened our anticipation. The first bite was always a revelation: juicy figs embraced by a subtle buttery crust, their sweetness balanced by just a pinch of salt. Those moments always reminded me that food is more than just sustenance; it’s about connection, love, and the simple joy of coming together.
Now, as I make my own Homemade Fig Newtons, I carry those cherished memories with me, infusing each batch with the love and warmth I felt in her kitchen. So, grab those figs and let’s bake some bliss together!
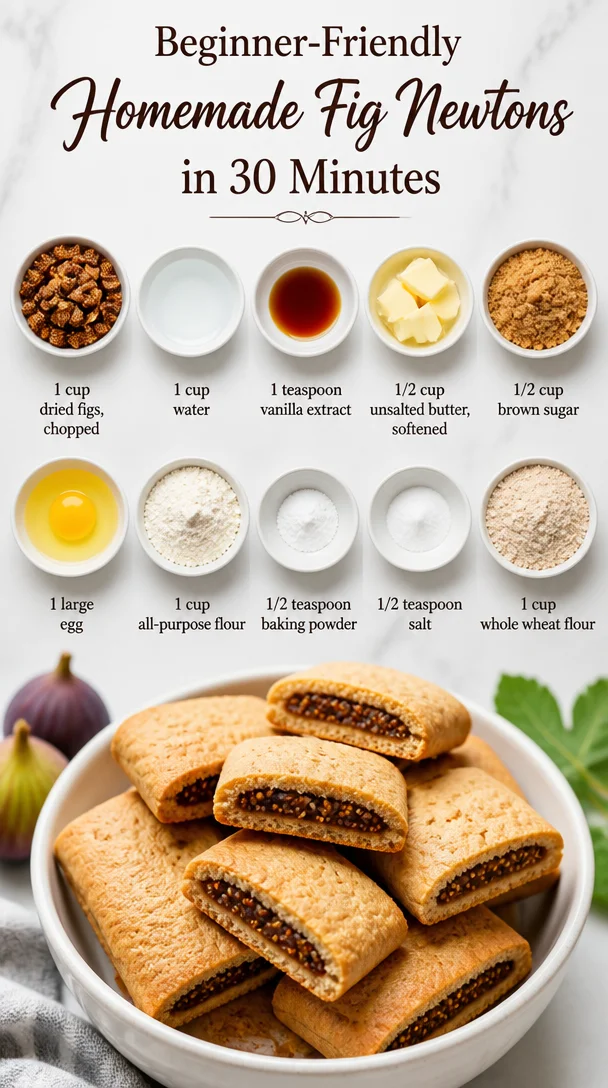
Ingredients
Let’s take a look at the lovely ingredients you’ll need to make these fig-tastic treats.
-
1 cup dried figs, chopped: Figs are the star here! The sweetness and chewiness add amazing texture and flavor. If you can’t find dried figs, you can substitute with dried apricots or dates, but the flavor will change slightly.
-
1 cup water: This helps to soften the dried figs; you want them plump and luscious.
-
1 teaspoon vanilla extract: A dash of pure vanilla extract enhances the sweetness and brings depth to the flavor. If you’re out of vanilla, a sprinkle of almond extract can work wonders.
-
1/2 cup unsalted butter, softened: This adds richness and flavor to the cookie base. If you prefer a dairy-free option, coconut oil is a good substitute.
-
1/2 cup brown sugar: Brown sugar adds moisture and a rich, caramel-like sweetness. If you’re looking for a healthier option, consider using coconut sugar for a similar taste profile.
-
1 large egg: Eggs provide structure and help bind the ingredients together. For a vegan option, you can mix 1 tablespoon of ground flaxseed with 2.5 tablespoons of water to make a “flax egg.”
-
1 cup all-purpose flour: This forms the base of the dough, giving it that classic cookie texture. For a gluten-free option, try using almond flour or a gluten-free flour blend.
-
1/2 teaspoon baking powder: To create a light and fluffy texture. An alternative is to use baking soda, but you may want to add a bit more acid (like lemon juice) to activate it.
-
1/2 teaspoon salt: Just a pinch balances the sweetness and enhances the flavors.
-
1 cup whole wheat flour: This adds a nutty flavor and is a healthier option than the regular all-purpose flour. If you want a gluten-free twist, you can substitute this with additional almond flour or oat flour.
Step-by-Step Instructions
Step 1: Prepare the Figs
In a small saucepan, combine 1 cup of chopped dried figs and 1 cup of water. Bring to a gentle simmer over medium heat. Cook for about 8-10 minutes until the figs are softened and have absorbed most of the water. Once they are nice and mushy, remove from heat, stir in 1 teaspoon of vanilla extract, and let them cool a bit before blending.
Chef’s Tip: For a little extra flavor, you can add a squeeze of lemon juice or a pinch of cinnamon to the figs while they’re cooking!
Step 2: Make the Dough
In a big mixing bowl, cream together 1/2 cup of softened unsalted butter (make sure it’s not melted, just soft!) and 1/2 cup of brown sugar until light and fluffy. This should take about 2-3 minutes.
Now, crack in 1 large egg and mix until combined.
In another bowl, whisk together 1 cup of all-purpose flour, 1/2 teaspoon of baking powder, and 1/2 teaspoon of salt. Gradually add the dry ingredients to the wet mixture, mixing until just combined. Finally, fold in 1 cup of whole wheat flour until a soft dough forms.
Chef’s Hack: If the dough seems too sticky, you can chill it in the fridge for about 30 minutes before rolling.
Step 3: Roll It Out
On a lightly floured surface, divide the dough into two equal halves and roll each one out into a rectangle about 1/4 inch thick. You want them thin but not too fragile—they should hold the fig filling beautifully.
Step 4: Fill ‘Em Up
Spread half of the fig filling down the center of each dough rectangle. Leave some space along the edges so you can seal them properly. Then, fold the dough over the filling, pinching the edges to seal.
Step 5: Bake to Perfection
Preheat your oven to 350°F (175°C). Line a baking sheet with parchment paper. Transfer the filled dough onto the sheet, seam side down. Bake for about 25-30 minutes, or until the tops are golden brown.
Chef’s Tip: For an extra touch of sweetness, you can sprinkle a little brown sugar on top before baking!
Step 6: Cool and Slice
Once they are baked, let them cool for about 10 minutes on the sheet. Carefully transfer them to a cooling rack. Once completely cooled, slice them into bars or squares.
Step 7: Enjoy!
Grab a mug of your favorite beverage, and you’re all set to enjoy your Homemade Fig Newtons!
Serving Suggestions
These delectable bars are perfect for a cozy afternoon tea or as an on-the-go snack. To serve, plate them on a rustic wooden board, sprinkle with some icing sugar, and add a few fresh figs or berries for a pop of color. They look gorgeous and taste even better when shared with friends or family.
For a lovely brunch, you could even pair these Homemade Fig Newtons with yogurt and a drizzle of honey, creating an indulgent yet healthy treat!
Recipe Variations
Feeling adventurous? Here are a few creative twists to make your Fig Newtons even more exciting:
- Nutty Addition: Throw in some chopped nuts like walnuts or pecans into the fig filling for a delightful crunch.
- Cocoa Kick: Add 2 tablespoons of unsweetened cocoa powder to the dough for a chocolatey version.
- Spiced Up: A dash of ground cinnamon or nutmeg in the dough or filling can enhance the flavor profile beautifully.
- Fruit Fusion: Mix dried figs with other dried fruits like apricots or cranberries for a medley of flavors.
- Sugar-Free Needs: Substitute honey or maple syrup for the brown sugar to create a more natural sweetness.
Chef’s Notes
It’s always fun to reminisce about how a recipe evolves over time. This Homemade Fig Newtons recipe started as a simple attempt to recreate my grandma’s version, but through plenty of taste tests and experiments, it has transformed into something uniquely delicious! Occasionally, my friends join me in the kitchen for baking days, and we usually get sidetracked with random safety jokes or silly antics. Who knew baking could spark laughter alongside some great treats?
FAQs and Troubleshooting
Q: My dough is too sticky; what do I do?
A: If your dough is sticky, try chilling it in the fridge for 30 minutes. It should be easier to handle after that!
Q: Can I freeze Homemade Fig Newtons?
A: Absolutely! Wrap them well and store them in an airtight container in the freezer for up to three months. When you want to enjoy them, just let them thaw at room temperature.
Q: How can I tell when they’re done baking?
A: They should be golden brown on top and firm to the touch. A toothpick inserted in the center should come out clean.
Q: What can I do with leftover fig filling?
A: Use it as a delicious topping for yogurt, pancakes, or even spread it on toast. It’s versatile and scrumptious!
Nutritional Info
Per serving (1 bar):
- Calories: 150
- Total Fat: 6g
- Saturated Fat: 3g
- Cholesterol: 30mg
- Sodium: 50mg
- Total Carbohydrates: 22g
- Dietary Fiber: 2g
- Sugars: 8g
- Protein: 2g
Homemade Fig Newtons are not just a nostalgic treat but also a delightful combination of flavors that everyone will enjoy. With wholesome ingredients, you can savor every bite while still feeling good about your snack choice!
Final Thoughts
And there you have it—delicious, homemade Fig Newtons that are sure to bring a smile to your face and a happy dance in your heart! I hope you enjoy making and sharing these sweet snacks as much as I do. They’re perfect for family gatherings, lunchboxes, or simply as a treat to brighten your day.
Don’t forget to share your creations with us! You might just inspire someone else to whip up their own batch. As always, keep cooking from the heart, and remember, the kitchen is where the magic happens. Until next time, happy baking!
Print
Homemade Fig Newtons
- Total Time: 45 minutes
- Yield: 12 servings 1x
- Diet: Vegetarian
Description
Delightful homemade Fig Newtons that blend nostalgia with a delicious flavor, perfect for snacking or sharing.
Ingredients
- 1 cup dried figs, chopped
- 1 cup water
- 1 teaspoon vanilla extract
- 1/2 cup unsalted butter, softened
- 1/2 cup brown sugar
- 1 large egg
- 1 cup all-purpose flour
- 1/2 teaspoon baking powder
- 1/2 teaspoon salt
- 1 cup whole wheat flour
Instructions
- Prepare the figs: In a small saucepan, combine chopped dried figs and water, simmer for 8-10 minutes until softened, stir in vanilla, and cool.
- Make the dough: Cream together softened butter and brown sugar, mix in the egg, then combine with dry ingredients until a soft dough forms.
- Roll it out: Divide the dough and roll each half into a rectangle about 1/4 inch thick.
- Fill ‘em up: Spread fig filling in the center of each rectangle, fold dough over, and seal edges.
- Bake to perfection: Preheat oven to 350°F (175°C), bake for 25-30 minutes until golden brown.
- Cool and slice: Let cool for 10 minutes, then transfer to a rack to cool completely before slicing.
- Enjoy! Pair with your favorite beverage and savor the homemade goodness.
Notes
For an extra touch of sweetness, sprinkle brown sugar on top before baking. You can also add nuts or spices for variations.
- Prep Time: 15 minutes
- Cook Time: 30 minutes
- Category: Snack
- Method: Baking
- Cuisine: American
Nutrition
- Serving Size: 1 bar
- Calories: 150
- Sugar: 8g
- Sodium: 50mg
- Fat: 6g
- Saturated Fat: 3g
- Unsaturated Fat: 2g
- Trans Fat: 0g
- Carbohydrates: 22g
- Fiber: 2g
- Protein: 2g
- Cholesterol: 30mg
Keywords: Fig Newtons, homemade snack, nostalgic treats, baking, dessert

Homemade Pepperoni Pizza Pockets
Homemade Pepperoni Pizza Pockets: Your New Favorite Comfort Food
Introduction
Hey there, fellow foodies! I’m Beau Collier, and I’m here to take you on a delightful culinary adventure with one of my all-time favorite comfort foods: Homemade Pepperoni Pizza Pockets! Picture this: a flaky, golden crust filled with gooey, melted cheese, savory pepperoni, and a vibrant splash of zesty pizza sauce. Doesn’t that sound like a warm hug in food form? Trust me, these delicious pockets are as fun to make as they are to eat.
Growing up, weekends and evenings were often filled with the delectable smell of homemade pizza wafting through my family’s kitchen. My mom had this way of making dough dance under her hands, transforming simple ingredients into mouthwatering masterpieces. It was during these fun family moments that I first began to appreciate how food brings people together, from rolling out the dough to getting a little flour on our noses as we crafted our own special pizzas. So, why not take that same magic and put it into easy, portable Pizza Pockets? They’re perfect for sharing at parties, picnics, or just cozy nights at home!
In this post, I’ll walk you through everything you need to know to create your own mouthwatering Pepperoni Pizza Pockets—from ingredients and step-by-step instructions to fun twists that make this dish uniquely yours. Grab your apron, and let’s create some kitchen memories together!
Personal Story
I remember the first time I made pizza pockets with my kids. It was a rainy Saturday afternoon, and we had planned a family movie marathon. Armed with the ingredients laid out on our kitchen counter, the smell of anticipation filled the air, along with a dash of chaos—and I loved every minute of it!
As we stretched the pizza dough, I instructed my little chefs on the proper way to fill and fold them, but let’s be real—there was more stuffing involved than I had anticipated! We ended up with a delightful variety of toppings, from the classic pepperoni to some unconventional treats like pineapple and even a little bit of spinach (you know, trying to sneak in some veggies).
The giggles and laughter that echoed off our walls made those pizza pockets more than just a meal; they turned into cherished family memories. We devoured those scrumptious pockets as we snuggled up on the couch, their cheesy goodness perfectly complimenting the heartwarming films we watched. Now, every time I whip up these tasty bites, I’m transported back to that rainy day, and I hope each of you finds similar joy and connection when you make them!
Ingredients
Here’s what you’ll need to make your scrumptious Homemade Pepperoni Pizza Pockets:
-
1 package of pizza dough: Fresh or store-bought works great! If you’re feeling adventurous, try your hand at homemade dough—trust me, it’s easier than you think. For gluten-free, you can find plenty of pre-made gluten-free dough options.
-
1 cup shredded mozzarella cheese: The classic choice! Mozzarella melts beautifully, but you can substitute with provolone or a dairy-free cheese if you prefer.
-
1 cup sliced pepperoni: Traditional pepperoni brings that nostalgic flavor, but feel free to get creative! Turkey pepperoni or even salami can work wonderfully.
-
1/2 cup pizza sauce: This is where the magic starts! Use your favorite jarred sauce, or whip up a quick homemade version. Don’t have pizza sauce? Try marinara or a mix of tomato sauce and Italian herbs instead.
-
1 tablespoon olive oil: For brushing on the pockets to give them that beautiful golden crust. You can use melted butter if you want an extra rich flavor.
-
1 teaspoon Italian seasoning: A blend of dried herbs like basil, oregano, and thyme. It captures all those Italian flavors in one sprinkle! If you don’t have it handy, don’t hesitate to use your favorite dried herbs, or even a pinch of garlic powder for that extra kick.
-
Flour for dusting: This is essential for keeping the dough from sticking. Just a light dusting will do—it’s not a snowstorm in the kitchen!
Let’s make some magic!
Step-by-Step Instructions
Alright, it’s time to roll up those sleeves and dive into the cooking process! Follow these steps, and I promise you’ll have a batch of delightful Pizza Pockets in no time.
-
Preheat Your Oven: Start by preheating your oven to 425°F (220°C). This will ensure that our Pizza Pockets bake to perfection, with a delectable crispy exterior.
-
Prepare Your Work Surface: Lightly flour your countertop or cutting board. You don’t want the dough to stick, so be generous, but don’t go overboard!
-
Roll Out the Pizza Dough: Unroll or stretch your pizza dough into a rectangle (about 12 inches by 8 inches). If using store-bought dough, let it sit at room temperature for about 20 minutes first—it’s easier to work with!
-
Cut the Dough into Squares: Use a sharp knife or pizza cutter to slice the dough into 4-inch squares—this is where you’ll build your Pizza Pockets. Aim for uniform sizes so they cook evenly!
-
Fill Your Dough Squares: On half of each square, place a couple of slices of pepperoni, followed by a sprinkle of shredded mozzarella cheese, and a spoonful of pizza sauce. Leave a bit of space around the edges so you can fold them over!
-
Season and Fold: Add a pinch of Italian seasoning on top of the filling before folding the dough over to create a pocket. It adds aromatics and flavor to each bite!
-
Seal the Edges: Using your fingers or a fork, press firmly on the edges to seal. Feel free to brush a little olive oil on top at this stage for that extra crunch!
-
Brush with Olive Oil: Once sealed, lightly brush the tops of each pizza pocket with olive oil. This not only adds flavor but helps achieve that lovely golden color when baked.
-
Bake Your Pockets: Place the pockets on a baking sheet lined with parchment paper. Bake for 12-15 minutes or until golden brown. I like to rotate my baking sheet halfway through for even browning!
-
Cool & Serve: Once they come out of the oven, let them cool for a few minutes before serving. You don’t want to burn your mouth on molten cheese!
Chef Hack: Having a bit of trouble sealing those edges? Run your finger along the rim with a touch of water before pressing down; the moisture will help create a stronger seal!
Serving Suggestions
Now that you’ve got your delicious Homemade Pepperoni Pizza Pockets ready, it’s time to serve them up! These pockets are perfect for any occasion, whether it’s game day, a family gathering, or a casual movie night at home.
-
Plating: Arrange the pizza pockets on a large platter for sharing. Add a small bowl of pizza sauce or marinara on the side for dipping. It takes the experience to the next level!
-
Garnish: For a pop of color, finish off with fresh basil leaves or a sprinkle of grated Parmesan cheese right before serving. It’s all about those presentation points!
-
Side Dishes: Complement these tasty treats with some fresh veggie sticks, like cucumber and bell pepper, or a simple mixed green salad for a balanced meal.
Recipe Variations
Feeling adventurous or have dietary restrictions? Don’t sweat it! Here are some fun variations you can try to mix things up:
-
Veggie Lover’s Delight: Swap out the pepperoni for a variety of thinly sliced vegetables like bell peppers, mushrooms, and black olives. Add a sprinkle of feta cheese for a Mediterranean twist!
-
BBQ Chicken Pizza Pockets: Use shredded rotisserie chicken mixed with BBQ sauce in place of pepperoni. It’s fun, flavorful, and a slight deviation from the classic!
-
Spicy Pepperoni: Give it a kick with spicy pepperoni or add crushed red pepper flakes to the filling!
-
Cheese-Only Pockets: For the cheese lovers out there, pile on an assortment of cheeses like mozzarella, cheddar, and gouda to create a multi-cheese masterpiece.
-
Breakfast Edition: For a fun breakfast take, fill with scrambled eggs, cheese, and even a bit of crumbled sausage or bacon. Serve it with your favorite salsa!
Chef’s Notes
A little behind-the-scenes story for you—when I first experimented with these pizza pockets, I accidentally filled them too much, and they burst open in the oven! While the flavors were still delightful, they left quite the mess. But hey, that’s how we learn! Now, I make sure to remind folks to leave some space at the edges.
This recipe has been tweaked and perfected over the years, and I love how each batch brings a new memory with it. It’s such a joy to watch friends and family devour them with big smiles!
FAQs and Troubleshooting
Feeling a bit uncertain? No worries! Here are some common questions and troubleshooting tips to get you on the right track:
-
Why are my pizza pockets leaking?
- Make sure to seal the edges properly! If the filling is too full, they may burst while baking. Less is more!
-
Can I freeze these pizza pockets?
- Absolutely! After assembling, flash freeze them in a single layer. Once frozen, transfer them to a freezer bag. When you’re ready to bake, no need to thaw—just add a few extra minutes to your bake time.
-
What if my dough isn’t stretching?
- If you’re using refrigerated dough, let it come to room temperature for 20-30 minutes. This helps relax the gluten, making it easier to roll out.
-
How can I make them healthier?
- Use whole wheat pizza dough, reduce the cheese, or fill with lots of veggies! You can also try baking them instead of frying for a lighter option.
Nutritional Info
While I’m not a nutritionist, I can certainly break down some rough estimates for you! Each Homemade Pepperoni Pizza Pocket typically contains:
- Calories: Approximately 250-300 (depending on size and filling)
- Protein: Around 12-15g (mostly from cheese and pepperoni)
- Carbohydrates: About 30-35g
- Fat: 12-15g (varying based on the type of cheese and pepperoni)
Of course, precise values will vary based on your ingredients and portion sizes. For those watching their nutritional intake, I recommend using leaner protein and whole grains, as mentioned earlier.
Final Thoughts
Creating these Homemade Pepperoni Pizza Pockets is more than just about the delicious flavors you’ll savor—it’s about the memories you’ll create along the way. Whether it’s decorating them with your loved ones, experimenting with toppings, or savoring that first bite of melted cheese and savory pepperoni, these pockets are sure to hold a special place in your heart—and your kitchen.
I encourage you to not just follow the recipe but to make it your own! Share your creations, variations, and stories with me! I can’t wait to hear how you make these pockets of joy truly special. Now, it’s your turn—get out there, roll up your sleeves, and pour some love into those Pizza Pockets. Happy cooking!
Print
Homemade Pepperoni Pizza Pockets
- Total Time: 35 minutes
- Yield: 4 servings 1x
- Diet: Vegetarian
Description
Delicious and fun to make, Homemade Pepperoni Pizza Pockets are perfect for sharing at parties or cozy nights at home.
Ingredients
- 1 package of pizza dough (fresh or store-bought)
- 1 cup shredded mozzarella cheese
- 1 cup sliced pepperoni
- 1/2 cup pizza sauce
- 1 tablespoon olive oil
- 1 teaspoon Italian seasoning
- Flour for dusting
Instructions
- Preheat your oven to 425°F (220°C).
- Prepare your work surface by lightly flouring the countertop or cutting board.
- Roll out the pizza dough into a rectangle (about 12 inches by 8 inches).
- Cut the dough into 4-inch squares.
- Fill half of each square with pepperoni, mozzarella cheese, and pizza sauce.
- Season with Italian seasoning, then fold the dough over to create a pocket.
- Seal the edges using your fingers or a fork.
- Brush the tops with olive oil for flavor and color.
- Bake for 12-15 minutes or until golden brown.
- Cool for a few minutes before serving.
Notes
For extra flavor, you can experiment with different fillings like vegetables or BBQ chicken.
- Prep Time: 20 minutes
- Cook Time: 15 minutes
- Category: Main Course
- Method: Baking
- Cuisine: Italian
Nutrition
- Serving Size: 1 pocket
- Calories: 300
- Sugar: 6g
- Sodium: 450mg
- Fat: 15g
- Saturated Fat: 5g
- Unsaturated Fat: 8g
- Trans Fat: 0g
- Carbohydrates: 35g
- Fiber: 2g
- Protein: 15g
- Cholesterol: 25mg
Keywords: pizza, pockets, comfort food, homemade, snack