
Minute Skillet Peach Cobbler for Busy Weeknights
How to Make Easy Peach Cobbler: A Comfort Food Classic
Hey there, fellow foodies! If you’ve got a sweet tooth and a love for that warm, fuzzy feeling that comes from sharing a delicious dessert, then you’re in for a treat. Today, we’re diving into one of the all-time comfort food classics—Peach Cobbler. It’s simple, satisfying, and bursting with flavor! Not to mention, it’s the perfect dessert to whip up when the cravings strike (and they often do!).
Introduction
Peach cobbler is more than just a dessert; it’s a warm hug on a plate! Picture this: it’s a lazy Sunday afternoon, the air is filled with the sweet aroma of fresh peaches, and the sun has just begun to set, casting a golden glow across your kitchen. This is when the magic happens. I can hardly ever resist the charm of a peach cobbler, and I bet you can’t either!
One of the best things about peach cobbler is its ability to bring people together. Whether it’s a potluck, a family gathering, or just a cozy night in, dolloping a generous scoop of peach cobbler into a bowl and passing it around is the perfect way to spread joy. Served warm with a scoop of vanilla ice cream on top? Oh, my friends, that’s heavenly magic right there!
What’s even better is that this recipe is incredibly easy. You don’t need to be a culinary expert to create this incredible treat. With just a few pantry staples and a can of peaches, you’ll have a beloved dessert that feels like a labor of love.
So, grab your aprons, roll up your sleeves, and let’s embark on this peachy journey together. Trust me; your kitchen is about to smell like a slice of summer paradise!
Personal Story
Let me take you back to my childhood for a moment. Growing up in a small town, summers meant spending time at my grandmother’s house, where the kitchen was my happy place. Every Saturday, she’d pull out her old, handwritten recipe book, filled with notes and stains from years of cooking for the family. My favorite entry? Her peach cobbler recipe!
I remember one summer, we had an abundance of fresh peaches from a local orchard. The sweet, juicy aroma filled the house as we prepared the cobbler together. We laughed and chatted, me sitting on the countertop, swinging my legs while she showed me how to combine the ingredients. The magic happened when it came out of the oven—golden brown and bubbly, with that irresistible crust just begging for a scoop of ice cream on top.
On that day, I learned not just how to make a dessert but also the importance of time spent in the kitchen with loved ones. Every bite of that cobbler took me back to those warm summer afternoons, where the love for good food was as rich as the flavors dancing on my palate. That’s what I aim to recreate every time I make this peach cobbler—a taste of nostalgia, comfort, and love.
Ingredients
Now, let’s gather our ingredients! Below is the list of what you’ll need to make this easy peach cobbler:
-
1 can of peaches (in syrup or juice): This is the star of the show! Using canned peaches saves time and ensures your cobbler is moist and flavorful. If you prefer fresh peaches, feel free to use them—just make sure they’re ripe!
-
1 cup all-purpose flour: This is the base for our cobbler crust. It provides the right structure. If you’re looking for a gluten-free option, try using a blend of gluten-free all-purpose flour.
-
1 cup sugar: We’ll use sugar to enhance the sweetness of the peaches and balance the dish. You can substitute with less sugar or use alternatives like honey or agave syrup for a lighter version.
-
1 cup milk: Provides moisture and helps create a tender batter. Any type of milk works—dairy or non-dairy alternatives like almond or oat milk are great too!
-
1/2 cup butter (melted): Butter adds richness and helps create that golden crust. If you’re looking for a healthier substitute, you can use coconut oil or a light margarine.
-
2 teaspoons baking powder: The secret ingredient that gives the batter its rise and fluffy texture!
-
1/4 teaspoon salt: Just a pinch! It balances the sweetness and enhances all the flavors.
-
1 teaspoon vanilla extract: This aromatic ingredient lifts the flavors and adds depth to the cobbler. Feel free to use almond extract for a different twist!
Step-by-Step Instructions
Alright, let’s roll up those sleeves and get cooking! Here’s how to make this heavenly peach cobbler in just a few simple steps:
-
Preheat the Oven: Start by preheating your oven to 350°F (175°C). This step is crucial for ensuring your cobbler bakes evenly and develops that crispy top we love so much.
-
Prepare the Baking Dish: Grab a 9-inch pie dish or a 9×9 inch square baking pan and grease it with a bit of butter or cooking spray. This helps prevent sticking and makes cleanup a breeze!
-
Drain the Peaches: Open the can of peaches and drain the syrup or juice into a bowl (you can save the juice for sipping!). Place these luscious peach slices at the bottom of your prepared baking dish. If you’re using fresh peaches, slice them up and add them to the dish.
-
Mix the Dry Ingredients: In a large mixing bowl, combine the flour, sugar, baking powder, and salt. Whisk these ingredients together until they’re well blended. This helps distribute the baking powder evenly, which is key for a fluffy cobbler.
-
Add the Wet Ingredients: Pour in the milk, melted butter, and vanilla extract. Stir gently until everything comes together into a smooth batter. Don’t overmix—just enough to combine!
-
Pour Over the Peaches: Now for the fun part! Carefully pour the batter over the peaches in the baking dish. Don’t worry if it looks a little lumpy; that’s part of the charm.
-
Bake to Perfection: Place your dish in the preheated oven and bake for about 30-35 minutes. Keep an eye on it! You’re looking for a golden-brown top that’s firm to the touch and a toothpick inserted into the center should come out clean.
-
Cool and Serve: Once baked, remove the cobbler from the oven and let it sit for about 10-15 minutes to cool down. This will help it set a bit and make for easier serving.
Serving Suggestions
Now that your peach cobbler is fresh out of the oven, it’s time to serve it up! Here’s how to present your delicious creation:
-
Serve Warm: Nothing beats peach cobbler straight from the oven! Use a large spoon to scoop it into bowls. You can serve it as is, or take it to the next level.
-
Add Ice Cream: I recommend a scoop of vanilla ice cream on top for that classic combination. The creaminess of the ice cream melting into the warm cobbler is a dessert dream come true!
-
Garnish with Mint: A sprig of fresh mint can add a lovely touch of color and a hint of freshness that contrasts beautifully with the sweet peaches.
-
Pair with Whipped Cream: If you’re feeling extra indulgent, a dollop of freshly whipped cream can add a light, airy element to the dish.
Recipe Variations
Now, let’s get creative! Here are a few fun twists you can try with this peach cobbler recipe:
-
Berry Bliss: Mix in some fresh or frozen berries (blueberries, raspberries, or blackberries) with the peaches for a berry-peach cobbler fusion.
-
Coconut Dreams: Replace half of the milk with coconut milk, and add toasted coconut flakes for a tropical spin on the classic.
-
Spiced Up: Add a pinch of cinnamon or nutmeg to the batter to warm up the flavors, or even a splash of bourbon or rum for an adult version.
-
Peachy Keen Oat Topping: Instead of a traditional crust, mix oats with some brown sugar and melted butter for a crunchy topping.
-
Gluten-Free Delight: Use a gluten-free flour blend to make this recipe suitable for those with gluten sensitivities.
Chef’s Notes
As I cook this cobbler, I can’t help but reminisce about those hot summer days spent in my grandmother’s kitchen. This recipe has evolved over the years, incorporating new flavors and twists as I’ve experimented. It’s versatile, forgiving, and simply delicious, making it one of my go-to recipes no matter the season. Trust me: once you try it, you’ll be hooked!
And remember, the beauty of cooking is in the love you pour into your food. Don’t be afraid to make this recipe your own!
FAQs and Troubleshooting
Q1: My cobbler is too wet; what did I do wrong?
A: If the filling appears too watery, it could be because the peaches were packed in syrup. Drain the peaches well, or reduce the amount of liquid added to the batter.
Q2: Can I use fresh peaches instead of canned?
A: Absolutely! Fresh peaches are delicious and add a wonderful flavor. Just make sure to slice and add them to the baking dish without too much excess juice.
Q3: How do I know when my cobbler is done?
A: Check for a golden brown topping and insert a toothpick into the center. If it comes out clean, your cobbler is ready!
Q4: How should I store leftovers?
A: Store leftover cobbler in an airtight container in the refrigerator for up to 3-4 days. You can reheat it in the microwave or oven to enjoy warm again!
Nutritional Info
If you’re curious about the nutritional aspect of this delightful cobbler, here’s an approximate breakdown per serving (based on an 8-serving dish):
- Calories: 220-250
- Total Fat: 10g
- Saturated Fat: 6g
- Carbohydrates: 33g
- Sugar: 15g
- Protein: 3g
Remember, nutritional values can vary based on the ingredients used, so if you’re counting calories, it’s always a good idea to calculate based on your specific ingredients.
Final Thoughts
And there you have it! A delicious easy peach cobbler that combines simplicity with heartwarming flavors. I hope you’re inspired to get into the kitchen and whip up this delightful dish that’s sure to bring smiles and a sprinkle of joy to your gatherings.
As you dig into that warm, baked goodness, remember—it’s not just about the flavors, but the memories and moments we create along the way. So, gather your loved ones, share a scoop (or two!), and let this peach cobbler bring a little sweetness to your life.
Happy baking, friends! Go on, dig in, and let’s make those kitchen memories together! 🍑✨
Print
Easy Peach Cobbler
- Total Time: 50 minutes
- Yield: 8 servings 1x
- Diet: Vegetarian
Description
A simple and satisfying peach cobbler recipe that’s perfect for any gathering, bursting with flavor and nostalgia.
Ingredients
- 1 can of peaches (in syrup or juice)
- 1 cup all-purpose flour
- 1 cup sugar
- 1 cup milk
- 1/2 cup butter (melted)
- 2 teaspoons baking powder
- 1/4 teaspoon salt
- 1 teaspoon vanilla extract
Instructions
- Preheat the oven to 350°F (175°C).
- Prepare a 9-inch pie dish or 9×9 inch square baking pan by greasing it with butter or cooking spray.
- Drain the canned peaches and place them at the bottom of the prepared baking dish.
- Mix the dry ingredients: flour, sugar, baking powder, and salt in a large mixing bowl.
- Add the wet ingredients: milk, melted butter, and vanilla extract. Stir until combined.
- Pour the batter over the peaches in the baking dish.
- Bake for about 30-35 minutes until golden brown and a toothpick comes out clean.
- Cool for 10-15 minutes before serving.
Notes
Serve warm with vanilla ice cream or whipped cream for a delightful treat.
- Prep Time: 15 minutes
- Cook Time: 35 minutes
- Category: Dessert
- Method: Baking
- Cuisine: American
Nutrition
- Serving Size: 1 serving
- Calories: 220
- Sugar: 15g
- Sodium: 200mg
- Fat: 10g
- Saturated Fat: 6g
- Unsaturated Fat: 4g
- Trans Fat: 0g
- Carbohydrates: 33g
- Fiber: 1g
- Protein: 3g
- Cholesterol: 30mg
Keywords: peach cobbler, dessert, easy recipes, comfort food, summer dessert
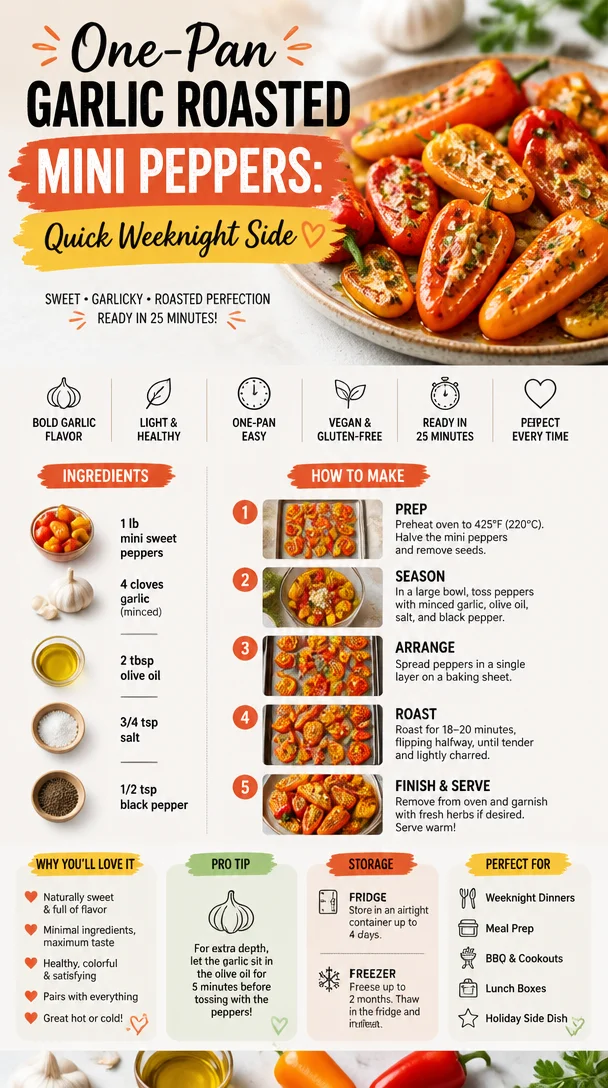
One-Pan Garlic Roasted Mini Peppers: Quick Weeknight Side
Garlic Roasted Mini Peppers: A Flavorful Delight
Hey there, fellow food lovers! I’m Beau Collier, and today we’re diving into a colorful, vibrant dish that’s guaranteed to brighten your day and your table: Garlic Roasted Mini Peppers. These little gems pack a punch of flavor and are super easy to whip up. Whether you’re looking for a zesty side dish, a party starter, or a simple snack to munch on, you’ve hit the jackpot with these beauties!
Introduction
Let’s be honest: everyone loves a good roasted pepper. They’re sweet, tender, and can elevate any dish from mundane to magnificent in just a matter of minutes. But what’s the secret? It’s all about roasting them to that perfect level of caramelization, infusing them with garlic goodness that’s simply irresistible.
Now, I can vividly remember my first encounter with mini peppers. I was at a local farmer’s market, and they caught my eye with their vibrant reds, yellows, and oranges. I couldn’t resist loading my basket full of these bite-sized beauties. Fast forward a few weekends later, and I found myself experimenting with different flavors and cooking methods. My kitchen transformed into a mini pepper paradise, and every time I roasted a batch, I was transported back to that sunny market day.
The great thing about garlic roasted mini peppers is they’re not just beautiful—they’re delicious! The creamy texture paired with the slight crunch makes every bite a burst of flavor. Plus, you’ll love the aroma that fills your kitchen as they roast. It’s like a warm hug welcomed by your senses, making this simple dish part of your comfort food repertoire.
As we cook together today, I want you to enjoy every step of the process. Embrace the smell of garlic wafting through your kitchen and the vibrant colors of these mini peppers. So, grab your favorite apron, crank up that oven, and let’s get cooking!
Personal Story
I still remember the summer of my culinary awakening. One beautiful Saturday, I invited a few close friends over for a backyard BBQ. Of course, I went a little overboard planning the menu—it’s just how I roll! Amidst the marinated meats and scrumptious salads, I wanted something unique to wow my guests.
That’s when I remembered those mini peppers. I quickly roasted a tray, drizzling them with olive oil, sea salt, and plenty of garlic. As they baked away, the anticipation built in the air. Once they were done, the vibrant colors and those savory smells brought everyone rushing over to the table.
The moment they took their first bite, I was flooded with compliments. People went back for more, and those mini peppers quickly became the star of the meal. Everyone loved how easy they were to make and how they complemented the barbecue spread perfectly. It was a small moment, but I realized how food brings people together and creates lasting memories. Whenever I make garlic roasted mini peppers now, I’m transported back to that summer BBQ, surrounded by laughter and good company.
Ingredients
To make these delectable Garlic Roasted Mini Peppers, you’ll need the following ingredients:
-
Mini Sweet Peppers: These bite-sized beauties come in a variety of colors and have a sweet, mild flavor. You can use red, yellow, or orange ones, or a mix for a colorful presentation. If you can’t find mini sweet peppers, feel free to use regular bell peppers, though you may need to adjust the roasting time.
-
Garlic: Fresh garlic is a game-changer in this recipe. It adds depth and aromatic flavor. You can substitute it with garlic powder in a pinch, though fresh will always yield the best results. Mince it finely or thinly slice it to achieve different flavor levels.
-
Olive Oil: A good quality extra virgin olive oil enhances the dish’s richness. It’s perfect for roasting and adds a wonderful flavor. If you’re looking for a lighter option, you can use avocado oil or a bit of melted butter instead.
-
Salt: A sprinkling of sea salt enhances all the natural flavors. If you want to experiment, consider using smoked salt for an added depth of flavor, or keep it simple with table salt.
-
Pepper: Freshly cracked black pepper is key to balancing the sweetness of the peppers. You can use white pepper for a different taste or even a pinch of cayenne for a little kick.
Step-by-Step Instructions
Now that we’ve gathered our ingredients, let’s dive into the cooking process. It’s time to transform those vibrant mini peppers into a mouthwatering dish.
-
Preheat Your Oven
Start by preheating your oven to 425°F (220°C). This high temperature will help caramelize the peppers, bringing out their natural sweetness. -
Prepare the Peppers
Rinse your mini sweet peppers under cold water and pat them dry with a clean kitchen towel. Slice each pepper in half lengthwise and remove the seeds. Feel free to leave the stems on for presentation—just a little more rustic and charming! -
Mince Garlic
While your oven heats up, let’s prep the garlic! Peel the garlic cloves and mince them finely. If you love a stronger garlic flavor, don’t be shy—add more! Just be aware that this recipe is all about balance, so taste as you go. -
Toss with Oil and Seasoning
In a large bowl, combine the halved peppers, minced garlic, olive oil, salt, and pepper. Use your hands to toss everything together until the peppers are well-coated. This is where the magic begins; the oil carries the flavors and helps them roast to perfection. -
Spread on a Baking Sheet
Arrange the seasoned peppers in a single layer on a baking sheet. Make sure they have some space between them—crowding the pan will lead to steaming rather than roasting, and we want those lovely browned edges! -
Roast in the Oven
Now’s the fun part! Place the baking sheet in the preheated oven and roast for about 20–25 minutes. The sweet smell of garlic will fill your kitchen—absolutely delightful! Give them a little toss halfway through to ensure even cooking. -
Check for Doneness
You’ll know they’re done when the peppers are tender and slightly charred around the edges. Keep an eye on them during the last few minutes—they can go from perfectly roasted to burnt pretty quickly! -
Taste and Adjust Seasoning
Once they’re ready, take them out of the oven and allow them to cool for a few minutes. Taste one pepper and see if it needs more salt or pepper. That’s the beauty of cooking—you get to personalize your dish! -
Serve and Enjoy!
Transfer the roasted mini peppers to a serving platter. They can be served warm or at room temperature, depending on your preference.
Serving Suggestions
When plating your garlic roasted mini peppers, think about how to enhance their presentation and flavor. A simple serving suggestion is to position them on a beautiful platter, and drizzle a little extra olive oil on top for sheen.
For an extra visual punch, consider adding fresh herbs like parsley or basil on top—their bright green colors will contrast beautifully with the vibrant peppers. You can also offer a bowl of feta cheese or goat cheese on the side for a creamy finish that complements the sweetness of the peppers.
These mini peppers can stand alone as a side dish, but they’re also wonderful as part of a charcuterie board or a tasty addition to salads. Serve them alongside some crusty bread for dipping, or toss them into pasta for an added twist.
Recipe Variations
Now that you’ve mastered the basic garlic roasted mini peppers, let’s have some fun with variations! Here are a few creative twists to try:
-
Honey Balsamic Glaze: Drizzle some honey balsamic reduction over the roasted peppers for a sweet-tangy finish.
-
Spicy Sriracha Kick: Add a splash of sriracha sauce into the oil mixture before roasting for a spicy punch.
-
Cheesy Delight: Top the peppers with shredded cheese (like mozzarella or parmesan) during the last 5 minutes of cooking for a melty finish.
-
Mediterranean Flair: Toss some olives and sun-dried tomatoes in with the peppers pre-roast for a Mediterranean twist.
-
Herb-Infused Oil: Instead of plain olive oil, blend in some fresh herbs like oregano or thyme with the oil for extra flavor.
Chef’s Notes
This recipe has become one of my go-to favorites over the years. It’s versatile, forgiving, and can be adapted to whatever you have on hand. The first time I made these, I overdid it on the garlic—who knew that much could be overwhelming? After some trial and error, I found the right balance that pleases most palates.
The best part is that garlic roasted mini peppers always bring smiles and satisfaction. Whenever friends come over for dinner, I know I can count on these lovely little bites to steal the show. Plus, they make a killer leftovers snack—if you have any left, that is!
FAQs and Troubleshooting
-
Why are my peppers not browning?
Make sure your oven is preheated and that you’re using high heat. Give the peppers space on the baking sheet to roast properly. -
Can I use frozen mini peppers?
While fresh is best, you can use frozen mini peppers. Just be sure to thaw and drain any excess water before tossing them with oil and seasoning. -
What can I do with leftovers?
Leftover roasted peppers are great in salads, on sandwiches, or blended into a pesto. They also freeze well for future meals! -
How do I know when the peppers are done?
They should be tender to the fork and have slightly charred edges. Keep an eye on them to avoid overcooking!
Nutritional Info
While garlic roasted mini peppers are a treat, they’re also packed with nutritional goodness! Mini sweet peppers are low in calories, making them a guilt-free addition to any meal. They’re rich in vitamins A and C, helping to boost your immune system and keep your skin glowing.
Olive oil, the base of our recipe, is known for its heart-healthy monounsaturated fats, which can help lower bad cholesterol. Plus, garlic has antioxidant properties and has been linked to various health benefits, including improved heart health. So, you can enjoy this dish knowing you’re also treating your body well!
Final Thoughts
So, there you have it—garlic roasted mini peppers that are bound to become a staple in your kitchen. They’re simple, satisfying, and downright delicious!
As you gather around the table with friends and family, remember that the best part of cooking is not just the end result but the experience—and the memories made together through good food. So the next time you find yourself at the grocery store, don’t forget to snag those little sweet peppers.
I can’t wait to hear how your garlic roasted mini peppers turn out. Let’s keep this culinary journey going—next up, I might just share my secret to a creamy garlic dip that pairs perfectly with these beauties. Happy cooking, and eat with joy!
PrintGarlic Roasted Mini Peppers
- Total Time: 35 minutes
- Yield: 4 servings 1x
- Diet: Vegetarian
Description
A colorful and flavorful dish of garlic roasted mini peppers, perfect as a side or snack.
Ingredients
- 1 pound Mini Sweet Peppers
- 4 cloves Garlic, minced
- 2 tablespoons Olive Oil
- 1 teaspoon Sea Salt
- 1/2 teaspoon Freshly Cracked Black Pepper
Instructions
- Preheat your oven to 425°F (220°C).
- Rinse the mini sweet peppers under cold water and pat them dry. Slice each pepper in half lengthwise and remove the seeds.
- Mince the garlic cloves finely.
- Combine the halved peppers, minced garlic, olive oil, salt, and pepper in a large bowl and toss until well coated.
- Arrange the seasoned peppers in a single layer on a baking sheet.
- Roast in the oven for about 20–25 minutes, tossing halfway through for even cooking.
- Check for doneness; they should be tender and slightly charred.
- Taste and adjust seasoning as needed.
- Serve the roasted mini peppers warm or at room temperature.
Notes
For a colorful presentation, use a mix of red, yellow, and orange mini peppers. Optionally, drizzle with extra olive oil and garnish with fresh herbs before serving.
- Prep Time: 10 minutes
- Cook Time: 25 minutes
- Category: Side Dish
- Method: Roasting
- Cuisine: Mediterranean
Nutrition
- Serving Size: 1 serving
- Calories: 150
- Sugar: 3g
- Sodium: 200mg
- Fat: 10g
- Saturated Fat: 1.5g
- Unsaturated Fat: 8g
- Trans Fat: 0g
- Carbohydrates: 15g
- Fiber: 4g
- Protein: 2g
- Cholesterol: 0mg
Keywords: mini peppers, roasted peppers, garlic, healthy side dish, easy recipes, Mediterranean

Tomato Pie Recipe for Busy Weeknights (30-Minute Prep)
The Ultimate Tomato Pie Recipe: A Slice of Comfort from My Kitchen to Yours
Hey there, food lovers! Today, we’re diving into a dish that’s not just a meal but a heartwarming slice of nostalgia: Tomato Pie. If you’re like me, there’s something about this savory delight that brings back memories of summer days spent in a sun-soaked garden, with juicy, red tomatoes dripping with flavor. So, roll up your sleeves and grab your apron; we’re going to whip up a dish that’s just as comforting as an old sweater and perfect for sharing with friends and family!
A Slice of Nostalgia
Let me take you back to a sweltering August afternoon in my grandmother’s kitchen. The air was thick with the scent of fresh tomatoes picked from her sprawling garden. I remember standing on a little stool, just tall enough to peek over the counter, while my grandma effortlessly transformed those ruby-red beauties into the most delicious Tomato Pie. We would laugh as she tossed in her secret ingredients, reminiscing about summers gone by and creating new memories in the process.
It was more than just cooking; it was a way of bonding—fingers sticky with tomato juice and flour as we crimped the edges of her flaky pie crust. The anticipation of that pie baking in the oven, its golden crust browning perfectly, was almost unbearable. Each time we dug in, it felt like we were diving into a treasure chest of flavors, with each slice unfolding layers of love and warmth.
And that’s exactly what I aim to recreate with my Tomato Pie recipe. It’s simple, delicious, and brings people together—just like Grandma’s did. Let’s get started on building our own delicious memories today!
Ingredients
We’re keeping it simple with a handful of fresh ingredients that you might already have in your pantry. Here’s what you’ll need:
-
1 Pie Crust
Whether you go for homemade or store-bought, this is the foundation of your Tomato Pie. If you’re short on time, a pre-made crust works wonders! Feeling adventurous? You can even use a savory biscuit crust for a fun twist. -
4 Beefsteak Tomatoes (peeled and sliced thin)
These large, juicy tomatoes are perfect for our pie. Not a fan of beefsteak? You can substitute with any ripe tomatoes or even heirloom varieties for a splash of color and flavor. -
Salt and Pepper (to taste)
These are your basic flavor enhancers! A dash of salt will help draw out the moisture in the tomatoes, making sure your pie isn’t soggy. -
1 tbsp Fresh Basil (or 1 tsp dried basil)
Fresh herbs elevate any dish! Basil pairs wonderfully with tomatoes but feel free to experiment with other herbs like oregano or thyme. -
2 tbsp Chopped Chives
Chives add a mild onion flavor that complements the tomatoes perfectly. If you don’t have chives, green onions or even parsley can work in a pinch. -
1 cup Heavy Mayonnaise (preferably Duke’s)
Mayonnaise might seem unusual, but it adds creaminess and depth to your pie. If you want a lighter version, Greek yogurt is a good substitute, although it’ll alter the flavor a bit. -
1 cup Grated Cheddar Cheese
Cheddar lends a rich, savory flavor to the pie. Experiment with other cheeses like mozzarella, goat cheese, or even a spicy pepper jack for something fun!
Step-by-Step Instructions
Now that we have our ingredients laid out, it’s time to bring it all together! Follow these steps for a Tomato Pie that will have your taste buds dancing.
-
Preheat your oven.
We want it nice and hot, so set your oven to 350°F (175°C). This ensures crispy edges for your pie. -
Prepare the pie crust.
If you’re using a store-bought crust, follow the package instructions. If homemade, roll it out and fit it into a 9-inch pie plate. Press it down gently to avoid any air pockets, then prick it with a fork to allow steam to escape. -
Layer the tomatoes.
Now, for the star of the show! Arrange the thinly sliced, peeled tomatoes in a single layer over the crust. Don’t worry if they overlap; this just makes for a more rustic, homey feel. Sprinkle salt and pepper over the top to enhance the flavor. -
Mix the delightful filling.
In a bowl, combine the mayonnaise, herbs, and half the cheese (saving the other half for later). Stir it all together until it’s creamy and well mixed. This is where the magic happens! -
Spread the filling over the tomatoes.
Carefully spoon the mayo mixture over the tomatoes, making sure to cover them nicely. This creamy layer adds richness and texture that’s simply irresistible. -
Top with cheese.
Sprinkle the remaining grated cheddar cheese over the top—you can never have too much cheese, am I right? It’s going to melt beautifully as the pie bakes. -
Bake to perfection.
Place your pie in the oven and bake for about 30-35 minutes or until the pie is bubbling and the cheese turns a golden brown. Your kitchen will smell like heaven, trust me! -
Cool and serve.
Once baked, let the pie cool for about 10 minutes before slicing. This will help the filling set up a bit, making your slices cleaner. The wait is agonizing, but it’s worth it!
Serving Suggestions
Serving your Tomato Pie can be just as creative as making it! Here are a few ideas to elevate your presentation:
-
Garnish with Fresh Herbs: Sprinkle fresh chives or basil on top for a pop of color and fresh flavor.
-
Perfect Pairings: Serve it with a simple green salad drizzled with balsamic vinaigrette or a light soup to round out the meal. This dish is fabulous alongside some crusty bread for soaking up any leftover juices.
-
Slice it Right: For a rustic touch, use a serrated knife to cut it into wedges. Each slice should reveal that gorgeous layering of tomatoes and creamy goodness.
-
Warm or Cold: This pie is delightful either warm or at room temperature, making it versatile for any occasion. It’s great as a main dish or even at a brunch buffet!
Recipe Variations
This Tomato Pie recipe is a fantastic canvas for creativity! Here are a few ideas to switch things up:
-
Add Proteins: Toss in cooked bacon bits or crumbled sausage for a heartier version. Who wouldn’t love the addition of some smoky flavor?
-
Spicy Kick: If you like a little heat, add red pepper flakes or diced jalapeños to the mayo mixture for an unexpected zing.
-
Cheesy Goodness: Swap out the cheddar for mozzarella and add in some parmesan for an Italian-inspired twist. You could even layer in some sautéed spinach!
-
Veggie Loaded: Mix in some sautéed bell peppers or mushrooms with the tomatoes for an earthy flavor explosion.
-
Gluten-Free Option: Use a gluten-free pie crust or even a cauliflower crust if you want to keep it lighter but still delicious!
Chef’s Notes
Over the years, my Tomato Pie recipe has gone through many transformations—kind of like me in the kitchen! There was that one time I accidentally grabbed expired mayo… let’s just say it didn’t turn out so well. But each failure taught me a valuable lesson: cooking is about experimenting and having fun. And the best part? Even mishaps often lead to surprisingly tasty outcomes!
So don’t be afraid to tweak this recipe and make it your own. It’s not just about following directions; it’s about letting your personality shine through your cooking. Who knows? You might just cook up your own family classic to be passed down for generations!
FAQs and Troubleshooting
Here are a few common questions and potential pitfalls to look out for:
-
Why is my Tomato Pie watery?
If your pie ends up soggier than expected, it might be due to the moisture content in the tomatoes. To avoid this, sprinkle some salt on the tomato slices before assembling, letting them sit for a bit to draw out excess liquid. -
Can I use other types of cheese?
Absolutely! Feel free to mix and match with your favorite cheeses. Just keep in mind that the flavor will change, so choose according to your taste preference. -
What can I do if I have leftovers?
Leftover Tomato Pie is a delicious treat the next day! Just store it in the fridge, and when you’re ready, reheat it in the oven for that freshly baked taste. It makes for a fantastic lunch or even a quick snack. -
How can I make this recipe vegetarian?
It’s already vegetarian-friendly! You can easily keep it meat-free by sticking to the original ingredients or swapping out cheese for a plant-based option if desired.
Nutritional Info
While I believe in enjoying every bite of our delicious Tomato Pie, it’s always good to be mindful of nutritional values. Here’s a quick breakdown of the calories and key nutrients per slice (assuming 8 slices):
- Calories: ~280
- Fat: 22g
- Carbohydrates: 16g
- Protein: 6g
- Fiber: 1g
This dish is packed with flavor and comfort, but like all good things, moderation is key!
Final Thoughts
So there you have it—the ultimate Tomato Pie recipe, brimming with love, nostalgia, and sunshine flavors. This pie isn’t just a meal; it’s a celebration of summer, simple ingredients, and the joy of cooking with family and friends. Remember, cooking is as much about the journey as it is about the destination; don’t rush it, and savor each slice.
I can’t wait for you to try out this recipe. I know it’ll become a cherished dish in your home just like it is in mine. So gather your favorite folks, dish out those slices, and create new memories around the dinner table. Happy cooking!
Print
The Ultimate Tomato Pie
- Total Time: 50 minutes
- Yield: 8 servings 1x
- Diet: Vegetarian
Description
A heartwarming Tomato Pie recipe that evokes memories of summer with fresh, juicy tomatoes and a creamy filling.
Ingredients
- 1 Pie Crust
- 4 Beefsteak Tomatoes (peeled and sliced thin)
- Salt and Pepper (to taste)
- 1 tbsp Fresh Basil (or 1 tsp dried basil)
- 2 tbsp Chopped Chives
- 1 cup Heavy Mayonnaise (preferably Duke’s)
- 1 cup Grated Cheddar Cheese
Instructions
- Preheat your oven to 350°F (175°C).
- Prepare the pie crust according to package instructions or roll it out and fit it into a 9-inch pie plate.
- Layer the thinly sliced, peeled tomatoes in a single layer over the crust, then sprinkle with salt and pepper.
- Mix the mayonnaise, herbs, and half the cheese in a bowl until creamy.
- Spread the mayo mixture over the tomatoes.
- Top with the remaining grated cheddar cheese.
- Bake for about 30-35 minutes until bubbling and golden brown.
- Cool for 10 minutes before slicing and serving.
Notes
This dish is delicious warm or at room temperature. It can also be served alongside a salad or soup.
- Prep Time: 15 minutes
- Cook Time: 35 minutes
- Category: Main Course
- Method: Baking
- Cuisine: American
Nutrition
- Serving Size: 1 slice
- Calories: 280
- Sugar: 4g
- Sodium: 550mg
- Fat: 22g
- Saturated Fat: 5g
- Unsaturated Fat: 15g
- Trans Fat: 0g
- Carbohydrates: 16g
- Fiber: 1g
- Protein: 6g
- Cholesterol: 30mg
Keywords: Tomato Pie, Comfort Food, Summer Recipe, Vegetarian Recipe, Heirloom Tomato

Weeknight One-Pan Caramelized Skillet Peaches in 15 Minutes
Caramelized Skillet Peaches: A Taste of Summer in Every Bite!
Hey there, food lovers! Welcome back to Feastical, where we whip up feel-good dishes that warm the heart and spark joy in the kitchen. Today, we’re diving into a recipe that’s as sweet as summer sunshine and as simple to make as it is delicious: Caramelized Skillet Peaches. Trust me; this dish is going to take your taste buds on a heavenly trip!
Let’s be real; peaches are one of those summer fruits that capture the essence of the season. Their sweet, juicy flesh is synonymous with long, lazy afternoons and sun-kissed memories. There’s something magical about cooking fresh produce, caramelizing the sugars to unlock their full potential. When you combine peaches with a bit of maple syrup and butter, you get a decadent dessert that feels fancy but is super easy to throw together. Imagine this: a warm, gooey peach straight from the skillet, topped with a scoop of creamy vanilla ice cream. Talk about summer bliss!
I first discovered the joys of caramelized peaches on a family camping trip in my late teens. We were gathered around the fire, trying to figure out ways to enjoy our meager supplies. While my siblings were busy making s’mores, my adventurous spirit led me to throw some halved peaches on the grill, a drizzle of honey, and a sprinkle of cinnamon. It was a game-changer! The combination of fire-kissed sweetness and smoky flavor was nothing less than divine. Fast forward to today, and I’ve refined that recipe, added a few more delicious tweaks, and now I want to share my version of these spectacular peaches with you.
So, whether you’re looking for a cozy dessert for an intimate dinner or a fun treat for a summer barbecue, this recipe will become your go-to. Let’s grab those peaches and get started on this heavenly journey!
A Sweet Slice of My Peachy Past
Growing up, our summers revolved around picking fresh fruit at a local orchard. I can still hear the sound of my siblings racing each other to fill their baskets. Those days were filled with laughter, sunshine, and a healthy dose of sibling rivalry! On one of our excursions, we found ourselves surrounded by rows and rows of juicy peaches. We picked until our baskets overflowed, our hands sticky from the sweet juice.
That evening, my mom whipped up her signature dish—peach cobbler. The entire house was filled with a warm, sugary aroma as she mixed and baked it to perfection. To this day, that memory holds a special place in my heart, and it’s why I’m so passionate about showcasing peaches in their simplest and most glorious form. Fast forward to adulthood, and I’m still chasing that warm peachy feeling, which brings us to today’s caramelized beauties!
Ingredients
For these delicious Caramelized Skillet Peaches, you’ll need the following ingredients:
-
6 ripe peaches
The fresher, the better! Look for peaches that are slightly soft to the touch. If they are too firm, leave them out for a couple of days at room temperature until they ripen. -
2 tablespoons lemon juice
This brightens up the dish and helps the peaches maintain their lovely color. If you’re in a pinch, lime juice works as a fantastic substitute! -
1/4 cup pure maple syrup
A natural sweetener that pairs beautifully with peaches. If you’re out of maple syrup, feel free to use honey or agave syrup. -
1/2 teaspoon kosher salt
This may seem like a small amount, but it enhances all the flavors beautifully, balancing the sweetness. I recommend kosher salt for its texture, but table salt will work as well – just use half the amount. -
4 tablespoons unsalted butter
Ah, the secret to richness! Butter creates that luscious glaze the peaches simmer in. You can swap it out for coconut oil for a dairy-free option if you’d like. -
1 teaspoon vanilla extract (pure)
This adds an aromatic layer to the dish. Always go for pure vanilla extract when you can—the flavor difference is worth it!
Step-by-Step Instructions
Ready to transform those peaches into a delightful dessert? Here’s how to do it step by step:
-
Prepare Your Peaches
Start by washing your peaches under cool running water. Once cleaned, dry them off and slice them in half, removing the pit. If you’re feeling daring, leave the skins on for a bit of extra texture and color! -
Heat the Skillet
Grab your favorite skillet (a cast-iron one works wonders here) and place it over medium heat. Let it warm up for a couple of minutes; you want that skillet hot enough to get a nice sear but not so hot that it scorches the butter. -
Melt the Butter
Add the unsalted butter to the skillet and let it melt completely, swirling the pan around to coat the bottom evenly. This is where the flavor magic begins! -
Add Peaches and Cook
Gently add your peach halves to the skillet, cut side down. Sear them for about 3-4 minutes. You’re looking for a beautiful golden-brown color. Resist the urge to poke and prod – let them do their thing! -
Create the Caramel Sauce
Once caramelized, carefully flip the peaches over with a spatula. Now, drizzle the maple syrup and lemon juice over them, followed by a sprinkle of kosher salt. Allow the mixture to bubble and thicken for another 2-3 minutes. When the peaches start to soften and soak up that syrup, you’re in for a treat! -
Finish with Vanilla
Remove the skillet from heat and stir in the pure vanilla extract. This final touch elevates the dish from delicious to utterly divine. -
Serve Warm
The best part? Enjoy them immediately while they’re still warm!
Serving Suggestions
When it comes to serving these Caramelized Skillet Peaches, the options are as delightful as the dish itself. Here are a few suggestions:
-
Serve the peaches over a generous scoop of vanilla ice cream for a classic dessert experience. The warm peaches will melt into the ice cream, creating a heavenly combination!
-
Another mouthwatering idea is to enjoy them alongside whipped cream or Greek yogurt for a lighter touch. The tanginess of yogurt plays off the sweetness of the peaches beautifully!
-
For a gourmet flair, plate the peaches over a slice of pound cake or French toast for breakfast. Top it with a sprinkle of powdered sugar, and you’ve got yourself a showstopper.
-
Don’t forget about garnishes! A sprinkle of cinnamon, a handful of fresh mint leaves, or a drizzle of more maple syrup can elevate your dish even further.
Recipe Variations
Let’s get creative! Here are 3–5 delicious variations to try with your caramelized peaches:
-
Honey-Balsamic Peaches
Replace maple syrup with honey and add a splash of balsamic vinegar. The sweetness paired with the tanginess of the vinegar will surprise and delight your taste buds! -
Spicy Peach Maple Glaze
If you enjoy a kick, sprinkle some cayenne pepper or red pepper flakes into your maple syrup before drizzling. It offers a surprising heat that pairs beautifully with the juicy sweetness. -
Nutty Caramelized Peaches
Add a sprinkle of chopped nuts—like pecans or almonds—during the last minute of cooking for a delicious crunch that complements the soft peaches. -
Coconut-Caramel Peaches
Swap the butter for coconut oil and drizzle unsweetened shredded coconut over the peaches just before serving for a tropical twist. -
Peach Melba
Serve your caramelized peaches with raspberry sauce (just puree fresh raspberries with a little sugar) and a scoop of ice cream for an elegant dessert.
Chef’s Notes
You know, every time I make caramelized peaches, I’m reminded of that camping trip and how something so simple can bring back the warmest memories. It’s comforting to think that something as easy as cooking fruit can transport us back in time. Over the years, I’ve experimented with this recipe in countless ways—the honey-balsamic twist remains a fan favorite among my friends! It’s fun to see how a little creativity can breathe new life into a classic.
FAQs and Troubleshooting
Q: What if my peaches are too firm?
A: If your peaches are a bit hard, you can place them in a paper bag for a day or two to ripen. If you’re in a rush, slice them thinner; they’ll caramelize quicker!
Q: Can I make this recipe in advance?
A: The caramelized peaches are best served fresh. However, if you do have leftovers, store them in an airtight container in the fridge. Just reheat in a skillet before serving.
Q: What if I made too much caramel sauce?
A: Lucky you! Leftover caramel sauce can be drizzled over pancakes, waffles, or coffee for an indulgent special treat.
Q: Can I use frozen peaches?
A: While fresh peaches are preferred, frozen peaches will work in a pinch! Just thaw and drain excess water. You may need to cook them a little longer to achieve that golden caramelization.
Nutritional Info
For a serving of these decadent Caramelized Skillet Peaches (based on a serving size of 2 peach halves), you will find the following nutrients:
- Calories: Approx. 180
- Total Fat: 8g
- Saturated Fat: 5g
- Cholesterol: 20mg
- Sodium: 30mg
- Carbohydrates: 27g
- Dietary Fiber: 2g
- Sugars: 18g
- Protein: 1g
Please note that these values are approximate and can vary based on specific ingredient brands and variations used.
Final Thoughts
I hope you’ve enjoyed this delightful journey into the world of Caramelized Skillet Peaches! They truly embody the flavors of summertime and are sure to impress your family and friends. Remember, cooking is all about experimenting and finding joy in the process.
So next time you find yourself with ripe peaches, don’t hesitate to whip up this recipe. It’s a great way to create memories in the kitchen, just like I did during those childhood summers. If you give these caramelized beauties a try, please let me know how they turned out in the comments or tag me on social media!
Happy cooking, my friends! Until next time, keep sharing love through food!
Print
Caramelized Skillet Peaches
- Total Time: 20 minutes
- Yield: 4 servings 1x
- Diet: Vegetarian
Description
A simple yet decadent dessert featuring juicy peaches caramelized with maple syrup and butter, perfect for summer.
Ingredients
- 6 ripe peaches
- 2 tablespoons lemon juice
- 1/4 cup pure maple syrup
- 1/2 teaspoon kosher salt
- 4 tablespoons unsalted butter
- 1 teaspoon vanilla extract (pure)
Instructions
- Prepare Your Peaches: Start by washing your peaches under cool running water. Once cleaned, dry them off and slice them in half, removing the pit. If you’re feeling daring, leave the skins on for a bit of extra texture and color!
- Heat the Skillet: Grab your favorite skillet (a cast-iron one works wonders here) and place it over medium heat. Let it warm up for a couple of minutes; you want that skillet hot enough to get a nice sear but not so hot that it scorches the butter.
- Melt the Butter: Add the unsalted butter to the skillet and let it melt completely, swirling the pan around to coat the bottom evenly. This is where the flavor magic begins!
- Add Peaches and Cook: Gently add your peach halves to the skillet, cut side down. Sear them for about 3-4 minutes. You’re looking for a beautiful golden-brown color. Resist the urge to poke and prod – let them do their thing!
- Create the Caramel Sauce: Once caramelized, carefully flip the peaches over with a spatula. Now, drizzle the maple syrup and lemon juice over them, followed by a sprinkle of kosher salt. Allow the mixture to bubble and thicken for another 2-3 minutes. When the peaches start to soften and soak up that syrup, you’re in for a treat!
- Finish with Vanilla: Remove the skillet from heat and stir in the pure vanilla extract. This final touch elevates the dish from delicious to utterly divine.
- Serve Warm: The best part? Enjoy them immediately while they’re still warm!
Notes
For variations, try honey-balsamic peaches, spicy peach maple glaze, or coconut-caramel peaches.
- Prep Time: 10 minutes
- Cook Time: 10 minutes
- Category: Dessert
- Method: Sautéing
- Cuisine: American
Nutrition
- Serving Size: 1 serving
- Calories: 180
- Sugar: 18g
- Sodium: 30mg
- Fat: 8g
- Saturated Fat: 5g
- Unsaturated Fat: 2g
- Trans Fat: 0g
- Carbohydrates: 27g
- Fiber: 2g
- Protein: 1g
- Cholesterol: 20mg
Keywords: peaches, caramelized, summer dessert, fruit dessert, easy dessert