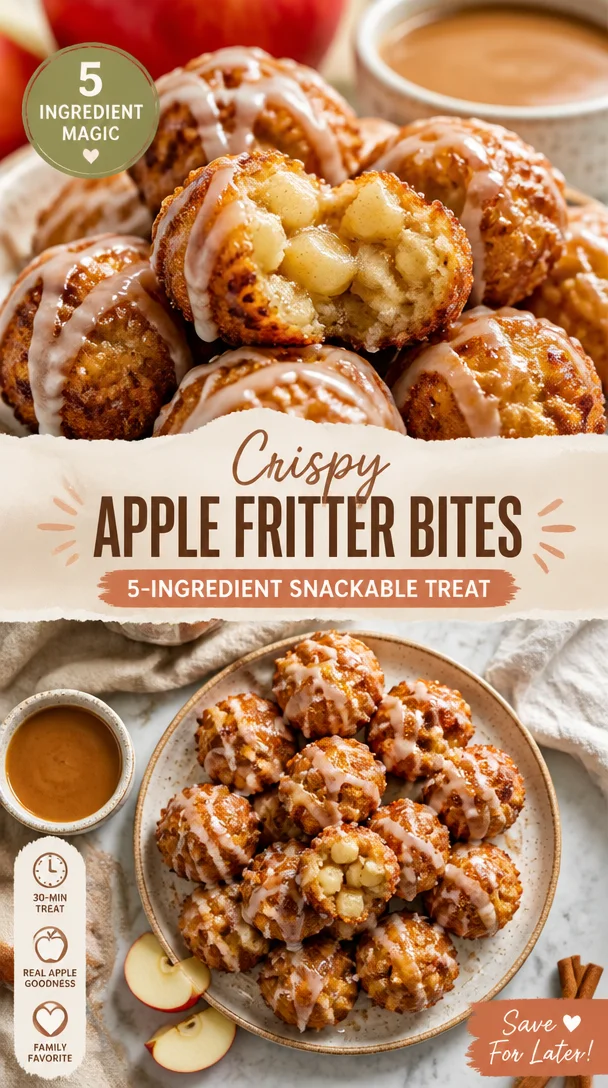
Crispy Apple Fritter Bites: 5-Ingredient Snackable Treat
The Delightful Journey of Apple Fritter Bites: A Sweet Indulgence
Hey there, food lovers! I’m Beau Collier, your trusty sidekick in the kitchen, and today we’re diving into a recipe that’s bound to tickle your taste buds and send warm, cozy vibes straight to your soul: Apple Fritter Bites! If you’ve ever had a craving for something sweet and satisfying, you know exactly what I’m talking about. These little bites of bliss blend tender apples, sweet cinnamon, and just enough glaze to make your heart do a happy dance.
Now, you might be asking, “Beau, what exactly are apple fritter bites?” Well, my friends, think of them as little nuggets of comfort that pack all the nostalgic flavors of a traditional apple fritter into a portable, bite-sized treat. Perfect for breakfast, dessert, or even a snack while binge-watching your favorite show—these apple fritter bites will have you returning to the kitchen for seconds.
The beauty of these treats lies not just in their flavor but in the joy of making them. I’m here to guide you every step of the way, sharing tips, tricks, and even a few stories that will make you feel like you’re cooking alongside a friend. So, grab your apron, preheat that oven, and let’s get rolling!
A Slice of Nostalgia
Let me take you on a journey back to my grandma’s kitchen—oh, the memories! Every fall, the comforting smell of cinnamon and freshly baked goods filled her home, and I couldn’t resist sneaking bites of her famous apple fritters. She had this magical touch; every recipe seemed to ooze love, laughter, and warm hugs, and her apple fritters were no exception.
I remember the first time she let me help out. My little hands were covered in dough, and I was tasked with mixing the spices, a job I took on with sheer delight. We’d peel apples together, and she’d tell me stories about her childhood and how her mother used to make these fritters.
Those moments became a tradition, and each batch was met with great anticipation. Even today, when I make apple fritter bites, I can almost hear her humming in the background. It’s a comforting reminder that food is not only about flavor but about connection, love, and remembrance. And today, I want you to create your own memories—let’s dive into the recipe!
Ingredients
To whip up these delightful apple fritter bites, you’ll need the following ingredients:
-
1 1/2 cups all-purpose flour
The backbone of our bites! All-purpose flour provides the perfect base. If you need a gluten-free option, try using a 1:1 gluten-free flour blend! -
2 tsp baking powder
This little gem provides lift and fluffiness. Make sure it’s fresh for the best results! -
1/2 tsp kosher salt
Salt enhances all the sweet flavors. If you’re using table salt, reduce the amount slightly, as it’s more potent. -
2 tsp ground cinnamon
Cinnamon is the soul of the apple fritter! If you want to spice things up, consider trying apple pie spice! -
1/4 cup unsalted butter (melted)
For richness! You can substitute with coconut oil if you’re looking for a dairy-free option. -
1/4 cup granulated sugar
Adds sweetness. Coconut sugar can be a nice alternative for a more caramel-like flavor. -
1 large egg
The binder! If you’re vegan, you can use a flax egg instead (1 tbsp flaxseed meal mixed with 2.5 tbsp water). -
1/2 tsp vanilla extract
For that lovely aromatic touch. Using homemade vanilla extract makes it even better! -
1/2 cup unsweetened applesauce
This adds moisture and flavor. You can also swap this with mashed bananas if you’re feeling adventurous! -
1 1/2 cups finely diced apples (Honeycrisp or Gala)
Fresh apple goodness! Honeycrisp is my favorite for sweetness and crunch, but any firm apple will do.
Glaze Ingredients
-
2 cups powdered sugar
For the sweet, glossy finish. If you’re looking for a healthier option, you could try a powdered erythritol or monk fruit sweetener. -
1/3 cup + 2 tbsp apple cider or juice
This keeps your glaze flavorful! If you’re in a pinch, clear soda works too for a fun twist!
Step-by-Step Instructions
Now it’s time to let the magic happen. Here’s how to make your apple fritter bites:
-
Preheat Your Oven: Start by preheating your oven to 375°F (190°C). This ensures they bake evenly and develop that delightful golden color.
-
Mix the Dry Ingredients: In a large bowl, whisk together the flour, baking powder, salt, cinnamon, and sugar. Make sure there are no lumps. This is where the flavors start to blend, so give it a good whisk!
-
Combine Wet Ingredients: In a separate bowl, melt the butter (you can use your microwave or a small saucepan) and let it cool slightly. Then add in the egg, vanilla extract, and applesauce, whisking until everything is well combined and smooth.
-
Combine Wet and Dry Mixtures: Pour the wet ingredients into the dry ingredients. Gently fold them together until just mixed; be careful not to overmix! The batter should be slightly lumpy—just how we like it.
-
Add Apples: Fold in the finely diced apples, ensuring they’re evenly distributed throughout the mixture. This step adds a lovely texture as well as flavor.
-
Prepare the Baking Sheet: Line a baking sheet with parchment paper or grease it to prevent sticking. Using a cookie scoop or a spoon, dollop small amounts of batter onto the baking sheet, spacing them about 2 inches apart.
-
Bake: Pop those beauties into the oven and bake for about 12-15 minutes or until they’re golden brown. You might notice a heavenly aroma filling your kitchen—just wait!
-
Make the Glaze: While your fritters are cooling, whip up the glaze. In a bowl, combine the powdered sugar with the apple cider or juice. Mix until it’s smooth and drizzle-ready.
-
Glaze the Fritters: Once the fritters are cool enough to handle, drizzle or dunk them into the glaze. Allow them to cool slightly before enjoying. Your kitchen will smell like heaven!
Serving Suggestions
Presentation is everything, folks! For a delightful serving experience, place your apple fritter bites on a rustic platter or a simple white plate to make those golden shapes pop. A sprinkle of extra cinnamon on top adds a beautiful touch and reminds everyone of the deliciousness waiting for them.
Pair these bites with a piping hot cup of coffee or a warm mug of spiced apple cider, which enhances that cozy fall feeling. For a fun twist, serve them alongside a scoop of vanilla or cinnamon ice cream for dessert; trust me, it’s an absolute game changer!
Recipe Variations
Feeling adventurous? Here are some creative ideas to mix things up with your apple fritter bites:
-
Caramel Apple Fritter Bites: Drizzle a touch of caramel sauce over your fritters after glazing for a decadent twist.
-
Chocolate Chip Add-In: Add 1/2 cup of mini chocolate chips to the batter for a delicious chocolatey surprise!
-
Nutty Fritters: Toss in 1/2 cup of chopped walnuts or pecans for some added crunch and flavor.
-
Cranberry Twist: Substitute some of the apples with dried cranberries or raisins for a chewy texture and a touch of tartness.
-
Pumpkin Spice: Embrace fall by adding 1/2 cup of pumpkin puree instead of applesauce and a bit more cinnamon and nutmeg to the batter.
Chef’s Notes
When I make these fritter bites, I often reminisce about those sweet days in my grandma’s kitchen. I’ve experimented with various recipes over the years, tweaking ingredients and techniques until I found the perfect balance between fluffiness and flavor. The trick is really in the mixing—don’t be afraid to get a bit messy, folks!
Remember, kitchen experiments can lead to the tastiest surprises, so let your creativity flow! There might be some funny mishaps along the way, but isn’t that part of the charm? Just keep a towel handy!
FAQs and Troubleshooting
Q: My fritters turned out dense. What did I do wrong?
A: Overmixing the batter is a common culprit! Mix until just combined and don’t be afraid of those lumps.
Q: Can I freeze these fritters?
A: Absolutely! Once they’ve cooled, place them in an airtight container or freezer bag. Just pop them in the toaster oven or microwave to reheat!
Q: What can I substitute for apples?
A: Feel free to experiment! Pears or peaches work exceptionally well if you’re looking for an alternative. Just keep in mind the moisture content.
Q: Can I make these gluten-free?
A: Yup! Use a gluten-free flour blend in place of all-purpose flour and ensure your baking powder is gluten-free as well.
Nutritional Info
Here’s a rough estimate of the nutritional info per apple fritter bite (assuming yields of around 24 bites):
- Calories: 120
- Total Fat: 4g
- Saturated Fat: 2g
- Carbohydrates: 19g
- Dietary Fiber: 1g
- Sugars: 5g
- Protein: 1g
Keep in mind that nutritional values can vary based on exact ingredient brands and variations you make.
Final Thoughts
There you have it, my friends! Your very own journey through the delicious world of apple fritter bites. Whether it’s a cozy afternoon treat or a fun project to whip up with family and friends, these little bites of bliss are sure to bring smiles to the table.
So, roll up your sleeves, embrace the joy of cooking, and create lasting memories with your loved ones. I can’t wait to hear all about your apple fritter adventures! Don’t forget to share your creations or any fun variations you try. Until next time, keep cooking with love and enthusiasm! Happy baking! 🍏❤️
Print
Apple Fritter Bites
- Total Time: 30 minutes
- Yield: 24 bites 1x
- Diet: Vegetarian
Description
These delightful apple fritter bites blend tender apples, sweet cinnamon, and just enough glaze for a sweet indulgence.
Ingredients
- 1 1/2 cups all-purpose flour
- 2 tsp baking powder
- 1/2 tsp kosher salt
- 2 tsp ground cinnamon
- 1/4 cup unsalted butter (melted)
- 1/4 cup granulated sugar
- 1 large egg
- 1/2 tsp vanilla extract
- 1/2 cup unsweetened applesauce
- 1 1/2 cups finely diced apples (Honeycrisp or Gala)
- 2 cups powdered sugar (for glaze)
- 1/3 cup + 2 tbsp apple cider or juice (for glaze)
Instructions
- Preheat your oven to 375°F (190°C).
- Mix the dry ingredients: In a large bowl, whisk together the flour, baking powder, salt, cinnamon, and sugar.
- Combine wet ingredients: In a separate bowl, melt the butter and let it cool slightly, then add the egg, vanilla extract, and applesauce.
- Combine wet and dry mixtures: Pour the wet ingredients into the dry ingredients and gently fold them together until just mixed.
- Add the finely diced apples, ensuring they’re evenly distributed.
- Prepare the baking sheet: Line it with parchment paper or grease it. Dollop small amounts of batter onto the sheet, spacing them about 2 inches apart.
- Bake for about 12-15 minutes until golden brown.
- Make the glaze by combining powdered sugar with apple cider or juice.
- Glaze the fritters once they are cool enough to handle.
Notes
For a fun twist, serve with vanilla ice cream or a sprinkle of cinnamon on top.
- Prep Time: 15 minutes
- Cook Time: 15 minutes
- Category: Dessert
- Method: Baking
- Cuisine: American
Nutrition
- Serving Size: 1 bite
- Calories: 120
- Sugar: 5g
- Sodium: 200mg
- Fat: 4g
- Saturated Fat: 2g
- Unsaturated Fat: 1g
- Trans Fat: 0g
- Carbohydrates: 19g
- Fiber: 1g
- Protein: 1g
- Cholesterol: 30mg
Keywords: apple fritter bites, dessert, baking, cozy treats, fall recipes

Minute Pumpkin Pie Crescent Rolls: A Cozy Fall Treat
The Cozy Comfort of Pumpkin Pie Crescent Rolls
Hey there, food lovers! If there’s one thing that warms my heart and fills my kitchen with joy, it’s the delicious aroma of freshly baked goods. Today, we’re diving deep into the world of comfort food with a twist—Pumpkin Pie Crescent Rolls! These delightful little treats combine all the flavors of classic pumpkin pie with the easy-to-handle charm of crescent rolls. Perfect for cozy gatherings, holiday celebrations, or an indulgent snack any day of the week!
Let’s face it, pumpkin pie is already a beloved dish, but who says we can’t spice things up a bit? By wrapping creamy pumpkin filling in flaky crescent dough, you’ll get that same beloved flavor in a fun and inviting form. Plus, these rolls are so simple to whip up that even beginner bakers will feel like kitchen rockstars!
So, grab your favorite apron, and let’s get started on a journey that will fill your home with the irresistible scent of warming spices and sweet goodness. Trust me, your friends and family will be lining up for seconds—and maybe even thirds!
A Bite of Nostalgia
Growing up, my fondest memories are entwined with the simple act of baking. My grandmother had a magical kitchen filled with treats that were as delightful to see as they were to taste. One of my all-time favorites was her pumpkin pie, rich and comforting, always baked to perfection right before Thanksgiving. It was the dish that brought our family together, a holiday staple that signaled it was time to gather around the table and share laughter and love.
But there was a twist! One year during our holiday prep, my grandmother, clutching a can of crescent rolls, boldly declared that she would create a new dessert. Boy, were we all curious! She spread that silky pumpkin filling onto the crescent dough and rolled them up into little bundles of joy. The result? A mix of our beloved pie and a fun, flaky roll that made me feel like it was the ultimate party food.
I’m excited to bring this gem back into your kitchen with my own take on Grandma’s creation. Trust me, once you taste these Pumpkin Pie Crescent Rolls, you’ll have a new family favorite to cherish!
Ingredients Overview
Here’s what you’ll need for these incredible rolls:
-
8-ounce container Pillsbury Crescent Rolls
- These ready-to-roll beauties make the process so simple. If you’re feeling adventurous, homemade crescent dough works too—though we won’t judge you for using store-bought!
-
½ cup canned pumpkin puree
- A must-have for that rich pumpkin flavor. You could also use fresh pumpkin puree if you’ve got some already roasted. Just make sure it’s not the spiced kind!
-
2 tablespoons sugar
- This adds the right amount of sweetness. For a healthier alternative, you can sub with coconut sugar or a sugar alternative like stevia.
-
1 whole egg (divided)
- We’ll use this for binding the filling and a wash for that golden crust! If you’re looking for an egg substitute, try a flax egg (1 tablespoon ground flaxseed mixed with 2.5 tablespoons water).
-
½ teaspoon pumpkin pie spice
- A crafter’s blend of cinnamon, nutmeg, ginger, and allspice to remind you of fall flavors. Feel free to make your own blend, or simply use cinnamon if that’s what you have!
-
½ cup powdered sugar
- This will create a lovely glaze for drizzling. If you need a healthier option, you can blend coconut sugar into a fine powder.
-
1 tablespoon milk
- Adds creaminess to the glaze. Any milk works—dairy or plant-based!
-
1 tablespoon pure maple syrup
- Sweetens our glaze with natural flavor. Honey or agave syrup are great substitutes!
Now that you have your ingredients lined up, let’s get cooking!
Step-by-Step Instructions
-
Preheat the Oven
Preheat your oven to 375°F (190°C). This is crucial for getting those rolls beautifully golden and perfectly cooked. A well-preheated oven can make all the difference in texture! -
Prepare the Filling
In a medium bowl, mix the canned pumpkin puree, sugar, and half of the egg (reserve the other half for later). Add in the pumpkin pie spice as well. Stir until well combined. Here’s my little chef hack: use a whisk to incorporate everything smoothly; it creates a creamy texture that will fill those rolls beautifully! -
Roll Out the Dough
Open your container of crescent rolls. Carefully unroll the dough on a lightly floured surface. You’ll want to keep the triangles intact, so try to avoid tearing them if possible. The flaky layers are what makes this dish special! -
Fill and Roll
Spoon a generous amount of the pumpkin filling onto the wider end of each triangle. Don’t be afraid to load it up—more filling means more flavor! Then roll each triangle from the wide end to the point. Place them seam-side down on a greased baking sheet. This helps keep them from unrolling during baking. -
Egg Wash
Brush the tops of the crescent rolls with the remaining egg. This step ensures a shiny, golden crust. If you want something a little healthier, you can skip this step, but I love that crunchy texture it adds! -
Bake Time
Bake in your preheated oven for about 12-15 minutes, or until they are golden brown. The scent? Absolutely heavenly! Make sure to keep an eye on them from the 10-minute mark onward—it’s easy to go from golden to burnt if you’re not careful. -
Prepare the Glaze
While your rolls are baking, whisk together powdered sugar, milk, and maple syrup in a separate bowl until smooth. This will make our delightful drizzle that completes the dish perfectly. -
Cool and Drizzle
Allow the rolls to cool for about 5 minutes after baking. Then, drizzle your glaze over the top—that sweet, creamy burst takes these rolls to a whole new level!
Serving Suggestions
When serving your Pumpkin Pie Crescent Rolls, think charming and rustic! Arrange them on a welcoming platter and sprinkle some extra powdered sugar on top for an elegant touch. You could also serve them alongside a small dollop of whipped cream or a scoop of vanilla ice cream, making it feel like a cozy dessert experience.
For a little extra flair, consider garnishing with a sprinkle of extra pumpkin pie spice or finely chopped pecans on top. Tie it all together with a steaming cup of coffee or spiced cider, and you’ll have a delightful autumn-themed gathering ready to impress!
Recipe Variations
Now that you’ve mastered the original recipe, why not explore some fun twists? Here are a few ideas:
-
Chocolate Chip Pumpkin Rolls: Add some mini chocolate chips to the filling before rolling them up. The creamy pumpkin paired with chocolate is a match made in heaven!
-
Nutty Crunch: Incorporate chopped walnuts or pecans into your pumpkin filling for a delightful crunch. It adds texture and a lovely nutty flavor!
-
Spiced Up: Experiment with different spices! Add a pinch of cardamom or swap out the pumpkin pie spice with your favorite chai blend for a different flavor profile.
-
Vegan Options: Substitute the egg with a flax egg, use almond milk in the glaze, and swap the butter in the crescent rolls for a plant-based version.
-
Cinnamon Roll Twist: After spreading the pumpkin filling, sprinkle a swirl of cinnamon and brown sugar before rolling them up for an even sweeter treat!
Chef’s Notes
This recipe holds a warm place in my heart, not only because of the memories tied to it but also how it has evolved over the years. Initially, I started with a basic filling, but I’ve experimented with flavor profiles and textures endlessly! My favorite variation so far is definitely the chocolate chip twist—it has been a hit at gatherings!
One of my fondest kitchen mishaps happened when I accidentally grabbed baking powder instead of baking soda for the filling. The rolls puffed up incredibly high but tasted amazing. That’s the beauty of cooking; even mistakes can lead to delicious discoveries!
FAQs and Troubleshooting
-
Why are my crescent rolls not rising?
Ensure your oven is preheated properly. Premade crescent rolls rely heavily on the heat to puff up. If they don’t feel flaky and rising, the dough may have lost its freshness—check your expiration dates! -
Can I make this ahead of time?
Absolutely! You can prepare the rolls a few hours ahead, just keep them covered in the fridge until you’re ready to bake. They may require an extra minute or two in the oven due to the chill. -
What if the filling leaks out?
If this happens, don’t fret! Make sure you’re rolling them tightly. If you do experience leakage, you can always serve them with a scoop of ice cream to help soothe the flavor mishap! -
How do I store leftovers?
Store any leftover rolls in an airtight container at room temperature for up to two days. If you want to keep them longer, you can refrigerate them and reheat in the oven for a minute or two to retain their flaky crust.
Nutritional Info
Each Pumpkin Pie Crescent Roll (estimated based on recipe with no additional toppings) contains approximately:
- Calories: 150
- Total Fat: 7g
- Saturated Fat: 1.5g
- Carbohydrates: 20g
- Fiber: 1g
- Sugars: 5g
- Protein: 2g
Note: Nutritional info may vary based on specific brand ingredients or substitutions used.
Final Thoughts
These Pumpkin Pie Crescent Rolls are not just a dessert; they’re a gateway to memories, comfort, and shared moments with the people you love. Whether it’s for a cozy fall gathering or just because you deserve a treat, these rolls will undoubtedly bring joy to your kitchen and your taste buds. The best part? They’re so easy to prepare that you’ll be whipping these up to impress anyone who steps foot into your kitchen!
So, roll up your sleeves, dive into this recipe, and share your creations with friends and family. Remember, cooking is all about joy, laughter, and creating unforgettable experiences—one flaky roll at a time. Happy baking, my fellow foodies! Let’s keep celebrating the magic of good food, and I can’t wait to see how you make this recipe your own!
Print
Pumpkin Pie Crescent Rolls
- Total Time: 30 minutes
- Yield: 8 servings 1x
- Diet: Vegetarian
Description
Delicious crescent rolls filled with creamy pumpkin filling, offering the perfect blend of classic pumpkin pie flavors in a fun, flaky form.
Ingredients
- 1 (8-ounce) container Pillsbury Crescent Rolls
- ½ cup canned pumpkin puree
- 2 tablespoons sugar
- 1 whole egg (divided)
- ½ teaspoon pumpkin pie spice
- ½ cup powdered sugar
- 1 tablespoon milk
- 1 tablespoon pure maple syrup
Instructions
- Preheat your oven to 375°F (190°C).
- Mix the canned pumpkin puree, sugar, and half of the egg in a medium bowl.
- Open the container of crescent rolls and unroll the dough on a floured surface.
- Spoon a generous amount of the pumpkin filling onto the wider end of each triangle.
- Roll each triangle from the wide end to the point and place seam-side down on a greased baking sheet.
- Brush the tops of the rolls with the remaining egg.
- Bake for about 12-15 minutes, or until golden brown.
- Whisk together powdered sugar, milk, and maple syrup for the glaze.
- Cool the rolls for about 5 minutes, then drizzle with glaze.
Notes
Serve warm with a sprinkle of powdered sugar or a dollop of whipped cream for an extra treat!
- Prep Time: 15 minutes
- Cook Time: 15 minutes
- Category: Dessert
- Method: Baking
- Cuisine: American
Nutrition
- Serving Size: 1 roll
- Calories: 150
- Sugar: 5g
- Sodium: 250mg
- Fat: 7g
- Saturated Fat: 1.5g
- Unsaturated Fat: 4g
- Trans Fat: 0g
- Carbohydrates: 20g
- Fiber: 1g
- Protein: 2g
- Cholesterol: 30mg
Keywords: pumpkin, crescent rolls, dessert, Thanksgiving, fall treats
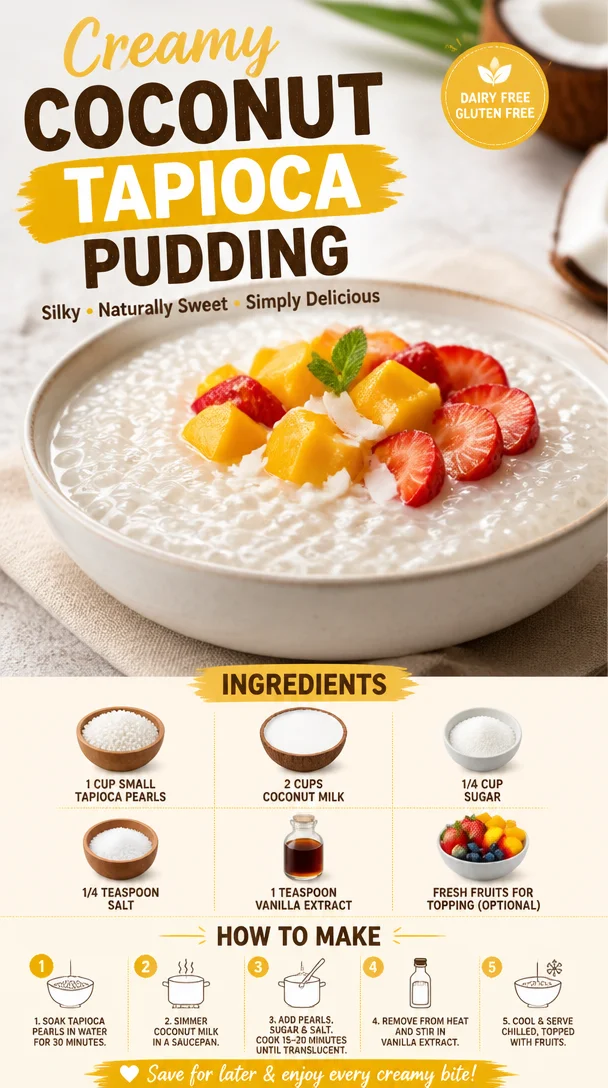
Coconut Tapioca Pudding
Coconut Tapioca Pudding: A Sweet Journey to Simplicity
Hey there, fellow food enthusiasts! Welcome back to Feastical! Today, we’re diving into a delightful dessert that’s as comforting as a favorite blanket on a chilly day—Coconut Tapioca Pudding. This dish is not just a treat for your taste buds; it’s a nostalgia-infused journey that brings back memories of simpler times when dessert was all about sweet simplicity and indulgent satisfaction. Get ready to whip up a batch, and allow my storytelling to whet your appetite!
A Sweet Memory
Let me take you back to my childhood kitchen, back when my grandmother would pull out her treasured recipe book every Sunday. She had a magical way of transforming ordinary ingredients into something extraordinarily delicious. One recipe that stood out was her coconut tapioca pudding, a dish that would fill the house with a sweet, nutty aroma that hinted at the joy to come.
I vividly remember the day she enlisted me as her sous-chef. With my tiny hands, I’d measure and pour while she stirred the creamy concoction on the stove, sharing stories of her own childhood and the flavors that shaped her life. The best part? The texture of the small tapioca pearls! They felt playful between my fingers, reminding me that cooking is not just about the final product but also about the joy in the process.
Fast forward to today, every time I make this comforting pudding, it evokes those precious memories of time spent with my grandma—stories shared and laughter exchanged around the kitchen table. And now, I’m thrilled to share this simple yet satisfying recipe with you.
Ingredients
Here’s what you’ll need to create this dreamy coconut tapioca pudding:
-
1 cup small tapioca pearls
These little gems serve as the star of the show! Small tapioca pearls are naturally gluten-free and add a delightful chewy texture. If you can’t find them, you can use instant tapioca, but the texture will be different. For a more adventurous option, try using sago pearls! -
2 cups coconut milk
This is where the magic happens! Coconut milk brings a rich creaminess and a tropical twist to your dessert. If you’re looking for a lighter version, feel free to use light coconut milk or even unsweetened almond milk for a different flavor profile. -
1/4 cup sugar
Sweetness, of course, is key! You can adjust the sugar to your liking. If you prefer a natural sweetener, honey or maple syrup will work, but you’ll want to adjust the quantities to taste. -
1/4 teaspoon salt
A pinch of salt enhances all the flavors, balancing the sweetness beautifully. If you like a deeper flavor, consider using sea salt. -
1 teaspoon vanilla extract
For an aromatic touch! If you’re feeling adventurous, you can infuse this pudding with other flavors—like almond extract or even a splash of rum. -
Fresh fruits for topping (optional)
Topping it with fresh fruits like mango, kiwi, or berries not only enhances the flavor but also adds a beautiful pop of color and nutrition. Use whatever fruits you love or that are in season!
Step-by-Step Instructions
Now that we have our ingredients, let’s get cooking! Follow these steps to make your own coconut tapioca pudding:
-
Prep the Tapioca Pearls
Start by rinsing the tapioca pearls with cold water in a fine-mesh sieve. This helps them release some of the excess starch and ensures they cook evenly. No one likes sticky tapioca! -
Combine Ingredients
In a medium saucepan, whisk together the coconut milk, sugar, and salt. Place over medium heat and stir occasionally until the sugar is dissolved and the mixture is warm—but not boiling. This step is where the sweet aromas start to fill your kitchen! -
Add the Tapioca
Once the coconut mixture is warm, gently stir in the rinsed tapioca pearls. Keep stirring occasionally over medium heat. You’ll notice the pearls start to absorb the liquid and become transparent—this is a sign they’re cooking! It usually takes about 15-20 minutes of cooking (depending on the brand), so keep an eye on them! -
Thickening the Pudding
Once the tapioca pearls are cooked and the pudding has thickened (it should coat the back of a spoon), remove the saucepan from the heat. Stir in the vanilla extract. Take a moment and breathe in that wonderful smell—it’s heavenly, right? -
Chill the Pudding
Transfer the pudding to serving cups or bowls and let it cool at room temperature for about 30 minutes. Then, cover them with plastic wrap and refrigerate for at least 2 hours. Chilling allows the pudding to firm up, making it easier to serve. -
Serve and Enjoy
Once chilled, it’s time to plate! Garnish each serving with fresh fruits, a sprinkle of toasted coconut flakes, or even a drizzle of honey for an extra touch of sweetness. Don’t forget to grab a spoon and dig in!
Serving Suggestions
Presentation is everything, my friends! When serving your coconut tapioca pudding, consider using clear glass cups or dessert bowls to showcase that beautiful pudding and toppings. Layering your pudding with fruits can create an eye-catching effect that’ll impress your family or guests. For an extra touch of flair, sprinkle a few mint leaves on top for that fresh finish. Not only does it look good, but it also adds a delightful aroma!
Recipe Variations
Ready to get creative? Here are some fun twists and variations on this classic dessert:
-
Matcha Coconut Tapioca: Add a teaspoon of matcha powder to the coconut milk mixture while it’s warming for a vibrant green hue and an earthy flavor.
-
Chocolate Coconut Tapioca: Stir in some cocoa powder or melted dark chocolate after cooking to elevate your pudding into a chocolate lover’s dream!
-
Tropical Rainbow: Mix in diced tropical fruits (like pineapple and papaya) into the pudding right before chilling for a burst of color and flavor throughout.
-
Nutty Delight: Fold in chopped nuts (like pistachios or almonds) once it’s cooled for added crunch and flavor.
-
Dairy-Free Chocolate Version: Substitute coconut milk with almond or cashew milk and then mix in cocoa for a dairy-free delight.
Chef’s Notes
I’ll let you in on a little secret—this pudding gets better with time! The flavors meld beautifully if you let it sit for a day in the fridge. Just be sure to give it a good stir before serving, and don’t be alarmed if the consistency thickens a bit more. Remember, cooking is all about experimentation and making the dish your own.
Speaking of kitchen stories, I once tried adding cardamom to a batch, thinking it’d provide a unique twist. Let’s just say my taste buds couldn’t handle that unexpected warmth! Experimentation can lead to incredible breakthroughs or a few giggles in the kitchen.
FAQs and Troubleshooting
Q: Why are my tapioca pearls not cooking properly?
A: If your pearls aren’t cooking through, double-check that you’re using small tapioca and not the instant kind. Remember to keep stirring and simmering gently; patience is key!
Q: Can I use regular milk instead of coconut milk?
A: Sure! You can substitute with whole milk or a non-dairy option, but remember, this changes the flavor profile. Coconut milk gives that tropical flair you crave.
Q: How can I make the pudding thicker?
A: If you want a thicker pudding, cook it a bit longer, or add an extra tablespoon of tapioca pearls. It’s all about finding that sweet spot for your personal preference.
Q: Can I freeze this pudding?
A: While it’s not ideal to freeze pudding because it can change the texture, you could store it in the fridge for 3-4 days if covered properly.
Nutritional Info
This delectable coconut tapioca pudding not only satisfies your sweet tooth but also brings some nutritional benefits to the table. It’s naturally gluten-free and can easily be made dairy-free, accommodating a range of dietary needs. Made with coconut milk, it’s rich in healthy fats and provides quick energy. Plus, if you load it up with fruits, you’re boosting the fiber, vitamins, and antioxidants right in your dessert!
Here’s a rough nutritional information breakdown per serving (with fruits):
- Calories: 210-250
- Protein: 3g
- Fat: 12g
- Carbohydrates: 28g
- Fiber: 2g
- Sugar: 14g
Final Thoughts
As we wrap up this delightful culinary adventure, I hope you’re inspired to give this coconut tapioca pudding a try! It’s a dish that encompasses the joy of cooking, the warmth of cherished memories, and the sweetness of indulging in something that feels like home.
Whether you make it for yourself, share it with friends, or whip it up for a family gathering, remember that the heart of cooking lies not just in the ingredients but in the love you put into it. So grab your ingredients, channel your inner chef, and let’s create some edible joy together!
Thank you for stopping by Feastical! Until next time, happy cooking and happy eating!
Print
Coconut Tapioca Pudding
- Total Time: 2 hours 30 minutes
- Yield: 4 servings 1x
- Diet: Gluten-Free
Description
A comforting and nostalgic coconut tapioca pudding that brings back memories of simpler times and indulgent satisfaction.
Ingredients
- 1 cup small tapioca pearls
- 2 cups coconut milk
- 1/4 cup sugar
- 1/4 teaspoon salt
- 1 teaspoon vanilla extract
- Fresh fruits for topping (optional)
Instructions
- Prep the tapioca pearls by rinsing them with cold water in a fine-mesh sieve.
- Combine the coconut milk, sugar, and salt in a medium saucepan over medium heat, stirring until the sugar dissolves.
- Add the rinsed tapioca pearls to the warm coconut mixture and stir occasionally as they cook, about 15-20 minutes, until transparent.
- Thicken the pudding by removing it from heat once it coats the back of a spoon, then stir in the vanilla extract.
- Chill the pudding in serving cups for at least 2 hours after cooling at room temperature for 30 minutes.
- Serve and enjoy with toppings like fresh fruits, toasted coconut flakes, or honey.
Notes
This pudding tastes best after a day in the fridge, allowing the flavors to meld. Stir before serving.
- Prep Time: 10 minutes
- Cook Time: 20 minutes
- Category: Dessert
- Method: Stovetop
- Cuisine: Asian
Nutrition
- Serving Size: 1 serving
- Calories: 230
- Sugar: 14g
- Sodium: 100mg
- Fat: 12g
- Saturated Fat: 10g
- Unsaturated Fat: 2g
- Trans Fat: 0g
- Carbohydrates: 28g
- Fiber: 2g
- Protein: 3g
- Cholesterol: 0mg
Keywords: Coconut Tapioca, Dessert, Gluten-Free, Pudding, Easy Dessert
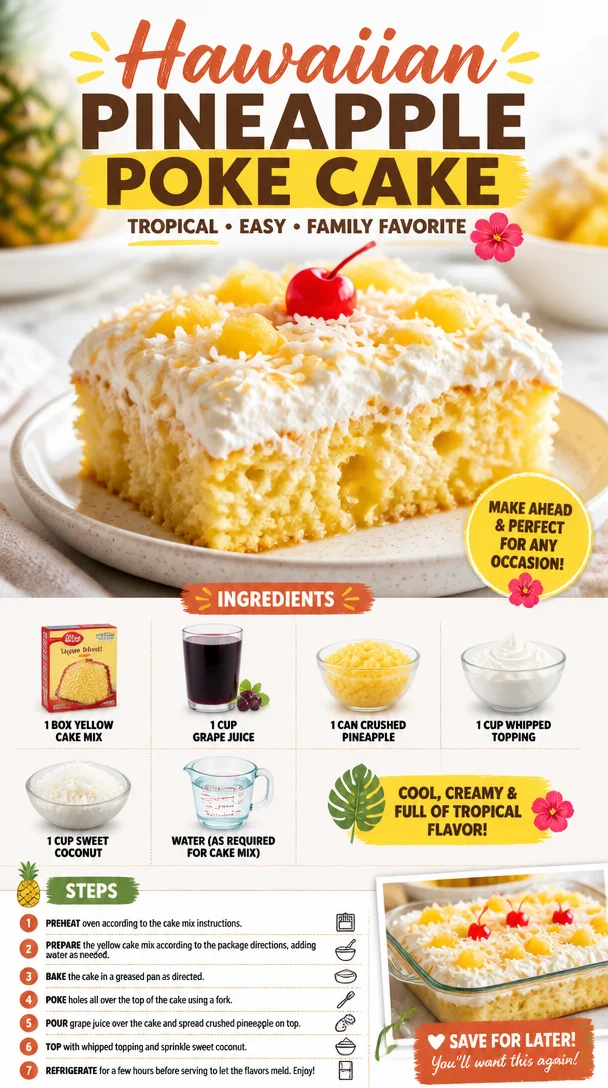
Hawaiian Pineapple Poke Cake
Hey there, food lovers! Welcome back to Feastical! Today we’re diving into something truly special—a delightful Hawaiian Pineapple Poke Cake that’s guaranteed to bring sunshine to your table and smiles to your guests. If you’ve ever had the pleasure of tasting a poke cake, you know exactly what I’m talking about. If not, well, buckle up because we’re about to take your dessert game to an entirely new level.
This cake is everything you could want in a dessert: moist, sweet, and bursting with tropical flavors. Imagine biting into a slice that has soaked up the essence of crushed pineapple and grape juice, creating a flavor explosion that transports you straight to a sunny beach in Hawaii. Not only is it utterly delightful, but it’s also among the simplest cakes you can whip up. Seriously, if you can mix ingredients and wait a little while for it to bake, you’re golden!
Now, this Hawaiian Pineapple Poke Cake is not just a recipe; it’s a loaded trunk of memories for me. I remember the first time I made it—it was for a family gathering, and the moment the cake came out of the oven, I was greeted with a wave of nostalgia. My Aunt Mabel used to make this cake every summer, and the scent alone was enough to bring everyone running to the kitchen. The best part? It was always an enthusiastic mess! We would all help with decorating and taste-testing—even the little ones had their hands on spoons. It was a true family affair filled with laughter, love, and, of course, a heaping dose of pineapple goodness.
Now, let’s get this party started! Grab your apron, and let’s bring a little piece of paradise into your kitchen.
Personal Story
Okay, let me take you back to one summer that feels forever etched in my memory. I was about ten years old, reeling with excitement because we were hosting our annual family luau in the backyard—a time when the sun never seemed to set and laughter echoed through our neighborhood. My Aunt Mabel, a culinary wizard, had just announced that she was bringing her famous Hawaiian Pineapple Poke Cake.
Now, if you’ve never experienced the joy of Aunt Mabel’s poke cake, let me paint a picture. The cake was always topped with clouds of whipped cream, crowned with sweet coconut shavings, and decorated with maraschino cherries—she called it “island bliss.” On the afternoon of the luau, the tantalizing aroma wafted through the open doors like an enchanting spell, pulling all of us toward the kitchen. I remember peeking at the cake cooling on the counter, only to be shooed away by Aunt Mabel, who insisted that patience was key.
The moment the cake was finally served, it practically disappeared. I recall sitting cross-legged on the grass, the sun kissing my cheeks, desperately trying to savor my slice while sneaking glances at everyone else’s faces as they delved into the deliciousness. That cake became a staple at our summer gatherings, and each bite was like a taste of joy itself—a beautiful reminder of food bringing us all together.
Looking back, I realize it isn’t just about the cake; it’s about shared experiences and creating new memories with loved ones. So let’s dive in and recreate those moments with your very own Hawaiian Pineapple Poke Cake!
Ingredients
Here’s what you’ll need to whip up this amazing Hawaiian Pineapple Poke Cake:
-
1 box yellow cake mix
This is the base of our poke cake! You can choose any brand you prefer, but I recommend going with a classic for that timeless flavor. If you want to lighten things up, a sugar-free cake mix works great too! -
1 cup grape juice
This gives a unique flavor profile while adding moisture. Feel free to swap it out with apple juice or a fruit punch if you want something a bit different. -
1 can crushed pineapple
This is the star of the show! The pineapple adds sweetness and pairs beautifully with the grape juice. Be sure to reserve the juice for mixing into your poke. You can also use fresh pineapple if you’re feeling fancy and adventurous! -
1 cup whipped topping
It’s what gives that creamy, dreamy texture on top. You can go for the store-bought kind or make your own—you know I’m all about keeping it simple, but it’s your cake! -
1 cup sweet coconut
This provides a lovely texture and a little tropical flair. Toasting the coconut before topping can intensify the flavor, but that’s entirely up to your taste! -
Water (as required for cake mix)
Follow the instructions on your cake mix box; usually, it requires some water in addition to the other ingredients.
Get these ingredients together, and get ready for something magical!
Step-by-Step Instructions
Now, let’s get started on creating this delicious cake! Don’t worry; I’ve got your back with some helpful tips and tricks along the way.
-
Preheat your oven
Preheat your oven to 350°F (175°C). This is an important first step because you want the oven nice and hot when your cake goes in. Think of it as giving your cake a warm welcoming hug! -
Prepare the baking pan
Grease a 9×13-inch baking pan with a little cooking spray or butter. This will ensure that your masterpiece doesn’t stick. Trust me, you don’t want to have a sticky situation on your hands! -
Mix the cake batter
In a large mixing bowl, combine the yellow cake mix, water (as per the package), and grape juice. Mix it on medium speed for about 2-3 minutes until it’s all well-combined and smooth. You could use an electric mixer or whisk it by hand—you do you! -
Pour into the pan
Now, it’s time to pour that vibrant batter into your greased pan, spreading it evenly. As you pour it in, take a moment to admire the swirls and colors. Doesn’t it look stunning already? -
Bake the cake
Pop the cake into your preheated oven and let it bake for about 25-30 minutes or until a toothpick inserted into the center comes out clean. While it’s baking, your kitchen will start to fill with that delicious, comforting smell. -
Cool the cake
Once baked, remove the cake from the oven and let it cool in the pan for about 10 minutes. After that, gently remove it from the pan to cool completely on a wire rack. This is crucial since we’ll be poking holes in it soon! -
Poke the cake
Once the cake is cooled, grab a fork and make holes evenly across its surface—about 1 inch apart. This is where the magic happens! The holes allow the juice to seep in, creating that delightful moistness that makes a poke cake so special. -
Prepare the pineapple and juice mix
While the cake is cooling, mix the reserved juice from the can of crushed pineapple and the pineapple itself together in a small bowl. Pour this mixture evenly over the poked cake. The juice will work its way down into the holes, flavoring every bite! -
Frost the cake
After the juice has been absorbed (give it about 30 minutes), it’s time to spread the whipped topping over the cake. Don’t be shy—make it thick and decadent! -
Add coconut
Finally, sprinkle the sweet coconut on top. If you’re feeling fancy, you can toast it lightly in the oven for a few minutes first. That added crunch and nutty flavor will take your cake to the next level! -
Chill the cake
Cover the cake and refrigerate it for at least an hour before serving. This helps meld all those flavors together beautifully.
And voila! You’ve created a Hawaiian Pineapple Poke Cake that’s not only delicious but also a blast to make.
Serving Suggestions
When it comes to serving your Hawaiian Pineapple Poke Cake, there are a few fun ideas to elevate your presentation.
-
Slice and Platter
Simply slice the cake into generous squares and place them on a festive platter. You can add a sprinkle of additional coconut and a maraschino cherry on top of each slice for that classic poke cake look! -
Individual Portions
For a more personal touch, serve the cake in individual glass cups. Layer some cake, a spoonful of extra pineapple, a dollop of whipped topping, and a sprinkle of coconut. Not only is it adorable, but it’s also super easy for guests to grab! -
Tropical Garnish
For that extra flair, consider adding some fresh tropical fruits like mango slices or kiwi on the side. It makes your dessert plate look spectacular and adds a pop of color! -
Serve with Ice Cream
A scoop of vanilla or coconut ice cream complements the poke cake beautifully, enhancing the creamy goodness and adding a delightful chill!
No matter how you serve it, this Hawaiian Pineapple Poke Cake is sure to be a crowd-pleaser.
Recipe Variations
Feeling adventurous? Here are a few delicious and unique variations of the Hawaiian Pineapple Poke Cake:
-
Mango-Pineapple Poke Cake
Swap half of the crushed pineapple for canned or pureed mango. The mango adds a tropical twist and brings a whole new dimension to your poke cake! -
Coconut Milk Substitute
For a more profound coconut flavor, replace the grape juice with coconut-infused juice or coconut milk mixed with a touch of sweetener. -
Nutty Addition
Add some chopped macadamia nuts to the top of your cake before serving for a delightful crunch and an authentic Hawaiian touch! -
Boozy Option
For adults only, consider adding a splash of rum to the pineapple juice or even a layer of coconut rum-flavored whipped topping. It’s a fun beachy twist! -
Sugar-Free Twist
Substitute the cake mix and grape juice for their sugar-free counterparts along with light whipped topping for a guilt-free dessert without sacrificing flavor!
Feel free to mix and match these variations to create your own signature poke cake!
Chef’s Notes
Despite its simplicity, this Hawaiian Pineapple Poke Cake has quite a history in my kitchen. What started as a beloved family treat has evolved into numerous variations to suit any occasion—birthdays, potlucks, or just a Tuesday night craving.
And the best part? It’s become a tradition for my own kids to help create it, each one adding their special touch or a little secret ingredient they come up with. The laughter and creativity they bring to the kitchen remind me of my own childhood, and it’s a beautiful cycle of loving food and laughter.
Plus, I can’t help but giggle when I think back to my attempt at turning this recipe into a multi-layer cake—in theory, it sounded great, but let’s just say it didn’t quite have the same vibe! I ended up transforming it back into a poke cake. Lesson learned: sometimes simple is best.
FAQs and Troubleshooting
Let’s tackle some common questions and potential hiccups you might run into!
-
Why is my cake dry?
If your cake comes out dry, it may not have been baked for the right amount of time or perhaps it didn’t get enough moisture. Make sure to follow the instructions and pour enough juice over the poked sections. -
Can I use fresh pineapple instead of canned?
Absolutely! Just make sure to finely chop it, and don’t forget to reserve the juice for that amazing flavor. -
Can I substitute the whipped topping?
Yes, you can definitely make your own whipped cream using heavy whipping cream, sugar, and vanilla extract if you prefer a homemade touch! -
How long will the cake last?
This cake is best enjoyed within 3-4 days when stored in the refrigerator. The longer it sits, the more the cake absorbs the juice—which can be good or bad depending on your taste!
Nutritional Info
While I always recommend enjoying treats like this in moderation, here’s a rough breakdown of the nutritional info for one slice of Hawaiian Pineapple Poke Cake (based on 12 servings):
- Calories: Approximately 250
- Total Fat: 7g
- Saturated Fat: 5g
- Cholesterol: 20mg
- Sodium: 250mg
- Total Carbohydrates: 43g
- Dietary Fiber: 1g
- Sugars: 25g
- Protein: 2g
Remember, these figures can change depending on the brands you use and if you add any variations!
Final Thoughts
There you have it, my friends! A delicious Hawaiian Pineapple Poke Cake ready to take center stage at your next gathering, backyard BBQ, or even just a cozy night at home. I hope this recipe transports you to a sunny paradise, packing each bite with nostalgia, family, and love.
As you dive into making your own poke cake, remember it’s not just about following the steps; it’s a journey of creativity, nostalgia, and deliciousness. Don’t hesitate to get playful with the flavors, twinkling in your own special touch.
So go ahead, grab your ingredients, gather your loved ones around the kitchen, and let’s make memories with this scrumptious Hawaiian Pineapple Poke Cake. After all, great food is meant to be shared and celebrated. Happy baking, and enjoy every bite! 🌺🍍✨
Print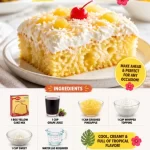
Hawaiian Pineapple Poke Cake
- Total Time: 45 minutes
- Yield: 12 servings 1x
- Diet: Vegetarian
Description
A delightful Hawaiian Pineapple Poke Cake that’s moist, sweet, and bursting with tropical flavors, perfect for any gathering.
Ingredients
- 1 box yellow cake mix
- 1 cup grape juice
- 1 can crushed pineapple
- 1 cup whipped topping
- 1 cup sweet coconut
- Water (as required for cake mix)
Instructions
- Preheat your oven to 350°F (175°C).
- Prepare a 9×13-inch baking pan by greasing it with cooking spray or butter.
- Mix the yellow cake mix, water, and grape juice in a large mixing bowl on medium speed for about 2-3 minutes.
- Pour the batter into the greased pan, spreading it evenly.
- Bake the cake for about 25-30 minutes or until a toothpick comes out clean.
- Cool the cake in the pan for about 10 minutes, then remove it to cool completely on a wire rack.
- Poke holes evenly across the cooled cake using a fork.
- Prepare a mixture of reserved juice from the crushed pineapple and the pineapple itself, then pour it over the poked cake.
- Frost the cake with whipped topping after the juice has absorbed.
- Add sweet coconut on top, toasting it if desired.
- Chill the cake in the refrigerator for at least an hour before serving.
Notes
Serve with additional coconut, maraschino cherries, or tropical fruits like mango for an extra special touch.
- Prep Time: 15 minutes
- Cook Time: 30 minutes
- Category: Dessert
- Method: Baking
- Cuisine: Hawaiian
Nutrition
- Serving Size: 1 serving
- Calories: 250
- Sugar: 25g
- Sodium: 250mg
- Fat: 7g
- Saturated Fat: 5g
- Unsaturated Fat: 2g
- Trans Fat: 0g
- Carbohydrates: 43g
- Fiber: 1g
- Protein: 2g
- Cholesterol: 20mg
Keywords: poke cake, Hawaiian dessert, pineapple cake, tropical dessert, family recipe
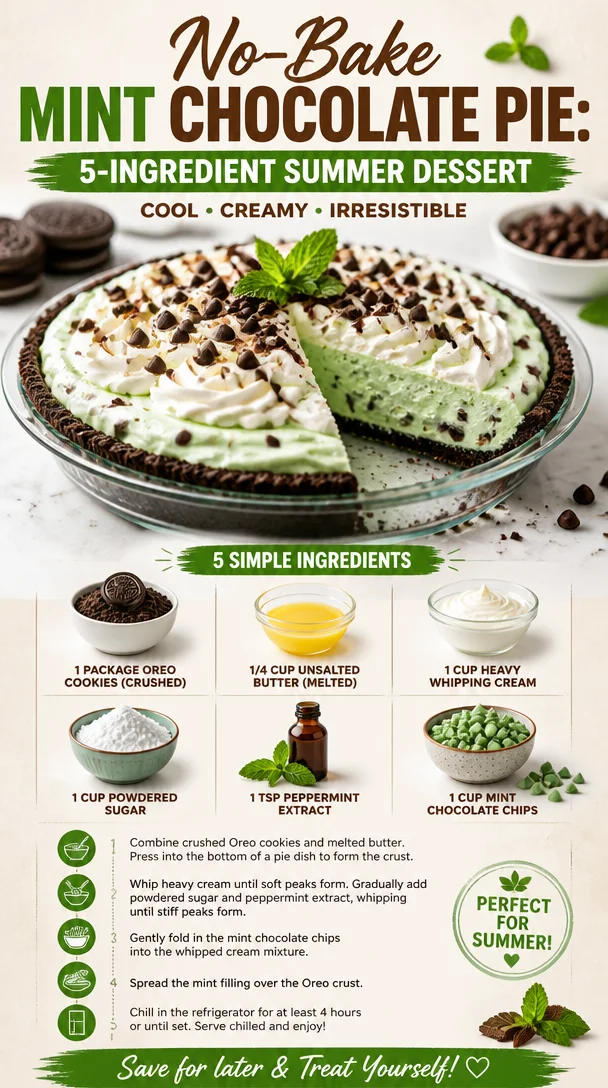
No-Bake Mint Chocolate Pie: 5-Ingredient Summer Dessert
No-Bake Mint Chocolate Pie: A Timeless Treat for Every Occasion
Hello, my fellow food lovers! I’m thrilled you’re here because today, we’re diving into a dessert that perfectly embodies the spirit of comfort food while also refreshing your taste buds—the delightful No-Bake Mint Chocolate Pie. Whether you’re hosting a summer picnic, celebrating a birthday, or just craving a sweet treat, this pie is bound to bring smiles and joy all around.
A Memory to Savor
Before I share my kitchen secrets, let me take you down memory lane for a moment. I vividly remember my childhood summers spent at my grandparents’ house. There was a tiny kitchen tucked away at the back of their charming cottage, where my grandma would often whip up her own version of a mint chocolate pie. It was a tried-and-true family favorite that seemed to vanish before our eyes!
Every summer, the air would be filled with laughter, and the sounds of my cousins battling in the backyard gave way to the sweet, unmistakable scent of mint and chocolate wafting from the kitchen. Those delicious moments, back-to-back with my grandma’s playful challenges to come help her mix the cream or crush the cookies, created lasting memories that still warm my heart today. You see, that’s the magic of food; it has a way of tethering us to our memories and making every bite feel special.
Ingredients: The Building Blocks of Bliss
Let’s break down the ingredients you’ll need for this luscious pie. Here’s the full lineup:
-
1 package Oreo cookies (crushed)
These are the perfect base for our crust. You can easily substitute with gluten-free Oreos or any chocolate cookie you love. -
1/4 cup unsalted butter (melted)
This helps bind the crust together. If you’re looking for a dairy-free option, coconut oil works beautifully. -
1 cup heavy whipping cream
This is crucial for our fluffy filling. If you want a lighter version, you can use coconut cream, but be ready for a bit of a flavor twist! -
1 cup powdered sugar
For that sweet touch! If you’re looking to cut down on sugar, consider using a powdered sugar substitute available at most grocery stores. -
1 tsp peppermint extract
This gives the pie its refreshing essence. You can play around with the amount depending on your minty preference! -
1 cup mint chocolate chips
These add that essential flavor kick. Feel free to swap them for dark chocolate chips if you want a richer taste.
Each ingredient plays a vital role in creating a sweet escape for the senses. So, let’s gather these goodies and get to work!
Step-by-Step Instructions: Your Culinary Adventure Awaits
Alright, time to roll up those sleeves and unleash your inner chef! Let’s walk through the process step-by-step.
-
Crush Those Oreos
Grab a large zip-top bag and fill it with your Oreos. Have some fun and crush them with a rolling pin, or get your kids involved! You want fine crumbs, almost like sand. Alternatively, you can use a food processor if you’re feeling fancy! -
Mix in the Melted Butter
In a bowl, combine the crushed Oreos with your melted butter. Stir until all the crumbs are coated. It’s like the sand on the beach, and you want it to stick together like a happy family! -
Form the Crust
Press this mixture evenly into the bottom and up the sides of a 9-inch pie pan. Use the flat bottom of a measuring cup or your fingers to pack it down tightly. The firmer it is, the better it’ll hold together when we cut into it! -
Refrigerate While You Make the Filling
Pop the crust into the fridge for about 15 minutes to set while we get to whipping. -
Whip the Cream
In a mixing bowl, beat the heavy whipping cream on medium speed until soft peaks form. This is where the magic really starts to happen! The cream will turn fluffy before your eyes! -
Add the Sugar and Mint Extract
Gradually mix in the powdered sugar and peppermint extract while continuing to whip. You’re going to achieve beautiful, billowy peaks that have a delightful sweetness and minty aroma. -
Fold in the Mint Chocolate Chips
Gently fold in the mint chocolate chips with a spatula. Remember, we don’t want to deflate our whipped cream. This step should feel light and airy! -
Fill the Crust
Spoon this fluffy mixture into your chilled Oreo crust, spreading it evenly. This is where you can feel like an artist, smoothing the top to your desired level of perfection. -
Chill Again
Cover your pie and refrigerate for at least 4 hours, but overnight is even better if you can wait! During this time, the flavors will meld together, and you’ll get a perfectly set pie. -
Serve and Enjoy
Before serving, you can add some extra mint chocolate chips or even shaved chocolate on top for that extra touch of decadence. Slice it up, and watch the smiles unfold!
Serving Suggestions: Let’s Get Creative!
Now that your pie is ready, let’s chat about how to make it a showstopper when serving. Presenting food is half the fun, right?
-
Pair with Fresh Mint Leaves: A few fresh mint leaves on top of each slice will elevate the presentation and add a burst of color.
-
Chocolate Drizzle: A drizzle of chocolate sauce over the pie gives it that extra hint of elegance.
-
Serve with Whipped Cream: A dollop of whipped cream on the side or even a full bowl for guest self-serve is always a hit.
-
Make Mini Pies: Use individual serving dishes to create mini pies! Not only are they cute, but they also make portion control a breeze.
-
Add Berries: Fresh raspberries or strawberries on the side complement the mint chocolate beautifully, adding a lovely tartness and a splash of color.
Recipe Variations: Spice Things Up!
The beauty of a No-Bake Mint Chocolate Pie is its adaptability! Here are a few variations to keep your taste buds excited:
-
Double Chocolate Delight: Use chocolate sandwich cookies for the crust instead of Oreos, and add more chocolate chips to the filling.
-
Peanut Butter Twist: Add some creamy peanut butter to the whipped cream filling for a delightful chocolate-peanut butter pairing.
-
Coffee Infusion: For the coffee lovers, add a teaspoon of instant coffee granules to the whipped cream for a mocha mint chocolate experience.
-
Fruit Fusion: Experiment by folding in fresh raspberries or crushed pineapple for a fruity twist. Just make sure to drain any excess liquid!
-
Dairy-Free Dreams: Use vegan whipped cream and dairy-free chocolate chips for a completely dairy-free version. You can even substitute coconut cream in place of heavy cream!
Chef’s Notes: A Dash of Personal Touch
What I love most about this recipe is how it has evolved over the years. I can still feel the warmth of those summer days in my grandparents’ kitchen, and once I was old enough to cook, I started experimenting. I remember one time, I accidentally left out the sugar but added an extra splash of peppermint extract—let’s just say it was a very minty evening! My family didn’t let me forget it, but it gave me a great lead-in to making this splendid dessert a family tradition.
I hope you give this No-Bake Mint Chocolate Pie a try—you’ll be the star of every gathering, and all your friends will be begging for the recipe.
FAQs and Troubleshooting: Your Questions Answered!
-
My filling didn’t set properly. What went wrong?
It’s crucial to whip the heavy cream to the right consistency! If it’s under-whipped, the filling may not hold its shape. Also, chilling time is essential—don’t rush it! -
How long will this pie last?
It should keep in the fridge for about 4-5 days, but trust me, it’s unlikely to last that long! -
Can I freeze this pie?
Absolutely! Just cover it tightly and freeze for up to a month. Let it thaw in the fridge before serving. -
Can I use other flavors instead of mint?
Certainly! You can experiment with different extracts like vanilla, almond, or citrus for a fresh twist.
Nutritional Info
This No-Bake Mint Chocolate Pie is indulgent, but here’s a general idea of what you’re looking at nutritionally per slice (based on a total of 8 slices):
- Calories: ~350
- Fat: 20g
- Carbohydrates: 40g
- Protein: 4g
- Sugar: 22g
Remember, nutrition varies with ingredient substitutions and portion sizes, so keep that in mind as you make this recipe your own.
Final Thoughts: Bringing It All Together
And there you have it! A No-Bake Mint Chocolate Pie that’s sure to become a household favorite, just like it did in my family. Everyone deserves a bite of something sweet and refreshing, and this pie delivers in spades—without a single stove top in sight!
So gather your ingredients, invite some loved ones into the kitchen, and let this pie bring you all together. I’d love to hear how your version turns out or any fun stories you create along the way. Feel free to share your experiences below or reach out to me through Feastical.com!
Until next time, happy cooking, and may every bite taste like a warm hug!
Print
No-Bake Mint Chocolate Pie
- Total Time: 240 minutes
- Yield: 8 servings 1x
- Diet: Vegetarian
Description
A delightful No-Bake Mint Chocolate Pie that combines refreshing mint and rich chocolate flavors. Perfect for any occasion, this pie is easy to make and sure to impress.
Ingredients
- 1 package Oreo cookies (crushed)
- 1/4 cup unsalted butter (melted)
- 1 cup heavy whipping cream
- 1 cup powdered sugar
- 1 tsp peppermint extract
- 1 cup mint chocolate chips
Instructions
- Crush those Oreos in a zip-top bag with a rolling pin or food processor.
- Mix in the melted butter until all crumbs are coated.
- Form the crust in a 9-inch pie pan, packing it tightly.
- Refrigerate the crust for 15 minutes.
- Whip the cream until soft peaks form.
- Add sugar and mint extract, mixing until billowy peaks form.
- Fold in the mint chocolate chips gently.
- Fill the crust with the cream mixture and smooth the top.
- Chill again for at least 4 hours or overnight.
- Serve and enjoy, optionally garnishing with mint chocolate chips or whipped cream.
Notes
For a dairy-free version, replace heavy cream with coconut cream and use dairy-free chocolate chips.
- Prep Time: 15 minutes
- Cook Time: 0 minutes
- Category: Dessert
- Method: No-Bake
- Cuisine: American
Nutrition
- Serving Size: 1 slice
- Calories: 350
- Sugar: 22g
- Sodium: 200mg
- Fat: 20g
- Saturated Fat: 12g
- Unsaturated Fat: 8g
- Trans Fat: 0g
- Carbohydrates: 40g
- Fiber: 2g
- Protein: 4g
- Cholesterol: 40mg
Keywords: mint chocolate pie, no-bake dessert, summer pie, chocolate pie, easy dessert

Lemon Posset
Discovering the Delight of Lemon Posset: A Dreamy Dessert Experience
Hey there, food lovers! Welcome back to Feastical, where we whip up some kitchen magic that’ll make you feel like you’ve strolled straight into a sun-drenched lemon orchard. Today, we’re diving into a dessert that’s as light as a feather and bursting with zesty goodness—lemon posset!
Now, if you’ve never tasted lemon posset before, let me tell you, you’re in for a treat. Imagine a velvety, creamy dessert that’s both tangy and sweet, perfectly balancing flavors like an expert tightrope walker. It’s quick to make, requires no baking, and will impress your friends and family with its sophisticated flair.
But first, let’s chat about the origin of this glorious treat. Possets date back to the medieval times—how cool is that? It started off as a hot drink and eventually morphed into the creamy dessert we adore today. The beauty of lemon posset lies in its simplicity: just a handful of ingredients transformed into a silky delight that feels like sunshine in a bowl. Whether you’re serving it at a fancy dinner or a cozy weeknight treat, lemon posset always delivers a smile.
So, grab your apron, and let’s embark on this flavorful adventure together!
A Sweet Memory of Lemon Posset
One of my fondest memories in the kitchen stems from my grandmother, who had a way of brightening gloomy days with her culinary magic. Lemon posset was one of her ultimate recipes, and many summer afternoons were spent huddled together in her tiny kitchen, the air thick with the tangy aroma of fresh lemons.
I remember the first time she invited me to help her make it. She handed me a zester and a lemon, her eyes twinkling with mischief as I attempted to mimic her technique. Zest flying everywhere, we giggled like kids as we tasted the concoction, the tartness of the lemons making our faces pucker.
When we finally took our first spoonful of her finished posset, it felt like a burst of sunshine. The tartness wrapped around the creamy base created an explosion of flavor that stays with you long after the last bite. It was a moment of connection—not just to the food but to the love she poured into every dish. Now, every time I make lemon posset, I feel like she’s right there with me, guiding my hands.
Ingredients
Now that we’ve set the stage with a bit of nostalgia, let’s get into what you need to create this lemony delight! Here’s a simple list of ingredients for you:
-
3 Large Lemons: You’ll want these to be juicy and vibrant. Substitute with limes for a different flavor twist!
-
1 Cup Heavy Cream: This is where the magic happens! If you’re looking for a lighter option, consider full-fat coconut milk or almond milk, but the texture will change slightly.
-
⅓ Cup Sugar: Just a hint of sweetness! Feel free to use coconut sugar, or for a low-calorie version, try a sugar alternative like stevia.
-
¼ Teaspoon Kosher Salt: A pinch of salt enhances the flavors perfectly! Table salt works too but go lighter on the quantity.
-
½ Tablespoon Lemon Zest: This is the secret to bringing out that zingy lemon flavor. Don’t skip it! Dried lemon zest can be a substitute, but fresh is always best.
-
2½ Tablespoons Lemon Juice: Fresh juice is key! Bottled lemon juice won’t have the same brightness; if you’re in a pinch, you could use bottled, but it will lack some freshness.
-
1 Teaspoon Vanilla Extract: This adds a lovely depth! You can swap it with lemon extract for an extra punch of flavor if you’re feeling adventurous.
Step-by-Step Instructions
Let’s get into the heart of the matter! Here’s how to whip up your very own lemon posset. Don’t worry, I’m here with you every step of the way—kitchen disasters don’t stand a chance!
-
Zest and Juice the Lemons: Start by zesting your lemons using a microplane grater. Make sure to avoid the white pith, as it can be bitter. Once you have your zest, cut the lemons in half and juice them, straining out any seeds. Tip: Use a fork to help extract more juice!
-
Combine Cream, Sugar, Salt, and Zest: In a medium saucepan over low heat, combine the heavy cream, sugar, kosher salt, and lemon zest. Gently heat while stirring until the sugar dissolves (about 2–3 minutes). It’s crucial to keep the heat low to prevent scalding the cream!
-
Add Lemon Juice: Once the mixture is warm and the sugar has dissolved, remove it from the heat and stir in the lemon juice and vanilla extract. The mixture will start to thicken as it cools. If you’re feeling fancy, you can strain it through a fine-mesh sieve to remove the zest, but remember, that zest packs flavor!
-
Chill to Set: Pour the mixture into serving cups or ramekins and let them cool to room temperature. Then, pop them into the fridge for at least 4 hours or overnight. This is when the posset will firm up beautifully.
-
Serve and Garnish: When you’re ready to enjoy, you can garnish with more lemon zest, a sprinkle of sea salt, or even fresh berries for an extra pop of color and flavor. Chef hack: If your posset is too firm, you can stir in a splash of cream before serving!
Serving Suggestions
Presentation is everything! Here’s how to plate your lemon posset for maximum effect:
-
Classic Cups: Serve it in beautiful glass cups or ramekins to show off that creamy texture and enticing lemon hue. A dollop of whipped cream and a adash of lemon zest on top creates both visual appeal and extra flavor.
-
Berry Bliss: Layer fresh berries (like raspberries or blueberries) at the bottom of the cup before adding the posset. They add a pop of color and a burst of freshness!
-
Elegant Platters: If you’re entertaining a crowd, go for a serving platter. Arrange individual portions side by side, and garnish with a few mint leaves for a refreshing touch.
Recipe Variations
Feeling adventurous? Here are a few creative twists on the classic lemon posset:
-
Meyer Lemon Posset: Use Meyer lemons for a sweeter, less acidic flavor. It’s a game-changer if you can find them!
-
Ginger Lemon Posset: Add a tablespoon of finely grated ginger to the cream mix for a zingy, warm twist.
-
Herb-Infused Posset: Infuse the cream with fresh herbs, like basil or rosemary, by steeping them in for about 15 minutes before straining out.
-
Chocolate Lemon Posset: Mix in a couple of tablespoons of melted dark chocolate into the cream mixture. Rich and delightful!
-
Lavender Lemon Posset: For a floral flavor, steep culinary lavender in the cream. Just be sure to strain it out before adding the citrus.
Chef’s Notes
So, here’s a funny little insight—a few years back, I had a little “help” from my lovely cat, Daisy, while making lemon posset. As I turned my back for just a second, she decided that my lemon zest was her new favorite toy! Lemons zipping around the kitchen was quite the distraction! But that’s the beauty of cooking—embracing the chaos and laughter that comes with it.
Over the years, I’ve played with different flavor combinations, and it’s been an incredible journey. The basic recipe remains close to my heart, a tribute to those sunny afternoons spent with Grandma, but I love the endless possibilities to make it uniquely yours!
FAQs and Troubleshooting
Here are some common questions you might have while making your lemon posset, along with helpful answers:
-
Why isn’t my posset thickening? If it’s not thickening enough, ensure you’re using fresh lemon juice and allow it to chill for the full time. If it’s still too runny, try adding a bit more cream and gently heating it until combined.
-
Can I use bottled lemon juice? While fresh is best, in a pinch you can use bottled lemon juice; just expect a slightly different flavor profile.
-
How long does lemon posset last in the fridge? Typically, it should be good for about 3–4 days. Make sure to cover it tightly to keep it fresh!
-
Can I freeze lemon posset? Freezing is not the best option for posset, as it can change the creamy texture. If you must, try freezing it in small portions for a short time, but let thawing happen in the fridge slowly.
Nutritional Info
Now, let’s talk nutrition! Here’s a rough breakdown of the nutrition facts per serving (assuming 4 servings):
- Calories: 250
- Fat: 20g
- Carbohydrates: 17g
- Fiber: 0g
- Protein: 2g
- Sugar: 12g
Keep in mind, these values can vary based on ingredient brands or adjustments you make! It’s always a good idea to do a quick calculation if you’re keeping an eye on specific dietary needs.
Final Thoughts
And there you have it, friends! A delicious journey into the world of lemon posset. Whether you whip it up for a special occasion or just because, this dessert is sure to become a favorite in your household. Remember the joy of cooking is in the process—the laughter, the memories, and the flavors that all come together to create something delightful.
So, what are you waiting for? Grab those lemons and start stirring! Don’t forget to share your culinary creations with me; I’d love to see how your lemon posset turns out. Until next time, keep simmering, sizzling, and savoring every bite of life. Cheers! 🍋
Print
Lemon Posset
- Total Time: 240 minutes
- Yield: 4 servings 1x
- Diet: Vegetarian
Description
A creamy and zesty lemon dessert that’s easy to make and sure to impress.
Ingredients
- 3 Large Lemons (juicy and vibrant)
- 1 Cup Heavy Cream
- ⅓ Cup Sugar
- ¼ Teaspoon Kosher Salt
- ½ Tablespoon Lemon Zest
- 2½ Tablespoons Lemon Juice
- 1 Teaspoon Vanilla Extract
Instructions
- Zest and juice the lemons, straining out any seeds.
- Combine cream, sugar, salt, and zest in a medium saucepan over low heat until sugar dissolves.
- Add lemon juice and vanilla extract, then stir until the mixture thickens.
- Chill the mixture in serving cups for at least 4 hours or overnight.
- Serve garnished with additional lemon zest or fresh berries.
Notes
For a lighter option, you can use coconut milk or almond milk. Feel free to add flavor variations like ginger or chocolate.
- Prep Time: 15 minutes
- Cook Time: 5 minutes
- Category: Dessert
- Method: Chilling
- Cuisine: British
Nutrition
- Serving Size: 1 serving
- Calories: 250
- Sugar: 12g
- Sodium: 50mg
- Fat: 20g
- Saturated Fat: 12g
- Unsaturated Fat: 8g
- Trans Fat: 0g
- Carbohydrates: 17g
- Fiber: 0g
- Protein: 2g
- Cholesterol: 80mg
Keywords: lemon dessert, creamy posset, no-bake dessert, summer dessert

Beginner-Friendly Rugelach Cookies: A Simple Pastry Recipe
The Irresistible Allure of Rugelach Cookies: A Sweet Journey
Hey there, fabulous food lovers! I’m so glad you stopped by Feastical today. Let’s take a delicious journey into the world of Rugelach cookies—a treat that has a special place in my heart and certainly in my stomach! If you’ve never dabbled in the art of making these little crescent-shaped delicacies, today’s your lucky day. I’ll guide you through every step of the process, sprinkle in some fun kitchen tidbits, and sprinkle a bit of good vibes to ensure your experience is as joyful as the first bite into that flaky, buttery goodness.
Rugelach has a rich history that traces back to Eastern European Jewish communities, but don’t let the traditional roots fool you; these cookies have become favorites in many households worldwide. They’re like tiny pastry presents waiting to be unwrapped, filled with sweet, flavorful surprises. The beauty of Rugelach lies in its versatility—it dances seamlessly between sweet and nutty and can be adapted to suit whatever fillings your heart (or pantry) desires. That means if you’re a creative foodie like me, the sky’s the limit!
Now, grab your rolling pin, preheat that oven, and let’s dive into what makes these Rugelach cookies so special. Whether you’re baking for a celebration, a cozy night at home, or simply because you crave something comforting, these cookies will surely bring a smile to your face.
Personal Story
Many moons ago, I found myself in my grandmother’s kitchen, the heart of our family gatherings. The air was thick with the scent of cinnamon and baked goods, but the real magic was happening at the counter where Grandma was rolling out dough for her famous Rugelach. As a curious kid, I stood on my tiptoes, watching her hands work the pastry with a skill that came from years of love and practice.
I can still see the joy on her face as she spread apricot jam over the dough and sprinkled it with walnuts and cinnamon sugar. She would always invite me to help, “Just a little bit of cinnamon here, and don’t forget to fold that edge in!” Little did I know that those moments of bonding would shape my love for baking and the importance of tradition in cooking.
Later, as I enjoyed the warm, flaky cookies fresh out of the oven, I learned they weren’t just treats—they were a heritage passed down through generations, each recipe carrying its own story. Now, I bring those stories into my own kitchen. Every time I whip up batch after batch of these delightful cookies, I recapture that joy and nostalgia. Today, we’re going to make our version of Grandma’s classic Rugelach, allowing those sweet memories to unfold all over again.
Ingredients
Let’s gather our ingredients! Here’s what you’ll need to whip up some fantastic Rugelach—each item plays a crucial role in achieving that perfect texture and flavor.
-
1 cup unsalted butter, softened: Butter is the star of the show! It provides richness and a flaky texture. If you’re in a pinch, you can substitute with margarine, but I highly recommend the real deal for that luscious flavor.
-
8 ounces cream cheese, softened: This adds a creamy, tangy flavor that balances the sweetness beautifully. For a lighter version, you can use Neufchâtel cheese.
-
1/4 cup granulated sugar: Just a dash of sweetness! This helps to enhance the overall flavor profile. You can use coconut sugar for a more caramel-like taste if you prefer.
-
1 teaspoon vanilla extract: A must-have in baking! Vanilla elevates the flavors and adds warmth. Pure vanilla extract is best, but imitation works too if you’re out.
-
2 cups all-purpose flour: This is the base for your dough. If you’re looking for a gluten-free option, a 1:1 gluten-free flour blend can stand in nicely.
-
1/2 cup apricot jam: The filling! Feel free to play around with flavors like raspberry or blackberry jam for a fun twist, but I love the classic apricot for its balance of tartness and sweetness.
-
1/2 cup chopped walnuts: They add a delightful crunch. If you’re nut-free, seeds or oats can add some texture without compromising the taste.
-
1 egg, beaten (for egg wash): This gives the Rugelach a beautiful golden color when baked. You can skip it if you want a vegan version or use a flax egg as a substitute.
-
1 tablespoon cinnamon sugar (optional): A little sprinkle on top adds a nice touch of sweetness and aromatic flavor—perfect for those of us who can’t resist a little cinnamon magic!
Step-by-Step Instructions
Now that we’ve gathered all the goodies, it’s time to get those hands busy! Follow these detailed steps to create your Rugelach cookies.
Step 1: Make the Dough
-
In a large mixing bowl, cream together the softened butter and cream cheese until smooth. I like to use a hand mixer for this, but you can also use a spatula if you’re feeling a bit nostalgic and want to channel your inner Grandma.
-
Add in the granulated sugar and vanilla extract, mixing until well combined. This is where the magic begins—mixing with joyous vigor helps create a fluffy and light texture.
-
Gradually add in the all-purpose flour, mixing until a dough forms. The dough should be soft and slightly tacky but manageable.
Step 2: Chill the Dough
- Divide the dough into four equal pieces and form each into a disk. Wrap them in plastic wrap and pop them into the fridge for at least 30 minutes. Chilling helps the butter firm up, making the dough easier to roll out!
Step 3: Roll and Fill
-
Preheat your oven to 350°F (175°C). Line a baking sheet with parchment paper—you want to keep that kitchen clean!
-
Lightly flour your work surface and roll out one disk of dough into a circle about 1/8-inch thick. Don’t stress about perfection! The beauty of Rugelach is that they’re homemade!
-
Spread a generous layer of apricot jam over the rolled-out dough, leaving about an inch from the edge. Sprinkle the jam with chopped walnuts and a dash of cinnamon sugar, if using. The aroma of cinnamon wafting up during this step is pure bliss!
Step 4: Cut and Shape
-
Now comes the fun part! Using a sharp knife or a pizza cutter, slice the dough circle into 8 even wedges (like a pizza).
-
Starting from the wide end, gently roll each wedge towards the tip, forming a crescent shape. Place the rolled cookies on your lined baking sheet, making sure you leave enough space between them.
-
Brush the tops of each cookie with the beaten egg wash. For an extra dose of sweetness, sprinkle a little more cinnamon sugar on top!
Step 5: Bake to Perfection
-
Bake in your preheated oven for about 25-30 minutes, or until they’re golden brown and the scent of baked goods fills your kitchen. Keep an eye on them; the mouth-watering aroma will have you tempted way before they’re done!
-
Once baked, allow your Rugelach to cool on the baking sheet for a few minutes before transferring them to a wire rack. The waiting is tough, but trust me, they’re worth every morsel!
Serving Suggestions
Oh, the joy of serving these Rugelach cookies! They’re stunning on a plate, with their golden spirals and delicious fillings peeking through. For a cozy gathering, set them on a rustic wooden platter accompanied by a lovely herbal tea or a rich cup of coffee.
You can also drizzle some melted chocolate over them for a little extravagance, or pair them with fresh berries and whipped cream for a more glamorous dessert experience. They make delightful gifts too! Just arrange the cookies in a cute box tied up with a ribbon, and you’ve got the perfect present for any occasion.
Recipe Variations
Feeling adventurous? Here are some fun twists on the classic Rugelach:
-
Nut-Free Option: Switch walnuts for rolled oats or sunflower seeds for a crunchy texture without the nuts.
-
Spicy Chocolate: Add a sprinkle of chili powder to your cinnamon sugar for a spicy chocolate twist. Dark chocolate or Nutella could also be delectable fillings!
-
Fruit Infusion: Use different jams or preserves like raspberry, cherry, or even Nut butter for a protein-packed option.
-
Citrus Zest: Mix in some orange or lemon zest to the dough for a refreshing burst of flavor.
-
Vegan Version: Swap butter and cream cheese for vegan alternatives, and use a flax egg instead of the egg wash for a plant-based treat.
Chef’s Notes
These Rugelach cookies have had a long journey for me, evolving through my experiences and inspirations. I remember when I first experimented with adding a hint of cardamom to the flour mixture—pure magic! Every time I whip them up, whether I’m channeling my grandmother or trying my own spins, I’m reminded that cooking is all about love, creativity, and experimentation.
If you ever find yourself in a pinch, remember that these cookies can be frozen before baking. Just wrap them tightly and keep them in the freezer for up to a month. When you’re ready to indulge, bake them straight from the freezer—just add a few extra minutes to the bake time.
FAQs and Troubleshooting
Here are some common questions and tips to ensure your rugelach journey is as smooth as butter!
-
Q: Why are my cookies not flaky?
- A: Ensure your butter is cold and don’t overmix the dough. Keep it chill!
-
Q: Can I make the dough in advance?
- A: Absolutely! Just wrap it well and keep it in the fridge for up to 3 days or freezer for one month.
-
Q: What if my dough is too sticky?
- A: Don’t panic! Just add a little bit of flour, but be careful not to overdo it as that can make the dough tough.
-
Q: Can I make these without cream cheese?
- A: You can substitute with more butter or try a dairy-free cream cheese alternative if you’re vegan.
Nutritional Info
While Rugelach cookies are a delightful indulgence, they also come with a few nutritional notes to keep in mind. Each cookie (based on a standard recipe) may contain approximately:
- Calories: 150-200
- Fat: 10g
- Carbohydrates: 15g
- Protein: 2g
- Sugar: 5g
As with any treat, moderation is key, but the happiness they bring is truly worth it!
Final Thoughts
There you have it, my fellow foodies! Your road map to perfecting delicious Rugelach cookies filled with love and warmth. Baking these delightful treats is about more than just sweetness; it’s about creating memorable moments, just like my Grandma did.
I can’t wait for you to try this recipe—trust me, your taste buds will be doing a happy dance! So, gather your friends and family, create your memories, and feel free to share your own twists and stories here at Feastical. Remember, the kitchen is a space of joy, creativity, and love. Happy baking! 🥐❤️
Now, go on and whip up those Rugelach cookies. Let them warm your heart and fill your home with happiness!
Print
Rugelach Cookies
- Total Time: 45 minutes
- Yield: 32 cookies 1x
- Diet: Vegetarian
Description
Delightfully flaky and buttery Rugelach cookies filled with sweet apricot jam and crunchy walnuts, perfect for any occasion.
Ingredients
- 1 cup unsalted butter, softened
- 8 ounces cream cheese, softened
- 1/4 cup granulated sugar
- 1 teaspoon vanilla extract
- 2 cups all-purpose flour
- 1/2 cup apricot jam
- 1/2 cup chopped walnuts
- 1 egg, beaten (for egg wash)
- 1 tablespoon cinnamon sugar (optional)
Instructions
- Make the dough: In a large mixing bowl, cream together the softened butter and cream cheese until smooth. Add in the granulated sugar and vanilla extract, mixing until well combined. Gradually add in the all-purpose flour, mixing until a dough forms.
- Chill the dough: Divide the dough into four equal pieces and form each into a disk. Wrap them in plastic wrap and pop them into the fridge for at least 30 minutes.
- Roll and fill: Preheat your oven to 350°F (175°C). Lightly flour your work surface and roll out one disk of dough into a circle about 1/8-inch thick. Spread a generous layer of apricot jam over the rolled-out dough, sprinkle with chopped walnuts and cinnamon sugar, if using.
- Cut and shape: Slice the dough circle into 8 wedges. Starting from the wide end, gently roll each wedge towards the tip, forming a crescent shape. Place on a lined baking sheet, brush with egg wash, and sprinkle with more cinnamon sugar if desired.
- Bake to perfection: Bake for about 25-30 minutes, or until golden brown. Allow to cool before transferring to a wire rack.
Notes
These cookies can be frozen before baking. Wrap tightly and keep in the freezer for up to a month. Bake from frozen—add a few extra minutes to the bake time.
- Prep Time: 15 minutes
- Cook Time: 30 minutes
- Category: Dessert
- Method: Baking
- Cuisine: Jewish
Nutrition
- Serving Size: 1 cookie
- Calories: 175
- Sugar: 5g
- Sodium: 250mg
- Fat: 11g
- Saturated Fat: 6g
- Unsaturated Fat: 4g
- Trans Fat: 0g
- Carbohydrates: 18g
- Fiber: 1g
- Protein: 3g
- Cholesterol: 30mg
Keywords: Rugelach, cookies, Jewish dessert, apricot jam, walnuts, baking

No-Bake Red White & Blue Lasagna: Patriotic Summer Dessert
Red, White, and Blue Dessert Lasagna: The Ultimate No-Bake Patriotic Treat
Hey there, fellow foodies! Welcome to Feastical, where we celebrate food that’s not just a recipe but an experience that brings joy, laughter, and a pinch of nostalgia into our kitchens. If you’re looking for something fantastic and eye-catching to make for your next barbecue or patriotic celebration, then let me introduce you to the delightful Red, White, and Blue Dessert Lasagna! This no-bake treat is not only a feast for the eyes but also a palate-pleaser that combines rich creaminess with fruity delights. So put your apron on, and let’s dive into the deliciousness!
A Slice of Nostalgia
I still remember the first time I indulged in a dessert lasagna. It was at my Aunt Linda’s Fourth of July picnic, and with every layer, I could taste the love and togetherness that filled her kitchen. Layers of chocolate cookies, sweet cream cheese, and fresh strawberries and blueberries all come together like a symphony of flavors. As kids, we devoured it in perfect harmony while the fireworks lit up the sky, and it became a tradition that I cherish. That dessert was more than just food; it was a canvas painted with happy memories of laughter and summer sunshine. Today, I’ll share my take on that beloved dish and help you create your own memorable moments with this spectacular no-bake dessert!
Ingredients
Let’s gather everything we need to whip up this fantastic dessert lasagna. Here’s what you’ll be using:
-
36 Chocolate Sandwich Cookies (Approx. 14.3 oz / 405g)
A crunchy base that adds depth and texture. You can swap these for chocolate graham crackers for a slightly different flavor profile! -
6 tbsp Unsalted Butter (85g, melted)
This helps bind the cookie crust together. If you need a dairy-free option, coconut oil works beautifully here! -
16 oz Cream Cheese (450g, softened)
The creamy heart of this dessert! You can use a dairy-free cream cheese if you’re looking for a vegan option. -
1/2 cup Powdered Sugar (60g)
Sweetness is essential! If you want a lower sugar option, consider using a sugar substitute like monk fruit sweetener. -
1 tsp Vanilla Extract (5ml)
A whisper of vanilla elevates all the flavors. No vanilla? Almond extract is a delightful substitute! -
2 cups Strawberries (300g, hulled)
Fresh and juicy strawberries add vibrant red layers. Frozen strawberries can be used, but make sure to drain excess liquid. -
1/4 cup Granulated Sugar (50g)
This will sweeten the berry mixture. Use less or a sugar alternative to taste. -
1 tbsp Cornstarch (8g)
This helps thicken the strawberry filling. You can substitute with arrowroot powder if you prefer something different. -
2 cups Blueberries (300g)
A burst of blueberry goodness! If you can’t find fresh blueberries, frozen ones work, but thaw and drain them first. -
1/4 cup Granulated Sugar (50g)
Another sweet touch for the blueberry layer. Again, feel free to switch it out for your preferred sweetener. -
1 tbsp Cornstarch (8g)
Used just like in the strawberry mixture. Arrowroot works great here too! -
2 cups Heavy Whipping Cream (480ml, chilled)
This is what makes the layers fluffy and dreamy! For a lighter version, you can substitute with whipped coconut cream. -
1/4 cup Powdered Sugar (30g)
To sweeten the whipped cream—because who doesn’t love a little extra sweetness? -
2 tbsp Star Sprinkles (Red, white, and blue)
These are for decoration, and they add a festive touch! You can use any sprinkles you have on hand if you prefer.
Step-by-Step Instructions
Now that we have our ingredients ready, let’s get to the fun part—making the dessert lasagna! Follow these steps, and you’ll be on your way to creating a delightful masterpiece.
-
Make the Cookie Crust
In a food processor, blend the chocolate sandwich cookies into fine crumbs. If you don’t have a food processor, you can put them in a zip-lock bag and crush them with a rolling pin—frustration-busting therapy included! Once you have crumbs, transfer them to a mixing bowl and stir in the melted butter. Press this mixture into the bottom of a 9×13 inch dish. Use the back of a measuring cup or your hands to ensure it’s packed tightly. This will give you a sturdy base for the layers above! -
Prepare the Strawberry Filling
In a medium bowl, combine the hulled strawberries, 1/4 cup granulated sugar, and 1 tbsp cornstarch. Toss them together to coat. Let this sit for about 10 to 15 minutes while the sugar works its magic on the strawberries. This will create a beautiful syrup that will intensify the strawberry flavor! -
Cream Cheese Mixture
In a separate large bowl, beat together the softened cream cheese, 1/2 cup powdered sugar, and 1 tsp vanilla extract with an electric mixer until smooth and creamy. If you want a little extra fluffiness, beat in 1 cup of heavy whipping cream until it forms soft peaks. This will make your cream layer light and luscious! -
Layer It Up
Start by spreading half of the cream cheese mixture evenly over the cookie crust. Next, spoon half of the strawberry filling over the top. Repeat these layers—first another layer of cream cheese mixture and then the rest of the strawberries. This creates a textural harmony as you dig in! -
Creating the Blueberry Layer
Repeat the same process with blueberries. Toss the blueberries with 1/4 cup granulated sugar and 1 tbsp cornstarch. Let this sit while you finish the layers. Portion out the remaining cream cheese mixture, spread it over the strawberries, then add your lovely blueberries on top. The colors are really coming together now! -
Whipped Topping
Whip the remaining 1 cup of heavy whipping cream with 1/4 cup powdered sugar until you reach stiff peaks. You want this whipped topping to be thick and fluffy. Spread it evenly over the blueberry layer, covering everything nicely. -
Final Touch
To finish off, sprinkle those fun star sprinkles on top for a festive touch! Feel free to go wild with the decoration—make it as fun and colorful as you like. -
Chill, Then Serve
Cover the lasagna with plastic wrap and pop it in the fridge for at least 4-6 hours, or ideally overnight. This will allow the flavors to meld beautifully together, and it’ll be easier to slice.
Serving Suggestions
When it’s time to serve, bring out this vibrant dessert lasagna and let it shine at your gathering! Slice it into squares, and for an extra touch, serve each piece with a dollop of extra whipped cream and a sprinkle of fresh berries on the side. You can also present it on a festive platter, garnishing with fresh mint leaves to give it that extra pop of color. Don’t forget to snap a few pics before everyone digs in—you’ll want to capture the comments of pure delight from your friends and family!
Recipe Variations
Here are a few fun twists you can try to make this recipe your own:
-
Brownie Base: Swap out the chocolate cookies for brownies! This adds a fudgy twist that chocolate lovers will adore.
-
Coconut Layer: Incorporate a layer of toasted shredded coconut in between the layers for a tropical vibe.
-
Peppermint Twist: For a winter celebration, add a few drops of peppermint extract to the cream cheese mixture and use crushed peppermint candies as a topping.
-
Seasonal Fruit: Feel free to change up the fruit based on the season. Peaches and blackberries make a delightful summer treat, while cranberries and orange zest are fantastic for fall or winter!
-
Dairy-Free Version: Use non-dairy cream cheese, whipped coconut cream, and your favorite dairy-free cookies for a deliciously inclusive dessert.
Chef’s Notes
As I’ve grown more comfortable in the kitchen, I’ve found that sharing recipes has become a way to connect with others. I love how a dish can tell a story. This dessert lasagna has gone from a simple creation to a family favorite, and I often hear requests for it during special occasions. You can truly make it your own by adding family traditions or even an unexpected ingredient. Every lasagna I make has a little piece of love in it—because that’s what food is all about.
FAQs and Troubleshooting
1. Can I use frozen fruit?
Absolutely! Just be sure to thaw and drain your frozen fruit completely, so the excess liquid doesn’t affect the dessert’s texture.
2. My whipped cream didn’t whip! What went wrong?
Make sure your whipping cream is cold and that you’re using heavy whipping cream. Be careful not to overbeat—it can turn grainy and become butter instead of whipped cream!
3. How long will this dessert last in the fridge?
It’s best enjoyed fresh, but it can last up to 3-4 days in the fridge. Just cover it tightly to keep it fresh.
4. Can I make this ahead of time?
Yes! This dessert is perfect for making ahead as it needs time to chill. It actually tastes better the next day after all the flavors meld together!
Nutritional Info
This delicious dessert can be enjoyed within a balanced diet, especially when shared with friends and family! Here’s a rough estimate of what’s in a slice (1/12th of the recipe):
- Calories: Approximately 290
- Total Fat: 19g
- Saturated Fat: 10g
- Carbohydrates: 28g
- Sugars: 15g
- Fiber: 1g
- Protein: 3g
Remember that nutritional values can change depending on substitutes and variations you make!
Final Thoughts
Cooking is not just about following a recipe; it’s about creating memories, sharing love, and making connections. This Red, White, and Blue Dessert Lasagna embodies all of that, just like my Aunt Linda’s cherished creation. As you gather around the table with your loved ones, I hope each slice represents laughter, joy, and most importantly, a love for food. So, roll up your sleeves, get creative, and let’s make every occasion a feast worth remembering!
Until next time, keep those forks ready—there’s always something delicious on the horizon here at Feastical!
Print
Red, White, and Blue Dessert Lasagna
- Total Time: 360 minutes
- Yield: 12 servings 1x
- Diet: Vegetarian
Description
A delightful no-bake dessert lasagna featuring layers of chocolate cookies, cream cheese, and fresh strawberries and blueberries, perfect for patriotic celebrations.
Ingredients
- 36 Chocolate Sandwich Cookies (Approx. 14.3 oz / 405g)
- 6 tbsp Unsalted Butter (85g, melted)
- 16 oz Cream Cheese (450g, softened)
- 1/2 cup Powdered Sugar (60g)
- 1 tsp Vanilla Extract (5ml)
- 2 cups Strawberries (300g, hulled)
- 1/4 cup Granulated Sugar (50g)
- 1 tbsp Cornstarch (8g)
- 2 cups Blueberries (300g)
- 1/4 cup Granulated Sugar (50g)
- 1 tbsp Cornstarch (8g)
- 2 cups Heavy Whipping Cream (480ml, chilled)
- 1/4 cup Powdered Sugar (30g)
- 2 tbsp Star Sprinkles (Red, white, and blue)
Instructions
- Make the cookie crust by blending chocolate sandwich cookies into fine crumbs. Stir in melted butter and press into the bottom of a 9×13 inch dish.
- Prepare the strawberry filling by combining hulled strawberries, 1/4 cup granulated sugar, and 1 tbsp cornstarch in a bowl.
- Cream the cream cheese with 1/2 cup powdered sugar and 1 tsp vanilla extract until smooth and creamy, adding 1 cup heavy whipping cream for fluffiness if desired.
- Layer half of the cream cheese mixture over the cookie crust followed by half of the strawberry filling. Repeat with remaining mixtures.
- Create the blueberry layer by tossing blueberries with 1/4 cup granulated sugar and 1 tbsp cornstarch, then add to the lasagna.
- Whip remaining 1 cup heavy whipping cream with 1/4 cup powdered sugar until stiff peaks form and spread over the blueberry layer.
- Finish with star sprinkles on top and refrigerate for 4-6 hours or overnight before serving.
Notes
For best results, allow chilling overnight. You can use different fruits and opt for dairy-free alternatives if desired.
- Prep Time: 30 minutes
- Cook Time: 0 minutes
- Category: Dessert
- Method: No-Bake
- Cuisine: American
Nutrition
- Serving Size: 1 serving
- Calories: 290
- Sugar: 15g
- Sodium: 150mg
- Fat: 19g
- Saturated Fat: 10g
- Unsaturated Fat: 8g
- Trans Fat: 0g
- Carbohydrates: 28g
- Fiber: 1g
- Protein: 3g
- Cholesterol: 60mg
Keywords: no-bake dessert, patriotic dessert, summer treat, dessert lasagna, Fourth of July

Raspberry Swirl Brownies: 5-Ingredient, One-Bowl Recipe
Indulgent Raspberry Brownies: A Delicious Twist on Classic Comfort
Hey there, food lovers! It’s Beau Collier here, and today we’re diving into the delightful world of Raspberry Brownies. If you’re anything like me, brownies are that quintessential comfort food that just hits the spot. Rich, chocolatey, and soul-soothing, they remind us that life’s simplest pleasures can often be the most satisfying. But let me tell you, when you throw in a burst of fresh raspberries, you elevate the whole experience to another level! So let’s roll up our sleeves and get ready to create a dessert that not only fills our tummies but warms our hearts.
Growing up, my kitchen was always the buzzing hub of creativity, where the sweet aroma of chocolate often wafted through the air. I fondly recall watching my grandma whip up her famous brownies, her laughter spilling into the mix like a pinch of salt that deepened the flavor. It was during one of those sunny afternoons, talking about life and love while stuffing our faces with gooey treats, that I realized how food truly brings people together. To me, brownies were more than just a dessert; they were memories in the making. Fast forward to today, and I’ve taken that childhood joy and infused it with my love for bold flavors. Thus, the idea of adding fresh raspberries and raspberry jam was born. It’s all about making memories, and I can’t wait to create new ones with you!
Ingredients
Let’s gather everything we need to make these scrumptious Raspberry Brownies. Here’s what you’ll need:
-
1 box brownie mix
Easy and convenient! Go for a fudgy version if you can. You can also make homemade brownies if you prefer to skip the box! Just ensure the richness complements the fruit. -
1/2 cup fresh raspberries
These little gems add a tart burst of flavor. If you can’t find fresh raspberries, frozen ones work too—just thaw them first! -
1/4 cup raspberry jam
This adds a lovely sweetness and enhances the raspberry flavor. You can substitute with strawberry or any berry jam, but trust me, raspberry elevates this recipe! -
2 large eggs
The magic binding agent! If you’re vegan, you can replace eggs with a flax egg (1 tablespoon ground flaxseed mixed with 2.5 tablespoons water). -
1/3 cup vegetable oil
This adds moisture and richness. You can use melted coconut oil or applesauce as a healthier alternative! -
1 tablespoon water
Just a splash to mix everything perfectly. You can use milk for a creamier batter.
Step-by-Step Instructions
Let’s get cooking! Follow these steps, and we’ll have a batch of delicious Raspberry Brownies in no time.
-
Preheat Your Oven:
First things first! Preheat your oven to 350°F (175°C). This is crucial for even cooking, so don’t skip this step! Once it’s nice and toasty, prepare an 8×8 inch baking pan by greasing it or lining it with parchment paper for easy brownie removal. -
Mix the Brownie Batter:
In a large mixing bowl, combine the brownie mix, eggs, vegetable oil, and water. Give it a good stir until fully incorporated. The batter should be thick and glossy—this is where the magic happens! Pro tip: using a whisk instead of a spoon can help to eliminate any lumps for a smoother final texture. -
Add in the Raspberries:
Gently fold in the fresh raspberries, being careful not to squish them. This is what will make each bite a treasure trove of fruity goodness! I find that folding in the raspberries at this stage allows for even distribution without breaking them too much. -
Layer with Raspberry Jam:
Pour half the brownie batter into the prepared pan and smooth it out. Then, dollop the raspberry jam over this layer. Use a spatula to spread it slightly, but don’t worry about making it perfect; the chaos is part of the charm! Pour the remaining brownie batter over the jam layer and smooth the top. -
Swirl it Up:
Here comes the best part! Use a knife or a skewer to make a few gentle swirls to incorporate the jam into the brownie batter. Be artistic and have fun with it! -
Bake to Perfection:
Pop your brownies into the preheated oven and let them bake for 25-30 minutes. You want a toothpick inserted into the center to come out with a few moist crumbs—no one wants dry brownies! Keep an eye on them, as oven temperatures can vary. -
Cool and Cut:
Once your house is filled with that tantalizing chocolate aroma, it’s time to remove them from the oven. Let these beauties cool in the pan for about 15-20 minutes before you try to cut them—patience is a virtue! Carefully lift them out using the parchment paper and place them on a wire rack to cool completely.
Serving Suggestions
Presentation is everything! For a beautiful serving, cut your brownies into squares and place them on a plate. You could also sprinkle them with powdered sugar for a touch of elegance. If you’re feeling fancy, drizzle some warm raspberry sauce or chocolate ganache over the top. Pair them with a scoop of vanilla ice cream for an indulgent dessert or serve them alongside whipped cream and a few extra raspberries to make it pop. Your guests (or family) will think you’ve entered gourmet territory!
Recipe Variations
While the classic Raspberry Brownies are simply divine, here are some fun twists to keep things interesting:
-
Chocolate Chip Delight: Add a handful of chocolate chips to the batter for extra melty goodness.
-
Nutty Crunch: Toss in some chopped nuts such as walnuts or pecans for a delightful crunch that balances the softness of the brownie.
-
Minty Fresh: Add a few drops of mint extract for a refreshing surprise that complements the chocolate beautifully.
-
Vegan Version: Swap the eggs for flax eggs and use a dairy-free brownie mix for a plant-based alternative that everyone will love!
Chef’s Notes
These Raspberry Brownies are a personal favorite of mine for tons of reasons. Each time I make them, I’m reminded of those carefree afternoons with grandma. I’ve played around with the recipe over the years, and I have to admit, the raspberry twist was a game-changer! It adds that little zing that makes every bite feel like pure joy. And if you have leftover brownies (unlikely, but it can happen), they store well in an airtight container for a few days—or you can freeze them for a rainy day treat!
FAQs and Troubleshooting
Can I make my brownies ahead of time?
Absolutely! These brownies last well in an airtight container at room temperature for 3-4 days. You can also freeze them for up to 3 months—just let them thaw at room temperature when you’re ready to indulge!
What if my brownies are too gooey in the middle?
If they are too gooey, they might need a few extra minutes in the oven. Remember, appliance temperatures can vary, so keep an eye on them! If you’ve overbaked, they might be a bit dry; about 1-2 minutes makes all the difference!
Can I use frozen raspberries instead of fresh?
Definitely! Just make sure to let them thaw and drain excess moisture before adding them to the batter, otherwise, they can add too much liquid.
What’s the best way to cut brownies?
To get nice clean cuts, use a sharp knife that’s been warmed under hot water. Wipe the knife clean between cuts to keep your brownie squares looking good!
Nutritional Info
For those keeping an eye on their nutrition, here’s a rough estimate of the caloric content of the Raspberry Brownies (per serving—let’s say 12 servings for your 8×8 brownie pan):
- Calories: Approximately 200
- Total fat: 9g
- Saturated fat: 1g
- Carbohydrates: 29g
- Dietary fiber: 1g
- Sugars: 16g
- Protein: 2g
Please adjust based on your specific ingredients or if you substitute things out!
Final Thoughts
And there you have it! A batch of delectable Raspberry Brownies that’s sure to become a beloved addition to your dessert repertoire. As always, cooking is about enjoying the process and infusing a bit of love into every step. Whether you’re baking these for a special occasion or simply because it’s a Tuesday, I hope they bring as much joy to your home as they do to mine.
So, grab those ingredients and let’s bake some happy memories together! Thank you for tuning in to Feastical, and I can’t wait to see you whip up these delicious treats. Happy baking, my friends!
Print
Indulgent Raspberry Brownies
- Total Time: 45 minutes
- Yield: 12 servings 1x
- Diet: Vegetarian
Description
Rich and chocolatey brownies enhanced with a burst of fresh raspberries and raspberry jam, perfect for creating sweet memories.
Ingredients
- 1 box brownie mix
- 1/2 cup fresh raspberries
- 1/4 cup raspberry jam
- 2 large eggs
- 1/3 cup vegetable oil
- 1 tablespoon water
Instructions
- Preheat your oven to 350°F (175°C) and prepare an 8×8 inch baking pan.
- Mix the brownie mix, eggs, vegetable oil, and water until well combined.
- Add in the fresh raspberries, folding gently.
- Layer half the brownie batter into the pan and spread the raspberry jam over it. Pour the remaining batter on top.
- Swirl the jam into the brownie batter with a knife.
- Bake for 25-30 minutes until a toothpick comes out with a few moist crumbs.
- Cool the brownies in the pan for 15-20 minutes before transferring to a wire rack.
Notes
For a twist, add chocolate chips or nuts to mix-ins. These brownies can be stored for 3-4 days or frozen for up to 3 months.
- Prep Time: 15 minutes
- Cook Time: 30 minutes
- Category: Dessert
- Method: Baking
- Cuisine: American
Nutrition
- Serving Size: 1 brownie
- Calories: 200
- Sugar: 16g
- Sodium: 150mg
- Fat: 9g
- Saturated Fat: 1g
- Unsaturated Fat: 8g
- Trans Fat: 0g
- Carbohydrates: 29g
- Fiber: 1g
- Protein: 2g
- Cholesterol: 30mg
Keywords: brownies, raspberry, dessert, chocolate, easy baking
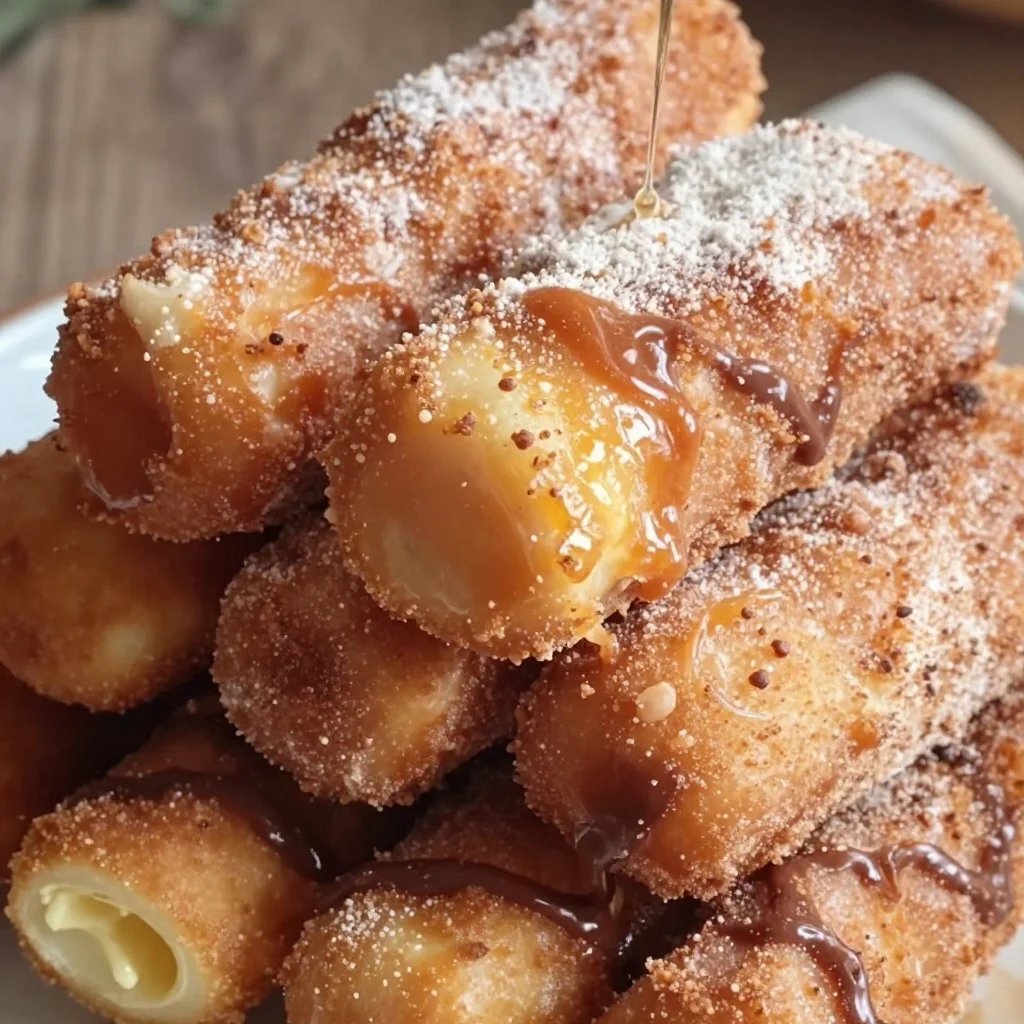
Minute Crispy Air Fryer Donut Sticks: Weeknight Snack
The Sweetest Treat: Crispy Air Fryer Donut Sticks
Hey there, my fellow foodies! It’s Beau Collier, and oh boy, do I have a treat for you today! If you’re ever in the mood for something sweet and delightful, you need to dive into these crispy air fryer donut sticks. Combining the nostalgic vibes of donuts with the ease of air frying, these little gems are crispy on the outside, soft on the inside, and just begging for a dip into chocolate sauce or maple syrup. Who could resist?
Now, let me take you on a little journey into the world of donut sticks. Picture this: weekend mornings buzzing with excitement, the aroma of baked goods wafting through my childhood home. My mom would often whip up a variety of treats, but the star of the show was always her cinnamon-sugar-coated donuts. They weren’t just any donuts; they were the kind that made you feel loved, comforted, and happy. My siblings and I would clamor around the kitchen island, trying to snag the first warm bites straight from the pan.
Fast forward a few years, and here I am, all grown up (well, kind of!). I’ve traded the frying pan for an air fryer, but the love remains the same. With less mess and less guilt, these crispy air fryer donut sticks are my modern spin on that cherished childhood memory. Today, let’s channel that nostalgia and whip up a batch of these beauties together!
Ingredients
Let’s gather our ingredients! Here’s what you’ll need to get started:
-
1 cup all-purpose flour: This is your base. A versatile ingredient, and if you’re looking for a gluten-free option, substitute with a 1:1 gluten-free flour blend!
-
1/4 cup granulated sugar: Sweetness is key! You can reduce the sugar or swap it for coconut sugar for a healthier alternative.
-
1 tsp baking powder: This gives the donut sticks their lift. If you’re out, try 1/3 tsp baking soda mixed with 1/2 tsp vinegar instead.
-
1/4 tsp salt: A pinch of salt enhances sweetness. If using salted butter, you might want to omit this.
-
1/2 tsp ground cinnamon: Cinnamon not only adds flavor but also a cozy warmth to the donuts. Feel free to experiment with nutmeg or cardamom for different flavor notes!
-
1/4 cup milk: Whole milk gives the best creaminess. Almond or oat milk work well too if you’re dairy-free.
-
1/4 cup unsalted butter, melted: Butter makes everything better! You can substitute it with vegetable oil if that’s what you have.
-
1 large egg: The egg helps bind everything together. For a vegan option, use 1/4 cup unsweetened applesauce or a flax egg (1 tbsp ground flaxseed mixed with 2.5 tbsp water).
-
1 tsp vanilla extract: This adds a wonderful flavor depth. If you want to get adventurous, use almond extract for a unique twist.
-
Cooking spray: A quick spritz ensures the donut sticks get that lovely crispy exterior.
-
Chocolate dipping sauce or maple syrup (for serving): The perfect accompaniments! You could even make a strawberry glaze for a fruity touch.
Step-by-Step Instructions
Now that we have our ingredients ready, let’s bring these crispy air fryer donut sticks to life!
-
Preheat Your Air Fryer: Start by preheating your air fryer to 350°F (180°C). This ensures even cooking and that lovely golden exterior.
-
Mix Dry Ingredients: In a large mixing bowl, whisk together the all-purpose flour, sugar, baking powder, salt, and cinnamon until they’re well combined. This step is crucial because it ensures that the baking powder is evenly distributed, leading to perfect rising.
-
Combine Wet Ingredients: In a separate bowl, whisk together the milk, melted butter, egg, and vanilla extract. Make sure the butter isn’t too hot, or it will scramble the egg — no one wants that!
-
Mix Wet and Dry: Pour the wet ingredients into the bowl with the dry ingredients. Gently fold the mixture until just combined. Don’t over-mix; a few lumps are okay. This keeps your donut sticks light and fluffy.
-
Shape the Dough: Lightly flour a clean countertop and turn your dough out onto it. Pat it into a rectangle about 1-inch thick. This is where the shaping begins! Use a sharp knife or pizza cutter to slice the dough into strips, about 1 inch wide and 4 inches long.
-
Prepare for Frying: Spray the air fryer basket with cooking spray and carefully arrange the donut sticks in a single layer, making sure not to overcrowd them. You may need to do this in batches.
-
Air Fry: Cook the donut sticks for about 5–6 minutes, flipping them halfway through. Keep an eye on them—they should be golden brown and crispy. Add an extra minute or two if needed!
-
Coat with Cinnamon Sugar: While they are still warm, toss the donut sticks in a mixture of sugar and cinnamon (around 1/4 cup sugar and 1 tsp cinnamon combined). This is the icing on the cake… erm, donut stick!
-
Serve and Enjoy: Grab that chocolate dipping sauce or maple syrup, and get ready to indulge!
Serving Suggestions
When it comes to serving your crispy air fryer donut sticks, presentation is everything! Arrange them in a cozy little stack on a rustic wooden platter, maybe sprinkle a little extra cinnamon sugar on top for that extra touch.
For a fun twist, serve them with individual dipping cups of chocolate sauce, maple syrup, or even a berry compote to dip in. If you’re feeling adventurous, pair them with a scoop of vanilla ice cream for a delicious dessert explosion. Trust me, your friends and family will be raving about it!
Recipe Variations
Ready to mix things up? Here are a few creative twists to elevate your donut sticks:
-
Chocolate Glazed: Dip your cooked donut sticks in melted dark or milk chocolate and top with sprinkles for a festive look.
-
Maple Pecan: Stir finely chopped pecans into the cinnamon sugar for a delightful crunch and flavor boost.
-
Coconut Delight: Toss the warm sticks in shredded coconut after frying for a tropical vibe, perfect for summer!
-
Pumpkin Spice: Add 1/4 cup of pumpkin puree and increase the spice mixture (cinnamon, nutmeg, and a touch of allspice) for a fall-inspired treat.
-
Savory Twist: Instead of sweet, add herbs like rosemary or thyme to the dough for a unique savory version. Serve with a garlic aioli for dipping!
Chef’s Notes
These crispy air fryer donut sticks have a special place in my heart. I started crafting them during my quest to create healthier versions of beloved comfort foods. The air fryer was a game-changer, allowing me to indulge in treats without the heaviness of traditional frying. Over the years, I’ve played around with flavors, and each iteration brings back those warm childhood vibes.
Oh, and here’s a little kitchen story for you: One time, I got so excited about making these that I accidentally dumped an entire bottle of cinnamon into the dough. Let’s just say, it was a very spicy adventure! Now, I always double-check my ingredient quantities before diving in.
FAQs and Troubleshooting
-
Why are my donut sticks not crispy?
- Make sure your air fryer is preheated and don’t overcrowd the basket. This way, hot air can circulate properly to create that perfect crisp!
-
Can I use whole wheat flour?
- Yes! You can substitute up to half of the all-purpose flour with whole wheat flour for a nuttier flavor. The texture may be a bit denser, but it will still be delicious.
-
My dough is too sticky; what should I do?
- If your dough is too sticky, add a little more flour, a tablespoon at a time, until it’s manageable. Just be careful not to overwork it.
-
How do I store leftover donut sticks?
- Allow them to cool completely, then store them in an airtight container at room temperature for up to two days. You can reheat them in the air fryer for a minute or two to regain that crispiness.
Nutritional Info
While everyone’s dietary needs are different, here’s a general idea of the nutritional content for one serving (assuming 4 servings total):
- Calories: 250
- Protein: 4g
- Fat: 10g
- Carbohydrates: 38g
- Sugars: 8g
As with any recipe, feel free to adjust based on substitutions or portion sizes!
Final Thoughts
There you have it, a delightful recipe for crispy air fryer donut sticks that are sure to bring smiles to your kitchen! They’re fun to make, versatile, and perfect for sharing with loved ones. Whether you’re enjoying them on a cozy weekend morning or celebrating a special occasion, these donut sticks are bound to create memories.
So gather your ingredients, put on your favorite apron, and channel your inner pastry chef! Remember, cooking is all about love, creativity, and a splash of joy. Thank you for visiting Feastical – I can’t wait to hear about your donut stick adventures! Happy cooking! 🍩✨
Print
Crispy Air Fryer Donut Sticks
- Total Time: 21 minutes
- Yield: 4 servings 1x
- Diet: Vegetarian
Description
Delicious crispy air fryer donut sticks that are perfect for a sweet treat with dipping sauces.
Ingredients
- 1 cup all-purpose flour
- 1/4 cup granulated sugar
- 1 tsp baking powder
- 1/4 tsp salt
- 1/2 tsp ground cinnamon
- 1/4 cup milk
- 1/4 cup unsalted butter, melted
- 1 large egg
- 1 tsp vanilla extract
- Cooking spray
- Chocolate dipping sauce or maple syrup (for serving)
Instructions
- Preheat your air fryer to 350°F (180°C).
- Mix dry ingredients: In a bowl, whisk flour, sugar, baking powder, salt, and cinnamon.
- Combine wet ingredients: In another bowl, whisk milk, melted butter, egg, and vanilla extract.
- Mix wet and dry ingredients together gently.
- Shape the dough into a rectangle about 1-inch thick and slice into strips.
- Prepare the air fryer basket with cooking spray and arrange the donut sticks.
- Air Fry for 5-6 minutes, flipping halfway through.
- Coat with cinnamon sugar while warm.
- Serve with chocolate dipping sauce or maple syrup.
Notes
For healthier options, substitute ingredients as suggested. Serve with various dipping sauces for a fun treat.
- Prep Time: 15 minutes
- Cook Time: 6 minutes
- Category: Dessert
- Method: Air Frying
- Cuisine: American
Nutrition
- Serving Size: 1 serving
- Calories: 250
- Sugar: 8g
- Sodium: 150mg
- Fat: 10g
- Saturated Fat: 5g
- Unsaturated Fat: 5g
- Trans Fat: 0g
- Carbohydrates: 38g
- Fiber: 1g
- Protein: 4g
- Cholesterol: 30mg
Keywords: air fryer, donuts, dessert, sweet treat, easy recipe, baking