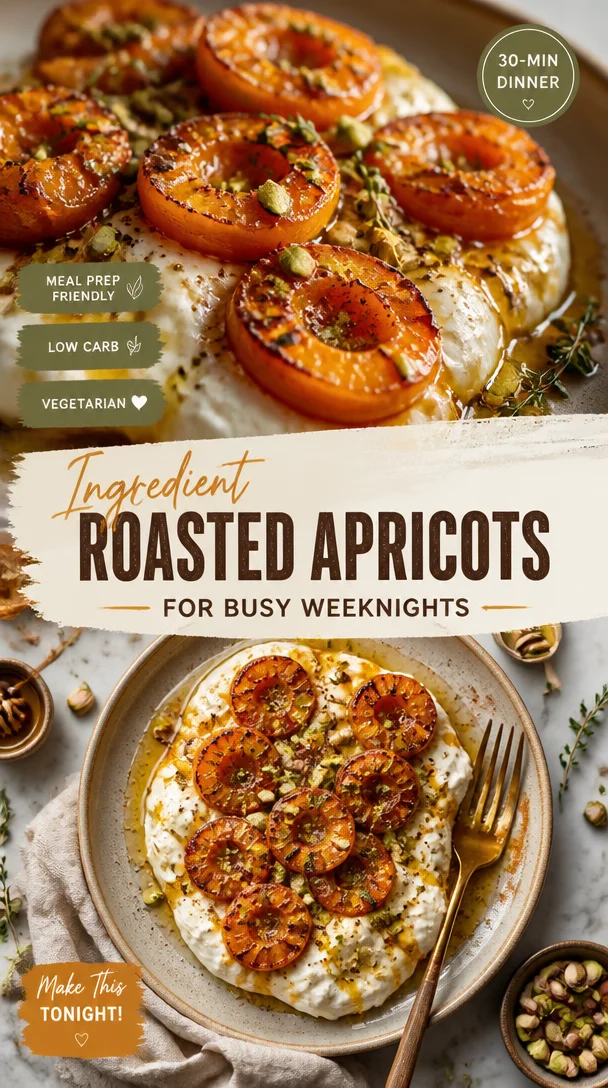
Ingredient Roasted Apricots for Busy Weeknights
Roasted Apricots – A Sweet Summer Delight at Kinsey’s Kitchen
Hey there, fellow food lovers! I’m Beau Collier, and I’m thrilled to have you join me today at Feastical! If you’re looking to indulge in a delicious summer treat, you’ve come to the right place. Today, we’re diving into the delightful world of roasted apricots—a simple yet spectacular dish that’s sure to become a seasonal favorite in your kitchen. Let’s warm up those ovens and get ready to savor some juicy, caramelized apricots!
Introduction
Roasted apricots have a special place in my heart, and I can’t wait to share with you why. There’s something magical about the way the heat transforms these little fruits, bringing out their natural sweetness and enhancing their flavor. As summer rolls in and the farmers’ markets come alive with vibrant colors, apricots are one of those treasures I always look forward to bringing home.
Imagine walking through a sun-kissed orchard, the sweet scent of ripe fruit wafting in the warm breeze. That’s the essence of summer, isn’t it? And when it comes to using apricots in the kitchen, roasting them turns this already delightful fruit into something spectacular. The roasting process transforms their texture, giving them a tender, caramelized exterior that’s almost like candy. Seriously, it’s like each bite is a warm hug from summer!
Not only are roasted apricots mouthwatering on their own, but they also lend themselves beautifully to various dishes. Whether you’re dressing them up with yogurt for breakfast, slathering them on toast for a sweet snack, or serving them alongside savory meats for a fancy dinner, they genuinely shine in all roles. So grab your apron, and let’s explore this luscious recipe that’s as easy to make as it is to eat. I promise you it’ll be a dish that’ll transport you straight to summer, no matter what season it is!
Personal Story
I remember my very first encounter with roasted apricots like it was yesterday. It was a lovely summer evening, and my good friend Kinsey had invited me over for dinner. As I arrived, the intoxicating aroma wafting from the kitchen made my mouth water. Kinsey is a wizard in the kitchen, and her juicy roasted apricots stole the show that night.
She served them warm on a platter, drizzled with velvety honey and a sprinkle of fresh mint. I was in paradise! The combination of the sweet, soft apricots paired with the honey’s rich flavor and the mint’s refreshing touch was pure magic. It was a simple dish, but it left a lasting impression on me—a reminder of the joy simple ingredients can bring when treated with love. Ever since then, roasted apricots have been a summer staple in my kitchen, and I couldn’t wait to share the recipe with all of you!
Ingredients
Let’s gather our ingredients! Here’s what you’ll need to create these roasted apricots and a couple of handy tips to make sure your dish shines:
-
Fresh Apricots (8-10 pieces)
Look for apricots that are slightly soft to the touch but not too mushy. They should have a beautiful golden hue. If you can’t find fresh apricots, peaches or nectarines are great substitutes as they roast beautifully too. -
Honey (2-3 tablespoons)
Honey adds a natural sweetness that enhances the apricots. Use local honey if you can—it’s a delightful way to support local beekeepers and can have unique flavors based on the blossoms. Maple syrup is a fabulous alternative if you’re looking for something a bit different! -
Fresh Mint Leaves (a handful)
Mint provides a refreshing burst of flavor. Snip the leaves just before serving for maximum brightness. You can also substitute with basil for a more unexpected flavor twist! -
Olive Oil (1 tablespoon)
A light drizzle of olive oil adds a beautiful sheen and prevents the apricots from sticking. If you’re up for it, try using a flavored oil like rosemary or garlic olive oil—it will introduce an exciting complexity. -
Sea Salt (a pinch)
A dash of sea salt helps to balance the sweetness of the honey and apricots. Don’t skip this, even if it seems counterintuitive; a little salt can elevate the dish to another level!
With these ingredients in hand, we’re well on our way to creating a glorious summer dish!
Step-by-Step Instructions
Now that we’ve gathered our ingredients, it’s time to get cooking! These roasted apricots come together quickly, so let’s jump right into it:
-
Preheat Your Oven
Start by preheating your oven to 350°F (175°C). This temperature is perfect for slowly roasting the apricots, allowing their natural sugars to caramelize without burning. If your oven has a convection option, feel free to use it for an even roast! -
Prepare the Apricots
Rinse the apricots under cool water, and then pat them dry gently with a clean kitchen towel. Cut each apricot in half, and carefully remove the pit. Don’t worry if they aren’t perfectly halved—imperfections add character! -
Arrange on a Baking Tray
Take a baking tray lined with parchment paper and arrange the apricot halves cut-side up. Give them a bit of space to breathe; you want them to roast, not steam. Arrange them in a single layer for even cooking. -
Drizzle with Olive Oil and Honey
Drizzle olive oil over the apricot halves, just enough to coat them lightly. Next, drizzle honey generously over the top. If you’re using flavored oils or different sweeteners, sprinkle that on at this stage. The heat will meld the flavors beautifully! -
Sprinkle with Sea Salt
Don’t forget the pinch of sea salt! A little can go a long way in enhancing the overall flavor. Just a bit on each apricot will do. -
Roast Them Up
Pop the tray into your preheated oven and roast for about 20-25 minutes. Keep an eye on them towards the end so they don’t get too dark. You’re looking for a golden, caramelized look. The apricots should be soft but still hold their shape. -
Fresh Mint Magic
Once they’re out of the oven, let them cool for just a couple of minutes. While they’re still warm, sprinkle on the fresh mint leaves. The warmth will release the oil in the mint, bursting with flavor! -
Plate and Serve
To serve, you can arrange them on a cute little platter or even in individual bowls. They are delectable on their own, but also fabulous with a dollop of Greek yogurt or a scoop of vanilla ice cream for that extra indulgence!
Serving Suggestions
When it comes to plating these roasted apricots, think simple but elegant! You can easily serve them in a shallow bowl or on a rustic wooden board for that homemade vibe. Arrange the apricots so they look inviting, with a sprinkle of fresh mint leaves on top for that pop of green!
If you want to dress them up even further, a drizzle of balsamic glaze or a savory blue cheese crumble can elevate your dish in no time—trust me, the flavor contrast is heavenly! Pair them with a nice cheese board for an easy appetizer that’ll wow your guests or serve them alongside grilled meats for a refreshing contrast on your summer dinner table.
Want to bring even more indulgence to the table? Serve alongside a little whipped cream or a scoop of tangy gelato. You’ll be surprised how delightful these warm roasted apricots can be with a cold, creamy companion—just imagine the textures blending together.
Recipe Variations
Now let’s talk about how you can play around with this recipe. The beauty of roasting apricots is that it’s super versatile. Here are some delightful variations you can try:
-
Cinnamon and Cardamom Twist
Add a pinch of ground cinnamon or cardamom to your honey before drizzling for a cozy, spiced flavor that pairs wonderfully with the apricots. -
Nutty Crunch
For a texture contrast, sprinkle some chopped nuts like walnuts or pistachios on the roasted apricots for a delightful crunch. Toasting them beforehand can enhance their flavor! -
Balsamic Reduction
Instead of honey, drizzle with a homemade balsamic reduction for a tangy-sweet contrast that’s perfect over cheese or meats. -
Fruit Fusion
Roasting apricots with other fruits like plums or cherries can work wonders, creating a fruit medley that’s bursting with flavor! -
Vegan Delight
Substitute honey with agave syrup or maple syrup for a completely vegan option without sacrificing that lovely sweetness.
Chef’s Notes
Roasted apricots have been around for a long time, and while the basic concept remains unchanged, I love how versatile this dish is—each time I make it, I add something new! Once, during a camping trip, I roasted them over a campfire with a sprinkle of brown sugar—pure bliss under a starlit sky! It’s funny how simple things can create some of the best memories.
One tip I swear by is to keep an eye on your oven; roasting times can vary based on the ripeness of the fruit and your specific oven type. If you’re keeping an eye on them, you can prevent those lovely fruits from turning into just a tasty dark morsel!
FAQs and Troubleshooting
1. Why are my apricots mushy after roasting?
Overripe apricots can turn mushy when roasted, so be sure to choose fruit that is ripe but still firm to the touch. If they are extremely soft before roasting, they may break apart during cooking.
2. Can I use frozen apricots?
Yes, frozen apricots can be used, but they will release more moisture as they roast, so adjust your cooking time. You might want to reduce the roasting time a bit to avoid them becoming too soggy.
3. How do I know when they’re done?
Look for a deep golden color and soft texture, but they should still hold their shape. If you poke one with a fork, it should give easily.
4. What can I do with leftovers?
Leftover roasted apricots can be stored in the refrigerator for up to three days! They are fantastic added to salads, blended into smoothies, or spooned over oatmeal for breakfast.
Nutritional Info
While apricots are delicious, they’re also packed with nutrients! A serving of roasted apricots (about 2-3 halves) offers:
- Calories: Approximately 60-80 calories (depending on how much honey you use)
- Carbohydrates: 16-20g
- Fiber: 2g
- Sugar: About 12g
- Vitamin A: Essential for eye health
- Vitamin C: Great for your immune system
This dish is not only a treat for the taste buds but also a boost for your health!
Final Thoughts
So there you have it—roasted apricots that will transport your taste buds straight to summer bliss! It’s amazing how such a simple recipe can turn into a highlight of your meal. Whether you enjoy them as a sweet snack, a side dish, or even a breakfast treat, I’m sure these little gems will be a hit in your kitchen.
Remember, cooking is all about infusion—infusing flavors, love, and memories into every dish. I hope you’ll take this recipe for roasted apricots and make it your own. Don’t forget to share your creations with me, and let’s keep spreading the joy of good food together! Happy cooking, my friends!
Print
Roasted Apricots
- Total Time: 35 minutes
- Yield: 4 servings
- Diet: Vegetarian
Description
A simple yet spectacular dish of roasted apricots that enhances their natural sweetness, perfect for summer.
Ingredients
- Fresh Apricots (8-10 pieces)
- Honey (2-3 tablespoons)
- Fresh Mint Leaves (a handful)
- Olive Oil (1 tablespoon)
- Sea Salt (a pinch)
Instructions
- Preheat your oven to 350°F (175°C).
- Rinse the apricots under cool water and pat them dry.
- Cut each apricot in half and remove the pit.
- Arrange apricot halves cut-side up on a baking tray lined with parchment paper.
- Drizzle olive oil and honey over the apricots.
- Sprinkle with a pinch of sea salt.
- Roast in the oven for about 20-25 minutes until golden.
- Cool for a couple of minutes and sprinkle fresh mint leaves before serving.
- Plate and serve with yogurt or ice cream if desired.
Notes
Try using flavored olive oils for an exciting twist. Pair with yogurt or ice cream for a delightful contrast.
- Prep Time: 10 minutes
- Cook Time: 25 minutes
- Category: Dessert
- Method: Roasting
- Cuisine: American
Nutrition
- Serving Size: 1 serving
- Calories: 70
- Sugar: 12g
- Sodium: 5mg
- Fat: 2g
- Saturated Fat: 0g
- Unsaturated Fat: 2g
- Trans Fat: 0g
- Carbohydrates: 16g
- Fiber: 2g
- Protein: 1g
- Cholesterol: 0mg
Keywords: roasted apricots, summer desserts, quick desserts
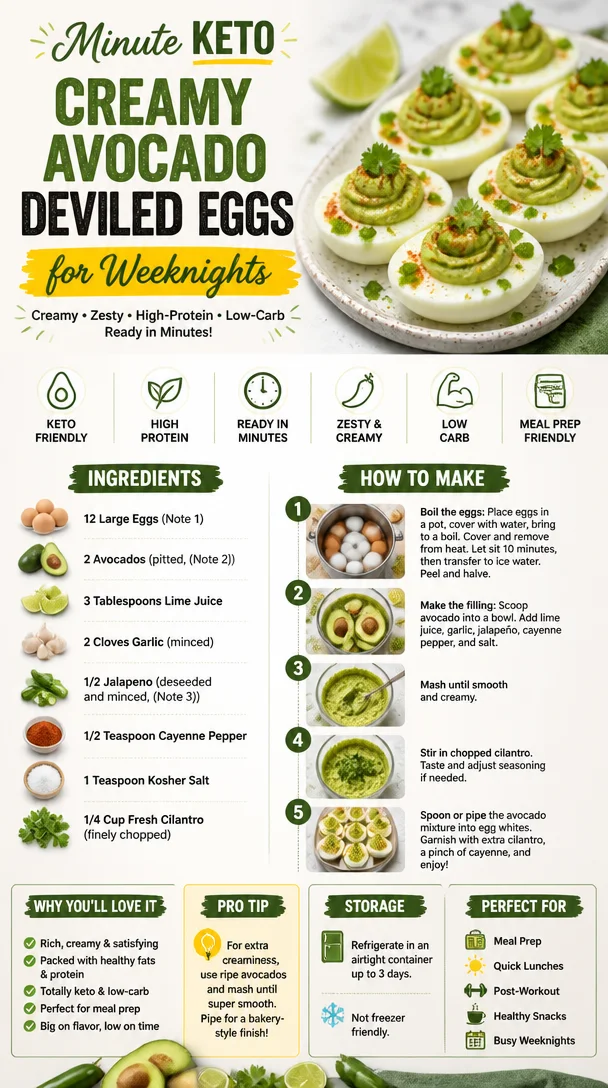
Minute Keto Creamy Avocado Deviled Eggs for Weeknights
Avocado Deviled Eggs: A Twist on a Classic!
Hey there, food lovers! Today, we’re diving into a recipe that’s not only packed full of flavor but also brings a healthy twist to a traditional favorite—Avocado Deviled Eggs! Imagine the creamy, rich texture of avocados blending beautifully with the classic deviled egg filling, all while adding a burst of color and nutrition.
Deviled eggs have long been a staple at gatherings, from potlucks to picnics, but they often find themselves swimming in a sea of mayo. What if I told you that you could whip up a batch that’s just as satisfying, but with the goodness of avocados instead? Trust me, this dish is bound to be a crowd-pleaser! Whether you’re serving these up for a holiday brunch, a summer BBQ, or just a chill weekend snack, they’re simple, fun, and utterly delicious.
Now, let me guide you through making the most scrumptious Avocado Deviled Eggs to impress your friends, family, or even just yourself! With vibrant flavors and a delightful texture, these beauties balance all the elements of a perfect appetizer. So roll up your sleeves and let’s make some magic in the kitchen!
A Delicious Memory
I still recall my first culinary love: deviled eggs at my grandmother’s Sunday brunches. As a kid, I would wiggle my way into the kitchen, eager to help her whip up these little treats. I remember standing on a stool, just tall enough to catch a peek at all the shenanigans in her bustling kitchen. Gran would always let me sprinkle the paprika on top, making me feel like a true chef.
Years later, I wanted to put a personal spin on her family recipe—something fresh that still held the nostalgia of those delightful gatherings. Avocados were my answer! They offered a creamy texture and healthy fats that turned classic deviled eggs into something new and exciting. So, here I am, happy to share this tasty twist with you. You’ll soon find that these avocadeo-packed delights might just become your new go-to recipe!
Ingredients
To create these Avocado Deviled Eggs, you’ll need the following ingredients:
-
12 Large Eggs
The base of our recipe! Use fresh eggs for better flavor and texture. If you need a quick protein boost, you can also opt for hard-boiled quail eggs! -
2 Avocados (pitted)
Creamy and nutritious, avocados provide a vibrant texture. If they’re a bit hard, just give them a day or two to ripen. In a pinch, Greek yogurt could be a healthier alternative! -
3 Tablespoons Lime Juice
This adds a zesty kick to your filling and prevents the avocado from browning. Fresh lime juice is best, but bottled is good too if that’s all you have. -
2 Cloves Garlic (minced)
Garlic brings depth and warmth to the dish. If you’re after something milder, roasted garlic works beautifully too! -
1/2 Jalapeno (deseeded and minced)
A little heat adds excitement! If you’re spice-averse, you can skip this or use a pinch of smoked paprika for a unique twist. -
1/2 Teaspoon Cayenne Pepper
This is optional but recommended for those who like a touch of spiciness. Adjust according to your heat preference! -
1 Teaspoon Kosher Salt
A must for enhancing flavors. Feel free to swap it out with sea salt or leave it out for a low-salt version. -
1/4 Cup Fresh Cilantro (finely chopped)
Adds lovely freshness and color. If cilantro isn’t your thing, swap it with chives or parsley for a different herbal dimension.
Step-by-Step Instructions
Now that we’ve got our ingredients ready, let’s jump into the fun part—making our Avocado Deviled Eggs!
-
Hard-Boil Your Eggs
Place the eggs in a pot and cover them with cold water. Bring the water to a gentle boil over medium heat. Once boiling, cover the pot and remove it from heat. Let the eggs sit for about 12-14 minutes. Transfer the eggs to an ice bath for a quick cool down. Chef Tip: Starting with room-temperature eggs can help minimize cracking! -
Peel Those Eggs
Once cooled, tap each egg gently on a hard surface and roll it to crack the shell. Under cool running water, carefully peel off the shells. Holding them under running water can help make peeling easier. Little hack: Older eggs peel more easily than fresh ones! -
Slice and Scoop
Now, cut each hard-boiled egg in half lengthwise. Scoop out the yolks into a bowl and set the whites aside. Tip: If you slightly angle your knife while cutting, you’ll get cleaner edges! -
Mix It Up
To the bowl with your egg yolks, add the pitted avocados, lime juice, minced garlic, jalapeño, cayenne pepper, and salt. Mash everything together with a fork until well combined and creamy. Chef Hack: A potato masher makes this task even easier! -
Taste Test
Give your mixture a taste! Adjust seasoning with more lime juice, salt, or spices as needed. This is where you get to personalize the flavor. -
Fill Those Whites
Using a spoon or a piping bag, fill each egg white half with the avocado mixture. If you want to be a little fancy, you can use a star tip on your piping bag for a decorative touch! Tip: Overfill a bit for a nice presentation. -
Garnish
Sprinkle the tops with chopped cilantro for that fresh finish and maybe more cayenne pepper if you’re feeling feisty! Serve chilled or at room temperature, and watch them disappear at your next gathering!
Serving Suggestions
These Avocado Deviled Eggs not only look gorgeous on a platter but are also incredibly versatile! I love serving them on a rustic wooden board with colorful veggies, like cherry tomatoes and cucumber slices, for that vibrant pop of color. Drizzle a bit of balsamic reduction around the platter for an upscale touch, and you’ll have a stunning centerpiece for any gathering. Honestly, they make a perfect addition to brunch spreads, appetizer trays, or even as a healthy snack throughout the week.
Recipe Variations
Now, let’s get creative! Here are some fun twists on this classic recipe that you can try out:
-
Bacon Avocado Deviled Eggs
Add crispy bacon bits to your avocado filling for an irresistible smoky flavor. -
Mediterranean Style
Toss in some chopped sun-dried tomatoes and feta cheese for a tangy, Mediterranean flair. -
Sriracha-Lime
Drizzle a bit of Sriracha sauce on top for a spicy kick, and garnish with green onions for added freshness. -
Curried Deviled Eggs
Stir in curry powder for an exotic flavor twist that pairs wonderfully with the creaminess of avocado. -
Smoked Salmon
Incorporate diced smoked salmon into the filling or simply top each egg half with a small piece for a delightful brunch treat.
Chef’s Notes
You know, it’s funny how recipes often evolve over time. When I first started making deviled eggs, I used a ton of mayo until I realized that avocados could ramp up both flavor and texture. The beauty of cooking is experimenting and adjusting to suit your palate. So, don’t be shy! Make this recipe your own. And who knows? You might just find a nostalgic twist that connects you to your cooking roots!
FAQs and Troubleshooting
1. Why are my eggs hard to peel?
Sometimes it’s just about the age of the eggs! Fresh eggs can be harder to peel, so opt for eggs that have been in your fridge for a week or so.
2. Can I make these ahead of time?
Absolutely! You can make them a few hours in advance. Just make sure to cover them with plastic wrap to prevent browning.
3. My filling is too chunky—what should I do?
If your avocado is hard or you’ve added too many chunks, just keep mashing until smooth. A little lime juice and a good fork or masher can fix that!
4. Can I use different herbs?
Of course! Fresh dill or even basil could add a lovely twist. Experimenting with fresh herbs is always a fun way to personalize recipes.
Nutritional Info
Now, let’s talk about the wonderful nutrition in these Avocado Deviled Eggs. They’re a great source of protein from the eggs, with healthy fats from the avocados to keep you satisfied. Each egg is low in carbs, creating a great option for those following a low-carb lifestyle. Not to mention, the jalapeños provide a boost of vitamins C and A, contributing to your daily nutritional needs. While a complete nutrition label can vary based on your specific ingredients and portion sizes, these beauties sure pack a nutritious punch without sacrificing flavor!
Final Thoughts
So there you have it, my friends—Avocado Deviled Eggs that are not only a joy to eat but also a delight to create. I hope this recipe brings you as much joy in the kitchen as it does in my home. Always remember, the art of cooking is about love, creativity, and sharing delicious bites with the people you care about most. I can’t wait to hear how your version turns out! So grab those ingredients and get cooking—let the flavors unfold, and most importantly, let the good times roll. Happy cooking, and see you at the next Feastical feast! 🍽️
Print
Avocado Deviled Eggs
- Total Time: 30 minutes
- Yield: 12 servings 1x
- Diet: Vegetarian
Description
A healthy twist on classic deviled eggs, combining creamy avocado with a zesty filling for a delicious appetizer.
Ingredients
- 12 Large Eggs
- 2 Avocados (pitted)
- 3 Tablespoons Lime Juice
- 2 Cloves Garlic (minced)
- 1/2 Jalapeno (deseeded and minced)
- 1/2 Teaspoon Cayenne Pepper
- 1 Teaspoon Kosher Salt
- 1/4 Cup Fresh Cilantro (finely chopped)
Instructions
- Hard-Boil your eggs: Place the eggs in a pot and cover with cold water. Bring to a gentle boil over medium heat. Cover and remove from heat, letting eggs sit for 12-14 minutes. Transfer to an ice bath to cool.
- Peel those eggs: Once cooled, gently tap each egg on a hard surface to crack the shell and peel under cool running water.
- Slice and scoop: Cut eggs in half lengthwise, scoop yolks into a bowl, and set the whites aside.
- Mix it up: Add avocados, lime juice, minced garlic, jalapeño, cayenne pepper, and salt to yolks. Mash until creamy.
- Taste test: Adjust seasoning with more lime juice, salt, or spices as desired.
- Fill those whites: Use a spoon or piping bag to fill each egg white half with the avocado mixture.
- Garnish: Sprinkle with chopped cilantro and more cayenne if desired. Serve chilled or at room temperature.
Notes
Feel free to experiment with different herbs or add bacon for extra flavor!
- Prep Time: 15 minutes
- Cook Time: 15 minutes
- Category: Appetizer
- Method: Boiling
- Cuisine: American
Nutrition
- Serving Size: 1 egg half
- Calories: 140
- Sugar: 1g
- Sodium: 200mg
- Fat: 10g
- Saturated Fat: 2g
- Unsaturated Fat: 8g
- Trans Fat: 0g
- Carbohydrates: 6g
- Fiber: 2g
- Protein: 6g
- Cholesterol: 160mg
Keywords: deviled eggs, avocado, healthy appetizer, party food, vegetarian
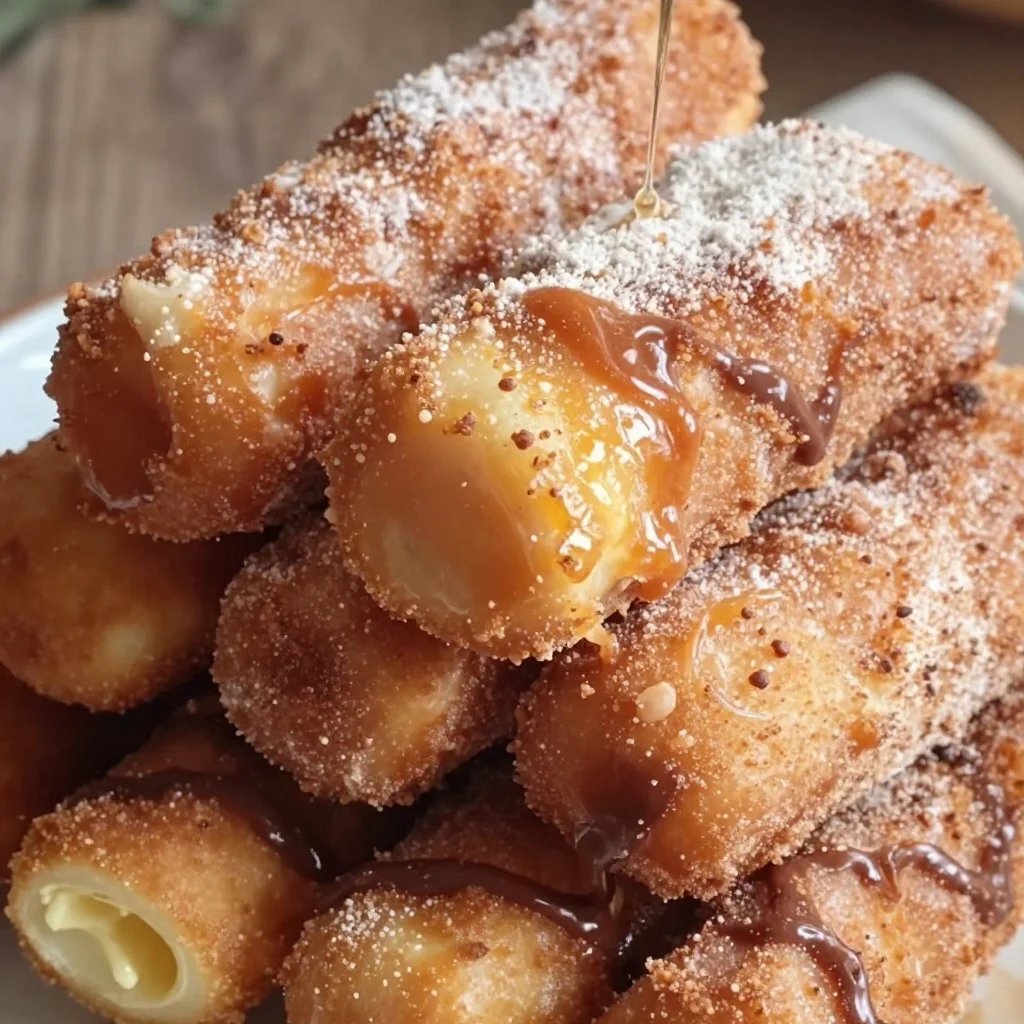
Minute Crispy Air Fryer Donut Sticks: Weeknight Snack
The Sweetest Treat: Crispy Air Fryer Donut Sticks
Hey there, my fellow foodies! It’s Beau Collier, and oh boy, do I have a treat for you today! If you’re ever in the mood for something sweet and delightful, you need to dive into these crispy air fryer donut sticks. Combining the nostalgic vibes of donuts with the ease of air frying, these little gems are crispy on the outside, soft on the inside, and just begging for a dip into chocolate sauce or maple syrup. Who could resist?
Now, let me take you on a little journey into the world of donut sticks. Picture this: weekend mornings buzzing with excitement, the aroma of baked goods wafting through my childhood home. My mom would often whip up a variety of treats, but the star of the show was always her cinnamon-sugar-coated donuts. They weren’t just any donuts; they were the kind that made you feel loved, comforted, and happy. My siblings and I would clamor around the kitchen island, trying to snag the first warm bites straight from the pan.
Fast forward a few years, and here I am, all grown up (well, kind of!). I’ve traded the frying pan for an air fryer, but the love remains the same. With less mess and less guilt, these crispy air fryer donut sticks are my modern spin on that cherished childhood memory. Today, let’s channel that nostalgia and whip up a batch of these beauties together!
Ingredients
Let’s gather our ingredients! Here’s what you’ll need to get started:
-
1 cup all-purpose flour: This is your base. A versatile ingredient, and if you’re looking for a gluten-free option, substitute with a 1:1 gluten-free flour blend!
-
1/4 cup granulated sugar: Sweetness is key! You can reduce the sugar or swap it for coconut sugar for a healthier alternative.
-
1 tsp baking powder: This gives the donut sticks their lift. If you’re out, try 1/3 tsp baking soda mixed with 1/2 tsp vinegar instead.
-
1/4 tsp salt: A pinch of salt enhances sweetness. If using salted butter, you might want to omit this.
-
1/2 tsp ground cinnamon: Cinnamon not only adds flavor but also a cozy warmth to the donuts. Feel free to experiment with nutmeg or cardamom for different flavor notes!
-
1/4 cup milk: Whole milk gives the best creaminess. Almond or oat milk work well too if you’re dairy-free.
-
1/4 cup unsalted butter, melted: Butter makes everything better! You can substitute it with vegetable oil if that’s what you have.
-
1 large egg: The egg helps bind everything together. For a vegan option, use 1/4 cup unsweetened applesauce or a flax egg (1 tbsp ground flaxseed mixed with 2.5 tbsp water).
-
1 tsp vanilla extract: This adds a wonderful flavor depth. If you want to get adventurous, use almond extract for a unique twist.
-
Cooking spray: A quick spritz ensures the donut sticks get that lovely crispy exterior.
-
Chocolate dipping sauce or maple syrup (for serving): The perfect accompaniments! You could even make a strawberry glaze for a fruity touch.
Step-by-Step Instructions
Now that we have our ingredients ready, let’s bring these crispy air fryer donut sticks to life!
-
Preheat Your Air Fryer: Start by preheating your air fryer to 350°F (180°C). This ensures even cooking and that lovely golden exterior.
-
Mix Dry Ingredients: In a large mixing bowl, whisk together the all-purpose flour, sugar, baking powder, salt, and cinnamon until they’re well combined. This step is crucial because it ensures that the baking powder is evenly distributed, leading to perfect rising.
-
Combine Wet Ingredients: In a separate bowl, whisk together the milk, melted butter, egg, and vanilla extract. Make sure the butter isn’t too hot, or it will scramble the egg — no one wants that!
-
Mix Wet and Dry: Pour the wet ingredients into the bowl with the dry ingredients. Gently fold the mixture until just combined. Don’t over-mix; a few lumps are okay. This keeps your donut sticks light and fluffy.
-
Shape the Dough: Lightly flour a clean countertop and turn your dough out onto it. Pat it into a rectangle about 1-inch thick. This is where the shaping begins! Use a sharp knife or pizza cutter to slice the dough into strips, about 1 inch wide and 4 inches long.
-
Prepare for Frying: Spray the air fryer basket with cooking spray and carefully arrange the donut sticks in a single layer, making sure not to overcrowd them. You may need to do this in batches.
-
Air Fry: Cook the donut sticks for about 5–6 minutes, flipping them halfway through. Keep an eye on them—they should be golden brown and crispy. Add an extra minute or two if needed!
-
Coat with Cinnamon Sugar: While they are still warm, toss the donut sticks in a mixture of sugar and cinnamon (around 1/4 cup sugar and 1 tsp cinnamon combined). This is the icing on the cake… erm, donut stick!
-
Serve and Enjoy: Grab that chocolate dipping sauce or maple syrup, and get ready to indulge!
Serving Suggestions
When it comes to serving your crispy air fryer donut sticks, presentation is everything! Arrange them in a cozy little stack on a rustic wooden platter, maybe sprinkle a little extra cinnamon sugar on top for that extra touch.
For a fun twist, serve them with individual dipping cups of chocolate sauce, maple syrup, or even a berry compote to dip in. If you’re feeling adventurous, pair them with a scoop of vanilla ice cream for a delicious dessert explosion. Trust me, your friends and family will be raving about it!
Recipe Variations
Ready to mix things up? Here are a few creative twists to elevate your donut sticks:
-
Chocolate Glazed: Dip your cooked donut sticks in melted dark or milk chocolate and top with sprinkles for a festive look.
-
Maple Pecan: Stir finely chopped pecans into the cinnamon sugar for a delightful crunch and flavor boost.
-
Coconut Delight: Toss the warm sticks in shredded coconut after frying for a tropical vibe, perfect for summer!
-
Pumpkin Spice: Add 1/4 cup of pumpkin puree and increase the spice mixture (cinnamon, nutmeg, and a touch of allspice) for a fall-inspired treat.
-
Savory Twist: Instead of sweet, add herbs like rosemary or thyme to the dough for a unique savory version. Serve with a garlic aioli for dipping!
Chef’s Notes
These crispy air fryer donut sticks have a special place in my heart. I started crafting them during my quest to create healthier versions of beloved comfort foods. The air fryer was a game-changer, allowing me to indulge in treats without the heaviness of traditional frying. Over the years, I’ve played around with flavors, and each iteration brings back those warm childhood vibes.
Oh, and here’s a little kitchen story for you: One time, I got so excited about making these that I accidentally dumped an entire bottle of cinnamon into the dough. Let’s just say, it was a very spicy adventure! Now, I always double-check my ingredient quantities before diving in.
FAQs and Troubleshooting
-
Why are my donut sticks not crispy?
- Make sure your air fryer is preheated and don’t overcrowd the basket. This way, hot air can circulate properly to create that perfect crisp!
-
Can I use whole wheat flour?
- Yes! You can substitute up to half of the all-purpose flour with whole wheat flour for a nuttier flavor. The texture may be a bit denser, but it will still be delicious.
-
My dough is too sticky; what should I do?
- If your dough is too sticky, add a little more flour, a tablespoon at a time, until it’s manageable. Just be careful not to overwork it.
-
How do I store leftover donut sticks?
- Allow them to cool completely, then store them in an airtight container at room temperature for up to two days. You can reheat them in the air fryer for a minute or two to regain that crispiness.
Nutritional Info
While everyone’s dietary needs are different, here’s a general idea of the nutritional content for one serving (assuming 4 servings total):
- Calories: 250
- Protein: 4g
- Fat: 10g
- Carbohydrates: 38g
- Sugars: 8g
As with any recipe, feel free to adjust based on substitutions or portion sizes!
Final Thoughts
There you have it, a delightful recipe for crispy air fryer donut sticks that are sure to bring smiles to your kitchen! They’re fun to make, versatile, and perfect for sharing with loved ones. Whether you’re enjoying them on a cozy weekend morning or celebrating a special occasion, these donut sticks are bound to create memories.
So gather your ingredients, put on your favorite apron, and channel your inner pastry chef! Remember, cooking is all about love, creativity, and a splash of joy. Thank you for visiting Feastical – I can’t wait to hear about your donut stick adventures! Happy cooking! 🍩✨
Print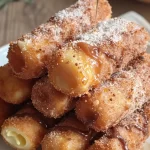
Crispy Air Fryer Donut Sticks
- Total Time: 21 minutes
- Yield: 4 servings 1x
- Diet: Vegetarian
Description
Delicious crispy air fryer donut sticks that are perfect for a sweet treat with dipping sauces.
Ingredients
- 1 cup all-purpose flour
- 1/4 cup granulated sugar
- 1 tsp baking powder
- 1/4 tsp salt
- 1/2 tsp ground cinnamon
- 1/4 cup milk
- 1/4 cup unsalted butter, melted
- 1 large egg
- 1 tsp vanilla extract
- Cooking spray
- Chocolate dipping sauce or maple syrup (for serving)
Instructions
- Preheat your air fryer to 350°F (180°C).
- Mix dry ingredients: In a bowl, whisk flour, sugar, baking powder, salt, and cinnamon.
- Combine wet ingredients: In another bowl, whisk milk, melted butter, egg, and vanilla extract.
- Mix wet and dry ingredients together gently.
- Shape the dough into a rectangle about 1-inch thick and slice into strips.
- Prepare the air fryer basket with cooking spray and arrange the donut sticks.
- Air Fry for 5-6 minutes, flipping halfway through.
- Coat with cinnamon sugar while warm.
- Serve with chocolate dipping sauce or maple syrup.
Notes
For healthier options, substitute ingredients as suggested. Serve with various dipping sauces for a fun treat.
- Prep Time: 15 minutes
- Cook Time: 6 minutes
- Category: Dessert
- Method: Air Frying
- Cuisine: American
Nutrition
- Serving Size: 1 serving
- Calories: 250
- Sugar: 8g
- Sodium: 150mg
- Fat: 10g
- Saturated Fat: 5g
- Unsaturated Fat: 5g
- Trans Fat: 0g
- Carbohydrates: 38g
- Fiber: 1g
- Protein: 4g
- Cholesterol: 30mg
Keywords: air fryer, donuts, dessert, sweet treat, easy recipe, baking

No-Bake Cookie Dough Bites: Fast, Creamy Dessert in Minutes
Indulgent No-Bake Cookie Dough Bites Recipe: Easy Dessert Bliss
Hey there, fellow food lovers! If you’re anything like me, the mere thought of cookie dough can make your heart race with excitement. There’s just something so delightful about that creamy, slightly sweet dough that brings us back to our childhood days of sneaking spoonfuls straight from the mixing bowl. Today, I’m so thrilled to share a recipe that combines that nostalgic joy with the grown-up bliss of indulgent treats: No-Bake Cookie Dough Bites. Trust me, these are as easy to whip up as they are to devour!
A Little Taste of Nostalgia
You know, I can’t help but smile when I think back to my childhood kitchen adventures with my mom. Every Saturday, we’d bake chocolate chip cookies, and like clockwork, I’d sneakily scoop up a spoonful of cookie dough when she wasn’t looking. I remember her chuckling and shaking her head, reminding me that raw flour and eggs weren’t exactly the healthiest choice, but that never stopped me from indulging in a little cookie dough heaven!
Fast forward a few years, and I found myself in a bit of a dilemma. I still craved that incredible taste of cookie dough but wanted something safe to snack on. Enter my No-Bake Cookie Dough Bites! They are perfect for satisfying your sweet tooth without any of the risks of traditional cookie dough—no eggs and heat-treated flour make this treat a total win! Plus, they’re easy to customize, allowing you to experiment with flavors and fillings. Let’s get rolling!
Ingredients
Here’s a quick rundown of the ingredients for these heavenly No-Bake Cookie Dough Bites:
-
1 stick Unsalted Butter (Softened)
The star ingredient! Butter adds a rich flavor and smooth texture. If you want to keep it vegan, feel free to swap in dairy-free butter. -
1/2 cup Light Brown Sugar
This brings the perfect sweetness and caramel-like depth to your bites. If you prefer not to use brown sugar, coconut sugar is a great alternative! -
2 tablespoons Milk
Just a splash for moisture! Use any milk you like—almond, soy, or oat milk work brilliantly for a dairy-free version. -
1 teaspoon Vanilla Extract
A must for that warm, comforting flavor! Homemade vanilla extract is easy to make and super tasty if you’re feeling adventurous. -
1 cup All-Purpose Flour (Must be heat-treated)
Heat-treating eliminates any potential pathogens in flour, making it safe to eat raw. You can also use gluten-free flour if needed! -
1/4 teaspoon Salt
A pinch of salt intensifies the sweetness and balances out all the flavors. Trust me, it’s a crucial step! -
1/2 cup Mini Chocolate Chips
Because who can resist more chocolate? Mini chips meld perfectly into the dough and give those delightful bites a perfect pop! -
1 cup Semisweet or Milk Chocolate
This is for coating the cookie dough bites. Use whichever chocolate suits your taste buds—dark chocolate would be divine too! -
1 tablespoon Coconut Oil or Vegetable Oil (Optional)
If you want a smoother chocolate coating, adding a bit of oil can help thin it out. Coconut oil lends a subtle flavor and sheen, making everything look extra gourmet!
Step-by-Step Instructions
Alright, my foodie friends, let’s get down to the fun part—making these delightful bites! Follow me as we craft these little pieces of cookie dough bliss.
-
Prep Your Kitchen: First thing’s first, we’ll want to make sure our kitchen is ready for action. Grab a mixing bowl, a spatula, and a baking sheet lined with parchment paper. The parchment makes clean-up so much easier!
-
Cream the Butter and Sugar: In your mixing bowl, combine the softened unsalted butter and brown sugar. Use your spatula or an electric mixer to beat them together until it’s creamy and smooth—about 2-3 minutes. Tip: The softer your butter, the easier this will be, so let it sit out for a bit before starting.
-
Add Milk and Vanilla: Pour in the milk and vanilla extract, and mix it all together until combined. If you like your dough on the sweeter side, you can always taste and adjust with a little more vanilla!
-
Mix in the Flour and Salt: Now for the magic! Gradually add in your heat-treated flour and the salt. I like to do this a little at a time, mixing as I go to avoid a flour explosion! Your mixture should come together into a lovely, thick dough.
-
Fold in the Chocolate Chips: Grab your mini chocolate chips and fold them into the dough using a spatula. You want to have an even distribution so every bite has those chocolatey bits we all love!
-
Form the Bites: Once your dough is ready, it’s time to form them into bites. Use your hands to roll out about 1-inch balls and place them on your prepared baking sheet. I find it helps to slightly dampen my hands, making the rolling process easier and less sticky!
-
Chill Out: Pop those cookie dough balls in the fridge for about 30 minutes. This will help them firm up and be less likely to fall apart when coating them in chocolate.
-
Melt the Chocolate: While they’re chilling, melt your semisweet or milk chocolate. You can do this in the microwave in 30-second intervals, stirring after each session until it’s completely smooth. If using, mix in the coconut oil for that ultra-smooth coating.
-
Coat the Dough Bites: Once your cookie dough bites are chilled, it’s time for the fun part! Dip each ball into the melted chocolate, making sure it’s fully coated. Return to the parchment-lined sheet afterward.
-
Set Them Up: Once all your bites are coated, pop them back into the fridge for another 15-20 minutes until the chocolate hardens. Then, it’s finally time to enjoy your incredible creation!
Serving Suggestions
Now that you’ve made these sensational No-Bake Cookie Dough Bites, here are a few fun ways to serve them up:
-
On a Dessert Platter: Arrange them on a pretty serving tray and dust with a sprinkle of sea salt for an extra touch of flair. They’ll shine bright among your favorite desserts!
-
Coffee Companion: Pair your bites with a cup of coffee or hot cocoa for the ultimate cozy treat. The chocolatey goodness complements that warm beverage perfectly!
-
Gift Them: Pack these bites into a mason jar tied with a ribbon for a sweet gift. They make great presents for friends, family, or anyone with a sweet tooth!
Recipe Variations
Love to mix things up? Here are some fun variations and twists you can try with your No-Bake Cookie Dough Bites:
-
Peanut Butter Lovers: Add ¼ cup of creamy peanut butter to your dough mixture for a delicious nutty flavor. You can also roll them in crushed peanuts for an added crunch!
-
Add Some Crunch: Mix in ¼ cup of chopped nuts, like walnuts, pecans, or almonds, to add a delightful texture to your cookie dough bites.
-
Spiced Up Dough: Looking for something a little different? Add a pinch of cinnamon or a sprinkle of nutmeg to the butter-sugar mix. It gives your bites a warm, cozy flavor that’s perfect for fall!
-
Nut-Free Version: If you want these bites to be nut-free, swap any nut products for sunflower seed butter, and be sure your chocolate chips are nut-free as well!
-
S’mores Style: Mix in mini marshmallows and crushed graham crackers, and use a blend of milk chocolate. A fun twist that’ll take you back to campfire nights!
Chef’s Notes
Ah, the journey of recipe creation is always full of delightful surprises! I’ve played around with this cookie dough bites recipe a ton over the years. From adding different mix-ins to experimenting with various chocolate coats, each trial has brought me closer to the perfect bite. One of my favorite iterations was adding a layer of crushed Oreos into the dough—it was a total game-changer!
Every aspiring chef has their mishaps in the kitchen, and trust me, I’ve had my fair share! The time I tried melting chocolate with butter on the stovetop led to a delightful disaster of burnt chocolate. Lesson learned: always use low heat, or better yet, melt in the microwave for a safer option!
FAQs and Troubleshooting
-
Can I use regular flour instead of heat-treated?
Nope! Use heat-treated flour to ensure it’s safe to eat raw. You can find it pre-heat-treated or easily make your own by baking it in a preheated oven at 350°F for about 5-7 minutes. -
Why did my dough come out crumbly?
If your dough is too crumbly, it might be due to too much flour. Next time, reduce the flour slightly or add a splash more milk to bring it all together. -
How do I store these bites?
Store in an airtight container in the fridge for up to a week. If you find you have extras, you can freeze them for longer storage. Just thaw them in the fridge when you’re ready to indulge! -
Can I sub the chocolate?
Absolutely! You can use white chocolate, dark chocolate, or even carob chips if you’re looking for a healthier option. Just keep the ratios consistent!
Nutritional Info
While I always recommend indulging in moderation, here’s a rough estimate of the nutritional value per No-Bake Cookie Dough Bite (assuming you make around 20 bites total):
- Calories: Approximately 120
- Fat: 7g
- Carbohydrates: 12g
- Sugar: 8g
- Protein: 1g
Feel free to make swaps or adjustments depending on dietary preferences, like using dairy-free options or different sweeteners, to make your bites fit your nutritional needs!
Final Thoughts
Creating these No-Bake Cookie Dough Bites is not just about satisfying that sweet tooth; it’s about reliving those cherished moments from my kitchen while creating new ones with you. This fun recipe invites you to take your first step into the world of no-bake desserts and embrace the joys of improvisation in the kitchen.
Gather your loved ones, roll up those sleeves, and whip up these delicious bites that practically scream comfort! Whether it’s an afternoon snack, a party treat, or a late-night indulgence, you won’t be able to resist their charm. Now, let’s give yourself a hearty hug in the form of indulgent bites and keep spreading the love through feel-good food, one bite at a time! Happy cooking!
Print
No-Bake Cookie Dough Bites
- Total Time: 45 minutes
- Yield: 20 bites 1x
- Diet: Vegetarian
Description
Indulge in these delightful No-Bake Cookie Dough Bites, combining the nostalgic taste of cookie dough with a safe twist—no eggs and heat-treated flour!
Ingredients
- 1 stick Unsalted Butter (Softened)
- 1/2 cup Light Brown Sugar
- 2 tablespoons Milk
- 1 teaspoon Vanilla Extract
- 1 cup All-Purpose Flour (Must be heat-treated)
- 1/4 teaspoon Salt
- 1/2 cup Mini Chocolate Chips
- 1 cup Semisweet or Milk Chocolate (for coating)
- 1 tablespoon Coconut Oil or Vegetable Oil (Optional)
Instructions
- Prep Your Kitchen: Prepare your mixing bowl, spatula, and a baking sheet lined with parchment paper.
- Cream the Butter and Sugar: In a mixing bowl, combine softened unsalted butter and brown sugar and beat until creamy—about 2-3 minutes.
- Add Milk and Vanilla: Mix in the milk and vanilla until combined.
- Mix in the Flour and Salt: Gradually add heat-treated flour and salt, mixing until a thick dough forms.
- Fold in the Chocolate Chips: Incorporate mini chocolate chips into the dough for even distribution.
- Form the Bites: Roll out 1-inch balls and place them on the prepared baking sheet.
- Chill Out: Refrigerate the cookie dough balls for about 30 minutes.
- Melt the Chocolate: Melt semisweet or milk chocolate in the microwave until smooth, adding coconut oil if desired.
- Coat the Dough Bites: Dip each ball into melted chocolate, ensuring it’s fully coated, and return to the lined sheet.
- Set Them Up: Chill again for 15-20 minutes until the chocolate hardens.
Notes
Store in an airtight container in the fridge for up to a week. Optional variations include adding peanut butter or nuts.
- Prep Time: 15 minutes
- Cook Time: 0 minutes
- Category: Dessert
- Method: No-Bake
- Cuisine: American
Nutrition
- Serving Size: 1 bite
- Calories: 120
- Sugar: 8g
- Sodium: 50mg
- Fat: 7g
- Saturated Fat: 4g
- Unsaturated Fat: 3g
- Trans Fat: 0g
- Carbohydrates: 12g
- Fiber: 0g
- Protein: 1g
- Cholesterol: 30mg
Keywords: cookie dough, no-bake dessert, easy treat, snack, indulgent, sweet bites
Crispy Garlic Cheese Ritz Bits: 15-Minute Weeknight Snack Hack
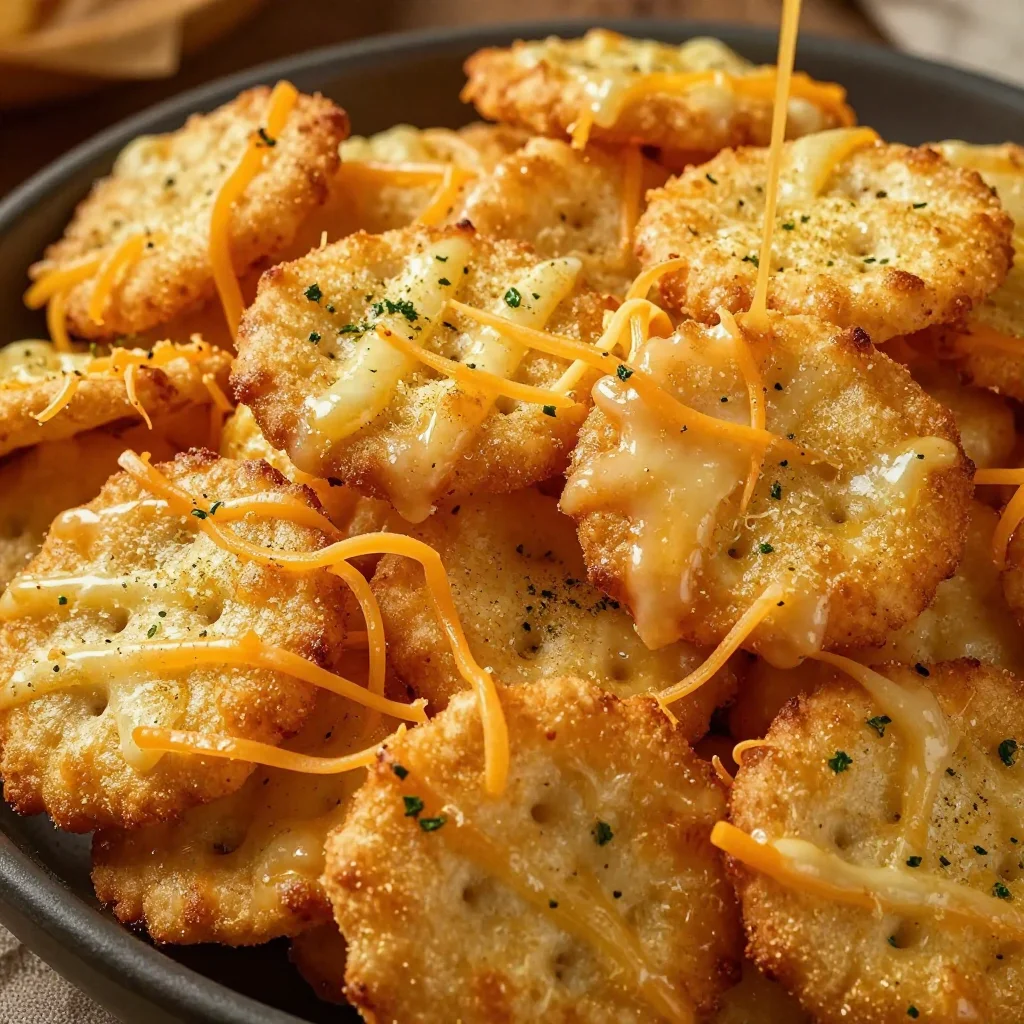
Cheesy Garlic Ritz Bits Snacks: A Culinary Hug for Your Taste Buds
Hey food lovers! It’s Beau Collier here, and today, I want to share with you a recipe that’s near and dear to my heart—Cheesy Garlic Ritz Bits Snacks. If you’re anything like me, there’s just something about tiny, crunchy snacks that come together effortlessly and pack a flavor punch. These cheesy, garlicky little bites not only make perfect party pleasers but also are fantastic for those cozy movie nights at home.
You might wonder why Ritz Bits? Let me tell you, they’re like little edible treasures. These bite-sized crackers are light, buttery, and, quite frankly, irresistible. The moment you pop that golden cracker in your mouth, it’s a mini explosion of comfort that brings back fond memories. Then, when you amp them up with cheese and garlic—oh boy—it’s a whole new level of deliciousness.
My First Kitchen Adventure with Ritz Bits
Let’s rewind to my childhood for a sec. I remember weekends at my grandmother’s house, and that meant something special was always cooking. She had these secret snacks—her “kitchen surprises”—that she would whip up like magic. One day, she decided to experiment with those classic Ritz Crackers, and let me tell you, it was a game-changer. As a kid, I was mesmerized watching her melt butter, sprinkle garlic powder, and introduce the cheesy goodness.
We would sit cross-legged on the floor, munching on these tasty bites while watching our favorite cartoons. The shared moments, full of laughter and crumbs, created an eternal bond between food and family for me. This recipe is my ode to those days—combining nostalgia with a touch of culinary creativity. Let’s dive into making these crunchy delights!
Ingredients
Here’s what you’ll need to create these Cheesy Garlic Ritz Bits Snacks:
-
1 box (12.5 oz) Ritz Bits Crackers, Original
- Perfectly bite-sized and buttery, these crackers are the foundation of our snack!
-
1/2 cup (1 stick) Unsalted Butter, melted
- Adds a rich flavor and helps everything stick together. You can swap this out for olive oil or a vegan butter alternative if you want to make it dairy-free.
-
2 tbsp Garlic Powder
- Because who doesn’t love garlic? If you’re feeling adventurous, feel free to use fresh minced garlic—1 clove gives you that vibrant flavor kick.
-
1 tbsp Onion Powder
- This adds depth to your snack. If you have fresh onions on hand, finely diced shallots can be an awesome substitute for a zestier version.
-
1 tsp Dried Parsley Flakes
- A pop of color and mild flavor. If you have fresh parsley lying around, use it! About a tablespoon of chopped fresh parsley will do the trick.
-
1/2 tsp Fine Sea Salt
- Enhances all the flavors. If you’re watching your salt intake, feel free to reduce this amount a tad.
-
1/4 tsp Freshly Ground Black Pepper
- Just a pinch gives a warm, peppery finish. Adjust according to your spice tolerance!
-
1/2 cup Finely Grated Parmesan Cheese
- Adds that irresistible cheesy flavor we all love. For a twist, try using Pecorino Romano for a more robust taste.
-
1/2 cup Finely Shredded Sharp Cheddar Cheese
- The sharpness of this cheese complements the richness perfectly. Feel free to use your favorite cheese or a blend of cheeses—it’s all good!
-
1/4 tsp Smoked Paprika (optional)
- For some added depth and smokiness. If you don’t have it, no worries—it’s fantastic either way.
-
Pinch Cayenne Pepper (optional)
- For those who like a little heat! A pinch adds excitement without overwhelming the flavor.
Step-by-Step Instructions
Alright, let’s get cooking! Here’s how to make your Cheesy Garlic Ritz Bits Snacks step by step:
-
Preheat Your Oven
Preheat your oven to 350°F (175°C). This will ensure that your snacks bake evenly and get to that perfect crispy state. -
Melt the Butter
In a small saucepan, melt the stick of unsalted butter over low heat. It’s not just about melting; stir it gently to prevent it from browning. As it melts, your kitchen will smell heavenly, and you’ll want to gobble it all up! -
Mix in the Spices
Once your butter is melted, take it off the heat. In a large bowl, combine the melted butter, garlic powder, onion powder, dried parsley, sea salt, black pepper, smoked paprika, and cayenne pepper if you’re using it. Just whisk it for about 30 seconds until it’s all combined, creating a luscious, fragrant marinade for our crackers. -
Add the Cheeses
Next, fold in the grated Parmesan and shredded cheddar cheese. The mixture will start to clump together, and that’s exactly what we want! This cheesy goodness is going to coat our Ritz Bits to perfection. -
Coat the Ritz Crackers
Now comes the fun part—gently add the Ritz Bits Crackers to the bowl. With a spatula or your hands, carefully toss the crackers in the buttery, cheesy mixture until every piece is beautifully coated. (And yes, it’s totally okay to sneak a taste; I won’t tell anyone!) -
Spread on a Baking Sheet
Line a baking sheet with parchment paper to prevent sticking. Spread the coated crackers out in a single layer. Make sure they aren’t overlapping too much; we want even baking! -
Bake to Golden Perfection
Pop them in the preheated oven and bake for 10-12 minutes, or until they turn a lovely golden brown. The smell in your kitchen will be absolutely irresistible, and you might find it hard to wait! -
Cool and Serve
Remove from the oven and let them cool on the baking sheet for a few minutes before serving. This helps them crisp up even more!
Now that you’ve made your Cheesy Garlic Ritz Bits Snacks, it’s time to enjoy the fruits of your labor!
Serving Suggestions
When it comes to serving your Cheesy Garlic Ritz Bits, the world is your oyster—or should I say, your cracker! Here’s how I love to plate them:
-
Classic Snack Bowl
Serve them warm in a beautiful bowl or dish. Let your guests dive in, either with their hands or with toothpicks, adding a touch of playful elegance. -
Pair with Dips
These snacks are fabulous on their own, but they shine even brighter alongside dips. Try a tangy ranch dressing or a warm, cheesy dip for that extra wow factor. -
Garnish with Fresh Herbs
Add a sprinkle of fresh parsley or chives on top right before serving for a pop of color and flavor. It adds a touch of gourmet flair that will impress your friends and family!
Recipe Variations
Now, let’s get creative! Here are some fun twists you can try with these Cheesy Garlic Ritz Bits Snacks:
-
Spicy Jalapeño: Mix in some finely chopped jalapeños for a spicy kick. You can also use pepper jack cheese for an extra cheesy heat.
-
Herb-Infused: Experiment with different herbs! Use fresh thyme or rosemary for a fragrant twist.
-
Italian Style: Add some Italian seasoning blend to the mix and swap out Parmesan for mozzarella for a pizza-flavored snack.
-
Sweet and Savory: Drizzle with honey after baking for a unique sweet-and-savory combo. You won’t regret it!
-
Buffalo Flavor: Toss in some buffalo sauce for a tangy, spicy zing, and pair with ranch for dipping.
Chef’s Notes
This recipe has seen a bit of evolution over time. Originally, I stumbled upon it during a potluck, where a friend brought a simple garlic cracker mix. I knew I could jazz it up with cheese and spices, turning it into something special. It’s become a go-to for me; be it a casual game night or a fancy gathering, it never disappoints!
And let me share a quick kitchen story—once, while trying to impress friends, I accidentally overbaked them. Instead of turning sad and mushy, they turned into the crispiest, cheesiest bites ever! Let’s just say, sometimes mistakes lead to delightful surprises, so keep experimenting!
FAQs and Troubleshooting
Here are some common questions I get about making these cheesy snacks:
-
Can I make these ahead of time?
Absolutely! You can prepare and coat the crackers, then store them in an airtight container in the fridge. To serve, just bake before the gathering! -
What do I do if they burn?
Baking speed varies by oven. If you see them browning quickly, turn your oven down to 325°F and check them frequently. Remember, they’ll continue to cook a little after coming out. -
Can I use other crackers?
Of course! Feel free to experiment with other types of crackers—just keep in mind the flavors might change slightly. -
How do I store leftovers?
Keep any leftovers in an airtight container at room temperature for a few days. They won’t last long—we can’t resist them too much, right?
Nutritional Info
For those keeping an eye on nutritional content, here’s a rough estimate per serving (based on 24 servings):
- Calories: 130
- Total Fat: 8g (Saturated Fat: 4g)
- Cholesterol: 20mg
- Sodium: 180mg
- Total Carbohydrates: 10g (Dietary Fiber: 0g, Sugars: 1g)
- Protein: 2g
Feel free to adjust the ingredients based on your dietary needs!
Final Thoughts
There you have it, my fabulous foodie friends—Cheesy Garlic Ritz Bits Snacks that are sure to become a staple in your kitchen. From family gatherings to cozy nights in, these bites bring joy and flavor to any occasion.
Remember, cooking is all about joy, exploration, and comfort—just like these snacks. So grab your ingredients, channel your inner chef, and get ready for your kitchen to smell like a warming hug of garlic and cheese.
Until next time, keep experimenting, keep enjoying, and most importantly—keep sharing good food with the people you love. Cheers to happy cooking!
Print
Cheesy Garlic Ritz Bits Snacks
- Total Time: 22 minutes
- Yield: 24 servings 1x
- Diet: Vegetarian
Description
Delicious, bite-sized cheesy and garlicky Ritz Bits that are perfect for parties or cozy movie nights.
Ingredients
- 1 box (12.5 oz) Ritz Bits Crackers, Original
- 1/2 cup (1 stick) Unsalted Butter, melted
- 2 tbsp Garlic Powder
- 1 tbsp Onion Powder
- 1 tsp Dried Parsley Flakes
- 1/2 tsp Fine Sea Salt
- 1/4 tsp Freshly Ground Black Pepper
- 1/2 cup Finely Grated Parmesan Cheese
- 1/2 cup Finely Shredded Sharp Cheddar Cheese
- 1/4 tsp Smoked Paprika (optional)
- Pinch Cayenne Pepper (optional)
Instructions
- Preheat your oven to 350°F (175°C).
- Melt the stick of unsalted butter over low heat in a small saucepan.
- Mix butter with garlic powder, onion powder, dried parsley, sea salt, black pepper, smoked paprika, and cayenne in a large bowl.
- Add the grated Parmesan and shredded cheddar cheese to the bowl and fold gently.
- Coat the Ritz Bits Crackers in the cheesy mixture with a spatula or your hands.
- Spread the coated crackers on a parchment-lined baking sheet in a single layer.
- Bake for 10-12 minutes, until golden brown.
- Cool on the baking sheet before serving.
Notes
You can substitute the butter with olive oil or vegan butter for a dairy-free version. To add heat, mix in chopped jalapeños or use pepper jack cheese.
- Prep Time: 10 minutes
- Cook Time: 12 minutes
- Category: Snack
- Method: Baking
- Cuisine: American
Nutrition
- Serving Size: 1 serving
- Calories: 130
- Sugar: 1g
- Sodium: 180mg
- Fat: 8g
- Saturated Fat: 4g
- Unsaturated Fat: 4g
- Trans Fat: 0g
- Carbohydrates: 10g
- Fiber: 0g
- Protein: 2g
- Cholesterol: 20mg
Keywords: Ritz snacks, cheesy snacks, garlic bites, party appetizers

Tuna Lettuce Wraps
Tuna Lettuce Wraps: A Fresh and Flavorful Delight
Introduction:
Hey there, food lovers! It’s your pal Beau Collier from Feastical, and today we’re diving into something that’s not only delicious but also fresh and breezy—Tuna Lettuce Wraps! If you’re anything like me, you love a meal that feels light yet filling, and these wraps are just the ticket.
Imagine sinking your teeth into crisp, refreshing lettuce filled with savory, perfectly seasoned tuna—sounds inviting, right? Whether you need a quick lunch, a fancy appetizer for your next gathering, or a healthy snack, these delightful wraps have got your back. Plus, they’re oh-so-simple to whip up, making them a perfect fit for anyone, from the seasoned chef to those still searching for their spatula. So, grab your butter lettuce or Bibb lettuce, and let’s get cooking!
I remember the first time I stumbled upon the idea of lettuce wraps. I was spending a lazy summer afternoon at my quirky Aunt Louisa’s house. She was the queen of inventive snacks, and that day she had a platter of tuna lettuce wraps, just waiting to spark joy. As I took my first bite, the crunch of the lettuce contrasted beautifully with the creamy tuna filling. It was a match made in heaven!
Since then, I’ve made my own versions of these wonderful wraps, each time adding a personal touch. Trust me, you’ll not only enjoy making them but also sharing them. So, let’s roll up our sleeves and create a dish that’s filled with culinary love, good vibes, and a sprinkle of creativity!
Personal Story:
Ah, memories in the kitchen! One of my fondest moments was when my daughter, little Sophie, decided to help me make these Tuna Lettuce Wraps for her first-ever picnic with friends. She was about seven, armed with a chef’s hat that was three sizes too big and an adventurous spirit that could conquer the world.
We pulled out the ingredients and got to work. I showed her how to open the canned tuna, and she giddily squished the contents into a mixing bowl. Together, we diced the celery and red onion while giggling and sharing stories of adventures from her kindergarten class.
Lettuce wraps became a tradition for our summer picnics, and from that day, Sophie became my little sous-chef. It made my heart swell to see her enthusiasm for cooking and eating healthy. We’d fill those greens with her favorite tuna mixture, decorating each one with bright sprigs of parsley. They became our signature treat!
As time passed and Sophie grew, so did our wrap-making skills. Those cherished moments in the kitchen not only turned out delicious food but also fostered a love for cooking that she carries with her today. It’s funny how something as simple as a tuna salad can become a heartwarming memory, isn’t it?
Ingredients:
Here’s what you’ll need to create your delectable Tuna Lettuce Wraps:
-
Butter Lettuce or Bibb Lettuce: 1 head (or about 8-10 leaves)
- Chef Insight: These leafy greens are sturdy enough to hold your filling, yet soft enough to deliver that refreshing crunch. The leaves are cupped, making them perfect little boats for our delicious tuna mixture!
-
Canned Albacore Tuna: 10 oz (2 5oz cans)
- Substitution Tip: If you’re feeling adventurous, swap from albacore to yellowfin or even canned salmon for a twist on the classic flavor.
-
Mayonnaise: 1/3 cup
- Chef Insight: This adds creaminess to the mixture. For a lighter option, try Greek yogurt or a vegan mayo if you’re keeping it plant-based.
-
Finely Diced Celery: 2 tbsp
- Substitution Tip: This gives a delightful crunch! Feel free to add diced bell peppers or cucumbers for an extra refreshing bite.
-
Finely Diced Red Onion: 2 tbsp (rinsed in cold water)
- Why Rinse?: Rinsing the onions helps tone down their sharpness while keeping that lovely crunch. If raw onion isn’t your jam, try scallions or shallots!
-
Whole Grain Mustard: 1 tsp
- Chef Insight: This adds a nice tangy flavor that rounds out the richness of the tuna. If you prefer a spicier kick, swap it for Dijon mustard.
-
Chopped Fresh Parsley: 1 tsp
- Flavor Boost: This herb acts as a fantastic fresh note. You could also use dill or cilantro depending on your preference.
-
Salt and Pepper: To taste
- Chef Tip: Always season as you go for the best flavor! A sprinkle here and a pinch there can make all the difference.
Step-by-Step Instructions:
Now that we’ve gathered our ingredients, let’s jump into the cooking process! Follow along for some chef hacks that’ll ensure your Tuna Lettuce Wraps turn out perfectly every time.
-
Prep the Lettuce: Start by washing the butter or Bibb lettuce leaves gently under cool running water. Pat them dry with a paper towel or a clean kitchen cloth.
- Chefs Tip: If you’re short on time, wash and dry them ahead of time and store them in an airtight container with a damp paper towel to keep them crisp.
-
Open the Tuna: Grab your cans of albacore tuna and open them. Drain the liquid carefully! Transfer the tuna to a mixing bowl.
- Chef Insight: I like to fluff it with a fork to break up any big chunks. This way, every bite is well-distributed and delicious!
-
Mix it Up: Add the mayonnaise, diced celery, and diced red onion to the tuna. Season with salt and pepper to taste. Drizzle in the whole grain mustard and fold everything gently until well combined.
- Hack Alert: If you want to get a bit creative, add a dash of hot sauce or some chopped pickles for an extra flavor boost!
-
Taste Test: Before proceeding, take a tiny spoonful and taste! Adjust seasoning if necessary.
- Chef Rule: Always remember that delicious food happens in layers of flavor. If it’s not tasting vibrant enough, a little more of this or that can work wonders.
-
Assemble the Wraps: Now comes the fun part! Take your prepared lettuce leaves and spoon a generous amount of the tuna mixture into each leaf. Don’t be shy—fill those cups!
- Serving Tip: If you like it a bit saucy, drizzle a little extra mayo or a squeeze of lemon juice on top.
-
Garnish: Sprinkle a bit of fresh parsley on top for color and added flavor.
- Final Touch: A slice of avocado or some cherry tomato halves on the side can elevate this plate even more!
-
Serve Immediately: Enjoy your tuna lettuce wraps right away while the lettuce is crisp and the flavors lively!
Serving Suggestions:
When it comes to serving these bad boys, presentation is key! Here are some fun ideas to get your Tuna Lettuce Wraps looking as delicious as they taste:
-
Platter Style: Arrange the stuffed lettuce leaves on a beautiful serving platter. You can even add some lemon wedges and herbs for a pop of color.
-
Dipping Sauces: Serve with little bowls of your favorite dipping sauces like soy sauce, sriracha, or a creamy dip to enhance those flavors.
-
Kids’ Picnic: For a fun twist, let the kids add their own toppings—like shredded carrots, sliced cucumbers, or even a dollop of guacamole!
-
Garnished Plate: For a fancy touch, sprinkle some microgreens or edible flowers around the plate to impress your guests.
-
Lunch Boxes: Perfect for meal prep! These wraps pack beautifully into lunch boxes; just keep the tuna filling and lettuce leaves separate until it’s time to eat.
Recipe Variations:
Feeling adventurous? Here are some creative variations to this basic recipe that’ll excite your taste buds!
-
Mediterranean Tuna Wraps: Swap in chopped kalamata olives and feta cheese for a Mediterranean flair. Toss in a few sun-dried tomatoes for extra oomph!
-
Tropical Twist: Add diced pineapple or mango to your mixture. The sweetness will balance beautifully with the savory tuna!
-
Spicy Sriracha Tuna: Mix in some Sriracha for a kick! Perfect for those who crave a bit of heat in their meals.
-
Avocado Tuna Wraps: Mash in some ripe avocado instead of mayonnaise for a creamy, nutrient-rich alternative that adds healthy fats.
-
Vegetarian Version: Replace tuna with chickpeas! Mash them up and season with the same ingredients for a satisfying plant-based option.
Chef’s Notes:
Every recipe tells a story, right? Tuna Lettuce Wraps have evolved over time in my kitchen! Initially, I made them for quick lunches, but over the years, they’ve become staples at parties and gatherings.
I remember one memorable dinner with friends where I doubled the batch, excited to share, only to find out they were devoured before I could even grab one! Let’s say I learned the hard way that these wraps disappear quickly!
I also love experimenting with leftovers—using turkey or chicken instead of tuna works great. It’s all about flexibility and finding joy in cooking!
FAQs and Troubleshooting:
1. My lettuce leaves are tearing when I fill them. What should I do?
- A gentle hand goes a long way! Look for larger, sturdier leaves and make sure they’re dry to avoid tearing. This way, they’ll hold up better against the filling.
2. Why does my tuna salad taste bland?
- Ah, the age-old kitchen conundrum! Don’t forget to taste as you mix. Adding a dash of acid like lemon juice or a splash of hot sauce can brighten the flavor remarkably!
3. Can I prepare these wraps ahead of time?
- Absolutely! Just keep the filling and lettuce separate until you’re ready to serve. Fill them just before eating to maintain that delightful crunch!
4. What if I’m sensitive to onions?
- No problem! Simply skip the onions, or substitute them with diced bell peppers, which provide a nice crunch without the sharpness.
Nutritional Info:
These Tuna Lettuce Wraps not only taste divine but they are also packed with nutrients, making them a guilt-free choice. Here’s a quick breakdown of what you’ll get in one serving (2 wraps):
- Calories: Approximately 230 calories
- Protein: 24 grams (thanks to that mighty tuna!)
- Fat: 14 grams (mostly from healthy sources like mayonnaise or avocado!)
- Carbohydrates: 4 grams (almost negligible, and it’s healthier from the lettuce!)
- Fiber: 1 gram (with all those fresh veggies!)
You’re fueling your body with lean protein, healthy fats, vitamins, and minerals without sacrificing flavor. It’s a win-win!
Final Thoughts:
And there you have it—Proud Tuna Lettuce Wraps that’ll make your taste buds sing! Whether you’re making them for a picnic, a quick dinner, or simply a snack, it’s all about embracing that ease and comfort of good food.
I hope you’ll whip these up and find joy in every bite, just like I do! Cooking doesn’t have to be complicated; it’s about connecting, sharing, and enjoying flavors. So, gather your loved ones around, make some memories, and enjoy these delightful wraps!
Remember, here at Feastical, it’s all about feeling good while eating delicious food. I can’t wait to hear about your adventures in the kitchen. Share your twists on these wraps or tell me your stories—it’s these delicious moments that bring us all together. Happy cooking, friends! 🥗✨
Print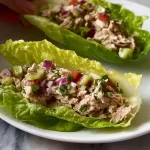
Tuna Lettuce Wraps
- Total Time: 25 minutes
- Yield: 4 servings 1x
- Diet: Low Carb
Description
Fresh and flavorful Tuna Lettuce Wraps perfect for a light meal or a healthy snack.
Ingredients
- 1 head Butter Lettuce or Bibb Lettuce (about 8–10 leaves)
- 10 oz Canned Albacore Tuna (2 5oz cans)
- 1/3 cup Mayonnaise
- 2 tbsp Finely Diced Celery
- 2 tbsp Finely Diced Red Onion (rinsed in cold water)
- 1 tsp Whole Grain Mustard
- 1 tsp Chopped Fresh Parsley
- Salt and Pepper to taste
Instructions
- Prep the Lettuce: Start by washing the butter or Bibb lettuce leaves gently under cool running water. Pat them dry with a paper towel or a clean kitchen cloth.
- Open the Tuna: Grab your cans of albacore tuna and open them. Drain the liquid carefully! Transfer the tuna to a mixing bowl.
- Mix it Up: Add the mayonnaise, diced celery, and diced red onion to the tuna. Season with salt and pepper to taste. Drizzle in the whole grain mustard and fold everything gently until well combined.
- Taste Test: Before proceeding, take a tiny spoonful and taste! Adjust seasoning if necessary.
- Assemble the Wraps: Now comes the fun part! Take your prepared lettuce leaves and spoon a generous amount of the tuna mixture into each leaf.
- Garnish: Sprinkle a bit of fresh parsley on top for color and added flavor.
- Serve Immediately: Enjoy your tuna lettuce wraps right away while the lettuce is crisp and the flavors lively!
Notes
These wraps are perfect for meal prep. Just keep the filling and lettuce leaves separate until you’re ready to eat.
- Prep Time: 15 minutes
- Cook Time: 10 minutes
- Category: Appetizer
- Method: No-Cook
- Cuisine: American
Nutrition
- Serving Size: 2 wraps
- Calories: 230
- Sugar: 1g
- Sodium: 500mg
- Fat: 14g
- Saturated Fat: 2g
- Unsaturated Fat: 10g
- Trans Fat: 0g
- Carbohydrates: 4g
- Fiber: 1g
- Protein: 24g
- Cholesterol: 30mg
Keywords: tuna, lettuce wraps, healthy snacks, meal prep, easy recipes
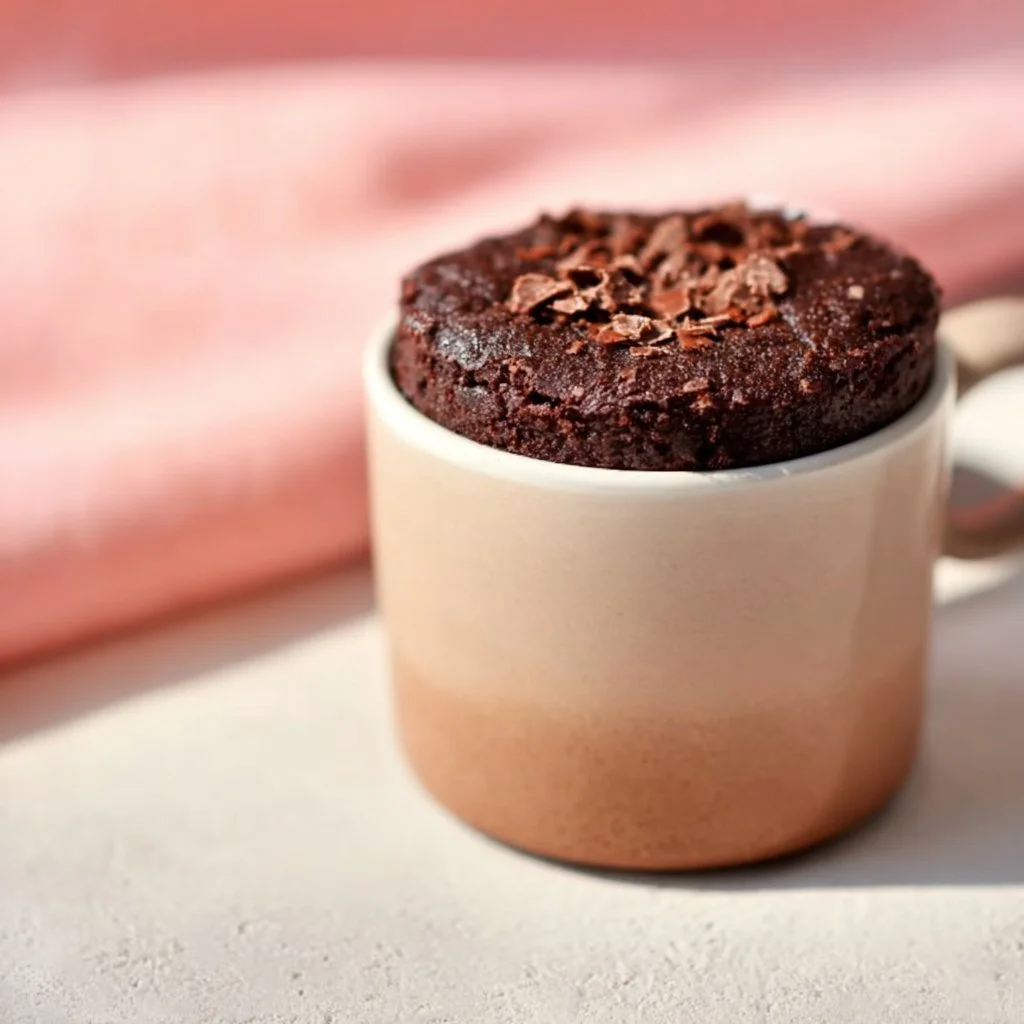
Healthy Mug Brownie
Indulgence in a Mug: Whipping Up a Healthy Mug Brownie
Hey there, foodies! Welcome to another delicious adventure on Feastical! Today, we’re diving into a decadent yet guilt-free treat that will satisfy your chocolate cravings in the most delightful way—yes, I’m talking about a Healthy Mug Brownie. Life can be hectic, and sometimes all you need is a quick dessert that feels like a warm hug without the post-sugar crash. With just a few simple ingredients, you can whip up this delicious brownie in less than five minutes. Trust me, it’ll give any fancy dessert a run for its money!
I remember the first time I stumbled upon the concept of a mug brownie. I was in my tiny college dorm, late at night, desperately craving something sweet. Like many of you, I was often held captive by my relentless sweet tooth. That night, a quick scroll online brought me to this miraculous invention: a brownie that could be made in a mug and, best of all, in the microwave! I threw together whatever I had in my mini pantry, and voilà! A deliciously gooey mug brownie emerged, fitting perfectly into my busy, budget-friendly lifestyle.
Fast forward to today, and my recipe has evolved, packed with wholesome ingredients that won’t send your blood sugar on a rollercoaster ride. It’s all about balance, right? This Healthy Mug Brownie is not only delicious and satisfying, but it’s also a step up in the healthy department. So whether you’re endless in your pursuit of chocolatey bliss or just craving a little midnight fun, roll up your sleeves and let’s bring this beauty to life!
Personal Story
Let me take you back to that fateful night in the dorm. My roommate and I had just finished a serious study session for finals week—needless to say, we were exhausted. As we were about to throw in the towel, I said, "What if we made something sweet?” The idea of baking an entire batch of brownies felt daunting. Plus, who had the time for that? We needed instant gratification!
That’s when I discovered the mug brownie recipe online, and I was instantly hooked. It was so simple and quick that I barely had time to grab a spoon before it was out of the microwave! The first ooey-gooey bite was magic; it felt like all the stress melted away with the chocolate. We high-fived and savored our culinary creation, gobbling it down before the microwave even beeped a second time. It became a tradition; whenever finals approached, we whipped up a fast mug brownie to ease our minds.
Now, all these years later, I still make this Healthier Mug Brownie. It’s a cozy way to bring back those nostalgic college vibes while keeping things nutrient-packed. Plus, I love how this adaptable recipe fits right into my healthy lifestyle. So gather your ingredients, and let’s revisit that perfect moment together!
Ingredients
Alright, let’s get into the nitty-gritty! Here’s what you need to function your own mug brownie masterpiece.
-
2 tablespoons almond flour
Almond flour gives the brownie a nutty flavor and a lovely texture. It’s lower in carbs and higher in healthy fats compared to regular flour. If you’re nut-free, oat flour works as a great substitute! -
1 tablespoon unsweetened cocoa powder
The star of the show! Cocoa powder adds rich chocolate flavor without the added sugar. Make sure you’re picking the unsweetened variety for the healthiest option. Want something even more indulgent? Go for dark cocoa powder for a deeper flavor. -
1 tablespoon sweetener (like stevia or erythritol)
To keep this brownie low-calorie, sweetener helps keep the gooey goodness without the sugar rush. If you’re not into sugar alternatives, coconut sugar or even honey would work fine; just adjust the quantity! -
1/8 teaspoon baking powder
This little guy helps your brownie rise and become fluffy. Don’t skip it! For a gluten-free alternative, you can also use baking soda, but remember to balance it with an acid like vinegar. -
1 tablespoon unsweetened applesauce
Applesauce gives moisture and sweetness without adding fat. This is a great ingredient for those of us trying to cut back on oils. You can substitute it with a mashed banana for a different flavor twist! -
1 tablespoon almond milk (or any milk of choice)
This helps bind all the ingredients together. I love almond milk for its creamy consistency, but feel free to use oat milk, cow’s milk, or even coconut milk! -
1/4 teaspoon vanilla extract
Just a splash of vanilla enhances the flavor and rounds out the brownie’s taste. It’s amazing how much depth this one little ingredient can add! -
Optional: dark chocolate chips or nuts for topping
Can you ever really have too much chocolate? I think not! Adding dark chocolate chips or crushed nuts not only amp up the flavor but also add texture. Enjoy some crunch with walnuts or pecans, or keep it classic with chocolate chips!
Step-by-Step Instructions
Now, let’s get down to business! Here’s how to whip up this Healthy Mug Brownie in just a few easy steps.
-
Gather Your Tools
First things first, grab a microwave-safe mug (or bowl if you prefer). You’ll also need a spoon for stirring—no fancy gadgets required! -
Mix the Dry Ingredients
In your mug, combine the almond flour, cocoa powder, sweetener, and baking powder. Use the back of your spoon to break up any clumps and mix them together well. This ensures a uniform blend, making sure you don’t have pockets of dry ingredients later on. -
Add the Wet Ingredients
Next, add the unsweetened applesauce, almond milk, and vanilla extract. Mix it all together until you get a smooth batter. Don’t overmix here—just until it comes together nicely! If the batter seems too thick, a little extra almond milk won’t hurt. -
Tweak and Taste
Here’s where you add your optional ingredients. Fold in chocolate chips or nuts if you’re feeling adventurous! A little taste test isn’t a bad idea either—hey, it’s quality control, right? -
Zap It
Time to fire things up! Pop your mug in the microwave and cook for about 30-40 seconds. Depending on your microwave’s power, you might need a bit more time. Keep a close eye—overcooking can lead to a dry brownie, and we don’t want that! -
Cool and Enjoy
Once that microwave timer goes off, let the brownie cool for a minute. It’ll be lava-like in the center, and it’s always best to let it rest before diving in. Top with a sprinkle of sea salt or a dollop of Greek yogurt or nut butter for a delightful finish!
Serving Suggestions
Plating is half the fun! Since this Healthy Mug Brownie is made right in its own serving vessel, you can either keep it cozy in your mug or scoop it out onto a plate. If you choose to plate it, try drizzling some almond butter on top or a sprinkle of chopped nuts for texture and a pop of color. You could even top it with a scoop of a healthy ice cream alternative if you feel like splurging a little.
I also love serving it with fresh berries for a tart contrast against the rich chocolate. A few strawberries or raspberries can add that beautiful splash of color while giving a juicy delight with each bite!
Recipe Variations
Here’s where the fun begins—let’s get creative! Having the flexibility to tailor this mug brownie can make it a key staple in your cooking repertoire. Consider these variations:
-
Peanut Butter Mug Brownie: Add a tablespoon of natural peanut butter directly to the batter for a heavenly nutty twist!
-
Mint Chocolate Brownie: A drop of peppermint extract gives an exciting flavor profile. Think Thin Mints, but healthier!
-
Coconut Bliss: Stir in unsweetened shredded coconut for a tropical touch. It’s a fantastic pairing with chocolate!
-
Gluten-Free: Swap almond flour for oat flour or coconut flour for another gluten-free option. Just remember the absorbency properties of coconut flour can call for a slightly adjusted liquid ratio.
-
Vegan: This recipe is already plant-based, but ensure your sweetener aligns with that if you’re avoiding animal products or consider vegan chocolate chips for those optional toppings.
Chef’s Notes
Over the years, I’ve made my fair share of mug brownies, and let me tell you, each batch seems to tell a story. There was that time I added too much baking powder and ended up with a brownie that ballooned over the mug like a volcano. It tasted fine, but let’s just say cleaning up was a little bit of a challenge!
As I’ve matured as a home chef, I’ve learned to appreciate the beauty of simplicity and balance in dessert recipes. Just a few high-quality ingredients can yield something that feels indulgent while feeding your body right. Also, my kids love it! That simple pleasure of making something together is priceless.
FAQs and Troubleshooting
Here are some common questions and helpful troubleshooting tips straight from the kitchen:
-
Why did my mug brownie come out too dry?
If it’s too dry, you may have overcooked it. Start with 30 seconds, then keep an eye out every 10 seconds after that for the perfect fudgy texture. Remember, it will continue to cook for a moment even after you remove it from the microwave! -
Can I make this in the oven?
Absolutely! Preheat your oven to 350°F (175°C) and pour your batter into a small baking dish or ramekin. Bake for 10-12 minutes or until a toothpick comes out clean but with a few crumbs. That’s the sweet spot! -
How do I store leftovers?
If you happen to have any leftovers, loves to them! Store in the refrigerator in a sealed container for up to 2-3 days. Simply reheat in the microwave for a quick treat! -
What if I don’t have almond flour?
No worries! You can use oat flour, whole wheat flour, or even all-purpose flour if you’re not gluten-sensitive. Adjust measurements as needed to retain the consistency.
Nutritional Info
This Healthy Mug Brownie checks off a few key nutritional boxes. Each serving provides a good source of fiber, healthy fats, and protein while being low in carbohydrates and sugar:
- Calories: Approximately 150
- Protein: 4 grams
- Fat: 6-7 grams (depending on whether you added nuts)
- Carbohydrates: 14 grams
- Fiber: 2 grams
It’s a balanced treat that fits well into a healthy eating plan. Enjoy the satisfaction of indulging without the guilt!
Final Thoughts
And there you have it, my dear culinary companions—a delicious, simple, and guilt-free Healthy Mug Brownie that’s perfect for any occasion (or no occasion at all!). This little gem captures what it means to enjoy food: deliciously, joyfully, and without stress.
Whether it’s a cozy night in, a quick energy boost, or a midnight snack loaded with nostalgia, this brownie can check all those boxes. So the next time life gets busy, or the craving hits, just remember you have the power to treat yourself in such a satisfying way, all in just minutes!
Now, go on, grab that mug and give this recipe a whirl! Happy baking!
Print
Healthy Mug Brownie
- Total Time: 6 minutes
- Yield: 1 serving 1x
- Diet: Vegetarian
Description
A quick and indulgent Healthy Mug Brownie recipe that satisfies your chocolate cravings in less than five minutes!
Ingredients
- 2 tablespoons almond flour
- 1 tablespoon unsweetened cocoa powder
- 1 tablespoon sweetener (like stevia or erythritol)
- 1/8 teaspoon baking powder
- 1 tablespoon unsweetened applesauce
- 1 tablespoon almond milk (or any milk of choice)
- 1/4 teaspoon vanilla extract
- Optional: dark chocolate chips or nuts for topping
Instructions
- Gather your tools: a microwave-safe mug and a spoon.
- Mix the dry ingredients: combine almond flour, cocoa powder, sweetener, and baking powder in the mug.
- Add the wet ingredients: mix in applesauce, almond milk, and vanilla extract until a smooth batter forms.
- Tweak and taste: fold in optional chocolate chips or nuts if desired.
- Zap the mug in the microwave for about 30-40 seconds; check often to avoid overcooking.
- Cool for a minute, then enjoy with toppings like sea salt, Greek yogurt, or almond butter.
Notes
Feel free to customize with add-ins like peanut butter or peppermint extract for different flavors.
- Prep Time: 5 minutes
- Cook Time: 1 minute
- Category: Dessert
- Method: Microwave
- Cuisine: American
Nutrition
- Serving Size: 1 serving
- Calories: 150
- Sugar: 2g
- Sodium: 100mg
- Fat: 6g
- Saturated Fat: 1g
- Unsaturated Fat: 5g
- Trans Fat: 0g
- Carbohydrates: 14g
- Fiber: 2g
- Protein: 4g
- Cholesterol: 0mg
Keywords: mug brownie, healthy dessert, quick recipe, chocolate