
Lemon Posset
Discovering the Delight of Lemon Posset: A Dreamy Dessert Experience
Hey there, food lovers! Welcome back to Feastical, where we whip up some kitchen magic that’ll make you feel like you’ve strolled straight into a sun-drenched lemon orchard. Today, we’re diving into a dessert that’s as light as a feather and bursting with zesty goodness—lemon posset!
Now, if you’ve never tasted lemon posset before, let me tell you, you’re in for a treat. Imagine a velvety, creamy dessert that’s both tangy and sweet, perfectly balancing flavors like an expert tightrope walker. It’s quick to make, requires no baking, and will impress your friends and family with its sophisticated flair.
But first, let’s chat about the origin of this glorious treat. Possets date back to the medieval times—how cool is that? It started off as a hot drink and eventually morphed into the creamy dessert we adore today. The beauty of lemon posset lies in its simplicity: just a handful of ingredients transformed into a silky delight that feels like sunshine in a bowl. Whether you’re serving it at a fancy dinner or a cozy weeknight treat, lemon posset always delivers a smile.
So, grab your apron, and let’s embark on this flavorful adventure together!
A Sweet Memory of Lemon Posset
One of my fondest memories in the kitchen stems from my grandmother, who had a way of brightening gloomy days with her culinary magic. Lemon posset was one of her ultimate recipes, and many summer afternoons were spent huddled together in her tiny kitchen, the air thick with the tangy aroma of fresh lemons.
I remember the first time she invited me to help her make it. She handed me a zester and a lemon, her eyes twinkling with mischief as I attempted to mimic her technique. Zest flying everywhere, we giggled like kids as we tasted the concoction, the tartness of the lemons making our faces pucker.
When we finally took our first spoonful of her finished posset, it felt like a burst of sunshine. The tartness wrapped around the creamy base created an explosion of flavor that stays with you long after the last bite. It was a moment of connection—not just to the food but to the love she poured into every dish. Now, every time I make lemon posset, I feel like she’s right there with me, guiding my hands.
Ingredients
Now that we’ve set the stage with a bit of nostalgia, let’s get into what you need to create this lemony delight! Here’s a simple list of ingredients for you:
-
3 Large Lemons: You’ll want these to be juicy and vibrant. Substitute with limes for a different flavor twist!
-
1 Cup Heavy Cream: This is where the magic happens! If you’re looking for a lighter option, consider full-fat coconut milk or almond milk, but the texture will change slightly.
-
⅓ Cup Sugar: Just a hint of sweetness! Feel free to use coconut sugar, or for a low-calorie version, try a sugar alternative like stevia.
-
¼ Teaspoon Kosher Salt: A pinch of salt enhances the flavors perfectly! Table salt works too but go lighter on the quantity.
-
½ Tablespoon Lemon Zest: This is the secret to bringing out that zingy lemon flavor. Don’t skip it! Dried lemon zest can be a substitute, but fresh is always best.
-
2½ Tablespoons Lemon Juice: Fresh juice is key! Bottled lemon juice won’t have the same brightness; if you’re in a pinch, you could use bottled, but it will lack some freshness.
-
1 Teaspoon Vanilla Extract: This adds a lovely depth! You can swap it with lemon extract for an extra punch of flavor if you’re feeling adventurous.
Step-by-Step Instructions
Let’s get into the heart of the matter! Here’s how to whip up your very own lemon posset. Don’t worry, I’m here with you every step of the way—kitchen disasters don’t stand a chance!
-
Zest and Juice the Lemons: Start by zesting your lemons using a microplane grater. Make sure to avoid the white pith, as it can be bitter. Once you have your zest, cut the lemons in half and juice them, straining out any seeds. Tip: Use a fork to help extract more juice!
-
Combine Cream, Sugar, Salt, and Zest: In a medium saucepan over low heat, combine the heavy cream, sugar, kosher salt, and lemon zest. Gently heat while stirring until the sugar dissolves (about 2–3 minutes). It’s crucial to keep the heat low to prevent scalding the cream!
-
Add Lemon Juice: Once the mixture is warm and the sugar has dissolved, remove it from the heat and stir in the lemon juice and vanilla extract. The mixture will start to thicken as it cools. If you’re feeling fancy, you can strain it through a fine-mesh sieve to remove the zest, but remember, that zest packs flavor!
-
Chill to Set: Pour the mixture into serving cups or ramekins and let them cool to room temperature. Then, pop them into the fridge for at least 4 hours or overnight. This is when the posset will firm up beautifully.
-
Serve and Garnish: When you’re ready to enjoy, you can garnish with more lemon zest, a sprinkle of sea salt, or even fresh berries for an extra pop of color and flavor. Chef hack: If your posset is too firm, you can stir in a splash of cream before serving!
Serving Suggestions
Presentation is everything! Here’s how to plate your lemon posset for maximum effect:
-
Classic Cups: Serve it in beautiful glass cups or ramekins to show off that creamy texture and enticing lemon hue. A dollop of whipped cream and a adash of lemon zest on top creates both visual appeal and extra flavor.
-
Berry Bliss: Layer fresh berries (like raspberries or blueberries) at the bottom of the cup before adding the posset. They add a pop of color and a burst of freshness!
-
Elegant Platters: If you’re entertaining a crowd, go for a serving platter. Arrange individual portions side by side, and garnish with a few mint leaves for a refreshing touch.
Recipe Variations
Feeling adventurous? Here are a few creative twists on the classic lemon posset:
-
Meyer Lemon Posset: Use Meyer lemons for a sweeter, less acidic flavor. It’s a game-changer if you can find them!
-
Ginger Lemon Posset: Add a tablespoon of finely grated ginger to the cream mix for a zingy, warm twist.
-
Herb-Infused Posset: Infuse the cream with fresh herbs, like basil or rosemary, by steeping them in for about 15 minutes before straining out.
-
Chocolate Lemon Posset: Mix in a couple of tablespoons of melted dark chocolate into the cream mixture. Rich and delightful!
-
Lavender Lemon Posset: For a floral flavor, steep culinary lavender in the cream. Just be sure to strain it out before adding the citrus.
Chef’s Notes
So, here’s a funny little insight—a few years back, I had a little “help” from my lovely cat, Daisy, while making lemon posset. As I turned my back for just a second, she decided that my lemon zest was her new favorite toy! Lemons zipping around the kitchen was quite the distraction! But that’s the beauty of cooking—embracing the chaos and laughter that comes with it.
Over the years, I’ve played with different flavor combinations, and it’s been an incredible journey. The basic recipe remains close to my heart, a tribute to those sunny afternoons spent with Grandma, but I love the endless possibilities to make it uniquely yours!
FAQs and Troubleshooting
Here are some common questions you might have while making your lemon posset, along with helpful answers:
-
Why isn’t my posset thickening? If it’s not thickening enough, ensure you’re using fresh lemon juice and allow it to chill for the full time. If it’s still too runny, try adding a bit more cream and gently heating it until combined.
-
Can I use bottled lemon juice? While fresh is best, in a pinch you can use bottled lemon juice; just expect a slightly different flavor profile.
-
How long does lemon posset last in the fridge? Typically, it should be good for about 3–4 days. Make sure to cover it tightly to keep it fresh!
-
Can I freeze lemon posset? Freezing is not the best option for posset, as it can change the creamy texture. If you must, try freezing it in small portions for a short time, but let thawing happen in the fridge slowly.
Nutritional Info
Now, let’s talk nutrition! Here’s a rough breakdown of the nutrition facts per serving (assuming 4 servings):
- Calories: 250
- Fat: 20g
- Carbohydrates: 17g
- Fiber: 0g
- Protein: 2g
- Sugar: 12g
Keep in mind, these values can vary based on ingredient brands or adjustments you make! It’s always a good idea to do a quick calculation if you’re keeping an eye on specific dietary needs.
Final Thoughts
And there you have it, friends! A delicious journey into the world of lemon posset. Whether you whip it up for a special occasion or just because, this dessert is sure to become a favorite in your household. Remember the joy of cooking is in the process—the laughter, the memories, and the flavors that all come together to create something delightful.
So, what are you waiting for? Grab those lemons and start stirring! Don’t forget to share your culinary creations with me; I’d love to see how your lemon posset turns out. Until next time, keep simmering, sizzling, and savoring every bite of life. Cheers! 🍋
Print
Lemon Posset
- Total Time: 240 minutes
- Yield: 4 servings 1x
- Diet: Vegetarian
Description
A creamy and zesty lemon dessert that’s easy to make and sure to impress.
Ingredients
- 3 Large Lemons (juicy and vibrant)
- 1 Cup Heavy Cream
- ⅓ Cup Sugar
- ¼ Teaspoon Kosher Salt
- ½ Tablespoon Lemon Zest
- 2½ Tablespoons Lemon Juice
- 1 Teaspoon Vanilla Extract
Instructions
- Zest and juice the lemons, straining out any seeds.
- Combine cream, sugar, salt, and zest in a medium saucepan over low heat until sugar dissolves.
- Add lemon juice and vanilla extract, then stir until the mixture thickens.
- Chill the mixture in serving cups for at least 4 hours or overnight.
- Serve garnished with additional lemon zest or fresh berries.
Notes
For a lighter option, you can use coconut milk or almond milk. Feel free to add flavor variations like ginger or chocolate.
- Prep Time: 15 minutes
- Cook Time: 5 minutes
- Category: Dessert
- Method: Chilling
- Cuisine: British
Nutrition
- Serving Size: 1 serving
- Calories: 250
- Sugar: 12g
- Sodium: 50mg
- Fat: 20g
- Saturated Fat: 12g
- Unsaturated Fat: 8g
- Trans Fat: 0g
- Carbohydrates: 17g
- Fiber: 0g
- Protein: 2g
- Cholesterol: 80mg
Keywords: lemon dessert, creamy posset, no-bake dessert, summer dessert
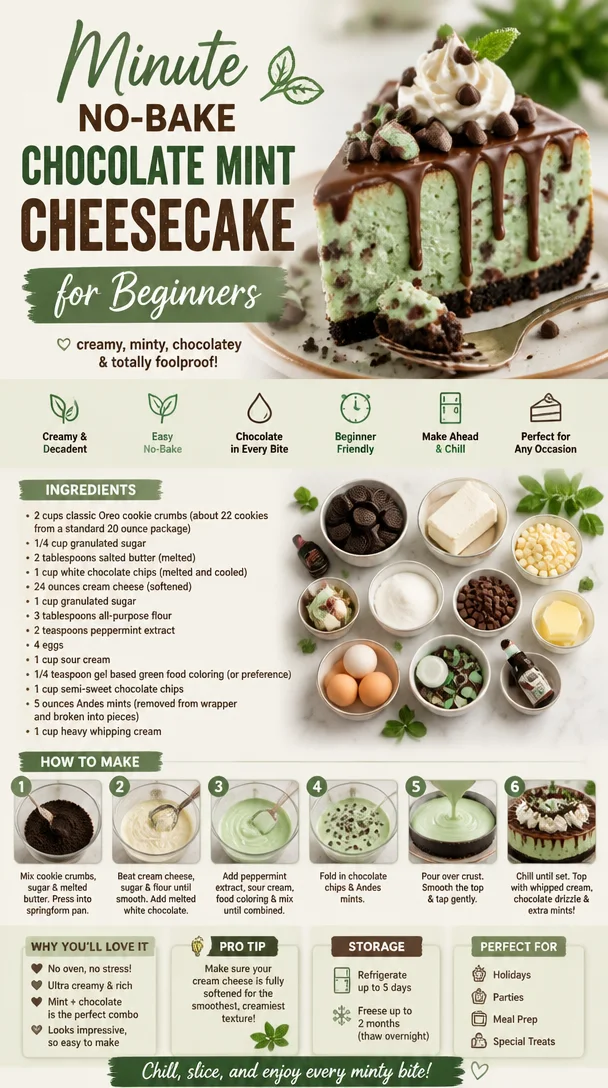
Minute No-Bake Chocolate Mint Cheesecake for Beginners
Chocolate Mint Cheesecake: A Decadent Delight
Hey there, fellow food lover! If you’re looking to bring a little indulgence into your life, then you’ve hit the jackpot with this Chocolate Mint Cheesecake recipe. Whether it’s for a holiday celebration, a birthday bash, or just because you deserve a treat (and trust me, you absolutely do!), this cheesecake is a showstopper. With its creamy layers, chocolatey goodness, and a refreshing hint of mint, this dessert will wow your friends, family, and, most importantly, you!
Personal Story
Let me take you back to my childhood for a moment. Imagine a warm summer evening, the scent of fresh mint wafting through the air, accompanied by laughter and the clinking of glasses. It was at my grandmother’s house, where family gatherings meant an abundance of food and love. One of her unforgettable creations was a minty chocolate dessert that she would whip up every year for our summer BBQs. The way it melted in your mouth was simply magic. Fast forward years later, and those memories inspire me whenever I create a chocolate mint dish, especially this cheesecake.
Remembering how my family couldn’t get enough of Grandma’s minty delight, I set out to craft a recipe that marries velvety cream cheese with the nostalgic flavors I once cherished. So, roll up those sleeves, and let’s make your kitchen the heart of your home, just like my grandma’s was!
Ingredients
Let’s get down to business, shall we? Here’s what you’ll need to make this show-stopping Chocolate Mint Cheesecake:
-
2 cups classic Oreo cookie crumbs (about 22 cookies from a standard 20-ounce package)
These delicious crumbs form the base of your cheesecake, providing a rich, chocolatey flavor and contrasting texture. You can substitute with chocolate graham cracker crumbs if you’re feeling adventurous! -
1/4 cup granulated sugar
This little bit of sugar enhances the sweetness of the crust. Feel free to swap it with coconut sugar for a different twist. -
2 tablespoons salted butter (melted)
Butter brings everything together in that crust and gives it that irresistible richness. Unsalted butter works too if you’re watching your sodium intake! -
1 cup white chocolate chips (melted and cooled)
White chocolate adds a creamy sweetness that complements the cheesecake perfectly. If you prefer, dark chocolate can give it a bolder flavor. -
24 ounces cream cheese (softened)
Cream cheese is the star of your cheesecake show—smooth and creamy! Make sure it’s softened to room temperature for easy mixing. -
1 cup granulated sugar
Just like the crust, this sugar sweetens your filling. Again, feel free to explore with alternatives like agave nectar. -
3 tablespoons all-purpose flour
This will stabilize the filling and keep it from cracking. For a gluten-free option, use almond flour or gluten-free flour blends. -
2 teaspoons peppermint extract
This is where your chocolate mint magic happens! If you’re not a fan of peppermint, try vanilla extract instead for a unique flavor. -
4 large eggs
Eggs help bind everything together and give that lovely cheesecake texture. You can use flax eggs for a vegan option. -
1 cup sour cream
Sour cream adds tanginess and creaminess, elevating the cheesecake to divine levels. Greek yogurt is a great substitute here, too! -
1/4 teaspoon gel-based green food coloring (or to your preference)
This is completely optional but makes for a lovely presentation! If you’re feeling natural, consider spirulina powder for a green hue. -
1 cup semi-sweet chocolate chips
These will take your cheesecake to another level of chocolaty goodness. Dark chocolate can be a rich alternative if you want to amp up the flavor. -
5 ounces Andes mints (removed from wrappers and broken into pieces)
The crushed mints add bursts of minty flavor throughout the cheesecake. If you can’t find them, peppermint candies work just as well! -
1 cup heavy whipping cream
To elevate this dessert with a light and fluffy whipped topping, heavy cream is your best friend! You can use coconut cream for a dairy-free twist.
Step-by-Step Instructions
Ready to bring this delicious cheesecake to life? Let’s dive into the fun part—cooking!
-
Preheat Your Oven
Set your oven to 325°F (160°C). Preheating ensures an evenly baked cheesecake, so don’t skip this step! -
Prepare the Crust
In a medium bowl, combine the Oreo crumbs, granulated sugar, and melted butter. Mix until everything is well combined and resembles wet sand. Now, pack this mixture tightly into the bottom of a 9-inch springform pan. I like to use the bottom of a measuring cup to press down evenly. Bake for 10 minutes, then let it cool while you prep the filling. This helps create a perfect foundation for your cheesecake. -
Make the Filling
In a large bowl, beat the softened cream cheese with an electric mixer until it’s smooth and creamy—about 2-3 minutes. Add in the granulated sugar, flour, and melted white chocolate, continuing to beat until everything is fully incorporated. -
Add the Eggs
Add the eggs one at a time, mixing on low speed after each addition just until blended. Remember, you want to avoid overmixing at this stage to keep your cheesecake nice and dense instead of airy. -
Flavors Galore!
Drizzle in the peppermint extract, sour cream, and the gel-based food coloring if using. Blend until everything is well combined and luscious. -
Incorporate the Minty Goodness
Gently fold in the semi-sweet chocolate chips and broken Andes mints. This is where the magic happens, as you create that delightful combination of chocolate and mint! -
Pour and Bake
Pour this dreamy filling over your cooled crust. Spread evenly with a spatula and bake in the preheated oven for about 50-60 minutes, or until the center is set but still slightly wobbly. You can tell it’s done when a gentle jiggle remains in the center—this helps ensure that your cheesecake won’t crack! -
Cool Down
After baking, turn off the oven and let the cheesecake cool in the oven with the door slightly ajar for about 1 hour. This gradual cooling helps prevent cracking. Then, remove it from the oven and cool to room temperature before refrigerating for at least 4 hours (or overnight, if you can resist!). This allows the flavors to meld perfectly. -
Whip Up the Topping
When you’re ready to serve, whip that heavy cream until stiff peaks form—about 3-5 minutes with an electric mixer. Spread or pipe it generously over the cheesecake. You can even sprinkle additional crushed Andes mints on top for that extra flair!
Serving Suggestions
When it comes to serving this Chocolate Mint Cheesecake, let’s elevate the experience! Here’s how to plate it beautifully:
- Carefully remove the sides of the springform pan and place the cheesecake on a flattering cake stand or a decorative plate.
- Slice your cheesecake with a hot, dry knife for nice clean cuts—just run it under hot water, wipe it clean, and cut.
- For an added flourish, top each slice with a dollop of whipped cream and a sprig of fresh mint. A drizzle of chocolate sauce could also give it that “wow” factor!
- Pair it with a scoop of vanilla ice cream or a steaming cup of coffee for a delightful treat!
Recipe Variations
Let’s get creative! Here are some fun variations you can try with this recipe:
- Chocolate Hazelnut Cheesecake: Swap out the mint extract for hazelnut syrup and add chopped hazelnuts for a delightful twist!
- Peanut Butter Swirl: Add dollops of creamy peanut butter into the cheesecake filling and use a knife to create swirls before baking.
- Nut-Free Option: Omit all mint candy and use cacao nibs instead for a crunch, or add a touch of orange zest for a citrusy contrast.
- Vegan Cheesecake: Substitute cream cheese with a vegan alternative, use aquafaba instead of eggs, and coconut cream for the topping for a luscious treat everyone can enjoy.
- Flavor Enhancements: Add chocolate or coffee liqueur to the filling for adults-only cheesecake. Just be mindful of the overall liquid content!
Chef’s Notes
This Chocolate Mint Cheesecake has become a staple in my dessert repertoire over the years. It’s evolved as I’ve experimented with different crusts and fillings, but the essence remains the same: comfort and joy. I remember once, during a particularly busy holiday season, I whipped up four of these cakes just to satisfy my friends’ cravings! They brought everyone together around the table, and there were smiles all around.
Oh, and one funny kitchen moment: I once forgot to add the eggs, and while it tasted good, let’s just say the texture was more reminiscent of fudge than cheesecake. We all had a good laugh about that one!
FAQs and Troubleshooting
-
Why did my cheesecake crack?
Cracking can occur due to rapid temperature changes. Allow your cheesecake to cool slowly in the oven and refrigerate it if possible to help maintain its creaminess. -
How do I know when my cheesecake is done baking?
The cheesecake should look set but still slightly jiggly in the center when you remove it from the oven. If it appears too jiggly, give it a few more minutes. -
Can I freeze my cheesecake?
Absolutely! Once it’s fully set, wrap it tightly in plastic wrap and foil and store it in the freezer for up to 3 months. Thaw it in the fridge overnight before serving. -
What if my filling is too runny?
This may happen if it’s not baked long enough or if too much mixing has occurred after adding the eggs. Leaving it in the oven longer (but not too long!) may help, or you can always try adding a little extra flour or cornstarch in future attempts.
Nutritional Info
Before diving into dessert, it’s always good to have a little nutritional perspective! Per slice (assuming 12 slices), this Chocolate Mint Cheesecake clocks in at approximately:
- Calories: 450
- Total Fat: 30g
- Saturated Fat: 18g
- Cholesterol: 105mg
- Sodium: 320mg
- Total Carbohydrates: 40g
- Fiber: 2g
- Sugars: 30g
- Protein: 6g
Keep in mind, these numbers can vary based on your specific ingredients and portion sizes, but they give you a ballpark idea of the deliciousness you’re indulging in!
Final Thoughts
So there you have it! A Chocolate Mint Cheesecake that not only satisfies your sweet tooth but also creates sweet memories in your kitchen. Baking is such a joyful experience, and sharing that with loved ones is what it’s all about. Whether you’re serving this to guests or treating yourself—because you absolutely deserve it—know that you’re creating a piece of happiness, bite by scrumptious bite.
Now, go ahead, gather those ingredients, and let’s start baking your delicious Chocolate Mint Cheesecake. Good luck, and happy baking! 🍰
PrintChocolate Mint Cheesecake
- Total Time: 90 minutes + 4 hours chilling
- Yield: 12 servings 1x
- Diet: Vegetarian
Description
A decadent chocolate mint cheesecake with creamy layers and a refreshing hint of mint, perfect for any celebration or indulgence.
Ingredients
- 2 cups classic Oreo cookie crumbs (about 22 cookies)
- 1/4 cup granulated sugar
- 2 tablespoons salted butter (melted)
- 1 cup white chocolate chips (melted and cooled)
- 24 ounces cream cheese (softened)
- 1 cup granulated sugar
- 3 tablespoons all-purpose flour
- 2 teaspoons peppermint extract
- 4 large eggs
- 1 cup sour cream
- 1/4 teaspoon gel-based green food coloring (optional)
- 1 cup semi-sweet chocolate chips
- 5 ounces Andes mints (broken into pieces)
- 1 cup heavy whipping cream
Instructions
- Preheat your oven to 325°F (160°C).
- Prepare the crust by combining the Oreo crumbs, granulated sugar, and melted butter in a bowl. Pack this mixture into the bottom of a 9-inch springform pan and bake for 10 minutes, then let it cool.
- Make the filling by beating the softened cream cheese on medium speed until smooth. Add in the granulated sugar, flour, and melted white chocolate, and mix until fully incorporated.
- Add the eggs one at a time, mixing on low speed after each addition.
- Drizzle in the peppermint extract, sour cream, and food coloring (if using), then blend until well combined.
- Fold in the semi-sweet chocolate chips and broken Andes mints gently.
- Pour the filling over the cooled crust and spread it evenly. Bake for 50-60 minutes, or until the center is set but still slightly wobbly.
- Cool the cheesecake in the oven with the door slightly ajar for 1 hour. Then remove and cool to room temperature before refrigerating for at least 4 hours or overnight.
- Whip the heavy cream until stiff peaks form. Spread or pipe it over the cheesecake and garnish with additional crushed Andes mints if desired.
Notes
For a different flavor, swap peppermint extract for vanilla extract. Make sure to let the cheesecake cool slowly to avoid cracking.
- Prep Time: 30 minutes
- Cook Time: 60 minutes
- Category: Dessert
- Method: Baking
- Cuisine: American
Nutrition
- Serving Size: 1 slice
- Calories: 450
- Sugar: 30g
- Sodium: 320mg
- Fat: 30g
- Saturated Fat: 18g
- Unsaturated Fat: 10g
- Trans Fat: 0g
- Carbohydrates: 40g
- Fiber: 2g
- Protein: 6g
- Cholesterol: 105mg
Keywords: chocolate cheesecake, mint dessert, creamy cheesecake
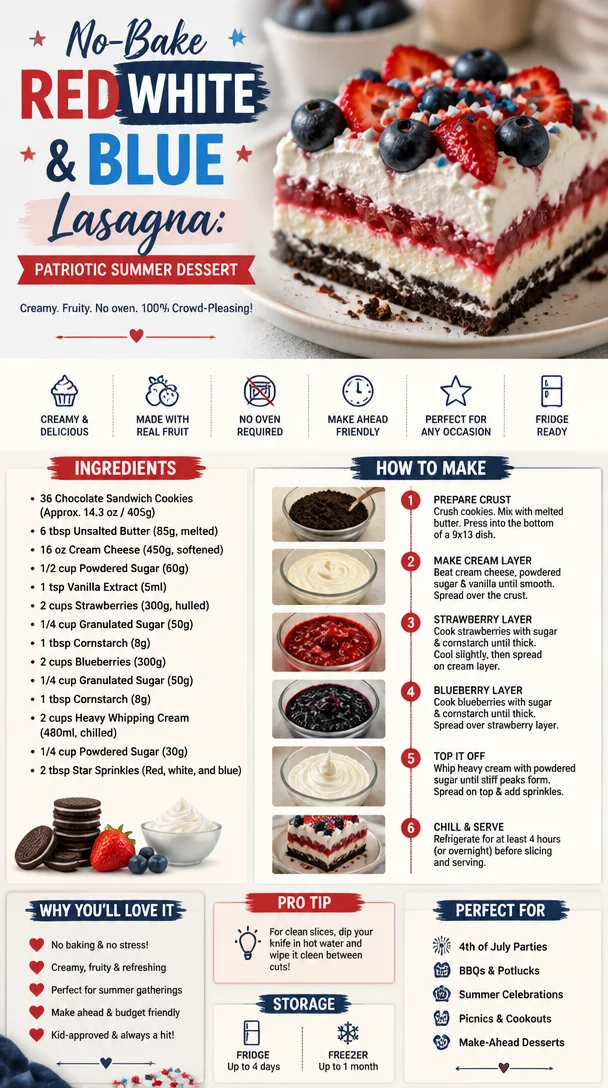
No-Bake Red White & Blue Lasagna: Patriotic Summer Dessert
Red, White, and Blue Dessert Lasagna: The Ultimate No-Bake Patriotic Treat
Hey there, fellow foodies! Welcome to Feastical, where we celebrate food that’s not just a recipe but an experience that brings joy, laughter, and a pinch of nostalgia into our kitchens. If you’re looking for something fantastic and eye-catching to make for your next barbecue or patriotic celebration, then let me introduce you to the delightful Red, White, and Blue Dessert Lasagna! This no-bake treat is not only a feast for the eyes but also a palate-pleaser that combines rich creaminess with fruity delights. So put your apron on, and let’s dive into the deliciousness!
A Slice of Nostalgia
I still remember the first time I indulged in a dessert lasagna. It was at my Aunt Linda’s Fourth of July picnic, and with every layer, I could taste the love and togetherness that filled her kitchen. Layers of chocolate cookies, sweet cream cheese, and fresh strawberries and blueberries all come together like a symphony of flavors. As kids, we devoured it in perfect harmony while the fireworks lit up the sky, and it became a tradition that I cherish. That dessert was more than just food; it was a canvas painted with happy memories of laughter and summer sunshine. Today, I’ll share my take on that beloved dish and help you create your own memorable moments with this spectacular no-bake dessert!
Ingredients
Let’s gather everything we need to whip up this fantastic dessert lasagna. Here’s what you’ll be using:
-
36 Chocolate Sandwich Cookies (Approx. 14.3 oz / 405g)
A crunchy base that adds depth and texture. You can swap these for chocolate graham crackers for a slightly different flavor profile! -
6 tbsp Unsalted Butter (85g, melted)
This helps bind the cookie crust together. If you need a dairy-free option, coconut oil works beautifully here! -
16 oz Cream Cheese (450g, softened)
The creamy heart of this dessert! You can use a dairy-free cream cheese if you’re looking for a vegan option. -
1/2 cup Powdered Sugar (60g)
Sweetness is essential! If you want a lower sugar option, consider using a sugar substitute like monk fruit sweetener. -
1 tsp Vanilla Extract (5ml)
A whisper of vanilla elevates all the flavors. No vanilla? Almond extract is a delightful substitute! -
2 cups Strawberries (300g, hulled)
Fresh and juicy strawberries add vibrant red layers. Frozen strawberries can be used, but make sure to drain excess liquid. -
1/4 cup Granulated Sugar (50g)
This will sweeten the berry mixture. Use less or a sugar alternative to taste. -
1 tbsp Cornstarch (8g)
This helps thicken the strawberry filling. You can substitute with arrowroot powder if you prefer something different. -
2 cups Blueberries (300g)
A burst of blueberry goodness! If you can’t find fresh blueberries, frozen ones work, but thaw and drain them first. -
1/4 cup Granulated Sugar (50g)
Another sweet touch for the blueberry layer. Again, feel free to switch it out for your preferred sweetener. -
1 tbsp Cornstarch (8g)
Used just like in the strawberry mixture. Arrowroot works great here too! -
2 cups Heavy Whipping Cream (480ml, chilled)
This is what makes the layers fluffy and dreamy! For a lighter version, you can substitute with whipped coconut cream. -
1/4 cup Powdered Sugar (30g)
To sweeten the whipped cream—because who doesn’t love a little extra sweetness? -
2 tbsp Star Sprinkles (Red, white, and blue)
These are for decoration, and they add a festive touch! You can use any sprinkles you have on hand if you prefer.
Step-by-Step Instructions
Now that we have our ingredients ready, let’s get to the fun part—making the dessert lasagna! Follow these steps, and you’ll be on your way to creating a delightful masterpiece.
-
Make the Cookie Crust
In a food processor, blend the chocolate sandwich cookies into fine crumbs. If you don’t have a food processor, you can put them in a zip-lock bag and crush them with a rolling pin—frustration-busting therapy included! Once you have crumbs, transfer them to a mixing bowl and stir in the melted butter. Press this mixture into the bottom of a 9×13 inch dish. Use the back of a measuring cup or your hands to ensure it’s packed tightly. This will give you a sturdy base for the layers above! -
Prepare the Strawberry Filling
In a medium bowl, combine the hulled strawberries, 1/4 cup granulated sugar, and 1 tbsp cornstarch. Toss them together to coat. Let this sit for about 10 to 15 minutes while the sugar works its magic on the strawberries. This will create a beautiful syrup that will intensify the strawberry flavor! -
Cream Cheese Mixture
In a separate large bowl, beat together the softened cream cheese, 1/2 cup powdered sugar, and 1 tsp vanilla extract with an electric mixer until smooth and creamy. If you want a little extra fluffiness, beat in 1 cup of heavy whipping cream until it forms soft peaks. This will make your cream layer light and luscious! -
Layer It Up
Start by spreading half of the cream cheese mixture evenly over the cookie crust. Next, spoon half of the strawberry filling over the top. Repeat these layers—first another layer of cream cheese mixture and then the rest of the strawberries. This creates a textural harmony as you dig in! -
Creating the Blueberry Layer
Repeat the same process with blueberries. Toss the blueberries with 1/4 cup granulated sugar and 1 tbsp cornstarch. Let this sit while you finish the layers. Portion out the remaining cream cheese mixture, spread it over the strawberries, then add your lovely blueberries on top. The colors are really coming together now! -
Whipped Topping
Whip the remaining 1 cup of heavy whipping cream with 1/4 cup powdered sugar until you reach stiff peaks. You want this whipped topping to be thick and fluffy. Spread it evenly over the blueberry layer, covering everything nicely. -
Final Touch
To finish off, sprinkle those fun star sprinkles on top for a festive touch! Feel free to go wild with the decoration—make it as fun and colorful as you like. -
Chill, Then Serve
Cover the lasagna with plastic wrap and pop it in the fridge for at least 4-6 hours, or ideally overnight. This will allow the flavors to meld beautifully together, and it’ll be easier to slice.
Serving Suggestions
When it’s time to serve, bring out this vibrant dessert lasagna and let it shine at your gathering! Slice it into squares, and for an extra touch, serve each piece with a dollop of extra whipped cream and a sprinkle of fresh berries on the side. You can also present it on a festive platter, garnishing with fresh mint leaves to give it that extra pop of color. Don’t forget to snap a few pics before everyone digs in—you’ll want to capture the comments of pure delight from your friends and family!
Recipe Variations
Here are a few fun twists you can try to make this recipe your own:
-
Brownie Base: Swap out the chocolate cookies for brownies! This adds a fudgy twist that chocolate lovers will adore.
-
Coconut Layer: Incorporate a layer of toasted shredded coconut in between the layers for a tropical vibe.
-
Peppermint Twist: For a winter celebration, add a few drops of peppermint extract to the cream cheese mixture and use crushed peppermint candies as a topping.
-
Seasonal Fruit: Feel free to change up the fruit based on the season. Peaches and blackberries make a delightful summer treat, while cranberries and orange zest are fantastic for fall or winter!
-
Dairy-Free Version: Use non-dairy cream cheese, whipped coconut cream, and your favorite dairy-free cookies for a deliciously inclusive dessert.
Chef’s Notes
As I’ve grown more comfortable in the kitchen, I’ve found that sharing recipes has become a way to connect with others. I love how a dish can tell a story. This dessert lasagna has gone from a simple creation to a family favorite, and I often hear requests for it during special occasions. You can truly make it your own by adding family traditions or even an unexpected ingredient. Every lasagna I make has a little piece of love in it—because that’s what food is all about.
FAQs and Troubleshooting
1. Can I use frozen fruit?
Absolutely! Just be sure to thaw and drain your frozen fruit completely, so the excess liquid doesn’t affect the dessert’s texture.
2. My whipped cream didn’t whip! What went wrong?
Make sure your whipping cream is cold and that you’re using heavy whipping cream. Be careful not to overbeat—it can turn grainy and become butter instead of whipped cream!
3. How long will this dessert last in the fridge?
It’s best enjoyed fresh, but it can last up to 3-4 days in the fridge. Just cover it tightly to keep it fresh.
4. Can I make this ahead of time?
Yes! This dessert is perfect for making ahead as it needs time to chill. It actually tastes better the next day after all the flavors meld together!
Nutritional Info
This delicious dessert can be enjoyed within a balanced diet, especially when shared with friends and family! Here’s a rough estimate of what’s in a slice (1/12th of the recipe):
- Calories: Approximately 290
- Total Fat: 19g
- Saturated Fat: 10g
- Carbohydrates: 28g
- Sugars: 15g
- Fiber: 1g
- Protein: 3g
Remember that nutritional values can change depending on substitutes and variations you make!
Final Thoughts
Cooking is not just about following a recipe; it’s about creating memories, sharing love, and making connections. This Red, White, and Blue Dessert Lasagna embodies all of that, just like my Aunt Linda’s cherished creation. As you gather around the table with your loved ones, I hope each slice represents laughter, joy, and most importantly, a love for food. So, roll up your sleeves, get creative, and let’s make every occasion a feast worth remembering!
Until next time, keep those forks ready—there’s always something delicious on the horizon here at Feastical!
Print
Red, White, and Blue Dessert Lasagna
- Total Time: 360 minutes
- Yield: 12 servings 1x
- Diet: Vegetarian
Description
A delightful no-bake dessert lasagna featuring layers of chocolate cookies, cream cheese, and fresh strawberries and blueberries, perfect for patriotic celebrations.
Ingredients
- 36 Chocolate Sandwich Cookies (Approx. 14.3 oz / 405g)
- 6 tbsp Unsalted Butter (85g, melted)
- 16 oz Cream Cheese (450g, softened)
- 1/2 cup Powdered Sugar (60g)
- 1 tsp Vanilla Extract (5ml)
- 2 cups Strawberries (300g, hulled)
- 1/4 cup Granulated Sugar (50g)
- 1 tbsp Cornstarch (8g)
- 2 cups Blueberries (300g)
- 1/4 cup Granulated Sugar (50g)
- 1 tbsp Cornstarch (8g)
- 2 cups Heavy Whipping Cream (480ml, chilled)
- 1/4 cup Powdered Sugar (30g)
- 2 tbsp Star Sprinkles (Red, white, and blue)
Instructions
- Make the cookie crust by blending chocolate sandwich cookies into fine crumbs. Stir in melted butter and press into the bottom of a 9×13 inch dish.
- Prepare the strawberry filling by combining hulled strawberries, 1/4 cup granulated sugar, and 1 tbsp cornstarch in a bowl.
- Cream the cream cheese with 1/2 cup powdered sugar and 1 tsp vanilla extract until smooth and creamy, adding 1 cup heavy whipping cream for fluffiness if desired.
- Layer half of the cream cheese mixture over the cookie crust followed by half of the strawberry filling. Repeat with remaining mixtures.
- Create the blueberry layer by tossing blueberries with 1/4 cup granulated sugar and 1 tbsp cornstarch, then add to the lasagna.
- Whip remaining 1 cup heavy whipping cream with 1/4 cup powdered sugar until stiff peaks form and spread over the blueberry layer.
- Finish with star sprinkles on top and refrigerate for 4-6 hours or overnight before serving.
Notes
For best results, allow chilling overnight. You can use different fruits and opt for dairy-free alternatives if desired.
- Prep Time: 30 minutes
- Cook Time: 0 minutes
- Category: Dessert
- Method: No-Bake
- Cuisine: American
Nutrition
- Serving Size: 1 serving
- Calories: 290
- Sugar: 15g
- Sodium: 150mg
- Fat: 19g
- Saturated Fat: 10g
- Unsaturated Fat: 8g
- Trans Fat: 0g
- Carbohydrates: 28g
- Fiber: 1g
- Protein: 3g
- Cholesterol: 60mg
Keywords: no-bake dessert, patriotic dessert, summer treat, dessert lasagna, Fourth of July
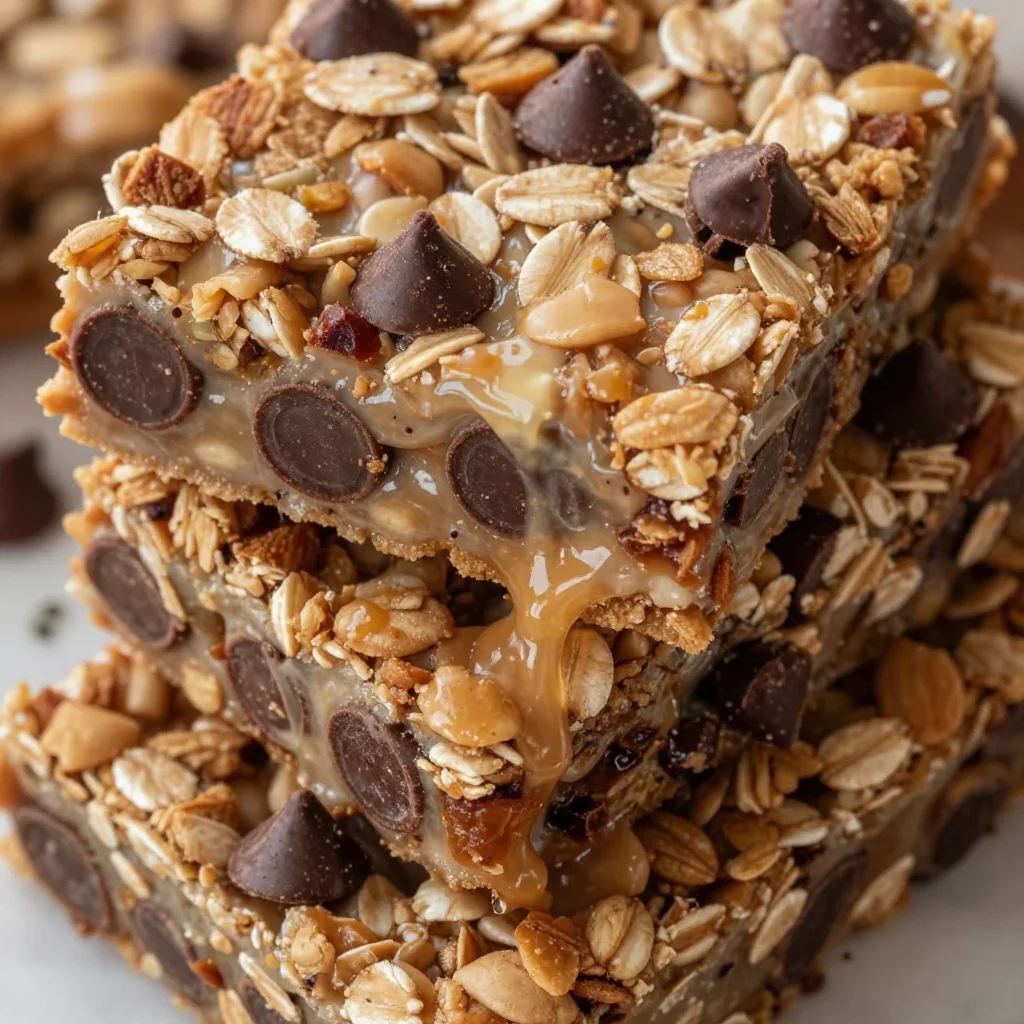
Minute No-Bake Granola Bars for Busy Weekday Meal-Prep
No-Bake Granola Bars: Your New Go-To Snack!
Hey there, fellow food lover! I’m Beau Collier, and today we’re diving into a kitchen adventure that’s as easy as pie—well, no-bake pie, that is. If you’re on the lookout for a delicious snack that not only satisfies but also gives you a warm, cozy feeling of home, then you’re in for a treat. We’re whipping up some Homemade No-Bake Granola Bars! These delightful munchies are perfect for when you need a quick pick-me-up, a healthy lunchbox addition, or a grab-and-go breakfast.
Now, let’s be real—life can get busy, and sometimes, who has the time to bake an entire batch of cookies or muffins? Not to mention, the cleanup can turn the kitchen into a battlefield! But that’s why no-bake recipes are my jam. They’re quick, easy, and oh-so-satisfying. Plus, kids and adults alike will enjoy these chewy, nutty, and utterly delicious granola bars.
As we walk through this recipe, I’ll sprinkle in some handy tips, little anecdotes, and personal touches that make this dish come alive. I invite you to put on your apron, grab your favorite mug, and let’s get cooking—no baking required!
A Granola Bar Trip Down Memory Lane
You know how certain smells and tastes can transport you back in time? That’s what homemade granola bars do for me. I remember sitting at the kitchen counter as a kid while my mom experimented with all sorts of snacks to fill our lunchboxes. She would blend oats, honey, and whatever nuts or fruits we had on hand, all while I eagerly awaited the final product. There was something so magical about watching her create perfection with just a few simple ingredients.
One of my favorite memories is when she made her first-ever batch of no-bake granola bars. As the mixture came together, we laughed about how messy the kitchen was getting—there was peanut butter everywhere, and I had Froot Loops in my hair from breakfast! But when we finally sunk our teeth into those chewy bars, it was like instant happiness. The satisfaction of knowing we’d helped make our own snacks amplified the fun, and from that day on, granola bars became a staple in our household.
Fast forward a few years, and I find myself in my own kitchen, trying to recreate that same sense of joy and nostalgia. And guess what? I think I’ve found the perfect no-bake granola bar recipe that captures all of those cherished memories. Best part? You can customize it just the way you like!
Ingredients
Let’s check out the lineup of ingredients you’ll need to craft these no-bake granola bars. Each one plays a key role in the texture and flavor, and I’ve got some great tips for you along the way!
-
2 cups oats
Rolled oats are the backbone of this recipe, providing texture and fiber. For a gluten-free option, just grab certified gluten-free oats! -
1 cup nut butter (peanut butter or almond butter)
This acts as the glue that holds everything together. Prefer a nut-free version? No problem! Sunflower seed butter or soy nut butter work wonderfully too. -
1/2 cup honey or maple syrup
Both sweeteners give this recipe a delightful sweetness and help bind the oats together. If you want a vegan alternative, maple syrup is your best bet! -
1/2 cup chocolate chips (optional)
Who can say no to a little chocolate? Dark, semi-sweet, or even dairy-free versions all work. To keep it healthy, consider swapping them for cacao nibs. -
1/2 cup dried fruits (optional)
Raisins, cranberries, or even chopped apricots add a lovely chewiness. Fresh fruits won’t work here since they can add too much moisture, but feel free to get creative with dried options! -
1/4 cup seeds (optional)
Think sunflower seeds, chia seeds, or pumpkin seeds. They add extra nutrition and a delightful crunch! You can skip these if you’re nut-free and want to lighten things up.
Step-by-Step Instructions
Now that we have our ingredients ready, let’s jump into some straightforward, fun, no-fuss steps to bring your granola bars to life. Each step will include tips and tricks that’ll make you feel like a pro chef in no time!
-
Gather Your Gear
Grab a large mixing bowl and a spatula for stirring. We’ll also need an 8×8 inch baking dish lined with parchment paper to make removal easy. -
Mix the Dry Ingredients
Start by pouring the oats into the mixing bowl. If you want a bit more flavor, give them a quick toast in a dry skillet over low heat for 5 minutes until lightly golden. It’ll enhance the nuttiness and aroma! Once ready, add any seeds and dried fruits you’re using. -
Heat the Nut Butter and Sweetener
In a small saucepan, combine the nut butter and honey (or maple syrup) over low heat, stirring continuously until smooth and warm. This is where the magic happens! The warmth makes it easier to blend with the oats. Just don’t let it come to a boil; we want to keep that creamy texture. -
Combine Everything Together
Pour the warm nut butter mixture over the dry ingredients. Now, grab that spatula and mix like your life depends on it! Make sure all the oats are coated evenly. If you’re adding chocolate chips, wait until the mixture has cooled slightly before folding them in to avoid melting them completely. -
Press It Down
Transfer the mixture into your lined baking dish. Use a second piece of parchment paper or your hands (which will likely get a bit sticky) to press it firmly and evenly into the dish. This step is crucial! The more compact it is, the better it will hold together once cut. -
Chill and Set
Place the dish in the refrigerator for at least 1-2 hours to set. This gives the mixture time to firm up, making it easier to slice into bars. If you’re in a rush, popping them in the freezer for 30 minutes does the trick too! -
Slice and Serve
Once set, remove the parchment paper and slice into your desired bar sizes. I usually aim for about 10-12 bars, but you do you! Store them in an airtight container in the fridge for up to a week (if they last that long).
Serving Suggestions
When it comes to serving these no-bake granola bars, there’s no wrong way! However, if you want to impress your friends or family, try bundling them up in wax paper and tying them with a cute kitchen twine for that homemade touch.
Pair them with a cup of coffee or a smoothie for breakfast on-the-go. Need a snack? These bars are just perfect for a quick energy boost between meals. Kids can take them to school, or you can enjoy them during your next hike. You might even crumble them over yogurt for a delicious parfait!
Recipe Variations
Now, let’s get creative! The beauty of no-bake granola bars is that they are truly customizable. Here are some flavorful variations to spice things up:
-
Tropical Twist: Swap out the dried fruits for shredded coconut and diced dried pineapple for a tropical vibe.
-
Chocolate Peanut Butter: Add cocoa powder to the nut butter mixture and increase the chocolate chips for an indulgent treat.
-
Protein Power-Up: Stir in a scoop of your favorite protein powder to the dry mix for a post-workout boost!
-
Trail Mix Style: Add your favorite nuts and seeds—think cashews, walnuts, or flaxseeds—for that crunchy trail mix feeling.
-
Pumpkin Spice Delight: For a seasonal treat, add pumpkin puree, pumpkin spice, and a few chocolate chips to turn these bars into a fall favorite!
Chef’s Notes
Over the years, I’ve tinkered with this recipe quite a bit. Initially, it was a straightforward combination of oats and peanut butter, but I discovered adding a mix of textures and flavors made all the difference. Funny enough, my first attempt at adding chia seeds turned into a gooey mess because I forgot they expand in moisture! Lesson learned, right?
This recipe has evolved to embrace various flavors and dietary preferences, ensuring everyone can enjoy a tasty snack. Plus, every twist adds a delightful surprise, making these bars a family favorite.
FAQs and Troubleshooting
-
Why are my granola bars falling apart?
This could be due to not pressing the mixture firmly enough or having too many add-ins. Ensure it’s compact in the dish before chilling! -
How do I store them?
These bars can be stored in an airtight container in the fridge for up to a week. If you need to extend their life, you can freeze them for up to three months. -
Can I use quick oats instead of rolled oats?
Absolutely! Quick oats will work, but keep in mind that the texture might be a bit different—less chewy and more crumbly. -
What if I want to make these chocolate-free?
No problem! Just skip over the chocolate chips. You could add extra dried fruit or nuts in place of them for added flavor and texture.
Nutritional Info
While homemade no-bake granola bars can vary in nutrition based on ingredients, here’s a rough estimate per bar (assuming you make 12 from the recipe):
- Calories: 150–180
- Protein: 5g
- Carbs: 22g
- Fats: 7g
- Fiber: 3g
These bars provide a great balance of healthy fats, fiber, and protein, making them a wholesome choice for a snack. Plus, you know exactly what’s in them—no preservatives or mystery ingredients!
Final Thoughts
There you have it—your new favorite go-to recipe for Homemade No-Bake Granola Bars! Not only are they delicious and easy to make, but they also carry a little bit of nostalgia that’ll warm your heart. I hope you enjoy making these as much as I do and that they bring a smile to your face with every bite.
Remember, the kitchen is a place for creativity, so don’t hesitate to play around with this recipe. Share your creations, or even your kitchen mishaps with me—I would love to hear your stories! Now grab your apron, get busy in the kitchen, and let’s get snacking. Happy cooking!
Print
No-Bake Granola Bars
- Total Time: 120 minutes
- Yield: 12 servings 1x
- Diet: Vegetarian
Description
Delicious and chewy no-bake granola bars that are easy to make and perfect for snacks, lunchboxes, or breakfast.
Ingredients
- 2 cups rolled oats
- 1 cup nut butter (peanut butter or almond butter)
- 1/2 cup honey or maple syrup
- 1/2 cup chocolate chips (optional)
- 1/2 cup dried fruits (optional)
- 1/4 cup seeds (optional)
Instructions
- Gather your gear: a large mixing bowl, a spatula, and an 8×8 inch baking dish lined with parchment paper.
- Mix the dry ingredients by pouring the oats into the bowl and adding any seeds and dried fruits.
- Heat the nut butter and sweetener in a saucepan over low heat until smooth and warm.
- Combine everything together by pouring the warm mixture over the dry ingredients and mixing thoroughly.
- Press the mixture into the lined baking dish using parchment paper or your hands.
- Chill in the refrigerator for at least 1-2 hours to set.
- Slice into bars and enjoy!
Notes
These bars can be customized with various add-ins like coconut, protein powder or pumpkin spice for seasonal flavors.
- Prep Time: 15 minutes
- Cook Time: 0 minutes
- Category: Snack
- Method: No-Bake
- Cuisine: American
Nutrition
- Serving Size: 1 bar
- Calories: 165
- Sugar: 8g
- Sodium: 50mg
- Fat: 7g
- Saturated Fat: 1g
- Unsaturated Fat: 6g
- Trans Fat: 0g
- Carbohydrates: 22g
- Fiber: 3g
- Protein: 5g
- Cholesterol: 0mg
Keywords: granola bars, no-bake, healthy snacks, easy recipes, homemade snacks

Ingredient Summer Peach Mousse Trifles (No-Bake)
The Sweet Taste of Summer: Summer Peach Mousse Trifles
Hey there, fellow foodies! If you’re looking to add a splash of sunshine to your dessert table, I’ve got something real special for you. Today, we’re diving into the world of Summer Peach Mousse Trifles. This delightful layered treat is not only a feast for the eyes but also a celebration of all the juicy, sweet peaches the season has to offer! Perfect for those warm, lazy summer afternoons, these trifles embody everything I love about summer cooking—easy, fresh, and oh-so-satisfying. So, roll up your sleeves, and let’s get ready to create a dessert that’ll make your taste buds dance!
A Slice of Summer Nostalgia
Growing up, my Grandma Bea had the most incredible peach tree in her backyard. Every summer, my siblings and I would wait with bated breath for those fuzzy, golden beauties to ripen. One of my fondest memories is picking peaches on a sun-soaked afternoon, our hands sticky with juice and laughter.
Grandma would always whip up her famous peach cobbler, but she had a little secret: she would make a light, fluffy mousse from the ripest peaches, layering it with cake and whipped cream. It was heavenly! I remember racing to the kitchen, eager to help out—tasting and giggling as Grandma taught me the magic of turning simple ingredients into something extraordinary.
That’s how the idea for these Summer Peach Mousse Trifles was born! This recipe captures those memories, combining my love for peaches, cake, and whipped cream into a modern dessert that’s both beautiful and comforting. It’s a dish that brings people together, just like those summer days in Grandma Bea’s kitchen.
Ingredients
Now, let’s gather the ingredients for our Summer Peach Mousse Trifles. Here’s what you’ll need:
-
2 cups fresh peaches, diced
Nothing beats the flavor of ripe summer peaches! If you can’t find fresh ones, consider using canned peaches in juice—just drain them well. -
1 box yellow cake mix
Using a boxed cake mix keeps it simple, but if you have a favorite homemade recipe, feel free to use that! Just adjust the baking time accordingly. -
3 eggs
Essential for making the cake fluffy and light. If you’re vegan or egg-free, you can substitute with flax eggs (1 tablespoon of ground flaxseed mixed with 2.5 tablespoons of water per egg, let sit for 5 minutes). -
1/3 cup vegetable oil
This adds moisture to the cake. You can use melted coconut oil or even applesauce for a lighter version. -
1 cup water
Simple and straightforward, this helps activate the cake mix. You can swap it with peach juice for an extra peachy flavor! -
1 cup heavy whipping cream
This is the magic ingredient for our mousse! If you’re looking for a lighter option, coconut cream chilled in the fridge also works beautifully. -
1/4 cup powdered sugar
Just a touch to sweeten our mousse. Make it more or less depending on your sweetness preference! -
1 teaspoon vanilla extract
Adds lovely warmth to both the mousse and the cake. Use pure vanilla extract for the best flavor—or even try almond extract for a twist!
Step-by-Step Instructions
Alright, friends! Let’s jump into the cooking process of our Summer Peach Mousse Trifles. Follow these steps, and you’ll be well on your way to an irresistible dessert!
-
Preheat the Oven
Start by preheating your oven to 350°F (180°C). This ensures that your cake bakes evenly. While the oven is warming up, go ahead and grease your cake pan with a little bit of cooking spray. -
Prepare the Cake Mix
In a large mixing bowl, combine the yellow cake mix, eggs, vegetable oil, and water. Using an electric mixer, beat on medium speed for about 2 minutes until the batter is smooth. Watch for lumps and make sure everything is well incorporated! -
Bake the Cake
Pour the batter into the greased cake pan. Bake according to the package instructions—typically, you’re looking at about 28-30 minutes, but it’s always good to check with a toothpick. Once it comes out clean, you know it’s done! Allow the cake to cool completely in the pan before transferring it to a wire rack. -
Make the Peach Mousse
Once the cake is cool, whip the heavy cream in a chilled bowl using an electric mixer. Start on low to avoid splashing, then gradually increase to high speed. After a minute, sprinkle in the powdered sugar and vanilla extract. Beat until stiff peaks form. This means when you lift the beaters, the cream holds its shape perfectly! -
Fold in the Peaches
Gently fold in the diced peaches into the whipped cream using a spatula. Be careful not to deflate the whipped cream. This is where the magic happens—the mixture transforms into a luscious, creamy mousse filled with sweet peachy goodness! -
Assemble the Trifles
Cut the cooled cake into even squares. In your serving glasses or bowls, start layering! Begin with a layer of cake, followed by a layer of peach mousse, and repeat until you reach the top. Finish with a dollop of remaining mousse, and if you’re feeling fancy, top with a slice of fresh peach or a sprig of mint for that wow factor.
Serving Suggestions
Presentation is key when it comes to trifles! Grab your prettiest glassware—like mason jars, parfait glasses, or even elegant stemware. Not only does this add charm, but your guests will appreciate the effort!
Layer your cake and mousse carefully, showcasing the beautiful colors of the peaches. You can even drizzle a little extra peach juice or a light syrup on the sides of the glass for an extra splash of flavor. These Summer Peach Mousse Trifles are perfect for summer picnics, backyard barbecues, or simply a fun family dessert after dinner. The best part? You can make them ahead of time and store them in the fridge for a few hours before serving!
Recipe Variations
Why not get creative with this recipe? Here are a few fun ideas to put your own spin on the Summer Peach Mousse Trifles:
-
Berry Bliss
Swap out the peaches for fresh strawberries or raspberries! This will give the mousse a vibrant red hue and a tangy flavor. -
Tropical Twist
Add some diced pineapple and coconut flakes to the mousse for a tropical vibe! You can use coconut yogurt to replace the whipped cream for a light and refreshing variation. -
Nutty Delight
Stir in some finely chopped nuts or nut butter into the mousse for added crunch and flavor. Almonds or pecans would work beautifully against the soft textures. -
Spiced Mousse
For an autumn feel, add a sprinkle of cinnamon or nutmeg to the mousse. It gives a cozy twist that’s equally delightful! -
Chocolate Drizzle
Before serving, drizzle some melted chocolate over the top for a decadent touch. It pairs surprisingly well with the fruity flavors.
Chef’s Notes
Every recipe evolves over time, and this one is no exception! I’ve experimented with various cakes, from chocolate to carrot, and fillings like lemon curd and even Nutella! Some days, I might even throw in some whipped cream cheese for a tangy twist. The beauty of trifles is their versatility. You can get creative based on what’s in season or what’s in your pantry. Remember, cooking is all about having fun in the kitchen and making memories—just like those summer afternoons I spent with Grandma Bea!
FAQs and Troubleshooting
1. My cake is too dense. What went wrong?
Sometimes it’s easy to overmix your batter. Make sure you mix just until combined, as overmixing can lead to a denser cake.
2. How can I store leftovers?
You can store leftovers in the fridge for up to 3 days! Just cover them tightly with plastic wrap to keep them fresh, but note that the cake may become a bit soggy.
3. The mousse didn’t set properly; what happened?
Make sure your cream was cold when you whipped it. Additionally, overwhipping can cause the cream to turn grainy or curdled instead of fluffy.
4. Can I make these trifles in advance?
Absolutely! They can be made a few hours ahead of serving and stored in the fridge. Just be sure to add any garnishes right before serving for the freshest taste!
Nutritional Info
While indulging in treats is part of life, it’s good to note the nutritional info for those who are keeping an eye on it! Here’s a rough estimate for one serving (1 trifle):
- Calories: Approximately 350-400
- Protein: 5g
- Fat: 20g
- Carbohydrates: 45g
- Sugar: 30g
Now, keep in mind, these values can vary based on specific ingredient choices and serving sizes.
Final Thoughts
There you have it—your guide to creating refreshing and delightful Summer Peach Mousse Trifles that will wow your family and friends. I hope you feel as inspired as I do whenever I whip up this dessert. The joy of cooking lies in sharing flavors, stories, and love through food.
Next time you bite into this peachy mousse goodness, let it remind you of sunlit summer days, laughter, and the simple pleasure of good company. So grab your peaches, gather your loved ones, and let’s celebrate the irresistible flavors of summer. Until next time, happy cooking and may your kitchen always be filled with warmth and wonderful aromas!
Print
Summer Peach Mousse Trifles
- Total Time: 45 minutes
- Yield: 4 servings 1x
- Diet: Vegetarian
Description
A delightful layered dessert featuring fresh peaches, cake and whipped cream, perfect for summer gatherings.
Ingredients
- 2 cups fresh peaches, diced
- 1 box yellow cake mix
- 3 eggs
- 1/3 cup vegetable oil
- 1 cup water
- 1 cup heavy whipping cream
- 1/4 cup powdered sugar
- 1 teaspoon vanilla extract
Instructions
- Preheat the oven to 350°F (180°C) and grease your cake pan.
- Combine the cake mix, eggs, vegetable oil, and water in a mixing bowl and beat for 2 minutes until smooth.
- Pour the batter into the greased pan and bake according to package instructions, about 28-30 minutes.
- Cool the cake completely before transferring it to a wire rack.
- Whip the heavy cream until soft peaks form. Add the powdered sugar and vanilla, and continue beating until stiff peaks form.
- Fold in the diced peaches into the whipped cream gently.
- Cut the cooled cake into squares and layer in serving glasses with peach mousse.
- Top with a dollop of mousse and a slice of peach or mint if desired.
Notes
Make ahead of time and store in the fridge for a few hours before serving for best results.
- Prep Time: 15 minutes
- Cook Time: 30 minutes
- Category: Dessert
- Method: Layering
- Cuisine: American
Nutrition
- Serving Size: 1 serving
- Calories: 350
- Sugar: 30g
- Sodium: 200mg
- Fat: 20g
- Saturated Fat: 10g
- Unsaturated Fat: 8g
- Trans Fat: 0g
- Carbohydrates: 45g
- Fiber: 2g
- Protein: 5g
- Cholesterol: 60mg
Keywords: peach mousse, summer dessert, trifles, layered dessert, fresh peaches, easy dessert
No-Bake Protein Brownie Bites
No-Bake Protein Brownie Bites: Sweet Treats Without the Heat
Hey there, food lovers! Beau Collier here—your friendly kitchen enthusiast, inviting you on a delightful culinary adventure! Today, we’re diving into a sweet treat that’ll leave both your taste buds and your body feeling oh-so-good: No-Bake Protein Brownie Bites. These little wonders are the restorative stash you didn’t know you needed—perfect for an energy boost or a healthy dessert option!
Now, let’s be real for a moment. Who among us hasn’t indulged in a fudgy brownie, feeling all warm and satisfied as we enjoy every bite? But sometimes, you want that scrumptious chocolatey goodness without the guilt or the oven’s fiery embrace. These brownie bites are rich, fudgy, and packed with protein, making them the go-to snack that’ll simplify your life while satisfying your chocolate craving.
What’s even better? These brownies don’t require any baking, making them ideal for hot summer days when the last thing you want to do is turn on the oven. Plus, they’re incredibly easy to whip up, so you can spend more time enjoying food and less time in the kitchen! It’s the best of both worlds, friends.
So grab your favorite mixing bowl and let’s create a no-bake magic that’ll impress everyone from your kids to your friends at your next potluck. Trust me—once you sink your teeth into these bites, you’ll want to make a double batch!
Personal Story
Let me take you back to my childhood kitchen, where the magic of baking first hooked me. My grandmother, a culinary diva in her own right, was a master at turning simple ingredients into delightful treats. I remember standing on a stool, inching my way closer to the countertop, hoping to catch a glimpse of her hands working their magic. One of my fondest memories involves a cocoa-heavy brownie recipe that she created—full of love and just a sprinkle of mischief.
But here’s the twist: she loved to sneak in healthy ingredients unbeknownst to the taste-testing neighborhood kids! We’d all gather in anticipation, and one day, she snuck some cottage cheese into her brownie batter. When I took that first bite, I was convinced I had just tasted pure chocolate heaven. It wasn’t until years later, while experimenting in my own kitchen, that I revisited that idea—combining what I loved about those brownies with a protein-packed twist. And thus, the No-Bake Protein Brownie Bites were born! With every batch, I’m reminded of that spirited kitchen and grandmother’s cheerful laughter—a reminder that cooking is more than just food; it’s about love, connection, and a sprinkle of nostalgia.
Ingredients
Here’s what you’ll need to whip up these tasty treats:
-
1 cup cottage cheese
This creamy base adds protein and moisture without overpowering the brownie flavor. If you’re dairy-free, try using silken tofu for a similar texture! -
1/2 cup almond butter
This nutty goodness provides healthy fats and creaminess. If you’re allergic to nuts, sunflower seed butter works like a charm. -
1/4 cup honey or maple syrup
This natural sweetener gives the brownies a touch of sweetness. Feel free to adjust the amount according to your sweet tooth! -
1/2 cup cocoa powder
The star of the show! Opt for unsweetened cocoa powder for that deep, rich chocolate flavor. You can also experiment with dark cocoa powder for an intense hit. -
1/2 cup rolled oats
These add texture and a bit of chewiness. If you’re gluten-free, just ensure your oats are certified gluten-free! -
1/4 cup chocolate chips (optional)
Because life is always better with chocolate! Use dark or milk chocolate chips, or even go ahead and get wild with white chocolate! -
1 tsp vanilla extract
This aromatic beauty enhances the chocolate flavor. Always opt for pure vanilla extract for the best taste! -
Pinch of salt
A little salt balances out the sweetness and brings out the flavors beautifully.
Step-by-Step Instructions
Ready to roll up your sleeves and create some magic? Here’s how to craft your No-Bake Protein Brownie Bites:
-
Gather Your Ingredients:
The first step in any successful cooking adventure is gathering everything you need. Load up that counter with your ingredients, and let’s get this party started! -
Blend the Base:
In a mixing bowl, combine the cottage cheese and almond butter until smooth. You can use a hand mixer, a blender, or even a food processor. This ensures your brownie base is creamy and lump-free. Trust me, it’ll make a difference in texture! -
Sweeten It Up:
Add in your honey or maple syrup, cocoa powder, and vanilla extract. Mix until everything is well combined. The kitchen should start smelling like a dream right about now. Don’t be afraid to give it a little taste—just a tiny spoonful won’t hurt! -
Incorporate the Dry Ingredients:
Throw in the rolled oats and salt. Stir gently with a spatula or spoon until fully incorporated. The batter should start to come together and give you a sense of chewy, chocolaty goodness. -
Chocolate Chips for Joy:
If you choose to include chocolate chips (and I highly recommend you do!), fold them into the mixture now. This is where the magic truly happens—every bite will reveal a delicious chocolate surprise! -
Shape the Bites:
Now, this is where the fun begins! Using your hands or a small cookie scoop, form the dough into bite-sized balls. You want them to be about 1-inch in diameter; they’re meant to be poppable! -
Chill for the Perfect Texture:
Place the bites on a parchment-lined baking sheet or plate, then pop them in the fridge for at least 30 minutes. This will help firm them up and make them even tastier. (Almost like letting them marinate in their chocolatey goodness!) -
Enjoy the Fruits of Your Labor:
After they’ve chilled, grab a couple (or five) because everyone deserves some healthy chocolatey happiness in their life!
Serving Suggestions
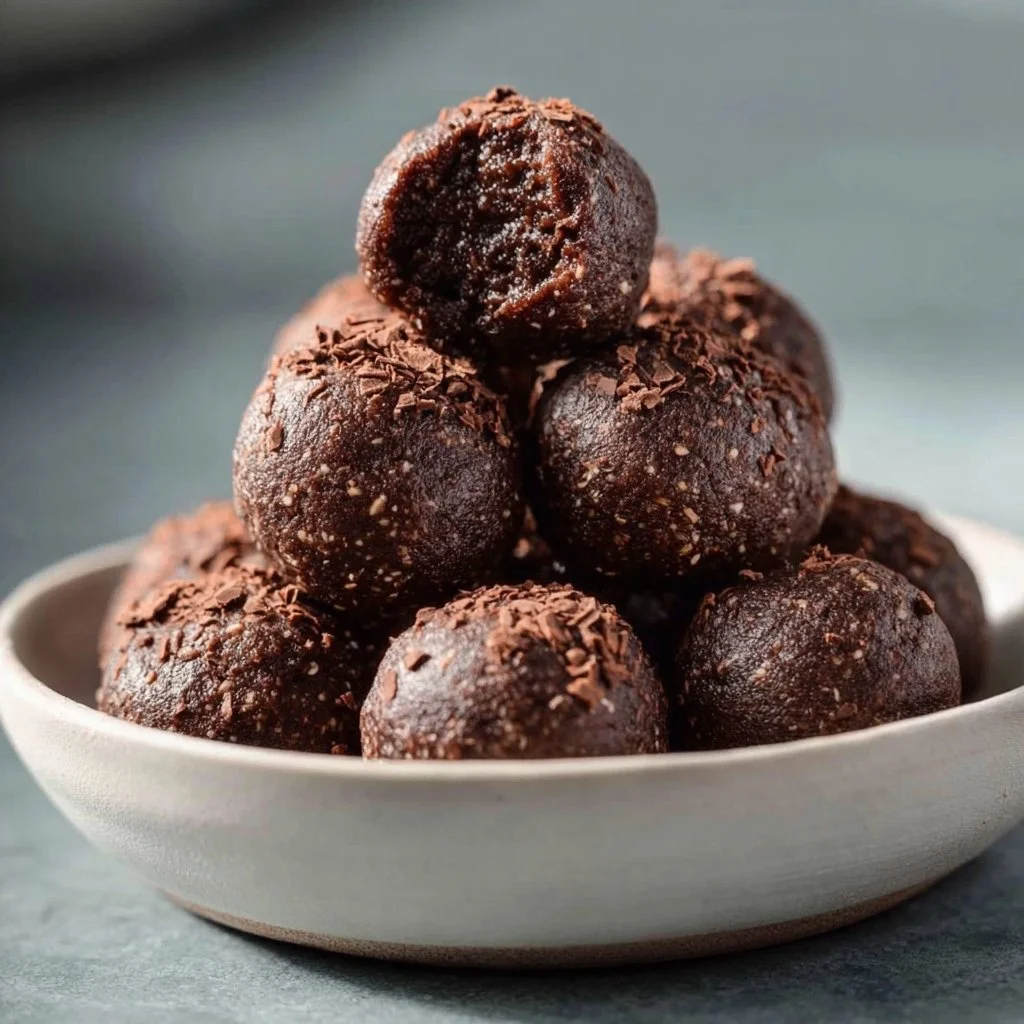
Now that you’ve created your masterpiece, it’s time to serve them up! You can simply present these delicious bites in a beautiful bowl, letting the cocoa-dusted surface shine—a perfect centerpiece for any gathering. For added flair, sprinkle a little extra cocoa powder on top or even drizzle some melted dark chocolate if you’re feeling extra indulgent.
Pair your No-Bake Protein Brownie Bites with a glass of almond milk or a scoop of your favorite yogurt for a complete treat. These pops of chocolate are also fantastic served alongside a fruit platter; the fresh fruit balances out the richness of the brownies.
And if you’re hosting a get-together, consider my favorite way to serve them: on a beautiful cheese board, interspersed with nuts and fruits. This creates a delightful sweet-and-savory experience that’ll have your guests raving!
Recipe Variations
Looking to kick it up a notch or change things up a bit? Here are some fun variations you can try:
-
Nutty Delight: Add in chopped nuts, such as walnuts or pecans, for extra crunch and a lovely texture.
-
Dried Fruit Bliss: Toss in some chopped dried fruit like cranberries, apricots, or cherries for a sweet and tangy burst in the bites.
-
Minty Freshness: Stir in a few drops of peppermint extract for a refreshing mint chocolate flavor that’s perfect for the holiday season!
-
Spicy Chocolate: How about adding a pinch of cayenne or cinnamon to the mix? It might sound odd, but trust me—spicy chocolate is an underrated flavor explosion.
-
Nut-Free Version: Swap out the almond butter for tahini or sunflower seed butter for a nut-free alternative that’s just as flavorful!
Chef’s Notes
Now that you’ve created such a delightful treat, let me share one of my favorite kitchen blunders related to this recipe. One time, I was in a hurry and accidentally grabbed the cayenne pepper instead of cocoa powder! The result? A brownie bite that had some serious kick. Admittedly, it was a hilarious mistake, causing my friends to laugh, sweat, and eat all at the same time. They didn’t waste any time dubbing them “Fiery Brownie Bites.” Who knows—maybe that could start a fun new trend!
As for evolving this recipe, every time I make these brownies, I always find new ways to reinterpret it. Whether it’s changing out the nut butter or trying different add-ins, it’s amazing how versatile they can be!
FAQs and Troubleshooting
As with any recipe, you might have a few questions or run into some hiccups. Let’s tackle a few common issues:
-
Why are my brownie bites crumbly?
If your mixture is too dry and crumbly, it may not have enough moisture. Try adding a little more almond butter or a splash of almond milk until you reach the desired consistency. -
Can I make these without cottage cheese?
Absolutely! You can substitute with silken tofu or a dairy-free yogurt to maintain creaminess without the dairy. -
How long do they last?
If stored in an airtight container, these brownie bites can last in the fridge for about one week. Trust me, they taste good—if they last that long! -
Do they freeze well?
Yes! You can freeze these bites for up to three months. Just make sure to separate layers with parchment paper before freezing to avoid sticking. When you’re ready to indulge, simply allow them to thaw in the fridge.
Nutritional Info
While I’m no nutritionist, I’ve poured my heart into crafting a treat that’s both delicious and nourishing! Each No-Bake Protein Brownie Bite is packed with protein from the cottage cheese and almond butter, making them a satisfying snack. With the inclusion of rolled oats, you’re also receiving essential fiber to keep your digestive system happy.
Here’s a quick breakdown (approximately, depending on how large you make them):
- Calories: ~100 per bite
- Protein: ~3g
- Fat: ~6g (mostly healthy fats!)
- Carbohydrates: ~10g
- Fiber: ~1g
Now, you can bite into goodness, knowing that you’re treating your body right while also indulging your sweet tooth!
Final Thoughts
And there you have it: your No-Bake Protein Brownie Bites are ready to be devoured! I hope you enjoyed this journey as much as I did. These little bites of joy are not just a recipe; they’re an expression of love, warmth, and nostalgia, perfectly suited to brighten up a snack or dessert time.
Whether you’re enjoying them as a pick-me-up during a busy day, serving them at a gathering, or snuggling up with a good book, these brownie bites will keep the smiles coming! I’d love to hear about your experiences with this recipe—feel free to share your thoughts and any creative twists you added along the way!
So until next time, keep spreading joy with food, keep experimenting, and remember: every meal you create is an opportunity to connect with others. Happy cooking, my friends! 🍫❤️
Print
No-Bake Protein Brownie Bites
- Total Time: 45 minutes
- Yield: 12 servings 1x
- Diet: Vegetarian
Description
Rich, fudgy, and packed with protein, these no-bake brownie bites are the perfect guilt-free treat.
Ingredients
- 1 cup cottage cheese
- 1/2 cup almond butter
- 1/4 cup honey or maple syrup
- 1/2 cup cocoa powder
- 1/2 cup rolled oats
- 1/4 cup chocolate chips (optional)
- 1 tsp vanilla extract
- Pinch of salt
Instructions
- Gather Your Ingredients: Gather everything you need.
- Blend the Base: Combine cottage cheese and almond butter until smooth.
- Sweeten It Up: Add honey or maple syrup, cocoa powder, and vanilla extract; mix well.
- Incorporate the Dry Ingredients: Add rolled oats and salt; stir until fully combined.
- Chocolate Chips for Joy: Fold chocolate chips into the mixture if using.
- Shape the Bites: Form the dough into 1-inch balls.
- Chill for the Perfect Texture: Refrigerate for at least 30 minutes.
- Enjoy the Fruits of Your Labor: Serve and indulge!
Notes
Serve with a glass of almond milk or yogurt. Pairs well with fresh fruit.
- Prep Time: 15 minutes
- Cook Time: 0 minutes
- Category: Dessert
- Method: No-Bake
- Cuisine: American
Nutrition
- Serving Size: 1 bite
- Calories: 100
- Sugar: 7g
- Sodium: 40mg
- Fat: 6g
- Saturated Fat: 1g
- Unsaturated Fat: 5g
- Trans Fat: 0g
- Carbohydrates: 10g
- Fiber: 1g
- Protein: 3g
- Cholesterol: 5mg
Keywords: no-bake, protein bites, healthy snacks, brownie bites, dessert