
Beginner-Friendly Rugelach Cookies: A Simple Pastry Recipe
The Irresistible Allure of Rugelach Cookies: A Sweet Journey
Hey there, fabulous food lovers! I’m so glad you stopped by Feastical today. Let’s take a delicious journey into the world of Rugelach cookies—a treat that has a special place in my heart and certainly in my stomach! If you’ve never dabbled in the art of making these little crescent-shaped delicacies, today’s your lucky day. I’ll guide you through every step of the process, sprinkle in some fun kitchen tidbits, and sprinkle a bit of good vibes to ensure your experience is as joyful as the first bite into that flaky, buttery goodness.
Rugelach has a rich history that traces back to Eastern European Jewish communities, but don’t let the traditional roots fool you; these cookies have become favorites in many households worldwide. They’re like tiny pastry presents waiting to be unwrapped, filled with sweet, flavorful surprises. The beauty of Rugelach lies in its versatility—it dances seamlessly between sweet and nutty and can be adapted to suit whatever fillings your heart (or pantry) desires. That means if you’re a creative foodie like me, the sky’s the limit!
Now, grab your rolling pin, preheat that oven, and let’s dive into what makes these Rugelach cookies so special. Whether you’re baking for a celebration, a cozy night at home, or simply because you crave something comforting, these cookies will surely bring a smile to your face.
Personal Story
Many moons ago, I found myself in my grandmother’s kitchen, the heart of our family gatherings. The air was thick with the scent of cinnamon and baked goods, but the real magic was happening at the counter where Grandma was rolling out dough for her famous Rugelach. As a curious kid, I stood on my tiptoes, watching her hands work the pastry with a skill that came from years of love and practice.
I can still see the joy on her face as she spread apricot jam over the dough and sprinkled it with walnuts and cinnamon sugar. She would always invite me to help, “Just a little bit of cinnamon here, and don’t forget to fold that edge in!” Little did I know that those moments of bonding would shape my love for baking and the importance of tradition in cooking.
Later, as I enjoyed the warm, flaky cookies fresh out of the oven, I learned they weren’t just treats—they were a heritage passed down through generations, each recipe carrying its own story. Now, I bring those stories into my own kitchen. Every time I whip up batch after batch of these delightful cookies, I recapture that joy and nostalgia. Today, we’re going to make our version of Grandma’s classic Rugelach, allowing those sweet memories to unfold all over again.
Ingredients
Let’s gather our ingredients! Here’s what you’ll need to whip up some fantastic Rugelach—each item plays a crucial role in achieving that perfect texture and flavor.
-
1 cup unsalted butter, softened: Butter is the star of the show! It provides richness and a flaky texture. If you’re in a pinch, you can substitute with margarine, but I highly recommend the real deal for that luscious flavor.
-
8 ounces cream cheese, softened: This adds a creamy, tangy flavor that balances the sweetness beautifully. For a lighter version, you can use Neufchâtel cheese.
-
1/4 cup granulated sugar: Just a dash of sweetness! This helps to enhance the overall flavor profile. You can use coconut sugar for a more caramel-like taste if you prefer.
-
1 teaspoon vanilla extract: A must-have in baking! Vanilla elevates the flavors and adds warmth. Pure vanilla extract is best, but imitation works too if you’re out.
-
2 cups all-purpose flour: This is the base for your dough. If you’re looking for a gluten-free option, a 1:1 gluten-free flour blend can stand in nicely.
-
1/2 cup apricot jam: The filling! Feel free to play around with flavors like raspberry or blackberry jam for a fun twist, but I love the classic apricot for its balance of tartness and sweetness.
-
1/2 cup chopped walnuts: They add a delightful crunch. If you’re nut-free, seeds or oats can add some texture without compromising the taste.
-
1 egg, beaten (for egg wash): This gives the Rugelach a beautiful golden color when baked. You can skip it if you want a vegan version or use a flax egg as a substitute.
-
1 tablespoon cinnamon sugar (optional): A little sprinkle on top adds a nice touch of sweetness and aromatic flavor—perfect for those of us who can’t resist a little cinnamon magic!
Step-by-Step Instructions
Now that we’ve gathered all the goodies, it’s time to get those hands busy! Follow these detailed steps to create your Rugelach cookies.
Step 1: Make the Dough
-
In a large mixing bowl, cream together the softened butter and cream cheese until smooth. I like to use a hand mixer for this, but you can also use a spatula if you’re feeling a bit nostalgic and want to channel your inner Grandma.
-
Add in the granulated sugar and vanilla extract, mixing until well combined. This is where the magic begins—mixing with joyous vigor helps create a fluffy and light texture.
-
Gradually add in the all-purpose flour, mixing until a dough forms. The dough should be soft and slightly tacky but manageable.
Step 2: Chill the Dough
- Divide the dough into four equal pieces and form each into a disk. Wrap them in plastic wrap and pop them into the fridge for at least 30 minutes. Chilling helps the butter firm up, making the dough easier to roll out!
Step 3: Roll and Fill
-
Preheat your oven to 350°F (175°C). Line a baking sheet with parchment paper—you want to keep that kitchen clean!
-
Lightly flour your work surface and roll out one disk of dough into a circle about 1/8-inch thick. Don’t stress about perfection! The beauty of Rugelach is that they’re homemade!
-
Spread a generous layer of apricot jam over the rolled-out dough, leaving about an inch from the edge. Sprinkle the jam with chopped walnuts and a dash of cinnamon sugar, if using. The aroma of cinnamon wafting up during this step is pure bliss!
Step 4: Cut and Shape
-
Now comes the fun part! Using a sharp knife or a pizza cutter, slice the dough circle into 8 even wedges (like a pizza).
-
Starting from the wide end, gently roll each wedge towards the tip, forming a crescent shape. Place the rolled cookies on your lined baking sheet, making sure you leave enough space between them.
-
Brush the tops of each cookie with the beaten egg wash. For an extra dose of sweetness, sprinkle a little more cinnamon sugar on top!
Step 5: Bake to Perfection
-
Bake in your preheated oven for about 25-30 minutes, or until they’re golden brown and the scent of baked goods fills your kitchen. Keep an eye on them; the mouth-watering aroma will have you tempted way before they’re done!
-
Once baked, allow your Rugelach to cool on the baking sheet for a few minutes before transferring them to a wire rack. The waiting is tough, but trust me, they’re worth every morsel!
Serving Suggestions
Oh, the joy of serving these Rugelach cookies! They’re stunning on a plate, with their golden spirals and delicious fillings peeking through. For a cozy gathering, set them on a rustic wooden platter accompanied by a lovely herbal tea or a rich cup of coffee.
You can also drizzle some melted chocolate over them for a little extravagance, or pair them with fresh berries and whipped cream for a more glamorous dessert experience. They make delightful gifts too! Just arrange the cookies in a cute box tied up with a ribbon, and you’ve got the perfect present for any occasion.
Recipe Variations
Feeling adventurous? Here are some fun twists on the classic Rugelach:
-
Nut-Free Option: Switch walnuts for rolled oats or sunflower seeds for a crunchy texture without the nuts.
-
Spicy Chocolate: Add a sprinkle of chili powder to your cinnamon sugar for a spicy chocolate twist. Dark chocolate or Nutella could also be delectable fillings!
-
Fruit Infusion: Use different jams or preserves like raspberry, cherry, or even Nut butter for a protein-packed option.
-
Citrus Zest: Mix in some orange or lemon zest to the dough for a refreshing burst of flavor.
-
Vegan Version: Swap butter and cream cheese for vegan alternatives, and use a flax egg instead of the egg wash for a plant-based treat.
Chef’s Notes
These Rugelach cookies have had a long journey for me, evolving through my experiences and inspirations. I remember when I first experimented with adding a hint of cardamom to the flour mixture—pure magic! Every time I whip them up, whether I’m channeling my grandmother or trying my own spins, I’m reminded that cooking is all about love, creativity, and experimentation.
If you ever find yourself in a pinch, remember that these cookies can be frozen before baking. Just wrap them tightly and keep them in the freezer for up to a month. When you’re ready to indulge, bake them straight from the freezer—just add a few extra minutes to the bake time.
FAQs and Troubleshooting
Here are some common questions and tips to ensure your rugelach journey is as smooth as butter!
-
Q: Why are my cookies not flaky?
- A: Ensure your butter is cold and don’t overmix the dough. Keep it chill!
-
Q: Can I make the dough in advance?
- A: Absolutely! Just wrap it well and keep it in the fridge for up to 3 days or freezer for one month.
-
Q: What if my dough is too sticky?
- A: Don’t panic! Just add a little bit of flour, but be careful not to overdo it as that can make the dough tough.
-
Q: Can I make these without cream cheese?
- A: You can substitute with more butter or try a dairy-free cream cheese alternative if you’re vegan.
Nutritional Info
While Rugelach cookies are a delightful indulgence, they also come with a few nutritional notes to keep in mind. Each cookie (based on a standard recipe) may contain approximately:
- Calories: 150-200
- Fat: 10g
- Carbohydrates: 15g
- Protein: 2g
- Sugar: 5g
As with any treat, moderation is key, but the happiness they bring is truly worth it!
Final Thoughts
There you have it, my fellow foodies! Your road map to perfecting delicious Rugelach cookies filled with love and warmth. Baking these delightful treats is about more than just sweetness; it’s about creating memorable moments, just like my Grandma did.
I can’t wait for you to try this recipe—trust me, your taste buds will be doing a happy dance! So, gather your friends and family, create your memories, and feel free to share your own twists and stories here at Feastical. Remember, the kitchen is a space of joy, creativity, and love. Happy baking! 🥐❤️
Now, go on and whip up those Rugelach cookies. Let them warm your heart and fill your home with happiness!
Print
Rugelach Cookies
- Total Time: 45 minutes
- Yield: 32 cookies 1x
- Diet: Vegetarian
Description
Delightfully flaky and buttery Rugelach cookies filled with sweet apricot jam and crunchy walnuts, perfect for any occasion.
Ingredients
- 1 cup unsalted butter, softened
- 8 ounces cream cheese, softened
- 1/4 cup granulated sugar
- 1 teaspoon vanilla extract
- 2 cups all-purpose flour
- 1/2 cup apricot jam
- 1/2 cup chopped walnuts
- 1 egg, beaten (for egg wash)
- 1 tablespoon cinnamon sugar (optional)
Instructions
- Make the dough: In a large mixing bowl, cream together the softened butter and cream cheese until smooth. Add in the granulated sugar and vanilla extract, mixing until well combined. Gradually add in the all-purpose flour, mixing until a dough forms.
- Chill the dough: Divide the dough into four equal pieces and form each into a disk. Wrap them in plastic wrap and pop them into the fridge for at least 30 minutes.
- Roll and fill: Preheat your oven to 350°F (175°C). Lightly flour your work surface and roll out one disk of dough into a circle about 1/8-inch thick. Spread a generous layer of apricot jam over the rolled-out dough, sprinkle with chopped walnuts and cinnamon sugar, if using.
- Cut and shape: Slice the dough circle into 8 wedges. Starting from the wide end, gently roll each wedge towards the tip, forming a crescent shape. Place on a lined baking sheet, brush with egg wash, and sprinkle with more cinnamon sugar if desired.
- Bake to perfection: Bake for about 25-30 minutes, or until golden brown. Allow to cool before transferring to a wire rack.
Notes
These cookies can be frozen before baking. Wrap tightly and keep in the freezer for up to a month. Bake from frozen—add a few extra minutes to the bake time.
- Prep Time: 15 minutes
- Cook Time: 30 minutes
- Category: Dessert
- Method: Baking
- Cuisine: Jewish
Nutrition
- Serving Size: 1 cookie
- Calories: 175
- Sugar: 5g
- Sodium: 250mg
- Fat: 11g
- Saturated Fat: 6g
- Unsaturated Fat: 4g
- Trans Fat: 0g
- Carbohydrates: 18g
- Fiber: 1g
- Protein: 3g
- Cholesterol: 30mg
Keywords: Rugelach, cookies, Jewish dessert, apricot jam, walnuts, baking
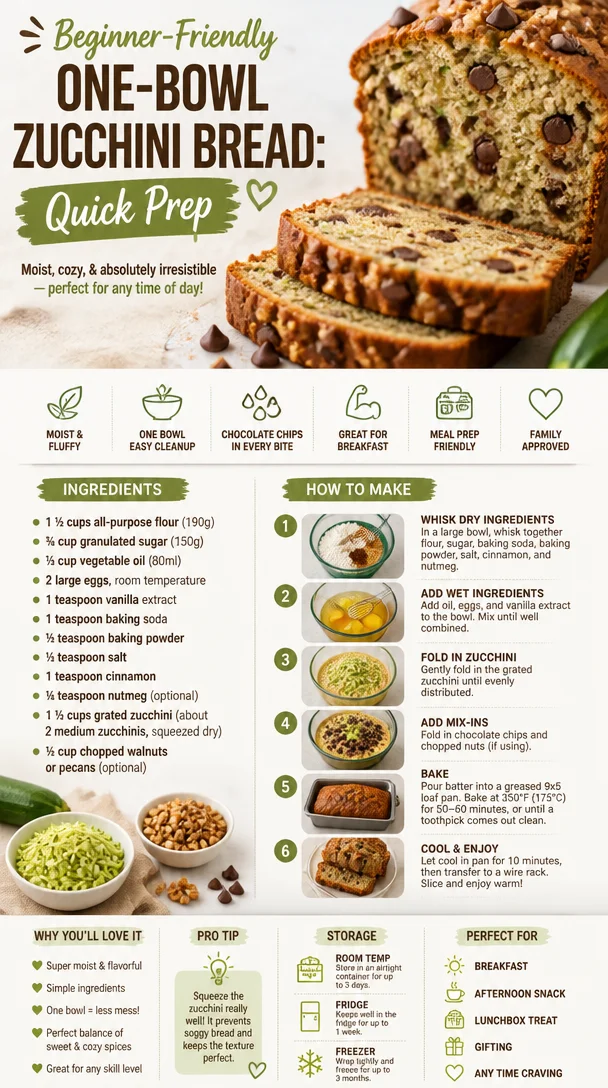
Beginner-Friendly One-Bowl Zucchini Bread: Quick Prep
Easy One-Bowl Zucchini Bread Recipe for Beginner Bakers to Perfect
Hey there, fellow food lovers! Beau Collier here, and I’m thrilled to welcome you to Feastical! Today, we’re diving into the world of vibrant flavors and homey comfort with none other than an Easy One-Bowl Zucchini Bread recipe. This delightful treat isn’t just scrumptious; it’s packed with all the feels that make you cozy up and share the love. Whether you’re an experienced baker or just figuring out how a whisk works, this is the perfect recipe to elevate your baking game without the stress. So, let’s get started and create something that will make your kitchen smell like pure joy!
Introduction: Baking with Zucchini – A Match Made in Culinary Heaven
If you’re anything like me, you probably have a basket of zucchinis sitting on your countertop, thanks to a generous neighbor or maybe your own garden adventure! Zucchinis are incredibly versatile – they can shine in savory dishes, but today we’re here to talk about how they can make your baked goods ultra-moist and flavor-packed. The beauty of zucchini bread lies in its ability to transform a vegetable into a delicious dessert or snack, maintaining a delightful balance of sweetness and a hint of spice.
It reminds me of those warm summer days when my grandmother would make her famous zucchini bread. Her kitchen was always filled with laughter, the sweet aroma of baked goods, and the lively chatter of family gathered together. Every slice was like a slice of life – filled with memorable moments and love baked right in. I can still picture her grating zucchini like a pro, her apron dusted with flour and the warm sunlight streaming through the window. That memory is not only sweet but also fondly connected to this wonderful recipe.
So, gather up your zucchini and let’s get cracking on this easy one-bowl zucchini bread recipe that’ll leave your friends asking for seconds!
Personal Story
The first time I tried my hand at zucchini bread, I was nervous. I thought, “How the heck can a vegetable turn into something so delicious?” Little did I know, it would become one of my go-to recipes! I remember spending an afternoon at my grandmother’s kitchen, where she casually tossed together her ingredients while sharing stories of her childhood in the kitchen. I was so focused on the whisking and measuring that I barely heard her give tips about patience and love being the secret ingredients.
That first bite of the fresh-out-of-the-oven zucchini bread transported me to those golden moments of family togetherness. Ever since that day, I’ve connected baking with joy, love, and creating lasting memories. Trust me, as you mix and bake this recipe, let the anticipation build; the final product will not only satisfy your taste buds but also bring a piece of nostalgia to your table. Let’s jump right into the ingredients!
Ingredients
Here’s what you’ll need to whip up this delicious zucchini bread. Don’t worry; it’s all simple stuff!
-
1 ½ cups all-purpose flour (190g): A staple in most kitchens, this flour provides the backbone for the bread. If you’re looking for an alternative, whole wheat flour can be a nutritious option—just keep an eye on the texture!
-
¾ cup granulated sugar (150g): This sugar brings sweetness to our zucchini bread! You can swap it out for coconut sugar or even honey if you like a different flavor profile—just adjust your liquid ingredients accordingly.
-
⅓ cup vegetable oil (80ml): This keeps our bread moist and tender. Feel free to use melted coconut oil or applesauce for a lower-fat option. You can also try olive oil for a little twist!
-
2 large eggs, room temperature: Eggs act as the binding agent, helping everything stick together beautifully. If you’d like an egg-free variation, try using unsweetened applesauce—about ¼ cup per egg!
-
1 teaspoon vanilla extract: This adds a lovely depth of flavor. Always opt for pure vanilla extract if you can – it makes a noticeable difference!
-
1 teaspoon baking soda: This is your leavening agent, giving the bread a lovely lift. If you run out, you can use baking powder, but you’ll need to adjust the quantity to about 2 teaspoons.
-
½ teaspoon baking powder: This works alongside baking soda to ensure your bread rises perfectly.
-
½ teaspoon salt: Salt enhances the overall flavors in baked goods.
-
1 teaspoon cinnamon: This warm spice adds a comforting aroma and flavor to our bread. You can experiment with pumpkin pie spice or even cardamom for a different twist!
-
¼ teaspoon nutmeg (optional): A touch of nutmeg gives an earthy warmth. If you’re a fan, by all means, add it in! If not, leave it out.
-
1 ½ cups grated zucchini (about 2 medium zucchinis, squeezed dry): The star of our show! Grate it, squeeze it to remove excess moisture, and watch how it transforms the bread.
-
½ cup chopped walnuts or pecans (optional): Add a delightful crunch to the bread! If you’re nut-free, sunflower seeds or chocolate chips are fantastic alternatives.
Step-by-Step Instructions
Now that we have everything lined up, let’s get to the fun part—mixing and baking our zucchini bread!
-
Preheat the Oven: Start by preheating your oven to 350°F (175°C). This step is crucial, as you don’t want to put your batter into a cold oven and alter your bread’s texture.
-
Mix Dry Ingredients: In a large mixing bowl, whisk together the flour, sugar, baking soda, baking powder, salt, cinnamon, and nutmeg (if using). A good tip is to use a whisk instead of a fork for better aeration—who doesn’t want light and fluffy bread?
-
Incorporate Wet Ingredients: Make a well in the center of your dry ingredients and add the eggs, vegetable oil, and vanilla extract. Use a spatula or a wooden spoon to mix until just combined. If it starts to look a bit lumpy, that’s perfectly fine! Overmixing will make your bread tough.
-
Add Zucchini and Nuts: Gently fold in the grated zucchini and your choice of nuts, being careful not to overwork the batter. This is where the magic happens—the zucchini adds moisture without overpowering the sweetness.
-
Prepare the Pan: Grease a loaf pan with cooking spray or line it with parchment paper for easy removal. You want a stress-free experience when it comes time to slice!
-
Pour and Bake: Transfer your batter to the prepared loaf pan. Smooth the top with a spatula and pop it into the preheated oven. Bake for 50–60 minutes, or until a toothpick inserted in the center comes out clean. The smell will be heavenly, trust me!
-
Cool Down: Once baked, remove the bread from the oven and set it on a wire rack. Allow it to cool in the pan for about 10 minutes before transferring it to the rack completely to cool. Slice it warm or let it cool completely—it’s delicious either way!
Serving Suggestions
Alright, let’s get to the fun part of enjoying your glorious zucchini bread! This lovely loaf can be served in so many delightful ways:
-
Slice it up for Breakfast: This bread pairs wonderfully with a pat of butter or a drizzle of honey. It’s perfect for a cozy breakfast or brunch spread alongside your favorite coffee or tea.
-
Snack Time Treat: Pack individual slices for a delightful afternoon snack. It travels well; just wrap in parchment paper or pop it in a sandwich bag for your on-the-go munching.
-
Toast It Up: For an easy twist, toast slices in a skillet for a crispy edge and warm center. Top with a dollop of cream cheese or ricotta for a more indulgent treat—delicious!
-
Elegant Dessert: Serve slices alongside a scoop of vanilla ice cream or a dollop of whipped cream for a no-fuss dessert that’s sure to impress at any gathering.
Recipe Variations
Let’s keep this zucchini bread exciting! Here are a few creative twists you can try:
-
Chocolate Chip Zucchini Bread: Fold in a cup of chocolate chips for a decadent spin. The chocolate adds a rich sweetness that pairs remarkably well with the zesty zucchini.
-
Spiced Zucchini Bread: Mix it up with a teaspoon of ginger or cloves for a more chai-inspired flavor, perfect for those fall days when you want to snuggle up.
-
Banana-Zucchini Bread: Substitute half of the grated zucchini with mashed bananas for a sweet combo that’s undeniably comforting.
-
Dairy-Free Option: Swap the eggs for flax eggs (1 tablespoon of ground flaxseed mixed with 2.5 tablespoons of water for each egg) and use a plant-based oil, like coconut or avocado oil, to accommodate those with dietary restrictions.
-
Add Fruit: Toss in some chopped apples or dried cranberries for a fruity twist. Not only does it brighten the flavor, but it also adds a stunning touch to the presentation!
Chef’s Notes
This recipe has followed me through countless kitchen adventures! I’ve learned over the years that patience and practice are the biggest keys to success. Don’t fret if your bread doesn’t turn out perfect the first time – that’s all part of the learning curve! Each loaf taught me something new. Remember, every kitchen disaster can become a funny story, especially when experimenting with flavors or techniques.
I once turned a loaf into zucchini pancakes—an unexpected win! So, embrace the mess; it’s all about learning and having fun in the kitchen!
FAQs and Troubleshooting
Here are some common questions I get when it comes to baking this delightful bread:
-
Why is my bread dense?
- This could be due to overmixing. Mix until just combined, and don’t be afraid of a few lumps. Also, make sure your baking soda and powder are fresh—old leavening agents won’t create the desired lift!
-
How can I tell when it’s done baking?
- A toothpick inserted into the center should come out clean or with just a few moist crumbs. If your bread is browning too quickly on top but isn’t done baking, try tenting it with aluminum foil.
-
Can I freeze zucchini bread?
- Absolutely! Let it cool completely, then wrap it well in plastic wrap and foil. It can be frozen for up to 3 months. Thaw it in the fridge overnight, and you’re good to go!
-
Can I use frozen zucchini?
- Yes! If you’ve got frozen grated zucchini, just thaw and then squeeze out excess moisture before adding it to the batter.
Nutritional Info
While I’ll always advocate for enjoying food, it’s useful to know what we’re putting in our bodies. A standard slice (about 1/12th of the loaf) contains roughly:
- Calories: 180
- Carbohydrates: 25g
- Protein: 3g
- Fat: 7g
- Fiber: 1g
- Sugars: 10g
Feel free to customize ingredients based on your dietary needs! With substitutions and variations, this bread can fit into many eating plans while still providing a delightful experience.
Final Thoughts
Baking doesn’t just fill our bellies; it fills our hearts! Sharing this Easy One-Bowl Zucchini Bread recipe with you brings back so many memories of laughter, love, and cozy moments in the kitchen. I hope you take this recipe and make it your own, adding your flair and creativity. Whether you enjoy it as breakfast, a delightful snack, or dessert, I guarantee it’ll bring a smile to your face—just as it has done for so many others.
So, gather your ingredients, whip out your mixing bowl, and let’s create a loaf of zucchini bread that will fill your kitchen with love and aroma. Remember, in the kitchen, there are no mistakes, just delicious discoveries! Happy baking, friends! 🍞❤️
Print
Easy One-Bowl Zucchini Bread
- Total Time: 75 minutes
- Yield: 12 servings 1x
- Diet: Vegetarian
Description
A delightful and moist zucchini bread recipe perfect for beginner bakers. This one-bowl method makes it easy to whip up a comforting treat.
Ingredients
- 1 ½ cups all-purpose flour (190g)
- ¾ cup granulated sugar (150g)
- ⅓ cup vegetable oil (80ml)
- 2 large eggs, room temperature
- 1 teaspoon vanilla extract
- 1 teaspoon baking soda
- ½ teaspoon baking powder
- ½ teaspoon salt
- 1 teaspoon cinnamon
- ¼ teaspoon nutmeg (optional)
- 1 ½ cups grated zucchini (about 2 medium zucchinis, squeezed dry)
- ½ cup chopped walnuts or pecans (optional)
Instructions
- Preheat the oven to 350°F (175°C).
- Mix dry ingredients in a large bowl: flour, sugar, baking soda, baking powder, salt, cinnamon, and nutmeg.
- Incorporate the wet ingredients: make a well in the center of the dry mix and add eggs, vegetable oil, and vanilla extract. Mix until just combined.
- Add grated zucchini and nuts, folding gently until combined.
- Prepare the loaf pan by greasing it with cooking spray or lining with parchment paper.
- Pour the batter into the pan and smooth the top.
- Bake for 50–60 minutes, or until a toothpick comes out clean.
- Cool the bread for about 10 minutes in the pan, then transfer to a wire rack to cool completely.
Notes
Feel free to customize by adding chocolate chips or other spices. This bread can be frozen for up to 3 months.
- Prep Time: 15 minutes
- Cook Time: 60 minutes
- Category: Dessert
- Method: Baking
- Cuisine: American
Nutrition
- Serving Size: 1 slice
- Calories: 180
- Sugar: 10g
- Sodium: 200mg
- Fat: 7g
- Saturated Fat: 1g
- Unsaturated Fat: 6g
- Trans Fat: 0g
- Carbohydrates: 25g
- Fiber: 1g
- Protein: 3g
- Cholesterol: 30mg
Keywords: zucchini bread, baking, dessert, easy recipe, one-bowl recipe, vegetarian, homemade