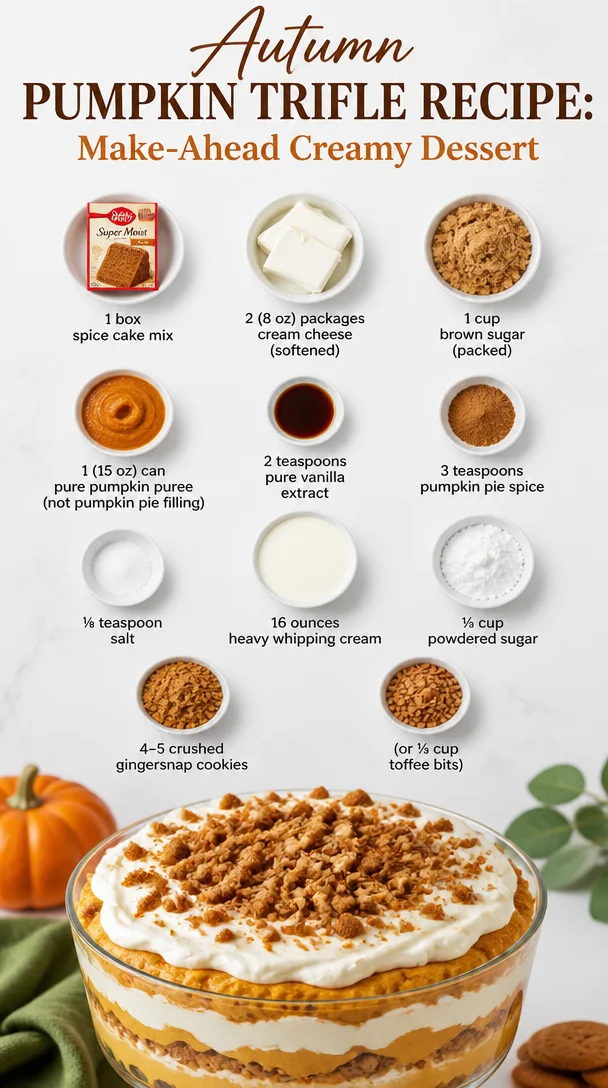
Autumn Pumpkin Trifle Recipe: Make-Ahead Creamy Dessert
Pumpkin Trifle Recipe: A Cozy Slice of Autumn
Hey there, food enthusiasts! Today we’re diving into a delightful dessert that will make your taste buds dance and your heart hum with joy: a Pumpkin Trifle! There’s just something about fall that brings out the warm and cozy flavors, right? And this trifle recipe is the perfect way to celebrate the season while bringing a little bit of cheer to your kitchen.
Introduction
Picture this: the crisp autumn air is mingling with the sweet aroma of spices, the leaves are turning golden, and the excitement of gathering around the dinner table with family and friends is palpable. That’s the magic of the fall season—and what better way to embrace it than with a stunning Pumpkin Trifle?
This dessert is not just a feast for the eyes; it’s an explosion of flavors that combines creamy pumpkin goodness, spiced cake, and a heavenly whipped cream topping. The layers come together beautifully, creating a lovely presentation that will impress your guests. Plus, the best part is, it’s super easy to whip up, so you won’t be drowning in dishes after dessert.
I love whipping up this Pumpkin Trifle for gatherings, cozy get-togethers, or just a little indulgence on a chilly evening. It’s a straightforward recipe that embodies the comfort food essence—I promise you’ll be spooning up seconds (and maybe even thirds) before you know it!
So, strap on that apron, grab your favorite mixing bowl, and let’s get started on this mouthwatering journey together!
Personal Story
One of my fondest memories is making this Pumpkin Trifle with my grandmother every fall. Her kitchen always smelled like a blend of spices and sweetness, a warmth that enveloped you as soon as you stepped inside. I remember the first time we made it together—I was just a kid, barely able to see over the counter, but I loved every minute of our baking session.
My grandma had this magical way of making cooking feel like an adventure. As we folded the whipped cream into the pumpkin mixture, she shared stories of her childhood and how her mother made pumpkin desserts for holiday feasts. That connection we shared over mixing and layering was priceless. This Pumpkin Trifle held a special place in my heart, representing not just the flavors of fall but the love and laughter that filled our kitchen.
Now, whenever I make this trifle, I can almost hear her voice, reminding me that cooking is about more than just food—it’s about creating memories. So, whether you’re making this for a party, a family gathering, or just for you, remember that love is the secret ingredient!
Ingredients
Gathering your ingredients is half the fun! Here’s what you’ll need for this luscious Pumpkin Trifle:
-
1 box spice cake mix
The star base! Feel free to swap in a vanilla cake mix if spices aren’t your thing. For a gluten-free version, look for a gluten-free cake mix at your local store. -
2 8-ounce packages cream cheese (softened)
Cream cheese adds a delightful tanginess. If you want a lighter option, try using Neufchâtel cheese or even mascarpone for a richer flavor. -
1 cup brown sugar (packed)
This sweetener enhances the molasses flavor from the brown sugar. You can substitute it with coconut sugar for a healthful twist. -
1 15-ounce can pure pumpkin puree (not pumpkin pie filling)
Pure pumpkin puree provides that earthy sweetness and bright orange color. Make it from scratch if you’re feeling adventurous, just roast fresh pumpkins! -
2 teaspoons pure vanilla extract
Always go for pure vanilla for depth in flavor. It can be swapped with almond extract for a nutty note. -
3 teaspoons pumpkin pie spice
A blend of cinnamon, nutmeg, ginger, and allspice that defines fall. You can make your own by mixing these spices in equal parts. -
⅛ teaspoon salt
Just a pinch elevates all the flavors! You can omit it if you’re watching sodium intake. -
16 ounces heavy whipping cream
This is what makes that fluffy whipped topping! For a dairy-free option, try coconut cream or whipped silken tofu. -
⅓ cup powdered sugar
Sweetens the whipped cream seamlessly. Dates or honey can be alternatives if you want to skip processed sugar. -
4-5 crushed gingersnap cookies (or ⅓ cup toffee bits)
These add an extra crunch and flavor dimension! Feel free to use crushed graham crackers if you prefer a milder flavor.
Step-by-Step Instructions
Now, let’s get cooking! Follow these detailed steps for your Pumpkin Trifle:
-
Prepare the Spice Cake:
- Preheat your oven to 350°F (175°C). First things first, let’s bake that spice cake! Follow the directions on the box to mix up your batter. An easy chef hack: always mix the wet ingredients separately before combining them with the dry to ensure an even batter.
- Grease a 9×13-inch baking dish or your preferred cake pan, then pour in the batter. Bake as directed (usually around 25-30 minutes) or until a toothpick comes out clean. Once done, let it cool completely before proceeding.
-
Make the Cream Cheese Mixture:
- In a mixing bowl, beat the softened cream cheese until smooth. You can use a hand mixer or stand mixer for this, making your life simpler!
- Gradually add the packed brown sugar, the pumpkin puree, pumpkin spice, vanilla extract, and salt. Beat until everything is perfectly combined and fluffy. You’ll notice it should be smooth with no lumps!
-
Whip the Cream:
- In a separate mixing bowl, whip your heavy cream using a mixer until it forms soft peaks (not too stiff!). Slowly add the powdered sugar while mixing. This helps stabilize the whipped cream and gives it a subtle sweetness.
-
Fold it All Together:
- Now, here’s the fun part! Take a third of the whipped cream and gently fold it into the cream cheese mixture. This process lightens up the cream cheese, making it easier to blend with the rest of the whipped cream.
- Once combined, add the rest of the whipped cream and fold gently until it’s all incorporated. The fluffiness is part of what makes this trifle irresistible.
-
Layer the Trifle:
- To assemble, break your cooled spice cake into chunks or crumble it into pieces. Start with a layer of cake at the bottom of your trifle dish or individual serving cups. It doesn’t have to be perfect—rustic is charming!
- Follow with a layer of the pumpkin cream cheese mixture, followed by a layer of whipped cream. Repeat these layers until you reach the top of your trifle dish. I love finishing with whipped cream because it looks so inviting.
-
Top It Off:
- To add that finishing touch, sprinkle crushed gingersnap cookies or toffee bits on the top. This will add a delightful crunch that contrasts beautifully with the creamy layers.
-
Chill and Serve:
- Let your trifle chill in the refrigerator for at least an hour to set the flavors and for everything to marry beautifully. You can keep it chilled until you’re ready to serve, making this a perfect make-ahead dessert!
Serving Suggestions
When it comes to serving, presentation is everything! Here are a few ideas to dish out your Pumpkin Trifle in style:
-
Layered Glass Bowls: A clear glass bowl allows everyone to see the beautiful layers of cake and cream, adding a wow factor to your dessert. You can also use individual cups or jars for a personal touch.
-
Garnish: Top with a dollop of whipped cream and a sprinkle of pumpkin pie spice or a single gingersnap cookie for a lovely pop of color.
-
Spoon It Out: Grab a big serving spoon and let everyone help themselves. There’s something delightful about sharing dessert directly from a big bowl.
-
Add Some Fresh Whip: Right before serving, consider whipping up a bit more cream and placing a fluffy mound on top for that picture-perfect finish!
Recipe Variations
If you’re up for experimenting (which I highly encourage!), here are some creative twists on the classic Pumpkin Trifle:
-
Chocolate Pumpkin Trifle: Layer crushed chocolate cake instead of spice cake, and add chocolate chips to the cream cheese mixture for a rich chocolate experience.
-
Nutty Delight: Incorporate toasted nuts such as pecans or walnuts between layers for that crunch and flavor! Just make sure to chop them finely.
-
Fall Fruit Addition: Layer in some diced apples or pears for a fruity twist. Their sweetness will complement the pumpkin beautifully!
-
Dairy-Free Version: Swap out dairy ingredients with coconut cream, vegan cream cheese, and use maple syrup instead of powdered sugar for a delicious dairy-free mishmash.
-
Chai Spice Variation: Instead of the typical pumpkin pie spice, consider adding a chai spice blend for a unique flavor twist that packs a spicy punch!
Chef’s Notes
Over the years, this Pumpkin Trifle recipe has evolved significantly. I used to make it with a store-bought whipped topping, but honestly, nothing beats fluffy whipped cream made from scratch! The flavor is just unmatched—and it’s such a joy to fold it all together.
Funny enough, the first time I served this trifle at a family gathering, everyone dove in with spoons, and I didn’t even get a taste until the very end—my family loved it so much, they wolfed it down! Now, I always make a double batch just to ensure I can indulge too.
FAQs and Troubleshooting
1. Can I prepare the trifle in advance?
Absolutely! This trifle is fantastic to make ahead of time. Just prepare it a day in advance, store it covered in the fridge, and it will be ready when your guests arrive!
2. What can I do if my whipped cream deflates?
If your whipped cream deflates, it may be due to overmixing or not enough sugar. Chill your mixing bowl and beaters before whipping cream, and ensure you stop mixing as soon as soft peaks form.
3. Can I freeze the Pumpkin Trifle?
I’d recommend against freezing it, as the cream can separate upon freezing and thawing. It’s best enjoyed fresh after it has set in the fridge.
4. How can I make it less sweet?
You can reduce the amount of brown sugar in the cream cheese mixture and powdered sugar in your whipped cream. This will allow the pumpkin flavor to shine through even more!
Nutritional Info
This Pumpkin Trifle, though indulgent, provides a delightful treat during the fall festivities! Here’s a quick overview of the nutritional info (per serving based on 12 servings):
- Calories: 350
- Total Fat: 22g
- Saturated Fat: 12g
- Cholesterol: 80mg
- Sodium: 200mg
- Total Carbohydrates: 31g
- Dietary Fiber: 1g
- Sugars: 18g
- Protein: 6g
As with any dessert, moderate indulgence is key—so enjoy responsibly!
Final Thoughts
And there you have it—an easy, scrumptious Pumpkin Trifle that’s sure to be the star of your next gathering! Remember, cooking should be fun, so put your own spin on the recipe, make it your own, and savor every spoonful.
Whether you’re whipping it up for Thanksgiving, a cozy night in, or simply to celebrate fall, this trifle will wrap you in the warmth of the season. From one foodie to another, I hope you love it as much as I do. Happy cooking, and until next time—stay hungry for adventure in the kitchen!
Print
Pumpkin Trifle
- Total Time: 60 minutes
- Yield: 12 servings 1x
- Diet: Vegetarian
Description
A delightful and creamy Pumpkin Trifle that captures the essence of autumn with layers of spiced cake, pumpkin cream cheese, and fluffy whipped cream.
Ingredients
- 1 box spice cake mix
- 2 8-ounce packages cream cheese (softened)
- 1 cup brown sugar (packed)
- 1 15-ounce can pure pumpkin puree
- 2 teaspoons pure vanilla extract
- 3 teaspoons pumpkin pie spice
- ⅛ teaspoon salt
- 16 ounces heavy whipping cream
- ⅓ cup powdered sugar
- 4–5 crushed gingersnap cookies (or ⅓ cup toffee bits)
Instructions
- Preheat your oven to 350°F (175°C) and prepare the spice cake according to the box instructions.
- Grease a 9×13-inch baking dish and pour in the batter, baking as directed (25-30 minutes) until a toothpick comes out clean. Let it cool completely.
- Beat the softened cream cheese in a mixing bowl until smooth, then gradually add brown sugar, pumpkin puree, pumpkin spice, vanilla extract, and salt. Mix until fluffy.
- Whip the heavy cream in a separate bowl until soft peaks form. Slowly add the powdered sugar while mixing.
- Fold a third of the whipped cream into the cream cheese mixture, then gently incorporate the remaining whipped cream.
- Layer pieces of the cooled spice cake, followed by the pumpkin cream cheese mixture, and then whipped cream in a trifle dish or individual cups. Repeat layers and finish with whipped cream.
- Sprinkle crushed gingersnap cookies or toffee bits on top before chilling in the refrigerator for at least an hour.
Notes
For a gluten-free version, use a gluten-free cake mix. You can also try different variations like chocolate pumpkin trifle or add fresh fruit layers for a twist.
- Prep Time: 30 minutes
- Cook Time: 30 minutes
- Category: Dessert
- Method: Layering
- Cuisine: American
Nutrition
- Serving Size: 1 serving
- Calories: 350
- Sugar: 18g
- Sodium: 200mg
- Fat: 22g
- Saturated Fat: 12g
- Unsaturated Fat: 0g
- Trans Fat: 0g
- Carbohydrates: 31g
- Fiber: 1g
- Protein: 6g
- Cholesterol: 80mg
Keywords: Pumpkin Trifle, Fall Dessert, Autumn Recipe, Spiced Cake, Cream Cheese, Whipped Cream
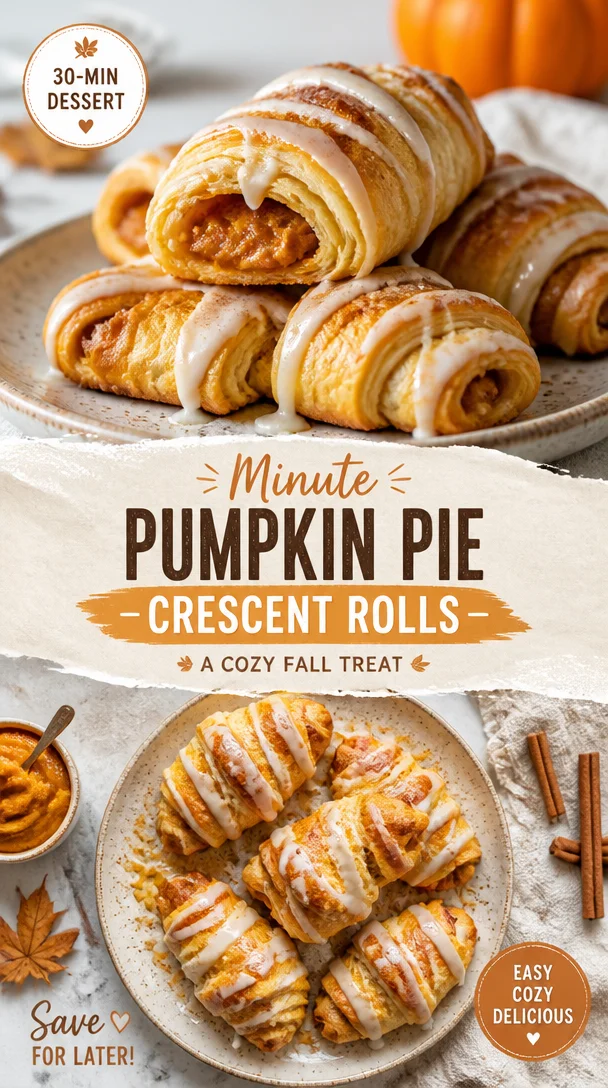
Minute Pumpkin Pie Crescent Rolls: A Cozy Fall Treat
The Cozy Comfort of Pumpkin Pie Crescent Rolls
Hey there, food lovers! If there’s one thing that warms my heart and fills my kitchen with joy, it’s the delicious aroma of freshly baked goods. Today, we’re diving deep into the world of comfort food with a twist—Pumpkin Pie Crescent Rolls! These delightful little treats combine all the flavors of classic pumpkin pie with the easy-to-handle charm of crescent rolls. Perfect for cozy gatherings, holiday celebrations, or an indulgent snack any day of the week!
Let’s face it, pumpkin pie is already a beloved dish, but who says we can’t spice things up a bit? By wrapping creamy pumpkin filling in flaky crescent dough, you’ll get that same beloved flavor in a fun and inviting form. Plus, these rolls are so simple to whip up that even beginner bakers will feel like kitchen rockstars!
So, grab your favorite apron, and let’s get started on a journey that will fill your home with the irresistible scent of warming spices and sweet goodness. Trust me, your friends and family will be lining up for seconds—and maybe even thirds!
A Bite of Nostalgia
Growing up, my fondest memories are entwined with the simple act of baking. My grandmother had a magical kitchen filled with treats that were as delightful to see as they were to taste. One of my all-time favorites was her pumpkin pie, rich and comforting, always baked to perfection right before Thanksgiving. It was the dish that brought our family together, a holiday staple that signaled it was time to gather around the table and share laughter and love.
But there was a twist! One year during our holiday prep, my grandmother, clutching a can of crescent rolls, boldly declared that she would create a new dessert. Boy, were we all curious! She spread that silky pumpkin filling onto the crescent dough and rolled them up into little bundles of joy. The result? A mix of our beloved pie and a fun, flaky roll that made me feel like it was the ultimate party food.
I’m excited to bring this gem back into your kitchen with my own take on Grandma’s creation. Trust me, once you taste these Pumpkin Pie Crescent Rolls, you’ll have a new family favorite to cherish!
Ingredients Overview
Here’s what you’ll need for these incredible rolls:
-
8-ounce container Pillsbury Crescent Rolls
- These ready-to-roll beauties make the process so simple. If you’re feeling adventurous, homemade crescent dough works too—though we won’t judge you for using store-bought!
-
½ cup canned pumpkin puree
- A must-have for that rich pumpkin flavor. You could also use fresh pumpkin puree if you’ve got some already roasted. Just make sure it’s not the spiced kind!
-
2 tablespoons sugar
- This adds the right amount of sweetness. For a healthier alternative, you can sub with coconut sugar or a sugar alternative like stevia.
-
1 whole egg (divided)
- We’ll use this for binding the filling and a wash for that golden crust! If you’re looking for an egg substitute, try a flax egg (1 tablespoon ground flaxseed mixed with 2.5 tablespoons water).
-
½ teaspoon pumpkin pie spice
- A crafter’s blend of cinnamon, nutmeg, ginger, and allspice to remind you of fall flavors. Feel free to make your own blend, or simply use cinnamon if that’s what you have!
-
½ cup powdered sugar
- This will create a lovely glaze for drizzling. If you need a healthier option, you can blend coconut sugar into a fine powder.
-
1 tablespoon milk
- Adds creaminess to the glaze. Any milk works—dairy or plant-based!
-
1 tablespoon pure maple syrup
- Sweetens our glaze with natural flavor. Honey or agave syrup are great substitutes!
Now that you have your ingredients lined up, let’s get cooking!
Step-by-Step Instructions
-
Preheat the Oven
Preheat your oven to 375°F (190°C). This is crucial for getting those rolls beautifully golden and perfectly cooked. A well-preheated oven can make all the difference in texture! -
Prepare the Filling
In a medium bowl, mix the canned pumpkin puree, sugar, and half of the egg (reserve the other half for later). Add in the pumpkin pie spice as well. Stir until well combined. Here’s my little chef hack: use a whisk to incorporate everything smoothly; it creates a creamy texture that will fill those rolls beautifully! -
Roll Out the Dough
Open your container of crescent rolls. Carefully unroll the dough on a lightly floured surface. You’ll want to keep the triangles intact, so try to avoid tearing them if possible. The flaky layers are what makes this dish special! -
Fill and Roll
Spoon a generous amount of the pumpkin filling onto the wider end of each triangle. Don’t be afraid to load it up—more filling means more flavor! Then roll each triangle from the wide end to the point. Place them seam-side down on a greased baking sheet. This helps keep them from unrolling during baking. -
Egg Wash
Brush the tops of the crescent rolls with the remaining egg. This step ensures a shiny, golden crust. If you want something a little healthier, you can skip this step, but I love that crunchy texture it adds! -
Bake Time
Bake in your preheated oven for about 12-15 minutes, or until they are golden brown. The scent? Absolutely heavenly! Make sure to keep an eye on them from the 10-minute mark onward—it’s easy to go from golden to burnt if you’re not careful. -
Prepare the Glaze
While your rolls are baking, whisk together powdered sugar, milk, and maple syrup in a separate bowl until smooth. This will make our delightful drizzle that completes the dish perfectly. -
Cool and Drizzle
Allow the rolls to cool for about 5 minutes after baking. Then, drizzle your glaze over the top—that sweet, creamy burst takes these rolls to a whole new level!
Serving Suggestions
When serving your Pumpkin Pie Crescent Rolls, think charming and rustic! Arrange them on a welcoming platter and sprinkle some extra powdered sugar on top for an elegant touch. You could also serve them alongside a small dollop of whipped cream or a scoop of vanilla ice cream, making it feel like a cozy dessert experience.
For a little extra flair, consider garnishing with a sprinkle of extra pumpkin pie spice or finely chopped pecans on top. Tie it all together with a steaming cup of coffee or spiced cider, and you’ll have a delightful autumn-themed gathering ready to impress!
Recipe Variations
Now that you’ve mastered the original recipe, why not explore some fun twists? Here are a few ideas:
-
Chocolate Chip Pumpkin Rolls: Add some mini chocolate chips to the filling before rolling them up. The creamy pumpkin paired with chocolate is a match made in heaven!
-
Nutty Crunch: Incorporate chopped walnuts or pecans into your pumpkin filling for a delightful crunch. It adds texture and a lovely nutty flavor!
-
Spiced Up: Experiment with different spices! Add a pinch of cardamom or swap out the pumpkin pie spice with your favorite chai blend for a different flavor profile.
-
Vegan Options: Substitute the egg with a flax egg, use almond milk in the glaze, and swap the butter in the crescent rolls for a plant-based version.
-
Cinnamon Roll Twist: After spreading the pumpkin filling, sprinkle a swirl of cinnamon and brown sugar before rolling them up for an even sweeter treat!
Chef’s Notes
This recipe holds a warm place in my heart, not only because of the memories tied to it but also how it has evolved over the years. Initially, I started with a basic filling, but I’ve experimented with flavor profiles and textures endlessly! My favorite variation so far is definitely the chocolate chip twist—it has been a hit at gatherings!
One of my fondest kitchen mishaps happened when I accidentally grabbed baking powder instead of baking soda for the filling. The rolls puffed up incredibly high but tasted amazing. That’s the beauty of cooking; even mistakes can lead to delicious discoveries!
FAQs and Troubleshooting
-
Why are my crescent rolls not rising?
Ensure your oven is preheated properly. Premade crescent rolls rely heavily on the heat to puff up. If they don’t feel flaky and rising, the dough may have lost its freshness—check your expiration dates! -
Can I make this ahead of time?
Absolutely! You can prepare the rolls a few hours ahead, just keep them covered in the fridge until you’re ready to bake. They may require an extra minute or two in the oven due to the chill. -
What if the filling leaks out?
If this happens, don’t fret! Make sure you’re rolling them tightly. If you do experience leakage, you can always serve them with a scoop of ice cream to help soothe the flavor mishap! -
How do I store leftovers?
Store any leftover rolls in an airtight container at room temperature for up to two days. If you want to keep them longer, you can refrigerate them and reheat in the oven for a minute or two to retain their flaky crust.
Nutritional Info
Each Pumpkin Pie Crescent Roll (estimated based on recipe with no additional toppings) contains approximately:
- Calories: 150
- Total Fat: 7g
- Saturated Fat: 1.5g
- Carbohydrates: 20g
- Fiber: 1g
- Sugars: 5g
- Protein: 2g
Note: Nutritional info may vary based on specific brand ingredients or substitutions used.
Final Thoughts
These Pumpkin Pie Crescent Rolls are not just a dessert; they’re a gateway to memories, comfort, and shared moments with the people you love. Whether it’s for a cozy fall gathering or just because you deserve a treat, these rolls will undoubtedly bring joy to your kitchen and your taste buds. The best part? They’re so easy to prepare that you’ll be whipping these up to impress anyone who steps foot into your kitchen!
So, roll up your sleeves, dive into this recipe, and share your creations with friends and family. Remember, cooking is all about joy, laughter, and creating unforgettable experiences—one flaky roll at a time. Happy baking, my fellow foodies! Let’s keep celebrating the magic of good food, and I can’t wait to see how you make this recipe your own!
Print
Pumpkin Pie Crescent Rolls
- Total Time: 30 minutes
- Yield: 8 servings 1x
- Diet: Vegetarian
Description
Delicious crescent rolls filled with creamy pumpkin filling, offering the perfect blend of classic pumpkin pie flavors in a fun, flaky form.
Ingredients
- 1 (8-ounce) container Pillsbury Crescent Rolls
- ½ cup canned pumpkin puree
- 2 tablespoons sugar
- 1 whole egg (divided)
- ½ teaspoon pumpkin pie spice
- ½ cup powdered sugar
- 1 tablespoon milk
- 1 tablespoon pure maple syrup
Instructions
- Preheat your oven to 375°F (190°C).
- Mix the canned pumpkin puree, sugar, and half of the egg in a medium bowl.
- Open the container of crescent rolls and unroll the dough on a floured surface.
- Spoon a generous amount of the pumpkin filling onto the wider end of each triangle.
- Roll each triangle from the wide end to the point and place seam-side down on a greased baking sheet.
- Brush the tops of the rolls with the remaining egg.
- Bake for about 12-15 minutes, or until golden brown.
- Whisk together powdered sugar, milk, and maple syrup for the glaze.
- Cool the rolls for about 5 minutes, then drizzle with glaze.
Notes
Serve warm with a sprinkle of powdered sugar or a dollop of whipped cream for an extra treat!
- Prep Time: 15 minutes
- Cook Time: 15 minutes
- Category: Dessert
- Method: Baking
- Cuisine: American
Nutrition
- Serving Size: 1 roll
- Calories: 150
- Sugar: 5g
- Sodium: 250mg
- Fat: 7g
- Saturated Fat: 1.5g
- Unsaturated Fat: 4g
- Trans Fat: 0g
- Carbohydrates: 20g
- Fiber: 1g
- Protein: 2g
- Cholesterol: 30mg
Keywords: pumpkin, crescent rolls, dessert, Thanksgiving, fall treats