
Ingredient Pineapple Coconut Dream Cake (No-Bake, Summer)
Pineapple Coconut Dream Cake: A Slice of Paradise
Hey there, food lovers! If there’s one thing that can transport you to a tropical island, it’s a bite of Pineapple Coconut Dream Cake. Picture this: a moist, fluffy cake bursting with sweet pineapple goodness and a hint of coconut, topped with cloud-like whipped topping. Every forkful feels like a warm hug! Whether you’re hosting a summer barbecue, celebrating a birthday, or just craving something sweet, this cake is sure to impress. So, let’s roll up our sleeves, unleash our inner bakers, and dive into this delightful cake that’ll make your taste buds dance.
My Tropical Kitchen Memory
Let me take you back to a sunny afternoon at my grandma’s house. I was a little kid, all wide-eyed and curious, standing on a stool beside her as she whipped up one of her signature desserts. The kitchen was filled with laughter, the aroma of baked goods, and a sprinkle of love. That day, we decided to make a pineapple, coconut cake—the same dreamy creation I’m sharing with you now. Grandma’s secret? A generous helping of crushed pineapple and shredded coconut. She’d often say, “Food tastes better when you make it with love.”
As we mixed, stirred, and tasted, I remember sneaking bites of the sweet, tropical mixture that was destined for the cake. The sheer joy on her face as we pulled the cake from the oven and the delicious scent wafting through the air made that memory unforgettable. Years later, when I created Feastical, I knew I had to share this recipe. It held the spirit of community, family, and unbridled joy in every bite!
Ingredients You’ll Need
-
1 box yellow cake mix
This is the base of our cake, bringing a simple and classic flavor. If you’re feeling adventurous, you can use a gluten-free cake mix for a gluten-free option. -
1 can (20 oz) crushed pineapple, with juice
This is where our tropical flavor shines! The pineapple keeps the cake moist and delicious. In a pinch, you could substitute it with crushed peaches or another fruity alternative. -
1 cup sweetened shredded coconut
Coconut adds that irresistible tropical flair! For a less sweet option, use unsweetened shredded coconut and adjust the sugar in the recipe accordingly. -
1 package (3.4 oz) instant vanilla pudding mix
This will add creaminess and stability to your cake. You can swap it for coconut cream pudding for an even richer coconut flavor. -
1 cup cold milk
This helps in mixing all the ingredients smoothly. Use almond milk or coconut milk as a creamy alternative if you’re dairy-free. -
1 container (8 oz) whipped topping, thawed
The final touch! It gives the cake a light, fluffy finish. If you’re feeling fancy, you can make your own whipped cream for a homemade touch.
Step-by-Step Instructions
-
Preheat the Oven
Start by preheating your oven to 350°F (175°C). This gives you a perfectly baked cake without any surprises! Trust me, nothing beats the smell of a warm cake in the oven. -
Prepare Your Baking Pan
Grab a 9×13-inch baking dish and grease it with a little non-stick spray or butter. This is key to preventing any cake disasters when it’s time to flip! -
Mix the Cake Batter
In a large mixing bowl, combine the yellow cake mix, crushed pineapple with its juice, and shredded coconut. Mix it until it’s well combined—about 2-3 minutes will do. Don’t overmix; we want a fluffy cake, not a dense brick! -
Add the Pudding and Milk
Now, stir in the instant pudding mix and cold milk until everything is smooth. This is where the magic happens! You’ll see that luscious texture forming. Make sure it’s all well incorporated, but again, don’t overdo it. -
Pour into the Baking Dish
Gently pour your batter into the prepared baking dish. Use a spatula to spread it evenly to the edges. This ensures that it bakes evenly, creating a beautiful cake. -
Bake
Pop your cake in the preheated oven and let it bake for 25-30 minutes. You’ll know it’s done when a toothpick inserted in the center comes out clean. Remember to watch for that gorgeous golden color! -
Cool the Cake
Once done, remove it from the oven and let it cool in the pan for about 10 minutes. Then, carefully transfer it to a wire rack to cool completely. Patience is key; cutting into a hot cake can lead to a crumbly mess. -
Top It Off
After the cake has completely cooled (trust me, it’s worth the wait!), spread the thawed whipped topping evenly across the top. This adds that dreamy touch we all love.
Serving Suggestions
Now that your beautiful Pineapple Coconut Dream Cake is ready, it’s time to serve it up! Consider presenting it on a vibrant platter garnished with fresh pineapple slices and a sprinkle of coconut for a tropical flair. If you’re feeling extra bold, add a drizzle of chocolate or a sprinkle of toasted coconut on top. For serving, slice it into squares and pair with a scoop of vanilla bean ice cream or a dollop of extra whipped cream. Trust me, this dessert is perfect for sharing (or not)!
Recipe Variations
-
Tropical Fruit Twist
Add some diced mango or finely chopped strawberries into the batter to mix things up. The more fruity, the better! -
Lemon Zing
For an added citrusy kick, incorporate the zest of one lemon or lime into the cake batter. -
Nutty Delight
Mix in some chopped macadamia nuts for that delicious crunch and flavor. This is perfect for nut lovers! -
Gluten-Free Version
Swap the yellow cake mix out for a gluten-free cake mix and use almond or coconut milk for a delicious gluten-free treat. -
Vegan Dream Cake
Use a vegan cake mix, substitute the milk with a plant-based alternative, and opt for coconut whipped cream to make it vegan-friendly!
Chef’s Notes
This Pineapple Coconut Dream Cake has evolved over the years. I remember experimenting with the recipe, adding different spices, and tinkering with flavors. Did you know that the combination of pineapple and coconut pairs perfectly with a hint of rum? Although traditional, it’s not just for piña coladas! Once for a summer bake sale, I added rum extract to the whipped topping, and it was a total hit! Mixing food and memories in the kitchen is what I love the most. If you have fond modifications or storytelling through food, drop by my site and share!
FAQs and Troubleshooting
-
Q: My cake is too dense. What happened?
A: Overmixing your batter can lead to a dense cake. Remember, mix just until combined to keep the fluffiness! -
Q: How do I know when my cake is done?
A: Stick a toothpick in the center; if it comes out clean or with a few crumbs, it’s done! -
Q: Can I use fresh pineapple instead of canned?
A: Absolutely! Just ensure it’s finely chopped and drained to keep the moisture balance. -
Q: How do I store leftovers?
A: Cover the cake and store it in the fridge. It should stay fresh for up to 4-5 days. Just make sure to bring it to room temperature before serving for the best flavor!
Nutritional Info
This Pineapple Coconut Dream Cake is packed with flavor but also with calories. Depending on how you serve it and the specific ingredients you choose, one piece (about 1/12 of the cake) typically contains:
- Calories: 280
- Fat: 11g
- Carbohydrates: 44g
- Sugar: 26g
- Protein: 2g
While it’s one indulgent dessert, remember that moderation is key. Enjoying this cake during special occasions or as a treat can keep it deliciously guilt-free!
Final Thoughts
There you have it—your very own Pineapple Coconut Dream Cake, ready to brighten up any gathering! The joy of cooking is not just about the food itself; it’s about the stories you create, the laughter you share, and those sunny moments that make life sweet. So, as you venture into your kitchen, remember: it’s not only about the destination, but the delicious journey along the way! So gather your loved ones, whip up this tropical delight, and let the smiles and memories unfold. Until next time, happy baking!
Print
Pineapple Coconut Dream Cake
- Total Time: 45 minutes
- Yield: 12 servings 1x
- Diet: Vegetarian
Description
A moist and fluffy cake bursting with sweet pineapple and a hint of coconut, topped with cloud-like whipped topping.
Ingredients
- 1 box yellow cake mix
- 1 can (20 oz) crushed pineapple, with juice
- 1 cup sweetened shredded coconut
- 1 package (3.4 oz) instant vanilla pudding mix
- 1 cup cold milk
- 1 container (8 oz) whipped topping, thawed
Instructions
- Preheat the oven to 350°F (175°C).
- Prepare a 9×13-inch baking dish by greasing it.
- Mix the yellow cake mix, crushed pineapple with juice, and shredded coconut for 2-3 minutes.
- Add the instant pudding mix and cold milk until smooth.
- Pour the batter into the prepared baking dish.
- Bake for 25-30 minutes, or until a toothpick comes out clean.
- Cool the cake in the pan for 10 minutes, then transfer it to a wire rack.
- Top with the thawed whipped topping evenly across the top.
Notes
This cake serves well with fresh pineapple slices and a sprinkle of coconut. Consider adding a drizzle of chocolate or a sprinkle of toasted coconut on top for extra flair.
- Prep Time: 15 minutes
- Cook Time: 30 minutes
- Category: Dessert
- Method: Baking
- Cuisine: Tropical
Nutrition
- Serving Size: 1 slice
- Calories: 280
- Sugar: 26g
- Sodium: 200mg
- Fat: 11g
- Saturated Fat: 8g
- Unsaturated Fat: 2g
- Trans Fat: 0g
- Carbohydrates: 44g
- Fiber: 1g
- Protein: 2g
- Cholesterol: 30mg
Keywords: cake, tropical cake, dessert, pineapple, coconut
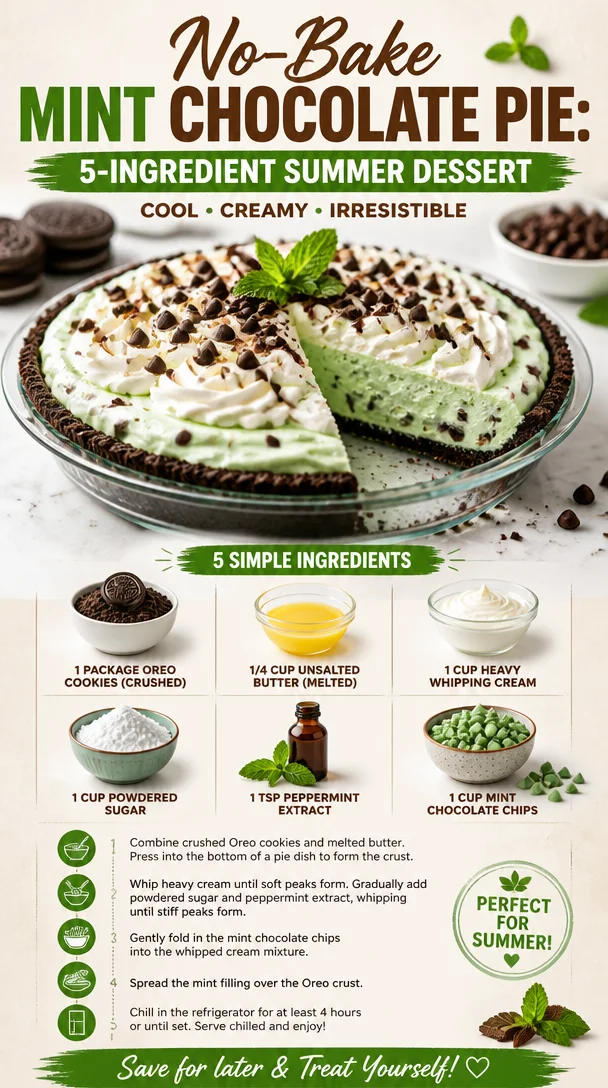
No-Bake Mint Chocolate Pie: 5-Ingredient Summer Dessert
No-Bake Mint Chocolate Pie: A Timeless Treat for Every Occasion
Hello, my fellow food lovers! I’m thrilled you’re here because today, we’re diving into a dessert that perfectly embodies the spirit of comfort food while also refreshing your taste buds—the delightful No-Bake Mint Chocolate Pie. Whether you’re hosting a summer picnic, celebrating a birthday, or just craving a sweet treat, this pie is bound to bring smiles and joy all around.
A Memory to Savor
Before I share my kitchen secrets, let me take you down memory lane for a moment. I vividly remember my childhood summers spent at my grandparents’ house. There was a tiny kitchen tucked away at the back of their charming cottage, where my grandma would often whip up her own version of a mint chocolate pie. It was a tried-and-true family favorite that seemed to vanish before our eyes!
Every summer, the air would be filled with laughter, and the sounds of my cousins battling in the backyard gave way to the sweet, unmistakable scent of mint and chocolate wafting from the kitchen. Those delicious moments, back-to-back with my grandma’s playful challenges to come help her mix the cream or crush the cookies, created lasting memories that still warm my heart today. You see, that’s the magic of food; it has a way of tethering us to our memories and making every bite feel special.
Ingredients: The Building Blocks of Bliss
Let’s break down the ingredients you’ll need for this luscious pie. Here’s the full lineup:
-
1 package Oreo cookies (crushed)
These are the perfect base for our crust. You can easily substitute with gluten-free Oreos or any chocolate cookie you love. -
1/4 cup unsalted butter (melted)
This helps bind the crust together. If you’re looking for a dairy-free option, coconut oil works beautifully. -
1 cup heavy whipping cream
This is crucial for our fluffy filling. If you want a lighter version, you can use coconut cream, but be ready for a bit of a flavor twist! -
1 cup powdered sugar
For that sweet touch! If you’re looking to cut down on sugar, consider using a powdered sugar substitute available at most grocery stores. -
1 tsp peppermint extract
This gives the pie its refreshing essence. You can play around with the amount depending on your minty preference! -
1 cup mint chocolate chips
These add that essential flavor kick. Feel free to swap them for dark chocolate chips if you want a richer taste.
Each ingredient plays a vital role in creating a sweet escape for the senses. So, let’s gather these goodies and get to work!
Step-by-Step Instructions: Your Culinary Adventure Awaits
Alright, time to roll up those sleeves and unleash your inner chef! Let’s walk through the process step-by-step.
-
Crush Those Oreos
Grab a large zip-top bag and fill it with your Oreos. Have some fun and crush them with a rolling pin, or get your kids involved! You want fine crumbs, almost like sand. Alternatively, you can use a food processor if you’re feeling fancy! -
Mix in the Melted Butter
In a bowl, combine the crushed Oreos with your melted butter. Stir until all the crumbs are coated. It’s like the sand on the beach, and you want it to stick together like a happy family! -
Form the Crust
Press this mixture evenly into the bottom and up the sides of a 9-inch pie pan. Use the flat bottom of a measuring cup or your fingers to pack it down tightly. The firmer it is, the better it’ll hold together when we cut into it! -
Refrigerate While You Make the Filling
Pop the crust into the fridge for about 15 minutes to set while we get to whipping. -
Whip the Cream
In a mixing bowl, beat the heavy whipping cream on medium speed until soft peaks form. This is where the magic really starts to happen! The cream will turn fluffy before your eyes! -
Add the Sugar and Mint Extract
Gradually mix in the powdered sugar and peppermint extract while continuing to whip. You’re going to achieve beautiful, billowy peaks that have a delightful sweetness and minty aroma. -
Fold in the Mint Chocolate Chips
Gently fold in the mint chocolate chips with a spatula. Remember, we don’t want to deflate our whipped cream. This step should feel light and airy! -
Fill the Crust
Spoon this fluffy mixture into your chilled Oreo crust, spreading it evenly. This is where you can feel like an artist, smoothing the top to your desired level of perfection. -
Chill Again
Cover your pie and refrigerate for at least 4 hours, but overnight is even better if you can wait! During this time, the flavors will meld together, and you’ll get a perfectly set pie. -
Serve and Enjoy
Before serving, you can add some extra mint chocolate chips or even shaved chocolate on top for that extra touch of decadence. Slice it up, and watch the smiles unfold!
Serving Suggestions: Let’s Get Creative!
Now that your pie is ready, let’s chat about how to make it a showstopper when serving. Presenting food is half the fun, right?
-
Pair with Fresh Mint Leaves: A few fresh mint leaves on top of each slice will elevate the presentation and add a burst of color.
-
Chocolate Drizzle: A drizzle of chocolate sauce over the pie gives it that extra hint of elegance.
-
Serve with Whipped Cream: A dollop of whipped cream on the side or even a full bowl for guest self-serve is always a hit.
-
Make Mini Pies: Use individual serving dishes to create mini pies! Not only are they cute, but they also make portion control a breeze.
-
Add Berries: Fresh raspberries or strawberries on the side complement the mint chocolate beautifully, adding a lovely tartness and a splash of color.
Recipe Variations: Spice Things Up!
The beauty of a No-Bake Mint Chocolate Pie is its adaptability! Here are a few variations to keep your taste buds excited:
-
Double Chocolate Delight: Use chocolate sandwich cookies for the crust instead of Oreos, and add more chocolate chips to the filling.
-
Peanut Butter Twist: Add some creamy peanut butter to the whipped cream filling for a delightful chocolate-peanut butter pairing.
-
Coffee Infusion: For the coffee lovers, add a teaspoon of instant coffee granules to the whipped cream for a mocha mint chocolate experience.
-
Fruit Fusion: Experiment by folding in fresh raspberries or crushed pineapple for a fruity twist. Just make sure to drain any excess liquid!
-
Dairy-Free Dreams: Use vegan whipped cream and dairy-free chocolate chips for a completely dairy-free version. You can even substitute coconut cream in place of heavy cream!
Chef’s Notes: A Dash of Personal Touch
What I love most about this recipe is how it has evolved over the years. I can still feel the warmth of those summer days in my grandparents’ kitchen, and once I was old enough to cook, I started experimenting. I remember one time, I accidentally left out the sugar but added an extra splash of peppermint extract—let’s just say it was a very minty evening! My family didn’t let me forget it, but it gave me a great lead-in to making this splendid dessert a family tradition.
I hope you give this No-Bake Mint Chocolate Pie a try—you’ll be the star of every gathering, and all your friends will be begging for the recipe.
FAQs and Troubleshooting: Your Questions Answered!
-
My filling didn’t set properly. What went wrong?
It’s crucial to whip the heavy cream to the right consistency! If it’s under-whipped, the filling may not hold its shape. Also, chilling time is essential—don’t rush it! -
How long will this pie last?
It should keep in the fridge for about 4-5 days, but trust me, it’s unlikely to last that long! -
Can I freeze this pie?
Absolutely! Just cover it tightly and freeze for up to a month. Let it thaw in the fridge before serving. -
Can I use other flavors instead of mint?
Certainly! You can experiment with different extracts like vanilla, almond, or citrus for a fresh twist.
Nutritional Info
This No-Bake Mint Chocolate Pie is indulgent, but here’s a general idea of what you’re looking at nutritionally per slice (based on a total of 8 slices):
- Calories: ~350
- Fat: 20g
- Carbohydrates: 40g
- Protein: 4g
- Sugar: 22g
Remember, nutrition varies with ingredient substitutions and portion sizes, so keep that in mind as you make this recipe your own.
Final Thoughts: Bringing It All Together
And there you have it! A No-Bake Mint Chocolate Pie that’s sure to become a household favorite, just like it did in my family. Everyone deserves a bite of something sweet and refreshing, and this pie delivers in spades—without a single stove top in sight!
So gather your ingredients, invite some loved ones into the kitchen, and let this pie bring you all together. I’d love to hear how your version turns out or any fun stories you create along the way. Feel free to share your experiences below or reach out to me through Feastical.com!
Until next time, happy cooking, and may every bite taste like a warm hug!
Print
No-Bake Mint Chocolate Pie
- Total Time: 240 minutes
- Yield: 8 servings 1x
- Diet: Vegetarian
Description
A delightful No-Bake Mint Chocolate Pie that combines refreshing mint and rich chocolate flavors. Perfect for any occasion, this pie is easy to make and sure to impress.
Ingredients
- 1 package Oreo cookies (crushed)
- 1/4 cup unsalted butter (melted)
- 1 cup heavy whipping cream
- 1 cup powdered sugar
- 1 tsp peppermint extract
- 1 cup mint chocolate chips
Instructions
- Crush those Oreos in a zip-top bag with a rolling pin or food processor.
- Mix in the melted butter until all crumbs are coated.
- Form the crust in a 9-inch pie pan, packing it tightly.
- Refrigerate the crust for 15 minutes.
- Whip the cream until soft peaks form.
- Add sugar and mint extract, mixing until billowy peaks form.
- Fold in the mint chocolate chips gently.
- Fill the crust with the cream mixture and smooth the top.
- Chill again for at least 4 hours or overnight.
- Serve and enjoy, optionally garnishing with mint chocolate chips or whipped cream.
Notes
For a dairy-free version, replace heavy cream with coconut cream and use dairy-free chocolate chips.
- Prep Time: 15 minutes
- Cook Time: 0 minutes
- Category: Dessert
- Method: No-Bake
- Cuisine: American
Nutrition
- Serving Size: 1 slice
- Calories: 350
- Sugar: 22g
- Sodium: 200mg
- Fat: 20g
- Saturated Fat: 12g
- Unsaturated Fat: 8g
- Trans Fat: 0g
- Carbohydrates: 40g
- Fiber: 2g
- Protein: 4g
- Cholesterol: 40mg
Keywords: mint chocolate pie, no-bake dessert, summer pie, chocolate pie, easy dessert

Easy Tomato Ricotta Tart
Easy Tomato Ricotta Tart: A Slice of Nostalgia!
Hey there, fellow food enthusiasts! I’m Beau Collier, and today, we’re diving deep into the world of flavors with a delightful recipe that’s as easy to whip up as it is to savor. Trust me, if you’re a fan of warm flavors that feel like a hug on a plate, you’re in for a treat with this Easy Tomato Ricotta Tart. This dish captures the essence of summer, a perfect blend of crispy phyllo pastry and the creamy richness of ricotta cheese, all topped with sun-kissed heirloom tomatoes.
Imagine a warm, sunny afternoon: you’re in the kitchen, the scent of fresh basil and ripe tomatoes wafting through the air, and you’re suddenly transported back to those blissful summers spent in Grandma’s backyard. That’s what cooking is all about for me—creating memories. Whether it’s a casual family meal or an elegant gathering, this tart is versatile and adored by all. So, dust off that apron and let’s make some magic happen!
A Personal Story: The Heirloom Garden
Growing up, I spent many hazy summer afternoons with my grandmother in her garden. Those days felt timeless as we’d harvest ripe tomatoes, sprinkle on some salt, and enjoy them fresh off the vine. They were juicy and bursting with flavor—nothing like the sad, pale versions you sometimes find in grocery stores.
One summer, we decided to make a simple dish that would use her beautiful bounty: a savory tart. With her haphazard yet affectionate guidance, I learned the art of layering flavors and textures. The flaky crust, creamy ricotta, and vibrant heirloom tomatoes we picked together seemed to sing, each bite a reminder of how food can tell stories of love and togetherness. When I created this Easy Tomato Ricotta Tart for the first time as an adult, I couldn’t help but smile, knowing how those memories had shaped my love for cooking. This recipe is a tribute to those treasured afternoons and the simple joys that come with making something delicious.
Ingredients
Here’s what you’ll need to make your own Easy Tomato Ricotta Tart. Each ingredient plays a key role in this culinary masterpiece:
-
1 roll phyllo dough (about 21 sheets): This delicate pastry gives our tart that fabulous crunchy texture. If you can’t find phyllo, puff pastry works nicely too, just keep an eye on the baking time!
-
¼ cup olive oil: A drizzle of quality olive oil brings richness and a touch of classic Mediterranean flavor. Extra-virgin is always a good choice for that lovely depth.
-
1 ¼ cups ricotta cheese: Creamy ricotta is the star of the show, adding a mild sweetness and luxurious texture. If you prefer, mascarpone or cream cheese are great substitutes.
-
1 tablespoon fresh basil (chopped, plus more for topping): This fragrant herb elevates our dish with its peppery notes. If you want a twist, try using fresh oregano or thyme.
-
1 tablespoon fresh chives (chopped, plus more for topping): Chives bring a mild onion flavor that complements the ricotta wonderfully. Green onions can be a quick substitute if chives aren’t available.
-
½ teaspoon lemon zest: A dash of citrus adds brightness that cuts through the creaminess. Fresh lemon juice can also do the trick if you prefer a zesty kick.
-
Salt and pepper (to taste): These are essential for enhancing the natural flavors of your ingredients. Don’t skip this step!
-
1 ½ to 2 pounds heirloom tomatoes (sliced to 1/4-inch thickness): The heart of our tart! Heirloom tomatoes aren’t just beautiful; they offer rich, complex flavors. If they’re out of season, feel free to use cherry tomatoes or vine-ripened varieties.
Step-by-Step Instructions
Let’s get you started on this Easy Tomato Ricotta Tart! Follow these steps for a fail-proof way to impress your friends and family:
1. Preheat and Prep
Preheat your oven to 400°F (200°C). While that’s heating up, it’s time to prep your phyllo dough. You’ll want to take it out of the packaging and gently unroll it. Chef Hack: Keep your phyllo covered with a damp towel while you work to prevent it from drying out!
2. Layer the Phyllo
Lay down your first sheet of phyllo on a baking sheet lined with parchment paper (trust me, this will make cleanup a breeze). Brush it lightly with olive oil—this is how we build that fabulous crispiness! Repeat this process, layering at least 5 to 8 sheets of phyllo, brushing each layer with olive oil. Feel free to rotate the sheets a bit as you layer to create a more rustic look.
3. Mix the Ricotta Filling
In a bowl, combine the ricotta cheese, chopped basil, chives, lemon zest, and a pinch of salt and pepper. Mix until everything is well combined—this step is where that delicious creaminess comes into play!
4. Spread It Out
Spread the ricotta mixture evenly over the phyllo layers, leaving about an inch around the edges. This is where the creamy goodness begins to shine. Tip: Use a spatula to smooth it out evenly for a nice presentation!
5. Tomato Time
Now, it’s time for the star ingredient: arrange those beautiful heirloom tomato slices on top of the ricotta mixture in a neat, overlapping pattern. This not only looks gorgeous but ensures every bite is packed with flavor.
6. Season and Bake
Drizzle just a touch more olive oil over the tomatoes and sprinkle with salt and pepper to taste. Slide your creation into the hot oven and bake for about 25-30 minutes, or until the phyllo is golden brown and crispy.
7. Garnish and Serve
Once baked, remove the tart from the oven and let it sit for a few minutes. Add fresh basil and chives on top for that finishing touch. Presentation Tip: Cut the tart into rustic squares or wedges and serve it warm or at room temperature.
Serving Suggestions
This Easy Tomato Ricotta Tart is incredibly versatile! It can be served as an appetizer, a light lunch alongside a crisp green salad, or as a fantastic side dish at your next barbecue. Drizzle a bit of balsamic glaze for a pop of flavor and a touch of sophistication. Pair it with a glass of chilled white wine, and you’ve got yourself a culinary delight worth sharing with friends!
Recipe Variations
Looking to shake things up? Here are some creative twists to try with your Tomato Ricotta Tart:
-
Pesto Twist: Spread a layer of fresh pesto over the ricotta before adding tomatoes for an herby explosion of flavor.
-
Veggie Medley: Add sautéed zucchini or bell peppers for an extra punch of color and nutrition.
-
Spicy Kick: A sprinkle of red pepper flakes will give your tart a fiery edge.
-
Cheesy Goodness: Mix in a sprinkle of grated Parmesan or pecorino cheese for an added flavor dimension.
-
Gluten-Free Option: Use gluten-free phyllo or a pre-made gluten-free pie crust for a variation that everyone can enjoy!
Chef’s Notes
This recipe is near and dear to my heart and has evolved over time. I started making it back in my culinary school days with whatever tomatoes I could find. As I grew more passionate about food, I began experimenting with different types of cheese and herbs to find that perfect balance. The love of using fresh, in-season ingredients became my guiding principle, and I hope it brings you as much joy in your kitchen as it does in mine!
FAQs and Troubleshooting
Q: Can I make this tart ahead of time?
A: Absolutely! You can prepare the tart in advance and store it in the refrigerator. Just pop it in the oven to reheat before serving for that freshly baked taste!
Q: What if my phyllo dough tears?
A: No worries! Overlapping the torn edges with another layer of phyllo works like a charm. It’s all about those delicious layers anyway!
Q: Can I use dried herbs instead of fresh?
A: While fresh herbs elevate the flavor, you can definitely use dried—just reduce the quantity since dried herbs are more concentrated.
Q: How long will leftovers last?
A: This tart stores well in the fridge for up to 3 days. Just reheat it gently in the oven!
Nutritional Info
The Easy Tomato Ricotta Tart is not only scrumptious but can also be a healthy choice within reason. On average, a single slice provides around 200-250 calories, depending on portion sizes and the specific ingredients used. Here’s the breakdown for you:
- Calories: 200-250 per slice
- Protein: 7-10g (thanks to ricotta)
- Carbohydrates: 20-25g (from phyllo)
- Fat: 12-15g (from olive oil and ricotta)
- Fiber: 1-2g (from tomatoes and herbs)
Loaded with nutrients from those vibrant heirloom tomatoes, this tart is a great way to indulge in some delicious comfort food while keeping it relatively light.
Final Thoughts
This Easy Tomato Ricotta Tart is more than just a recipe; it’s an experience that invites you into the kitchen, sparking joy and inspiring connections. Cooking is all about experimentation—feel free to add your favorite twist or tweak ingredients based on what you have available.
So gather your friends, family, or even just your favorite book, and let this tart usher you into a world where good food equals good memories. I can’t wait to hear how your own tomato ricotta adventures turn out. Get ready for some happy bellies and joyful hearts! Happy cooking, my friends! 🍅💚
Print
Easy Tomato Ricotta Tart
- Total Time: 45 minutes
- Yield: 8 servings 1x
- Diet: Vegetarian
Description
A delightful tart featuring crispy phyllo pastry, creamy ricotta cheese, and sun-kissed heirloom tomatoes, perfect for any occasion.
Ingredients
- 1 roll phyllo dough (about 21 sheets)
- ¼ cup olive oil
- 1 ¼ cups ricotta cheese
- 1 tablespoon fresh basil (chopped, plus more for topping)
- 1 tablespoon fresh chives (chopped, plus more for topping)
- ½ teaspoon lemon zest
- Salt and pepper (to taste)
- 1 ½ to 2 pounds heirloom tomatoes (sliced to 1/4-inch thickness)
Instructions
- Preheat your oven to 400°F (200°C). Take out phyllo dough and unroll it while keeping it covered with a damp towel.
- Lay down your first sheet of phyllo on a baking sheet lined with parchment paper and brush lightly with olive oil. Repeat layering 5 to 8 sheets, brushing each with oil.
- Combine ricotta cheese, chopped basil, chives, lemon zest, and a pinch of salt and pepper in a bowl. Mix until well combined.
- Spread the ricotta mixture evenly over the phyllo layers, leaving about an inch around the edges.
- Arrange heirloom tomato slices on top of the ricotta mixture in a neat, overlapping pattern.
- Drizzle more olive oil over the tomatoes and sprinkle with salt and pepper. Bake for about 25-30 minutes, until the phyllo is golden brown and crispy.
- Remove the tart from the oven and let it sit for a few minutes. Garnish with fresh basil and chives before serving.
Notes
This tart can be served warm, at room temperature, or as part of a meal with salad or wine. It can also be prepared ahead of time and reheated before serving.
- Prep Time: 15 minutes
- Cook Time: 30 minutes
- Category: Appetizer
- Method: Baking
- Cuisine: Mediterranean
Nutrition
- Serving Size: 1 slice
- Calories: 225
- Sugar: 4g
- Sodium: 350mg
- Fat: 14g
- Saturated Fat: 4g
- Unsaturated Fat: 8g
- Trans Fat: 0g
- Carbohydrates: 22g
- Fiber: 2g
- Protein: 9g
- Cholesterol: 20mg
Keywords: tomato tart, ricotta tart, vegetable tart, summer recipe, easy appetizer

Green Apple Sorbet: 5-Ingredient Quick Summer Treat
Refreshingly Simple: Homemade Green Apple Sorbet Recipe
Hey there, food friends! Today, we’re diving into a delightful and refreshing homemade treat that’s perfect for any occasion: Green Apple Sorbet! There’s nothing quite like a scoop of chilled sorbet to cool you down on a hot day or to cleanse your palate between courses at a dinner party. Trust me; this is a simple, fun, and nostalgic recipe that will bring joy to your kitchen.
A Whiff of Nostalgia
Whenever I think of sorbet, I’m taken back to those sultry summer afternoons of my childhood. My family and I would pack up a cooler and head to the beach, our favorite playground of sun and saltwater. My mom would whip up her famous fruit sorbet—sweet, tangy, and ice-cold. She’d always let me pick the fruit, so I’d reach for those shiny green apples, their tartness singing in harmony with the sugar and lemon juice. The way the sorbet brightened our spirits while we built sandcastles and chased waves is a memory I cherish.
Now, I want to share this lovely tradition with all of you. Making your own sorbet is easier than pie (and trust me, pie can be pretty easy too!). Grab some green apples, and let’s turn up the fun in your kitchen!
Ingredients
Here’s what you’ll need for this delightfully zesty Green Apple Sorbet:
-
2 cups green apples, peeled and chopped
These crisp beauties bring all the tart flavor you need. I love Granny Smith apples! If you want a sweeter taste, feel free to mix in some red apples. -
1 cup granulated sugar
This sweetener helps balance out the tartness of the apples. For a lighter option, you can substitute with coconut sugar or a sugar alternative like Stevia (just check the conversion). -
1 cup water
It’s the base of our sorbet, essential for blending all the goodness together. You can use sparkling water if you’re feeling fancy for an extra fizz! -
1 tablespoon lemon juice
Freshly squeezed is always best! It adds a nice zippy flavor that brightens the sorbet. If you have lime on hand, that works beautifully, too. -
1 teaspoon vanilla extract
This will enhance the overall flavor profile and add a warm note to the tartness. You can replace it with almond extract for a different vibe.
Step-by-Step Instructions
Alright, my fellow kitchen adventurers! Let’s get swirling.
-
Prepare Your Apples
Peel and chop the green apples into small chunks (roughly 1-inch pieces). The smaller the pieces, the easier they will blend. Pro Tip: Try to keep them as uniform as possible for even cooking. -
Cook the Apples
In a medium saucepan, combine the chopped apples, sugar, and water. Bring it to a gentle simmer over medium heat, stirring occasionally, until the apples are soft (about 10-12 minutes). This step releases all those juicy flavors. Keep stirring to avoid sticking; you want a tasty compote! -
Add the Zing
Once the apples are soft, remove the saucepan from heat. Stir in the lemon juice and vanilla extract. This is when the magic starts; the aroma becomes heavenly! Let it cool for about 10-15 minutes before moving to the next step. -
Blend It Up
Transfer the apple mixture to a blender (or use an immersion blender) and blend until smooth. You can blend it to your desired texture—if you prefer a little chunky sorbet, feel free to keeping some bits of apple. Taste it, and adjust sugar or lemon, if needed! -
Chill Out
Pour the mixture into a shallow container, cover it, and pop it into the freezer. Let it freeze for about 4-6 hours or until solid. Remember to give it a stir every hour or so; this incorporates air into the sorbet for a light and fluffy texture. -
Scoop and Serve!
To serve, let it sit out for 5-10 minutes to soften before scooping. Use an ice cream scoop or a sturdy spoon, and get ready to enjoy your homemade Green Apple Sorbet!
Serving Suggestions
Presentation is key, right? Here are some fun ways to serve this delightful sorbet:
-
Classic Scoops: Serve in beautiful ice cream dishes or bowls. Add a sprig of mint or a slice of apple on top for that extra wow factor.
-
Sorbet Floats: Scoop some sorbet into a tall glass and pour sparkling water or ginger ale over it for a refreshing float!
-
With a Twist: Drizzle a bit of balsamic reduction over the top. It pairs so well with the tartness and looks oh-so-classy.
Recipe Variations
Feeling adventurous? Here are some fun twists and swaps to jazz up your Green Apple Sorbet:
-
Spiced Sorbet: Add a pinch of cinnamon or nutmeg for a cozy flavor that’s perfect for fall.
-
Herbal Infusion: Try adding fresh basil or mint during the cooking step for a refreshing herbal note.
-
Berry Blend: Mix in some smashed raspberries or strawberries before freezing for a vibrant color and new flavor.
-
Coconut Cream: Swap out half of the water for coconut milk to make a creamier, tropical sorbet.
Chef’s Notes
Over time, I’ve learned to embrace creativity in the kitchen, and this sorbet is versatile enough to experiment. Every summer, I find myself making this, tweaking the ingredients based on what’s in my pantry or what fruits are at their peak. My kids even love getting involved, especially when it’s time to taste test! Remember, your kitchen is your playground. Don’t shy away from making it your own!
FAQs and Troubleshooting
Q: What if my sorbet is too hard?
A: If your sorbet’s too hard, let it sit out for a bit before scooping. Or, blend it again with a splash of water to soften it up.
Q: Can I make this ahead of time?
A: Absolutely! It keeps well in the freezer for about 2 weeks, but trust me, it will likely disappear before that!
Q: My sorbet turned icy. What went wrong?
A: That can happen if there’s not enough sugar or if it was left un-stirred while freezing. Just remember to stir it every hour!
Q: Can I use other fruits?
A: Yes! Almost any fruit can be used—just blend it up and follow the same instructions. Just keep in mind that not all fruits provide the same tartness.
Nutritional Info
Let’s get down to the nitty-gritty. Each serving of this delightful Green Apple Sorbet (approximately 1/2 cup) contains:
- Calories: ~120
- Total Fat: 0g
- Carbohydrates: 32g (Sugars: 28g)
- Fiber: 1g
- Protein: 0g
Note: Nutritional values can vary based on the specific ingredients used and portion sizes.
Final Thoughts
And there you have it, friends! A simple, feel-good recipe for Green Apple Sorbet. It’s refreshing, easy to make, and a wonderful way to celebrate the fruity gems of the season. Not only is this sorbet a treat for your taste buds, but it also stirs up warm memories of shared joy and laughter in the kitchen. So the next time you’re in need of a cool-down or a simple dessert, remember: the kitchen is a place for both delicious creations and cherished memories.
Now grab those apples, get blending, and enjoy this vibrant, tangy sorbet that’s sure to please! Happy cooking, everyone!
Print
Homemade Green Apple Sorbet
- Total Time: 240 minutes
- Yield: 4 servings 1x
- Diet: Vegan
Description
A refreshing and simple homemade green apple sorbet that’s perfect for any occasion.
Ingredients
- 2 cups green apples, peeled and chopped
- 1 cup granulated sugar
- 1 cup water
- 1 tablespoon lemon juice
- 1 teaspoon vanilla extract
Instructions
- Prepare your apples by peeling and chopping them into small chunks.
- Cook the apples with sugar and water in a saucepan until soft, about 10-12 minutes.
- Add the lemon juice and vanilla to the mixture and let it cool.
- Blend the mixture until smooth and adjust flavor if necessary.
- Chill the mixture in the freezer for 4-6 hours, stirring every hour.
- Scoop and serve the sorbet after letting it sit for 5-10 minutes.
Notes
Feel free to experiment with different fruits or flavor additions. Check for sweetness before freezing.
- Prep Time: 15 minutes
- Cook Time: 12 minutes
- Category: Dessert
- Method: Freezing
- Cuisine: American
Nutrition
- Serving Size: 1/2 cup
- Calories: 120
- Sugar: 28g
- Sodium: 1mg
- Fat: 0g
- Saturated Fat: 0g
- Unsaturated Fat: 0g
- Trans Fat: 0g
- Carbohydrates: 32g
- Fiber: 1g
- Protein: 0g
- Cholesterol: 0mg
Keywords: sorbet, dessert, green apple, refreshing, vegan, homemade

Minute Cucumber Guacamole Bites for Summer Entertaining
Cucumber Guacamole Appetizer Bites: A Refreshing Twist on a Classic Favorite
Hey there, foodie friends! 🌟 Today, I’m super excited to share one of my absolute favorite appetizers that’s not only easy to make but also packs a punch of flavor and freshness. I’m talking about Cucumber Guacamole Appetizer Bites! If you’re looking for a light, refreshing treat that’ll impress your guests (or just provide the perfect snack while binge-watching your favorite show), you’ve found it!
Picture this: a sunny afternoon gathering with friends on the patio, laughter filling the air, and the aroma of delicious food wafting through the breeze. You reached into the fridge and pulled out some creamy guacamole—because, let’s be honest, who doesn’t love guac? Now, instead of the usual tortilla chips, imagine crisp slices of European cucumber topped with that velvety goodness. Sounds heavenly, right? This dish combines simplicity with sophistication. Not only is it packed with wholesome ingredients, but it also looks like it’s straight out of your favorite bistro’s menu.
You don’t have to be a culinary expert to whip up these gorgeous bites. Seriously, if you can slice a cucumber and scoop some guacamole, you’re halfway there! Plus, the beauty of this dish is that it can be customized to fit any occasion or dietary preference. Whether you’re hosting a summer gathering, having a cozy date night, or just need a mid-afternoon snack, Cucumber Guacamole Appetizer Bites are here to save the day and delight your taste buds.
So, grab your apron and let’s dive into this deliciously fresh recipe that will surely become a staple in your kitchen!
A Nostalgic Twist on Creamy Goodness
Reflecting on my love for this recipe takes me back to the summer barbecues of my childhood. My grandparents had a stunning garden where they grew a variety of fruits and veggies, and, of course, cucumbers were always plentiful. They had this secret recipe for guacamole that was like no other—spicy, creamy, and oh-so-delicious. While my family would devour heaps of chips and guacamole, it was my imaginative cousin who decided to use cucumbers as a base instead. Watching her compose those little appetizer bites was pure magic.
From that moment, the combination of creamy guacamole and crisp cucumber became a summertime staple in our family. Not only did it add a light, refreshing crunch, but it also meant everyone could enjoy the snack without overindulging. Whether I was helping my cousin slice cucumber rounds or sneaking bites of guac before it ever made it to the table, those memories are forever etched in my heart. It’s amazing how simple ingredients can create such powerful memories and experiences. And that’s why I’m so excited to share this recipe with you! Let’s keep the tradition alive and bring some laughter and flavor into our kitchens.
Ingredients
Here’s what you’ll need to make these delightful Cucumber Guacamole Appetizer Bites. I’ll also throw in some quick insights for each ingredient!
-
1 large European cucumber: The star of the show! European cucumbers are ideal because they have fewer seeds and a thinner skin. If you can’t find one, you can substitute with regular cucumbers, just consider peeling them if you want a less bitter taste.
-
1 cup guacamole: Feel free to use store-bought or make your own homemade version! If you want to customize it, try adding diced tomatoes, jalapeños for some heat, or even a squeeze of lime for a zesty pop!
-
Chili powder (or Tajin seasoning): To sprinkle on top, adding a hint of spice and color. If you want something milder, a sprinkle of paprika or even just salt will do the trick.
Step-by-Step Instructions
Alright, let’s get down to the good stuff—making these beauties! Follow these detailed steps, and you’ll have a platter of Cucumber Guacamole Appetizer Bites ready in no time.
Step 1: Prepare the Cucumber
-
Slice your cucumber: Using a sharp knife, slice your European cucumber into rounds about ½ inch thick. This thickness gives them a satisfying crunch and provides a sturdy base for the guacamole.
-
Tip: If you want a bit of color, you can use a peeler to create stripes on the cucumber! Just run it down the length in a pattern, alternating between peeling and leaving the skin intact. Not only does it look fancy, but it also adds some visual flair to your dish.
Step 2: Make or Use Guacamole
-
If you’re going homemade: Start with ripe avocados. Cut them in half, remove the pits, and scoop the flesh into a bowl. Mash them with a fork or a potato masher until they reach your desired creaminess. Mix in lime juice, salt, diced onion, garlic powder, cilantro, and jalapeños as desired.
-
If using store-bought: Take that guacamole out of the fridge and give it a good stir! It’s always nice to add a few extras like fresh cilantro or a splash of lime juice for an elevating touch.
Step 3: Assemble the Bites
-
Scoop the guac: Use a spoon or a piping bag (fancy, huh?) to dollop or pipe a generous scoop of guacamole onto each cucumber round. Don’t be shy—this is the star flavor we want to shine!
-
Tip: If you’re planning to prepare these ahead of time, just assemble the cucumber and keep the guacamole separate until serving. It’ll maintain that fresh, vibrant color, and no browning will occur!
Step 4: Add Your Seasoning
-
Sprinkle it: To finish off these beauties, sprinkle a touch of chili powder or Tajin seasoning atop each bite. This adds a pop of color and a delightful kick!
-
Tip: Feel free to get creative! You could even add a small slice of jalapeño on top for an extra spicy bite.
Serving Suggestions
To serve these crisp, creamy trailers of joy, place them on a decorative platter, alternating between cucumber and guacamole to create a lovely visual arrangement. Garnishing with fresh cilantro leaves or a sprinkle of additional seasoning not only adds beauty but also a final touch of flavor.
These bites are perfect for any occasion—an appetizer for a garden party, snacks for a movie night, or even a light meal on a hot day. Pair them with fresh tortilla chips, margaritas, or your favorite beverage and you’ll have everything you need for a delightful gathering.
Recipe Variations
Here are some creative twists you can make to this recipe, just to keep things exciting:
-
Roasted Garlic Guacamole: Add roasted garlic into your guacamole for a rich and savory flavor.
-
Herbed Cream Cheese Spread: Swap guacamole for a creamy goat cheese or herbed cream cheese for a different but equally delicious topping!
-
Add Ins: For a bit of zing, incorporate diced tomatoes or mango into your guacamole for a sweet and tangy flavor burst.
-
Spicy Salsa: Instead of guacamole, top with your favorite salsa for a fresh, zippy option!
-
Veggie Wraps: Roll these cucumber bites with strips of bell pepper or carrots for added crunch and color—perfect for a summer picnic!
Chef’s Notes
Just a little secret here—I’ve been known to nibble on the leftovers of this dish way too many times! It’s a great post-workout snack or a guilty pleasure when you need a midday pick-me-up.
I’ve also experimented with varying levels of seasoning, so don’t be afraid to play it by ear! If you have a couple of friends who prefer something spicier or milder, aluminum foil can help keep some of the bites mild while the others pack a punch.
FAQs and Troubleshooting
-
Can I prepare these in advance?
- Absolutely! Just prepare the cucumber and guacamole separately. Assemble them right before serving for the best flavor and freshness.
-
What if my guacamole turns brown?
- Don’t panic! If you’ve made too much guacamole, just add a sprinkle of lime juice over the surface before covering it with plastic wrap to help prevent browning.
-
Can I use different types of cucumbers?
- Sure! Regular cucumbers work, but you might want to peel them to reduce bitterness and make them more appealing.
-
What’s the best way to store leftovers?
- If you have leftover cucumber rounds, store them in a sealed container in the fridge. Guacamole can be stored separately with plastic wrap pressed against its surface to prevent browning.
Nutritional Info
Let’s talk about how deliciously healthy these beauties are! Each Cucumber Guacamole Appetizer Bite is low in calories and packed with nutritious goodness.
On average, one cucumber slice topped with guacamole contains:
- Calories: ~50
- Carbohydrates: ~6g
- Healthy fats: ~4g (thanks to the avocado)
- Fiber: ~2g (cucumbers are surprisingly high in fiber!)
- Vitamins: Rich in Vitamin K, C, and E
These bites make for a guilt-free party snack, so feel free to enjoy them without holding back!
Final Thoughts
And there you have it, friends—Cucumber Guacamole Appetizer Bites that will transform any gathering into a flavor-packed fiesta! While these bites are undeniably simple, they remind us that the best meals usually come from the heart and highlight fresh, wholesome ingredients.
Whether you’re reminiscing about your own childhood memories in the kitchen, entertaining friends, or just feeding your cravings, I hope this recipe becomes a delightful addition to your culinary repertoire. Let’s keep the love of good food alive. Grab those cucumbers and guacamole, and let’s make some tasty memories! Happy cooking! 🍽️
Print
Cucumber Guacamole Appetizer Bites
- Total Time: 10 minutes
- Yield: 4 servings 1x
- Diet: Vegetarian
Description
A light and refreshing appetizer featuring crisp cucumber rounds topped with creamy guacamole.
Ingredients
- 1 large European cucumber
- 1 cup guacamole
- Chili powder (or Tajin seasoning) for garnish
Instructions
- Slice your cucumber into rounds about ½ inch thick.
- Make or use store-bought guacamole, mixing in lime juice and desired extras.
- Scoop a generous amount of guacamole onto each cucumber round.
- Sprinkle chili powder or Tajin seasoning on top of each bite.
Notes
These bites can be prepared ahead of time if you keep the guacamole separate until serving.
- Prep Time: 10 minutes
- Cook Time: 0 minutes
- Category: Appetizer
- Method: No-Cook
- Cuisine: Mexican
Nutrition
- Serving Size: 1 serving
- Calories: 50
- Sugar: 1g
- Sodium: 150mg
- Fat: 4g
- Saturated Fat: 0.5g
- Unsaturated Fat: 3g
- Trans Fat: 0g
- Carbohydrates: 6g
- Fiber: 2g
- Protein: 1g
- Cholesterol: 0mg
Keywords: cucumber bites, guacamole, appetizer, vegetarian snack, healthy snacks

Zucchini Pie
Zucchini Pie: A Slice of Comfort
Hey there, food lovers! Today we’re diving into a recipe that’s a true celebration of summer’s bounty: Zucchini Pie! Now, don’t let the name fool you—this isn’t your average pie with a sweet crust and fruity filling. No, my friend, this dish is a savory delight that’s truly a feast for the senses. It’s easy to make, bursting with flavor, and a wonderful way to showcase those beautiful zucchinis we all either adore or have an abundance of in our gardens.
Now, I believe every dish tells a story—each ingredient has a journey that shaped it, every spice brings along a whisper of history. For me, Zucchini Pie takes me back to those sun-soaked days when my grandmother would welcome me into her cozy kitchen, the sound of sizzling onions and the scent of fresh herbs filling the air. She had a knack for turning simple ingredients into something magical, and this pie was one of her sweet triumphs.
Whether you’re bursting with summer squash from your garden, or you’re picking up those glossy green beauties at the local market, this Zucchini Pie is your ticket to a hearty meal that feels like a hug from the inside out. Let’s roll up those sleeves and get cooking!
A Personal Story: Grandma’s Kitchen Comfort
As a child, I spent countless summers at my grandmother’s house, where the kitchen was always bustling with activity. One of my favorite memories was coming home from playing outside, my hands dusty and my cheeks flushed, only to be greeted by the intoxicating aroma of something delicious wafting from the oven. I distinctly remember the day she introduced me to Zucchini Pie.
“Watch closely, Beau,” she said, her warm smile making even the hottest days feel like a cool breeze. The way she shredded zucchini with the precision of an artist was mesmerizing. I was tasked with mixing the ingredients in a colossal bowl, my enthusiasm reining over my slight struggle to keep everything intact. It was chaotic and messy, but that’s exactly how cooking should be—a delightful adventure!
We’d sit down together, savoring that pie. Each bite was more than just food; it was love, joy, and the comfort of family. Now, every time I make Zucchini Pie, I think of Grandma and those sun-drenched afternoons. Let’s bring some of that nostalgia to your kitchen!
Ingredients
Here’s what you’ll need to create a mouthwatering Zucchini Pie. Each ingredient plays a vital role in making this dish a delightful experience.
-
2 cups shredded zucchini: These lovely green gems are the star of the show! Grate them finely to ensure they incorporate well into the pie. For a twist, you can experiment with yellow squash if you’re feeling adventurous.
-
1 cup grated Parmesan cheese: This cheesy goodness adds a savory depth and richness to your pie. Not a fan of Parmesan? Try using Gruyere or even feta for a tangy kick!
-
1 cup all-purpose flour: This acts as the glue, giving the pie its structure. If you’re looking for a gluten-free option, feel free to swap in almond flour or a gluten-free all-purpose blend.
-
3 eggs: These little marvels are your binding agents. They help hold everything together while providing a rich flavor. You could substitute with flax eggs (1 tablespoon ground flaxseed mixed with 2.5 tablespoons water per egg) for a vegan twist.
-
1/2 cup milk: This adds moisture to your pie. You can use any milk you prefer—dairy, almond, or oat milk can all work beautifully.
-
1/2 teaspoon salt: A pinch of salt enhances all the flavors and keeps everything balanced. If you’re on a low-sodium diet, consider using a salt substitute or adjusting according to your taste.
-
1/2 teaspoon black pepper: This adds a touch of warmth and complements the zucchini perfectly. Want to spice it up? Crushed red pepper or smoked paprika can give it an extra kick!
-
1 tablespoon olive oil: A drizzle of this golden elixir provides richness and helps in sautéing the onions for a wonderful depth of flavor. You could also use coconut oil or butter if you prefer.
-
1/2 cup chopped onion: Onions add sweetness and a great base flavor. Shallots or leeks are excellent substitutes if you want something a bit different.
-
1/2 teaspoon garlic powder: This is an easy way to enhance flavor without the fuss of fresh garlic. If you have fresh garlic on hand, one minced clove would work well too!
-
Fresh herbs (optional, e.g. basil or thyme): A sprinkle of your favorite herbs can elevate the flavor! Go wild with seasonal herbs and let your creativity shine.
Step-by-Step Instructions
Ready to bring this delicious Zucchini Pie to life? Let’s get started!
-
Preheat Your Oven: Set your oven to 350°F (175°C). This ensures your pie gets that golden-brown crispness we all love. Pro tip: a little pastry stone can help maintain an even heat for a perfectly baked crust—even if this isn’t a crusted pie!
-
Prepare Your Zucchini: Start by shredding the zucchini using a box grater or a food processor. After shredding, place the zucchini in a clean kitchen towel and squeeze out any excess moisture. This is crucial! Too much liquid can make your pie soggy. (And who wants soggy pie? Not me, friends!)
-
Sauté the Onions: Heat the olive oil in a skillet over medium heat. Add the chopped onions and sauté until they’re translucent and slightly caramelized, about 5–7 minutes. Keep stirring! This will enhance their flavor and sweetness, making your pie shine.
-
Combine Your Wet Ingredients: In a large bowl, whisk together the eggs and milk. This airy mixture will act as a lovely custard. It’s all about texture, baby!
-
Add in the Zucchini: Fold the shredded zucchini into the egg and milk mixture. Add the sautéed onions, garlic powder, salt, and black pepper. Mix everything thoroughly—let those flavors dance together!
-
Incorporate the Dry Ingredients: Gradually mix in the flour and Parmesan cheese until everything is well combined. You want a homogenous mixture, so there are no pockets of floury goodness left. If you’re feeling adventurous, toss in some finely chopped fresh herbs here!
-
Pour and Bake: Grease a 9-inch pie dish or casserole and pour your mixture in. Spread it evenly with a spatula. Bake in the preheated oven for 30-35 minutes, or until the top is golden and a toothpick inserted into the center comes out clean. This is what we call patience, friends!
-
Cool and Serve: Once out of the oven, allow your Zucchini Pie to cool for about 10 minutes. This gives it a chance to firm up and makes slicing easier.
Serving Suggestions
Serving this Zucchini Pie is half the fun; it’s all about presentation and comfort!
For a rustic feel, simply slice it into wedges and serve directly from the pie dish. You can garnish with a sprinkle of freshly chopped herbs or a few shavings of extra Parmesan on top—talk about a pop of flavor!
Pair this delightful dish with a light salad drizzled in balsamic vinaigrette, or fresh tomato slices with basil and mozzarella for a classic summer touch.
If you want to indulge, serve it with a dollop of sour cream or Greek yogurt on the side. It’s the creamy accent that takes it over the top!
Recipe Variations
Let’s keep that creativity flowing! Here are some fun twists to consider when making your Zucchini Pie:
-
Cheesy Spinach Zucchini Pie: Toss in a handful of chopped fresh spinach along with the zucchini for added nutrients and vibrant color.
-
Mediterranean Flare: Swap out the Parmesan for feta and add some kalamata olives and sun-dried tomatoes. You’ll get a flavor explosion that’s simply divine!
-
Herbed Delight: Experiment with your favorite herbs! Swap in dill and chives for a fresh, garden vibe that’s utterly refreshing.
-
Spicy Kick: Want to turn up the heat? Add chopped jalapeños or a sprinkle of cayenne to the mix.
-
Gluten-Free Option: As mentioned earlier, replace the all-purpose flour with almond flour or a gluten-free flour blend. Just make sure to balance the moisture, so it bakes up nicely.
Chef’s Notes
Man, there’s something special about revisiting family recipes! I started making Zucchini Pie during the summer months, and every time I do, it reminds me of Grandma’s incredible kitchen. She could whip up dishes with whatever she had on hand—no recipe required. The love was always the secret ingredient!
Over the years, I’ve played around with this recipe, and it always feels like a challenge to make it slightly different every time. Whether it’s adding different cheeses or including a variety of veggies, this Zucchini Pie lends itself beautifully to experimenting.
One time, I was in a rush and accidentally swapped the milk for yogurt—didn’t even skip a beat! It resulted in an extra tangy flavor that I ended up loving. Just goes to show—mistakes can lead to pure kitchen magic!
FAQs and Troubleshooting
1. My Zucchini Pie is too watery. What did I do wrong?
Don’t worry—it happens to the best of us! Ensure you squeeze out as much moisture from the zucchini as possible before mixing. Also, consider reducing the milk slightly next time.
2. Can I use frozen zucchini for this recipe?
Absolutely! Just be sure to thaw and thoroughly drain the frozen zucchini, as it can carry excess moisture.
3. My pie didn’t rise! Why?
This could be due to overmixing the batter or using old eggs. Make sure your ingredients are fresh, and mix just until combined for the best texture.
4. How should I store any leftovers?
Store your Zucchini Pie in an airtight container in the refrigerator for up to 3 days. You can also freeze it for up to a month. Just be sure to thaw it overnight in the fridge before reheating!
Nutritional Info
Now, let’s talk nutrition. It’s always good to have an idea of what we’re enjoying in our meals!
- Calories: Approximately 120 calories per slice (based on making eight slices).
- Protein: About 6 grams per slice, thanks to those eggs and cheese.
- Carbohydrates: Roughly 10 grams per slice; the zucchini keeps things light.
- Fats: Around 7 grams per slice, with healthy fats coming from olive oil and cheese.
- Fiber: Zucchini is a good source, offering about 1 gram—great for digestion!
Of course, these values depend on the specific ingredients you use and the serving size, but it shows that you can enjoy a delicious meal without compromising on nutrition!
Final Thoughts
There you have it—a fantastic journey into making Zucchini Pie! This savory dish not only nourishes the body but also the soul. It connects us to memories of family, laughter, and shared meals—oh, how magical food can be!
The next time you find yourself with an abundance of zucchini or just want to create a delightful meal that brings people together, remember this recipe. Enjoy every step, embrace your creativity, and share those delicious moments with loved ones.
So, grab your apron, get into that kitchen, and let your inner chef shine. Until next time, happy cooking!
Print
Zucchini Pie
- Total Time: 50 minutes
- Yield: 8 servings 1x
- Diet: Vegetarian
Description
A savory pie bursting with flavor, perfect for showcasing fresh summer zucchini.
Ingredients
- 2 cups shredded zucchini
- 1 cup grated Parmesan cheese
- 1 cup all-purpose flour
- 3 eggs
- 1/2 cup milk
- 1/2 teaspoon salt
- 1/2 teaspoon black pepper
- 1 tablespoon olive oil
- 1/2 cup chopped onion
- 1/2 teaspoon garlic powder
- Fresh herbs (optional, e.g. basil or thyme)
Instructions
- Preheat your oven to 350°F (175°C).
- Prepare the zucchini by shredding and squeezing out excess moisture.
- Sauté the onions in olive oil until translucent and caramelized, about 5–7 minutes.
- Combine eggs and milk in a large bowl, whisking to blend.
- Add the shredded zucchini to the egg mixture, then the sautéed onions, garlic powder, salt, and black pepper.
- Incorporate the flour and Parmesan cheese until well combined.
- Pour the mixture into a greased 9-inch pie dish.
- Bake for 30-35 minutes, or until golden and a toothpick comes out clean.
- Cool for about 10 minutes before serving.
Notes
Serve with a light salad or drizzle with balsamic vinaigrette for a refreshing touch.
- Prep Time: 15 minutes
- Cook Time: 35 minutes
- Category: Main Course
- Method: Baking
- Cuisine: Italian
Nutrition
- Serving Size: 1 slice
- Calories: 120
- Sugar: 2g
- Sodium: 300mg
- Fat: 7g
- Saturated Fat: 3g
- Unsaturated Fat: 4g
- Trans Fat: 0g
- Carbohydrates: 10g
- Fiber: 1g
- Protein: 6g
- Cholesterol: 80mg
Keywords: zucchini pie, summer recipe, savory pie, vegetarian dish

Minute Tortellini Caprese Salad for Summer Lunches
Tortellini Caprese Salad: A Perfect Mix of Comfort and Freshness
Hey there, food enthusiasts! Today, we’re diving into the vibrant world of summer flavors with a dish that perfectly balances comfort and freshness—Tortellini Caprese Salad. With cheese tortellini playing a starring role alongside juicy cherry tomatoes, creamy mozzarella, and the aromatic embrace of basil, this salad is nothing short of an edible celebration! Each mouthful is like a sunny day in Italy, and trust me, once you whip this up, it’ll become a staple in your kitchen repertoire.
Now, before we get into the cooking part, let’s keep it real. We all lead busy lives, and the last thing we want is to feel overwhelmed when stepping into the kitchen. That’s where the magic of this Tortellini Caprese Salad comes in. It’s quick, effortless, and oh-so-satisfying! Whether you’re prepping for a summer barbecue, hosting friends, or just whipping up a cozy family dinner, this dish has got you covered.
A Personal Touch: My Love for Tortellini
Ah, tortellini! For me, it’s more than just carbohydrates—it’s a vessel of cherished memories. I remember my first cooking adventure with my grandmother, who had a knack for making the kitchen come alive with her traditional Italian recipes. One sunny afternoon, she gathered me around the kitchen counter, her apron dusted with flour.
She showed me the art of folding tortellini—how to create those perfect little pockets filled with cheesy goodness. As I attempted to fold the pasta, my patience wavered, and more than a few “mishaps” occurred! But through laughter and some kitchen chaos, I discovered the joy of cooking and the beauty of sharing meals with loved ones. That day sparked my passion for cooking, making tortellini a centerpiece in my culinary repertoire.
So, when I think of this Tortellini Caprese Salad, I’m whisked back to those warm family gatherings, where food brought us all together. You know that feeling of biting into something that transports you straight into nostalgia? That’s exactly what this salad does, and I can’t wait to share it with you!
Ingredients You’ll Need
Let’s gather our ingredients! This Tortellini Caprese Salad is packed with fresh, lively flavors and simple ingredients that you can easily find at your local market. Here’s what you’ll need:
-
20 oz cheese tortellini, uncooked (approximately 5 cups uncooked)
These delightful pasta pockets are filled with a mix of cheese—think ricotta and Parmesan. You can substitute with spinach or mushroom tortellini for a different flavor profile or go for whole-grain for added nutrition! -
10 oz cherry tomatoes, halved
Bursting with sweetness, these little gems add a lovely pop of color. If cherry tomatoes aren’t available, feel free to use grape tomatoes or any small, flavorful variety. -
8 oz mozzarella pearls
Creamy and soft, these little balls of cheesy goodness are easy to pop in your mouth. For a non-dairy option, try marinated tofu or a vegan mozzarella alternative. -
1 cup chopped spinach
Bringing in a green touch, fresh spinach adds a nutritious boost. If you prefer, you can swap it out for arugula for a peppery flavor or even kale for a heartier bite! -
1/4 cup chopped basil
This fresh herb is the heart of the dish, giving it that classic Caprese flair. In a pinch, use parsley or fresh mint, though they will lend a different vibe to the dish! -
1/2 cup olive oil
Extra virgin olive oil is best for dressing our salad, drizzling some healthy fats while enhancing the flavors! Avocado oil could be a great alternative if you’re looking for a change. -
2 tablespoons balsamic vinegar
This adds a delightful tang! If you don’t have balsamic on hand, a splash of red wine vinegar can work beautifully too. -
3-4 garlic cloves, minced
Garlic is a flavor powerhouse that elevates any dish. You can use garlic powder in a pinch, but there’s nothing like the real thing! -
3/4 teaspoon Italian seasoning
A beautiful blend of herbs that brings an aromatic quality to the salad. You can easily swap this for a mix of dried oregano, thyme, and rosemary if needed. -
1/2 teaspoon salt and pepper
Simple seasoning to make everything pop! Feel free to adjust to your taste. -
Balsamic glaze (optional)
A drizzle of balsamic glaze at the end adds a nice finish and visual appeal. If you’re feeling adventurous, try a citrus glaze, too!
Step-by-Step Instructions
Ready to get cooking? Let’s put this Tortellini Caprese Salad together, step by step!
-
Cook the Tortellini:
Bring a large pot of salted water to a rolling boil. Toss in your tortellini and cook according to package instructions until they float to the top, typically 2-4 minutes. Make sure not to overcook them; we want that perfect al dente texture! Once cooked, drain and set aside. Chef tip: Remember to reserve a little pasta water in case you want to adjust the consistency later! -
Prep the Veggies:
While your pasta is cooking, grab your chopping board! Halve the cherry tomatoes, slice up your spinach, and chop the basil—let your inner chef shine as you bring those beautiful colors to life. -
Make the Dressing:
In a small bowl, whisk together the olive oil, balsamic vinegar, minced garlic, Italian seasoning, salt, and pepper. Taste it to see if it needs any extra seasoning. Quick insight: If you want to pack the dressing with flavor, let it sit for a bit to allow the garlic and herbs to infuse! -
Combine Everything:
In a large mixing bowl, combine the cooked tortellini, halved cherry tomatoes, mozzarella pearls, chopped spinach, and basil. Pour the dressing over the mixture and gently toss until everything is well coated. Pro tip: Use a spatula to be gentle yet thorough—no one likes a mushy tortellini! -
Chill Out (Optional):
For best results, let your salad sit for about 15 minutes before serving. This allows the flavors to meld together beautifully. If you want to prep in advance, you can refrigerate it for up to a few hours! -
Serve and Enjoy:
Give it one last gentle toss before serving. You can garnish it with a drizzle of balsamic glaze on top for that gourmet touch. Serve it fresh and enjoy the masterpiece you’ve created!
Serving Suggestions
Presentation is key, right? To serve your Tortellini Caprese Salad beautifully, use a large, shallow bowl that showcases the vibrant colors and textures. Scoop generous portions and sprinkle some fresh basil or a few extra mozzarella pearls on top for that wow factor! You might also dust a little freshly cracked black pepper or sea salt just before sharing it with your loved ones.
Pair this salad with a crusty bread to soak up the delicious dressing, or serve it alongside grilled chicken or fish for a complete meal. Whether it’s a picnic, a family gathering, or just a cozy dinner at home, this dish is sure to steal the show!
Recipe Variations
Now, let’s get creative with some fun variations!
-
Pesto Tortellini Caprese: Instead of dressing it with olive oil and balsamic vinegar, give it a swirl of fresh basil pesto. Talk about bursting with flavor!
-
Mediterranean Twist: Add kalamata olives, sun-dried tomatoes, and feta cheese for a Mediterranean vibe. You could skip the mozzarella, too, to keep it dairy-free!
-
Spicy Kick: Spice things up by adding sliced jalapeños or a sprinkle of red pepper flakes to the dressing for heat.
-
Fruit Fusion: Toss in some diced avocado for creaminess or even some diced watermelon for a refreshing twist.
-
Grill it: Grill the cherry tomatoes and toss them in with the salad for that smoky flavor. They’ll add a new depth that you’ll absolutely love!
Chef’s Notes
As we wrap things up, I can’t help but share how this dish has evolved for me over the years. Originally, I started with a very straightforward Caprese salad topped with just tomatoes and mozzarella. But as I grew as a cook, I fell in love with the depth that tortellini brings to this dish.
And let’s not forget the funny kitchen moments! One time, I thought I could multitask and answer a call while cooking. Let’s just say I ended up burning the garlic and had to start all over again—a classic case of kitchen mayhem! But hey, every mishap is a lesson learned, right?
FAQs and Troubleshooting
Q1: Why did my tortellini fall apart while cooking?
Overcooking is usually the culprit! Make sure to watch the clock and follow the package directions closely—tortellini should only take a few minutes.
Q2: Can I make it ahead of time?
Definitely! To keep the fresh flavors intact, prepare everything except the dressing, then toss it all together just before serving.
Q3: What can I use instead of tortellini?
Try using farfalle or penne for a pasta salad twist, or even zoodles (zucchini noodles) for a low-carb version!
Q4: How long can I store leftovers?
Store leftovers in an airtight container for up to 3 days in the fridge. Just note that the pasta may absorb some dressing, so give it a quick toss before enjoying!
Nutritional Info
When it comes to this Tortellini Caprese Salad, you’re not just treating your taste buds but also nourishing your body! Here’s a rough breakdown of the nutritional content per serving (based on 8 servings):
- Calories: 300–350
- Fat: 18-20g
- Carbohydrates: 30-35g
- Protein: 11-13g
- Fiber: 2-3g
This salad is packed with healthy fats from the olive oil and plenty of nutrients from the veggies, keeping you satisfied and energized!
Final Thoughts
So there you have it, folks! Tortellini Caprese Salad is the perfect dish for those lazy summer afternoons or any time you crave a taste of Italy. It’s a great way to enjoy fresh ingredients, cherish their vibrant flavors, and create lasting memories around the dining table.
I hope this recipe brings a smile to your face and warms your heart, just like it does for me. So grab your apron, put on a fun playlist, and let’s dive into the wonderful world of flavors. Happy cooking, my foodie friends—until next time, let’s keep the good vibes rolling and the flavors tangy!
Print
Tortellini Caprese Salad
- Total Time: 15 minutes
- Yield: 4 servings 1x
- Diet: Vegetarian
Description
A delightful mix of cheese tortellini, fresh cherry tomatoes, mozzarella, and basil in a vibrant salad.
Ingredients
- 20 oz cheese tortellini, uncooked (approximately 5 cups uncooked)
- 10 oz cherry tomatoes, halved
- 8 oz mozzarella pearls
- 1 cup chopped spinach
- 1/4 cup chopped basil
- 1/2 cup olive oil
- 2 tablespoons balsamic vinegar
- 3–4 garlic cloves, minced
- 3/4 teaspoon Italian seasoning
- 1/2 teaspoon salt and pepper
- Balsamic glaze (optional)
Instructions
- Cook the tortellini: Bring a large pot of salted water to a rolling boil. Toss in your tortellini and cook according to package instructions until they float to the top, typically 2-4 minutes. Drain and set aside.
- Prep the veggies: Halve the cherry tomatoes, slice up your spinach, and chop the basil.
- Make the dressing: In a small bowl, whisk together the olive oil, balsamic vinegar, minced garlic, Italian seasoning, salt, and pepper.
- Combine everything: In a large mixing bowl, combine the cooked tortellini, halved cherry tomatoes, mozzarella pearls, chopped spinach, and basil. Pour the dressing over the mixture and gently toss until well coated.
- Chill out (optional): Let your salad sit for about 15 minutes before serving to allow the flavors to meld together.
- Serve and enjoy: Give it one last gentle toss before serving, garnishing with balsamic glaze if desired.
Notes
You can prepare everything except the dressing in advance, and refrigerate for freshness.
- Prep Time: 10 minutes
- Cook Time: 4 minutes
- Category: Salad
- Method: Boiling and Mixing
- Cuisine: Italian
Nutrition
- Serving Size: 1 serving
- Calories: 350
- Sugar: 5g
- Sodium: 400mg
- Fat: 20g
- Saturated Fat: 3g
- Unsaturated Fat: 13g
- Trans Fat: 0g
- Carbohydrates: 30g
- Fiber: 3g
- Protein: 12g
- Cholesterol: 30mg
Keywords: tortellini, caprese salad, summer salad, vegetarian, Italian

Minute Firecracker Hot Dogs: Smoky, Spicy Summer Bites
Flavorful Firecracker Hot Dogs: A Perfect Summer Treat
Hey there, foodies! It’s Beau Collier here, and today we’re diving into a summer classic with a spicy twist: the Flavorful Firecracker Hot Dogs! If you’ve ever thrown a backyard barbecue or just needed a quick and satisfying meal, hot dogs have a special place in our hearts (and stomachs!). But let’s be honest—they can be a bit basic sometimes. That’s why we’re turning the humble hot dog into something truly explosive (in a delicious way, of course).
Imagine unrolling a hot dog packed with zesty flavors, topped with fresh veggies and a creamy sauce that brings the heat. Whether you’re cooking for the family, hosting a weekend gathering, or just looking for a quick weeknight meal, these firecracker hot dogs promise to be a hit. Follow along as we explore this recipe that combines nostalgia with a kick, making every bite unforgettable.
My Personal Story with Firecracker Hot Dogs
Let me take you back to a summer evening a few years ago. I remember it vividly. I was hosting a small gathering at my place—just a few good friends, some cold drinks, and the grill fired up. The sun was setting, casting that golden hue all over the backyard, and the smell of grilled meat danced around us.
It was one of those laid-back evenings where laughter came easily, and the atmosphere hugged you like a warm blanket. I had planned on serving traditional hot dogs, but a stroke of inspiration hit me. Why not jazz them up? I whipped up my Firecracker Sauce on a whim, mixing in ingredients I had on hand. To my surprise and delight, my friends went wild for them! The combination of flavors was nothing short of explosive, and that night became a memory I cherish.
Since then, these hot dogs have become a staple in my kitchen and at every barbecue I throw. They are fun, customizable, and always leave my guests raving! With this recipe, I am excited to share the joy they’ve brought me, so let’s get cooking!
Ingredients
Let’s gather everything we need for these Flavorful Firecracker Hot Dogs. Here’s what you’ll need:
-
8 all-beef hot dogs
(Stick with high-quality, all-beef hot dogs for the best flavor and texture. You can substitute with turkey or plant-based hot dogs for a lighter option!) -
8 soft hot dog buns, lightly toasted
(A great bun is key! Opt for fresh, soft buns to hold all that flavor. Lightly toasting them adds a delightful crunch.)
Firecracker Sauce:
-
¼ cup mayonnaise
(This adds creaminess! You can swap for Greek yogurt for a lighter version—plus, it gives it a nice tang.) -
2 tablespoons sriracha sauce
(For that kick! Adjust the amount based on your spice tolerance; you can use any hot sauce in its place if sriracha’s not your jam.) -
1 tablespoon honey
(This balances the heat with a touch of sweetness. Maple syrup is a great substitute if you want a vegan option.) -
1 teaspoon smoked paprika
(For that smoky depth of flavor! You can use regular paprika if you prefer less smokiness.) -
1 teaspoon garlic powder
(A little garlic flavor goes a long way! Fresh minced garlic works too, but you might want to adjust the quantity.) -
1 tablespoon fresh lime juice
(Freshly squeezed is best! It brightens up the sauce and enhances all the flavors.)
Toppings:
-
1 cup shredded sharp cheddar cheese (or pepper jack)
(Sharp cheddar brings a bold flavor, while pepper jack adds extra heat! Feel free to mix it up.) -
½ cup diced red onions
(They add a lovely crunch and bite. You can swap with green onions for something milder.) -
½ cup sliced jalapeños (optional)
(A great way to turn up the heat! Leave them out if spicy isn’t your thing.) -
Fresh cilantro leaves
(To garnish! Fresh herbs add a pop of color and freshness. You can opt for green onions or parsley if cilantro isn’t your favorite.)
Step-by-Step Instructions
Alright, let’s get down to the important part—cooking these beauties! Follow these simple steps, and you’ll have Flavorful Firecracker Hot Dogs ready to impress.
-
Prepare the Firecracker Sauce:
In a mixing bowl, combine the mayonnaise, sriracha sauce, honey, smoked paprika, garlic powder, and fresh lime juice. Whisk until smooth and well blended. Here’s a little chef hack: taste as you go! If you like it tangier, add a bit more lime; for extra sweetness, a touch more honey can do wonders. -
Grill the Hot Dogs:
Preheat your grill to medium heat. Once it’s hot, throw those hot dogs on! Grill each side for about 5-7 minutes, turning until you see nice grill marks and they’re heated all the way through. If you don’t have a grill, you can also cook them in a skillet over medium-high heat or boil them for a quick option. -
Toast the Buns:
While the hot dogs are grilling, lightly toast your buns. You can place them on the grill for about 1-2 minutes or throw them in a toaster oven. This step makes a big difference in texture—trust me! -
Assemble the Firecracker Hot Dogs:
Once your hot dogs are perfectly grilled and your buns are toasty, it’s time to assemble! Place a hot dog in each bun. Slather a generous amount of that Firecracker Sauce on top—don’t be shy; this is where the magic happens! -
Add Your Toppings:
Now for the fun part! Sprinkle the shredded cheese on each dog, then add the diced red onions. If you’re feeling spicy, pop those sliced jalapeños on top! Finally, finish with a handful of fresh cilantro leaves for that pop of color and taste. -
Serve and Enjoy:
Place your assembled Firecracker Hot Dogs on a platter. Set out extra toppings and sauces in bowls for your guests to customize theirdogs further. Everyone loves a DIY station!
Serving Suggestions
When it comes to serving these hot dogs, presentation is key! Consider using a vintage platter or a fun board to display them. You might want to add some colorful items beside your hot dogs, like homemade potato chips or a fresh salad. You could even offer a variety of sauces (like ketchup, mustard, or extra sriracha) for a fun topping bar!
For a dinner party, pair your Firecracker Hot Dogs with ice-cold beverages—think lemonade, craft beer, or kombucha! And don’t forget an extra sprig of cilantro on top of each dog for that wow factor.
Recipe Variations
These Firecracker Hot Dogs are super versatile! Here are a few creative twists to spark your imagination:
-
BBQ Firecracker Dog: Mix in some BBQ sauce with the Firecracker Sauce for a smoky-sweet flavor profile. Top with coleslaw for an added crunch.
-
Tex-Mex Dog: Switch up the toppings—add guacamole, pico de gallo, and crumbled queso fresco for a fiesta in every bite!
-
Veggie Dog Option: Swap the beef hot dogs for a veggie or tofu dog. They still hold all the flavorful goodness without sacrificing taste.
-
Breakfast Dog: Try breakfast sausages instead of hot dogs, topped with scrambled eggs and a drizzle of the Firecracker Sauce for a fun brunch idea.
-
Spicy Asian Dog: Use kimchi and sesame seeds as toppings, and mix sesame oil into the Firecracker Sauce for an Asian-inspired twist.
Chef’s Notes
I have to tell you, this recipe has evolved quite a bit over the years. Initially, I relied solely on store-bought sauces, but as I learned more about flavor combinations, I couldn’t resist experimenting. The combination of sweet, spicy, and smoky in the Firecracker Sauce was born out of trial and error, and now it’s the star of the show!
One of my funniest kitchen moments while developing this recipe involved a slightly overzealous sriracha pour—let’s just say my lips were on fire for a bit afterward. I learned to measure and taste as I went, which is much less stressful!
FAQs and Troubleshooting
Q: What can I do if my hot dogs burst while grilling?
A: If you find your hot dogs splitting, it could be due to high heat. Try grilling them at a lower temperature, and make sure to turn them often to avoid one side cooking too fast.
Q: Can I prep the Firecracker Sauce in advance?
A: Absolutely! The sauce can be made a day in advance—just store it in the refrigerator. The flavors meld together beautifully overnight!
Q: How can I make this dish gluten-free?
A: Simply swap the hot dog buns for gluten-free versions, which are increasingly available at most grocery stores.
Q: What if I don’t have a grill?
A: No worries! You can boil the hot dogs or cook them in a skillet. You can even use a broiler to get that grill-like finish.
Nutritional Info
While it’s often tempting to label hot dogs as a guilty pleasure, these Firecracker Hot Dogs can be made healthier with thoughtful ingredient choices. Each serving (one hot dog with sauce and toppings) can vary but generally provides a satisfying mix of protein, carbohydrates, and fats.
- Calories: Approximately 300-400 (depending on toppings)
- Protein: About 12-15g
- Carbohydrates: Roughly 30-35g
- Fat: Approximately 15-20g
Feel free to adjust your choices (like using turkey dogs or Greek yogurt) to fit your nutritional goals.
Final Thoughts
Food is an adventure, and these Flavorful Firecracker Hot Dogs are perfect for igniting those summer gatherings with friends and family—or simply for a cozy night in. Remember, cooking isn’t just about the ingredients; it’s about the memories you create along the way. Get creative, adjust the flavors, and most importantly, have fun in the kitchen!
So, whether you’re firing up the grill or the stovetop, grab your ingredients and dive into this flavorful journey. I can’t wait to hear how your Firecracker Hot Dogs turn out—let’s spark that culinary creativity! Happy cooking, and cheers to good eats and great company!
Print
Flavorful Firecracker Hot Dogs
- Total Time: 30 minutes
- Yield: 4 servings 1x
- Diet: Gluten-Free Option
Description
A spicy twist on classic hot dogs, perfect for summer gatherings. Packed with zesty flavors and topped with fresh veggies and a creamy sauce.
Ingredients
- 8 all-beef hot dogs
- 8 soft hot dog buns, lightly toasted
- ¼ cup mayonnaise
- 2 tablespoons sriracha sauce
- 1 tablespoon honey
- 1 teaspoon smoked paprika
- 1 teaspoon garlic powder
- 1 tablespoon fresh lime juice
- 1 cup shredded sharp cheddar cheese (or pepper jack)
- ½ cup diced red onions
- ½ cup sliced jalapeños (optional)
- Fresh cilantro leaves (for garnish)
Instructions
- Prepare the Firecracker Sauce by whisking together mayonnaise, sriracha, honey, smoked paprika, garlic powder, and lime juice in a bowl.
- Grill the hot dogs on medium heat for about 5-7 minutes until heated through and marked.
- Toast the buns on the grill for 1-2 minutes until lightly crispy.
- Assemble the hot dogs in buns and slather with Firecracker Sauce.
- Add toppings like cheese, red onions, jalapeños, and cilantro.
- Serve on a platter with extra topping options for guests.
Notes
Feel free to customize toppings and sauces according to your taste. The sauce can be prepared a day in advance for best flavor.
- Prep Time: 15 minutes
- Cook Time: 15 minutes
- Category: Main Course
- Method: Grilling
- Cuisine: American
Nutrition
- Serving Size: 1 hot dog
- Calories: 350
- Sugar: 5g
- Sodium: 600mg
- Fat: 18g
- Saturated Fat: 6g
- Unsaturated Fat: 9g
- Trans Fat: 0g
- Carbohydrates: 30g
- Fiber: 2g
- Protein: 14g
- Cholesterol: 35mg
Keywords: hot dogs, barbecue, summer, quick meal, grilling, spicy food

Ingredient Summer Peach Mousse Trifles (No-Bake)
The Sweet Taste of Summer: Summer Peach Mousse Trifles
Hey there, fellow foodies! If you’re looking to add a splash of sunshine to your dessert table, I’ve got something real special for you. Today, we’re diving into the world of Summer Peach Mousse Trifles. This delightful layered treat is not only a feast for the eyes but also a celebration of all the juicy, sweet peaches the season has to offer! Perfect for those warm, lazy summer afternoons, these trifles embody everything I love about summer cooking—easy, fresh, and oh-so-satisfying. So, roll up your sleeves, and let’s get ready to create a dessert that’ll make your taste buds dance!
A Slice of Summer Nostalgia
Growing up, my Grandma Bea had the most incredible peach tree in her backyard. Every summer, my siblings and I would wait with bated breath for those fuzzy, golden beauties to ripen. One of my fondest memories is picking peaches on a sun-soaked afternoon, our hands sticky with juice and laughter.
Grandma would always whip up her famous peach cobbler, but she had a little secret: she would make a light, fluffy mousse from the ripest peaches, layering it with cake and whipped cream. It was heavenly! I remember racing to the kitchen, eager to help out—tasting and giggling as Grandma taught me the magic of turning simple ingredients into something extraordinary.
That’s how the idea for these Summer Peach Mousse Trifles was born! This recipe captures those memories, combining my love for peaches, cake, and whipped cream into a modern dessert that’s both beautiful and comforting. It’s a dish that brings people together, just like those summer days in Grandma Bea’s kitchen.
Ingredients
Now, let’s gather the ingredients for our Summer Peach Mousse Trifles. Here’s what you’ll need:
-
2 cups fresh peaches, diced
Nothing beats the flavor of ripe summer peaches! If you can’t find fresh ones, consider using canned peaches in juice—just drain them well. -
1 box yellow cake mix
Using a boxed cake mix keeps it simple, but if you have a favorite homemade recipe, feel free to use that! Just adjust the baking time accordingly. -
3 eggs
Essential for making the cake fluffy and light. If you’re vegan or egg-free, you can substitute with flax eggs (1 tablespoon of ground flaxseed mixed with 2.5 tablespoons of water per egg, let sit for 5 minutes). -
1/3 cup vegetable oil
This adds moisture to the cake. You can use melted coconut oil or even applesauce for a lighter version. -
1 cup water
Simple and straightforward, this helps activate the cake mix. You can swap it with peach juice for an extra peachy flavor! -
1 cup heavy whipping cream
This is the magic ingredient for our mousse! If you’re looking for a lighter option, coconut cream chilled in the fridge also works beautifully. -
1/4 cup powdered sugar
Just a touch to sweeten our mousse. Make it more or less depending on your sweetness preference! -
1 teaspoon vanilla extract
Adds lovely warmth to both the mousse and the cake. Use pure vanilla extract for the best flavor—or even try almond extract for a twist!
Step-by-Step Instructions
Alright, friends! Let’s jump into the cooking process of our Summer Peach Mousse Trifles. Follow these steps, and you’ll be well on your way to an irresistible dessert!
-
Preheat the Oven
Start by preheating your oven to 350°F (180°C). This ensures that your cake bakes evenly. While the oven is warming up, go ahead and grease your cake pan with a little bit of cooking spray. -
Prepare the Cake Mix
In a large mixing bowl, combine the yellow cake mix, eggs, vegetable oil, and water. Using an electric mixer, beat on medium speed for about 2 minutes until the batter is smooth. Watch for lumps and make sure everything is well incorporated! -
Bake the Cake
Pour the batter into the greased cake pan. Bake according to the package instructions—typically, you’re looking at about 28-30 minutes, but it’s always good to check with a toothpick. Once it comes out clean, you know it’s done! Allow the cake to cool completely in the pan before transferring it to a wire rack. -
Make the Peach Mousse
Once the cake is cool, whip the heavy cream in a chilled bowl using an electric mixer. Start on low to avoid splashing, then gradually increase to high speed. After a minute, sprinkle in the powdered sugar and vanilla extract. Beat until stiff peaks form. This means when you lift the beaters, the cream holds its shape perfectly! -
Fold in the Peaches
Gently fold in the diced peaches into the whipped cream using a spatula. Be careful not to deflate the whipped cream. This is where the magic happens—the mixture transforms into a luscious, creamy mousse filled with sweet peachy goodness! -
Assemble the Trifles
Cut the cooled cake into even squares. In your serving glasses or bowls, start layering! Begin with a layer of cake, followed by a layer of peach mousse, and repeat until you reach the top. Finish with a dollop of remaining mousse, and if you’re feeling fancy, top with a slice of fresh peach or a sprig of mint for that wow factor.
Serving Suggestions
Presentation is key when it comes to trifles! Grab your prettiest glassware—like mason jars, parfait glasses, or even elegant stemware. Not only does this add charm, but your guests will appreciate the effort!
Layer your cake and mousse carefully, showcasing the beautiful colors of the peaches. You can even drizzle a little extra peach juice or a light syrup on the sides of the glass for an extra splash of flavor. These Summer Peach Mousse Trifles are perfect for summer picnics, backyard barbecues, or simply a fun family dessert after dinner. The best part? You can make them ahead of time and store them in the fridge for a few hours before serving!
Recipe Variations
Why not get creative with this recipe? Here are a few fun ideas to put your own spin on the Summer Peach Mousse Trifles:
-
Berry Bliss
Swap out the peaches for fresh strawberries or raspberries! This will give the mousse a vibrant red hue and a tangy flavor. -
Tropical Twist
Add some diced pineapple and coconut flakes to the mousse for a tropical vibe! You can use coconut yogurt to replace the whipped cream for a light and refreshing variation. -
Nutty Delight
Stir in some finely chopped nuts or nut butter into the mousse for added crunch and flavor. Almonds or pecans would work beautifully against the soft textures. -
Spiced Mousse
For an autumn feel, add a sprinkle of cinnamon or nutmeg to the mousse. It gives a cozy twist that’s equally delightful! -
Chocolate Drizzle
Before serving, drizzle some melted chocolate over the top for a decadent touch. It pairs surprisingly well with the fruity flavors.
Chef’s Notes
Every recipe evolves over time, and this one is no exception! I’ve experimented with various cakes, from chocolate to carrot, and fillings like lemon curd and even Nutella! Some days, I might even throw in some whipped cream cheese for a tangy twist. The beauty of trifles is their versatility. You can get creative based on what’s in season or what’s in your pantry. Remember, cooking is all about having fun in the kitchen and making memories—just like those summer afternoons I spent with Grandma Bea!
FAQs and Troubleshooting
1. My cake is too dense. What went wrong?
Sometimes it’s easy to overmix your batter. Make sure you mix just until combined, as overmixing can lead to a denser cake.
2. How can I store leftovers?
You can store leftovers in the fridge for up to 3 days! Just cover them tightly with plastic wrap to keep them fresh, but note that the cake may become a bit soggy.
3. The mousse didn’t set properly; what happened?
Make sure your cream was cold when you whipped it. Additionally, overwhipping can cause the cream to turn grainy or curdled instead of fluffy.
4. Can I make these trifles in advance?
Absolutely! They can be made a few hours ahead of serving and stored in the fridge. Just be sure to add any garnishes right before serving for the freshest taste!
Nutritional Info
While indulging in treats is part of life, it’s good to note the nutritional info for those who are keeping an eye on it! Here’s a rough estimate for one serving (1 trifle):
- Calories: Approximately 350-400
- Protein: 5g
- Fat: 20g
- Carbohydrates: 45g
- Sugar: 30g
Now, keep in mind, these values can vary based on specific ingredient choices and serving sizes.
Final Thoughts
There you have it—your guide to creating refreshing and delightful Summer Peach Mousse Trifles that will wow your family and friends. I hope you feel as inspired as I do whenever I whip up this dessert. The joy of cooking lies in sharing flavors, stories, and love through food.
Next time you bite into this peachy mousse goodness, let it remind you of sunlit summer days, laughter, and the simple pleasure of good company. So grab your peaches, gather your loved ones, and let’s celebrate the irresistible flavors of summer. Until next time, happy cooking and may your kitchen always be filled with warmth and wonderful aromas!
Print
Summer Peach Mousse Trifles
- Total Time: 45 minutes
- Yield: 4 servings 1x
- Diet: Vegetarian
Description
A delightful layered dessert featuring fresh peaches, cake and whipped cream, perfect for summer gatherings.
Ingredients
- 2 cups fresh peaches, diced
- 1 box yellow cake mix
- 3 eggs
- 1/3 cup vegetable oil
- 1 cup water
- 1 cup heavy whipping cream
- 1/4 cup powdered sugar
- 1 teaspoon vanilla extract
Instructions
- Preheat the oven to 350°F (180°C) and grease your cake pan.
- Combine the cake mix, eggs, vegetable oil, and water in a mixing bowl and beat for 2 minutes until smooth.
- Pour the batter into the greased pan and bake according to package instructions, about 28-30 minutes.
- Cool the cake completely before transferring it to a wire rack.
- Whip the heavy cream until soft peaks form. Add the powdered sugar and vanilla, and continue beating until stiff peaks form.
- Fold in the diced peaches into the whipped cream gently.
- Cut the cooled cake into squares and layer in serving glasses with peach mousse.
- Top with a dollop of mousse and a slice of peach or mint if desired.
Notes
Make ahead of time and store in the fridge for a few hours before serving for best results.
- Prep Time: 15 minutes
- Cook Time: 30 minutes
- Category: Dessert
- Method: Layering
- Cuisine: American
Nutrition
- Serving Size: 1 serving
- Calories: 350
- Sugar: 30g
- Sodium: 200mg
- Fat: 20g
- Saturated Fat: 10g
- Unsaturated Fat: 8g
- Trans Fat: 0g
- Carbohydrates: 45g
- Fiber: 2g
- Protein: 5g
- Cholesterol: 60mg
Keywords: peach mousse, summer dessert, trifles, layered dessert, fresh peaches, easy dessert
Crazy Limeade Slush
Crazy Limeade Slush: A Refreshing Twist on a Classic Treat
Hey there, food friends! If you’re looking for a way to beat the heat while indulging your taste buds, you’ve come to the right place. Today, we’re diving into the delightful world of slushies with my Crazy Limeade Slush! This vibrant drink combines zesty limeade, aromatic ginger, and fresh mint for a refreshment that’s as uplifting as a summer breeze. So grab your blender, and let’s kick off this flavor adventure!
The Joy of Sharing a Slush
You know that feeling when summer rolls around, and all you want to do is sip on something icy and fun? I remember back in the day when my family would have these little epic slush parties in the backyard. The laughter, the joy, and of course, the colorful drinks whirling in everyone’s hands. One summer, I decided to take our usual fruity concoction and give it a twist. I tossed in fresh ginger and mint – a daring move that instantly elevated our summer sipping!
That special day was filled with kids running around, birds chirping, and people raving about this unexpected but delicious drink. It felt like I had stumbled upon a hidden gem, and trust me, after that, our backyard became the go-to spot for summer hangouts! Now, every time I whip up a Crazy Limeade Slush, I’m reminded of those sunny days and the bond we built over something as simple yet magical as a drink. So, let’s recreate that magic together!
Ingredients
Here’s what you’ll need to create this refreshing slush:
-
12 ounces container frozen limeade concentrate
This is the star of the show, bringing the signature tangy flavor. If you can’t find limeade, you can use lemonade or any citrus concentrate for a delightful twist! -
1 inch fresh ginger
Ginger adds a peppery kick that enlivens the slush. You can swap it with equal amounts of ginger powder if you’re in a pinch, but fresh is definitely the way to go for that lively zing! -
1/2 cup fresh mint leaves
Mint provides a fresh burst of flavor. Not a mint lover? Try basil or lemon verbena for a different herbaceous spin. -
3 cups ice
Ice gives our slush its signature icy texture. If you want a thicker slush, use more ice, but be careful not to over-blend, or you’ll wind up with a smoothie! -
1 1/2 cups cold water
This helps blend everything smoothly. For an extra flavor boost, consider using coconut water or sparkling water for a fizzy twist!
Step-by-Step Instructions
-
Prep Your Ingredients
Before you dive in, gather your ingredients and give your mint leaves a rough chop. This helps release all those aromatic oils. Peel and slice your ginger into thin coins for easier blending. -
Blend the Base
Toss the frozen limeade concentrate, fresh ginger, mint leaves, and cold water into your blender. Start with a low speed first to mix the ingredients. -
Add the Ice
Now, add those three cups of ice. Here’s a little chef hack: add ice gradually. Start with a cup and blend, then keep adding until you reach your desired slush consistency. This way, you can control the texture better! -
Blend Away!
Blend until everything is smooth and frothy, about 30-45 seconds. You want it to have that lovely slushy texture. If it’s too thick, add a splash more water. If it’s too thin, toss in more ice! -
Taste and Adjust
Here’s where the magic happens. Taste your slush and adjust the flavor. Want it tangier? Add a splash of lime juice. A little sweeter? A dash of honey or agave syrup will do the trick. -
Serve It Up
Once your slush is perfectly blended, scoop it into fun cups or glasses. Don’t forget to garnish! A sprig of mint and a slice of lime on top make for a stunning presentation, and you’ll look like a pro!
Serving Suggestions
Served chilled in colorful cups or mason jars, this Crazy Limeade Slush is perfect for summer gatherings, picnics, or just lounging on your patio. I recommend serving it alongside tortilla chips and guacamole, as the tangy slush is a refreshing accompaniment to savory snacks. You can even add decorative straws or fun drink umbrellas for a festive touch! Fancy hosting a movie night? Serve it in a large bowl and let everyone scoop their own slush.
Recipe Variations
Let’s keep it interesting! Here are a few creative twists to throw into your slush game:
-
Berry Burst: Toss in a cup of mixed frozen berries before blending for a fruity explosion that balances great with that zesty limeade.
-
Tropical Paradise: Add in some pineapple chunks or mango for a taste of the tropics; they pair beautifully with lime!
-
Spicy Kick: If you dare, throw in a pinch of cayenne pepper for a sweet and spicy combo that will have guests talking.
-
Coconut Cooler: Substitute half of the cold water with coconut milk for a creamy, tropical treat that’s oh-so-refreshing!
-
Mocktail Marvel: Pour your slush into a glass and top with soda or tonic water for a fizzy mocktail experience that’s perfect for summer sipping.
Chef’s Notes
Every great recipe evolves, and this Crazy Limeade Slush is no exception! I started out with a simple recipe just to cool down on hot days, but over time, I found myself experimenting with flavors and ingredients. One time, I accidentally blended a batch with cherries instead of mint, and while I thought it was a cooking disaster, it turned out to be a hit! The beauty of cooking is in the creativity and fun of experimenting. So, don’t be afraid to try new things and discover what delightfully unexpected flavors you can create!
FAQs and Troubleshooting
-
Why is my slush too thick?
If your slush is too thick, add a little bit more cold water or limeade concentrate and blend again. -
Can I make this ahead of time?
Yes! You can prepare the base (limeade, ginger, mint, and water) and store it in the fridge for a few hours. Just blend it with ice when you’re ready to serve. However, be mindful that it’s best enjoyed fresh for that lovely slushy texture. -
Is it possible to make a non-alcoholic version?
Absolutely! This recipe is naturally non-alcoholic. If you’re looking to make it an adult treat, add in a splash of your favorite white rum or vodka. -
What can I do with leftovers?
If you have any slush left over, pour it into an ice cube tray and freeze. These flavored cubes are great for adding to cocktails, smoothies, or just to keep your drinks cool without watering them down!
Nutritional Info
While I’m not a nutritionist, here’s a rough estimate of the nutritional content per serving of this Crazy Limeade Slush (assuming six servings):
- Calories: 80
- Carbohydrates: 20 g
- Sugars: 15 g
- Fiber: 1 g
- Protein: 0.5 g
This slush is a lower-calorie way to enjoy a sweet treat! The freshness of herbs and ginger boosts its flavor without adding too much sweetness, making it a great guilt-free indulgence!
Final Thoughts
Now that you’re armed with the recipe and a few creative twists, it’s time to create your very own Crazy Limeade Slush! Whether it’s a hot summer day or you’re simply in need of a refreshing drink, this slush is sure to bring smiles to your table. Gather your friends and family, share a laugh, and enjoy this delightful drink that’s packed with flavor and love. Food is about connection and joy, so let’s keep serving it up with warmth and creativity! Cheers to many more homemade slushes and backyard memories! Grab your forks — or straws, and let’s dig in!
Print
Crazy Limeade Slush
- Total Time: 10 minutes
- Yield: 6 servings 1x
- Diet: Vegetarian
Description
A refreshing twist on a classic treat, this Crazy Limeade Slush combines zesty limeade, aromatic ginger, and fresh mint for a delightful summer beverage.
Ingredients
- 12 ounces frozen limeade concentrate
- 1 inch fresh ginger
- 1/2 cup fresh mint leaves
- 3 cups ice
- 1 1/2 cups cold water
Instructions
- Prep your ingredients by gathering and roughly chopping the mint leaves, while peeling and slicing the ginger.
- Toss the frozen limeade concentrate, fresh ginger, mint leaves, and cold water into your blender.
- Add the ice gradually starting with a cup, ensuring to blend after each addition until you reach your desired slush consistency.
- Blend until smooth and frothy, about 30-45 seconds, adding more water or ice as needed for texture.
- Taste your slush and adjust the flavor with lime juice or sweeteners as desired.
- Serve the slush in fun cups or glasses, garnishing with a sprig of mint and a slice of lime.
Notes
This slush is perfect for summer gatherings and can be customized with various fruit additions or herbs for a unique twist.
- Prep Time: 10 minutes
- Cook Time: 0 minutes
- Category: Beverage
- Method: Blending
- Cuisine: American
Nutrition
- Serving Size: 1 serving
- Calories: 80
- Sugar: 15g
- Sodium: 5mg
- Fat: 0g
- Saturated Fat: 0g
- Unsaturated Fat: 0g
- Trans Fat: 0g
- Carbohydrates: 20g
- Fiber: 1g
- Protein: 0.5g
- Cholesterol: 0mg
Keywords: limeade, slush, refreshing drink, summer beverage, ginger, mint