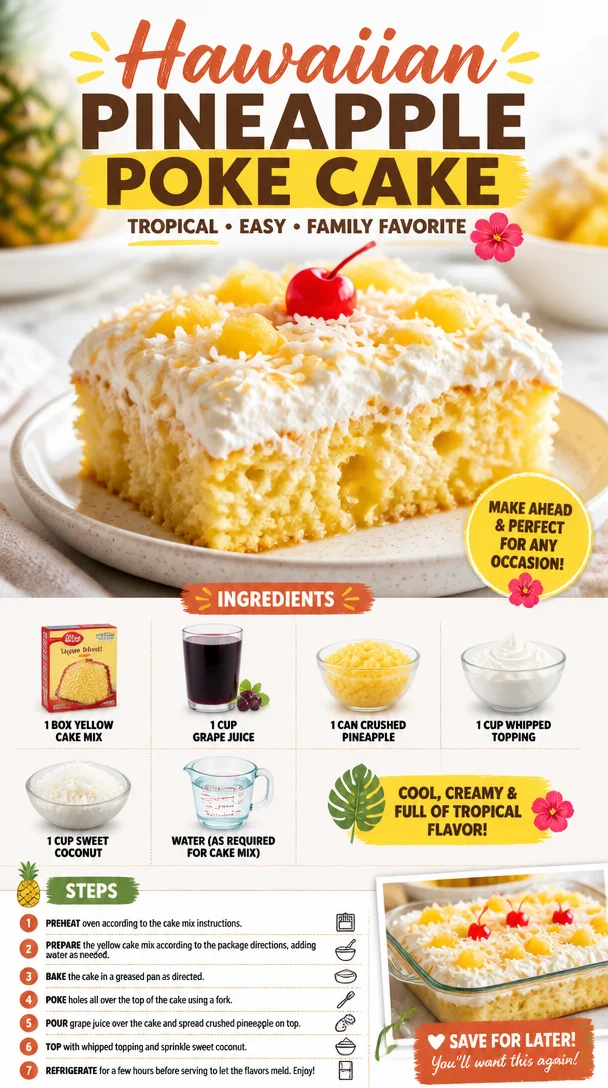
Hawaiian Pineapple Poke Cake
Hey there, food lovers! Welcome back to Feastical! Today we’re diving into something truly special—a delightful Hawaiian Pineapple Poke Cake that’s guaranteed to bring sunshine to your table and smiles to your guests. If you’ve ever had the pleasure of tasting a poke cake, you know exactly what I’m talking about. If not, well, buckle up because we’re about to take your dessert game to an entirely new level.
This cake is everything you could want in a dessert: moist, sweet, and bursting with tropical flavors. Imagine biting into a slice that has soaked up the essence of crushed pineapple and grape juice, creating a flavor explosion that transports you straight to a sunny beach in Hawaii. Not only is it utterly delightful, but it’s also among the simplest cakes you can whip up. Seriously, if you can mix ingredients and wait a little while for it to bake, you’re golden!
Now, this Hawaiian Pineapple Poke Cake is not just a recipe; it’s a loaded trunk of memories for me. I remember the first time I made it—it was for a family gathering, and the moment the cake came out of the oven, I was greeted with a wave of nostalgia. My Aunt Mabel used to make this cake every summer, and the scent alone was enough to bring everyone running to the kitchen. The best part? It was always an enthusiastic mess! We would all help with decorating and taste-testing—even the little ones had their hands on spoons. It was a true family affair filled with laughter, love, and, of course, a heaping dose of pineapple goodness.
Now, let’s get this party started! Grab your apron, and let’s bring a little piece of paradise into your kitchen.
Personal Story
Okay, let me take you back to one summer that feels forever etched in my memory. I was about ten years old, reeling with excitement because we were hosting our annual family luau in the backyard—a time when the sun never seemed to set and laughter echoed through our neighborhood. My Aunt Mabel, a culinary wizard, had just announced that she was bringing her famous Hawaiian Pineapple Poke Cake.
Now, if you’ve never experienced the joy of Aunt Mabel’s poke cake, let me paint a picture. The cake was always topped with clouds of whipped cream, crowned with sweet coconut shavings, and decorated with maraschino cherries—she called it “island bliss.” On the afternoon of the luau, the tantalizing aroma wafted through the open doors like an enchanting spell, pulling all of us toward the kitchen. I remember peeking at the cake cooling on the counter, only to be shooed away by Aunt Mabel, who insisted that patience was key.
The moment the cake was finally served, it practically disappeared. I recall sitting cross-legged on the grass, the sun kissing my cheeks, desperately trying to savor my slice while sneaking glances at everyone else’s faces as they delved into the deliciousness. That cake became a staple at our summer gatherings, and each bite was like a taste of joy itself—a beautiful reminder of food bringing us all together.
Looking back, I realize it isn’t just about the cake; it’s about shared experiences and creating new memories with loved ones. So let’s dive in and recreate those moments with your very own Hawaiian Pineapple Poke Cake!
Ingredients
Here’s what you’ll need to whip up this amazing Hawaiian Pineapple Poke Cake:
-
1 box yellow cake mix
This is the base of our poke cake! You can choose any brand you prefer, but I recommend going with a classic for that timeless flavor. If you want to lighten things up, a sugar-free cake mix works great too! -
1 cup grape juice
This gives a unique flavor profile while adding moisture. Feel free to swap it out with apple juice or a fruit punch if you want something a bit different. -
1 can crushed pineapple
This is the star of the show! The pineapple adds sweetness and pairs beautifully with the grape juice. Be sure to reserve the juice for mixing into your poke. You can also use fresh pineapple if you’re feeling fancy and adventurous! -
1 cup whipped topping
It’s what gives that creamy, dreamy texture on top. You can go for the store-bought kind or make your own—you know I’m all about keeping it simple, but it’s your cake! -
1 cup sweet coconut
This provides a lovely texture and a little tropical flair. Toasting the coconut before topping can intensify the flavor, but that’s entirely up to your taste! -
Water (as required for cake mix)
Follow the instructions on your cake mix box; usually, it requires some water in addition to the other ingredients.
Get these ingredients together, and get ready for something magical!
Step-by-Step Instructions
Now, let’s get started on creating this delicious cake! Don’t worry; I’ve got your back with some helpful tips and tricks along the way.
-
Preheat your oven
Preheat your oven to 350°F (175°C). This is an important first step because you want the oven nice and hot when your cake goes in. Think of it as giving your cake a warm welcoming hug! -
Prepare the baking pan
Grease a 9×13-inch baking pan with a little cooking spray or butter. This will ensure that your masterpiece doesn’t stick. Trust me, you don’t want to have a sticky situation on your hands! -
Mix the cake batter
In a large mixing bowl, combine the yellow cake mix, water (as per the package), and grape juice. Mix it on medium speed for about 2-3 minutes until it’s all well-combined and smooth. You could use an electric mixer or whisk it by hand—you do you! -
Pour into the pan
Now, it’s time to pour that vibrant batter into your greased pan, spreading it evenly. As you pour it in, take a moment to admire the swirls and colors. Doesn’t it look stunning already? -
Bake the cake
Pop the cake into your preheated oven and let it bake for about 25-30 minutes or until a toothpick inserted into the center comes out clean. While it’s baking, your kitchen will start to fill with that delicious, comforting smell. -
Cool the cake
Once baked, remove the cake from the oven and let it cool in the pan for about 10 minutes. After that, gently remove it from the pan to cool completely on a wire rack. This is crucial since we’ll be poking holes in it soon! -
Poke the cake
Once the cake is cooled, grab a fork and make holes evenly across its surface—about 1 inch apart. This is where the magic happens! The holes allow the juice to seep in, creating that delightful moistness that makes a poke cake so special. -
Prepare the pineapple and juice mix
While the cake is cooling, mix the reserved juice from the can of crushed pineapple and the pineapple itself together in a small bowl. Pour this mixture evenly over the poked cake. The juice will work its way down into the holes, flavoring every bite! -
Frost the cake
After the juice has been absorbed (give it about 30 minutes), it’s time to spread the whipped topping over the cake. Don’t be shy—make it thick and decadent! -
Add coconut
Finally, sprinkle the sweet coconut on top. If you’re feeling fancy, you can toast it lightly in the oven for a few minutes first. That added crunch and nutty flavor will take your cake to the next level! -
Chill the cake
Cover the cake and refrigerate it for at least an hour before serving. This helps meld all those flavors together beautifully.
And voila! You’ve created a Hawaiian Pineapple Poke Cake that’s not only delicious but also a blast to make.
Serving Suggestions
When it comes to serving your Hawaiian Pineapple Poke Cake, there are a few fun ideas to elevate your presentation.
-
Slice and Platter
Simply slice the cake into generous squares and place them on a festive platter. You can add a sprinkle of additional coconut and a maraschino cherry on top of each slice for that classic poke cake look! -
Individual Portions
For a more personal touch, serve the cake in individual glass cups. Layer some cake, a spoonful of extra pineapple, a dollop of whipped topping, and a sprinkle of coconut. Not only is it adorable, but it’s also super easy for guests to grab! -
Tropical Garnish
For that extra flair, consider adding some fresh tropical fruits like mango slices or kiwi on the side. It makes your dessert plate look spectacular and adds a pop of color! -
Serve with Ice Cream
A scoop of vanilla or coconut ice cream complements the poke cake beautifully, enhancing the creamy goodness and adding a delightful chill!
No matter how you serve it, this Hawaiian Pineapple Poke Cake is sure to be a crowd-pleaser.
Recipe Variations
Feeling adventurous? Here are a few delicious and unique variations of the Hawaiian Pineapple Poke Cake:
-
Mango-Pineapple Poke Cake
Swap half of the crushed pineapple for canned or pureed mango. The mango adds a tropical twist and brings a whole new dimension to your poke cake! -
Coconut Milk Substitute
For a more profound coconut flavor, replace the grape juice with coconut-infused juice or coconut milk mixed with a touch of sweetener. -
Nutty Addition
Add some chopped macadamia nuts to the top of your cake before serving for a delightful crunch and an authentic Hawaiian touch! -
Boozy Option
For adults only, consider adding a splash of rum to the pineapple juice or even a layer of coconut rum-flavored whipped topping. It’s a fun beachy twist! -
Sugar-Free Twist
Substitute the cake mix and grape juice for their sugar-free counterparts along with light whipped topping for a guilt-free dessert without sacrificing flavor!
Feel free to mix and match these variations to create your own signature poke cake!
Chef’s Notes
Despite its simplicity, this Hawaiian Pineapple Poke Cake has quite a history in my kitchen. What started as a beloved family treat has evolved into numerous variations to suit any occasion—birthdays, potlucks, or just a Tuesday night craving.
And the best part? It’s become a tradition for my own kids to help create it, each one adding their special touch or a little secret ingredient they come up with. The laughter and creativity they bring to the kitchen remind me of my own childhood, and it’s a beautiful cycle of loving food and laughter.
Plus, I can’t help but giggle when I think back to my attempt at turning this recipe into a multi-layer cake—in theory, it sounded great, but let’s just say it didn’t quite have the same vibe! I ended up transforming it back into a poke cake. Lesson learned: sometimes simple is best.
FAQs and Troubleshooting
Let’s tackle some common questions and potential hiccups you might run into!
-
Why is my cake dry?
If your cake comes out dry, it may not have been baked for the right amount of time or perhaps it didn’t get enough moisture. Make sure to follow the instructions and pour enough juice over the poked sections. -
Can I use fresh pineapple instead of canned?
Absolutely! Just make sure to finely chop it, and don’t forget to reserve the juice for that amazing flavor. -
Can I substitute the whipped topping?
Yes, you can definitely make your own whipped cream using heavy whipping cream, sugar, and vanilla extract if you prefer a homemade touch! -
How long will the cake last?
This cake is best enjoyed within 3-4 days when stored in the refrigerator. The longer it sits, the more the cake absorbs the juice—which can be good or bad depending on your taste!
Nutritional Info
While I always recommend enjoying treats like this in moderation, here’s a rough breakdown of the nutritional info for one slice of Hawaiian Pineapple Poke Cake (based on 12 servings):
- Calories: Approximately 250
- Total Fat: 7g
- Saturated Fat: 5g
- Cholesterol: 20mg
- Sodium: 250mg
- Total Carbohydrates: 43g
- Dietary Fiber: 1g
- Sugars: 25g
- Protein: 2g
Remember, these figures can change depending on the brands you use and if you add any variations!
Final Thoughts
There you have it, my friends! A delicious Hawaiian Pineapple Poke Cake ready to take center stage at your next gathering, backyard BBQ, or even just a cozy night at home. I hope this recipe transports you to a sunny paradise, packing each bite with nostalgia, family, and love.
As you dive into making your own poke cake, remember it’s not just about following the steps; it’s a journey of creativity, nostalgia, and deliciousness. Don’t hesitate to get playful with the flavors, twinkling in your own special touch.
So go ahead, grab your ingredients, gather your loved ones around the kitchen, and let’s make memories with this scrumptious Hawaiian Pineapple Poke Cake. After all, great food is meant to be shared and celebrated. Happy baking, and enjoy every bite! 🌺🍍✨
Print
Hawaiian Pineapple Poke Cake
- Total Time: 45 minutes
- Yield: 12 servings 1x
- Diet: Vegetarian
Description
A delightful Hawaiian Pineapple Poke Cake that’s moist, sweet, and bursting with tropical flavors, perfect for any gathering.
Ingredients
- 1 box yellow cake mix
- 1 cup grape juice
- 1 can crushed pineapple
- 1 cup whipped topping
- 1 cup sweet coconut
- Water (as required for cake mix)
Instructions
- Preheat your oven to 350°F (175°C).
- Prepare a 9×13-inch baking pan by greasing it with cooking spray or butter.
- Mix the yellow cake mix, water, and grape juice in a large mixing bowl on medium speed for about 2-3 minutes.
- Pour the batter into the greased pan, spreading it evenly.
- Bake the cake for about 25-30 minutes or until a toothpick comes out clean.
- Cool the cake in the pan for about 10 minutes, then remove it to cool completely on a wire rack.
- Poke holes evenly across the cooled cake using a fork.
- Prepare a mixture of reserved juice from the crushed pineapple and the pineapple itself, then pour it over the poked cake.
- Frost the cake with whipped topping after the juice has absorbed.
- Add sweet coconut on top, toasting it if desired.
- Chill the cake in the refrigerator for at least an hour before serving.
Notes
Serve with additional coconut, maraschino cherries, or tropical fruits like mango for an extra special touch.
- Prep Time: 15 minutes
- Cook Time: 30 minutes
- Category: Dessert
- Method: Baking
- Cuisine: Hawaiian
Nutrition
- Serving Size: 1 serving
- Calories: 250
- Sugar: 25g
- Sodium: 250mg
- Fat: 7g
- Saturated Fat: 5g
- Unsaturated Fat: 2g
- Trans Fat: 0g
- Carbohydrates: 43g
- Fiber: 1g
- Protein: 2g
- Cholesterol: 20mg
Keywords: poke cake, Hawaiian dessert, pineapple cake, tropical dessert, family recipe

Moist Lemon Yogurt Cake
Moist Lemon Yogurt Cake: A Slice of Sunshine for Every Occasion
Hey there, food lover! 🍋 If you’re anything like me, there’s nothing quite as magical as the aroma of a cake baking in the oven—especially when that cake is a zesty, moist lemon yogurt delight that practically sparkles with sunshine. Welcome to the world of Feastical, where we celebrate the joy of good food and the stories they tell!
When I think about the perfect dessert, my mind races back to that iconic lemon yogurt cake my grandma used to whip up on sunny afternoons. Her kitchen would transform into a mini bakery, with flour dust dancing in the sunlight and that sharp, sweet scent of lemons filling the air. It became our family tradition to gather around the table, share stories, and, more importantly, savor every last crumb of that glorious cake. It was never just about the food; it was about connection, laughter, and memories crafted over cake slices and cups of tea.
Now, with a few classic and personal twists, I’m excited to share my version of this beloved recipe with you! This Moist Lemon Yogurt Cake is simple yet has the power to evoke the warmest of memories and the brightest of smiles. Not only is it easy to make—perfect for both the seasoned chef and the kitchen newbie—but it also boasts a texture so moist and a flavor so vibrant that one slice simply won’t do!
So, grab your apron and let’s get to work bringing a little sunshine into your kitchen!
Personal Story
Growing up, my summers were spent at my grandparents’ quaint little house in the countryside. They had a beautiful lemon tree in their backyard that seemed to grow the biggest, juiciest lemons you’ve ever seen. My grandma was a firm believer in using fresh ingredients, and what’s fresher than lemons straight from the tree?
I can’t remember a single visit where we didn’t bake something together, and it was always this lemon yogurt cake that stole the show! I fondly recall the thrill of helping her mix and measure—trying to sneak a taste of the batter when she wasn’t looking. Her laughter would fill the room when I inevitably ended up with a smudge of flour on my nose. As it baked, we’d sit on the porch, listening to the cheerful birds and plotting what flavor we’d experiment with next. This cake was more than just a sweet treat; it was a cherished family ritual.
Now, as an adult, every time I whip up this cake, I’m transported back to those sun-soaked afternoons, bringing with me the same joy and excitement that filled my childhood kitchen. Let’s carry that spirit forward together as we dive into the delightful world of flavors!
Ingredients
Here’s what you’ll need to bring this Citrus Wonder to life. Each ingredient plays a crucial role in creating that perfect moist texture and refreshing flavor.
-
1 cup plain yogurt
You can use any type of plain yogurt (Greek, regular, or even non-dairy). Greek yogurt will give you extra creaminess and protein while regular yogurt provides adequate moisture. -
3/4 cup sugar
This is essential for that balanced sweetness. If you want a healthier option, you can substitute with honey or coconut sugar, but be mindful of the moisture levels. -
3 large eggs
Eggs are your binding agents! If you’re vegan or allergic, replace them with flax eggs (1 tablespoon ground flaxseed mixed with 2.5 tablespoons water for each egg) for a similar binding effect. -
1/2 cup vegetable oil
This adds richness to the cake without making it heavy. You can swap it with melted coconut oil for a tropical twist or applesauce for a healthier alternative, but be cautious about the additional moisture. -
1 teaspoon vanilla extract
For that warm, fragrant undertone. Feel free to use almond extract for a different flavor profile! -
2 cups almond flour
The secret to that delicate texture! If you don’t have almond flour, you can try using all-purpose flour, but it will change the texture slightly. -
1 tablespoon baking powder
This helps the cake rise beautifully. Double-check its freshness—old baking powder might leave you with a flat cake! -
1/4 teaspoon salt
A pinch of salt enhances sweetness. Don’t skip it! -
Zest of 2 lemons
For that bold, bright flavor. Be sure to zest before juicing! You can substitute with limes if you’re feeling adventurous. -
1/4 cup fresh lemon juice
This is where the magic happens—adding acidity and freshness. Fresh is always best, but store-bought juice works in a pinch.
Step-by-Step Instructions
Now, let’s get our hands dirty and make this lemony goodness happen! 🍰
-
Preheat Your Oven
Preheat your oven to 350°F (175°C). This step is crucial for an even bake. Also, don’t forget to grease your cake pan! A 9-inch round or a loaf pan works great. -
Mix Your Wet Ingredients
In a large mixing bowl, whisk together the yogurt, sugar, and eggs until smooth. This is where all the magic begins. The yogurt gives structure and moisture, while the sugar helps the cake to rise. Make sure not to skip the whisking; let it blend harmoniously! -
Incorporate the Oil and Vanilla
Gradually drizzle in the vegetable oil while whisking, followed by the vanilla extract. You want to make sure the mixture is light and airy. I like to imagine it’s like a dance—gentle yet invigorating! -
Combine Dry Ingredients
In a separate bowl, mix together the almond flour, baking powder, salt, and lemon zest. The zest adds that pop of citrus flavor right from the get-go. This is also a good time to mentally prepare for the zesty burst that’ll soon fill your kitchen! -
Bring It All Together
Gently fold the dry ingredients into the wet mixture. Be careful not to overmix; a few lumps are perfectly okay! This is where our loving approach to baking comes into play—gentleness brings about the best texture! -
Infuse with Lemon Juice
Once mixed, gently fold in the lemon juice. Feel free to take a quick taste—it’s bursting with freshness! -
Pour and Bake
Pour the batter into your prepared pan and smooth the top. Place it in your preheated oven and bake for 40-45 minutes, or until a toothpick inserted in the center comes out clean. The aroma wafting from your oven will be irresistible! -
Cool and Enjoy
Once baked, allow the cake to cool in the pan for about 10 minutes before transferring it to a wire rack. Against all urges, let it cool completely before serving. The flavors meld beautifully as it cools!
Serving Suggestions
Now that your cake has cooled, it’s time to serve it up and impress your family or guests! You can slice it into generous wedges and dust with powdered sugar for a touch of elegance. A dollop of whipped cream or a scoop of vanilla ice cream served alongside will take this treat to the next level.
For an added twist, consider drizzling a simple lemon glaze over the top. Just mix together powdered sugar and fresh lemon juice until smooth. It adds a delightful shine and is easier than you’d think!
Perhaps you could also serve it with a vibrant fruit salad to balance the richness of the cake. Berries, in particular, complement the lemon perfectly, creating a refreshing burst when you take that first bite.
Recipe Variations
While the classic moist lemon yogurt cake is simply divine, why not shake things up? Here are some fun variations to try:
-
Berry Lemon Swirl
Fold in some fresh or frozen berries (like blueberries or raspberries) into the batter for a delicious fruity twist. It’s like a mini explosion of flavor in every bite! -
Coconut-Lemon Cake
Swap out half of the almond flour for shredded coconut. This will add a tropical flair that brightens up the cake. -
Lavender Lemon Delight
Add a dash of culinary lavender to the batter—around 1 tablespoon—before baking to create an aromatic experience that’s simply unforgettable. -
Choco-Lemon Hybrid
Mix in some mini chocolate chips into the batter—it’s a delightful contrast with the tangy lemon! -
Gluten-Free Version
Use a gluten-free flour blend instead of almond flour if you or your guests have dietary restrictions. It will still turn out great!
Chef’s Notes
When I first experimented with this recipe, I made the classic mistake of forgetting the baking powder! It turned out to be a dense lemon pie instead—a delicious accident! Over the years, I’ve learned to adapt the recipe based on what I had on hand and even discovered how versatile it could be. It became a canvas for whatever flavors excited me.
Baking is like life—it’s all about trial and error, serendipitous accidents, and learning what works best for you. Remember that this cake is about more than just ingredients. Try to feel the joy in making it, just as my grandma taught me.
FAQs and Troubleshooting
-
Why is my cake dense?
This usually happens from overmixing the batter, which can develop the gluten in the flour (especially if using regular flour). Be gentle when combining your ingredients! -
Can I make this ahead of time?
Absolutely! This cake actually tastes even better the next day after the flavors have melded. Just keep it covered to maintain moisture. -
What if my cake sinks in the middle?
This might be due to underbaking. Always check with a toothpick before pulling it out of the oven. If it’s too wet, pop it back in for a few more minutes. -
How do I store my leftovers?
Keep any leftover cake in an airtight container in the fridge for up to a week. It can be enjoyed cold or warmed slightly in the microwave!
Nutritional Info (if applicable)
This Moist Lemon Yogurt Cake packs a punch for quality ingredients! Here’s a breakdown of the nutritional facts for one slice (assuming 12 slices per cake):
- Calories: Approximately 200
- Total Fat: 10g (from the vegetable oil and almond flour)
- Carbohydrates: 25g
- Sugars: 10g (from the sugar and natural fruit sugars)
- Protein: 5g
- Fiber: 2g (from the almond flour)
Keep in mind that these are estimates and may vary based on any substitutions made!
Final Thoughts
And there you have it—your very own slice of the sunshine that is Moist Lemon Yogurt Cake! Isn’t it great how food can weave us into a tapestry of memories and connect us with those we love?
This recipe embodies that spirit perfectly: simple, refreshing, and bursting with flavor. So, let the baking begin! As you whip up this cake, may it bring back your own delightful stories and inspire countless new ones.
Thank you for joining me on this culinary adventure today! I can’t wait to hear how your cake turns out! Share your creations, stories, and variations, and let’s keep the feast going! Happy baking, and don’t forget—food tastes better when shared! 🍰✨
Print
Moist Lemon Yogurt Cake
- Total Time: 60 minutes
- Yield: 12 servings 1x
- Diet: Vegetarian
Description
A zesty and moist lemon yogurt cake that brings sunshine to every occasion.
Ingredients
- 1 cup plain yogurt
- 3/4 cup sugar
- 3 large eggs
- 1/2 cup vegetable oil
- 1 teaspoon vanilla extract
- 2 cups almond flour
- 1 tablespoon baking powder
- 1/4 teaspoon salt
- Zest of 2 lemons
- 1/4 cup fresh lemon juice
Instructions
- Preheat your oven to 350°F (175°C) and grease your cake pan.
- Mix together the yogurt, sugar, and eggs until smooth.
- Incorporate the vegetable oil and vanilla extract gradually while whisking.
- Combine the almond flour, baking powder, salt, and lemon zest in a separate bowl.
- Bring the dry ingredients into the wet mixture gently.
- Infuse with lemon juice and taste for freshness.
- Pour the batter into the prepared pan and bake for 40-45 minutes.
- Cool the cake in the pan for 10 minutes before transferring to a wire rack to cool completely.
Notes
For serving, dust with powdered sugar or drizzle with lemon glaze. Enjoy with whipped cream or fruit salad.
- Prep Time: 15 minutes
- Cook Time: 45 minutes
- Category: Dessert
- Method: Baking
- Cuisine: American
Nutrition
- Serving Size: 1 slice
- Calories: 200
- Sugar: 10g
- Sodium: 150mg
- Fat: 10g
- Saturated Fat: 1g
- Unsaturated Fat: 9g
- Trans Fat: 0g
- Carbohydrates: 25g
- Fiber: 2g
- Protein: 5g
- Cholesterol: 50mg
Keywords: lemon cake, yogurt cake, dessert, baking, moist cake
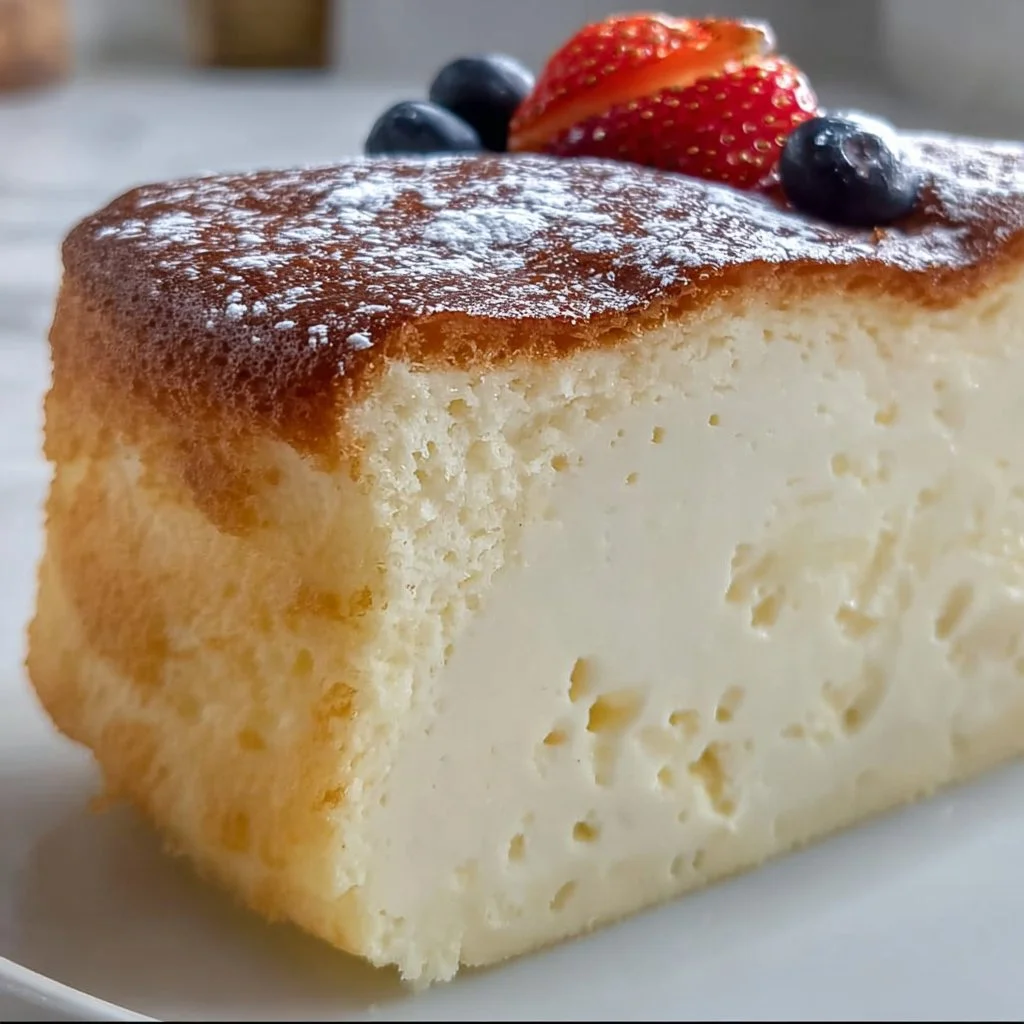
Sugar Free Yogurt Cake
Sugar-Free Yogurt Cake: A Slice of Happiness
Introduction
Hey there, fellow food lovers! Today, I’m super excited to share with you one of my absolute favorite desserts: the Sugar-Free Yogurt Cake! Now, I know what you might be thinking: “How can a cake be both delicious and sugar-free?” Well, let me tell you—this cake is not only a guilt-free indulgence, but it’s also moist, light, and utterly scrumptious. Whether you’re hosting a cozy weekend brunch, looking for the perfect dessert to share with friends, or simply treating yourself on a weekday, this cake fits the bill perfectly.
You see, desserts don’t always have to be loaded with sugar to be satisfying. I believe that food is about finding balance, joy, and love in every bite, and this yogurt cake embodies that philosophy beautifully. Made with simple, wholesome ingredients, it’s a delightful way to enjoy a sweet treat without the sugar crash that typically follows. Plus, it’s incredibly versatile, so you can dress it up or down as your taste buds desire!
Picture this: a warm slice of cake fresh out of the oven, served with a dollop of whipped cream or fresh berries. Yum! So, grab your apron and let’s dive into this scrumptious recipe that’s sure to become a staple in your kitchen!
Personal Story
This yogurt cake holds a special place in my heart. I remember the first time I decided to make it when my sister was visiting from out of town. She had been raving about healthy desserts, and I wanted to surprise her with something delightful that wouldn’t make her cringe at the thought of “healthy.” Buzzing with excitement, I rummaged through my pantry and found a few simple ingredients: Greek yogurt, eggs, and monkfruit sweetener.
As I mixed everything in my cozy little kitchen, the familiar scent of vanilla wafted through the air, and I could feel my excitement bubble over. When I pulled the cake out of the oven, it puffed up beautifully, golden and inviting. We eagerly waited for it to cool, and when it was finally ready to slice, we couldn’t resist diving in! The first bite was pure bliss. The cake was not only delightfully moist but also incredibly satisfying. My sister’s eyes lit up, and we couldn’t stop talking about how amazing it was to enjoy such a delicious dessert without the remorse of excess sugar. That day solidified my love for this yogurt cake and for the joy that homemade desserts can bring.
Ingredients
Before we get started, let’s gather all the goodies you’ll need for our Sugar-Free Yogurt Cake:
-
4 Large Eggs (separated)
Eggs provide structure and moisture, giving the cake its fluffy texture. If you’re vegan or looking for an egg substitute, you can use flax eggs (1 tablespoon of flaxseed meal mixed with 2.5 tablespoons of water per egg). -
1.5 Cups Non-Fat Greek Yogurt (350 g/12.5 oz)
Greek yogurt lends creaminess and a slight tang to the cake, which balances the sweetness beautifully. Want to add more flavor? Try using vanilla or lemon-flavored yogurt! -
⅓ Cup Monkfruit Sweetener (70 g/2.5 oz)
This natural sweetener offers a low-calorie alternative to sugar. It’s great for sugar-free baking! If you don’t have monkfruit sweetener, you could use stevia or erythritol, but make sure to adjust the quantities according to the sweetness level. -
⅓ Cup Cornstarch (40 g/1.4 oz)
Cornstarch is key for a light, fluffy texture. You can easily substitute it with arrowroot powder or even almond flour for a different flavor profile. Just be aware this might slightly adjust the texture! -
1 tsp Vanilla Extract (optional)
Vanilla extract enhances the flavors in the cake, making it taste heavenly! If you want to get a little creative, you can swap this out for almond extract or a splash of citrus juice for bright notes.
In total, these simple yet wholesome ingredients come together to create a cake that you’ll love letting melt in your mouth!
Step-by-Step Instructions
Now that we have everything ready, let’s get baking! Follow these steps, and we’ll whip up a delicious Sugar-Free Yogurt Cake.
-
Preheat Your Oven:
Start by preheating your oven to 350°F (175°C). This step ensures your cake bakes evenly and nicely. -
Prepare Your Baking Pan:
Grease a 9-inch round cake pan with a little olive oil or non-stick spray, and then line the bottom with parchment paper. This makes sure your cake comes out without a hitch! -
Separate the Eggs:
In two separate bowls, crack your eggs and separate the whites from the yolks. When beating the egg whites, you want them to whip up into soft peaks—this will help your cake rise beautifully! -
Mix the Egg Yolks and Yogurt:
In a large mixing bowl, combine the egg yolks with Greek yogurt and the monkfruit sweetener. Mix until well combined—no lumps here! This mixture will be creamy and luscious. -
Add Cornstarch and Vanilla:
Gradually add the cornstarch and vanilla extract to the yolk and yogurt mixture. Stir until fully combined. Your batter should start to come together beautifully at this stage. -
Whip the Egg Whites:
Grab a clean bowl and your electric mixer, and start whipping the egg whites until they form soft peaks. This is where the magic happens—whipped egg whites will give your cake that airy, fluffy texture! -
Fold in the Egg Whites:
Gently fold the whipped egg whites into the yogurt mixture. Do this slowly and lovingly, as you want to keep as much air in the batter as possible. You’ll see the color lighten; that’s a great sign! -
Pour the Batter into the Pan:
Transfer the batter to your prepared cake pan, spreading it evenly to level out the top. Don’t worry about perfection; it’ll all even out in the oven! -
Bake to Perfection:
Place the cake in the preheated oven and let it bake for about 30-35 minutes. You’ll know it’s done when the top is golden, and a toothpick inserted into the center comes out clean. -
Cool and Unmold:
Once baked, take it out of the oven and allow it to cool in the pan for about 15 minutes. Then, gently remove it from the pan, peel off the parchment paper, and let it cool completely on a wire rack. -
Time to Serve and Enjoy!:
Once cooled, slice it up and serve it your favorite way, whether that’s plain, with some whipped cream, or topped with fresh fruit. Let your guests marvel at your baking prowess!
Serving Suggestions
Now that your Sugar-Free Yogurt Cake is out of the oven and looking fabulous, let’s talk about how to serve it up! Here are a few of my favorite ways:
-
Classic Slice: Just serve it as is. This cake is naturally delicious and doesn’t need much dressing up. Serve slices at room temperature with a sprinkle of powdered monkfruit sweetener if you’d like, for a little extra flair!
-
Whipped Cream: Top slices with a dollop of whipped cream (or whipped coconut cream for a dairy-free option). A little cinnamon sprinkled on top adds warmth and a lovely aroma.
-
Fruit Toppings: Fresh berries such as strawberries, blueberries, or raspberries add a burst of color and flavor. Drizzle a bit of honey or a sugar-free syrup over the fruits for an extra touch.
-
Yogurt Parfait: Turn your cake into a delightful parfait! Crumble leftover cake into a glass, layer with Greek yogurt, and top with fresh fruits or a berry compote for an impressive dessert.
Recipe Variations
Feeling a little adventurous? Here are some easy twists or variations you can try with this Sugar-Free Yogurt Cake:
-
Chocolate Yogurt Cake: Add 1/3 cup of unsweetened cocoa powder to the dry ingredients for a rich chocolate flavor. Replace the vanilla extract with an espresso shot for a mocha twist!
-
Citrus Infusion: Add zest from one lemon or orange, along with a tablespoon of juice, to give your cake a bright, fresh flavor that’s especially lovely in spring or summer.
-
Nutty Crunch: Fold in a handful of chopped nuts or seeds (like almonds or walnuts) for added texture and nutritional benefits. They will add a wonderful crunch and flavor!
-
Spiced Sensation: For a warming twist, try adding a pinch of nutmeg or cinnamon to the batter. Alternatively, some ginger will give it a cozy kick!
-
Gluten-Free Option: Substitute cornstarch with a gluten-free all-purpose flour blend. Your cake will be equally marvelous for your gluten-sensitive friends!
Chef’s Notes
Over the years, this recipe has evolved to suit my taste and needs. I initially stumbled upon a similar yogurt cake recipe but quickly personalized it to make it sugar-free and lighter. It’s fun to experiment with flavors and textures, always keeping in mind the essence of comfort and joy in the kitchen. And I must share: every time I serve this cake, it prompts stories and happy memories, whether it’s from sharing slices with friends or enjoying it solo on a cozy evening.
Once, I even made it for a potluck and came back with an empty dish—that’s a sure sign of success! Remember, cooking is a journey, and this cake has been a part of mine, transforming from an experiment into a beloved staple.
FAQs and Troubleshooting
1. Why did my cake turn out dense?
If your cake came out denser than expected, it may be due to overmixing the batter after adding the egg whites. Be gentle when folding them in to keep that nice airy texture!
2. Can I use regular yogurt instead of Greek yogurt?
Absolutely! Just be aware that the texture and flavor profile might change a bit. Regular yogurt will make the cake a little less thick and creamy, but it can still be delicious!
3. How long can I store the cake?
You can store the cake in an airtight container at room temperature for up to 3 days, or refrigerate it for about a week. If you want to keep it longer, slice and freeze—thaw it out whenever you’re craving a sweet treat!
4. What if I don’t have monkfruit sweetener?
No worries! Feel free to substitute with another sugar-free sweetener, like stevia or erythritol, adjusting the amount according to sweetness levels. Just ensure it’s a one-to-one substitution if possible for best results.
Nutritional Info
Let’s break down the nutrition in a single slice of this fantastic Sugar-Free Yogurt Cake (assuming the recipe yields 12 slices):
- Calories: Approximately 80
- Protein: 6g
- Carbohydrates: 10g
- Fat: 3g
- Fiber: 1g
- Sugar: 1g (depending on your sweetener)
With a healthy protein boost from the Greek yogurt and low sugars, this cake is a great option for those looking to satisfy their sweet tooth without the guilt!
Final Thoughts
There you have it—a delicious and simple recipe for Sugar-Free Yogurt Cake that will surely put a smile on your face! Remember, the best meals are the ones shared with friends and family, bringing together laughter, memories, and, of course, fantastic food. So whether you’re making this cake for a gathering or just to treat yourself, know that you’re creating something wonderful!
As you embark on your baking journey, make sure to enjoy every moment of the process. Cooking is as much about the experience as it is about the food itself. Don’t forget to share your creation with loved ones or put your unique twist on the recipe—this is just the beginning!
Thanks for joining me in the kitchen today, and happy cooking! Until next time, keep those spatulas twirling and those taste buds tingling!
Print
Sugar-Free Yogurt Cake
- Total Time: 45 minutes
- Yield: 12 servings 1x
- Diet: Sugar-Free
Description
A delicious and moist yogurt cake that’s sugar-free, perfect for any occasion!
Ingredients
- 4 Large Eggs (separated)
- 1.5 Cups Non-Fat Greek Yogurt (350 g/12.5 oz)
- ⅓ Cup Monkfruit Sweetener (70 g/2.5 oz)
- ⅓ Cup Cornstarch (40 g/1.4 oz)
- 1 tsp Vanilla Extract (optional)
Instructions
- Preheat your oven to 350°F (175°C).
- Prepare a 9-inch round cake pan with olive oil and parchment paper.
- Separate the eggs into whites and yolks in two bowls.
- Mix egg yolks with Greek yogurt and monkfruit sweetener until creamy.
- Add cornstarch and vanilla to the mixture and stir until combined.
- Whip egg whites in a clean bowl until soft peaks form.
- Fold the whipped egg whites into the yogurt mixture gently.
- Pour the batter into the prepared cake pan, leveling the top.
- Bake for about 30-35 minutes until golden and a toothpick comes out clean.
- Cool for 15 minutes in the pan before transferring to a wire rack to cool completely.
- Serve plain, with whipped cream, or topped with fresh fruit.
Notes
This cake can be stored in an airtight container at room temperature for up to 3 days, or refrigerated for about a week. It can also be sliced and frozen for future cravings.
- Prep Time: 10 minutes
- Cook Time: 35 minutes
- Category: Dessert
- Method: Baking
- Cuisine: American
Nutrition
- Serving Size: 1 slice
- Calories: 80
- Sugar: 1g
- Sodium: 50mg
- Fat: 3g
- Saturated Fat: 1g
- Unsaturated Fat: 2g
- Trans Fat: 0g
- Carbohydrates: 10g
- Fiber: 1g
- Protein: 6g
- Cholesterol: 120mg
Keywords: sugar-free, yogurt cake, healthy dessert, light cake, guilt-free dessert