
Coconut Dream Bars
Coconut Dream Bars: A Slice of Tropical Bliss
Hey there, fellow food lovers! Today, we’re diving into a heavenly treat that will surely make your taste buds dance—Coconut Dream Bars! I’m thrilled to share this delightful dessert that’s perfect for any occasion, from a sunny picnic to a cozy family movie night. What’s not to love about a buttery, sweet, and totally dreamy concoction of coconut goodness?
Picture this: you walk into your kitchen, and the aroma of sweet coconut fills the air. It’s like being transported to a tropical paradise right in your own home! These Coconut Dream Bars are everything you could wish for in a dessert and more. They’re rich, satisfying, and incredibly easy to whip up. With just a handful of ingredients, you’ll create a treat that will have your friends and family begging for the recipe!
But first, let’s talk about why I adore these bars. Growing up, my family had a special tradition where we would gather at my Aunt Linda’s house for Sunday brunch. It was a cozy ritual filled with laughter, heartwarming conversations, and, of course, delicious food. Aunt Linda was famous for her Coconut Dream Bars—she made them with love, and they were always the highlight of our brunch spread. The crispy graham cracker base combined with the sweet, gooey coconut filling was simply irresistible.
I can still remember my little cousin Matthew trying to sneak away with the last piece, and Aunt Linda playfully scolding him. As we savored every bite, she would share stories about her adventures in the kitchen, explaining the importance of not just cooking but doing it with flair. That’s the spirit I try to embody in my cooking, and I hope to inspire you to infuse your kitchen with joy and creativity as well.
So, grab your apron and let’s get started on these Coconut Dream Bars that are sure to create their own little slice of joy in your life!
Ingredients
Let’s gather what we need to bring these Coconut Dream Bars to life. You might already have some of these in your pantry! Here’s the lineup:
-
1 cup unsweetened shredded coconut
This is the star of our show! Unsweetened coconut gives the bars a delectable texture and depth of flavor. If you can’t find shredded coconut, you can use flaked coconut for a similar effect—just keep an eye on the texture! -
1/2 cup unsalted butter, melted
Butter is the magic ingredient here, providing richness and a luscious mouthfeel. If you’re looking for a dairy-free option, coconut oil works like a charm too. Just make sure it’s melted and cooled before mixing! -
1 cup sweetened condensed milk
This adds a creaminess that holds everything together. If you want to reduce sugar, consider using a low-sugar or sugar-free version of sweetened condensed milk, but keep in mind the texture may change slightly. -
1 cup graham cracker crumbs
The base of our bars! You can make your own crumbs by crushing graham crackers in a food processor or purchase pre-made ones to save time. For a gluten-free version, try using gluten-free graham crackers or crushed almond flour. -
1/2 cup powdered sugar
To sweeten things up just a notch! This ingredient also helps with the texture. If you’re avoiding sugar, powdered erythritol can be a great substitute—just note that the sweetness level might differ. -
1 teaspoon vanilla extract
A little splash of vanilla elevates the flavors beautifully. For an extra kick, you could experiment with coconut extract—a delightful twist that’ll take these bars to the next level!
Step-by-Step Instructions
Now that we’ve gathered our ingredients, let’s dive into the nitty-gritty of making these mouthwatering Coconut Dream Bars. Follow these steps, and you’ll be delighting in your creation in no time!
-
Preheat Your Oven:
Start by preheating your oven to 350°F (175°C). This is crucial as it ensures the bars bake evenly. A hot oven means golden-brown edges and a beautifully set center. -
Prepare Your Pan:
Line an 8×8 inch baking dish with parchment paper, leaving some overhang for easy removal later. This simple step saves you from the dreaded sticky situation when you’re trying to cut the bars! -
Mix the Base:
In a large mixing bowl, combine the graham cracker crumbs, melted butter, and powdered sugar. Stir until everything is well incorporated. The mixture should resemble damp sand—when squeezed, it should hold together nicely! -
Press the Mixture:
Pour the crumb mixture into the prepared baking dish and use the back of a measuring cup to press it down firmly. This creates a solid foundation for our dreamy filling. Pro tip: the firmer you press, the better the bars will hold together! -
Make the Filling:
In another bowl, mix the shredded coconut, sweetened condensed milk, and vanilla extract. Stir until all the ingredients are well combined. You should have a sticky, sweet mixture that looks like a tropical island in a bowl! -
Spread It Out:
Pour the coconut mixture over the pressed graham cracker base, spreading it evenly with a spatula. Don’t be shy—make sure to cover every corner! -
Bake the Bars:
Pop the baking dish into the preheated oven and let the bars bake for 25-30 minutes, or until the top is golden brown. The smell wafting through your kitchen will be enough to make anyone’s mouth water! -
Cool and Chill:
Once baked, remove the bars from the oven and let them cool in the pan at room temperature for about 10 minutes. Then, carefully lift them out using the parchment overhang and allow them to cool completely on a wire rack. For a cleaner cut, chill the bars in the refrigerator for a bit before slicing. -
Slice and Serve:
Use a sharp knife to cut the bars into squares or rectangles. I like to dust mine with a little extra powdered sugar for presentation!
Serving Suggestions
When it comes to enjoying your Coconut Dream Bars, the possibilities are endless! Here are some delightful serving suggestions to elevate your dessert experience:
-
Garnish with Fresh Fruit: Top the bars with slices of fresh pineapple or mango for an extra burst of tropical flavor. You can also add a sprinkle of toasted coconut flakes for that extra crunch.
-
Drizzle of Chocolate: Melt some dark or white chocolate and drizzle it over the sliced bars for a rich, decadent touch. The combination of coconut and chocolate is simply divine!
-
Pair with Ice Cream: Serve a warm piece of your Coconut Dream Bar alongside a scoop of vanilla ice cream. As it melts a little, it creates a creamy, dreamy experience that’s hard to beat.
-
Add Some Whipped Cream: A dollop of freshly whipped cream on top makes for a beautiful presentation and enhances the creamy texture.
Recipe Variations
Versatility is key in the kitchen, and these Coconut Dream Bars are no exception! Here are some fun variations to shake things up:
-
Chocolate Coconut Bars: Mix in chocolate chips with the coconut filling for a chocolatey twist. You’ll get pockets of melted chocolate that turn every bite into a flavor explosion!
-
Nutty Twist: Add chopped nuts, like pecans or almonds, into the crust or filling for an added crunch. The nutty flavor will complement the sweetness of the coconut beautifully.
-
Lemon Zest: For a zingy surprise, add a teaspoon of lemon zest to the coconut filling. It adds a refreshing brightness that balances the rich sweetness.
-
Almond Joy Variation: Mix in some chopped almonds and a few dark chocolate chips for an homage to the famous candy bar. Everyone will enjoy this nostalgic flavor combo!
-
Vegan Version: Replace the butter with coconut oil, use a plant-based sweetened condensed milk, and swap out powdered sugar for a vegan alternative. You won’t believe how scrumptious they still taste!
Chef’s Notes
As someone who loves experimenting in the kitchen, I can tell you that each batch of Coconut Dream Bars carries a little piece of my heart. Originally, I learned to make these delightful bars from Aunt Linda, but over the years, I’ve really made them my own by adding my favorite twists.
One of my funniest kitchen stories involves the time I accidentally mixed up the salty and sweet ingredients. I thought I was adding salt to the butter, but it turned out to be sugar! The mix-up produced the most unexpectedly delicious batch of bars. Now, I sometimes add a pinch of sea salt on top just to keep that surprise element alive!
FAQs and Troubleshooting
Here are some common questions you might have when making your Coconut Dream Bars, along with solutions to any potential hiccups:
1. My bars are too crumbly; what went wrong?
If your bars are falling apart and crumbling, it could be due to not packing the crust tightly enough. Use the back of a measuring cup to press it down firmly. Also, make sure your butter is fully melted and incorporated well!
2. Can I use sweetened shredded coconut instead?
Absolutely! If you prefer a sweeter filling, using sweetened shredded coconut can work, but reduce or omit the powdered sugar to balance the sweetness.
3. How do I store leftovers?
Keep your Coconut Dream Bars covered in the refrigerator for up to a week. You could also freeze them wrapped tightly in plastic wrap and aluminum foil, perfect for a sweet treat later on!
4. Why did my bars puff up while baking?
If your bars puff up during baking, it may be due to excess air trapped in the mixture. When mixing, be gentle but thorough. If they deflate after cooling, that’s completely normal!
Nutritional Info
While desserts are often more about enjoyment than counting calories, here’s a general breakdown of the Coconut Dream Bars per square (1/16th of the recipe):
- Calories: 180
- Total Fat: 10g
- Saturated Fat: 7g
- Cholesterol: 20mg
- Sodium: 50mg
- Total Carbohydrate: 22g
- Dietary Fiber: 1g
- Sugars: 10g
- Protein: 1g
Note that these values may vary based on the specific brands and substitutes you use, so always check your product labels if you have dietary restrictions.
Final Thoughts
There you have it, folks—a deliciously easy recipe for Coconut Dream Bars that’s bound to become a favorite in your household. Cooking is all about love and creativity, and I hope this recipe inspires you to make something delicious while creating your dreamy moments in the kitchen.
So next time you find yourself with a craving for something sweet or want to impress your friends, whip up a batch of these Coconut Dream Bars! They’re so simple to make, and trust me, the compliments will be pouring in.
I can’t wait to hear how yours turn out! Share your kitchen adventures with me, and remember, it’s all about having fun and making memories in the kitchen. Happy baking, and may your days be filled with coconut bliss!
Print
Coconut Dream Bars
- Total Time: 45 minutes
- Yield: 16 servings 1x
- Diet: Vegetarian
Description
Delightful Coconut Dream Bars that combine a buttery graham cracker base with a sweet, gooey coconut filling, perfect for any occasion.
Ingredients
- 1 cup unsweetened shredded coconut
- 1/2 cup unsalted butter, melted
- 1 cup sweetened condensed milk
- 1 cup graham cracker crumbs
- 1/2 cup powdered sugar
- 1 teaspoon vanilla extract
Instructions
- Preheat your oven to 350°F (175°C).
- Line an 8×8 inch baking dish with parchment paper.
- Mix the graham cracker crumbs, melted butter, and powdered sugar in a large bowl.
- Press the mixture into the prepared baking dish.
- Mix the shredded coconut, sweetened condensed milk, and vanilla extract in another bowl.
- Spread the coconut mixture over the pressed graham cracker base.
- Bake for 25-30 minutes, or until the top is golden brown.
- Cool in the pan for about 10 minutes before transferring to a wire rack to cool completely.
- Slice into squares and serve.
Notes
For a cleaner cut, chill the bars in the refrigerator for a bit before slicing. You can also garnish with fresh fruit or a drizzle of chocolate for extra flavor.
- Prep Time: 15 minutes
- Cook Time: 30 minutes
- Category: Dessert
- Method: Baking
- Cuisine: American
Nutrition
- Serving Size: 1 square
- Calories: 180
- Sugar: 10g
- Sodium: 50mg
- Fat: 10g
- Saturated Fat: 7g
- Unsaturated Fat: 2g
- Trans Fat: 0g
- Carbohydrates: 22g
- Fiber: 1g
- Protein: 1g
- Cholesterol: 20mg
Keywords: Coconut Dream Bars, dessert, tropical dessert, easy dessert recipe, sweet treats

Andes Mint Dip
A Deliciously Sweet Escape: Andes Mint Dip
Hey there, fellow food lovers! It’s your chef pal, Beau Collier, and today we’re diving into a creamy, dreamy treat that’s sure to elevate your snack game: Andes Mint Dip. Picture this: a velvety dip that tastes just like those iconic green mint-chocolate candies we all adore. Yep, you heard me right! This dip is a flavor-packed journey through minty bliss and chocolatey goodness.
Whether you’re planning a cozy gathering with friends or just need a delicious way to unwind at the end of a long day, this Andes Mint Dip is your ticket to happy taste buds. You can whip it up in no time, and trust me, it’s always a hit! So grab your favorite mixing bowl and let’s get started!
A Whiff of Nostalgia
Let me take you back to one of my favorite childhood memories. Picture this: my family gathered around the table after a hearty dinner, and instead of traditional dessert, my mom would surprise us with her famous mint dip. I remember watching in awe as she whipped together the cream cheese, mint extract, and all the magical ingredients that would eventually create this incredible concoction. The excitement in the air was tangible; you could practically taste the anticipation!
As we dug in, our faces lit up with joy. The creamy texture, the cool mint, the rich chocolate — it was a flavor explosion that felt so comforting and indulgent. The best part? We’d pair it with graham crackers, fresh fruit, or even just enjoy it straight from the bowl (no judgment here!). It was our little post-dinner ritual, and until today, that memory brings a smile to my face. Sharing recipes is like sharing a piece of my heart, and I can’t wait for you to create your own precious memories with this Andes Mint Dip!
Ingredients
Here’s what you’ll need to whip up your scrumptious Andes Mint Dip:
-
1 (8-ounce) package cream cheese
A key ingredient that gives your dip that lovely creaminess. If you’re looking for a lighter option, you can substitute with Neufchâtel cheese or Greek yogurt. -
1 teaspoon mint extract
The magical ingredient that will elevate your dip with a refreshing burst of mint. Don’t have mint extract on hand? You can use peppermint extract for a more intense flavor! -
1 cup powdered sugar
This adds sweetness and helps achieve that smooth consistency. If you’re watching your sugar intake, feel free to swap it out with powdered monk fruit sweetener or coconut sugar mixed with a bit of cornstarch. -
1 (8-ounce) container whipped topping
This adds a light, fluffy texture to our dip. You can use homemade whipped cream for a fresher taste, or even coconut whipped topping for a dairy-free version. -
1/3 cup mini chocolate chips
These little guys are packed with chocolatey goodness. If you want to get fancy, try dark chocolate or even white chocolate chips! -
1/3 cup chopped Andes mints (plus more for topping)
Ah, the star of the show! Those chopped mints take this dip to a whole new level. If you can’t find Andes mints, chocolate-covered mint candies work well too. -
Green food coloring (optional)
For that pop of festive color! If you’re feeling adventurous, add a drop or two to make your dip even more eye-catching.
Step-by-Step Instructions
Alright, foodies! Let’s dive into the nitty-gritty of making this delightful Andes Mint Dip.
-
Prepare Your Ingredients
Begin by gathering all your ingredients. This makes the cooking process smooth and enjoyable. Plus, it has a cool chef vibe! -
Soften the Cream Cheese
Leave your cream cheese at room temperature for about 30 minutes before you start. This will make it much easier to mix. If you forgot, no worries! Just microwave it for about 10-15 seconds. -
Mix the Cream Cheese and Mint Extract
In a large mixing bowl, combine the softened cream cheese and the mint extract. Using a hand mixer, beat them together until the mixture is smooth and creamy. It should resemble a fluffy cloud of deliciousness! -
Add the Powdered Sugar
Gradually add the powdered sugar to the cream cheese mixture. Increasing the mixer speed as you go will help you avoid a cloud of sugar dust! Mix until combined, and don’t be afraid to taste the sweetness! -
Fold in the Whipped Topping
Gently fold in the whipped topping. Use a spatula and be careful not to over-mix; we want that light, airy texture to stay intact. -
Stir in the Chocolate Chips and Andes Mints
Time to bring in the chocolate! Fold in the mini chocolate chips and the chopped Andes mints. This is where the magic really begins; you’ll feel like a master chocolatier! -
Add Food Coloring (Optional)
If you want that gorgeous minty green hue, now’s the time to mix in a few drops of food coloring. Start with one drop, stir, and adjust until you reach your desired color. -
Serve and Garnish
Transfer the dip to a serving bowl and sprinkle some extra chopped Andes mints on top for that finishing touch. You might also want to add a few mini chocolate chips for flair! -
Chill (Optional)
This dip can be served immediately, but if you have the patience, refrigerate it for about an hour. The flavors really meld together beautifully in the fridge, making it even tastier!
Serving Suggestions
Now that your Andes Mint Dip is ready to dazzle, it’s time to think about how to serve it! Here are some fabulous ideas:
-
Fresh Fruit: Pair the dip with strawberries, apples, or banana slices. The fresh sweetness of the fruit balances the creamy minty goodness perfectly!
-
Graham Crackers: The classic pairing! The crunchy texture creates a delightful contrast to the creamy dip. Feel free to use flavored graham crackers like chocolate or honey for an extra special treat.
-
Pretzels: If you’re in the mood for a sweet and salty combo, dip pretzels into that minty concoction for a flavor explosion. Trust me; it’ll leave you wanting more!
-
Chocolate Wafer Cookies: Channel your inner dessert connoisseur with chocolate wafer cookies. They add a satisfying crunch that complements the dip’s smooth texture.
-
Spoonful of Happiness: Of course, there’s nothing wrong with grabbing a spoon and enjoying this goodness straight from the bowl. Sometimes, simple is best!
Recipe Variations
Here are some fun twists on this Andes Mint Dip to get those creative juices flowing:
-
Mint Chocolate Chip Ice Cream Dip: Use softened mint chocolate chip ice cream instead of whipped topping for a refreshing twist!
-
Add a Pinch of Sea Salt: A little sprinkle of sea salt adds a delightful contrast to the sweet mint. Sweet and salty, anyone?
-
Chocolate Drizzle: Top the dip with a drizzle of melted chocolate for an extra indulgent treat. You can also add a splash of peppermint extract for that extra minty punch.
-
Dairy-Free Delight: Substitute the cream cheese with dairy-free cream cheese and the whipped topping with coconut whipped topping for an entire vegan experience!
-
Mint Flavored Syrup: For a boom of minty goodness, stir in a tablespoon of mint-flavored syrup. It’s a double whammy of flavor!
Chef’s Notes
This Andes Mint Dip has come a long way since those early family dinners. I’ve fondly adapted this recipe over the years, tweaking it here and there to suit the ever-changing tastes of my loved ones. There was even one particularly chaotic dinner party where I accidentally added too much mint extract, and let me tell you, that created a whole new level of minty madness!
But every culinary blunder is a chance to learn. Now, when I make it, I always remind myself to taste as I go and trust my instincts. Whether you’re trying this dip for the first time or the hundredth, remember the joy it brings doesn’t just come from perfect execution; it comes from the laughter, love, and memories you create along the way.
FAQs and Troubleshooting
1. My dip turned out too runny! What happened?
If you used a low-fat cream cheese or under-measured the powdered sugar, it can affect the dip’s consistency. Using full-fat cream cheese will give you that creamy dip. In a pinch, you could chill it in the fridge for a little longer, allowing it to thicken up!
2. Can I make this dip ahead of time?
Absolutely! In fact, making this dip ahead of time allows the flavors to meld, creating an even more delicious treat. Just be sure to store it in an airtight container in the fridge until you’re ready to serve.
3. What can I use if I can’t find Andes mints?
Don’t sweat it! You can use any chocolate mint candy, chocolate-covered mints, or even crushed peppermint candies. The key is to keep that minty flavor alive!
4. What do I do if it’s too sweet for my taste?
Adjusting sweetness is a breeze! You can add a pinch of salt to cut the sweetness, or mix in some plain Greek yogurt to balance it out.
Nutritional Info
Do you want a delicious scoop of nutritional knowledge? Here’s a breakdown of what’s going on per serving:
- Calories: 212
- Total Fat: 10g
- Saturated Fat: 6g
- Carbohydrates: 30g
- Sugar: 26g
- Protein: 2g
Keep in mind that these values may vary based on your specific ingredients and portion sizes. However, I believe in enjoying a treat like this in moderation. Life’s all about balance, am I right?
Final Thoughts
And there you have it, my lovely food friends: a decadent Andes Mint Dip that’s not just delicious but also reminiscent of sweet childhood moments. This recipe is a delightful reminder that cooking is more than just a task; it’s about connection, joy, and the magic that happens when you share what you’ve created with others.
So whether you’re serving this dip at a festive gathering, a chill movie night, or simply indulging on a quiet evening, let the flavors transport you to those warm, snuggly memories just like they did for me. Now go forth, gather your ingredients, and create some heartwarming goodness. I can’t wait to hear your stories and see your delicious creations!
Happy dipping!
Print
Andes Mint Dip
- Total Time: 15 minutes
- Yield: 8 servings 1x
- Diet: Vegetarian
Description
A creamy, dreamy Andes Mint Dip that tastes just like the iconic green mint-chocolate candies, perfect for snacks or gatherings.
Ingredients
- 1 (8-ounce) package cream cheese
- 1 teaspoon mint extract
- 1 cup powdered sugar
- 1 (8-ounce) container whipped topping
- 1/3 cup mini chocolate chips
- 1/3 cup chopped Andes mints (plus more for topping)
- Green food coloring (optional)
Instructions
- Prepare your ingredients.
- Soften the cream cheese by leaving it at room temperature for about 30 minutes.
- Mix the cream cheese and mint extract until smooth.
- Add the powdered sugar gradually, mixing until combined.
- Fold in the whipped topping gently.
- Stir in the chocolate chips and chopped Andes mints.
- Add food coloring if desired.
- Serve the dip in a bowl and garnish with extra chopped Andes mints.
- Chill for about an hour if time allows for better flavor melding.
Notes
This dip can be prepared ahead of time for better flavor. Feel free to get creative with serving options!
- Prep Time: 15 minutes
- Cook Time: 0 minutes
- Category: Dessert
- Method: Mixing
- Cuisine: American
Nutrition
- Serving Size: 1 serving
- Calories: 212
- Sugar: 26g
- Sodium: 300mg
- Fat: 10g
- Saturated Fat: 6g
- Unsaturated Fat: 4g
- Trans Fat: 0g
- Carbohydrates: 30g
- Fiber: 1g
- Protein: 2g
- Cholesterol: 30mg
Keywords: Andes Mint Dip, mint dip, dessert dip, creamy dip, chocolate dip

Minute Sour Cherry Muffins: Fluffy, Tangy Breakfast
Delightful Sour Cherry Muffins: A Sweet Treat to Cherish
Hey there, fellow foodies! Welcome back to Feastical, where we whip up some magical moments in the kitchen with delicious recipes that warm your heart. Today, I’m excited to share a special recipe that’s close to my heart: Sour Cherry Muffins. These muffins aren’t just any ordinary breakfast treat; they’re a fusion of tart cherries and a moist, sweet batter that’s perfect for any time of day.
Can you think of a food that transports you back to a cherished moment in your life? For me, that’s a muffin! There’s something undeniably comforting about biting into a freshly baked muffin topped with a sprinkle of sugar, and it takes me back to summer afternoons spent in my grandmother’s kitchen, surrounded by love and laughter. She had a way of turning simple ingredients into something magical, and believe me, her sour cherry muffins were legendary.
The juicy sour cherries bursting in each muffin remind me of the first time I picked them—every summer, my family would pile into our old van and head out to a nearby cherry orchard. We would spend hours plucking the bright red fruits from the trees, filling our baskets while enjoying the sun-kissed day. Then came the best part: heading home to mix and bake those cherries into the fluffiest muffins you could ever imagine. These muffins became a staple in our household and a favorite in our family gatherings.
So, if you’re ready to dive into a recipe that will not only tantalize your taste buds but also evoke precious memories, let’s get started!
Ingredients
Let’s gather our ingredients before we dive in:
-
3/4 cup reduced fat buttermilk
Provides a lovely tang and moisture. If you’re out of buttermilk, just mix 3/4 cup of milk with a tablespoon of vinegar or lemon juice! -
1/4 cup water or cherry juice
Water will work just fine, but cherry juice is a fun twist that boosts the flavor and adds a lovely pink hue to your muffin batter. -
2/3 cup canola oil
A fantastic source of moisture and smoothness! Feel free to swap this out with melted coconut oil or melted butter if you prefer a richer flavor. -
1 large egg
This helps in binding all the ingredients together. For a vegan alternative, you can use a flax egg (1 tablespoon of ground flaxseed mixed with 2.5 tablespoons of water). -
1 lemon (zested, about 1 heaping tablespoon)
Fresh lemon zest invigorates the muffins with a bright flavor! If you don’t have a lemon, use any citrus zest you have on hand, like lime or orange. -
2 cups all-purpose flour
My go-to for that fluffy texture. You can use a gluten-free flour blend if you need a gluten-free option. -
1 cup sugar
Adds sweetness; it’s essential in balancing the sour cherries’ tartness. You can reduce the sugar if you prefer a less sweet muffin or use coconut sugar for a healthier option. -
1 tsp baking powder
This is our leavening agent to get those muffins rising! Make sure it’s fresh for the best results. -
2 cups sour cherries (fresh or frozen)
Use well-drained, pitted sour cherries to avoid any sogginess. You can substitute with tart blueberries or raspberries if cherries aren’t available. -
2 Tbs sanding sugar (for topping, optional)
This adds a delightful crunch on top, but feel free to skip it if you want a more understated finish.
Step-by-Step Instructions
Now that we’ve got our ingredients ready, let’s make some magic!
-
Preheat the oven: Preheat your oven to 375°F (190°C) and prepare a muffin tin by lining it with muffin liners or greasing it with a little cooking spray. The quick oven heat will give us that perfect rise!
-
Mix wet ingredients: In a large mixing bowl, whisk together the reduced-fat buttermilk, cherry juice (or water), canola oil, and egg until well combined. This is where the magic begins, blending the moisture into the heart of your muffins.
-
Add zest: Gently fold in the lemon zest—oh, the fragrance that hits your nose! This little gem of an ingredient elevates the entire muffin experience.
-
Combine dry ingredients: In another bowl, mix together the flour, sugar, and baking powder. Stirring the dry ingredients separately prevents clumping and ensures even distribution of the baking powder later.
-
Combine and fold: Gradually add the dry mixture to the wet ingredients, folding them together gently. Pro tip: over-mixing will lead to dense muffins, so just stir until you don’t see dry flour anymore. Remember, lumps are your friends!
-
Add cherries: Delicately fold in the sour cherries. I like to reserve a few cherries to strategically place on top of the muffins for a pretty presentation.
-
Fill muffin tin: Scoop the batter evenly into the muffin tin cups, filling them about 2/3 full. If you reserved extra cherries, pop one or two on top of each muffin for a burst of color.
-
Sprinkle sanding sugar: If you’re feeling a bit extra, sprinkle sanding sugar over the tops of each muffin for that delightful crunch!
-
Bake: Slide that tin into the oven and bake for about 18-20 minutes. You’ll know they’re ready when golden brown on top, and a toothpick inserted in the center comes out clean.
-
Cool down: Let them cool in the pan for about 10 minutes, then transfer them to a wire rack. It’s hard to resist the aroma wafting through your kitchen, but let’s hold off munching until they’re not scorching hot!
Serving Suggestions
Just picture it: a warm muffin fresh from the oven, perhaps with a dollop of whipped cream or a smear of butter. You could serve these delightful sour cherry muffins alongside a steaming cup of coffee or a tall glass of fresh-squeezed lemonade on a bright morning. For a brunch gathering, arrange them nicely on a wooden platter with sprigs of mint scattered around. These muffins aren’t just tasty; they’re Instagram-worthy, too!
Recipe Variations
Feeling adventurous? Here are some fun twists you can take with this basic recipe:
-
Almond Joy Muffins: Add some toasted shredded coconut and chopped dark chocolate pieces for a tropical treat!
-
Oatmeal Cherry Muffins: Swap in 1 cup of rolled oats for 1 cup of flour for a heartier muffin that keeps you feeling full longer.
-
Spiced Cherry Muffins: Add warming spices like cinnamon, nutmeg, or ginger for a little zing, creating a cozy vibe that’s perfect for cooler months.
-
Nutty Cherry Muffins: Fold in some chopped nuts like walnuts or pecans for a delightful crunch and a dose of healthy fats.
-
Maple Cherry Muffins: Substitute half of the sugar with pure maple syrup for a naturally sweetened option that adds a unique flavor.
Chef’s Notes
These sour cherry muffins have evolved quite a bit over the years! Initially, they were made with whatever fruit was on hand, but the introduction of sour cherries turned them into a family favorite. The first time I shared them at a potluck, the entire tray disappeared within minutes! It’s moments like those that remind me why I love cooking and sharing recipes—food has a magical way of connecting us all. Remember, cooking is about experimenting, so don’t be scared to put your unique spin on it!
FAQs and Troubleshooting
1. My muffins turned out dense. What did I do wrong?
The common culprit is over-mixing the batter. Mix just until the flour disappears; a few lumps are okay!
2. Can I use frozen cherries?
Absolutely! Just make sure they are well-drained and pitted. Avoid thawing them in advance, as they can get soggy.
3. How do I store them?
Keep the muffins in an airtight container at room temperature for up to 3 days or freeze them for longer storage. Just pop them in the microwave for a quick warm-up!
4. Can I make these gluten-free?
Yes! Use a gluten-free flour blend, and make sure your baking powder is gluten-free.
Nutritional Info
For those mindful of their nutritional intake, let’s break it down a bit. Each muffin (makes about 12) contains approximately:
- Calories: 180
- Fat: 7g
- Carbohydrates: 28g
- Protein: 3g
- Fiber: 1g
- Sugar: 9g
These muffins are a delightful balance of a treat that feels indulgent without the guilt—perfect for a breakfast or snack that won’t send you straight to a sugar crash!
Final Thoughts
There you have it, my friends—the delightful Sour Cherry Muffins recipe that takes you on a nostalgic journey while treating your taste buds to a burst of flavor! Whether you whip them up for brunch, share them at gatherings, or simply enjoy them yourself on a quiet afternoon, these muffins are a warm hug in every bite. Remember, cooking is an adventure that’s best enjoyed with friends and family, so don’t hesitate to mix things up, share your creations, and spread the love!
So grab your apron and get baking! I can’t wait to hear how your sour cherry muffins turn out. Happy cooking, friends! Until next time, let’s keep sprinkling a little joy into our days through delicious food!
Print
Delightful Sour Cherry Muffins
- Total Time: 35 minutes
- Yield: 12 muffins 1x
- Diet: Vegetarian
Description
These muffins are a fusion of tart cherries and a moist, sweet batter that’s perfect for any time of day.
Ingredients
- 3/4 cup reduced fat buttermilk
- 1/4 cup water or cherry juice
- 2/3 cup canola oil
- 1 large egg
- 1 lemon (zested, about 1 heaping tablespoon)
- 2 cups all-purpose flour
- 1 cup sugar
- 1 tsp baking powder
- 2 cups sour cherries (fresh or frozen)
- 2 Tbs sanding sugar (for topping, optional)
Instructions
- Preheat your oven to 375°F (190°C) and prepare a muffin tin.
- Mix together the reduced-fat buttermilk, cherry juice (or water), canola oil, and egg in a large mixing bowl.
- Add the lemon zest and gently fold it into the mixture.
- Combine the flour, sugar, and baking powder in another bowl.
- Gradually add the dry mixture to the wet ingredients, folding gently.
- Add the sour cherries, reserving a few for topping if desired.
- Fill the muffin tin cups about 2/3 full with batter.
- Sprinkle sanding sugar over the tops of each muffin if using.
- Bake for about 18-20 minutes until golden brown.
- Cool in the pan for about 10 minutes before transferring to a wire rack.
Notes
These muffins can be made with gluten-free flour and stored in an airtight container at room temperature for up to 3 days.
- Prep Time: 15 minutes
- Cook Time: 20 minutes
- Category: Breakfast
- Method: Baking
- Cuisine: American
Nutrition
- Serving Size: 1 muffin
- Calories: 180
- Sugar: 9g
- Sodium: 150mg
- Fat: 7g
- Saturated Fat: 0.5g
- Unsaturated Fat: 6g
- Trans Fat: 0g
- Carbohydrates: 28g
- Fiber: 1g
- Protein: 3g
- Cholesterol: 30mg
Keywords: muffins, cherries, baking, breakfast, sweet treats
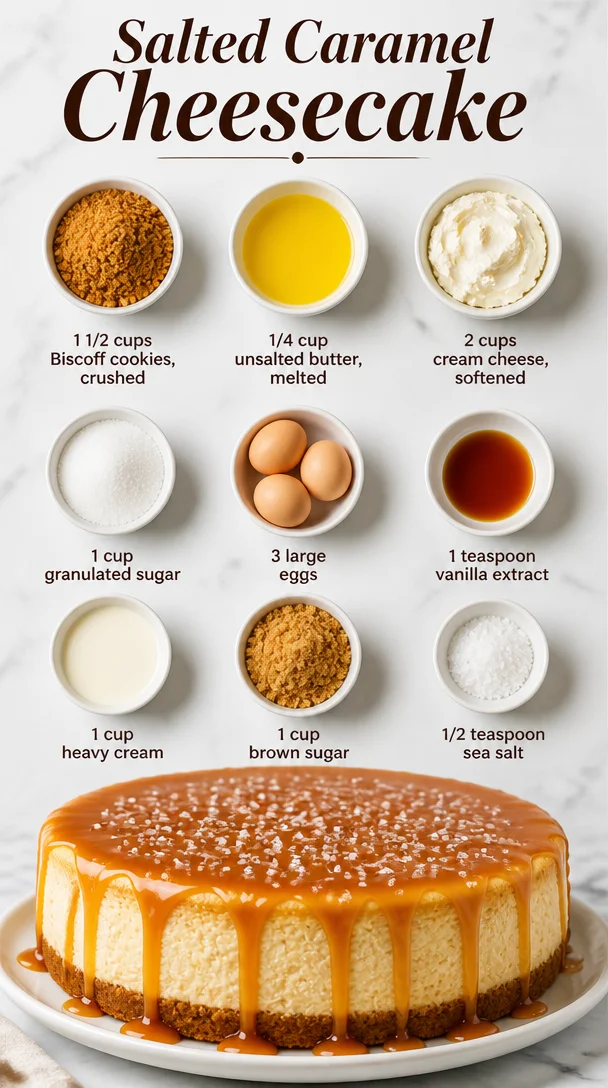
Salted Caramel Cheesecake
The Ultimate Salted Caramel Cheesecake Recipe
Hey there, fellow foodies! I’m Beau Collier, and today, we’re diving into a dessert that’s not just a feast for your taste buds, but also a memory-maker in the kitchen: Salted Caramel Cheesecake. Are you ready to embark on this buttery, creamy, and oh-so indulgent journey? Grab your apron, and let’s get cooking!
Introduction
There’s something utterly enchanting about a slice of cheesecake. Maybe it’s the dense, rich texture, or the creamy sweetness that dances on your palate, but for me, calling it “just dessert” doesn’t do it justice. Cheesecake has an emotional resonance; it’s a reminder of gatherings, celebrations, and sometimes even quiet evenings spent with a good book. When you add salted caramel to the mix? Well, get ready for a taste explosion that will have you dreaming of seconds.
Imagine this: a buttery crust made from Biscoff cookies—those deliciously spiced morsels that are so good you could eat them straight out of the package. Then, we layer a creamy cheesecake filling that’s smooth enough to make a jazz musician jealous, topped off with a warm, gooey homemade salted caramel sauce. Each bite is a little slice of heaven that whispers, “You’re in for a treat!”
In this post, I’ll guide you step-by-step through the process of making this decadent dessert from scratch. Whether you’re a cheesecake aficionado or a kitchen newbie on a culinary quest, my aim is to make this approachable and fun. So let’s roll up our sleeves and bring this gorgeous creation to life!
Personal Story
Ah, the first time I made a cheesecake! It was my sister’s birthday, and my mother had passed down her well-loved recipe, scribbled in her own handwriting on a well-worn index card. I remember the kitchen filled with the sweet aroma of cream cheese mixing with sugar and vanilla. The excitement was palpable as I poured the filling into the crust.
But here’s where the nostalgia really kicks in: halfway through baking, when I nervously opened the oven to check if it was setting properly, I accidentally let out a rush of steam that fogged up my glasses! My little sister burst out laughing, claiming I looked like a mad scientist. In that moment, I realized that cooking is not just about the food; it’s about the joy, laughter, and sometimes the minor disasters that turn into great stories. I was determined to make my cheesecake a showstopper, and I did! It went on to become a family favorite, a classic at every birthday celebration.
Since then, I’ve added my twists to the recipes—salted caramel being one of them. It’s become a family tradition, connecting the past to the present, one sweet slice at a time.
Ingredients
Let’s get into the nitty-gritty of this recipe! Here’s what you need to make your Salted Caramel Cheesecake shine.
-
1 1/2 cups Biscoff cookies, crushed: These delightful cookies lend an aromatic spiced flavor and a perfect crispy texture for the crust. In a pinch, you can substitute them with graham crackers or Oreos for a chocolate twist.
-
1/4 cup unsalted butter, melted: This binds the crumbs together and gives your crust that rich buttery goodness. If you’re in a dairy-free mood, coconut oil is a solid alternative.
-
2 cups cream cheese, softened: The star of your cheesecake! Make sure it’s room temperature (no one wants chunky cream cheese), or switch to mascarpone for a slightly different creamy feel.
-
1 cup granulated sugar: This provides the necessary sweetness that balances the tang of the cream cheese. If you want to cut back on refined sugar, try coconut sugar or even honey.
-
3 large eggs: They help the cheesecake set to perfection. You could use flaxseed or chia seed substitutes (1 tablespoon of ground flax or chia mixed with 2.5 tablespoons water per egg) if you need a vegan option!
-
1 teaspoon vanilla extract: This adds warmth and depth to your filling. Consider using fresh vanilla beans for an intense flavor!
-
1 cup heavy cream: The heavy cream gives you that luscious, velvety texture. For a lighter version, opt for light cream or even Greek yogurt, but be aware that it may alter the flavor slightly.
-
1 cup brown sugar: This goes into the caramel and brings a deeper, more complex sweetness. If you’re out, regular granulated sugar will work in a pinch.
-
1/2 teaspoon sea salt: Salt enhances the flavor of caramel and balances sweetness. You can play with different salts: Himalayan pink salt or smoked salt can add a surprising twist!
Step-by-Step Instructions
1. Prepare the Crust
- Preheat your oven to 350°F (175°C). A hot oven equals a perfectly baked crust.
- In a medium bowl, mix the crushed Biscoff cookies and melted butter until it resembles wet sand. This is one of my favorite parts; the aroma is divine!
- Press this mixture firmly into the bottom of a 9-inch springform pan. Use the bottom of a measuring cup to really pack it down! Bake for 10 minutes. This step ensures your crust is sturdy enough to hold all the delicious filling in.
2. Make the Cheesecake Filling
- While the crust is baking, grab a mixing bowl and beat the softened cream cheese with an electric mixer until it’s smooth and creamy—no lumps allowed here! Add in the granulated sugar and mix until combined.
- Next, add in the eggs one at a time, mixing well after each addition. This keeps your cheesecake from cracking later! Add in the vanilla extract and blend until fluffy. It should look like a dreamy cloud.
- Beat in the heavy cream until the mixture is thick and creamy. This gives your cheesecake that luxurious mouthfeel. Pour that luscious filling over the baked crust, smoothing it out.
3. Bake Your Cheesecake
- Place the springform pan in the oven. Here’s a little hack: to prevent cracks, place a pan filled with water on the rack below your cheesecake. The steam helps keep your cheesecake moist, just like a hot bath for your dessert!
- Bake for about 55 to 60 minutes. The edges should be set while the center will still have a light jiggle. Don’t worry; it’ll firm up as it cools.
4. Make the Salted Caramel
- Combine the brown sugar and heavy cream in a saucepan over medium heat. Stir constantly until it smooths out and begins to bubble, about 5–7 minutes.
- Reduce the heat to low and let it simmer for an additional 5 minutes without stirring. Then remove it from the heat and stir in the sea salt—this is where the magic happens! Let it cool for a bit before drizzling it over your cooled cheesecake.
5. Cool and Chill
- Once your cheesecake is out of the oven, let it cool for at least an hour on the counter before moving it to the refrigerator. Chill for at least 4 hours or overnight if you’re really planning ahead. I know, it’s patience-testing, but it’s worth every moment!
Serving Suggestions
When it’s time to serve your Salted Caramel Cheesecake, here are a few tips to make it extra special:
- Presentation: Remove the sides of the springform pan carefully. Place the cheesecake on a decorative cake stand or a sleek serving plate to showcase it!
- Drizzle: Warm your salted caramel slightly and drizzle it over the top in swooping motions for that professional touch. Don’t forget to add a sprinkle of flaky sea salt for a gorgeous contrast.
- Garnish: Top with a dollop of freshly whipped cream and maybe some caramel popcorn for texture, if you’re feeling fancy. You could also add a few chocolate shavings for an extra decadent flair!
Recipe Variations
Here are a few fun twists you can try with this Salted Caramel Cheesecake recipe:
-
Nutty Twist: Add crushed pecans or walnuts into the crust for an added crunch. You could also add a layer of nut butter to the filling for extra richness.
-
Chocolate Lovers: Pour in half a cup of melted dark chocolate into the cheesecake batter for a rich mocha flavor. You can top it with chocolate ganache for extra indulgence.
-
Fruit Flavor: Incorporate fresh fruit like raspberries or strawberries into the cheesecake filling. The tartness will cut through the richness beautifully.
-
Spiced Autumn Delight: Add a teaspoon of cinnamon and a dash of nutmeg to the filling for a cozy, spiced version that’s perfect for fall gatherings.
-
Vegan Option: Use cashews soaked overnight, blended with maple syrup and coconut cream instead of the cream cheese and heavy cream.
Chef’s Notes
Ah, what a journey! Since that fateful first cheesecake, I’ve become a self-proclaimed cheesecake enthusiast. Each experiment I’ve taken has taught me something new. One quirky tradition I have is to name every cheesecake I make; this one? I call it “Hug in a Slice.”
When you sit down with a generous slice, take a moment to savor the flavors and the memories they bring. And remember, every kitchen has its mishaps, like that time I forgot the sugar altogether—let’s just say, that was a very different kind of ‘cheesecake’!
FAQs and Troubleshooting
1. Why did my cheesecake crack?
Cracks can occur if the cheesecake is overbaked or if it was cooled too quickly. Ensure you use the water bath method and let it cool gradually in the oven with the door cracked.
2. Can I freeze the cheesecake?
Absolutely! Wrap it tightly in plastic wrap and then aluminum foil. It can last frozen for up to 2 months. Thaw it overnight in the fridge before serving.
3. It didn’t set properly; what went wrong?
This can be because the cream cheese wasn’t softened enough or it needed more time to bake. If the center is still wobbly after cooling, that’s okay! It’ll firm up after chilling in the fridge.
4. How do I make this gluten-free?
Swap the Biscoff cookies for gluten-free cookie options, or a ground nut and date crust works brilliantly too!
Nutritional Info
While it varies based on your specific ingredients, here’s an approximate nutritional breakdown per slice (assuming 12 servings):
- Calories: 450
- Fat: 30g
- Carbohydrates: 40g
- Protein: 6g
- Sugar: 28g
- Sodium: 220mg
Final Thoughts
There you have it, friends! A recipe that not only satisfies but resonates with nostalgia and the joy of togetherness. Each slice of Salted Caramel Cheesecake is an invitation to celebrate life’s sweet moments and create new memories in the kitchen. So whether it’s for a birthday, a dinner party, or just because you deserve a treat, this cheesecake is ready to impress.
I hope this article lights a fire in your kitchen and inspires you to whip up this delightful dessert. Remember, cooking is a blend of art, science, and a whole lot of love. So go ahead, make your Salted Caramel Cheesecake, and don’t forget to share your edible masterpieces with the world (or just your family—no judgment here!). Happy baking, and see you next time at Feastical!
Print
Ultimate Salted Caramel Cheesecake
- Total Time: 90 minutes
- Yield: 12 servings 1x
- Diet: Vegetarian
Description
A decadent salted caramel cheesecake with a buttery Biscoff crust, rich cream cheese filling, and a homemade caramel drizzle.
Ingredients
- 1 1/2 cups Biscoff cookies, crushed
- 1/4 cup unsalted butter, melted
- 2 cups cream cheese, softened
- 1 cup granulated sugar
- 3 large eggs
- 1 teaspoon vanilla extract
- 1 cup heavy cream
- 1 cup brown sugar
- 1/2 teaspoon sea salt
Instructions
- Preheat your oven to 350°F (175°C).
- Mix the crushed Biscoff cookies and melted butter until it resembles wet sand.
- Press this mixture firmly into the bottom of a 9-inch springform pan and bake for 10 minutes.
- Beat the softened cream cheese with an electric mixer until smooth, then add the granulated sugar and mix.
- Add the eggs one at a time, mixing well after each addition, followed by the vanilla extract.
- Beat in the heavy cream until thick and creamy, then pour the filling over the baked crust.
- Place the springform pan in the oven and bake for about 55-60 minutes.
- Combine the brown sugar and heavy cream in a saucepan over medium heat, stirring constantly until bubbly.
- Reduce heat and let it simmer for 5 minutes; then stir in the sea salt.
- Cool the cheesecake on the counter for at least an hour, then chill for at least 4 hours or overnight before serving.
Notes
Drizzle with warm salted caramel and top with whipped cream for extra indulgence.
- Prep Time: 30 minutes
- Cook Time: 60 minutes
- Category: Dessert
- Method: Baking
- Cuisine: American
Nutrition
- Serving Size: 1 slice
- Calories: 450
- Sugar: 28g
- Sodium: 220mg
- Fat: 30g
- Saturated Fat: 18g
- Unsaturated Fat: 12g
- Trans Fat: 0g
- Carbohydrates: 40g
- Fiber: 1g
- Protein: 6g
- Cholesterol: 150mg
Keywords: salted caramel, cheesecake, dessert, baking