Minute Apple Crumble Cheesecake: Easy One-Bowl Recipe
The Ultimate Guide to Making an Irresistible Apple Crumble Cheesecake
Hey there, fellow foodies! I’m Beau Collier, your friendly guide to all things delicious here at Feastical! If you’ve ever found yourself longing for a dessert that combines the richness of cheesecake with the comforting crunch of apple crumble, then you’ve hit the jackpot! Today, we’re diving into the delightful world of Apple Crumble Cheesecake, a dessert that’s sure to steal the show at any gathering. Buckle up as we whip together a treat that feels like a warm hug on a plate!
Introduction: A Dessert to Remember
There’s something magical about dessert that brings people together. I can still remember the very first time I tasted an Apple Crumble Cheesecake. I was at my grandmother’s house for Thanksgiving, and the sweet aromas of cinnamon, butter, and baked apples wafted through her cozy kitchen. As we gathered around the table, she brought out this beautiful cheesecake adorned with the golden crumble topping. With whipped cream in hand, we knew we were in for something special.
Why do I love this dessert so much? It’s a beautiful fusion of textures and flavors—the creamy, smooth cheesecake perfectly complemented by the creamy apple filling and a crunchy, buttery crumble topping. It’s a classic comfort food with a twist, making it an ideal dessert for any occasion, from family gatherings to a cozy night in.
And let’s not forget the best part: it’s surprisingly simple to make! Trust me, even if you’re still trying to figure out where your spatula went, you can whip this up and impress your friends and family. So, are you ready to create a dessert that not only tastes incredible but also fills your kitchen with heavenly aromas? Let’s get started on this Apple Crumble Cheesecake!
Personal Story: A Family Tradition
Every family has its own cherished traditions, and mine certainly includes dessert. My grandmother was the queen of sweets, and gatherings at her house were always centered around her infamous cheesecake. One memorable evening, she added her own twist to the classic recipe by incorporating apple pie filling and a crumbly topping. That first bite was like a party in my mouth—a creamy cheesecake layer topped with sweet, spiced apples and finished off with the crunch of a homemade crumble.
After we demolished that cheesecake, Grandma shared her secret ingredient: love. “Everything tastes better when made with love,” she said, with a twinkle in her eye. It’s a lesson I carry with me in every dish I create, and I hope it resonates with you as we embark on this Apple Crumble Cheesecake adventure together.
Ingredients
Here’s what you’ll need to whip up this amazing dessert:
-
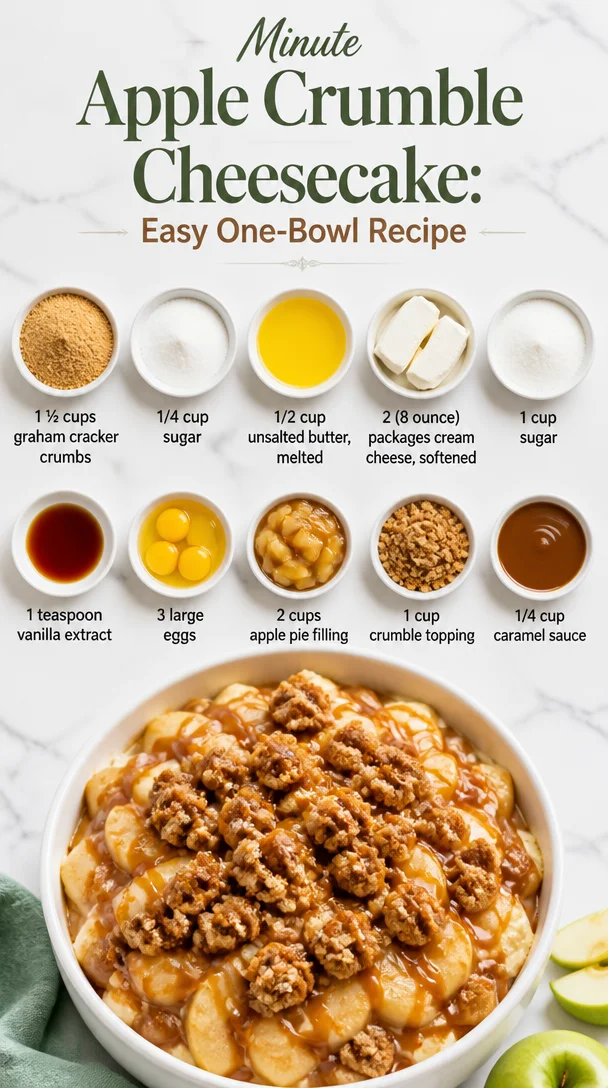
1 ½ cups graham cracker crumbs
Perfect for that classic cheesecake crust. You can substitute with crushed digestive biscuits for a different flavor profile. -
1/4 cup sugar
This adds sweetness to the crust. Brown sugar can be used for a deeper flavor, or you can skip it altogether if you prefer. -
1/2 cup unsalted butter, melted
Butter holds the crust together and gives it richness. If you’re looking for a dairy-free option, coconut oil works wonders! -
2 (8-ounce) packages cream cheese, softened
Cream cheese is the star of the cheesecake. For a lighter option, use Neufchâtel cheese, which has less fat but a similar taste. -
1 cup sugar
This sweetens up the filling nicely! Feel free to experiment with less sugar or even a sugar substitute like agave or honey if you’re watching calories. -
1 teaspoon vanilla extract
Vanilla adds depth and flavor to the cheesecake. Don’t skimp here—use pure vanilla for the best taste! -
3 large eggs
They help set the structure of the cheesecake. If you’re looking for an eggless version, consider using a flax egg (1 tablespoon ground flaxseed mixed with 3 tablespoons of water) for every egg. -
2 cups apple pie filling
This gives a wonderful apple flavor without the hassle of making filling from scratch! If you’re feeling adventurous, homemade filling is also an option. -
1 cup crumble topping
A delightful, crunchy layer for that extra texture. You can use store-bought crumble mix or make your own for freshness. -
1/4 cup caramel sauce
For drizzling on top! Using homemade caramel elevates this dessert, but store-bought works perfectly in a pinch.
Step-by-Step Instructions
Now that we have our ingredients ready, let’s get down to business! Here’s how to make this scrumptious Apple Crumble Cheesecake step by step.
-
Preheat the Oven:
Start by preheating your oven to 325°F (160°C). This ensures the cheesecake cooks evenly. While it heats, let’s prepare the crust! -
Make the Crust:
In a mixing bowl, combine the graham cracker crumbs, sugar, and melted butter. Mix until the crumbs are well-coated and resemble wet sand. Press this mixture firmly into the bottom of a 9-inch springform pan. Use the back of a measuring cup to pack it down for a solid base. This step is crucial for keeping the crust crunchy, so make sure it’s nice and compact! -
Bake the Crust:
Place the crust in the preheated oven for about 10 minutes. This helps to set the crust and avoid a soggy bottom. While it’s baking, let’s prepare the cheesecake filling. -
Prepare the Filling:
In a large mixing bowl, beat the softened cream cheese and sugar together until smooth and creamy. Scrape down the sides of the bowl to ensure everything is incorporated. This step is essential; it helps to avoid lumps in your cheesecake. -
Add the Eggs:
Add the eggs one at a time, mixing after each addition until just combined. Don’t overmix; you want the mixture to be smooth but not frothy. -
Add the Vanilla:
Mix in the vanilla extract. This is where that delicious flavor really starts to come through! -
Layer the Apple Filling:
Pour half of the cheesecake batter into the crust. Spread the apple pie filling evenly over it, then pour the remaining cheesecake batter on top. This layering technique creates beautiful swirls of apple goodness throughout your cheesecake. -
Add the Crumble:
Sprinkle the crumble topping over the cheesecake batter—don’t be shy, make it generous! This will bake into the top, creating that perfect crunchy finish we love. -
Bake the Cheesecake:
Place the cheesecake in the oven for about 55-60 minutes, or until the edges are set and the center is slightly jiggly. Don’t panic if it’s a tad wobbly still; it will firm up as it cools! -
Cool:
Once it’s done baking, turn off the oven and crack the door ajar. Let the cheesecake cool slowly in the oven for about an hour. This prevents cracking and helps it set perfectly. -
Chill:
After the cheesecake cools in the oven, transfer it to the fridge and chill for at least 4 hours, or overnight if you can wait that long! -
Serve with Caramel:
When you’re ready to serve, drizzle caramel sauce over the top and slice it up. Get your forks ready—it’s time to dig in!
Serving Suggestions
To wow your guests, consider serving your Apple Crumble Cheesecake with a dollop of freshly whipped cream or a scoop of vanilla ice cream on the side. You can even add a sprinkle of cinnamon for that comforting, warm aroma. If you’re feeling extra fancy, a pinch of sea salt on top of the caramel sauce elevates the flavors beautifully. Alternatively, serve it along with a hot cup of coffee or tea for the ultimate comforting experience!
Recipe Variations
While this Apple Crumble Cheesecake is divine as is, there are tons of ways to mix it up!
-
Nutty Crumble: Add chopped walnuts or pecans to the crumble topping for a delightful crunch and a burst of nutty flavor.
-
Spiced Pear: Swap the apple pie filling for spiced pear filling for a different fruity experience that’s equally comforting.
-
Chocolate Drizzle: For a twist on flavors, add a chocolate drizzle alongside the caramel for a peanut butter cup vibe.
-
Mini Cheesecakes: Want to impress at parties? Make mini cheesecakes in muffin tins! Just adjust the bake time to about 20-25 minutes.
-
Vegan Version: Use cashew cream or silken tofu blended with cocoa for a vegan-friendly cheesecake. Just make sure to substitute your sugar and crust with vegan alternatives.
Chef’s Notes
This Apple Crumble Cheesecake has been a personal favorite of mine for many years, and I love how it makes people feel! The beauty of this recipe is its versatility. I’ve often added seasonal spices or fresh fruits, depending on what I had on hand or what appealed to my mood that day. I remember one Thanksgiving where I decided to throw in some cranberries for a festive touch, and let me tell you, it was a hit! Remember, the kitchen is a place of joy and creativity. Don’t be afraid to make it your own!
FAQs and Troubleshooting
-
Why did my cheesecake crack?
Cheesecakes can be sensitive to temperature changes. Make sure you cool it gradually in the turned-off oven and avoid opening the door frequently while it bakes. -
How do I know when my cheesecake is done?
Check for a set outer edge and a slightly jiggly center. It will continue to set as it cools, so don’t over-bake! -
Can I freeze the cheesecake?
Absolutely! Wrap it tightly and freeze for up to 3 months. Just let it thaw in the fridge overnight when you’re ready to enjoy it again. -
What’s the best way to cut cheesecake?
Use a hot knife (run it under hot water and dry it) for clean slices. Wipe the knife between cuts to keep each piece looking pristine!
Nutritional Info
While it’s always tempting to dive into dessert without thinking about the nutritional aspects, it’s good to keep in mind that this Apple Crumble Cheesecake is considered a treat.
- Approximate Serving Size: 1 slice (based on 12 servings)
- Calories: 380
- Total Fat: 25g
- Saturated Fat: 15g
- Cholesterol: 90mg
- Sodium: 350mg
- Total Carbohydrates: 38g
- Dietary Fiber: 1g
- Sugars: 24g
- Protein: 5g
Remember, this dessert shines best when shared with loved ones, so enjoy every bite guilt-free!
Final Thoughts
Embarking on the journey of creating an Apple Crumble Cheesecake is not just about the destination of enjoying a delicious dessert; it’s about the joy of creating something wonderful with your own hands. Each step carries the spirit of togetherness, nostalgia, and sweetness that makes this dish a true celebration of life.
So, whether you’re sharing it at a family gathering, a friendly get-together, or a cozy evening just for yourself, I hope this cheesecake brings as much joy to your heart as it has to mine over the years. Remember, friends, cooking should be fun and filled with love, so take your time, experiment, and enjoy every moment. Happy baking, and I can’t wait to hear how your Apple Crumble Cheesecake turns out! Cheers!
Print
Apple Crumble Cheesecake
- Total Time: 80 minutes
- Yield: 12 servings 1x
- Diet: Vegetarian
Description
A delightful fusion of creamy cheesecake and crunchy apple crumble, this Apple Crumble Cheesecake is the perfect dessert for any occasion.
Ingredients
- 1 ½ cups graham cracker crumbs
- 1/4 cup sugar
- 1/2 cup unsalted butter, melted
- 2 (8-ounce) packages cream cheese, softened
- 1 cup sugar
- 1 teaspoon vanilla extract
- 3 large eggs
- 2 cups apple pie filling
- 1 cup crumble topping
- 1/4 cup caramel sauce
Instructions
- Preheat the oven to 325°F (160°C).
- Combine the graham cracker crumbs, sugar, and melted butter in a mixing bowl. Press the mixture into the bottom of a 9-inch springform pan.
- Bake the crust in the preheated oven for about 10 minutes.
- Beat the softened cream cheese and sugar together until smooth and creamy.
- Add the eggs one at a time, mixing after each addition until just combined.
- Mix in the vanilla extract.
- Pour half of the cheesecake batter into the crust and spread the apple pie filling evenly over it. Then pour the remaining cheesecake batter on top.
- Sprinkle the crumble topping over the cheesecake batter generously.
- Bake the cheesecake in the oven for about 55-60 minutes.
- Cool the cheesecake in the oven with the door ajar for about an hour before transferring it to the fridge.
- Chill for at least 4 hours, or overnight.
- Drizzle caramel sauce over the cheesecake before serving.
Notes
Serve with whipped cream or a scoop of vanilla ice cream for added indulgence.
- Prep Time: 20 minutes
- Cook Time: 60 minutes
- Category: Dessert
- Method: Baking
- Cuisine: American
Nutrition
- Serving Size: 1 slice
- Calories: 380
- Sugar: 24g
- Sodium: 350mg
- Fat: 25g
- Saturated Fat: 15g
- Unsaturated Fat: 5g
- Trans Fat: 0g
- Carbohydrates: 38g
- Fiber: 1g
- Protein: 5g
- Cholesterol: 90mg
Keywords: cheesecake, dessert, apple crumble, baking, sweet treat
Creamy Fruit Salad: 20-Min Quick Recipe for Busy Weeknights
Creamy Fruit Salad: A Bowl of Sunshine
Welcome back to Feastical, my foodie friends! Today, we’re diving into a dish that’s as vibrant and delightful as a summer day: Creamy Fruit Salad! This isn’t just any ol’ fruit salad; oh no! We’re talking about a colorful medley of fruity goodness, drizzled in a smooth, creamy dressing that is guaranteed to transport your taste buds straight to happyville. Whether it’s a potluck, picnic, or simply a fresh addition to your everyday meals, this creamy fruit salad is a showstopper that brings joy with every bite.
A Dash of Nostalgia
Isn’t it funny how food has a way of bringing back memories? For me, my love affair with fruit salad began in my grandma’s kitchen during hot summer afternoons. The little wooden table was often piled high with fresh fruits from her garden: juicy strawberries, plump blueberries, and the sweetest grapes you could ever imagine. As a kid, I loved to help her chop up the fruit. We had this simple yet delightful ritual: she’d whip up a creamy dressing using yogurt and a splash of lemon juice, and together, we’d toss the fruit together like the perfect harmony of flavors. I still remember how the sun poured through the window, lighting up the colorful fruit like jewels, and how my grandma would wink and say, “Food tastes better when you make it with love!” That’s the spirit I’ve captured in this recipe!
A Rainbow of Ingredients
Let’s gather the ingredients for our Creamy Fruit Salad—trust me when I say, it’s as easy-peasy as it gets!
-
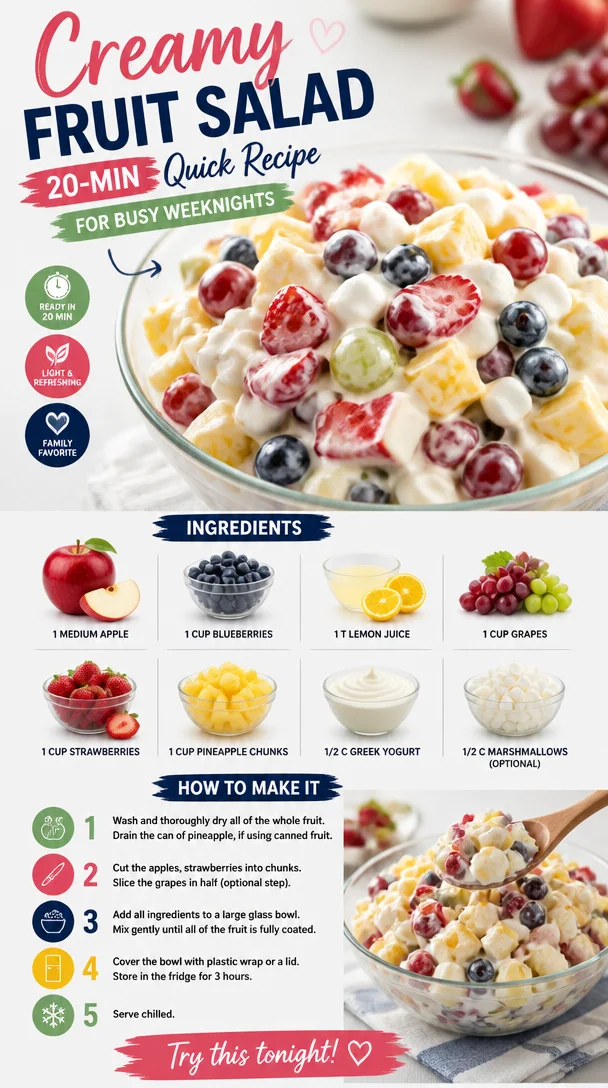
1 medium apple: A crunchy addition. Use a sweet variety like Fuji or Gala for extra flavor, or swap in pears for a twist!
-
1 cup blueberries: Bursting with antioxidants and flavor. If you’re out of blueberries, just include another berry like raspberries or blackberries for a similar vibe.
-
1 tablespoon lemon juice: Adds zing and helps keep the fruit fresh. You can use lime juice if you’re looking for a different citrus kick!
-
1 cup grapes: Juicy and bite-sized—perfect for salad! Red, green, or even a mix work beautifully. No grapes? Chopped kiwi would be a fun alternative.
-
1 cup strawberries: Sweet and bright; cut them into halves or quarters. If strawberries are out of season, consider using diced mango instead—they’re both tropical and fun!
-
1 cup pineapple chunks: Adds a tropical flair that’ll leave you daydreaming about the beach! You can opt for canned in juice (drained) if fresh isn’t available.
-
1/2 cup Greek yogurt: This is the creaminess factor! Full-fat or low-fat works too. If you’re after a vegan option, coconut yogurt is a fabulous substitute to create that luscious mouthfeel.
-
1/2 cup marshmallows (optional): For those wanting a bit of nostalgia and fluffiness! You can skip these if you prefer a less sweet salad or want to keep things healthy.
Step-by-Step Instructions
Alright, let’s make this magic happen! Follow these steps, and watch as your kitchen transforms into a fruity wonderland:
-
Prepare the Fruit: Start by washing all your fruits thoroughly. Pat them dry with a clean kitchen towel or paper towels. This step is essential—no one likes a soggy fruit salad!
-
Chop the Apple: Dice your apple into bite-sized pieces. There’s no need to peel; the peel adds color and nutrients. Plus, it’s quicker! Just remember to core it. If you’re worried about browning, toss the pieces in a teeny splash of lemon juice right after cutting.
-
Slice the Strawberries: Remove the green tops and slice them into halves or quarters depending on their size. This allows for an even mix with the other fruits while showcasing their gorgeous color.
-
Prep the Grapes and Blueberries: For grapes, simply wash them and remove from the stem. Keep them whole for pops of juice in each bite! Wash the blueberries too—no fuss here. They can just join the party!
-
Tropical Vibes with Pineapple: If you’re using fresh pineapple, cut off the skin and core, then chop into uniform chunks. If canned, drain well and give them a quick rinse.
-
Make the Creamy Dressing: In a medium bowl, combine your Greek yogurt, the tablespoon of lemon juice, and mix well until creamy and smooth. This is where the magic happens! Feel free to add a drizzle of honey or maple syrup if you prefer it sweeter.
-
Combine the Ingredients: In a large mixing bowl, combine all your freshly cut fruits with the creamy dressing. Gently fold everything together with a spatula so as not to mush the delicate fruits!
-
Add Marshmallows: If you’re going the extra sweet route and adding marshmallows, now’s the time. Fold them through the salad for a delightful surprise.
-
Chill and Serve: Cover the bowl with cling wrap or a lid, and let it chill in the refrigerator for about 30 minutes. This allows the flavors to meld beautifully and keeps it refreshingly cool!
Plating and Serving Suggestions
Now that your creamy fruit salad is all ready to go, let’s talk about how to present this beauty! A large glass bowl allows the colors to shine through—think of it as showing off a delightful gem. Serve it alongside your favorite brunch dishes, as a vibrant side at barbecues, or even as a delightful dessert.
For an elegant touch, consider serving it in individual glasses or bowls. You can even garnish each serving with a sprig of mint or sprinkle some crushed nuts on top for texture. Pair with homemade granola for an added crunch, or serve it as part of a larger brunch spread with pancakes or waffles. Each scoop should feel like a little burst of summer!
Recipe Variations
Get ready to switch things up! Here are a few creative variations to jazz up your creamy fruit salad:
-
Citrus Melange: Swap the pineapple and apples for oranges and grapefruit for a refreshing citrus take. Do keep the creamy dressing for balance!
-
Nutty Addition: Toss in some walnuts or almonds for added crunch and healthy fats.
-
Tropical Paradise: Add diced kiwi and papaya instead of apples and pineapple for a true island experience.
-
Berry Blast: Make it a berry medley! Combine strawberries, blueberries, raspberries, and blackberries for a double-dose of fruit flavor.
-
Vegan Delight: Use your favorite non-dairy yogurt and add chia seeds for extra nutrition!
A Few Chef’s Notes
As with any beloved recipe, this creamy fruit salad has its roots in the desire for simplicity and heartiness. Back in Grandma’s kitchen, we didn’t have fancy ingredients—just whatever she had in her pantry. That’s part of what’s so special about this dish: it evolves with what’s on hand and your taste preferences. Plus, have I mentioned how forgiving this recipe is? Feel free to play around with the fruits; there’s no right or wrong here!
Oh, and I must confess: I once made this salad for a potluck, and instead of marshmallows, I accidentally grabbed a bag of jelly beans. Let’s just say the kids loved it, and it became a ‘Dessert Salad’ instead!
FAQs and Troubleshooting
Q: Can I make this salad ahead of time?
A: Yes, you can! Just prepare the fruits and dressing separately and combine them a few hours before serving. This keeps everything fresh and prevents the fruit from getting too mushy.
Q: My dressing is too thick; what do I do?
A: No worries! You can thin it out with a splash of milk or almond milk. Stir until you reach your desired consistency!
Q: Can I use frozen fruit?
A: Absolutely! Just thaw it out first, pat it dry, and use it the same way. Keep in mind it might release more juice into the salad.
Q: What if I’m allergic to one of the fruits?
A: Substitute it with any other fruit you enjoy! The beauty of a fruit salad is its versatility—there’s always room for your favorites.
Nutritional Information
While this creamy fruit salad is a treat for your taste buds, it’s also packed with nutrition! Here’s a general breakdown per serving, though it can vary based on your exact fruit choices:
- Calories: Approximately 180
- Protein: 6g (thanks to Greek yogurt!)
- Carbohydrates: 30g
- Dietary Fiber: 3g
- Sugars: 12g (natural sugars from fruits)
- Fat: 3g
Loaded with vitamins, antioxidants, and healthy fats, this salad is not only a delicious dish but also a nutritious one!
Final Thoughts
So there you have it, friends! Just a bowl of simple pleasures that brings a smile to your face and some sunshine to your day. This creamy fruit salad isn’t just about the flavors; it’s about the memories, the laughter, and the connections we make around the table. As you gather your fruits and whip up this delightful dish, I hope it sparks joy and maybe a few nostalgic moments of your own!
Go ahead, dig in, and remember: life’s too short for boring salads! Keep it colorful, keep it creamy, and above all, keep it delicious. Until next time, happy cooking!
Print
Creamy Fruit Salad
- Total Time: 30 minutes
- Yield: 4 servings 1x
- Diet: Vegetarian
Description
A colorful medley of fruity goodness drizzled in a smooth, creamy dressing, perfect for potlucks and picnics.
Ingredients
- 1 medium apple (Fuji or Gala)
- 1 cup blueberries
- 1 tablespoon lemon juice
- 1 cup grapes
- 1 cup strawberries
- 1 cup pineapple chunks
- 1/2 cup Greek yogurt
- 1/2 cup marshmallows (optional)
Instructions
- Prepare the Fruit: Wash all your fruits thoroughly and pat them dry.
- Chop the Apple: Dice your apple into bite-sized pieces without peeling it.
- Slice the Strawberries: Remove green tops and slice them into halves or quarters.
- Prep the Grapes and Blueberries: Wash the grapes and blueberries and keep them whole.
- Tropical Vibes with Pineapple: Chop fresh pineapple or drain canned pineapple.
- Make the Creamy Dressing: Combine Greek yogurt and lemon juice until creamy.
- Combine the Ingredients: In a large mixing bowl, mix fruits with the creamy dressing.
- Add Marshmallows: Fold in marshmallows if desired.
- Chill and Serve: Cover and chill for about 30 minutes before serving.
Notes
Serve in a large glass bowl or individual glasses, garnished with mint or nuts for added texture.
- Prep Time: 15 minutes
- Cook Time: 0 minutes
- Category: Side Dish
- Method: No-Cook
- Cuisine: American
Nutrition
- Serving Size: 1 serving
- Calories: 180
- Sugar: 12g
- Sodium: 30mg
- Fat: 3g
- Saturated Fat: 1g
- Unsaturated Fat: 2g
- Trans Fat: 0g
- Carbohydrates: 30g
- Fiber: 3g
- Protein: 6g
- Cholesterol: 10mg
Keywords: fruit salad, creamy salad, summer recipe, potluck dish, healthy dessert
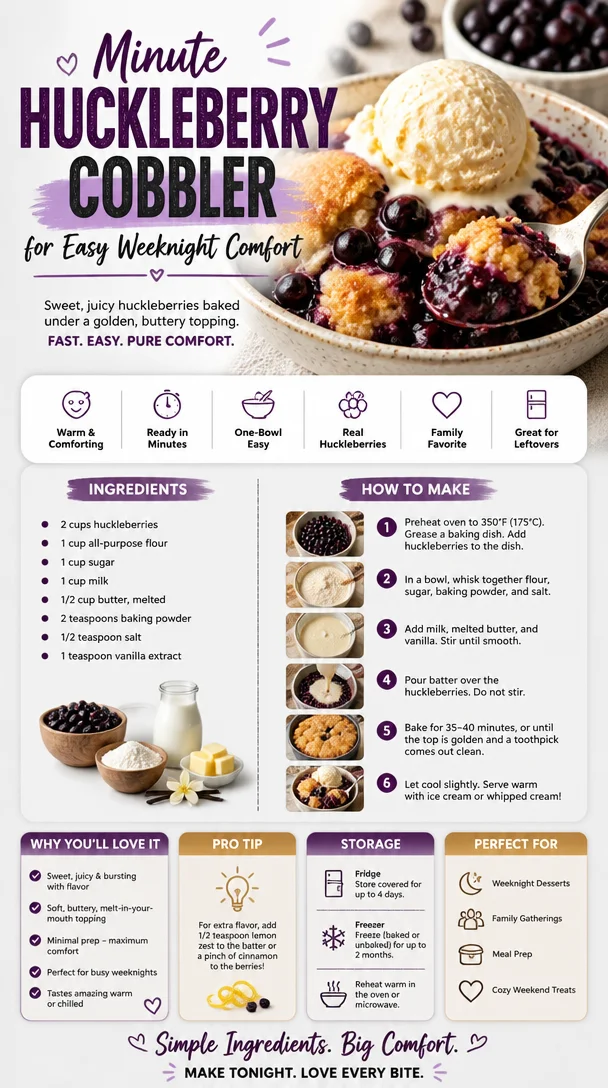
Minute Huckleberry Cobbler for Easy Weeknight Comfort
Huckleberry Cobbler: A Taste of Summer Memories
Hey there, fellow foodies! Welcome back to Feastical, where we whip up feel-good dishes that not only satisfy the palate but spark joy and nostalgia. Today, we’re diving into a classic dessert that screams summer and celebrates the wonderful huckleberry—the Huckleberry Cobbler. If you’ve never had huckleberries, you’re in for a treat. Sweet, tart, and oh-so-delicious, they transform simple ingredients into an unforgettable dessert that is both comforting and magical.
A Slice of Nostalgia: My Huckleberry Experience
Growing up, summer meant family road trips and adventures into the wild—one of my fondest memories is foraging for huckleberries with my grandma. We would hike through the dense woods, her laughter ringing out like a melody as I picked the small, juicy berries off the bushes. Each bite was a burst of sweetness followed by a mild tartness that was utterly refreshing. After a long day of berry picking, we’d head back home, arms filled with our treasure, and my grandma would whip up her famous Huckleberry Cobbler.
The smell of butter and sugar mingling with the earthiness of the huckleberries would fill the house, wrapping us all in a cozy embrace. As we gathered around the table, the cobbler would be served hot, bubbling, and golden, making our taste buds dance in delight. Those summer days were not merely about eating; they were about bonding, sharing stories, and creating a sense of family that lasted well beyond that slice of cobbler. So, are you ready to create some delicious memories? Let’s get started!
Ingredients
To make this tasty Huckleberry Cobbler, you’ll need the following ingredients:
- 2 cups huckleberries
Fresh is best, but if you can’t find huckleberries, blueberries or blackberries work great, too! - 1 cup all-purpose flour
This forms the base of the cobbler; for a gluten-free option, use almond flour or a gluten-free blend. - 1 cup sugar
A sweetener to balance the acidity of the huckleberries; you can reduce it to ¾ cup for a less sweet version. - 1 cup milk
Adds moisture; for a dairy-free option, almond milk or oat milk are excellent substitutes. - ½ cup butter, melted
This adds richness; coconut oil can be swapped in for a dairy-free option. - 2 teaspoons baking powder
Ensures the batter rises beautifully. - ½ teaspoon salt
Enhances the flavors and balances the sweetness. - 1 teaspoon vanilla extract
A flavor booster; feel free to use almond extract for a different twist.
Step-by-Step Instructions
Rolling up our sleeves? Let’s get our cobbler on!
-
Preheat the Oven
Start by preheating your oven to 350°F (175°C). This is crucial, as it helps the cobbler cook evenly and become golden on top. -
Prep the Berries
In a bowl, toss the huckleberries with a tablespoon of sugar (optional). This helps to release some of their juices and creates a lovely syrup in the cobbler. Let them sit while you prepare the batter. -
Make the Batter
In a large mixing bowl, whisk together the flour, sugar, baking powder, and salt. Create a well in the center and pour in the milk, melted butter, and vanilla extract. Mix until just combined—no one likes a tough cobbler! -
Assembly Time!
In a greased 9×13 inch baking dish, pour in the batter, spreading it out evenly. Do not fret if it looks a bit lumpy; that’s just the way cobblers roll. Next, spoon the huckleberries (and any released juice) on top of the batter. Don’t mix them in—this creates that beautiful bubbling topping! -
Bake
Place your dish in the oven and let it bake for about 35-40 minutes or until the top is golden brown and the juices are bubbling. It might be tough, but resist the urge to peek—let it do its magic! -
Cool and Serve
Once baked, remove the cobbler from the oven and let it sit for about 10 minutes (if you can wait!). This allows the juices to settle. Serve warm with a scoop of vanilla ice cream or whipped cream—heavenly!
Serving Suggestions
Plating a cobbler can be as simple or as fancy as you want! For a casual vibe, scoop out servings directly from the baking dish. However, if you’re looking to impress, try using a large spoon to serve individual portions neatly on plates. Drizzle a bit of the juices over the cobbler for an extra touch. Add a dollop of whipped cream or a generous scoop of vanilla ice cream on the side—it tastes divine and adds to the whole experience. Garnish with a few fresh huckleberries or mint leaves for that beautiful, restaurant-worthy finish!
Recipe Variations
While the classic Huckleberry Cobbler is fantastic just as it is, here are a few creative variations to shake things up:
-
Berry Medley Cobbler
Replace huckleberries with a mix of strawberries, blueberries, and raspberries for a rainbow of flavors. -
Peach-Huckleberry Cobbler
Add chopped peaches to the mix for a sweet and juicy twist. The peaches balance the tartness of the huckleberries beautifully! -
Coconut Huckleberry Cobbler
Swap out half the milk for coconut milk and sprinkle some shredded coconut on top of the batter before baking. -
Vegan Huckleberry Cobbler
Replace the milk with almond milk, the butter with coconut oil, and the egg with a flax egg for a dairy-free delight! -
Spiced Huckleberry Cobbler
Add a teaspoon of cinnamon or nutmeg to the batter for a warm, autumnal flavor twist.
Chef’s Notes
Cooking is often an adventure, an evolution, and my Huckleberry Cobbler is no different. I’ve tweaked this recipe over the years to match my taste and the ingredients available to me. What started as a simple family dessert has now become a staple at potlucks and gatherings. I love how it brings everyone together, just like those summer hikes with Grandma. Oh, and trust me when I say: do not be afraid to get creative with your huckleberries. Experimenting is half the fun!
FAQs and Troubleshooting
-
Why did my cobbler turn out soggy?
A soggy cobbler may result from too much liquid from the berries. Make sure to toss the berries with a touch of sugar as this helps to balance out the moisture! -
Can I use frozen huckleberries?
Absolutely! Frozen huckleberries can be used, but they might need a little longer to cook so expect a longer bake time. -
How do I store leftover cobbler?
Store any leftovers in an airtight container in the fridge for up to 3 days. You can reheat in the oven for a few minutes to crisp it back up. -
Can this recipe be doubled?
Yes! Just make sure to use a larger baking dish and adjust the cooking time slightly.
Nutritional Info
While comfort food isn’t always known for its health benefits, this Huckleberry Cobbler is relatively friendly compared to other desserts! Each serving is approximately 290 calories, with 12g fat, 43g carbohydrates, and 3g protein. It’s packed with antioxidants from the huckleberries, making it a tasty treat you can enjoy in moderation. Plus, when paired with fresh fruit or ice cream, the joy it brings is just unbeatable!
Final Thoughts
And there you have it—a heartwarming recipe for Huckleberry Cobbler that’s bound to fill your kitchen with delightful aromas and your hearts with joyful memories. I hope you make it your own and create beautiful moments with loved ones around the table. Whether it’s the laughter of kids, the stories of family, or simply the bliss of a delicious dessert, food is a bridge to connect us all. So gather your ingredients, embrace the messiness, and dig into this scrumptious cobbler. Until next time, happy feasting!
PrintHuckleberry Cobbler
- Total Time: 55 minutes
- Yield: 8 servings 1x
- Diet: Vegetarian
Description
A comforting and magical dessert featuring sweet and tart huckleberries, perfect for summer gatherings.
Ingredients
- 2 cups huckleberries
- 1 cup all-purpose flour
- 1 cup sugar
- 1 cup milk
- ½ cup butter, melted
- 2 teaspoons baking powder
- ½ teaspoon salt
- 1 teaspoon vanilla extract
Instructions
- Preheat the oven to 350°F (175°C).
- In a bowl, toss the huckleberries with a tablespoon of sugar (optional) and let them sit.
- Whisk together the flour, sugar, baking powder, and salt in a large mixing bowl.
- Create a well in the center and pour in the milk, melted butter, and vanilla extract. Mix until just combined.
- Pour the batter into a greased 9×13 inch baking dish and spread it evenly.
- Spoon the huckleberries on top of the batter, do not mix.
- Place the dish in the oven and bake for about 35-40 minutes, or until golden brown and bubbling.
- Remove from the oven and let it sit for about 10 minutes before serving warm.
Notes
Serve this cobbler warm with a scoop of vanilla ice cream or whipped cream for a delightful treat.
- Prep Time: 15 minutes
- Cook Time: 40 minutes
- Category: Dessert
- Method: Baking
- Cuisine: American
Nutrition
- Serving Size: 1 serving
- Calories: 290
- Sugar: 18g
- Sodium: 200mg
- Fat: 12g
- Saturated Fat: 7g
- Unsaturated Fat: 4g
- Trans Fat: 0g
- Carbohydrates: 43g
- Fiber: 3g
- Protein: 3g
- Cholesterol: 30mg
Keywords: huckleberry cobbler, summer dessert, berry dessert
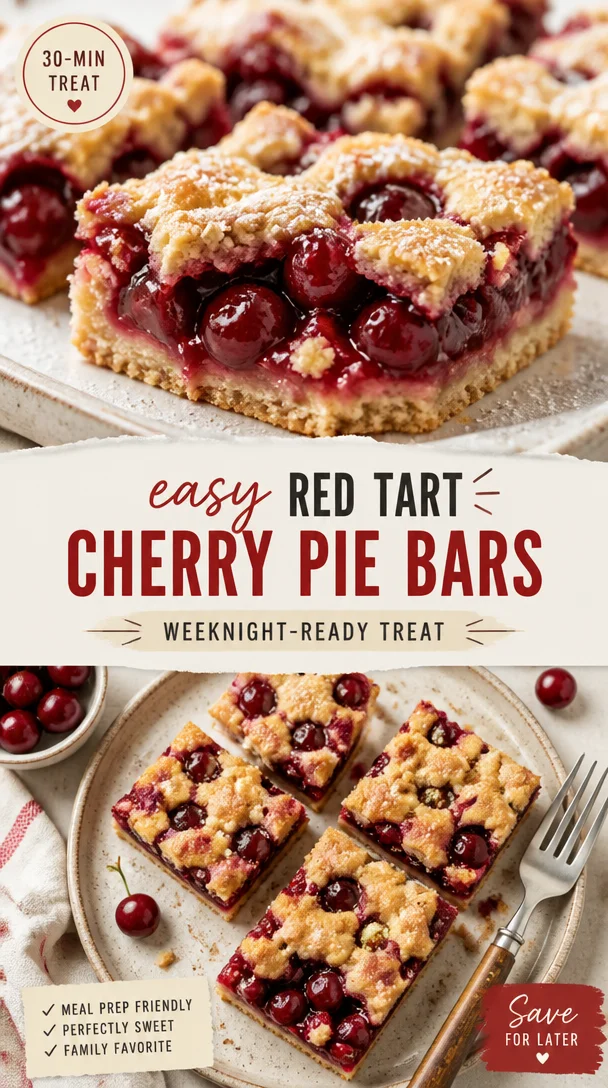
Easy Red Tart Cherry Pie Bars (Weeknight-Ready Treat)
The Sweet and Tart Symphony of Red Tart Cherry Pie Bars
Hey there, fellow food lovers! Today we’re diving into a delightful treat that’s sure to tickle your taste buds and create a little magic in your kitchen: Red Tart Cherry Pie Bars. Picture this: a buttery crust, a vibrant cherry filling bursting with flavor, and a sprinkle of coconut for that extra touch. Sounds divine, right? Trust me, these bars are the ultimate comfort dessert that’ll have everyone coming back for seconds.
When I first stumbled upon red tart cherries, I was instantly captivated. Their sweet yet slightly tart flavor spoke to me, and I knew they would be the star of a scrumptious recipe. Fast forward to many at-home baking sessions, and these cherry pie bars quickly became a staple in my kitchen—perfect for potlucks, picnics, or just a cozy night in with family. Let’s embark on this dreamy culinary journey together and create something memorable!
A Slice of Nostalgia
Let me take you back to one of my fondest childhood memories. Every summer, my family would pile into the car and head to our favorite local orchard. The air was filled with the fragrant aroma of ripe cherries, and I could barely contain my excitement. My mom would hand me a small bucket, and we’d race through the orchard, plucking the brightest red cherries we could find. The experience was thrilling, as I enjoyed the one-of-a-kind sweetness of those tart cherries fresh from the tree.
Later, my mom would whip up her famous cherry pie, filling the house with the most delightful aroma. The buttery crust, vibrant cherry filling, and sweet-tart flavor combination created a sense of warmth and joy. As we gathered around the dining table after dinner, I always savored that first bite. Fast forward to today, and those cherished memories inspired my rendition of cherry pie—just in a more portable and fun form: Red Tart Cherry Pie Bars. Now, every time I bake these bars, I relive those sweet summer days, and I can’t wait for you to create your own beautiful memories!
Ingredients
Let’s gather our ingredients and prepare to create these spectacular cherry pie bars. Here’s what you’ll need:
-
2 cans (14 ounces each) Oregon Fruit Red Tart Cherries: The star of the show! These canned cherries save us time while packing in loads of flavor. If you’re feeling adventurous, you can easily swap them with fresh cherries when they’re in season, just be sure to adjust the sweetness accordingly!
-
1/2 cup (100 grams) sugar: This will balance the tartness of the cherries. Feel free to reduce the sugar for a less sweet filling or substitute with a natural sweetener, like honey or maple syrup.
-
2 tablespoons (18 grams) cornstarch: Cornstarch acts as a thickener for our cherry filling. If you find yourself out of cornstarch, you can use flour, but keep in mind it may alter the texture a bit.
-
1/4 teaspoon kosher salt: A pinch of salt brings all the flavors to life. You can use regular table salt if that’s what you have, but kosher salt is my go-to for a more delicate touch.
-
1 tablespoon lemon juice: Just a splash brightens the flavors and enhances the cherries’ natural tartness. If you prefer, you can use lime juice for a fun twist.
-
1 teaspoon vanilla extract: Because, let’s be honest, everything is better with a hint of vanilla. If you’re feeling fancy, consider using a high-quality vanilla bean or vanilla paste.
-
2 5/8 cups (336 grams) unbleached all-purpose flour: This forms the base of our buttery crust. You can substitute whole wheat flour for a nuttier flavor or gluten-free flour for a dietary adjustment.
-
3/4 cup (150 grams) granulated sugar: More sweetness for our crust, which creates a lovely contrast with the tart filling.
-
1/2 teaspoon kosher salt: Just like before, this balances the sweetness.
-
1/4 teaspoon baking powder: A bit of leavening agent for that perfect texture.
-
16 tablespoons (227 grams) unsalted butter: Melted down, this will create a rich and delicious crust. If you’re looking for a dairy-free option, coconut oil works wonderfully!
-
3 tablespoons sweetened shredded coconut: This adds a delightful texture and tropical flair to our crust. If you prefer a classic flavor, feel free to omit it.
Step-by-Step Instructions
Ready to get baking? Let’s roll up our sleeves and dive into the detailed steps for creating these fabulous Red Tart Cherry Pie Bars!
-
Preheat the Oven: Preheat your oven to 350°F (175°C). Preheating helps ensure a uniform baking temperature from the start, resulting in even cooking.
-
Prepare the Pan: Grab a 9×13-inch baking pan (that’s the perfect size for bar recipes!) and brush the sides and bottom with melted butter. This will help prevent sticking.
-
Create the Crust:
- In a large mixing bowl, combine the flour, granulated sugar, salt, and baking powder.
- Next, stir in the melted butter until it forms a crumbly mixture. You can use a fork or your hands for that homestyle vibe. If you like a thicker crust, you can reserve a little of the mixture to sprinkle on top of the cherry filling later.
-
Press the Crust: Pour the crumbly crust mixture into the prepared pan and press it evenly across the bottom with your fingers or a spatula. This will create a solid foundation for our juicy filling!
-
Bake the Crust: Pop the crust into the preheated oven and bake for about 15-20 minutes or until it’s lightly golden. Keep an eye on it, as we want a lovely golden hue without overbaking.
-
Prepare the Filling: While the crust is baking, it’s time to whip up the cherry filling!
- In a mixing bowl, combine the drained red tart cherries, sugar, cornstarch, salt, lemon juice, and vanilla extract. Gently toss until the cherries are coated well, letting those flavors meld beautifully.
-
Assemble the Bars: Once your crust is done baking and has cooled for just a moment, pour the cherry filling over the warm crust. Spread it evenly, making sure every inch is covered with luscious cherry goodness.
-
Add Toppings (if desired): If you saved a bit of the crust mixture, sprinkle it over the cherry filling for a crumble topping! Alternatively, you can sprinkle shredded coconut over the cherries for that extra delicious touch.
-
Bake Again: Return the pan to the oven and bake for an additional 25-30 minutes. The filling should be bubbling, and the top should be lightly golden.
-
Cool and Slice: Once out of the oven, let the pie bars cool completely in the pan. I know it’s tough to wait, but trust me—it’ll be worth it! Once cooled, slice them into generous squares or rectangles, and get ready for the taste explosion.
Serving Suggestions
These Red Tart Cherry Pie Bars are perfect for any occasion! Here are some fun ways to plate and serve them:
-
Classic Presentation: Simply serve the bars as is, dusted with powdered sugar for a charming touch. It adds an enchanting visual and a hint of sweetness with every bite.
-
À la Mode: Get decadent by serving warm bars with a scoop of vanilla ice cream on top. The creamy ice cream beautifully balances the tart cherries and buttery crust.
-
Tart Cherry Drizzle: For an extra burst of flavor, drizzle a simple sauce made from reduced cherry juice over the bars before serving.
-
Pair with Coffee or Tea: These bars are perfect for a cozy afternoon treat. Serve them alongside a steaming cup of coffee or tea, and enjoy the delightful combination of flavors.
Recipe Variations
Why stop at just one version? Here are some fun twists you can explore with your Red Tart Cherry Pie Bars:
-
Almond Joy Bars: Add sliced almonds and use almond extract instead of vanilla for a nutty flavor.
-
Chocolate Cherry Bars: Incorporate chocolate chips into the crust for a chocolatey complement to the cherries.
-
Cranberry Cherry Combo: Mix in some fresh cranberries with the red tart cherries for a festive red-and-white bar, perfect for the holidays!
-
Vegan Friendly: Substitute the butter with coconut oil or vegan butter and use a flax egg to bind the crust for a plant-based take.
-
Spicy Kick: Add a sprinkle of cayenne pepper or cinnamon to the filling for a little bit of heat that pairs beautifully with the tartness.
Chef’s Notes
These Red Tart Cherry Pie Bars have evolved over the years in my kitchen. Initially, I only used fresh cherries, but life has a way of steering us toward simplicity—canned cherries are now my go-to! They save time and still deliver an amazing flavor. And don’t get me started on how helpful they are during cherry off-seasons. I’ll never forget the first time I made these for a summer gathering. Everyone dove in and schooled me on not reserving enough for leftovers. It was that good!
FAQs and Troubleshooting
1. Why did my cherry filling turn out runny?
If your filling is runny, it could be because the cherries released too much juice, or you didn’t use enough cornstarch. Make sure to drain canned cherries well before mixing or add a little extra cornstarch next time.
2. Can I use frozen cherries instead of canned?
Absolutely! Just be sure to thaw them and drain off excess liquid before using. You might need to adjust the sugar and cornstarch, depending on your taste.
3. My crust didn’t bake evenly; what happened?
Make sure your oven temperature is accurate—an oven thermometer can help you check this. Also, ensure the crust mixture is pressed down evenly in the pan.
4. Can I make these bars ahead of time?
Yes! These bars can be made a day in advance. Just store them in an airtight container in the fridge. The flavors often deepen, making them even more delicious!
Nutritional Info
When it comes to baking, it’s essential to balance indulgence with nutritional awareness. Here’s a rough breakdown per serving (if you cut the batch into 12 bars):
- Calories: Approximately 250-300
- Total Fat: 13g (saturated fat approx. 8g)
- Cholesterol: 30mg
- Sodium: 80mg
- Total Carbohydrates: 34g (fiber approx. 1g, sugars approx. 20g)
- Protein: 2g
Remember, these numbers can vary based on the specific ingredients you choose. Enjoy these bars in moderation—every bite is worth it!
Final Thoughts
There you have it—your guide to creating delightful Red Tart Cherry Pie Bars! I hope this recipe inspires you to get into the kitchen and whip up something delectable that also holds a part of your heart, just as it does for me. Whether you share these bars with friends and family or savor them solo on a cozy evening, the joy they bring is sure to warm your soul.
So, let’s keep the oven warm and the cherries rolling! I can’t wait to hear your own stories and twists on this recipe. After all, every memorable meal has a story, and I’m thrilled to have shared this one with you. Happy baking, foodies! 🥧✨
Print
Red Tart Cherry Pie Bars
- Total Time: 70 minutes
- Yield: 12 servings 1x
- Diet: Vegetarian
Description
Delicious and portable cherry pie bars with a buttery crust and vibrant cherry filling, sprinkled with coconut.
Ingredients
- 2 cans (14 ounces each) Oregon Fruit Red Tart Cherries
- 1/2 cup (100 grams) sugar
- 2 tablespoons (18 grams) cornstarch
- 1/4 teaspoon kosher salt
- 1 tablespoon lemon juice
- 1 teaspoon vanilla extract
- 2 5/8 cups (336 grams) unbleached all-purpose flour
- 3/4 cup (150 grams) granulated sugar
- 1/2 teaspoon kosher salt
- 1/4 teaspoon baking powder
- 16 tablespoons (227 grams) unsalted butter, melted
- 3 tablespoons sweetened shredded coconut
Instructions
- Preheat your oven to 350°F (175°C).
- Prepare a 9×13-inch baking pan by brushing it with melted butter.
- In a large mixing bowl, combine flour, sugar, salt, and baking powder.
- Stir in melted butter until the mixture is crumbly.
- Pour the crust mixture into the prepared pan and press it evenly across the bottom.
- Bake in the preheated oven for 15-20 minutes until golden.
- Combine drained cherries, sugar, cornstarch, salt, lemon juice, and vanilla extract in a mixing bowl.
- Pour the cherry filling over the warm crust and spread evenly.
- Sprinkle reserved crust mixture or coconut over the filling, if desired.
- Bake again for 25-30 minutes until bubbly and golden.
- Cool completely in the pan before slicing into bars.
Notes
Serve with powdered sugar, vanilla ice cream, or a drizzle of cherry sauce for added flavor.
- Prep Time: 20 minutes
- Cook Time: 50 minutes
- Category: Dessert
- Method: Baking
- Cuisine: American
Nutrition
- Serving Size: 1 bar
- Calories: 275
- Sugar: 20g
- Sodium: 100mg
- Fat: 13g
- Saturated Fat: 8g
- Unsaturated Fat: 5g
- Trans Fat: 0g
- Carbohydrates: 36g
- Fiber: 2g
- Protein: 3g
- Cholesterol: 30mg
Keywords: cherry pie bars, dessert recipe, baking, sweet treat

Weeknight One-Pan Caramelized Skillet Peaches in 15 Minutes
Caramelized Skillet Peaches: A Taste of Summer in Every Bite!
Hey there, food lovers! Welcome back to Feastical, where we whip up feel-good dishes that warm the heart and spark joy in the kitchen. Today, we’re diving into a recipe that’s as sweet as summer sunshine and as simple to make as it is delicious: Caramelized Skillet Peaches. Trust me; this dish is going to take your taste buds on a heavenly trip!
Let’s be real; peaches are one of those summer fruits that capture the essence of the season. Their sweet, juicy flesh is synonymous with long, lazy afternoons and sun-kissed memories. There’s something magical about cooking fresh produce, caramelizing the sugars to unlock their full potential. When you combine peaches with a bit of maple syrup and butter, you get a decadent dessert that feels fancy but is super easy to throw together. Imagine this: a warm, gooey peach straight from the skillet, topped with a scoop of creamy vanilla ice cream. Talk about summer bliss!
I first discovered the joys of caramelized peaches on a family camping trip in my late teens. We were gathered around the fire, trying to figure out ways to enjoy our meager supplies. While my siblings were busy making s’mores, my adventurous spirit led me to throw some halved peaches on the grill, a drizzle of honey, and a sprinkle of cinnamon. It was a game-changer! The combination of fire-kissed sweetness and smoky flavor was nothing less than divine. Fast forward to today, and I’ve refined that recipe, added a few more delicious tweaks, and now I want to share my version of these spectacular peaches with you.
So, whether you’re looking for a cozy dessert for an intimate dinner or a fun treat for a summer barbecue, this recipe will become your go-to. Let’s grab those peaches and get started on this heavenly journey!
A Sweet Slice of My Peachy Past
Growing up, our summers revolved around picking fresh fruit at a local orchard. I can still hear the sound of my siblings racing each other to fill their baskets. Those days were filled with laughter, sunshine, and a healthy dose of sibling rivalry! On one of our excursions, we found ourselves surrounded by rows and rows of juicy peaches. We picked until our baskets overflowed, our hands sticky from the sweet juice.
That evening, my mom whipped up her signature dish—peach cobbler. The entire house was filled with a warm, sugary aroma as she mixed and baked it to perfection. To this day, that memory holds a special place in my heart, and it’s why I’m so passionate about showcasing peaches in their simplest and most glorious form. Fast forward to adulthood, and I’m still chasing that warm peachy feeling, which brings us to today’s caramelized beauties!
Ingredients
For these delicious Caramelized Skillet Peaches, you’ll need the following ingredients:
-
6 ripe peaches
The fresher, the better! Look for peaches that are slightly soft to the touch. If they are too firm, leave them out for a couple of days at room temperature until they ripen. -
2 tablespoons lemon juice
This brightens up the dish and helps the peaches maintain their lovely color. If you’re in a pinch, lime juice works as a fantastic substitute! -
1/4 cup pure maple syrup
A natural sweetener that pairs beautifully with peaches. If you’re out of maple syrup, feel free to use honey or agave syrup. -
1/2 teaspoon kosher salt
This may seem like a small amount, but it enhances all the flavors beautifully, balancing the sweetness. I recommend kosher salt for its texture, but table salt will work as well – just use half the amount. -
4 tablespoons unsalted butter
Ah, the secret to richness! Butter creates that luscious glaze the peaches simmer in. You can swap it out for coconut oil for a dairy-free option if you’d like. -
1 teaspoon vanilla extract (pure)
This adds an aromatic layer to the dish. Always go for pure vanilla extract when you can—the flavor difference is worth it!
Step-by-Step Instructions
Ready to transform those peaches into a delightful dessert? Here’s how to do it step by step:
-
Prepare Your Peaches
Start by washing your peaches under cool running water. Once cleaned, dry them off and slice them in half, removing the pit. If you’re feeling daring, leave the skins on for a bit of extra texture and color! -
Heat the Skillet
Grab your favorite skillet (a cast-iron one works wonders here) and place it over medium heat. Let it warm up for a couple of minutes; you want that skillet hot enough to get a nice sear but not so hot that it scorches the butter. -
Melt the Butter
Add the unsalted butter to the skillet and let it melt completely, swirling the pan around to coat the bottom evenly. This is where the flavor magic begins! -
Add Peaches and Cook
Gently add your peach halves to the skillet, cut side down. Sear them for about 3-4 minutes. You’re looking for a beautiful golden-brown color. Resist the urge to poke and prod – let them do their thing! -
Create the Caramel Sauce
Once caramelized, carefully flip the peaches over with a spatula. Now, drizzle the maple syrup and lemon juice over them, followed by a sprinkle of kosher salt. Allow the mixture to bubble and thicken for another 2-3 minutes. When the peaches start to soften and soak up that syrup, you’re in for a treat! -
Finish with Vanilla
Remove the skillet from heat and stir in the pure vanilla extract. This final touch elevates the dish from delicious to utterly divine. -
Serve Warm
The best part? Enjoy them immediately while they’re still warm!
Serving Suggestions
When it comes to serving these Caramelized Skillet Peaches, the options are as delightful as the dish itself. Here are a few suggestions:
-
Serve the peaches over a generous scoop of vanilla ice cream for a classic dessert experience. The warm peaches will melt into the ice cream, creating a heavenly combination!
-
Another mouthwatering idea is to enjoy them alongside whipped cream or Greek yogurt for a lighter touch. The tanginess of yogurt plays off the sweetness of the peaches beautifully!
-
For a gourmet flair, plate the peaches over a slice of pound cake or French toast for breakfast. Top it with a sprinkle of powdered sugar, and you’ve got yourself a showstopper.
-
Don’t forget about garnishes! A sprinkle of cinnamon, a handful of fresh mint leaves, or a drizzle of more maple syrup can elevate your dish even further.
Recipe Variations
Let’s get creative! Here are 3–5 delicious variations to try with your caramelized peaches:
-
Honey-Balsamic Peaches
Replace maple syrup with honey and add a splash of balsamic vinegar. The sweetness paired with the tanginess of the vinegar will surprise and delight your taste buds! -
Spicy Peach Maple Glaze
If you enjoy a kick, sprinkle some cayenne pepper or red pepper flakes into your maple syrup before drizzling. It offers a surprising heat that pairs beautifully with the juicy sweetness. -
Nutty Caramelized Peaches
Add a sprinkle of chopped nuts—like pecans or almonds—during the last minute of cooking for a delicious crunch that complements the soft peaches. -
Coconut-Caramel Peaches
Swap the butter for coconut oil and drizzle unsweetened shredded coconut over the peaches just before serving for a tropical twist. -
Peach Melba
Serve your caramelized peaches with raspberry sauce (just puree fresh raspberries with a little sugar) and a scoop of ice cream for an elegant dessert.
Chef’s Notes
You know, every time I make caramelized peaches, I’m reminded of that camping trip and how something so simple can bring back the warmest memories. It’s comforting to think that something as easy as cooking fruit can transport us back in time. Over the years, I’ve experimented with this recipe in countless ways—the honey-balsamic twist remains a fan favorite among my friends! It’s fun to see how a little creativity can breathe new life into a classic.
FAQs and Troubleshooting
Q: What if my peaches are too firm?
A: If your peaches are a bit hard, you can place them in a paper bag for a day or two to ripen. If you’re in a rush, slice them thinner; they’ll caramelize quicker!
Q: Can I make this recipe in advance?
A: The caramelized peaches are best served fresh. However, if you do have leftovers, store them in an airtight container in the fridge. Just reheat in a skillet before serving.
Q: What if I made too much caramel sauce?
A: Lucky you! Leftover caramel sauce can be drizzled over pancakes, waffles, or coffee for an indulgent special treat.
Q: Can I use frozen peaches?
A: While fresh peaches are preferred, frozen peaches will work in a pinch! Just thaw and drain excess water. You may need to cook them a little longer to achieve that golden caramelization.
Nutritional Info
For a serving of these decadent Caramelized Skillet Peaches (based on a serving size of 2 peach halves), you will find the following nutrients:
- Calories: Approx. 180
- Total Fat: 8g
- Saturated Fat: 5g
- Cholesterol: 20mg
- Sodium: 30mg
- Carbohydrates: 27g
- Dietary Fiber: 2g
- Sugars: 18g
- Protein: 1g
Please note that these values are approximate and can vary based on specific ingredient brands and variations used.
Final Thoughts
I hope you’ve enjoyed this delightful journey into the world of Caramelized Skillet Peaches! They truly embody the flavors of summertime and are sure to impress your family and friends. Remember, cooking is all about experimenting and finding joy in the process.
So next time you find yourself with ripe peaches, don’t hesitate to whip up this recipe. It’s a great way to create memories in the kitchen, just like I did during those childhood summers. If you give these caramelized beauties a try, please let me know how they turned out in the comments or tag me on social media!
Happy cooking, my friends! Until next time, keep sharing love through food!
Print
Caramelized Skillet Peaches
- Total Time: 20 minutes
- Yield: 4 servings 1x
- Diet: Vegetarian
Description
A simple yet decadent dessert featuring juicy peaches caramelized with maple syrup and butter, perfect for summer.
Ingredients
- 6 ripe peaches
- 2 tablespoons lemon juice
- 1/4 cup pure maple syrup
- 1/2 teaspoon kosher salt
- 4 tablespoons unsalted butter
- 1 teaspoon vanilla extract (pure)
Instructions
- Prepare Your Peaches: Start by washing your peaches under cool running water. Once cleaned, dry them off and slice them in half, removing the pit. If you’re feeling daring, leave the skins on for a bit of extra texture and color!
- Heat the Skillet: Grab your favorite skillet (a cast-iron one works wonders here) and place it over medium heat. Let it warm up for a couple of minutes; you want that skillet hot enough to get a nice sear but not so hot that it scorches the butter.
- Melt the Butter: Add the unsalted butter to the skillet and let it melt completely, swirling the pan around to coat the bottom evenly. This is where the flavor magic begins!
- Add Peaches and Cook: Gently add your peach halves to the skillet, cut side down. Sear them for about 3-4 minutes. You’re looking for a beautiful golden-brown color. Resist the urge to poke and prod – let them do their thing!
- Create the Caramel Sauce: Once caramelized, carefully flip the peaches over with a spatula. Now, drizzle the maple syrup and lemon juice over them, followed by a sprinkle of kosher salt. Allow the mixture to bubble and thicken for another 2-3 minutes. When the peaches start to soften and soak up that syrup, you’re in for a treat!
- Finish with Vanilla: Remove the skillet from heat and stir in the pure vanilla extract. This final touch elevates the dish from delicious to utterly divine.
- Serve Warm: The best part? Enjoy them immediately while they’re still warm!
Notes
For variations, try honey-balsamic peaches, spicy peach maple glaze, or coconut-caramel peaches.
- Prep Time: 10 minutes
- Cook Time: 10 minutes
- Category: Dessert
- Method: Sautéing
- Cuisine: American
Nutrition
- Serving Size: 1 serving
- Calories: 180
- Sugar: 18g
- Sodium: 30mg
- Fat: 8g
- Saturated Fat: 5g
- Unsaturated Fat: 2g
- Trans Fat: 0g
- Carbohydrates: 27g
- Fiber: 2g
- Protein: 1g
- Cholesterol: 20mg
Keywords: peaches, caramelized, summer dessert, fruit dessert, easy dessert

Ingredient Summer Peach Mousse Trifles (No-Bake)
The Sweet Taste of Summer: Summer Peach Mousse Trifles
Hey there, fellow foodies! If you’re looking to add a splash of sunshine to your dessert table, I’ve got something real special for you. Today, we’re diving into the world of Summer Peach Mousse Trifles. This delightful layered treat is not only a feast for the eyes but also a celebration of all the juicy, sweet peaches the season has to offer! Perfect for those warm, lazy summer afternoons, these trifles embody everything I love about summer cooking—easy, fresh, and oh-so-satisfying. So, roll up your sleeves, and let’s get ready to create a dessert that’ll make your taste buds dance!
A Slice of Summer Nostalgia
Growing up, my Grandma Bea had the most incredible peach tree in her backyard. Every summer, my siblings and I would wait with bated breath for those fuzzy, golden beauties to ripen. One of my fondest memories is picking peaches on a sun-soaked afternoon, our hands sticky with juice and laughter.
Grandma would always whip up her famous peach cobbler, but she had a little secret: she would make a light, fluffy mousse from the ripest peaches, layering it with cake and whipped cream. It was heavenly! I remember racing to the kitchen, eager to help out—tasting and giggling as Grandma taught me the magic of turning simple ingredients into something extraordinary.
That’s how the idea for these Summer Peach Mousse Trifles was born! This recipe captures those memories, combining my love for peaches, cake, and whipped cream into a modern dessert that’s both beautiful and comforting. It’s a dish that brings people together, just like those summer days in Grandma Bea’s kitchen.
Ingredients
Now, let’s gather the ingredients for our Summer Peach Mousse Trifles. Here’s what you’ll need:
-
2 cups fresh peaches, diced
Nothing beats the flavor of ripe summer peaches! If you can’t find fresh ones, consider using canned peaches in juice—just drain them well. -
1 box yellow cake mix
Using a boxed cake mix keeps it simple, but if you have a favorite homemade recipe, feel free to use that! Just adjust the baking time accordingly. -
3 eggs
Essential for making the cake fluffy and light. If you’re vegan or egg-free, you can substitute with flax eggs (1 tablespoon of ground flaxseed mixed with 2.5 tablespoons of water per egg, let sit for 5 minutes). -
1/3 cup vegetable oil
This adds moisture to the cake. You can use melted coconut oil or even applesauce for a lighter version. -
1 cup water
Simple and straightforward, this helps activate the cake mix. You can swap it with peach juice for an extra peachy flavor! -
1 cup heavy whipping cream
This is the magic ingredient for our mousse! If you’re looking for a lighter option, coconut cream chilled in the fridge also works beautifully. -
1/4 cup powdered sugar
Just a touch to sweeten our mousse. Make it more or less depending on your sweetness preference! -
1 teaspoon vanilla extract
Adds lovely warmth to both the mousse and the cake. Use pure vanilla extract for the best flavor—or even try almond extract for a twist!
Step-by-Step Instructions
Alright, friends! Let’s jump into the cooking process of our Summer Peach Mousse Trifles. Follow these steps, and you’ll be well on your way to an irresistible dessert!
-
Preheat the Oven
Start by preheating your oven to 350°F (180°C). This ensures that your cake bakes evenly. While the oven is warming up, go ahead and grease your cake pan with a little bit of cooking spray. -
Prepare the Cake Mix
In a large mixing bowl, combine the yellow cake mix, eggs, vegetable oil, and water. Using an electric mixer, beat on medium speed for about 2 minutes until the batter is smooth. Watch for lumps and make sure everything is well incorporated! -
Bake the Cake
Pour the batter into the greased cake pan. Bake according to the package instructions—typically, you’re looking at about 28-30 minutes, but it’s always good to check with a toothpick. Once it comes out clean, you know it’s done! Allow the cake to cool completely in the pan before transferring it to a wire rack. -
Make the Peach Mousse
Once the cake is cool, whip the heavy cream in a chilled bowl using an electric mixer. Start on low to avoid splashing, then gradually increase to high speed. After a minute, sprinkle in the powdered sugar and vanilla extract. Beat until stiff peaks form. This means when you lift the beaters, the cream holds its shape perfectly! -
Fold in the Peaches
Gently fold in the diced peaches into the whipped cream using a spatula. Be careful not to deflate the whipped cream. This is where the magic happens—the mixture transforms into a luscious, creamy mousse filled with sweet peachy goodness! -
Assemble the Trifles
Cut the cooled cake into even squares. In your serving glasses or bowls, start layering! Begin with a layer of cake, followed by a layer of peach mousse, and repeat until you reach the top. Finish with a dollop of remaining mousse, and if you’re feeling fancy, top with a slice of fresh peach or a sprig of mint for that wow factor.
Serving Suggestions
Presentation is key when it comes to trifles! Grab your prettiest glassware—like mason jars, parfait glasses, or even elegant stemware. Not only does this add charm, but your guests will appreciate the effort!
Layer your cake and mousse carefully, showcasing the beautiful colors of the peaches. You can even drizzle a little extra peach juice or a light syrup on the sides of the glass for an extra splash of flavor. These Summer Peach Mousse Trifles are perfect for summer picnics, backyard barbecues, or simply a fun family dessert after dinner. The best part? You can make them ahead of time and store them in the fridge for a few hours before serving!
Recipe Variations
Why not get creative with this recipe? Here are a few fun ideas to put your own spin on the Summer Peach Mousse Trifles:
-
Berry Bliss
Swap out the peaches for fresh strawberries or raspberries! This will give the mousse a vibrant red hue and a tangy flavor. -
Tropical Twist
Add some diced pineapple and coconut flakes to the mousse for a tropical vibe! You can use coconut yogurt to replace the whipped cream for a light and refreshing variation. -
Nutty Delight
Stir in some finely chopped nuts or nut butter into the mousse for added crunch and flavor. Almonds or pecans would work beautifully against the soft textures. -
Spiced Mousse
For an autumn feel, add a sprinkle of cinnamon or nutmeg to the mousse. It gives a cozy twist that’s equally delightful! -
Chocolate Drizzle
Before serving, drizzle some melted chocolate over the top for a decadent touch. It pairs surprisingly well with the fruity flavors.
Chef’s Notes
Every recipe evolves over time, and this one is no exception! I’ve experimented with various cakes, from chocolate to carrot, and fillings like lemon curd and even Nutella! Some days, I might even throw in some whipped cream cheese for a tangy twist. The beauty of trifles is their versatility. You can get creative based on what’s in season or what’s in your pantry. Remember, cooking is all about having fun in the kitchen and making memories—just like those summer afternoons I spent with Grandma Bea!
FAQs and Troubleshooting
1. My cake is too dense. What went wrong?
Sometimes it’s easy to overmix your batter. Make sure you mix just until combined, as overmixing can lead to a denser cake.
2. How can I store leftovers?
You can store leftovers in the fridge for up to 3 days! Just cover them tightly with plastic wrap to keep them fresh, but note that the cake may become a bit soggy.
3. The mousse didn’t set properly; what happened?
Make sure your cream was cold when you whipped it. Additionally, overwhipping can cause the cream to turn grainy or curdled instead of fluffy.
4. Can I make these trifles in advance?
Absolutely! They can be made a few hours ahead of serving and stored in the fridge. Just be sure to add any garnishes right before serving for the freshest taste!
Nutritional Info
While indulging in treats is part of life, it’s good to note the nutritional info for those who are keeping an eye on it! Here’s a rough estimate for one serving (1 trifle):
- Calories: Approximately 350-400
- Protein: 5g
- Fat: 20g
- Carbohydrates: 45g
- Sugar: 30g
Now, keep in mind, these values can vary based on specific ingredient choices and serving sizes.
Final Thoughts
There you have it—your guide to creating refreshing and delightful Summer Peach Mousse Trifles that will wow your family and friends. I hope you feel as inspired as I do whenever I whip up this dessert. The joy of cooking lies in sharing flavors, stories, and love through food.
Next time you bite into this peachy mousse goodness, let it remind you of sunlit summer days, laughter, and the simple pleasure of good company. So grab your peaches, gather your loved ones, and let’s celebrate the irresistible flavors of summer. Until next time, happy cooking and may your kitchen always be filled with warmth and wonderful aromas!
Print
Summer Peach Mousse Trifles
- Total Time: 45 minutes
- Yield: 4 servings 1x
- Diet: Vegetarian
Description
A delightful layered dessert featuring fresh peaches, cake and whipped cream, perfect for summer gatherings.
Ingredients
- 2 cups fresh peaches, diced
- 1 box yellow cake mix
- 3 eggs
- 1/3 cup vegetable oil
- 1 cup water
- 1 cup heavy whipping cream
- 1/4 cup powdered sugar
- 1 teaspoon vanilla extract
Instructions
- Preheat the oven to 350°F (180°C) and grease your cake pan.
- Combine the cake mix, eggs, vegetable oil, and water in a mixing bowl and beat for 2 minutes until smooth.
- Pour the batter into the greased pan and bake according to package instructions, about 28-30 minutes.
- Cool the cake completely before transferring it to a wire rack.
- Whip the heavy cream until soft peaks form. Add the powdered sugar and vanilla, and continue beating until stiff peaks form.
- Fold in the diced peaches into the whipped cream gently.
- Cut the cooled cake into squares and layer in serving glasses with peach mousse.
- Top with a dollop of mousse and a slice of peach or mint if desired.
Notes
Make ahead of time and store in the fridge for a few hours before serving for best results.
- Prep Time: 15 minutes
- Cook Time: 30 minutes
- Category: Dessert
- Method: Layering
- Cuisine: American
Nutrition
- Serving Size: 1 serving
- Calories: 350
- Sugar: 30g
- Sodium: 200mg
- Fat: 20g
- Saturated Fat: 10g
- Unsaturated Fat: 8g
- Trans Fat: 0g
- Carbohydrates: 45g
- Fiber: 2g
- Protein: 5g
- Cholesterol: 60mg
Keywords: peach mousse, summer dessert, trifles, layered dessert, fresh peaches, easy dessert

Yogurt Cake
A Delightful Journey into Yogurt Cake: Your New Favorite Dessert
Hey friends! Beau here, and today we’re diving into something incredibly special—Yogurt Cake. If you’re searching for a dessert that’s not just sweet, but also a little tangy, super moist, and quite forgiving for us home cooks, you’ve stumbled into the right recipe! This cake isn’t just another dessert; it’s a nostalgic treasure that carries the essence of laid-back afternoons, laughter, and the warmth of home.
You might be wondering, why yogurt? Well, let me tell you: yogurt is a magical ingredient. Its natural moisture adds a luxurious softness to cakes, while that slight tanginess balances the sweetness perfectly. Plus, it brings a wealth of health benefits to our humble dessert, making it feel like a win-win in the kitchen.
Picture this: a thick slice of golden Yogurt Cake resting on your favorite plate, the fork gently sinking in, revealing a fluffy crumb that’s just begging for a cup of tea or coffee on the side. Trust me; this cake is more than just a snack; it’s a hug on a plate! So, tie on that apron, and let’s embark on this delicious adventure together.
Why is Yogurt Cake becoming a go-to for so many home chefs like us? It’s versatile, easy to customize, and doesn’t demand a lot of special equipment or time. Plus, it’s the perfect canvas for seasonal fruits, spices, or a drizzle of icing. So let’s roll up our sleeves and create something wonderful that’s going to impress not just your taste buds but also anyone you’ll share it with!
Personal Story
Ah, the memories tied to Yogurt Cake are some of my favorites. I remember standing on a stool in my grandmother’s kitchen, eyes wide with excitement, while she measured ingredients for her famous cake. The air was filled with the comforting aroma of vanilla and citrus zest. Every Sunday, like clockwork, we’d whip up a batch together, and I’d sneak spoonfuls of the yogurt mixture when she wasn’t looking (sorry, Grandma!).
One rainy afternoon stands out particularly in my mind. After a long day of exploring the neighborhood puddles, I came home soaked but bursting with energy. My grandmother greeted me with a warm slice of Yogurt Cake and a tall glass of milk. That moment felt like pure magic; with every bite, I felt comforted and content as we chatted about everything and nothing over the soft, fluffy cake.
As I grew up, I began to make this cake for friends and family alike, adding my twist while keeping my grandmother’s fundamental lessons alive. It’s funny how a dish can carry so much love and nostalgia, uniting us across generations. So let’s share that joy! If I can bring a bit of that warmth into your kitchen, my job here is done. Now, let’s get those ingredients ready!
Ingredients
Before we jump into the magical world of mixing and baking, let’s gather our ingredients. Here’s what we’ll need for our Yogurt Cake:
-
1 cup plain yogurt
Yogurt is the star of our show! A thicker yogurt (like Greek) will yield a denser cake, while regular will keep it lighter. If you’re looking for dairy-free options, try using coconut yogurt! -
3 large eggs
Eggs give the cake structure and moisture. For a vegan substitute, you can use flax eggs (1 tablespoon of ground flaxseed + 2.5 tablespoons of water, set aside for 5 minutes). -
1 cup granulated sugar
This sweetens our cake and helps create that beautiful crust as it bakes. If you prefer, you can replace white sugar with coconut sugar for a hint of caramel flavor. -
1/2 cup vegetable oil (or melted butter)
This fat keeps our cake moist. You can substitute with melted coconut oil for a delicious twist or use applesauce for a healthier option. -
1 teaspoon vanilla extract
A splash of vanilla enhances the flavor, but feel free to get creative with almond extract or citrus zest for a unique spin. -
2 cups all-purpose flour
The base of our cake, providing structure. If you want a gluten-free version, try a gluten-free flour blend. -
2 teaspoons baking powder
This is our rising agent, creating those fluffy textures. Always double-check your baking powder for freshness! -
1/2 teaspoon salt
A little salt balances the sweetness and enhances flavors across the board.
Using these ingredients, let’s create something truly comforting and delightful.
Step-by-Step Instructions
Now that we’ve got all of our ingredients ready, let’s get our hands dirty! Here’s how to make the perfect Yogurt Cake.
Step 1: Preheat and Prep
Start by preheating your oven to 350°F (175°C). While that’s warming up, grease a 9-inch round cake pan (or line it with parchment paper) to prevent any sticky situations later.
Chef Tip: I love using cooking spray for the corners of my cake pans—those pesky edges can be tricky!
Step 2: Mix Your Wet Ingredients
In a large bowl, whisk together your yogurt, eggs, sugar, and oil until smooth and creamy. This is the stage to really get that good arm workout in!
Chefs Insight: Whisking not only mixes but also incorporates air, helping our cake rise beautifully.
Step 3: Combine Dry Ingredients
In another bowl, sift together the flour, baking powder, and salt. Sifting helps eliminate lumps and creates a lighter texture.
Chefs Tip: You can whisk the dry ingredients to combine them well; no need for extra bowls if you’re like me and hate the dishes!
Step 4: Bring It Together
Now, gently fold your dry mixture into your wet mixture using a rubber spatula. Be careful not to overmix—this can lead to a dense cake. We want light and fluffy!
Chef Hack: If you see a few flour streaks, that’s okay! They will sort themselves out as you mix.
Step 5: Pour and Bake!
Pour the batter into your prepared cake pan, ensuring it’s evenly distributed. Pop it into that preheated oven and bake for about 30–35 minutes, or until a toothpick inserted in the center comes out clean.
Tip for Success: It’s always a good idea to start checking around the 25-minute mark if your oven runs hot!
Step 6: Cool Down
Once baked, remove the cake from the oven and let it cool in the pan for 10 minutes. Then, transfer it to a wire rack to cool completely.
Chef’s Note: This is the perfect moment to whip up some tea or coffee—trust me, you’re going to need it!
Serving Suggestions
Serving your Yogurt Cake can be as simple or as fancy as you like! Dust the cooled cake with powdered sugar for a classic look, or drizzle a simple glaze made of powdered sugar and lemon juice for a zesty kick.
For an elevated experience, consider topping it with fresh berries, mint leaves, or even a dollop of whipped cream for a touch of elegance. If you’re feeling adventurous, serve warm slices with a scoop of vanilla ice cream for dessert perfection.
Chef Tip: Plate it up on your favorite colorful dishware—it makes a world of difference in presentation!
Recipe Variations
The beauty of Yogurt Cake lies in its versatility. Here are some fun twists you can explore:
-
Lemon Yogurt Cake: Add the zest of one lemon to the batter and replace some of the yogurt with freshly squeezed lemon juice for a refreshing punch.
-
Berry Swirl Yogurt Cake: Gently fold in fresh berries like blueberries or raspberries right before you pour it into the baking pan. Think painterly swirls of fruit color throughout!
-
Chocolate Chip Yogurt Cake: Fold in 1/2 cup of semi-sweet or dark chocolate chips into the batter for a decadent treat.
-
Coconut Yogurt Cake: Add shredded coconut to the batter for a tropical twist. You can also top it with toasted coconut flakes for extra texture.
-
Spiced Yogurt Cake: Incorporate warm spices like cinnamon or nutmeg to elevate the flavor profile. A pinch goes a long way!
Chef’s Notes
It’s wild how one recipe can evolve over time, much like our taste preferences. I’ve made this Yogurt Cake countless times, and every version adds a new memory and twist to the original. I recall one lovely summer afternoon, a dear friend attempted to bake it alongside me, which promptly turned into a flour fight! But at the end of that chaotic day, we had the most delightful, albeit slightly uneven, Yogurt Cake. It turned out perfectly imperfect!
Each time I bake this, I remember those golden moments—laughter echoing through the kitchen, and the aroma wafting through the air feels like a warm hug from my grandmother, reminding me that cooking is about love and connection, not perfection.
FAQs and Troubleshooting
Let’s tackle some common questions that arise when trying to whip up the perfect Yogurt Cake.
Q1: My cake didn’t rise! What went wrong?
A: This could happen if your baking powder is expired or you overmixed the batter. Always check your leavening agents for freshness!
Q2: Can I use flavored yogurt?
Absolutely! However, be cautious with fruity or super sweet flavors as they can alter the overall balance of your cake.
Q3: Why is my cake too dry?
A: Overbaking is usually the culprit or possibly using too much flour. Remember to measure your flour accurately and check on that cake early!
Q4: Can I freeze this cake?
Yes! Just wrap it tightly in plastic wrap and then foil to prevent freezer burn. It will last for up to three months.
Nutritional Info
While it’s tempting to focus on the deliciousness of this recipe, it’s also good to know what we’re putting into our bodies. A typical slice of Yogurt Cake (about 1/12 of the cake) contains approximately:
- Calories: 220
- Total Fat: 8g
- Saturated Fat: 1.5g
- Cholesterol: 35mg
- Sodium: 150mg
- Carbohydrates: 34g
- Fiber: 1g
- Sugars: 14g
- Protein: 4g
This nutritional breakdown can fluctuate based on variations, so feel free to adjust based on your dietary needs. Just remember: moderation is key!
Final Thoughts
And there you have it, my kitchen companions—your very own, scrumptious Yogurt Cake ready to warm hearts and fill bellies! I hope you enjoy every slice as much as I do. Nothing compares to seeing family and friends gather around, smiles on their faces, indulging in something homemade with love.
Take these recipes and make them your own; that’s what cooking is all about! Explore flavors, experiment with toppings, and remember that every cake tells a story. I can’t wait to hear about your adventures in the kitchen and how this Yogurt Cake becomes a staple in your home!
So go on, cut yourself a slice, pour that drink, and relish the feeling of creating something beautiful. Until next time, happy cooking, and may your kitchen be filled with warmth, laughter, and lots of delicious memories! 🍰✨
Print
Yogurt Cake
- Total Time: 50 minutes
- Yield: 12 servings 1x
- Diet: Vegetarian
Description
A moist and tangy Yogurt Cake that is easy to make and perfect for any occasion.
Ingredients
- 1 cup plain yogurt
- 3 large eggs
- 1 cup granulated sugar
- 1/2 cup vegetable oil (or melted butter)
- 1 teaspoon vanilla extract
- 2 cups all-purpose flour
- 2 teaspoons baking powder
- 1/2 teaspoon salt
Instructions
- Preheat your oven to 350°F (175°C). Grease a 9-inch round cake pan.
- Whisk together your yogurt, eggs, sugar, and oil until smooth and creamy.
- Sift together the flour, baking powder, and salt in another bowl.
- Fold your dry mixture into your wet mixture gently with a rubber spatula.
- Pour the batter into the prepared cake pan and bake for about 30–35 minutes.
- Let cool in the pan for 10 minutes, then transfer to a wire rack to cool completely.
Notes
Serve with powdered sugar, fresh berries, or whipped cream for an enjoyable treat.
- Prep Time: 15 minutes
- Cook Time: 35 minutes
- Category: Dessert
- Method: Baking
- Cuisine: American
Nutrition
- Serving Size: 1 slice
- Calories: 220
- Sugar: 14g
- Sodium: 150mg
- Fat: 8g
- Saturated Fat: 1.5g
- Unsaturated Fat: 5.5g
- Trans Fat: 0g
- Carbohydrates: 34g
- Fiber: 1g
- Protein: 4g
- Cholesterol: 35mg
Keywords: cake, yogurt cake, dessert, easy dessert, baking
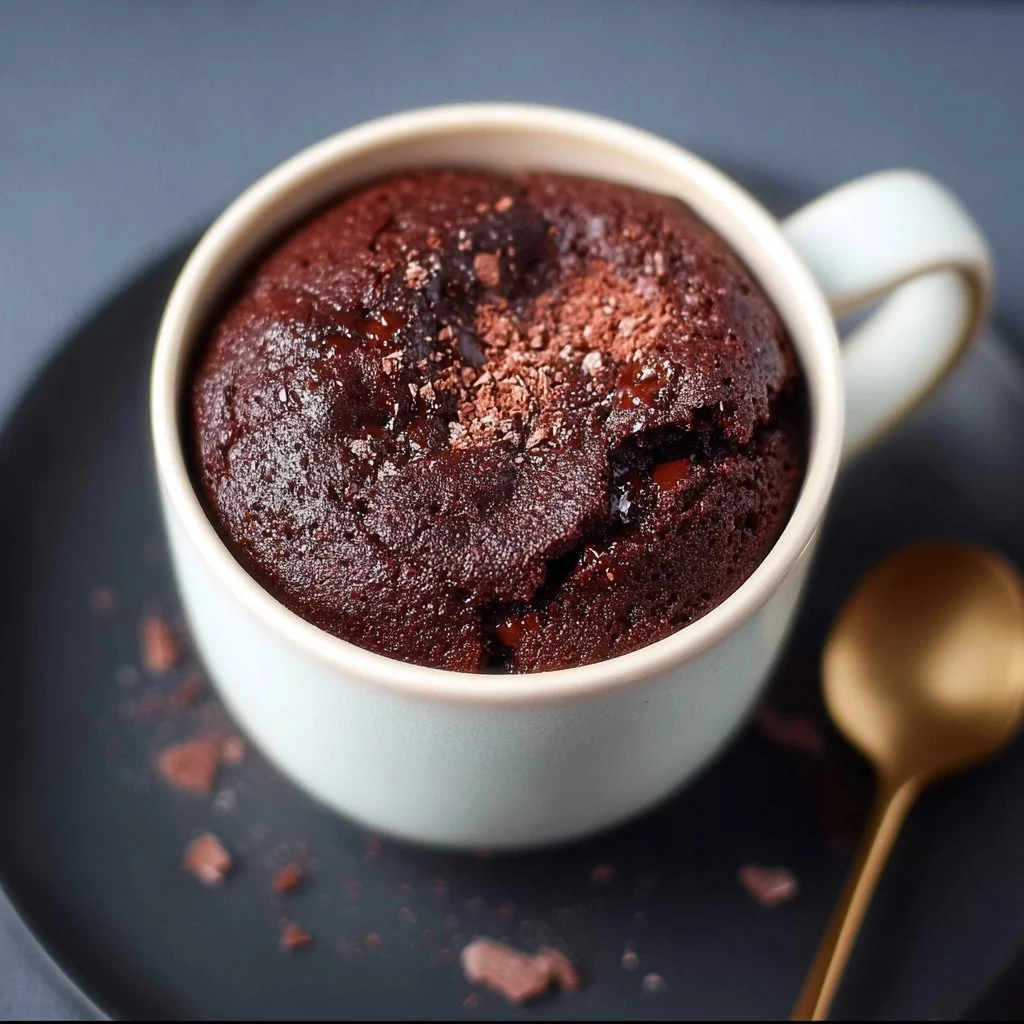
99 Calorie Chocolate Mug Cake
99 Calorie Chocolate Mug Cake: Your Go-To Sweet Escape!
Hey there, fellow foodie! 🎉 Are you ready to embark on a simple yet satisfying kitchen adventure? If you’re looking for a quick dessert that’s delightfully rich without the guilt, you’ve landed in the right spot! Today, we’re diving into the world of chocolatey goodness with a recipe that’ll have you smiling from ear to ear: the 99 Calorie Chocolate Mug Cake.
This decadent creation is like a hug in a cup, perfect for those late-night cravings or when you want to treat yourself without derailing your health goals. It’s quick, delicious, and made with wholesome ingredients that make it a guilt-free indulgence. Plus, it takes just minutes from start to finish—all you need is a mug, a microwave, and a sprinkle of love!
Now, I know what you might be thinking: "Can I really make a cake in a mug?" Absolutely! Mug cakes are the modern marvel of the culinary world. They capture that homemade charm without all the fuss. You can whip up this delightful treat in under five minutes, and that means more time to kick back and enjoy your well-deserved reward. So, grab your favorite mug, and let’s get baking!
Personal Story
Ah, mug cakes bring back some sweet memories for me! I remember one rainy afternoon when I was a teenager, stuck at home and craving something sweet. My mom, who was never one to keep desserts around, decided it was time for an impromptu baking session. We rummaged through the pantry and discovered a half-empty bag of cocoa powder and a collection of mismatched mugs. It felt like a culinary treasure hunt!
We mixed up the ingredients right there in a big old mug—definitely a “kitchen mishmash” sort of affair. As the mug cake puffed up in the microwave, our kitchen filled with the aroma of rich chocolate. It turned out heavenly, brightening up that dreary day. That experience sparked my love for easy, comforting desserts, and now I cherish the opportunity to share that spirit with all of you!
Ingredients
Let’s take a closer look at the ingredients we’ll be using for our 99 Calorie Chocolate Mug Cake. Each one plays a vital role in creating that soft, gooey goodness we crave:
-
2 tbsp plain/all-purpose flour: This is the base of our mug cake. It gives it structure! If you’re gluten-free, you can substitute it with almond flour or a gluten-free all-purpose blend.
-
1 tbsp unsweetened cocoa powder: This is where our chocolatey flavor comes from! For a deeper flavor, try using dark cocoa powder.
-
2 tbsp stevia or 0-calorie granulated sweetener: We want that sweetness without the extra calories! Choose your favorite no-calorie sweetener. Be cautious with the measurement if you’re using something more potent, like monk fruit sweetener.
-
¼ tsp baking powder: This little powerhouse gives our cake that lovely fluffiness. No substitutes are necessary here—just stick to the recipe!
-
½ tsp olive oil or oil of choice: This adds moisture! You can switch it out for coconut oil if you prefer a more tropical flavor.
-
3 tbsp unsweetened almond milk: A perfect way to add moisture without too many calories. You can replace it with any dairy milk or oat milk if you wish.
-
1-2 g chocolate chips (optional): For those moments when you want an extra chocolatey kick! Go wild—use dark chocolate chips, white chocolate, or even some carob chips for a unique twist.
With these ingredients in hand, we’re on our way to mug cake bliss!
Step-by-Step Instructions
Now, let’s get into the nitty-gritty of creating our 99 Calorie Chocolate Mug Cake! Follow these simple steps to achieve chocolatey perfection:
-
Gather Your Ingredients: Before you start, make sure you have all your ingredients ready. There’s nothing worse than realizing you forgot to grab the cocoa powder halfway through the process!
-
Mix Dry Ingredients: In your favorite microwave-safe mug, combine the flour, cocoa powder, stevia, and baking powder. Give it a good whisk with a fork until everything is well combined. This is where the magic begins!
-
Add the Wet Ingredients: Pour in the olive oil and almond milk into your dry mix. Stir well again until everything is nicely incorporated. The batter should be smooth and thick—just like the richness of a classic chocolate cake!
-
Optional Chocolate Chips: If you can’t resist, now is the time to fold in chocolate chips. Trust me, they’ll melt delightfully in the microwave, creating pockets of gooey joy in each bite.
-
Microwave Magic: Place your mug in the microwave and cook on high for about 1 minute. Keep an eye on it; microwaves may vary in power. You’re aiming for it to puff up and look set on the edges but slightly soft in the middle. Don’t overcook—it’s meant to be moist!
-
Cool It Down (Just a Bit): Once done, let your cake cool for a moment before devouring. It will be super hot when it comes out!
-
Top it Off (Optional): If you’re feeling fancy, drizzle a little more almond milk on top for a creamy finish or sprinkle some extra chocolate chips for good measure.
And there you have it! Your very own chocolate mug cake, ready to be enjoyed.
Serving Suggestions
How you serve your 99 Calorie Chocolate Mug Cake can elevate the experience even further! Here are my favorite serving suggestions:
-
Add Fresh Berries: Garnish your cake with a handful of fresh raspberries or strawberries for a pop of color and freshness. The tartness of the fruit complements the richness of the chocolate.
-
Whipped Cream: A dollop of low-calorie whipped cream is a delightful addition! It adds a creaminess that makes each bite even more indulgent.
-
Ice Cream Surprise: For the ultimate treat, throw a scoop of vanilla or mint chocolate chip ice cream on top while it’s still warm. The melting contrast is to die for!
-
Nut Butter Drizzle: If you’re a nut butter fan, adding a drizzle of almond or peanut butter on top brings a savory component that balances the sweet.
No matter how you choose to enjoy it, this mug cake is sure to impress!
Recipe Variations
Feeling adventurous? Here are some creative twists and variations to make this mug cake your own:
-
Mint Chocolate Mug Cake: Add a drop of peppermint extract along with your wet ingredients for a refreshing kick. Perfect for mint lovers!
-
Spiced Option: Sprinkle in a bit of cinnamon or cayenne pepper for a spicy chocolate twist. It adds such a delightful warmth!
-
Lavender Infusion: Try incorporating a few drops of food-grade lavender extract for a floral note that’s unexpected and wonderful.
-
Nutty Mug Cake: Mix in finely chopped nuts or a spoonful of nut butter in the batter for added texture and flavor. Almonds and hazelnuts work beautifully.
-
Protein-Packed: Substitute some of the flour with protein powder to create a mug cake that’s not only delicious but also power-packed!
Chef’s Notes
Ah, this recipe has evolved over the years! I first stumbled upon the idea of mug cakes during my baking experiments with friends. We were all trying to create healthier versions of our favorite desserts without sacrificing taste. This recipe stands out as my go-to, and I love how forgiving it is for less seasoned cooks. You can experiment and substitute almost any ingredient, which makes it a fun kitchen playground.
Funny story: the first time I made it, I got so excited about the idea that I accidentally mixed in salt instead of stevia! Let’s just say the result was not what I’d hoped for. But hey, that’s what the kitchen is all about—learning and growing!
FAQs and Troubleshooting
Here are some questions I often hear about mug cakes, along with some helpful solutions:
-
Why did my mug cake overflow?
- Every microwave is different! To prevent overflow, make sure you don’t overfill your mug and keep an eye on the cooking time. Remember, it puffs up as it cooks!
-
Can I use different sweeteners?
- You bet! Just remember that the sweetness can vary; start with a little less if you’re using a new sweetener, and adjust to taste.
-
It turned out dry; what did I do wrong?
- That might be due to overcooking. Lean towards the undercooked side, as it continues to cook a bit even after you take it out.
-
Can I double the recipe?
- I wouldn’t recommend it in one mug, as it may not cook evenly. Instead, make one mug cake per mug for best results.
Nutritional Info
Let’s break down the nutrition for our 99 Calorie Chocolate Mug Cake! This recipe is not only delicious but also health-conscious:
- Calories: 99
- Carbohydrates: 14-15g (depending on sweetener)
- Protein: 2-3g
- Fat: 3-5g (depends on the oil)
- Fiber: 1g (thanks to the cocoa powder and flour!)
This mug cake is a great option when you want to indulge without feeling guilty. Plus, it’s lower in sugar than traditional cakes, which is a huge win!
Final Thoughts
Whether it’s a cozy evening in or a quick treat after a long day, this 99 Calorie Chocolate Mug Cake is the perfect little indulgence to have up your sleeve. It embodies the joy of cooking—simple, rewarding, and just plain fun!
I hope this recipe sparks happiness in your kitchen and brings back fond memories like it has for me. Remember, cooking is all about creativity and sharing joy with those around you. So don’t be shy—experiment with this recipe, and make it uniquely yours.
Now, go grab that mug, and let’s make some magic happen! Happy baking! 🍫✨
Print
99 Calorie Chocolate Mug Cake
- Total Time: 6 minutes
- Yield: 1 serving 1x
- Diet: Vegetarian
Description
A quick and satisfying dessert that’s rich in chocolate flavor but low in calories, perfect for late-night cravings.
Ingredients
- 2 tbsp plain/all-purpose flour
- 1 tbsp unsweetened cocoa powder
- 2 tbsp stevia or 0-calorie granulated sweetener
- ¼ tsp baking powder
- ½ tsp olive oil or oil of choice
- 3 tbsp unsweetened almond milk
- 1–2 g chocolate chips (optional)
Instructions
- Gather Your Ingredients: Before you start, make sure you have all your ingredients ready.
- Mix Dry Ingredients: In a microwave-safe mug, combine the flour, cocoa powder, stevia, and baking powder. Whisk until well combined.
- Add the Wet Ingredients: Pour in the olive oil and almond milk into your dry mix. Stir well until the batter is smooth and thick.
- Optional Chocolate Chips: Fold in chocolate chips if desired.
- Microwave Magic: Place your mug in the microwave and cook on high for about 1 minute. Don’t overcook!
- Cool It Down: Let your cake cool briefly before enjoying.
- Top it Off: Drizzle some almond milk or sprinkle extra chocolate chips if you like.
Notes
Stir well to prevent lumps in the batter. Adjust cooking time as needed based on microwave wattage.
- Prep Time: 5 minutes
- Cook Time: 1 minute
- Category: Dessert
- Method: Microwaving
- Cuisine: American
Nutrition
- Serving Size: 1 serving
- Calories: 99
- Sugar: 1g
- Sodium: 210mg
- Fat: 4g
- Saturated Fat: 0.5g
- Unsaturated Fat: 3.5g
- Trans Fat: 0g
- Carbohydrates: 14g
- Fiber: 1g
- Protein: 3g
- Cholesterol: 0mg
Keywords: mug cake, chocolate, dessert, quick dessert, low calorie