Beginner-Friendly Caramelized Apricot Upside-Down Cake
Caramelized Apricot Upside Down Cake: A Sweet Slice of Summer
Introduction
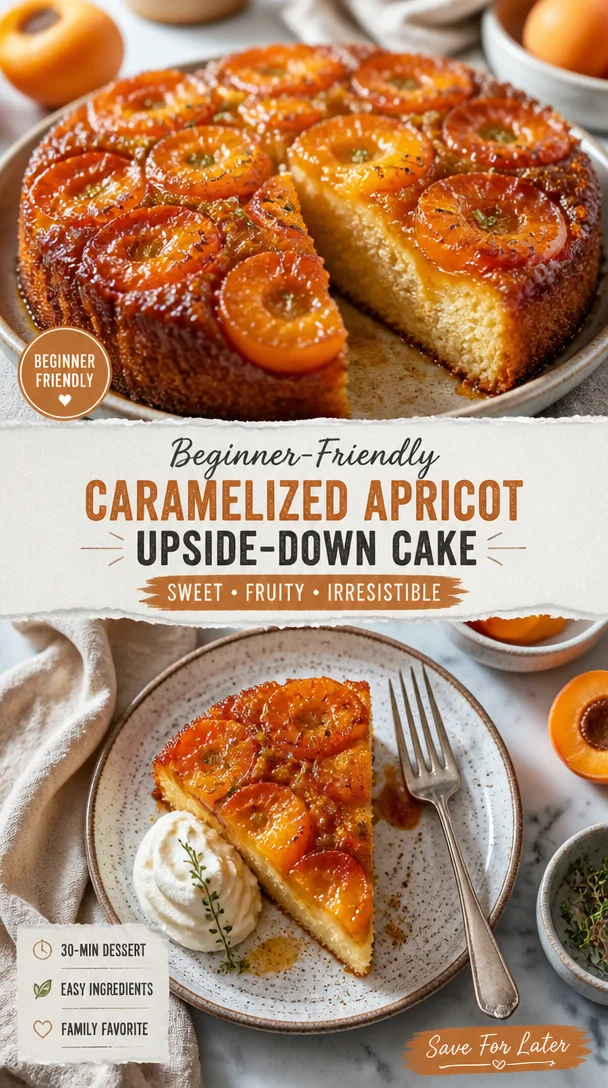
Hey there, fellow food lovers! I’m Beau Collier, and welcome back to Feastical, the cozy corner of the internet where food isn’t just about sustenance – it’s about connection, joy, and a sprinkle of love. Today, we’re going to whip up something that feels like summer on a plate: the delightful Caramelized Apricot Upside Down Cake. Picture this: a fluffy cake layered with golden, juicy apricots, all resting on a luscious caramel sauce. It’s a dessert that not only dazzles the eye but also warms the heart and soul.
What’s really awesome about this cake is the way it wraps you in nostalgia. I can just smell those sweet apricots roasting in the oven, their sugary scent wafting through the kitchen, wrapping around me like my grandmother’s comforting hug. She often made delicious treats with the season’s bounty, and apricots were always her favorite. I can still recall the sound of her mixing bowl as she whisked the ingredients together, the laughter and chatter of family in the background as we awaited our slice of heaven.
Whether you’re looking to impress guests at a summer dinner party or just need a slice of sweet nostalgia at home, this Caramelized Apricot Upside Down Cake will bring smiles all around. With a modest list of ingredients, it’s easy to make, and the end result is absolutely uplifting. So, preheat that oven, and let’s dive into the buttery, fruity world of upside-down cakes together!
Personal Story
Growing up, weekends in my house were always filled with the enticing aroma of baked goods. My mom would often gather us around the kitchen island, ingredients laid out like a painter’s palette. One of her signature desserts was an apricot tart that could make anyone weak in the knees. It was during one of those Saturday afternoons, with flour dusting the countertops and apricots spilling out of the basket like sunny jewels, that I learned the importance of creating something with love. We would work as a team, laughing, tasting, and occasionally sneaking pieces of fruit when we thought nobody was looking.
As I grew older and started to experiment in my own kitchen, I found myself drawn back to those moments. However, I wanted to put my twist on things. That’s when I first tried my hand at an upside-down cake. The idea of caramelizing apricots and watching them transform into a gooey, golden masterpiece was too tempting to resist. From that day forward, this cake became a staple in my kitchen, reminding me of those cherished moments with family. Each slice tastes like nostalgia, happiness, and a dash of sunshine.
Ingredients
Let’s gather the stars of our show! Here’s what you’ll need to create your Caramelized Apricot Upside Down Cake:
-
1 cup brown sugar
The secret to that rich caramel flavor! Brown sugar has molasses, which adds depth and moisture. If you’re in a pinch, you can substitute it with white sugar mixed with a little bit of molasses. -
1/2 cup unsalted butter
Butter adds richness and tenderness to the cake. Unsalted is preferred because it allows you to control the overall saltiness. If you’re looking for a dairy-free option, coconut oil works great here! -
6-8 fresh apricots, halved and pitted
Fresh apricots are the star of this cake, bursting with juicy flavor. If you can’t find fresh apricots, canned ones will do, but make sure they’re packed in juice, not syrup. -
1 1/2 cups all-purpose flour
This is the backbone of our cake. All-purpose keeps it wonderfully fluffy, but if you’d like a gluten-free option, almond flour can make an excellent substitute! -
1 cup granulated sugar
For sweetness and a light texture, granulated sugar helps our cake rise. You can use coconut sugar for a raw alternative, but be aware it might alter the taste slightly. -
1/2 cup milk
Milk adds moisture and enriches the cake. You can swap in almond milk or buttermilk if you prefer or need a lactose-free option. -
2 large eggs
Eggs help bind the ingredients together and act as a leavening agent. If you need a vegan option, try using 1/4 cup of unsweetened applesauce per egg. -
1 teaspoon vanilla extract
Vanilla adds a beautiful aromatic essence. If you’re feeling ambitious, homemade vanilla extract is divine but store-bought works just fine! -
1 teaspoon baking powder
This is our rising agent! Make sure it’s fresh for the best lift. If you’re out, you can mix 1/4 teaspoon baking soda with 1/2 teaspoon vinegar as a substitute. -
1/2 teaspoon baking soda
This works in tandem with baking powder for a beautifully risen cake. If you’re out, just use double the baking powder—easy peasy! -
1/4 teaspoon salt
A pinch of salt enhances all the flavors and balances the sweetness. If you’re on a low-sodium diet, you can reduce it a little, but don’t eliminate it completely.
Step-by-Step Instructions
Now, let’s get into the nitty-gritty of bringing our cake to life!
-
Preheat your oven to 350°F (175°C)
This is the first and most vital step! You want your oven nice and hot so that your cake bakes evenly. Meanwhile, grab your favorite mixing bowl. -
Prepare the caramel layer
In a medium-sized saucepan over medium heat, melt the 1/2 cup of unsalted butter and 1 cup of brown sugar together. Stir constantly until it’s bubbling and smooth—about 3-5 minutes. Don’t wander too far; it can turn from fab to burnt in an instant! Once it’s ready, pour it into the bottom of a greased 9-inch round cake pan. This will be the delicious base that our apricots sit on. -
Arrange the apricots
After pouring the caramel mix into the pan, arrange your halved apricots, cut side down, on top of the caramel. Be fancy about it! You want it to look beautiful because that’s the side your guests will see first once it’s flipped. Plus, the more apricots, the better! -
Mix the batter
In a large bowl, beat together the 2 large eggs, 1 cup of granulated sugar, and 1 teaspoon of vanilla extract until fluffy. This should take about 2 minutes with an electric mixer. Next, add the 1/2 cup of milk and mix until combined. -
Combine the dry ingredients
In a separate bowl, whisk together the 1 1/2 cups of all-purpose flour, 1 teaspoon of baking powder, 1/2 teaspoon of baking soda, and 1/4 teaspoon of salt. Gradually add these dry ingredients to your wet mixture. Mix until just combined – a few lumps are okay. -
Bake your cake
Pour the batter carefully over the apricots in your pan, smoothing it out gently. Bake for 35-40 minutes or until a toothpick inserted comes out clean. The aroma will start to envelop your home, and trust me, you’ll know it’s almost done when that sweet scent fills the air! -
Cool and flip
Once your cake is out of the oven, let it rest in the pan for about 10 minutes. Then, take a large plate and carefully flip it over to reveal the beautiful apricot caramelized layer. Be cautious—the caramel will be hot! -
Serve warm or at room temperature
Enjoy your cake warm, perhaps with a scoop of vanilla ice cream or a dollop of whipped cream. It’s a heavenly combination that takes this dessert to the next level!
Serving Suggestions
Now that your Caramelized Apricot Upside Down Cake is on display, how do we serve it up nicely? Consider drizzling honey or a little heavy cream over each slice for an extra splash of indulgence! A sprinkle of powdered sugar can also elevate the dessert’s presentation, giving it that bakery-fresh feel. If you want to bring in some contrast, serve a dollop of tart Greek yogurt on the side—it pairs wonderfully with the sweetness of the apricots.
For those summer backyard gatherings, you could even serve the cake on a wooden cutting board surrounded by fresh apricots and fragrant mint leaves for a beautiful touch. This not only looks stunning but also invites your guests to dig in and enjoy.
Recipe Variations
-
Berry Blast: Swap out some of the apricots for fresh berries like blueberries or raspberries. The tartness works beautifully with the sweet caramel.
-
Nutty Crunch: Add in 1/2 cup of chopped walnuts or pecans to the batter for some added texture. The nuttiness will enhance the flavor profile!
-
Zesty Twist: Add a tablespoon of lemon or orange zest in with your wet ingredients to brighten the flavor—a little zing goes a long way.
-
Spiced Up: Try stirring in a teaspoon of cinnamon or nutmeg for a warm, cozy flavor, especially perfect for fall gatherings.
-
Gluten-Free Delight: Substitute the all-purpose flour with a gluten-free blend and make sure that your baking powder is certified gluten-free.
Chef’s Notes
Every recipe tells a story, and this one is no exception. I’ve made this cake for countless family gatherings, and it’s never failed to impress. One time, I experimented by swapping apricots with peaches, and though it was delicious, nothing quite captures the spirit of summer for me like the apricot version. Life in the kitchen is all about learning and adapting, and there’s always room for improvisation. I encourage you to put your flair into this recipe! After all, cooking is about making it your own while savoring every moment.
FAQs and Troubleshooting
Q: My cake sank in the middle. What happened?
A: This usually happens due to overmixing the batter or opening the oven too early. Ensure that your ingredients are at room temperature, and don’t peek until it’s almost done!
Q: Can I use frozen apricots?
A: Yes! Just be sure to thaw and drain them properly beforehand. They may release some moisture, so you might want to reduce the milk slightly.
Q: How do I store leftovers?
A: Store leftovers in an airtight container in the refrigerator for up to 3 days. You can reheat individual slices in the microwave for a delicious warm dessert!
Q: Can I make this ahead of time?
A: Absolutely! You can prepare the caramel and arrange the apricots ahead of time, then mix the batter right before you’re ready to bake!
Nutritional Info
Each slice of this Caramelized Apricot Upside Down Cake is not just a treat for the taste buds but also packs a nutritional punch. With real fruits, healthy fats from butter, and quality sugars, it can be a delightful addition to a balanced diet. In moderation, enjoy all the goodness that comes with fresh apricots – full of vitamins A and C, as well as dietary fiber. Of course, since it is a dessert, it is best to enjoy it occasionally as part of a varied diet. The sweetness and fruitiness can satisfy any dessert craving without the guilt—just remember to share!
Final Thoughts
As we wrap up our time together today, I hope you feel inspired to grab those apricots and head to the kitchen. Making Caramelized Apricot Upside Down Cake isn’t just about the end result—it’s about the joy of baking, the love you put into it, and the stories you’ll share over each slice. So, whether you’re gathering with family, enjoying a quiet evening alone, or throwing an epic summer barbecue, remember that food is best shared.
Here’s to many delicious moments ahead, filled with laughter, love, and of course, wonderful food. Until next time, happy baking! Don’t forget to experiment, have fun, and let your kitchen be a haven of tasty exploration. Can’t wait to hear your own stories and see photos of your beautiful cakes! Dig in, my friends!
Print
Caramelized Apricot Upside Down Cake
- Total Time: 55 minutes
- Yield: 8 servings 1x
- Diet: Vegetarian
Description
A fluffy upside-down cake layered with golden apricots and luscious caramel sauce, perfect for summer gatherings.
Ingredients
- 1 cup brown sugar
- 1/2 cup unsalted butter
- 6–8 fresh apricots, halved and pitted
- 1 1/2 cups all-purpose flour
- 1 cup granulated sugar
- 1/2 cup milk
- 2 large eggs
- 1 teaspoon vanilla extract
- 1 teaspoon baking powder
- 1/2 teaspoon baking soda
- 1/4 teaspoon salt
Instructions
- Preheat your oven to 350°F (175°C).
- Prepare the caramel layer by melting butter and brown sugar in a saucepan.
- Pour the caramel mix into a greased pan and arrange the apricots cut side down.
- Mix the wet ingredients: eggs, granulated sugar, and vanilla extract until fluffy.
- Add milk to the wet mixture and combine.
- Combine the dry ingredients and add them to the wet mixture.
- Pour the batter over the apricots in the pan and smooth it out.
- Bake for 35-40 minutes until a toothpick comes out clean.
- Cool for 10 minutes before flipping onto a plate.
- Serve warm or at room temperature with ice cream or whipped cream.
Notes
Consider drizzling honey or heavy cream on top for an extra indulgence.
- Prep Time: 15 minutes
- Cook Time: 40 minutes
- Category: Dessert
- Method: Baking
- Cuisine: American
Nutrition
- Serving Size: 1 slice
- Calories: 350
- Sugar: 30g
- Sodium: 200mg
- Fat: 15g
- Saturated Fat: 8g
- Unsaturated Fat: 5g
- Trans Fat: 0g
- Carbohydrates: 50g
- Fiber: 2g
- Protein: 4g
- Cholesterol: 80mg
Keywords: apricot cake, upside down cake, summer dessert, caramel dessert, baking, family recipe
Apricot Buckle
Hey there, foodie friends! 🌟 Today, we’re diving into the sweet, sun-kissed world of apricots with a delightful dish that’s bound to become a superstar in your kitchen: Apricot Buckle! This cozy, comforting dessert is like a warm hug after a long day, and I can’t wait to share my love for it with you.
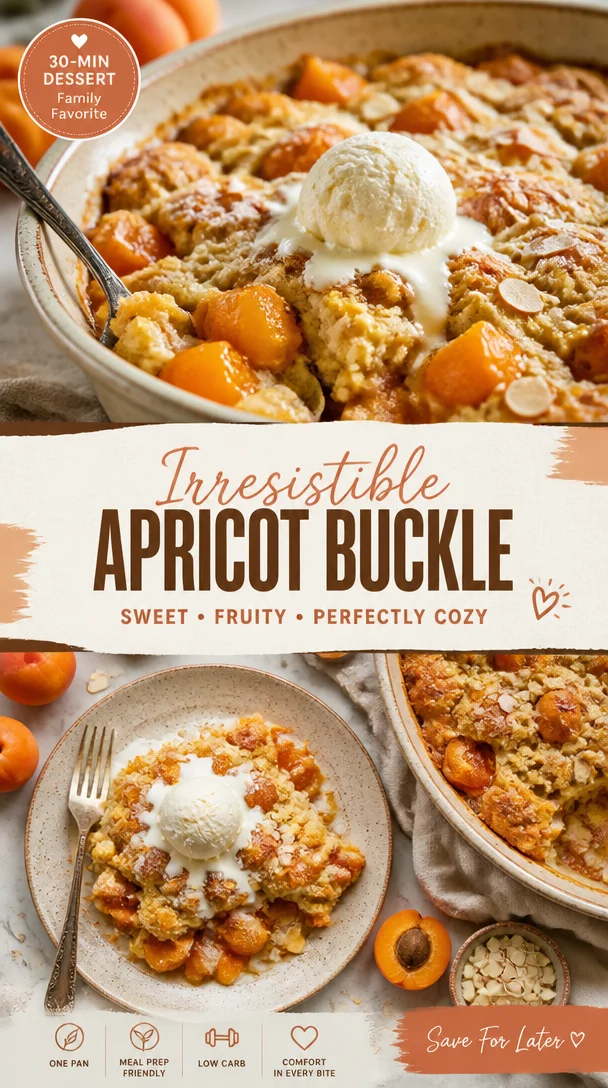
Now, if you’re wondering what a "buckle" is, it’s actually a type of fruit dessert that features a delicious cake base topped with fresh fruit— in this case, juicy apricots. As it bakes, the cake puffs around the fruit, creating a lovely buckled effect. With every bite, you’ll be treated to a perfect harmony of tender cake and sweet-tart apricot goodness.
Why do I love this dessert so much? It takes me right back to my childhood summers spent in my grandmother’s kitchen. She had an apricot tree in her backyard, and let me tell you, those fruits were little jewels of summer delight! We’d pick them fresh, their sweet fragrance mingling with the warm air, and turn them into something wonderful. Apricot Buckle was one of her signature recipes. The smell of it baking would draw everyone to the kitchen like moths to a flame.
So, if you’re ready to bring a bit of that nostalgia and a whole lot of deliciousness into your home, gather your apricots and let’s get baking! This dish is perfect for gatherings, cozy nights in, or just because you deserve a treat.
Personal Story
Let me paint a picture for you. It’s a sunny afternoon, and I’m around ten years old, running barefoot through my grandmother’s backyard. The grass prickles under my feet as I dash toward the apricot tree, its branches heavy with ripe, golden fruits. My grandma calls to me, “Beau! Come help me pick some apricots!” Those words spark pure joy within me!
Armed with a basket, we harvest bags of these plump beauties, laughter ringing through the air. Once we have our haul, we head into her warm kitchen, where the sunny light streams through the window, illuminating flour clouds and the tantalizing smell of vanilla.
Grandma would retreat into her calming rhythm, her hands dancing through the motions as she whipped up the batter for her famous Apricot Buckle. As the cake baked, we’d sneak bites of the raw apricot and giggle about the sticky sweetness. Nothing compared to the first slice pulled from the oven, still warm, with buttery crumbs and chunky apricot pieces. It’s a memory I cherish deeply, one that belongs to a simpler time when love was the main ingredient in every dish.
Ingredients
Here’s what you’ll need to capture that magical Apricot Buckle experience:
-
Fresh Apricots (about 2 cups): The star of the show! Juicy and sweet-tart, they’ll provide a burst of flavor. If fresh apricots aren’t available, try using canned in syrup—just drain them well.
-
All-Purpose Flour (2 cups): A good base for any cake, giving it structure. You can substitute with a gluten-free blend if you’re avoiding gluten.
-
Granulated Sugar (1 cup): This adds sweetness. For a healthier twist, feel free to use coconut sugar or a sugar substitute like monk fruit.
-
Unsalted Butter (1/2 cup or 1 stick): For tenderness and flavor. If you’re after a dairy-free version, coconut oil or a vegan butter can do the trick.
-
Baking Powder (2 teaspoons): The leavening agent to help your buckle rise and give it a light texture.
-
Salt (1/2 teaspoon): Just a pinch to balance the sweetness! Consider using sea salt for a more nuanced flavor.
-
Eggs (2 large): These bind the ingredients and add moisture. To make this vegan, you can use flax eggs (1 tablespoon ground flaxseed mixed with 2.5 tablespoons water per egg).
-
Milk (1/2 cup): For moisture and richness. You can opt for any milk—dairy, almond, oat… you name it!
-
Vanilla Extract (1 teaspoon): The secret ingredient that amplifies the flavors! A splash of almond extract can be a delightful alternative as well.
-
Optional Topping: Cinnamon Sugar: A mix of sugar and cinnamon for a delightful topping—isn’t that a cozy touch?
Easy peasy, right? Just a few staple ingredients, and you’ll be halfway to dessert heaven!
Step-by-Step Instructions
Alright, let’s get baking! Here’s how to create the most scrumptious Apricot Buckle, without a hitch:
-
Preheat Your Oven: Start by preheating your oven to 375°F (190°C). A hot oven is essential to getting that beautiful, golden-brown crust.
-
Prep Your Pan: Grease a 9×9-inch baking dish or an 8×8-inch square pan with butter or cooking spray. This will ensure that your buckle slides out easily when it’s time to serve.
-
Prepare the Apricots: Wash the apricots thoroughly. Slice them in half and remove the pits. If you’re feeling adventurous, cut each half into quarters for more bite-sized pieces and set them aside.
-
Make the Cake Batter:
- In a large mixing bowl, cream together the softened butter and sugar until light and fluffy. This should take about 3–5 minutes. (Chef tip: The fluffier the butter-sugar mixture, the lighter your cake will be!)
- Add the eggs one at a time, mixing well after each addition. Then, stir in the vanilla extract.
-
Combine Dry Ingredients: In another bowl, whisk together the flour, baking powder, and salt. Gradually add this dry mixture to the wet ingredients, alternating with the milk. Mix until just combined. (Pro tip: Avoid over-mixing to keep your cake tender!)
-
Fold in Apricots: Gently fold in half of the apricot pieces into the batter. This gives you that lovely fruity surprise in every bite!
-
Pour and Level: Pour the batter into your prepared baking dish and spread it evenly. If you’re feeling fancy, arrange the remaining apricot pieces on top for an inviting look.
-
Sprinkle the Topping: Add a generous sprinkle of cinnamon sugar over the top. This is optional, but it gives an extra layer of warmth and sweetness.
-
Bake!: Pop the buckle into the oven and let it bake for about 35–40 minutes, or until a toothpick inserted in the center comes out clean. You’re looking for a golden-brown top that’s slightly firm to the touch. (Kitchen hack: To prevent over-browning, place a piece of aluminum foil over the top if it gets too dark before it’s fully baked.)
-
Cool and Serve: Once it’s done, take the buckle out of the oven and allow it to cool in the pan for about 10 minutes. This will make it easier to slice. Scoop it out into generous squares and serve it warm or at room temperature.
-
Enjoy!: Top it with a dollop of whipped cream, a scoop of vanilla ice cream, or simply enjoy it as is. You can get creative here!
Serving Suggestions
Let’s talk about plating! Apricot Buckle is delightful when served warm, but you can add a personal touch. Here are a few serving ideas:
-
Classic Style: Serve your buckle squares on a charming plate, topped with a dollop of freshly whipped cream and a sprinkle of cinnamon for that extra pizazz.
-
À la Mode: For those who want to indulge, add a scoop of vanilla ice cream on the side—this contrast of warm cake and cold ice cream is heavenly!
-
Breakfast Twist: Why not have it for breakfast? Serve it up with a side of Greek yogurt drizzled with honey and berries for a nutritious start to your day.
-
Garnish with Fresh Herbs: A mint or basil leaf placed on top can freshen up the presentation. It might sound fancy, but it’s super easy!
Whatever your style, the key is to enjoy the process and dig in with family and friends!
Recipe Variations
Now, let’s get a little creative! Here are some fun twists to put your spin on Apricot Buckle:
-
Berry Good: Mix in some blueberries or raspberries along with the apricots. The tartness of berries complements the sweet apricots perfectly!
-
Nutty Delight: Add chopped walnuts or almonds to the batter. They give the buckle a lovely crunch that’ll keep you coming back for more.
-
Spiced Up: Try adding a touch of cardamom or ginger to the batter for an aromatic twist. It brings warmth that’s just right for colder seasons.
-
Chocolate Chunk: Who doesn’t love chocolate? Mix in some dark chocolate chunks for an indulgent treat. The melting chocolate with the juicy apricots is nothing short of magic!
-
Vegan Version: As mentioned earlier, substituting ingredients like flax eggs, almond milk, and vegan butter results in a vegan-friendly buckle that’s just as delicious!
Explore these variations and make the recipe your own—you can’t go wrong!
Chef’s Notes
This recipe holds a special place in my heart because it’s evolved over the years. There were times I experimented with different fruits, adding strawberries, peaches, and even plums. Each time, it was a delightful surprise!
I remember one summer, I had more apricots than I knew what to do with. My friends and I had a baking party, and we practically turned my kitchen into a fruit buckle factory! We laughed, danced, and made a complete mess of flour and batter. Those are moments I treasure, and they remind me that cooking is more than just about food—it’s about making memories.
So, don’t stress if things get a little messy in your kitchen—it’s part of the fun!
FAQs and Troubleshooting
-
Why did my buckle sink in the middle?
- That could be due to overmixing or underbaking. Make sure to mix just until incorporated and give it enough time in the oven for structure.
-
Can I freeze the buckle?
- Absolutely! Cool it completely, slice it, and layer it with parchment paper in an airtight container before freezing. It’ll last for about 2-3 months.
-
What if I don’t have apricots?
- No problem! This recipe is versatile—use any fruit you love or have on hand. Just make sure to adjust the sugar based on the fruit’s sweetness.
-
Can I make this gluten-free?
- Yes, use a 1:1 gluten-free flour blend, and you’re all set! Just check the other ingredients for gluten-friendly options.
Nutritional Info
I believe in enjoying delicious food without the guilt, but I also know many of you are mindful of nutritional details. Here’s a rough estimate for a single serving (based on the full recipe yielding about 9 squares):
- Calories: 240
- Total Fat: 10g
- Saturated Fat: 5g
- Cholesterol: 57mg
- Sodium: 150mg
- Total Carbohydrates: 36g
- Dietary Fiber: 1g
- Sugars: 12g
- Protein: 3g
Keep in mind, these values may vary based on specific ingredients, so adjust as you please!
Final Thoughts
And there you have it, folks! Your very own Apricot Buckle, packed with flavors and warm memories. Isn’t it incredible how food transcends generations and connects us to cherished moments?
As you whip this up in your kitchen, I hope you find joy in each step, whether you’re baking alone or sharing the experience with loved ones. Remember, it’s all about savoring those delightful bites and creating experiences that are just as sweet as the dessert itself.
So, roll up those sleeves, embrace the process, and let’s celebrate the joy of cooking together. Happy baking, and may your kitchen be filled with warmth, laughter, and Apricot Buckle goodness! 🍑💛
Print
Apricot Buckle
- Total Time: 55 minutes
- Yield: 9 servings
- Diet: Vegetarian
Description
A cozy dessert featuring a tender cake base topped with juicy apricots, perfect for any occasion.
Ingredients
- Fresh Apricots (about 2 cups)
- All-Purpose Flour (2 cups)
- Granulated Sugar (1 cup)
- Unsalted Butter (1/2 cup or 1 stick)
- Baking Powder (2 teaspoons)
- Salt (1/2 teaspoon)
- Eggs (2 large)
- Milk (1/2 cup)
- Vanilla Extract (1 teaspoon)
- Optional Topping: Cinnamon Sugar
Instructions
- Preheat your oven to 375°F (190°C).
- Grease a 9×9-inch baking dish or an 8×8-inch square pan with butter or cooking spray.
- Wash the apricots and slice them in half to remove the pits.
- Cream together the softened butter and sugar until light and fluffy.
- Add the eggs one at a time, mixing well after each addition, then stir in the vanilla extract.
- Whisk together the flour, baking powder, and salt in a separate bowl.
- Combine the dry mixture with the wet ingredients, alternating with the milk.
- Fold in half of the apricot pieces into the batter.
- Pour the batter into the prepared baking dish and level it out.
- Sprinkle cinnamon sugar over the top if desired.
- Bake for about 35–40 minutes, or until a toothpick comes out clean.
- Cool the buckle for about 10 minutes, then serve warm.
Notes
Pair with whipped cream or ice cream for a delightful treat.
- Prep Time: 15 minutes
- Cook Time: 40 minutes
- Category: Dessert
- Method: Baking
- Cuisine: American
Nutrition
- Serving Size: 1 square
- Calories: 240
- Sugar: 12g
- Sodium: 150mg
- Fat: 10g
- Saturated Fat: 5g
- Unsaturated Fat: 3g
- Trans Fat: 0g
- Carbohydrates: 36g
- Fiber: 1g
- Protein: 3g
- Cholesterol: 57mg
Keywords: apricot buckle, dessert, baking, sweet treats, fruit dessert
Seasonal Cherry Pie with Silky Vanilla Custard Recipe
Cherry Pie with Vanilla Custard: A Slice of Nostalgia
Hey there, fellow foodies! I’m so glad you’re here at Feastical, where we celebrate feel-good food that’s bound to make your heart sing. Today, we’re whipping up something truly special: a vibrant Cherry Pie with Vanilla Custard. Believe me when I say, this dish is more than just a dessert—it’s a warm hug served on a plate.
Picture this: It’s a sunny afternoon, and the air is filled with the sweet scent of cherries ripening on the tree. Growing up, summer meant a trip to my grandparents’ farm where we’d pick fresh fruit, and nothing was more exciting than those bright red cherries. They were so sweet, just waiting to be turned into something delicious. When the cherries came rolling in, my grandma would roll out the dough, and the whole kitchen would be filled with laughter and the clinking of measuring cups as we prepared one of her famous cherry pies. It wasn’t just about the food; it was about the memories made—a tradition that I cherish dearly.
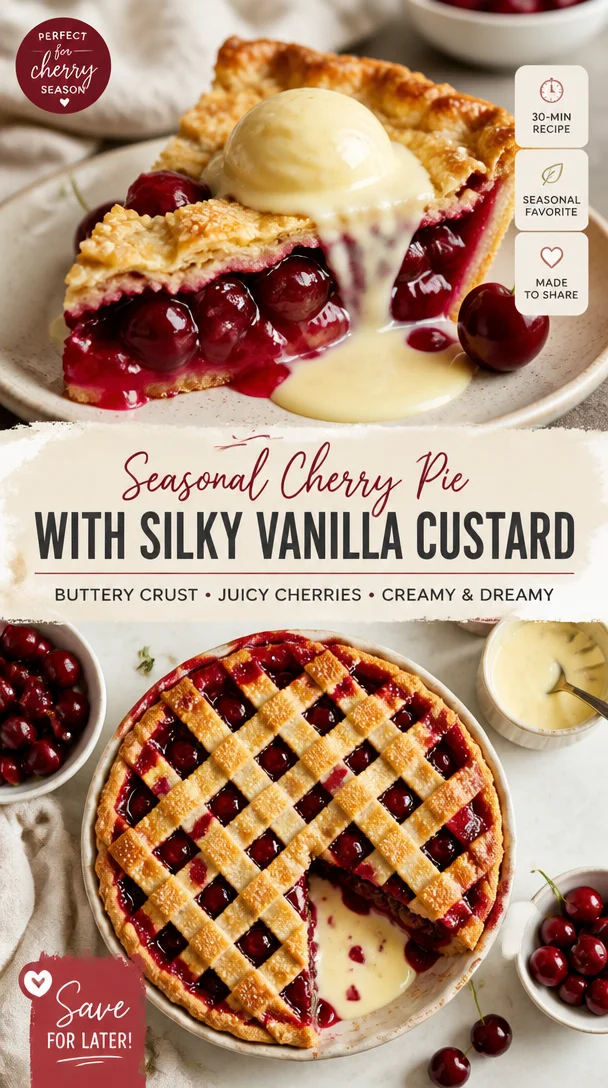
This recipe brings that nostalgia to your kitchen—it’s straightforward, delicious, and perfect for impressing family and friends. With juicy sour cherries complemented by a silky vanilla custard, this pie is a heavenly blend of tart and sweet that will leave everyone clamoring for seconds. So grab your apron, and let’s dive into the wonderful world of cherry pie-making!
Personal Story
Ah, cherry pie! Just the thought of it takes me back to my childhood summers spent at my grandparents’ house, where the cherry tree in the yard was a staple. I still remember the way the branches would bend under the weight of those plump, red gems. My siblings and I would race to see who could fill their bucket first, our laughter echoing through the orchard as we fought over that last cherry.
Once we had gathered enough cherries, it was time for the real fun: working in the kitchen with Grandma. I can still hear her humming softly as she rolled out the dough, my job was to "help" by munching on some cherries and sneaking bites of sugar. Grandma taught me the secret to a perfect cherry filling—harmony between sugar, cornstarch, and a squeeze of lemon juice to balance the flavors. While the pie baked, the kitchen filled with a warm, inviting aroma that wrapped around me like a blanket. It was in those moments that I learned not just how to bake, but how to create memories.
Now, as I make this cherry pie for you, I hope you’ll feel inspired to create your own sweet memories. Let’s cherish those small moments that turn into cherished traditions, all while enjoying a slice of this heavenly pie!
Ingredients
-
2 cups sour cherries (pitted)
Fresh or frozen sour cherries work beautifully here. If fresh cherries aren’t available, thaw any frozen cherries, and make sure you drain them well before using. -
1 cup sugar
Granulated sugar brings a sweet balance to the tart cherries. For a twist, you can use brown sugar for a hint of caramel flavor or coconut sugar for a lower glycemic option. -
2 tablespoons cornstarch
This thickening agent ensures your cherry filling isn’t too runny. If you’re looking for a gluten-free alternative, you could also use arrowroot powder. -
1 tablespoon lemon juice
This zesty note brightens the flavors of the cherries. If you’re fresh out of lemons, white vinegar can serve as a substitute in a pinch! -
1 teaspoon vanilla extract
A touch of vanilla enhances the pie’s sweetness and adds depth to the filling. If you want to kick it up a notch, try using almond extract instead for a lovely nutty note. -
1 pre-made shortcrust pastry
To keep things simple, a store-bought shortcrust pastry saves time. Feel free to use a homemade pastry if you’re up for the challenge! -
1 cup vanilla quark (or vanilla pudding)
This creamy element adds richness to the pie. Yogurt can be used if you’re looking for something lighter, or you can opt for a dairy-free pudding if needed. -
1 egg (for egg wash)
Beaten egg gives your pie that luscious golden finish. If you prefer not to use eggs, a splash of milk or a dairy-free alternative can work just as well. -
Powdered sugar (for dusting, optional)
A light dusting of powdered sugar right before serving makes the pie look extra special!
Step-by-Step Instructions
-
Prepare the Cherries
Start by washing, pitting, and draining your cherries (if using frozen). Ensure they’re as dry as possible to prevent excess moisture in your pie. This is the moment to taste a cherry or two—it’s crucial work, trust me! -
Make the Cherry Filling
In a mixing bowl, combine the pitted cherries, sugar, cornstarch, lemon juice, and vanilla extract. Toss everything together gently with a spatula until the cherries are well-coated. Let this mixture sit for about 15 minutes to allow the flavors to meld and the sugar to draw out the juices. Oh, the anticipation! -
Preheat the Oven
Preheat your oven to 425°F (220°C). A hot oven means a beautifully baked pie with crisp crust and bubbling filling. -
Roll Out the Pastry
If you’re using a homemade pie crust, roll out your shortcrust pastry until it’s about ¼ inch thick. Fit it into your pie pan, making sure to leave a little overhang to seal the top. -
Add the Filling
Pour the cherry mixture into the prepared pastry shell. Speaking of which, take a moment to admire those vibrant cherries—they should look like a dazzling red jewel treasure trove! -
Prepare the Top Layer
If you’re going with a lattice top or want to create a full crust, it’s time to roll out the second piece of pastry. Roll it out, drape it over the filling, and make slits for ventilation or cut decorative shapes (you know I’m a sucker for making it pretty!). -
Seal and Brush the Pie
If using a full crust, gently tuck the overhang underneath, create a nice border to seal in the filling, and make some slits on top to allow steam to escape. Brush the top crust with the beaten egg for that golden finish. It’s your pie, make it shine! -
Bake
Pop your pie in the preheated oven and let it bake for about 20-25 minutes. You’re looking for the crust to be golden brown and the filling to be bubbling. My kitchen timer is usually my unofficial assistant—set it and get ready to drool! -
Cool and Prepare the Custard
After the pie is done, let it cool on the counter for at least 20 minutes. This helps set the filling. Now while it cools, whip up that vanilla custard (or grab your ready-made vanilla pudding). I like to fold in a little whipped cream for a fluffy texture! -
Serve
Slice the pie and serve with a generous dollop of vanilla custard. Take a moment to appreciate the beautiful juxtaposition of colors, textures, and flavors—life is beautiful, isn’t it?
Serving Suggestions
To plate your cherry pie, I recommend a simple yet elegant presentation. Start with a slice on a dessert plate and pour a generous amount of vanilla custard around it. You can use a tablespoon to create little pools artfully. For an extra special touch, garnish with a sprig of mint—its bright green adds a lovely contrast with the vibrant red of the cherries. If you’re feeling indulgent, why not add a scoop of vanilla ice cream on the side? This classic pairing is sure to make everyone’s hearts—and stomachs—happy!
Recipe Variations
Now, let’s get a little creative with our cherry pie! Here are some fun variations to consider:
-
Lattice-Topped Cherry Pie: Instead of a full top crust, weave strips of pastry together for a charming lattice to show off that beautiful filling underneath.
-
Almond Cherry Pie: Add a teaspoon of almond extract to the cherry filling for a delicious nutty twist.
-
Bourbon Cherry Pie: For the adults in the house, a splash of bourbon in the filling elevates the flavor, giving it a rich, deep profile.
-
Coconut Vanilla Custard: Swap out part of the vanilla quark for coconut creme. This tropical twist is perfect for summer!
-
Gluten-Free Version: Use a gluten-free shortcrust pastry. Substitute cornstarch with arrowroot for the filling if needed.
Chef’s Notes
One of my favorite things about this cherry pie recipe is how it has evolved over the years. What started as a simple summer tradition has grown into a family favorite that’s made its way onto our holiday table as well. Sometimes, I catch my kids sneaking bites of the filling before it hits the crust, and it reminds me of those carefree days with my grandma.
Another funny kitchen story comes from the first time I tried to make this recipe without the egg wash. Let’s just say it turned out looking like a pie that was afraid of getting baked! The crust didn’t have that glorious sheen, and while it still tasted amazing, it lacked that beautiful finish. Never again, dear friends!
FAQs and Troubleshooting
Q: Why is my pie filling runny?
A: This can happen if you didn’t let the mixture sit long enough for the cornstarch to activate, or if you used too much liquid from the cherries. Aim to soak up excess moisture, and don’t skimp on the cornstarch!
Q: Can I use sweet cherries instead?
A: While sour cherries are the star of this recipe, sweet cherries can work too! You may want to reduce the sugar a bit since they are already quite sweet.
Q: How do I know when my pie is done?
A: Look for a golden-brown crust and bubbling filling! If you notice the edges browning too quickly, cover them with strips of aluminum foil.
Q: Can I make this ahead of time?
A: Absolutely! You can bake the pie a day in advance. Just allow it to cool completely before storing it in the fridge. Condiments like the vanilla custard can also be made ahead and stored separately!
Nutritional Info
Let’s talk nutrition! While this cherry pie is undoubtedly a dessert treat, it does offer some merits. Sour cherries are packed with antioxidants and have anti-inflammatory properties, which may help in supporting your immune health.
On average, each slice of this pie contains roughly 350 calories, depending on the specific ingredients used and portion sizes. To lighten it up, consider reducing sugar and opting for a lighter custard or ice cream option.
Here’s the general nutrient breakdown for one slice of this pie:
- Calories: 350
- Carbohydrates: 54g
- Protein: 3g
- Fat: 15g
- Fiber: 2g
Keep in mind: desserts are meant to be enjoyed, so indulge wisely!
Final Thoughts
And there you have it—a delightful Cherry Pie with Vanilla Custard that’s bursting with flavor and packed with memories! I hope this recipe inspires you to create your own traditions and share your love for cooking with those around you. Remember, the kitchen is the heart of the home, where stories are shared, and memories are made.
So, whether you’re hosting a family gathering or just baking for yourself, don’t forget to savor every moment. Happy cooking, and may your kitchen always be filled with the warmth of good food and laughter! If you try this recipe, I’d love to hear how it turned out for you. Feel free to drop your comments and share your kitchen stories with me. Now, let’s make some cherry pie magic! 🍒✨
Print
Cherry Pie with Vanilla Custard
- Total Time: 40 minutes
- Yield: 8 servings 1x
- Diet: Vegetarian
Description
A vibrant Cherry Pie with silky Vanilla Custard, perfect for evoking sweet summer memories.
Ingredients
- 2 cups sour cherries (pitted)
- 1 cup sugar
- 2 tablespoons cornstarch
- 1 tablespoon lemon juice
- 1 teaspoon vanilla extract
- 1 pre-made shortcrust pastry
- 1 cup vanilla quark (or vanilla pudding)
- 1 egg (for egg wash)
- Powdered sugar (for dusting, optional)
Instructions
- Prepare the cherries by washing, pitting, and draining them. Ensure they’re dry.
- Make the cherry filling by combining cherries, sugar, cornstarch, lemon juice, and vanilla extract in a bowl.
- Preheat your oven to 425°F (220°C).
- Roll out the pastry if homemade and fit it into your pie pan.
- Add the cherry mixture into the prepared pastry shell.
- Prepare the top layer by rolling out another piece of pastry and placing it over the filling.
- Seal the pie and brush the top crust with the beaten egg.
- Bake in the preheated oven for about 20-25 minutes.
- Cool the pie on the counter for at least 20 minutes before serving.
- Slice and serve with a generous dollop of vanilla custard.
Notes
Feel free to use fresh or frozen cherries; if fresh aren’t available, make sure to drain frozen cherries well.
- Prep Time: 15 minutes
- Cook Time: 25 minutes
- Category: Dessert
- Method: Baking
- Cuisine: American
Nutrition
- Serving Size: 1 slice
- Calories: 350
- Sugar: 22g
- Sodium: 150mg
- Fat: 15g
- Saturated Fat: 6g
- Unsaturated Fat: 6g
- Trans Fat: 0g
- Carbohydrates: 54g
- Fiber: 2g
- Protein: 3g
- Cholesterol: 40mg
Keywords: cherry pie, vanilla custard, dessert, summer recipe, nostalgic cooking

Quick Peach Upside-Down Mini Cakes: 30-Minute Summer Treat
Peach Upside Down Mini Cakes: A Slice of Summer Nostalgia
Hey there, food lovers! Today, I’m thrilled to share with you a delightful dessert that’ll make your taste buds sing and your heart soar: Peach Upside Down Mini Cakes! When summer rolls around, there’s nothing quite like the sweet, juicy essence of fresh peaches. And believe me, when you flip these little beauties upside down, you’re in for a delicious surprise.
Let’s be honest. There’s something utterly charming about mini cakes. They’re like little bundles of joy that remind you of childhood delights—perfect for sharing (or not, no judgment here!). As I prepare to share this recipe, I’m grinning just thinking about those sun-kissed evenings spent on the porch, surrounded by family, savoring dessert and delightful conversation. So, whether you’re celebrating a special occasion or simply treating yourself on a casual Wednesday, these mini cakes are sure to brighten your day!
Personal Story
Growing up, my grandma always had a knack for transforming simple ingredients into magical moments. One summer, she decided to experiment with peaches from our backyard tree. I can’t recall the exact day, but I remember the warm sun filtering through the leaves, the sweet aroma wafting from the kitchen, and the sound of my grandma humming softly as she worked her magic.
That day, she pulled out a cast iron skillet and started caramelizing those peaches with a bit of butter and brown sugar, a process that felt like watching a beautiful dance unfold in front of my eyes. When she poured the cake batter over those glorious peaches and turned it upside down just out of the oven, it was like unwrapping a present—an explosion of warm, gooey, peachy goodness that took my little foodie heart straight to cloud nine.
These Peach Upside Down Mini Cakes are my homage to that unforgettable summer memory. I hope they inspire similar heartwarming moments in your kitchen too!
Ingredients
To make these Peach Upside Down Mini Cakes, gather the following ingredients:
-
Non-stick cooking spray
A kitchen lifesaver! This ensures our mini cakes pop out effortlessly. Go for coconut oil spray for an extra hint of flavor! -
1 tablespoon unsalted butter (cold)
This is for greasing the muffin tin. Cold butter helps to create that luscious caramel layer. -
6 teaspoons light brown sugar
The secret to that rich, caramel flavor! You can substitute with coconut sugar for a more natural twist. -
3 fresh peaches (Note 1)
The star of the show! Feel free to swap them out for nectarines or even pears when peaches aren’t in season. -
1 ½ cups all-purpose flour
The foundation of our cake. Whole wheat flour can be used for a healthier spin, but it may yield a denser cake. -
1 teaspoon baking powder
This adds fluffy lift! Always fresh is best—check that expiration date. -
½ teaspoon baking soda
Works in tandem with the baking powder for extra lightness. Don’t skip this, or your cakes won’t rise as they should! -
¼ teaspoon salt
Just a pinch! It enhances all the flavors, bringing everything together harmoniously. -
2/3 cup granulated sugar
Regular ol’ sugar for sweetness! You could use a sugar substitute like erythritol if you want to cut down on calories. -
1/3 cup unsalted butter (at room temperature)
This whipped into sugar creates a light and airy texture. Always allow it to sit out for a bit to soften! -
1 large egg (at room temperature)
Helps with binding and adds moisture to our cakes. Don’t forget to let it sit for a while in warm water if you left it in the fridge! -
1 teaspoon pure vanilla extract
Because vanilla makes everything better! Choose pure over imitation for a richer flavor. -
½ cup buttermilk (at room temperature) (Note 2)
This gives our cakes a tender crumb. No buttermilk? You can make a substitute by mixing milk with a teaspoon of vinegar or lemon juice and letting it sit for 5 minutes.
Step-by-Step Instructions
Alright, let’s dive into the delightful adventure of making our Peach Upside Down Mini Cakes!
-
Preheat Your Oven
Preheat your oven to 350°F (175°C). This ensures that your mini cakes get that lovely golden exterior, caramelizing the peaches perfectly. -
Prepare the Muffin Tin
Grab a 12-cup muffin tin and spray each cup generously with non-stick cooking spray. Then, place 1 tablespoon of cold butter in each cup and pop it in the oven for just a few minutes until melted. After a minute, sprinkle 6 teaspoons of light brown sugar evenly across the melted butter. This will create your gooey topping! -
Slice the Peaches
While the butter and sugar are melting, wash and slice your fresh peaches. You want thin wedges to ensure they cook evenly and caramelize beautifully. -
Arrange the Peaches
Once the butter-sugar mixture is ready, carefully remove the muffin tin from the oven (watch out, it’s hot!). Arrange the peach slices on top of the brown sugar and butter mixture, making them as pretty as you like. This is your opportunity to show off your artistic flair! -
Mix the Dry Ingredients
In a medium bowl, whisk together the flour, baking powder, baking soda, and salt. Set it aside for now. -
Cream the Butter and Sugar
In another large bowl, beat the granulated sugar and room-temperature butter together until light and fluffy—about 2 to 3 minutes. This is where the magic happens, so don’t rush this step! -
Add the Egg and Vanilla
Next, add in the egg and pure vanilla extract. Beat until everything is combined. You’ll notice a luscious, creamy texture forming! -
Combine the Mixtures
Gradually add the dry ingredients to the wet mixture, alternating with the buttermilk. Start and end with the dry ingredients. Mix until just combined; don’t overdo it, or your cakes might turn out dense. -
Spoon the Batter
Carefully spoon the batter over the arranged peaches in each muffin cup, filling each cup about 2/3 full. -
Bake
Pop the muffin tin into the oven and let them bake for about 20 to 25 minutes, or until a toothpick inserted into the center comes out clean. Your kitchen will smell absolutely heavenly during this time! -
Cool and Flip
Once done, allow the cakes to cool in the tin for about 5 minutes. Then, using a butter knife, gently loosen the edges of each cake, flip them onto a wire rack, and then onto a serving platter. You might want to do this over a baking sheet just in case of any caramel drips!
Serving Suggestions
Now that your Peach Upside Down Mini Cakes are fully baked and cooled, it’s time to serve them up! For a classic presentation, simply place them on a beautiful platter with the peach side facing up.
For an extra touch of indulgence, top them with a dollop of freshly whipped cream or a scoop of vanilla ice cream while they’re still warm. The cold cream melting into the warm cake is pure bliss! You could also garnish with crushed nuts or a sprig of mint for that added pop of color. These little touches turn the humble mini cakes into a show-stopping dessert!
Recipe Variations
Want to shake things up a bit? Here are some fun variations to try:
-
Berry Bliss: Swap out the peaches for a medley of fresh berries like blueberries, raspberries, or strawberries. The result will be a tart and sweet delight!
-
Nutty Twist: Add chopped nuts like pecans or walnuts into the batter for an earthy crunch that complements the sweetness of the peaches.
-
Spiced Delights: Incorporate warm spices like cinnamon or nutmeg into the cake batter for added depth and complexity—perfect for fall!
-
Gluten-Free Goodness: Substitute all-purpose flour with a gluten-free blend to cater to gluten-sensitive friends while keeping all the deliciousness intact.
-
Coconut Dream: Use coconut milk instead of buttermilk and add shredded coconut to the batter for a tropical twist!
Chef’s Notes
Ah, the beauty of recipes! As I’ve experimented with these little cakes over the years, I’ve come to realize they’re incredibly forgiving. Not only that, but they can evolve with your pantry and seasonal produce. One time, I had a few leftover apricots and pecans, and let me tell you—the flavors worked like a charm!
Another fun story: during a cooking class, someone accidentally swapped out the peaches for plums and used lemon juice instead of buttermilk. I was skeptical at first, but it turned into one of my favorite variations! Sometimes the kitchen is a magical place—embrace the surprises!
FAQs and Troubleshooting
Q1: What if my cakes stick to the tin?
Make sure to generously spray the muffin tin with non-stick cooking spray. If they still stick, gently run a pair of kitchen tongs around the edges before flipping.
Q2: Can I use canned peaches?
Absolutely! Just be sure to drain and pat them dry thoroughly before using. Canned peaches can be a bit softer, so handle them carefully.
Q3: My cakes are dense. What happened?
This likely means the batter was over-mixed. For the fluffiest mini cakes, mix just until combined after adding the dry ingredients.
Q4: Can I freeze these mini cakes?
Yes! Once cooled, wrap them tightly in plastic wrap and store them in an airtight container. They’ll keep for up to 3 months. When ready to eat, simply thaw and warm them up!
Nutritional Info
When you’re indulging in desserts, you might wonder about the nutritional breakdown. Here’s a rough estimate per mini cake (based on standard servings):
- Calories: 180
- Total Fat: 7g
- Saturated Fat: 4g
- Cholesterol: 35mg
- Sodium: 150mg
- Total Carbohydrates: 27g
- Dietary Fiber: 1g
- Sugars: 12g
- Protein: 2g
Of course, these will vary based on your specific ingredients and portion sizes. That said, it’s always good to indulge in moderation!
Final Thoughts
And there you have it! A recipe filled with heart, flavor, and memories that will surely become a staple in your home. Peach Upside Down Mini Cakes are not just a treat; they’re an experience.
Next time you take a bite, think of the sunny days, the laughter shared, and the memories yet to come. So pop into the kitchen, gather those ingredients, and create your own little piece of summer magic. Enjoy every last crumb, and as always, happy cooking from your favorite foodie friend here at Feastical! 🍑✨
Print
Peach Upside Down Mini Cakes
- Total Time: 40 minutes
- Yield: 12 mini cakes 1x
- Diet: Vegetarian
Description
Delightful mini cakes featuring fresh peaches caramelized to perfection, capturing the essence of summer nostalgia.
Ingredients
- Non-stick cooking spray
- 1 tablespoon unsalted butter (cold)
- 6 teaspoons light brown sugar
- 3 fresh peaches
- 1 ½ cups all-purpose flour
- 1 teaspoon baking powder
- ½ teaspoon baking soda
- ¼ teaspoon salt
- 2/3 cup granulated sugar
- 1/3 cup unsalted butter (at room temperature)
- 1 large egg (at room temperature)
- 1 teaspoon pure vanilla extract
- ½ cup buttermilk (at room temperature)
Instructions
- Preheat your oven to 350°F (175°C).
- Prepare the muffin tin by spraying each cup with non-stick cooking spray.
- Place 1 tablespoon of cold butter in each cup and melt in the oven.
- Sprinkle 6 teaspoons of light brown sugar over the melted butter.
- Slice the fresh peaches into thin wedges.
- Arrange the peach slices on top of the butter-sugar mixture.
- Mix the dry ingredients: flour, baking powder, baking soda, and salt.
- Cream the granulated sugar and room-temperature butter until light and fluffy.
- Add the egg and pure vanilla extract, mixing until combined.
- Combine the dry ingredients with the wet mixture, alternating with buttermilk.
- Spoon the batter over the arranged peaches, filling each cup about 2/3 full.
- Bake for 20 to 25 minutes, until a toothpick comes out clean.
- Cool the cakes for 5 minutes before flipping them onto a wire rack.
Notes
Serve with whipped cream or vanilla ice cream for an extra touch of indulgence. These mini cakes can be frozen for up to 3 months.
- Prep Time: 15 minutes
- Cook Time: 25 minutes
- Category: Dessert
- Method: Baking
- Cuisine: American
Nutrition
- Serving Size: 1 mini cake
- Calories: 180
- Sugar: 12g
- Sodium: 150mg
- Fat: 7g
- Saturated Fat: 4g
- Unsaturated Fat: 3g
- Trans Fat: 0g
- Carbohydrates: 27g
- Fiber: 1g
- Protein: 2g
- Cholesterol: 35mg
Keywords: Peach cake, mini cakes, summer dessert, upside down cake
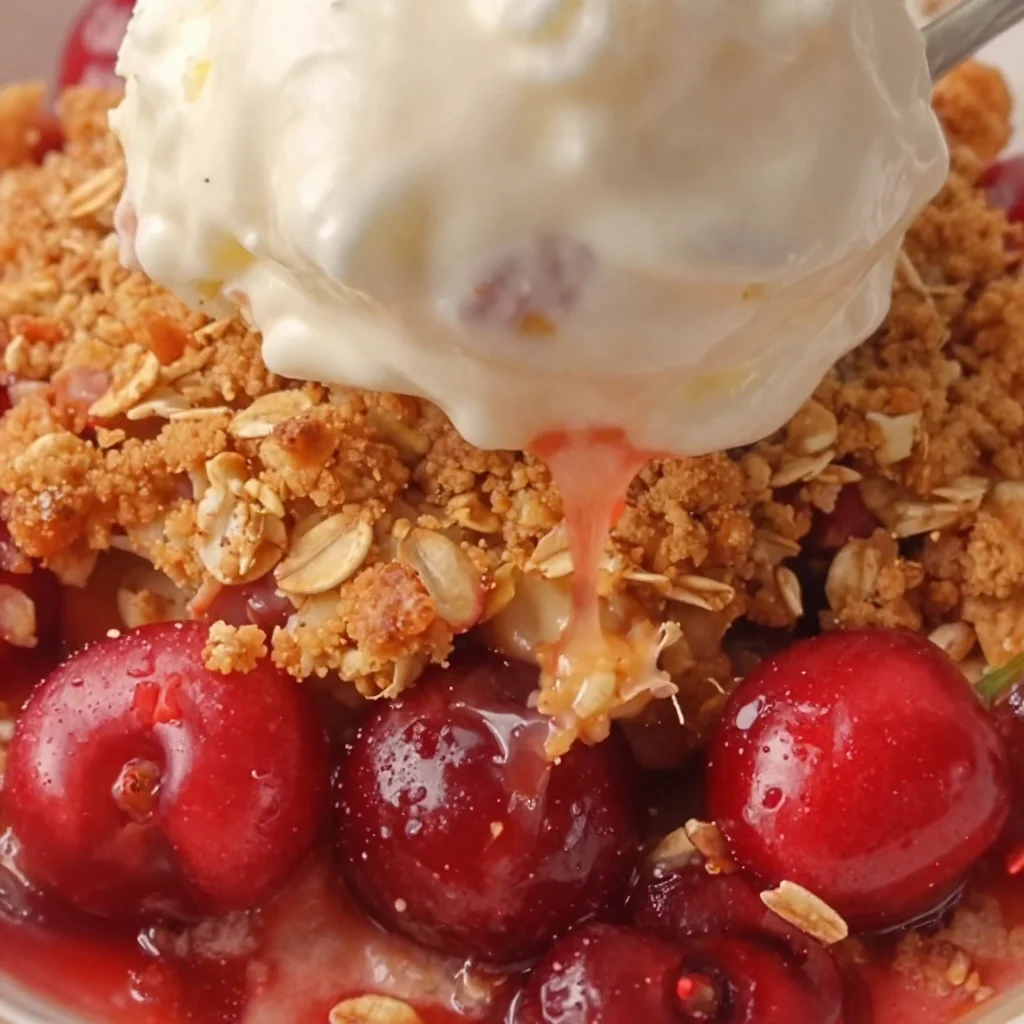
Cherry Crumble
Dive into Deliciousness with Cherry Crumble
Hey there, my fellow food lovers! Today, we’re diving into a dish that has all the charm of summer nostalgia and the cozy warmth of a homey kitchen: Cherry Crumble. Picture this — the sweet, tangy burst of fresh cherries topped with a buttery, golden crumble that’s crisp, crumbly, and totally irresistible. Whether you’re hosting a backyard barbecue or simply treating yourself to a well-deserved dessert, this Cherry Crumble is a delicious way to celebrate every moment.
Cherry season is a fleeting delight. Every year, I eagerly await those luscious cherries to hit the market. There’s just something about standing in the sun, hand-picking those juicy gems with their deep red hues that makes my heart sing. And when it comes time to use them, I have a little ritual: I play my favorite music, pour a glass of something refreshing, and get to work. Trust me, making this dish is as delightful as eating it!
Now, I know what you might be thinking: “Is making a crumble really as easy as you say?” The answer is a resounding yes! With just a few simple steps and some kitchen staples, you’ll have a dessert that impresses friends and family alike. Plus, the aroma wafting through your home while it’s baking? Pure magic! So, grab those cherries, roll up your sleeves, and let’s get cooking!
A Cherry-filled Memory
I can still remember the first time I made Cherry Crumble. It was a sweltering summer afternoon, and my best friend and I were rummaging through my grandmother’s recipe box, searching for something to satisfy our sweet tooth. That box was treasure trove filled with beloved family recipes, and we stumbled upon a handwritten card that read "Cherry Crumble – Grandma’s Favorite."
That day, we picked cherries from the tree in Grandma’s backyard, laughing and joking as we avoided the guide to getting stained (spoiler alert: we weren’t very successful!). As we prepared our ingredients, Grandma wandered in with her apron — the one with little cherries printed all over it — and shared stories of her own summer adventures with cherries. We baked that crumble together and feasted on it warm with scoops of vanilla ice cream melting on top. The taste was heavenly, but it was the laughter and love that made the moment truly unforgettable. Ever since then, Cherry Crumble has held a special place in my heart, and I’m here to help you create your own cherished memories with this fabulous dish!
Ingredients
For this delightful Cherry Crumble, you’ll need:
-
2 cups fresh cherries, pitted and halved
Juicy, sweet cherries are the star of the show! Make sure they’re ripe for optimal flavor. If fresh cherries aren’t available, frozen cherries work well too — just let them thaw and drain excess liquid. -
1 cup rolled oats
These oats add texture and a nutty flavor. If you want a gluten-free version, look for certified gluten-free oats. -
1/2 cup all-purpose flour
Flour is essential for binding your crumble together. For a gluten-free option, use almond flour or a gluten-free all-purpose blend. -
1/2 cup brown sugar
This adds a deep caramel flavor to the topping. You can substitute with coconut sugar for a slightly different but equally tasty sweetness. -
1/3 cup butter, melted
Butter gives your crumble richness and helps create that irresistible crust. For a vegan option, use melted coconut oil or vegan butter. -
1 teaspoon cinnamon
A pinch of spice elevates the flavor profile! Feel free to experiment with nutmeg or pumpkin spice for a different twist. -
1/4 teaspoon salt
A small amount of salt balances the sweetness. It’s an essential ingredient that enhances all the flavors!
Step-by-Step Instructions
Alright, foodie friends, let’s roll up our sleeves and get started on this delightful Cherry Crumble! Follow these steps, and you’ll have a stunning dessert ready in a flash.
-
Preheat Your Oven
Start off by preheating your oven to 350°F (180°C). This is crucial as it ensures even baking, crispy topping, and gooey cherries. -
Prepare the Baking Dish
Grab your favorite baking dish (an 8×8 square or a round dish works great!). Lightly grease it with butter or non-stick spray to prevent sticking. This also adds a little extra buttery flavor! -
Prepare the Cherries
If you’re using fresh cherries, wash them and remove the pits. Halving them allows for better flavor distribution and makes them easier to eat. Toss them with a little sugar (about 1 tablespoon) and set them aside while you prep the crumble. This will create a lovely syrup as the cherries release their juices. -
Make the Crumble Topping
In a medium bowl, combine the rolled oats, flour, brown sugar, cinnamon, and salt. Pour in the melted butter and mix until everything is well combined. You want a crumbly texture, so don’t overmix! There should still be some visible pieces of butter. -
Assemble
Spread the cherries evenly in the prepared baking dish. Sprinkle the crumble mixture generously over the top, ensuring all the cherries are covered. -
Bake to Perfection
Place the dish in the preheated oven and bake for about 30-35 minutes, or until the topping is golden brown and the cherries are bubbling. Your kitchen will soon be filled with the most mouthwatering aroma! -
Serve Warm
Once it’s out of the oven, let it cool for about 10 minutes (if you can wait!). Serve it warm with a generous scoop of vanilla ice cream or a dollop of whipped cream. You can also sprinkle some fresh mint for a pop of color and flavor!
Serving Suggestions
Plating your Cherry Crumble is almost as enjoyable as making it. Here’s how to do it like a pro:
- Option 1: Serve it right from the baking dish! It has that homespun charm and feels extra cozy.
- Option 2: Scoop individual portions into bowls, allowing everyone to customize with their choice of ice cream or toppings.
- Option 3: For a more elegant presentation, use a ring mold to create a pretty layer of cherries topped with the crumble in the center of a dessert plate, garnished with a mint leaf.
No matter how you choose to serve it, I promise your friends and family will be clamoring for seconds!
Recipe Variations
Ready to mix things up a bit? Here are some creative twists on the classic Cherry Crumble:
-
Mixed Berry Crumble: Swap out some of the cherries for blueberries, raspberries, or even strawberries. A mix of berries adds a fun complexity to the flavors!
-
Nutty Crunch: Incorporate chopped nuts like almonds, pecans, or walnuts into your crumble topping for added texture and a health boost.
-
Peachy Cherry Combo: Add sliced peaches for a delightful summer twist. The sweetness of peaches complements the tartness of cherries beautifully!
-
Spiced Up Crumble: For an autumn feel, add a dash of nutmeg or ginger to your crumble topping. It adds warmth and depth of flavor.
-
Coconut Lover: Stir in some shredded coconut to the crumble for a tropical vibe. It beautifully complements the cherries!
Chef’s Notes
Creating the perfect Cherry Crumble has been a journey for me. Over the years, I’ve played with different ratios of sugar, butter, and oats to get just the right texture. The beauty of this recipe is its versatility — you can really make it your own! I’ve had moments of kitchen disasters (yes, I’ve burned a few crumble toppings along the way), but they taught me patience and creativity in the kitchen. Now, each time I make it, I become a little nostalgia machine, recalling sunny summer days with friends and family.
FAQs and Troubleshooting
Let’s tackle some common questions and potential hiccups for making this Cherry Crumble:
-
Why is my topping too dry?
It might be that you didn’t add enough butter! Ensure the mixture is evenly combined; it should be moist but crumbly. You can also add a splash of water or milk if necessary. -
How do I keep my cherries from getting mushy?
Avoid overbaking! Keep a close eye on your crumble near the end of the baking time. The cherries should be softened but still retain some shape. -
Can I use frozen cherries?
Absolutely! Just make sure to thaw and drain the excess liquid before mixing them into the crumble. You may need to adjust cooking time slightly as frozen cherries may take a bit longer to heat up. -
What should I do if I don’t have fresh cherries?
Canned cherries work in a pinch! Just drain them well to avoid excess moisture, and you’re set.
Nutritional Info
For those of you keeping an eye on nutritional content, here’s a rough estimate of what you can expect for one serving (without ice cream):
- Calories: 280
- Total Fat: 12g
- Saturated Fat: 7g
- Carbohydrates: 42g
- Dietary Fiber: 3g
- Sugars: 20g
- Protein: 3g
Remember, these values can vary based on specific brands and ingredients used, so feel free to adjust based on your preferences!
Final Thoughts
And there you have it, my dear food adventurers — a simple, scrumptious Cherry Crumble recipe that is perfect for any occasion. This dessert serves as a beautiful reminder of the joy of cooking and the love that can come from it. Gather your friends, enjoy the smiles it brings, and sprinkle a little more joy into your lives, one crumble at a time.
Thank you for spending this time with me! I hope you create amazing memories in your kitchen while making Cherry Crumble. It’s all about laughter, love, and of course, delicious food! Until next time, happy cooking! 🍒✨
Print
Cherry Crumble
- Total Time: 50 minutes
- Yield: 4 servings 1x
- Diet: Vegetarian
Description
A delightful Cherry Crumble featuring sweet, tangy cherries topped with a buttery, golden crumble. Perfect for summer gatherings or as a comforting dessert.
Ingredients
- 2 cups fresh cherries, pitted and halved
- 1 cup rolled oats
- 1/2 cup all-purpose flour
- 1/2 cup brown sugar
- 1/3 cup butter, melted
- 1 teaspoon cinnamon
- 1/4 teaspoon salt
Instructions
- Preheat your oven to 350°F (180°C).
- Prepare a baking dish by lightly greasing it with butter or non-stick spray.
- Prepare the cherries by washing, pitting, and halving them. Toss with 1 tablespoon of sugar and set aside.
- Make the crumble topping by combining the oats, flour, brown sugar, cinnamon, and salt in a medium bowl. Mix in the melted butter until crumbly.
- Assemble by spreading the cherries in the prepared dish and topping with the crumble mixture.
- Bake in the preheated oven for 30-35 minutes until golden brown and bubbling.
- Serve warm with vanilla ice cream or whipped cream.
Notes
Feel free to customize your crumble with nuts or other fruits, such as peaches or mixed berries.
- Prep Time: 15 minutes
- Cook Time: 35 minutes
- Category: Dessert
- Method: Baking
- Cuisine: American
Nutrition
- Serving Size: 1 serving
- Calories: 280
- Sugar: 20g
- Sodium: 250mg
- Fat: 12g
- Saturated Fat: 7g
- Unsaturated Fat: 4g
- Trans Fat: 0g
- Carbohydrates: 42g
- Fiber: 3g
- Protein: 3g
- Cholesterol: 30mg
Keywords: Cherry Crumble, dessert, summer, baking, fruity dessert
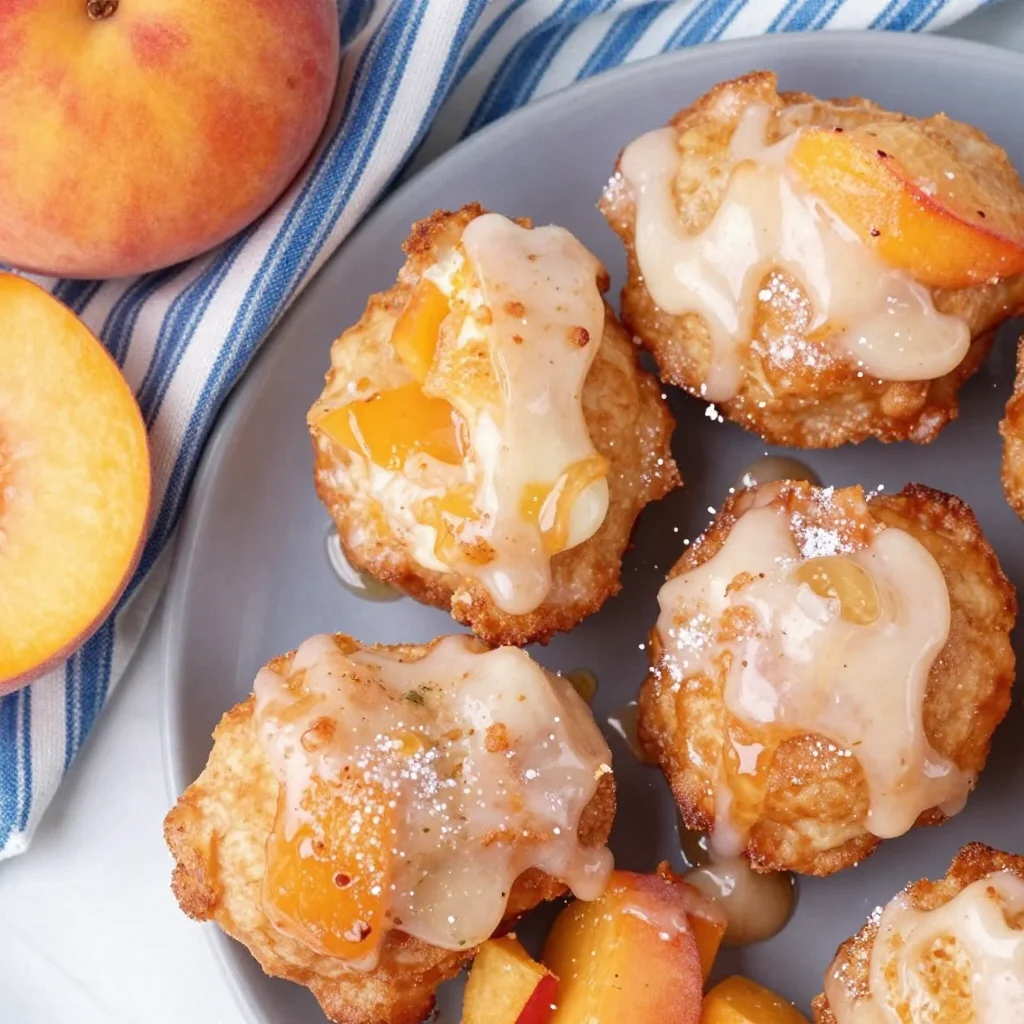
Ingredient Peach Fritters with Honey Glaze in 25 Minutes
Glazed Peach Fritters: A Sweet Summer Treat
Hey there, food lovers! Are you ready to dive into a world of sweetness and sunshine with me? Today, we’re whipping up something that’s sure to make your taste buds dance—Glazed Peach Fritters! These little gems are like little bites of happiness, capturing the essence of summer in every crispy, golden layer. Whether you’re hosting a brunch or just need a sweet pick-me-up, these fritters have got your back!
The beauty of these fritters lies not only in their taste but in their casual, approachable nature. They’re perfect for both seasoned chefs and those just finding their culinary groove. Plus, think about how wonderful it would be to bring a batch of these to your next gathering! I mean, who can resist the aroma of freshly fried dough mingling with that delightful peachy goodness?
Personal Story: A Peach of a Memory
Let me whisk you back to one sultry summer afternoon during my childhood. My grandma had an old, weathered fry pan that she cherished, and with it, she whipped up the most delightful fritters. We’d spend the summer days at her cozy farmhouse, surrounded by peach trees that seemed to stretch endlessly into the horizon. I can still remember the sweet, fragrant air wafting through the windows as we waited, hands clasped in anticipation.
One magical day, we decided to harvest the ripest peaches from her garden. With my young hands covered in sticky peach juice, we laughed and concocted a plan for Grandma’s famous fritters. Every bite we shared felt like a warm hug, reminding us that food isn’t just about nourishment; it’s about connection and nostalgia. Now, that memory fuels my desire to recreate those feelings through cooking. Each fritter I make is a tribute to those sunny afternoons spent mixing, frying, and laughing in Grandma’s kitchen.
Ingredients: Gather Your Goodies
Let’s dive into the ingredients that will bring these delightful fritters to life! Make sure you have these on hand:
-
2 cups all-purpose flour: This is your fritter base. If you’re looking for gluten-free options, a gluten-free flour blend will work wonders, but you might need to play with the liquid a bit.
-
1 tablespoon baking powder: This is your secret weapon for that fluffy, airy texture. No substitutes needed here; just make sure it’s fresh!
-
1/2 teaspoon salt: A little pinch elevates the sweetness, balancing the flavors wonderfully. You can use sea salt or kosher salt based on your preference.
-
1/4 cup granulated sugar: Sweetness is key! If you want to experiment, brown sugar adds a lovely depth of flavor.
-
1 cup buttermilk: This tangy ingredient makes the batter oh-so-rich and moist. If you don’t have buttermilk, no worries! Just mix a cup of regular milk with a tablespoon of vinegar or lemon juice and let it sit for 5 minutes.
-
2 large eggs: These help bind the mixture and add some fluffiness. You can swap with flaxseed meal mixed with water for a vegan option.
-
2 cups fresh peaches (diced): These beauties are the star of the show! Choose perfectly ripe ones that are fragrant. If peaches aren’t in season, feel free to use frozen ones—just drain the excess moisture.
-
Oil for frying: A neutral oil, like vegetable or canola, is ideal for frying. Avoid olive oil, as its lower smoke point isn’t optimal for frying.
-
1 cup powdered sugar: This will form your lovely glaze. If you want it less sweet, reduce the sugar, or use coconut sugar for a fun twist.
-
2 tablespoons milk (for the glaze): Use whatever milk you fancy—dairy, almond, soy—you name it!
Step-by-Step Instructions: Let’s Get Cooking!
Alright, friends! It’s time to put on that apron and get down to business. Here’s how to create these peach fritters step by step.
-
Prep Your Peaches: Start by washing and dicing your fresh peaches. Aim for about 1/2-inch chunks. Remember, the juicier the peach, the better the flavor! If you’re feeling adventurous, reserve some larger pieces for the garnish!
-
Mix the Dry Ingredients: In a large mixing bowl, whisk together the flour, baking powder, salt, and granulated sugar. Give it a good mix to combine everything evenly; you don’t want any unexpected pockets of salt or sugar in your fritters!
-
Combine the Wet Ingredients: In another bowl, beat the eggs and then add in the buttermilk. Mix until well combined. This creamy mixture is where the magic happens!
-
Bring It All Together: Carefully fold the wet ingredients into the dry mixture. Be gentle; you want to maintain that airiness! It’s totally okay if the batter is a little lumpy—flour pockets are just waiting to puff up beautifully in the fryer.
-
Add the Peaches: Gently fold in those marvelous diced peaches. Don’t be too rough; you want to keep the pieces intact as much as possible. Think of them as little jewels nestled into your batter.
-
Heat the Oil: In a deep pan or heavy-bottomed pot, pour in enough oil for frying. You’ll want it to be about 2 inches deep. Heat it on medium until it reaches around 350°F (175°C). A good way to test if the oil is ready is by dropping a little batter into it; if it sizzles and rises, you’re good to go!
-
Fry Away! Using a tablespoon or ice cream scoop, drop spoonfuls of the batter into the hot oil, being careful not to overcrowd the pan. Fry for about 2-3 minutes on each side or until they’re golden brown and lovely. Flip them gently with a slotted spoon when they’re perfect!
-
Drain and Cool: Once your fritters are golden, carefully transfer them to a plate lined with paper towels to drain excess oil. Let them cool for a moment as you prepare the glaze.
-
Make the Glaze: In a small bowl, whisk together powdered sugar and milk until you achieve a smooth, glossy consistency. If it’s too thick, add a tiny bit more milk!
-
Glaze Those Fritters: Drizzle or dip your cooled fritters in the glaze, letting it drip down the sides in a sweet cascade. Trust me; this step is worth every sticky finger!
Serving Suggestions: The Perfect Plate
When it comes to serving your Glazed Peach Fritters, presentation is key! Arrange them on a beautiful platter, maybe sprinkle a bit of extra powdered sugar on top for that Instagrammable touch. You could even garnish with a few fresh peach slices or mint leaves to make them pop.
For a fun twist, serve them alongside a cup of rich vanilla ice cream or a dollop of whipped cream for that indulgent dessert vibe. Got a brunch party? Place them at the center of the table for a delightful sharing experience. Everyone will want to grab a warm fritter, and trust me, they won’t last long!
Recipe Variations: Get Creative!
Want to mix things up? Here are a few creative variations to make these fritters uniquely yours:
-
Spiced Peach Fritters: Add a dash of cinnamon and nutmeg to the dry ingredients for a warm, cozy flavor twist.
-
Savory Option: How about some savory peach fritters by adding crumbled bacon or fresh herbs like basil or thyme?
-
Berry Fusion: Swap out some peaches for blueberries or raspberries for a delightful berry fritter medley.
-
Peach-Chipotle: For the adventurous, a bit of finely chopped chipotle pepper can add a smoky kick!
-
Gluten-Free Goodness: Use a gluten-free flour blend, and watch as everyone enjoys these fritters without a worry!
Chef’s Notes: A Dash of Nostalgia and Joy
Here’s a little nugget of wisdom from my kitchen: recipes evolve over time, just like our palates do. The first time I tried making these fritters, I was all over the place—I burned a few, had batter flying everywhere, and icing splatters were the least of my worries! But through all the kitchen chaos, I found that each failed attempt taught me something new.
Don’t stress if your fritters aren’t perfect the first time. Use it as an opportunity to learn and embrace that fabulous kitchen mess! Those imperfect moments can lead to the most delightful flavors. After all, the best recipes come with a side of laughter and a pinch of love!
FAQs and Troubleshooting: Your Burning Questions
-
Why did my fritters absorb too much oil?
- If your fritters absorbed oil, the oil may not have been hot enough. Make sure it’s at the right temperature (around 350°F) before frying. If they are frying too slowly, they’ll soak up excess oil.
-
Can I use frozen peaches instead of fresh ones?
- Absolutely! Just be sure to thaw them first and drain excess moisture. They’ll be just as delicious!
-
How can I store leftover fritters?
- Store any leftover fritters in an airtight container in the refrigerator. To reheat, pop them in the oven at 350°F for about 10 minutes, or until warm!
-
My batter is too thick; what do I do?
- If your batter seems overly thick, add a little more buttermilk, one tablespoon at a time, until you reach the desired consistency.
Nutritional Info
While indulging in sweet treats, it’s always nice to be aware of what you’re consuming. One glazed peach fritter will typically contain about:
- Calories: 210-250
- Carbohydrates: 30g
- Protein: 3g
- Fat: 10g
- Sugar: 8g
Adjusting the recipe may alter these nutritional values, but remember, food should be enjoyed in moderation!
Final Thoughts: Come Together Over Fritters
As we wrap up this journey of crafting Glazed Peach Fritters together, I hope you’re inspired to create your own batch in your kitchen. There’s a certain magic that happens when you cook with love—and trust me, every bite will feel like summer’s sweetest memory.
So gather your friends and family, let the aroma of these delectable fritters fill your space, and share stories and laughter around the table. After all, life is better when enjoyed with good company and great food! Don’t forget to share your fritter successes, failings, and variations with me—let’s continue to spread that warmth and creativity in the kitchen. Happy cooking, my friends!
Print
Glazed Peach Fritters
- Total Time: 35 minutes
- Yield: 12 servings 1x
- Diet: Vegetarian
Description
Delicious peach fritters that capture the essence of summer in every crispy, golden layer.
Ingredients
- 2 cups all-purpose flour
- 1 tablespoon baking powder
- 1/2 teaspoon salt
- 1/4 cup granulated sugar
- 1 cup buttermilk
- 2 large eggs
- 2 cups fresh peaches (diced)
- Oil for frying
- 1 cup powdered sugar
- 2 tablespoons milk (for the glaze)
Instructions
- Prep Your Peaches: Start by washing and dicing your fresh peaches into about 1/2-inch chunks.
- Mix the Dry Ingredients: In a large mixing bowl, whisk together the flour, baking powder, salt, and granulated sugar.
- Combine the Wet Ingredients: In another bowl, beat the eggs and then add the buttermilk.
- Bring It All Together: Carefully fold the wet ingredients into the dry mixture.
- Add the Peaches: Gently fold in the diced peaches until just combined.
- Heat the Oil: In a deep pan, heat oil to about 350°F (175°C).
- Fry Away! Drop spoonfuls of the batter into the hot oil and fry until golden brown.
- Drain and Cool: Transfer fritters to paper towels to drain excess oil.
- Make the Glaze: In a small bowl, whisk together powdered sugar and milk until smooth.
- Glaze Those Fritters: Drizzle or dip cooled fritters in the glaze.
Notes
Serve warm and enjoy with ice cream or whipped cream for an extra indulgent treat.
- Prep Time: 15 minutes
- Cook Time: 20 minutes
- Category: Dessert
- Method: Frying
- Cuisine: American
Nutrition
- Serving Size: 1 fritter
- Calories: 230
- Sugar: 8g
- Sodium: 200mg
- Fat: 10g
- Saturated Fat: 1g
- Unsaturated Fat: 7g
- Trans Fat: 0g
- Carbohydrates: 30g
- Fiber: 1g
- Protein: 3g
- Cholesterol: 25mg
Keywords: fritters, peach fritters, dessert, summer treat

Peach Sorbet
Cool Off with Homemade Peach Sorbet: A Summer Delight
Hey there, fellow foodies! Let me tell you, there’s no better way to soak up the summer sun than with a delightful bowl of homemade peach sorbet. If you’re like me, you can’t resist the sweet, juicy flavor of peaches. They’re the golden gems of summer, and when you transform them into sorbet, pure magic happens! So, grab a comfy seat and a cold drink because we’re diving into a simple, scrumptious recipe that’ll keep you refreshed and smiling during those hot days!
A Little Slice of Summer: A Personal Story
Growing up in the South, summer meant two things: sticky humidity and delicious peaches. Every year, my family would take a trip to the local peach orchard. I still remember the excitement of picking sun-ripened peaches from the trees, their fuzzy skins warm from the sun. We’d load up our basket, and after a day of picking, we’d head home, where my mom would whip up batches of peach everything – cobblers, jams, and especially sorbet.
Once, my cousin and I decided we could make our own sorbet to impress the adults. Armed with a few overripe peaches, a bag of sugar, and a dream, we boldly ventured into the kitchen. The blending, the pouring, and cheeky taste-testing filled the air with laughter and yummy smells. Though we got a bit too liberal with the sugar (sorry, Mom!), that first scoop was pure joy. We had created more than just frozen fruit; we made memories. Now, every time I make peach sorbet, it takes me back to those carefree summer days filled with laughter, sticky fingers, and, of course, that vibrant peach flavor. Let’s recreate some of that magic today!
Ingredients
Here’s what you’ll need to create your very own peach sorbet:
-
4 Peaches: Nothing says summer like fresh, ripe peaches. Opt for soft, juicy ones; they’re sweeter and will make your sorbet dreamy. If peaches are out of season, feel free to try this with frozen peaches—just thaw them first!
-
1 Cup Sugar: The sugar will help sweeten and balance the tartness (if any) of your peaches. You can replace it with honey or agave for a naturally sweetened version; just adjust to taste!
-
1 Cup Water: This helps dissolve the sugar and will lend a smooth texture to your sorbet. If you want an extra flavor boost, try using peach juice or a bit of peach schnapps instead.
-
1 Tablespoon Lemon Juice: A splash of lemon juice brightens up the flavors and adds a nice tang. You can also experiment with lime juice for a tropical twist!
With these simple ingredients, you’re already on your way to making something delightful!
Step-by-Step Instructions
Now that we have all our ingredients, let’s get cooking! (Or, in this case, blending and freezing!)
-
Prepare the Peaches: Start by washing your peaches under cool running water. Carefully slice them in half and remove the pits. Don’t worry about making it perfect; a little mushiness adds character! If you like a smooth sorbet, you can peel the skins, but I say keep them for extra flavor and nutrients.
-
Blend the Fruit: In a blender or food processor, toss the peaches, sugar, water, and lemon juice. Blend until you’ve got a smooth and creamy mixture. If you prefer a textural bite, blend just until combined, leaving some peach chunks.
-
Taste and Adjust: Before moving forward, take a quick taste! Feel free to adjust the sweetness with extra sugar or a splash more lemon juice if you want a bit more zing. Sometimes, a peach can throw you a surprise with its sweetness!
-
Freeze It: Pour the peach mixture into a shallow dish or a freezer-safe container. I love using a metal loaf pan—it freezes quicker and makes scooping easier later! Cover it tightly.
-
Initial Freeze: Let your mixture freeze for about 2 hours. Here’s a chef hack: scrape the mixture with a fork every 30 minutes while freezing to break up any ice crystals forming. This step helps achieve that perfectly scoopable texture you’re aiming for!
-
Final Freeze: After you’ve scraped it a few times, let it freeze completely—around 4–6 hours is ideal, but overnight works great if you’re prepping ahead.
-
Serve and Enjoy: When your sorbet is done, take it out about 10 minutes before serving. This helps soften it, making it easier to scoop. Serve in chilled bowls, and enjoy this refreshing treat!
Serving Suggestions
Let’s talk about serving! How you present your sorbet can take it from “delicious” to “wow!” Here are a few ideas:
-
Scoop into Bowls: Serve your sorbet in pretty dessert bowls. If you have fresh mint, a sprig on top makes it pop!
-
Waffle Cones or Cups: For a fun twist, serve scoops in waffle cones. Toss them in some chopped nuts or sprinkles for added crunch.
-
Garnish: Slice a peach or two and arrange them around your sorbet scoop. Drizzle with a little honey or even a splash of prosecco for an adults-only treat!
-
Sundae Style: Add chocolate or caramel sauce, crushed cookies, or vanilla yogurt for a fabulous sundae. You could even throw in a scoosh of whipped cream—yum!
Recipe Variations
Excited to experiment? Here are some creative twists and variations to satisfy your sorbet cravings:
-
Berry Peach Sorbet: Mix in a cup of frozen berries, like raspberries or strawberries, for a fruity blend. The vibrant colors will make it irresistible!
-
Coconut Peach Sorbet: Swap in a can of coconut milk (full-fat for creaminess) instead of water for a tropical flavor. The combination of peach and coconut will transport you to a beach!
-
Spiced Peach Sorbet: Add a pinch of cinnamon or nutmeg for a spicy kick. It’s like summer in a bowl with a cozy vibe!
-
Peach Basil Sorbet: Toss in fresh basil leaves while blending for a unique herby flavor. Basil helps elevate the natural sweetness of the peaches—so gourmet!
-
Peach Mojito Sorbet: Combine mint and a tiny splash of rum (okay, maybe a shot!) for an adult-only refreshing dessert that’ll take your taste buds to the next level.
Chef’s Notes
I can’t tell you how many times this peach sorbet has saved my summer gatherings! Friends often ask how I quickly whipped up such a treat, and the secret lies in the beautiful simplicity of it. This recipe started evolving over my years in the kitchen, inspired by everything from the seasons to my adventurous taste buds. Using different fruits, spices, and notes of sweetness has turned a summer classic into a year-round go-to. Keep it simple, and you’ll always find a crowd favorite!
FAQs and Troubleshooting
Q: How do I make sure my sorbet doesn’t become too icy?
A: The key is to mix often! Scraping with a fork periodically during the freezing process will help break up the ice crystals and keep your sorbet smooth.
Q: Can I use frozen peaches?
A: Absolutely! Just be sure to thaw them completely before blending so you achieve a smooth texture.
Q: My sorbet seems too hard to scoop. What should I do?
A: Let it rest at room temperature for 10-15 minutes before scooping. If it’s still rock-hard, you might have mixed in too much water. Adjust your sugar and water ratio next time!
Q: How long will this sorbet last in the freezer?
A: Stored in an airtight container, it’ll be good for up to a month. But trust me, it probably won’t last that long!
Nutritional Info
One serving (approximately 1/2 cup) of homemade peach sorbet contains:
- Calories: 120
- Total Fat: 0.5g
- Saturated Fat: 0g
- Cholesterol: 0mg
- Sodium: 0mg
- Total Carbohydrate: 30g
- Dietary Fiber: 1g
- Sugars: 24g
- Protein: 1g
Peach sorbet is a lighter dessert option and perfect for cooling off without the guilt. Just remember, a little moderation goes a long way!
Final Thoughts
There you have it, my delightful readers—the ultimate homemade peach sorbet recipe! With its vibrant flavors and uncomplicated steps, this is your go-to refresher for those warm days ahead. So, whether you’re savoring a scoop on a hot afternoon, serving it at a picnic, or whipping it up for guests, this peach sorbet is bound to steal the spotlight.
Don’t forget to experiment and make this recipe your own. Share your favorite variations and fond memories with peach sorbet in the comments! Now, get out there, grab a fork (or a spoon!), and let’s make summer memories one scoop at a time. Happy cooking, friends!
Print
Homemade Peach Sorbet
- Total Time: 135 minutes
- Yield: 4 servings 1x
- Diet: Vegan
Description
A refreshing and delightful peach sorbet perfect for summer to cool off while enjoying the sweet taste of peaches.
Ingredients
- 4 Peaches
- 1 Cup Sugar
- 1 Cup Water
- 1 Tablespoon Lemon Juice
Instructions
- Prepare the peaches: Wash and slice them in half, removing the pits.
- Blend the peaches, sugar, water, and lemon juice in a blender until smooth.
- Taste the mixture and adjust sweetness if needed.
- Freeze the peach mixture in a shallow dish or container.
- Initial freeze for 2 hours, scraping every 30 minutes.
- Final freeze completely for 4-6 hours or overnight.
- Serve in chilled bowls, scooping out as desired.
Notes
Use fresh mint for garnish or serve in waffle cones for a fun twist! Experiment with different flavors like coconut or berry.
- Prep Time: 15 minutes
- Cook Time: 120 minutes
- Category: Dessert
- Method: Freezing
- Cuisine: American
Nutrition
- Serving Size: 1/2 cup
- Calories: 120
- Sugar: 24g
- Sodium: 0mg
- Fat: 0.5g
- Saturated Fat: 0g
- Unsaturated Fat: 0g
- Trans Fat: 0g
- Carbohydrates: 30g
- Fiber: 1g
- Protein: 1g
- Cholesterol: 0mg
Keywords: peach sorbet, summer dessert, homemade sorbet, refreshing dessert, vegan dessert