Ingredient Pumpkin Pie Protein Smoothie for Fall Mornings
Pumpkin Pie Protein Smoothie: A Taste of Nostalgia in a Glass
Hey there, fellow foodies! I’m so excited to share with you one of my all-time favorite smoothies that’s not just bursting with flavor, but also packed with nutrients: the Pumpkin Pie Protein Smoothie. If you’ve ever found yourself craving fall flavors year-round, then this vibrant orange drink is gonna be your new BFF.
Introduction
Let’s be real—there’s something magical about pumpkins. They’re like the cozy sweaters of the food world, bringing warmth and a hint of sweetness wherever they go. This smoothie embodies everything I love about the fall season with its rich flavors and creamy texture, but the best part? You can whip it up any time of year! Honestly, this isn’t just a breakfast beverage; it’s a mood booster wrapped in a cup.
Imagine this: You’re rushing out the door in the morning, and the last thing you want is to settle for a mundane breakfast. Enter my Pumpkin Pie Protein Smoothie. It’s quick, easy, and hands-down delightful! Plus, it provides all the goodness you need to kick off your day with energy and a smile. So whether you’re enjoying it pre-workout or as an afternoon snack, trust me, this recipe will become a staple in your kitchen.
This delightful concoction is not just delicious—it’s a powerhouse of protein, vitamins, and that signature pumpkin spice that screams warmth and comfort. So, grab your blender and let’s get started on this creamy, dreamy Pumpkin Pie Protein Smoothie that will have you feeling cozy inside and out!
Personal Story
Isn’t it hilarious how food can be tied to so many memories? Whenever I whip up this smoothie, I can’t help but think back to the time my grandma let me be her little sous-chef during the fall season. She would prepare pumpkin pies from scratch, and man, did the kitchen smell amazing! I remember her standing there, mixing the spices, occasionally letting me sneak a taste of the pumpkin mixture. The best part? Watching her slip a secret ingredient into the filling—a pinch of love that made everything just perfect.
As I grew up, I tried to replicate her recipe, but health considerations kicked in, and I began to experiment with healthier options. The result? This glorious and nutritious Pumpkin Pie Protein Smoothie that brings grandma’s flavors to my own busy kitchen. With each sip, it feels as though I’m getting a hug from her, reminding me of those sunny autumn days spent laughing and baking together.
Ingredients
Before we dive into the making process, here’s a handy list of what you’ll need to create this scrumptious smoothie:
-
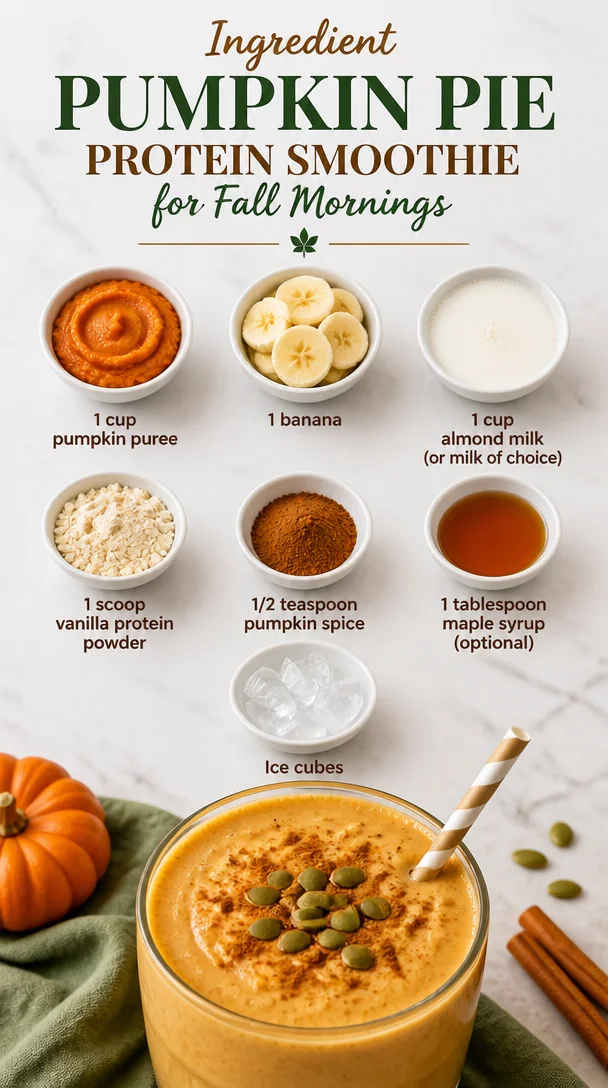
1 cup pumpkin puree
This is the star of your smoothie! Pumpkin puree adds amazing flavor and a thick, creamy texture. You can use canned or homemade, but make sure it’s 100% pumpkin and not the spiced pie filling. If you don’t have pumpkin puree, sweet potato puree is a fantastic substitute. -
1 ripe banana
Bananas sweeten up your smoothie and provide a natural creaminess. If you’re not a fan of bananas, try using a ½ cup of Greek yogurt or a handful of spinach for added nutrition. -
1 cup almond milk (or milk of choice)
Almond milk gives a nice nutty flavor, but any milk works—coconut, skim, or oat milk will do just fine. For a richer flavor, consider using canned coconut milk. -
1 scoop vanilla protein powder
This ingredient packs a protein punch and enhances the vanilla flavor. If you’re vegan or prefer plant-based options, look out for pea protein powder! -
1/2 teaspoon pumpkin spice
A quintessential element that brings warmth and essence of spices—cinnamon, nutmeg, cloves, and ginger. If you don’t have pumpkin spice, feel free to use cinnamon and a dash of nutmeg. -
1 tablespoon maple syrup (optional)
For those with a sweet tooth! If you’re watching sugar, you could skip it or using a teaspoon of honey or agave syrup instead. -
Ice cubes
These cool down your smoothie and give it the perfect texture. If you prefer a thicker consistency without adding too many ice cubes, throw in some frozen banana chunks instead!
Step-by-Step Instructions
Ready to get blending? This recipe is incredibly simple, and I promise you’ll have it ready in no time.
-
Gather your ingredients
It’s always best to have everything out and ready. I like to set a little "smoothie station" on my countertop, gathering each item so I can just pop them in the blender without a hitch! -
Start with the pumpkin puree
Pour in your lovely cup of pumpkin puree into the blender. It’s like the base of a delicious fall-inspired canvas! -
Add the banana
Toss in your ripe banana. You can chop it into smaller pieces to help your blender do its job more easily. Plus, who doesn’t love seeing that cheerful yellow banana brighten up the mix? -
Mix in the milk
Next, pour in your cup of almond milk. If you’re using any sweetened milk alternatives, consider adjusting the added maple syrup to balance the sweetness. -
Scoop up the protein powder
Add that protein powder to the mix and blend. That’s right, we’re turning our breakfast into a nutritious palette! -
Sprinkle in the spices
Toss in the pumpkin spice—this is where the magic happens. Your kitchen is going to start smelling like a fall festival! -
Sweeten it up (if needed)
If you like it a bit sweeter, add the tablespoon of maple syrup. Blend together until it’s smooth, and the ingredients are well combined. -
Add ice cubes
Toss in a handful of ice cubes. Depending on how thick you like your smoothie, you can adjust this step with fewer or more ice cubes. Blend again until it reaches your desired consistency. -
Taste test
Now, the fun part! Grab a small spoon and taste your smoothie. Need more pumpkin spice? Some more sweetness? Adjust according to your preference and blend again! -
Serve & Enjoy!
Pour that glorious orange smoothie into a glass—don’t forget to garnish with a sprinkle of extra pumpkin spice on top or a cute straw. Voila! You’ve got yourself a delicious Pumpkin Pie Protein Smoothie.
Serving Suggestions
This smoothie is fabulous on its own, but if you want to elevate it even more, try serving it in a mason jar adorned with some whipped coconut cream on top—because who doesn’t love that? You could even sprinkle a few pumpkin seeds for a hint of crunch, or drizzle a bit of maple syrup across the top for visual appeal. Perfectly Instagrammable!
For a more indulgent take, consider pairing the smoothie with a slice of whole-grain toast topped with almond butter and cinnamon—the perfect breakfast duo or afternoon snack!
Recipe Variations
If you’re in the mood to get creative (which I totally encourage), here are some fun variations to switch things up for your Pumpkin Pie Protein Smoothie:
-
Chocolate Pumpkin Twist
Add a tablespoon of unsweetened cocoa powder or chocolate protein powder for a richer, dessert-like drink. -
Nutty Delight
Toss in a tablespoon of almond butter or peanut butter for some extra protein and healthy fats. It’s like a peanut butter cup—pure deliciousness! -
Superfood Booster
Add a scoop of your favorite greens powder or a tablespoon of chia seeds for additional nutrition. -
Frozen Fruits Fusion
Swap out the banana for a ½ cup of frozen mango or peaches for a tropical spin on flavors. -
Dairy-Free & Nut-Free
Use oat milk or any seed milk if you’re both dairy-free and nut-free, keeping all those delicious flavors intact.
Chef’s Notes
Over the years, I’ve played with several ingredients to arrive at this perfect balance. There was one time I accidentally grabbed taco seasoning instead of pumpkin spice—turns out, that made for a very interesting smoothie experience! While I don’t recommend that particular switch, it reminded me how cooking is always a journey of discovery. This recipe has evolved as I’ve conducted "taste tests" with friends and family, tweaking it until it was just right—with smiles all around.
FAQs and Troubleshooting
1. It’s too thick! What should I do?
No problem! Just add a splash more almond milk and blend it until you reach your desired consistency.
2. Can I make this ahead of time?
Absolutely! You can prep the ingredients the night before and store them in the fridge. Just blend it in the morning!
3. What if I don’t have pumpkin puree?
No worries! Use sweet potato puree, or even consider blending some cooked carrots with a bit of honey or maple syrup.
4. Can I make this smoothie vegan?
This recipe is already vegan if you use a plant-based protein powder and skip the maple syrup or use a suitable sweetener.
Nutritional Info
While exact values may vary based on specific brands used and modifications, here’s a general approximation for the Pumpkin Pie Protein Smoothie:
- Calories: 320
- Protein: 20g
- Fat: 7g
- Carbohydrates: 52g
- Fiber: 7g
- Sugar: 14g (less if you skip the syrup)
- Vitamin A: 180% of the Daily Value (yay, pumpkin!)
This smoothie not only satisfies your taste buds but also provides a solid dose of nutrition, making it an excellent addition to your day.
Final Thoughts
Well, there you have it—a heartwarming, soul-satisfying Pumpkin Pie Protein Smoothie that’s as delicious as it is nutritious. I love how this recipe brings a taste of nostalgia while being a powerhouse of energy and refreshment!
You don’t need to wait for the leaves to change colors to enjoy the warm, cozy flavors of fall. You can whip up this delicious smoothie any time you need a little pick-me-up! Remember, cooking is about joy, experimentation, and connection—so don’t be afraid to make this recipe your own!
So, what are you waiting for? Go grab those ingredients, blend away, and then let me know how it turned out. Cheers to cozy vibes, delicious sips, and the joy of cooking! Enjoy! 🍂🥤
Print
Pumpkin Pie Protein Smoothie
- Total Time: 10 minutes
- Yield: 2 servings 1x
- Diet: Vegan
Description
A delicious and nutritious smoothie that embodies the warm flavors of pumpkin pie, packed with protein and fall spices.
Ingredients
- 1 cup pumpkin puree
- 1 ripe banana
- 1 cup almond milk (or milk of choice)
- 1 scoop vanilla protein powder
- 1/2 teaspoon pumpkin spice
- 1 tablespoon maple syrup (optional)
- Ice cubes
Instructions
- Gather your ingredients
- Start with the pumpkin puree
- Add the banana
- Mix in the milk
- Scoop up the protein powder
- Sprinkle in the spices
- Sweeten it up (if needed)
- Add ice cubes
- Taste test
- Serve & Enjoy!
Notes
Serve in a mason jar with whipped coconut cream or a sprinkle of pumpkin seeds for added flair.
- Prep Time: 10 minutes
- Cook Time: 0 minutes
- Category: Breakfast
- Method: Blending
- Cuisine: American
Nutrition
- Serving Size: 1 serving
- Calories: 320
- Sugar: 14g
- Sodium: 150mg
- Fat: 7g
- Saturated Fat: 0.5g
- Unsaturated Fat: 6.5g
- Trans Fat: 0g
- Carbohydrates: 52g
- Fiber: 7g
- Protein: 20g
- Cholesterol: 0mg
Keywords: pumpkin, smoothie, protein, fall flavors, vegan
Autumn 4-Ingredient Pumpkin Spice Caramel Mini Tarts
Pumpkin Spice Caramel Tarts: A Cozy Embrace of Fall
Welcome back, my fellow food enthusiasts! If you’re like me, the fall season brings a delightful wave of warmth and comfort—not just in the air but also on our plates. Today, I’m sharing a recipe that’s as cozy as snuggling under a blanket with your favorite book. We’re diving into the world of Pumpkin Spice Caramel Tarts. These little beauties combine the rich flavor of pumpkin, the warmth of spices, and the sweet allure of caramel. Sound delicious? Let’s bake!
There’s something magical about this time of year. The leaves begin to change, the air turns crisp, and the scent of pumpkin spice wafts through the neighborhood. With Halloween and Thanksgiving just around the corner, pumpkin-flavored treats become the stars of the show. That’s why I developed this recipe for Pumpkin Spice Caramel Tarts. They’re sweet, creamy, and just a little indulgent. Plus, who can resist that golden drizzle of caramel on top?
Let’s face it: the best moments in life often happen around the kitchen table. Whether it’s family gatherings, cozy dinners with friends, or just treating yourself after a long day, food plays a pivotal role in creating memories. That’s why I’m here to help guide you through this simple yet impressive dessert that anyone can master. With these tarts, you’ll have the perfect way to celebrate the fall—one delightful bite at a time. So, roll up your sleeves, grab your favorite apron, and let’s get to it!
Personal Story
I still remember the first time I made pumpkin tarts with my grandmother. I was about eight years old, standing on a kitchen stool, peering over the counter where she effortlessly mixed spices into her homemade pumpkin pie filling. The aroma enveloped us like a warm hug as we chatted about life—about school, our family, and how she used to make these tarts every autumn. Those moments spent with her—the laughter, the shared stories, and the happy mess we created—sparked my love for cooking. Fast forward a couple of decades, and those cherished memories inspired me to put a twist on that classic recipe with these delicious tarts.
Every time I take a bite out of these Pumpkin Spice Caramel Tarts, I’m reminded of those golden days filled with love and laughter. Food for me is about connection, and I want to pass that experience on to you. So, are you ready to create your own cozy memories in the kitchen?
Ingredients
Here’s what you’ll need to whip up these scrumptious tarts:
-
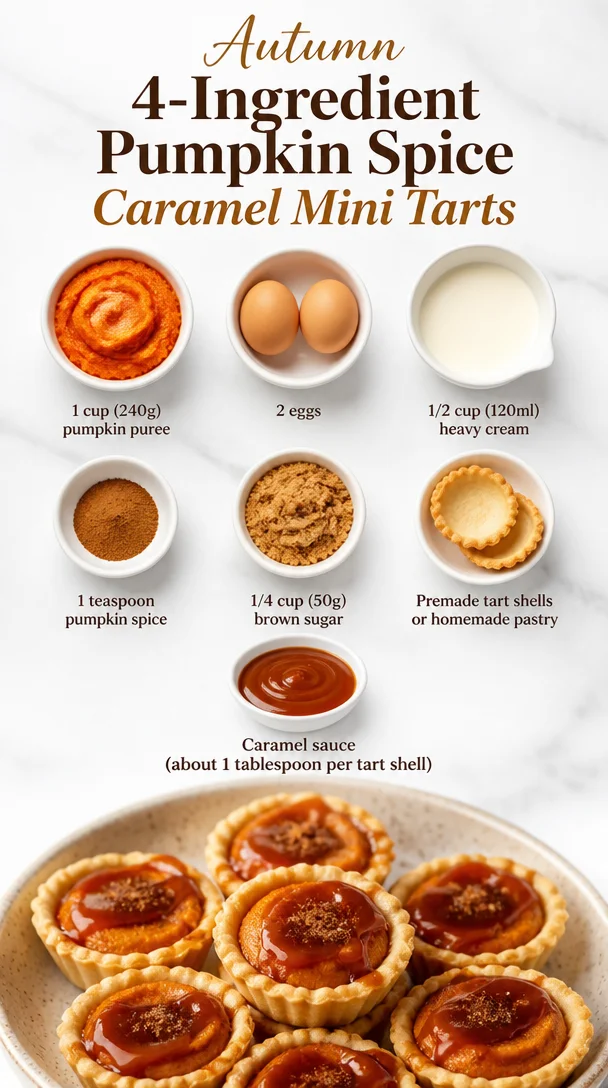
1 cup (240g) pumpkin puree
A key ingredient that brings that iconic fall flavor! You can use canned pumpkin (just ensure there’s no added sugar or spices) or make your own by roasting fresh pumpkins. -
2 eggs
These give structure and a smooth custard-like texture to the filling. You can substitute with flaxseed meal mixed with water (1 tablespoon flaxseed with 2.5 tablespoons water) for a vegan version. -
1/2 cup (120ml) heavy cream
Rich and creamy, this adds a luxurious mouthfeel. For a lighter option, you can use half-and-half or coconut cream for a dairy-free alternative. -
1 teaspoon pumpkin spice
This magical mix typically contains cinnamon, nutmeg, ginger, and cloves. You can easily make your own blend or buy it pre-mixed. If you want a kick, try a dash of cayenne for some heat! -
1/4 cup (50g) brown sugar
This adds depth and caramel notes to the tarts. You can swap it for coconut sugar if you’re looking for a healthier option, or use maple syrup for a unique taste! -
Premade tart shells or homemade pastry
If you’re short on time, premade shells are a lifesaver. But if you want to take the homemade route, a simple shortcrust pastry works brilliantly. -
Caramel sauce
Store-bought or homemade; either delight will do. If you’re feeling adventurous, add a pinch of sea salt to elevate the flavors!
Step-by-Step Instructions
Alright, time to roll up those sleeves! Let’s get down to the steps to create these beauties.
-
Prepare Your Tart Shells
If using premade shells, simply arrange them in a muffin tin. If you’re making your pastry, roll out your dough to about 1/8 inch thickness and cut into circles to fit your tart pans. Press them gently into the pans, trimming off any excess. Pre-bake for about 10 minutes at 350°F (175°C) until golden and set aside to cool. -
Make the Filling
In a large mixing bowl, combine the pumpkin puree, eggs, heavy cream, pumpkin spice, and brown sugar. Whisk until smooth. Take a moment to breathe in those amazing autumn aromas—this is where the magic starts! -
Fill the Tarts
Pour the pumpkin mixture evenly into each tart shell. Fill them about three-quarters full to leave some room for rising. You want them to bake evenly and not overflow. Trust me, your muffin tin will thank you! -
Bake
Pop those babies in the oven at 350°F (175°C) for 20-25 minutes. You’ll know they’re done when the filling is set and a toothpick comes out clean. Let them cool for a bit before you unleash that glorious caramel sauce. -
Drizzle the Caramel
Once the tarts have cooled to room temperature, drizzle about one tablespoon of caramel sauce on top of each tart. For an extra special touch, sprinkle a pinch of sea salt on top—yum! -
Serve
If you can resist the temptation to dive in immediately, let the tarts chill in the fridge for about 30 minutes for a smoother texture before serving.
Each bite will transport you right into a cozy autumn afternoon, full of laughter and love.
Serving Suggestions
Serving these Pumpkin Spice Caramel Tarts is where you can get really creative! Here are a few ideas:
-
Plating: Arrange the tarts on a simple white plate for a beautiful contrast. Drizzle some extra caramel on the plate for a beautifully artistic touch.
-
Garnish: Top each tart with a dollop of whipped cream or a scoop of vanilla ice cream to take it to the next level of indulgence!
-
Drink Pairing: Serve alongside a warm cup of spiced chai or a steaming mug of cider to blend those cozy flavors perfectly.
-
Presentation: If hosting a gathering, consider placing each tart in decorative cupcake liners to make serving easy and add a splash of color to your dessert table.
Let your creativity shine during this step; after all, we eat with our eyes first!
Recipe Variations
Now that you’ve mastered the classic recipe, here are a few fun variations to excite your taste buds:
-
Chocolate Drizzle: Add some extra indulgence by drizzling melted chocolate over the caramel.
-
Nutty Topper: Sprinkle chopped pecans or walnuts over the caramel topping for a delightful crunch!
-
Spiced Pecan Crust: Swap your pastry shell for a pecan shortcrust for a nutty twist.
-
Maple Pumpkin Tarts: Substitute the regular sugar with maple syrup to create a lovely maple flavor in the filling.
-
Vegan Version: Use almond or coconut milk cream, vegan eggs (like flaxseed), and a coconut crust for a deliciously plant-based option.
There are no rules, just possibilities! Let your imagination guide you and customize the tarts to your heart’s content.
Chef’s Notes
I can’t stress how much of a crowd-pleaser these tarts are! They’ve evolved so much since my first attempts at baking. Initially, they were a simple pumpkin pie in a crust, but as I experimented and tasted, I realized the addition of caramel took them from good to absolutely heavenly!
And just a fun story: one Thanksgiving, I forgot to add the sugar entirely! Instead of tossing them out, I drizzled extra caramel and called them “sugar-free tarts.” They were a hit! Embrace your kitchen mistakes, friends; they can lead to the most delightful surprises!
FAQs and Troubleshooting
-
What if my tarts overflow during baking?
Ensure you’re filling them just three-quarters full. If you do have overflow, gently trim away any excess filling when cool. -
My filling didn’t set properly. What happened?
It’s crucial to make sure you bake them long enough, especially if your oven runs cool. Give them the full time and keep an eye on them for that toothpick test! -
Can I freeze these tarts?
Absolutely! Just make sure they’re cooled completely before wrapping tightly and freezing. To serve, simply thaw in the fridge overnight and reheat gently. -
What if I can’t find pumpkin puree?
You can make your own by roasting and pureeing fresh pumpkins or, in a pinch, use butternut squash for a similar flavor and texture.
Nutritional Info
If you’re keeping an eye on nutrition, here’s a quick breakdown per tart:
- Calories: Approximately 250
- Protein: 3g
- Fat: 12g
- Carbohydrates: 35g
- Fiber: 2g
- Sugar: 10g
Remember, it’s all about moderation and balance. Enjoy these tarts as a sweet treat during the fall festivities, savoring every rich bite!
Final Thoughts
There you have it! A cozy, delectable recipe for Pumpkin Spice Caramel Tarts that not only tastes great but also brings a sense of warmth and nostalgia to your kitchen. As you carve out a bit of time to create these tarts, remember to embrace the entire experience—the mixing, the baking, the delicious smells wafting through your home, and those shared moments over the table. Food is about connection, about love, and about celebrating the seasons.
So, whether you’re sharing these tarts with loved ones or indulging in a sweet moment all by yourself, know that each bite is a little piece of joy, a slice of comfort, and your key to making memories worth savoring. Happy baking, friends! Let’s keep the kitchen sizzling!
Print
Pumpkin Spice Caramel Tarts
- Total Time: 45 minutes
- Yield: 12 tarts 1x
- Diet: Vegetarian
Description
Delightful tarts that combine rich pumpkin flavor, warming spices, and sweet caramel, perfect for fall festivities.
Ingredients
- 1 cup (240g) pumpkin puree
- 2 eggs
- 1/2 cup (120ml) heavy cream
- 1 teaspoon pumpkin spice
- 1/4 cup (50g) brown sugar
- Premade tart shells or homemade pastry
- Caramel sauce
Instructions
- Prepare your tart shells by arranging premade shells in a muffin tin or rolling out homemade pastry and cutting into circles.
- Make the filling by combining pumpkin puree, eggs, heavy cream, pumpkin spice, and brown sugar in a bowl.
- Fill the tarts with the pumpkin mixture, filling them about three-quarters full.
- Bake in a preheated oven at 350°F (175°C) for 20-25 minutes.
- Drizzle caramel sauce on top of cooled tarts before serving.
- Serve chilled or at room temperature for the best texture.
Notes
These tarts can be served with whipped cream or ice cream for added indulgence. A sprinkle of sea salt can enhance the caramel flavor.
- Prep Time: 15 minutes
- Cook Time: 30 minutes
- Category: Dessert
- Method: Baking
- Cuisine: American
Nutrition
- Serving Size: 1 tart
- Calories: 250
- Sugar: 10g
- Sodium: 150mg
- Fat: 12g
- Saturated Fat: 7g
- Unsaturated Fat: 4g
- Trans Fat: 0g
- Carbohydrates: 35g
- Fiber: 2g
- Protein: 3g
- Cholesterol: 70mg
Keywords: pumpkin tarts, fall dessert, caramel, pumpkin spice
Creamy Mexican Street Corn Soup: 30-Minute Weeknight Dinner
Discover the Comfort of Mexican Street Corn Soup
Hey there, food lovers! Welcome back to Feastical, the warm and fuzzy culinary corner where we whip up scrumptious dishes that’ll make you feel right at home. Today, we’re diving into a delightful bowl of Mexican Street Corn Soup—a dish that’s as vibrant as it is comforting. If you’ve ever walked past a street vendor and caught the alluring aroma of grilled corn slathered with creamy goodness, then you’ll want to grab your spatula because we’re about to recreate that cozy experience in a soup form!
A Touch of Tradition
Now, before we get our hands dirty in the kitchen, let me take you on a little nostalgic journey. Growing up, my family would often visit our local farmer’s market during the summer. It was a bustling hub of color, fragrance, and, of course, food! I’ll never forget the excitement of wandering through the stalls, my senses buzzing with the lively chatter and the smell of fresh produce mingling with something more tantalizing—charred corn on the cob!
Those vendors would sprinkle Tajín, squeeze fresh lime, and dollop on creamy toppings. With each bite, I could taste the sunshine of summer evenings and the warmth of family. It’s those cherished memories that inspired me to turn such a cherished street food into a cozy bowl of soup you can enjoy any time of year.
Let’s gather our ingredients and get cooking!
Ingredients
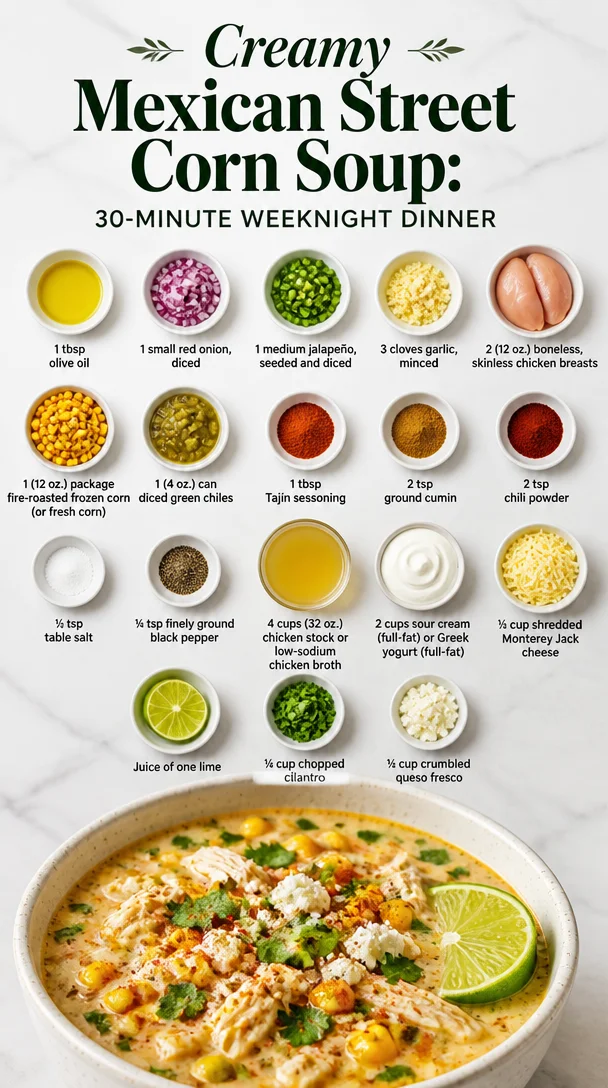
Here’s what you’ll need to create this delightful Mexican Street Corn Soup:
-
1 tbsp olive oil: A versatile oil that adds flavor and helps sauté the vegetables. You can swap it out for avocado oil for a nuttier flavor!
-
1 small red onion, diced: This offers sweetness and depth. Yellow onions work as a great substitute.
-
1 medium jalapeño, seeded and diced: Adds a nice kick! Feel free to use green bell pepper if you prefer a milder flavor.
-
3 cloves garlic, minced: Garlic is a flavor powerhouse. If you’re out of fresh cloves, garlic powder can work in a pinch—just use about 1 teaspoon.
-
2 (12 oz.) boneless, skinless chicken breasts: Provides protein and substance. You can replace chicken with shredded rotisserie chicken or even tofu for a vegetarian twist.
-
1 (12 oz.) package fire-roasted frozen corn (or fresh corn): Fire-roasted adds a depth of flavor that regular corn doesn’t have. Fresh off the cob is fantastic if you’re feeling fancy!
-
1 (4 oz.) can diced green chiles: This introduces a subtle heat and extra flavor. Look for mild if you’re sensitive to spice.
-
1 tbsp Tajín seasoning: This is packed with lime and chili flavor that brightens the soup. If you can’t find it, a mix of chili powder and lime zest will work well.
-
2 tsp ground cumin: Earthy and warm. A key ingredient in many Mexican dishes. If you’re out, coriander comes close!
-
2 tsp chili powder: Another flavor enhancer! Feel free to adjust based on how spicy you like it.
-
½ tsp table salt: Enhances all flavors. If you’re watching your sodium, you can use reduced-sodium salt.
-
¼ tsp finely ground black pepper: For a gentle kick! Use white pepper if you prefer a milder taste without the black specks.
-
4 cups (32 oz.) chicken stock or low-sodium chicken broth: This is the heart of the soup’s flavor base. Substitute with vegetable stock for a meatless version.
-
2 cups sour cream (full-fat) or Greek yogurt (full-fat): Creaminess galore! Greek yogurt is a healthier option while still being delicious.
-
½ cup shredded Monterey Jack cheese: Melts beautifully and adds richness. Cheddar or pepper jack are excellent alternatives too.
-
Juice of one lime: Brightens the whole dish! Lemons can also be used in a pinch.
-
¼ cup chopped cilantro: Fresh and fragrant! If cilantro isn’t your thing, basil or parsley can substitute.
-
½ cup crumbled queso fresco: For that signature topping. Feta works if you need a substitute.
Step-by-Step Instructions
Alright, let’s get cooking! Follow these steps to create your very own bowl of Mexican Street Corn Soup:
-
Heat the oil: In a large pot, heat your tablespoon of olive oil over medium heat. This is where the magic begins, so let it warm up for about a minute.
-
Sauté the veggies: Add the diced red onion and jalapeño to the pot. Sauté them for about 3-4 minutes—until the onion is translucent and fragrant. This step is crucial for building flavor, so don’t rush it!
-
Garlic bliss: Toss in the minced garlic and stir for about 30 seconds until it becomes aromatic. Be careful not to let it burn, or you’ll end up with bitterness in your soup.
-
Chicken time: Add the boneless, skinless chicken breasts to the mixture. Sear both sides until they’re slightly browned, about 4-5 minutes. This step helps seal in the juices, ensuring that every bite is tender and juicy.
-
Fire-roasted corn and chiles: Once your chicken is just about done, throw in the fire-roasted corn and diced green chiles. The combination of these sweet and spicy ingredients will elevate your soup to new heights!
-
Season it up: Sprinkle in the Tajín seasoning, ground cumin, chili powder, salt, and black pepper. Stir everything together and let those flavors mingle for a couple of minutes.
-
Add the stock: Pour in the chicken stock or broth. Bring the soup to a boil, then reduce heat and let it simmer uncovered for about 10-15 minutes. This allows the chicken to cook through while your kitchen fills with heavenly aromas.
-
Shred the chicken: Using two forks, remove the chicken from the pot and shred it into bite-sized pieces. Return it to the pot and stir well. This adds heartiness and spreads the chicken flavor throughout the soup.
-
Creamy goodness: Stir in the sour cream or Greek yogurt. This is where things get beautifully creamy, so mix thoroughly to combine every bit of richness into the broth.
-
Final touches: Squeeze in the juice of that lime, then toss in the chopped cilantro. Stir well and let the soup simmer for an additional 2-3 minutes to warm through.
Serving Suggestions
Now that your soup is ready, let’s talk presentation. I love serving it in wide, shallow bowls to really showcase the creamy and colorful ingredients.
-
Garnish it up: Top each bowl generously with crumbled queso fresco, a sprinkle of extra cilantro, and even a slice of lime on the side for that extra zesty kick!
-
Side it up: Pair it with crunchy tortilla chips or warm, buttery corn muffins for a delightful contrast in texture. You could even offer a side of guacamole—because who doesn’t love that?
-
Make it a meal: For a heartier meal, serve this soup alongside a fresh avocado salad dressed in lime vinaigrette. The brightness of the salad perfectly complements the rich soup.
Recipe Variations
Let’s jazz things up a bit! Here are a few creative twists you can take on this Mexican Street Corn Soup:
-
Spicy avocado: Add diced avocado on top for a creamy texture with every bite. It elevates the flavor and adds healthy fats!
-
Smoky flavor: For that outdoor grill vibe, toss in some smoked paprika along with your spices to get that charred taste reminiscent of street food.
-
Different proteins: Try using shrimp or chorizo instead of chicken. Both options will add a distinct flavor profile to the soup.
-
Vegetarian delight: Substitute the chicken with roasted cauliflower or chickpeas for a satisfying plant-based meal that still packs a punch!
-
Pasta twist: If you want to make it heartier, serve it with a handful of cooked small pasta, like ditalini or elbow macaroni, to turn it into a fun, filling dish.
Chef’s Notes
I can’t stress enough how versatile this soup is. It has evolved over the years as I’ve tried to reinvent classic comfort foods into family favorites. The first time I introduced it at a family gathering, I made it extra spicy—what a mistake! But now, I’d say I’ve perfected it to satisfy even the pickiest eaters. The beauty of cooking is how we learn, adapt, and pour a little bit of ourselves into each dish!
If you find yourself with leftovers, don’t throw them away! This soup tastes even better the next day, as the flavors meld beautifully. Just be sure to add a splash of chicken broth when reheating it to keep that creamy texture intact.
FAQs and Troubleshooting
Q1: Can I use canned corn instead of frozen?
A1: Absolutely! Canned corn will work just fine. Drain and rinse it before adding to the soup to reduce extra salt.
Q2: What if my soup is too thick?
A2: No worries! Simply add a splash of chicken stock or water while heating to reach your desired consistency.
Q3: How can I make this vegetarian?
A3: Just replace the chicken with black beans and use vegetable broth as your base; you’ll retain that heartiness and enjoy a fantastic flavor!
Q4: Can I freeze this soup?
A4: Yes! Make sure it’s completely cooled before transferring to airtight containers. Just thaw and heat when you’re ready for a tasty meal!
Nutritional Info
This Mexican Street Corn Soup is not only delicious but also packed with nutrients. Here’s a quick breakdown per serving (about 1 cup):
- Calories: ~350
- Protein: 25g
- Total Fat: 20g
- Saturated Fat: 10g
- Carbohydrates: 24g
- Fiber: 3g
- Sugar: 5g
- Sodium: ~650mg
(Nutritional values may vary based on specific ingredients used.)
The combination of lean protein from the chicken, wholesome fats from the cream, and fiber from the vegetables makes this dish satisfying without being overly indulgent.
Final Thoughts
So there you have it—Mexican Street Corn Soup that’s teeming with love, warmth, and that wonderful, comforting nostalgia of street-side vendor delight. It’s a kitchen adventure that’s simple yet profound, and I can’t wait for you to share it with your friends and family.
Remember, the best part of cooking is not just the final product, but the stories you create and memories you share while preparing the meal. So, put on your apron, turn on your favorite tunes, and make a pot of this heavenly soup today! From my kitchen to yours, happy cooking!
Now, who’s ready to dig in?
Print
Mexican Street Corn Soup
- Total Time: 45 minutes
- Yield: 4 servings 1x
- Diet: Gluten-Free
Description
A comforting bowl of vibrant Mexican Street Corn Soup that captures the essence of street-side vendors with every spoonful.
Ingredients
- 1 tbsp olive oil
- 1 small red onion, diced
- 1 medium jalapeño, seeded and diced
- 3 cloves garlic, minced
- 2 (12 oz.) boneless, skinless chicken breasts
- 1 (12 oz.) package fire-roasted frozen corn (or fresh corn)
- 1 (4 oz.) can diced green chiles
- 1 tbsp Tajín seasoning
- 2 tsp ground cumin
- 2 tsp chili powder
- ½ tsp table salt
- ¼ tsp finely ground black pepper
- 4 cups (32 oz.) chicken stock or low-sodium chicken broth
- 2 cups sour cream (full-fat) or Greek yogurt (full-fat)
- ½ cup shredded Monterey Jack cheese
- Juice of one lime
- ¼ cup chopped cilantro
- ½ cup crumbled queso fresco
Instructions
- Heat the oil: In a large pot, heat your tablespoon of olive oil over medium heat for about a minute.
- Sauté the veggies: Add the diced red onion and jalapeño to the pot, sautéing for about 3-4 minutes until the onion is translucent.
- Garlic bliss: Toss in the minced garlic and stir for about 30 seconds until it becomes aromatic.
- Chicken time: Add the boneless, skinless chicken breasts to the mixture and sear both sides for about 4-5 minutes.
- Fire-roasted corn and chiles: Once the chicken is just about done, add the fire-roasted corn and diced green chiles.
- Season it up: Sprinkle in the Tajín seasoning, ground cumin, chili powder, salt, and black pepper, stirring to combine.
- Add the stock: Pour in the chicken stock or broth, bring to a boil, then reduce heat and let it simmer uncovered for about 10-15 minutes.
- Shred the chicken: Remove the chicken from the pot and shred it into bite-sized pieces, then return to the pot.
- Creamy goodness: Stir in the sour cream or Greek yogurt thoroughly to combine.
- Final touches: Squeeze in the lime juice, add chopped cilantro, and let it simmer for an additional 2-3 minutes.
Notes
For a heartier meal, serve with crunchy tortilla chips or warm corn muffins. Leftovers taste even better the next day!
- Prep Time: 15 minutes
- Cook Time: 30 minutes
- Category: Soup
- Method: Cooking
- Cuisine: Mexican
Nutrition
- Serving Size: 1 cup
- Calories: 350
- Sugar: 5g
- Sodium: 650mg
- Fat: 20g
- Saturated Fat: 10g
- Unsaturated Fat: 8g
- Trans Fat: 0g
- Carbohydrates: 24g
- Fiber: 3g
- Protein: 25g
- Cholesterol: 90mg
Keywords: Mexican soup, street corn soup, comfort food, corn recipes, easy soup recipes
Iced Pumpkin Spice Oatmeal Cookies
Iced Pumpkin Spice Oatmeal Cookies: A Cozy Fall Delight
Hey there, food lovers! It’s your friend Beau Collier, and today we’re diving into a warm, comforting treat that’ll make your taste buds do a happy dance. Yes, you guessed it! We’re talking about Iced Pumpkin Spice Oatmeal Cookies. The hype around pumpkin spice might be real, but these cookies serve up a delightful twist that will make you feel all warm and fuzzy inside—no matter the season!
Picture this: a cozy afternoon, the leaves are just beginning to turn, and there’s a crispness in the air. This is the kind of day where baking is absolutely essential. And what better way to embrace those autumn vibes than with these soft, chewy oatmeal cookies, nestled in pumpkin spice? They’re perfect for sharing (or not!). Don’t worry; I won’t judge if you decide to keep the whole batch for yourself.
Why Iced Pumpkin Spice Oatmeal Cookies?
These cookies combine the hearty goodness of rolled oats, the warm embrace of pumpkin pie spice, and a lovely icing that’ll make you feel like you’re indulging in a hug from Grandma. Whether you’re serving them at a gathering, lugging them to the office, or simply enjoying them as an afternoon snack, they deliver flavor and joy in every bite. So, grab your apron and let’s whip up this comforting treat together!
A Cozy Memory
Every time I bake these Iced Pumpkin Spice Oatmeal Cookies, I’m transported back to my childhood kitchen. I vividly remember standing on a sturdy stool, eyes wide with excitement, watching my mom put together a batch. The air was filled with the spicy aroma of cinnamon and nutmeg, making its way into my little heart and igniting my love for baking.
We’d make these cookies just as the leaves changed colors, each batch turning out a little different based on the slight tweaks we’d make. Sometimes we’d mix in chocolate chips, other times, we’d throw in some dried cranberries. The anticipation of waiting for them to cool before slathering on that sweet icing was pure torture but oh-so-rewarding!
Now, baking these cookies alone allows me to reminisce about those cherished moments filled with laughter, flour fights, and the feeling of being immersed in love. It brings my heart joy to recreate that experience now and share it with all of you.
Ingredients
Ready to gather your ingredients? Here’s what you’ll need to create these scrumptious cookies:
-
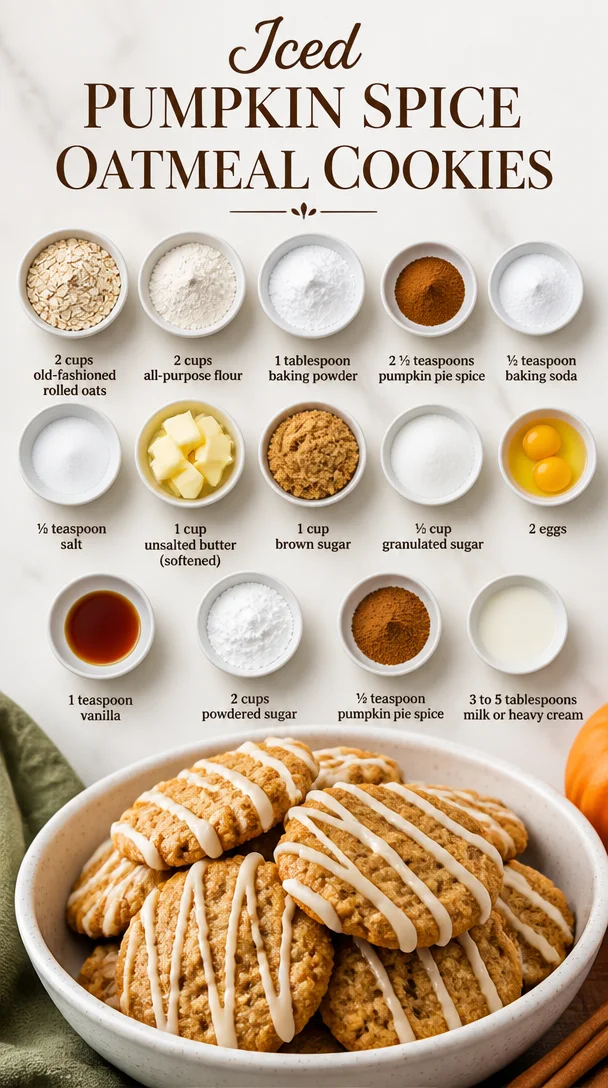
2 cups old-fashioned rolled oats
These hearty oats are key to achieving that delightful chewiness! If you’re in a pinch, quick oats can work, but they’ll yield a different texture—less chewy, a bit more crumbly. -
2 cups all-purpose flour
This is your base. It provides structure. If you want to experiment, whole wheat flour can cut through the sweetness a bit, giving a nice nutty flavor—especially good during fall! -
1 tablespoon baking powder
This little magic ingredient is what will puff your cookies up! If you’re out, you could use 1/3 teaspoon of baking soda plus 2/3 teaspoon of cream of tartar as a swap. -
2 ½ teaspoons pumpkin pie spice
This is where the magic begins! You could mix your own spices (cinnamon, nutmeg, ginger, and allspice), but nothing beats the convenience of pumpkin pie spice! -
½ teaspoon baking soda
This helps with the spread of your cookies and keeps them from getting too dense. If you’re using only baking powder, you might want to increase the quantity slightly. -
½ teaspoon salt
Salt elevates flavor. Don’t skip it! It balances the sweetness beautifully. -
1 cup unsalted butter (softened)
This makes everything rich and creamy. If you’re looking for a lower-calorie option, you can use coconut oil or even unsweetened applesauce for a softer cookie. -
1 cup brown sugar
Bringing that deep, caramel flavor to your cookies. Light brown sugar works just as well if that’s what you’ve got on hand! -
½ cup granulated sugar
For added sweetness and that pretty contrast in textures. -
2 eggs
They add moisture and help bind everything together. If you’re going egg-free, flax eggs (1 tablespoon of ground flaxseed mixed with 2.5 tablespoons of water) can do the trick! -
1 teaspoon vanilla
A splash of vanilla is essential for depth. Go for pure vanilla extract when you can, but imitation works too in a pinch. -
2 cups powdered sugar
This is for icing your cookies—a sweetening sensation that just makes everything better. -
½ teaspoon pumpkin pie spice
A hint of this in the icing ties it all together beautifully. -
3 to 5 tablespoons milk or heavy cream
This is to achieve that perfect icing consistency. Adjust as needed; it’s all about getting it right for your personal taste!
Step-by-Step Instructions
Now that we’ve got our ingredients, let’s dive into the deliciousness of making these cookies together! Follow these steps for kitchen fun that will create aromatic bliss in your home.
-
Preheat Your Oven: Set your oven to 350°F (175°C) while you gather your ingredients. It’s always best to start with a warm oven so your cookies can spread just right.
-
Mix the Dry Ingredients: In a large bowl, whisk together the rolled oats, flour, baking powder, pumpkin pie spice, baking soda, and salt. This is a crucial step as it ensures that the leavening agents and spices are evenly distributed, so every bite is as flavorful as the next.
-
Cream the Butters and Sugars: In another bowl, beat together the softened unsalted butter, brown sugar, and granulated sugar until it’s light and fluffy. Aim for about 2-3 minutes; this aeration is key to soft cookies! You can use an electric mixer, but a good ol’ wooden spoon works just fine—just make sure you put in a little elbow grease.
-
Add Eggs and Vanilla: Beat in the eggs, one at a time, along with the vanilla extract. Mix just until combined—don’t overmix here!
-
Combine Wet and Dry Ingredients: Now, slowly add the dry mixture to the wet mixture, stirring until just combined. Avoid the temptation to overmix; we want a soft dough, not a tough cookie!
-
Scoop and Bake: Use a cookie scoop or two spoons to drop rounded tablespoons of dough onto ungreased or parchment-lined baking sheets. Leave a couple of inches apart to allow for spreading!
-
Bake: Pop them in your preheated oven for about 10-12 minutes. You’ll want them to be golden around the edges with soft centers. Don’t worry if they look underdone; they’ll continue to cook on the baking sheet as they cool!
-
Cool Down: Let those beauties cool on the baking sheet for about 5 minutes before transferring them to a wire rack. This will help firm them up!
-
Make the Icing: While your cookies are cooling, whisk together the powdered sugar, pumpkin pie spice, and enough milk/cream to reach a drizzle-able consistency in a small bowl.
-
Ice Those Cookies: Once the cookies are completely cool, drizzle the icing over the tops! Go wild—there are no rules here!
Serving Suggestions
How to serve these beauties? Well, they’re perfect for any occasion! Arrange them on a cozy platter and maybe throw in a sprinkle of cinnamon for garnishing. Consider pairing them with a cup of warm chai tea or your favorite coffee blend. The spices really complement each other, creating a delightful sensory experience.
For a party, stack them high on a dessert bar, alongside some other fall-themed snacks. A lovely pumpkin spice latte would be the perfect accompanying drink. Have some fun with it; you could even wrap a couple of cookies in twine for an adorable gift!
Recipe Variations
Here’s where you get to have fun! Feel free to customize your cookies with these creative twists:
-
Chocolate Chip Addition: Toss in a cup of semi-sweet or dark chocolate chips for those chocoholics in your life. It creates a fabulous combination with the spicy flavor.
-
Dried Fruit Delight: Add a half cup of raisins or chopped dried cranberries for a fruity kick!
-
Nutty Crunch: Stir in some chopped pecans or walnuts for added texture. The crunch balances out the softness beautifully!
-
Gluten-Free Option: Swap out the all-purpose flour for a gluten-free blend to cater to your gluten-sensitive friends.
-
Maple Icing: Instead of the traditional icing, make a maple-flavored icing by substituting maple syrup for some of the milk—sweet and deliciously autumnal!
Chef’s Notes
These cookies have a little piece of my heart. Over the years, I’ve found ways to simplify things or make them even more delightful. I started adding the icing when I wanted to elevate them—it’s like the cherry on top! An ex-chef friend once challenged me to experiment with the spices, leading me to play with a bit of cardamom and nutmeg in place of some of the pumpkin spice. You learn something new every day in the kitchen, don’t you?
Baking is a forgiving art; if things go wrong, you can always turn a mishap into a “chef’s special." My advice? Embrace the journey of cooking and remember—the most important ingredient is love!
FAQs and Troubleshooting
1. My cookies turned out flat! What did I do wrong?
Flat cookies typically result from adding too much fat or not enough flour. Make sure your measurements are accurate especially with the flour. Also, check the freshness of your baking powder and baking soda; old leaveners won’t give your cookies the rise they need!
2. How do I store leftover cookies?
Store your cookies in an airtight container at room temperature for up to a week. You can also freeze them! Just place them in a single layer in a freezer bag. They’ll keep for up to three months—perfect for treats later!
3. My icing is too runny. What can I do?
If your icing is too runny, simply add more powdered sugar until you reach your desired consistency. A few tablespoons will usually do the trick!
4. Can I use pumpkin puree instead of pumpkin pie spice?
While you could technically do this, it’s advisable to stick to the spice blend as it gives that concentrated flavor burst. If you really want to use pumpkin puree, just reduce the wet ingredients slightly and increase the spices to compensate.
Nutritional Info
When it comes to nutritional information, these cookies sit comfortably between indulgence and moderation. Each cookie packs in about:
- Calories: 150
- Fat: 7g
- Carbohydrates: 21g
- Protein: 2g
- Fiber: 1g
Of course, these values can vary depending on tweaking and recipe variations. If you’re looking to lighten them up, consider using lower-fat alternatives wherever possible. But hey, sometimes it’s just nice to treat yourself!
Final Thoughts
And there you have it! A delicious journey into the world of Iced Pumpkin Spice Oatmeal Cookies. Whether you choose to stick with the classic recipe or add your personal flair, remember that cooking is about joy, creativity, and sharing.
I hope you’re inspired to whip up a batch soon. As always, take your time, enjoy the process, and don’t forget those kitchen adventures come with a sprinkle of laughter and a dash of love. Happy baking, my friends, and may your fall days be filled with warmth, comfort, and, of course, a cookie (or three)! 🍪💛
Let me know how they turn out! If you have any other foodie questions or need more kitchen inspiration, I’m here to help!
Print
Iced Pumpkin Spice Oatmeal Cookies
- Total Time: 27 minutes
- Yield: 24 cookies 1x
- Diet: Vegetarian
Description
A warm and comforting treat perfect for fall, these soft, chewy oatmeal cookies are infused with pumpkin spice and topped with a delightful icing.
Ingredients
- 2 cups old-fashioned rolled oats
- 2 cups all-purpose flour
- 1 tablespoon baking powder
- 2 ½ teaspoons pumpkin pie spice
- ½ teaspoon baking soda
- ½ teaspoon salt
- 1 cup unsalted butter (softened)
- 1 cup brown sugar
- ½ cup granulated sugar
- 2 eggs
- 1 teaspoon vanilla
- 2 cups powdered sugar
- ½ teaspoon pumpkin pie spice (for icing)
- 3 to 5 tablespoons milk or heavy cream
Instructions
- Preheat your oven to 350°F (175°C) while you gather your ingredients.
- Mix the dry ingredients: In a large bowl, whisk together the rolled oats, flour, baking powder, pumpkin pie spice, baking soda, and salt.
- Cream the butters and sugars: In another bowl, beat together softened unsalted butter, brown sugar, and granulated sugar until light and fluffy, about 2-3 minutes.
- Add eggs and vanilla: Beat in eggs one at a time, along with the vanilla extract.
- Combine the wet and dry ingredients: Slowly add the dry mixture to the wet mixture, stirring until just combined.
- Scoop and bake: Use a cookie scoop to drop rounded tablespoons of dough onto ungreased or parchment-lined baking sheets.
- Bake: Pop them in your preheated oven for 10-12 minutes until golden around the edges.
- Cool down: Let the cookies cool on the baking sheet for about 5 minutes before transferring them to a wire rack.
- Make the icing: Whisk together powdered sugar, pumpkin pie spice, and enough milk/cream to reach a drizzle-able consistency.
- Ice those cookies: Once completely cool, drizzle the icing over the tops!
Notes
For variations, consider adding chocolate chips, dried cranberries, or using gluten-free flour.
- Prep Time: 15 minutes
- Cook Time: 12 minutes
- Category: Dessert
- Method: Baking
- Cuisine: American
Nutrition
- Serving Size: 1 cookie
- Calories: 150
- Sugar: 10g
- Sodium: 100mg
- Fat: 7g
- Saturated Fat: 4g
- Unsaturated Fat: 2g
- Trans Fat: 0g
- Carbohydrates: 21g
- Fiber: 1g
- Protein: 2g
- Cholesterol: 30mg
Keywords: pumpkin, oatmeal cookies, fall baking, dessert, cozy treats
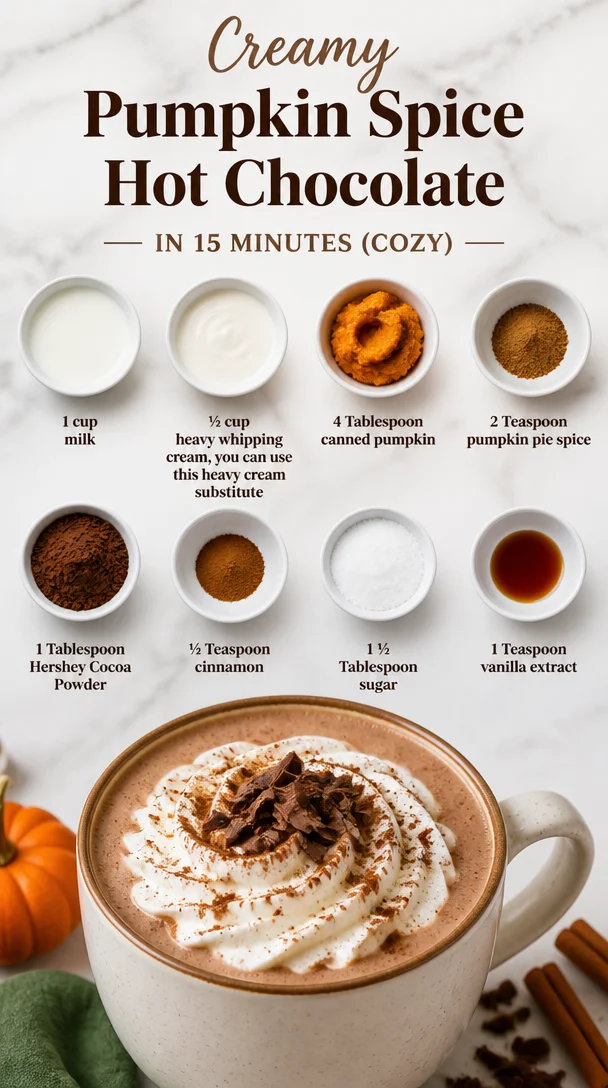
Creamy Pumpkin Spice Hot Chocolate in 15 Minutes (Cozy)
Easy Pumpkin Spice Hot Chocolate: A Comforting Fall Delight
Hey, food friends! 🍂 As the leaves turn vibrant shades of orange and gold, there’s something magical about curling up with a warm drink that whispers comfort and coziness. If you’ve been dreaming of a rich, creamy hot chocolate that captures the essence of autumn, then you’re in for a treat! Today, we’re diving headfirst into making the Easiest Pumpkin Spice Hot Chocolate that’s perfect for those chilly days when all you want is a warm hug in a mug.
I created this delightful recipe not just because it’s delicious, but because it brings me back to cherished memories. Picture this: a crisp fall afternoon, my grandma’s kitchen filled with the sweet aroma of spices and chocolate, and the laughter of family gathering around the table. Those moments inspired me to share this simple yet soulful drink that everyone can enjoy, whether you’re a whiz with a whisk or still trying to locate your spatula. So, let’s don our aprons and get started!
A Taste of Nostalgia
Growing up, fall was a time for family traditions, and there was one beverage that was a staple in our household: hot chocolate. My grandma had a magical way of transforming the simplest ingredients into something extraordinary. I fondly recall the evenings we’d spend in the kitchen, the warm glow of the lights reflecting off the colorful autumn leaves peeking through the window.
One of my favorite memories is when we first introduced pumpkin into our beloved hot chocolate. We’d sit by the fire, wrapped in cozy blankets, sipping as we watched the world outside transform. The added pumpkin turned our favorite drink into something festive, and the spices filled the room with a sense of comfort and warmth. Today, every sip of this Easy Pumpkin Spice Hot Chocolate takes me back to those beautiful autumn nights. And now, I invite you to create those memories in your kitchen!
Ingredients
Now that we’re feeling all cozy, let’s talk about what you’ll need for this delightful drink. Here’s your simple ingredient list:
-
1 cup milk
Regular cow’s milk works best, but you can totally use almond, oat, or coconut milk if you’re looking for a dairy-free option! -
½ cup heavy whipping cream
This adds creaminess and richness to your hot chocolate. If you want a lighter version, feel free to substitute with half-and-half or coconut cream for a dairy-free alternative. -
4 Tablespoon canned pumpkin
Make sure it’s pure pumpkin puree from the can, not pumpkin pie filling! This will give you that rich, autumn flavor. -
2 Teaspoon pumpkin pie spice
You can find this pre-mixed at most grocery stores, but if you’re feeling adventurous, mix your own with cinnamon, nutmeg, ginger, and allspice. Yum! -
1 Tablespoon Hershey Cocoa Powder
This gives your drink the chocolatey goodness we all crave. You can swap this for any other cocoa powder you fancy. -
½ Teaspoon cinnamon
A little extra kick of warmth! You can adjust this to taste, especially if you’re a cinnamon lover like me. -
1 ½ Tablespoon sugar
Sweeten to your preference—honey, maple syrup, or even agave syrup work well too! -
1 Teaspoon vanilla extract
This elevates the flavors and adds a lovely aroma to your drink. Don’t skimp on this one, it’s a game changer!
Step-by-Step Instructions
Alright, time to roll up those sleeves and bring this warm hug to life. Follow these steps, and I promise you’ll have a steaming cup of happiness in no time!
-
Mix the Pumpkin Base
In a medium saucepan over low heat, combine the canned pumpkin, pumpkin pie spice, cocoa powder, and sugar. Stir this mixture together until it’s smooth and well-combined. (Chef Tip: Low heat ensures you don’t scorch the pumpkin while adding flavor. You want everything to blend beautifully!) -
Add Milk and Cream
Gradually whisk in the milk and heavy whipping cream. (Chef Insight: Whisking constantly while adding the liquids prevents any lumps from forming. Plus, your arm gets a mini workout!) Keep stirring until the mixture is heated through but not boiling— we’re looking for a gentle simmer. -
Introduce the Flavors
Once your hot chocolate is warm, stir in the vanilla extract and cinnamon. Taste this dreamy concoction and adjust the sweetness if you desire. (Chef Hack: If it’s not sweet enough, add a bit of maple syrup instead of more sugar for a lovely twist!) -
Serve with Love
Pour your pumpkin spice hot chocolate into your favorite mugs. You can top it with whipped cream, a sprinkle of extra pumpkin pie spice, or even some chocolate shavings for that gourmet touch! (Tip: Use a marshmallow or two if you’re feeling nostalgic; they make everything more fun!) -
Relax & Enjoy
Take a moment to inhale that delicious aroma and savor the first sip. Nothing beats the feeling of creating something that warms your body and soul!
Serving Suggestions
When it comes to serving, presentation can elevate your drink from ordinary to spectacular! Here are a few creative ideas:
-
Mug Magic: Choose festive mugs that match the season. A chunky ceramic mug can keep your drink warm longer and adds a handmade charm.
-
Whipped Cream Wonders: Top your hot chocolate with dollops of whipped cream. You can even get fancy with a drizzle of caramel or chocolate syrup for an irresistible treat.
-
Garnish Time: Consider adding a cinnamon stick or a sprinkle of pumpkin pie spice on top. It not only looks beautiful, but it also enhances the flavors as you sip.
-
Pair It Up: Enjoy your hot chocolate alongside a spiced scone, pumpkin bread, or even some buttery popcorn for a cozy movie night treat!
Recipe Variations
Let your creativity shine! Here are some delightful twists you can try:
-
Spicy Pumpkin Mocha: Add a shot of espresso for a caffeinated kick. The chocolate and coffee flavors meld beautifully with the pumpkin!
-
Nutty Pumpkin Spice: Incorporate a tablespoon of almond or hazelnut extract for a delightful nutty flavor. You could even top with crushed nuts for added texture.
-
Choco-Mint Pumpkin Delight: Add a drop of peppermint extract for a minty spin. Perfect for those who love a hint of freshness!
-
Vegan & Dairy-Free: Use almond or oat milk and coconut cream for a completely dairy-free version. Adjust sweeteners to your liking!
-
Low-Cal Pumpkin Hot Cocoa: Substitute the sugar with stevia or another favorite sweetener, and use skim milk for a lighter and lower-calorie option.
Chef’s Notes
Fun fact: Last year, I attempted an entire pumpkin-themed drink menu for my fall gathering. Everything was going smoothly until I accidentally grabbed the cayenne pepper instead of the pumpkin pie spice! Let’s just say, there was a lot of surprised faces that evening. Remember, friends, always double-check your spices!
Through the years, my Easy Pumpkin Spice Hot Chocolate has evolved from just a simple recipe to a beloved tradition, one that warms my heart as much as it warms my hands. I love seeing families gather and create memories around this drink every fall. Feel free to add your own twists to make it your own!
FAQs and Troubleshooting
What should I do if my hot chocolate is too thick?
If your hot chocolate seems too thick for your liking, simply whisk in more milk, one tablespoon at a time, until you reach the desired consistency.
Can I make this ahead of time?
Absolutely! You can make a batch and store it in the fridge. Just reheat gently on the stovetop, adding a splash of milk to loosen it up.
Can I freeze pumpkin hot chocolate?
While it’s not ideal (the cream can separate), you can freeze it! Just make sure to leave room for expansion in your container.
How can I avoid lumps in my mixture?
When blending dry ingredients like cocoa or pumpkin with liquids, always whisk consistently, starting slow. This will help create a smooth mixture.
Nutritional Info
Now, let’s talk about that warm mug of joy you’re brewing! Here’s a rough estimate of the nutritional information for one serving of Easy Pumpkin Spice Hot Chocolate (without toppings):
- Calories: Approximately 400
- Protein: 6g
- Carbohydrates: 45g
- Fat: 20g
(Note that nutritional values can vary based on specific brands and substitutions.)
While this drink is a treat, it’s also packed with the goodness of pumpkin, which is loaded with vitamins and antioxidants. Enjoy it in moderation, and feel free to experiment with the ingredients for healthier swaps!
Final Thoughts
There you have it, friends! Your very own Easy Pumpkin Spice Hot Chocolate ready to warm up those chilly nights and bring families together. I hope this recipe fills your kitchen with delightful aromas and creates memories that linger long after the last sip. So gather your loved ones, cozy up with a blanket, and enjoy every moment because life, like good food, is meant to be savored.
Now go on, grab your ingredients, and let the pumpkin spice magic begin! Cheers to making more delicious memories—one sip at a time! 🍁🧡
Print
Easy Pumpkin Spice Hot Chocolate
- Total Time: 20 minutes
- Yield: 2 servings 1x
- Diet: Vegetarian
Description
A rich, creamy hot chocolate infused with pumpkin and spices, perfect for cozy fall evenings.
Ingredients
- 1 cup milk
- ½ cup heavy whipping cream
- 4 Tablespoon canned pumpkin
- 2 Teaspoon pumpkin pie spice
- 1 Tablespoon Hershey Cocoa Powder
- ½ Teaspoon cinnamon
- 1 ½ Tablespoon sugar
- 1 Teaspoon vanilla extract
Instructions
- Mix the Pumpkin Base: In a medium saucepan over low heat, combine the canned pumpkin, pumpkin pie spice, cocoa powder, and sugar. Stir this mixture together until it’s smooth.
- Add Milk and Cream: Gradually whisk in the milk and heavy whipping cream. Keep stirring until the mixture is heated through but not boiling.
- Introduce the Flavors: Stir in the vanilla extract and cinnamon. Taste and adjust the sweetness if desired.
- Serve with Love: Pour into mugs and top with whipped cream, pumpkin pie spice, or chocolate shavings.
- Relax & Enjoy: Inhale the aroma and savor the first sip of your warm drink.
Notes
For a dairy-free option, substitute with almond or oat milk and coconut cream.
- Prep Time: 10 minutes
- Cook Time: 10 minutes
- Category: Beverage
- Method: Stovetop
- Cuisine: American
Nutrition
- Serving Size: 1 serving
- Calories: 400
- Sugar: 15g
- Sodium: 100mg
- Fat: 20g
- Saturated Fat: 10g
- Unsaturated Fat: 8g
- Trans Fat: 0g
- Carbohydrates: 45g
- Fiber: 3g
- Protein: 6g
- Cholesterol: 60mg
Keywords: pumpkin spice, hot chocolate, fall drinks, cozy beverages, warm drinks
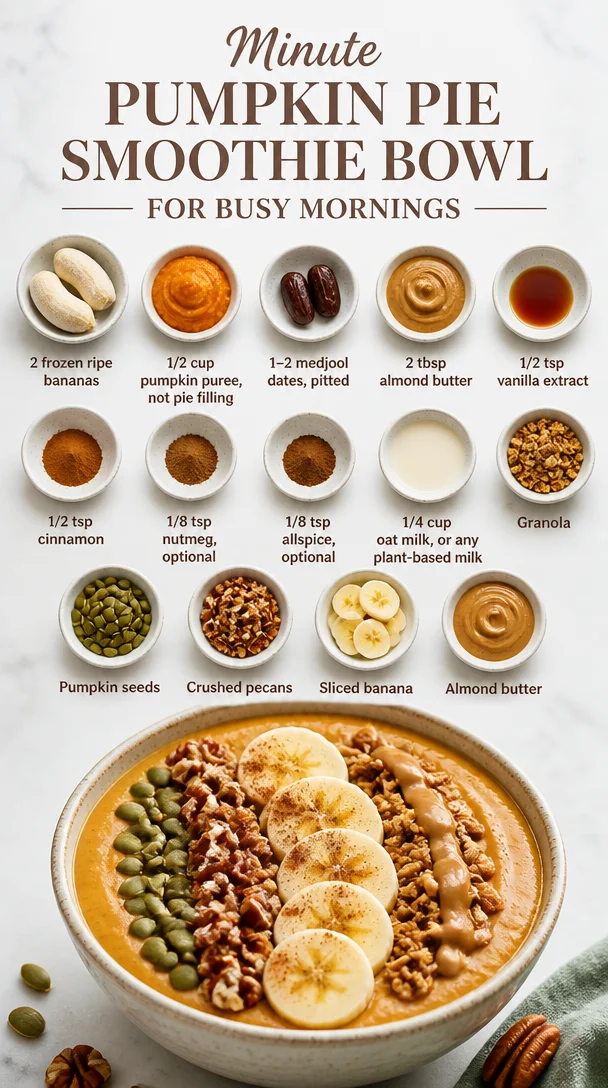
Minute Pumpkin Pie Smoothie Bowl for Busy Mornings
The Ultimate Pumpkin Pie Smoothie Bowl: A Creamy Fall Treat
Hey there, food lovers! 🥳 As the leaves change color and that familiar crispness fills the air, there’s no denying that fall is officially here. It’s a season filled with cozy sweaters, vibrant pumpkin patches, and of course, all the delicious pumpkin-flavored treats we can get our hands on. One delightful way to get your pumpkin fix while keeping things healthy and satisfying is with a scrumptious Pumpkin Pie Smoothie Bowl! Not only is it packed with nutrients, but it also brings the warmth of autumn right into your breakfast bowl. So, grab your blender and let’s whip up something magical!
A Taste of Autumn: My Pumpkin Pie Memory
I can still vividly remember my first taste of pumpkin pie. I was about ten years old, and my grandmother let me help her in the kitchen as we prepared for our family Thanksgiving dinner. The aroma of freshly baked pie wafting through the air was something I’ll never forget. We laughed and chatted while she showed me the ropes—how to roll out the crust, mix the spiced filling, and carefully check the pie as it baked in the oven. The excitement of waiting for it to cool down was almost unbearable, and the first slice was a glorious moment of pure indulgence.
Fast forward to today, and while I still love classic pumpkin pie, I wanted to create something that encapsulated that same sweet, spiced feeling but in a healthier format. That’s how the Pumpkin Pie Smoothie Bowl was born! This bowl takes all the delightful flavors of traditional pumpkin pie and turns them into a creamy, dreamy treat you can enjoy any time of the day. Ready to make some memories of your own? Let’s dive into the ingredients!
Ingredients: What You’ll Need
-
2 frozen ripe bananas, peeled prior to freezing
Bananas add natural sweetness and creaminess to this smoothie bowl. Pro tip: freeze them in advance for an ultra-smooth consistency! -
1/2 cup pumpkin puree, not pie filling
Pure pumpkin puree provides that rich pumpkin flavor along with vitamins and nutrients. Make sure to check your labels to avoid sweetened pie filling! -
1-2 medjool dates, pitted
Dates bring in natural sweetness while enhancing the bowl’s caramel-like notes. Want a less sweet bowl? Start with one and adjust to taste! -
2 tbsp almond butter
Almond butter adds healthy fats and creaminess, making everything dreamy and rich. Substitute with peanut butter or sunflower seed butter if needed. -
1/2 tsp vanilla extract
Vanilla elevates the flavor profile to new heights, a warm hug in a bowl. You can use almond extract for an extra nutty twist! -
1/2 tsp cinnamon
A classic spice that brings warmth and coziness to our smoothie bowl. Don’t shy away—cinnamon is your friend here! -
1/8 tsp nutmeg (optional)
Nutmeg adds a depth of flavor and warmth. If you’re not a fan, feel free to skip it—it’s just as tasty! -
1/8 tsp allspice (optional)
Allspice adds that extra spiced kick. Again, optional, but a delightful addition! -
1/4 cup oat milk or any plant-based milk
Oat milk keeps things super creamy while being dairy-free. Almond, coconut, or soy milk work wonders too!
Step-by-Step Instructions: Let’s Make Magic
-
Gather Your Ingredients
To kick off, gather all your ingredients and make sure your bananas are frozen. You want them nice and icy to create that dreamy consistency! -
Blend the Base
In a high-powered blender, combine the frozen bananas, pumpkin puree, medjool dates, almond butter, vanilla extract, cinnamon, and your choice of milk. Blend until you reach a smooth and creamy texture. Patience is key—stop and scrape down the sides if needed to ensure everything is well mixed. -
Taste Test
Here comes the fun part—before you pour it into your bowl, take a quick taste! If you like it sweeter, toss in an additional date or a tiny drizzle of maple syrup. This is your bowl, so make it the way you love it! -
Pour and Top
Now, carefully pour your creamy mixture into your favorite serving bowl. Get creative with your toppings! I always recommend a solid sprinkle of granola for crunch, a dollop of almond butter, some pumpkin seeds for that autumn feel, and a few fresh banana slices. You can’t go wrong! -
Dig In
Grab a spoon and savor every luscious bite. Take a moment to appreciate your creation—you’ve just elevated breakfast to a whole new level!
Serving Suggestions: A Feast for the Eyes
Presentation is key! When serving your Pumpkin Pie Smoothie Bowl, consider arranging your toppings in a visually appealing way. Here are a few ideas:
- Layering: Start by sprinkling a base of granola in the center, then add dollops of almond butter around the edges.
- Fruits First: Place your sliced bananas artistically on top, perhaps next to a mound of pumpkin seeds for that eye-catching contrast.
- Fun Additions: A sprinkle of cinnamon or a drizzle of maple syrup can add both flavor and charm.
Remember, we eat with our eyes first, so make it colorful and inviting!
Recipe Variations: Switching It Up
If you’re feeling adventurous (and I hope you are!), here are a few fun twists to try that could take your Pumpkin Pie Smoothie Bowl to the next level:
- Spiced Chai: Add a splash of brewed chai tea instead of plant milk for a spicy flavor explosion!
- Nutty Delight: Sub in different nut butters, like cashew or pecan, for a unique twist.
- Chocolate Chip: Fold in mini dark chocolate chips before blending—who says you can’t have chocolate for breakfast?
- Superfood Boost: Incorporate a spoonful of chia seeds or flaxseeds for a nutritional boost and extra texture.
- Tropical Twist: Add a handful of spinach or kale for a green smoothie bowl while still keeping the pumpkin flavor.
Chef’s Notes: A Journey Through Time
Every recipe tells a story, and this Pumpkin Pie Smoothie Bowl has led me on quite an adventure. I remember when I first experimented with smoothies; I was shocked at how something so simple could ooze with flavor. Over the years, I’ve played with variations, trying different fruits, spices, and toppings until I landed on this delicious combo.
Oh, and speaking of playing, let me admit: the kitchen has seen its share of delightful disasters! There was that one time I added way too much nutmeg, and I ended up with a smoothie bowl that tasted like a holiday candle. Lesson learned—less is sometimes more!
FAQs and Troubleshooting: Key Questions
-
Why did my smoothie bowl turn out too thick?
If your mix is a little too thick for your liking, simply drizzle in some extra plant-based milk and blend again. It should loosen up right away! -
Can I use fresh pumpkin instead of canned puree?
Absolutely! Just remember, fresh pumpkin usually requires roasting and pureeing, so make sure it’s cooked and smooth before mixing. -
What if I don’t have a blender?
A food processor would work if blending isn’t possible. The key is to ensure everything is well combined and smooth, similar to using a blender. -
How long can I store leftover smoothie bowl?
You can store it in an airtight container in the fridge for up to 24 hours. Just give it a good stir before digging in!
Nutritional Info
One serving of this Pumpkin Pie Smoothie Bowl is not only a feast for the eyes but also for your health! Here’s a quick overview:
- Calories: Approximately 300-400, depending on toppings
- Protein: Around 7-10g (thanks to the almond butter and seeds!)
- Fiber: 5-8g (from the bananas, pumpkin, and toppings)
- Vitamins and Minerals: A rich source of Vitamin A from pumpkin, potassium from bananas, and healthy fats from nuts.
This bowl isn’t just a treat—it’s a nourishing start to your day!
Final Thoughts
There you have it—a cozy, delectable Pumpkin Pie Smoothie Bowl that celebrates the best of fall while keeping things ridiculously tasty and easy! Whether you whip it up for breakfast, as a snack, or even a light dessert, it’s bound to become a favorite for you and your loved ones.
Next time the fall season rolls around, or you just crave that warm hug in a bowl, remember this recipe and make it your own! With endless possibilities and flavors, the kitchen is where your creativity can shine. So grab your ingredients, blend away, and don’t forget to share your delicious creations with friends and family!
Stay cozy, stay hungry, and until next time—happy feasting! 🍂✨
Print
The Ultimate Pumpkin Pie Smoothie Bowl
- Total Time: 10 minutes
- Yield: 1 serving 1x
- Diet: Vegan
Description
A creamy, dreamy Pumpkin Pie Smoothie Bowl that captures the flavors of fall while keeping it healthy and satisfying.
Ingredients
- 2 frozen ripe bananas, peeled prior to freezing
- 1/2 cup pumpkin puree, not pie filling
- 1–2 medjool dates, pitted
- 2 tbsp almond butter
- 1/2 tsp vanilla extract
- 1/2 tsp cinnamon
- 1/8 tsp nutmeg (optional)
- 1/8 tsp allspice (optional)
- 1/4 cup oat milk or any plant-based milk
Instructions
- Gather your ingredients.
- Blend the frozen bananas, pumpkin puree, medjool dates, almond butter, vanilla extract, cinnamon, and milk until smooth.
- Taste the mixture and adjust sweetness if necessary.
- Pour into a serving bowl and add toppings like granola and banana slices.
- Dig in and enjoy your delicious creation!
Notes
Presentation is key; arrange toppings for a beautiful bowl. Experiment with different nut butters and toppings for a unique twist.
- Prep Time: 10 minutes
- Cook Time: 0 minutes
- Category: Breakfast
- Method: Blending
- Cuisine: American
Nutrition
- Serving Size: 1 bowl
- Calories: 350
- Sugar: 22g
- Sodium: 50mg
- Fat: 14g
- Saturated Fat: 1g
- Unsaturated Fat: 12g
- Trans Fat: 0g
- Carbohydrates: 52g
- Fiber: 7g
- Protein: 9g
- Cholesterol: 0mg
Keywords: smoothie bowl, pumpkin, fall recipe, healthy breakfast, vegan
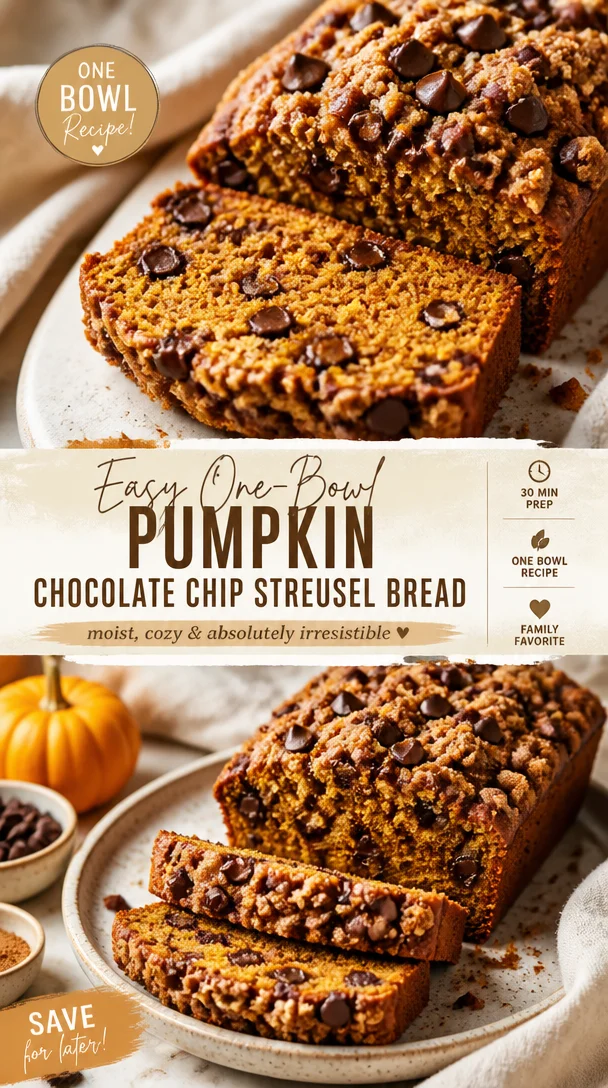
Easy One-Bowl Pumpkin Chocolate Chip Streusel Bread
Pumpkin Chocolate Chip Streusel Bread: A Hug in Loaf Form!
Hey there, fellow food lovers! Let me tell you about one of my absolute favorite baking adventures. If there’s one thing I can’t resist as the leaves start to turn and the air gets a bit crisp, it’s the magic of pumpkin season. And what better way to celebrate that magic than with some delicious Pumpkin Chocolate Chip Streusel Bread? Trust me, this recipe will fill your kitchen with inviting aromas and warm your heart, wrapping you in cozy nostalgia with every bite.
Picture this: it’s a brisk fall afternoon, and I’m tossing around ideas for that perfect treat to accompany my hot cup of coffee. I reminisce about the days when my grandma would whip up her fabulous pumpkin bread every autumn, filling our house with spicy-sweet scents that promised comfort and joy. For me, it was a tradition—one that sparked countless family moments and laughter. As we gathered around the table, we would compare our favorite toppings: some loved the classic butter, while others drizzled on some extra chocolate.
So here we are, years later, and I’ve taken that beloved family recipe and put my own twist on it. This Pumpkin Chocolate Chip Streusel Bread combines the best autumn flavors with rich chocolate and a buttery streusel topping. It’s perfect for brunch, a cozy get-together, or just a quiet day at home. Whether you’re a baking veteran or a newbie in the kitchen, I promise you this delicious recipe will care for you and offer a sweet escape into fall.
Let’s not waste any more time! Grab your mixing bowls, and let’s dig into making this delightful pumpkin bread together!
Personal Story: Finding Joy in the Kitchen
I remember the first time I attempted to bake a loaf of pumpkin bread entirely on my own. I was just a teenager, filled with excitement and nerves as I dived into the world of baking. The kitchen was my happy haven, and it felt like magic was about to happen. I had all my ingredients laid out, carefully following Grandma’s handwritten recipe, but there was one catch—I forgot to check for baking soda.
As I whisked the batter, I realized the telltale absence of that vital ingredient. The realization hit me like a splash of cold water! Instead of panic, I embraced the challenge. I quickly grabbed my bike and rode down to the local store, hoping they wouldn’t run out of baking soda. I remember feeling like a real pastry hero on a mission! It felt so rewarding as I returned, and once that loaf came out of the oven—golden brown, bubbling with flavor—I knew that baking wasn’t just about following the rules; it was about creating memories and having fun.
That sense of joy and creativity still fills my heart when I bake today. This Pumpkin Chocolate Chip Streusel Bread carries with it a sprinkle of those early adventures, reminding me that cooking is all about growth, personality, and a healthy dash of spontaneity.
Ingredients
Here’s what you’ll need to make this cozy, delicious Pumpkin Chocolate Chip Streusel Bread. Each ingredient plays an important role, and I’ll share some tips along the way.
-
1 cup canned pumpkin puree
Opt for 100% pure pumpkin without additives. You can also use homemade pumpkin puree if you’re feeling adventurous! It offers a fresher taste. -
1/2 cup vegetable oil
Vegetable oil keeps the bread moist, but you can substitute it with melted coconut oil or unsweetened apple sauce for a healthier option. -
1/2 cup granulated sugar
This adds sweetness, but feel free to reduce this amount to taste, or try using coconut sugar for a deeper caramel flavor. -
1/2 cup brown sugar
Brown sugar contributes rich moisture and a hint of molasses. Dark brown sugar warms the flavor even more! -
2 large eggs
Eggs help bind everything together. For a vegan alternate, you can use 1/4 cup of unsweetened applesauce or a flax egg (1 tablespoon ground flaxseed + 2.5 tablespoons water, let it sit until thick). -
1 teaspoon vanilla extract
This takes the flavor to new heights! You can also use almond extract if you’re in the mood for a twist. -
2 cups all-purpose flour
Feel free to substitute with whole-wheat flour or a gluten-free blend; just keep in mind that this will affect the texture. -
1 teaspoon baking soda
This is essential for that lovely rise! Always check for freshness—old baking soda won’t work as effectively! -
1/2 teaspoon baking powder
It complements the baking soda for a light texture. If you’re out, it’s possible to omit it, but I recommend sticking to the recipe for optimal fluffiness! -
1/2 teaspoon salt
A pinch of salt enhances all the flavors! -
1 teaspoon ground cinnamon
Autumn in a spice! You can add more or mix in pumpkin spice for a kick of seasonal flavor. -
1/2 teaspoon ground nutmeg
Nutmeg adds depth, but a little goes a long way. If you’re not a fan, you can leave it out or substitute with allspice. -
1 cup chocolate chips
Dark, semi-sweet, or even white chocolate—use whichever speaks to your soul! You can swap them for berries or dried fruits for variety. -
1/2 cup chopped nuts (optional)
Pecans or walnuts add amazing texture. Want a nut-free option? Simply skip this ingredient! -
Streusel Topping:
- 1/4 cup all-purpose flour
- 1/4 cup brown sugar
- 1/2 teaspoon ground cinnamon
- 2 tablespoons cold butter (cubed)
For a vegan twist, swap cold butter for cold coconut oil. Combine the streusel ingredients with a fork until crumbly, and watch how it amps up your bread!
Step-by-Step Instructions
Alright, let’s get our bake on! Follow these steps, and I promise you’ll have a loaf that’ll impress your friends and family—or at least make your kitchen smell like happiness!
-
Preheat the Oven
Start by preheating your oven to 350°F (175°C), which helps your bread bake evenly. Don’t skip this step; a hot oven ensures that your bread rises beautifully! -
Prepare Your Loaf Pan
Grease a 9×5 inch loaf pan or line it with parchment paper. This helps in easy removal of the bread once it’s baked—trust me, the less mess, the better! -
Mix Wet Ingredients
In a large mixing bowl, combine the pumpkin puree, vegetable oil, granulated sugar, brown sugar, eggs, and vanilla extract. Use a whisk or electric mixer on medium speed until everything is smooth and creamy. You want these flavors to blend harmoniously. -
Combine Dry Ingredients
In another bowl, whisk together the all-purpose flour, baking soda, baking powder, salt, cinnamon, and nutmeg. Mixing these dry ingredients separately ensures that the baking soda and powder are evenly distributed, which is key to achieving that perfect rise! -
Combine Wet & Dry
Gradually add the dry mixture to the wet ingredients, mixing until just incorporated. Avoid overmixing, or your bread could end up dense! It’s okay if there are a few lumps. -
Fold in Chocolate Chips and Nuts
Now for the fun part! Gently fold in those chocolate chips (and nuts, if using) into the batter. This is like adding the sparkle to your masterpiece! -
Prepare the Streusel
In a small bowl, mix together the streusel ingredients: flour, brown sugar, cinnamon, and cold butter. Use your hands or a fork to mix until it becomes crumbly. This step is crucial for that delightful crunchy topping! -
Pour the Batter
Pour the batter into your prepared loaf pan, smoothing the top with a spatula. Make sure it’s spread evenly and ready for its crunchy crown! -
Add the Streusel
Sprinkle the streusel mixture generously over the batter. Don’t hold back—this is where the magic happens! -
Bake
Place your pan into the preheated oven and bake for 50-60 minutes or until a toothpick inserted into the center comes out clean. Watch the loaf rise and turn beautifully golden brown. The aroma filling your kitchen will be unforgettable! -
Cool and Enjoy
Once baked, let your bread cool in the pan for 10 minutes, then turn it out on a wire rack to cool completely. This patience really pays off as the flavors continue to meld.
And voilà! You’ve just made a loaf of Pumpkin Chocolate Chip Streusel Bread that will melt hearts and fill bellies.
Serving Suggestions
When it’s time to devour your creation, slice that loaf into thick pieces that are just begging for a topping! You can serve it plain, but I suggest slathering it with butter or cream cheese for a delightful spread. You can also serve it warm with a drizzle of maple syrup or a dusting of powdered sugar if you’re feeling fancy.
Pair it with a steaming cup of coffee or a warm spiced apple cider, and you’ve got yourself the ultimate autumn treat. Want to impress? Throw in a scoop of vanilla ice cream—yes, please!
Recipe Variations
Let’s talk possibilities! This recipe is super flexible, and you can have fun with it. Here are a few twists to try:
-
Add a Tart Twist: Toss in some cranberries or a handful of dried cherries for a bright, tangy contrast to the sweetness.
-
Spicy Sensation: For a spicy kick, add a pinch of cayenne or some chopped jalapeños! This variation might sound odd, but trust me, it can be a delightful surprise.
-
Nutty Alternative: Swap out the chocolate chips for toffee bits or butterscotch chips for a different flavor journey.
-
Sugar-Free: Use a sugar substitute like erythritol or monk fruit sweetener for a lower-calorie version of this treat.
-
Pumpkin Patch: Did you know you can use other pureed squashes? Try substituting with butternut squash or even sweet potato for an equally delicious treat.
Chef’s Notes
As I’ve experimented with this recipe over the years, I’ve learned that baking is all about lifelong learning and adapting. There’s no ‘one way’ to make it! I once swapped the chocolate chips for white chocolate and added a handful of shredded coconut, and it created a tropical twist that blew everyone’s mind.
I’ve had my fair share of baking fails, too—like the time I added baking powder instead of baking soda (oops!). It ended up a delightful pancake rather than bread. But those moments make for great kitchen stories, right?
It’s important to embrace the art of cooking (and to laugh at the mishaps along the way). Remember, the best ingredient is love; if you’re having fun, it’ll shine through in your baking!
FAQs and Troubleshooting
-
Why did my bread not rise?
Ensure your baking soda and baking powder are fresh. If they’re past their prime, they won’t provide the lift your bread needs. -
Can I make this in advance?
Absolutely! Bake it up to three days ahead and store it at room temperature in an airtight container. You can also freeze it—just wrap it tightly and it’ll last for about 3 months. -
How can I tell when it’s done?
Use the toothpick test! Insert a toothpick into the center; it should come out clean or with just a few crumbs. If there’s gooey batter, it needs more time. -
What if I don’t have chocolate chips?
No worries! You can try substituting with nuts, seeds, or even popcorn (yes, truly) for a crunchy surprise!
Nutritional Info
Here’s a rough breakdown of this delicious Pumpkin Chocolate Chip Streusel Bread per slice (assuming 12 slices):
- Calories: 220
- Protein: 3g
- Fat: 10g
- Carbohydrates: 32g
- Fiber: 1g
- Sugar: 10g
Note: Nutritional values will vary based on ingredient substitutions. For healthier options, consider replacing sugars or using whole grain flour!
Final Thoughts
Baking is more than just assembling ingredients; it’s about creating, sharing, and building memories. My Pumpkin Chocolate Chip Streusel Bread is the epitome of comfort food during cozy fall days and gatherings. It’s sweet enough to satisfy dessert cravings but hearty and wholesome enough to feel like pure comfort.
So whether you’re making it for yourself, sharing it at a neighborhood potluck, or gifting a loaf to a friend, know that you’re creating moments that last longer than the bread itself. Grab your mixing bowl, turn on some tunes, and let your baking journey begin. Trust me; you’ll be glad you did!
Happy baking, friends! I can’t wait for you to experience the warmth and joy of this delightful Pumpkin Chocolate Chip Streusel Bread. Enjoy every yummy bite!
Print
Pumpkin Chocolate Chip Streusel Bread
- Total Time: 75 minutes
- Yield: 12 slices 1x
- Diet: Vegetarian
Description
A cozy baking adventure that combines the best autumn flavors with rich chocolate and a buttery streusel topping, perfect for any occasion.
Ingredients
- 1 cup canned pumpkin puree
- 1/2 cup vegetable oil
- 1/2 cup granulated sugar
- 1/2 cup brown sugar
- 2 large eggs
- 1 teaspoon vanilla extract
- 2 cups all-purpose flour
- 1 teaspoon baking soda
- 1/2 teaspoon baking powder
- 1/2 teaspoon salt
- 1 teaspoon ground cinnamon
- 1/2 teaspoon ground nutmeg
- 1 cup chocolate chips
- 1/2 cup chopped nuts (optional)
- Streusel Topping: 1/4 cup all-purpose flour
- 1/4 cup brown sugar
- 1/2 teaspoon ground cinnamon
- 2 tablespoons cold butter (cubed)
Instructions
- Preheat the oven to 350°F (175°C).
- Prepare a 9×5 inch loaf pan by greasing it or lining it with parchment paper.
- Mix the wet ingredients: pumpkin puree, vegetable oil, granulated sugar, brown sugar, eggs, and vanilla extract until smooth.
- Combine the dry ingredients: flour, baking soda, baking powder, salt, cinnamon, and nutmeg in another bowl.
- Add the dry mixture to the wet ingredients gradually, mixing until just incorporated.
- Fold in the chocolate chips and nuts if using.
- Prepare the streusel by mixing flour, brown sugar, cinnamon, and cold butter until crumbly.
- Pour the batter into the prepared loaf pan and smooth the top.
- Add the streusel topping generously over the batter.
- Bake for 50-60 minutes or until a toothpick comes out clean.
- Cool the bread in the pan for 10 minutes, then turn it out onto a wire rack to cool completely.
Notes
For a vegan alternative, substitute eggs with unsweetened applesauce or a flax egg. Adjust sugar levels to taste for a less sweet bread.
- Prep Time: 15 minutes
- Cook Time: 60 minutes
- Category: Dessert
- Method: Baking
- Cuisine: American
Nutrition
- Serving Size: 1 slice
- Calories: 220
- Sugar: 10g
- Sodium: 200mg
- Fat: 10g
- Saturated Fat: 2g
- Unsaturated Fat: 8g
- Trans Fat: 0g
- Carbohydrates: 32g
- Fiber: 1g
- Protein: 3g
- Cholesterol: 30mg
Keywords: pumpkin bread, chocolate chip, streusel, fall baking, dessert, cozy recipe
Minute Vegan Pumpkin Donuts for Cozy Weekend Mornings
Deliciously Festive Vegan Pumpkin Donuts
Hey food lovers! I’m Beau Collier, and I’m super excited to share a recipe that’s not just a treat for your taste buds but also a celebration of everything cozy and comforting about the fall season: Vegan Pumpkin Donuts! As the leaves change and the air turns crisp, there’s nothing quite like the mouthwatering aroma of freshly baked donuts wafting through your kitchen.
These delightful little rings of happiness are not only easy to whip up, but they also carry the essence of autumn with every bite. With the sweet spices of pumpkin pie and the warm, buttery goodness that makes you feel like you’re wrapped in a soft blanket, these vegan donuts are a must-try. Whether you’re a long-time vegan or just looking to add some plant-based goodness to your baking repertoire, these donuts are sure to impress everyone—even your non-vegan friends!
Now, I have to tell you, the inspiration for this recipe came from my own fond memories of fall baking with my family. Every year, as the daylight grew shorter and the evenings turned chillier, we would gather in my grandmother’s kitchen, excited to help her whip up all sorts of autumnal goodies. The excitement was tangible, and the centerpiece was always a batch of her legendary pumpkin donuts. She used the simplest ingredients, yet they were always a hit! With this recipe, I’ve put my own twist on her classic, giving it a modern, vegan makeover without sacrificing any of that nostalgic flavor.
So, let’s gather our ingredients and dive into this delectable recipe that’s perfect for your next brunch, casual afternoon snack, or even a cozy evening dessert. Trust me, once you taste these vegan pumpkin donuts, you’ll want to bake a batch every weekend!
Personal Story
Growing up, fall was always my favorite time of year. The vivid colors of the leaves, the crispness in the air, and of course, the delicious smells coming from the kitchen were enough to make anyone giddy with joy. One of my most cherished memories revolves around those pumpkin donuts and my grandmother’s kitchen—a place that seemed to be filled with laughter, warmth, and, yes, a little flour.
I remember sitting on the countertop, swinging my legs as I watched her mix the batter. She always let me sprinkle in the spices, letting me feel like a real chef. The best part of the experience was when we would bite into those warm, fluffy donuts still dusted with a little cinnamon sugar. It felt like magic.
After she passed, I found myself craving those donuts desperately. I experimented in the kitchen, trying to recreate her version until I finally hit the jackpot with these Vegan Pumpkin Donuts. They took me back in time, reminding me that food has the power to connect us—through memories, flavors, and love. These donuts have become not just a recipe but a tribute to her spirit and our family’s tradition.
Ingredients
Here’s what you’ll need to whip up these tasty vegan donuts:
-
2 cups all-purpose flour
This is the base of our donuts. You can substitute with a gluten-free flour blend if needed, but be sure to adjust liquid in the recipe accordingly! -
1 cup light brown sugar (packed)
This adds that warm, caramel-like sweetness. If you want a less intense sweetness, feel free to use coconut sugar as a 1:1 substitute. -
2 teaspoons baking powder
Baking powder is our leavening agent, ensuring that the donuts rise and have that fluffy texture we love. -
1 1/2 teaspoons pumpkin pie spice
This blend offers a lovely autumn flavor, but you can make your own using equal parts cinnamon, nutmeg, and allspice if you’re feeling adventurous! -
1/4 teaspoon salt
A little salt enhances the sweetness, creating a perfect balance in flavor. -
1/2 cup melted vegan butter
Provides richness and moisture; feel free to use coconut oil or any other plant-based fat you have on hand. -
1 cup pumpkin puree
The star of the show! You can use homemade puree or canned (just make sure it’s pure pumpkin, not pie filling). -
1/2 cup oat milk
This creamy base keeps our donuts moist. Almond milk or soy milk are also great alternatives! -
2 teaspoons pure vanilla extract
Vanilla adds depth to our flavor profile. Always opt for pure extract over imitation for the best taste. -
1 1/2 cups powdered sugar
We’ll use this for the icing to give our donuts a delightful sweet finish. -
4 tablespoons pure maple syrup
A wonderful natural sweetener that complements the pumpkin flavor beautifully. -
1 teaspoon ground cinnamon
A classic spice that brings warmth and coziness—just like a hug! -
2-4 tablespoons oat milk
This is for adjusting the icing consistency—add more or less to get that perfect glaze!
Step-by-Step Instructions
Let’s get baking! Here’s how to create these delicious Vegan Pumpkin Donuts:
-
Preheat Your Oven
Start by preheating your oven to 350°F (175°C). Make sure it’s nice and warm so our donuts can bake evenly! -
Prepare the Donut Pan
Grease your donut pan with a little vegan butter or cooking spray. If you don’t have a donut pan, don’t fret—mini muffin tins work too! -
Mix the Dry Ingredients
In a large mixing bowl, combine the all-purpose flour, brown sugar, baking powder, pumpkin pie spice, and salt. Whisk them together until everything is well-combined. This step is key for an even texture, so be thorough! -
Combine the Wet Ingredients
In a separate bowl, mix the melted vegan butter, pumpkin puree, oat milk, and vanilla extract. Make sure your butter isn’t too hot, or it could cook the pumpkin! Stir until everything is smooth and creamy. -
Bring It All Together
Pour the wet ingredients into the dry ingredients and mix with a spatula or wooden spoon until just combined. Be careful not to overmix; a few lumps are totally fine. -
Fill the Donut Pan
Spoon the batter into the greased donut pan, filling each cavity about halfway. You can also use a piping bag for a neater fill—just cut off the end and squeeze it in! -
Bake and Cool
Pop the pan in the preheated oven and bake for about 12-15 minutes. You’ll know they’re done when a toothpick inserted comes out clean. Let them cool in the pan for about 5 minutes before transferring them to a wire rack. -
Make the Icing
While your donuts are cooling, whisk together the powdered sugar, maple syrup, ground cinnamon, and oat milk in a bowl until smooth. Adjust the oat milk to achieve your desired consistency: thicker for dipping or thinner for drizzling! -
Coat the Donuts
Once the donuts have cooled completely, dip the tops into the icing, or drizzle it on for a beautiful finish. -
Serve & Enjoy
Serve your donuts warm for the best experience, and watch your loved ones swoon!
Serving Suggestions
Now that these beautiful Vegan Pumpkin Donuts are ready, how you serve them can elevate the whole experience. Here are a few fun ideas for plating:
-
Dust Them Up: A light sprinkle of cinnamon sugar or extra powdered sugar on top gives them an extra sweet touch.
-
Plate on a Family-Style Board: Arrange the donuts on a rustic wooden board, accompanied by a small bowl of fresh whipped coconut cream or a pumpkin dip for a fun, interactive treat.
-
Pair with Cozy Drinks: Serve them alongside a warm spiced chai tea or a pumpkin spice latte for a perfect fall afternoon treat.
-
Add Decorative Touches: Toss on some seasonal decorations—think tiny pumpkins or a fresh sprig of rosemary for a festive presentation!
Recipe Variations
The beauty of these Vegan Pumpkin Donuts lies in their versatility! Here are some creative twists and variations you can try:
-
Chocolate Chip Pumpkin Donuts: Add about half a cup of vegan chocolate chips to the batter for a delightfully sweet surprise.
-
Maple Glazed Variation: Instead of icing, drizzle warm maple syrup over the donuts for a naturally sweetened, sticky coating.
-
Nutty Addition: Fold in some chopped walnuts or pecans to give a satisfying crunch and nutty flavor.
-
Spiced Apple Donuts: Replace half the pumpkin puree with applesauce for a unique take, and toss in some diced apples and raisins.
-
Gluten-Free Option: Swap the all-purpose flour with a 1:1 gluten-free flour blend and adjust for moisture as needed.
Chef’s Notes
As with any recipe, there’s always room for creativity in your kitchen! Remember, the first time I tried whipping these donuts up, I got carried away with the pumpkin spice and ended up with a batter that was too runny. Lesson learned: always measure carefully! Over the years, I’ve adapted this recipe based on friends’ suggestions and my own trial and error. Sometimes, I toss in sprinkles after the glaze for a party vibe, or even test different flavor extracts.
Most importantly, remember that cooking is all about having fun! Don’t be afraid to tweak it to make it your own. That’s what makes it special.
FAQs and Troubleshooting
1. Why are my donuts too dense?
If your donuts are too dense, it could be due to overmixing the batter. Mix until just combined to keep them light and fluffy!
2. Can I use fresh pumpkin instead of canned?
Absolutely! Just make sure to cook and puree your fresh pumpkin beforehand. It should be smooth and not too watery.
3. How do I store leftovers?
Store your cooled donuts in an airtight container at room temperature for up to 3 days, or in the refrigerator for about a week. They also freeze well—just thaw and reheat gently in the oven or microwave.
Nutritional Info
These delicious Vegan Pumpkin Donuts not only please your palate but can also fit into a balanced diet! Here’s a rough estimate of the nutritional info per donut (excluding decorative toppings):
- Calories: Approximately 150-200
- Protein: 2g
- Carbohydrates: 30g
- Fat: 6g
- Fiber: 1g
- Sugar: 10g
Feel free to adjust based on the specific ingredients you use—remember, cooking is all about customizing to fit your lifestyle!
Final Thoughts
Well, there you have it, my deliciously festive Vegan Pumpkin Donuts! I hope this recipe brings warmth and joy to your kitchen, just like it does to mine. Don’t forget that the best part of cooking is sharing it with others, so whisk up a batch and spread the joy!
Whether you’re enjoying these on a cozy Sunday morning or sharing them at a holiday gathering, I’d love to hear how they turn out for you. Remember to tag me on social media if you post about them—I’d love to see your creations and hear your stories!
Happy baking, and may your kitchen always be filled with sweet smells and laughter. Now go grab those ingredients, and let’s make some scrumptious memories together!
Print
Deliciously Festive Vegan Pumpkin Donuts
- Total Time: 30 minutes
- Yield: 12 servings 1x
- Diet: Vegan
Description
A cozy and delightful recipe for vegan pumpkin donuts that celebrate the essence of fall with every bite.
Ingredients
- 2 cups all-purpose flour
- 1 cup light brown sugar (packed)
- 2 teaspoons baking powder
- 1 1/2 teaspoons pumpkin pie spice
- 1/4 teaspoon salt
- 1/2 cup melted vegan butter
- 1 cup pumpkin puree
- 1/2 cup oat milk
- 2 teaspoons pure vanilla extract
- 1 1/2 cups powdered sugar
- 4 tablespoons pure maple syrup
- 1 teaspoon ground cinnamon
- 2–4 tablespoons oat milk (for icing consistency)
Instructions
- Preheat your oven to 350°F (175°C).
- Prepare the donut pan by greasing it with vegan butter or cooking spray.
- Mix the dry ingredients: flour, brown sugar, baking powder, pumpkin pie spice, and salt in a large bowl.
- Combine the wet ingredients: melted butter, pumpkin puree, oat milk, and vanilla extract in a separate bowl.
- Bring the wet ingredients into the dry ingredients and mix gently.
- Fill the donut pan with the batter, filling each cavity halfway.
- Bake for 12-15 minutes or until a toothpick comes out clean.
- Cool for 5 minutes in the pan then transfer to a wire rack.
- Make the icing by whisking together powdered sugar, maple syrup, ground cinnamon, and oat milk until smooth.
- Coat the cooled donuts with icing for a delightful finish.
- Serve your donuts warm for the best experience!
Notes
Feel free to customize the recipe with additional toppings or fillings like chocolate chips or nuts.
- Prep Time: 15 minutes
- Cook Time: 15 minutes
- Category: Dessert
- Method: Baking
- Cuisine: American
Nutrition
- Serving Size: 1 donut
- Calories: 180
- Sugar: 10g
- Sodium: 200mg
- Fat: 6g
- Saturated Fat: 2g
- Unsaturated Fat: 3g
- Trans Fat: 0g
- Carbohydrates: 30g
- Fiber: 1g
- Protein: 2g
- Cholesterol: 0mg
Keywords: vegan donuts, pumpkin recipe, fall baking, dessert, healthy baking
Old Fashioned Peanut Butter Cake
The Ultimate Guide to Old Fashioned Peanut Butter Cake
Introduction
Hey there, fellow foodies! If you’ve ever tasted a slice of peanut butter cake, you know it’s a hug on a plate—warm, comforting, and full of that nutty goodness that makes everything better. Today, I’m excited to share my Old Fashioned Peanut Butter Cake recipe that will make your taste buds dance and your kitchen smell like a cozy cafe. Whether you’re looking for a sweet treat for a special occasion or simply want to indulge in some comfort food, this cake is just the ticket!
Let’s be real: there’s something magical about peanut butter. It’s a staple in many homes, often found tucked away in a pantry or atop breakfast toast. But what if I told you that peanut butter can shine even brighter as the star of a cake? Buckle up, because I’m about to reveal how you can transform a humble jar of peanut butter into a show-stopping dessert that will have everyone asking for seconds!
I’ve spent countless afternoons in my kitchen, mixing and experimenting, all in the name of creating the perfect peanut butter cake. It took some trial and errors, a few taste tests (okay, many!), and a couple of late-night baking sessions, but I’ve finally landed on the recipe that pays homage to the old-fashioned flavors of home baking while delivering a modern twist. So, grab your apron and let’s whip up this delectable delight together!
Personal Story
As a child, I spent much of my summer vacations at my grandma’s house, where the scent of baked goods wafted through the air. One of my fondest memories is standing on a stool by her kitchen counter, watching her whip up an old-fashioned peanut butter cake. I remember her quirky stories, her infectious laughter, and the way her eyes sparkled as she folded each ingredient into the mix. She always said that baking is as much about love as it is about the recipe.
That peanut butter cake was her signature dish—rich, moist, and topped with a luscious frosting that made you forget about everything else. We would crowd around the kitchen table, digging into generous slices while sharing stories from our day. As we savored each bite, I learned that food is not just sustenance; it’s a way to connect with each other, to create memories, and to celebrate life’s little moments.
Years later, I find myself recreating that same peanut butter cake, infusing it with all the love and nostalgia that my grandma poured into every floured surface, every hunk of butter, and every scoop of peanut butter. I can’t wait for you to experience the joy and warmth of this recipe—it’s like bringing a bit of my childhood into your kitchen!
Ingredients
Here’s what you’ll need to craft this delightful Old Fashioned Peanut Butter Cake:
-
3 sticks unsalted butter (12 oz / 339 g, softened)
Butter brings richness and moisture to our cake. If you need a dairy-free option, coconut oil works in a pinch, but the flavor will vary. -
2/3 cup smooth peanut butter (178 g)
Smooth peanut butter gives the cake its signature flavor. Feel free to experiment with crunchy peanut butter if you like a bit of texture in every bite! -
5 cups sifted powdered sugar (568 g)
This is what makes the frosting super sweet, airy, and melt-in-your-mouth. If you want a less sweet option, you can cut this amount down to 4 cups. -
1/2 tsp vanilla extract
A dash of vanilla adds depth. Always opt for the real deal over imitation for the best flavor! -
1 1/2 cups packed light brown sugar (320 g)
Brown sugar contributes to the moisture and adds a subtle caramel flavor. You can substitute with dark brown sugar for a more robust taste. -
1 stick unsalted butter (4 oz / 113 g, softened)
This will be used in the frosting. Remember, softening it at room temperature ensures a smooth mix! -
1/2 cup smooth peanut butter (135 g)
Yup, more peanut butter! This is for the dreamy frosting that tops our cake. -
2 large eggs
Eggs act as binders, giving structure to the cake. If you’re vegan, a chia seed "egg" (1 tbsp chia seeds + 2.5 tbsp water) yields great results, too! -
1/2 cup vegetable oil (99 g)
A neutral oil keeps our cake moist. Canola or avocado oil work wonderfully! -
1 1/2 cups buttermilk (360 g)
Buttermilk adds acidity and moisture, creating a soft crumb. Don’t have buttermilk? Mix regular milk with a splash of vinegar or lemon juice! -
1 1/2 tsp baking powder
This is our leavening agent, making the cake rise. -
1 tsp baking soda
This works alongside the buttermilk to create a light, fluffy texture. -
1 tsp salt
Salt balances the sweetness—you’ll want to keep it! -
3 2/3 cups all-purpose flour
The foundation of our cake. Make sure to sift to avoid lumps! -
2 tsp vanilla extract
Another splash of vanilla for good measure—why not, right?
Step-by-Step Instructions
Now that we have our ingredients lined up, let’s get to the fun part: baking! Don’t worry; I’ll guide you through every step with some handy tips and chef hacks along the way.
-
Preheat your oven to 350°F (175°C). This is super important! A well-preheated oven ensures your cake bakes evenly, so make sure to get this going first.
-
Prepare your cake pans. Grease and flour two 9-inch round cake pans or line them with parchment paper. This will prevent our delicious creation from sticking, allowing for a flawless reveal later on.
-
In a large mixing bowl, beat the 3 sticks of softened butter and the 2/3 cup smooth peanut butter together until light and fluffy—about 3-4 minutes. This step is crucial; incorporating air at this stage will result in a lighter cake.
-
Add the packed brown sugar and continue beating for another 2 minutes. The mixture should be smooth and creamy. If you see some lumps, don’t worry; our dry ingredients will take care of that!
-
Crack in the eggs, one at a time, mixing well after each addition. This allows each egg to fully incorporate, giving our cake the structure it needs.
-
Pour in the vegetable oil and buttermilk (imagine those flavors mingling beautifully!). Mix until just combined. Chef tip: If you’re worried about an oily batter, remember that the oil keeps our cake moist, and that’s what we want!
-
In a separate bowl, whisk together the flour, baking powder, baking soda, and salt. Gradually add the dry ingredients to the wet mixture, mixing until just combined. Be careful not to overmix—this will ensure we have a tender cake.
-
Divide the batter evenly between your prepared pans. A kitchen scale can help you achieve precision, ensuring even baking.
-
Bake for about 30-35 minutes, or until a toothpick inserted into the middle comes out clean. Keep an eye on your cakes; ovens can be quirky!
-
Once baked to perfection, remove from the oven and let them cool in the pans for about 10 minutes. Then, transfer the cakes to wire racks to cool completely.
-
Now, let’s whip up that peanut butter frosting! In a bowl, beat the 1 stick of softened butter and 1/2 cup of peanut butter until smooth. Gradually add the powdered sugar and the 1/2 tsp vanilla extract. Mix until creamy and fluffy. If you want it a bit thicker, add more sugar!
-
When your cakes have cooled completely, frost the top of one layer with a generous amount of peanut butter frosting. Place the second layer on top and frost the top and sides of the entire cake. Get creative with how much frosting you want—the more, the merrier!
Serving Suggestions
Now that you’ve artfully frosted your cake, it’s time to slice and serve! Here’s how to make it look even more irresistible:
- Garnish with chopped peanuts on the top of the cake for a delightful crunch.
- Dust with a sprinkle of cocoa powder for a fancy touch or drizzling some melted chocolate or caramel sauce over the top to take it up a notch.
- For a contrasting touch, serve each slice beside a scoop of vanilla ice cream or a dollop of whipped cream. Trust me; the warm cake and cold ice cream duo is heavenly!
Recipe Variations
Feeling adventurous? Here are some hints to mix things up a bit:
-
Chocolate Peanut Butter Cake: Incorporate cocoa powder into your batter for a rich chocolate base, or swirl in some melted chocolate.
-
Nutty Swirl: Fold in chopped nuts or chocolate chips for extra texture. If you’re feeling wild, try adding crushed pretzels for a sweet-salty kick!
-
Peanut Butter and Jelly Twist: Spread a layer of your favorite jam between the cakes before frosting them. The tartness of the jelly complements the sweetness of the peanut butter perfectly!
-
Gluten-Free Option: Substitute all-purpose flour with a 1:1 gluten-free flour blend for a gluten-free version of this cake.
-
Vegan Delight: Use flax eggs and a plant-based butter or coconut oil to create a vegan-friendly cake that’s just as delicious!
Chef’s Notes
As I’ve experimented with this recipe over the years, I’ve learned that the heart of a great peanut butter cake lies in balancing flavors. Don’t shy away from trying out different brands of peanut butter—some can be smoother or nuttier, which dramatically influences the cake’s outcome. Each time you make it, it’s an opportunity to customize and elevate.
One of my most hilarious kitchen moments occurred during a baking session gone awry when I realized I was out of eggs. In a frenzy, I whisked together some chia seeds and water in a last-ditch effort to save the day. The resulting cake was surprisingly delicious! Lesson learned: when life gives you no eggs, improvise!
FAQs and Troubleshooting
-
Q: My cake turned out dry. What did I do wrong?
A: Cake dryness often stems from overbaking or using too much flour. Make sure to measure your flour properly, and keep an eye on baking time! -
Q: Why did my cake sink in the middle?
A: Cake sinking can be due to underbaking or a sudden temperature change. Be sure your oven is preheated and avoid opening the oven door while it’s baking. -
Q: Can I use chunky peanut butter?
A: Absolutely! It will give your cake a delightful texture. Just keep in mind the flavor profile may shift slightly. -
Q: How should I store any leftover cake?
A: Store your cake in an airtight container at room temperature for up to 3 days or in the refrigerator for up to a week. It also freezes beautifully—just wrap it tightly in plastic wrap and aluminum foil.
Nutritional Info
Now, let’s talk nutrition, shall we? While this Old Fashioned Peanut Butter Cake is undeniably a treat, knowing that it contains a good amount of protein and healthy fats from the peanut butter can make indulging feel a tad more justified.
In a typical slice (1/12th of the cake), you can expect:
- Calories: ~400
- Protein: ~6g
- Fat: ~20g
- Carbohydrates: ~50g
- Fiber: ~1g
- Sugar: ~30g
Keep in mind that these numbers can vary depending on the exact ingredients you use and the size of your slices!
Final Thoughts
Baking this Old Fashioned Peanut Butter Cake is more than just a recipe; it’s an opportunity to create something beautiful and delicious, all while making memories along the way. Every bite is a reminder of the joy brought by simple, homemade goodness.
So whether you’re celebrating a birthday, having a family gathering, or simply indulging because you deserve it, I hope this cake brings as much joy to your kitchen as it did in mine. Remember, cooking is all about creating joy and sharing it with those you love. Happy baking, and as always, I can’t wait to hear how your peanut butter cake turns out! Grab a fork and dig in—let’s make some memories!
Print
Old Fashioned Peanut Butter Cake
- Total Time: 55 minutes
- Yield: 12 servings 1x
- Diet: Vegetarian
Description
A warm, comforting peanut butter cake that captures the essence of home baking with a modern twist.
Ingredients
- 3 sticks unsalted butter (12 oz / 339 g, softened)
- 2/3 cup smooth peanut butter (178 g)
- 5 cups sifted powdered sugar (568 g)
- 1/2 tsp vanilla extract
- 1 1/2 cups packed light brown sugar (320 g)
- 1 stick unsalted butter (4 oz / 113 g, softened)
- 1/2 cup smooth peanut butter (135 g)
- 2 large eggs
- 1/2 cup vegetable oil (99 g)
- 1 1/2 cups buttermilk (360 g)
- 1 1/2 tsp baking powder
- 1 tsp baking soda
- 1 tsp salt
- 3 2/3 cups all-purpose flour
- 2 tsp vanilla extract
Instructions
- Preheat your oven to 350°F (175°C).
- Prepare your cake pans by greasing and flouring or lining with parchment paper.
- Beat the 3 sticks of softened butter and 2/3 cup smooth peanut butter until light and fluffy—about 3-4 minutes.
- Add the packed brown sugar and continue beating for another 2 minutes.
- Crack in the eggs, one at a time, mixing well after each.
- Pour in the vegetable oil and buttermilk, mixing until just combined.
- Whisk together the flour, baking powder, baking soda, and salt in a separate bowl.
- Add the dry ingredients to the wet mixture, mixing until just combined.
- Divide the batter evenly between the prepared pans.
- Bake for about 30-35 minutes, or until a toothpick comes out clean.
- Cool in the pans for about 10 minutes, then transfer to wire racks.
- Beat the 1 stick of softened butter and 1/2 cup of peanut butter until smooth for the frosting.
- Add the powdered sugar and the 1/2 tsp vanilla extract, mixing until creamy.
- Frost the top of one layer with frosting, place the second layer on top, and frost the top and sides of the cake.
Notes
For variations, try adding cocoa powder, nuts, or jam between the layers for a delightful twist.
- Prep Time: 20 minutes
- Cook Time: 35 minutes
- Category: Dessert
- Method: Baking
- Cuisine: American
Nutrition
- Serving Size: 1 slice
- Calories: 400
- Sugar: 30g
- Sodium: 200mg
- Fat: 20g
- Saturated Fat: 8g
- Unsaturated Fat: 11g
- Trans Fat: 0g
- Carbohydrates: 50g
- Fiber: 1g
- Protein: 6g
- Cholesterol: 30mg
Keywords: peanut butter cake, dessert, baking, comfort food, nostalgic recipe
Slow Cooker Pumpkin Dump Cake: Easy 3-Ingredient Fall Dessert
Slow Cooker Pumpkin Dump Cake: A Cozy Fall Favorite
Hey there, fellow foodies! It’s Beau Collier, and today I’m so excited to share one of my absolute favorite fall desserts with you—Slow Cooker Pumpkin Dump Cake. This dish is like a warm hug from your grandma, with the sweet, spiced aroma filling the kitchen, beckoning everyone to gather ’round. If you love the taste of fall as much as I do, you’re in for a real treat. Trust me; this is the kind of dessert that makes you feel all the cozy vibes!
Now, why the slow cooker, you ask? Well, let me tell you, using a slow cooker for this pumpkin dump cake is a game-changer. It’s easy, it’s forgiving, and it gives you that tender, gooey goodness without the worry of burning. Plus, it keeps everything nice and moist—a must for any cake!
When I first stumbled onto the idea of a “dump cake,” I was a bit skeptical. I mean, how could something so simple actually turn out delicious? But, let me tell you, after one luscious bite, I was sold! The blend of pumpkin and spices just screams autumn, and it’s incredibly easy to whip up.
So, let’s roll up our sleeves and dive into this scrumptious recipe! I promise that by the end of our little kitchen adventure, you’ll have a delightful pumpkin dessert to share with family and friends—or just keep all to yourself!
A Warm Memory from the Pumpkin Patch
I remember a crisp, autumn day a few years back when my friends and I ventured to a local pumpkin patch. The leaves were ablaze with rich oranges and deep reds, and the air was filled with that unmistakable scent of fall. After picking out the perfect pumpkins, we gathered around a bonfire, sipping spiced apple cider and sharing stories. Someone mentioned their favorite fall recipes, and that’s when I first heard about pumpkin dump cake. The concept intrigued me, and that night, I knew I had to try making one myself.
Soon after, I crafted my first pumpkin dump cake, and it brought back the magic of that pumpkin patch day. It was simple, fun, and captured the essence of what makes fall so special. Now, every year, I whip up this treat as the leaves turn and the air fills with the promise of the holidays. It’s become a tradition in my kitchen—a dish that brings friends and family together, wrapped in the warmth of nostalgia and comfort.
Ingredients
Here’s what you’ll need to create this mouthwatering Slow Cooker Pumpkin Dump Cake:
-
Spice Cake Mix (15.25 oz)
This is the star of our show! The spice cake mix adds the perfect blend of cinnamon, nutmeg, and clove. If you want to switch it up, consider using a vanilla or yellow cake mix for a different flavor profile. -
1 Box Instant Vanilla Pudding (3.4 oz)
This will ensure your cake is moist and adds a silky texture. If you’re feeling adventurous, you could try butterscotch pudding for a unique twist! -
1 Can of Pumpkin (15 oz)
The pumpkin brings that classic autumn flavor and moisture. Make sure you get pure pumpkin purée, not pumpkin pie filling, which has added sugars and spices. -
1 1/2 Cups of Milk
Milk is crucial for achieving the right consistency. Swap in almond or oat milk if you’re looking for dairy-free options! -
1 1/2 Stick of Butter (melted)
Butter contributes richness and flavor. If you wish for a healthier option, melted coconut oil or unsweetened applesauce can be used instead.
Step-by-Step Instructions
Let’s get cooking! Follow these easy steps for your Slow Cooker Pumpkin Dump Cake, and feel free to grab a spoon and taste along the way!
Step 1: Gather Your Ingredients
Start by gathering all your ingredients before you get rolling. It makes the process smoother and more fun—no frantic searches for the butter halfway through mixing!
Step 2: Prepare Your Slow Cooker
Lightly grease the inside of your slow cooker with butter or cooking spray. This will help your cake release easily once it’s done!
Step 3: Mix the First Layer
In a large mixing bowl, combine the spice cake mix and the instant vanilla pudding mix. Whisk them together so they’re well-blended.
Step 4: Add the Pumpkin
Now, let’s add in the can of pumpkin! Stir it into the cake mix mixture until you don’t see any dry streaks. The batter should be thick and creamy.
Step 5: Pour in the Milk
Next, gradually add the milk to your mixture. Use a spatula to fold it in gently. This will achieve that luscious, smooth batter!
Step 6: Pour the Batter into the Slow Cooker
Once you’ve got it all mixed up, pour the batter into your prepared slow cooker. Use a spatula to evenly spread it out, making sure it’s level.
Step 7: Melt the Butter
Melt your butter in a microwave-safe bowl, then drizzle it over the top of the batter in the slow cooker. This will create a beautiful, golden crust as it cooks.
Step 8: Cook Low and Slow
Cover the slow cooker with its lid and set it on low for about 4 hours. Resist the urge to peek too often—it’ll smell amazing, but every time you lift the lid, you let out heat!
Step 9: Check for Doneness
After 4 hours, check the cake. It can be tricky as the center may look a bit gooey, and that’s okay! If it’s not quite set, simply cover it again and let it go for an additional 30 minutes.
Step 10: Cool and Serve
Once it’s done, turn off the slow cooker and let it cool for a bit before serving. Scoop out generous portions, top with whipped cream, and enjoy!
Serving Suggestions
When it comes to serving your Slow Cooker Pumpkin Dump Cake, the sky’s the limit!
-
A Dollop of Whipped Cream: Nothing says fall quite like a scoop of creamy whipped topping. You can even sprinkle some cinnamon on top for an extra touch.
-
Ice Cream Sundae Style: Serve it warm with a scoop of vanilla ice cream melting atop the cake, drizzled with caramel for the ultimate indulgence.
-
Garnished with Nuts: A sprinkle of chopped pecans or walnuts adds a delightful crunch!
-
In a Bowl: Serve it right in a bowl with some of that lovely sauce that forms at the bottom of the slow cooker—it’s pure magic!
Recipe Variations
Feeling adventurous? Here are some fun twists you can try with this recipe:
-
Chocolate Swirl: Add in some chocolate chips or swirl in some cocoa powder for a decadent chocolate pumpkin dump cake.
-
Boozy Twist: For the adults, a splash of bourbon or rum in the batter takes the flavor profile to the next level!
-
More Spice: Throw in extra spices like ginger or allspice for a taste that’s as warm as a cozy hug.
-
Fruit Mix-Ins: Toss in some chopped apples or cranberries for an added zing and burst of flavor.
-
Gluten-Free Option: Swap out the spice cake mix with a gluten-free blend to make it perfect for gluten-sensitive friends!
Chef’s Notes
As a chef who loves to experiment, this recipe has evolved quite a bit since I first tried it out. I remember once using an unexpected ingredient—cooked sweet potatoes instead of pumpkin—and it turned out surprisingly delicious! The sweetness took on a whole new life, and I realized that cooking is all about adapting and having fun. So don’t be afraid to play around with flavors and decide what works best for you!
FAQs and Troubleshooting
Here are some common questions I’ve encountered about this recipe, along with handy tips to keep you on track:
1. Why is my cake gooey in the middle?
The center of the cake might take a bit longer to cook. If it still appears undercooked after 4 hours, give it an extra 30 minutes to set up properly.
2. How do I store leftovers?
You can store leftovers in an airtight container in the fridge for up to 3 days. Just reheat it in the microwave for a few seconds before serving for a quick treat!
3. Can I use fresh pumpkin instead of canned?
Absolutely! Just make sure to cook and puree your fresh pumpkin, and keep the moisture content similar to the canned version.
4. What’s the best way to warm it up?
The microwave works great for leftovers, but if you want to keep it moist, try reheating in the oven at 350°F for about 10-15 minutes.
Nutritional Info (Per Serving)
You’ll get a delightful balance of flavors with your slice of Slow Cooker Pumpkin Dump Cake. Here’s a quick breakdown of the nutrition:
- Calories: Approximately 350
- Protein: 4g
- Carbohydrates: 45g
- Fat: 18g
- Fiber: 1g
- Sugar: 8g
Remember, these values may vary depending on how you customize your recipe—especially with toppings and mix-ins!
Final Thoughts
And there you have it—your very own Slow Cooker Pumpkin Dump Cake! I hope you enjoy every bite of this sweet, spiced treat as much as I do. It’s an easy, crowd-pleaser that effortlessly merges tradition with a dash of contemporary cooking.
As you bring this delectable cake to your table, remember it’s more than just a dessert. It’s a chance to share laughter, stories, and warmth with those you love. So, gather your friends and family, and dive into the comforting flavors of fall.
Keep those spatulas at the ready, and don’t forget to tell me how your pumpkin dump cake turns out! Until next time, happy cooking!
Print
Slow Cooker Pumpkin Dump Cake
- Total Time: 255 minutes
- Yield: 8 servings 1x
- Diet: Vegetarian
Description
A cozy fall dessert featuring pumpkin and spice flavors, easy to make in a slow cooker.
Ingredients
- 1 Box Spice Cake Mix (15.25 oz)
- 1 Box Instant Vanilla Pudding (3.4 oz)
- 1 Can of Pumpkin (15 oz)
- 1 1/2 Cups of Milk
- 1 1/2 Sticks of Butter (melted)
Instructions
- Gather your ingredients.
- Prepare your slow cooker by lightly greasing it.
- Mix the spice cake mix and the vanilla pudding mix in a large bowl.
- Add in the can of pumpkin and mix until combined.
- Pour in the milk and fold it gently into the mixture.
- Pour the batter into the slow cooker and spread it evenly.
- Melt the butter and drizzle it over the batter.
- Cook on low for about 4 hours.
- Check for doneness and cook longer if needed.
- Cool slightly before serving.
Notes
Top with whipped cream or ice cream for extra indulgence.
- Prep Time: 15 minutes
- Cook Time: 240 minutes
- Category: Dessert
- Method: Slow Cooking
- Cuisine: American
Nutrition
- Serving Size: 1 serving
- Calories: 350
- Sugar: 8g
- Sodium: 400mg
- Fat: 18g
- Saturated Fat: 10g
- Unsaturated Fat: 6g
- Trans Fat: 0g
- Carbohydrates: 45g
- Fiber: 1g
- Protein: 4g
- Cholesterol: 60mg
Keywords: pumpkin, dump cake, slow cooker, fall dessert, cozy dessert