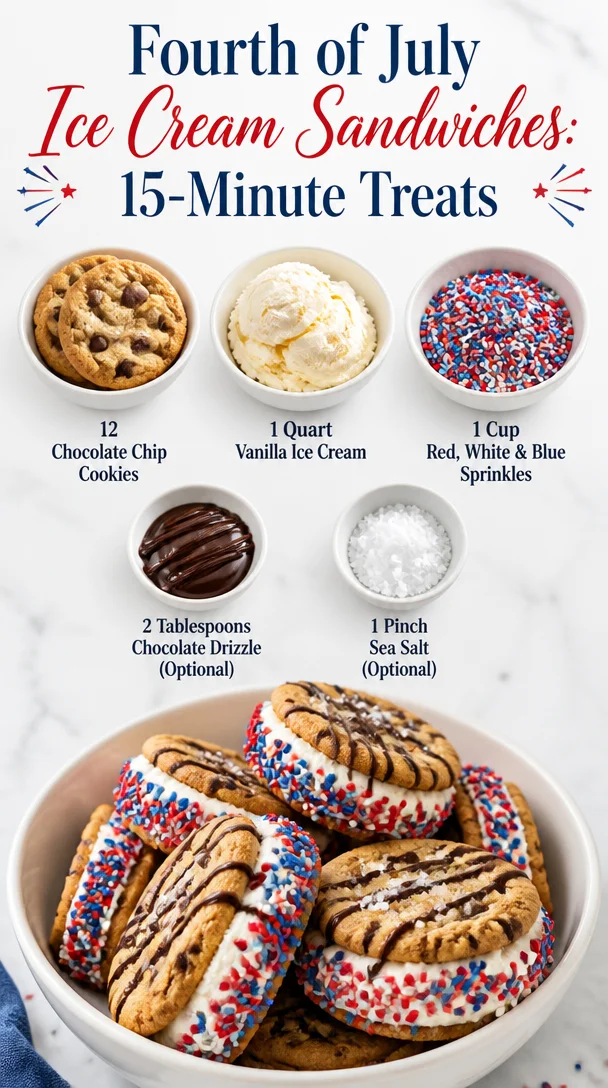
Fourth of July Ice Cream Sandwiches: 15-Minute Treats
Patriotic Ice Cream Sandwiches: A Celebration of Flavor and Festivity
Hey there, fellow food lovers! It’s Beau Collier here, and today we’re diving into a delightful treat that’s perfect for celebrating any summer occasion—Patriotic Ice Cream Sandwiches! Whether it’s the Fourth of July, Memorial Day, or simply a sunny day with friends and family, these festive desserts radiate fun, flavor, and a dash of nostalgia. Imagine biting into a soft chocolate chip cookie, a scoop of creamy vanilla ice cream oozing out, and a sprinkle of colorful joy all around. Sounds amazing, right? Let’s make it happen!
A Taste of Nostalgia
One of my fondest memories from childhood is enjoying ice cream sandwiches during family picnics. It wasn’t just about the delicious dessert; it was the laughter, the sunshine, and the carefree moments shared with those I loved. My grandma would whip up trays of homemade cookies right before our summer gatherings, and we’d race each other to get the first sandwich—always with the biggest scoop of ice cream we could manage. Those days were filled with innocence, love, and, of course, plenty of sprinkles.
Fast forward to now, I strive to recreate those feelings every time I take a bite of an ice cream sandwich. The combination of soft cookies with creamy ice cream sprinkled with vibrant colors is a celebration of those cherished moments. Trust me; these Patriotic Ice Cream Sandwiches will not only taste incredible—they’ll also spark sweet memories for you and your loved ones. Let’s dive into the details so you can make your own tasty trip down memory lane.
Ingredients
To create these delightful desserts, here’s what you’ll need:
-
12 Soft Chocolate Chip Cookies
- Chef Insight: Make sure they’re fresh and soft! Not only are homemade cookies best, but you can also use store-bought ones if you’re in a rush. Softness is key—no one wants a hard sandwich!
-
1 quart Vanilla Ice Cream, slightly softened
- Substitution Tip: If vanilla isn’t your jam, feel free to switch it up! Cookies and cream, strawberry, or mint chocolate chip could give your sandwich a new twist!
-
1 cup Red, White, and Blue Sprinkles
- Chef Insight: These colorful sprinkles add a fun pop of patriotism! If you can’t find them, any combination of red and blue will do, or use your favorite sprinkles for some extra pizazz!
-
2 tablespoons Chocolate Drizzle (optional)
- Substitution Tip: You can also use caramel or a fruit sauce if chocolate isn’t your vibe. It’s all about what tickles your taste buds!
-
1 pinch Sea Salt (optional)
- Chef Insight: A sprinkle of sea salt can really enhance the sweetness of the ice cream and cookies. Just a pinch makes a world of difference!
Step-by-Step Instructions
-
Prepare Your Cookies
- If you’re making cookies from scratch, preheat your oven to 350°F (175°C). Mix together your flour, sugar, chocolate chips, and other cookie ingredients to create a delicious dough. Shape tablespoons of the dough into balls on a baking tray—give each cookie some space to spread. Bake for 10 to 12 minutes until they are golden brown but still soft. Let them cool!
-
Soften Your Ice Cream
- While the cookies cool down, let your vanilla ice cream sit at room temperature for about 10-15 minutes until it’s slightly softened. This makes it easier to scoop and spread between the cookies. Pro tip: If you leave it out too long, you may end up with a puddle instead of scoops, so keep an eye on it!
-
Assembly Time!
- Grab your cooled cookies and place a generous scoop of softened ice cream on the flat side of one cookie. Top it with another cookie, flat side down, and gently press down to create your sandwich. Don’t worry about making it perfect; a little ice cream oozing out is part of the fun!
-
Roll in Sprinkles
- Take your assembled sandwiches and roll the sides in red, white, and blue sprinkles. This adds colorful flair and a nice crunch that complements the creaminess of the ice cream. You can never have too much sprinkle action!
-
Drizzle (If You’re Feeling Fancy)
- If you opted for chocolate drizzle, now’s the time! Drizzle a little over the top of your ice cream sandwiches for an extra splash of decadence.
-
Chill Out
- Place the assembled sandwiches on a baking sheet lined with parchment paper and pop them back into the freezer for about 30 minutes to let the ice cream firm up again. This will make your sandwiches easier to cut and eat!
Serving Suggestions
When it comes to serving, presentation is everything! You can place each ice cream sandwich on a festive plate adorned with colorful napkins (maybe stars and stripes, if you have them!). If you want to take it to the next level, serve them with a side of fresh berries or a scoop of additional ice cream. For an extra festive flourish, consider topping them off with whipped cream and a cherry! These little touches can take your dessert from ordinary to extraordinary, making it an unforgettable experience for friends and family.
Recipe Variations
When it comes to ice cream sandwiches, the only limit is your imagination! Here are a few creative ideas to switch things up:
-
Flavor Fusion: Swap out vanilla ice cream for your favorite variety. Think salted caramel for a sweet-salty delight or strawberry for a fruity twist!
-
Cookie Choices: Instead of chocolate chip, use oatmeal raisin, peanut butter, or even brownie cookies for added richness. The choice is yours!
-
Add-Ins Galore: Mix in crushed candies, nuts, or even bits of your favorite cereal into the softened ice cream before assembling for a new layer of flavor and texture.
-
Health-Conscious Version: Use whole wheat flour cookies with reduced-sugar ice cream for a healthier twist. You won’t compromise on flavor, I promise!
-
Vegan Option: Create a vegan version using plant-based cookies and almond or coconut milk ice cream. Who says you can’t have delicious ice cream sandwiches on a plant-based diet?
Chef’s Notes
Oh boy, these sandwiches have evolved so much over the years. I remember my first attempt, which resulted in ice cream gushing out in every direction. It was hilariously messy but a blast! Cooking is about experimentation and having fun, so don’t sweat the small stuff! The more I’ve made these ice cream sandwiches, the more I’ve learned to embrace imperfections. Each sandwich is unique—just like the memories we’re creating!
FAQs and Troubleshooting
-
Q: Why is my ice cream melting before I finish assembling?
A: That’s a classic problem! If you notice your ice cream is melting too quickly, try freezing it for a bit longer before the assembly, or work in a colder room if possible. -
Q: My cookies turned out hard. What did I do wrong?
A: Often, it’s a matter of baking time or the amount of flour used. Make sure to measure your flour correctly and take them out of the oven when they’re golden—soft cookies will firm as they cool. -
Q: Can I make these ice cream sandwiches ahead of time?
A: Absolutely! You can assemble them a day in advance and keep them in the freezer. Just make sure they’re well-wrapped to avoid freezer burn. -
Q: Can I use something other than sprinkles?
A: Definitely! You can roll them in crushed cookies, nuts, or chocolate chips. Get creative with what you love!
Nutritional Info
While I always emphasize flavor and fun, it’s also nice to be aware of the nutritional aspects of our treats. Each ice cream sandwich contains roughly:
- Calories: 350-450 (depending on the cookie type and ice cream used)
- Protein: 5g
- Fat: 15g
- Carbohydrates: 50g
This is a delightful indulgence, so enjoy every bite! Just remember balance is key; these sandwiches can be a special treat rather than a daily indulgence.
Final Thoughts
There you have it, folks—Patriotic Ice Cream Sandwiches that are as fun to make as they are to eat! I hope this recipe brings you as much joy as my childhood memories do for me. Cooking is about creativity, love, and connection. Share these treats with your friends and family, and watch as they become a cherished part of your gatherings, just like they have in mine.
So, what are you waiting for? Dive into your kitchen, gather your loved ones, and whip up a batch of these delicious ice cream sandwiches. Remember to savor the process as much as the final bite! Happy cooking, and may your summer celebrations be filled with joy and amazing treats! 🌟🍪🍦
Print
Patriotic Ice Cream Sandwiches
- Total Time: 45 minutes
- Yield: 4 servings 1x
- Diet: Vegetarian
Description
A fun and flavorful treat perfect for summer celebrations, combining soft chocolate chip cookies and creamy vanilla ice cream, rolled in festive sprinkles.
Ingredients
- 12 Soft Chocolate Chip Cookies
- 1 quart Vanilla Ice Cream, slightly softened
- 1 cup Red, White, and Blue Sprinkles
- 2 tablespoons Chocolate Drizzle (optional)
- 1 pinch Sea Salt (optional)
Instructions
- Prepare the cookies: Preheat your oven to 350°F (175°C). Mix together your flour, sugar, chocolate chips, and other cookie ingredients to create a delicious dough. Shape tablespoons of the dough into balls on a baking tray and bake for 10 to 12 minutes until golden but still soft. Let them cool.
- Soften your ice cream: While the cookies cool, let your vanilla ice cream sit at room temperature for about 10-15 minutes until slightly softened.
- Grab your cooled cookies and place a generous scoop of softened ice cream on the flat side of one cookie. Top with another cookie, and gently press down.
- Roll the assembled sandwiches in sprinkles for added flair and crunch.
- Drizzle chocolate (if using) over the top for extra decadence.
- Chill the sandwiches in the freezer for about 30 minutes to firm up the ice cream.
Notes
Feel free to experiment with different ice cream flavors and cookie types. Try to keep things festive and colorful with sprinkles!
- Prep Time: 15 minutes
- Cook Time: 12 minutes
- Category: Dessert
- Method: Baking
- Cuisine: American
Nutrition
- Serving Size: 1 sandwich
- Calories: 400
- Sugar: 30g
- Sodium: 200mg
- Fat: 15g
- Saturated Fat: 9g
- Unsaturated Fat: 6g
- Trans Fat: 0g
- Carbohydrates: 50g
- Fiber: 2g
- Protein: 5g
- Cholesterol: 25mg
Keywords: ice cream, sandwiches, patriotic, dessert, summer, celebration
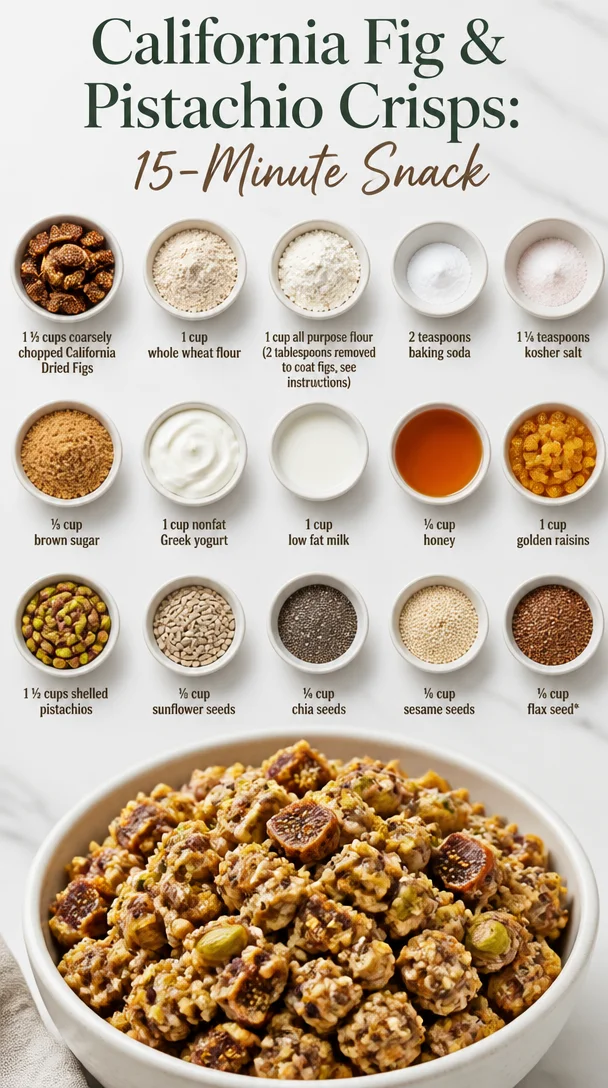
California Fig & Pistachio Crisps: 15-Minute Snack
California Fig and Pistachio Crisps: A Flavorful Crunch You Can’t Resist!
Hey there, fellow food lovers! Today, I’m bubbling with excitement to share an incredible recipe that’s sure to tickle your taste buds—California Fig and Pistachio Crisps. These delightful bites are not only a fantastic snack, but they also pack a flavorful punch that can transform any ordinary day into a festive one. Trust me, once you try these crisps, they’ll become your go-to offering for neighbors at holiday gatherings, parties, or just a cozy evening at home with loved ones.
Now, before we dive into the nitty-gritty of the recipe, let me take you on a little journey down memory lane, where the roots of my affection for figs and pistachios began.
A Walk Down Memory Lane
Growing up, my family cherished these special occasions when we’d gather around the table, sharing stories and laughter over homemade treats. One summer, my grandparents took me to a little local farmer’s market in our quaint town. I remember it vividly—rows of luscious fruits, aromatic herbs, and little stalls boasting homemade goodies. My eyes immediately zeroed in on a vendor with a colorful display of dried fruits and nuts, their vibrant colors almost calling out to me.
The vendor was selling the most succulent California figs and crunchy pistachios. The sweet scent of the figs wafting through the air hooked me from the start. I bought a tiny bag of those figs, and with every bite, I felt the essence of summer and sun-soaked afternoons. I couldn’t resist pairing them with pistachios, which provided this beautiful contrast of sweetness and crunch. That magical combination became the inspiration behind today’s recipe.
So, let’s get back to the present and whip up a batch of these California Fig and Pistachio Crisps that remind me so much of those sunny days filled with joy and delectable flavors.
Ingredients You’ll Need
Before we get cooking, here’s what you’ll need:
-
1 ½ cups coarsely chopped California Dried Figs: I used California Mission Figs, but feel free to explore any variety you enjoy. Dried figs are naturally sweet and lend a chewy texture to the crisps. If you’re in a pinch, you can substitute with dried dates or apricots, but the unique flavor of figs is unmatched.
-
1 cup whole wheat flour: This is our whole grain hero, giving the crisps a nutty flavor. If you need a gluten-free option, almond flour or oat flour works beautifully too.
-
1 cup all-purpose flour (2 tablespoons removed to coat figs): This will help bind the dough. You can use gluten-free all-purpose flour if you prefer.
-
2 teaspoons baking soda: This gives our crisps that lovely rise. Make sure it’s fresh; expired baking soda can compromise the texture.
-
1 ¼ teaspoons kosher salt: Just the right touch! You can substitute with table salt, but reduce the amount to about 1 teaspoon as table salt is saltier by volume.
-
⅓ cup brown sugar: This adds sweetness and depth. If you want to keep it sugar-free, consider using coconut sugar or a natural sweetener like stevia.
-
1 cup nonfat Greek yogurt: This adds moisture and tanginess. If you’re dairy-free, opt for coconut yogurt or a non-dairy alternative.
-
1 cup low-fat milk: To keep the dough nice and smooth. Any plant-based milk works just as well!
-
¼ cup honey: A marvel of nature that adds sweetness with a floral note. If you’re vegan, maple syrup is a delicious alternative!
-
1 cup golden raisins: Incorporating these gives pops of sweetness. You could swap these for dried cranberries or cherries for a tart twist.
-
1 ½ cups shelled pistachios: Crunchy and nutritious! You can use any unsalted nuts, but the creaminess of pistachios is hard to beat.
-
½ cup sunflower seeds: These give a lovely crunch while packing in nutrients. You can replace them with pumpkin seeds if you like.
-
¼ cup chia seeds: They help bind the dough and offer a boost of Omega-3s. If they’re not your thing, you could skip them or replace them with flax seeds.
-
¼ cup sesame seeds: Toasted sesame seeds sprinkle such delightful flavor! Feel free to use poppy seeds for a different profile.
-
¼ cup flax seed: This is a fantastic source of fiber and adds nuttiness. You can omit it if don’t have any on hand.
Step-by-Step Instructions
Now that we’ve gathered our ingredients, let’s roll up our sleeves and start cooking!
-
Preheat the Oven: Let’s set the stage first by preheating your oven to 350°F (175°C). This ensures the crisps bake evenly and get crispy without burning.
-
Prep the Figs: Toss the chopped California figs with 2 tablespoons of all-purpose flour. This prevents them from sinking to the bottom of the dough during baking. It’s one of my favorite little hacks to ensure even distribution throughout the crisps.
-
Mix Dry Ingredients: In a large mixing bowl, combine the whole wheat flour, remaining all-purpose flour, baking soda, kosher salt, and brown sugar. Stir well to integrate everything. This is a critical step—uniform mixing ensures every bite is just as scrumptious!
-
Combine Wet Ingredients: In another bowl, whisk together the Greek yogurt, low-fat milk, honey, and golden raisins. When you introduce these wet ingredients to the dry, they’ll create a beautifully cohesive dough.
-
Combine and Fold: Gradually pour the wet mixture into the dry ingredients, mixing gently until no flour streaks remain. Avoid over-mixing; we want our crisps to keep a chewy yet crumbly texture!
-
Incorporate Nuts and Seeds: Gently fold in the chopped pistachios, sunflower seeds, chia seeds, sesame seeds, and flax seeds. You’ll love how vibrant the mixture looks with all those colors and textures. Mix just until they’re evenly distributed.
-
Shape the Crisps: Line a baking sheet with parchment paper and scoop tablespoons of the mixture onto it, spacing them about 2 inches apart. Use the back of a spoon to flatten them gently. They won’t spread much while baking, so don’t worry about a perfect shape.
-
Bake to Perfection: Slide the baking sheet into your preheated oven and bake for about 20-25 minutes or until they’re golden brown and crisp on the edges. Keep an eye on them towards the end—nobody likes burnt crisps! When done, take a moment to inhale the irresistible aroma filling your kitchen.
-
Cool Down: Once out of the oven, let them cool on a baking rack for a few minutes before enjoying. This cooling period also allows them to harden up nicely for that perfect crunch!
-
Store and Enjoy: Store any leftovers in an airtight container. I promise they’ll stay fresh for days (if they even last that long)!
Serving Suggestions
Now that your California Fig and Pistachio Crisps are ready to shine, let’s talk about serving them. These crisps make a delightful snack on their own, but my favorite way to serve them is with a little spread!
Try pairing them with a creamy goat cheese or a delectable honey ricotta spread. The tang of cheese against the sweet fig and crunchy pistachio offers a taste experience that’ll leave everyone wanting more. You can also serve them alongside a fresh fruit platter—think slices of sweet pears or tart apples (yes, please!). They complement charcuterie boards beautifully too, inviting everyone to dig in.
For a unique twist, crumble some crisps over yogurt or a salad for an added crunch and sweetness. The possibilities are endless!
Recipe Variations
Just some constructive creativity here! Why not shake things up a bit? Here are a few variations on this delicious recipe:
-
Mediterranean Touch: Add chopped dried apricots and replace some pistachios with chopped walnuts or almonds.
-
Spicy and Sweet: Toss in some cinnamon and a pinch of cayenne pepper to the flour mix, giving your crisps a little kick.
-
Citrus Zing: Incorporate zest from an orange or lemon to the dough for a refreshing citrus twist!
-
Nut-Free Version: Swap out pistachios and sunflower seeds with pumpkin seeds or just skip the nuts—more room for extra figs, perhaps?
-
Choco Delight: Mix some dark chocolate chips into the dough for an indulgent treat! Who says you can’t have a little sweetness with your crunch?
Chef’s Notes
Oh, I have a few funny little stories about my kitchen adventures with these crisps! I remember the first time I made them for a brunch party. I thought I’d be super fancy and add a pinch of chili powder for a flair. Let’s just say my friends were wide-eyed, and I quickly learned that not every experiment turns out to be a hit! They graciously finished the entire batch, though. It was a lesson learned—sometimes simple is the way to go!
Over the years, I’ve honed this recipe, and it has transformed into my go-to quick snack. Every time I tweak it slightly, I’m reminded of that summer at the farmer’s market. It brings me joy knowing that these crisps can become a special bonding element in your kitchen too!
FAQs and Troubleshooting
Q1: Why did my crisps turn out too soft?
If your crisps turned out softer than you expected, it might be due to over-mixing or adding too much liquid. Make sure you’re measuring accurately and mixing gently.
Q2: How can I make these without dairy?
No problem! Just swap the Greek yogurt and milk with non-dairy alternatives like almond or coconut yogurt and your favorite plant-based milk.
Q3: Can I freeze these crisps?
Absolutely! Once cooled, you can freeze them in an airtight container. When you’re ready for a snack, just pop them in the oven to refresh their crispiness!
Q4: What should I do if my dough is too sticky?
If your dough feels too sticky, you can sprinkle a bit more flour to achieve a workable consistency, but be careful not to overdo it as it might change the texture of the crisps.
Nutritional Info (for one serving, about 2 crisps)
- Calories: Approximately 150
- Protein: 4g
- Fat: 6g
- Carbohydrates: 20g
- Fiber: 3g
- Sugar: 5g
Packed with fiber from the figs and seeds, and a hint of protein thanks to the Greek yogurt, these crisps provide a well-rounded snack, keeping your energy levels up throughout the day!
Final Thoughts
There you have it—California Fig and Pistachio Crisps that capture the essence of community, comfort, and creativity in every bite! These crisps are not just a recipe; they’re a story of fond memories and flavor connections that have stood the test of time.
So, whether you enjoyed them on a cozy afternoon or shared them with friends, I hope they bring you as much joy as they do to me. Food is meant to be shared and experienced together, and I can’t wait for you to make these in your kitchen. Grab your apron and start baking that batch of happiness today!
Let me know how your crisps turned out, share your adaptations, or simply drop a note about your own food memories. Until next time, happy cooking and see you at Feastical!
Print
California Fig and Pistachio Crisps
- Total Time: 40 minutes
- Yield: 4 servings 1x
- Diet: Vegetarian
Description
Delightful and crunchy California Fig and Pistachio Crisps, perfect for snacking or festive gatherings.
Ingredients
- 1 ½ cups coarsely chopped California Dried Figs
- 1 cup whole wheat flour
- 1 cup all-purpose flour (2 tablespoons removed to coat figs)
- 2 teaspoons baking soda
- 1 ¼ teaspoons kosher salt
- ⅓ cup brown sugar
- 1 cup nonfat Greek yogurt
- 1 cup low-fat milk
- ¼ cup honey
- 1 cup golden raisins
- 1 ½ cups shelled pistachios
- ½ cup sunflower seeds
- ¼ cup chia seeds
- ¼ cup sesame seeds
- ¼ cup flax seed
Instructions
- Preheat the oven to 350°F (175°C).
- Toss the chopped California figs with 2 tablespoons of all-purpose flour.
- Combine the whole wheat flour, remaining all-purpose flour, baking soda, kosher salt, and brown sugar in a large bowl.
- Whisk together the Greek yogurt, low-fat milk, honey, and golden raisins in another bowl.
- Pour the wet mixture into the dry ingredients, mixing gently.
- Fold in the chopped pistachios, sunflower seeds, chia seeds, sesame seeds, and flax seeds.
- Scoop tablespoons of the mixture onto a lined baking sheet, spacing them 2 inches apart.
- Bake for about 20-25 minutes until golden brown and crisp on the edges.
- Cool on a baking rack for a few minutes before enjoying.
Notes
These crisps are perfect with cheese or fresh fruit and can be crumbled over yogurt or salads for added crunch.
- Prep Time: 15 minutes
- Cook Time: 25 minutes
- Category: Snack
- Method: Baking
- Cuisine: American
Nutrition
- Serving Size: 2 crisps
- Calories: 150
- Sugar: 5g
- Sodium: 400mg
- Fat: 6g
- Saturated Fat: 1g
- Unsaturated Fat: 5g
- Trans Fat: 0g
- Carbohydrates: 20g
- Fiber: 3g
- Protein: 4g
- Cholesterol: 5mg
Keywords: figs, pistachios, snacks, healthy crisps
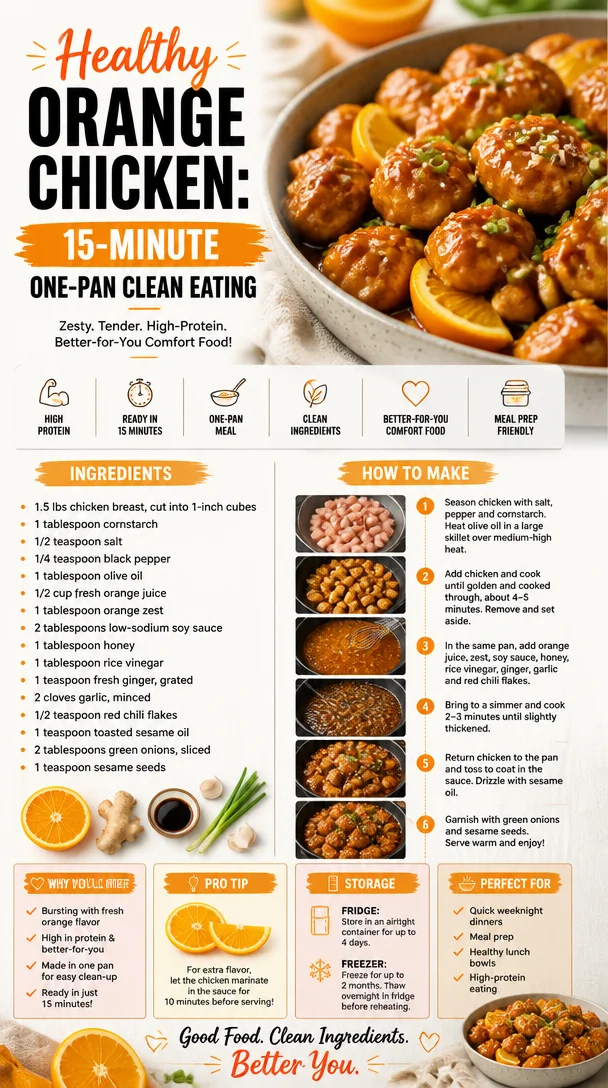
Healthy Orange Chicken: 15-Minute One-Pan Clean Eating
Healthy Orange Chicken: A Delicious Twist on a Classic Favorite
Hey there, food lovers! Welcome back to Feastical, where we’re always whipping up something scrumptious that warms the heart and delights the palate. Today, I’m thrilled to take you on a zesty culinary adventure with a dish that marries sweet and savory perfectly: Healthy Orange Chicken.
Now, if you’re anything like me, your taste buds spark joy at the mere mention of orange chicken—but often, traditional versions can be heavy on the calories and a little light on the wholesome goodness. With this recipe, you’re not just getting a satisfying meal; you’re embracing fresh ingredients that celebrate flavor without the guilt.
Imagine succulent pieces of chicken coated in a tangy orange sauce, garnished with green onions and sesame seeds that add a delightful crunch. Whether you’re making this for a quick weeknight dinner or a friendly gathering, this dish is sure to impress everyone at the table. Ready to dig in? Let’s kick things off!
A Slice of Nostalgia: My Orange Chicken Adventure
I’ll never forget the first time I tried orange chicken. I was about ten years old, pestering my mom after school for a snack, and she decided to treat us to some takeout from our favorite Chinese restaurant. I can still picture us sitting at the kitchen table, our faces lit up as my mom set down a steaming platter of that brightly colored dish. The sweet aromas filled the air, dancing with notes of ginger and garlic—what a combination!
That first bite? Pure magic! My taste buds were bombarded by the perfect balance of sweet, savory, and just a hint of heat. From that moment on, I knew orange chicken would always have a special place in my heart. As I grew up and ventured into the kitchen, creating my version of this beloved classic became a rite of passage. Over time, I learned how to create a healthier version without sacrificing any of that delightful flavor we all crave.
Now, I’m excited to share this revamped recipe with you, so you too can experience that same delightful nostalgia without the extra calories. Let’s get to it!
Ingredients
Gathering fresh, flavorful ingredients is key to making this Healthy Orange Chicken shine! Here’s what you’ll need:
-
1.5 lbs chicken breast, cut into 1-inch cubes
Chicken breast is a lean protein that absorbs flavors beautifully. You can substitute with boneless skinless chicken thighs for a richer taste, but keep in mind they have a higher fat content. -
1 tablespoon cornstarch
This helps create a crispy coating on the chicken while keeping it healthy. You can also opt for arrowroot powder if you’re looking for a gluten-free option. -
1/2 teaspoon salt
A dash of salt enhances all the flavors in this dish. Use low-sodium salt if you’re watching your sodium intake! -
1/4 teaspoon black pepper
A pinch of black pepper adds just the right kick. Feel free to substitute with white pepper for a subtler heat. -
1 tablespoon olive oil
Olive oil is heart-healthy and perfect for sautéing. Avocado oil is an excellent alternative if you prefer a higher smoke point. -
1/2 cup fresh orange juice
Go for fresh-squeezed juice for the best flavor! If you’re in a pinch, bottled juice will work, but make sure it’s pure and without added sugars. -
1 tablespoon orange zest
Zest adds a burst of citrus flavor! If you don’t have a fresh orange on hand, lemon zest will provide a different but equally delightful flavor. -
2 tablespoons low-sodium soy sauce
This soy sauce adds umami and depth. Tamari is a great gluten-free alternative, and coconut aminos can be used for a soy-free option. -
1 tablespoon honey
Honey balances our dish with its natural sweetness. Maple syrup is a great vegan alternative if you prefer. -
1 tablespoon rice vinegar
This adds a nice tang to the sauce. If you don’t have rice vinegar, white wine vinegar works well too! -
1 teaspoon fresh ginger, grated
Ginger adds a spicy kick! You can use ground ginger in a pinch—1/4 teaspoon will do! -
2 cloves garlic, minced
Garlic is a staple for flavor. If you’re not a fan, you can reduce the amount or leave it out entirely. -
1/2 teaspoon red chili flakes
This provides a hint of heat. If you want more spice, feel free to add more! -
1 teaspoon toasted sesame oil
This oil adds a rich, nutty flavor. Olive oil can substitute, but you’ll miss that delightful toasted flavor. -
2 tablespoons green onions, sliced
These add freshness and color—perfect for garnish! You can swap with chives for a similar look and taste. -
1 teaspoon sesame seeds
These seeds add a lovely crunch and a nutty flavor. You can skip them or use pumpkin seeds if you want a different texture.
Step-by-Step Instructions
Alright, let’s get cooking! Follow these steps carefully, and you’ll have a plate of zesty orange chicken in no time.
-
Prep the Chicken: Start by cutting your chicken breast into 1-inch cubes. This helps them cook evenly and allows the sauce to adhere better.
-
Coat the Chicken: In a bowl, toss the chicken pieces with salt, pepper, and cornstarch until evenly coated. This is the secret to achieving that crunchy texture while keeping it light. You want a nice thin layer—too much cornstarch, and it can turn gummy.
-
Heat the Pan: In a large skillet, heat the olive oil over medium heat until shimmering. Make sure your pan is hot before adding the chicken to get that beautiful sear!
-
Cook the Chicken: Working in batches if necessary, add the chicken to the pan. Cook for about 5-7 minutes, turning occasionally until golden brown and cooked through. You can use a meat thermometer (165°F/74°C) to be sure!
-
Make the Sauce: While the chicken cooks, let’s whip up the orange sauce! In a bowl, whisk together orange juice, zest, soy sauce, honey, rice vinegar, grated ginger, minced garlic, and red chili flakes. This will be the perfect blend of flavors you’ll toss the chicken in later!
-
Combine: Once the chicken is cooked, reduce the heat to low. Pour the orange sauce over the chicken and stir well, allowing the chicken to soak in that zesty goodness. Cook for an additional 3-5 minutes until the sauce thickens slightly.
-
Finish it Off: Remove from heat and drizzle the toasted sesame oil over the top. Toss in the green onions and give it a gentle stir. The aroma will be out of this world!
-
Garnish: Just before serving, sprinkle the sesame seeds over the top for that extra flair!
Serving Suggestions
Now that your Healthy Orange Chicken is done, how do you plate and serve this masterpiece? It’s all in the presentation!
For a gorgeous serving option, plate a generous scoop of the chicken onto a bed of steamed rice—brown rice or cauliflower rice works wonderfully for a healthier touch. You can add some stir-fried vegetables or a simple green salad on the side to round out the meal.
Drizzle a bit more of that luscious orange sauce over the chicken for extra sparkle. And remember to scatter those beautiful green onions and sesame seeds on top; not only do they enhance the flavor, but they’ll also make your dish pop with color.
Recipe Variations
Feeling adventurous? Here are some creative twists to make this Healthy Orange Chicken even more exciting:
-
Spicy Orange Chicken: Add more red chili flakes or some sliced fresh chili peppers for those who love heat. You can also toss in some chili garlic sauce for an extra kick!
-
Crispy Baked Version: Lightly coat the chicken in cornstarch, then bake at 425°F (220°C) for about 20-25 minutes until crispy. Then, add the orange sauce after baking.
-
Orange Tofu: For a vegetarian alternative, swap chicken for firm tofu. Just press the tofu to remove excess water, cut it into cubes, and follow the same steps for a flavorful plant-based dish.
-
Fruit-Infused Orange Chicken: Get creative by adding pineapple chunks or bell peppers to the mix. They’ll absorb some of that delicious sauce, creating bursts of flavor in every bite!
-
Sesame-Soy Variation: Swap out honey for a dash of sesame oil in the sauce for a nutty flavor, transforming the dish to suit your taste!
Chef’s Notes
This Healthy Orange Chicken recipe has evolved over the years—from a guilty pleasure to a wholesome crowd-pleaser. I love hearing how each cook puts their spin on it. It reminds me of countless family dinners and gatherings filled with laughter, all thanks to a shared love of cooking and good eats.
One funny story comes to mind: I once tried to make this dish for a dinner party, and I accidentally grabbed a bottle of orange extract instead of juice! The result? A fascinatingly potent orange chicken that my friends still tease me about to this day. Now I always double-check my ingredients!
FAQs and Troubleshooting
1. Why isn’t my sauce thickening?
If your sauce isn’t thickening, try letting it simmer a bit longer. A splash of water helps if it’s too thick, although cornstarch slurry (1 tablespoon cornstarch mixed with 2 tablespoons of water) can also thicken it nicely.
2. Can I use frozen chicken?
Absolutely! Just be sure to thaw it completely before cooking to ensure even cooking.
3. What’s the best way to store leftovers?
Store leftovers in an airtight container in the fridge for up to 3-4 days. Reheat gently in a pan over low heat, adding a splash of orange juice if the sauce has thickened.
4. Can I make this dish ahead of time?
You can prepare the chicken and the sauce ahead of time, but I recommend tossing them together just before serving for optimal freshness and flavor.
Nutritional Info
This Healthy Orange Chicken packs a punch when it comes to nourishment! With lean proteins and a bounty of citrus benefits, here’s a quick overview of its nutritional highlights:
- Calories: Approximately 350 calories per serving (includes chicken, sauce, and garnishes)
- Protein: Around 35g of protein per serving, making it a great post-workout meal!
- Carbohydrates: Approximately 30g, mostly from the natural sugars of oranges and honey.
- Fats: About 10g, depending on the quantity of olive oil and chicken cuts used.
Keep in mind that these figures can vary based on ingredients used and portion sizes.
Final Thoughts
There you have it—a delightful and healthy take on a classic favorite! I hope you enjoyed this journey through the world of flavors that Healthy Orange Chicken brings, from its vibrant origins to your dinner table. Remember, the kitchen is all about having fun, experimenting, and creating memories—so don’t be afraid to make this dish your own.
Thank you for stopping by Feastical! I can’t wait to hear how your creation turns out. Snap a pic, share your thoughts, and let’s keep inspiring each other to whip up some feel-good food. Here’s to great meals, cherished memories, and lots of happy taste buds. Until next time, happy cooking! 🍊🍗
Print
Healthy Orange Chicken
- Total Time: 35 minutes
- Yield: 4 servings 1x
- Diet: Gluten-Free
Description
A healthier twist on the classic orange chicken dish with fresh ingredients and a zesty sauce.
Ingredients
- 1.5 lbs chicken breast, cut into 1-inch cubes
- 1 tablespoon cornstarch
- 1/2 teaspoon salt
- 1/4 teaspoon black pepper
- 1 tablespoon olive oil
- 1/2 cup fresh orange juice
- 1 tablespoon orange zest
- 2 tablespoons low-sodium soy sauce
- 1 tablespoon honey
- 1 tablespoon rice vinegar
- 1 teaspoon fresh ginger, grated
- 2 cloves garlic, minced
- 1/2 teaspoon red chili flakes
- 1 teaspoon toasted sesame oil
- 2 tablespoons green onions, sliced
- 1 teaspoon sesame seeds
Instructions
- Prep the chicken: Start by cutting your chicken breast into 1-inch cubes.
- Coat the chicken: In a bowl, toss the chicken pieces with salt, pepper, and cornstarch until evenly coated.
- Heat the pan: In a large skillet, heat the olive oil over medium heat until shimmering.
- Cook the chicken: Add the chicken to the pan and cook for about 5-7 minutes until golden brown and cooked through.
- Make the sauce: In a bowl, whisk together orange juice, zest, soy sauce, honey, rice vinegar, grated ginger, minced garlic, and red chili flakes.
- Combine: Reduce heat to low, pour the orange sauce over the chicken and stir well.
- Finish it off: Remove from heat and drizzle the toasted sesame oil over the top.
- Garnish: Sprinkle the sesame seeds over the top before serving.
Notes
For a crispy baked version, lightly coat the chicken in cornstarch and bake at 425°F for about 20-25 minutes.
- Prep Time: 15 minutes
- Cook Time: 20 minutes
- Category: Main Course
- Method: Sautéing
- Cuisine: Asian
Nutrition
- Serving Size: 1 serving
- Calories: 350
- Sugar: 10g
- Sodium: 500mg
- Fat: 10g
- Saturated Fat: 1.5g
- Unsaturated Fat: 8g
- Trans Fat: 0g
- Carbohydrates: 30g
- Fiber: 1g
- Protein: 35g
- Cholesterol: 85mg
Keywords: orange chicken, healthy recipe, dinner, Asian cuisine, gluten-free
Crispy Mozzarella Sticks in 15 Minutes: Quick Snack Recipe
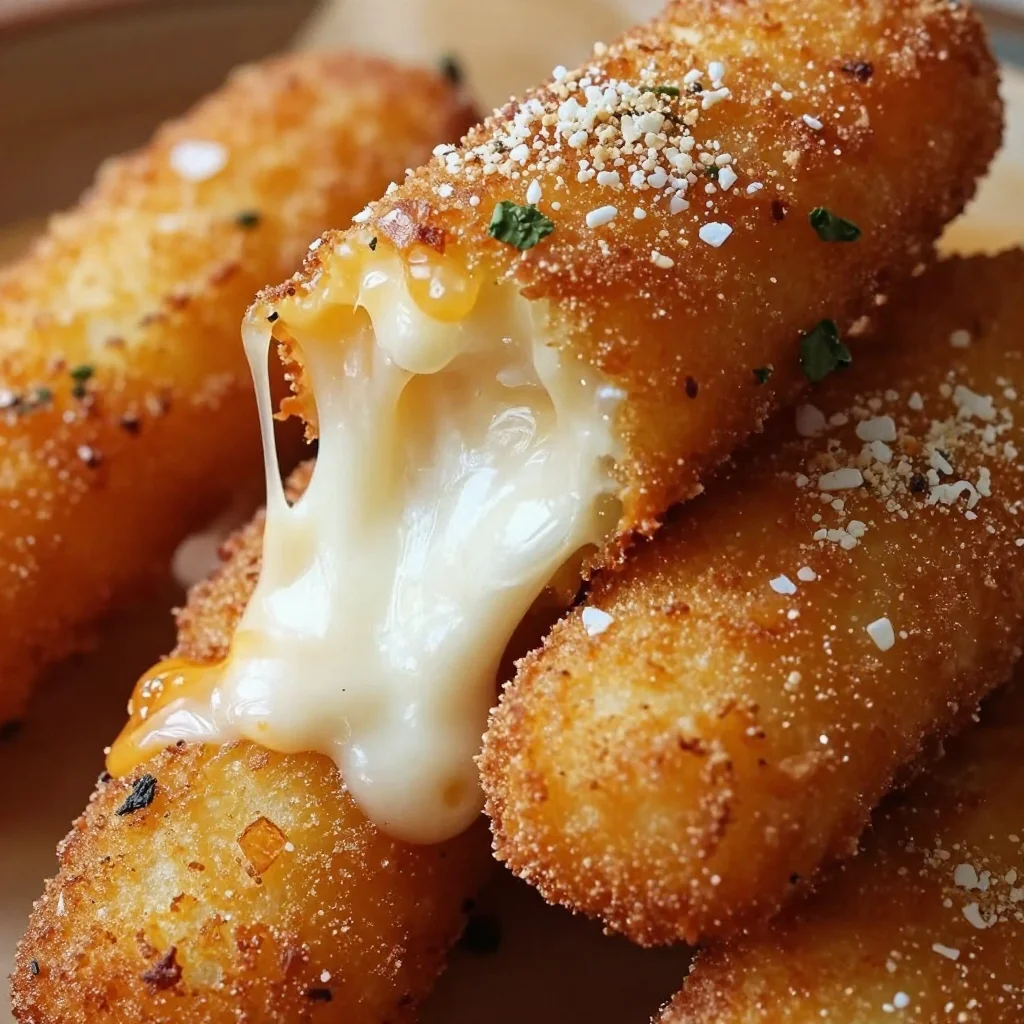
Irresistible Mozzarella Cheese Sticks: A Must-Try Recipe!
Hey, food lovers! It’s Beau Collier here, and today, we’re diving into one of the most delightful, gooey, and golden snacks you could ever make—Mozzarella Cheese Sticks! Trust me; these little bites of heaven will transport you back to your favorite pizza joint, or perhaps that beloved fair where you first discovered the magic of deep-fried cheese. With every stretchy, savory bite, you’ll feel like a kid again!
Making homemade mozzarella cheese sticks is not only super fun, but it’s also a great way to impress guests or spoil the family on movie night. Plus, there’s nothing quite like the satisfaction of pulling that cheese apart and watching it stretch like taffy. Ready your frying pan, folks, because we’re about to get cheesy!
A Trip Down Memory Lane
Let me share a little kitchen story with you. The first time I made mozzarella cheese sticks was at a family gathering, and boy, was that an adventure! I had gathered up some cousins and decided we should impress the adults with our snack-making prowess. Armed with a block of mozzarella and a smattering of ingredients I’d gathered, we set off on our cheesy quest.
Well, let’s just say it didn’t go entirely as planned. We were a bit too ambitious; flour ended up on the floor, breadcrumbs flew through the air like glitter at a party, and let’s not even talk about the oil splatters! But once we finally managed to fry our first batch of cheese sticks, the joy on everyone’s faces made all the chaos worth it. Those gooey, cheesy sticks disappeared faster than we could make them, and from that day on, I’ve cherished the delightful simplicity of this recipe and the laughter that comes with it.
Ingredients
Alright, let’s gather our ingredients, shall we? Here’s everything you need to whip up these mozzarella delights:
- 12 ounces mozzarella cheese: You can use string cheese or a block cut into sticks. If you want a fun twist, try flavored mozzarella for a kick!
- 1 cup all-purpose flour: This is your base for coating. Use gluten-free flour for a gluten-free option.
- 2 large eggs, beaten: This helps the breadcrumbs stick. For a vegan option, use a flax egg (1 tablespoon ground flaxseed combined with 3 tablespoons water).
- 1 cup seasoned breadcrumbs: Store-bought is great, but if you’re feeling adventurous, make your own by blending stale bread with your favorite spices!
- ½ teaspoon garlic powder (optional): Adds a lovely kick! Feel free to skip it if you’re not into garlic.
- ½ teaspoon Italian seasoning (optional): This will elevate the flavor profile. Experiment with your favorite herbs!
- Vegetable oil (for frying): Canola or peanut oil work great. You can air-fry for a healthier version!
Step-by-Step Instructions
Ready to get cheesy? Let’s go! Here’s how to make those irresistible mozzarella sticks step by step:
-
Prep Your Stations: First, set up an assembly line for easy coating. Place the flour in one bowl, the beaten eggs in another, and the breadcrumbs mixed with garlic powder and Italian seasoning in a third bowl. Trust me, this prep will save you time and sticky fingers later!
-
Cut the Cheese: If you’re using a block of mozzarella, cut it into sticks about 3 to 4 inches long. If you’re using string cheese, just unwrap those bad boys!
-
Coat the Sticks: Now for the fun part—dipping! Start by coating each mozzarella stick in flour, shaking off any excess. Then, dip it into the beaten eggs, ensuring it’s fully coated. Finally, roll it in the breadcrumb mixture. I like to press the breadcrumbs onto the cheese to ensure they stick well.
-
Double-Dip (Optional): For an extra crispy result, you can repeat the egg and breadcrumb steps. This double coating will give your cheese sticks that extra crunch you crave!
-
Chill for a Bit: Before frying, lay the coated cheese sticks on a plate and pop them into the freezer for about 15-20 minutes. This step helps to firm up the cheese and prevents it from melting too quickly during frying.
-
Heat the Oil: In a large skillet, pour enough vegetable oil to cover the bottom, about ½ inch deep. Heat the oil over medium-high until hot, but not smoking. You can test if it’s ready by dropping a breadcrumb in—if it sizzles, you’re good to go!
-
Fry ‘Em Up: Carefully place a few cheese sticks in the hot oil, making sure not to overcrowd the pan. Fry them for 1-2 minutes on each side or until golden brown. Use tongs or a slotted spoon to turn them and drain the excess oil on paper towels once they’re done.
-
Repeat: Continue frying the rest of the cheese sticks, adjusting the heat as necessary to keep the oil at the right temperature.
-
Serve: While they’re still hot, serve your gooey mozzarella sticks immediately with marinara sauce or your favorite dipping sauce. You’ll want to savor every cheesy bite!
Serving Suggestions
Presentation matters, folks! To make your mozzarella cheese sticks even more appetizing, consider serving them on a beautiful wooden platter or a colorful plate with a small bowl of warm marinara sauce on the side. You could sprinkle some fresh parsley or basil on top for a pop of color and freshness.
For a fun game day snack, pair these cheesy wonders with a side of spicy ranch or even sriracha for those who like a bit of heat. They’re also fabulous served alongside a crisp salad for balance. Just grab a toothpick and let your guests dip away!
Recipe Variations
Feeling adventurous? Here are a few creative twists you can try with your mozzarella cheese sticks:
-
Bacon-Wrapped: Wrap each cheese stick with a slice of bacon before frying for a smoky, meaty flavor. Just be aware that they’re even more indulgent—perfect for a party!
-
Spicy Jalapeño: Add finely chopped jalapeños to your breadcrumb mixture for an extra kick. You can also serve with chipotle or spicy marinara for an added heat boost!
-
Herb Crust: Instead of traditional breadcrumbs, try using crushed herbs or even a mixture of crushed tortilla chips for a unique flavor.
-
Cheese Mix: For a fun twist, use different types of cheese like pepper jack, cheddar, or Gouda along with mozzarella to create a gooey, flavorful combination.
-
Air Frying: For a healthier alternative, you can air fry your cheese sticks. Just spray the sticks lightly with olive oil and cook according to your air fryer’s instructions.
Chef’s Notes
Oh, where do I begin? This recipe has been a staple in my kitchen for years. Fun fact: the first time I attempted cheese sticks in my adult life, I was wearing a white shirt. Spoiler alert: it didn’t end well! Ever since that day, I’ve learned to wear an apron and embrace the culinary chaos.
The great thing is that this recipe has evolved over time. When I started, I strictly followed a standard breadcrumb coating; now, I experiment with flavors and ingredients. It’s all about what feels good to you. Remember, the best kitchen stories come from trying new things, whether they result in success or, let’s say, “character-building” experiences!
FAQs and Troubleshooting
-
Why did my cheese sticks burst open while frying?
- This can happen if the oil is too hot or if they weren’t chilled long enough. Try chilling them longer and adjusting the heat!
-
Can I bake these instead of frying?
- Absolutely! Preheat your oven to 400°F (200°C) and place the cheese sticks on a baking sheet lined with parchment. Spray with cooking oil and bake for about 15 minutes or until golden. They might not be as gooey but still delicious!
-
How can I make sure they stay crispy?
- Serve immediately after frying. If you have leftovers, pop them into the oven to crisp them up again instead of the microwave.
-
Can I freeze the cheese sticks?
- Yes! Before frying, freeze them. Once they’re firm, you can store them in a zip-top bag. When you’re ready to enjoy, fry them straight from the freezer—just add a minute or two to the fry time.
Nutritional Info
While comfort food isn’t always synonymous with health food, I believe in balance. Each cheese stick contains about 150 calories, with 10g of fat and 8g of protein. Rich in cheesy goodness and always a crowd-pleaser, these treats fit into an occasional indulgence. For a lighter version, opt to bake or air-fry, and serve with plenty of veggies for balance!
Final Thoughts
Mozzarella cheese sticks are more than just a snack—they’re a piece of nostalgia, a source of joy, and the ultimate party pleaser. With this recipe, you’ll never again have to settle for mediocre frozen varieties when you can whip up a homemade batch in no time. So, roll up those sleeves, channel your inner kid in the kitchen, and let your taste buds revel in the gooey magic of mozzarella.
I can’t wait to see how you put your spin on this recipe! Tag your photos and share your cheesy adventures with me. Happy cooking, and remember: there are no mistakes in the kitchen, just opportunities for deliciousness! 🍽️🧀
Print
Irresistible Mozzarella Cheese Sticks
- Total Time: 25 minutes
- Yield: 4 servings 1x
- Diet: Vegetarian
Description
Delightful, gooey, and golden mozzarella cheese sticks, perfect for parties or movie nights.
Ingredients
- 12 ounces mozzarella cheese, cut into sticks
- 1 cup all-purpose flour
- 2 large eggs, beaten
- 1 cup seasoned breadcrumbs
- ½ teaspoon garlic powder (optional)
- ½ teaspoon Italian seasoning (optional)
- Vegetable oil (for frying)
Instructions
- Prep your stations by setting up bowls of flour, beaten eggs, and breadcrumb mixture.
- Cut the mozzarella into sticks if using a block.
- Coat each stick in flour, dip in eggs, and roll in breadcrumbs.
- Double-Dip for a crispier result (optional).
- Chill the coated sticks in the freezer for 15-20 minutes.
- Heat vegetable oil in a skillet over medium-high heat.
- Fry the sticks for 1-2 minutes on each side until golden brown.
- Repeat with the remaining sticks.
- Serve immediately with marinara sauce.
Notes
For a healthier option, consider air-frying the cheese sticks.
- Prep Time: 15 minutes
- Cook Time: 10 minutes
- Category: Snack
- Method: Frying
- Cuisine: Italian
Nutrition
- Serving Size: 1 serving
- Calories: 150
- Sugar: 1g
- Sodium: 300mg
- Fat: 10g
- Saturated Fat: 4g
- Unsaturated Fat: 5g
- Trans Fat: 0g
- Carbohydrates: 10g
- Fiber: 1g
- Protein: 8g
- Cholesterol: 70mg
Keywords: mozzarella, cheese sticks, snack, party food, baking
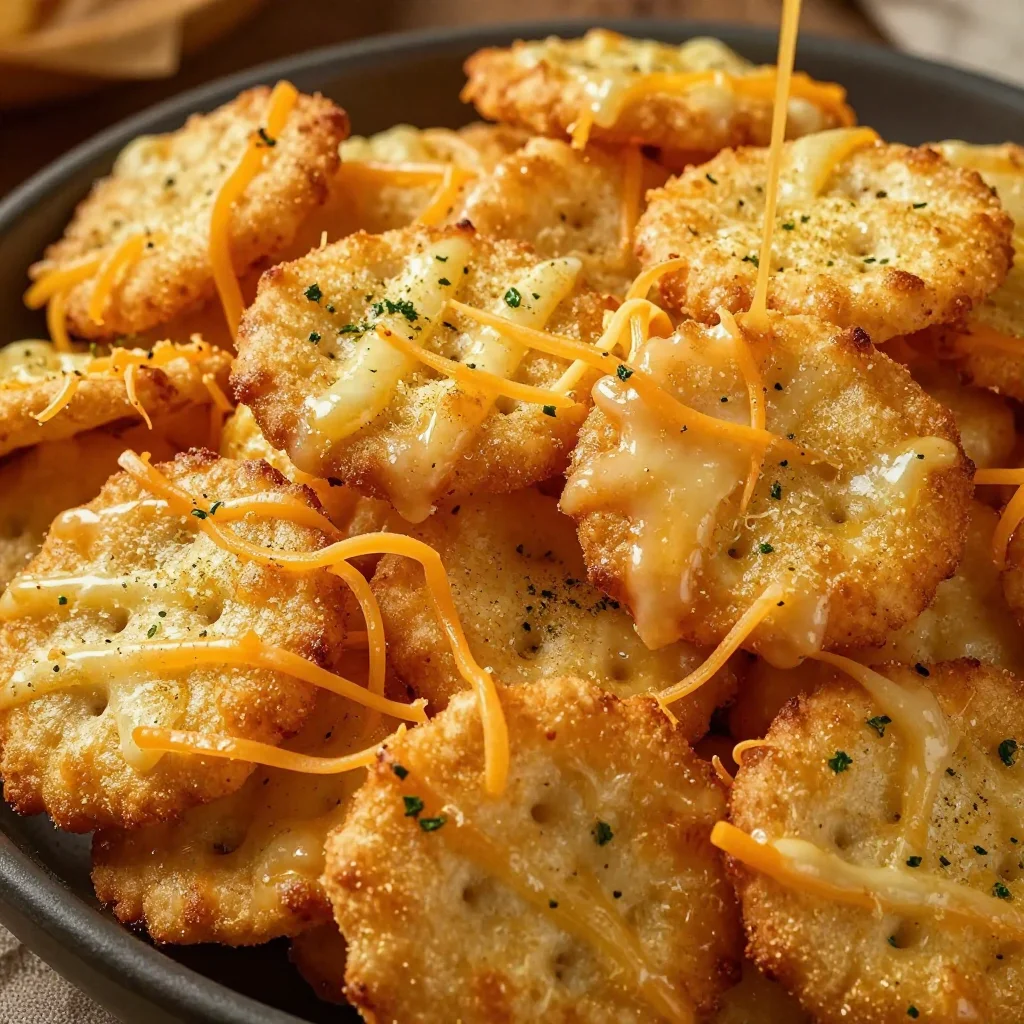
Crispy Garlic Cheese Ritz Bits: 15-Minute Weeknight Snack Hack
Cheesy Garlic Ritz Bits Snacks: A Culinary Hug for Your Taste Buds
Hey food lovers! It’s Beau Collier here, and today, I want to share with you a recipe that’s near and dear to my heart—Cheesy Garlic Ritz Bits Snacks. If you’re anything like me, there’s just something about tiny, crunchy snacks that come together effortlessly and pack a flavor punch. These cheesy, garlicky little bites not only make perfect party pleasers but also are fantastic for those cozy movie nights at home.
You might wonder why Ritz Bits? Let me tell you, they’re like little edible treasures. These bite-sized crackers are light, buttery, and, quite frankly, irresistible. The moment you pop that golden cracker in your mouth, it’s a mini explosion of comfort that brings back fond memories. Then, when you amp them up with cheese and garlic—oh boy—it’s a whole new level of deliciousness.
My First Kitchen Adventure with Ritz Bits
Let’s rewind to my childhood for a sec. I remember weekends at my grandmother’s house, and that meant something special was always cooking. She had these secret snacks—her “kitchen surprises”—that she would whip up like magic. One day, she decided to experiment with those classic Ritz Crackers, and let me tell you, it was a game-changer. As a kid, I was mesmerized watching her melt butter, sprinkle garlic powder, and introduce the cheesy goodness.
We would sit cross-legged on the floor, munching on these tasty bites while watching our favorite cartoons. The shared moments, full of laughter and crumbs, created an eternal bond between food and family for me. This recipe is my ode to those days—combining nostalgia with a touch of culinary creativity. Let’s dive into making these crunchy delights!
Ingredients
Here’s what you’ll need to create these Cheesy Garlic Ritz Bits Snacks:
-
1 box (12.5 oz) Ritz Bits Crackers, Original
- Perfectly bite-sized and buttery, these crackers are the foundation of our snack!
-
1/2 cup (1 stick) Unsalted Butter, melted
- Adds a rich flavor and helps everything stick together. You can swap this out for olive oil or a vegan butter alternative if you want to make it dairy-free.
-
2 tbsp Garlic Powder
- Because who doesn’t love garlic? If you’re feeling adventurous, feel free to use fresh minced garlic—1 clove gives you that vibrant flavor kick.
-
1 tbsp Onion Powder
- This adds depth to your snack. If you have fresh onions on hand, finely diced shallots can be an awesome substitute for a zestier version.
-
1 tsp Dried Parsley Flakes
- A pop of color and mild flavor. If you have fresh parsley lying around, use it! About a tablespoon of chopped fresh parsley will do the trick.
-
1/2 tsp Fine Sea Salt
- Enhances all the flavors. If you’re watching your salt intake, feel free to reduce this amount a tad.
-
1/4 tsp Freshly Ground Black Pepper
- Just a pinch gives a warm, peppery finish. Adjust according to your spice tolerance!
-
1/2 cup Finely Grated Parmesan Cheese
- Adds that irresistible cheesy flavor we all love. For a twist, try using Pecorino Romano for a more robust taste.
-
1/2 cup Finely Shredded Sharp Cheddar Cheese
- The sharpness of this cheese complements the richness perfectly. Feel free to use your favorite cheese or a blend of cheeses—it’s all good!
-
1/4 tsp Smoked Paprika (optional)
- For some added depth and smokiness. If you don’t have it, no worries—it’s fantastic either way.
-
Pinch Cayenne Pepper (optional)
- For those who like a little heat! A pinch adds excitement without overwhelming the flavor.
Step-by-Step Instructions
Alright, let’s get cooking! Here’s how to make your Cheesy Garlic Ritz Bits Snacks step by step:
-
Preheat Your Oven
Preheat your oven to 350°F (175°C). This will ensure that your snacks bake evenly and get to that perfect crispy state. -
Melt the Butter
In a small saucepan, melt the stick of unsalted butter over low heat. It’s not just about melting; stir it gently to prevent it from browning. As it melts, your kitchen will smell heavenly, and you’ll want to gobble it all up! -
Mix in the Spices
Once your butter is melted, take it off the heat. In a large bowl, combine the melted butter, garlic powder, onion powder, dried parsley, sea salt, black pepper, smoked paprika, and cayenne pepper if you’re using it. Just whisk it for about 30 seconds until it’s all combined, creating a luscious, fragrant marinade for our crackers. -
Add the Cheeses
Next, fold in the grated Parmesan and shredded cheddar cheese. The mixture will start to clump together, and that’s exactly what we want! This cheesy goodness is going to coat our Ritz Bits to perfection. -
Coat the Ritz Crackers
Now comes the fun part—gently add the Ritz Bits Crackers to the bowl. With a spatula or your hands, carefully toss the crackers in the buttery, cheesy mixture until every piece is beautifully coated. (And yes, it’s totally okay to sneak a taste; I won’t tell anyone!) -
Spread on a Baking Sheet
Line a baking sheet with parchment paper to prevent sticking. Spread the coated crackers out in a single layer. Make sure they aren’t overlapping too much; we want even baking! -
Bake to Golden Perfection
Pop them in the preheated oven and bake for 10-12 minutes, or until they turn a lovely golden brown. The smell in your kitchen will be absolutely irresistible, and you might find it hard to wait! -
Cool and Serve
Remove from the oven and let them cool on the baking sheet for a few minutes before serving. This helps them crisp up even more!
Now that you’ve made your Cheesy Garlic Ritz Bits Snacks, it’s time to enjoy the fruits of your labor!
Serving Suggestions
When it comes to serving your Cheesy Garlic Ritz Bits, the world is your oyster—or should I say, your cracker! Here’s how I love to plate them:
-
Classic Snack Bowl
Serve them warm in a beautiful bowl or dish. Let your guests dive in, either with their hands or with toothpicks, adding a touch of playful elegance. -
Pair with Dips
These snacks are fabulous on their own, but they shine even brighter alongside dips. Try a tangy ranch dressing or a warm, cheesy dip for that extra wow factor. -
Garnish with Fresh Herbs
Add a sprinkle of fresh parsley or chives on top right before serving for a pop of color and flavor. It adds a touch of gourmet flair that will impress your friends and family!
Recipe Variations
Now, let’s get creative! Here are some fun twists you can try with these Cheesy Garlic Ritz Bits Snacks:
-
Spicy Jalapeño: Mix in some finely chopped jalapeños for a spicy kick. You can also use pepper jack cheese for an extra cheesy heat.
-
Herb-Infused: Experiment with different herbs! Use fresh thyme or rosemary for a fragrant twist.
-
Italian Style: Add some Italian seasoning blend to the mix and swap out Parmesan for mozzarella for a pizza-flavored snack.
-
Sweet and Savory: Drizzle with honey after baking for a unique sweet-and-savory combo. You won’t regret it!
-
Buffalo Flavor: Toss in some buffalo sauce for a tangy, spicy zing, and pair with ranch for dipping.
Chef’s Notes
This recipe has seen a bit of evolution over time. Originally, I stumbled upon it during a potluck, where a friend brought a simple garlic cracker mix. I knew I could jazz it up with cheese and spices, turning it into something special. It’s become a go-to for me; be it a casual game night or a fancy gathering, it never disappoints!
And let me share a quick kitchen story—once, while trying to impress friends, I accidentally overbaked them. Instead of turning sad and mushy, they turned into the crispiest, cheesiest bites ever! Let’s just say, sometimes mistakes lead to delightful surprises, so keep experimenting!
FAQs and Troubleshooting
Here are some common questions I get about making these cheesy snacks:
-
Can I make these ahead of time?
Absolutely! You can prepare and coat the crackers, then store them in an airtight container in the fridge. To serve, just bake before the gathering! -
What do I do if they burn?
Baking speed varies by oven. If you see them browning quickly, turn your oven down to 325°F and check them frequently. Remember, they’ll continue to cook a little after coming out. -
Can I use other crackers?
Of course! Feel free to experiment with other types of crackers—just keep in mind the flavors might change slightly. -
How do I store leftovers?
Keep any leftovers in an airtight container at room temperature for a few days. They won’t last long—we can’t resist them too much, right?
Nutritional Info
For those keeping an eye on nutritional content, here’s a rough estimate per serving (based on 24 servings):
- Calories: 130
- Total Fat: 8g (Saturated Fat: 4g)
- Cholesterol: 20mg
- Sodium: 180mg
- Total Carbohydrates: 10g (Dietary Fiber: 0g, Sugars: 1g)
- Protein: 2g
Feel free to adjust the ingredients based on your dietary needs!
Final Thoughts
There you have it, my fabulous foodie friends—Cheesy Garlic Ritz Bits Snacks that are sure to become a staple in your kitchen. From family gatherings to cozy nights in, these bites bring joy and flavor to any occasion.
Remember, cooking is all about joy, exploration, and comfort—just like these snacks. So grab your ingredients, channel your inner chef, and get ready for your kitchen to smell like a warming hug of garlic and cheese.
Until next time, keep experimenting, keep enjoying, and most importantly—keep sharing good food with the people you love. Cheers to happy cooking!
Print
Cheesy Garlic Ritz Bits Snacks
- Total Time: 22 minutes
- Yield: 24 servings 1x
- Diet: Vegetarian
Description
Delicious, bite-sized cheesy and garlicky Ritz Bits that are perfect for parties or cozy movie nights.
Ingredients
- 1 box (12.5 oz) Ritz Bits Crackers, Original
- 1/2 cup (1 stick) Unsalted Butter, melted
- 2 tbsp Garlic Powder
- 1 tbsp Onion Powder
- 1 tsp Dried Parsley Flakes
- 1/2 tsp Fine Sea Salt
- 1/4 tsp Freshly Ground Black Pepper
- 1/2 cup Finely Grated Parmesan Cheese
- 1/2 cup Finely Shredded Sharp Cheddar Cheese
- 1/4 tsp Smoked Paprika (optional)
- Pinch Cayenne Pepper (optional)
Instructions
- Preheat your oven to 350°F (175°C).
- Melt the stick of unsalted butter over low heat in a small saucepan.
- Mix butter with garlic powder, onion powder, dried parsley, sea salt, black pepper, smoked paprika, and cayenne in a large bowl.
- Add the grated Parmesan and shredded cheddar cheese to the bowl and fold gently.
- Coat the Ritz Bits Crackers in the cheesy mixture with a spatula or your hands.
- Spread the coated crackers on a parchment-lined baking sheet in a single layer.
- Bake for 10-12 minutes, until golden brown.
- Cool on the baking sheet before serving.
Notes
You can substitute the butter with olive oil or vegan butter for a dairy-free version. To add heat, mix in chopped jalapeños or use pepper jack cheese.
- Prep Time: 10 minutes
- Cook Time: 12 minutes
- Category: Snack
- Method: Baking
- Cuisine: American
Nutrition
- Serving Size: 1 serving
- Calories: 130
- Sugar: 1g
- Sodium: 180mg
- Fat: 8g
- Saturated Fat: 4g
- Unsaturated Fat: 4g
- Trans Fat: 0g
- Carbohydrates: 10g
- Fiber: 0g
- Protein: 2g
- Cholesterol: 20mg
Keywords: Ritz snacks, cheesy snacks, garlic bites, party appetizers