
One-Pot Chicken Gnocchi Soup: Olive Garden Copycat Recipe
The Cozy Comfort of Olive Garden Chicken Gnocchi Soup
Hey there, food lovers! If you’re here, it means you’re ready to dive into a bowl of pure bliss—Olive Garden Chicken Gnocchi Soup. This dish isn’t just a meal; it’s a warm hug in a bowl, a soul-soothing delight that brings memories rushing back like the aroma of home-cooked goodness. So, let’s get comfy, grab that spatula, and start stirring up some magic.
A Warm Bowl of Memories
I can still remember the first time I tasted Chicken Gnocchi Soup at Olive Garden. I was a fresh-faced college student, and dinner with friends was always a special occasion. We’d pile into the restaurant, the comforting smells wrapping around us like a cozy blanket as we ordered our usuals. But on that particular night, I ventured out of my comfort zone. I decided to try this creamy soup, and oh boy, it was a game changer!
With each spoonful, I was hit with flavors that danced across my palate—tender chicken, silky gnocchi, and vibrant veggies making for the perfect blend of heartiness and comfort! I loved how it made me feel—happy, fulfilled, and ready to take on the world (or at least get through my next exam). That moment sparked my love for cooking, inspiring me to recreate the exact magic in my own kitchen. So, here I am today, sharing this cherished recipe with you!
Ingredients You’ll Need
Let’s jump into the heart of this recipe: the ingredients. Here’s what you’ll need to create this delicious, comforting soup:
-
1 pound boneless skinless chicken breasts (cooked and shredded)
A great source of protein, pre-cooked and shredded for easy use. You can substitute rotisserie chicken for convenience! -
1 tablespoon olive oil
This adds richness and depth. If you’re out, butter can work as a substitute—just keep it classic! -
4 tablespoons butter
Ah, the magic of butter! Its creamy goodness elevates the soup. If you’re watching your dairy intake, try using vegan butter. -
1/4 cup all-purpose flour
This will help thicken our soup. For gluten-free alternatives, cornstarch can do the trick—simply mix it with a bit of water before adding it to the pot. -
1 small onion (chopped)
Onion adds a savory base flavor. Feeling adventurous? Shallots or leeks are fantastic substitutes. -
2 garlic cloves (minced)
Garlic is a flavor powerhouse! Swap in garlic powder in a pinch—1/4 teaspoon will do. -
6 cups chicken broth
A comforting base filled with flavor. Low-sodium varieties work too! Vegetable broth is a great alternative for a veggie-packed soup. -
2 cups milk
This creates the creamy texture. Use almond milk or oat milk for a dairy-free option. -
1 cup carrots (shredded)
Carrots add sweetness and color. You can use frozen shredded carrots if fresh ones aren’t available. -
2 teaspoons parsley flakes
Freshness in every bite! Feel free to substitute with thyme or basil for a different flavor profile. -
Salt and pepper for seasoning
Always essential for flavor enhancement. Adjust to your taste preferences! -
1 package (16 ounces mini potato gnocchi)
The star of the soup! If you can’t find gnocchi, consider substituting it with small pasta shapes like ditalini or orzo. -
1 cup fresh spinach (chopped)
Spinach adds nutritional value and a pop of color. Kale is a sturdy substitute, and it holds up well when cooked!
Step-by-Step Instructions to Soup Perfection
Now that we’ve gathered our ingredients, it’s time to embark on this culinary adventure! Follow these detailed steps to whip up your very own Olive Garden Chicken Gnocchi Soup:
-
Prep the Ingredients
Start by shredding your cooked chicken. This step can be done ahead of time; I often make extra chicken just for this soup! It saves time and adds an extra layer of flavor. -
Sauté the Aromatics
In a large pot, heat the olive oil over medium heat. Add the chopped onion and sauté until it becomes translucent and fragrant—about 5 minutes. Your kitchen will start smelling amazing at this point! -
Garlic Time
Stir in the minced garlic and cook for an additional minute. Remember not to overcook it; burnt garlic can ruin the flavor and we want this soup to shine! -
Make it Creamy
Now, sprinkle the flour over the onion and garlic mixture and stir constantly for about 2-3 minutes. This creates a roux that will thicken our soup. Don’t rush this step; it builds the base! -
Add the Broth and Milk
Gradually pour in the chicken broth while continuously stirring to prevent lumps. Then add the milk, and bring the mixture to a gentle simmer. This is where the magic begins to happen! -
Add the Carrots and Chicken
Toss in the shredded carrots and cooked chicken, allowing everything to meld together beautifully. Let it simmer on low for about 10-15 minutes. If you want your carrots extra tender, feel free to let it simmer a bit longer. -
Gnocchi Goes In
Add the mini potato gnocchi to the pot. They will cook quickly, so keep an eye on them! Stir gently as they settle in, and allow them to absorb all the creamy goodness—about 2-3 minutes until they float to the top. -
Flavorful Finishing Touches
Toss in the chopped spinach and parsley flakes, stirring until the spinach wilts. This adds a fresh and vibrant touch to our hearty soup. -
Season to Perfection
Give your soup a taste and add salt and pepper to your liking. Each batch is unique, so adjust these seasonings until the soup sings with flavor for you! -
Serve and Enjoy!
Your heavenly Chicken Gnocchi Soup is ready to embrace you. Ladle it into bowls, garnish with a sprinkle of fresh parsley, and serve warm with crusty bread or a side salad. Enjoy those cozy vibes!
Serving Suggestions
Presentation matters, even for comfort food! Here’s how to plate your soup for added appeal:
- Use Wide Bowls: Opt for wide, shallow bowls to showcase the soup’s vibrant colors.
- Garnish: Sprinkle with extra parsley or a drizzle of olive oil for that gourmet touch.
- Accompaniments: Serve with a slice of warm, crusty baguette or a light mixed greens salad. A sprinkle of Parmesan cheese on top doesn’t hurt either!
Recipe Variations
The beauty of this soup lies not just in its comforting nature but also in its versatility! Here are some creative variations to jazz it up:
- Creamy Mushroom Cold: Toss in sautéed mushrooms for an earthy twist.
- Spicy Kick: Add a dash of red pepper flakes for some heat—just don’t overdo it!
- Veggie-Packed Gnocchi: Add in other veggies like peas or zucchini to make it a vibrant veggie medley.
- Herbed Delight: Switch up the herbs! Thyme, rosemary, or Italian seasoning can create enticing new flavors.
- Cheesetastic: Stir in a handful of shredded cheese (like mozzarella or cheddar) just before serving for an extra cheesy experience!
Chef’s Notes
This soup has come a long way from the initial experiment in my kitchen. I remember the first time I made it; I was juggling a few pans and fretting over the ratio of chicken to gnocchi. But, with practice, I found my rhythm. I’ve even had friends suggest adding different proteins, like shrimp or sausage, and I’m here for it! Cooking should evolve as we do, bringing in new flavors and memories every time.
FAQs and Troubleshooting
Let’s tackle some of those common questions you might have:
-
Why is my soup too thick?
If you find your soup too thick, simply add a little more chicken broth or milk until it reaches your desired consistency. -
My gnocchi is mushy—what did I do wrong?
If gnocchi are overcooked, they can become mushy. Be sure to follow the cooking time closely. They should only take a few minutes in the pot! -
Can I freeze this soup?
Yes, but gnocchi can become mushy when frozen and reheated. If you want to freeze it, consider freezing the soup base without the gnocchi and adding them fresh when reheating. -
Is this soup gluten-free?
You can easily make it gluten-free by substituting the all-purpose flour with cornstarch and using gluten-free gnocchi!
Nutritional Info
Here’s a rough breakdown of the nutritional components per serving (about 1.5 cups):
- Calories: ~400
- Protein: ~30g
- Carbohydrates: ~45g
- Fat: ~15g
- Fiber: ~2g
These values may vary based on the specific brands and quantities used. No matter what, this dish is a wholesome way to enjoy a well-rounded, hearty meal.
Final Thoughts
Just like that, you’ve created a bowl of goodness that brings everyone to the table! Olive Garden Chicken Gnocchi Soup is a recipe that goes beyond just ingredients—it represents togetherness, warmth, and those unforgettable moments spent with friends and family. Whether you’re making this for a cozy night in or whipping it up for a gathering, this soup is sure to satisfy.
So, next time you find yourself feeling a little under the weather or just in need of a culinary hug, remember this recipe. Keep it simple, keep it soulful, and most importantly, keep it delicious. Happy cooking, friends!
Print
Olive Garden Chicken Gnocchi Soup
- Total Time: 45 minutes
- Yield: 4 servings 1x
- Diet: Non-Vegetarian
Description
A creamy and comforting chicken gnocchi soup that brings warmth and nostalgia in every spoonful.
Ingredients
- 1 pound boneless skinless chicken breasts (cooked and shredded)
- 1 tablespoon olive oil
- 4 tablespoons butter
- 1/4 cup all-purpose flour
- 1 small onion (chopped)
- 2 garlic cloves (minced)
- 6 cups chicken broth
- 2 cups milk
- 1 cup carrots (shredded)
- 2 teaspoons parsley flakes
- Salt and pepper for seasoning
- 1 package (16 ounces mini potato gnocchi)
- 1 cup fresh spinach (chopped)
Instructions
- Prep the ingredients by shredding your cooked chicken.
- Sauté the onion in olive oil over medium heat until translucent, about 5 minutes.
- Stir in the minced garlic, cooking for an additional minute.
- Sprinkle the flour over the mixture, stirring constantly for 2-3 minutes.
- Add the chicken broth gradually, stirring to prevent lumps, then add the milk and simmer.
- Toss in the shredded carrots and cooked chicken, simmer for 10-15 minutes.
- Add the gnocchi to the pot and cook for about 2-3 minutes until they float.
- Stir in the chopped spinach and parsley flakes until the spinach wilts.
- Season with salt and pepper to taste.
- Serve warm with garnishes and enjoy!
Notes
Consider garnishing with additional parsley or a drizzle of olive oil. Serve with bread.
- Prep Time: 15 minutes
- Cook Time: 30 minutes
- Category: Soup
- Method: Stovetop
- Cuisine: Italian
Nutrition
- Serving Size: 1.5 cups
- Calories: 400
- Sugar: 6g
- Sodium: 800mg
- Fat: 15g
- Saturated Fat: 8g
- Unsaturated Fat: 5g
- Trans Fat: 0g
- Carbohydrates: 45g
- Fiber: 2g
- Protein: 30g
- Cholesterol: 80mg
Keywords: soup, chicken, gnocchi, comfort food, creamy soup
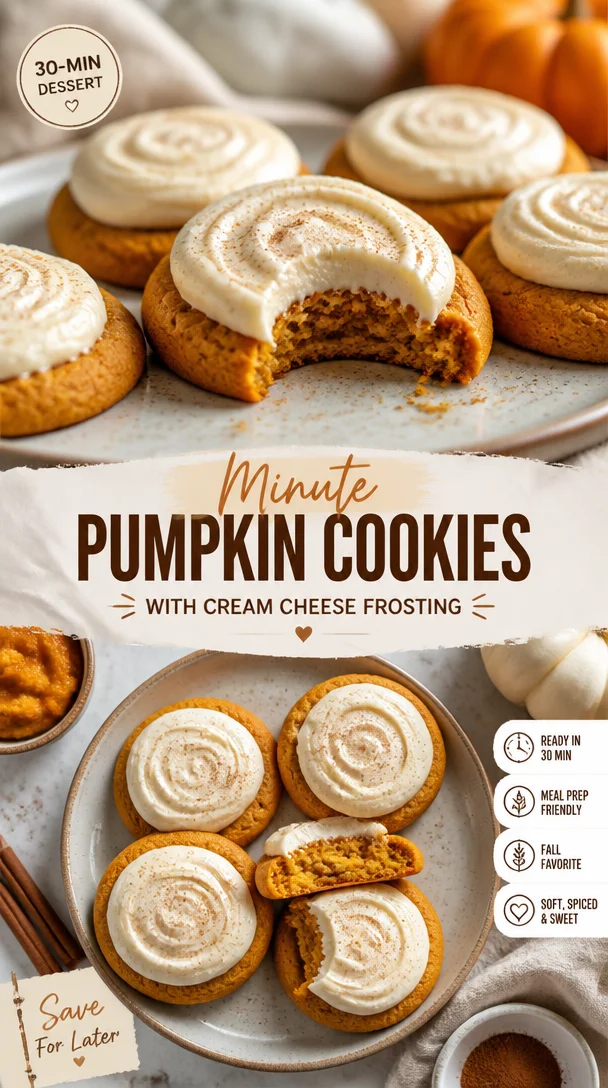
Minute Pumpkin Cookies with Cream Cheese Frosting
Pumpkin Cookies with Cream Cheese Frosting: A Cozy Fall Delight
Hey there, fellow foodies! It’s Beau Collier back in the kitchen, ready to share one of my absolute favorite recipes that not only fills your home with a heavenly aroma but also tugs at your heartstrings—Pumpkin Cookies with Cream Cheese Frosting. One bite of these soft, chewy cookies topped with that dreamy frosting, and you’ll understand why they are a must-make during the fall season. Let’s jump into the wonderful world of pumpkin goodness!
A Slice of Nostalgia
Every autumn, my grandma would whip up a batch of her famous pumpkin cookies, filling our kitchen with the warm scents of cinnamon, nutmeg, and, of course, pumpkin. I can still remember coming home from school, dropping my backpack at the door, and following my nose into the kitchen. There she would be, rolling out a tray of golden-brown cookies, each topped with a creamy, dreamy frosting that just begged to be devoured.
I remember one particular Thanksgiving, when there were so many desserts lining the table, but all I could think about were Grandma’s cookies. As family and friends dug into their pumpkin pies and pecan tarts, I was secretly raiding the cookie plate, my guilt washed away with each bite. The cookies were always gone before the main meal was even served, leading me to believe that they were simply too good to resist!
Now, I find joy in carrying on that tradition and sharing it with you. What I love most about this recipe is its ability to bring people together—just as those cherished memories did for me and my family. So, gather your loved ones and let’s create some kitchen magic together!
Ingredients
Let’s gather our ingredients! Here’s what you’ll need for these delightful pumpkin cookies, plus a few handy tips for each:
-
2 1/2 cups (312 g) all-purpose flour
All-purpose flour is the backbone of most cookie recipes. You can substitute with a 1:1 gluten-free flour blend for a delicious gluten-free version. -
1 teaspoon baking powder
This helps your cookies rise a bit. If you’re out of baking powder, a mix of baking soda and cream of tartar can work in a pinch! -
1 teaspoon baking soda
This is another leavening agent that helps the cookies achieve that perfect softness. Don’t skip it! -
1 tablespoon pumpkin pie spice (plus extra for sprinkling)
This heavenly blend adds warmth and flavor. If you don’t have pumpkin pie spice, a mix of cinnamon, ginger, and nutmeg can do the trick! -
1/2 teaspoon salt
Salt enhances the sweetness of your cookies. Just a touch goes a long way in balancing flavors. -
3/4 cup (170 g) unsalted butter (room temperature)
Butter gives your cookies that rich, buttery flavor. Make sure it’s at room temperature for easy creaming! -
3/4 cup (150 g) granulated sugar
This adds sweetness and helps create that light texture. You can replace some with coconut sugar for a healthier twist! -
1/2 cup (100 g) packed light brown sugar
Brown sugar brings in moisture and a slight caramel flavor—so good! Avoid packed dark brown sugar if you don’t want a strong molasses flavor. -
1 1/4 cups (305 g) canned pumpkin puree
This is the star of the show! Look for 100% pure pumpkin, not pumpkin pie filling. If in doubt, make your own! -
1 large egg (room temperature)
Eggs bind your cookies together and provide structure. Always room temperature for the best results! -
1 teaspoon pure vanilla extract
Vanilla is the secret ingredient that enhances all the flavors. Use quality pure vanilla for the best taste! -
8 ounces (226 g) block-style cream cheese (softened but still cool)
Cream cheese is essential for that creamy frosting. Avoid spreadable cream cheese for the best consistency! -
¼ cup (56 g) unsalted butter (softened but still cool)
Like the cream cheese, softened butter gives you a smooth, spreadable frosting—no one likes a hard frosting! -
1 teaspoon pure vanilla extract
Another layer of vanilla. Yes, please! This will make your frosting fabulous! -
1 3/4 cups (210 g) confectioners’ sugar (sifted)
Sifted sugar ensures a smooth frosting. Adjust for sweetness based on your taste!
Step-by-Step Instructions
Let’s get cooking! Here’s how to whip up these autumnal delights.
-
Preheat Your Oven:
Preheat your oven to 350°F (175°C). This is essential for even baking—every second counts! -
Prep Your Baking Sheets:
Line two baking sheets with parchment paper or silicone baking mats. This keeps your cookies from sticking and helps them bake evenly. -
Mix Dry Ingredients:
In a medium bowl, whisk together the flour, baking powder, baking soda, pumpkin pie spice, and salt. This helps combine everything evenly! -
Cream the Butter and Sugars:
In a large mixing bowl, beat the room-temperature unsalted butter, granulated sugar, and brown sugar until light and fluffy (about 2-3 minutes). Here’s a tip: using an electric mixer makes this job easier, but you can definitely do it by hand—it just takes a bit more elbow grease! -
Add Pumpkin, Egg, and Vanilla:
Beat in the canned pumpkin puree, the room-temperature egg, and vanilla extract until combined. You want a silky blend here! -
Combine the Dry Ingredients:
Gradually add the flour mixture into your wet ingredients. Mix just until combined—don’t overmix, or your cookies can turn out tough. -
Scoop the Cookies:
Use a cookie scoop or spoon to drop rounded tablespoons of dough onto the prepared baking sheets, leaving about 2 inches between each one. They spread a little, so give them some space! -
Bake ‘Em Up:
Pop the trays into the oven and bake for 12-15 minutes until the edges are lightly golden and the centers look set. Keep an eye on them—every oven is a little different! -
Cool Your Cookies:
Remove from the oven and let them cool on the baking sheets for about 5 minutes before transferring them to wire racks to cool completely. Here’s my pro tip: if they’re too hot, the frosting will melt right off. -
Make the Frosting:
While the cookies cool, beat together the softened cream cheese, softened butter, and vanilla until smooth. Gradually mix in the sifted confectioners’ sugar until you achieve your desired sweetness and consistency. Smooth and creamy is what you’re aiming for! -
Frost Those Cookies:
Once cooled, generously frost each cookie with your cream cheese frosting. If you’re feeling fancy, sprinkle a bit of pumpkin pie spice on top. It’s a simple touch that looks so professional!
Serving Suggestions
Let’s talk presentation! These pumpkin cookies are perfect for any gathering or cozy night in. For the ultimate experience, serve them on a wooden platter lined with parchment paper and arrange them in a rustic style. You could even garnish the platter with miniature pumpkins or fall leaves to really set the mood. Pair these cookies with a warm cup of cider or a hot latte, and you’ve got the ultimate autumn treat!
Recipe Variations
Why not switch things up? Here are a few creative variations you can try out:
- Chocolate Chip Pumpkin Cookies: Mix in 1 cup of semi-sweet chocolate chips for an extra indulgent twist.
- Nutty Addition: Add chopped walnuts or pecans for a delightful crunch and added health benefits.
- Spiced Icing: For a fun twist, mix in a bit of cinnamon or nutmeg to the cream cheese frosting.
- Gluten-Free Version: Use a 1:1 gluten-free flour blend to make these cookies gluten-free without losing the fabulous flavor!
- Vegan Option: Replace the egg with a chia egg (1 tablespoon chia seeds soaked in 3 tablespoons water), and use vegan butter and cream cheese.
Chef’s Notes
As I reminisce about my grandma in the kitchen, I can’t help but laugh at the story of the time she accidentally used salt instead of sugar in her frosting. Let’s just say the looks on our faces when we took that first bite were priceless! Our kitchen adventures never lacked hilarity! Over time, I’ve modified her recipe just a tad, but the heart remains the same—simple, sweet, and filled with love!
FAQs and Troubleshooting
Q: My cookies turned out flat! What went wrong?
A: This can happen if your butter was too warm. Make sure it’s just softened, not melted. Also, check that your baking soda and baking powder are fresh!
Q: How do I store these cookies?
A: Store your cookies in an airtight container at room temperature for about a week. They also freeze well—just make sure to freeze them without frosting!
Q: Can I use fresh pumpkin instead of canned?
A: Absolutely! Roast and scoop out fresh pumpkin, then puree it, and you’ll have a delicious homemade alternative.
Q: What if my frosting is too runny?
A: If this happens, simply add a bit more sifted confectioners’ sugar until it reaches a spreadable consistency.
Nutritional Info
For those keeping track, here’s a quick rundown on the nutritional information per cookie (with frosting):
- Calories: 180
- Carbohydrates: 25g
- Dietary Fiber: 1g
- Sugars: 12g
- Protein: 2g
- Total Fat: 8g
- Saturated Fat: 3g
Keep in mind variations will affect these values, especially if you switch out ingredients!
Final Thoughts
There you have it—my grandma’s beloved pumpkin cookies transformed into a delightful, easy-to-make recipe that promises to fill your home with warmth and love. Fall may be fleeting, but these cookies keep the spirit of the season alive! As you gather with family and friends to enjoy these cozy bites, remember that food isn’t just about what’s on the table; it’s about the memories and connections we create around it.
So, until next time, grab that spatula, get your hands a little messy, and keep spreading the love through your kitchen adventures! Happy baking, and I can’t wait to hear about your cookie creations! 🍪💛
Feel free to customize any part of this post to fit your style or mood. Happy cooking!
Print
Pumpkin Cookies with Cream Cheese Frosting
- Total Time: 30 minutes
- Yield: 24 servings 1x
- Diet: Vegetarian
Description
Delightful soft and chewy pumpkin cookies topped with creamy cream cheese frosting, perfect for cozy fall gatherings.
Ingredients
- 2 1/2 cups (312 g) all-purpose flour
- 1 teaspoon baking powder
- 1 teaspoon baking soda
- 1 tablespoon pumpkin pie spice (plus extra for sprinkling)
- 1/2 teaspoon salt
- 3/4 cup (170 g) unsalted butter (room temperature)
- 3/4 cup (150 g) granulated sugar
- 1/2 cup (100 g) packed light brown sugar
- 1 1/4 cups (305 g) canned pumpkin puree
- 1 large egg (room temperature)
- 1 teaspoon pure vanilla extract
- 8 ounces (226 g) block-style cream cheese (softened but still cool)
- 1/4 cup (56 g) unsalted butter (softened but still cool)
- 1 teaspoon pure vanilla extract
- 1 3/4 cups (210 g) confectioners’ sugar (sifted)
Instructions
- Preheat your oven to 350°F (175°C).
- Prep your baking sheets with parchment paper or silicone mats.
- Mix together the flour, baking powder, baking soda, pumpkin pie spice, and salt in a medium bowl.
- Cream the room-temperature butter, granulated sugar, and brown sugar until light and fluffy (about 2-3 minutes).
- Add the pumpkin puree, egg, and vanilla extract until combined.
- Combine the dry ingredients with the wet mixture until just mixed.
- Scoop rounded tablespoons of dough onto the prepared baking sheets, spacing them 2 inches apart.
- Bake for 12-15 minutes until edges are golden and centers are set.
- Cool cookies on the baking sheets for 5 minutes before transferring to wire racks.
- Make the frosting by beating together cream cheese, butter, and vanilla until smooth, then mix in sifted confectioners’ sugar.
- Frost each cooled cookie generously with cream cheese frosting and sprinkle with pumpkin pie spice if desired.
Notes
Store cookies in an airtight container. They freeze well without frosting.
- Prep Time: 15 minutes
- Cook Time: 15 minutes
- Category: Dessert
- Method: Baking
- Cuisine: American
Nutrition
- Serving Size: 1 cookie
- Calories: 180
- Sugar: 12g
- Sodium: 200mg
- Fat: 8g
- Saturated Fat: 3g
- Unsaturated Fat: 3g
- Trans Fat: 0g
- Carbohydrates: 25g
- Fiber: 1g
- Protein: 2g
- Cholesterol: 25mg
Keywords: pumpkin cookies, pumpkin dessert, fall treats, cream cheese frosting

Ingredient Apricot Pillow Cookies for Busy Weeks
Apricot Pillow Cookies: A Sweet Tribute to Comfort and Nostalgia
Hey there, fellow food aficionados! Today we’re diving into a delicious recipe that’s near and dear to my heart—Apricot Pillow Cookies. If you haven’t had the pleasure of trying these soft, delectable morsels, let me tell you, you’re in for a treat!
When I think of cookies, I can’t help but recall the warmth of my grandmother’s kitchen, where the scent of baking goods wafted through the air, blending with the laughter of family and friends gathering around the table. Apricot Pillow Cookies were one of her signature desserts, a true labor of love, and a perfect blend of sweet and tangy flavors. Every bite felt like a hug from her that transported me back to those lazy Sunday afternoons, where the world outside melted away, and all that mattered was the deliciousness we brought to life in the kitchen.
These cookies are not just a dessert; they’re a symbol of love, warmth, and shared memories. They capture the essence of what food should be—comforting, delightful, and capable of bringing people together. So grab your apron, put on your favorite playlist, and let’s embark on this baking adventure!
Personal Story: The Kitchen Magic
One of my fondest memories involves me as a wide-eyed child, standing alongside my grandmother in her cozy kitchen. The walls were adorned with family photos, each frame holding a story of its own. The counter was a chaotic blend of flour, sugar, and excitement. I remember asking her how she created those fluffy, light cookies that seemed to dance on your taste buds. With a wink, she simply said, “It’s all about love, Beau.”
As she rolled the dough into little pillows of joy, she’d encourage me to let my imagination run wild with the flavors. I’d sprinkle a touch of cinnamon sometimes or even add a dash of vanilla just for fun. But the heart of the cookie—the apricot preserves—remained a staple. The sweet-tart goodness would burst inside the soft shell, and each cookie was more than just a treat; it was a lesson in creativity and a reminder of tradition.
I’ve carried this recipe through the years, adapting here and there, but it always brings me back to those moments in my grandma’s kitchen. So let’s keep this beautiful tradition alive and create our own batch of Apricot Pillow Cookies that will surely fill your home with joy (and a heavenly aroma)!
Ingredients
Let’s gather our ingredients! Here’s what you’ll need to create these delightful cookies:
Dough:
-
1 3/4 cups flour (sifted): Sifting is key for light and airy cookies! It also helps to eliminate any lumps. You could use all-purpose flour, but for a gluten-free option, a 1:1 gluten-free blend works great!
-
1/2 tsp lemon zest: This adds a fresh brightness to the cookies. Feel free to substitute with orange zest for a different citrus twist!
-
1/4 tsp salt: A pinch of salt enhances sweetness! If you’re on a low-sodium diet, you can reduce the quantity, but I wouldn’t skip it entirely.
-
8 oz cream cheese (soft to room temperature): This is the secret to a creamy and rich texture in the dough. If you’re looking for a lighter option, you can use Neufchâtel cheese instead.
-
1 cup butter (soft to room temperature): Using unsalted butter gives you control over your cookie’s overall salt content. Margarine can be a substitute, but it may alter the flavor slightly.
Filling:
- 1 jar quality apricot preserves: The star of the show! Use a good-quality preserve for the best flavor. You can swap out apricot for peach or raspberry jam if you’re feeling adventurous.
Additional:
-
Egg whites for brushing: This helps give the cookies a lovely golden finish. If you prefer a vegan option, you can use almond milk for a gentle wash.
-
Granulated sugar for sprinkling: A little sweetness on top never hurt anyone! If you want to get fancy, try using coarse sugar for extra crunch.
Step-by-Step Instructions
Alright, let’s get to the fun part—baking these delicious cookies!
Step 1: Prepare Your Dough
-
Mix the Dry Ingredients: In a large bowl, combine your sifted flour, lemon zest, and salt. This combo is where the magic begins! Use a whisk to blend them well, ensuring the zest is evenly distributed.
-
Cream the Cheese and Butter: In another bowl, beat the softened cream cheese and butter together until it’s light and fluffy—about 3-4 minutes. Pro tip: make sure your butter is truly at room temperature; it should be soft enough to poke without resistance.
-
Combine: Gradually add the dry ingredients to the butter and cream cheese mixture, mixing on low speed until everything is just combined. Don’t over-mix! We want that tender texture.
-
Chill: Cover the dough with plastic wrap and refrigerate for at least 1 hour (or overnight if you can wait that long!). This will make it easier to handle later and enhance the flavors.
Step 2: Form the Cookies
-
Preheat the Oven: Before you pull out that dough, preheat your oven to 350°F (175°C). This gives your cookies a nice baking start!
-
Scoop and Shape: Once the dough has chilled, scoop out about a tablespoon of dough and flatten it in your palm. Place a small dollop (about a teaspoon) of apricot preserves in the center and fold the dough over to make a pillow shape. Seal the edges well—no one likes a leak during baking!
-
Brush and Sprinkle: Place your pillows on a prepared baking sheet lined with parchment paper. Brush the tops with egg whites and sprinkle granulated sugar over them for that lovely crunch!
Step 3: Bake and Enjoy!
-
Bake: Slide those beauties into the oven and bake for about 15-18 minutes or until they’re lightly golden. The aroma will fill your space with pure joy!
-
Cool and Serve: Let the cookies cool on a wire rack for about 10 minutes. Trust me; the wait is worth it! These cookies are best enjoyed warm, but they’ll keep well in an airtight container for a week (if they last that long!).
Serving Suggestions
Once your Apricot Pillow Cookies have cooled, it’s time to serve! You can plate them in a charming cookie jar on your kitchen counter to showcase your hard work or arrange them on a beautiful serving platter dusted lightly with powdered sugar.
Consider pairing these cookies with a cup of herbal tea or a glass of milk. Feel free to get creative—drizzle a bit of warm chocolate sauce over them, or try a scoop of vanilla ice cream on the side for a heavenly dessert!
Recipe Variations
Now that you’ve mastered the classic Apricot Pillow Cookies, why not play around with a few variations? Here are some fun ideas to get you started:
-
Different preserves: Swap the apricot preserves for any fruit jam you love—think raspberry, peach, or even fig!
-
Spice it up: Add a dash of cinnamon or nutmeg to the dough for a warm, cozy flavor.
-
Stuffed: Go gourmet and add a couple of chopped nuts, like walnuts or almonds, to the filling for some added texture.
-
Chocolate lovers: Mix in chocolate chips into the dough for a decadent twist, or drizzle melted chocolate over the cooled cookies.
-
Vegan pillows: Substitute the cream cheese and butter for plant-based versions and try a flax egg instead of egg white for the wash!
Chef’s Notes
Every time I make these cookies, I can’t help but chuckle at the time I completely miscalculated the amount of filling. The dough was bursting at the seams, and they ended up looking more like little plump dumplings! While they looked a tad ridiculous, they ended up tasting incredible—still my family’s favorite mishap!
Through the years, I’ve adapted this recipe to fit different dietary needs and preferences, but the spirit of it—the love, the warmth, the deliciousness—remains unchanged. It has become a staple in my home, just like it was in my grandmother’s.
FAQs and Troubleshooting
1. Why are my cookies flat?
If your cookies spread too much, it could be due to overmixing the dough or not chilling it long enough. Make sure the butter and cream cheese are at room temperature but not overly soft, and don’t skip the chilling step!
2. Can I use a different type of flour?
Absolutely! While all-purpose flour yields the best results, you can use a gluten-free flour blend as long as it contains xanthan gum to help with structure.
3. What can I do if I don’t have any apricot preserves?
No worries! Any fruity filling works, from other jams to pie filling—be creative!
4. How do I store these cookies?
Keep them in an airtight container at room temperature for up to a week. For longer storage, you can freeze them. Just make sure to place parchment paper between layers to avoid sticking!
Nutritional Info (Approximate)
Each cookie (when making about 24) contains approximately:
- Calories: 120
- Protein: 1.5g
- Carbohydrates: 18g
- Fat: 5g
- Sugar: 5g
Nutritional Note:
These numbers are approximations based on the ingredients listed. They can vary based on specific brands and measurements used. Always check the labels if you’re tracking macros!
Final Thoughts
And there you have it—my heartfelt recipe for Apricot Pillow Cookies! As you bake and enjoy these delightful treats, remember that each cookie carries a story, a memory, and a little bit of love.
Whether you’re sharing them with friends, family, or just keeping them to yourself (no judgment here!), I hope these cookies bring as much joy to your home as they have in mine. So don your apron, grab those ingredients, and let’s create some delicious memories together!
Happy baking, food friends! 🍪
Print
Apricot Pillow Cookies
- Total Time: 78 minutes
- Yield: 24 cookies 1x
- Diet: Vegetarian
Description
Deliciously soft cookies filled with apricot preserves, reminiscent of warm family memories and kitchen comforts.
Ingredients
- 1 3/4 cups flour (sifted)
- 1/2 tsp lemon zest
- 1/4 tsp salt
- 8 oz cream cheese (soft to room temperature)
- 1 cup butter (soft to room temperature)
- 1 jar quality apricot preserves
- Egg whites for brushing
- Granulated sugar for sprinkling
Instructions
- Mix the dry ingredients: In a large bowl, combine your sifted flour, lemon zest, and salt.
- Cream the cheese and butter: In another bowl, beat the softened cream cheese and butter together until light and fluffy—about 3-4 minutes.
- Combine: Gradually add the dry ingredients to the butter and cream cheese mixture, mixing on low speed until just combined.
- Chill: Cover the dough with plastic wrap and refrigerate for at least 60 minutes.
- Preheat the oven: Before pulling out the dough, preheat your oven to 350°F (175°C).
- Scoop and shape: Once chilled, scoop out about a tablespoon of dough, flatten it, place a teaspoon of apricot preserves in the center, and fold the dough over.
- Brush and sprinkle: Place on a prepared baking sheet, brush with egg whites, and sprinkle with granulated sugar.
- Bake: Bake for about 15-18 minutes until lightly golden.
- Cool and serve: Allow to cool on a wire rack for about 10 minutes before enjoying.
Notes
For a vegan option, substitute cream cheese and butter with plant-based alternatives and use almond milk as a wash.
- Prep Time: 15 minutes
- Cook Time: 18 minutes
- Category: Dessert
- Method: Baking
- Cuisine: American
Nutrition
- Serving Size: 1 cookie
- Calories: 120
- Sugar: 5g
- Sodium: 100mg
- Fat: 5g
- Saturated Fat: 3g
- Unsaturated Fat: 2g
- Trans Fat: 0g
- Carbohydrates: 18g
- Fiber: 0g
- Protein: 1.5g
- Cholesterol: 25mg
Keywords: cookies, apricot cookies, dessert, baking, comfort food
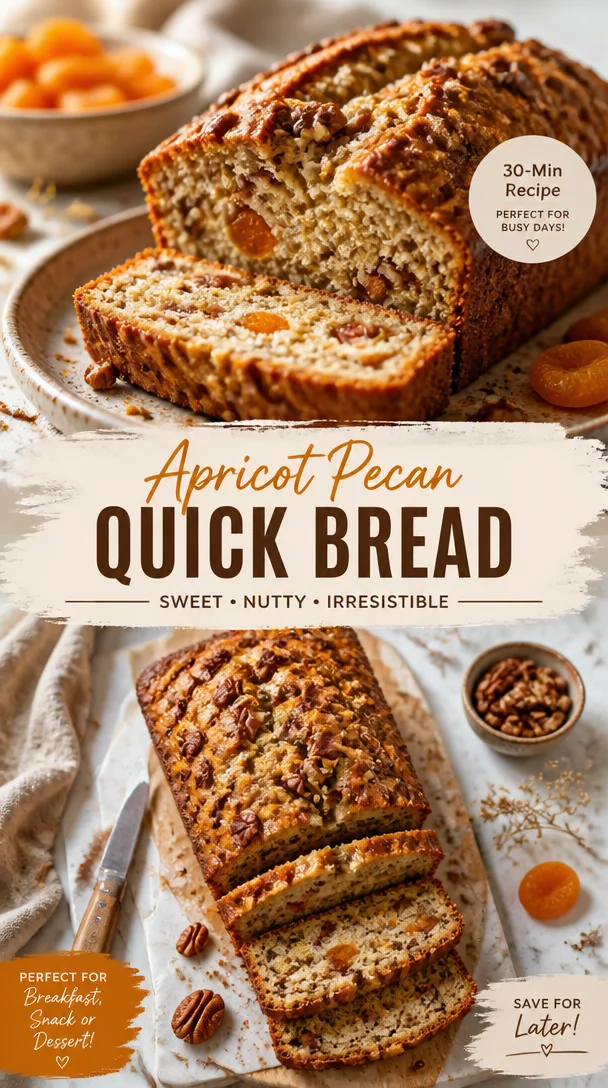
Apricot Pecan Quick Bread Recipe
Apricot Pecan Quick Bread Recipe
Hey there, food lovers! Welcome back to Feastical! Today, we’re diving into a delightful, cozy recipe that’s about to become your new favorite: Apricot Pecan Quick Bread. If you’re looking for something that fills your kitchen with warmth and sweet aroma, you’re in the right place. Imagine slicing into a moist, buttery loaf, the sweet-tart apricots punctuating each bite, with a satisfying crunch from the pecans. This isn’t just a recipe; it’s an experience that beckons you to slow down, savor, and share.
Quick breads are my go-to for baking enthusiasts and novices alike. They’re forgiving, no fuss, and you get quick satisfaction (which often includes warm bread slathered in butter!). Plus, there’s something so comforting about the act of baking—especially when it results in something that will make your friends and family gather around the table, reminiscing about their favorite meals.
Let’s grab our aprons, put on our favorite tunes, and get started on this incredible Apricot Pecan Quick Bread. You’ll love how this recipe shines a spotlight on the humble yet vibrant flavors of dried apricots and crunchy pecans. Whether it’s for breakfast, dessert, or just an afternoon snack, this bread is sure to be the highlight of your day.
Personal Story
I remember the first time I pulled a loaf of apricot pecan bread from the oven. It was a chilly Sunday morning, and I was on a bit of a baking spree. My family, most of whom had not turned on their coffee makers yet, were greeted by the mouthwatering aroma wafting through the house. As I sliced the bread, the sunlight streamed through the kitchen windows, highlighting the glistening apricots and golden-brown crust.
With each bite, we couldn’t help but share our memories—of growing up with grandma’s apricot jams, winter picnics, and holiday gatherings where sweets were a must. That day, it felt like food had superpowers; with every slice, it sparked joy and nostalgia. Now, that memory is etched in my heart, motivating me to share this recipe with you. I hope you create your own memories, just as I did that sunny Sunday morning!
Ingredients
To whip up this Apricot Pecan Quick Bread, gather the following ingredients:
-
2 cups (480 ml) all-purpose flour: The backbone of your bread! You can substitute with whole wheat flour for a nuttier flavor or gluten-free flour for a gluten-free option.
-
1 cup (200 g) granulated sugar: Adds sweetness and moisture. If you’re looking to cut down on sugar, coconut sugar or a sugar substitute can work (though you’ll need to adjust the quantity!).
-
1 cup (100 g) dried apricots, chopped: These sweet bites are the star of the show! If apricots aren’t your jam, substitute with dried cranberries or cherries for a different twist.
-
1 cup (100 g) pecans, chopped: They bring a beautiful crunch! You can swap these with walnuts or almonds if you’d like a change or even omit the nuts for a nut-free version.
-
2 large eggs: They’re essential for binding everything together, but you could use flax eggs for a vegan approach.
-
1 teaspoon baking powder: The leavening agent that helps your bread rise. Make sure it’s fresh for the best results.
-
1/2 teaspoon baking soda: This goes hand in hand with baking powder for a well-risen bread.
-
1/2 teaspoon salt: Balances the sweetness. Remember, a little salt enhances flavor!
-
1 teaspoon ground cinnamon: Adds a warm, cozy flavor. Nutmeg or pumpkin spice can also create an aromatic twist if you’re feeling adventurous.
-
1/2 cup (113 g) unsalted butter, softened: Use the real deal for richness! In a pinch, coconut oil or a plant-based butter can work.
-
1/2 cup (120 ml) buttermilk: For that touch of tanginess. You can use plain yogurt diluted with milk or even almond milk mixed with a dash of vinegar as substitutes.
-
1 teaspoon vanilla extract: It adds a delightful depth of flavor. Homemade vanilla extract is always a winner!
Step-by-Step Instructions
Ready to get baking? Here’s how to make this scrumptious bread!
-
Preheat the Oven: Start by preheating your oven to 350°F (175°C). Prepare your 9×5-inch loaf pan by greasing it with butter or cooking spray, or lining it with parchment paper. This ensures the bread slides right out when it’s done.
-
Mix Dry Ingredients: In a medium-sized bowl, whisk together your all-purpose flour, baking powder, baking soda, salt, and ground cinnamon. This not only combines the ingredients but also aerates the flour, helping your bread rise perfectly.
-
Cream the Butter and Sugar: In a large mixing bowl, beat together the softened unsalted butter and granulated sugar until the mixture is light and fluffy. This usually takes about 3 to 5 minutes. The air pockets you’re creating will give your bread a lovely texture!
-
Add the Eggs and Vanilla: Now, mix in the eggs one at a time until fully incorporated. Then, add the vanilla extract. This step helps bring all those flavors together.
-
Combine Wet and Dry Ingredients: Gradually add the dry ingredients into the butter mixture, alternating with buttermilk. You’ll want to mix gently until just combined. Overmixing can lead to tough bread, and nobody wants that!
-
Fold in the Goodies: Gently fold in the chopped dried apricots and pecans. Take a moment to appreciate how beautiful the mixture looks—those vibrant apricot pieces are like little gems!
-
Pour and Bake: Transfer your beautifully combined batter into the prepared loaf pan. Use a spatula to smooth out the top. Bake in the preheated oven for about 60 minutes, or until a toothpick inserted in the center comes out clean.
-
Cool: Once done, don’t forget to let it cool in the pan for about 10 minutes before transferring it to a wire rack. This helps prevent it from becoming soggy on the bottom.
-
Slice and Serve: After it has cooled enough to handle, slice it up and serve! A pat of butter on top is perfection, and coffee would be a great companion too!
Serving Suggestions
When it comes to serving your Apricot Pecan Quick Bread, the options are limitless! This bread can shine in so many ways:
- Breakfast Delight: Enjoy a warm slice with butter or cream cheese and a hot cup of coffee or tea.
- Brunch Star: Serve alongside fresh fruit, yogurt, and a drizzle of honey for a delightful brunch spread.
- Snack Time: Mid-afternoon, pair it with a strong cup of tea or a glass of milk to recharge your spirit.
- Dessert with a Twist: Slice it warm and serve with vanilla ice cream for a cozy dessert after dinner.
No matter how you serve it, this bread is sure to bring smiles all around.
Recipe Variations
Feeling adventurous? Here are a few creative twists you can try:
-
Spicy Ginger Apricot: Add some chopped crystallized ginger for a spicy kick that complements the sweetness of the apricots.
-
Chocolate Chip Delight: Fold in some chocolate chips (dark or white) along with the apricots for a chocolatey twist.
-
Fruit Medley: Substitute dried apricots with a mix of dried fruits like cherries, blueberries, or strawberries to provide a colorful array of flavors.
-
Nut-Free Version: Simply omit the pecans to cater to nut allergies, and you’ll still have a beautiful loaf!
-
Citrus Zest: Add a teaspoon of orange or lemon zest to the batter for a refreshing citrus flavor that brightens the bread!
Chef’s Notes
This Apricot Pecan Quick Bread has evolved over the years in my kitchen. What started as a simple recipe from a dusty old cookbook has turned into a family favorite that I make for special occasions. Every time I bake it, I think of the laughter shared and the memories created. Plus, I love experimenting with different fruits and nuts, making it a versatile recipe that never gets boring!
And hey, I’ve had my fair share of baking disasters—there was one time I accidentally used baking powder instead of baking soda. Let’s just say the bread exploded in my oven! But hey, every mishap taught me something new, and I love sharing those laughs with friends in the kitchen. That’s what makes cooking so beautifully imperfect!
FAQs and Troubleshooting
1. My bread came out dense. What happened?
Dense bread could be a result of overmixing the batter or not measuring the flour correctly. Make sure to spoon your flour into the measuring cup rather than scooping it directly, as that can lead to too much flour.
2. How do I store my bread?
Store the bread in an airtight container at room temperature for up to three days. If you want to keep it longer, slice it, wrap it in plastic wrap, and freeze it for up to three months!
3. Can I make this gluten-free?
Absolutely! Substitute the all-purpose flour with a gluten-free 1:1 baking mix, and you’re good to go! Just be mindful that the texture might differ slightly.
4. Can I use fresh apricots instead of dried?
While you can, fresh apricots have a higher water content, so you’d need to adjust the amount of liquid in the recipe. Dried apricots work best for this quick bread.
Nutritional Info
This Apricot Pecan Quick Bread not only tastes scrumptious but is also a good source of energy and nutrients. Each slice is packed with carbohydrates for quick energy, and the nuts provide healthy fats and protein. Dried apricots contribute fiber, potassium, and various vitamins, making this bread not just a delightful treat, but also a satisfying one for your taste buds!
Estimated Nutrition per Slice (based on 10 slices):
- Calories: 180
- Protein: 3g
- Total Fat: 7g
- Carbohydrates: 25g
- Fiber: 1g
- Sugar: 8g
Bear in mind that these are rough estimates, and variations will occur based on specific ingredient choices and portion sizes.
Final Thoughts
And there you have it—the soul-warming, utterly delectable Apricot Pecan Quick Bread! I hope you can’t wait to get into your kitchen and whip up your loaf, filling your home with those irresistible aromas. There’s a certain joy that comes from sharing homemade goodies with those you love, and this recipe encapsulates that perfectly.
Don’t forget to have fun and put your unique spin on the recipe! After all, cooking is about creativity, exploration, and love. And if you get a moment and feel inclined to share – show me your baking adventures on social media! Tag me @Feastical, and let’s celebrate the art of cooking together. Happy baking, friends! 🍞💖
Print
Apricot Pecan Quick Bread
- Total Time: 75 minutes
- Yield: 10 servings 1x
- Diet: Vegetarian
Description
A delightful, cozy recipe that blends the sweet-tart flavor of dried apricots with crunchy pecans in a moist, buttery loaf.
Ingredients
- 2 cups (480 ml) all-purpose flour
- 1 cup (200 g) granulated sugar
- 1 cup (100 g) dried apricots, chopped
- 1 cup (100 g) pecans, chopped
- 2 large eggs
- 1 teaspoon baking powder
- 1/2 teaspoon baking soda
- 1/2 teaspoon salt
- 1 teaspoon ground cinnamon
- 1/2 cup (113 g) unsalted butter, softened
- 1/2 cup (120 ml) buttermilk
- 1 teaspoon vanilla extract
Instructions
- Preheat the oven to 350°F (175°C). Prepare a 9×5-inch loaf pan by greasing it.
- Mix the dry ingredients in a medium bowl: flour, baking powder, baking soda, salt, and cinnamon.
- Cream the butter and sugar in a large bowl until light and fluffy.
- Add the eggs one at a time, mixing well after each, then incorporate the vanilla.
- Combine the dry ingredients with the butter mixture alternately with buttermilk until just mixed.
- Fold in the chopped dried apricots and pecans gently.
- Pour the batter into the prepared loaf pan and smooth the top.
- Bake for about 60 minutes, or until a toothpick comes out clean.
- Cool in the pan for 10 minutes before transferring to a wire rack.
- Slice and serve!
Notes
For a nut-free version, simply omit the pecans. Feel free to substitute dried apricots with cranberries or cherries.
- Prep Time: 15 minutes
- Cook Time: 60 minutes
- Category: Bread
- Method: Baking
- Cuisine: American
Nutrition
- Serving Size: 1 slice
- Calories: 180
- Sugar: 8g
- Sodium: 150mg
- Fat: 7g
- Saturated Fat: 4g
- Unsaturated Fat: 2g
- Trans Fat: 0g
- Carbohydrates: 25g
- Fiber: 1g
- Protein: 3g
- Cholesterol: 75mg
Keywords: quick bread, apricot, pecan, baking, comfort food

Minute Sour Cherry Tarts: Simple Summer Dessert
Easy Sour Cherry Tarts: A Sweet Treat with a Tart Twist!
Hey there, fellow food lovers! Today, I’m feeling a bit nostalgic as I share a delightful recipe that warms my heart and brings back some of my fondest memories: Easy Sour Cherry Tarts. Picture this: sun-drenched orchards, the sweet-and-sour aroma of cherries wafting through the air, and laughter filling the kitchen as family members gather to whip up something delicious. That’s the magic of cherries—sweet on some days and a tad tart on others, just like life!
In my world, sour cherries are underrated gems that deserve a spotlight. These vibrant little fruits are perfect for desserts that strike a balance between sweet indulgence and zesty freshness. Whether it’s a casual get-together or a fancy dinner party, these Easy Sour Cherry Tarts will have everyone asking for seconds (and maybe even thirds)! So, put on your apron, roll up your sleeves, and let’s embark on this cherry adventure together!
A Cherry Memory
Let me take you back to a summer long ago, back when my grandmother had an expansive cherry tree in her backyard. Those arms of green would be filled to the brim with the brightest, juiciest sour cherries you could imagine. The air would buzz with excitement as my cousins and I would have friendly cherry-picking contests, trying to outdo each other on who could gather the most. Sun-soaked faces, sticky fingers, and the joy of biting into a fresh cherry was always the best part of summer.
After our cherry-picking escapades, Grandma would lead us back into her cozy kitchen, where the delightful aroma of baked goods was a constant invitation. Together, we would mix, stir, and bake, turning those tart gems into the most scrumptious pies and tarts. I can still hear Grandma’s laughter as she caught us sneaking a few cherries to munch on while we worked. Those Easy Sour Cherry Tarts were the highlight of our family gatherings, and now, they’re a cherished tradition that I love sharing with you all!
Ingredients for Easy Sour Cherry Tarts
Here’s what you’ll need to make these delightful tarts:
- 6 cups pitted sour cherries: Fresh, frozen, or canned—just make sure they’re pitted! If you’re using frozen cherries, there’s no need to thaw them; they’ll cook down beautifully.
- 2 cups white sugar: Essential for balancing the tartness of the cherries! You can adjust this based on your sweetness preference or swap it out for brown sugar for a deeper flavor.
- 1 heaping tbsp cornstarch: This is our thickening agent! It helps the cherry filling hold together nicely. If you don’t have cornstarch, you can use arrowroot or all-purpose flour, but you may need to adjust the quantity.
- 2-3 tbsp water: Helps create the syrupy mixture with sugar and cherries. Use as needed to achieve the right consistency.
- 1 package pastry tart shells (approximately 30 in a package): Store-bought or homemade—save time with pre-made shells or impress your friends with a homemade version!
- Whipped cream to garnish: The perfect light and airy topping! You can use store-bought or whip up some fresh cream by mixing heavy cream and sugar until it forms soft peaks.
- Optional: Edible flowers and thyme for garnish: These add a beautiful touch! Look for flowers like nasturtiums or violets, and fresh thyme for a lovely herbal contrast.
Step-by-Step Instructions for Making Your Tarts
Now that we’ve gathered our ingredients, let’s get started on these delightful Easy Sour Cherry Tarts.
Step 1: Prepare the Filling
-
In a large pot, combine the pitted sour cherries and sugar over medium heat. Stir them gently until the cherries begin to release their juices and the sugar starts to dissolve.
Chef Tip: To enhance the flavor, consider adding a dash of vanilla extract or a sprinkle of cinnamon for an unexpected twist!
-
Once the mixture is simmering, sprinkle the cornstarch over the cherries and stir to combine. This will help thicken the filling. If it looks too thick, add a bit of water to loosen it up. Let this cook for about 5-7 minutes until it thickens and bubbles.
Pro Tip: If you notice clumps of cornstarch, whisk it with a bit of cold water first to create a slurry before adding it to the hot filling.
Step 2: Fill the Tart Shells
-
Preheat your oven to 350°F (175°C). While it preheats, take your prepared tart shells and place them on a baking sheet.
-
Once the filling is ready, carefully spoon the tart cherry mixture into the prepared tart shells, filling each one generously.
Chef Insight: Don’t be shy! A heaping spoonful of filling in each shell makes for an irresistible tart.
Step 3: Bake the Tarts
-
Place the filled tart shells in the oven and bake for approximately 20-25 minutes or until the tart shells are golden and the cherry filling is bubbling.
Baker’s Pro Tip: Keep an eye on the tarts towards the end of baking! If you see that the shells are browning too quickly, you can cover them with aluminum foil to prevent burning.
Step 4: Cool and Serve
-
Once baked, remove the tarts from the oven and let them cool on a wire rack for at least 15-20 minutes. This will allow the filling to set a bit more.
-
Before serving, top each tart with a dollop of whipped cream and, if you’re feeling fancy, a sprinkling of edible flowers or thyme!
Serving Suggestion: Arrange the tarts on a beautiful platter, perhaps with a few fresh cherries scattered around for a pop of color!
Recipe Variations to Try
-
Mixed Cherry Tarts: Combine sour cherries with sweet cherries or other fruits like blueberries or raspberries for a mixed berry experience!
-
Almond Cherry Tarts: Add a teaspoon of almond extract to the filling for a nutty twist that complements the cherry flavor beautifully.
-
Savory Cherry Tarts: For a unique take, incorporate goat cheese into the filling and sprinkle a bit of fresh rosemary on top before baking!
-
Chocolate Cherry Tarts: Drizzle some melted dark chocolate over the tarts either before or after baking for a rich, decadent dessert.
-
Gluten-Free Tarts: Use gluten-free pastry shells or make your own with almond flour for a gluten-free version that everyone can enjoy!
Chef’s Notes
These Easy Sour Cherry Tarts are truly a labor of love. The recipe has evolved over the years as I’ve played with different variations, discovering that the tartness of the cherries complements so many flavors. I remember the first time I added a bit of almond extract to the filling; it was like a light bulb moment in my kitchen! The creativity goes on forever!
And let me tell you, there’s nothing quite like pulling these fresh tarts out of the oven—it fills the air with a scent that makes everyone gather around, just waiting for their first bite!
FAQs and Troubleshooting
1. How do I know when the tarts are baked properly?
Look for a bubbling filling and a golden-brown crust. If your tarts are browning too quickly, use foil to cover them.
2. Can I use fresh cherries instead of frozen?
Absolutely! Just make sure to pit them first. Fresh cherries add a lovely texture!
3. My filling is too runny; what did I do wrong?
If your filling is too runny, it may be due to not enough cornstarch or cooking time. Let it cook a bit longer to thicken up.
4. How can I store leftover tarts?
Keep them in an airtight container in the fridge for up to three days. They’re perfect for a quick snack!
Nutritional Info
While exact values can vary based on the specific ingredients you use, here’s a general breakdown for each tart based on serving size:
- Calories: Approximately 200 calories per tart
- Total Fat: 8g
- Saturated Fat: 4g
- Cholesterol: 30mg
- Sodium: 150mg
- Total Carbohydrates: 30g
- Fiber: 2g
- Sugars: 18g
- Protein: 2g
Keep in mind that these tarts are a delightful indulgence meant to be enjoyed in moderation—the fresh cherries bring a load of vitamins and antioxidants, making them a slightly healthier choice than other dessert options!
Final Thoughts
Creating Easy Sour Cherry Tarts is more than just a recipe; it’s about celebrating the connections we make over good food. It’s about the laughter shared while baking and the memories created around the dinner table. Whether you’re whipping these up for a family gathering, a potluck, or just a Tuesday night treat for yourself, I promise they’ll bring a little sweetness and tart joy to your day!
So there you have it! These Easy Sour Cherry Tarts are not just a dessert—they are a tradition, a moment, and an experience all wrapped in a delightful flaky shell. Get in that kitchen, have fun, and enjoy every bite! Happy baking!
Print
Easy Sour Cherry Tarts
- Total Time: 45 minutes
- Yield: 30 tarts 1x
- Diet: Vegetarian
Description
Delightful Easy Sour Cherry Tarts that perfectly balance sweet and tart flavors, making them a favorite for any occasion.
Ingredients
- 6 cups pitted sour cherries (fresh, frozen, or canned)
- 2 cups white sugar
- 1 heaping tbsp cornstarch
- 2–3 tbsp water (as needed)
- 1 package pastry tart shells (approximately 30)
- Whipped cream (for garnish)
- Optional: Edible flowers and thyme for garnish
Instructions
- Combine the pitted sour cherries and sugar in a large pot over medium heat to release juices.
- Sprinkle the cornstarch over the mixture and stir until combined, cooking for 5-7 minutes until thickened.
- Preheat your oven to 350°F (175°C) and arrange tart shells on a baking sheet.
- Spoon the cherry mixture into the tart shells generously.
- Bake for 20-25 minutes or until shells are golden and filling is bubbling.
- Cool the tarts on a wire rack for 15-20 minutes before serving.
- Top each tart with whipped cream and optional edible flowers or thyme.
Notes
Experiment with different variations by adding almond extract or mixing in different fruit for a unique twist.
- Prep Time: 20 minutes
- Cook Time: 25 minutes
- Category: Dessert
- Method: Baking
- Cuisine: American
Nutrition
- Serving Size: 1 tart
- Calories: 200
- Sugar: 18g
- Sodium: 150mg
- Fat: 8g
- Saturated Fat: 4g
- Unsaturated Fat: 4g
- Trans Fat: 0g
- Carbohydrates: 30g
- Fiber: 2g
- Protein: 2g
- Cholesterol: 30mg
Keywords: sour cherry, tarts, dessert, easy recipe, baking, cherry recipe

Min Apricot Ginger Pork Chops – Steakhouse Style
Easy Apricot Ginger Steakhouse Pork Chops in 30 Minutes!
Hey there, food lovers! Welcome back to the Feastical kitchen, where we’re all about sharing delicious recipes with a sprinkle of love and a dash of fun. Today, we’re whipping up a dish that’s not only a feast for the taste buds but also super simple to make—Easy Apricot Ginger Steakhouse Pork Chops! And guess what? You’re only 30 minutes away from a flavor-packed meal that might just become your new weeknight go-to.
If you’ve ever found yourself staring into the fridge wondering what to cook (and how on earth to make it exciting), you’re definitely in the right place. These pork chops are juicy, glazed with a sweet and tangy apricot ginger sauce, and will make you feel like a culinary rockstar in no time. Plus, they pair excellently with a fresh salad or some roasted veggies. So, roll up those sleeves and let’s get cooking!
A Bite of Nostalgia
Now, let’s take a little trip down memory lane. I remember the first time I had apricot-glazed anything. It was at this cozy little steakhouse that my family used to visit when I was a teenager. The aroma would hit my senses the moment we walked through the door, and I would eagerly flip through the menu, dreaming of all the new flavors I was about to dive into.
One night, I finally decided to venture beyond my usual burger and ordered their apricot ginger-glazed pork chops. My first bite was a revelation! The way the sweet apricot and zesty ginger danced together was pure magic. It was one of those moments that etched itself in my memory forever. When I started cooking for myself, I knew I had to recreate that experience in my own kitchen. And now, I’m sharing it with all of you so we can create our own delicious memories together!
Ingredients
Let’s gather our ingredients for these delightful pork chops. Here’s what you’ll need:
-
4 Hatfield® Premium Reserve Pork® Boneless Pork Chops
- A fantastic choice for juicy and tender meat. If you can’t find these, feel free to use any boneless pork chops you can find. Just ensure they’re around an inch thick for even cooking.
-
1 1/2 tbsp Extra Virgin Olive Oil
- This adds flavor and helps sear the pork chops beautifully. You could substitute it with avocado oil or canola oil if needed.
-
1/4 tsp Garlic Powder
- A pantry staple that gives depth to the dish. If you prefer fresh garlic, feel free to use one clove minced.
-
Black Pepper to Taste
- Freshly cracked black pepper enhances the overall flavor of the dish. No black pepper? Try using white pepper as an alternative!
-
Salt to Taste
- Just enough to enhance the flavors without overpowering them. Sea salt or kosher salt works beautifully!
-
1/2 cup Apricot Preserves
- This is the star of our show! These give the glaze its sweetness. Can’t find apricot? Peach preserves would work beautifully, too!
-
1 tbsp Fresh Minced Ginger
- Ginger adds a nice zing. You could substitute ground ginger if that’s all you have, though fresh is always best for that kick!
-
2 tbsp Lime Juice (or juice of one lime)
- This brightens the dish and adds acidity. Lemon juice could be used if lime isn’t on hand.
-
1/4 cup Water
- Just enough to create a lovely sauce. Want it thicker? Reduce the water a little!
-
1 Dash Cayenne Pepper (Optional)
- Adds a little heat! Feel free to omit or increase to taste if you like it spicy.
-
2 Dashes Black Pepper
- Because we can never have enough pepper!
-
3/4 tbsp Fresh Thyme Leaves (or leaves of one sprig)
- Thyme brings an earthy touch. Dried thyme could work, but use about half the measurement since dried herbs are more concentrated.
Step-by-Step Instructions
Now that we’ve got everything we need, let’s get down to business with our cooking steps. Follow along, and I promise you’ll have a winner of a dish on your hands in no time!
-
Prep the Pork Chops
- Start by patting the pork chops dry with a paper towel. This helps you get a nice sear! Season both sides generously with salt, black pepper, and garlic powder. Give them a little love—don’t be shy!
-
Sear the Pork Chops
- Place a large skillet over medium-high heat. Add the olive oil and let it heat up until it shimmers. Carefully place the pork chops in the pan. Sear them for about 4-5 minutes on each side until they’re golden brown and cooked through (internal temperature should reach at least 145°F). Don’t overcrowd the pan; you want them to sear nicely. If your skillet isn’t big enough, you can cook them in batches.
-
Make the Apricot Ginger Sauce
- Once the chops are cooked, remove them from the skillet and set them aside on a plate. In the same skillet (still over medium heat), add the apricot preserves, minced ginger, lime juice, and water. Mix everything together, scraping any lovely browned bits off the bottom of the pan—this is where the flavor lives!
-
Add Seasoning
- Sprinkle in the cayenne and thyme. Let the sauce simmer for about 2-3 minutes until it thickens slightly. Look at that gorgeous color! It’s a work of art.
-
Glaze the Pork Chops
- Return the pork chops to the skillet and coat them with the apricot ginger sauce. Let them bask in that sunshine for an additional minute, ensuring they’re heated through.
-
Serve
- Once everything is nicely glazed, remove from heat. You can either serve them right from the skillet or transfer them to a serving platter.
Serving Suggestions
Now that you have these beautiful, glazed pork chops ready, let’s talk presentation. To make the dish pop, consider serving the chops on a plate sprinkled with some additional fresh thyme. You can also add a side of sautéed green beans or mashed sweet potatoes for a lovely contrast of colors and flavors. If you want to get really fancy, serve the pork chops with a lime wedge on the side for a burst of freshness!
Recipe Variations
Let’s get creative, shall we? Here are a few fun twists you can try with this recipe:
-
Sweet and Spicy Apricot Sauce
- Add more cayenne or even some chopped jalapeños to your sauce for a fiery kick.
-
Peachy Keen
- Swap out the apricot preserves for peach preserves for a sweet summer twist.
-
Herbed Up
- Toss in other fresh herbs like cilantro or parsley instead of thyme for a refreshing change.
-
Gluten-Free Option
- This dish is naturally gluten-free, but just double-check your condiment labels, especially for any prepared ingredients.
-
Pork Chop Sandwich
- Give the leftover pork chops a second life by slicing them and tossing them in a fresh roll with some slaw for a great sandwich option.
Chef’s Notes
Over the years, I’ve played around with this recipe quite a bit. I once made it for my best friend’s birthday BBQ—she went gaga over it! It’s funny how food can create memories. I still remember everyone gathered around the table, sharing stories and laughing over these savory chops. Since then, I’ve adapted the recipe to include fresh herbs and different fruit glazes, but the core remains the same: simple, soulful cooking that brings people together.
FAQs and Troubleshooting
-
What if my pork chops are tough?
- Tough pork chops typically mean they were overcooked! Use a meat thermometer next time to ensure they’re cooked perfectly.
-
Can I make this ahead of time?
- You can prep the sauce and refrigerate it in advance. Just reheat it in a saucepan before glazing your cooked pork chops.
-
Could I use a different meat?
- Absolutely! Chicken breasts or thighs would also work well with this sauce.
-
What should I do if my sauce is too thick?
- Just whisk in a little more water until you reach your desired consistency. Easy peasy!
Nutritional Info
Let’s talk about the nitty-gritty! Each serving of these Easy Apricot Ginger Steakhouse Pork Chops (based on four servings) typically contains the following nutritional values:
- Calories: 320
- Protein: 30g
- Total Fat: 15g
- Saturated Fat: 3g
- Carbohydrates: 14g
- Sugars: 10g
- Fiber: 1g
Remember, these are estimates and can vary depending on the exact ingredients used and serving sizes!
Final Thoughts
So there you have it—Easy Apricot Ginger Steakhouse Pork Chops ready to steal the show at your dinner table. Cooking doesn’t have to be complicated to be delicious; with a few good ingredients and a little creativity, you can elevate your meals and make any night feel special.
Next time you need to impress some friends or treat yourself to a fantastic dinner, you know what to make! I hope this dish brings you as much joy as it has brought me. Let’s keep making memories in the kitchen—grab a fork, dig in, and share your culinary adventures with me! Happy cooking, friends! 🍽️
Print
Easy Apricot Ginger Steakhouse Pork Chops
- Total Time: 30 minutes
- Yield: 4 servings 1x
- Diet: Gluten-Free
Description
Juicy pork chops glazed with a sweet and tangy apricot ginger sauce, ready in just 30 minutes.
Ingredients
- 4 Hatfield® Premium Reserve Pork® Boneless Pork Chops
- 1 1/2 tbsp Extra Virgin Olive Oil
- 1/4 tsp Garlic Powder
- Black Pepper to Taste
- Salt to Taste
- 1/2 cup Apricot Preserves
- 1 tbsp Fresh Minced Ginger
- 2 tbsp Lime Juice (or juice of one lime)
- 1/4 cup Water
- 1 Dash Cayenne Pepper (Optional)
- 2 Dashes Black Pepper
- 3/4 tbsp Fresh Thyme Leaves (or leaves of one sprig)
Instructions
- Prep the Pork Chops by patting them dry and seasoning both sides with salt, black pepper, and garlic powder.
- Sear the Pork Chops in a skillet over medium-high heat with olive oil for 4-5 minutes on each side until golden brown.
- Make the Apricot Ginger Sauce by combining apricot preserves, minced ginger, lime juice, and water in the same skillet.
- Add seasoning like cayenne and thyme, and let the sauce simmer until slightly thickened (about 2-3 minutes).
- Glaze the Pork Chops with the sauce for an additional minute.
- Serve the glazed pork chops warm on a plate, optionally garnished with fresh thyme.
Notes
Serve with sautéed green beans or mashed sweet potatoes for a complete meal.
- Prep Time: 10 minutes
- Cook Time: 20 minutes
- Category: Main Course
- Method: Searing
- Cuisine: American
Nutrition
- Serving Size: 1 serving
- Calories: 320
- Sugar: 10g
- Sodium: 500mg
- Fat: 15g
- Saturated Fat: 3g
- Unsaturated Fat: 8g
- Trans Fat: 0g
- Carbohydrates: 14g
- Fiber: 1g
- Protein: 30g
- Cholesterol: 80mg
Keywords: pork chops, apricot ginger, easy recipe, weeknight dinner, seared pork

Beginner-Friendly Rugelach Cookies: A Simple Pastry Recipe
The Irresistible Allure of Rugelach Cookies: A Sweet Journey
Hey there, fabulous food lovers! I’m so glad you stopped by Feastical today. Let’s take a delicious journey into the world of Rugelach cookies—a treat that has a special place in my heart and certainly in my stomach! If you’ve never dabbled in the art of making these little crescent-shaped delicacies, today’s your lucky day. I’ll guide you through every step of the process, sprinkle in some fun kitchen tidbits, and sprinkle a bit of good vibes to ensure your experience is as joyful as the first bite into that flaky, buttery goodness.
Rugelach has a rich history that traces back to Eastern European Jewish communities, but don’t let the traditional roots fool you; these cookies have become favorites in many households worldwide. They’re like tiny pastry presents waiting to be unwrapped, filled with sweet, flavorful surprises. The beauty of Rugelach lies in its versatility—it dances seamlessly between sweet and nutty and can be adapted to suit whatever fillings your heart (or pantry) desires. That means if you’re a creative foodie like me, the sky’s the limit!
Now, grab your rolling pin, preheat that oven, and let’s dive into what makes these Rugelach cookies so special. Whether you’re baking for a celebration, a cozy night at home, or simply because you crave something comforting, these cookies will surely bring a smile to your face.
Personal Story
Many moons ago, I found myself in my grandmother’s kitchen, the heart of our family gatherings. The air was thick with the scent of cinnamon and baked goods, but the real magic was happening at the counter where Grandma was rolling out dough for her famous Rugelach. As a curious kid, I stood on my tiptoes, watching her hands work the pastry with a skill that came from years of love and practice.
I can still see the joy on her face as she spread apricot jam over the dough and sprinkled it with walnuts and cinnamon sugar. She would always invite me to help, “Just a little bit of cinnamon here, and don’t forget to fold that edge in!” Little did I know that those moments of bonding would shape my love for baking and the importance of tradition in cooking.
Later, as I enjoyed the warm, flaky cookies fresh out of the oven, I learned they weren’t just treats—they were a heritage passed down through generations, each recipe carrying its own story. Now, I bring those stories into my own kitchen. Every time I whip up batch after batch of these delightful cookies, I recapture that joy and nostalgia. Today, we’re going to make our version of Grandma’s classic Rugelach, allowing those sweet memories to unfold all over again.
Ingredients
Let’s gather our ingredients! Here’s what you’ll need to whip up some fantastic Rugelach—each item plays a crucial role in achieving that perfect texture and flavor.
-
1 cup unsalted butter, softened: Butter is the star of the show! It provides richness and a flaky texture. If you’re in a pinch, you can substitute with margarine, but I highly recommend the real deal for that luscious flavor.
-
8 ounces cream cheese, softened: This adds a creamy, tangy flavor that balances the sweetness beautifully. For a lighter version, you can use Neufchâtel cheese.
-
1/4 cup granulated sugar: Just a dash of sweetness! This helps to enhance the overall flavor profile. You can use coconut sugar for a more caramel-like taste if you prefer.
-
1 teaspoon vanilla extract: A must-have in baking! Vanilla elevates the flavors and adds warmth. Pure vanilla extract is best, but imitation works too if you’re out.
-
2 cups all-purpose flour: This is the base for your dough. If you’re looking for a gluten-free option, a 1:1 gluten-free flour blend can stand in nicely.
-
1/2 cup apricot jam: The filling! Feel free to play around with flavors like raspberry or blackberry jam for a fun twist, but I love the classic apricot for its balance of tartness and sweetness.
-
1/2 cup chopped walnuts: They add a delightful crunch. If you’re nut-free, seeds or oats can add some texture without compromising the taste.
-
1 egg, beaten (for egg wash): This gives the Rugelach a beautiful golden color when baked. You can skip it if you want a vegan version or use a flax egg as a substitute.
-
1 tablespoon cinnamon sugar (optional): A little sprinkle on top adds a nice touch of sweetness and aromatic flavor—perfect for those of us who can’t resist a little cinnamon magic!
Step-by-Step Instructions
Now that we’ve gathered all the goodies, it’s time to get those hands busy! Follow these detailed steps to create your Rugelach cookies.
Step 1: Make the Dough
-
In a large mixing bowl, cream together the softened butter and cream cheese until smooth. I like to use a hand mixer for this, but you can also use a spatula if you’re feeling a bit nostalgic and want to channel your inner Grandma.
-
Add in the granulated sugar and vanilla extract, mixing until well combined. This is where the magic begins—mixing with joyous vigor helps create a fluffy and light texture.
-
Gradually add in the all-purpose flour, mixing until a dough forms. The dough should be soft and slightly tacky but manageable.
Step 2: Chill the Dough
- Divide the dough into four equal pieces and form each into a disk. Wrap them in plastic wrap and pop them into the fridge for at least 30 minutes. Chilling helps the butter firm up, making the dough easier to roll out!
Step 3: Roll and Fill
-
Preheat your oven to 350°F (175°C). Line a baking sheet with parchment paper—you want to keep that kitchen clean!
-
Lightly flour your work surface and roll out one disk of dough into a circle about 1/8-inch thick. Don’t stress about perfection! The beauty of Rugelach is that they’re homemade!
-
Spread a generous layer of apricot jam over the rolled-out dough, leaving about an inch from the edge. Sprinkle the jam with chopped walnuts and a dash of cinnamon sugar, if using. The aroma of cinnamon wafting up during this step is pure bliss!
Step 4: Cut and Shape
-
Now comes the fun part! Using a sharp knife or a pizza cutter, slice the dough circle into 8 even wedges (like a pizza).
-
Starting from the wide end, gently roll each wedge towards the tip, forming a crescent shape. Place the rolled cookies on your lined baking sheet, making sure you leave enough space between them.
-
Brush the tops of each cookie with the beaten egg wash. For an extra dose of sweetness, sprinkle a little more cinnamon sugar on top!
Step 5: Bake to Perfection
-
Bake in your preheated oven for about 25-30 minutes, or until they’re golden brown and the scent of baked goods fills your kitchen. Keep an eye on them; the mouth-watering aroma will have you tempted way before they’re done!
-
Once baked, allow your Rugelach to cool on the baking sheet for a few minutes before transferring them to a wire rack. The waiting is tough, but trust me, they’re worth every morsel!
Serving Suggestions
Oh, the joy of serving these Rugelach cookies! They’re stunning on a plate, with their golden spirals and delicious fillings peeking through. For a cozy gathering, set them on a rustic wooden platter accompanied by a lovely herbal tea or a rich cup of coffee.
You can also drizzle some melted chocolate over them for a little extravagance, or pair them with fresh berries and whipped cream for a more glamorous dessert experience. They make delightful gifts too! Just arrange the cookies in a cute box tied up with a ribbon, and you’ve got the perfect present for any occasion.
Recipe Variations
Feeling adventurous? Here are some fun twists on the classic Rugelach:
-
Nut-Free Option: Switch walnuts for rolled oats or sunflower seeds for a crunchy texture without the nuts.
-
Spicy Chocolate: Add a sprinkle of chili powder to your cinnamon sugar for a spicy chocolate twist. Dark chocolate or Nutella could also be delectable fillings!
-
Fruit Infusion: Use different jams or preserves like raspberry, cherry, or even Nut butter for a protein-packed option.
-
Citrus Zest: Mix in some orange or lemon zest to the dough for a refreshing burst of flavor.
-
Vegan Version: Swap butter and cream cheese for vegan alternatives, and use a flax egg instead of the egg wash for a plant-based treat.
Chef’s Notes
These Rugelach cookies have had a long journey for me, evolving through my experiences and inspirations. I remember when I first experimented with adding a hint of cardamom to the flour mixture—pure magic! Every time I whip them up, whether I’m channeling my grandmother or trying my own spins, I’m reminded that cooking is all about love, creativity, and experimentation.
If you ever find yourself in a pinch, remember that these cookies can be frozen before baking. Just wrap them tightly and keep them in the freezer for up to a month. When you’re ready to indulge, bake them straight from the freezer—just add a few extra minutes to the bake time.
FAQs and Troubleshooting
Here are some common questions and tips to ensure your rugelach journey is as smooth as butter!
-
Q: Why are my cookies not flaky?
- A: Ensure your butter is cold and don’t overmix the dough. Keep it chill!
-
Q: Can I make the dough in advance?
- A: Absolutely! Just wrap it well and keep it in the fridge for up to 3 days or freezer for one month.
-
Q: What if my dough is too sticky?
- A: Don’t panic! Just add a little bit of flour, but be careful not to overdo it as that can make the dough tough.
-
Q: Can I make these without cream cheese?
- A: You can substitute with more butter or try a dairy-free cream cheese alternative if you’re vegan.
Nutritional Info
While Rugelach cookies are a delightful indulgence, they also come with a few nutritional notes to keep in mind. Each cookie (based on a standard recipe) may contain approximately:
- Calories: 150-200
- Fat: 10g
- Carbohydrates: 15g
- Protein: 2g
- Sugar: 5g
As with any treat, moderation is key, but the happiness they bring is truly worth it!
Final Thoughts
There you have it, my fellow foodies! Your road map to perfecting delicious Rugelach cookies filled with love and warmth. Baking these delightful treats is about more than just sweetness; it’s about creating memorable moments, just like my Grandma did.
I can’t wait for you to try this recipe—trust me, your taste buds will be doing a happy dance! So, gather your friends and family, create your memories, and feel free to share your own twists and stories here at Feastical. Remember, the kitchen is a space of joy, creativity, and love. Happy baking! 🥐❤️
Now, go on and whip up those Rugelach cookies. Let them warm your heart and fill your home with happiness!
Print
Rugelach Cookies
- Total Time: 45 minutes
- Yield: 32 cookies 1x
- Diet: Vegetarian
Description
Delightfully flaky and buttery Rugelach cookies filled with sweet apricot jam and crunchy walnuts, perfect for any occasion.
Ingredients
- 1 cup unsalted butter, softened
- 8 ounces cream cheese, softened
- 1/4 cup granulated sugar
- 1 teaspoon vanilla extract
- 2 cups all-purpose flour
- 1/2 cup apricot jam
- 1/2 cup chopped walnuts
- 1 egg, beaten (for egg wash)
- 1 tablespoon cinnamon sugar (optional)
Instructions
- Make the dough: In a large mixing bowl, cream together the softened butter and cream cheese until smooth. Add in the granulated sugar and vanilla extract, mixing until well combined. Gradually add in the all-purpose flour, mixing until a dough forms.
- Chill the dough: Divide the dough into four equal pieces and form each into a disk. Wrap them in plastic wrap and pop them into the fridge for at least 30 minutes.
- Roll and fill: Preheat your oven to 350°F (175°C). Lightly flour your work surface and roll out one disk of dough into a circle about 1/8-inch thick. Spread a generous layer of apricot jam over the rolled-out dough, sprinkle with chopped walnuts and cinnamon sugar, if using.
- Cut and shape: Slice the dough circle into 8 wedges. Starting from the wide end, gently roll each wedge towards the tip, forming a crescent shape. Place on a lined baking sheet, brush with egg wash, and sprinkle with more cinnamon sugar if desired.
- Bake to perfection: Bake for about 25-30 minutes, or until golden brown. Allow to cool before transferring to a wire rack.
Notes
These cookies can be frozen before baking. Wrap tightly and keep in the freezer for up to a month. Bake from frozen—add a few extra minutes to the bake time.
- Prep Time: 15 minutes
- Cook Time: 30 minutes
- Category: Dessert
- Method: Baking
- Cuisine: Jewish
Nutrition
- Serving Size: 1 cookie
- Calories: 175
- Sugar: 5g
- Sodium: 250mg
- Fat: 11g
- Saturated Fat: 6g
- Unsaturated Fat: 4g
- Trans Fat: 0g
- Carbohydrates: 18g
- Fiber: 1g
- Protein: 3g
- Cholesterol: 30mg
Keywords: Rugelach, cookies, Jewish dessert, apricot jam, walnuts, baking

Minute Sour Cherry Muffins: Fluffy Summer Breakfast
Sweet and Tangy Delight: Sour Cherry Muffins
Hey there, food lovers! Are you ready to embark on a mouthwatering journey that perfectly balances sweet and tart? Today, we’re diving into the delightful world of Sour Cherry Muffins! If you’re looking for a comforting treat ideal for breakfast, brunch, or just a little pick-me-up, you’ve come to the right spot. These muffins are bursting with tartness from the cherries and are sweetened just right— each bite is like a delicious hug from the inside.
Now, let’s get one thing straight – muffins are not just a means of sustenance; they’re an experience! Just the thought of sinking your teeth into a warm muffin, with its tender crumb and a bit of melted chocolate (if you choose to add that decadent twist), can instantly brighten your day. So grab that spatula and let’s hop into the kitchen!
A Nostalgic Taste of Cherry Joy
Let me take you back to my childhood. Picture a sun-drenched summer day, the trees fully alive, heavy with the weight of ripe fruit waiting to be picked. We spent lazy afternoons at my grandmother’s countryside home, where she had a cherry orchard. The vibrant red fruit seemed to call us. We plucked them off branches, dusted them off, and before you knew it, we had baskets brimming with these sour gems.
I vividly remember the aroma of her freshly baked cherry pies wafting through the air, mingling with laughter and the sounds of our family gathering. It was pure magic. But there was one recipe that always stood out: her sour cherry muffins. They perfectly captured the essence of those summer days—tart yet sweet, light yet filling, and oh-so-comforting! Each bite was reminiscent of a hug from Grandma, and now I’m thrilled to share my own take on this cherished recipe with you!
Ingredients
Here’s what you’ll need to make these scrumptious sour cherry muffins:
-
1 ½ Cups Unbleached, All-Purpose Flour: This is the base for our muffins. Unbleached flour gives a nice texture that results in a light crumb. If you need a gluten-free alternative, try using a 1:1 gluten-free baking flour.
-
⅓ Cup Sugar: This little bit of sweetness balances the tartness of the cherries. Feel free to adjust according to your taste, or use coconut sugar for a healthier option.
-
2 ½ teaspoons Baking Powder: The magic leavening agent that helps our muffins rise beautifully. Make sure it’s fresh for the best results.
-
½ Cup Milk: This adds moisture and richness. You can swap in almond milk or any plant-based milk for a dairy-free option.
-
¼ Cup Salted Butter, melted: Butter not only enhances flavor but also gives those muffins a delightful richness. If you’re looking for a substitute, coconut oil or unsalted butter will work beautifully—just a sprinkle of salt if you go unsalted.
-
1 Egg: This binds everything together and adds moisture. You can also substitute it with a flax egg (1 tablespoon ground flaxseed mixed with 3 tablespoons of water) for a vegan option.
-
1 Cup Sour Cherries, pitted and halved: These are the stars of our show! If you can’t find fresh sour cherries, feel free to use frozen ones. Just make sure to thaw and drain any excess liquid.
-
½ Cup Dark Chocolate Chunks (Optional): Okay, let’s talk about this option. Who can resist little pockets of melted dark chocolate? It adds a luxurious touch! You can replace this with white chocolate or substitute it with carob chips for an alternative.
Step-by-Step Instructions
Ready to whip these up? Let’s do it! Here’s how to create your own batch of sour cherry magic:
-
Preheat your Oven: Preheat your oven to 375°F (190°C). This ensures that as soon as the muffins are in, they’ll start baking evenly. While it heats up, grease your muffin pan with non-stick spray or line with muffin liners—your choice!
-
Mix the Dry Ingredients: In a large mixing bowl, whisk together the flour, sugar, and baking powder until thoroughly combined. This is where your muffins begin to take shape! A good blend here helps to aerate the flour for a fluffy texture.
-
Combine Wet Ingredients: In a separate bowl, combine the melted butter, milk, and egg. Give it a good whisk until it’s smooth and there’s no trace of egg left. If you’re using a vegan option, don’t be afraid to mix it well—it helps to bring out the flavors!
-
Combine Wet and Dry Mixtures: Pour the wet ingredients into the dry mixture. Gently stir until just combined. Over-mixing can result in tough muffins, and we’re aiming for light and fluffy! A few lumps are totally okay.
-
Add the Cherries and Chocolate: Fold in the sour cherries and chocolate chunks (if using). Be gentle here—just enough to distribute them without breaking up the cherries too much. You want those juicy spots of goodness!
-
Fill the Muffin Cups: Scoop the batter into your prepared muffin pan, filling each cup about ¾ full. This gives enough room for them to rise without spilling over.
-
Bake Them Up: Slide that muffin pan into the preheated oven and let it work its magic! Bake for 18-20 minutes, or until golden and a toothpick inserted into the center comes out clean.
-
Cool and Enjoy: Once they’re out of the oven, let the muffins cool in the pan for about 5 minutes before transferring them to a wire rack. The smell will be incredible, and trust me, letting them cool a bit will make them easier to handle!
Serving Suggestions
When it comes to serving these muffins, a little presentation goes a long way! Here’s what I suggest:
-
Plating: Serve them warm, dusted with a bit of powdered sugar for a touch of elegance. A drizzle of honey or maple syrup on top adds a sweet finishing touch—your guests will appreciate the effort!
-
Pairing: These muffins are delightful on their own but pair beautifully with a dollop of whipped cream or yogurt. You could also serve them alongside a fresh fruit salad or a cup of your favorite tea or coffee for a comforting breakfast experience.
Recipe Variations
Looking to mix things up? Here are some creative twists and tweaks you might want to try:
-
Berry Combo: Add different berries such as blueberries or raspberries along with the sour cherries for a berry medley muffin.
-
Nuts for Crunch: Toss in a half-cup of chopped walnuts or pecans for some extra crunch and nutty flavor.
-
Zesty Lemon: Add the zest of a lemon or a splash of almond extract to the batter for an interesting twist.
-
Chili Chocolate: Experiment with spicy chocolate by adding a pinch of cayenne or chili powder to the mix for a sweet heat!
-
Gluten-Free Delight: Use an all-purpose gluten-free flour blend to make these muffins gluten-free without sacrificing taste.
Chef’s Notes
Each time I make these sour cherry muffins, I think back to those summer days spent harvesting cherries. They remind me of the joyful noise of family and laughter permeating the kitchen, and I can’t help but smile. Over the years, I’ve tweaked this recipe, played around with the add-ins, and even had friends request alternate versions. Whether it’s the additional chunks of chocolate or swapping in different fruits, the original charm of these sour cherry muffins always shines through.
One time, I took a batch to a potluck, and they disappeared before I even had a chance to grab one! If that’s not a testament to their deliciousness, I don’t know what is!
FAQs and Troubleshooting
1. My muffins turned out dense. What went wrong?
Over-mixing the batter can lead to dense muffins. Remember, mix until just combined!
2. How can I store these muffins?
Keep them in an airtight container at room temperature for up to 3 days, or in the fridge for about a week. For longer storage, pop them in the freezer!
3. Can I use frozen cherries?
Absolutely! Just make sure to thaw and drain them to avoid excess moisture in the batter.
4. What if I don’t have a muffin pan?
No worries! You can bake this batter in a loaf pan as a delicious cherry bread—just adjust the baking time!
Nutritional Info
One sour cherry muffin (without chocolate) contains approximately:
- Calories: 160
- Protein: 3g
- Fat: 5g
- Carbohydrates: 25g
- Fiber: 1g
- Sugar: 8g
These values may vary based on specific ingredient brands and any substitutions you make, but it gives you a good ballpark idea.
Final Thoughts
There you have it—my delightful, sweet, and tart Sour Cherry Muffins! These little bites of happiness have been a family favorite and are sure to become a new staple in your kitchen. So, whether you’re enjoying them fresh out of the oven or saving a few for a midday snack, I hope you embrace every moment spent baking and indulging.
Remember, the kitchen is a place for creativity and connection, and there’s no better way to express that than through food! Don’t forget to share your baking adventures and let me know how your muffins turn out. Happy baking, fellow foodies! Let’s keep that love for food alive, one muffin at a time!
Print
Sweet and Tangy Delight: Sour Cherry Muffins
- Total Time: 35 minutes
- Yield: 12 muffins 1x
- Diet: Vegetarian
Description
These sour cherry muffins are a delightful balance of sweet and tart, perfect for breakfast or brunch. Each bite is a comforting experience filled with juicy cherries.
Ingredients
- 1 ½ Cups Unbleached, All-Purpose Flour
- ⅓ Cup Sugar
- 2 ½ teaspoons Baking Powder
- ½ Cup Milk
- ¼ Cup Salted Butter, melted
- 1 Egg
- 1 Cup Sour Cherries, pitted and halved
- ½ Cup Dark Chocolate Chunks (Optional)
Instructions
- Preheat your oven to 375°F (190°C).
- Mix the dry ingredients: whisk together the flour, sugar, and baking powder.
- Combine the melted butter, milk, and egg in a separate bowl and whisk until smooth.
- Combine the wet ingredients into the dry mixture and stir until just combined.
- Add the sour cherries and chocolate chunks, gently folding them in.
- Fill the muffin pan about ¾ full with the batter.
- Bake for 18-20 minutes or until golden and a toothpick comes out clean.
- Cool in the pan for 5 minutes before transferring to a wire rack.
Notes
For a vegan option, substitute the egg with a flax egg and use plant-based milk.
- Prep Time: 15 minutes
- Cook Time: 20 minutes
- Category: Breakfast
- Method: Baking
- Cuisine: American
Nutrition
- Serving Size: 1 muffin
- Calories: 160
- Sugar: 8g
- Sodium: 200mg
- Fat: 5g
- Saturated Fat: 3g
- Unsaturated Fat: 2g
- Trans Fat: 0g
- Carbohydrates: 25g
- Fiber: 1g
- Protein: 3g
- Cholesterol: 30mg
Keywords: muffins, sour cherry, breakfast, brunch, baking, sweet and tart
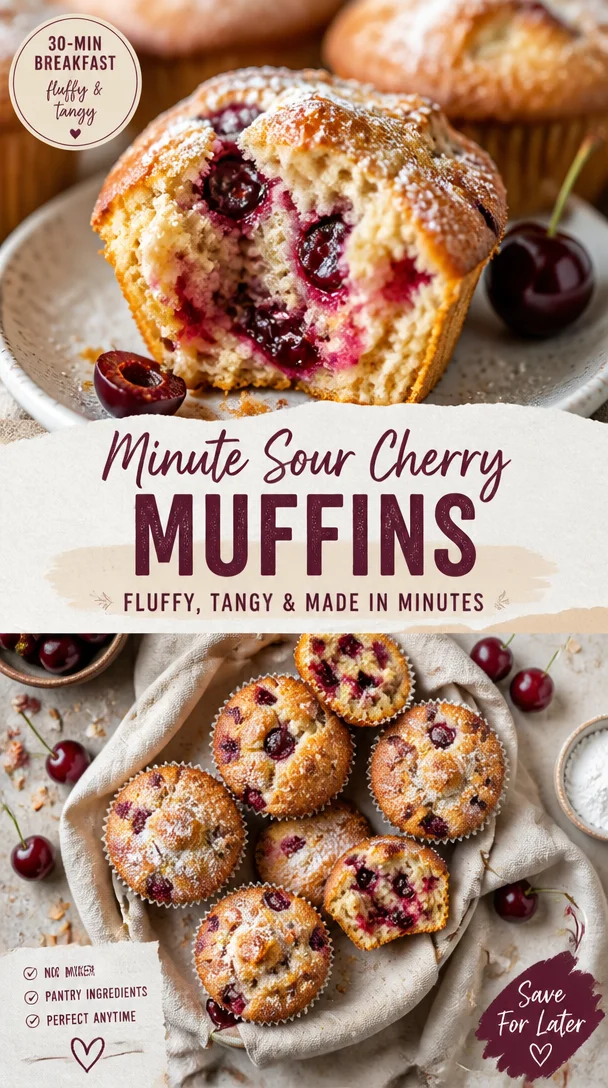
Minute Sour Cherry Muffins: Fluffy, Tangy Breakfast
Delightful Sour Cherry Muffins: A Sweet Treat to Cherish
Hey there, fellow foodies! Welcome back to Feastical, where we whip up some magical moments in the kitchen with delicious recipes that warm your heart. Today, I’m excited to share a special recipe that’s close to my heart: Sour Cherry Muffins. These muffins aren’t just any ordinary breakfast treat; they’re a fusion of tart cherries and a moist, sweet batter that’s perfect for any time of day.
Can you think of a food that transports you back to a cherished moment in your life? For me, that’s a muffin! There’s something undeniably comforting about biting into a freshly baked muffin topped with a sprinkle of sugar, and it takes me back to summer afternoons spent in my grandmother’s kitchen, surrounded by love and laughter. She had a way of turning simple ingredients into something magical, and believe me, her sour cherry muffins were legendary.
The juicy sour cherries bursting in each muffin remind me of the first time I picked them—every summer, my family would pile into our old van and head out to a nearby cherry orchard. We would spend hours plucking the bright red fruits from the trees, filling our baskets while enjoying the sun-kissed day. Then came the best part: heading home to mix and bake those cherries into the fluffiest muffins you could ever imagine. These muffins became a staple in our household and a favorite in our family gatherings.
So, if you’re ready to dive into a recipe that will not only tantalize your taste buds but also evoke precious memories, let’s get started!
Ingredients
Let’s gather our ingredients before we dive in:
-
3/4 cup reduced fat buttermilk
Provides a lovely tang and moisture. If you’re out of buttermilk, just mix 3/4 cup of milk with a tablespoon of vinegar or lemon juice! -
1/4 cup water or cherry juice
Water will work just fine, but cherry juice is a fun twist that boosts the flavor and adds a lovely pink hue to your muffin batter. -
2/3 cup canola oil
A fantastic source of moisture and smoothness! Feel free to swap this out with melted coconut oil or melted butter if you prefer a richer flavor. -
1 large egg
This helps in binding all the ingredients together. For a vegan alternative, you can use a flax egg (1 tablespoon of ground flaxseed mixed with 2.5 tablespoons of water). -
1 lemon (zested, about 1 heaping tablespoon)
Fresh lemon zest invigorates the muffins with a bright flavor! If you don’t have a lemon, use any citrus zest you have on hand, like lime or orange. -
2 cups all-purpose flour
My go-to for that fluffy texture. You can use a gluten-free flour blend if you need a gluten-free option. -
1 cup sugar
Adds sweetness; it’s essential in balancing the sour cherries’ tartness. You can reduce the sugar if you prefer a less sweet muffin or use coconut sugar for a healthier option. -
1 tsp baking powder
This is our leavening agent to get those muffins rising! Make sure it’s fresh for the best results. -
2 cups sour cherries (fresh or frozen)
Use well-drained, pitted sour cherries to avoid any sogginess. You can substitute with tart blueberries or raspberries if cherries aren’t available. -
2 Tbs sanding sugar (for topping, optional)
This adds a delightful crunch on top, but feel free to skip it if you want a more understated finish.
Step-by-Step Instructions
Now that we’ve got our ingredients ready, let’s make some magic!
-
Preheat the oven: Preheat your oven to 375°F (190°C) and prepare a muffin tin by lining it with muffin liners or greasing it with a little cooking spray. The quick oven heat will give us that perfect rise!
-
Mix wet ingredients: In a large mixing bowl, whisk together the reduced-fat buttermilk, cherry juice (or water), canola oil, and egg until well combined. This is where the magic begins, blending the moisture into the heart of your muffins.
-
Add zest: Gently fold in the lemon zest—oh, the fragrance that hits your nose! This little gem of an ingredient elevates the entire muffin experience.
-
Combine dry ingredients: In another bowl, mix together the flour, sugar, and baking powder. Stirring the dry ingredients separately prevents clumping and ensures even distribution of the baking powder later.
-
Combine and fold: Gradually add the dry mixture to the wet ingredients, folding them together gently. Pro tip: over-mixing will lead to dense muffins, so just stir until you don’t see dry flour anymore. Remember, lumps are your friends!
-
Add cherries: Delicately fold in the sour cherries. I like to reserve a few cherries to strategically place on top of the muffins for a pretty presentation.
-
Fill muffin tin: Scoop the batter evenly into the muffin tin cups, filling them about 2/3 full. If you reserved extra cherries, pop one or two on top of each muffin for a burst of color.
-
Sprinkle sanding sugar: If you’re feeling a bit extra, sprinkle sanding sugar over the tops of each muffin for that delightful crunch!
-
Bake: Slide that tin into the oven and bake for about 18-20 minutes. You’ll know they’re ready when golden brown on top, and a toothpick inserted in the center comes out clean.
-
Cool down: Let them cool in the pan for about 10 minutes, then transfer them to a wire rack. It’s hard to resist the aroma wafting through your kitchen, but let’s hold off munching until they’re not scorching hot!
Serving Suggestions
Just picture it: a warm muffin fresh from the oven, perhaps with a dollop of whipped cream or a smear of butter. You could serve these delightful sour cherry muffins alongside a steaming cup of coffee or a tall glass of fresh-squeezed lemonade on a bright morning. For a brunch gathering, arrange them nicely on a wooden platter with sprigs of mint scattered around. These muffins aren’t just tasty; they’re Instagram-worthy, too!
Recipe Variations
Feeling adventurous? Here are some fun twists you can take with this basic recipe:
-
Almond Joy Muffins: Add some toasted shredded coconut and chopped dark chocolate pieces for a tropical treat!
-
Oatmeal Cherry Muffins: Swap in 1 cup of rolled oats for 1 cup of flour for a heartier muffin that keeps you feeling full longer.
-
Spiced Cherry Muffins: Add warming spices like cinnamon, nutmeg, or ginger for a little zing, creating a cozy vibe that’s perfect for cooler months.
-
Nutty Cherry Muffins: Fold in some chopped nuts like walnuts or pecans for a delightful crunch and a dose of healthy fats.
-
Maple Cherry Muffins: Substitute half of the sugar with pure maple syrup for a naturally sweetened option that adds a unique flavor.
Chef’s Notes
These sour cherry muffins have evolved quite a bit over the years! Initially, they were made with whatever fruit was on hand, but the introduction of sour cherries turned them into a family favorite. The first time I shared them at a potluck, the entire tray disappeared within minutes! It’s moments like those that remind me why I love cooking and sharing recipes—food has a magical way of connecting us all. Remember, cooking is about experimenting, so don’t be scared to put your unique spin on it!
FAQs and Troubleshooting
1. My muffins turned out dense. What did I do wrong?
The common culprit is over-mixing the batter. Mix just until the flour disappears; a few lumps are okay!
2. Can I use frozen cherries?
Absolutely! Just make sure they are well-drained and pitted. Avoid thawing them in advance, as they can get soggy.
3. How do I store them?
Keep the muffins in an airtight container at room temperature for up to 3 days or freeze them for longer storage. Just pop them in the microwave for a quick warm-up!
4. Can I make these gluten-free?
Yes! Use a gluten-free flour blend, and make sure your baking powder is gluten-free.
Nutritional Info
For those mindful of their nutritional intake, let’s break it down a bit. Each muffin (makes about 12) contains approximately:
- Calories: 180
- Fat: 7g
- Carbohydrates: 28g
- Protein: 3g
- Fiber: 1g
- Sugar: 9g
These muffins are a delightful balance of a treat that feels indulgent without the guilt—perfect for a breakfast or snack that won’t send you straight to a sugar crash!
Final Thoughts
There you have it, my friends—the delightful Sour Cherry Muffins recipe that takes you on a nostalgic journey while treating your taste buds to a burst of flavor! Whether you whip them up for brunch, share them at gatherings, or simply enjoy them yourself on a quiet afternoon, these muffins are a warm hug in every bite. Remember, cooking is an adventure that’s best enjoyed with friends and family, so don’t hesitate to mix things up, share your creations, and spread the love!
So grab your apron and get baking! I can’t wait to hear how your sour cherry muffins turn out. Happy cooking, friends! Until next time, let’s keep sprinkling a little joy into our days through delicious food!
Print
Delightful Sour Cherry Muffins
- Total Time: 35 minutes
- Yield: 12 muffins 1x
- Diet: Vegetarian
Description
These muffins are a fusion of tart cherries and a moist, sweet batter that’s perfect for any time of day.
Ingredients
- 3/4 cup reduced fat buttermilk
- 1/4 cup water or cherry juice
- 2/3 cup canola oil
- 1 large egg
- 1 lemon (zested, about 1 heaping tablespoon)
- 2 cups all-purpose flour
- 1 cup sugar
- 1 tsp baking powder
- 2 cups sour cherries (fresh or frozen)
- 2 Tbs sanding sugar (for topping, optional)
Instructions
- Preheat your oven to 375°F (190°C) and prepare a muffin tin.
- Mix together the reduced-fat buttermilk, cherry juice (or water), canola oil, and egg in a large mixing bowl.
- Add the lemon zest and gently fold it into the mixture.
- Combine the flour, sugar, and baking powder in another bowl.
- Gradually add the dry mixture to the wet ingredients, folding gently.
- Add the sour cherries, reserving a few for topping if desired.
- Fill the muffin tin cups about 2/3 full with batter.
- Sprinkle sanding sugar over the tops of each muffin if using.
- Bake for about 18-20 minutes until golden brown.
- Cool in the pan for about 10 minutes before transferring to a wire rack.
Notes
These muffins can be made with gluten-free flour and stored in an airtight container at room temperature for up to 3 days.
- Prep Time: 15 minutes
- Cook Time: 20 minutes
- Category: Breakfast
- Method: Baking
- Cuisine: American
Nutrition
- Serving Size: 1 muffin
- Calories: 180
- Sugar: 9g
- Sodium: 150mg
- Fat: 7g
- Saturated Fat: 0.5g
- Unsaturated Fat: 6g
- Trans Fat: 0g
- Carbohydrates: 28g
- Fiber: 1g
- Protein: 3g
- Cholesterol: 30mg
Keywords: muffins, cherries, baking, breakfast, sweet treats
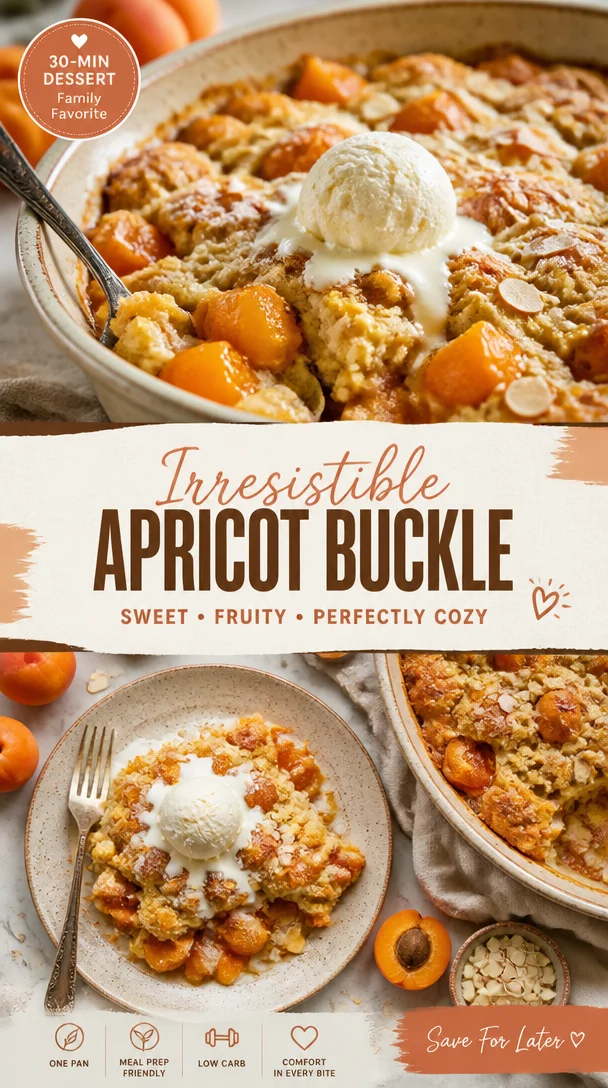
Apricot Buckle
Hey there, foodie friends! 🌟 Today, we’re diving into the sweet, sun-kissed world of apricots with a delightful dish that’s bound to become a superstar in your kitchen: Apricot Buckle! This cozy, comforting dessert is like a warm hug after a long day, and I can’t wait to share my love for it with you.
Now, if you’re wondering what a "buckle" is, it’s actually a type of fruit dessert that features a delicious cake base topped with fresh fruit— in this case, juicy apricots. As it bakes, the cake puffs around the fruit, creating a lovely buckled effect. With every bite, you’ll be treated to a perfect harmony of tender cake and sweet-tart apricot goodness.
Why do I love this dessert so much? It takes me right back to my childhood summers spent in my grandmother’s kitchen. She had an apricot tree in her backyard, and let me tell you, those fruits were little jewels of summer delight! We’d pick them fresh, their sweet fragrance mingling with the warm air, and turn them into something wonderful. Apricot Buckle was one of her signature recipes. The smell of it baking would draw everyone to the kitchen like moths to a flame.
So, if you’re ready to bring a bit of that nostalgia and a whole lot of deliciousness into your home, gather your apricots and let’s get baking! This dish is perfect for gatherings, cozy nights in, or just because you deserve a treat.
Personal Story
Let me paint a picture for you. It’s a sunny afternoon, and I’m around ten years old, running barefoot through my grandmother’s backyard. The grass prickles under my feet as I dash toward the apricot tree, its branches heavy with ripe, golden fruits. My grandma calls to me, “Beau! Come help me pick some apricots!” Those words spark pure joy within me!
Armed with a basket, we harvest bags of these plump beauties, laughter ringing through the air. Once we have our haul, we head into her warm kitchen, where the sunny light streams through the window, illuminating flour clouds and the tantalizing smell of vanilla.
Grandma would retreat into her calming rhythm, her hands dancing through the motions as she whipped up the batter for her famous Apricot Buckle. As the cake baked, we’d sneak bites of the raw apricot and giggle about the sticky sweetness. Nothing compared to the first slice pulled from the oven, still warm, with buttery crumbs and chunky apricot pieces. It’s a memory I cherish deeply, one that belongs to a simpler time when love was the main ingredient in every dish.
Ingredients
Here’s what you’ll need to capture that magical Apricot Buckle experience:
-
Fresh Apricots (about 2 cups): The star of the show! Juicy and sweet-tart, they’ll provide a burst of flavor. If fresh apricots aren’t available, try using canned in syrup—just drain them well.
-
All-Purpose Flour (2 cups): A good base for any cake, giving it structure. You can substitute with a gluten-free blend if you’re avoiding gluten.
-
Granulated Sugar (1 cup): This adds sweetness. For a healthier twist, feel free to use coconut sugar or a sugar substitute like monk fruit.
-
Unsalted Butter (1/2 cup or 1 stick): For tenderness and flavor. If you’re after a dairy-free version, coconut oil or a vegan butter can do the trick.
-
Baking Powder (2 teaspoons): The leavening agent to help your buckle rise and give it a light texture.
-
Salt (1/2 teaspoon): Just a pinch to balance the sweetness! Consider using sea salt for a more nuanced flavor.
-
Eggs (2 large): These bind the ingredients and add moisture. To make this vegan, you can use flax eggs (1 tablespoon ground flaxseed mixed with 2.5 tablespoons water per egg).
-
Milk (1/2 cup): For moisture and richness. You can opt for any milk—dairy, almond, oat… you name it!
-
Vanilla Extract (1 teaspoon): The secret ingredient that amplifies the flavors! A splash of almond extract can be a delightful alternative as well.
-
Optional Topping: Cinnamon Sugar: A mix of sugar and cinnamon for a delightful topping—isn’t that a cozy touch?
Easy peasy, right? Just a few staple ingredients, and you’ll be halfway to dessert heaven!
Step-by-Step Instructions
Alright, let’s get baking! Here’s how to create the most scrumptious Apricot Buckle, without a hitch:
-
Preheat Your Oven: Start by preheating your oven to 375°F (190°C). A hot oven is essential to getting that beautiful, golden-brown crust.
-
Prep Your Pan: Grease a 9×9-inch baking dish or an 8×8-inch square pan with butter or cooking spray. This will ensure that your buckle slides out easily when it’s time to serve.
-
Prepare the Apricots: Wash the apricots thoroughly. Slice them in half and remove the pits. If you’re feeling adventurous, cut each half into quarters for more bite-sized pieces and set them aside.
-
Make the Cake Batter:
- In a large mixing bowl, cream together the softened butter and sugar until light and fluffy. This should take about 3–5 minutes. (Chef tip: The fluffier the butter-sugar mixture, the lighter your cake will be!)
- Add the eggs one at a time, mixing well after each addition. Then, stir in the vanilla extract.
-
Combine Dry Ingredients: In another bowl, whisk together the flour, baking powder, and salt. Gradually add this dry mixture to the wet ingredients, alternating with the milk. Mix until just combined. (Pro tip: Avoid over-mixing to keep your cake tender!)
-
Fold in Apricots: Gently fold in half of the apricot pieces into the batter. This gives you that lovely fruity surprise in every bite!
-
Pour and Level: Pour the batter into your prepared baking dish and spread it evenly. If you’re feeling fancy, arrange the remaining apricot pieces on top for an inviting look.
-
Sprinkle the Topping: Add a generous sprinkle of cinnamon sugar over the top. This is optional, but it gives an extra layer of warmth and sweetness.
-
Bake!: Pop the buckle into the oven and let it bake for about 35–40 minutes, or until a toothpick inserted in the center comes out clean. You’re looking for a golden-brown top that’s slightly firm to the touch. (Kitchen hack: To prevent over-browning, place a piece of aluminum foil over the top if it gets too dark before it’s fully baked.)
-
Cool and Serve: Once it’s done, take the buckle out of the oven and allow it to cool in the pan for about 10 minutes. This will make it easier to slice. Scoop it out into generous squares and serve it warm or at room temperature.
-
Enjoy!: Top it with a dollop of whipped cream, a scoop of vanilla ice cream, or simply enjoy it as is. You can get creative here!
Serving Suggestions
Let’s talk about plating! Apricot Buckle is delightful when served warm, but you can add a personal touch. Here are a few serving ideas:
-
Classic Style: Serve your buckle squares on a charming plate, topped with a dollop of freshly whipped cream and a sprinkle of cinnamon for that extra pizazz.
-
À la Mode: For those who want to indulge, add a scoop of vanilla ice cream on the side—this contrast of warm cake and cold ice cream is heavenly!
-
Breakfast Twist: Why not have it for breakfast? Serve it up with a side of Greek yogurt drizzled with honey and berries for a nutritious start to your day.
-
Garnish with Fresh Herbs: A mint or basil leaf placed on top can freshen up the presentation. It might sound fancy, but it’s super easy!
Whatever your style, the key is to enjoy the process and dig in with family and friends!
Recipe Variations
Now, let’s get a little creative! Here are some fun twists to put your spin on Apricot Buckle:
-
Berry Good: Mix in some blueberries or raspberries along with the apricots. The tartness of berries complements the sweet apricots perfectly!
-
Nutty Delight: Add chopped walnuts or almonds to the batter. They give the buckle a lovely crunch that’ll keep you coming back for more.
-
Spiced Up: Try adding a touch of cardamom or ginger to the batter for an aromatic twist. It brings warmth that’s just right for colder seasons.
-
Chocolate Chunk: Who doesn’t love chocolate? Mix in some dark chocolate chunks for an indulgent treat. The melting chocolate with the juicy apricots is nothing short of magic!
-
Vegan Version: As mentioned earlier, substituting ingredients like flax eggs, almond milk, and vegan butter results in a vegan-friendly buckle that’s just as delicious!
Explore these variations and make the recipe your own—you can’t go wrong!
Chef’s Notes
This recipe holds a special place in my heart because it’s evolved over the years. There were times I experimented with different fruits, adding strawberries, peaches, and even plums. Each time, it was a delightful surprise!
I remember one summer, I had more apricots than I knew what to do with. My friends and I had a baking party, and we practically turned my kitchen into a fruit buckle factory! We laughed, danced, and made a complete mess of flour and batter. Those are moments I treasure, and they remind me that cooking is more than just about food—it’s about making memories.
So, don’t stress if things get a little messy in your kitchen—it’s part of the fun!
FAQs and Troubleshooting
-
Why did my buckle sink in the middle?
- That could be due to overmixing or underbaking. Make sure to mix just until incorporated and give it enough time in the oven for structure.
-
Can I freeze the buckle?
- Absolutely! Cool it completely, slice it, and layer it with parchment paper in an airtight container before freezing. It’ll last for about 2-3 months.
-
What if I don’t have apricots?
- No problem! This recipe is versatile—use any fruit you love or have on hand. Just make sure to adjust the sugar based on the fruit’s sweetness.
-
Can I make this gluten-free?
- Yes, use a 1:1 gluten-free flour blend, and you’re all set! Just check the other ingredients for gluten-friendly options.
Nutritional Info
I believe in enjoying delicious food without the guilt, but I also know many of you are mindful of nutritional details. Here’s a rough estimate for a single serving (based on the full recipe yielding about 9 squares):
- Calories: 240
- Total Fat: 10g
- Saturated Fat: 5g
- Cholesterol: 57mg
- Sodium: 150mg
- Total Carbohydrates: 36g
- Dietary Fiber: 1g
- Sugars: 12g
- Protein: 3g
Keep in mind, these values may vary based on specific ingredients, so adjust as you please!
Final Thoughts
And there you have it, folks! Your very own Apricot Buckle, packed with flavors and warm memories. Isn’t it incredible how food transcends generations and connects us to cherished moments?
As you whip this up in your kitchen, I hope you find joy in each step, whether you’re baking alone or sharing the experience with loved ones. Remember, it’s all about savoring those delightful bites and creating experiences that are just as sweet as the dessert itself.
So, roll up those sleeves, embrace the process, and let’s celebrate the joy of cooking together. Happy baking, and may your kitchen be filled with warmth, laughter, and Apricot Buckle goodness! 🍑💛
Print
Apricot Buckle
- Total Time: 55 minutes
- Yield: 9 servings
- Diet: Vegetarian
Description
A cozy dessert featuring a tender cake base topped with juicy apricots, perfect for any occasion.
Ingredients
- Fresh Apricots (about 2 cups)
- All-Purpose Flour (2 cups)
- Granulated Sugar (1 cup)
- Unsalted Butter (1/2 cup or 1 stick)
- Baking Powder (2 teaspoons)
- Salt (1/2 teaspoon)
- Eggs (2 large)
- Milk (1/2 cup)
- Vanilla Extract (1 teaspoon)
- Optional Topping: Cinnamon Sugar
Instructions
- Preheat your oven to 375°F (190°C).
- Grease a 9×9-inch baking dish or an 8×8-inch square pan with butter or cooking spray.
- Wash the apricots and slice them in half to remove the pits.
- Cream together the softened butter and sugar until light and fluffy.
- Add the eggs one at a time, mixing well after each addition, then stir in the vanilla extract.
- Whisk together the flour, baking powder, and salt in a separate bowl.
- Combine the dry mixture with the wet ingredients, alternating with the milk.
- Fold in half of the apricot pieces into the batter.
- Pour the batter into the prepared baking dish and level it out.
- Sprinkle cinnamon sugar over the top if desired.
- Bake for about 35–40 minutes, or until a toothpick comes out clean.
- Cool the buckle for about 10 minutes, then serve warm.
Notes
Pair with whipped cream or ice cream for a delightful treat.
- Prep Time: 15 minutes
- Cook Time: 40 minutes
- Category: Dessert
- Method: Baking
- Cuisine: American
Nutrition
- Serving Size: 1 square
- Calories: 240
- Sugar: 12g
- Sodium: 150mg
- Fat: 10g
- Saturated Fat: 5g
- Unsaturated Fat: 3g
- Trans Fat: 0g
- Carbohydrates: 36g
- Fiber: 1g
- Protein: 3g
- Cholesterol: 57mg
Keywords: apricot buckle, dessert, baking, sweet treats, fruit dessert