Crock Pot Crack Potato Soup
The Creamy Comfort of Crock Pot Crack Potato Soup
Hey there, food lovers! Beau Collier here, and today we’re diving into the wonderful world of comfort food with a delightful dish that feels like a warm hug on a chilly evening: Crock Pot Crack Potato Soup. I promise, this recipe is easy, tasty, and sure to become a staple in your home. So grab your favorite mug and let’s dig into this soul-satisfying bowl of goodness!
Introduction
Imagine coming home after a long day—maybe you’ve dealt with an endless stream of emails, the chaos of the morning rush, and those pesky errands that never seem to end. As you walk through your door, the comforting aroma of a rich, creamy soup greets you. That, my friends, is the magic of slow cooking!
Crock Pot Crack Potato Soup is one of those recipes that feels like it was made for days just like this. It combines the wholesome goodness of diced potatoes with the indulgent flavors of cheddar cheese and crispy bacon, finished off with a smooth, silky creaminess that just wraps around your insides like a cozy blanket. And let’s be real—it’s the perfect antidote for a hectic day!
This soup is not just quick to throw together; it’s comforting enough to make you feel at home, no matter where you are. Plus, utilizing a crockpot means you can set it and forget it until dinner time. You’ll barely lift a finger (unless you want to add some extra cheese, which I definitely recommend!).
So, whether you’re hosting a cozy gathering, enjoying a casual night in, or just want to impress your family with minimal effort, this Crock Pot Crack Potato Soup has got your back. Let’s get cooking!
Personal Story
Growing up, my family had a tradition of Sunday dinners that revolved around comfort food. My mom would whip up all kinds of hearty dishes, but my favorite was her potato soup. It was thick, creamy, and filled with so much love that you could practically feel it. Every spoonful felt nostalgic, wrapping you in that warm hug I talked about earlier.
One Sunday, I decided to surprise her by taking the reins in the kitchen. I mustered up all my courage, figuring that if I could make a simple potato soup, it would undoubtedly impress everyone. However, in my excitement, I may have gone a little overboard with the seasonings! The soup turned out to be a salty mess (sorry, Mom!).
But that mishap taught me a valuable lesson about flavor balance, and I’ve cherished that memory ever since. That’s why I love this Crock Pot Crack Potato Soup recipe: it’s simple, forgiving, and, best of all, you can add or tweak flavors to your heart’s content!
Ingredients
Here’s what you’ll need to make this magical comfort soup come to life:
-
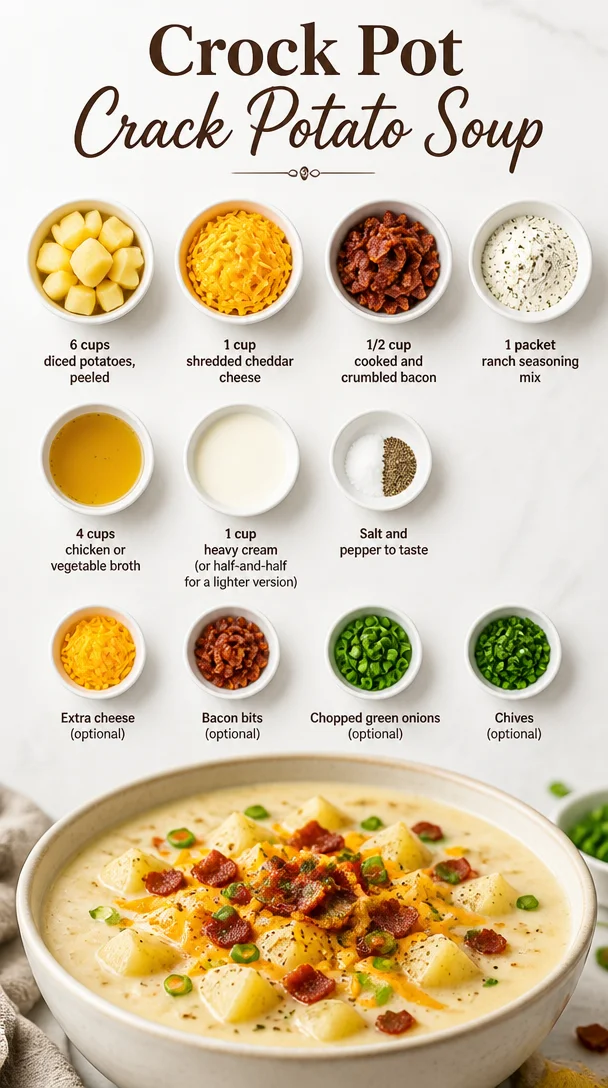
6 cups of diced potatoes, peeled: The star of the show! I recommend using Russet or Yukon Gold potatoes for their creamy texture. If you’re in a pinch, frozen diced potatoes can work too!
-
1 cup of shredded cheddar cheese: This adds that ooey-gooey cheesiness we all crave. Swap it for Monterey Jack or a dairy-free cheese if you’re looking for alternatives.
-
1/2 cup of cooked and crumbled bacon: The crispy bits of bacon elevate the flavor and add a wonderful crunch. Looking to keep it vegetarian? Go for smoked paprika to get that savory edge instead!
-
1 packet of ranch seasoning mix: This brings a zesty kick to the soup. You can easily make your own ranch seasoning at home with a mix of herbs and spices if you prefer a DIY approach.
-
4 cups of chicken or vegetable broth: This is your soup’s foundation. Feel free to use store-bought or homemade broth; just be sure it’s low-sodium to keep the flavors balanced!
-
1 cup of heavy cream (or half-and-half for a lighter version): Cream makes things dreamy! But if you’re looking for a lighter option, half-and-half or even coconut milk can replace it.
-
Salt and pepper to taste: Always season to your preference as potatoes love a bit of salt!
-
Optional garnishes: Extra cheese, bacon bits, chopped green onions, or chives. These toppings add a personal touch and a pop of color to your bowl!
Step-by-Step Instructions
Alright, let’s get down to business! Here’s how to make your comforting Crock Pot Crack Potato Soup.
-
Prep the Potatoes: Start by peeling and dicing your potatoes into small cubes—about 1-inch pieces work best. This helps them cook evenly. You can totally get those little hands in the kitchen to help with this step!
-
Add Ingredients to the Crock Pot: Throw those diced potatoes into the crock pot. Next, sprinkle in the ranch seasoning mix, and pour in the chicken or vegetable broth. Trust me, the broth will bloom with flavor as it cooks and melds with the potatoes.
-
In with the Cream: Add the heavy cream (or half-and-half) directly into the pot—as it cooks, it will help create that creamy texture we all love. Give everything a gentle stir to mix it up!
-
Cook Low and Slow: Cover your crock pot and set it to low for 6-8 hours, or on high for 3-4 hours. Make sure to resist the urge to peek too often—keeping the lid on allows the flavors to develop beautifully.
-
Finish with Cheese and Bacon: An hour before serving, stir in the shredded cheese and cooked bacon. This will give your soup that luxurious taste and texture. It’s like a surprise party for your taste buds!
-
Season and Serve: About 30 minutes prior to serving, taste your soup and add salt and pepper as needed. Just remember, you can always add more!
Serving Suggestions
Serving this soup is a treat in itself. Ladle the steaming soup into bowls and don’t skimp on those garnishes! Sprinkle extra shredded cheddar cheese on top to melt into the warm soup, followed by crispy bacon bits (if you have any left)! A sprinkle of green onions or chives adds a lovely pop of color and freshness.
If you’re feeling extra fancy, serve the soup with crusty bread or homemade garlic knots for dipping. Trust me, it takes this comforting dish to a whole new level.
Recipe Variations
The beauty of this soup is its versatility! Here are some fun variations to keep things exciting:
-
Spicy Kick: If you like a little heat, add diced jalapeños or a few dashes of hot sauce to the mix. Spice lovers will appreciate this flavor enhancer!
-
Loaded Baked Potato Style: Top your soup with all the fixins of a loaded baked potato: sour cream, additional cheese, crispy bacon, and even some sautéed broccoli for a veggie boost.
-
Vegan Version: Switch out the cream for coconut milk or cashew cream and use your favorite plant-based bacon. Just ensure your ranch seasoning is vegan-friendly, and you’re golden!
-
Smoky Flavor: For an enticing twist, toss in smoked Gouda cheese instead of cheddar. This will add depth and a unique smoky profile to your dish.
-
Herbaceous Touch: Fresh herbs like thyme or rosemary can be added for a fragrant twist. Toss these in during the last hour of cooking for an aromatic flavor burst.
Chef’s Notes
As with any recipe, the beauty lies in the details! Over the years, I’ve made this soup countless times, and it just keeps getting better (and easier!). There’s something incredibly gratifying about taking a simple dish and turning it into a comforting experience.
I remember one chilly evening, I decided to experiment by adding some leftover veggies—think carrots and celery—into the mix. The result was a heartier soup that turned out to be a hit! So, don’t hesitate to modify this recipe as per your fridge’s inventory.
FAQs and Troubleshooting
Q: My soup seems too thick. What should I do?
If your soup is thicker than you’d like, simply add an extra cup of broth or cream and stir until you reach your desired consistency.
Q: Can I freeze leftover soup?
Absolutely! Let the soup cool completely and then transfer it to an airtight container. It can be frozen for up to three months. Just remember to thaw and reheat gently to maintain creamy texture!
Q: What can I use if I don’t have a crock pot?
No worries! You can easily make this soup in a large pot on the stove. Just simmer until the potatoes are tender, then proceed with the rest of the recipe.
Q: How can I make this more nutritious?
Consider adding in more veggies like spinach, broccoli, or cauliflower for added fiber and nutrients. You’ll hardly notice they’re in there with the creamy goodness!
Nutritional Info
Now, you might be wondering about the nutrition—because comfort food can often come with that guilty feeling. Here’s a quick rundown of what to expect:
- Calories: Approximately 300-400 per serving (varies based on toppings and portion size).
- Protein: Thanks to the cheese and bacon, you can get about 10-15 grams of protein in each hearty bowl.
- Fat: With the cream and bacon, fat content could range around 20 grams per serving. You can make it lighter by choosing half-and-half or skipping the bacon.
- Carbohydrates: The potatoes will generally contribute around 40-50 grams of carbs, which will definitely fuel your day.
Remember, indulgence is part of the culinary journey, so enjoy every spoonful!
Final Thoughts
And there you have it, friends! Your guide to creating an utterly satisfying Crock Pot Crack Potato Soup that will win over hearts and warm souls. Cooking doesn’t have to be complicated or stressful; with recipes like this, you’ll be able to whip up comfort food goodness in no time at all.
So, the next time life gets busy, and you find yourself longing for something comforting, remember this soup will always have your back. Enjoy it, share it, and feel the love in every delicious bite!
Now, let’s pull out that crock pot and unleash the magic. Happy cooking, and don’t forget to share your delicious creations with all of us at Feastical! 🍲💖
Print
Crock Pot Crack Potato Soup
- Total Time: 255 minutes
- Yield: 6 servings 1x
- Diet: Omnivore
Description
A comforting and creamy potato soup made in a slow cooker, featuring potatoes, cheddar cheese, and crispy bacon.
Ingredients
- 6 cups of diced potatoes, peeled
- 1 cup of shredded cheddar cheese
- 1/2 cup of cooked and crumbled bacon
- 1 packet of ranch seasoning mix
- 4 cups of chicken or vegetable broth
- 1 cup of heavy cream (or half-and-half)
- Salt and pepper to taste
- Optional garnishes: Extra cheese, bacon bits, chopped green onions, or chives
Instructions
- Prep the Potatoes: Peel and dice your potatoes into small cubes.
- Add Ingredients to the Crock Pot: Place diced potatoes in the crockpot, sprinkle in ranch seasoning, and pour in broth.
- In with the Cream: Add heavy cream and stir gently.
- Cook Low and Slow: Cover and set the crock pot to low for 6-8 hours or high for 3-4 hours.
- Finish with Cheese and Bacon: Stir in cheese and bacon an hour before serving.
- Season and Serve: Adjust seasoning and serve hot with garnishes.
Notes
Feel free to customize with additional vegetables or spices according to your preference.
- Prep Time: 15 minutes
- Cook Time: 240 minutes
- Category: Soup
- Method: Slow Cooker
- Cuisine: American
Nutrition
- Serving Size: 1 cup
- Calories: 350
- Sugar: 5g
- Sodium: 550mg
- Fat: 24g
- Saturated Fat: 12g
- Unsaturated Fat: 8g
- Trans Fat: 0g
- Carbohydrates: 45g
- Fiber: 4g
- Protein: 12g
- Cholesterol: 50mg
Keywords: crock pot, soup, potato soup, comfort food, creamy soup

Restaurant-Style Olive Garden Chicken Gnocchi Soup at Home
Homemade Olive Garden Chicken Gnocchi Soup
Hey there, fellow food lovers! Beau Collier here, and today I’m so excited to dive into a recipe that is the epitome of comfort food: Olive Garden Chicken Gnocchi Soup. If you’re like me, there are few things better than a cozy bowl of soup on a chilly day—or any day, really! It warms the soul and brings back cherished memories of meals shared with family and friends.
This dish is creamy, rich, and filled with hearty ingredients that make it a standout. Plus, it’s inspired by one of the most beloved soups on the Olive Garden menu! Today, I’ll walk you step-by-step through my version of this classic recipe so that you can recreate that warm Olive Garden feeling right in your own kitchen.
Now, let’s kick things off with a little story. Growing up, soup was an integral part of our family dinners. My mom always believed in the healing power of homemade broth and the comforting embrace of a delicious soup. Whether we were fighting off colds or just savoring the warmth of time together, soup was always on the menu. The Chicken Gnocchi Soup became a family favorite, especially on cold nights when the snow would blanket our neighborhood.
Through the years, as I ventured into my own cooking journey, I made it my mission to perfect that recipe and add my own twist. Now, I’m thrilled to share it with you so you can create your own memories around the dinner table. So, grab your apron and let’s jump into this deliciously warm bowl of goodness!
Personal Story
One of my fondest memories associated with this soup comes from a cold winter evening a few years back. I had invited a few friends over to celebrate a particularly hard week. We gathered around the dining table, and I decided to cook up a big pot of Chicken Gnocchi Soup. As the aromatics filled the air—onions sautéing, garlic sizzling, and chicken simmering—we all began to reminisce about our own culinary adventures. The laughter and storytelling served as the perfect backdrop to the warmth of the soup.
When I ladled the first servings into our bowls, the enthusiastic “oohs” and “aahs” from my friends were music to my ears. Each spoonful was met with smiles and requests for seconds. That night turned into an impromptu tradition—the "Gnocchi Soup Sundays" quickly became a regular event. We’d cook together, share recipes, and savor the moment. It was a reminder of how food has this magical ability to bring people closer together—one delicious bite at a time.
Ingredients
Let’s get to the star of the show! Here’s what you’ll need to whip up this delightful Chicken Gnocchi Soup:
-
4 tablespoons Butter
The foundation of flavor! Butter adds richness and a lovely creaminess to your soup. You can use unsalted butter to control the saltiness, or substitute with margarine for a dairy-free version. -
1 tablespoon Extra Virgin Olive Oil
This helps sauté the veggies while bringing in a hint of fruitiness. Feel free to use avocado oil if you prefer higher smoke points! -
1 cup Finely Diced Onion
Sweet and savory, onions provide a flavorful base. If you’re not a fan of onions, you can swap for shallots. -
1/2 cup Finely Diced Celery
Celery adds a nice crunch and depth of flavor. If you’d like to skip it, you could use more carrots! -
2 Garlic Cloves, Minced
Garlic is what truly elevates the dish. Fresh is best, but pre-minced garlic works in a pinch—just adjust the quantity. -
1/4 cup All-Purpose Flour
This is our thickening agent for a creamy, luscious texture. For gluten-free goodness, cornstarch or almond flour can be effective substitutes. -
1 quart Half-and-Half
This gives the soup its creamy body. You can swap for heavy cream if you want an ultra-rich experience or use a plant-based alternative for a lighter version. -
28 ounces Chicken Broth
A must for depth of flavor, homemade broth is always the best! You can use low-sodium broth to control the salt levels. -
1/2 teaspoon Dried Thyme
Thyme adds an earthy flavor. Fresh thyme is a splendid alternative and adds a brighter taste! -
1/2 teaspoon Dried Parsley Flakes
For a hint of herbal freshness, pairing well with chicken. You can skip this if you’re fresh-out, as the soup will still be tasty! -
1/4 teaspoon Ground Nutmeg (optional)
This is a secret weapon that enhances the whole flavor profile with warmth. Just a pinch does the trick! -
1 cup Carrots (Finely Shredded)
Carrots add sweetness and color. You can substitute with parsnips if you’re feeling adventurous! -
1 cup Spinach Leaves (Coarsely Chopped)
For a burst of green goodness! Feel free to use kale or swiss chard instead for a heartier bite. -
1 cup Chicken Breast (Cooked and Diced)
This is our protein! Use grilled chicken, rotisserie, or even leftover turkey for this recipe. -
16 ounces Package Ready-to-Use Gnocchi
These little pillows of joy are a must! Look for gluten-free options or homemade if you’re feeling crafty.
Step-by-Step Instructions
Alright, let’s get cooking! Here’s how to create this delicious bowl of Chicken Gnocchi Soup.
-
Sauté the Vegetables
Start by melting your butter and olive oil in a large pot over medium heat. Add the diced onion and celery, and sauté for about 5 minutes until they become tender and fragrant. This is your flavor base, so don’t rush it! If you want to kick things up a notch, toss in a bay leaf while sautéeing for added depth. -
Add Garlic and Flour
Stir in the minced garlic and cook for about 30 seconds until it gets aromatic. Next, sprinkle the flour over the veggies and mix well to form a paste. This will thicken up the soup beautifully! Cook for another minute, stirring constantly to avoid burning the flour. -
Pour in the Liquids
Gradually whisk in the half-and-half and chicken broth. It’s important to go slowly to avoid lumps. The mixture will start to thicken as it heats. Keep stirring until it’s silky smooth—this is where the magic happens! -
Season It Up
Add the dried thyme, parsley, and nutmeg (if using) to the pot. Bring the soup to a gentle simmer and let it bubble away for around 10 minutes. This will give the flavors a chance to meld beautifully! -
Add the Veggies and Chicken
Toss in the shredded carrots and chopped spinach. Add in your cooked, diced chicken and gnocchi, stirring to combine. Cook for an additional 5-7 minutes or until the gnocchi float to the top—this means they’re ready to be devoured! -
Taste and Adjust
Before serving, give your soup a taste. This is your chance to adjust the seasoning; add salt and pepper to your liking. Remember, little tweaks can elevate the dish! -
Serve It Up
Ladle your magnificent soup into bowls. Top it off with a sprinkle of fresh parsley or a few shavings of parmesan cheese for that added touch!
Serving Suggestions
When it comes to serving this amazing Chicken Gnocchi Soup, presentation is key! Serve it piping hot in a rustic bowl. Add a sprinkle of fresh parsley on top for that vibrant green touch, and perhaps a few shavings of Parmesan if you like it rich and cheesy.
Pair it with a thick slice of crusty bread or crunchy garlic knots to soak up the creamy goodness. You could also serve a side salad with a bright vinaigrette to contrast the richness of the soup. It’s all about creating that perfect cozy dining experience!
Recipe Variations
Now, a little creativity never hurt anyone! Here are some fun variations to try with this Chicken Gnocchi Soup:
-
Spicy Kick
Add a pinch of red pepper flakes while sautéing the vegetables for a spicy twist. This can bring a whole new level of flavor! -
Mushroom Delight
Replace half of the chicken with sautéed mushrooms. This earthy flavor pairs beautifully with the creamy base. -
Herb Infusion
Swap the dried herbs for fresh ones! Use fresh thyme, rosemary, or basil for a brighter flavor profile. -
Vegetarian Version
Replace the chicken with chickpeas or lentils and use vegetable broth instead of chicken broth for a lovely vegetarian option. -
Creamy Tomato Variation
Add a can of diced tomatoes for a hint of acidity and a beautiful color contrast. Just adjust the seasoning accordingly!
Chef’s Notes
Every recipe has its journey, and this soup has surely been through some flavorful peaks and valleys in my kitchen. I remember the first time I made this—let’s just say, I may have accidentally grabbed the cayenne pepper instead of the dried thyme. Talk about a fiery fiasco! But hey, as every chef knows, the best way to learn is through trial and error!
Over the years, I’ve kept tweaking the recipe to balance flavors and textures just right. It’s developed into a dish that not only warms the body but also brings smiles around the dinner table.
FAQs and Troubleshooting
Here are a few common questions you might have as you embark on your cooking adventure:
-
What if my soup is too thick?
No worries! You can always thin it out with a bit more chicken broth or water. Just add a little at a time until it reaches your desired consistency. -
Can I freeze this soup?
Absolutely! Just make sure to cool it down completely before transferring it to an airtight container. It should stay good for up to three months. But keep in mind, the gnocchi may become softer when reheated. -
How do I ensure my gnocchi don’t get soggy?
If you’re worried about the gnocchi absorbing too much liquid, you can prepare them separately and add them just before serving. This way, they remain perfectly pillowy! -
Can I make this soup in advance?
You bet! Prep and cook the soup but add the gnocchi and spinach just before serving. Both ingredients are best served fresh!
Nutritional Info
For those keeping track, here’s a quick breakdown of what you can expect in a hearty serving of this soup (approximate values):
- Calories: 360
- Protein: 18g
- Carbohydrates: 42g
- Fats: 15g
- Fiber: 2g
Served in moderation, this dish can be a delicious part of a balanced meal!
Final Thoughts
And there you have it! A comforting bowl of Olive Garden-style Chicken Gnocchi Soup that’s easy to make and absolutely delightful. Cooking is all about sharing stories, experiences, and love—and I hope this recipe helps you create some beautiful memories around your table.
Remember, cooking is an adventure! Don’t hesitate to experiment, swap ingredients, and make this recipe your own. After all, food tastes best when it’s made with joy and shared with those you love!
So, until next time, keep exploring the world of flavor and keep that kitchen filled with warmth and laughter. Grab a bowl, dig in, and know that you’ve got this! Happy cooking!
Print
Homemade Olive Garden Chicken Gnocchi Soup
- Total Time: 45 minutes
- Yield: 4 servings 1x
- Diet: None
Description
A comforting bowl of creamy Chicken Gnocchi Soup inspired by Olive Garden, perfect for warming up on chilly days.
Ingredients
- 4 tablespoons Butter
- 1 tablespoon Extra Virgin Olive Oil
- 1 cup Finely Diced Onion
- 1/2 cup Finely Diced Celery
- 2 Garlic Cloves, Minced
- 1/4 cup All-Purpose Flour
- 1 quart Half-and-Half
- 28 ounces Chicken Broth
- 1/2 teaspoon Dried Thyme
- 1/2 teaspoon Dried Parsley Flakes
- 1/4 teaspoon Ground Nutmeg (optional)
- 1 cup Carrots (Finely Shredded)
- 1 cup Spinach Leaves (Coarsely Chopped)
- 1 cup Chicken Breast (Cooked and Diced)
- 16 ounces Package Ready-to-Use Gnocchi
Instructions
- Sauté the vegetables: Start by melting your butter and olive oil in a large pot over medium heat. Add the diced onion and celery, and sauté for about 5 minutes until they become tender and fragrant.
- Add garlic and flour: Stir in the minced garlic and cook for about 30 seconds until it gets aromatic. Next, sprinkle the flour over the veggies and mix well to form a paste.
- Pour in the liquids: Gradually whisk in the half-and-half and chicken broth, stirring until it’s silky smooth.
- Season it up: Add the dried thyme, parsley, and nutmeg (if using). Bring the soup to a gentle simmer for around 10 minutes.
- Add the veggies and chicken: Toss in the shredded carrots and chopped spinach along with the cooked, diced chicken and gnocchi. Cook for an additional 5-7 minutes or until the gnocchi float to the top.
- Taste and adjust: Before serving, taste the soup and adjust the seasoning with salt and pepper as needed.
- Serve it up: Ladle your soup into bowls and garnish with fresh parsley and parmesan if desired.
Notes
To add a spicy kick, consider adding red pepper flakes while sautéing the vegetables.
- Prep Time: 15 minutes
- Cook Time: 30 minutes
- Category: Main Course
- Method: Stovetop
- Cuisine: Italian
Nutrition
- Serving Size: 1 serving
- Calories: 360
- Sugar: 5g
- Sodium: 800mg
- Fat: 15g
- Saturated Fat: 8g
- Unsaturated Fat: 4g
- Trans Fat: 0g
- Carbohydrates: 42g
- Fiber: 2g
- Protein: 18g
- Cholesterol: 60mg
Keywords: Chicken Gnocchi, Soup, Comfort Food, Olive Garden, Easy Recipe

One-Pan Meatloaf with Cheesy Mashed Potatoes (30-Min)
Comforting Meatloaf with Mashed Potatoes and Cheese: A Heartwarming Feast
Hey there, fellow food lovers! I’m Beau Collier, and I believe that every great meal begins with a story. Today, we’re diving into an iconic dish that brings back fond memories for so many of us—meatloaf with mashed potatoes and cheese. When I think of meatloaf, I think of cozy family dinners, a warm kitchen filled with laughter, and the tantalizing aroma wafting through the air—it’s the epitome of comfort food, isn’t it?
There’s something so satisfying about meatloaf. It’s hearty, filling, and incredibly versatile. You can whip it up using whatever seasonal ingredients you have, and there’s a personal touch in every loaf that makes it special. Did you know that meatloaf has been a staple in many households since the Great Depression? It was a clever way to stretch ingredients and feed a crowd, and it has firmly cemented itself in the hearts of many as a beloved classic.
In this blog post, not only will I share my scrumptious recipe for meatloaf smothered in cheesy, buttery mashed potatoes, but I’ll also take you along on this delightful culinary journey filled with personal stories, cooking tips, and a sprinkle of nostalgic magic. So, take a seat, grab your apron, and let’s create something delicious that will have your family gathering around the table, smiles all around!
Personal Story
Growing up, Sunday dinners at my grandparents’ house were sacred. It was always a bite of comfort and tradition, and one dish that consistently made an appearance was Grandma’s famous meatloaf. Let me tell you, her secret involved using a touch of love, a dash of nostalgia, and sometimes, I’d like to think, a little bit of magic.
I remember the first time I helped her in the kitchen, my tiny hands mixing the meat and spices together, making a mess but also a masterpiece. The joy of molding that messy loaf felt like pure creativity, and when it slid into the oven, the transformation was almost mesmerizing. The buttery scent of meatloaf baking mingled with the earthy aroma of roasted potatoes created a symphony that echoed through the hallways of their home.
Grandma always topped her meatloaf with a generous layer of cheese—because let’s face it, cheese makes everything better! Those cheesy mashed potatoes became an essential side, eagerly piling high on our plates, reminding me of the love and warmth that only family meals can bring. With each bite, I felt history unfolding, and that’s exactly the flavor I want to bring to your kitchen today!
Ingredients
Now that we have our hearts warmed up with memories, let’s get cooking! Here’s what you’ll need for this classic meatloaf with mashed potatoes and cheese, plus some little tips to keep in mind.
For the Meatloaf Layer:
- 1 lb ground beef (85/15 preferred): This is the star of our dish! The 85/15 ratio gives you the perfect balance of flavor and juiciness. If you’re going leaner, consider adding a bit of olive oil to keep it moist.
- 1/2 cup plain breadcrumbs: They help bind everything together. You can also use crushed crackers or panko for a crunchier texture.
- 1/3 cup milk: This keeps the meatloaf moist and helps it hold together. Almond milk or any dairy-free version works well if you’re looking for alternatives.
- 1 egg: Acts as a binding agent. If you need a vegan substitute, try using flaxseed meal mixed with water (1 tablespoon flaxseed meal + 2.5 tablespoons water = 1 egg).
- 1/4 cup ketchup: An essential for flavor and moisture! Feel free to use BBQ sauce or even salsa for a zesty kick.
- 1 tsp garlic powder: A must for flavor. Fresh minced garlic works too—just adjust the quantity to your taste!
- 1 tsp onion powder: A nice depth of flavor. If you prefer freshness, sauté finely chopped onions before mixing them in.
- 1/2 tsp salt and 1/2 tsp black pepper: Basic seasonings to elevate your dish. Always taste before final seasoning adjustments!
For the Mashed Potato Layer:
- 3 cups mashed potatoes (prepared or leftover): Whip up fresh or use leftovers for a quick meal. Creamy, buttery goodness is what we’re aiming for!
- 1/4 cup sour cream: This adds a delightful tang and creaminess. Plain Greek yogurt is a great substitute if you’re looking for something healthier.
- 2 tbsp butter: Adds richness and flavor. You can swap it with olive oil for a lighter version.
- Salt & pepper, to taste: Adjust according to your preferences!
Topping:
- 1 1/2 cups shredded cheddar cheese: The melty layer that takes this comfort food to the next level! Feel free to mix it up with mozzarella or pepper jack for some excitement.
- Fresh parsley (optional, for garnish): A pop of color and freshness; it makes everything look fancy!
Step-by-Step Instructions
Alright! Let’s roll up those sleeves and get down to the good stuff. Follow these steps to create a meatloaf that would make Grandma proud!
Step 1: Preheat Your Oven
Before we dive into mixing, preheat your oven to 350°F (175°C). This ensures your meatloaf gets that perfect sizzle!
Step 2: Mix the Meatloaf Ingredients
In a large mixing bowl, combine the ground beef, breadcrumbs, milk, egg, ketchup, garlic powder, onion powder, salt, and pepper. Get your hands in there—this is where the magic happens. I love using my hands for this; it just feels more personal, doesn’t it?
Tip: If the mixture feels a bit too wet, just add a touch more breadcrumbs. Conversely, if it feels too dry, a splash of milk can help transform it. You want a mixture that holds together well but isn’t too dense.
Step 3: Shape the Loaf
Transfer your meaty mixture to a lined or greased loaf pan. Shape it gently—remember, the more you handle it, the denser the meatloaf will be. We’re looking for a fluffy texture here!
Step 4: Bake the Meatloaf
Place your shaped meatloaf in the oven and bake for about 45-50 minutes. You can check doneness by inserting a meat thermometer into the center; it should read 160°F (70°C) for safe consumption.
Chef Hint: If you want a beautiful caramelized glaze, brush additional ketchup on top during the last 10 minutes of baking. It adds flavor and a lovely shine!
Step 5: Prepare the Mashed Potatoes
While the meatloaf is doing its thing, it’s the perfect time to whip up our creamy mashed potatoes. If you’re starting with fresh potatoes, peel and boil them until tender, then mash with sour cream, butter, salt, and pepper until creamy and dreamy.
Step 6: Layer It Up!
Once your meatloaf is cooked, take it out of the oven and slice the top gently to create a small "bowl" for your mashed potatoes. Spoon those mashed potatoes right on top, smoothing them out.
Step 7: Cheese It Up
Lastly, sprinkle the shredded cheddar over the mashed potatoes. Pop the entire loaf back into the oven for about 15 minutes or until the cheese is bubbly and golden brown.
Step 8: Garnish and Serve
Once bubbly and enticing, you’ll want to let it rest for about 10 minutes before slicing. Garnish with a sprinkle of fresh parsley for that pop of color and freshness!
Serving Suggestions
This meatloaf with cheesy mashed potatoes can be the star of the show! You can serve it with simple steamed veggies like broccoli or green beans for a colorful plate. A sprinkle of herbs adds sophistication, while a side salad lends a refreshing crunch.
For an ultimate comfort meal, you can even serve it with gravy drizzled over the top. Trust me; that’s a flavor combo that will have your family raving!
A fun way to serve this dish is in individual ramekins—layer up mini portions for an adorable presentation at dinner parties.
Recipe Variations
Now, let’s explore a few creative twists you can put on this classic dish:
-
Savory Bacon Meatloaf: Mix cooked, crumbled bacon into the meat mixture for a smoky flavor profile.
-
Vegetarian Version: Swap out the ground beef for lentils or black beans, and keep the spices and herbs for that familiar meaty taste.
-
Spicy Twist: Add in diced jalapeños or a few dashes of hot sauce for a spicy kick!
-
BBQ Meatloaf: Replace the ketchup with tangy barbecue sauce for a sweet and smoky flavor.
-
Herbed Mash: Stir in fresh herbs like chives or dill into your mashed potatoes for a fresh twist.
Chef’s Notes
Before we wrap things up, can I just say how much I adore meatloaf? Over time, I’ve made countless variations, but there’s nothing quite like the classic. I once tried to get fancy and added some unexpected ingredients—think chopped olives and gourmet cheeses. Let’s just say, my family had strong opinions that night. Sometimes, simplicity really is key!
And don’t worry if it doesn’t come out perfect! Cooking is about experimentation—embracing flavor, and having fun in the kitchen means making a few culinary memories, sweet or savory.
FAQs and Troubleshooting
Q: Can I prepare the meatloaf ahead of time?
Absolutely! You can mix everything, shape it, and refrigerate it until you’re ready to bake. Just be sure to add a few extra minutes of cooking time if it’s coming straight from the fridge.
Q: Why did my meatloaf turn out dry?
Oh no! Dry meatloaf could be the result of overcooking or using lean meat without enough fat. Consider using a little olive oil when using leaner options to keep things juicy.
Q: How can I tell when the meatloaf is done?
Using a meat thermometer is the best way to ensure it’s safe to eat. Aim for an internal temperature of 160°F (70°C). If you don’t have one, cut into the center—juices should run clear, not pink.
Q: Can I freeze meatloaf?
Yes! It freezes beautifully. Just make sure it cools completely, then wrap it tight in plastic wrap and foil before popping it in the freezer.
Nutritional Info
When it comes to a comfort food like meatloaf with cheesy mashed potatoes, it’s a bit of a hearty dish! On average, a serving may contain:
- Calories: ~450-500
- Protein: ~35g (thanks to that tasty beef!)
- Carbohydrates: ~40g (mostly from the potatoes)
- Fat: ~20g
- Fiber: 2g
It’s important to savor this dish in moderation if you’re looking out for your daily intake, but it’s also packed with vitamins and minerals from fresh ingredients!
Final Thoughts
And there you have it! A recipe that not only fills your belly but also warms your heart. Meatloaf with cheesy mashed potatoes is more than just a meal; it’s a celebration of togetherness, nostalgia, and the joy of cooking. I encourage you to make it your own! Add a couple of your favorite spices, share the process, and perhaps even recreate some cozy memories along the way.
Food tastes better when shared, so invite your loved ones over, serve it hot, and watch as they gather around the table, laughter filling the air. Remember, it’s all about those moments spent together, and I’m so grateful to have shared this recipe with you. Until next time, happy cooking and enjoy the feast!
Print
Comforting Meatloaf with Mashed Potatoes and Cheese
- Total Time: 65 minutes
- Yield: 4 servings 1x
- Diet: Omnivore
Description
A heartwarming feast of meatloaf topped with cheesy mashed potatoes, perfect for family gatherings.
Ingredients
- 1 lb ground beef (85/15 preferred)
- 1/2 cup plain breadcrumbs
- 1/3 cup milk
- 1 egg
- 1/4 cup ketchup
- 1 tsp garlic powder
- 1 tsp onion powder
- 1/2 tsp salt
- 1/2 tsp black pepper
- 3 cups mashed potatoes (prepared or leftover)
- 1/4 cup sour cream
- 2 tbsp butter
- 1 1/2 cups shredded cheddar cheese
- Fresh parsley (optional, for garnish)
Instructions
- Preheat your oven to 350°F (175°C).
- Mix the ground beef, breadcrumbs, milk, egg, ketchup, garlic powder, onion powder, salt, and pepper in a large mixing bowl.
- Shape the mixture into a loaf and transfer it to a lined or greased loaf pan.
- Bake for 45-50 minutes or until the internal temperature reaches 160°F (70°C).
- Prepare mashed potatoes by mashing potatoes with sour cream, butter, salt, and pepper until creamy.
- Layer the mashed potatoes over the cooked meatloaf.
- Sprinkle shredded cheddar cheese on top of the mashed potatoes.
- Bake for an additional 15 minutes or until cheese is bubbly and golden brown.
- Garnish with fresh parsley if desired and let it rest for 10 minutes before slicing.
Notes
For a beautiful glaze, brush additional ketchup on top during the last 10 minutes of baking. This dish goes well with steamed veggies or a side salad.
- Prep Time: 15 minutes
- Cook Time: 50 minutes
- Category: Main Course
- Method: Baking
- Cuisine: American
Nutrition
- Serving Size: 1 serving
- Calories: 450
- Sugar: 5g
- Sodium: 600mg
- Fat: 20g
- Saturated Fat: 8g
- Unsaturated Fat: 8g
- Trans Fat: 0g
- Carbohydrates: 40g
- Fiber: 2g
- Protein: 35g
- Cholesterol: 90mg
Keywords: meatloaf, comfort food, mashed potatoes, family dinner

One-Pan Bacon Onion Tomato Pie: Weeknight Comfort Dinner
Discovering Comfort: Bacon Onion Tomato Pie
Hey there, fellow foodies! Let me tell you, there’s nothing quite like the aroma of bacon sizzling in the pan as it mingles with sweet, caramelized onions under the warm glow of your kitchen lights. If you’ve never had the joy of creating—or indulging in—a Bacon Onion Tomato Pie, you’re in for a treat today. This dish, a delightful mix of savory and slightly sweet, embodies everything I love about comfort food; it’s a warm hug in pie form!
Imagine this: You arrive home after a long day, and the delightful smell of bacon fills every corner of your house. You can’t help but feel a sense of joy wash over you. That’s what this Bacon Onion Tomato Pie is all about. It’s comforting, it’s satisfying, and it’s downright delicious. That’s why I started Feastical: to help you find those little pockets of happiness through food. So wash your hands, grab your favorite apron, and let’s dive into making this flavor-packed treasure!
A Slice of Nostalgia: My Kitchen Memory
Let me take you back to a sun-drenched afternoon in my grandmother’s kitchen. The door was propped open with a wooden block, and the scent of freshly baked pies floated through the air. One of my grandmother’s signature dishes was a savory pie similar to what we’re making today—a Bacon Onion Tomato Pie that had everyone coming back for seconds.
She had a knack for turning simple ingredients into something extraordinary! I remember her expertly tossing together leafy greens, juicy tomatoes, and crispy bacon, laughing while she said, “Good food is like good friends; it only gets better as you share it.” Those moments ignited a passion in me that’s blossomed into my love for cooking and feeding others. And while I wish I could replicate her magic exactly, I’ve added my own flair to her original recipe, bringing it back to life while creating new memories in my cozy kitchen.
Ingredients You’ll Need
Now, let’s gather our ingredients to kick off this delicious journey! Here’s what you’ll need for our Bacon Onion Tomato Pie:
-
1 refrigerated pie crust (9-inch)
Perfect for saving time! But feel free to make a homemade crust if you’re up for it. It adds a personal touch. -
6 strips bacon (cooked and crumbled)
The star of the show! Use thick-cut bacon for extra flavor. Can’t have bacon? Try using smoked tempeh instead for a plant-based alternative. -
1 large sweet onion (thinly sliced)
Sweet onions like Vidalia or Walla Walla work wonders here. They sweeten nicely when caramelized. Yellow onions are a solid substitute if you need to use what you have. -
3 medium ripe tomatoes (sliced, about 2 cups)
Juicy and fresh! Don’t skimp on quality here. Heirloom tomatoes really bring that garden-fresh taste, but any good ripe tomato will do. -
1 cup shredded cheddar cheese
Sharp cheddar adds a nice bite. You can mix it up with aged gouda or go for a spicy pepper jack for some heat! -
½ cup shredded mozzarella cheese
This gives that melty goodness! You can substitute with provolone or fontina for an extra layer of flavor. -
½ cup mayonnaise
Sounds odd, but it creates a creamy base that holds the pie together. Greek yogurt can make for a delicious and healthier swap. -
2 tablespoons chopped fresh basil (or 1 tsp dried)
Fresh is always best for flavor. Dried basil can work in a pinch, just be sure to adjust the quantity since it’s more concentrated. -
½ teaspoon salt
Always essential! Adjust to taste based on your other ingredients. -
¼ teaspoon black pepper
A touch of heat; feel free to add more if you like!
Step-By-Step Instructions
Alright, let’s roll up our sleeves and get cooking! Here’s how to whip up this Bacon Onion Tomato Pie:
-
Preheat your oven to 375°F (190°C).
This step is crucial! You want your pie crust to crisp up perfectly, and preheating helps achieve that beautiful golden color. -
Prepare the Pie Crust:
Unroll your refrigerated pie crust and lay it gently into a 9-inch pie pan. Press it into the sides and trim any excess hanging over. If you’re feeling fancy, you can crimp the edges for a beautiful finish. Pre-bake your crust for about 10 minutes until it’s just lightly golden. This ensures it won’t get soggy later on. -
Cook the Bacon:
In a skillet over medium heat, cook the bacon until crispy. Once it’s done, transfer it to a paper towel-lined plate to drain, keeping that savory goodness! Don’t forget to reserve some drippings in the pan for the next step—yum! -
Caramelize the Onions:
In the same skillet with leftover bacon fat (don’t you love using every bit?), add the thinly sliced onions. Sauté them on low heat, stirring frequently, for about 10-15 minutes until they are a beautiful golden brown. Patience pays off here; the longer you cook them, the sweeter they become! -
Layer the Goodness:
In a mixing bowl, combine the cooked bacon, caramelized onions, sliced tomatoes, both cheeses, mayonnaise, basil, salt, and pepper. Mix until everything is coated and well combined. You’re combining layers of flavor here! -
Fill the Pie Crust:
Pour the mixture into your pre-baked pie crust, spreading it evenly. Don’t be shy—let the ingredients pile up a bit! -
Bake the Pie:
Place your pie in the preheated oven and bake for 30-35 minutes or until it’s bubbly and golden brown on top. The aroma will fill your kitchen, and trust me, you’ll have to resist the urge to dive in right away! -
Let It Cool:
Once you pull that beauty out, let it rest for about 10 minutes before slicing. This will help it set up just right.
Serving Suggestions
Now that your Bacon Onion Tomato Pie is ready, let’s talk about how to present it! Slice it into wedges and serve warm, perhaps with a side salad for a complete meal. A simple arugula salad with a drizzle of balsamic would be fantastic to cut through the richness of the pie. Garnish each slice with some extra basil or a sprinkle of parmesan for an elegant touch. And, of course, if you’re feeling extra fabulous, serve it with a glass of chilled white wine. Cheers to that!
Recipe Variations
The beauty of this dish is its versatility! Here are a few creative twists and variations to inspire you:
-
Spicy Kick: Add some diced jalapeños or a pinch of red pepper flakes for a kick that’ll tantalize your taste buds.
-
Vegetarian Delight: Replace the bacon with mushrooms or zucchini for a delicious vegetarian option that still keeps the pie hearty.
-
Southern Style: Add a dash of hot sauce or BBQ sauce to the filling for a smoky, tangy twist.
-
Herbaceous Kick: Swap out the basil for fresh rosemary or thyme. These herbs will elevate the flavor profile significantly.
-
Dairy-Free: Use vegan mayo and dairy-free cheese alternatives for a completely dairy-free version that still packs a flavor punch!
Chef’s Notes
As I’ve perfected this recipe over the years, I’ve realized that it’s not just about the ingredients but the love and laughter that goes along with it. I recall one time when I had friends over, and I decided to throw this pie together last minute. We had a blast, with one friend getting a bit too eager with the spices! Let’s just say there was fire in our eyes—quite literally, but we ended up creating one of our most memorable evenings.
FAQs and Troubleshooting
Q1: Why did my pie crust shrink?
A: This can happen if the dough isn’t chilled enough. Make sure to refrigerate your crust before rolling it out. If it happens, no worries; just crimp the edges again after baking!
Q2: My pie is watery—what did I do wrong?
A: Tomatoes can release a lot of juices. To prevent this, you can salt your tomato slices and let them sit for about 30 minutes before building your pie. This draws out excess moisture.
Q3: Can I make this pie ahead of time?
A: Absolutely! You can prep the filling and assemble the pie without baking. Cover and refrigerate, then bake it fresh just before serving.
Q4: What should I do with leftovers?
A: This pie keeps well in the fridge for 3-4 days. Simply reheat in the microwave or oven until warmed through.
Nutritional Info
While indulgent, this Bacon Onion Tomato Pie doesn’t have to be an enemy to your health goals if enjoyed in moderation! Each slice (based on 8 servings) contains approximately:
- Calories: 350
- Protein: 12g
- Fat: 26g
- Carbohydrates: 25g
- Fiber: 2g
- Sugar: 3g
As always, you can adjust the ingredients to fit your nutritional needs better.
Final Thoughts
So there you have it, folks! A scrumptiously comforting Bacon Onion Tomato Pie ready to be enjoyed with family and friends. Cooking is not just about feeding our bodies; it’s about nourishing our souls. Whether it’s a cozy evening in with a loved one or a cheerful gathering with friends, this pie is bound to add joy and flavor to every occasion. Remember, food is as much about the experiences we create around it—so gather your favorite people, dig in, and make some memories!
Until next time, happy cooking! Keep those spatulas flying and your heart full!
Print
Bacon Onion Tomato Pie
- Total Time: 50 minutes
- Yield: 8 servings 1x
- Diet: Omnivore
Description
A delightful blend of savory bacon, caramelized onions, and fresh tomatoes, all baked in a crispy pie crust for a comforting meal.
Ingredients
- 1 refrigerated pie crust (9-inch)
- 6 strips bacon (cooked and crumbled)
- 1 large sweet onion (thinly sliced)
- 3 medium ripe tomatoes (sliced, about 2 cups)
- 1 cup shredded cheddar cheese
- ½ cup shredded mozzarella cheese
- ½ cup mayonnaise
- 2 tablespoons chopped fresh basil (or 1 tsp dried)
- ½ teaspoon salt
- ¼ teaspoon black pepper
Instructions
- Preheat your oven to 375°F (190°C).
- Prepare the Pie Crust: Unroll your refrigerated pie crust and lay it gently into a 9-inch pie pan. Pre-bake for about 10 minutes.
- Cook the Bacon: In a skillet over medium heat, cook the bacon until crispy. Reserve some drippings.
- Caramelize the Onions: Sauté thinly sliced onions in the same skillet with bacon fat for about 10-15 minutes.
- Layer the Goodness: In a bowl, combine bacon, onions, tomatoes, cheeses, mayonnaise, basil, salt, and pepper. Mix well.
- Fill the Pie Crust: Pour the mixture into your pre-baked pie crust, spreading it evenly.
- Bake the Pie: Place in the oven and bake for 30-35 minutes until bubbly and golden brown.
- Let It Cool: Allow to rest for about 10 minutes before slicing.
Notes
Serve warm with a side salad or garnish with fresh basil and parmesan.
- Prep Time: 15 minutes
- Cook Time: 35 minutes
- Category: Main Course
- Method: Baking
- Cuisine: American
Nutrition
- Serving Size: 1 slice
- Calories: 350
- Sugar: 3g
- Sodium: 600mg
- Fat: 26g
- Saturated Fat: 9g
- Unsaturated Fat: 15g
- Trans Fat: 0g
- Carbohydrates: 25g
- Fiber: 2g
- Protein: 12g
- Cholesterol: 30mg
Keywords: bacon pie, tomato pie, comfort food, savory pie, easy recipe

Min Apricot Ginger Pork Chops – Steakhouse Style
Easy Apricot Ginger Steakhouse Pork Chops in 30 Minutes!
Hey there, food lovers! Welcome back to the Feastical kitchen, where we’re all about sharing delicious recipes with a sprinkle of love and a dash of fun. Today, we’re whipping up a dish that’s not only a feast for the taste buds but also super simple to make—Easy Apricot Ginger Steakhouse Pork Chops! And guess what? You’re only 30 minutes away from a flavor-packed meal that might just become your new weeknight go-to.
If you’ve ever found yourself staring into the fridge wondering what to cook (and how on earth to make it exciting), you’re definitely in the right place. These pork chops are juicy, glazed with a sweet and tangy apricot ginger sauce, and will make you feel like a culinary rockstar in no time. Plus, they pair excellently with a fresh salad or some roasted veggies. So, roll up those sleeves and let’s get cooking!
A Bite of Nostalgia
Now, let’s take a little trip down memory lane. I remember the first time I had apricot-glazed anything. It was at this cozy little steakhouse that my family used to visit when I was a teenager. The aroma would hit my senses the moment we walked through the door, and I would eagerly flip through the menu, dreaming of all the new flavors I was about to dive into.
One night, I finally decided to venture beyond my usual burger and ordered their apricot ginger-glazed pork chops. My first bite was a revelation! The way the sweet apricot and zesty ginger danced together was pure magic. It was one of those moments that etched itself in my memory forever. When I started cooking for myself, I knew I had to recreate that experience in my own kitchen. And now, I’m sharing it with all of you so we can create our own delicious memories together!
Ingredients
Let’s gather our ingredients for these delightful pork chops. Here’s what you’ll need:
-
4 Hatfield® Premium Reserve Pork® Boneless Pork Chops
- A fantastic choice for juicy and tender meat. If you can’t find these, feel free to use any boneless pork chops you can find. Just ensure they’re around an inch thick for even cooking.
-
1 1/2 tbsp Extra Virgin Olive Oil
- This adds flavor and helps sear the pork chops beautifully. You could substitute it with avocado oil or canola oil if needed.
-
1/4 tsp Garlic Powder
- A pantry staple that gives depth to the dish. If you prefer fresh garlic, feel free to use one clove minced.
-
Black Pepper to Taste
- Freshly cracked black pepper enhances the overall flavor of the dish. No black pepper? Try using white pepper as an alternative!
-
Salt to Taste
- Just enough to enhance the flavors without overpowering them. Sea salt or kosher salt works beautifully!
-
1/2 cup Apricot Preserves
- This is the star of our show! These give the glaze its sweetness. Can’t find apricot? Peach preserves would work beautifully, too!
-
1 tbsp Fresh Minced Ginger
- Ginger adds a nice zing. You could substitute ground ginger if that’s all you have, though fresh is always best for that kick!
-
2 tbsp Lime Juice (or juice of one lime)
- This brightens the dish and adds acidity. Lemon juice could be used if lime isn’t on hand.
-
1/4 cup Water
- Just enough to create a lovely sauce. Want it thicker? Reduce the water a little!
-
1 Dash Cayenne Pepper (Optional)
- Adds a little heat! Feel free to omit or increase to taste if you like it spicy.
-
2 Dashes Black Pepper
- Because we can never have enough pepper!
-
3/4 tbsp Fresh Thyme Leaves (or leaves of one sprig)
- Thyme brings an earthy touch. Dried thyme could work, but use about half the measurement since dried herbs are more concentrated.
Step-by-Step Instructions
Now that we’ve got everything we need, let’s get down to business with our cooking steps. Follow along, and I promise you’ll have a winner of a dish on your hands in no time!
-
Prep the Pork Chops
- Start by patting the pork chops dry with a paper towel. This helps you get a nice sear! Season both sides generously with salt, black pepper, and garlic powder. Give them a little love—don’t be shy!
-
Sear the Pork Chops
- Place a large skillet over medium-high heat. Add the olive oil and let it heat up until it shimmers. Carefully place the pork chops in the pan. Sear them for about 4-5 minutes on each side until they’re golden brown and cooked through (internal temperature should reach at least 145°F). Don’t overcrowd the pan; you want them to sear nicely. If your skillet isn’t big enough, you can cook them in batches.
-
Make the Apricot Ginger Sauce
- Once the chops are cooked, remove them from the skillet and set them aside on a plate. In the same skillet (still over medium heat), add the apricot preserves, minced ginger, lime juice, and water. Mix everything together, scraping any lovely browned bits off the bottom of the pan—this is where the flavor lives!
-
Add Seasoning
- Sprinkle in the cayenne and thyme. Let the sauce simmer for about 2-3 minutes until it thickens slightly. Look at that gorgeous color! It’s a work of art.
-
Glaze the Pork Chops
- Return the pork chops to the skillet and coat them with the apricot ginger sauce. Let them bask in that sunshine for an additional minute, ensuring they’re heated through.
-
Serve
- Once everything is nicely glazed, remove from heat. You can either serve them right from the skillet or transfer them to a serving platter.
Serving Suggestions
Now that you have these beautiful, glazed pork chops ready, let’s talk presentation. To make the dish pop, consider serving the chops on a plate sprinkled with some additional fresh thyme. You can also add a side of sautéed green beans or mashed sweet potatoes for a lovely contrast of colors and flavors. If you want to get really fancy, serve the pork chops with a lime wedge on the side for a burst of freshness!
Recipe Variations
Let’s get creative, shall we? Here are a few fun twists you can try with this recipe:
-
Sweet and Spicy Apricot Sauce
- Add more cayenne or even some chopped jalapeños to your sauce for a fiery kick.
-
Peachy Keen
- Swap out the apricot preserves for peach preserves for a sweet summer twist.
-
Herbed Up
- Toss in other fresh herbs like cilantro or parsley instead of thyme for a refreshing change.
-
Gluten-Free Option
- This dish is naturally gluten-free, but just double-check your condiment labels, especially for any prepared ingredients.
-
Pork Chop Sandwich
- Give the leftover pork chops a second life by slicing them and tossing them in a fresh roll with some slaw for a great sandwich option.
Chef’s Notes
Over the years, I’ve played around with this recipe quite a bit. I once made it for my best friend’s birthday BBQ—she went gaga over it! It’s funny how food can create memories. I still remember everyone gathered around the table, sharing stories and laughing over these savory chops. Since then, I’ve adapted the recipe to include fresh herbs and different fruit glazes, but the core remains the same: simple, soulful cooking that brings people together.
FAQs and Troubleshooting
-
What if my pork chops are tough?
- Tough pork chops typically mean they were overcooked! Use a meat thermometer next time to ensure they’re cooked perfectly.
-
Can I make this ahead of time?
- You can prep the sauce and refrigerate it in advance. Just reheat it in a saucepan before glazing your cooked pork chops.
-
Could I use a different meat?
- Absolutely! Chicken breasts or thighs would also work well with this sauce.
-
What should I do if my sauce is too thick?
- Just whisk in a little more water until you reach your desired consistency. Easy peasy!
Nutritional Info
Let’s talk about the nitty-gritty! Each serving of these Easy Apricot Ginger Steakhouse Pork Chops (based on four servings) typically contains the following nutritional values:
- Calories: 320
- Protein: 30g
- Total Fat: 15g
- Saturated Fat: 3g
- Carbohydrates: 14g
- Sugars: 10g
- Fiber: 1g
Remember, these are estimates and can vary depending on the exact ingredients used and serving sizes!
Final Thoughts
So there you have it—Easy Apricot Ginger Steakhouse Pork Chops ready to steal the show at your dinner table. Cooking doesn’t have to be complicated to be delicious; with a few good ingredients and a little creativity, you can elevate your meals and make any night feel special.
Next time you need to impress some friends or treat yourself to a fantastic dinner, you know what to make! I hope this dish brings you as much joy as it has brought me. Let’s keep making memories in the kitchen—grab a fork, dig in, and share your culinary adventures with me! Happy cooking, friends! 🍽️
Print
Easy Apricot Ginger Steakhouse Pork Chops
- Total Time: 30 minutes
- Yield: 4 servings 1x
- Diet: Gluten-Free
Description
Juicy pork chops glazed with a sweet and tangy apricot ginger sauce, ready in just 30 minutes.
Ingredients
- 4 Hatfield® Premium Reserve Pork® Boneless Pork Chops
- 1 1/2 tbsp Extra Virgin Olive Oil
- 1/4 tsp Garlic Powder
- Black Pepper to Taste
- Salt to Taste
- 1/2 cup Apricot Preserves
- 1 tbsp Fresh Minced Ginger
- 2 tbsp Lime Juice (or juice of one lime)
- 1/4 cup Water
- 1 Dash Cayenne Pepper (Optional)
- 2 Dashes Black Pepper
- 3/4 tbsp Fresh Thyme Leaves (or leaves of one sprig)
Instructions
- Prep the Pork Chops by patting them dry and seasoning both sides with salt, black pepper, and garlic powder.
- Sear the Pork Chops in a skillet over medium-high heat with olive oil for 4-5 minutes on each side until golden brown.
- Make the Apricot Ginger Sauce by combining apricot preserves, minced ginger, lime juice, and water in the same skillet.
- Add seasoning like cayenne and thyme, and let the sauce simmer until slightly thickened (about 2-3 minutes).
- Glaze the Pork Chops with the sauce for an additional minute.
- Serve the glazed pork chops warm on a plate, optionally garnished with fresh thyme.
Notes
Serve with sautéed green beans or mashed sweet potatoes for a complete meal.
- Prep Time: 10 minutes
- Cook Time: 20 minutes
- Category: Main Course
- Method: Searing
- Cuisine: American
Nutrition
- Serving Size: 1 serving
- Calories: 320
- Sugar: 10g
- Sodium: 500mg
- Fat: 15g
- Saturated Fat: 3g
- Unsaturated Fat: 8g
- Trans Fat: 0g
- Carbohydrates: 14g
- Fiber: 1g
- Protein: 30g
- Cholesterol: 80mg
Keywords: pork chops, apricot ginger, easy recipe, weeknight dinner, seared pork
Cheesy Zucchini Casserole Recipe
Cheesy Zucchini Casserole: A Hug in a Dish
Hey there, food lovers! Beau here, and today we’re diving into something that will make your kitchen smell like a cozy haven and your heart feel warm—Cheesy Zucchini Casserole! This dish is like a warm hug that makes everything better, and trust me, it’s as easy to whip up as it is comforting to share. Whether you’re dealing with a bounty of zucchini from your garden or just looking for a scrumptious way to sneak some veggies into your meal, this casserole has got you covered.
In the world of comfort food, casseroles often hold a special place. They symbolize togetherness and warmth—a dish to share with family or friends when you gather around the table after a long day. And you know what? They are also the perfect canvas for creativity. With the combination of creamy goodness, cheesy decadence, and the wholesome taste of zucchini, this dish is the epitome of ‘feel-good food’. So, let’s roll up our sleeves, grab that spatula, and get cooking!
A Personal Connection: My Zucchini Adventure
Let me take you back to my childhood for a moment. I remember hot summer days spent at my grandmother’s house, where she would turn out delicious meals from her garden’s bounty. Zucchini was always in abundance, and I could never quite wrap my head around what to do with it. That all changed one day when grandma brought out her beloved casserole dish. She layered slices of zucchini with gooey cheese and a creamy mixture that became my instant favorite. Every bite was a magical combination of flavors that warmed my heart. Now, whenever I make this Cheesy Zucchini Casserole, I can almost hear her laughter and imagine her bustling around the kitchen, sharing stories while stirring pots and pans. It’s not just food—it’s nostalgia, love, and a whole lot of cheesy goodness all rolled into one.
Ingredients to Gather
Before we dive into cooking, let’s gather our ingredients. Here’s what you’ll need:
-
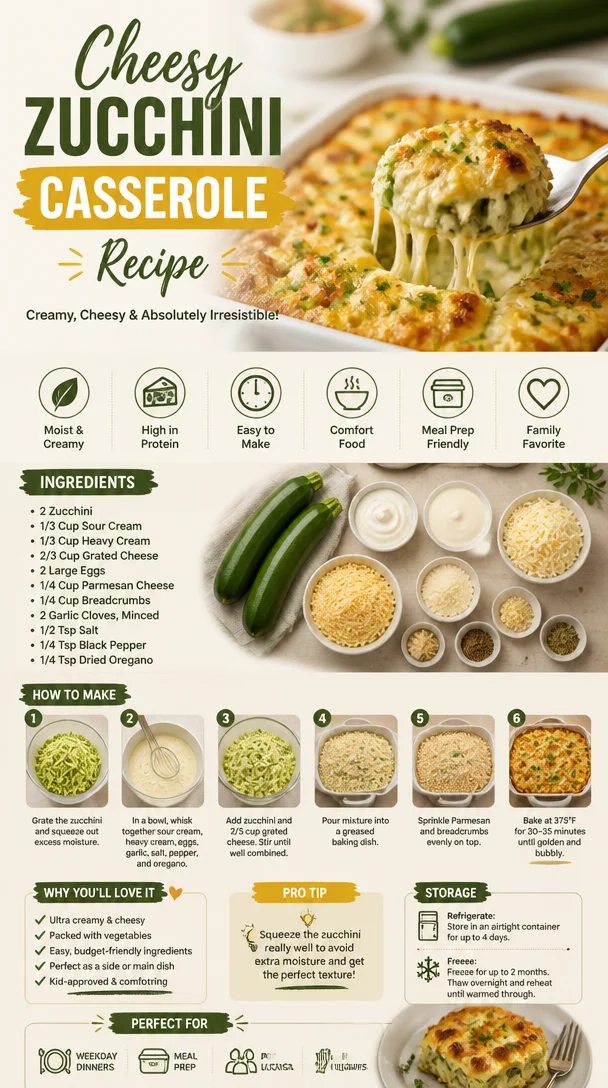
2 Zucchini: Fresh, medium-sized zucchini is key for the best texture. If you’re in a pinch, yellow squash can work too!
-
1/3 Cup Sour Cream: Adds a rich, tangy flavor. If you prefer, plain Greek yogurt is a fantastic substitute for a healthier option.
-
1/3 Cup Heavy Cream: This is where the creaminess comes into play! If you’re looking for a lighter option, you can use half-and-half or even almond milk for a dairy-free version.
-
2/3 Cup Grated Cheese: I love using cheddar for its melty goodness, but feel free to mix it up! Mozzarella gives a nice gooey stretch, and Parmesan adds a delightful sharpness.
Step-by-Step Instructions
Now that we have our ingredients, let’s get cooking! Follow these easy steps and let’s unleash the power of zucchini!
-
Preheat Your Oven: Set your oven to 350°F (175°C) so it’s nice and hot when your casserole is ready to go in. This ensures even cooking and that golden bubbly top we all love!
-
Prepare the Zucchini:
- Wash them thoroughly, then slice your zucchini into thin rounds—about 1/4 inch thick. You want them to cook evenly without getting mushy. Chef Tip: A mandoline can give you uniform slices, but a trusty knife works just fine!
-
Season It Up:
- Sprinkling a little salt over the zucchini slices before cooking helps to draw out excess moisture. Let them sit for about 10-15 minutes. This will keep your casserole from getting watery and help the zucchini maintain its structure.
-
Mix the Creamy Base:
- In a large bowl, combine the sour cream, heavy cream, and half of your grated cheese. Whisk until combined and creamy. A little pepper or garlic powder adds an extra kick if you fancy it.
-
Layer Like a Pro:
- In a greased 9×9 inch baking dish, start by layering half of the sliced zucchini at the bottom. Then pour half of your creamy mixture over the zucchini. Repeat with the remaining zucchini and creamy mixture.
-
Top It Off:
- Sprinkle the rest of the grated cheese on top. This will create a beautiful, cheesy crust when it bakes. Chef Hack: Mix a bit of breadcrumbs with your cheese for an extra crunch!
-
Bake:
- Slide your casserole into that preheated oven and let it bake for about 30-35 minutes, or until the zucchini is tender and the cheese is bubbly and golden brown.
-
Cool and Serve:
- Once out of the oven, let it cool for about 5-10 minutes. This allows the layers to set a bit and makes serving easier. Plus, the aroma will fill your kitchen, and believe me, everyone will come running!
Serving Suggestions
There are countless ways to enjoy your Cheesy Zucchini Casserole! I love serving it hot right from the oven. For a beautiful presentation, try cutting it into squares and placing them on a colorful plate. Sprinkle with fresh herbs like parsley or basil for a pop of color and freshness.
This casserole makes a fabulous side dish to accompany grilled meats or a zesty salad. Or serve it as a main dish alongside crusty bread to soak up all that deliciousness. A light drizzle of olive oil or a sprinkling of crushed red pepper flakes can amp up the flavor profile, making each bite something to rave about!
Recipe Variations
Here are a few creative twists on this Cheesy Zucchini Casserole that you might want to try:
-
Add Protein: Toss in some shredded cooked chicken or cooked ground turkey for a heartier dish that turns it into a full meal.
-
Herb Delight: Fresh herbs like thyme, rosemary, or dill can bring an aromatic flair to the casserole. Mix them into the creamy base for a special touch.
-
Zany Zucchini: Want to mix it up? Add in some diced tomatoes for a Mediterranean vibe or swap out half the zucchini for eggplant or bell peppers.
-
Cheesy Surprise: Layer in a different cheese profile, like goat cheese for tanginess, or feta for a more Mediterranean twist.
-
Make It Spicy: Incorporate some jalapeños or even a touch of crushed red pepper for those who like a kick in their comfort food.
Chef’s Notes
This Cheesy Zucchini Casserole has been a staple recipe in my household for years, and it has certainly evolved! Early on, I experimented with numerous veggies, and I found it’s an absolute canvas for seasonal ingredients. Just last month, I threw in some leftover roasted veggies, and wow—what a game-changer! It’s a reminder that cooking is all about experimenting and adjusting to our taste preferences. And if you ever burn the top, just call it ‘extra crispy’—a fancy term in the culinary world!
FAQs and Troubleshooting
Q: Can I make this ahead of time?
A: Absolutely! You can prepare the casserole, cover it, and refrigerate it for a day before baking. Just add a few extra minutes to the baking time if it’s coming straight from the fridge.
Q: What if my casserole is watery?
A: If you notice excess moisture, make sure to drain the zucchini after salting. You can also try baking it a little longer; this may help evaporate some of that liquid.
Q: Can I freeze leftovers?
A: Yes! Just scoop the leftovers into an airtight container after it cools. When you’re ready to eat, thaw it overnight in the fridge and reheat—not quite as fresh as the first time, but still delicious!
Q: What can I serve with the casserole?
A: It pairs well with grilled meats, fresh salads, or even a light soup. The cheesy richness makes it a beautiful accompaniment to a variety of dishes!
Nutritional Info
This casserole not only warms the heart but also packs a nutritional punch. Here’s a rough estimate of the nutritional information per serving, based on 8 servings:
- Calories: Approximately 180
- Protein: 6g
- Carbohydrates: 7g
- Dietary Fiber: 2g
- Total Fat: 14g (Saturated Fat: 8g)
- Sugar: 2g
These values can vary depending on the specific ingredients you use, but the addition of zucchini ensures you’re getting some vital nutrients like Vitamin C, potassium, and fiber.
Final Thoughts
Cooking should feel like a delightful adventure, and this Cheesy Zucchini Casserole is the perfect dish to make memories around. The way ingredients come together to create goodness is nothing short of magic. Remember, food is not just a necessity; it’s an experience to be shared, enjoyed, celebrated, and even at times, adapted to reflect who we are.
So the next time you find yourself with some zucchini or simply craving comfort food, give this casserole a try. And hey, don’t forget to share your creations with me! Grab your fork, dig in, and let’s keep the kitchen love going strong. Happy cooking, friends!
Print
Cheesy Zucchini Casserole
- Total Time: 50 minutes
- Yield: 8 servings 1x
- Diet: Vegetarian
Description
A comforting cheesy zucchini casserole perfect for family gatherings, made with layers of zucchini, creamy goodness, and gooey cheese.
Ingredients
- 2 Zucchini, fresh, medium-sized
- 1/3 Cup Sour Cream
- 1/3 Cup Heavy Cream
- 2/3 Cup Grated Cheese (cheddar, mozzarella, or parmesan)
Instructions
- Preheat your oven to 350°F (175°C).
- Prepare the zucchini by washing and slicing into thin rounds.
- Season the zucchini slices with salt and let them sit for 10-15 minutes.
- Mix the sour cream, heavy cream, and half of the grated cheese in a bowl until creamy.
- Layer half of the zucchini in a greased 9×9 inch baking dish, followed by half of the creamy mixture. Repeat.
- Top with the remaining grated cheese.
- Bake for 30-35 minutes or until the cheese is bubbly and golden brown.
- Cool for 5-10 minutes before serving.
Notes
Feel free to mix in different cheeses or add leftover vegetables. For a crunchier top, mix breadcrumbs with cheese before baking.
- Prep Time: 15 minutes
- Cook Time: 35 minutes
- Category: Main Course
- Method: Baking
- Cuisine: American
Nutrition
- Serving Size: 1 serving
- Calories: 180
- Sugar: 2g
- Sodium: 400mg
- Fat: 14g
- Saturated Fat: 8g
- Unsaturated Fat: 4g
- Trans Fat: 0g
- Carbohydrates: 7g
- Fiber: 2g
- Protein: 6g
- Cholesterol: 30mg
Keywords: casserole, zucchini, comfort food, cheesy, vegetarian

Minute Copycat P.F. Chang’s Ground Chicken Lettuce Wraps
P.F. Chang’s Ground Chicken Lettuce Wraps: A Delicious Journey of Flavors
Hey there, fellow food enthusiasts! Today, I’m super excited to dive into a recipe that has been a hit not only at my kitchen table but also, thanks to P.F. Chang’s, in dining rooms around the globe – Ground Chicken Lettuce Wraps! If you’ve ever experienced the burst of flavors and textures in those little bundles of joy, then you know exactly why this dish is a must-try at home.
Lettuce wraps are fantastic for so many reasons: they’re fresh, light, and incredibly versatile. Plus, they’re perfect for that healthy, feel-good eating we all crave from time to time. Whether you’re hosting a cozy dinner with friends or simply indulging in a solo snack, these flavorful bites have a way of making any meal special. So, let’s roll up our sleeves, dive into this culinary adventure, and create some delicious memories together!
A Personal Touch: The Story Behind My Love for Lettuce Wraps
I’ll always remember the first time I experienced these delightful wraps. It was a beautiful summer evening, and my family decided to have dinner at a nearby P.F. Chang’s. The energy in the restaurant was vibrant, almost like the food itself was singing with stories just waiting to be told!
When the lettuce wraps arrived, I was captivated not just by their colorful presentation but by the intoxicating aroma wafting through the air. My first bite was a blend of tender ground chicken, the crunch of water chestnuts, and a hint of soy and sesame that transported me to flavor town. Everyone around the table smiled in unison, clearly relishing every moment of the meal. I knew right then that I needed to recreate this dish in my kitchen, so I began my journey to bring this deliciousness home.
Over the years, I’ve tweaked the recipe to fit my taste while keeping those essential, soul-warming flavors intact. This dish has become a staple for gatherings, and it’s often the highlight of my dinner parties. Each wrap tells a story, and I love sharing them with friends and family. Now, let’s jump into the delicious details so you can create your own magical meal!
Ingredients: What You’ll Need
Here’s a quick list of ingredients to gather before we start cooking. I’ll also share some handy tips and tricks for each ingredient!
-
1 lb ground chicken: The star of our dish! Ground chicken is lean and absorbs flavors beautifully. You can substitute it with ground turkey or even a plant-based alternative like lentils or chopped mushrooms for a vegetarian version.
-
1 tablespoon vegetable oil: This oil helps to sauté the ingredients without overpowering them. Alternatively, you can use sesame oil for a nuttier flavor.
-
1/2 cup onion, chopped: Adding a subtle sweetness and crunch. Yellow or white onions work wonders here – just avoid red onions as they can be too sharp.
-
1 cup mushrooms, chopped: These add an earthy flavor and a wonderful texture. Feel free to swap with bell peppers if you prefer a different kind of crunch.
-
2 cloves garlic, minced: Garlic is the secret to flavor town! If you’re short on garlic, garlic powder can work in a pinch (1/8 teaspoon per clove).
-
1/4 cup soy sauce: This brings the umami goodness! For a gluten-free option, use tamari or coconut aminos.
-
1 tablespoon rice vinegar: It adds a lovely tang. If you don’t have rice vinegar, apple cider vinegar works as a great substitute.
-
1 tablespoon hoisin sauce: This sweet and savory sauce is essential for that signature flavor. If you can’t find it, a mixture of soy sauce and a dash of honey can mimic the taste.
-
1 teaspoon sesame oil: This will enhance the overall flavor of the dish with a nutty aroma. Use it sparingly, as it’s potent!
-
1/4 cup water chestnuts, chopped: They give our wraps a satisfying crunch. If you don’t have them, try using diced jicama or cucumber for a similar effect.
-
1/4 cup green onions, chopped: These add a fresh bite at the end. You can also sprinkle some cilantro for a vibrant twist!
-
Salt and pepper to taste: Always season to suit your palate! Feel free to experiment with different types of salt (like garlic or smoked salt) for an added dimension.
-
Lettuce leaves (for wrapping): Butter lettuce or romaine works beautifully as it holds up well to the filling. You can also use collard greens or even thinly sliced cabbage for a unique twist!
Step-by-Step Instructions: Let’s Get Cooking!
Now that we’ve gathered our ingredients, it’s time to bring these flavors to life! Follow my step-by-step process, and I promise you’ll be serving up a plate of magic in no time.
-
Heat the Oil: Begin by heating your vegetable oil in a large skillet over medium-high heat. Lean into those sizzles – they’re announcing that deliciousness is on its way!
-
Sauté Onions: Once the oil is shimmering, toss in the chopped onions. Cook them for about 3-4 minutes, until they’re soft and translucent. Give them a stir every now and then, and inhale that heavenly aroma!
-
Add Garlic and Mushrooms: Next, add the minced garlic and chopped mushrooms to the skillet. Cook for another 3-5 minutes until the mushrooms release their moisture and begin to brown. This is where the magic happens – the flavors meld together beautifully!
-
Brown the Chicken: Push the onion and mushroom mixture to the side of the skillet and add your ground chicken. Break it up with a spatula and cook until it’s no longer pink, about 5-7 minutes. Keep stirring, letting those flavors dance together.
-
Season the Mix: Once the chicken is cooked, it’s time to season! Pour in the soy sauce, rice vinegar, hoisin sauce, and sesame oil. Stir everything together until well combined, ensuring that each morsel is coated in that glorious sauce.
-
Add Water Chestnuts: Toss in the chopped water chestnuts and mix to combine. These will add the crunch that elevates each bite into something truly satisfying.
-
Finish with Green Onions: Finally, stir in the chopped green onions and season with salt and pepper to taste. Give everything a final stir to ensure it’s all well incorporated.
-
Prepare Your Lettuce: While your filling is cooling slightly, rinse and dry your lettuce leaves. Arrange them on a platter, ready to be filled with that delicious chicken mixture!
Serving Suggestions: How to Plate These Little Delights
Presentation is key! To serve, simply scoop a generous amount of the chicken mixture into the center of a lettuce leaf, folding it up like a little burrito. You want to create a beautiful, edible package for your guests to enjoy.
Drizzle some additional hoisin or soy sauce on top for an extra burst of flavor and sprinkle some sesame seeds or chopped cilantro for a pop of color. Serve alongside lime wedges for a zesty kick, and you have a stunning appetizer or main course that’s bound to impress!
Recipe Variations: Get Creative in the Kitchen
Feeling adventurous? Here are a few fun twists to try with your lettuce wraps:
-
Thai Twist: Add a tablespoon of peanut butter or finely chopped peanuts for a Thai-inspired version. Pair it with a spicy chili sauce for some heat!
-
Asian Slaw: Mix in grated carrots and shredded cabbage into your chicken mixture for added crunch and color.
-
Spicy Kick: Add chopped fresh jalapeños or a splash of Sriracha to heat things up. The balance of heat and sweet from the hoisin will be divine!
-
Herb-Infused: Swap the green onions for fresh basil or mint for a refreshing herbaceous flavor that brightens the dish.
-
Vegetarian Delight: Substitute ground chicken with crumbled tofu and add extra veggies like bell peppers and zucchini. Season with the same sauce for an equally delicious meatless version.
Chef’s Notes: Reflections and Kitchen Memories
Over the years, my ground chicken lettuce wraps have grown from a simple recreation into a family-tested favorite that warms my heart every time I make it. It’s become a versatile dish that adapts to the seasons and my guests’ cravings.
One funny memory I have is the time I attempted to cook these for a dinner party without realizing I was out of lettuce! I raced to the store only to discover it was closed for a holiday. In a moment of desperation, I substituted tortillas. The results were surprisingly delicious and led to a new “wrap” tradition in our home!
These lettuce wraps are all about flexibility and creativity. They encourage an interactive dining experience where everyone can build their own, allowing each person to customize the flavor and crunch to their exact liking.
FAQs and Troubleshooting: Common Questions Answered
-
What if my chicken mixture is too dry?
If your filling turns out dry, try adding a splash more of soy sauce or hoisin sauce until you reach your desired consistency. -
How do I store leftovers?
Place the filling in an airtight container and refrigerate for up to 3 days. Keep the lettuce leaves separate to maintain their crispness. -
Can I make this in advance?
Absolutely! You can prepare the chicken mixture a day ahead and store it in the fridge. Just reheat it on the stovetop before serving. -
What can I use if I don’t have lettuce?
Use cabbage leaves, collard greens, or even large radishes for crispness and taste. They all serve as excellent wrappers with a unique crunch!
Nutritional Info
For those interested in the nutritional aspect, here’s a quick breakdown (per serving of wraps):
- Calories: 230
- Protein: 25g
- Carbs: 14g
- Fat: 9g
- Fiber: 2g
Please note these values may vary depending on the specific brands of ingredients used and how generously you fill your lettuce wraps!
Final Thoughts: Wrap It Up with Love!
There you have it – my take on P.F. Chang’s Ground Chicken Lettuce Wraps, filled with tasty bites and heartwarming stories. They’re the perfect blend of fresh, vibrant flavors, and trust me, they’ll leave your taste buds wanting more. Cooking is all about expressing love and creativity, and I hope this recipe inspires you to whip up your version of this delightful dish.
So gather your loved ones, roll up your sleeves, and enjoy wrapping up your own flavorful memories. Happy cooking, foodies! Let’s create delicious moments together and continue sharing the joy of cooking – one meal at a time!
Print
Ground Chicken Lettuce Wraps
- Total Time: 35 minutes
- Yield: 4 servings 1x
- Diet: Gluten-Free
Description
A delicious and versatile recipe for ground chicken lettuce wraps that are perfect for any occasion.
Ingredients
- 1 lb ground chicken
- 1 tablespoon vegetable oil
- 1/2 cup onion, chopped
- 1 cup mushrooms, chopped
- 2 cloves garlic, minced
- 1/4 cup soy sauce
- 1 tablespoon rice vinegar
- 1 tablespoon hoisin sauce
- 1 teaspoon sesame oil
- 1/4 cup water chestnuts, chopped
- 1/4 cup green onions, chopped
- Salt and pepper to taste
- Lettuce leaves (for wrapping)
Instructions
- Heat the vegetable oil in a large skillet over medium-high heat.
- Sauté the chopped onions for about 3-4 minutes until soft and translucent.
- Add the minced garlic and chopped mushrooms, cooking for another 3-5 minutes until the mushrooms are browned.
- Brown the ground chicken, breaking it up with a spatula, until it’s no longer pink, about 5-7 minutes.
- Season the mixture with soy sauce, rice vinegar, hoisin sauce, and sesame oil, stirring until well combined.
- Add the chopped water chestnuts and mix to combine.
- Finish with green onions, seasoning with salt and pepper to taste.
- Prepare your lettuce leaves by rinsing and drying them.
Notes
These wraps are great for a healthy meal. Feel free to customize the filling based on your preferences!
- Prep Time: 15 minutes
- Cook Time: 20 minutes
- Category: Appetizer
- Method: Sautéing
- Cuisine: Asian
Nutrition
- Serving Size: 2 wraps
- Calories: 230
- Sugar: 2g
- Sodium: 600mg
- Fat: 9g
- Saturated Fat: 1g
- Unsaturated Fat: 8g
- Trans Fat: 0g
- Carbohydrates: 14g
- Fiber: 2g
- Protein: 25g
- Cholesterol: 70mg
Keywords: chicken, lettuce wraps, healthy, Asian cuisine, easy appetizer, gluten-free

Creamy Garlic Butter Steak Bites with Cajun Alfredo Pasta
Creamy Garlic Butter Steak Bites with Spicy Cajun Alfredo Twisted Pasta
Introduction
Hey there, fellow food enthusiast! It’s Beau Collier from Feastical, and I can’t tell you how excited I am to dive into today’s scrumptious recipe with you. If you’ve ever wanted a plate that feels like a cozy hug after a long day, you’re in for a treat! Today, we’re bringing you something that perfectly balances savory and creamy flavors: Creamy Garlic Butter Steak Bites with Spicy Cajun Alfredo Twisted Pasta.
Picture this: tender, juicy steak bites seared to perfection, soaking up all that luscious garlic butter, nestled on a bed of twisted pasta drizzled with a spicy Cajun Alfredo sauce. It’s comfort food at its finest, and I promise it’s just the right dish to impress your dinner guests—or simply to indulge yourself after a busy week.
This dish is a complete meal that showcases both classic cooking techniques and bold flavors that will have everyone at the table asking for seconds (and probably thirds). Plus, it’s a relatively quick dish to whip up, so whether you’re a kitchen newbie or a seasoned chef, we’ve got you covered!
Grab your apron, roll up your sleeves, and let’s get into the deliciousness that makes the world go round—food!
Personal Story
Growing up, my family had a tradition of Sunday dinners, where we would gather around the table after a long week of hustle and bustle. I remember one particular Sunday when my dad decided to throw together a mishmash of ingredients he had left in the fridge. It was a random selection, to say the least: steak, some pasta, and an odd assortment of spices. He tossed everything together and somehow, even in its “thrown together” state, it was delightful!
That “accidental creation” sparked a love for experimenting in the kitchen for me. It led to countless culinary adventures, and this Creamy Garlic Butter Steak Bites with Spicy Cajun Alfredo Twisted Pasta recipe is a delicious product of those memories. What I love about cooking is that even the simplest ingredients can come together to create something magnificent—much like our family dinners.
So, let’s recreate that magic today!
Ingredients
For this delicious dish, you’ll need the following ingredients:
-
1.5 pounds sirloin steak (or chicken/turkey)
A great choice for meat lovers! Sirloin is tender and flavorful. If you’re in the mood for poultry, chicken or turkey would make a fantastic alternative. Just be sure to adjust the cooking time accordingly. -
12 oz twisted pasta (rotini or fusilli)
Twisted pasta is perfect for holding onto those creamy sauces. If you’re feeling adventurous, try using whole wheat or gluten-free pasta to give it a little extra kick. -
1 cup heavy cream
The base for our dreamy Alfredo sauce. Half-and-half or a plant-based alternative can work here if you’re looking for a lighter version. -
4 tablespoons butter
What’s cooking without a little butter? This adds richness and depth to our dish. Feel free to use garlic-infused butter for an extra layer of flavor! -
2 tablespoons Cajun seasoning
This is where the magic happens! It gives our Alfredo a spicy kick. You can mix your own seasoning blend or grab your favorite store-bought one. -
1/2 cup grated Parmesan cheese
Because cheese makes everything better! If you don’t have Parmesan, Pecorino Romano or nutritional yeast for a vegan option will work beautifully too. -
Olive oil for cooking
A staple in any kitchen. Use this for searing your steak or chicken, ensuring a lovely caramelized crust.
Step-by-Step Instructions
Now that we’ve gathered all our ingredients, let’s get cooking!
-
Prepare the Pasta:
Start by boiling a large pot of salted water. Toss in your twisted pasta and cook according to package instructions until al dente. This usually takes about 8-10 minutes. Remember to reserve about a cup of pasta water later—it can help loosen your sauce if needed! -
Sear Your Protein:
While your pasta is cooking, heat a large skillet over medium-high heat and drizzle in some olive oil. If you’re using steak, cut it into bite-sized pieces. Season generously with salt and pepper. Once the oil is hot, add the steak bites to the skillet in a single layer. Sear them for about 3-4 minutes or until they’ve got a lovely crust, flipping halfway through. If you’re using chicken or turkey, cook until the internal temperature reaches 165°F. -
Make It Buttery:
When the steak bites (or chicken) are cooked to a perfect medium-rare, lower the heat and add in the butter and minced garlic. Stir well, allowing the garlic to become fragrant but not burned (about 1-2 minutes). The butter will meld with those lovely steak juices, creating a beautiful sauce! -
Create the Alfredo Sauce:
Pour in the heavy cream and sprinkle in the Cajun seasoning. Stir to combine, allowing the mixture to come to a gentle simmer. The cream will thicken slightly, creating that velvety Alfredo sauce we all know and love. Mix in the grated Parmesan cheese until fully incorporated! Adjust seasoning if needed with salt and pepper. -
Combine Pasta and Sauce:
Once your pasta is ready, drain it (don’t forget to reserve that pasta water!), and add it directly into the skillet with the creamy Cajun sauce. Give everything a good stir to combine. If the sauce seems too thick, add pasta water a little at a time until you reach your desired consistency. -
Serve it Up:
Once everything is cooked and well-mixed, remove the skillet from heat. Serve your creamy garlic butter steak bites over a big helping of that delicious twisted pasta.
Serving Suggestions
Plating is an art! To serve, transfer generous portions of the creamy pasta onto plates. Top it with the luscious garlic butter steak bites and drizzle any remaining sauce over the top. For an elegant touch, sprinkle some extra Parmesan and a few shakes of Cajun seasoning on top.
Pair it with a colorful garden salad drizzled with balsamic vinaigrette, and maybe a glass of red wine for the perfect cozy dinner experience. Don’t forget to offer some warm, crusty bread to complement the richness of the dish!
Recipe Variations
-
Seafood Delight:
Swap the steak for shrimp or scallops for a seafood twist! They cook quickly and absorb that divine garlic butter flavor beautifully. -
Veggie Medley:
Load this pasta with sautéed vegetables like bell peppers, zucchini, or spinach for a colorful, nutritious boost. -
Spicy Kick:
For an extra spicy kick, toss in some diced jalapeños or a pinch of red pepper flakes to the garlic butter sauce. -
Creamy Spinach Alfredo:
Add in some fresh spinach leaves during the last minute of cooking for a touch of color and nutrition. The heat will wilt the leaves perfectly. -
Pasta Swap:
Try using zoodles (zucchini noodles) instead of pasta for a lighter, low-carb option that still satisfies your craving for creamy deliciousness!
Chef’s Notes
I’ve been improvising in the kitchen for as long as I can remember, and this recipe has certainly evolved over time. I started by making basic steak bites and alfredo separately. It wasn’t until I had a lightbulb moment to combine them (and add butter—because, let’s be real, butter makes everything better) that it turned into my signature dish.
Don’t be afraid to infuse this recipe with your own twist! Cooking should be fun, and it’s all about what you enjoy. So, experiment with flavors and ingredients until it feels just right for you. You might just stumble upon your own delicious creation!
FAQs and Troubleshooting
1. What if my sauce is too thick?
No worries! Simply add a bit of the reserved pasta water until you reach your desired consistency.
2. How do I know when the steak is done?
For a perfect medium-rare, aim for an internal temperature of 130°F–135°F. Use a meat thermometer for accuracy if you need it!
3. Can I make this dish ahead of time?
While it’s best enjoyed fresh, you can cook the steak and pasta separately, then combine them when you’re ready to serve. Just know that reheating cream sauces can sometimes change the texture slightly, so add a splash of cream or water during reheating to help it along.
4. How do I keep leftovers from becoming dry?
Store the creamy pasta in an airtight container in the fridge. When you reheat, add a little extra cream or broth to loosen it up again.
Nutritional Info
While it’s always good to indulge occasionally, keep in mind that this dish does have some rich ingredients. Here’s a breakdown of the nutritional info per serving (approx. 4 servings):
- Calories: 600-700 (depending on protein choice)
- Protein: 40g
- Carbohydrates: 60g
- Fat: 35g
- Fiber: 3g
Feel free to adjust and make substitutions to better cater to your dietary needs or preferences.
Final Thoughts
And there you have it! A delightful, satisfying dish that’s perfect for any occasion. The Creamy Garlic Butter Steak Bites with Spicy Cajun Alfredo Twisted Pasta is everything comfort food should be—rich, flavorful, and perfect for sharing (or not!). Remember, cooking is about experimentation and making each recipe your own.
I hope you enjoyed this culinary journey as much as I love sharing these recipes with you. So next Sunday, or any day of the week, gather your loved ones, whip up this delectable dish, and enjoy a meal filled with warmth and good conversation.
Until next time, happy cooking! 🍽️
Print
Creamy Garlic Butter Steak Bites with Spicy Cajun Alfredo Twisted Pasta
- Total Time: 45 minutes
- Yield: 4 servings 1x
- Diet: Optional: Gluten-Free
Description
A comforting dish featuring tender steak bites in garlic butter over twisted pasta with a spicy Cajun Alfredo sauce.
Ingredients
- 1.5 pounds sirloin steak (or chicken/turkey)
- 12 oz twisted pasta (rotini or fusilli)
- 1 cup heavy cream
- 4 tablespoons butter
- 2 tablespoons Cajun seasoning
- 1/2 cup grated Parmesan cheese
- Olive oil for cooking
Instructions
- Prepare the Pasta: Start by boiling a large pot of salted water. Toss in your twisted pasta and cook according to package instructions until al dente (about 8-10 minutes). Remember to reserve about a cup of pasta water later!
- Sear Your Protein: Heat a large skillet over medium-high heat and drizzle in some olive oil. Cut steak into bite-sized pieces. Season with salt and pepper. Add steak bites to the skillet in a single layer and sear for about 3-4 minutes, flipping halfway through. For chicken, cook until the internal temperature reaches 165°F.
- Make It Buttery: When cooked, lower heat and add butter and minced garlic. Stir well, allowing the garlic to become fragrant (about 1-2 minutes).
- Create the Alfredo Sauce: Pour in heavy cream and sprinkle in Cajun seasoning. Stir and let it simmer gently. Add Parmesan cheese until fully incorporated!
- Combine Pasta and Sauce: Drain pasta and add it to the skillet with the creamy sauce. Stir to combine, adding reserved pasta water if the sauce is too thick.
- Serve it Up: Remove from heat. Serve creamy steak bites over pasta and drizzle with remaining sauce.
Notes
For extra flavor, add garlic-infused butter while making the sauce. Experiment with proteins or add vegetables for a nutritious boost!
- Prep Time: 15 minutes
- Cook Time: 30 minutes
- Category: Main Course
- Method: Cooking
- Cuisine: American
Nutrition
- Serving Size: 1 serving
- Calories: 650
- Sugar: 3g
- Sodium: 600mg
- Fat: 35g
- Saturated Fat: 15g
- Unsaturated Fat: 10g
- Trans Fat: 0g
- Carbohydrates: 60g
- Fiber: 3g
- Protein: 40g
- Cholesterol: 100mg
Keywords: steak, pasta, creamy alfredo, cajun, comfort food

The Ultimate Creamy Garlic Parmesan Chicken Pasta You’ll Crave Every Week
The Ultimate Creamy Garlic Parmesan Chicken Pasta You’ll Crave Every Week
Hey there, food lovers! I’m super excited to share with you one of my all-time favorite recipes that will have your taste buds doing a happy dance—Creamy Garlic Parmesan Chicken Pasta. Imagine a bowl of twirly pasta enveloped in a luscious cream sauce, studded with tender chicken and punched up with the fresh zests of garlic and herbs. It’s comfort food at its finest and utterly satisfying!
Now, I don’t know about you, but there are days when all I want to do after a long day is curl up on the couch with something warm and cheesy—preferably in a giant bowl. This dish is perfect for those days. Plus, it’s easy to whip up, and the elegance of garlic and Parmesan makes it feel like a gourmet meal without the fuss. You could even impress your dinner guests with it!
So whether you’re cooking for family, friends, or just treating yourself to a special meal, you’ll want to hang around for the next couple of minutes. Grab that apron, pour yourself a glass of your favorite drink (coffee or wine, I don’t judge!), and let’s dive into this creamy goodness together.
Personal Story
Let me take you back to a chilly autumn evening when I first started experimenting in the kitchen. I had just moved out of my parents’ house, and although I was armed with a few family recipes, pasta was an uncharted territory for me. One night, I decided to cook for my then-girlfriend, hoping to impress her. I didn’t have much in the pantry, but I had some chicken, pasta, and the staple garlic and cheese—ah, the culinary dream team!
I threw everything together in a single pan, let the garlic become aromatic, and soon enough, a creamy concoction was bubbling away. The moment I plated it, the memory of my mom serving pasta at the family table came rushing back. That’s when magic happened! The combination was an instant hit, leading to a lovely dinner filled with laughter, shared stories, and my girlfriend’s delighted smiles—needless to say, the evening accelerated to all sorts of possibilities for us.
Here’s the good news: you, too, can create a moment just like that with this recipe. Trust me, this creamy garlic Parmesan chicken pasta will become a staple in your kitchen repertoire!
Ingredients
Here’s what you’ll need to craft this culinary delight:
-
Boneless, skinless chicken breast (2 large, cut into 1-inch cubes)
Chicken breast is super lean and absorbs flavor wonderfully. If you prefer something more flavorful, you can substitute it with thighs or even shrimp! -
Twisted pasta (fusilli) (1 lb / 450 g)
The twists and turns of fusilli capture the creamy sauce perfectly! If you can’t find it, penne or rotini work too—just choose your favorite! -
Unsalted butter (3 Tbsp, divided)
A must-have for sautéing the garlic and chicken. Unsalted gives you more control over the saltiness. You can swap for olive oil if you’re feeling a bit healthier! -
Fresh garlic, minced (4–5 cloves)
Garlic is the star of this dish! If you’re in a pinch, you can use garlic powder, but fresh adds an unmatched depth of flavor. -
Heavy cream (1 ½ cups)
The creaminess factor! For a lighter version, you might try using half-and-half or a non-dairy milk, although the texture may differ. -
Chicken broth (½ cup)
Use homemade if possible for more flavor! Vegetable broth can be a great substitute if you want a vegetarian twist. -
Grated Parmesan cheese (1 cup, freshly grated preferred)
Always go for fresh; it melts beautifully. If you’re in a pinch, pre-grated works too, but it won’t be as cheesy! -
Italian seasoning (1 tsp, divided)
This is a mix of herbs that brings depth to the dish. If you don’t have it, oregano, basil, and thyme alone would do just fine! -
Red pepper flakes (¼ tsp, optional)
If you like a little kick, toss this in! Otherwise, leave it out. -
Fine salt & black pepper (to taste)
Essential for bringing the flavors together. -
Fresh parsley, chopped (2 Tbsp, for garnish)
For that pop of freshness! Basil also works, and would add a lovely aroma.
Step-by-Step Instructions
Alright, let’s get cooking! Here’s how to bring this creamy pasta to life:
-
Prep Your Chicken
Start by cutting your chicken breast into bite-sized cubes (1-inch or so). This allows for even cooking and makes for easy eating. Season them generously with salt, black pepper, and half of your Italian seasoning. -
Heat the Pan
Grab a large skillet (or a deep frying pan if you have one) and place it over medium heat. Add 2 tablespoons of unsalted butter. Hear that sizzle? That’s the sound of flavor being born! -
Cook the Chicken
Once the butter is melted and bubbling, add the seasoned chicken pieces to the pan. Cook them for about 6-7 minutes until golden brown and cooked through, stirring occasionally. This is where you want to lock in that delicious, savory goodness. -
Add the Garlic
Now, here comes the miracle worker. Add your minced garlic and sauté for about 1-2 minutes until fragrant. Be careful not to burn it—the smell will be divine! -
The Creamy Base
Pour in the heavy cream and chicken broth, stirring to combine everything. Let it simmer for a few minutes until it starts to thicken—a magical transformation is happening! -
Add the Cheese
Sprinkle in your grated Parmesan cheese and stir until it melts into that beautiful creamy sauce. You should be able to see those lovely golden hues of cheese swirled throughout. -
Boil the Pasta
While the sauce is working its magic, cook your fusilli (or choice of pasta) in a large pot of boiling salted water according to package instructions, usually around 8-10 minutes for al dente. -
Combine
Drain the pasta (don’t rinse—those starchy bits help the sauce stick), and add it straight to your creamy chicken mixture. Toss everything together gently, ensuring each piece of pasta is coated. -
Final Seasoning
Taste and adjust your seasoning with more salt, black pepper, and the rest of the Italian seasoning. Remember, you can always add more but can’t take it away! -
Serve It Up
Scoop your creamy chicken pasta onto plates or in bowls. Sprinkle with freshly chopped parsley for that extra touch of color and freshness!
And just like that, you’ve created a comforting, delectable meal that’s sure to please anyone at your table.
Serving Suggestions
When serving, consider adding a simple side salad dressed with olive oil and vinegar to balance the richness of the pasta. Garlic bread is another classic pairing—what’s better than dipping a chunk of warm bread into that creamy sauce?
For a presentation that wows, you can twirl the pasta onto your plate using a fork (it looks fancy!) and garnish it with some extra grated Parmesan. Serve it family-style in a large bowl if you’re feeling communal—there’s something so warm and inviting about sharing a dish straight from the bowl, don’t you think?
Recipe Variations
Let’s talk a little about how you can play around with this recipe! Here are some creative twists:
-
Mushroom Magic: Swap in sautéed mushrooms for added earthiness. They pair beautifully with the garlic and cream!
-
Vegetable Delight: Add some steamed broccoli, spinach, or asparagus for a vibrant, nutritious boost. You might also find this makes for a great vegetarian option if you skip the chicken!
-
Spice It Up: For a Southwestern spin, toss in some diced bell peppers and a dash of taco seasoning instead of Italian herbs.
-
Lemon Burst: Add a splash of lemon juice and zest at the end for a fresh citrusy note that brightens everything up.
-
Bacon Bliss: For those who like a little indulgence, crispy bacon bits can be a delightful addition.
Chef’s Notes
Over the years, I’ve played around with this recipe a ton! In fact, the first time I made it, I used less cream and a bit of white wine. It was a happy accident that turned into a go-to dinner party dish!
Sometimes I’ll play with the textures by using different pastas; orecchiette has become a favorite because they cradle the sauce so well. Don’t forget—the best part of being in the kitchen is making the recipe your own, so have fun with it!
FAQs and Troubleshooting
-
Why did my sauce separate?
This can happen if it gets too hot too fast! Always keep a gentle simmer on the sauce. -
Can I make this ahead of time?
Absolutely! Just be aware that the pasta might absorb some sauce. You can reheat it and add a splash of cream or broth to loosen it up. -
What if my pasta is too sticky?
Stir it gently during cooking and add a touch of olive oil right after draining to help separate the noodles. -
How do I store leftovers?
Transfer to an airtight container and refrigerate for up to three days. Reheat over low heat on the stovetop, adding a little cream if needed.
Nutritional Info (if applicable)
Estimated Nutrition Info per Serving (based on 6 servings):
- Calories: 540
- Protein: 34g
- Fat: 30g
- Carbohydrates: 40g
- Fiber: 2g
- Sugar: 2g
These numbers can vary based on brands and ingredient variations, so adjust according to your specific choices!
Final Thoughts
Well, there you have it! Your kitchen is now armed with the ultimate creamy garlic Parmesan chicken pasta recipe. It’s comforting, delicious, and, most importantly, simple! Whether it’s a weeknight dinner or special occasion, this dish is sure to become a family favorite.
Don’t forget to take your own little culinary detours as you make it your own. Share your love for cooking with friends and family, keep experimenting, and remember that the best recipes come from the heart. Until next time, happy cooking, and may your plates always be full of flavor!
Cheers,
Beau

Creamy Garlic Parmesan Chicken Pasta
- Total Time: 45 minutes
- Yield: 4 servings 1x
- Diet: Non-Vegetarian
Description
A luscious, comforting pasta dish enveloped in creamy garlic sauce and tender chicken, perfect for any day of the week.
Ingredients
- 2 large Boneless, skinless chicken breasts, cut into 1-inch cubes
- 1 lb (450 g) Twisted pasta (fusilli)
- 3 Tbsp Unsalted butter, divided
- 4–5 cloves Fresh garlic, minced
- 1 ½ cups Heavy cream
- ½ cup Chicken broth
- 1 cup Grated Parmesan cheese, freshly grated preferred
- 1 tsp Italian seasoning, divided
- ¼ tsp Red pepper flakes, optional
- Fine salt & black pepper, to taste
- 2 Tbsp Fresh parsley, chopped, for garnish
Instructions
- Start by cutting your chicken breast into bite-sized cubes (1-inch or so). Season them generously with salt, black pepper, and half of your Italian seasoning.
- Grab a large skillet and place it over medium heat. Add 2 tablespoons of unsalted butter.
- Once the butter is melted and bubbling, add the seasoned chicken pieces to the pan. Cook for about 6-7 minutes until golden brown.
- Add your minced garlic and sauté for about 1-2 minutes until fragrant.
- Pour in the heavy cream and chicken broth, stirring to combine. Let it simmer for a few minutes until it starts to thicken.
- Sprinkle in your grated Parmesan cheese and stir until it melts into the creamy sauce.
- Cook your fusilli in a large pot of boiling salted water according to package instructions, usually around 8-10 minutes for al dente.
- Drain the pasta (don’t rinse) and add it straight to your creamy chicken mixture. Toss everything together gently.
- Taste and adjust seasoning with more salt, black pepper, and the rest of the Italian seasoning.
- Scoop your creamy chicken pasta onto plates or in bowls. Sprinkle with freshly chopped parsley.
Notes
For a lighter option, substitute heavy cream with half-and-half or non-dairy milk. Enhance with garlic bread or a simple side salad.
- Prep Time: 15 minutes
- Cook Time: 30 minutes
- Category: Main Course
- Method: Cooking
- Cuisine: Italian
Nutrition
- Serving Size: 1 serving
- Calories: 540
- Sugar: 2g
- Sodium: 750mg
- Fat: 30g
- Saturated Fat: 18g
- Unsaturated Fat: 10g
- Trans Fat: 0g
- Carbohydrates: 40g
- Fiber: 2g
- Protein: 34g
- Cholesterol: 120mg
Keywords: creamy pasta, garlic, chicken, quick dinner, comfort food

Irresistible Easy Grilled Cheese Burrito You’ll Crave Again
Irresistible Easy Grilled Cheese Burrito You’ll Crave Again
Hey there, food lovers! It’s your pal Beau Collier, and I’m beyond excited to share one of my all-time favorite comfort food concoctions with you today – the Easy Grilled Cheese Burrito! Now, I know what you’re thinking: “What’s so special about a burrito?” Well, my foodie friends, this isn’t just any burrito; it’s a delicious melty masterpiece that wraps up all the goodness of grilled cheese with a taco twist!
Imagine biting into a warm, crispy tortilla that gives way to savory ground beef (or turkey… we’ll talk about options later) swaddled in ooey-gooey nacho cheese sauce, crowned with creamy sour cream, and topped with a decadent mix of cheddar and mozzarella. It’s the kind of dish that makes your taste buds do a happy little dance and your soul feel warm and fuzzy. Perfect for lazy weekends, quick dinners, or impromptu parties, it checks all the boxes for feel-good food.
The greatest part? You don’t need to be a culinary genius to whip this up! In fact, even if you just found your spatula after burying it under takeout menus and snack wrappers, don’t fret – this recipe is smooth sailing. So grab those ingredients and let’s dive deep into this scrumptious, cheesy adventure!
Personal Story
I still remember the first time I created this lovely burrito. It was a crisp fall weekend, and I found myself craving all the things that remind me of home—cozy blankets, the glowing warmth of a fireplace, and, of course, a mouthwatering meal. So, I rummaged through my pantry and fridge like a modern-day treasure hunter. I came across some leftover ground beef, a half-eaten block of cheddar, and those old tortillas in the back of my cupboard that needed a little love.
What started as a “let’s empty out the fridge” moment transformed into a delightful memory filled with laughter and flavor. My friends and I gathered around the stove, sipping our favorite drinks and playing DJ while I grilled these beauties up. Each bite led to oohs and aahs, and we ended up dubbing them the Grilled Cheese Burrito Extravaganza. It’s one of those cherished moments that reminds me of the joy food can bring, and I hope to replicate that joy in your kitchen!
Ingredients
Here’s what you’ll need to create your own Easy Grilled Cheese Burrito:
-
1 pound Ground Beef (or Turkey/Plant-based Meat)
- This is the heart of our burrito! Ground beef gives a rich flavor, but feel free to swap in ground turkey for a leaner option or plant-based meat for a vegetarian delight!
-
1 packet Taco Seasoning
- Spice it up! You can use store-bought or make your own with chili powder, cumin, garlic powder, and a pinch of salt for those who like it fresh and homemade.
-
2 cups Cooked White Rice
- Adds volume and texture. Brown rice or quinoa are great swaps if you’re looking for a nuttier flavor or extra health benefits!
-
1 cup Sour Cream (or Greek Yogurt/Dairy-Free Alternatives)
- The creaminess factor! Regular sour cream is lovely, but yogurt gives a tangy zip, and there are many great dairy-free yogurts if you prefer.
-
1 cup Nacho Cheese Sauce
- Go for the classic, or whip up homemade cheese sauce for a special touch. Vegan cheese sauce is an excellent choice for our plant-based friends!
-
1 cup Shredded Cheddar Cheese
- Adds that cheesy goodness! Feel free to mix in mozzarella or a Mexican blend to amp up the flavors.
-
1 cup Shredded Mozzarella Cheese (optional)
- More cheese equals more fun! If you’re watching your dairy intake, you can skip this or use a lower-fat cheese.
-
1 tablespoon Chipotle Sauce
- Adds a nice kick! Adjust according to your spice level—just a hint creates a fabulous smoky flavor.
-
4 large Flour Tortillas
- The ultimate wrap! Whole wheat tortillas are healthier, and gluten-free tortillas work perfectly too.
-
2 tablespoons Butter or Oil
- To grill those burritos to crispy perfection! Olive oil is a lovely substitute if you’re aiming for a healthier option.
Step-by-Step Instructions
Alrighty, let’s get cooking! Grab your apron (or that comfy shirt—no judgment here!), and let’s embark on this cheesy journey!
-
Cook the Ground Beef:
- Heat a large skillet over medium heat and add the ground beef. Cook until browned, breaking it apart with a spatula. It should take about 7–10 minutes. Chef tip: Drain the fat if you’re using beef to keep things from getting too greasy!
-
Season the Beef:
- Once the beef is cooked, sprinkle the taco seasoning over it. Pour in a splash of water if needed to help distribute those spices. Stir until everything is well coated. Let it simmer for a couple of minutes to let those flavors meld! Want a kick? Toss in some diced jalapeños or a pinch of cayenne pepper.
-
Mix with Rice:
- Remove your skillet from heat and fold in the cooked rice until well mixed. That rice gives a lovely fluffy texture and stretches those tasty ground flavors!
-
Prepare the Tortillas:
- On a clean countertop or cutting board, lay out your tortilla. Scoop about a generous half cup of the beef-rice mixture towards the center. Drizzle over the nacho cheese sauce, and add a dollop of sour cream. Don’t be stingy with the toppings!
-
Add the Cheeses:
- Sprinkle some shredded cheddar and mozzarella on top of the filling. Chef hack: Use pre-shredded cheeses for convenience or, if you’ve got time, shred your own for fresher flavors!
-
Roll ‘Em Up:
- Fold in the sides of the tortilla first, then roll it from the edge closest to you diagonally over the filling until you have a nice tight burrito. Protip: Make sure it’s snug, so nothing spills out while grilling!
-
Grill Time:
- In the same skillet or a griddle over medium heat, melt butter (or drizzle olive oil). Place the burrito seam side down and toast for about 3-4 minutes on each side until golden brown and crispy. Keep an eye on it! You want it to get that golden color without burning.
-
Slice and Serve:
- After that perfect crispiness is achieved, remove it from the skillet and slice it in half. The melty insides will ooze just a bit—yum! Let it cool for a moment before serving, but you’ll want to dive right in!
Serving Suggestions
Time to make it look as good as it tastes! Here’s how to plate your Easy Grilled Cheese Burrito:
-
Simple Plating: Place the halved burrito on a rustic wooden board or a colorful plate. You can add a drizzle of additional nacho cheese or a spoonful of sour cream on the side. A sprinkle of chopped cilantro or green onions for a fresh pop always looks gourmet!
-
Add Sides: Consider serving with a fresh side of guacamole or salsa for dipping. You want those vibrant colors and flavors to make everyone drool!
-
Garnish: If you’re feeling fancy, throw on some sliced jalapeños or a sprinkle of chili flakes for an extra sprinkle of flair. Your guests (or family!) will think you’re a culinary rock star!
Recipe Variations
Let’s keep things interesting! Here are a few creative twists and variations to try with your Easy Grilled Cheese Burrito:
-
Veggie Delight: Swap the ground beef for sautéed mushrooms, bell peppers, and black beans. Add some fresh spinach for a vibrant, healthy take!
-
Tex-Mex Spanish Fusion: Add some zesty chili con carne sauce instead of regular taco seasoning. Pair it with a Spanish rice mix instead of white rice for a fiesta in your mouth!
-
Buffalo Chicken Twist: Swap in shredded cooked chicken tossed in buffalo sauce and a sprinkle of blue cheese for a spicy kick! Pair it with a side of ranch dressing for dipping.
-
Breakfast Burrito: Add scrambled eggs and sautéed onions for a hearty breakfast option! Throw in some crispy bacon for extra flavor or chorizo for a Mexican twist.
-
Loaded Vegan: Use jackfruit or lentils as the protein base, and switch out all dairy ingredients for a vegan alternative. Top with avocado slices for healthy fats!
Chef’s Notes
Every kitchen has its adventures, and this recipe has evolved over time in my kitchen! I remember one particularly chaotic evening when I decided to get creative and accidentally added too much chipotle sauce. The result? A delicious smoky mess so good that my friends still ask for the ‘spicy version’ whenever they see me. Laughter was certainly the ingredient of the night!
Food should never be intimidating—it should be an adventure! So, feel free to take risks with this dish. Remember, the kitchen is your playground!
FAQs and Troubleshooting
Q: Why is my burrito falling apart?
- A: It could be a few factors! Make sure to roll it tightly and don’t overfill it. If the tortilla is too dry, it might crack, so warm them gently before adding the filling.
Q: Can I freeze these burritos?
- A: Absolutely! Wrap them tightly in foil or plastic wrap and freeze. When you’re ready to enjoy, just pop them in the oven at 375°F (190°C) for about 25 minutes, and they’ll be all warmed up!
Q: What is the best way to reheat leftovers?
- A: Try reheating in a skillet to maintain that crispness or the oven instead of the microwave. You want that cheesy goodness to stay melty without getting soggy!
Q: How can I make this dish vegetarian or vegan?
- A: Use plant-based ground meat, skip the cheese or choose vegan varieties, and switch out the sour cream for plant-based yogurt! Substitute the butter with olive oil, and you’re golden!
Nutritional Info
Let’s talk numbers! Each burrito (assuming you’re using ground beef and traditional ingredients) will range around:
- Calories: Approximately 525–575 calories
- Protein: 30–35 grams (depending on the meat)
- Fats: 25–30 grams
- Carbohydrates: 45–50 grams
Note: Adjustments based on swaps, such as using turkey or plant-based meat, will change nutritional values significantly for the better!
Final Thoughts
And there you have it—the Irresistible Easy Grilled Cheese Burrito that’s sure to become a staple in your home! Cooking is an expression, and combining ingredients doesn’t have to be about rigidity; it’s about joy, exploration, and bringing people together. Whether you’re sharing this with friends or enjoying it solo during a Netflix binge, it’s the kind of meal that fills not just your stomach but your heart as well.
So, don’t wait any longer—grab those ingredients, get into the kitchen, and whip up this delightful burrito. Remember, food is about community, laughter, and love—and with this dish, you’re sure to leave everyone craving for more! Happy cooking, my friends—let’s make some kitchen magic!
Print
Easy Grilled Cheese Burrito
- Total Time: 35 minutes
- Yield: 4 servings 1x
- Diet: Vegetarian
Description
A delicious melty masterpiece combining grilled cheese and burrito goodness, featuring ground beef or turkey and ooey-gooey cheese.
Ingredients
- 1 pound Ground Beef (or Turkey/Plant-based Meat)
- 1 packet Taco Seasoning
- 2 cups Cooked White Rice
- 1 cup Sour Cream (or Greek Yogurt/Dairy-Free Alternatives)
- 1 cup Nacho Cheese Sauce
- 1 cup Shredded Cheddar Cheese
- 1 cup Shredded Mozzarella Cheese (optional)
- 1 tablespoon Chipotle Sauce
- 4 large Flour Tortillas
- 2 tablespoons Butter or Oil
Instructions
- Heat a large skillet over medium heat and add the ground beef. Cook until browned, breaking it apart with a spatula for about 7–10 minutes.
- Sprinkle the taco seasoning over the cooked beef and stir until well coated. Let it simmer for a couple of minutes.
- Remove your skillet from heat and fold in the cooked rice until well mixed.
- Lay out your tortilla and scoop about half a cup of the beef-rice mixture towards the center.
- Drizzle over the nacho cheese sauce and add a dollop of sour cream.
- Sprinkle some shredded cheddar and mozzarella on top of the filling.
- Fold in the sides of the tortilla first, then roll it from the edge closest to you diagonally over the filling.
- Melt butter (or drizzle olive oil) in the same skillet and place the burrito seam side down. Toast for about 3-4 minutes on each side until golden brown.
- Remove from the skillet and slice it in half to reveal the melty insides.
Notes
Feel free to experiment with different fillings or swap the ground beef for plant-based options for a healthier or vegetarian delight.
- Prep Time: 15 minutes
- Cook Time: 20 minutes
- Category: Main Course
- Method: Grilling
- Cuisine: Mexican
Nutrition
- Serving Size: 1 burrito
- Calories: 550
- Sugar: 3g
- Sodium: 600mg
- Fat: 30g
- Saturated Fat: 15g
- Unsaturated Fat: 10g
- Trans Fat: 0g
- Carbohydrates: 45g
- Fiber: 3g
- Protein: 35g
- Cholesterol: 80mg
Keywords: grilled cheese, burrito, comfort food, easy recipe, quick dinner, beef burrito