
One-Pot Anti-Inflammatory Turmeric Chicken Soup for Immunity
Warm Up with My Anti-Inflammatory Turmeric Chicken Soup
Hey there, my fellow food lovers! Welcome back to Feastical, where we’re all about feel-good eats that not only taste amazing but also nourish your body and soul.
Today, I’m thrilled to share one of my all-time favorites: Anti-Inflammatory Turmeric Chicken Soup! It’s the kind of dish that warms you from the inside out, especially on those chilly evenings when all you want is something cozy and satisfying. This soup is packed with nutrients thanks to turmeric, a golden-spiced superstar known for its anti-inflammatory properties. Plus, it’s loaded with fresh vegetables and tender chicken that make it a perfect meal for any day of the week.
Now, this recipe isn’t just about filling your belly; it’s a heartfelt reminder of the importance of delicious comfort food in our lives. So, grab your favorite mug or a trendy bowl, and let’s dive into the details of this delightful dish!
A Taste of Nostalgia
Growing up, my childhood home always smelled of savory stews and bubbling broths. My mom had this magical recipe book she would lug around, filled with notes, spills, and happy memories. But her chicken soup? It was legendary.
I remember cool autumn days when I’d return from school, my fingers cold from the brisk air, and there it was—a pot of steaming soup waiting for me on the stove. The aroma was intoxicating, a fragrant symphony of spices that promised deliciousness.
As I grew older, I started experimenting with my own versions of chicken soup, discovering spices that enhanced flavor and boosted nutrition. Turmeric quickly became a staple in my cooking after hearing about its health benefits and vibrant hue. It’s funny how memories attached to food can make each bite taste even better. Now, this Turmeric Chicken Soup warms my heart, just as my mom’s did, while also fitting perfectly in my kitchen today!
Ingredients
Here’s what you’ll need to create this goodness:
-
1/4 cup olive oil
Great for sautéing and adds healthy fats. You could substitute with avocado oil for a higher smoke point or melted coconut oil for a slight sweetness. -
1 medium onion, diced
Offers a beautiful base for the soup. If you’re not a fan of onions, shallots can be a milder, sweeter option. -
1 large leek, white and light green parts only, halved lengthwise, and thinly sliced
Leeks add a delicate flavor. If unavailable, use extra onion or a couple of green onions in a pinch. -
3 large carrots, thinly sliced
Carrots provide sweetness and color. Feel free to swap with parsnips for an earthier sweetness. -
3 stalks celery, thinly sliced
Adds crunch and depth. If you’re not keen on celery, bell peppers could work, too. -
1 teaspoon kosher salt
Enhances flavor. Adjust according to your taste; sea salt or Himalayan pink salt are great alternatives. -
3 cloves garlic, chopped
Because who doesn’t love garlic? It boosts immunity, so feel free to throw in a few extra cloves if you’re feeling bold! -
1 teaspoon turmeric
The star of our show! Known for its golden hue and health benefits, if you can’t find fresh turmeric, ground will do just fine. -
1 teaspoon poultry seasoning
A blend of thyme, sage, and rosemary that elevates any chicken dish. If you’re feeling adventurous, try making your own blend with your favorite herbs! -
6 cups chicken broth
Provides the soup base. Use homemade for the best flavor, or low-sodium store-bought. Vegetable broth can work for a lighter version too! -
1 (13.5 ounce) can coconut milk
Adds creaminess and a hint of sweetness. Swap with heavy cream or evaporated milk for a richer flavor, or omit for a lighter taste. -
1 1/4 pounds boneless skinless thighs or breasts
Both are great options—thighs are juicier, while breasts are leaner. Use rotisserie chicken for a faster meal. -
1 (10 ounce) bag frozen peas (optional)
A pop of color and sweetness! Feel free to skip or replace with green beans or chopped broccoli. -
1/4 cup chopped fresh parsley
Fresh herbs brighten flavors! Basil or cilantro could also work well, depending on your tastes. -
1 teaspoon kosher salt, or to taste
Seasoning is key! Just keep in mind to adjust based on your broth. -
1/2 teaspoon black pepper
A dash of spice that elevates the entire dish!
Step-by-Step Instructions
Alright, let’s get cooking! Here’s how to whip up this delightful soup:
-
Heat the Olive Oil:
In a large pot over medium heat, add the olive oil. Let it warm up for about a minute. This step is crucial because it helps bloom the flavors of the vegetables we’ll add next. -
Sauté the Veggies:
Toss in your diced onion and sliced leek. Sauté for about 5-7 minutes until they’re translucent and fragrant. Keep stirring occasionally to prevent any sticking at the bottom. The aroma will start filling your kitchen, and let me tell you, it’s one of the best parts! -
Carrots and Celery Next:
Add the sliced carrots and celery. Stir them in and let them soften for another 5 minutes. These veggies add so much texture and flavor to the soup. -
Season with Salt and Garlic:
Sprinkle in the kosher salt and add the chopped garlic. Stir it well and let them cook for an additional minute. Garlic loves a short cook time; it can get bitter if overcooked. -
Spices, Baby:
Make the pot aromatic by adding the ground turmeric and poultry seasoning. Don’t be shy—stir for about 30 seconds to a minute to let those spices toast up beautifully! -
The Broth Comes in:
Pour in the 6 cups of chicken broth. Give it a good stir to combine everything. Bring this to a gentle simmer, and let the flavors meld together. -
Coconut Milk Love:
Pour in the can of coconut milk! Not only does this make the soup creamy, but it also adds that tropical flair. Stir well! -
Add the Chicken:
Now it’s time to add your chicken—thighs or breasts, you decide. Allow the chicken to poach gently in that bubbling broth. This should take about 15-20 minutes. You’ll know it’s done when it’s cooked through and juicy. -
Shred It Up:
Once the chicken is cooked, remove it from the pot and let it cool slightly. Then shred it using two forks (or your fingers if you’re feeling adventurous!). Toss the shredded chicken back into the pot. -
Frozen Peas (If Using):
If you’re using frozen peas, stir them in now and let the soup cook for another 5 minutes. They’ll warm up quickly and add a lovely pop of color! -
Garnish and Serve:
Finish with fresh parsley and adjust the taste with more salt and pepper as needed. Serve the soup hot, optionally with some crusty bread for dunking!
Serving Suggestions
Plating soup can be an artform, so let’s make it count! Use a large, deep bowl that allows for easy sipping. Ladle the steaming soup into your bowls, ensuring a good mix of chicken, veggies, and broth in each serving.
For that extra wow-factor, sprinkle with more fresh parsley or even a dollop of Greek yogurt or sour cream for creaminess! Consider serving with a few slices of freshly toasted bread or a light salad on the side for a complete meal.
Recipe Variations
Ready to mix things up a bit? Here are some fun variations you can try:
-
Spicy Addition: Add a pinch of cayenne pepper or red pepper flakes for a warming kick. Just be careful—start small and taste as you go!
-
Herb Swap: Experiment with different herbs like thyme or cilantro to switch up the flavor profile. Fresh dill can also add a delightful zing!
-
Vegetarian Version: Replace chicken with hearty chickpeas or lentils and use vegetable broth alongside the coconut milk for a satisfying plant-based meal.
-
Thai Twist: Add a tablespoon of lime juice and some fish sauce for an Asian-inspired version. Serve it topped with cilantro and a squeeze of lime!
-
Noodle Nice: Incorporate your favorite noodles (like rice noodles or whole-grain pasta) to give the soup an extra hearty feel. Cook them separately and add them just before serving for perfect texture.
Chef’s Notes
You know what they say: cooking is all about improvisation! This soup has evolved through trial and error over the years. There was a time when I overcooked the chicken until it turned into something resembling rubber. Lesson learned: poaching gently is key!
And about the turmeric—it can stain! So, make sure to wear an apron (never a bad idea anyway) and use a non-reactive pot if you can. But hey, a little color on your counter can add to the homey vibe, right?
FAQs and Troubleshooting
Q: What if my soup is too salty?
A: If you find it too salty, try adding a peeled potato to the soup while it simmers. The potato absorbs excess salt. Just remember to remove it before serving!
Q: How can I make the soup thicker?
A: For a thicker soup, you can either puree part of it using an immersion blender or mix 1 tablespoon of cornstarch with water to create a slurry, then stir it in until the desired thickness is achieved.
Q: Can I make this soup ahead of time?
A: Absolutely! This soup tastes even better after sitting in the fridge for a day. Just keep the chicken separate if you’re going to store it for more than a day to avoid overcooking.
Q: What should I do if it’s too spicy?
A: If your soup turned out too spicy, stir in some more coconut milk to mellow the flavors or add sugar to balance out the heat.
Nutritional Info
This Anti-Inflammatory Turmeric Chicken Soup is not just comforting; it’s also packed with nutrients:
- Calories: Approximately 350 per serving
- Protein: 25g (great for muscle recovery)
- Fiber: 5g (from all those wholesome veggies)
- Fat: 20g (from the olive oil and coconut milk, which are heart-healthy!)
- Vitamins: Rich in vitamin A, C, and K thanks to carrots and parsley.
Best of all, turmeric has been shown to fight inflammation and was even hailed as an immune booster during cold and flu season — making this soup a perfect addition to your winter meal plan.
Final Thoughts
There’s something utterly nourishing about a bowl of Anti-Inflammatory Turmeric Chicken Soup. It’s more than just a recipe; it’s comfort food that connects us to memories, family, and, ultimately, each other.
Whether you’re enjoying it on a chilly evening, sharing it with friends, or savoring it solo while catching up on your favorite show, this soup makes every moment a little brighter.
Thank you for joining me today! I hope you’re inspired to whip up this recipe and share your own stories of comfort food. Don’t forget to leave a comment below if you have questions or simply want to share how it turned out. Grab your spatula, and let’s keep spreading that love through food. Happy cooking!
Print
Anti-Inflammatory Turmeric Chicken Soup
- Total Time: 45 minutes
- Yield: 6 servings 1x
- Diet: Gluten-Free
Description
Warm and nourishing chicken soup infused with anti-inflammatory turmeric and loaded with fresh vegetables.
Ingredients
- 1/4 cup olive oil
- 1 medium onion, diced
- 1 large leek, white and light green parts only, halved lengthwise and thinly sliced
- 3 large carrots, thinly sliced
- 3 stalks celery, thinly sliced
- 1 teaspoon kosher salt
- 3 cloves garlic, chopped
- 1 teaspoon turmeric
- 1 teaspoon poultry seasoning
- 6 cups chicken broth
- 1 (13.5 ounce) can coconut milk
- 1 1/4 pounds boneless skinless thighs or breasts
- 1 (10 ounce) bag frozen peas (optional)
- 1/4 cup chopped fresh parsley
- 1 teaspoon kosher salt, or to taste
- 1/2 teaspoon black pepper
Instructions
- Heat the olive oil in a large pot over medium heat for about a minute.
- Toss in your diced onion and sliced leek, sautéing for about 5-7 minutes until translucent.
- Add the sliced carrots and celery, stirring them in for another 5 minutes.
- Sprinkle in the kosher salt and garlic, stirring and cooking for an additional minute.
- Make the pot aromatic by adding turmeric and poultry seasoning, stirring for about 30 seconds.
- Pour in the chicken broth, stirring to combine, and bring to a gentle simmer.
- Add the coconut milk, stirring well to incorporate.
- Add your chicken and poach gently in the bubbling broth for about 15-20 minutes.
- Remove the chicken to cool slightly, then shred it and return it to the pot.
- If using frozen peas, stir them in and let cook for another 5 minutes.
- Finish with fresh parsley and adjust seasoning before serving.
Notes
Serve hot with crusty bread for dunking. Can be made ahead and tastes even better the next day.
- Prep Time: 15 minutes
- Cook Time: 30 minutes
- Category: Soup
- Method: Stovetop
- Cuisine: American
Nutrition
- Serving Size: 1 serving
- Calories: 350
- Sugar: 5g
- Sodium: 800mg
- Fat: 20g
- Saturated Fat: 10g
- Unsaturated Fat: 8g
- Trans Fat: 0g
- Carbohydrates: 30g
- Fiber: 5g
- Protein: 25g
- Cholesterol: 70mg
Keywords: turmeric, chicken soup, anti-inflammatory, healthy recipe, comfort food
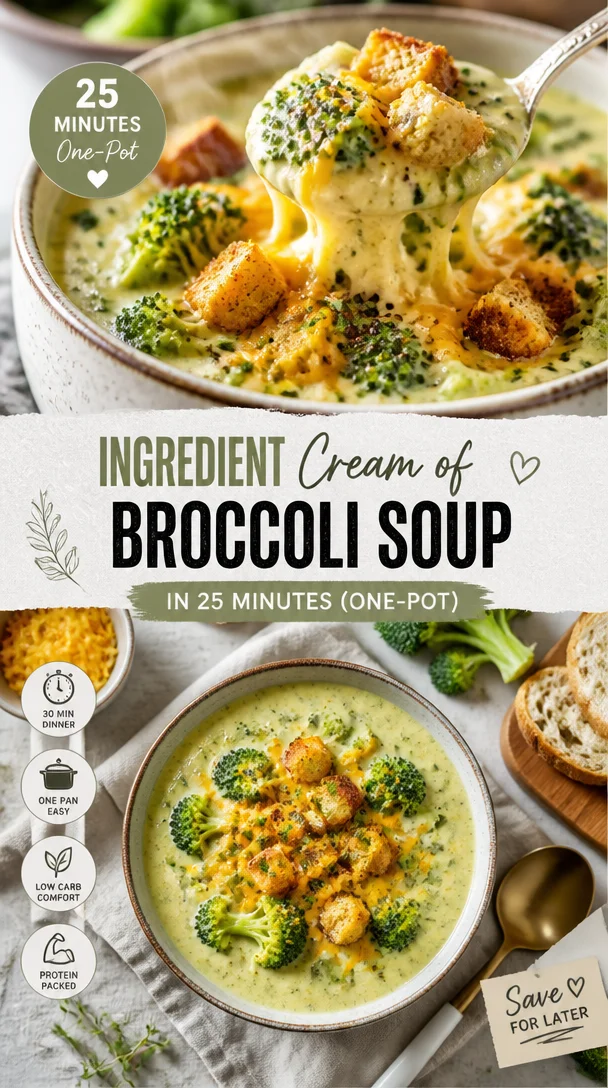
Ingredient Cream of Broccoli Soup in 25 Minutes (One-Pot)
Cream of Broccoli Soup: A Warm Hug in a Bowl
Hey there, food lovers! Welcome to Feastical, where we whip up dishes that feel just as good to eat as they do to create. Today, we’re diving into a timeless classic—Cream of Broccoli Soup. Trust me, once you get a taste of this velvety goodness, it’ll become your go-to for cozy nights in or when you need a little pick-me-up. But before we jump into the kitchen, let me share a little story about why this soup holds such a special place in my heart.
A Trip Down Memory Lane
When I think of broccoli soup, I can’t help but remember chilly winter evenings spent at my grandmother’s house. She had this old, well-loved cookbook that was filled to the brim with handwritten notes and splatters from years of cooking. One particularly frosty night, I walked in to find her humming softly as she stirred a bubbling pot on the stove. The aroma of garlic and fresh broccoli filled the air, a warm welcome that made all my worries fade away.
As a kid, I wasn’t the biggest fan of vegetables—you know, the usual broccoli rebellion most kids go through. But my grandma had a way of transforming them into something magical. She’d ladle that creamy soup into mismatched bowls, and just like that, I forgot about any veggie drama. Instead, I was savoring each rich spoonful and feeling warmth spread through my belly. That experience, bursting with love and flavor, became a cherished memory, a thread woven into my culinary fabric. Now, I replicate her recipe with a twist, sharing my version of this meal that hugs you from the inside out.
Ingredients
Let’s get down to business, shall we? Here are the key players in our Cream of Broccoli Soup. You might already have some of these in your pantry!
-
2 tablespoons unsalted butter
This will add a rich flavor and help sauté our aromatics. If you’re looking for a dairy-free alternative, you can use olive oil or a plant-based butter. -
1 medium yellow onion, diced
A staple in many soups, the onion brings sweetness and depth. If you’re sensitive to onion, feel free to substitute with leeks or shallots for a milder taste. -
2 cloves garlic, minced
Garlic is the superstar ingredient that elevates the flavor profile. For garlic lovers, you can definitely add more! For a milder flavor, consider using roasted garlic instead. -
1 pound fresh broccoli florets, chopped
Fresh is ideal, but frozen broccoli will also work in a pinch. Just make sure to thaw and drain any excess moisture to prevent a watery soup. -
3 cups vegetable stock
This is the base of your soup. If you don’t have vegetable stock, chicken stock is a great option for added flavor. You can also make your own stock to control ingredients, especially salt. -
1 cup heavy cream
Cream gives the soup its signature richness. If you’re looking for a lighter option or a vegan substitute, try coconut cream or cashew cream. -
0.5 teaspoon kosher salt
Always essential but see my notes on seasoning later—taste as you go! -
0.25 teaspoon ground black pepper
This adds a dash of spice. If you want to kick it up a notch, swap with red pepper flakes! -
0.25 teaspoon ground nutmeg
Nutmeg can enhance the earthiness of the broccoli and adds a lovely warmth; however, you can leave it out if you’re not a fan.
Step-by-Step Instructions
Let’s get cooking! Follow these steps, and I promise you’ll have a bowl of deliciousness ready in no time.
-
Prepare Your Ingredients:
Ensure all your ingredients are at hand! This makes for a smoother cooking process. Chop that onion, mince those garlic cloves, and get your broccoli ready! -
Sauté the Aromatics:
In a large pot, melt the unsalted butter over medium heat. Once it’s melted, add in the diced onion. Sauté for about 5 minutes until they soften and turn translucent. Don’t rush this step—this is where the flavor starts to bloom! Toss in the minced garlic and sauté for another minute. The smell will surely tempt your taste buds! -
Add the Broccoli:
Now, it’s time for the star of the show! Add the chopped broccoli florets into the pot. Sauté for about 3-4 minutes. You want the broccoli to retain its vibrant green color but start to soften just a bit. It’s all about layering that flavor! -
Pour in the Vegetable Stock:
Time to add the depth! Pour in the vegetable stock. Bring this concoction to a gentle boil. Then lower the heat and let it simmer for about 10-15 minutes until the broccoli is tender. If you’re feeling bold, give it a taste and adjust that salt and pepper! -
Blend It Up:
Here’s where the magic happens! Using an immersion blender, blend the soup until it’s creamy and smooth. If you don’t have an immersion blender, carefully transfer the soup to a regular blender in batches and blend until smooth. Just be cautious—hot soup can splatter! -
Add the Cream:
Now, back to the pot! Stir in that delicious heavy cream to give it the richness it deserves. Keep it on low heat for just a few more minutes—don’t let it boil! -
Taste and Adjust:
The final step! Taste your soup and adjust with salt, pepper, or a dash more nutmeg. This is your masterpiece—make it sing!
Serving Suggestions
Ah, the best part—serving your creation! Cream of Broccoli Soup always deserves a little love on presentation. Here are some ideas to make it visually stunning:
-
Classic Bowl: Ladle the soup into a rustic bowl (because who doesn’t love a bit of charm?) and garnish with a drizzle of cream. Maybe a few toasted croutons on top for that extra crunch!
-
Herb Garnish: A sprinkle of fresh herbs like chives or parsley can elevate the dish. They add a lovely color and fresh flavor that pairs perfectly with the creamy soup.
-
Bread Sidekick: Serve with a crusty slice of hearty bread or a warm baguette for dunking. Trust me; nothing is better than a good dunk!
Recipe Variations
Now that you have the basics down, let’s add some fun twists! Here are some creative variations you can try:
-
Cheesy Goodness: Stir in a cup of sharp cheddar cheese just after blending. This makes for a creamy, cheesy broccoli soup that’s absolutely scrumptious!
-
Spicy Kick: Add a teaspoon of red pepper flakes or a dash of hot sauce during the sautéing phase for those who like a little heat.
-
Different Greens: Swap out half of the broccoli with spinach or kale for a nutrient boost. They blend beautifully and give your soup a vibrant green!
-
Nutty Flavor: Before serving, sprinkle toasted sunflower seeds or chopped walnuts on top for added texture and a nutty flavor.
-
Vegan Delight: Stick with the vegetable stock, swap the cream for coconut cream or nut milk, and you have a delightful vegan broccoli soup!
Chef’s Notes
This recipe has come a long way since Grandma’s original. I remember her adding whatever was leftover in her fridge to replicate flavors. Over the years, I’ve experimented, and today’s version reflects my love for creaminess with a touch of decadence! Funny story: one time, I realized halfway through that I was out of cream, so I used soy milk instead and added more garlic for flavor. Let’s just say it was a surprise and didn’t turn out half bad!
FAQs and Troubleshooting
-
Why is my soup too thick? If your soup turns out thicker than you want, simply add more vegetable stock or water until it reaches your desired consistency.
-
My soup is too salty! What can I do? If you over-salted your soup, adding a few cubes of potato while it simmers can help absorb some of the salt. You can also add more vegetable stock to balance the flavors.
-
Can I freeze this soup? Absolutely! Just let it cool completely before transferring it to freezer-friendly containers. It can be stored for up to three months. Just thaw in the fridge before reheating.
-
Why is my soup not smooth? If you don’t have an immersion blender, ensure to blend in small batches if using a regular blender. Make sure the lid is secure and don’t overfill to prevent splatter!
Nutritional Info
When calculating the nutritional content for Cream of Broccoli Soup, here’s a rough breakdown per serving (about 1 cup):
- Calories: 280-320
- Fat: 23g (primarily from cream)
- Carbohydrates: 16g
- Protein: 6g
- Fiber: 6g
Keep in mind that variations in ingredients can affect these numbers, especially if you’re adding cheese or cream. Overall, though it’s indulgent, it’s packed with nutrients and can definitely fit into a balanced diet!
Final Thoughts
There you have it—the heartwarming and inviting Cream of Broccoli Soup! Every spoonful is an invitation to slow down, savor, and enjoy life’s simple pleasures. Whether it’s a chilly evening or a cozy lunch at home, this soup makes everything better. So, what are you waiting for? Grab those ingredients, get cooking, and relish the comfort that comes with making something delicious.
Thank you for joining me in my kitchen today! I can’t wait to hear how your version turns out. Feel free to drop a comment or share your thoughts. Until next time, happy cooking, and remember—food is all about love and connection!
Print
Cream of Broccoli Soup
- Total Time: 40 minutes
- Yield: 4 servings 1x
- Diet: Vegetarian
Description
A cozy and creamy broccoli soup that brings warmth and comfort with every spoonful.
Ingredients
- 2 tablespoons unsalted butter
- 1 medium yellow onion, diced
- 2 cloves garlic, minced
- 1 pound fresh broccoli florets, chopped
- 3 cups vegetable stock
- 1 cup heavy cream
- 0.5 teaspoon kosher salt
- 0.25 teaspoon ground black pepper
- 0.25 teaspoon ground nutmeg
Instructions
- Prepare your ingredients: Ensure all your ingredients are at hand.
- Sauté the aromatics: In a large pot, melt the butter over medium heat.
- Add the broccoli: Add the chopped broccoli florets into the pot.
- Pour in the vegetable stock: Bring to a gentle boil and let it simmer.
- Blend it up: Using an immersion blender, blend the soup until creamy.
- Add the cream: Stir in the heavy cream and keep it on low heat for a few more minutes.
- Taste and adjust: Taste your soup and adjust seasonings as needed.
Notes
For a vegan option, substitute heavy cream with coconut cream. Serve with crusty bread or garnished with fresh herbs.
- Prep Time: 10 minutes
- Cook Time: 30 minutes
- Category: Soup
- Method: Blending
- Cuisine: American
Nutrition
- Serving Size: 1 cup
- Calories: 300
- Sugar: 3g
- Sodium: 700mg
- Fat: 23g
- Saturated Fat: 13g
- Unsaturated Fat: 6g
- Trans Fat: 0g
- Carbohydrates: 16g
- Fiber: 6g
- Protein: 6g
- Cholesterol: 70mg
Keywords: broccoli soup, comfort food, vegetarian soup, creamy soup

One-Pot Sweet Potato Turkey Chili for Weeknight Dinners
Sweet Potato Turkey Chili: A Heartwarming Comfort Food
Hey there, foodies! Welcome back to Feastical! Today, I’ve got something truly comforting for you: Sweet Potato Turkey Chili. This dish is like a warm hug on a chilly evening, and it’s packed full of flavor. Perfect for cozy nights in or when you want to impress your friends at dinner! And the best part? It’s easy to make and guarantees seconds—or maybe thirds!
A Bowl Full of Memories
Let me take you back to a crystal-clear autumn evening a few years ago. Picture this: I was in my kitchen, the aroma of chili bubbling away on the stovetop, while the leaves outside danced to the ground in shades of orange and gold. My roommate at the time, Sam, was prepping cornbread, adding just a touch of honey to the batter because, well, why not?
We had invited a bunch of friends over, and it was one of those laid-back gatherings where everyone felt at home. As the sun dipped below the horizon, we all gathered around the kitchen counter—my favorite place, where food and laughter flow.
When we finally dug into that Sweet Potato Turkey Chili, it was one of those magical moments where every bite felt like a celebration. The chili was filling, the sweet potato brought a lovely sweetness that balanced the spices perfectly, and the turkey gave it a heartiness that was just right. We topped it off with crispy tortilla chips, a dollop of sour cream, and a sprinkle of fresh cilantro. Can you say heaven on a plate?
That evening taught me something special: food isn’t just about nutrition; it’s about connection. It’s about gathering the people you love around a table and sharing stories, flavors, and laughter. And that’s exactly what this chili embodies!
Ingredients
Let’s dive into the ingredients that will transform your kitchen into flavor town while ensuring your sweet potato turkey chili is full of deliciousness.
-
1 lb ground turkey: A lean protein that’s perfect for keeping things light. If you’re not into turkey, feel free to swap in ground chicken or even plant-based crumbles for a vegetarian option!
-
2 large sweet potatoes, diced: These little beauties add sweetness and a creamy texture. Not a fan of sweet potatoes? Try using butternut squash or regular potatoes instead for that hearty base.
-
1 can diced tomatoes: The foundation of our chili. You can use fire-roasted diced tomatoes for an extra smokey flavor, or even crushed tomatoes if you’re after a thicker consistency.
-
1 cup corn (frozen or canned): Adds sweetness and texture. I love using frozen corn in the winter months; it tastes fresh and is super easy to grab from the freezer.
-
1 onion, chopped: Creates depth and sweetness. Sweet onions or red onions work wonderfully here.
-
2 cloves garlic, minced: Garlic is essential for flavor! If fresh garlic isn’t around, 1/2 tsp of garlic powder can work in a pinch.
-
2 cups chicken broth: This is the soul of the chili! Vegetable broth works too, and for a richer flavor, consider homemade broth or low-sodium styles.
-
1 tablespoon chili powder: This is where the magic happens! Add more for extra heat or use mild paprika if you’re sensitive to spice.
-
1 teaspoon cumin: Adds that warm, earthy flavor. Ground coriander could be a nice alternative for a different twist.
-
Salt and pepper to taste: Essential for flavor! Always season toward the end to adjust according to your liking.
-
Olive oil for cooking: A splash to get things sizzling! You could use avocado oil or even butter for a richer taste.
With these ingredients, you’re on your way to producing an aromatic pot of sweet potato turkey chili that will make your kitchen smell divine!
Step-by-Step Instructions
Now that we have our ingredients ready, let’s get down to cooking this delicious dish.
-
Prep Your Ingredients: Imagine you’re at a beautiful farmer’s market—take your time to chop your sweet potatoes and onions. Mindfulness in cooking is important!
-
Heat the Olive Oil: In a large pot or Dutch oven, pour in a tablespoon of olive oil over medium heat. Let it warm for a couple of minutes; you want it glistening, not smoking.
-
Sauté the Veggies: Toss the chopped onion into the pot and sauté for about 3-4 minutes until they’re translucent. Don’t rush this step! Let that sweetness develop! Add in the minced garlic and keep stirring for another minute—trust me, you want to smell that garlicky goodness wafting through your kitchen!
-
Brown the Turkey: Now, add in the ground turkey. Break it apart with your spoon and sauté until it’s fully cooked and browned, which takes about 5-7 minutes. Keep stirring to ensure even browning and that you don’t have any pink left.
-
Add the Sweet Potatoes: Stir in your diced sweet potatoes and cook for an additional 3 minutes. This pre-cooking step helps to slightly soften them before adding the liquids.
-
Pour in the Goodness: Now, it’s time for the chicken broth and diced tomatoes. Stir everything well, scraping up any bits that may have stuck to the bottom of the pot.
-
Spice it Up: Sprinkle in the chili powder, cumin, salt, and pepper. Stir and let it simmer for about 30 minutes. If it looks too thick, add a touch more broth; if it’s too soupy, let it simmer uncovered. You’re in charge of the consistency here!
-
Add the Corn: About 5 minutes before serving, toss in the corn. Stir it in and let it warm through for a wonderful pop of sweetness!
-
Final Taste Check: Give it a taste and adjust the seasoning if needed. Sometimes, adding a dash of lime juice or a pinch of cayenne can take it to the next level!
-
Serve: Once everything is perfectly cooked and flavorful, remove from heat and allow to cool slightly before serving.
With each step, take a moment to enjoy the aromas, maybe sip on a glass of something refreshing—this part is as crucial as the cooking itself!
Serving Suggestions
I love to serve this Sweet Potato Turkey Chili in hearty bowls! Top it with some crushed tortilla chips for that crunch, a dollop of sour cream or Greek yogurt for creaminess, and a sprinkle of fresh cilantro for a burst of freshness. If you’re feeling extra cheesy (who isn’t?), a handful of shredded cheese on top can make everything even more delightful.
Pair it with some warm cornbread or a side salad, and you’ve got yourself a fantastic meal. And let’s be honest—this dish is perfect for meal prep too! It tastes even better after a day in the fridge, and reheating it yields a comforting dinner in a snap.
Recipe Variations
Now, if you’re anything like me, you love to switch things up! Here are some fun variations to keep your chili game fresh:
-
Spicy Kick: Add in a diced jalapeño for a fiery twist. If you love heat, toss in some cayenne pepper or crushed red pepper flakes!
-
Beans Galore: Throw in a can of black beans or kidney beans to up the protein and fiber.
-
Vegan Delight: Swap the ground turkey for plant-based crumbles and use vegetable broth. I promise you won’t miss the meat!
-
Extra Veggies: Add in chopped bell peppers, zucchini, or any leftover veggies lurking in your fridge for more taste and nutrition.
-
Sweet & Savory: Drizzle a bit of maple syrup for a sweet contrast to the heat. It’s not expected, but it’s oh-so-good!
With all these variations, it’s like having a whole new dish every time you cook it! Love that versatility!
Chef’s Notes
I’ve been making this chili for a few years now, and it’s evolved beautifully over time. The first version was far too spicy—my friends still tease me about it! With every batch, I learned something new about balance and flavor.
Honestly, I just love the way this recipe brings people together. It’s perfect for casual dinners, game days, or even cozy nights on the couch. Plus, it’s a total crowd-pleaser. I once had a guest declare it the best chili they’d ever had, and that seriously made my day!
FAQs and Troubleshooting
1. Why is my chili too watery?
If your chili turns out too runny, let it simmer an additional 10-15 minutes uncovered to allow some of that liquid to evaporate. Alternatively, if you prefer it thicker, mash or blend a small portion of the sweet potatoes into the pot.
2. Can I freeze this chili?
Absolutely! Once cooled, transfer it to an airtight container or zip-top bag and freeze for up to 3 months. Just thaw it overnight in the fridge before reheating!
3. How can I make it spicier?
If you’re ready to bring the heat, add more chili powder or diced jalapeños. A dash of hot sauce can also work wonders. Just remember to taste as you go!
4. What do I do if I don’t have chicken broth?
No worries, my friend! You can use vegetable broth, water with a splash of soy or Worcestershire sauce, or even tomato juice for a unique twist.
Nutritional Info
Now let’s chat about nutrition! This Sweet Potato Turkey Chili is not just tasty but also nutrient-packed. Each serving offers an excellent balance of protein, fiber, and a variety of vitamins from the sweet potatoes and corn. Here’s a quick rundown for one serving:
- Calories: Approximately 350
- Protein: 25g
- Fat: 10g
- Carbohydrates: 40g
- Fiber: 8g
With all those immune-boosting ingredients, you can enjoy every spoonful knowing you’re nourishing your body as you feast!
Final Thoughts
There you have it, dear friends! A big ol’ pot of Sweet Potato Turkey Chili just waiting to find its way into your hearts and homes. Cooking is not just a task; it’s an experience, a chance to connect and share love through food. Each bowl tells a story, and I can’t wait to hear yours!
So gather your ingredients, roll up those sleeves, and let this recipe inspire you to create something wonderful. And remember, cooking doesn’t always look pretty, but it sure tastes divine. Don’t forget to tag me on social media when you whip up your own chili masterpiece. Happy cooking, and until next time—let the flavors shine!
Print
Sweet Potato Turkey Chili
- Total Time: 60 minutes
- Yield: 4 servings 1x
- Diet: Gluten-Free
Description
A heartwarming sweet potato turkey chili that’s perfect for cozy nights in or gatherings with friends, packed with flavor and nutritious ingredients.
Ingredients
- 1 lb ground turkey
- 2 large sweet potatoes, diced
- 1 can diced tomatoes
- 1 cup corn (frozen or canned)
- 1 onion, chopped
- 2 cloves garlic, minced
- 2 cups chicken broth
- 1 tablespoon chili powder
- 1 teaspoon cumin
- Salt and pepper to taste
- Olive oil for cooking
Instructions
- Prep your ingredients: chop your sweet potatoes and onions.
- Heat the olive oil in a large pot over medium heat.
- Sauté the chopped onion for 3-4 minutes until translucent, then add garlic and stir for another minute.
- Brown the ground turkey for 5-7 minutes until fully cooked.
- Add the sweet potatoes and cook for 3 minutes.
- Pour in the chicken broth and diced tomatoes, scraping up any bits stuck to the pot.
- Spice it up with chili powder, cumin, salt, and pepper, and let it simmer for 30 minutes.
- Add the corn 5 minutes before serving.
- Final taste check and adjust seasoning.
- Serve in bowls with toppings of choice.
Notes
Perfect for meal prepping; tastes even better the next day!
- Prep Time: 15 minutes
- Cook Time: 45 minutes
- Category: Main Course
- Method: Stovetop
- Cuisine: American
Nutrition
- Serving Size: 1 serving
- Calories: 350
- Sugar: 6g
- Sodium: 500mg
- Fat: 10g
- Saturated Fat: 2g
- Unsaturated Fat: 8g
- Trans Fat: 0g
- Carbohydrates: 40g
- Fiber: 8g
- Protein: 25g
- Cholesterol: 75mg
Keywords: chili, turkey, sweet potato, comfort food, easy recipes

One-Pot Chicken Gnocchi Soup: Olive Garden Copycat Recipe
The Cozy Comfort of Olive Garden Chicken Gnocchi Soup
Hey there, food lovers! If you’re here, it means you’re ready to dive into a bowl of pure bliss—Olive Garden Chicken Gnocchi Soup. This dish isn’t just a meal; it’s a warm hug in a bowl, a soul-soothing delight that brings memories rushing back like the aroma of home-cooked goodness. So, let’s get comfy, grab that spatula, and start stirring up some magic.
A Warm Bowl of Memories
I can still remember the first time I tasted Chicken Gnocchi Soup at Olive Garden. I was a fresh-faced college student, and dinner with friends was always a special occasion. We’d pile into the restaurant, the comforting smells wrapping around us like a cozy blanket as we ordered our usuals. But on that particular night, I ventured out of my comfort zone. I decided to try this creamy soup, and oh boy, it was a game changer!
With each spoonful, I was hit with flavors that danced across my palate—tender chicken, silky gnocchi, and vibrant veggies making for the perfect blend of heartiness and comfort! I loved how it made me feel—happy, fulfilled, and ready to take on the world (or at least get through my next exam). That moment sparked my love for cooking, inspiring me to recreate the exact magic in my own kitchen. So, here I am today, sharing this cherished recipe with you!
Ingredients You’ll Need
Let’s jump into the heart of this recipe: the ingredients. Here’s what you’ll need to create this delicious, comforting soup:
-
1 pound boneless skinless chicken breasts (cooked and shredded)
A great source of protein, pre-cooked and shredded for easy use. You can substitute rotisserie chicken for convenience! -
1 tablespoon olive oil
This adds richness and depth. If you’re out, butter can work as a substitute—just keep it classic! -
4 tablespoons butter
Ah, the magic of butter! Its creamy goodness elevates the soup. If you’re watching your dairy intake, try using vegan butter. -
1/4 cup all-purpose flour
This will help thicken our soup. For gluten-free alternatives, cornstarch can do the trick—simply mix it with a bit of water before adding it to the pot. -
1 small onion (chopped)
Onion adds a savory base flavor. Feeling adventurous? Shallots or leeks are fantastic substitutes. -
2 garlic cloves (minced)
Garlic is a flavor powerhouse! Swap in garlic powder in a pinch—1/4 teaspoon will do. -
6 cups chicken broth
A comforting base filled with flavor. Low-sodium varieties work too! Vegetable broth is a great alternative for a veggie-packed soup. -
2 cups milk
This creates the creamy texture. Use almond milk or oat milk for a dairy-free option. -
1 cup carrots (shredded)
Carrots add sweetness and color. You can use frozen shredded carrots if fresh ones aren’t available. -
2 teaspoons parsley flakes
Freshness in every bite! Feel free to substitute with thyme or basil for a different flavor profile. -
Salt and pepper for seasoning
Always essential for flavor enhancement. Adjust to your taste preferences! -
1 package (16 ounces mini potato gnocchi)
The star of the soup! If you can’t find gnocchi, consider substituting it with small pasta shapes like ditalini or orzo. -
1 cup fresh spinach (chopped)
Spinach adds nutritional value and a pop of color. Kale is a sturdy substitute, and it holds up well when cooked!
Step-by-Step Instructions to Soup Perfection
Now that we’ve gathered our ingredients, it’s time to embark on this culinary adventure! Follow these detailed steps to whip up your very own Olive Garden Chicken Gnocchi Soup:
-
Prep the Ingredients
Start by shredding your cooked chicken. This step can be done ahead of time; I often make extra chicken just for this soup! It saves time and adds an extra layer of flavor. -
Sauté the Aromatics
In a large pot, heat the olive oil over medium heat. Add the chopped onion and sauté until it becomes translucent and fragrant—about 5 minutes. Your kitchen will start smelling amazing at this point! -
Garlic Time
Stir in the minced garlic and cook for an additional minute. Remember not to overcook it; burnt garlic can ruin the flavor and we want this soup to shine! -
Make it Creamy
Now, sprinkle the flour over the onion and garlic mixture and stir constantly for about 2-3 minutes. This creates a roux that will thicken our soup. Don’t rush this step; it builds the base! -
Add the Broth and Milk
Gradually pour in the chicken broth while continuously stirring to prevent lumps. Then add the milk, and bring the mixture to a gentle simmer. This is where the magic begins to happen! -
Add the Carrots and Chicken
Toss in the shredded carrots and cooked chicken, allowing everything to meld together beautifully. Let it simmer on low for about 10-15 minutes. If you want your carrots extra tender, feel free to let it simmer a bit longer. -
Gnocchi Goes In
Add the mini potato gnocchi to the pot. They will cook quickly, so keep an eye on them! Stir gently as they settle in, and allow them to absorb all the creamy goodness—about 2-3 minutes until they float to the top. -
Flavorful Finishing Touches
Toss in the chopped spinach and parsley flakes, stirring until the spinach wilts. This adds a fresh and vibrant touch to our hearty soup. -
Season to Perfection
Give your soup a taste and add salt and pepper to your liking. Each batch is unique, so adjust these seasonings until the soup sings with flavor for you! -
Serve and Enjoy!
Your heavenly Chicken Gnocchi Soup is ready to embrace you. Ladle it into bowls, garnish with a sprinkle of fresh parsley, and serve warm with crusty bread or a side salad. Enjoy those cozy vibes!
Serving Suggestions
Presentation matters, even for comfort food! Here’s how to plate your soup for added appeal:
- Use Wide Bowls: Opt for wide, shallow bowls to showcase the soup’s vibrant colors.
- Garnish: Sprinkle with extra parsley or a drizzle of olive oil for that gourmet touch.
- Accompaniments: Serve with a slice of warm, crusty baguette or a light mixed greens salad. A sprinkle of Parmesan cheese on top doesn’t hurt either!
Recipe Variations
The beauty of this soup lies not just in its comforting nature but also in its versatility! Here are some creative variations to jazz it up:
- Creamy Mushroom Cold: Toss in sautéed mushrooms for an earthy twist.
- Spicy Kick: Add a dash of red pepper flakes for some heat—just don’t overdo it!
- Veggie-Packed Gnocchi: Add in other veggies like peas or zucchini to make it a vibrant veggie medley.
- Herbed Delight: Switch up the herbs! Thyme, rosemary, or Italian seasoning can create enticing new flavors.
- Cheesetastic: Stir in a handful of shredded cheese (like mozzarella or cheddar) just before serving for an extra cheesy experience!
Chef’s Notes
This soup has come a long way from the initial experiment in my kitchen. I remember the first time I made it; I was juggling a few pans and fretting over the ratio of chicken to gnocchi. But, with practice, I found my rhythm. I’ve even had friends suggest adding different proteins, like shrimp or sausage, and I’m here for it! Cooking should evolve as we do, bringing in new flavors and memories every time.
FAQs and Troubleshooting
Let’s tackle some of those common questions you might have:
-
Why is my soup too thick?
If you find your soup too thick, simply add a little more chicken broth or milk until it reaches your desired consistency. -
My gnocchi is mushy—what did I do wrong?
If gnocchi are overcooked, they can become mushy. Be sure to follow the cooking time closely. They should only take a few minutes in the pot! -
Can I freeze this soup?
Yes, but gnocchi can become mushy when frozen and reheated. If you want to freeze it, consider freezing the soup base without the gnocchi and adding them fresh when reheating. -
Is this soup gluten-free?
You can easily make it gluten-free by substituting the all-purpose flour with cornstarch and using gluten-free gnocchi!
Nutritional Info
Here’s a rough breakdown of the nutritional components per serving (about 1.5 cups):
- Calories: ~400
- Protein: ~30g
- Carbohydrates: ~45g
- Fat: ~15g
- Fiber: ~2g
These values may vary based on the specific brands and quantities used. No matter what, this dish is a wholesome way to enjoy a well-rounded, hearty meal.
Final Thoughts
Just like that, you’ve created a bowl of goodness that brings everyone to the table! Olive Garden Chicken Gnocchi Soup is a recipe that goes beyond just ingredients—it represents togetherness, warmth, and those unforgettable moments spent with friends and family. Whether you’re making this for a cozy night in or whipping it up for a gathering, this soup is sure to satisfy.
So, next time you find yourself feeling a little under the weather or just in need of a culinary hug, remember this recipe. Keep it simple, keep it soulful, and most importantly, keep it delicious. Happy cooking, friends!
Print
Olive Garden Chicken Gnocchi Soup
- Total Time: 45 minutes
- Yield: 4 servings 1x
- Diet: Non-Vegetarian
Description
A creamy and comforting chicken gnocchi soup that brings warmth and nostalgia in every spoonful.
Ingredients
- 1 pound boneless skinless chicken breasts (cooked and shredded)
- 1 tablespoon olive oil
- 4 tablespoons butter
- 1/4 cup all-purpose flour
- 1 small onion (chopped)
- 2 garlic cloves (minced)
- 6 cups chicken broth
- 2 cups milk
- 1 cup carrots (shredded)
- 2 teaspoons parsley flakes
- Salt and pepper for seasoning
- 1 package (16 ounces mini potato gnocchi)
- 1 cup fresh spinach (chopped)
Instructions
- Prep the ingredients by shredding your cooked chicken.
- Sauté the onion in olive oil over medium heat until translucent, about 5 minutes.
- Stir in the minced garlic, cooking for an additional minute.
- Sprinkle the flour over the mixture, stirring constantly for 2-3 minutes.
- Add the chicken broth gradually, stirring to prevent lumps, then add the milk and simmer.
- Toss in the shredded carrots and cooked chicken, simmer for 10-15 minutes.
- Add the gnocchi to the pot and cook for about 2-3 minutes until they float.
- Stir in the chopped spinach and parsley flakes until the spinach wilts.
- Season with salt and pepper to taste.
- Serve warm with garnishes and enjoy!
Notes
Consider garnishing with additional parsley or a drizzle of olive oil. Serve with bread.
- Prep Time: 15 minutes
- Cook Time: 30 minutes
- Category: Soup
- Method: Stovetop
- Cuisine: Italian
Nutrition
- Serving Size: 1.5 cups
- Calories: 400
- Sugar: 6g
- Sodium: 800mg
- Fat: 15g
- Saturated Fat: 8g
- Unsaturated Fat: 5g
- Trans Fat: 0g
- Carbohydrates: 45g
- Fiber: 2g
- Protein: 30g
- Cholesterol: 80mg
Keywords: soup, chicken, gnocchi, comfort food, creamy soup
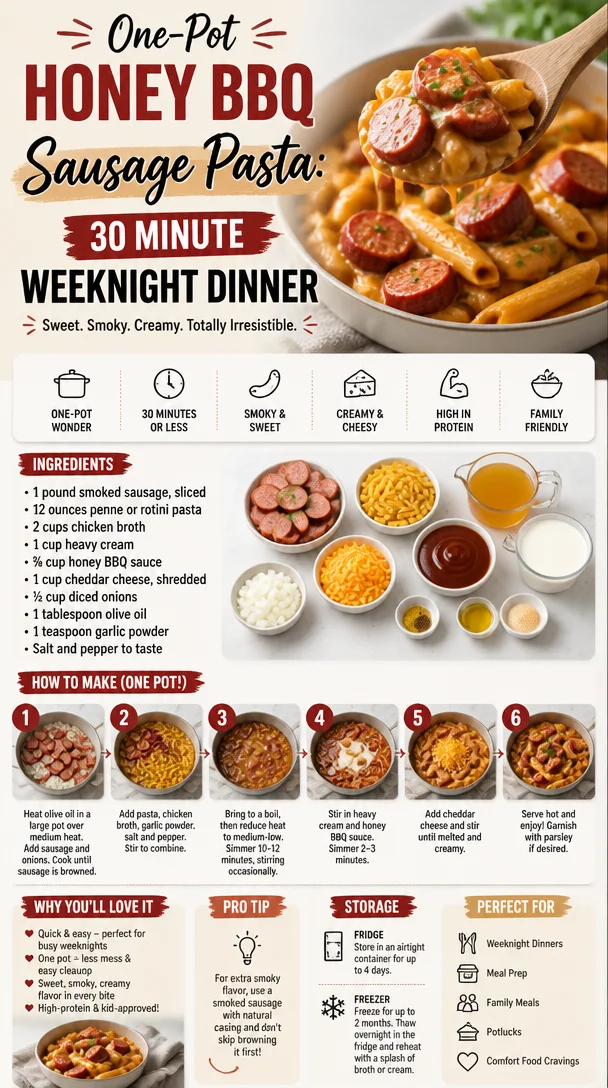
One-Pot Honey BBQ Sausage Pasta: 30 Minute Weeknight Dinner
One-Pot Bold Honey BBQ Sausage Pasta: Comfort Food Done Right
Hey there, friends! Welcome back to Feastical, where the heart of the home is the kitchen, and the flavors are always on point. Today, I’m thrilled to dive into a dish that has become a comfort staple in my kitchen: One-Pot Bold Honey BBQ Sausage Pasta. This dish is not only a breeze to make but also bursts with flavor that’ll have you and your taste buds dancing. Buckle up, because we’re about to whip up something special!
Introduction: Let’s Get Cooking!
If there’s one thing I love more than sharing recipes, it’s the stories and memories that accompany those meals. Growing up, weekends in my family were all about gathering around the kitchen table, enjoying hearty meals that not only filled our stomachs but also fueled our hearts. One of those meals was a simple, yet oh-so-delicious sausage pasta that my grandma used to whip up on busy weeknights. Fast forward to today, and I’ve given that dish a bold, modern twist with a honey BBQ flair that’ll have you asking for seconds!
Picture this: the aroma of sautéed sausage filling the air, mingling with the sweet smokiness of BBQ sauce and the creamy richness of pasta. It’s a dish that brings people together, whether it’s a casual family dinner or a get-together with friends. And the best part? It all comes together in just one pot! Talk about a win-win. So, grab your favorite apron and let’s dive into the exciting world of One-Pot Bold Honey BBQ Sausage Pasta!
Personal Story: A Nostalgic Twist
Let me take you back to a warm summer evening when I was just a little kitchen helper. I remember standing on a stool, peering over the counter as my grandma orchestrated our family meal. She had this incredible knack for making simple ingredients sing, and her homemade BBQ sauce was legendary. One Saturday, we decided to experiment, tossing in some smoked sausage and penne pasta while she hummed her favorite tunes. The vibrant flavors danced together in perfect harmony, and I could hardly wait to dig in.
That meal stuck with me, and as I grew up, I often found myself revisiting that moment in my own cooking adventures. Fast forward a few years—after culinary school and countless dinner parties later—and here I am, ready to share this updated version. It’s not just a recipe; it’s a tribute to the joy of cooking and the memories we create around the table. Are you ready to create your own flavorful memories? Let’s get started!
Ingredients: What You’ll Need
Got your apron on? Great! Here’s what you’ll need to recreate this deliciousness:
-
1 pound smoked sausage, sliced
This adds a wonderful depth of flavor to your dish. Feel free to substitute with turkey sausage or even vegetarian sausage for a lighter alternative! -
12 ounces penne or rotini pasta
These pasta shapes hold onto the sauce beautifully. If you’re gluten-free, go for a gluten-free pasta like chickpea or quinoa pasta. -
2 cups chicken broth
Homemade is always best, but store-bought works too! Use vegetable broth if you’re looking for a vegetarian option. -
1 cup heavy cream
This creates the creamy base of the sauce. You can swap it for half-and-half or coconut cream for a dairy-free version. -
¾ cup honey BBQ sauce
This is the star of the dish! I recommend a quality sauce that balances sweetness and smokiness. -
1 cup cheddar cheese, shredded
Cheddar adds a creamy texture and sharpness. Try pepper jack cheese for an extra kick! -
½ cup diced onions
A classic base for flavor. Green onions or shallots can be a nice alternative if you want something milder. -
1 tablespoon olive oil
This helps sauté the onions and sausage. Feel free to use avocado oil for a healthier twist. -
1 teaspoon garlic powder
A simple way to add flavor without the hassle of minced garlic. Fresh garlic can be substituted as well. -
Salt and pepper to taste
Essential for seasoning! A dash of smoked paprika can also add an extra layer of flavor.
Step-by-Step Instructions: Cooking Up a Storm
Alright, let’s roll up our sleeves and break this down step by step! Cooking should never feel intimidating; it should be fun and fulfilling. Here’s how we do it:
-
Sauté the Sausage and Onions
Heat a large pot over medium heat and drizzle in that olive oil. Toss in the sliced smoked sausage and diced onions. Sauté them for about 5-7 minutes until the onions become translucent and the sausage begins to brown. Don’t be afraid to let the sausage get a little crispy on the edges—those caramelized bits add incredible flavor! -
Add the Pasta
Once the sausage and onions are looking delicious, pour in the penne or rotini pasta. Give it a good stir to coat everything in that savory goodness. Trust me, you’ll want to get all those flavors mingling right from the start. -
Pour in the Broth and Cream
Now it’s time to bring all of that together! Pour in the chicken broth and heavy cream. Stir gently to combine and raise the heat just a touch until it’s bubbling away. This is the moment where the magic starts to happen, and your kitchen will start to smell heavenly. -
Add the Honey BBQ Sauce
Here comes the fun part! Add in that luscious honey BBQ sauce and stir until everything is well combined. The sauce will start to thicken and coat the pasta beautifully. Give it a taste—this is your chance to fine-tune the flavors! If you like it sweeter, add a bit more BBQ sauce. -
Mix in the Cheese
Once the pasta is al dente, reduce the heat and stir in the shredded cheddar cheese. Watch as it melts into the creamy sauce, creating a comforting, cheesy hug for your pasta. At this point, taste again and add salt and pepper as needed. -
Serve It Up
Turn off the heat and let it sit for a minute or two. This allows everything to settle, making it easier to serve. Plus, it gives you just enough time to take a quick taste test (as if you needed an excuse).
Serving Suggestions: Plating Perfection
Ah, the final touch! Plate your One-Pot Bold Honey BBQ Sausage Pasta in vibrant, shallow bowls. You can also use a big serving dish to keep it family-style. Finish it off with a sprinkle of chopped green onions or fresh parsley for that burst of color.
For an extra twist, consider serving it with a light side salad or some crusty garlic bread to soak up all that creamy goodness. And if you’re feeling adventurous, a drizzle of extra honey BBQ sauce on top can elevate the dish even further!
Recipe Variations: Get Creative
Now that you’ve mastered the basics, let’s talk variations! Here are a few creative twists to consider:
-
Vegetable Explosion
Toss in your favorite veggies—like bell peppers, zucchini, or spinach—when sautéing the onions. Not only do they add nutrients, but they’ll also bring a lovely pop of color. -
Spicy Sausage Kick
Use a spicy Italian sausage or add a pinch of cayenne pepper to the mix if you’re looking to ignite your taste buds. -
Cheesy Mozzarella Surprise
Replace the cheddar with fresh mozzarella for a gooey, cheesy delight. Just stir it in at the very end until it melts slightly. -
Pesto Infusion
Swap out the honey BBQ sauce for basil pesto to give it an herbaceous spin. Pair it with toasted pine nuts for added crunch! -
Plant-Based Swap
Use plant-based sausage and swap the heavy cream for cashew cream to make this dish entirely plant-based without sacrificing taste.
Chef’s Notes: A Bit of Kitchen Wisdom
Here’s a little kitchen tidbit from my own experience: this recipe is incredibly forgiving. Whether you are missing an ingredient or want to add something to the mix, don’t stress! Cooking is all about creativity and finding what flavors you love. I’ve had nights where I completely forgot to add the cheese, and it still turned out delicious! Remember, your unique touch is what makes each meal special.
FAQs and Troubleshooting: Your Prep Companion
-
What if my pasta is too mushy?
Make sure to keep an eye on your pasta. It should be al dente, meaning it should have a slight bite to it. It will continue cooking a bit even after you’ve turned off the heat. -
Can I make this in advance?
Absolutely! Feel free to prep it ahead and store it in the fridge. Just reheat it with a splash of extra broth or cream to keep it creamy. -
What if it’s too thick?
If your pasta dish becomes too thick during cooking or reheating, just add a splash of chicken broth or milk until you reach your desired consistency. -
Can I freeze leftovers?
Yes, you can freeze the remaining pasta. Just let it cool completely, then store in an airtight container for up to three months. Reheat it gently, adding a little extra cream if needed.
Nutritional Info: A Quick Breakdown
Per serving (based on eight servings), you’re looking at approximately:
- Calories: 550 kcal
- Protein: 20g
- Carbohydrates: 50g
- Fat: 30g
Keep in mind that these numbers may vary based on your ingredient choices. It’s all about balance; enjoy a delicious meal and savor every bite!
Final Thoughts: A Bow to You, the Home Cook
There you have it, friend—a comforting bowl of One-Pot Bold Honey BBQ Sausage Pasta that’s sure to become a favorite in your household. With every bite, you’ll taste the love and effort you put into making this dish, and the memories that come with it. So whether you’re dining solo, feeding the family, or hosting friends, know that this delicious pasta will bring smiles and warm hearts around the table.
Remember, cooking is a journey, and every recipe you explore is an opportunity to learn and grow. Embrace those moments, share your meals, and create connections through food. I can’t wait to hear about your adventures in the kitchen, so drop me a comment below and let me know how your pasta turns out!
Until next time, keep those pots stirring and those plates filled with love. Happy cooking!
Print
One-Pot Bold Honey BBQ Sausage Pasta
- Total Time: 30 minutes
- Yield: 4 servings 1x
- Diet: Non-Vegetarian
Description
A comforting one-pot pasta dish featuring smoked sausage and a sweet honey BBQ sauce, perfect for family dinners or gatherings.
Ingredients
- 1 pound smoked sausage, sliced
- 12 ounces penne or rotini pasta
- 2 cups chicken broth
- 1 cup heavy cream
- ¾ cup honey BBQ sauce
- 1 cup cheddar cheese, shredded
- ½ cup diced onions
- 1 tablespoon olive oil
- 1 teaspoon garlic powder
- Salt and pepper to taste
Instructions
- Sauté the sausage and onions: Heat a large pot over medium heat and drizzle in olive oil. Toss in sliced sausage and diced onions. Sautéfor about 5-7 minutes until onions become translucent and sausage begins to brown.
- Add the pasta: Pour in the penne or rotini pasta and stir to coat everything in the savory goodness.
- Pour in the broth and cream: Add chicken broth and heavy cream, and stir gently. Raise the heat until it starts bubbling.
- Add the honey BBQ sauce: Stir in the honey BBQ sauce until everything is well combined.
- Mix in the cheese: Once the pasta is al dente, reduce the heat and stir in shredded cheddar cheese until melted.
- Serve it up: Let it sit for a minute before serving. Plate and finish it off with chopped green onions or fresh parsley.
Notes
This recipe is flexible; feel free to add vegetables or substitute proteins as needed. You can also make it ahead of time and reheat with a splash of broth.
- Prep Time: 10 minutes
- Cook Time: 20 minutes
- Category: Main Course
- Method: Stovetop
- Cuisine: American
Nutrition
- Serving Size: 1 serving
- Calories: 550 kcal
- Sugar: 12g
- Sodium: 900mg
- Fat: 30g
- Saturated Fat: 12g
- Unsaturated Fat: 14g
- Trans Fat: 0g
- Carbohydrates: 50g
- Fiber: 2g
- Protein: 20g
- Cholesterol: 75mg
Keywords: one-pot pasta, honey BBQ, sausage pasta, comfort food, easy dinner

Minute Summer Corn and Zucchini Chowder (Creamy One-Pot)
Embrace Summer with a Warm Bowl of Corn and Zucchini Chowder
Hey there, fellow food lovers! It’s Beau Collier here, and I’m excited to welcome you to another delicious adventure in the kitchen. As the summer sun shines bright and nature puts on its vibrant display, there’s no better way to celebrate the season than with a bowl of fresh, heartwarming Corn and Zucchini Chowder. This dish is like a cozy hug in a bowl, brimming with the sweet taste of summer corn and fresh garden veggies!
Chowder is one of those comforting dishes that can transport you back to sun-soaked afternoons, family barbecues, and lazy weekends spent laughing around the dinner table. I remember the first time I tasted chowder; my Grandma Alice would whip it up on scorching summer days after we’d made a trip to the farmer’s market. The aroma of sautéing garlic and onions would fill the kitchen, instantly making me feel at home. This recipe is a tribute to those nostalgic memories, crafted with love and a touch of creativity!
What I adore about chowder is its flexibility. Each ingredient works in perfect harmony, layering flavors that tell the story of the season. Whether you’re cozying up on the couch, hosting a summer get-together, or just looking to brighten up your weekday meals, this Corn and Zucchini Chowder will bring a sunny smile to your face.
So, grab your apron, chill your favorite drink, and let’s get cooking!
Personal Story: Grandma’s Kitchen and Summer Memories
Ah, the kitchen! It’s not just a space; it’s a hub of warmth, laughter, and memories. I can still picture myself as a kid, standing on a stool to reach the countertop in Grandma Alice’s kitchen, eagerly awaiting her famous chowder. She’d have me by her side, teaching me the secrets of simmering vegetables and stirring in love. Those afternoons were filled with stories—of her childhood, her garden, and of the community that thrived around her.
The family would gather each Sunday, and I vividly remember my aunts arguing over who made the best cornbread to accompany Grandma’s chowder. The tangy scent of sweet corn and sautéed garlic wafted through the air, each bowl served with a sprinkle of freshly chopped basil from her garden. I still treasure those moments, knowing that the love we stirred into our meals was as vital as the ingredients we used. This recipe is inspired by those sunny days, echoing the laughter and sweet memories of summer.
Ingredients
Let’s dive into the ingredient list for this mouthwatering Corn and Zucchini Chowder! Here’s what you’ll need:
-
2 tablespoons olive oil
A perfect base for sautéing your veggies and bringing out their robust flavors. You can substitute this with avocado oil for a slightly different taste or use butter for a creamy richness. -
1 onion, diced
Onions add that savory depth we all crave. If you’re sensitive to onions, shallots work wonderfully, or you can skip them altogether and use a sprinkle of onion powder. -
2 cloves garlic, minced
Garlic brings a punch of flavor to the dish. If you prefer a milder taste, reduce the amount or use roasted garlic for sweetness. -
2 zucchinis, diced
Zucchinis are light, fresh, and add a lovely texture. Feel free to substitute them with yellow squash or even chopped bell peppers for a twist. -
3 cups corn kernels (fresh or frozen)
Fresh corn is a winner in this dish! If fresh isn’t available, frozen works great too. Canned corn can also be used in a pinch, but drain and rinse it to remove excess sodium. -
4 cups vegetable broth
This is the heart of the chowder, giving it body and flavor. For a richer taste, you could use homemade broth or swap in chicken broth if you don’t mind the meat. -
1 cup heavy cream or coconut milk
This adds the creamy element that pulls everything together. If you’re looking for a lighter option, canned evaporated milk could work, too. -
Salt and pepper to taste
Essential seasonings! Don’t skimp on these—trust your taste buds. If you want a flavor boost, add a pinch of smoked paprika or cayenne pepper! -
Fresh basil or parsley for garnish
A sprinkle of fresh herbs adds the finishing touch. Basil pairs beautifully, but feel free to use parsley or even cilantro for a fresh note.
Step-by-Step Instructions
Now that we’re ready with our ingredients, let’s walk through the flavorful process of creating our delicious Corn and Zucchini Chowder!
-
Sauté the Aromatics
In a large pot or Dutch oven, heat the olive oil over medium heat. Once hot, add the diced onion, stirring frequently. You’ll want to cook them until they turn translucent—about 5 minutes. This step is crucial because it sets the flavor base. Pro tip: Add a pinch of salt at this stage to help the onions release moisture and develop flavor. -
Add the Garlic
Toss in the minced garlic and continue to sauté for about 1 minute. Be careful not to let the garlic brown too much, as it can impart a bitter taste. You want it fragrant and fragrant only! -
Introduce the Zucchini
Add the diced zucchini to the pot and cook for 3-4 minutes, just until they start to soften but are still vibrant in color. This is your chance to be creative! Want an herb kick? Throw in a pinch of thyme or Italian seasoning at this stage. -
Stir in the Corn
Now for the star of the show! Add the corn kernels to the mix and stir everything together, letting all those flavors mingle for another 2-3 minutes. If you’re using fresh corn, the sweet smell will start to fill your kitchen! -
Pour in the Broth
Carefully add the vegetable broth to the pot and increase the heat, allowing it to come to a gentle simmer. This will help everything cook together and absorb that yummy broth flavor. -
Simmer and Season
Reduce the heat to low and let the chowder simmer for about 15 minutes. This is where the magic really happens! Turn on your favorite playlist or podcast and enjoy the fragrant aromas filling your space. Taste it halfway through and adjust the seasoning with salt and pepper as needed. -
Cream It Up
Once the vegetables are tender, add in the heavy cream (or coconut milk). Stir well and let it warm through for another 5 minutes. You want the chowder to be rich but not overly heavy. For a lighter alternative, add more broth or a splash of water! -
Garnish and Serve
Serve hot, garnished with fresh basil or parsley. This adds a pop of color and a fresh flavor that balances the richness of the chowder.
Serving Suggestions
Now that you’ve got this steaming bowl of Corn and Zucchini Chowder, how do you serve it up? Here are a few fun ideas to elevate your dining experience:
- Crusty Bread: The classic pairing—serve with a slice of toasted crusty bread or a hearty baguette to soak up every drop of that delicious broth.
- Cheese Croutons: Fancy it up by sprinkling cheese over your bread, toasting it under the broiler for cheesy croutons to top your chowder.
- Side Salad: Pair it with a vibrant summer salad filled with mixed greens, cherry tomatoes, and a zesty vinaigrette for a refreshing balance.
Recipe Variations
Feeling adventurous? Here are some creative twists and variations for your Chowder:
-
Spicy Corn and Zucchini Chowder: Add a diced jalapeño or a smattering of chili flakes for a kick!
-
Bacon Lovers’ Chowder: Sauté some chopped bacon before the onion—remove when crispy, and use the rendered fat for adding flavor—then sprinkle the crispy bits on top before serving.
-
Herbed Delight: Cosset in fresh herbs like dill or rosemary for herbal tweaks that both enhance the chowder and make your kitchen smell amazing!
-
Cheesy Twist: Stir in shredded cheddar or a cheese blend towards the end for a creamy, cheesy extra layer of flavor.
-
Dairy-Free Options: Swap the cream for more coconut milk or even a cashew cream for a creamy and satisfying plant-based option.
Chef’s Notes
Every recipe has its own journey, and this chowder is no exception. What started as simple summer cooking with my Grandma Alice has evolved over time into a creative outlet in my kitchen. I’ve experimented with different vegetables, spicing it up based on what I’ve got on hand or what’s fresh at the market.
Whenever I make this chowder, I’m reminded of those cherished moments—how love and food connect us. Whether it’s a quiet dinner or a lively family occasion, this recipe serves as a canvas for memories, laughter, and sharing.
FAQs and Troubleshooting
1. My chowder is too thick! What can I do?
If your chowder is thicker than you’d like, simply add more vegetable broth or water to reach your desired consistency. Stir well and let it simmer for a few more minutes.
2. Can I use frozen corn instead of fresh?
Absolutely! Frozen corn is a great alternative. Just toss it in directly from the bag; there’s no need to thaw it out—convenience at its best!
3. What if my chowder is too salty?
If you find your chowder is too salty, try adding a splash more cream or water. You can also add a diced potato, which will absorb some of the saltiness. Let it simmer a bit longer with the potato, and then remove before serving.
4. How do I store leftovers?
Store leftovers in an airtight container in the refrigerator for up to 3 days. The flavors will meld beautifully! To reheat, gently warm it on the stovetop, adding a splash of broth or water if it thickens too much.
Nutritional Info
This Corn and Zucchini Chowder is not only delicious but also packed with nutrition. Here’s a quick breakdown (per serving, based on yield of 6 servings):
- Calories: Approximately 350
- Protein: 8g
- Fat: 24g (primarily from cream and olive oil)
- Carbohydrates: 30g (with a healthy dose of fiber from the corn and zucchini)
- Fiber: 4g
- Vitamins: High in Vitamins A and C, thanks to the zucchini and corn!
Always remember to keep an eye on portion sizes if you’re watching calories, but this chowder can definitely fit into a balanced diet!
Final Thoughts
Cooking is all about connection—whether it’s with our ingredients, our families, or even the memories we forge along the way. As you dive into this delectable Corn and Zucchini Chowder, I hope it brings a little piece of summer into your home. Remember, it’s not just about the final dish but the joy of cooking, the laughter shared in the kitchen, and the love that you stir in with each ingredient.
So, tell me, what memories do you have that inspire your cooking? Do you have a go-to chowder recipe? I’d love to hear your stories, tips, and any summer twist you bring to your own chowder creations. Until next time, keep cooking, keep smiling, and remember—every bite can be a celebration!
Bon appétit! 🍽️✨
Print
Corn and Zucchini Chowder
- Total Time: 45 minutes
- Yield: 6 servings 1x
- Diet: Vegetarian
Description
A heartwarming chowder brimming with the sweet taste of summer corn and fresh garden veggies, perfect for cozying up on a sunny day.
Ingredients
- 2 tablespoons olive oil
- 1 onion, diced
- 2 cloves garlic, minced
- 2 zucchinis, diced
- 3 cups corn kernels (fresh or frozen)
- 4 cups vegetable broth
- 1 cup heavy cream or coconut milk
- Salt and pepper to taste
- Fresh basil or parsley for garnish
Instructions
- Sauté the onions in olive oil over medium heat until translucent—about 5 minutes.
- Add the minced garlic and sauté for about 1 minute.
- Introduce the diced zucchini and cook for 3-4 minutes.
- Stir in the corn kernels and combine for another 2-3 minutes.
- Pour the vegetable broth into the pot and bring to a gentle simmer.
- Simmer for about 15 minutes on low heat, adjusting seasoning with salt and pepper.
- Add heavy cream (or coconut milk) and warm through for another 5 minutes.
- Garnish with fresh basil or parsley before serving.
Notes
Great with toasted crusty bread or as a base for cheesy croutons!
- Prep Time: 15 minutes
- Cook Time: 30 minutes
- Category: Soup
- Method: Simmering
- Cuisine: American
Nutrition
- Serving Size: 1 serving
- Calories: 350
- Sugar: 5g
- Sodium: 400mg
- Fat: 24g
- Saturated Fat: 12g
- Unsaturated Fat: 8g
- Trans Fat: 0g
- Carbohydrates: 30g
- Fiber: 4g
- Protein: 8g
- Cholesterol: 60mg
Keywords: chowder, summer soup, vegetarian soup, corn, zucchini

One-Pot Cajun Chicken & Sausage Gumbo in 30 Minutes
A Taste of Louisiana: Cajun Chicken and Sausage Gumbo
Hey there, food lovers! Welcome back to Feastical, where the aroma of home-cooked meals fills the air and every dish tells a story. Today, I’m jazzing things up with a recipe that’s a warm hug on a plate: Cajun Chicken and Sausage Gumbo. If you’ve never had the pleasure of slurping a steaming bowl of gumbo, get ready for a delicious adventure. Whether you’re cozying up in the kitchen or entertaining friends, this dish is bound to become a favorite in your culinary repertoire.
Introduction
What is it about gumbo that feels like a comforting old friend? It’s hearty, it’s full of flavor, and it’s the kind of dish that brings people together. Originating from the vibrant state of Louisiana, gumbo is a staple that showcases the unique blend of cultures—African, French, Spanish, and Native American—within the region. This rich stew is typically made in a single pot, making it a delightful way to feed a crowd or simply enjoy a hearty meal at home.
In my own kitchen, I’ve stirred up countless pots of gumbo, each time putting my twist on the classic dish. There’s something magical about caramelizing the roux and watching the ingredients mingle to create an explosion of flavor. The beauty of gumbo is its adaptability; you can make it your own by adjusting the spices, adding seasonal vegetables, or even switching up proteins.
So, strap on your apron and let’s dive deep into the colorful world of Cajun cooking! Trust me, once you master this dish, you’ll realize that cooking gumbo is not just about the food—it’s an experience that brings back memories of laughter, warmth, and gatherings around the dinner table. Ready to get cookin’?
Personal Story
Speaking of gatherings, I remember my first gumbo experience like it was yesterday. I was invited to a friend’s housewarming party in New Orleans, where the scent of spicy sausage and peppery chicken wafted through the air, beckoning me closer. There, I met “Big Mama,” my friend’s grandmother, who was famous for her gumbo. With a big spoon in hand and the biggest smile on her face, she served up steaming bowls of her creation, laden with sausage, chicken, and a generous helping of okra.
Each bite was magical. The roux was perfectly dark, a deep cocoa brown, and the flavors danced on my palate. I couldn’t get enough. I spent the evening sipping sweet tea and swapping stories with friends as we filled our bellies with love and laughter. That night solidified my love for gumbo, and I knew I had to try making it myself.
Fast forward a few years, and here I am, sharing my own version of Cajun Chicken and Sausage Gumbo with you. It’s a dish that’s carried forward with not only the flavors of Louisiana but also the memories of friends, family, and the bonds we create over good food.
Ingredients
Here’s what you’ll need to whip up this Cajun delight:
-
1/2 cup vegetable oil
The base for your roux. You can substitute with canola or grapeseed oil if you prefer. -
1/2 cup all-purpose flour
The key to thickening the gumbo. For a gluten-free option, you can use a gluten-free flour blend. -
1 pound Andouille sausage, sliced
This spicy smoked sausage is a must for authentic flavor. Chicken or turkey sausage works well too! -
1 pound boneless chicken thighs, diced
Thighs are juicy and flavorful; however, you can use chicken breasts for a leaner option. -
1 cup okra, sliced (fresh or frozen)
This adds a unique taste and some thickness to the gumbo. If you’re not a fan, you can leave it out or substitute with sliced zucchini. -
1 green bell pepper, chopped
This enhances the gumbo’s flavor and color. Feel free to experiment with red or yellow bell peppers for a sweeter taste. -
1 onion, chopped
A flavor powerhouse! You can use shallots or even leeks if you’re feeling fancy. -
4 cloves garlic, minced
Because everything is better with garlic! You can amp it up with more if you love that garlicky punch. -
2 tablespoons Cajun seasoning (adjust to taste)
This is where you kick up the flavor. You can use store-bought or make your own! For a milder version, reduce the amount. -
6 cups low-sodium chicken broth
A rich base for your gumbo. You can substitute vegetable broth for a vegetarian option. -
2 cups cooked white rice (for serving)
Serve your gumbo over fluffy white rice—instant comfort food! Brown rice works, too, for a nuttier flavor. -
1/4 cup green onions, chopped (for garnish)
Bright and fresh! A lovely finishing touch. -
1/4 cup parsley, chopped (for garnish)
Adds a pop of color and freshness. Cilantro can also substitute for a change.
Step-by-Step Instructions
-
Make the Roux:
In a large pot or Dutch oven, heat the vegetable oil over medium heat. Once it’s shimmering, slowly whisk in the flour. You want to cook this mixture, stirring constantly, until it turns a rich brown color. This can take about 20-30 minutes, so be patient! If it starts to smell nutty and looks like chocolate, you’re on the right track. Pro tip: Keep the heat low to prevent burning. -
Add the Holy Trinity:
Once your roux is perfect, toss in the chopped onion, green bell pepper, and minced garlic. Stir well and cook until the vegetables are tender, about 5-7 minutes. The smell will be intoxicating at this point! -
Brown the Sausage and Chicken:
Add the sliced Andouille sausage to the pot and let it cook for about 5 minutes. Then, add the diced chicken thighs, stirring to coat with the roux and veggies. Cook until the chicken is browned on the outside, about 5 more minutes. -
Incorporate the Rest:
Pour in the low-sodium chicken broth, followed by the sliced okra and Cajun seasoning. Stir it all together, allowing the flavors to meld. If you want a little kick, you can add a pinch of cayenne pepper! Bring the mixture to a boil, then reduce the heat and let it simmer gently for at least 30 minutes. Letting it simmer allows those hearty flavors to truly shine through. -
Serve it Up:
To serve, ladle the gumbo into a bowl over a scoop of fluffy white rice. Garnish with chopped green onions and parsley for that fresh touch. And there you have it—gorgeous, savory Cajun Chicken and Sausage Gumbo!
Serving Suggestions
Gumbo is best served with a side of crusty French bread for dipping and some hot sauce for those who like to spice things up. You could also offer up a light salad as a starter to complement the rich flavors of the gumbo.
When plating, you can make it look extra appealing by placing a mound of the cooked rice right in the center of the bowl and carefully pouring the gumbo around it. A sprinkle of green onions and parsley on top will give it that restaurant-quality flair! Trust me, your friends and family will be impressed.
Recipe Variations
-
Seafood Gumbo: Swap the chicken and sausage for shrimp and crab. Toss the seafood in towards the end to avoid overcooking.
-
Vegetarian/Garden Gumbo: Leave out the meat altogether and load it with seasonal veggies like bell peppers, eggplant, and zucchini. Use vegetable broth for the base.
-
Spicy Kick: Add some diced jalapeños or a dash of Tabasco sauce if you crave that extra heat!
-
One-Pot Wonder: Mix in some lentils or beans for additional protein while keeping it vegetarian; just adjust the broth amount accordingly.
-
Coconut-Curry Gumbo: For an exciting flavor twist, replace part of the chicken broth with coconut milk and toss in some curry powder for a fusion twist!
Chef’s Notes
Over the years, I’ve played around with my version of gumbo, experimenting with the ingredients and techniques. One funny moment that stands out was when I mistakenly grabbed powdered sugar instead of salt during a dinner party prep. Imagine my guests’ faces when they tasted a hint of sweetness in my gumbo! While it wasn’t a total disaster, it certainly made for a memorable evening filled with laughter.
Yet, that’s the beauty of cooking. It’s all about exploration and connection—both with the ingredients and the people you share meals with. Gumbo is forgiving, and you can adjust it to suit your taste. So don’t be afraid to make it your own!
FAQs and Troubleshooting
-
Why did my roux burn?
Burning roux is often due to too high heat or not stirring enough. Keep the heat low and be patient. -
My gumbo is too thick. What should I do?
Simply add more broth or water to reach your desired consistency. Adjust the seasoning afterward! -
Can I make gumbo ahead of time?
Absolutely! It often tastes even better the next day! Just store it in the fridge, and reheat on the stove until hot. -
How do I store leftover gumbo?
Place it in an airtight container in the fridge for up to 3 days, or freeze it for longer storage (up to 3 months).
Nutritional Info
This hearty gumbo packed with protein and vegetables provides a well-rounded meal. A typical serving (one bowl with rice) contains approximately:
- Calories: 450
- Protein: 30g
- Fat: 24g
- Carbohydrates: 38g
- Fiber: 3g
- Sodium: 800mg
Adjustments in fat or ingredients can affect nutritional values, so feel free to customize based on your dietary preferences.
Final Thoughts
There you have it, my friends! Cajun Chicken and Sausage Gumbo is not just a recipe; it is a delightful homage to the flavors of Louisiana and the memories created around the table. Whether you’re a novice cook or a seasoned chef, I hope this recipe inspires you to gather your loved ones and serve up a hearty bowl of comfort.
So, roll up your sleeves, put on some jazzy tunes, and let’s get cookin’! Remember, at the end of the day, it’s all about enjoying the process, embracing the flavors, and creating moments that linger long after the last spoonful. Happy cooking!
Print
Cajun Chicken and Sausage Gumbo
- Total Time: 75 minutes
- Yield: 6 servings 1x
- Diet: Paleo
Description
A hearty and flavorful Cajun Chicken and Sausage Gumbo that brings together the vibrant flavors of Louisiana in a warm bowl of comfort.
Ingredients
- 1/2 cup vegetable oil
- 1/2 cup all-purpose flour
- 1 pound Andouille sausage, sliced
- 1 pound boneless chicken thighs, diced
- 1 cup okra, sliced (fresh or frozen)
- 1 green bell pepper, chopped
- 1 onion, chopped
- 4 cloves garlic, minced
- 2 tablespoons Cajun seasoning (adjust to taste)
- 6 cups low-sodium chicken broth
- 2 cups cooked white rice (for serving)
- 1/4 cup green onions, chopped (for garnish)
- 1/4 cup parsley, chopped (for garnish)
Instructions
- Make the roux: In a large pot or Dutch oven, heat the vegetable oil over medium heat. Whisk in the flour until it turns a rich brown color, about 20-30 minutes.
- Add the Holy Trinity: Toss in the chopped onion, green bell pepper, and minced garlic. Cook until tender, about 5-7 minutes.
- Brown the sausage and chicken: Add the sliced Andouille sausage and cook for 5 minutes. Add the diced chicken thighs and cook until browned, about 5 more minutes.
- Incorporate the rest: Pour in the chicken broth, add the okra and Cajun seasoning. Bring to a boil, then reduce the heat and let it simmer for at least 30 minutes.
- Serve it up: Ladle the gumbo into bowls over a scoop of white rice. Garnish with green onions and parsley.
Notes
Gumbo can be made ahead of time and often tastes even better the next day. Store it in an airtight container in the fridge for up to 3 days.
- Prep Time: 15 minutes
- Cook Time: 60 minutes
- Category: Main Course
- Method: Stovetop
- Cuisine: Cajun
Nutrition
- Serving Size: 1 serving
- Calories: 450
- Sugar: 3g
- Sodium: 800mg
- Fat: 24g
- Saturated Fat: 8g
- Unsaturated Fat: 12g
- Trans Fat: 0g
- Carbohydrates: 38g
- Fiber: 3g
- Protein: 30g
- Cholesterol: 80mg
Keywords: gumbo, cajun, chicken, sausage, comfort food, Louisiana