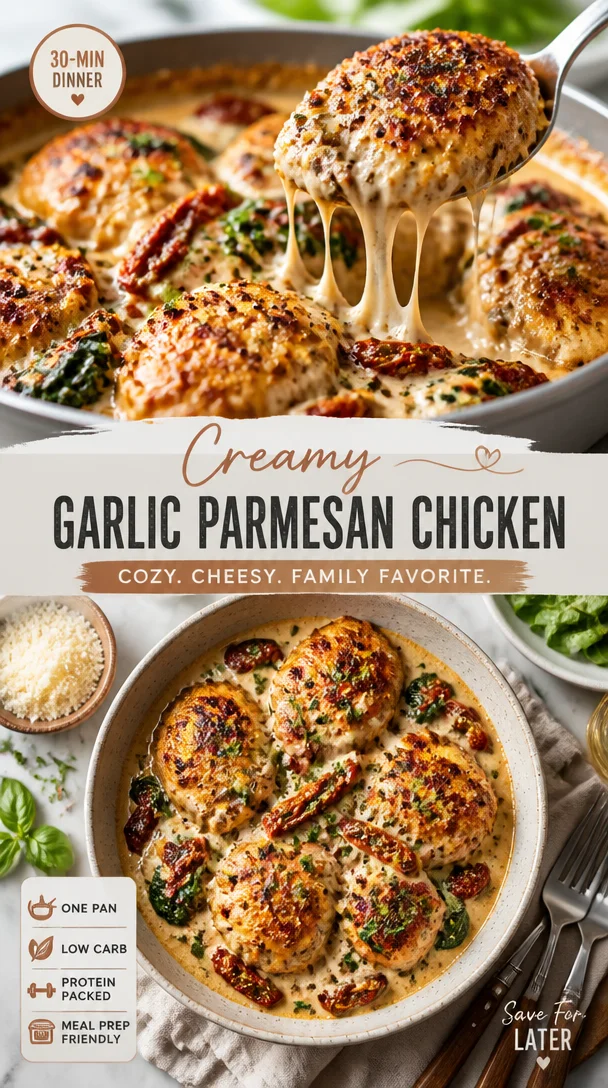
This Fall Dinner: A Cozy, Family-Approved Weeknight Favorite
The Fall Dinner Everyone Looks Forward to Every Year Awaits!
Ah, fall—the season that wraps you in its cozy embrace and invites you to indulge in the warm flavors of comfort food. As the leaves turn golden and the air becomes crisp, there’s one dinner that everyone eagerly anticipates year after year. Yes, you guessed it—it’s the beloved Thanksgiving feast!
There’s something magical about gathering around a table overflowing with delicious dishes, laughter, and cherished memories. Whether you’re a seasoned chef or just dipping your toes into the culinary waters, this is the time when everyone becomes an avid cook. It’s a culinary stage where everyone shines, from Grandma’s secret stuffing recipe to that pumpkin pie that makes the world go ’round.
So, grab your apron, and let’s dive into this year’s Thanksgiving dinner that will have everyone begging for seconds—and maybe even thirds! With the perfect turkey at its center, accompanied by rich stuffing, creamy mashed potatoes, crisp green beans, tangy cranberry sauce, and a slice of heavenly pumpkin pie, this meal is as much about the food as it is about the love it brings to our hearts.
This blog post will take you through the steps of preparing this stunning spread, share my personal memories tied to these dishes, offer some clever kitchen tips, and explore variations that will keep things exciting. Together, we’ll turn this fall dinner into an unforgettable experience loved by all.
Personal Story
I still remember the first Thanksgiving I ever helped cook. I was around 10 years old, standing on a stool to reach the counter, excitement bubbling in my chest. My mom had decided this was my year to learn how to prepare the turkey—our family’s centerpiece dish. I can still see her guiding my hands, showing me how to carefully rub the bird with spices, introducing flavors that would dance together in the oven.
As the turkey roasted, the tantalizing aroma filled our home, wrapping us in warmth and comfort. We played games in the living room while sneaking bites of stuffing, our giggles mingling with the sizzling sounds from the kitchen. Once dinner was served, the table was breathtaking: a feast fit for kings and queens!
That year, I learned not just how to cook a meal, but created a rhythm of family gatherings that I carry into my own home today. Those meals were not just about food, but shared joy, love, and the wonderful connections that come from sitting around the dinner table. That experience ignited my passion for cooking and made me realize that food is not just sustenance; it’s an experience, a story, and a hug in the form of deliciousness. So, let’s carry this tradition into our own kitchens!
Ingredients
To recreate the Thanksgiving classic that everyone dreams about, here’s what you’ll need:
-
2 lbs of turkey: The star of the show! Choose a fresh turkey if possible, which tends to be juicier than frozen. If you’re serving a smaller gathering, feel free to adjust the size accordingly, usually about 1 pound per person is a safe bet.
-
1 cup of stuffing: You can opt for store-bought or make your own from bread, herbs, and vegetables. Bread cubes such as sourdough or whole wheat add depth. If you prefer gluten-free, substitute with gluten-free breadcrumbs or quinoa.
-
4 cups of mashed potatoes: Creamy and buttery, these are the ultimate comfort food. Use russet or Yukon Gold potatoes for the best texture. For a twist, try substituting some of the butter with sour cream or buttermilk for extra creaminess.
-
2 cups of green beans: Fresh green beans bring a vibrant pop of color and crunch. Snap off the ends before cooking. Want a gourmet touch? Blanch them lightly before sautéing with garlic and olive oil.
-
1 cup of cranberry sauce: A tart and sweet counterpoint to the savory dishes. You can certainly buy a can of it, but homemade is always a delightful surprise. For a twist, try adding orange zest or a splash of balsamic vinegar.
-
1 pumpkin pie: The iconic Thanksgiving dessert! You can make it from scratch using fresh or canned pumpkin, or quickly whip up a store-bought version (no judgment here!). Add a dollop of whipped cream for the perfect finish!
Step-by-Step Instructions
Now that you have your ingredients, let’s break this down into simple, easy-to-follow steps!
Preparing the Turkey
-
Preheat the Oven: Start by preheating your oven to 325°F (165°C). Setting the stage for that beautiful golden bird!
-
Prep the Turkey: Gently pat your turkey dry with paper towels to help crisp the skin. Rub a generous amount of salt and pepper all over the turkey, including the cavity. This will enhance the flavor tremendously!
-
Seasoning: For an extra special touch, add herbs like rosemary, thyme, and sage under the skin and in the cavity. These flavors will perfume the meat as it roasts, creating a sensational aroma.
-
Stuff the Turkey: If you’re using stuffing, fill the cavity of the turkey, but don’t pack it too tightly. The stuffing needs room to expand as it cooks (and trust me, it will soak up those turkey juices like a sponge).
-
Roasting: Place the turkey breast side up on a roasting pan. Pour a bit of broth or water into the pan to keep the environment humid (which equals juicy turkey!). Roast for about 13-15 minutes per pound. A meat thermometer inserted into the thickest part of the thigh should read 165°F (74°C).
-
Baste: Halfway through cooking, baste the turkey with the pan juices. This helps to keep the meat moist and gives it that perfect golden brown color.
-
Resting: Once done, let the turkey rest for at least 20-30 minutes before carving. This step is crucial! Resting allows the juices to redistribute throughout the meat.
Making the Mashed Potatoes
-
Prep and Boil: Peel the potatoes and cut them into similar-sized chunks for even cooking. Place them in a pot, cover with cold water, salt, and boil until fork-tender (about 15-20 minutes).
-
Draining: Once cooked, drain the potatoes well and return them to the pot. This helps steam evaporate, preventing watery mashed potatoes!
-
Mashing: Add a generous scoop of butter, a splash of milk, and a pinch of salt and pepper before mashing away. For added creaminess, consider using sour cream or cream cheese. Mash until smooth and creamy, but don’t overdo it—lumpy is part of the charm!
Cooking the Green Beans
-
Prep: Wash and trim the ends off your green beans.
-
Sautéing: Heat a tablespoon of olive oil in a skillet over medium heat. Add minced garlic (if using), and sauté until fragrant. Toss your green beans in and cook until they’re just tender, about 5-7 minutes. Season with salt and pepper to taste.
Assembling your Feast
-
Cranberry Sauce: If making homemade cranberry sauce, simmer fresh cranberries with sugar and water for about 10-15 minutes until they burst and create a thickened sauce. Let cool before serving.
-
Pumpkin Pie: If you’re baking your pumpkin pie, follow the recipe on the pie crust or pumpkin filling carefully. Let it chill in the fridge for a couple of hours—this improves the flavor and texture.
-
Plating: Now, for the grand finale! Carve the turkey and arrange the slices beautifully on a large platter. Next, scoop generous servings of mashed potatoes, stuffing, and green beans around the turkey. Don’t forget a bowl of cranberry sauce and a beautiful slice of pumpkin pie to complete the table!
Serving Suggestions
Your Thanksgiving table should be a feast for the eyes as well as the stomach! Arrange the turkey in the center, with colorful sides cascading around it. Consider garnishing the turkey platter with fresh herbs or fruit slices for an eye-pleasing arrangement.
For serving utensil suggestions, use large serving spoons for mashed potatoes, and a ladle for your cranberry sauce—because nobody wants a messy serving experience! Encourage your guests to build their own plates, creating the perfect combination of savory and sweet that suits their taste buds.
Recipe Variations
-
Flavorful Stuffing: Swap out traditional bread stuffing for cornbread or wild rice stuffing. You can even add in sautéed apples or cranberries for a sweet twist.
-
Savory Mashed Potatoes: Experiment with garlic or roasted cauliflower added to your mashed potatoes. For an indulgent twist, try adding truffle oil or cheese!
-
Green Bean Almondine: Add toasted almonds to your green beans for a delightful crunch and a flavor upgrade.
-
Zesty Cranberry Sauce: Add jalapeños for a spicy kick or orange zest and ginger for a citrusy flair to your cranberry sauce.
-
Pumpkin Cheesecake: For a twist on the traditional pumpkin pie, whip up a rich pumpkin cheesecake topped with whipped cream. Your guests will love it!
Chef’s Notes
Over the years, this Thanksgiving recipe has come to resemble a family tradition and it has evolved beautifully. My mom’s original turkey recipe inspired my adjustments. I had fun experimenting with different flavor profiles, added spices, and butter tricks until I found the balance everyone loves today.
Sometimes, the cooking process has its silly moments, like the time my dog stole a chunk of turkey while my back was turned. But those funny moments in the kitchen are what make the experience unforgettable. I encourage you to embrace imperfection in your cooking—those moments become cherished stories and laughs during the holiday gatherings!
FAQs and Troubleshooting
-
What if my turkey is undercooked?: If you find your turkey isn’t at the right internal temperature when you’re ready to serve, quickly return it to the oven, tent with foil, and keep an eye on it until cooked through.
-
How do I fix gluey mashed potatoes?: If you find yourself with gluey potatoes, it’s likely they were over-mashed or overcooked. Unfortunately, there’s no totally foolproof fix, but try adding sour cream or crème fraîche to lighten the texture.
-
What’s the best way to reheat leftovers?: The best way to reheat turkey is to slice it and place it in a baking dish with a little broth, covering it with foil to keep moisture in. For mashed potatoes, stir in a splash of milk and reheat in the oven or on the stovetop to revive creaminess.
-
Can I prepare dishes ahead of time?: Absolutely! You can prep the stuffing days in advance and store it in the fridge until it’s time to bake. For the mashed potatoes, consider making them the day before, storing in an airtight container, and reheating on the day of.
Nutritional Info
Thanksgiving dinner is often indulgent, but you can balance your plate for a healthier twist! Here’s a rough estimate of nutritional information per serving (assuming 1/6 of a turkey and respective sides):
- Calories: 900-1200 (depending largely on portion and added ingredients)
- Protein: 50-60g (from turkey, stuffing, and any added proteins)
- Carbohydrates: 70-90g (primarily from potatoes and stuffing)
- Fat: 40-50g (largely from the turkey skin, butter, and creamy sides)
- Fiber: 5-7g (thanks to those green beans and whole grains in stuffing)
Remember, this meal is meant to be enjoyed! With balance and moderation, you can savor every delicious bite.
Final Thoughts
Thanksgiving dinner is more than just a meal; it’s an experience steeped in love, laughter, and tradition. As a friendly reminder, allow yourself to enjoy the cooking process just as much as the meal itself. Burnt edges and overcooked vegetables are all part of the journey!
In gathering around the table with your family and friends, you’re not just filling bellies—you’re creating lasting memories that will be shared for years to come. From my kitchen to yours, I hope this guide inspires you to create a fall feast that is cherished by all. Happy cooking and happy eating!
Print
Thanksgiving Dinner
- Total Time: 180 minutes
- Yield: 6 servings 1x
- Diet: None
Description
A classic Thanksgiving feast featuring turkey, stuffing, mashed potatoes, green beans, cranberry sauce, and pumpkin pie.
Ingredients
- 2 lbs of turkey
- 1 cup of stuffing
- 4 cups of mashed potatoes
- 2 cups of green beans
- 1 cup of cranberry sauce
- 1 pumpkin pie
Instructions
- Preheat the oven to 325°F (165°C).
- Prep the turkey by patting it dry and rubbing it with salt and pepper.
- Season with herbs like rosemary, thyme, and sage.
- Stuff the turkey with stuffing if using.
- Roast the turkey for 13-15 minutes per pound until it reaches 165°F (74°C).
- Baste halfway through cooking with pan juices.
- Rest the turkey for 20-30 minutes before carving.
- Prep the potatoes by peeling and cutting them into chunks.
- Boil the potatoes until fork-tender, about 15-20 minutes.
- Drain and return the potatoes to the pot, then mash with butter and milk.
- Wash and trim the green beans.
- Sauté green beans with garlic in olive oil until just tender, about 5-7 minutes.
- Prepare homemade cranberry sauce if desired.
- Bake the pumpkin pie following recipe instructions.
- Plate the turkey and side dishes on a serving platter for the grand finale.
Notes
Feel free to add your own favorite sides or variations!
- Prep Time: 60 minutes
- Cook Time: 120 minutes
- Category: Main Course
- Method: Roasting
- Cuisine: American
Nutrition
- Serving Size: 1 serving
- Calories: 1000
- Sugar: 20g
- Sodium: 600mg
- Fat: 50g
- Saturated Fat: 20g
- Unsaturated Fat: 25g
- Trans Fat: 0g
- Carbohydrates: 90g
- Fiber: 7g
- Protein: 60g
- Cholesterol: 120mg
Keywords: Thanksgiving, turkey, stuffing, mashed potatoes, pumpkin pie
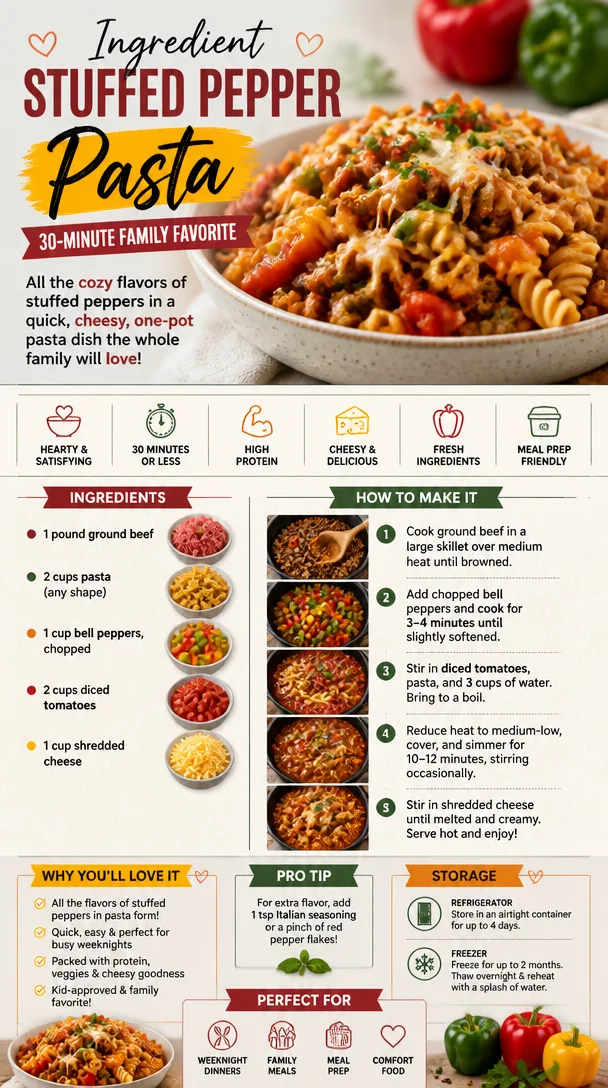
Ingredient Stuffed Pepper Pasta: 30-Minute Family Favorite
5-Ingredient Stuffed Pepper Pasta: A Comforting Meal That Brings Everyone Together
Hey there, food lovers! It’s Beau here—ready to dive into a delicious and super simple recipe that’s going to become a staple in your kitchen. If you’ve ever craved the classic flavors of stuffed peppers but didn’t have the time or energy to stuff ’em, I’ve got a fab solution: 5-Ingredient Stuffed Pepper Pasta. Trust me; this dish is a warm hug after a long day and perfect for the whole family.
Nothing says "comfort food" like the combination of savory ground beef, vibrant bell peppers, and gooey cheese all mixed with your favorite pasta. And the best part? You only need five simple ingredients to whip this up! Whether you’re cooking for a crowd or just want to treat yourself, this dish is sure to satisfy—without turning your kitchen into a hot mess.
In this post, I’ll share not just the recipe but also a little slice of my cooking history and tips on mastering this dish. I promise it will be a joy to make, and who knows, you might just find a new family favorite at your table!
A Personal Flavor Journey
Let me take you back to my childhood for a moment—a glorious era of cozy family dinners and the delightful aroma of home-cooked meals drifting through the house. One of those meals that always stood out was stuffed bell peppers. My mom, the queen of simple yet magical meals, would whip them up on busy weeknights. We’d gather around the dinner table as she served vibrant, colorful peppers stuffed to the brim with a scrumptious filling.
What I remember most is how everyone dove right into that warm, cheesy goodness, laughing and sharing stories with each bite. It was more than just a meal; it became a cherished family tradition. As I grew older, I decided to take that warm memory and transform it into something even easier to prepare—pasta! A dish that retains all those nostalgic flavors but is infinitely simpler. So, grab your spatula, and let’s get cooking!
Ingredients You’ll Need
To make this mouthwatering 5-Ingredient Stuffed Pepper Pasta, you’ll need:
-
1 pound ground beef
The base of our dish! Feel free to swap it with ground turkey or plant-based meat alternatives for a healthier or vegetarian version. -
2 cups pasta (any shape)
Pick your favorite! Fusilli or penne works great for holding on to the sauce. You can also try whole wheat or gluten-free pasta for dietary needs. -
1 cup bell peppers, chopped
Red, green, yellow—you name it! Each pepper brings a different flavor profile. If you’re feeling adventurous, try adding some spicy jalapeños for an extra kick! -
2 cups diced tomatoes
Canned or fresh, these juicy beauties add incredible flavor and moisture. If you like your dish to have more sauce, go ahead and add an extra cup! -
1 cup shredded cheese
The melty crown jewel of our dish! Cheddar is classic, but mozzarella, pepper jack, or a blend can take it to the next level.
Step-by-Step Instructions
Ready to cook? Let’s dive right in!
-
Cook the Pasta
Begin by bringing a large pot of salted water to a boil. Add in your pasta and cook until al dente, around 8-10 minutes depending on the shape. Be sure to taste it! While it cooks, set aside some pasta water—this trick is a lifesaver when combining everything later. -
Sauté the Beef
In a large skillet over medium heat, add your ground beef. Cook until browned and crumbly, 5–7 minutes. Drain any excess fat, then season with salt and pepper. Pro tip: For an added depth of flavor, throw in a dash of garlic powder or Italian seasoning while it cooks! -
Add the Bell Peppers
Once your beef is ready, toss in the chopped bell peppers. Stir them into the mixture and let them soften for about 3–5 minutes. This builds flavor and gives your dish a vibrant pop of color. -
Mix with Tomatoes
Pour in the diced tomatoes (along with their juices) and stir everything together. Let it simmer for about 5 minutes. If the mixture feels too thick, add a splash of the reserved pasta water to reach your desired consistency. -
Combine with Pasta and Cheese
Now, it’s time to bring it all together! Add your cooked pasta directly into the skillet and mix well. Sprinkle in the shredded cheese, and stir until it’s melted and gooey. If you want an added cheesy crust, you can transfer the whole mix into a baking dish, top with more cheese, and pop it under the broiler for 2–3 minutes.
Serving Suggestions
To plate your 5-Ingredient Stuffed Pepper Pasta, I recommend serving it in generous bowls topped with a sprinkle of freshly chopped parsley or basil for a pop of freshness. If you’re feeling indulgent, drizzle some olive oil or a generous dollop of sour cream on top. You can also throw in some homemade garlic bread on the side—it’s the perfect accompaniment for scooping up that cheesy goodness!
Recipe Variations
Feeling adventurous? Here are a few creative twists you can try with this recipe:
-
Spicy Stuffed Pepper Pasta: Add diced jalapeños or a splash of hot sauce to the ground beef for a spicy kick.
-
Vegetarian Delight: Replace ground beef with sautéed mushrooms and lentils for a delicious vegetarian option.
-
Creamy Version: Stir in a few tablespoons of cream cheese or ricotta before serving to make it extra creamy and rich.
-
Herb-Infused: Add fresh or dried herbs like basil, oregano, or thyme during the beef-cooking step for an aromatic touch.
-
Add More Veggies: Toss in other veggies like zucchini, corn, or spinach for added nutrients and colors!
Chef’s Notes
This recipe has evolved over the years from my mom’s traditional stuffed peppers to a beautifully simplified pasta dish. I love that it still brings the comfort and warmth of that family meal but with a modern twist! Plus, you’ll have minimal pots and pans to clean up, which is always a win in my book!
Oh, and always remember to taste along the way. Cooking is all about finding your flavor balance—don’t be afraid to add a pinch of this or a dash of that to personalize it to your liking!
FAQs and Troubleshooting
Q: My pasta is sticky; what did I do wrong?
A: This usually happens if the pasta wasn’t cooked in enough salted water or didn’t have enough stirring. Always give it a good stir while cooking to keep those noodles nice and separate!
Q: Can I prep this dish ahead of time?
A: Absolutely! You can make it a day before and refrigerate it, then just reheat it in the oven or on the stovetop until hot.
Q: What can I use instead of ground beef?
A: Ground turkey, chicken, or even lentils for a vegetarian version work well! Also, keep in mind that cooking times might vary with different proteins.
Q: Can I freeze leftovers?
A: Yes! This dish freezes well, so pack it into an airtight container for up to three months. Just thaw and reheat when you’re ready to enjoy!
Nutritional Info
While enjoying this delicious 5-Ingredient Stuffed Pepper Pasta, you’ll also be getting a lovely balance of nutrients. Here’s a quick breakdown (per serving):
- Calories: Approximately 400-450
- Protein: 25g (dependent on meat choice)
- Carbohydrates: 40g
- Fat: 20g
- Fiber: 4g (especially if you add in extra veggies!)
It’s a satisfying meal that can be made healthier by selecting lean meats and whole-grain pasta.
Final Thoughts
There you have it, friends—a simple and scrumptious recipe for 5-Ingredient Stuffed Pepper Pasta that’s bound to become a kitchen favorite! I hope you’re excited to try this out and maybe share it with loved ones around your own dinner table. Cooking is all about bringing joy and connection, and this dish does just that.
So roll up your sleeves, grab those ingredients, and have a blast creating this warm, comforting meal. Remember, cooking should always feel good, just like that warm hug I mentioned earlier. I can’t wait to hear how yours turns out! Until next time—happy cooking!
Bon appétit!
Print5-Ingredient Stuffed Pepper Pasta
- Total Time: 45 minutes
- Yield: 4 servings 1x
- Diet: Meat
Description
A comforting and simple meal combining the classic flavors of stuffed peppers with easy-to-cook pasta, perfect for the whole family.
Ingredients
- 1 pound ground beef
- 2 cups pasta (any shape)
- 1 cup bell peppers, chopped
- 2 cups diced tomatoes
- 1 cup shredded cheese
Instructions
- Cook the Pasta: Begin by bringing a large pot of salted water to a boil. Add in your pasta and cook until al dente, around 8-10 minutes. While it cooks, set aside some pasta water.
- Sauté the Beef: In a large skillet over medium heat, add your ground beef. Cook until browned and crumbly, 5-7 minutes. Drain excess fat, then season with salt and pepper.
- Add the Bell Peppers: Once beef is ready, toss in the chopped bell peppers and stir into the mixture. Let them soften for 3-5 minutes.
- Mix with Tomatoes: Pour in the diced tomatoes and stir. Let it simmer for about 5 minutes, adding reserved pasta water if necessary.
- Combine with Pasta and Cheese: Add cooked pasta into the skillet, mix well, then sprinkle in the shredded cheese until melted. Optionally, top with more cheese and broil for a crispy crust.
Notes
Feel free to substitute ground beef with turkey or plant-based alternatives. Experiment with different pasta shapes and add extra veggies for more nutrition.
- Prep Time: 15 minutes
- Cook Time: 30 minutes
- Category: Main Course
- Method: Baking
- Cuisine: Italian
Nutrition
- Serving Size: 1 serving
- Calories: 400
- Sugar: 6g
- Sodium: 500mg
- Fat: 20g
- Saturated Fat: 8g
- Unsaturated Fat: 9g
- Trans Fat: 0g
- Carbohydrates: 40g
- Fiber: 4g
- Protein: 25g
- Cholesterol: 75mg
Keywords: stuffed peppers, pasta, easy dinner, family meal, comfort food
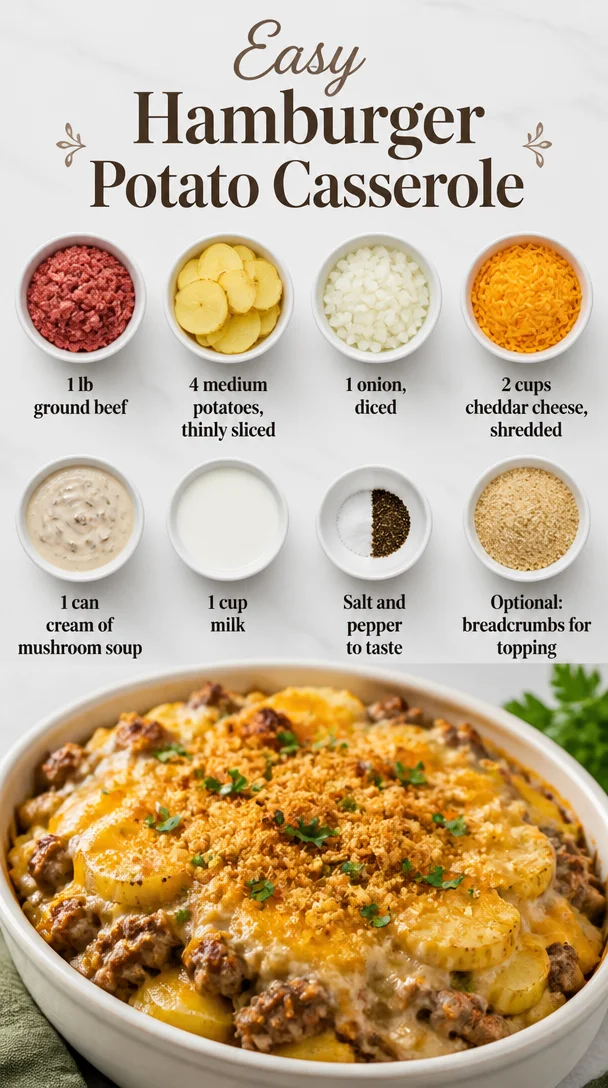
Easy Hamburger Potato Casserole
The Ultimate Easy Hamburger Potato Casserole: A Comfort Food Classic
Hey there, fellow food lovers! I’m so excited to share my latest culinary creation with you: the Easy Hamburger Potato Casserole. If you’re looking for a dish that’s not only delicious but also simple to whip up after a long day, you’ve hit the jackpot! This casserole is the epitome of comfort food, combining hearty ground beef, tender potatoes, and creamy cheese, all wrapped up in one warm, inviting dish that feels like a hug from your grandma. Grab your apron, and let’s dive into this flavor-packed experience together!
A Little Slice of Nostalgia
Growing up in my family’s kitchen, casseroles were a staple. My mom had a knack for creating meals that were both straightforward and soul-satisfying, and the Hamburger Potato Casserole was definitely at the top of her list. I remember coming home from school on chilly autumn days, the smell of bubbling cheese and simmering meat wafting through our house. It felt like my worries melted away as soon as I laid eyes on that comforting dish, bubbling away in the oven.
One particular time, I had a couple of friends over for a study session (or, more accurately, a silly hangout filled with laughter and too many snacks). With full bellies and a few minutes to spare before our next gaming adventure, Mom tossed together this casserole. While she expertly layered the ingredients in a casserole dish, I could hardly contain my excitement—but I was also slightly terrified I might ruin it by sneaking too many bites before it was done! When it finally came out of the oven, it was a glorious golden masterpiece, and there was more than enough to feed my friends and me. We savored every cheesy, meaty bite and shared stories, laughter, and friendship—a perfect recipe for unforgettable memories.
Ingredients You’ll Need
Let’s gather our ingredients! Here’s what you’ll need to make this delicious casserole:
-
1 lb ground beef
A classic choice for this dish. You can use turkey or a plant-based alternative if you prefer. Just be aware that different meats may change the flavor profile slightly! -
4 medium potatoes, thinly sliced
Yukon gold or russet potatoes work beautifully here, giving a great texture and flavor. If you’re short on time, you can use pre-packaged frozen sliced potatoes. -
1 onion, diced
Onions add depth to the flavor. If you’re not a fan, try substituting with shallots or green onions for a milder taste. -
2 cups cheddar cheese, shredded
Who doesn’t love cheese? Sharp cheddar brings a wonderful zing to the casserole, but feel free to mix it up with Monterey Jack or mozzarella for a creamier finish. -
1 can cream of mushroom soup
This is what lends that creamy goodness to the dish. If you’re looking for a healthier option, you can use a low-fat or homemade version. -
1 cup milk
This helps to thin out the soup and create a more cohesive texture. Almond milk or other plant-based milks can be used as substitutes. -
Salt and pepper to taste
Don’t skimp on seasoning! They elevate all the flavors. -
Optional: breadcrumbs for topping
For a crispy finish, sprinkle some breadcrumbs on top before baking. You could also add some grated Parmesan for an extra flavor punch.
Step-by-Step Instructions
Got everything ready? Let’s get cooking! Here’s your step-by-step guide to making the ultimate Easy Hamburger Potato Casserole:
-
Preheat Your Oven
Start by cranking up your oven to 375°F (190°C). This ensures that your casserole cooks evenly once it hits the oven! -
Brown the Beef
In a large skillet over medium-high heat, add your ground beef. Break it apart with a spatula, seasoning with salt and pepper as it cooks. You want to cook it until it’s browned and no longer pink, about 5-7 minutes. If you have excess grease, carefully drain it away to keep your casserole from becoming too greasy. -
Add Onions
Toss the diced onions into the meat mixture. Cook everything together for an additional 3-4 minutes until the onions become translucent. This will enhance the beef’s flavor while adding a lovely aroma! -
Mix Cream of Mushroom Soup and Milk
In a mixing bowl, combine the cream of mushroom soup and milk. This step blends the two together seamlessly, allowing for a creamy consistency that wraps around the potatoes beautifully. Give it a good stir, and set it aside. -
Layer It Up
Now, it’s time for the fun part! Grab a greased 9×13 inch baking dish and start layering. Begin with half of the sliced potatoes, followed by half of the beef and onion mixture. Then, pour half of the soup and milk mixture over this layer. Sprinkle with a generous amount of shredded cheddar cheese. Repeat the layers until all ingredients are used, finishing with cheese on top (we want a cheesy crust, after all!). -
Bake It
Cover the casserole with aluminum foil and pop it into the preheated oven. Bake for about 45-50 minutes. The steam will cook the potatoes perfectly, making sure they are tender and delicious. -
Get Crispy (Optional)
If you’re using breadcrumbs for an extra crunchy topping, carefully remove the foil during the last 10 minutes of baking and sprinkle the breadcrumbs on top. Pop it back in the oven until the topping is golden and crispy! -
Cool and Serve
Once it’s done, let the casserole cool for about 10-15 minutes before serving. This helps the layers set a bit, making it easier to serve. Trust me; your patience will be rewarded!
Serving Suggestions
To plate this mesmerizing dish, scoop a hearty portion onto a plate and consider topping it with fresh chopped parsley for a burst of color and flavor. You can also serve it alongside a simple green salad or some roasted veggies for a complete meal. For an extra cozy touch, why not serve it with warm, crusty bread? Guests will love it, and it balances out the hearty casserole perfectly!
Recipe Variations
Now, let’s get creative! Here are a few fun twists and adaptations to make this dish your own:
-
Mexican Twist
Add some taco seasoning to the beef and toss in some black beans and corn. Top with pepper jack cheese for a spicy finish. -
Vegetable Lover’s Delight
Layer in some steamed broccoli or sautéed bell peppers and zucchini for a healthy pop of color and flavor. -
Italian Style
Swap out the cream of mushroom soup for a marinara sauce, add Italian herbs, and use mozzarella cheese for a lasagna-style casserole. -
Breakfast Casserole
Make it a breakfast dish by adding scrambled eggs and breakfast sausage instead of ground beef. Perfect for brunch gatherings! -
Gluten-Free Option
Simply use gluten-free breadcrumbs or skip the topping altogether. This dish will still shine without it!
Chef’s Notes
As I’ve made this casserole over the years, I’ve discovered a few fun variations and personal touches that made it feel uniquely mine. One day, in a burst of creativity, I added leftover roasted veggies I had in the fridge. The result? A whole new level of flavor! I also love to experiment with different cheeses—sometimes a little feta crumbled on top adds a delightful tang. This dish, like all good comfort food, has a way of evolving based on what you have on hand and your personal flavor preferences.
FAQs and Troubleshooting
Q: My potatoes didn’t cook all the way through! What happened?
A: Make sure you’re cutting your potatoes thin enough for even cooking. Also, letting the casserole rest before serving allows it to firm up, which can help with serving.
Q: How do I make this ahead of time?
A: You can prepare everything a day ahead—just cover it and store it in the fridge. When you’re ready to bake, add about 10-15 extra minutes to the baking time.
Q: Can I freeze this casserole?
A: Absolutely! Just make sure to let it cool completely before wrapping it tightly in foil and plastic wrap. It can last in the freezer for 2-3 months, and you can thaw it in the fridge overnight before baking.
Q: What if I don’t have cream of mushroom soup?
A: You can easily substitute with cream of chicken soup or even make a homemade white sauce with butter, flour, and broth.
Nutritional Info
This Easy Hamburger Potato Casserole is comforting and hearty but also brings a satisfying balance of nutrients. Each serving contains a hefty amount of protein from the ground beef, essential vitamins and minerals from the potatoes and onions, and calcium from the cheese. To keep it on the healthier side, consider using lean ground beef, low-fat cheese, and serving it alongside a salad to round out your meal.
While I don’t specifically track the nutritional values, a typical serving should provide around:
- Calories: 450
- Protein: 30g
- Carbs: 35g
- Fat: 25g
(Do keep in mind that these numbers may vary based on the specifics of your ingredients and portion sizes!)
Final Thoughts
There you have it, my friends! The Easy Hamburger Potato Casserole—comfort food at its finest. This recipe embodies the warmth of home-cooked meals and the joyous moments shared around the dinner table. Whether it’s a weeknight dinner or a gathering with friends, this casserole always brings people together, creating memories worth savoring.
So, grab your favorite person to cook with, get those ingredients together, and let’s create some kitchen magic! I can’t wait to hear your stories and see how your casseroles turn out. And remember, cooking is all about love, a sprinkle of creativity, and, of course, enjoying the journey as you go. Happy cooking, everyone!
Print
Easy Hamburger Potato Casserole
- Total Time: 65 minutes
- Yield: 6 servings 1x
- Diet: Omnivore
Description
A delicious and comforting casserole combining ground beef, tender potatoes, and creamy cheese, perfect for a quick meal after a long day.
Ingredients
- 1 lb ground beef
- 4 medium potatoes, thinly sliced
- 1 onion, diced
- 2 cups cheddar cheese, shredded
- 1 can cream of mushroom soup
- 1 cup milk
- Salt and pepper to taste
- Optional: breadcrumbs for topping
Instructions
- Preheat your oven to 375°F (190°C).
- Brown the beef in a skillet over medium-high heat for 5-7 minutes. Drain excess grease if necessary.
- Add the diced onions and cook for an additional 3-4 minutes until translucent.
- Mix the cream of mushroom soup and milk in a bowl and set aside.
- Layer the potatoes, beef mixture, soup mixture, and cheese in a greased 9×13 inch baking dish.
- Bake covered with foil for 45-50 minutes or until potatoes are tender.
- Get crispy by removing the foil in the last 10 minutes and adding breadcrumbs if desired.
- Cool for 10-15 minutes before serving.
Notes
Can be prepared a day in advance and refrigerated. Great for freezing, just allow to cool completely before wrapping.
- Prep Time: 15 minutes
- Cook Time: 50 minutes
- Category: Main Course
- Method: Baking
- Cuisine: American
Nutrition
- Serving Size: 1 serving
- Calories: 450
- Sugar: 3g
- Sodium: 800mg
- Fat: 25g
- Saturated Fat: 12g
- Unsaturated Fat: 8g
- Trans Fat: 1g
- Carbohydrates: 35g
- Fiber: 4g
- Protein: 30g
- Cholesterol: 80mg
Keywords: casserole, comfort food, hamburger, potato, cheese, easy recipe
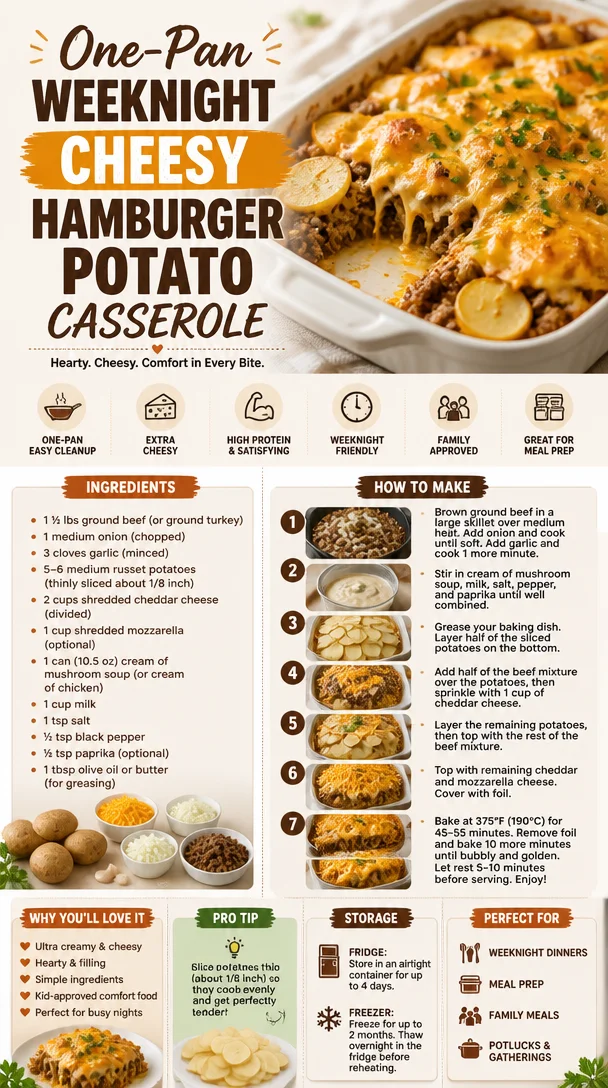
One-Pan Weeknight Cheesy Hamburger Potato Casserole
Cheesy Hamburger Potato Casserole: A Comfort Food Classic
Hey there, food lovers! Welcome back to Feastical! Today, we’re diving into a recipe that feels like a warm hug on a chilly evening, and it’s a family favorite of mine—Cheesy Hamburger Potato Casserole. Imagine layers of tender potatoes, savory ground beef, and a gooey cheese topping that are sure to make your taste buds sing!
This dish is all about comfort food—hungry bellies satisfied, laughter echoing around the table, and the delightful aroma wafting from the oven that brings everyone together. So, whether you’re an experienced home cook or just starting, trust me, you’re going to want to keep this one in your repertoire.
A Little Bit of History: My Love Affair with Casseroles
Before we jump into the nitty-gritty of the recipe, I have a little story to share about why this dish holds a special place in my heart. Growing up, my family had a tradition of gathering around the dinner table every Sunday. It was our sacred time—a day filled with warmth, laughter, and of course, some of the best home-cooked meals you could imagine.
My mom was a casserole queen (if that title even exists!), and Cheesy Hamburger Potato Casserole was her secret weapon. After a long week, she knew that this dish could put smiles on our faces and fill our bell bellies until we plopped down on the couch in a satisfied food coma. I can still picture her in the kitchen, donning her favorite apron, as she layered the ingredients, chatting about our week and sharing stories of her own, all while the comforting scents enveloped our home.
Years later, as I embarked on my culinary journey, I knew I had to keep this tradition alive. Each time I whip up this cheesy, layered delight, it reminds me of those Sunday evenings, which were filled with good food and even better company. Now, let’s create some new memories in the kitchen together!
Ingredients You’ll Need
Here’s what you’ll need to make this savory creation:
- 1 ½ lbs ground beef (or ground turkey): Ground beef is the classic choice here, but if you prefer a lighter option, ground turkey works just as well. It’s leaner but still brings plenty of flavor to the dish.
- 1 medium onion (chopped): Onions add depth and sweetness. You can swap them out for shallots or even green onions for a different flavor profile.
- 3 cloves garlic (minced): Garlic is a must for that aromatic kick! If you’re a garlic lover, feel free to throw in more!
- 5–6 medium russet potatoes (thinly sliced, about 1/8 inch): These provide the hearty base. Russet potatoes are ideal, but you could use Yukon golds for a creamier texture.
- 2 cups shredded cheddar cheese (divided): Cheddar brings all that cheesy goodness! For a twist, try using pepper jack for an added spice.
- 1 cup shredded mozzarella (optional, for extra meltiness): Mozzarella not only adds another layer of cheesiness but also creates that gooey effect we all love.
- 1 10.5 oz can cream of mushroom soup (or cream of chicken): This is the perfect binder to hold everything together. If you’re feeling adventurous, consider making your own cream sauce!
- 1 cup milk: This helps to thin out the soup for better distribution throughout the casserole. Use any type of milk you prefer!
- 1 tsp salt: Don’t forget the salt to enhance the flavors.
- ½ tsp black pepper: A little seasoning never hurt anyone!
- ½ tsp paprika (optional): Paprika adds a hint of smokiness. If you’re not a fan, this can easily be omitted.
- 1 tbsp olive oil or butter (for greasing the dish): A little fat is necessary to prevent sticking!
Now that we’ve gathered our ingredients, let’s dive into the cooking process!
Step-by-Step Instructions
-
Preheat the Oven: First things first, preheat your oven to 375°F (190°C). This will ensure that your casserole cooks evenly and comes out bubbly and golden.
-
Sauté the Ground Beef and Onions: In a large skillet over medium heat, add your olive oil or butter. Once hot, toss in the chopped onions and cook them until they’re translucent—about 3–4 minutes. Then, add the ground beef (or turkey) and use a spatula to break it apart. Cook until it’s browned and fully cooked, stirring occasionally. Add the minced garlic toward the end and let it cook for another minute.
Chef Tip: Always drain excess grease from the beef to keep your casserole from becoming greasy!
-
Mix in the Cream Soup: Once your meat is browned, stir in the cream of mushroom (or cream of chicken) soup and the cup of milk. This creamy mixture is where the magic happens—make sure it’s well combined and season with salt and pepper.
-
Prepare Your Potatoes: While the meat mixture is simmering, thinly slice your russet potatoes. You can use a mandoline for even slicing or a sharp knife if you prefer.
Pro Tip: Even slices help the potatoes cook uniformly, so take your time with this step!
-
Layer the Casserole: Grease a large baking dish (it’s casserole time!) and start layering. Place half of the sliced potatoes on the bottom, followed by half of the meat mixture. Sprinkle with one cup of cheddar cheese. Repeat this layer until you’ve used up all your ingredients, ensuring the last layer ends with cheese on top—you want that glorious melt!
-
Bake: Cover the dish with aluminum foil and bake in the preheated oven for 40 minutes. This allows the potatoes to soften without browning too much. After 40 minutes, remove the foil and bake for an additional 20 minutes, or until the cheese is melted and bubbly and the potatoes are fork-tender.
Chef Hack: If you want an extra crispy top, broil for an additional 2–3 minutes at the end—just watch it closely!
Serving Suggestions
Now that your Cheesy Hamburger Potato Casserole is out of the oven and looking fabulous, let’s talk presentation! Allow it to cool for about 10 minutes before diving in—this allows it to set a little and makes serving easier.
Spoon out generous portions onto plates, and if you’re feeling fancy, sprinkle some chopped parsley or chives on top for a pop of color. This dish pairs beautifully with a simple green salad or roasted veggies to balance out the cheese overload. In our house, we love adding a dollop of sour cream or some hot sauce on top for a little extra zing!
Recipe Variations
Feeling adventurous? Let’s explore some creative twists to this classic dish:
-
Vegetarian Style: Swap the ground beef for lentils or black beans for a hearty vegetarian option. Additionally, you could add in some sautéed bell peppers or mushrooms for added depth.
-
Spicy Kick: For those who love a bit of heat, mix in some diced jalapeños or a couple of shakes of hot sauce in the meat mixture.
-
Twice-Baked Casserole: Add in some cooked broccoli or spinach for that extra nutrient boost. You can layer them in with the potatoes for added color and vitamins!
-
Herbed Infusion: Toss a tablespoon of dried thyme or Italian seasoning into the meat mixture to elevate the flavor profile even more.
-
Gluten-Free Option: Use a certified gluten-free cream soup or make your own with a roux base to keep it gluten-free!
Chef’s Notes
As with anything in the kitchen, don’t be afraid to experiment. I’ve made this casserole countless times, and it always brings back those Sunday night memories while still allowing room for creativity. The recipe has evolved over the years, shifting from my mom’s classic technique to my own modern spin. I even once tried adding some taco seasoning instead of salt and pepper! It turned into a delicious Mexican twist that my friends still rave about.
FAQs and Troubleshooting
Q: My potatoes are still hard after baking, what’s wrong?
A: This could mean they weren’t sliced thin enough or maybe your oven temperature wasn’t accurate. Just pop it back in for another 10-15 minutes covered until tender!
Q: Can I prepare this casserole ahead of time?
A: Absolutely! Assemble it and refrigerate overnight. Just add an extra 10-15 minutes to your baking time when ready to cook.
Q: Is it possible to freeze leftovers?
A: Yes, you can freeze the casserole after baking. Just ensure it’s cooled completely before wrapping tightly in aluminum foil. It should last up to 3 months in the freezer. When you’re ready to enjoy, thaw it in the refrigerator overnight before reheating.
Q: What if I don’t have cream soup?
A: You can substitute homemade white sauce instead! Just whisk together equal parts of flour and butter with some milk until thickened, then add seasonings to taste.
Nutritional Info
Now, I know what you’re thinking—comfort food usually comes with a bit of a guilty conscience, but moderation is key! Here’s a rough breakdown (per serving, based on 8 servings):
- Calories: Approximately 410
- Protein: 24g
- Carbohydrates: 30g
- Fat: 22g
- Fiber: 3g
Opting for leaner meat and reducing cheese can make this a bit lighter if you’re looking to cut back on calories while still enjoying a satisfying meal.
Final Thoughts
And there you have it, folks—a Cheesy Hamburger Potato Casserole that’s sure to become a beloved staple in your kitchen, just like it is in mine. Cooking is about creating connections and making memories, and sharing meals with loved ones only sweetens the experience.
So, next time you’re looking for something comforting and delicious, remember to whip out this recipe and share the love! We all need a little cheesy goodness in our lives, right? Happy cooking, and don’t forget to come back for more delightful dishes and kitchen tips here at Feastical!
Print
Cheesy Hamburger Potato Casserole
- Total Time: 75 minutes
- Yield: 8 servings 1x
- Diet: Omnivore
Description
A comforting and cheesy casserole made with layers of ground beef, potatoes, and melty cheese, perfect for family gatherings.
Ingredients
- 1 ½ lbs ground beef (or ground turkey)
- 1 medium onion (chopped)
- 3 cloves garlic (minced)
- 5–6 medium russet potatoes (thinly sliced, about 1/8 inch)
- 2 cups shredded cheddar cheese (divided)
- 1 cup shredded mozzarella (optional, for extra meltiness)
- 1 10.5 oz can cream of mushroom soup (or cream of chicken)
- 1 cup milk
- 1 tsp salt
- ½ tsp black pepper
- ½ tsp paprika (optional)
- 1 tbsp olive oil or butter (for greasing the dish)
Instructions
- Preheat the oven to 375°F (190°C).
- Sauté the onions in olive oil or butter until translucent, then add the ground beef and cook until browned.
- Add the minced garlic and cook for another minute.
- Mix in the cream of mushroom soup and milk, stirring until well combined.
- Prepare the potatoes by thinly slicing them.
- Layer half of the sliced potatoes in a greased baking dish, followed by half of the meat mixture and one cup of cheddar cheese. Repeat the layers, finishing with cheese on top.
- Bake covered with aluminum foil for 40 minutes, then uncover and bake for an additional 20 minutes until the cheese is melted and bubbly.
Notes
Allow the casserole to cool for 10 minutes before serving. This dish pairs well with a green salad or roasted vegetables.
- Prep Time: 15 minutes
- Cook Time: 60 minutes
- Category: Main Course
- Method: Baking
- Cuisine: American
Nutrition
- Serving Size: 1 serving
- Calories: 410
- Sugar: 3g
- Sodium: 800mg
- Fat: 22g
- Saturated Fat: 10g
- Unsaturated Fat: 8g
- Trans Fat: 1g
- Carbohydrates: 30g
- Fiber: 3g
- Protein: 24g
- Cholesterol: 75mg
Keywords: casserole, comfort food, cheesy, hamburger, potatoes, family meal
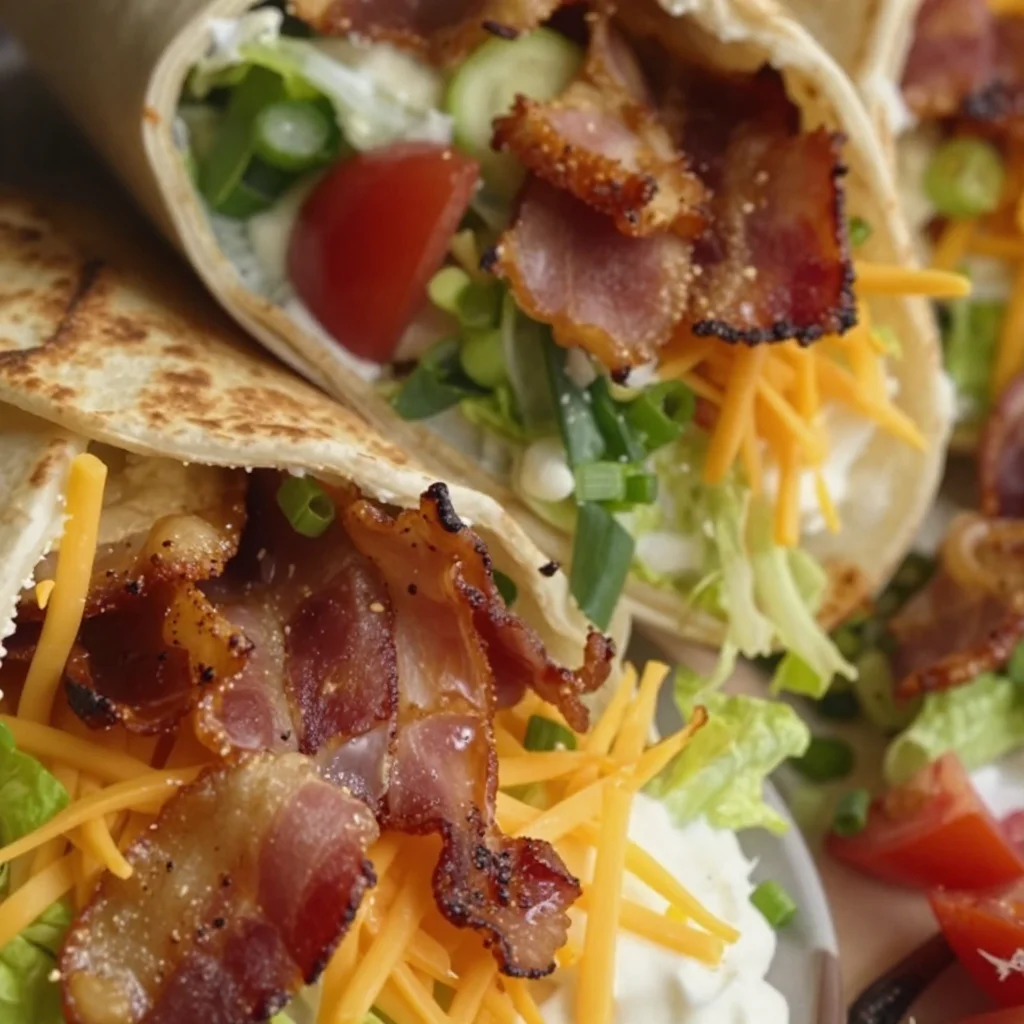
Minute Cheesy Bacon Ranch Wraps for Busy Weeknights
Cheesy Bacon Ranch Wraps: The Ultimate Comfort Food
Hey there, food lovers! Today we’re diving into the scrumptious world of Cheesy Bacon Ranch Wraps. If you’re in the mood for a dish that brings together creamy goodness, crispy bacon, and all the fresh flavors that make your taste buds sing, you’re in the right spot. These wraps are the quintessential feel-good food, perfect for everything from a casual lunch to a festive gathering with friends. Let’s get started on a culinary adventure that’ll leave everyone asking for seconds!
A Flavorful Journey
This recipe isn’t just a delightful meal; it’s a nostalgia trip down memory lane. I still vividly remember the first time I whipped up these cheesy bacon ranch wraps for a family gathering. I was just a young chef in training, excited to impress my parents with something quick and delicious. We had just built this fantastic outdoor grill in our backyard, and the scent of cooking food mingled with laughter and the sound of my siblings playing nearby. I can still see my dad grabbing a wrap, stuffing it full, and giving me a thumbs up. That moment sparked my love for cooking, and it also made me realize how food has this magical ability to bring people together.
Fast forward a few years, and I’ve made countless variations of the wraps, each time adding a little personal flair and love. From backyard BBQs to cozy movie nights, these wraps have never failed to evoke feelings of warmth and comfort. You can’t go wrong with this recipe—trust me on that!
Ingredients
Here’s what you’ll need to whip up these amazing wraps:
-
4 large flour tortillas
The base of your wrap; feel free to substitute with whole wheat or gluten-free tortillas for a healthier twist! -
8 ounces cream cheese, softened
This adds a rich, creamy layer. You can swap it with Neufchâtel cheese for a lighter version or even Greek yogurt for a tangy kick. -
1/2 cup ranch dressing
The star of the show! Use homemade ranch for a fresh taste or a low-fat alternative if you’re watching calories. -
1 cup shredded cheddar cheese
Cheddar is classic, but you can also use pepper jack for a spicier version. -
1 cup cooked bacon, chopped
Who doesn’t love bacon? Alternatively, you could use turkey bacon or even crispy chickpeas for a vegetarian option. -
1/2 cup green onions, chopped
These add a refreshing crunch; chives can also do the trick if green onions aren’t available. -
1 cup lettuce, shredded
Iceberg for that crunch or spinach for a nutrient boost—no wrong choices here. -
1 cup diced tomatoes (optional)
They add a nice burst of flavor and color. Leave them out if you’re not a fan. -
Salt and pepper to taste
Always essential to crank up those flavors!
Step-by-Step Instructions
Cooking these wraps is as easy as pie! Let’s break it down step by step:
-
Prep Your Ingredients:
Start by gathering and prepping all your ingredients. Chop your bacon, green onions, and tomatoes (if using), and shred your lettuce. Having everything ready makes the assembly process smoother. Trust me, the less frantic you are, the more fun you’ll have! -
Mix the Cream Cheese Mixture:
In a medium bowl, combine your softened cream cheese and ranch dressing using a spatula or hand mixer until it becomes smooth and creamy. This mixture serves as the glue that holds everything together, so don’t rush this step! -
Assemble the Wraps:
Place a tortilla on a clean, flat surface. Spread a generous layer of the cream cheese mixture on the tortilla, leaving about an inch around the edges. Feel free to spread it to the ends—you want that creamy goodness in every bite! -
Layer Your Ingredients:
Now it’s time to add some fun! Sprinkle a handful of shredded cheese over the cream cheese layer. Then, add chopped bacon, a sprinkle of green onions, and a nice handful of lettuce. If you’re using tomatoes, toss those on too. Remember, don’t go overboard—if you pack them too tight, the wraps will be hard to roll and may explode like confetti! -
Roll It Up:
Here comes the fun part! Starting from one edge, gently roll the tortilla tightly but not too tight (you want the fillings to stay inside). Once you’ve reached the end, press the seam to secure your wrap. If it doesn’t stick, a little smear of cream cheese will do the trick. -
Slice and Serve:
Take a sharp knife and slice the wrap in half diagonally. This not only makes it easier to eat but also showcases the colorful fillings inside. You can serve them as they are or pop them in the fridge for 30 minutes for a cooler snack.
Serving Suggestions
While these wraps are delicious on their own, there are plenty of ways to elevate the experience! Serve them alongside some crunchy veggie sticks or a fresh garden salad for added texture. A side of extra ranch or even a spicy dipping sauce can add a fun twist. Arrange your wraps on a platter, cut side up for a beautiful presentation, and voilà! Your guests will be in for a treat, and they’ll love munching on these tasty delights.
Recipe Variations
Get ready to get creative in the kitchen! Here are a few fun twists on the classic wrap that’ll keep things fresh:
-
Buffalo Cheesy Bacon Ranch Wrap: Substitute half of the ranch with buffalo sauce for a spicy kick. Add sliced grilled chicken to the mix for a hearty meal.
-
Mediterranean Twist: Swap the ranch dressing for tzatziki, add feta cheese, and substitute olives for bacon. It’s a deliciously zesty change of pace.
-
Veggie Lovers’ Wrap: Skip the bacon and pile on more veggies like bell peppers, cucumbers, and shredded carrots for a refreshing vegetarian option.
-
BBQ Bacon Ranch Wrap: Use BBQ sauce instead of ranch for a tangy, sweet flavor. Pair it with pulled pork or chicken for a satisfying meal that feels like summer all year round.
-
Breakfast Breakfast Wrap: Add scrambled eggs, avocado, and some salsa for a morning twist that’ll get your day started on a delicious note!
Chef’s Notes
Oh, how these wraps have evolved! I still remember the very first batch I made; they were a bit of a mess, honestly. The ingredients spilled out everywhere, but boy, did we have fun digging in! Over time, I’ve learned to be more strategic with the filling amounts and to have a few napkins handy (because let’s face it—wraps can be a bit gooey!). The versatility is what holds a special place in my heart; they’ve adapted to every party, mood, and dietary whim.
FAQs and Troubleshooting
Q: Can I make these in advance?
Absolutely! You can make them a few hours ahead of time. Just wrap them tightly in foil or plastic wrap and store them in the fridge to keep everything fresh.
Q: What if I don’t have ranch dressing?
No problem! You can whip up a quick homemade ranch using buttermilk, mayo, and your favorite herbs. Or, try a store-bought alternative like Caesar dressing or a creamy vinaigrette.
Q: Can I freeze these wraps?
While you can freeze them, I recommend enjoying them fresh to retain that delightful texture. If you must, wrap them tightly in foil or plastic and consume within a month.
Q: How can I add more protein?
Feel free to toss in some cooked chicken, turkey, or even black beans for an extra protein punch!
Nutritional Info
Each Cheesy Bacon Ranch Wrap (without additional ingredients) typically contains:
- Calories: Approximately 300-400 (varies based on specific ingredients)
- Protein: 15g
- Fats: 20g
- Carbohydrates: 30g
- Fiber: 2g
- Sodium: 700mg
(Note: For a healthier balance, adjust ingredients like bacon and cheese according to personal dietary preferences.)
Final Thoughts
These Cheesy Bacon Ranch Wraps are a simple, delicious way to bring a dose of happiness to your day. Whether as a quick lunch, a party platter, or a fun snack for movie night, they’re a hit everywhere. So roll up those tortillas and dig into a dish that’s not only satisfying but also packed with flavor and love. Remember, the kitchen is about creating memories—now get out there, put on your apron, and start wrapping!
Thanks for joining me today in the kitchen. Keep cooking, keep sharing, and above all, keep enjoying those feel-good moments that food brings into our lives. Happy feasting!
Print
Cheesy Bacon Ranch Wraps
- Total Time: 15 minutes
- Yield: 4 servings 1x
- Diet: Omnivore
Description
Delicious and creamy wraps filled with bacon, cheese, fresh vegetables, and ranch dressing, perfect for any occasion.
Ingredients
- 4 large flour tortillas
- 8 ounces cream cheese, softened
- 1/2 cup ranch dressing
- 1 cup shredded cheddar cheese
- 1 cup cooked bacon, chopped
- 1/2 cup green onions, chopped
- 1 cup lettuce, shredded
- 1 cup diced tomatoes (optional)
- Salt and pepper to taste
Instructions
- Prep your ingredients: Start by gathering and prepping all your ingredients. Chop your bacon, green onions, and tomatoes (if using), and shred your lettuce.
- Mix the cream cheese mixture: In a medium bowl, combine your softened cream cheese and ranch dressing using a spatula or hand mixer until smooth.
- Assemble the wraps: Place a tortilla on a clean, flat surface and spread a generous layer of the cream cheese mixture on the tortilla.
- Layer your ingredients: Sprinkle shredded cheese, chopped bacon, green onions, and lettuce over the cream cheese layer. Add tomatoes if using.
- Roll it up: Starting from one edge, gently roll the tortilla tightly. Press the seam to secure your wrap.
- Slice and serve: Slice the wrap in half diagonally. You can serve them immediately or refrigerate for 30 minutes.
Notes
Feel free to customize the ingredients based on your preferences and dietary needs.
- Prep Time: 15 minutes
- Cook Time: 0 minutes
- Category: Appetizer
- Method: No-Cook
- Cuisine: American
Nutrition
- Serving Size: 1 wrap
- Calories: 350
- Sugar: 3g
- Sodium: 700mg
- Fat: 26g
- Saturated Fat: 10g
- Unsaturated Fat: 12g
- Trans Fat: 0g
- Carbohydrates: 30g
- Fiber: 2g
- Protein: 15g
- Cholesterol: 40mg
Keywords: cheesy wraps, bacon ranch, comfort food, quick lunch, party food