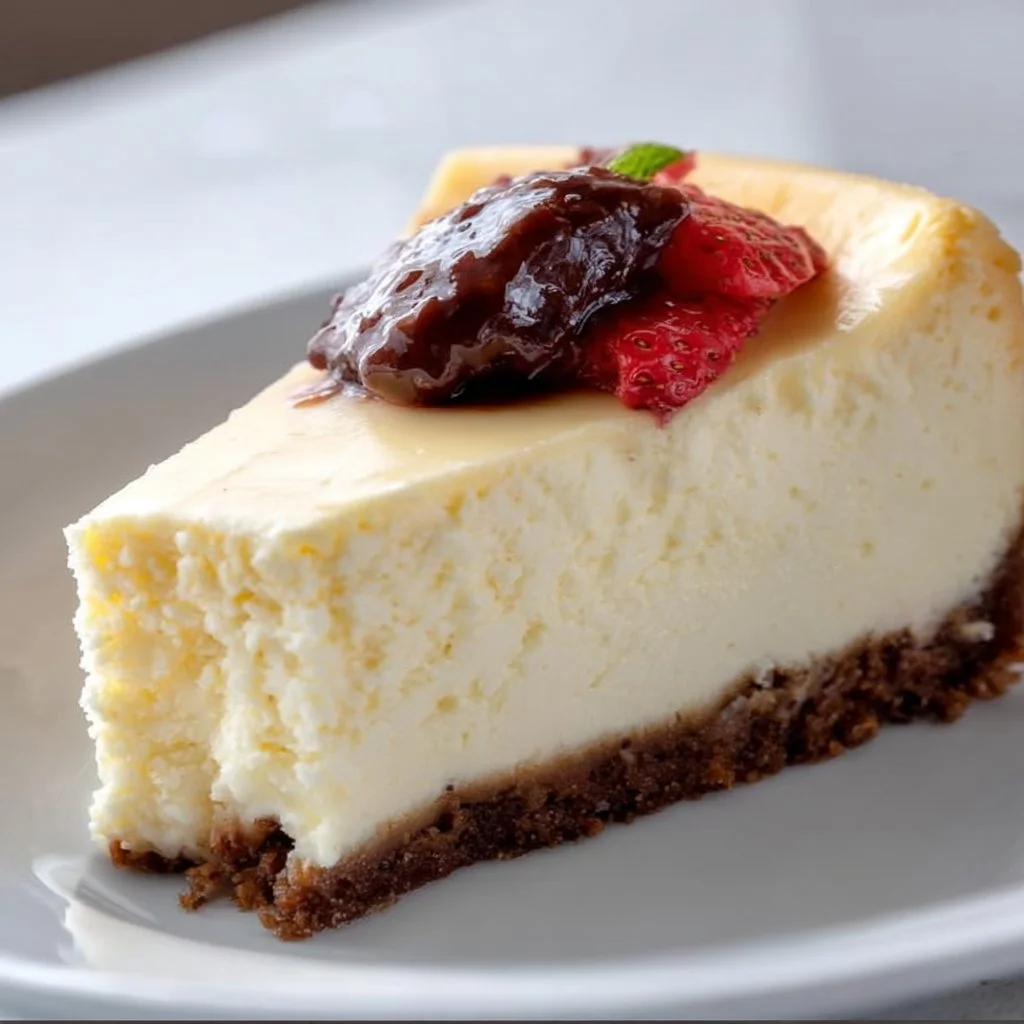
Minute Apple Crumble Cheesecake: Easy One-Bowl Recipe
The Ultimate Guide to Making an Irresistible Apple Crumble Cheesecake
Hey there, fellow foodies! I’m Beau Collier, your friendly guide to all things delicious here at Feastical! If you’ve ever found yourself longing for a dessert that combines the richness of cheesecake with the comforting crunch of apple crumble, then you’ve hit the jackpot! Today, we’re diving into the delightful world of Apple Crumble Cheesecake, a dessert that’s sure to steal the show at any gathering. Buckle up as we whip together a treat that feels like a warm hug on a plate!
Introduction: A Dessert to Remember
There’s something magical about dessert that brings people together. I can still remember the very first time I tasted an Apple Crumble Cheesecake. I was at my grandmother’s house for Thanksgiving, and the sweet aromas of cinnamon, butter, and baked apples wafted through her cozy kitchen. As we gathered around the table, she brought out this beautiful cheesecake adorned with the golden crumble topping. With whipped cream in hand, we knew we were in for something special.
Why do I love this dessert so much? It’s a beautiful fusion of textures and flavors—the creamy, smooth cheesecake perfectly complemented by the creamy apple filling and a crunchy, buttery crumble topping. It’s a classic comfort food with a twist, making it an ideal dessert for any occasion, from family gatherings to a cozy night in.
And let’s not forget the best part: it’s surprisingly simple to make! Trust me, even if you’re still trying to figure out where your spatula went, you can whip this up and impress your friends and family. So, are you ready to create a dessert that not only tastes incredible but also fills your kitchen with heavenly aromas? Let’s get started on this Apple Crumble Cheesecake!
Personal Story: A Family Tradition
Every family has its own cherished traditions, and mine certainly includes dessert. My grandmother was the queen of sweets, and gatherings at her house were always centered around her infamous cheesecake. One memorable evening, she added her own twist to the classic recipe by incorporating apple pie filling and a crumbly topping. That first bite was like a party in my mouth—a creamy cheesecake layer topped with sweet, spiced apples and finished off with the crunch of a homemade crumble.
After we demolished that cheesecake, Grandma shared her secret ingredient: love. “Everything tastes better when made with love,” she said, with a twinkle in her eye. It’s a lesson I carry with me in every dish I create, and I hope it resonates with you as we embark on this Apple Crumble Cheesecake adventure together.
Ingredients
Here’s what you’ll need to whip up this amazing dessert:
-
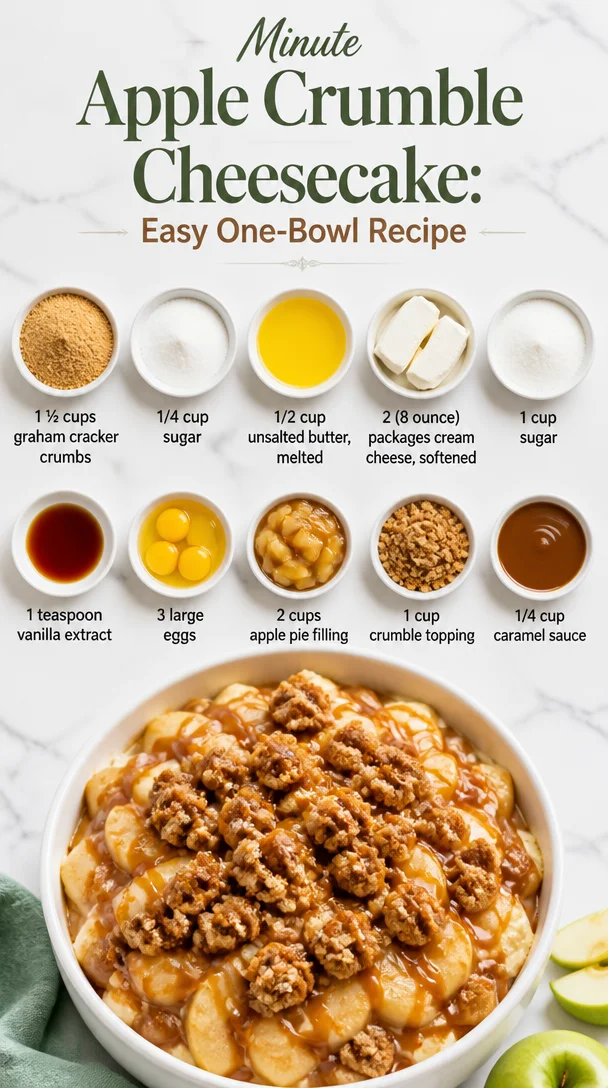
1 ½ cups graham cracker crumbs
Perfect for that classic cheesecake crust. You can substitute with crushed digestive biscuits for a different flavor profile. -
1/4 cup sugar
This adds sweetness to the crust. Brown sugar can be used for a deeper flavor, or you can skip it altogether if you prefer. -
1/2 cup unsalted butter, melted
Butter holds the crust together and gives it richness. If you’re looking for a dairy-free option, coconut oil works wonders! -
2 (8-ounce) packages cream cheese, softened
Cream cheese is the star of the cheesecake. For a lighter option, use Neufchâtel cheese, which has less fat but a similar taste. -
1 cup sugar
This sweetens up the filling nicely! Feel free to experiment with less sugar or even a sugar substitute like agave or honey if you’re watching calories. -
1 teaspoon vanilla extract
Vanilla adds depth and flavor to the cheesecake. Don’t skimp here—use pure vanilla for the best taste! -
3 large eggs
They help set the structure of the cheesecake. If you’re looking for an eggless version, consider using a flax egg (1 tablespoon ground flaxseed mixed with 3 tablespoons of water) for every egg. -
2 cups apple pie filling
This gives a wonderful apple flavor without the hassle of making filling from scratch! If you’re feeling adventurous, homemade filling is also an option. -
1 cup crumble topping
A delightful, crunchy layer for that extra texture. You can use store-bought crumble mix or make your own for freshness. -
1/4 cup caramel sauce
For drizzling on top! Using homemade caramel elevates this dessert, but store-bought works perfectly in a pinch.
Step-by-Step Instructions
Now that we have our ingredients ready, let’s get down to business! Here’s how to make this scrumptious Apple Crumble Cheesecake step by step.
-
Preheat the Oven:
Start by preheating your oven to 325°F (160°C). This ensures the cheesecake cooks evenly. While it heats, let’s prepare the crust! -
Make the Crust:
In a mixing bowl, combine the graham cracker crumbs, sugar, and melted butter. Mix until the crumbs are well-coated and resemble wet sand. Press this mixture firmly into the bottom of a 9-inch springform pan. Use the back of a measuring cup to pack it down for a solid base. This step is crucial for keeping the crust crunchy, so make sure it’s nice and compact! -
Bake the Crust:
Place the crust in the preheated oven for about 10 minutes. This helps to set the crust and avoid a soggy bottom. While it’s baking, let’s prepare the cheesecake filling. -
Prepare the Filling:
In a large mixing bowl, beat the softened cream cheese and sugar together until smooth and creamy. Scrape down the sides of the bowl to ensure everything is incorporated. This step is essential; it helps to avoid lumps in your cheesecake. -
Add the Eggs:
Add the eggs one at a time, mixing after each addition until just combined. Don’t overmix; you want the mixture to be smooth but not frothy. -
Add the Vanilla:
Mix in the vanilla extract. This is where that delicious flavor really starts to come through! -
Layer the Apple Filling:
Pour half of the cheesecake batter into the crust. Spread the apple pie filling evenly over it, then pour the remaining cheesecake batter on top. This layering technique creates beautiful swirls of apple goodness throughout your cheesecake. -
Add the Crumble:
Sprinkle the crumble topping over the cheesecake batter—don’t be shy, make it generous! This will bake into the top, creating that perfect crunchy finish we love. -
Bake the Cheesecake:
Place the cheesecake in the oven for about 55-60 minutes, or until the edges are set and the center is slightly jiggly. Don’t panic if it’s a tad wobbly still; it will firm up as it cools! -
Cool:
Once it’s done baking, turn off the oven and crack the door ajar. Let the cheesecake cool slowly in the oven for about an hour. This prevents cracking and helps it set perfectly. -
Chill:
After the cheesecake cools in the oven, transfer it to the fridge and chill for at least 4 hours, or overnight if you can wait that long! -
Serve with Caramel:
When you’re ready to serve, drizzle caramel sauce over the top and slice it up. Get your forks ready—it’s time to dig in!
Serving Suggestions
To wow your guests, consider serving your Apple Crumble Cheesecake with a dollop of freshly whipped cream or a scoop of vanilla ice cream on the side. You can even add a sprinkle of cinnamon for that comforting, warm aroma. If you’re feeling extra fancy, a pinch of sea salt on top of the caramel sauce elevates the flavors beautifully. Alternatively, serve it along with a hot cup of coffee or tea for the ultimate comforting experience!
Recipe Variations
While this Apple Crumble Cheesecake is divine as is, there are tons of ways to mix it up!
-
Nutty Crumble: Add chopped walnuts or pecans to the crumble topping for a delightful crunch and a burst of nutty flavor.
-
Spiced Pear: Swap the apple pie filling for spiced pear filling for a different fruity experience that’s equally comforting.
-
Chocolate Drizzle: For a twist on flavors, add a chocolate drizzle alongside the caramel for a peanut butter cup vibe.
-
Mini Cheesecakes: Want to impress at parties? Make mini cheesecakes in muffin tins! Just adjust the bake time to about 20-25 minutes.
-
Vegan Version: Use cashew cream or silken tofu blended with cocoa for a vegan-friendly cheesecake. Just make sure to substitute your sugar and crust with vegan alternatives.
Chef’s Notes
This Apple Crumble Cheesecake has been a personal favorite of mine for many years, and I love how it makes people feel! The beauty of this recipe is its versatility. I’ve often added seasonal spices or fresh fruits, depending on what I had on hand or what appealed to my mood that day. I remember one Thanksgiving where I decided to throw in some cranberries for a festive touch, and let me tell you, it was a hit! Remember, the kitchen is a place of joy and creativity. Don’t be afraid to make it your own!
FAQs and Troubleshooting
-
Why did my cheesecake crack?
Cheesecakes can be sensitive to temperature changes. Make sure you cool it gradually in the turned-off oven and avoid opening the door frequently while it bakes. -
How do I know when my cheesecake is done?
Check for a set outer edge and a slightly jiggly center. It will continue to set as it cools, so don’t over-bake! -
Can I freeze the cheesecake?
Absolutely! Wrap it tightly and freeze for up to 3 months. Just let it thaw in the fridge overnight when you’re ready to enjoy it again. -
What’s the best way to cut cheesecake?
Use a hot knife (run it under hot water and dry it) for clean slices. Wipe the knife between cuts to keep each piece looking pristine!
Nutritional Info
While it’s always tempting to dive into dessert without thinking about the nutritional aspects, it’s good to keep in mind that this Apple Crumble Cheesecake is considered a treat.
- Approximate Serving Size: 1 slice (based on 12 servings)
- Calories: 380
- Total Fat: 25g
- Saturated Fat: 15g
- Cholesterol: 90mg
- Sodium: 350mg
- Total Carbohydrates: 38g
- Dietary Fiber: 1g
- Sugars: 24g
- Protein: 5g
Remember, this dessert shines best when shared with loved ones, so enjoy every bite guilt-free!
Final Thoughts
Embarking on the journey of creating an Apple Crumble Cheesecake is not just about the destination of enjoying a delicious dessert; it’s about the joy of creating something wonderful with your own hands. Each step carries the spirit of togetherness, nostalgia, and sweetness that makes this dish a true celebration of life.
So, whether you’re sharing it at a family gathering, a friendly get-together, or a cozy evening just for yourself, I hope this cheesecake brings as much joy to your heart as it has to mine over the years. Remember, friends, cooking should be fun and filled with love, so take your time, experiment, and enjoy every moment. Happy baking, and I can’t wait to hear how your Apple Crumble Cheesecake turns out! Cheers!
Print
Apple Crumble Cheesecake
- Total Time: 80 minutes
- Yield: 12 servings 1x
- Diet: Vegetarian
Description
A delightful fusion of creamy cheesecake and crunchy apple crumble, this Apple Crumble Cheesecake is the perfect dessert for any occasion.
Ingredients
- 1 ½ cups graham cracker crumbs
- 1/4 cup sugar
- 1/2 cup unsalted butter, melted
- 2 (8-ounce) packages cream cheese, softened
- 1 cup sugar
- 1 teaspoon vanilla extract
- 3 large eggs
- 2 cups apple pie filling
- 1 cup crumble topping
- 1/4 cup caramel sauce
Instructions
- Preheat the oven to 325°F (160°C).
- Combine the graham cracker crumbs, sugar, and melted butter in a mixing bowl. Press the mixture into the bottom of a 9-inch springform pan.
- Bake the crust in the preheated oven for about 10 minutes.
- Beat the softened cream cheese and sugar together until smooth and creamy.
- Add the eggs one at a time, mixing after each addition until just combined.
- Mix in the vanilla extract.
- Pour half of the cheesecake batter into the crust and spread the apple pie filling evenly over it. Then pour the remaining cheesecake batter on top.
- Sprinkle the crumble topping over the cheesecake batter generously.
- Bake the cheesecake in the oven for about 55-60 minutes.
- Cool the cheesecake in the oven with the door ajar for about an hour before transferring it to the fridge.
- Chill for at least 4 hours, or overnight.
- Drizzle caramel sauce over the cheesecake before serving.
Notes
Serve with whipped cream or a scoop of vanilla ice cream for added indulgence.
- Prep Time: 20 minutes
- Cook Time: 60 minutes
- Category: Dessert
- Method: Baking
- Cuisine: American
Nutrition
- Serving Size: 1 slice
- Calories: 380
- Sugar: 24g
- Sodium: 350mg
- Fat: 25g
- Saturated Fat: 15g
- Unsaturated Fat: 5g
- Trans Fat: 0g
- Carbohydrates: 38g
- Fiber: 1g
- Protein: 5g
- Cholesterol: 90mg
Keywords: cheesecake, dessert, apple crumble, baking, sweet treat
Salted Caramel Cheesecake
The Ultimate Salted Caramel Cheesecake Recipe
Hey there, fellow foodies! I’m Beau Collier, and today, we’re diving into a dessert that’s not just a feast for your taste buds, but also a memory-maker in the kitchen: Salted Caramel Cheesecake. Are you ready to embark on this buttery, creamy, and oh-so indulgent journey? Grab your apron, and let’s get cooking!
Introduction
There’s something utterly enchanting about a slice of cheesecake. Maybe it’s the dense, rich texture, or the creamy sweetness that dances on your palate, but for me, calling it “just dessert” doesn’t do it justice. Cheesecake has an emotional resonance; it’s a reminder of gatherings, celebrations, and sometimes even quiet evenings spent with a good book. When you add salted caramel to the mix? Well, get ready for a taste explosion that will have you dreaming of seconds.
Imagine this: a buttery crust made from Biscoff cookies—those deliciously spiced morsels that are so good you could eat them straight out of the package. Then, we layer a creamy cheesecake filling that’s smooth enough to make a jazz musician jealous, topped off with a warm, gooey homemade salted caramel sauce. Each bite is a little slice of heaven that whispers, “You’re in for a treat!”
In this post, I’ll guide you step-by-step through the process of making this decadent dessert from scratch. Whether you’re a cheesecake aficionado or a kitchen newbie on a culinary quest, my aim is to make this approachable and fun. So let’s roll up our sleeves and bring this gorgeous creation to life!
Personal Story
Ah, the first time I made a cheesecake! It was my sister’s birthday, and my mother had passed down her well-loved recipe, scribbled in her own handwriting on a well-worn index card. I remember the kitchen filled with the sweet aroma of cream cheese mixing with sugar and vanilla. The excitement was palpable as I poured the filling into the crust.
But here’s where the nostalgia really kicks in: halfway through baking, when I nervously opened the oven to check if it was setting properly, I accidentally let out a rush of steam that fogged up my glasses! My little sister burst out laughing, claiming I looked like a mad scientist. In that moment, I realized that cooking is not just about the food; it’s about the joy, laughter, and sometimes the minor disasters that turn into great stories. I was determined to make my cheesecake a showstopper, and I did! It went on to become a family favorite, a classic at every birthday celebration.
Since then, I’ve added my twists to the recipes—salted caramel being one of them. It’s become a family tradition, connecting the past to the present, one sweet slice at a time.
Ingredients
Let’s get into the nitty-gritty of this recipe! Here’s what you need to make your Salted Caramel Cheesecake shine.
-
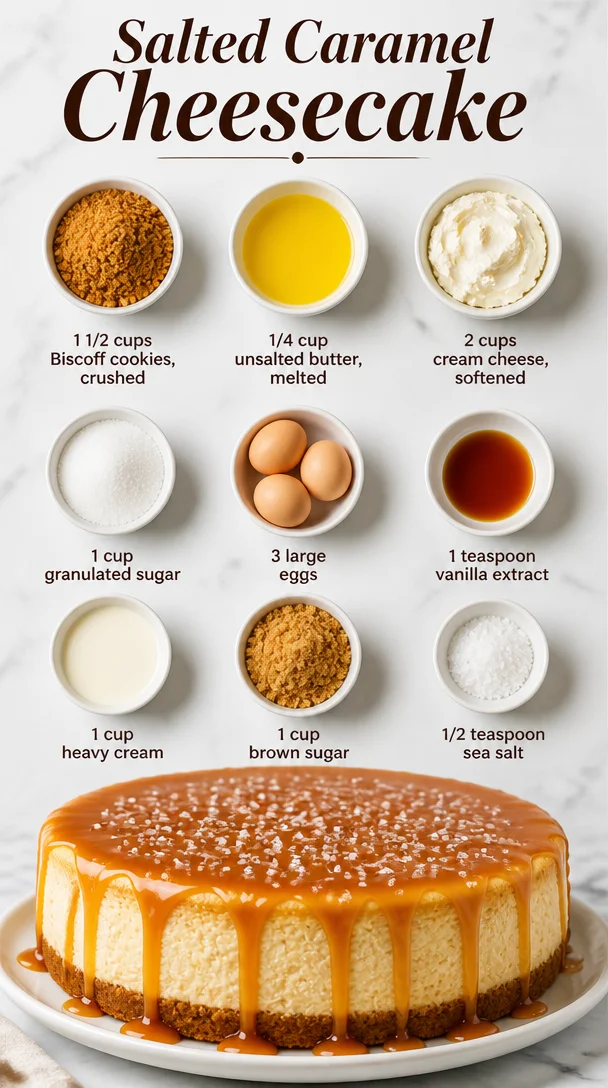
1 1/2 cups Biscoff cookies, crushed: These delightful cookies lend an aromatic spiced flavor and a perfect crispy texture for the crust. In a pinch, you can substitute them with graham crackers or Oreos for a chocolate twist.
-
1/4 cup unsalted butter, melted: This binds the crumbs together and gives your crust that rich buttery goodness. If you’re in a dairy-free mood, coconut oil is a solid alternative.
-
2 cups cream cheese, softened: The star of your cheesecake! Make sure it’s room temperature (no one wants chunky cream cheese), or switch to mascarpone for a slightly different creamy feel.
-
1 cup granulated sugar: This provides the necessary sweetness that balances the tang of the cream cheese. If you want to cut back on refined sugar, try coconut sugar or even honey.
-
3 large eggs: They help the cheesecake set to perfection. You could use flaxseed or chia seed substitutes (1 tablespoon of ground flax or chia mixed with 2.5 tablespoons water per egg) if you need a vegan option!
-
1 teaspoon vanilla extract: This adds warmth and depth to your filling. Consider using fresh vanilla beans for an intense flavor!
-
1 cup heavy cream: The heavy cream gives you that luscious, velvety texture. For a lighter version, opt for light cream or even Greek yogurt, but be aware that it may alter the flavor slightly.
-
1 cup brown sugar: This goes into the caramel and brings a deeper, more complex sweetness. If you’re out, regular granulated sugar will work in a pinch.
-
1/2 teaspoon sea salt: Salt enhances the flavor of caramel and balances sweetness. You can play with different salts: Himalayan pink salt or smoked salt can add a surprising twist!
Step-by-Step Instructions
1. Prepare the Crust
- Preheat your oven to 350°F (175°C). A hot oven equals a perfectly baked crust.
- In a medium bowl, mix the crushed Biscoff cookies and melted butter until it resembles wet sand. This is one of my favorite parts; the aroma is divine!
- Press this mixture firmly into the bottom of a 9-inch springform pan. Use the bottom of a measuring cup to really pack it down! Bake for 10 minutes. This step ensures your crust is sturdy enough to hold all the delicious filling in.
2. Make the Cheesecake Filling
- While the crust is baking, grab a mixing bowl and beat the softened cream cheese with an electric mixer until it’s smooth and creamy—no lumps allowed here! Add in the granulated sugar and mix until combined.
- Next, add in the eggs one at a time, mixing well after each addition. This keeps your cheesecake from cracking later! Add in the vanilla extract and blend until fluffy. It should look like a dreamy cloud.
- Beat in the heavy cream until the mixture is thick and creamy. This gives your cheesecake that luxurious mouthfeel. Pour that luscious filling over the baked crust, smoothing it out.
3. Bake Your Cheesecake
- Place the springform pan in the oven. Here’s a little hack: to prevent cracks, place a pan filled with water on the rack below your cheesecake. The steam helps keep your cheesecake moist, just like a hot bath for your dessert!
- Bake for about 55 to 60 minutes. The edges should be set while the center will still have a light jiggle. Don’t worry; it’ll firm up as it cools.
4. Make the Salted Caramel
- Combine the brown sugar and heavy cream in a saucepan over medium heat. Stir constantly until it smooths out and begins to bubble, about 5–7 minutes.
- Reduce the heat to low and let it simmer for an additional 5 minutes without stirring. Then remove it from the heat and stir in the sea salt—this is where the magic happens! Let it cool for a bit before drizzling it over your cooled cheesecake.
5. Cool and Chill
- Once your cheesecake is out of the oven, let it cool for at least an hour on the counter before moving it to the refrigerator. Chill for at least 4 hours or overnight if you’re really planning ahead. I know, it’s patience-testing, but it’s worth every moment!
Serving Suggestions
When it’s time to serve your Salted Caramel Cheesecake, here are a few tips to make it extra special:
- Presentation: Remove the sides of the springform pan carefully. Place the cheesecake on a decorative cake stand or a sleek serving plate to showcase it!
- Drizzle: Warm your salted caramel slightly and drizzle it over the top in swooping motions for that professional touch. Don’t forget to add a sprinkle of flaky sea salt for a gorgeous contrast.
- Garnish: Top with a dollop of freshly whipped cream and maybe some caramel popcorn for texture, if you’re feeling fancy. You could also add a few chocolate shavings for an extra decadent flair!
Recipe Variations
Here are a few fun twists you can try with this Salted Caramel Cheesecake recipe:
-
Nutty Twist: Add crushed pecans or walnuts into the crust for an added crunch. You could also add a layer of nut butter to the filling for extra richness.
-
Chocolate Lovers: Pour in half a cup of melted dark chocolate into the cheesecake batter for a rich mocha flavor. You can top it with chocolate ganache for extra indulgence.
-
Fruit Flavor: Incorporate fresh fruit like raspberries or strawberries into the cheesecake filling. The tartness will cut through the richness beautifully.
-
Spiced Autumn Delight: Add a teaspoon of cinnamon and a dash of nutmeg to the filling for a cozy, spiced version that’s perfect for fall gatherings.
-
Vegan Option: Use cashews soaked overnight, blended with maple syrup and coconut cream instead of the cream cheese and heavy cream.
Chef’s Notes
Ah, what a journey! Since that fateful first cheesecake, I’ve become a self-proclaimed cheesecake enthusiast. Each experiment I’ve taken has taught me something new. One quirky tradition I have is to name every cheesecake I make; this one? I call it “Hug in a Slice.”
When you sit down with a generous slice, take a moment to savor the flavors and the memories they bring. And remember, every kitchen has its mishaps, like that time I forgot the sugar altogether—let’s just say, that was a very different kind of ‘cheesecake’!
FAQs and Troubleshooting
1. Why did my cheesecake crack?
Cracks can occur if the cheesecake is overbaked or if it was cooled too quickly. Ensure you use the water bath method and let it cool gradually in the oven with the door cracked.
2. Can I freeze the cheesecake?
Absolutely! Wrap it tightly in plastic wrap and then aluminum foil. It can last frozen for up to 2 months. Thaw it overnight in the fridge before serving.
3. It didn’t set properly; what went wrong?
This can be because the cream cheese wasn’t softened enough or it needed more time to bake. If the center is still wobbly after cooling, that’s okay! It’ll firm up after chilling in the fridge.
4. How do I make this gluten-free?
Swap the Biscoff cookies for gluten-free cookie options, or a ground nut and date crust works brilliantly too!
Nutritional Info
While it varies based on your specific ingredients, here’s an approximate nutritional breakdown per slice (assuming 12 servings):
- Calories: 450
- Fat: 30g
- Carbohydrates: 40g
- Protein: 6g
- Sugar: 28g
- Sodium: 220mg
Final Thoughts
There you have it, friends! A recipe that not only satisfies but resonates with nostalgia and the joy of togetherness. Each slice of Salted Caramel Cheesecake is an invitation to celebrate life’s sweet moments and create new memories in the kitchen. So whether it’s for a birthday, a dinner party, or just because you deserve a treat, this cheesecake is ready to impress.
I hope this article lights a fire in your kitchen and inspires you to whip up this delightful dessert. Remember, cooking is a blend of art, science, and a whole lot of love. So go ahead, make your Salted Caramel Cheesecake, and don’t forget to share your edible masterpieces with the world (or just your family—no judgment here!). Happy baking, and see you next time at Feastical!
Print
Ultimate Salted Caramel Cheesecake
- Total Time: 90 minutes
- Yield: 12 servings 1x
- Diet: Vegetarian
Description
A decadent salted caramel cheesecake with a buttery Biscoff crust, rich cream cheese filling, and a homemade caramel drizzle.
Ingredients
- 1 1/2 cups Biscoff cookies, crushed
- 1/4 cup unsalted butter, melted
- 2 cups cream cheese, softened
- 1 cup granulated sugar
- 3 large eggs
- 1 teaspoon vanilla extract
- 1 cup heavy cream
- 1 cup brown sugar
- 1/2 teaspoon sea salt
Instructions
- Preheat your oven to 350°F (175°C).
- Mix the crushed Biscoff cookies and melted butter until it resembles wet sand.
- Press this mixture firmly into the bottom of a 9-inch springform pan and bake for 10 minutes.
- Beat the softened cream cheese with an electric mixer until smooth, then add the granulated sugar and mix.
- Add the eggs one at a time, mixing well after each addition, followed by the vanilla extract.
- Beat in the heavy cream until thick and creamy, then pour the filling over the baked crust.
- Place the springform pan in the oven and bake for about 55-60 minutes.
- Combine the brown sugar and heavy cream in a saucepan over medium heat, stirring constantly until bubbly.
- Reduce heat and let it simmer for 5 minutes; then stir in the sea salt.
- Cool the cheesecake on the counter for at least an hour, then chill for at least 4 hours or overnight before serving.
Notes
Drizzle with warm salted caramel and top with whipped cream for extra indulgence.
- Prep Time: 30 minutes
- Cook Time: 60 minutes
- Category: Dessert
- Method: Baking
- Cuisine: American
Nutrition
- Serving Size: 1 slice
- Calories: 450
- Sugar: 28g
- Sodium: 220mg
- Fat: 30g
- Saturated Fat: 18g
- Unsaturated Fat: 12g
- Trans Fat: 0g
- Carbohydrates: 40g
- Fiber: 1g
- Protein: 6g
- Cholesterol: 150mg
Keywords: salted caramel, cheesecake, dessert, baking
0 Point Cheesecake
The Light and Creamy 0 Point Cheesecake: A Guilt-Free Delight!
Hey there, fellow food lovers! I’m Beau Collier, and you’re in for a treat today because we’re diving into the silky, sweet world of cheesecake—but with a twist! Yes, you heard me right: I’m going to show you how to whip up a luscious 0 Point Cheesecake. That’s right, zero points! This dessert not only tastes heavenly but is also a guilt-free indulgence that makes your heart and taste buds sing.
Now, cheesecake has long been a beloved dessert, often associated with decadent dinners and occasions where you’re tempted to eat the whole pie by yourself (I’ve been there, trust me!). But with this super simple recipe, I promise you can have your cheesecake and eat it too—without straying from your healthy eating goals. Whether you’re whipping this up for a gathering or just for yourself (no judgment here, we all deserve a little “me time”), this recipe is your ticket to a lighter dessert that everyone will adore. So grab your spatula, and let’s get ready to create some cheesecake magic!
A Slice of Nostalgia
Let me take you back to one of my most cherished memories in the kitchen. It was a rainy Saturday afternoon, and I was around ten years old, cooking alongside my grandma. She was the master of dessert, and I was her eager apprentice. On that day, we were making her famous cheesecake from scratch, a family recipe that had been passed down through generations.
As the sweet aroma filled the kitchen, we shared stories about life, love, and everything in between. I remember the way she’d sneak in a bit of lemon juice and a dash of vanilla extract—ingredients that created a perfect balance in flavor. In those moments, I learned that cooking is more than just following a recipe; it’s about creating memories and bonding over something delicious.
Fast forward years later, I found myself wanting to recreate that rich, creamy cheesecake, but I knew my health goals needed to come first. This led me to experiment with lighter ingredients, eventually landing on this fabulous 0 Point Cheesecake. It’s a tribute to that cherished memory and all the joy that comes from cooking with loved ones.
Ingredients: The Building Blocks of Our Cheesecake
Ready to gather your ingredients? Here’s what you’ll need to make this scrumptious 0 Point Cheesecake:
-
1 cup non-fat Greek yogurt
Why it’s fab: This creamy base gives our cheesecake its richness without the calories of regular cream cheese. Plus, it packs in protein, helping you feel fuller for longer!
Substitution tip: If you’re feeling adventurous, try low-fat yogurt for a creamier consistency. -
1/2 cup unsweetened applesauce
Why it’s fab: This natural sweetener not only adds moisture but also complements the tanginess of the yogurt.
Substitution tip: Pureed banana or even pumpkin can work wonders if you’re after a different flavor. -
2 packets of sugar substitute (optional)
Why it’s fab: Want a sweeter cheesecake? These can help without the extra calories!
Substitution tip: Honey or maple syrup are great natural alternatives—just adjust the quantity! -
1 tsp vanilla extract
Why it’s fab: Vanilla adds warmth and depth. It’s the secret ingredient that rounds out the flavor perfectly! -
1/2 cup low-fat cream cheese
Why it’s fab: This adds that traditional cheesecake texture without all the fat!
Substitution tip: Neufchâtel cheese is a fantastic option for an even lighter alternative! -
1/4 cup lemon juice
Why it’s fab: The tartness balances the sweetness and adds brightness to the cheesecake.
Substitution tip: If you’re really not a lemon fan, try lime juice instead! -
1/2 tsp cornstarch (optional for thickening)
Why it’s fab: This helps the cheesecake set, especially if you’re looking for that extra firmness.
Substitution tip: Arrowroot powder can serve the same purpose if you prefer a gluten-free option!
Step-by-Step Instructions: Let’s Get Cooking
Alright, my friend, it’s time to get cooking! Here’s how to whip up this delicious cheesecake:
Step 1: Gather Your Ingredients
First thing’s first, ensure you have all your ingredients prepped and at your fingertips. Trust me, nothing dashes the excitement quite like running around searching for that elusive vanilla extract!
Step 2: Blend It Up
In a mixing bowl, combine the non-fat Greek yogurt, unsweetened applesauce, and low-fat cream cheese. Use a hand mixer or a stand mixer for a smooth and creamy texture. Start on a low speed (we don’t want a messy kitchen!) and gradually increase. Mix until everything is well blended and there are no lumps. Chef’s Note: Let your cream cheese soften at room temperature before mixing to avoid clumps!
Step 3: Sweeten the Deal
Add in the sugar substitute (if using) and vanilla extract to the mixture. Continue to blend until all ingredients are smoothly integrated. Tip: Tasting along the way is key! Adjust the sweetness to your liking—everyone has their own preference!
Step 4: Lemon-Lime Goodness
Now, pour in the lemon juice and mix again until everything is well combined. The fresh citrus is going to elevate the cheesecake to a whole new level! If you’re using cornstarch, add it in now and mix until it’s completely incorporated.
Step 5: Prepare Your Pan
Grab a springform pan (this makes for easy release later!) and spray it lightly with cooking spray. Pour your cheesecake mixture into the pan, smoothing the top with a spatula. Chef’s Hack: To avoid cracking as it bakes, tap the pan gently on the counter to release any air bubbles!
Step 6: Bake or Chill
Here’s where you can choose your destiny! You can bake it at 350°F (about 175°C) for about 25-30 minutes until it sets, or you can chill it in the fridge for about 4 hours if you prefer a no-bake approach. I personally love the no-bake route for how dreamy and lush the texture ends up!
Step 7: Cool and Serve
Once baked or chilled, let it cool completely before releasing from the springform pan. Trust me, the wait will be worth it! Top with fresh fruit, a drizzle of chocolate, or a sprinkle of nuts for added flair.
Serving Suggestions: How to Plate It Up
Now comes the fun part: serving your gorgeous cheesecake! For that Instagram-worthy look, take a slice and place it on a colorful plate. Add a dollop of fresh whipped cream (you can use light whipped cream for an even lighter option) and scatter fresh berries around—raspberries, blueberries, or strawberries all work beautifully.
Drizzle a bit of honey for that sweet touch, or if you’re feeling adventurous, a homemade berry compote brings a lovely burst of flavor. The contrasting colors and textures not only make it inviting but will also have your guests raving about your culinary skills!
Recipe Variations: Mix It Up!
This 0 Point Cheesecake is incredibly versatile, so let’s get creative! Here are some fun variations you can try:
1. Chocolate Delight
Mix in unsweetened cocoa powder with the base mixture for a rich chocolate cheesecake. Top with dark chocolate shavings or fresh raspberries for a decadent treat!
2. Tropical Twist
Add crushed pineapple and shredded coconut for a fruity island-inspired cheesecake. A bit of lime juice can elevate the tropical vibe!
3. Nutty Flavor
Swirl in a bit of almond butter for a nutty flair, giving your cheesecake a delightful taste. Top with sliced almonds or pecans for crunch!
4. Coffee Kick
For all the coffee lovers out there, add espresso powder or brewed coffee to the mixture for a delightful mocha cheesecake. A sprinkle of cocoa or chocolate-covered espresso beans on top would make it divine!
5. Seasonal Spice
Don’t forget about the holidays! Add cinnamon and nutmeg for a fall-inspired cheesecake, and maybe top it with a warm apple compote.
Chef’s Notes: A Journey of Flavors
As I developed this recipe, it has gone through quite a few iterations in my kitchen. I originally intended to create a cheesecake low in points, but I found myself sautéing in the whims of flavor. The key was always balancing that creamy texture with the zestiness of lemon. I remember when I accidentally added too much lemon juice one time—it turned into a delightful lemon curd instead of a cheesecake! A happy accident, indeed!
I also recall a time when I brought this cheesecake to a potluck dinner, nervously peeking around to see if anyone would pick it over the other rich desserts. To my surprise, it was one of the first to disappear! It warmed my heart to see how well-received it was, proving you can enjoy delicious desserts without the heaviness.
FAQs and Troubleshooting
Question 1: Why is my cheesecake cracked?
Cracking can happen for several reasons: oven temperature, rapid cooling, or even overmixing. Baking it at a lower temperature and allowing it to cool gradually can help prevent cracks.
Question 2: How can I make it sweeter?
Feel free to play around with sweeteners—taste as you go! Honey or maple syrup can give you that perfect sweetness level while keeping it natural.
Question 3: Can I freeze it?
Absolutely! This cheesecake freezes wonderfully. Just make sure to wrap it tightly in plastic wrap and foil to maintain its texture.
Question 4: What’s the best way to store leftovers?
Keep it covered in the fridge for up to a week, or freeze for longer storage. Just remember to let it come to room temperature before serving again for the best texture!
Nutritional Info
Let’s talk about the nutritional benefits of this delightful cheesecake! Each slice of this 0 Point Cheesecake is generally low in calories, high in protein from the Greek yogurt, and contains no added sugars if you skip the sweeteners.
This means you’re indulging in:
- Protein: Thanks to Greek yogurt, which will help you feel full.
- Calcium: Essential for maintaining healthy bones, plus it contributes to the creaminess of the cheesecake without the added fat.
- Vitamins and Minerals: From the fruit toppings, you’ll also be adding antioxidants and essential vitamins into the mix.
The best part? You can enjoy this dessert guilt-free, making it an ideal treat for any health-conscious dessert lover!
Final Thoughts
So there you have it—your road map to crafting a delicious 0 Point Cheesecake that promises to delight your taste buds without the guilt! I hope this recipe brings a little something special to your kitchen, just as it has for mine.
I can’t wait for you to try it and maybe even make your own memories while whipping it up. Remember, cooking isn’t just about the end product; it’s about the joy of creating, the laughter shared, and the delightful treats savored. So let’s keep the good vibes going and make every meal a feast!
Till next time, happy cooking, my fellow culinary adventurers! 🌟🍰
Print
0 Point Cheesecake
- Total Time: 45 minutes
- Yield: 8 servings 1x
- Diet: Low-Calorie
Description
A silky, sweet, and guilt-free cheesecake that’s perfect for healthy eating goals.
Ingredients
- 1 cup non-fat Greek yogurt
- 1/2 cup unsweetened applesauce
- 2 packets of sugar substitute (optional)
- 1 tsp vanilla extract
- 1/2 cup low-fat cream cheese
- 1/4 cup lemon juice
- 1/2 tsp cornstarch (optional for thickening)
Instructions
- Gather Your Ingredients: Ensure you have all your ingredients prepped.
- Blend It Up: Combine the Greek yogurt, applesauce, and cream cheese until smooth.
- Sweeten the Deal: Add in sugar substitute and vanilla, blending until well mixed.
- Lemon-Lime Goodness: Pour in lemon juice and mix again; add cornstarch if using.
- Prepare Your Pan: Spray a springform pan with cooking spray and pour in the mixture, smoothing the top.
- Bake or Chill: Bake at 350°F for 25-30 minutes or chill in the fridge for 4 hours for a no-bake option.
- Cool and Serve: Let it cool completely before serving, then top with fresh fruit or nuts.
Notes
For a variation, mix in cocoa for a chocolate cheesecake or add crushed pineapple for a tropical flavor.
- Prep Time: 15 minutes
- Cook Time: 30 minutes
- Category: Dessert
- Method: Baking
- Cuisine: American
Nutrition
- Serving Size: 1 slice
- Calories: 150
- Sugar: 4g
- Sodium: 80mg
- Fat: 5g
- Saturated Fat: 2g
- Unsaturated Fat: 3g
- Trans Fat: 0g
- Carbohydrates: 20g
- Fiber: 1g
- Protein: 7g
- Cholesterol: 15mg
Keywords: cheesecake, low calorie, guilt-free dessert, healthy cheesecake