
Andes Mint Dip
A Deliciously Sweet Escape: Andes Mint Dip
Hey there, fellow food lovers! It’s your chef pal, Beau Collier, and today we’re diving into a creamy, dreamy treat that’s sure to elevate your snack game: Andes Mint Dip. Picture this: a velvety dip that tastes just like those iconic green mint-chocolate candies we all adore. Yep, you heard me right! This dip is a flavor-packed journey through minty bliss and chocolatey goodness.
Whether you’re planning a cozy gathering with friends or just need a delicious way to unwind at the end of a long day, this Andes Mint Dip is your ticket to happy taste buds. You can whip it up in no time, and trust me, it’s always a hit! So grab your favorite mixing bowl and let’s get started!
A Whiff of Nostalgia
Let me take you back to one of my favorite childhood memories. Picture this: my family gathered around the table after a hearty dinner, and instead of traditional dessert, my mom would surprise us with her famous mint dip. I remember watching in awe as she whipped together the cream cheese, mint extract, and all the magical ingredients that would eventually create this incredible concoction. The excitement in the air was tangible; you could practically taste the anticipation!
As we dug in, our faces lit up with joy. The creamy texture, the cool mint, the rich chocolate — it was a flavor explosion that felt so comforting and indulgent. The best part? We’d pair it with graham crackers, fresh fruit, or even just enjoy it straight from the bowl (no judgment here!). It was our little post-dinner ritual, and until today, that memory brings a smile to my face. Sharing recipes is like sharing a piece of my heart, and I can’t wait for you to create your own precious memories with this Andes Mint Dip!
Ingredients
Here’s what you’ll need to whip up your scrumptious Andes Mint Dip:
-
1 (8-ounce) package cream cheese
A key ingredient that gives your dip that lovely creaminess. If you’re looking for a lighter option, you can substitute with Neufchâtel cheese or Greek yogurt. -
1 teaspoon mint extract
The magical ingredient that will elevate your dip with a refreshing burst of mint. Don’t have mint extract on hand? You can use peppermint extract for a more intense flavor! -
1 cup powdered sugar
This adds sweetness and helps achieve that smooth consistency. If you’re watching your sugar intake, feel free to swap it out with powdered monk fruit sweetener or coconut sugar mixed with a bit of cornstarch. -
1 (8-ounce) container whipped topping
This adds a light, fluffy texture to our dip. You can use homemade whipped cream for a fresher taste, or even coconut whipped topping for a dairy-free version. -
1/3 cup mini chocolate chips
These little guys are packed with chocolatey goodness. If you want to get fancy, try dark chocolate or even white chocolate chips! -
1/3 cup chopped Andes mints (plus more for topping)
Ah, the star of the show! Those chopped mints take this dip to a whole new level. If you can’t find Andes mints, chocolate-covered mint candies work well too. -
Green food coloring (optional)
For that pop of festive color! If you’re feeling adventurous, add a drop or two to make your dip even more eye-catching.
Step-by-Step Instructions
Alright, foodies! Let’s dive into the nitty-gritty of making this delightful Andes Mint Dip.
-
Prepare Your Ingredients
Begin by gathering all your ingredients. This makes the cooking process smooth and enjoyable. Plus, it has a cool chef vibe! -
Soften the Cream Cheese
Leave your cream cheese at room temperature for about 30 minutes before you start. This will make it much easier to mix. If you forgot, no worries! Just microwave it for about 10-15 seconds. -
Mix the Cream Cheese and Mint Extract
In a large mixing bowl, combine the softened cream cheese and the mint extract. Using a hand mixer, beat them together until the mixture is smooth and creamy. It should resemble a fluffy cloud of deliciousness! -
Add the Powdered Sugar
Gradually add the powdered sugar to the cream cheese mixture. Increasing the mixer speed as you go will help you avoid a cloud of sugar dust! Mix until combined, and don’t be afraid to taste the sweetness! -
Fold in the Whipped Topping
Gently fold in the whipped topping. Use a spatula and be careful not to over-mix; we want that light, airy texture to stay intact. -
Stir in the Chocolate Chips and Andes Mints
Time to bring in the chocolate! Fold in the mini chocolate chips and the chopped Andes mints. This is where the magic really begins; you’ll feel like a master chocolatier! -
Add Food Coloring (Optional)
If you want that gorgeous minty green hue, now’s the time to mix in a few drops of food coloring. Start with one drop, stir, and adjust until you reach your desired color. -
Serve and Garnish
Transfer the dip to a serving bowl and sprinkle some extra chopped Andes mints on top for that finishing touch. You might also want to add a few mini chocolate chips for flair! -
Chill (Optional)
This dip can be served immediately, but if you have the patience, refrigerate it for about an hour. The flavors really meld together beautifully in the fridge, making it even tastier!
Serving Suggestions
Now that your Andes Mint Dip is ready to dazzle, it’s time to think about how to serve it! Here are some fabulous ideas:
-
Fresh Fruit: Pair the dip with strawberries, apples, or banana slices. The fresh sweetness of the fruit balances the creamy minty goodness perfectly!
-
Graham Crackers: The classic pairing! The crunchy texture creates a delightful contrast to the creamy dip. Feel free to use flavored graham crackers like chocolate or honey for an extra special treat.
-
Pretzels: If you’re in the mood for a sweet and salty combo, dip pretzels into that minty concoction for a flavor explosion. Trust me; it’ll leave you wanting more!
-
Chocolate Wafer Cookies: Channel your inner dessert connoisseur with chocolate wafer cookies. They add a satisfying crunch that complements the dip’s smooth texture.
-
Spoonful of Happiness: Of course, there’s nothing wrong with grabbing a spoon and enjoying this goodness straight from the bowl. Sometimes, simple is best!
Recipe Variations
Here are some fun twists on this Andes Mint Dip to get those creative juices flowing:
-
Mint Chocolate Chip Ice Cream Dip: Use softened mint chocolate chip ice cream instead of whipped topping for a refreshing twist!
-
Add a Pinch of Sea Salt: A little sprinkle of sea salt adds a delightful contrast to the sweet mint. Sweet and salty, anyone?
-
Chocolate Drizzle: Top the dip with a drizzle of melted chocolate for an extra indulgent treat. You can also add a splash of peppermint extract for that extra minty punch.
-
Dairy-Free Delight: Substitute the cream cheese with dairy-free cream cheese and the whipped topping with coconut whipped topping for an entire vegan experience!
-
Mint Flavored Syrup: For a boom of minty goodness, stir in a tablespoon of mint-flavored syrup. It’s a double whammy of flavor!
Chef’s Notes
This Andes Mint Dip has come a long way since those early family dinners. I’ve fondly adapted this recipe over the years, tweaking it here and there to suit the ever-changing tastes of my loved ones. There was even one particularly chaotic dinner party where I accidentally added too much mint extract, and let me tell you, that created a whole new level of minty madness!
But every culinary blunder is a chance to learn. Now, when I make it, I always remind myself to taste as I go and trust my instincts. Whether you’re trying this dip for the first time or the hundredth, remember the joy it brings doesn’t just come from perfect execution; it comes from the laughter, love, and memories you create along the way.
FAQs and Troubleshooting
1. My dip turned out too runny! What happened?
If you used a low-fat cream cheese or under-measured the powdered sugar, it can affect the dip’s consistency. Using full-fat cream cheese will give you that creamy dip. In a pinch, you could chill it in the fridge for a little longer, allowing it to thicken up!
2. Can I make this dip ahead of time?
Absolutely! In fact, making this dip ahead of time allows the flavors to meld, creating an even more delicious treat. Just be sure to store it in an airtight container in the fridge until you’re ready to serve.
3. What can I use if I can’t find Andes mints?
Don’t sweat it! You can use any chocolate mint candy, chocolate-covered mints, or even crushed peppermint candies. The key is to keep that minty flavor alive!
4. What do I do if it’s too sweet for my taste?
Adjusting sweetness is a breeze! You can add a pinch of salt to cut the sweetness, or mix in some plain Greek yogurt to balance it out.
Nutritional Info
Do you want a delicious scoop of nutritional knowledge? Here’s a breakdown of what’s going on per serving:
- Calories: 212
- Total Fat: 10g
- Saturated Fat: 6g
- Carbohydrates: 30g
- Sugar: 26g
- Protein: 2g
Keep in mind that these values may vary based on your specific ingredients and portion sizes. However, I believe in enjoying a treat like this in moderation. Life’s all about balance, am I right?
Final Thoughts
And there you have it, my lovely food friends: a decadent Andes Mint Dip that’s not just delicious but also reminiscent of sweet childhood moments. This recipe is a delightful reminder that cooking is more than just a task; it’s about connection, joy, and the magic that happens when you share what you’ve created with others.
So whether you’re serving this dip at a festive gathering, a chill movie night, or simply indulging on a quiet evening, let the flavors transport you to those warm, snuggly memories just like they did for me. Now go forth, gather your ingredients, and create some heartwarming goodness. I can’t wait to hear your stories and see your delicious creations!
Happy dipping!
Print
Andes Mint Dip
- Total Time: 15 minutes
- Yield: 8 servings 1x
- Diet: Vegetarian
Description
A creamy, dreamy Andes Mint Dip that tastes just like the iconic green mint-chocolate candies, perfect for snacks or gatherings.
Ingredients
- 1 (8-ounce) package cream cheese
- 1 teaspoon mint extract
- 1 cup powdered sugar
- 1 (8-ounce) container whipped topping
- 1/3 cup mini chocolate chips
- 1/3 cup chopped Andes mints (plus more for topping)
- Green food coloring (optional)
Instructions
- Prepare your ingredients.
- Soften the cream cheese by leaving it at room temperature for about 30 minutes.
- Mix the cream cheese and mint extract until smooth.
- Add the powdered sugar gradually, mixing until combined.
- Fold in the whipped topping gently.
- Stir in the chocolate chips and chopped Andes mints.
- Add food coloring if desired.
- Serve the dip in a bowl and garnish with extra chopped Andes mints.
- Chill for about an hour if time allows for better flavor melding.
Notes
This dip can be prepared ahead of time for better flavor. Feel free to get creative with serving options!
- Prep Time: 15 minutes
- Cook Time: 0 minutes
- Category: Dessert
- Method: Mixing
- Cuisine: American
Nutrition
- Serving Size: 1 serving
- Calories: 212
- Sugar: 26g
- Sodium: 300mg
- Fat: 10g
- Saturated Fat: 6g
- Unsaturated Fat: 4g
- Trans Fat: 0g
- Carbohydrates: 30g
- Fiber: 1g
- Protein: 2g
- Cholesterol: 30mg
Keywords: Andes Mint Dip, mint dip, dessert dip, creamy dip, chocolate dip
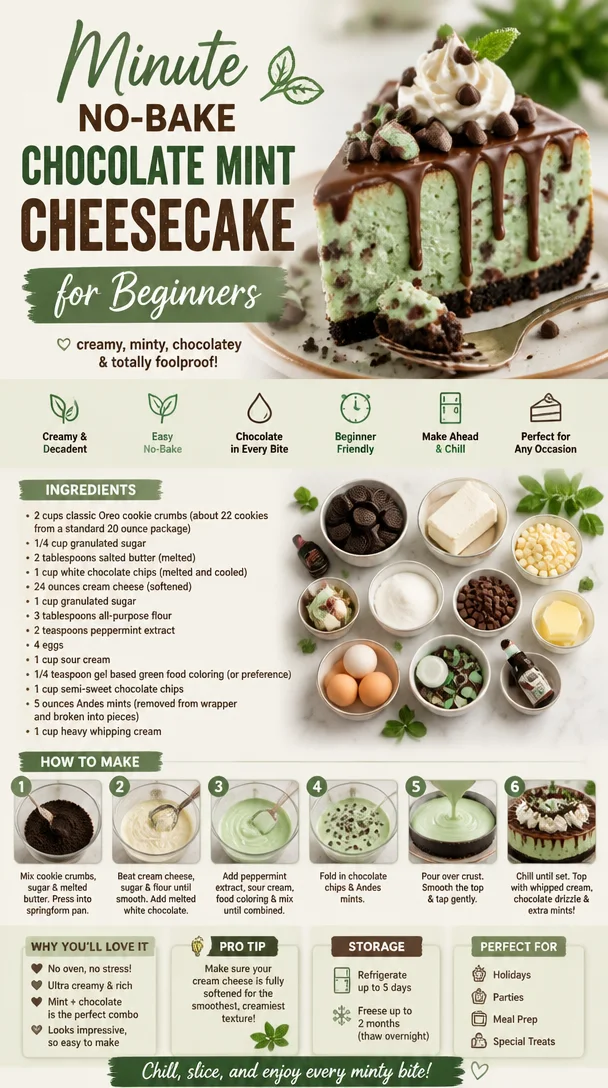
Minute No-Bake Chocolate Mint Cheesecake for Beginners
Chocolate Mint Cheesecake: A Decadent Delight
Hey there, fellow food lover! If you’re looking to bring a little indulgence into your life, then you’ve hit the jackpot with this Chocolate Mint Cheesecake recipe. Whether it’s for a holiday celebration, a birthday bash, or just because you deserve a treat (and trust me, you absolutely do!), this cheesecake is a showstopper. With its creamy layers, chocolatey goodness, and a refreshing hint of mint, this dessert will wow your friends, family, and, most importantly, you!
Personal Story
Let me take you back to my childhood for a moment. Imagine a warm summer evening, the scent of fresh mint wafting through the air, accompanied by laughter and the clinking of glasses. It was at my grandmother’s house, where family gatherings meant an abundance of food and love. One of her unforgettable creations was a minty chocolate dessert that she would whip up every year for our summer BBQs. The way it melted in your mouth was simply magic. Fast forward years later, and those memories inspire me whenever I create a chocolate mint dish, especially this cheesecake.
Remembering how my family couldn’t get enough of Grandma’s minty delight, I set out to craft a recipe that marries velvety cream cheese with the nostalgic flavors I once cherished. So, roll up those sleeves, and let’s make your kitchen the heart of your home, just like my grandma’s was!
Ingredients
Let’s get down to business, shall we? Here’s what you’ll need to make this show-stopping Chocolate Mint Cheesecake:
-
2 cups classic Oreo cookie crumbs (about 22 cookies from a standard 20-ounce package)
These delicious crumbs form the base of your cheesecake, providing a rich, chocolatey flavor and contrasting texture. You can substitute with chocolate graham cracker crumbs if you’re feeling adventurous! -
1/4 cup granulated sugar
This little bit of sugar enhances the sweetness of the crust. Feel free to swap it with coconut sugar for a different twist. -
2 tablespoons salted butter (melted)
Butter brings everything together in that crust and gives it that irresistible richness. Unsalted butter works too if you’re watching your sodium intake! -
1 cup white chocolate chips (melted and cooled)
White chocolate adds a creamy sweetness that complements the cheesecake perfectly. If you prefer, dark chocolate can give it a bolder flavor. -
24 ounces cream cheese (softened)
Cream cheese is the star of your cheesecake show—smooth and creamy! Make sure it’s softened to room temperature for easy mixing. -
1 cup granulated sugar
Just like the crust, this sugar sweetens your filling. Again, feel free to explore with alternatives like agave nectar. -
3 tablespoons all-purpose flour
This will stabilize the filling and keep it from cracking. For a gluten-free option, use almond flour or gluten-free flour blends. -
2 teaspoons peppermint extract
This is where your chocolate mint magic happens! If you’re not a fan of peppermint, try vanilla extract instead for a unique flavor. -
4 large eggs
Eggs help bind everything together and give that lovely cheesecake texture. You can use flax eggs for a vegan option. -
1 cup sour cream
Sour cream adds tanginess and creaminess, elevating the cheesecake to divine levels. Greek yogurt is a great substitute here, too! -
1/4 teaspoon gel-based green food coloring (or to your preference)
This is completely optional but makes for a lovely presentation! If you’re feeling natural, consider spirulina powder for a green hue. -
1 cup semi-sweet chocolate chips
These will take your cheesecake to another level of chocolaty goodness. Dark chocolate can be a rich alternative if you want to amp up the flavor. -
5 ounces Andes mints (removed from wrappers and broken into pieces)
The crushed mints add bursts of minty flavor throughout the cheesecake. If you can’t find them, peppermint candies work just as well! -
1 cup heavy whipping cream
To elevate this dessert with a light and fluffy whipped topping, heavy cream is your best friend! You can use coconut cream for a dairy-free twist.
Step-by-Step Instructions
Ready to bring this delicious cheesecake to life? Let’s dive into the fun part—cooking!
-
Preheat Your Oven
Set your oven to 325°F (160°C). Preheating ensures an evenly baked cheesecake, so don’t skip this step! -
Prepare the Crust
In a medium bowl, combine the Oreo crumbs, granulated sugar, and melted butter. Mix until everything is well combined and resembles wet sand. Now, pack this mixture tightly into the bottom of a 9-inch springform pan. I like to use the bottom of a measuring cup to press down evenly. Bake for 10 minutes, then let it cool while you prep the filling. This helps create a perfect foundation for your cheesecake. -
Make the Filling
In a large bowl, beat the softened cream cheese with an electric mixer until it’s smooth and creamy—about 2-3 minutes. Add in the granulated sugar, flour, and melted white chocolate, continuing to beat until everything is fully incorporated. -
Add the Eggs
Add the eggs one at a time, mixing on low speed after each addition just until blended. Remember, you want to avoid overmixing at this stage to keep your cheesecake nice and dense instead of airy. -
Flavors Galore!
Drizzle in the peppermint extract, sour cream, and the gel-based food coloring if using. Blend until everything is well combined and luscious. -
Incorporate the Minty Goodness
Gently fold in the semi-sweet chocolate chips and broken Andes mints. This is where the magic happens, as you create that delightful combination of chocolate and mint! -
Pour and Bake
Pour this dreamy filling over your cooled crust. Spread evenly with a spatula and bake in the preheated oven for about 50-60 minutes, or until the center is set but still slightly wobbly. You can tell it’s done when a gentle jiggle remains in the center—this helps ensure that your cheesecake won’t crack! -
Cool Down
After baking, turn off the oven and let the cheesecake cool in the oven with the door slightly ajar for about 1 hour. This gradual cooling helps prevent cracking. Then, remove it from the oven and cool to room temperature before refrigerating for at least 4 hours (or overnight, if you can resist!). This allows the flavors to meld perfectly. -
Whip Up the Topping
When you’re ready to serve, whip that heavy cream until stiff peaks form—about 3-5 minutes with an electric mixer. Spread or pipe it generously over the cheesecake. You can even sprinkle additional crushed Andes mints on top for that extra flair!
Serving Suggestions
When it comes to serving this Chocolate Mint Cheesecake, let’s elevate the experience! Here’s how to plate it beautifully:
- Carefully remove the sides of the springform pan and place the cheesecake on a flattering cake stand or a decorative plate.
- Slice your cheesecake with a hot, dry knife for nice clean cuts—just run it under hot water, wipe it clean, and cut.
- For an added flourish, top each slice with a dollop of whipped cream and a sprig of fresh mint. A drizzle of chocolate sauce could also give it that “wow” factor!
- Pair it with a scoop of vanilla ice cream or a steaming cup of coffee for a delightful treat!
Recipe Variations
Let’s get creative! Here are some fun variations you can try with this recipe:
- Chocolate Hazelnut Cheesecake: Swap out the mint extract for hazelnut syrup and add chopped hazelnuts for a delightful twist!
- Peanut Butter Swirl: Add dollops of creamy peanut butter into the cheesecake filling and use a knife to create swirls before baking.
- Nut-Free Option: Omit all mint candy and use cacao nibs instead for a crunch, or add a touch of orange zest for a citrusy contrast.
- Vegan Cheesecake: Substitute cream cheese with a vegan alternative, use aquafaba instead of eggs, and coconut cream for the topping for a luscious treat everyone can enjoy.
- Flavor Enhancements: Add chocolate or coffee liqueur to the filling for adults-only cheesecake. Just be mindful of the overall liquid content!
Chef’s Notes
This Chocolate Mint Cheesecake has become a staple in my dessert repertoire over the years. It’s evolved as I’ve experimented with different crusts and fillings, but the essence remains the same: comfort and joy. I remember once, during a particularly busy holiday season, I whipped up four of these cakes just to satisfy my friends’ cravings! They brought everyone together around the table, and there were smiles all around.
Oh, and one funny kitchen moment: I once forgot to add the eggs, and while it tasted good, let’s just say the texture was more reminiscent of fudge than cheesecake. We all had a good laugh about that one!
FAQs and Troubleshooting
-
Why did my cheesecake crack?
Cracking can occur due to rapid temperature changes. Allow your cheesecake to cool slowly in the oven and refrigerate it if possible to help maintain its creaminess. -
How do I know when my cheesecake is done baking?
The cheesecake should look set but still slightly jiggly in the center when you remove it from the oven. If it appears too jiggly, give it a few more minutes. -
Can I freeze my cheesecake?
Absolutely! Once it’s fully set, wrap it tightly in plastic wrap and foil and store it in the freezer for up to 3 months. Thaw it in the fridge overnight before serving. -
What if my filling is too runny?
This may happen if it’s not baked long enough or if too much mixing has occurred after adding the eggs. Leaving it in the oven longer (but not too long!) may help, or you can always try adding a little extra flour or cornstarch in future attempts.
Nutritional Info
Before diving into dessert, it’s always good to have a little nutritional perspective! Per slice (assuming 12 slices), this Chocolate Mint Cheesecake clocks in at approximately:
- Calories: 450
- Total Fat: 30g
- Saturated Fat: 18g
- Cholesterol: 105mg
- Sodium: 320mg
- Total Carbohydrates: 40g
- Fiber: 2g
- Sugars: 30g
- Protein: 6g
Keep in mind, these numbers can vary based on your specific ingredients and portion sizes, but they give you a ballpark idea of the deliciousness you’re indulging in!
Final Thoughts
So there you have it! A Chocolate Mint Cheesecake that not only satisfies your sweet tooth but also creates sweet memories in your kitchen. Baking is such a joyful experience, and sharing that with loved ones is what it’s all about. Whether you’re serving this to guests or treating yourself—because you absolutely deserve it—know that you’re creating a piece of happiness, bite by scrumptious bite.
Now, go ahead, gather those ingredients, and let’s start baking your delicious Chocolate Mint Cheesecake. Good luck, and happy baking! 🍰
PrintChocolate Mint Cheesecake
- Total Time: 90 minutes + 4 hours chilling
- Yield: 12 servings 1x
- Diet: Vegetarian
Description
A decadent chocolate mint cheesecake with creamy layers and a refreshing hint of mint, perfect for any celebration or indulgence.
Ingredients
- 2 cups classic Oreo cookie crumbs (about 22 cookies)
- 1/4 cup granulated sugar
- 2 tablespoons salted butter (melted)
- 1 cup white chocolate chips (melted and cooled)
- 24 ounces cream cheese (softened)
- 1 cup granulated sugar
- 3 tablespoons all-purpose flour
- 2 teaspoons peppermint extract
- 4 large eggs
- 1 cup sour cream
- 1/4 teaspoon gel-based green food coloring (optional)
- 1 cup semi-sweet chocolate chips
- 5 ounces Andes mints (broken into pieces)
- 1 cup heavy whipping cream
Instructions
- Preheat your oven to 325°F (160°C).
- Prepare the crust by combining the Oreo crumbs, granulated sugar, and melted butter in a bowl. Pack this mixture into the bottom of a 9-inch springform pan and bake for 10 minutes, then let it cool.
- Make the filling by beating the softened cream cheese on medium speed until smooth. Add in the granulated sugar, flour, and melted white chocolate, and mix until fully incorporated.
- Add the eggs one at a time, mixing on low speed after each addition.
- Drizzle in the peppermint extract, sour cream, and food coloring (if using), then blend until well combined.
- Fold in the semi-sweet chocolate chips and broken Andes mints gently.
- Pour the filling over the cooled crust and spread it evenly. Bake for 50-60 minutes, or until the center is set but still slightly wobbly.
- Cool the cheesecake in the oven with the door slightly ajar for 1 hour. Then remove and cool to room temperature before refrigerating for at least 4 hours or overnight.
- Whip the heavy cream until stiff peaks form. Spread or pipe it over the cheesecake and garnish with additional crushed Andes mints if desired.
Notes
For a different flavor, swap peppermint extract for vanilla extract. Make sure to let the cheesecake cool slowly to avoid cracking.
- Prep Time: 30 minutes
- Cook Time: 60 minutes
- Category: Dessert
- Method: Baking
- Cuisine: American
Nutrition
- Serving Size: 1 slice
- Calories: 450
- Sugar: 30g
- Sodium: 320mg
- Fat: 30g
- Saturated Fat: 18g
- Unsaturated Fat: 10g
- Trans Fat: 0g
- Carbohydrates: 40g
- Fiber: 2g
- Protein: 6g
- Cholesterol: 105mg
Keywords: chocolate cheesecake, mint dessert, creamy cheesecake