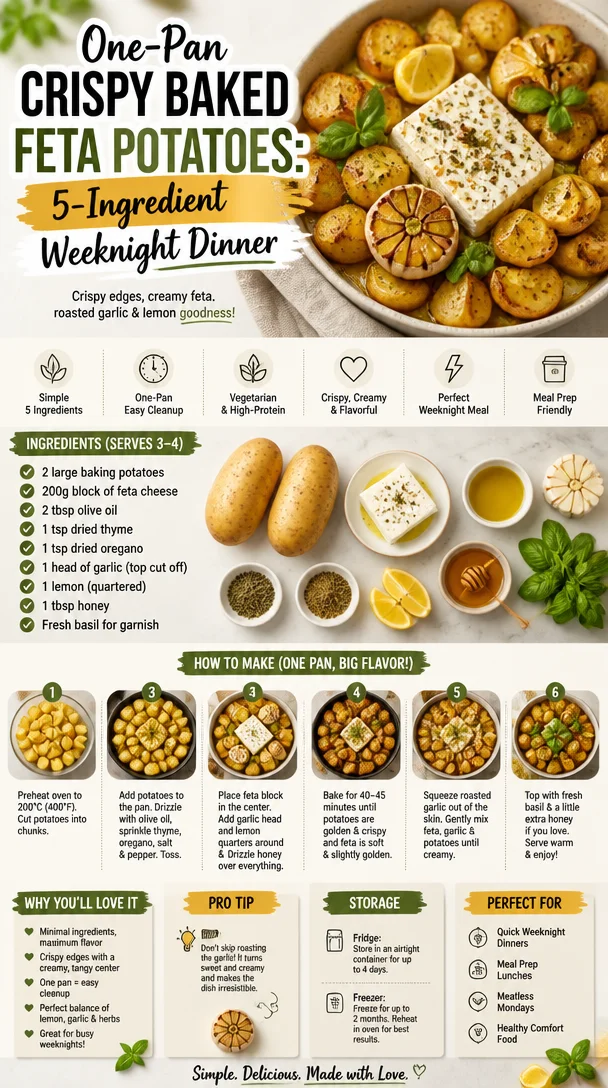
One-Pan Crispy Baked Feta Potatoes: 5-Ingredient Weeknight Dinner
Baked Feta Potatoes: A Cozy Comfort Dish Worth Sharing
Hey there, food lovers! If you’re on the hunt for a dish that’s cozy, incredibly delicious, and just begging to be shared, then buckle up because I’m about to take you on a flavor journey with my Baked Feta Potatoes. This dish isn’t just a recipe; it’s a little nostalgic trip down memory lane, the kind that wraps you in warmth like your favorite sweater on a chilly evening.
The Aroma of Home
Let me take you back to a rainy afternoon in my childhood kitchen. I remember the smell of roasted garlic wafting through the air, mixing with my mom’s laughter as she stirred pots filled with love. One of her go-to comfort dishes was a spin on Greek-style potatoes, but instead of just tossing in a bit of feta, she would make the whole experience dreamy. As kids, we could barely contain our excitement when the oven roasted its magic, transforming simple ingredients into a cheesy, golden delight.
It was the kind of dish that brought everyone together, each spoonful echoing stories, laughs, and the longing to go back to simpler times. As we sat down, the candor around the table reminded me that food is more than just nourishment; it’s a way of connecting with loved ones. That’s why this recipe is so close to my heart. Whenever I make Baked Feta Potatoes, I’m reminded of family bonding, joy, and oh-so-delicious moments that fill our bellies and souls.
Ingredients
Ready to whip up this crowd-pleaser? Here’s what you’ll need:
- 2 large baking potatoes: Choose russet or Yukon gold for their fluffy texture. Slice them in half for quicker cooking or leave them whole if you’re feeling rustic!
- 200g block of feta cheese: The star of the show! This tangy cheese will soften and melt, creating that dreamy, creamy goodness. Swap with goat cheese for a unique flavor twist.
- 2 tbsp olive oil: A drizzle of this liquid gold brings out the flavors in the dish. Extra virgin is the best choice; it’s heart-healthy and rich in antioxidants.
- 1 tsp dried thyme: Earthy and fragrant, thyme gives a lovely depth to the flavor. Fresh thyme works too—just double the amount!
- 1 tsp dried oregano: This adds that Mediterranean flair. If you want a different taste, consider trying dried rosemary or marjoram.
- 1 head of garlic (top cut off): Roasting garlic turns it buttery and sweet. Don’t shy away from using a whole head; the flavor mellows beautifully!
- 1 lemon (quartered): This adds a bright zing! Lemon juice elevates the dish. You can substitute it with lime if that’s what you have on hand.
- 1 tbsp honey: A touch of sweetness complements the saltiness of the feta perfectly. Maple syrup can be used if you’re in a pinch.
- Fresh basil for garnish: The fresh herbs will add color and a pop of flavor. Feel free to get creative—chives or parsley work well too!
Step-by-Step Instructions
Now, onto the best part—cooking! Are you ready? Let’s jump right in!
-
Preheat your oven: Start by setting your oven to 400°F (200°C). This way, it’s nice and hot when you’re ready to pop in those potatoes!
-
Prepare the potatoes: Scrub your baking potatoes thoroughly under water to remove any dirt. Pat them dry, then pierce each potato a few times with a fork. This helps steam escape and keeps them from exploding in the oven. Trust me, that’s a kitchen nightmare! (Funny story—I once had my roommate’s potato explode, and it was like a starchy bomb went off!)
-
Second cut: If you want quicker cooking time and extra crispy edges, slice those potatoes in half lengthwise. Drizzle each piece with olive oil and sprinkle with salt and pepper. Massage those ‘taters like you mean it; you want to coat them well!
-
Roast the potatoes: Place them cut side down on a baking sheet lined with parchment paper or foil. Roasting for about 25-30 minutes will help them get that beautiful, crispy exterior. Keep an eye on them—check for tenderness!
-
Make a feta nest: As the potatoes are roasting, grab a small baking dish and place your feta block in the center. Surround it with the garlic head, oregano, and thyme. Drizzle olive oil and honey over everything, and squeeze a bit of lemon juice from the quartered lemon all over the dish. Trust me, this mix will create a delightful aroma!
-
Combine and roast: When the potatoes are done, remove them from the oven and flip them over. Nestle your rosemary-infused feta dish right in the center. Return everything to the oven and roast for an additional 20-25 minutes until the feta is golden, and the garlic head has softened.
-
Garnish and serve: Once everything is beautifully roasted, give that garlic a good squeeze over the potatoes. The sweet, roasted garlic adds incredible flavor! Top with freshly torn basil leaves and another squeeze of lemon for extra freshness.
Serving Suggestions
Plating is where you can have a little fun! Serve these Baked Feta Potatoes on a vibrant platter with a sprinkle of fresh basil on top. Get creative—add in some colorful roasted vegetables like cherry tomatoes or zucchini around the edges to make your dish pop! If you’re feeling extra generous, serve it alongside a crisp side salad dressed in olive oil and lemon for a complete meal. You could even pair it with a light white wine, like a chilled Sauvignon Blanc. Cheers to that!
Recipe Variations
The best part about cooking is making a recipe your own, so let’s get playful!
-
Mediterranean flair: Add kalamata olives and sun-dried tomatoes for a briny, tangy punch. Toss them in with the feta before roasting!
-
Spicy twist: Add red pepper flakes to the olive oil drizzle for a hint of heat. Alternatively, slice up a fresh jalapeño and place it with the feta.
-
Veggie-packed: Toss in some halved cherry tomatoes or bell pepper slices to roast alongside the feta. They’ll soak up all those incredible flavors.
-
Gluten-free & vegan swap: Use tofu feta for a plant-based alternative. And if you’re serving a gluten-sensitive crowd, these potatoes are naturally gluten-free—because comfort shouldn’t come with restrictions!
-
Loaded: Try loading them with toppings post-roast! Think crispy bacon bits, sour cream, or even a sprinkle of your favorite cheese.
Chef’s Notes
I have to confess—Baked Feta Potatoes started as a way for me to use up ingredients in my fridge. One night, I had an extra block of feta and some potatoes that were getting a little too cozy in their bag, and voilà! The deliciousness that was born became a staple in my home. I remember having friends over for dinner, and we all gathered around the kitchen table. The first bite was met with silence, which then erupted into cheers. Since then, every dinner party has had a spot for this meal.
FAQs and Troubleshooting
-
What if my feta isn’t melting?
No worries! Sometimes the type of feta you use may not fully melt. Go for a softer feta, or heat it a little longer—just keep an eye on it so it doesn’t dry out! -
Can I roast the garlic differently?
Absolutely! If you want a deeper flavor, you can roast the garlic separately for about 30 minutes before everything else, or use minced raw garlic if you want a sharper taste. -
Can leftovers be stored?
Yes! Just store in an airtight container in the fridge for up to 3 days. Reheat in the oven for a crispier dish or the microwave for quick warming. -
What if I’m out of honey?
No biggie! You can substitute it with agave syrup or another sweetener. A touch of sugar mixed with water can work too!
Nutritional Info
While we all know that comfort food is for the soul, it’s nice to keep an eye on the nutritional side too! This Baked Feta Potatoes recipe is relatively wholesome, making use of roasted veggies, healthy fats from olive oil, and the benefits of feta cheese, which is lower in calories than many other cheeses. Made simply with clean ingredients, it’s packed with protein and calcium. Each serving offers a delightful balance of carbohydrates, proteins, and healthy fats, perfect for a comforting yet guilt-free indulgence!
Final Thoughts
Friends, let’s face it: we all need that comforting, soul-soothing dish in our lives that brings back happy memories and creates new ones. Baked Feta Potatoes do just that—they bridge the gap between nostalgia and culinary creativity. So roll up your sleeves and get cooking! And remember, whether it’s just you in the kitchen or you’ve got loved ones gathered around, make it a joyful experience. Grab that fork, share a laugh, and dive into that cheesy goodness. You’ve earned it!
Now tell me, what’s your favorite comfort food? Let’s keep this delicious conversation going!
PrintBaked Feta Potatoes
- Total Time: 70 minutes
- Yield: 4 servings 1x
- Diet: Vegetarian
Description
A cozy comfort dish featuring fluffy potatoes, creamy feta, and roasted garlic, perfect for sharing with loved ones.
Ingredients
- 2 large baking potatoes (russet or Yukon gold)
- 200g block of feta cheese
- 2 tbsp olive oil
- 1 tsp dried thyme
- 1 tsp dried oregano
- 1 head of garlic (top cut off)
- 1 lemon (quartered)
- 1 tbsp honey
- Fresh basil for garnish
Instructions
- Preheat your oven to 400°F (200°C).
- Prepare the potatoes by scrubbing, drying, and piercing them with a fork.
- Slice the potatoes in half lengthwise for quicker cooking.
- Drizzle each potato with olive oil and sprinkle with salt and pepper.
- Place potatoes cut side down on a baking sheet and roast for 25-30 minutes.
- Make a feta nest with feta, garlic, oregano, and thyme in a baking dish.
- Combine the roasted potatoes and feta dish, then return to the oven for an additional 20-25 minutes.
- Garnish with roasted garlic and fresh basil before serving.
Notes
Feel free to experiment with added ingredients like olives or cherry tomatoes for extra flavor.
- Prep Time: 15 minutes
- Cook Time: 55 minutes
- Category: Main Course
- Method: Baking
- Cuisine: Mediterranean
Nutrition
- Serving Size: 1 serving
- Calories: 350
- Sugar: 5g
- Sodium: 400mg
- Fat: 12g
- Saturated Fat: 4g
- Unsaturated Fat: 6g
- Trans Fat: 0g
- Carbohydrates: 45g
- Fiber: 3g
- Protein: 15g
- Cholesterol: 30mg
Keywords: baked potatoes, feta cheese, comfort food, Mediterranean dish, vegetarian recipe
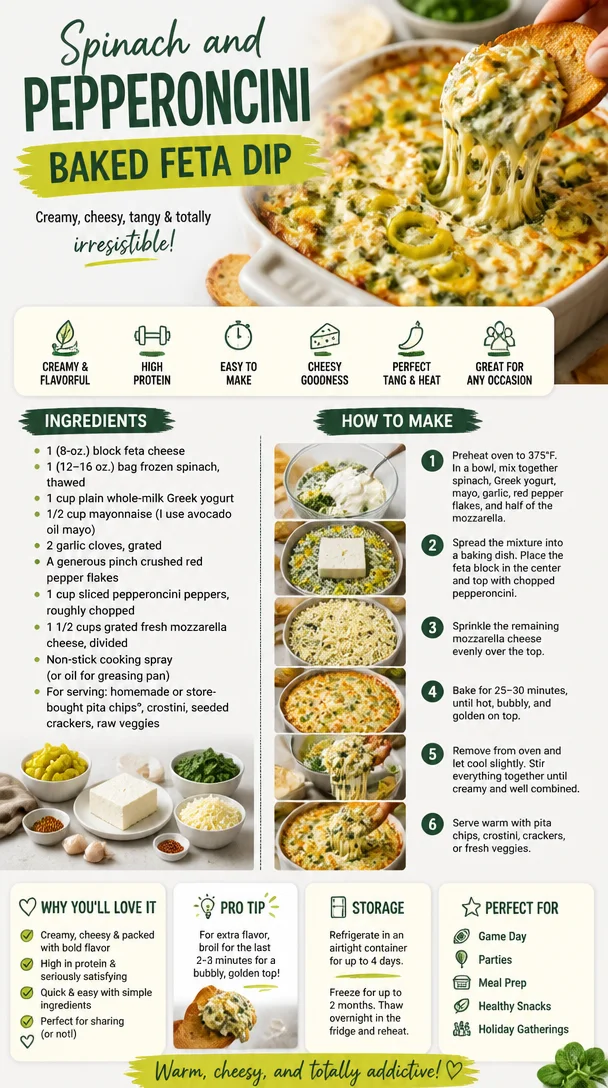
Spinach and Pepperoncini Baked Feta Dip
Spinach and Pepperoncini Baked Feta Dip: A Flavorful Feast for Your Taste Buds
Hey there, food lovers! Welcome to another scrumptious journey here at Feastical. I’m excited to share a recipe that’s as comforting as your favorite pair of sweatpants and as flavorful as a Mediterranean sunset: Spinach and Pepperoncini Baked Feta Dip. Picture this: creamy feta, vibrant spinach, zesty pepperoncini, and a medley of savory spices all baked to perfection. Whether you’re hosting a gathering, planning a cozy night in with friends, or just need an excuse to dig into something utterly delicious, this dip is your ticket!
Why This Recipe is Special
When I think of comfort food, I often find my mind wandering back to family gatherings. One particular memory stands out—my aunt’s holiday parties. She was the queen of dips, and every year, without fail, she’d present a baked feta dip that made the entire room stop and just breathe in the delicious aroma. That dip was not your average starter; it was an experience, a conversation starter, and a warm hug on chilly evenings. It always brought people together, sparking laughter and shared stories.
As I’ve grown in my own cooking journey, I’ve taken my aunt’s inspiration and jazzed it up, coming up with my Spinach and Pepperoncini Baked Feta Dip. Trust me, you don’t just eat this dip; you savor it, making every bite a delightful little moment. It’s creamy, it’s tangy, and it’s oh-so addictively delicious. So roll up your sleeves, and let’s get cooking!
Ingredients
Here’s what you’ll need to whip up this delectable dip:
-
1 (8-oz.) block feta cheese
Feta is the star here—its salty, tangy flavor mingles beautifully with the other ingredients. If you’re looking for a substitute, goat cheese works well but has a different tanginess. -
1 (12-16 oz.) bag frozen spinach, thawed
Spinach brings a wonderful earthiness to this dish. Frozen spinach is super convenient, but fresh can easily be used—just blanch it briefly. -
1 cup plain whole-milk Greek yogurt
Creamy and rich, Greek yogurt adds a nice tang and makes the dip luscious. Don’t have Greek yogurt? Use sour cream for a similar effect. -
1/2 cup mayonnaise (I use avocado oil mayo)
Mayonnaise adds depth and richness. Opt for a flavored mayo or even a vegan version if you’re looking for a twist. -
2 garlic cloves, grated
Garlic injects a wonderful aromatic punch into the dip. You can sub with garlic powder, but fresh is always best! -
A generous pinch crushed red pepper flakes
This is for a little heat. Adjust the quantity to match your spice level—more flakes = more kick! -
1 cup sliced pepperoncini peppers, roughly chopped
Zesty and tangy, pepperoncini adds a unique flavor. If these aren’t your favorite, banana peppers give a similar taste profile. -
1 1/2 cups grated fresh mozzarella cheese, divided
Cheese? Yes, please! Make sure to reserve some for the topping. For a low-fat option, part-skim mozzarella works great. -
Non-stick cooking spray (or oil for greasing pan)
A little grease helps with that perfect crispy edge we all adore! -
For serving: homemade or store-bought pita chips, crostini, seeded crackers, raw veggies
Choose your favorite dippers! Pita chips give a great crunch, while veggies add freshness.
Step-by-Step Instructions
1. Preheat Your Oven:
Start by preheating your oven to 350°F (175°C). The key to a delightful baked dip is a consistent, cozy heat that gently melds all those flavors together.
2. Prepare the Baking Dish:
Lightly grease a medium-sized baking dish with non-stick cooking spray or a bit of olive oil. This step ensures easy cleanup and prevents your delectable dip from sticking.
3. Mix the Base Ingredients:
In a large mixing bowl, combine the thawed spinach, Greek yogurt, mayonnaise, garlic, and crushed red pepper flakes. Use a spatula to fold everything together until well combined. You want those flavors to start popping!
4. Add the Feta and Pepperoncini:
Crumble the block of feta into the mixture and add the chopped pepperoncini. Stir gently to incorporate everything without breaking up the feta too much. Remember, the feta should be present in charming little chunks throughout the dip!
5. Pack It into the Dish:
Transfer your mixture into the prepared baking dish. Spread it out evenly and smooth the top with your spatula to create a lovely surface for your mozzarella later.
6. Cheese, Please!
Sprinkle one cup of the grated mozzarella over the top of your dip. This isn’t just for looks—this layer acts as a melty blanket of goodness when baked! Reserve the remaining half cup for later.
7. Bake It Up:
Pop the baking dish into your preheated oven and set a timer for about 25 minutes. You’re looking for bubbly edges and a slight golden crust on top—heaven is just around the corner!
8. The Finishing Touch:
Once the dip is bubbling beautifully, remove it from the oven and sprinkle the remaining mozzarella on top. Place it back in for an additional 5-7 minutes, just until the cheese is melted and slightly browned.
9. Serve It Up:
Let the dip cool for a minute or two before serving. This is perfect for gathering around with friends while it’s still warm and inviting!
Serving Suggestions
Serve your Spinach and Pepperoncini Baked Feta Dip hot from the oven alongside a platter of assorted dippers. Think crispy homemade pita chips, crunchy crostini, or even vibrant raw veggies like carrots and bell peppers. For an extra gourmet touch, drizzle some good-quality olive oil over the top before serving or add a sprinkle of freshly chopped herbs like parsley or basil.
Recipe Variations
-
Spicy Kick: Add some diced jalapeños for an extra layer of heat that’ll give your dip a kick in the taste buds.
-
Herb Infusion: Incorporate fresh herbs like dill or thyme, which can elevate the flavor profile and add a fragrant touch.
-
Meaty Goodness: For those meat lovers out there, toss in some crumbled cooked sausage or bacon for an extra savory depth.
-
Creamy Vegan Option: Swap out the feta and yogurt for tofu and nutritional yeast for a creamy, plant-based version that’s just as satisfying.
-
Mediterranean Twist: Add a handful of sun-dried tomatoes or olives for a Mediterranean flair that will transport you straight to the coast!
Chef’s Notes
I absolutely love how this recipe has evolved over time. The original concept was a more straightforward baked feta dip, but with the addition of spin and pepperoncini, it became a crowd-pleaser! I remember making this for a holiday get-together, and it completely stole the show—it was gone before I had a chance for seconds! This dish holds a soft spot in my heart, reminding me that food is so much more than just sustenance; it’s all about connection, celebration, and love.
FAQs and Troubleshooting
1. Can I use fresh spinach instead of frozen?
Absolutely! Just make sure to blanch it first and press out the excess moisture to keep your dip from getting too watery.
2. My dip is too runny—what did I do wrong?
It might be a tad too much yogurt or mayo. To remedy, mix in a little bit of cornstarch dusted on the top before baking, which will help absorb excess moisture.
3. Can I make this dip ahead of time?
For sure! Prep your dip a few hours—or even a day—before serving. Just cover and refrigerate, and then bake when you’re ready.
4. What’s the best way to store leftovers?
Store leftovers in an airtight container in the fridge for up to 3 days. Just reheat in the oven or microwave. It’s also delicious served cold on a cracker!
Nutritional Info
While I’m all about enjoying food, I want to share that this Spinach and Pepperoncini Baked Feta Dip is nutrient-dense thanks to the ingredients we use. The spinach packs a punch with vitamins A and C, iron, and fiber. The Greek yogurt adds probiotics, while the feta and mozzarella provide calcium. Enjoy this dip guilt-free! Each serving is approximately 150 calories, 10g fat, 5g carbohydrates, and 8g protein—perfect for an indulgent treat without the hefty caloric load!
Final Thoughts
So there you have it, folks! Your new go-to recipe for Spinach and Pepperoncini Baked Feta Dip. Whether it’s for a party or a cozy night at home, this dip is guaranteed to be a hit. Don’t forget to gather your loved ones around the table and share stories as you indulge in this delicious creation. Cooking should be fun, and sharing food is one of the best ways to connect! So roll up your sleeves, embrace your inner chef, and let this dip become a staple in your kitchen. Thanks for joining me at Feastical—I can’t wait to see you next time for more delicious adventures! Happy cooking!
PrintSpinach and Pepperoncini Baked Feta Dip
- Total Time: 45 minutes
- Yield: 4 servings 1x
- Diet: Vegetarian
Description
A creamy and tangy dip featuring feta, spinach, and pepperoncini, perfect for gatherings or cozy nights in.
Ingredients
- 1 (8-oz.) block feta cheese
- 1 (12-16 oz.) bag frozen spinach, thawed
- 1 cup plain whole-milk Greek yogurt
- 1/2 cup mayonnaise
- 2 garlic cloves, grated
- A generous pinch crushed red pepper flakes
- 1 cup sliced pepperoncini peppers, roughly chopped
- 1 1/2 cups grated fresh mozzarella cheese, divided
- Non-stick cooking spray (or oil for greasing pan)
- For serving: pita chips, crostini, seeded crackers, raw veggies
Instructions
- Preheat your oven to 350°F (175°C).
- Prepare a medium-sized baking dish with non-stick cooking spray or olive oil.
- Mix the thawed spinach, Greek yogurt, mayonnaise, garlic, and crushed red pepper flakes in a large mixing bowl.
- Add the crumbled feta and chopped pepperoncini, stirring gently.
- Pack the mixture into the baking dish, smoothing the top.
- Sprinkle one cup of grated mozzarella over the dip.
- Bake for about 25 minutes, until bubbly and slightly golden.
- Remove from the oven and top with remaining mozzarella, then bake for an additional 5-7 minutes until melted.
- Serve warm with your favorite dippers!
Notes
For extra flavor, drizzle olive oil over the top or sprinkle with fresh herbs before serving.
- Prep Time: 15 minutes
- Cook Time: 30 minutes
- Category: Appetizer
- Method: Baking
- Cuisine: Mediterranean
Nutrition
- Serving Size: 1 serving
- Calories: 150
- Sugar: 2g
- Sodium: 300mg
- Fat: 10g
- Saturated Fat: 4g
- Unsaturated Fat: 5g
- Trans Fat: 0g
- Carbohydrates: 5g
- Fiber: 1g
- Protein: 8g
- Cholesterol: 30mg
Keywords: baked feta dip, spinach dip, party appetizer
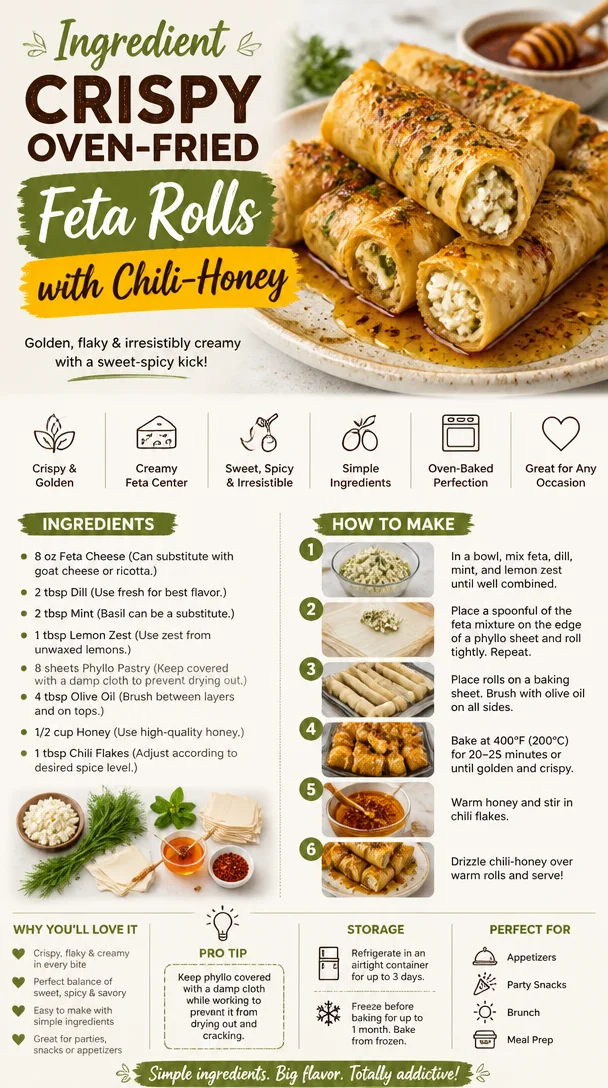
Ingredient Crispy Oven-Fried Feta Rolls with Chili-Honey
Indulgent Oven Fried Feta Rolls with Chili Honey Magic
Hey there, fellow foodie! I’m so glad you’re here, ready to embark on a culinary adventure with me. Today, we’re diving into one of my all-time favorite indulgences that’s sure to impress your friends and family, and leave your taste buds dancing with joy—Indulgent Oven Fried Feta Rolls with Chili Honey Magic. Seriously, with its crispy exterior, creamy feta filling, and that delightful drizzle of chili honey, you’ll be coming back for seconds (and thirds)!
This recipe isn’t just about the tantalizing flavors; it’s about embracing the joy of cooking and the warm memories that food can create. So, roll up those sleeves, grab your spatula, and let’s get cooking!
Personal Story
Let me take you back a few years to one of those evenings that turn into legends in the kitchen. I had a group of my closest friends over for a casual get-together. Everyone brought a dish to share, and while my pals brought the amigos of comfort food—think stews, salads, and a decadent chocolate cake—I decided to step out of my comfort zone and whip up something exciting: these oven-fried feta rolls!
I remember feeling nervous as I layered the phyllo pastry, wondering if the delicate sheets would maintain their crunch after baking. But once I pulled them out of the oven, golden brown and mesmerizing, all doubts evaporated! The first bite was magical; the lovely creaminess of the feta paired with the sweetness of honey and a spicy kick made everyone’s eyes whirl with delight!
That night was filled with laughter, memories, and quite a few feta rolls disappearing in record time. It’s moments like these that remind me why I love cooking—it brings people together, weaves beautiful stories, and creates warm, yummy memories worth cherishing!
Ingredients
Now, let’s talk about what you’ll need to whip up these heavenly feta rolls. The best part? Most of these ingredients are quite accessible, and I even have some substitution suggestions for you! Here’s what you’ll need:
-
8 oz Feta Cheese
Feta is the star here! Its briny flavor brings character to the rolls. Can’t find feta? Goat cheese or ricotta would substitute beautifully! Goat cheese will offer a tangy flair, while ricotta will be extra creamy. -
2 tbsp Dill
Fresh dill is a total game-changer and adds a burst of freshness. If you don’t have dill, you can use dried dill (just 1 tbsp will do!) or if you’re in the mood for something different, tarragon or parsley works well too. -
2 tbsp Mint
Mint adds an unexpected twist that elevates the dish. Fresh mint is a must, but if you can’t find it, fresh basil or even cilantro can lend a nice touch. -
1 tbsp Lemon Zest
Get the zest from unwaxed lemons! It brightens the flavors and provides a zingy freshness. Skip it if you must, but just a pinch of lemon juice can offer a hint of acidity if you don’t have zest on hand. -
8 sheets Phyllo Pastry
You can find phyllo sheets in the frozen aisle. Remember to keep them covered with a damp cloth to prevent drying out; they can be temperamental! -
4 tbsp Olive Oil
Used for brushing between layers and on top, this adds richness and color! Canola or melted butter works well as substitutes, but I think olive oil keeps it healthy and provides a lovely flavor. -
1/2 cup Honey
Going for high-quality honey truly makes all the difference! If you want a healthier version, agave syrup can be a fine alternative, although it may change the flavor profile slightly. -
1 tbsp Chili Flakes
Adjust these little gems according to your spice preference! If you prefer something milder, swap them with smoked paprika, or kick it up a notch with fresh diced jalapeños for authentic heat.
Step-by-Step Instructions
Now, it’s time to create these delicious feta rolls. Follow along, and I promise you’ll have these irresistible bites ready in no time!
-
Preheat Your Oven
Start by preheating your oven to 375°F (190°C). A hot oven is key for achieving that crunchy exterior! -
Prepare Your Baking Sheet
Line a baking sheet with parchment paper. This little step makes cleanup a breeze and prevents the rolls from sticking. -
Mix the Filling
In a mixing bowl, crumble the feta cheese and mix in the chopped dill, mint, and lemon zest. Use a fork to combine everything until it’s well-blended. Feel free to taste it; you’ll appreciate the fresh flavors! -
Set Up Your Phyllo Station
Here’s where the magic happens! Lay out your phyllo sheets one at a time, taking care to keep the rest covered with a damp cloth. Brush the top sheet with olive oil, ensuring it’s well-coated. This helps achieve that perfect crispiness! -
Layering
Place another sheet on top and brush with olive oil again. Repeat this with 4 sheets, so you have a nice stack of prepared phyllo—trust me; it’s worth the effort! -
Fill and Roll
Now, scoop about 2-3 tablespoons of the filling and place it on one end of the layered phyllo. Fold the sides over the filling and roll it up tightly, starting from the end with the filling. Don’t worry too much about it being perfect; the charm is in the rustic look! -
Brush with Olive Oil
Once rolled, place the feta roll seam-side down on your parchment-lined baking sheet. Brush the top with olive oil before popping them into the oven. -
Bake to Perfection
Bake the rolls for about 20-25 minutes or until they turn golden brown and deliciously crisp. Keep an eye on them, as oven times may vary. -
Prepare the Chili Honey Drizzle
While the rolls are baking, combine the honey and chili flakes in a small saucepan over low heat. Stir until warmed through and mixed. You want it drizzled on top, so keep it on low heat until ready to serve. -
Serve and Enjoy
Once the feta rolls are out of the oven, let them cool slightly. Drizzle the chili honey magic over the rolls (don’t be shy!), and serve them warm. Trust me, they’ll disappear in no time!
Serving Suggestions
Alright, presentation time! To serve these feta rolls, plate them up on a beautiful serving platter. You can arrange them artistically or in a casual pile—either way, they’ll look inviting. To amp up the flair, garnish with extra sprigs of mint or dill for that pop of color. You can also drizzle a little extra honey around the plate for a touch of elegance.
Pair these rolls with a light salad—think arugula with a lemon vinaigrette—or maybe a dollop of Greek yogurt for some cool creaminess. Serve with drinks—perhaps a crisp white wine or a refreshing sparkling lemonade— and enjoy the compliments coming your way!
Recipe Variations
Feeling adventurous? Here are some creative twists you can explore with these feta rolls:
-
Mediterranean Style – Add in sun-dried tomatoes and olives to your feta filling for an extra kick of Mediterranean flavor.
-
Spiced Up – Mix in a teaspoon of cumin or smoked paprika in your cheese filling for a smoky undertone that enhances the chili honey perfectly.
-
Herb Lover’s Delight – Go crazy with the herbs! Use a mix of thyme and oregano along with the dill for a more robust flavor.
-
Veggie Power – Incorporate finely chopped spinach or sautéed veggies like bell peppers or zucchini in the filling for a healthy twist.
-
Sweet Heat Fusion – Substitute the chili flakes for a teaspoon of sriracha sauce in the honey for a delightful hot-sweet drizzle!
Chef’s Notes
Oh, how this recipe has evolved over the years! I remember making these rolls for the first time and being nervous about mastering phyllo dough. Now, it’s all about experimenting with fillings and spices. One time, I even tried adding a little crumbled bacon for a smoky flavor that took it to another level—my friends declared them the “ultimate watch party snack.”
You know, cooking is just like life—sometimes it’s messy, sometimes it surprises you. Just roll with it and have fun!
FAQs and Troubleshooting
-
Can I use frozen phyllo pastry?
Absolutely! Just allow it to thaw in the fridge overnight or at room temperature for a few hours before use. -
What if my rolls don’t crisp up?
Ensure you’ve brushed enough olive oil on the phyllo sheets and preheat the oven properly. A good layer of oil is crucial for that crunch! -
Can I freeze the rolls before baking?
Yes! Assemble the rolls and freeze them on a baking sheet before transferring to a freezer bag. Bake from frozen, adding a few extra minutes to the baking time. -
What should I do if the phyllo tears?
No worries! Just patch it up with a small piece of phyllo—it’s all about creating layers! Just brush with oil to avoid any dampness.
Nutritional Info
Now, let’s chat about the nutrition of our fabulous feta rolls. Each roll packs a delightful punch, so here’s a bit of insight into what you can expect:
- Calories: Approximately 160 calories per roll
- Protein: 6 grams—thanks to the feta!
- Fat: 11 grams—mostly from olive oil and cheese
- Carbohydrates: 9 grams—a good balance from the phyllo pastry.
If you’re looking for a lower-calorie option, consider using less oil or baking them at a higher temperature for a shorter time. You can also experiment with reducing the cheese quantity and adding more vegetables!
Final Thoughts
As we wrap up this delicious journey of oven-fried feta rolls with chili honey magic, I hope you’re inspired to dive into your kitchen. Remember, the heart of cooking is about experimenting, having fun, and most importantly, sharing food with those you love.
So, gather your friends, get your apron on, and prepare for laughter, flavor explosions, and unforgettable memories! Don’t forget to come back and share how your feta rolls turned out or what creative variations you tried!
Until next time, happy cooking! 🍽️✨
PrintIndulgent Oven Fried Feta Rolls with Chili Honey Magic
- Total Time: 40 minutes
- Yield: 8 servings 1x
- Diet: Vegetarian
Description
Crispy and creamy oven-fried feta rolls drizzled with a spicy chili honey sauce, perfect for impressing friends and family.
Ingredients
- 8 oz Feta Cheese
- 2 tbsp Dill
- 2 tbsp Mint
- 1 tbsp Lemon Zest
- 8 sheets Phyllo Pastry
- 4 tbsp Olive Oil
- 1/2 cup Honey
- 1 tbsp Chili Flakes
Instructions
- Preheat your oven to 375°F (190°C).
- Line a baking sheet with parchment paper.
- In a mixing bowl, crumble the feta cheese and mix in the chopped dill, mint, and lemon zest.
- Lay out your phyllo sheets one at a time, keeping the rest covered with a damp cloth.
- Brush the top sheet with olive oil, ensuring it’s well-coated.
- Place another sheet on top and brush with olive oil again. Repeat with a total of 4 sheets.
- Scoop about 2-3 tablespoons of the filling and place it on one end of the prepared phyllo.
- Fold the sides over the filling and roll it up tightly.
- Brush the top of the rolled feta roll with olive oil.
- Bake for 20-25 minutes or until golden brown and crispy.
- While baking, combine the honey and chili flakes in a small saucepan over low heat.
- Once out of the oven, drizzle the warm chili honey over the rolls and serve them warm.
Notes
Great served with a light salad or Greek yogurt. Garnish with extra herbs for presentation.
- Prep Time: 15 minutes
- Cook Time: 25 minutes
- Category: Appetizer
- Method: Baking
- Cuisine: Mediterranean
Nutrition
- Serving Size: 1 roll
- Calories: 160
- Sugar: 15g
- Sodium: 450mg
- Fat: 11g
- Saturated Fat: 4g
- Unsaturated Fat: 5g
- Trans Fat: 0g
- Carbohydrates: 9g
- Fiber: 1g
- Protein: 6g
- Cholesterol: 20mg
Keywords: feta rolls, chili honey, Mediterranean appetizer, baked feta, vegetarian
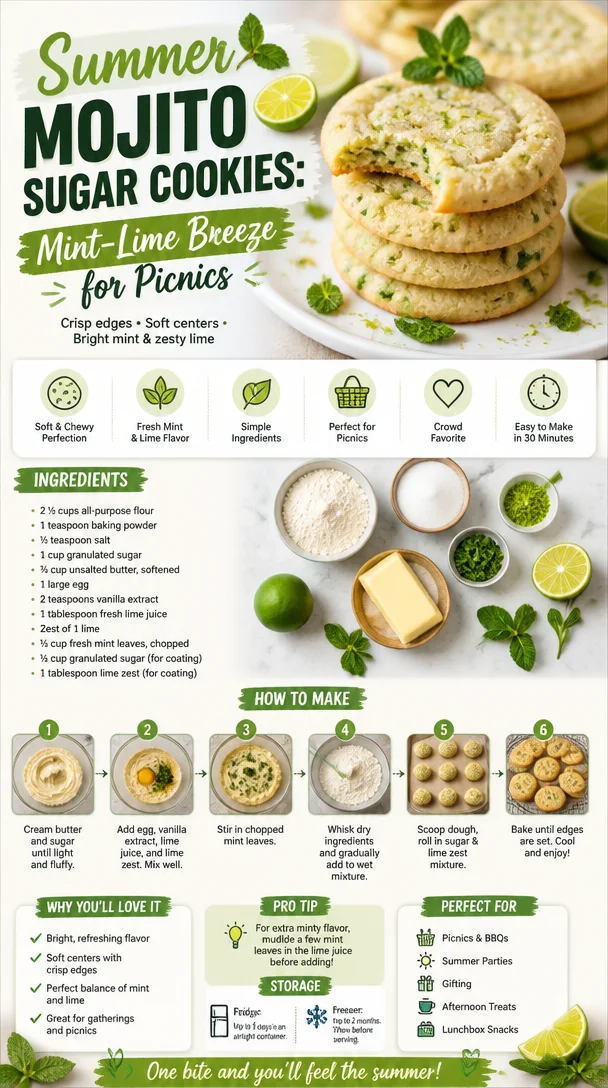
Summer Mojito Sugar Cookies: Mint-Lime Breeze for Picnics
Summer Mojito Sugar Cookies: A Sweet Twist on a Classic
Hey there, sugar cookie lovers! Welcome back to Feastical, where we take those ordinary kitchen moments and turn them into delicious memories. Today, I’m super excited to share a delightful recipe that brings together the refreshing flavors of summer: Summer Mojito Sugar Cookies! Imagine the sweetness of sugar cookies fused with the zesty lime and mint of a classic mojito. You’re going to love this treat, whether you’re lounging by the pool, hosting a backyard barbecue, or simply enjoying a sunny afternoon with friends.
A Taste of Nostalgia
Let me take you back to those magical summer days of my childhood. Picture this: it’s a balmy afternoon; the sun is shining brightly, and I’m sprawled out on the porch indulging in fresh lemonade and homemade cookies. My grandmother, the queen of summer baking, would whip up her famous sugar cookies while we sat around chatting, sipping on cool drinks, and laughing. Those soft, sugary cookies were always a hit, but the best part? They were never quite the same each time. Sometimes she’d add a splash of lemon, other times a sprinkle of cinnamon, but the one flavor profile that always brought us back to summer was mint.
Fast forward a few decades, and here I am crafting my own twist on Grandma’s classic recipe—her legacy lives on in every bite of these cookies. The idea hit me one afternoon while sipping a mint mojito on the patio, and the combination of those vibrant flavors practically jumped into my head. And voilà! The Summer Mojito Sugar Cookie was born. These cookies are not just a treat; they are a celebration of summer, love, and family, and I can’t wait for you to experience them as I have.
Ingredients
Before we dive into the deliciousness, let’s gather our ingredients! Here’s what you’ll need:
-
2 ½ cups all-purpose flour: The foundation of our cookies. Feel free to substitute with gluten-free flour if needed, just make sure to check the recommended ratios.
-
1 teaspoon baking powder: This will help our cookies rise beautifully, creating that soft, fluffy texture we love.
-
½ teaspoon salt: Just a pinch helps to balance out the sweetness and enhance the flavors.
-
1 cup granulated sugar: Sweet, sweet sugar! You can use a sugar substitute if you’re looking for lower-calorie options, but the texture might vary.
-
¾ cup unsalted butter, softened: Butter makes everything better! For dairy-free options, use coconut oil or a plant-based butter.
-
1 large egg: This adds moisture and binds our cookies together. A flaxseed egg can work if you’re going vegan.
-
2 teaspoons vanilla extract: For that warm, comforting flavor that pairs so well with lime and mint.
-
1 tablespoon fresh lime juice: A splash of acidity to brighten up those flavors—fresh is best!
-
Zest of 1 lime: Adds to the awesome zing; you can also use lemon zest for a different citrus twist.
-
⅓ cup fresh mint leaves, chopped: The star of our mojito flavor! If fresh mint isn’t available, you can use a scant teaspoon of dried mint.
-
¼ cup granulated sugar (for coating): This gives cookies that appealing sugary crust.
-
1 tablespoon lime zest (for coating): Adds a little extra kick right at the finish.
Let’s gather these treasures and get ready to bake!
Step-by-Step Instructions
Now, the moment we’ve all been waiting for: baking our Summer Mojito Sugar Cookies! Let’s roll up those sleeves and get started.
-
Preheat the oven: First things first, preheat your oven to 350°F (175°C). This is essential for getting those cookies perfectly baked.
-
Mix the dry ingredients: In a large mixing bowl, whisk together the flour, baking powder, and salt. This step ensures our dry ingredients are evenly distributed, giving a consistent texture to the cookies.
-
Cream the butter and sugar: In another bowl, cream together the softened butter and granulated sugar until it’s light and fluffy—about 3-5 minutes. This is a crucial step! Incorporating air into your butter and sugar mixture will result in cookies that have a lovely texture. Want a quick tip? Use room temperature butter for the best results.
-
Add egg and vanilla: Beat in the egg and vanilla extract. You’ll want to mix until it’s smooth—just a minute will do! The mixture should look slightly glossy.
-
Incorporate lime juice and zest: Now for the magic—mix in that fresh lime juice and zest. This is what brings that summery punch to our cookies!
-
Add dry to wet ingredients: Slowly add your dry flour mixture to the wet ingredients, stirring just until combined. Make sure not to overmix—we want our cookies to be light and airy!
-
Chop the mint: Take your fresh mint leaves and chop them finely. Gently fold them into your cookie batter. The aroma will be heavenly!
-
Prep for baking: In a separate small bowl, mix together the ¼ cup of granulated sugar and 1 tablespoon of lime zest for coating. This will create a flavorful exterior on our finished cookies.
-
Scoop the dough: Using an ice cream scoop or spoon, scoop out the dough balls (about 1-2 tablespoons each). Roll them into smooth balls, then roll them in the sugar-zest mixture to coat.
-
Spacing on baking sheet: Place the sugar-coated dough balls on a lined baking sheet, spaced about 2 inches apart. This allows them room to spread while baking.
-
Bake to perfection: Pop them into your preheated oven and bake for 10-12 minutes or until the edges are just turning golden. In the last minute of baking, you can press them down gently with the bottom of a glass to flatten them slightly—this gives them that traditional sugar cookie look!
-
Cool and enjoy: When they’re done, let them cool on the baking sheet for a few minutes before transferring them to a wire rack. Trust me, the aroma will draw everyone to the kitchen like a magnet!
Serving Suggestions
Now that your cookies are baked to perfection, it’s time to serve them up! These Summer Mojito Sugar Cookies are fantastic on their own, but they also shine as part of a dessert spread. Here are a few serving ideas:
-
On a Snack Platter: Arrange your cookies on a large, colorful plate with some sliced citrus fruits and fresh mint leaves scattered around for an aesthetic touch.
-
With a Refreshing Drink: Pair your cookies with a mojito or a glass of iced tea. The flavors will complement each other beautifully and quench that summer thirst.
-
Pack for Picnics: These cookies are perfect for picnics! Slip them into a cute container or a jar for easy transport and share them with friends.
-
Gift-Worthy Treats: Present these cookies in a decorative box tied with a ribbon—perfect for gifts for friends or family during summer gatherings.
Recipe Variations
One of the best parts about baking is experimenting! Here are a few fun variations you can try with this base recipe:
-
Coconut Mojito Cookies: Incorporate shredded coconut into your batter for a tropical twist! About ½ cup will add that delightful coconut flavor.
-
Chocolate-Dipped: Once cooled, dip half of the cookie in melted chocolate for a rich, sweet contrast to the zesty lime and mint.
-
Gluten-Free Option: Substitute the all-purpose flour with a gluten-free all-purpose flour blend. Just ensure it has xanthan gum included for the best texture!
-
Add Some Spice: For a hint of warmth, add a pinch of cayenne pepper or chili powder to the cookie dough. It’s an unexpected yet delightful surprise!
-
Frozen Treats: Crumble the cookies and mix them into vanilla ice cream for a refreshing summer dessert!
Chef’s Notes
These cookies have a special place in my heart and in my kitchen. Over the years, I’ve played with the recipe to get it just right. What started as a simple sugar cookie has turned into a vibrant, fresh summery treat that carries a little nostalgia with each bite. I encourage you to personalize it, whether through flavors, sugars, or shape. Remember, cooking is all about joy—don’t stress, have fun, and let every cookie reflect your taste!
FAQs and Troubleshooting
-
Why are my cookies spreading too much?
If your cookies are spreading too much in the oven, try refrigerating the dough before baking. Chilled dough spreads less! -
Can I adjust the sweetness?
Absolutely! Feel free to reduce the sugar by ¼ cup for a less sweet cookie while still capturing the wonderful flavors. -
What can I do if my mint flavor is too strong?
If you find the mint flavor overwhelming, try reducing the amount of fresh mint used or balance it out with a little more lime juice. -
Why are my cookies not fluffy?
Make sure you’re not overmixing the batter once the flour is added. Overmixing can lead to dense cookies.
Nutritional Info
If you’re watching what you eat, here’s a rough breakdown of the nutritional values per cookie (approximately 2.5-inch cookie):
- Calories: 120 kcal
- Total Fat: 6g
- Saturated Fat: 3.5g
- Cholesterol: 15mg
- Sodium: 50mg
- Total Carbohydrates: 17g
- Dietary Fiber: 0g
- Sugars: 8g
- Protein: 1g
Keep in mind that these values may vary based on specific ingredient brands and measurements, but they’re pretty close to the mark.
Final Thoughts
And there you have it—my beloved Summer Mojito Sugar Cookies that bring sunshine and sweetness into your kitchen! I hope you find joy in recreating this recipe and adding your unique touch along the way. Baking isn’t just about the ingredients; it’s about the love, memories, and connections we create through the kitchen. Whether you enjoy these cookies solo or shared with a crowd, each bite has the potential to brighten someone’s day.
So grab your spatula, gather your ingredients, and let’s make some summertime magic together. Don’t forget to tag @Feastical when you share your cookie love; I’d love to see how you make them your own! Happy baking, foodies!
PrintSummer Mojito Sugar Cookies
- Total Time: 32 minutes
- Yield: 24 servings 1x
- Diet: Vegetarian
Description
Delightful sugar cookies infused with refreshing lime and mint flavors, capturing the essence of summer.
Ingredients
- 2 ½ cups all-purpose flour
- 1 teaspoon baking powder
- ½ teaspoon salt
- 1 cup granulated sugar
- ¾ cup unsalted butter, softened
- 1 large egg
- 2 teaspoons vanilla extract
- 1 tablespoon fresh lime juice
- Zest of 1 lime
- ⅓ cup fresh mint leaves, chopped
- ¼ cup granulated sugar (for coating)
- 1 tablespoon lime zest (for coating)
Instructions
- Preheat the oven to 350°F (175°C).
- Mix the flour, baking powder, and salt in a large mixing bowl.
- Cream together the softened butter and granulated sugar until fluffy.
- Add the egg and vanilla extract, mixing until smooth.
- Incorporate the fresh lime juice and zest into the mixture.
- Add the dry ingredients to the wet, stirring until combined.
- Chop the fresh mint leaves and fold them into the cookie batter.
- Prep a mixture of the coating sugar and lime zest in a small bowl.
- Scoop out the dough into balls, rolling them in the sugar-zest mixture.
- Place the dough balls on a lined baking sheet, spaced about 2 inches apart.
- Bake for 10-12 minutes until edges are golden.
- Cool on the baking sheet for a few minutes before transferring to a wire rack.
Notes
For a tropical twist, add shredded coconut or chocolate-dip the cookies after cooling.
- Prep Time: 20 minutes
- Cook Time: 12 minutes
- Category: Dessert
- Method: Baking
- Cuisine: American
Nutrition
- Serving Size: 1 cookie
- Calories: 120
- Sugar: 8g
- Sodium: 50mg
- Fat: 6g
- Saturated Fat: 3.5g
- Unsaturated Fat: 2.5g
- Trans Fat: 0g
- Carbohydrates: 17g
- Fiber: 0g
- Protein: 1g
- Cholesterol: 15mg
Keywords: cookies, mojito, summer, dessert, baking
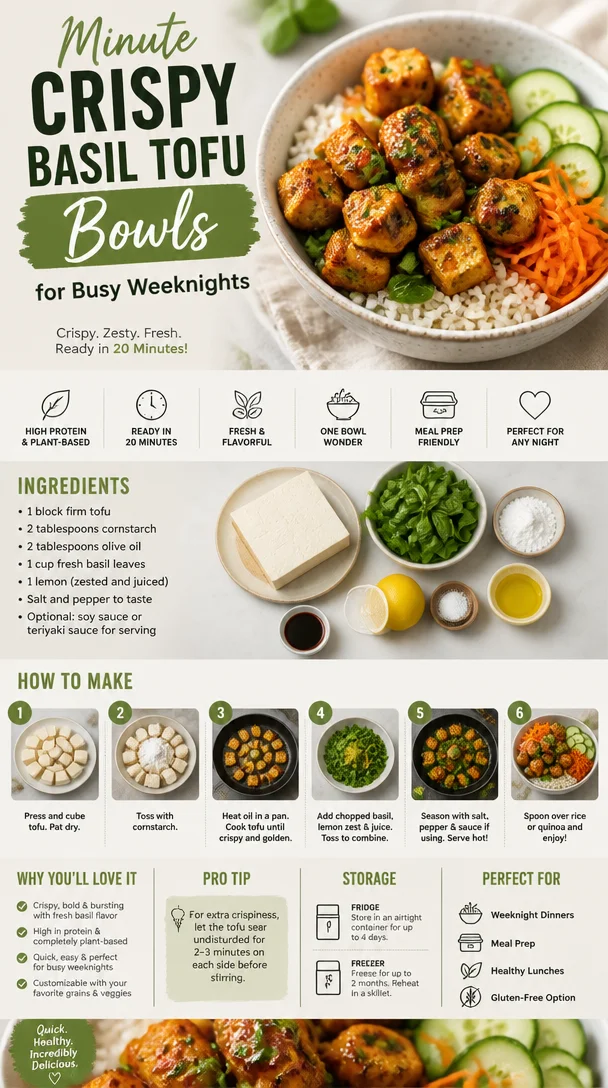
Minute Crispy Basil Tofu Bowls for Busy Weeknights
Crispy Basil Tofu: A Delight for Your Taste Buds
Hey there, fellow food lover! If you’ve ever found yourself scrolling through recipe sites or flipping through cookbooks, searching for something that speaks to your culinary soul, you’re in for a treat. Today, we’re diving into a crispy basil tofu recipe that’s as vibrant as a summer garden and as comforting as that long-awaited hug from a friend.
When I created this dish for Feastical, I wanted to merge simplicity with deliciousness, crafting something that’s not only easy to whip up but also brings a sense of joy to every bite. Tofu can sometimes get a bad rap, but let me tell you, when it’s done right, it can be the star of your dining table! Trust me; this crispy basil tofu will have everyone singing its praises and begging for seconds.
So, grab your apron, invite a friend into the kitchen, and let’s get cooking. You’re about to discover how crispy, flavorful, and delightful tofu can truly be!
A Personal Story: My Tofu Awakening
Let me take you back to my college days. Picture this: a cramped dorm room with a tiny hot plate, my trusty collection of cookbooks spilling over (some of which have questionable stains from my experimental cooking phase), and a whole lot of takeout menus. The truth is, I had no clue how to cook, but I was determined to learn.
One chilly evening, I stumbled across a recipe for crispy tofu. It called for simple ingredients and promised something delicious. Skeptical but intrigued, I gave it a shot. Fast forward to me in the kitchen, cranking up the heat, and witnessing those little cubes of tofu turn golden brown—oh, the magic! Tossing in fresh basil from a friend’s herb garden turned out to be the icing on the cake. That evening, I savored every crunchy bite and felt like a culinary genius. From that moment on, tofu became my go-to for quick, nutritious meals and a canvas for flavor. It opened up a world of possibilities, and I couldn’t wait to share that joy with everyone around me.
Ingredients
Let’s dive into the star ingredients of our crispy basil tofu. Here’s what you’ll need:
-
1 block firm tofu
The foundation of our dish! Firm tofu holds its shape when cooked and offers just the right texture. Soft or silken tofu won’t yield the crispy results we’re aiming for! If you can’t find firm tofu, check out “extra-firm” in your local grocery; it works like a charm! -
2 tablespoons cornstarch
This is our secret weapon for achieving that crispy, golden crust. Cornstarch helps absorb moisture from the tofu’s surface, leading to a delightful crunch. A substitute? Potato starch can work similarly if you have it on hand! -
2 tablespoons olive oil
For frying, olive oil gives a lovely flavor and a nice crisp. If you’re seeking a stronger flavor profile, you can swap this for sesame oil or even coconut oil! -
1 cup fresh basil leaves
Fresh basil is the flavor hero of this dish. Its aromatic, slightly sweet taste complements the tofu perfectly. If you don’t have basil, feel free to use cilantro, parsley, or even a mix of herbs that you love! -
1 lemon (zested and juiced)
This adds a zesty brightness that elevates the dish. Zest activates those aromatic oils, so don’t skip this! If you’re out of lemons, lime juice works well too! -
Salt and pepper to taste
The quintessential seasoning duo! Adjust these to your preference, remembering that a little salt can go a long way. -
Optional: soy sauce or teriyaki sauce for serving
Want to take it up a notch? These sauces can add a savory depth to your crispy basil tofu, creating a perfect dipping sauce or drizzle.
Step-by-Step Instructions
Ready to turn those ingredients into a dish worth raving about? Let’s jump into the cooking process!
-
Press the Tofu
Start by pressing your tofu to remove excess moisture. Wrap the block in a clean kitchen towel and place something heavy on top (a cast-iron skillet works wonders!). Let it sit for about 15-20 minutes. This step is essential because drier tofu will crisp up beautifully! (Chef tip: You can press it in the morning and leave it in the fridge if you’re busy!) -
Cube the Tofu
Once your tofu is pressed, cut it into bite-sized cubes—around 1-inch pieces are ideal. The smaller the cubes, the crispier they’ll get! -
Toss with Cornstarch
In a large bowl, toss the cubed tofu with cornstarch, salt, and pepper until evenly coated. The cornstarch creates a lovely crust when you fry it! (A little chef hack: You can do this step in a Ziploc bag for mess-free coating!) -
Heat the Oil
In a non-stick skillet, heat the olive oil over medium-high heat. The pan should be hot but not smoking. If you see it shimmering, we’re ready to go! -
Fry the Tofu
Carefully place the tofu cubes in the hot skillet in a single layer—avoid overcrowding, as this prevents crisping! Fry for about 5-7 minutes on one side until golden brown, then flip and repeat. (Chef’s secret: For extra crunch, allow the tofu to sit undisturbed for a few moments before flipping!) -
Add the Basil
Once the tofu is golden and crispy on all sides, add the fresh basil leaves to the skillet, along with the lemon juice and zest. Toss everything gently, allowing the basil to wilt slightly and coat the tofu with its aromatic flavor. Cook for an additional 1-2 minutes and season with salt and pepper to taste. -
Serve Up the Goodness
Transfer your crispy basil tofu onto a platter, and drizzle with soy sauce or teriyaki sauce if desired. Enjoy while hot!
Serving Suggestions
Now that you’ve got your crispy basil tofu ready, let’s talk presentation! Here’s how to plate this vibrant dish:
- Serve the tofu over a mound of fluffy jasmine rice or quinoa for a hearty meal.
- Garnish with extra basil leaves for a pop of green.
- Add a few lemon wedges on the side for that extra zing!
- You can even serve it alongside a fresh salad or steamed veggies for a well-rounded plate.
Make sure to invite friends or family to the table; this dish deserves to be shared!
Recipe Variations
Why stick to just one version when you can switch things up? Here are some creative twists on the classic crispy basil tofu:
- Spicy Sriracha Glaze: Add a kick by drizzling sriracha or a sweet chili sauce over the tofu before serving. The heat complements the basil beautifully!
- Coconut Crunch: Add shredded coconut to the cornstarch mixture for a tropical twist—perfect with a side of mango salsa!
- Garlic Lovers’ Delight: Sauté minced garlic in the oil before adding the tofu for a garlicky explosion of flavor.
- Peanut Sauce Drench: Serve your tofu with a homemade or store-bought peanut sauce for a nutty blend of tastes that pairs so well with Thai-inspired dishes.
- Herbed Variations: Mix and match with other herbs like cilantro or mint for a unique flavor profile!
Chef’s Notes
As I’ve played with this recipe over the years, I’ve found endless variations that can adapt to seasons and personal tastes. The humble tofu really does shine as a versatile ingredient. I once had a hilarious kitchen disaster when I mistook powdered sugar for cornstarch while making this dish. The result? Sweet, soggy tofu! Learning from that, I also became a believer in keeping my pantry organized to avoid any funny mix-ups.
FAQs and Troubleshooting
-
Why isn’t my tofu crispy?
If your tofu isn’t crisping up, it might be due to excess moisture. Ensure you press it thoroughly before cooking and coat it evenly with cornstarch. -
Can I use soft tofu instead of firm?
While it’s not recommended for frying, soft tofu can be great for a different dish. If you’re craving a crispy texture, stick with firm or extra-firm tofu! -
How do I store leftovers?
Store any leftovers in an airtight container in the refrigerator for up to 3 days. Reheat in a hot skillet for that delicious crunch again! -
Can this dish be frozen?
While you can freeze cooked tofu, the texture may change once thawed. It’s best served fresh for optimal crunchiness.
Nutritional Info
This crispy basil tofu is not only delicious but also packed with nutrients! Here’s a quick breakdown:
- Protein: Tofu is a fantastic source of plant-based protein, perfect for vegetarian or vegan diets.
- Healthy Fats: Olive oil provides healthy fats that support heart health.
- Vitamins and Minerals: Basil is rich in vitamins A, K, and C, while lemon boosts your vitamin C intake.
- Low-Calorie Option: This dish is a low-calorie delight that keeps you satisfied without feeling heavy.
Final Thoughts
There you have it—your guide to making crispy basil tofu a star on your dinner table! Whether you’re looking for a quick weeknight meal or a dish to impress your guests, this recipe is your new go-to. Remember to flavor your journey by experimenting and finding your unique twist on it.
I hope you find as much joy in cooking and sharing this dish as I do. Food is about connection, laughter, and creating cherished memories. So grab a fork, dig in, and let’s celebrate the wonderful world of cooking together. Happy feasting, my friend!
PrintCrispy Basil Tofu
- Total Time: 35 minutes
- Yield: 4 servings 1x
- Diet: Vegetarian
Description
A vibrant and crispy basil tofu recipe that’s simple to make and full of flavor.
Ingredients
- 1 block firm tofu
- 2 tablespoons cornstarch
- 2 tablespoons olive oil
- 1 cup fresh basil leaves
- 1 lemon (zested and juiced)
- Salt and pepper to taste
- Optional: soy sauce or teriyaki sauce for serving
Instructions
- Press the tofu to remove excess moisture, wrapping it in a towel and placing something heavy on top for 15-20 minutes.
- Cube the pressed tofu into bite-sized pieces.
- Toss the cubed tofu with cornstarch, salt, and pepper in a bowl until evenly coated.
- Heat olive oil in a non-stick skillet over medium-high heat.
- Fry the tofu cubes in a single layer for 5-7 minutes on one side until golden brown, then flip and repeat.
- Add fresh basil leaves, lemon juice, and zest; cook for an additional 1-2 minutes, seasoning with salt and pepper.
- Serve hot, drizzled with soy sauce or teriyaki sauce if desired.
Notes
Pair this dish with jasmine rice or quinoa for a complete meal. Great for sharing!
- Prep Time: 20 minutes
- Cook Time: 15 minutes
- Category: Main Course
- Method: Frying
- Cuisine: Asian
Nutrition
- Serving Size: 1 serving
- Calories: 350
- Sugar: 5g
- Sodium: 400mg
- Fat: 12g
- Saturated Fat: 2g
- Unsaturated Fat: 8g
- Trans Fat: 0g
- Carbohydrates: 45g
- Fiber: 3g
- Protein: 15g
- Cholesterol: 0mg
Keywords: tofu, basil, vegetarian, crispy, easy recipes
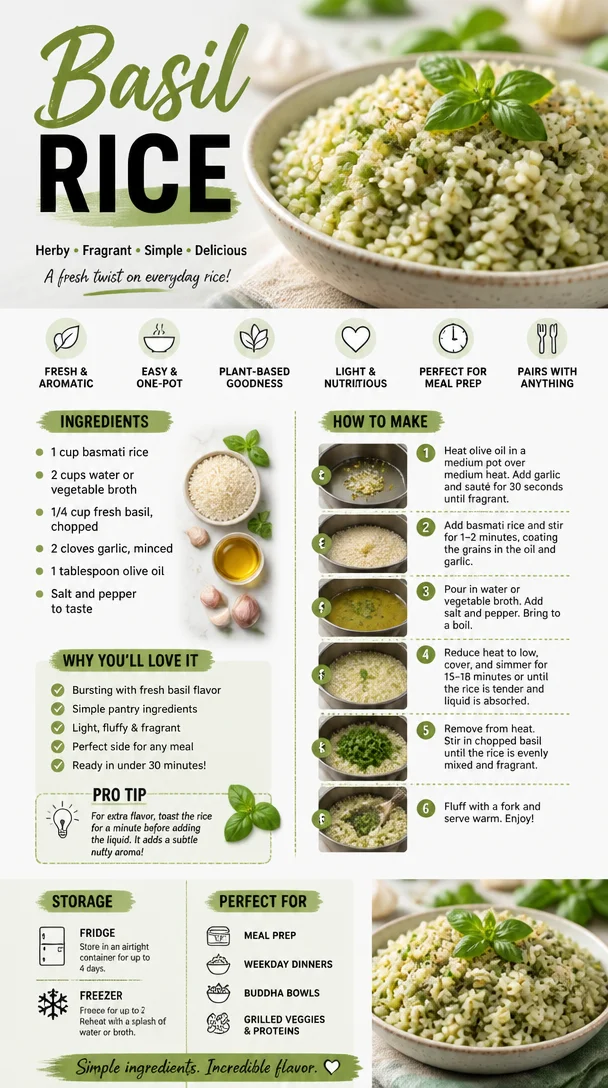
Basil Rice
The Ultimate Basil Rice Recipe: A Flavor Explosion in Every Bite!
Hey there, food lovers! If you’re anything like me, the kitchen is your happy place—where magic happens, memories are made, and delicious aromas swirl around to create an irresistible atmosphere. Get ready because today we’re diving into a dish that packs a punch of flavor while keeping things easy and breezy: Basil Rice!
Imagine stepping into your home and being greeted by the fresh scent of basil wafting through the air. That’s what you can expect when you whip up this culinary gem! Basil Rice isn’t just a dish; it’s an experience—one that brings comfort and a sprinkle of joy to your dining table.
I remember when my love affair with basil began. I was just a curious kid in my grandmother’s kitchen, stirring sauces and sneaking tastes of whatever she was cooking. One day, she asked me to help her with a simple side dish—her signature basil rice. As I chopped fresh basil, the fragrance took me back to summer days spent in her garden—each whiff bringing back memories of laughter, family gatherings, and, of course, delicious food. That moment ignited a passion in me that would later evolve into my love for cooking, sharing, and creating flavorful meals.
Basil Rice is perfect for any occasion: a cozy weeknight dinner, a potluck with friends, or even as a bed for a grilled chicken or a veggie stir-fry. It combines fragrant basmati rice with fresh basil and garlic, resulting in a dish that’s vibrant and fresh. So, are you ready to embark on this flavorful journey with me? Let’s gather those ingredients!
Ingredients
Here’s what you’ll need to create your delicious Basil Rice:
-
1 cup basmati rice
Basmati rice is the star of the show! Its long grains and nutty flavor make it a perfect choice for this dish. If you don’t have basmati, jasmine rice or long-grain white rice can work as alternatives, but the flavor profile will differ slightly. -
2 cups water or vegetable broth
Using vegetable broth adds an extra layer of flavor to the rice. If you’re in a pinch, plain water is just fine, but I highly recommend broth for the best results! -
1/4 cup fresh basil, chopped
Fresh basil makes all the difference here. The peppery-sweet flavor elevates this simple dish into something special. If you can’t find fresh basil, you can use 1 tablespoon of dried basil, though the taste won’t be as vibrant. -
2 cloves garlic, minced
Garlic adds a robust flavor that complements the basil beautifully. If you love garlic as much as I do, feel free to add an extra clove! -
1 tablespoon olive oil
A drizzle of olive oil enhances the rice’s texture and flavor. You can substitute with butter for a creamier finish or a flavored oil for an extra kick. -
Salt and pepper to taste
Simple seasonings that allow the essence of basil to shine through. Remember to taste as you go; we want those flavors to sing harmoniously!
Step-by-Step Instructions
Now that we have our ingredients ready, let’s get cooking! Follow these steps, and you’ll have the most aromatic and flavorful Basil Rice on your table in no time.
-
Rinse the Rice
Start by rinsing your basmati rice under cold water. This step is essential as it helps remove excess starch, preventing the rice from becoming gummy. Simply place the rice in a fine-mesh sieve and run it under cool water until it runs clear. -
Sauté the Garlic
In a medium saucepan, heat the olive oil over medium heat. Add the minced garlic and sauté for about 1 minute or until fragrant. Keep an eye on it, though—garlic can go from perfectly golden to burnt in the blink of an eye! -
Combine the Ingredients
Once your kitchen is filled with the delightful aroma of garlic, add the rinsed rice to the saucepan. Stir it around for a minute or two to toast the rice lightly. This adds depth to the flavor, making your finished dish even more scrumptious! -
Add the Liquid
Pour in the water or vegetable broth. Bring it to a boil, then reduce the heat to low and cover the pot with a tight-fitting lid. Let it simmer for about 15-20 minutes. Don’t lift the lid! This allows the rice to steam properly and absorb all that lovely flavor. -
Fluff and Season
After 20 minutes, remove the pot from heat. Let it sit, covered, for another 5 minutes to finish steaming. Then, uncover and gently fluff the rice with a fork. Add the chopped fresh basil, and season with salt and pepper to your liking. Give it a gentle toss, and you’re ready to savor the magic!
Serving Suggestions
One of the best things about Basil Rice is its versatility! Serve it as a side dish alongside roasted veggies, grilled chicken, or even a spicy stir-fry. To plate it up beautifully, try the following tips:
- Mound It Up: Use a small bowl to shape the rice into a perfect dome. This makes for a stunning presentation.
- Garnish: A sprinkle of freshly chopped basil or a drizzle of good quality olive oil on top adds a pop of color and maximizes flavor.
- Pair with Protein: Serve alongside grilled shrimp or chicken marinated in lemon and herbs, creating a mouth-watering balance.
Don’t forget, Basil Rice can also be enjoyed all on its own as a light, flavorful vegan option!
Recipe Variations
Want to jazz things up a bit? Here are some creative twists to take your Basil Rice to the next level:
-
Lemon Basil Rice: Add the zest of one lemon and a tablespoon of lemon juice while adding the basil for a fresh, zesty kick!
-
Cheesy Basil Rice: Stir in 1/4 cup of grated Parmesan or feta cheese just before serving for a creamy, savory flavor.
-
Mushroom Basil Rice: Sauté some sliced mushrooms along with the garlic for an earthy enhance to the dish.
-
Nutty Basil Rice: Toss in some toasted pine nuts or slivered almonds for a delightful crunch that complements the soft rice.
-
Spicy Basil Rice: Add a chopped chili or red pepper flakes while sautéing the garlic to spice things up!
Chef’s Notes
As I reminisce about my grandmother’s kitchen, I can’t help but chuckle at our little mishaps. I remember burning the garlic once—let’s just say burnt garlic does NOT a good basil rice make! Thankfully, she was there to rescue the dish with a dash of more fresh garlic (because we can never have enough).
This recipe has evolved over time, influenced by different cuisines and flavors I’ve encountered on my culinary journey. I’ve played around with various herbs and spices, but the classic basil remains my favorite. It’s simple yet packed with memories and warm feelings that bring my family together.
FAQs and Troubleshooting
1. My rice turned out soggy. What happened?
Soggy rice usually occurs from too much liquid or overcooking. Make sure to measure your water or broth accurately and keep an eye on the cooking time!
2. Can I use dried basil instead of fresh?
Absolutely! Use about 1 tablespoon of dried basil, but remember that the flavor is more subtle, so fresh is always preferable if you can get it.
3. How do I store leftovers?
Place any leftover Basil Rice in an airtight container and store it in the fridge for up to 4 days. Just reheat it gently in the microwave or on the stovetop with a splash of water or broth to revive its fluffy texture.
4. Can I make Basil Rice in advance?
Definitely! Cook the rice ahead of time and let it cool completely before storing it in the fridge. Just reheat and toss with fresh basil when you’re ready to serve.
Nutritional Info
This Basil Rice is not just delicious—it’s also a nutritious side! A single serving (1/2 cup) contains approximately:
- Calories: 150
- Carbohydrates: 30g
- Protein: 3g
- Fat: 2g
- Fiber: 1g
With fresh basil and the option to add various proteins or veggies, you can certainly create a complete meal that appeals to your taste buds while keeping things healthy!
Final Thoughts
As we wrap up this kitchen adventure, I hope you feel inspired to bring a little magic to your own home with this Basil Rice recipe. Remember, cooking is all about creativity and joy. Feel free to adjust the recipe, add your twist, or even make a fun memory while cooking it—just as I did with my grandma.
Let this dish be the warm hug you share with friends and family, no matter the occasion. Whether you keep it classic or switch it up, Basil Rice is sure to bring smiles and satisfaction all around the table. Happy cooking, my fellow foodies! Let’s continue to explore and celebrate the wonderful world of flavor together!
PrintUltimate Basil Rice
- Total Time: 30 minutes
- Yield: 4 servings 1x
- Diet: Vegetarian
Description
A fragrant and flavorful basil rice that’s perfect for any occasion.
Ingredients
- 1 cup basmati rice
- 2 cups water or vegetable broth
- 1/4 cup fresh basil, chopped
- 2 cloves garlic, minced
- 1 tablespoon olive oil
- Salt and pepper to taste
Instructions
- Rinse the basmati rice under cold water to remove excess starch.
- Sauté the garlic in olive oil over medium heat for about 1 minute.
- Combine the rinsed rice with the garlic in the saucepan and stir for a minute.
- Add the water or vegetable broth, bring to a boil, then reduce heat to low and cover.
- Fluff the rice with a fork after removing it from heat and add the basil, seasoning with salt and pepper.
Notes
For added flavor, use vegetable broth instead of water. Feel free to spice it up with ingredients like lemon, cheese, or nuts.
- Prep Time: 10 minutes
- Cook Time: 20 minutes
- Category: Side Dish
- Method: Cooking
- Cuisine: Italian
Nutrition
- Serving Size: 1 serving
- Calories: 150
- Sugar: 1g
- Sodium: 150mg
- Fat: 2g
- Saturated Fat: 0g
- Unsaturated Fat: 1g
- Trans Fat: 0g
- Carbohydrates: 30g
- Fiber: 1g
- Protein: 3g
- Cholesterol: 0mg
Keywords: basil rice, side dish, vegetarian recipe
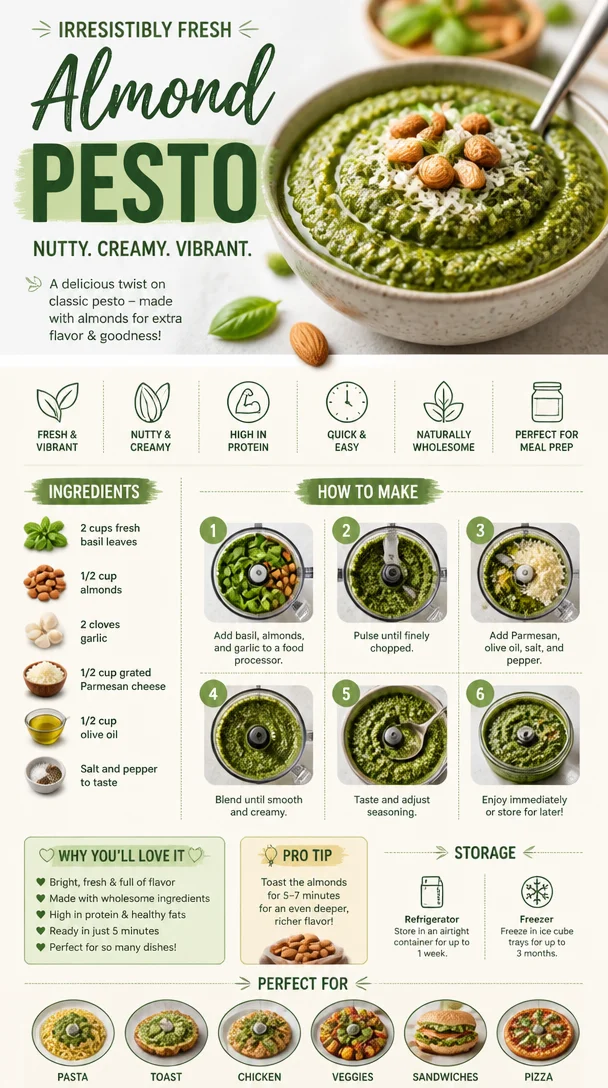
Almond Pesto
Almond Pesto: A Flavorful Twist on a Classic
Hey there, food lovers! If you’ve ever wandered into the delightful world of pesto, you probably already know that it’s a green sauce that brings a burst of flavor and excitement to any meal. But today, let’s kick things up a notch with a nutty twist—welcome to the wonderful world of Almond Pesto!
This isn’t just any old recipe; it’s a vibrant fusion of herbs, garlic, and yes, you guessed it, almonds! Picture this: You have a bowl of perfectly cooked pasta, and then you drizzle your homemade almond pesto over it, transforming a simple dish into something that even your fancy restaurant could envy. Whether you spread it on toast, stir it into pasta, or use it as a dip for crunchy veggies, this almond pesto has versatility written all over it. So, grab your apron and let’s dive into this nutty, green creation!
A Taste of Nostalgia
I can’t help but smile when I think back to summers spent at my grandmother’s house. Her garden was a veritable wonderland of fresh herbs, and it was there that I first discovered pesto. She would take us outside to gather basil—her pride and joy—while the scent filled the air, wrapping around us like a warm hug. The moment she transformed those vibrant green leaves into pesto was pure magic. We would slather it on crusty bread, toss it with pasta, and sometimes even mix it into a chicken dish for a pop of flavor.
Years later, I decided to experiment with ingredients that spoke to my own culinary identity and personal tastes. That’s when I stumbled upon almond pesto. The creamy texture and nutty flavor instantly took me back to those sunny afternoons in my grandmother’s kitchen. Just like her, I love sharing joy through food, and this almond pesto is my way of inviting you into this flavorful journey.
Ingredients
Let’s gather our ingredients for this delightful almond pesto:
-
2 cups fresh basil leaves
- The star ingredient! Look for vibrant green leaves that are lush and fragrant. Dull leaves? Pass! If you can’t find basil, try spinach, arugula, or a mix of greens for a slightly different flavor.
-
1/2 cup almonds
- Almonds provide that lovely nutty flavor and give the pesto a creamy texture. You can use raw or toasted almonds, but toasting them brings out a deeper flavor. No almonds? No problem! Substitute with pine nuts or walnuts for a change.
-
2 cloves garlic
- Garlic brings boldness and warmth to the pesto. Feel free to adjust based on your love for garlic. If you find raw garlic a bit too pungent, consider roasted garlic for a sweeter, more mellow taste.
-
1/2 cup grated Parmesan cheese
- While traditional pesto uses Pecorino Romano, Parmesan adds a lovely saltiness and creaminess. Want a dairy-free version? Try nutritional yeast or a vegan cheese alternative.
-
1/2 cup olive oil
- This liquid gold is essential for the texture and flavor of the pesto. Extra virgin is ideal, but a light olive oil works fine if you prefer a milder taste.
-
Salt and pepper to taste
- Simple but effective! Adjust according to your preferences, keeping in mind the saltiness of the cheese.
Step-by-Step Instructions
Now that we have our ingredients ready, let’s transform them into almond pesto!
-
Prep your ingredients.
Start by gathering all your lovely ingredients. It makes the process smoother and more exciting! Wash and dry your basil leaves thoroughly to avoid any unwanted moisture. -
Toast the almonds (optional, but recommended!).
Heat a skillet over medium heat. Toss in the almonds and stir occasionally for about 3-5 minutes until they’re golden brown and fragrant. This step intensifies their nutty flavor, making your pesto sing! Be careful not to burn them—your nose will be your best friend here. -
Blend the base.
In a food processor, combine the toasted almonds, basil leaves, garlic, and Parmesan cheese. Pulse a few times until the ingredients are roughly combined. Stop and scrape down the sides with a spatula to ensure everything gets mixed evenly. -
Add the olive oil.
With the processor running, slowly drizzle in the olive oil until the mixture becomes smooth and creamy. You can adjust the amount of oil depending on how thick or thin you want the pesto. -
Season it up!
Taste your almond pesto and sprinkle in salt and pepper as desired. Blend again. Feel free to adjust flavorings—maybe a splash more lemon juice if you like it zesty! -
Serve or store.
Your almond pesto is ready for adventures! Use it right away or store it in an airtight container in the refrigerator. Drizzle a bit more olive oil on top to help keep it fresh. It holds up well for about a week—if it lasts that long!
Serving Suggestions
Now that you’ve whipped up this luscious almond pesto, let’s talk about the best ways to serve it!
-
Pasta Delight: Toss it with your favorite pasta; it works beautifully with spaghetti, fusilli, or even zucchini noodles. Top with sliced cherry tomatoes and a sprinkle of extra Parmesan for a pop of color and acidity.
-
Spread it: Want a quick appetizer? Spread almond pesto over toasted baguette slices or bagels for a delightful twist on crostini.
-
Veggie Dip: Pair it with fresh veggies like carrots, cucumbers, or bell peppers—crunch meets creaminess; perfection!
-
Drizzle it: Use almond pesto as a delicious sauce over grilled chicken, fish, or roasted veggies, giving your dishes a gourmet touch.
Recipe Variations
Get ready to mix things up! Here are a few creative twists on the classic almond pesto:
-
Citrus Burst: Add a tablespoon of lemon juice or zest for a zingy flavor that brightens up the dish. Perfect for summer!
-
Herb Medley: Swap out some basil for parsley or cilantro for an entirely new herbal profile.
-
Cheesy Goodness: Amp up the cheesiness with a mix of Pecorino Romano and Parmesan, or even throw in some feta for an extra kick.
-
Spicy Kick: Want to bring the heat? Add a pinch of red pepper flakes or a fresh jalapeño to your food processor.
-
Nut-Free Version: For a nut-free or allergy-friendly option, replace the almonds with sunflower seeds—they’ll give you that creamy texture too!
Chef’s Notes
Every recipe tells a story, and my almond pesto has evolved over the years. Initially, I followed my grandmother’s classic basil pesto recipe, but once I started playing around with different nuts, it opened up a whole new world of flavors! The best part? I’ve experimented with almonds, walnuts, and even pistachios, each giving a unique twist to the dish.
Oh, and can we talk about the time I accidentally dropped a whole clove of garlic into the food processor? It turned out stronger than a garlic lover’s dream—let’s just say I had some aromatic friends that day!
FAQs and Troubleshooting
-
Why is my pesto turning brown?
- Pesto can oxidize if exposed to air for too long. To keep it green, store it with a thin layer of olive oil on top or press plastic wrap directly on the surface before sealing.
-
Can I freeze almond pesto?
- Absolutely! Spoon it into ice cube trays and freeze, then transfer to a bag for easy portions. Just thaw and enjoy whenever you want!
-
What can I substitute for Parmesan cheese?
- Nutritional yeast is a fantastic dairy-free alternative. Alternatively, try pecorino or a vegan cheese option for a similar savory kick.
-
How can I make it creamier?
- If you prefer a creamier texture, blend in some ricotta cheese or cream cheese, or simply add more olive oil as needed.
Nutritional Info
While I can’t get too technical here, almond pesto is overflowing with good stuff! It’s filled with healthy fats from the almonds and olive oil, which support heart health. Plus, that fresh basil provides antioxidants while keeping your taste buds dancing. Just keep an eye on the amount you serve, as the olive oil and cheese can add up in calories if you’re watching your intake—but trust me, every bite is worth it!
Final Thoughts
There you have it—your go-to guide for creating delicious, homemade almond pesto! I hope this recipe brings as much joy to your kitchen as it has to mine. Remember, the beauty of cooking lies in its ability to evoke memories and create new ones. So, don’t hesitate to share this incredible dish with friends and family.
Gather around the table, laugh a little, and indulge in the rich flavors of almond pesto. If you try this recipe, I’d love to hear your experiences! Whether you put your spin on it or keep it classic, the important thing is to enjoy the food, celebrate the moment, and let the flavors shine. Happy cooking, my friends!
PrintAlmond Pesto
- Total Time: 15 minutes
- Yield: 4 servings 1x
- Diet: Vegetarian
Description
A flavorful twist on classic pesto with almonds, perfect for pasta, dips, and more.
Ingredients
- 2 cups fresh basil leaves
- 1/2 cup almonds
- 2 cloves garlic
- 1/2 cup grated Parmesan cheese
- 1/2 cup olive oil
- Salt and pepper to taste
Instructions
- Prep your ingredients. Start by gathering all your lovely ingredients. Wash and dry your basil leaves thoroughly.
- Toast the almonds (optional, but recommended!). Heat a skillet over medium heat. Toss in the almonds and stir occasionally for about 3-5 minutes until golden brown.
- Blend the base. In a food processor, combine the toasted almonds, basil leaves, garlic, and Parmesan cheese. Pulse until roughly combined.
- Add the olive oil. With the processor running, slowly drizzle in the olive oil until the mixture is smooth and creamy.
- Season it up! Taste your almond pesto and sprinkle in salt and pepper as desired. Blend again.
- Serve or store. Your almond pesto is ready! Use immediately or store in an airtight container in the refrigerator.
Notes
Drizzle a bit more olive oil on top to keep it fresh. Holds well for about a week.
- Prep Time: 10 minutes
- Cook Time: 5 minutes
- Category: Sauce
- Method: Blending
- Cuisine: Italian
Nutrition
- Serving Size: 2 tablespoons
- Calories: 250
- Sugar: 1g
- Sodium: 150mg
- Fat: 20g
- Saturated Fat: 3g
- Unsaturated Fat: 15g
- Trans Fat: 0g
- Carbohydrates: 8g
- Fiber: 3g
- Protein: 6g
- Cholesterol: 10mg
Keywords: pesto, almond pesto, sauce, vegetarian, Italian, pasta
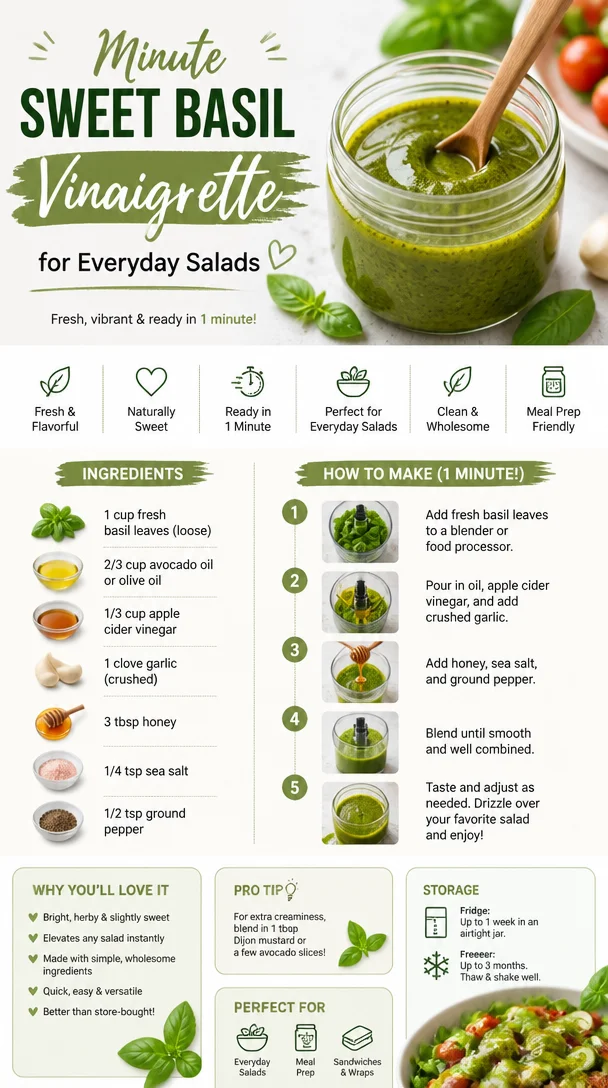
Minute Sweet Basil Vinaigrette for Everyday Salads
Sweet Basil Vinaigrette: A Flavorful Journey
Hey there, food lovers! I’m so glad you’ve decided to join me in the kitchen today. If you’re hunting for a recipe that brings a burst of freshness and flavor to your meals, you’re in for a treat with this Sweet Basil Vinaigrette! This delightful dressing is not only easy to whip up, but it also elevates your salads and meals to a whole new level of deliciousness.
Imagine this: it’s a sunny afternoon, and you’re invited to a backyard barbecue. The aroma of grilled veggies fills the air, and laughter dances through the breeze. You’re given a leafy green salad topped with the vibrant hues of ripe tomatoes and crunchy cucumbers. But wait—what brings this dish together? A drizzle of Sweet Basil Vinaigrette! With its herbaceous notes and a hint of sweetness, it’s the secret ingredient that transforms an ordinary salad into something extraordinary.
This vinaigrette celebrates the fresh, aromatic goodness of basil—a herb that’s often associated with summer gardens and sunny days. Plus, it’s made with wholesome ingredients that you can feel good about. So, roll up your sleeves, grab that blender, and let’s get to work creating an unforgettable condiment that you’ll want to drizzle over everything!
Personal Story
I still remember the first time I tasted basil vinaigrette. It was at a quaint little café tucked away in a charming neighborhood that was bursting with artisan flavors. I was there to visit a friend, but what really captivated my attention was the vibrant salad served alongside a perfectly grilled chicken. The dressing was like a magical potion—it transformed every bite and made even the simplest of ingredients shine. I knew then that I had to learn the art of crafting my own delicious vinaigrette.
Fast forward a few years, and I’m blending up my very own Sweet Basil Vinaigrette in my cozy kitchen! It’s a recipe I love to share with friends and family, and every time I make it, it brings me back to that café and that delightful meal. Now, I get to spread that joy around and put a smile on the faces of my loved ones, one salad at a time.
Ingredients
Here’s what you’ll need to create this tantalizing Sweet Basil Vinaigrette:
-
1 cup fresh basil leaves (loose): Fresh basil is the star of this dish! Opt for vibrant leaves that are free from blemishes. If fresh isn’t handy, feel free to use 1/4 cup of dried basil, but the flavor will be less intense.
-
2/3 cup avocado oil or olive oil: While avocado oil gives a silky texture and a subtle flavor, olive oil adds a classic richness. Choose extra virgin olive oil for a robust taste.
-
1/3 cup apple cider vinegar: This tangy vinegar adds acidity to balance the sweetness of the honey. If you want a milder flavor, white wine vinegar is a great alternative.
-
1 clove garlic (crushed): Garlic adds depth and that wonderful savory punch. To mellow it out, use roasted garlic instead for a sweeter, more caramelized flavor.
-
3 tbsp honey: The sweetness from honey brightens this vinaigrette beautifully. Maple syrup or agave nectar are excellent vegan substitutes.
-
1/4 tsp sea salt: A pinch of salt enhances the overall flavors, but adjust to taste. Kosher salt works well, too!
-
1/2 tsp ground pepper: Freshly cracked pepper adds a delightful kick. You can also experiment with pink peppercorns for a milder touch.
Step-by-Step Instructions
Now, let’s blend this beauty together!
-
Prep Your Ingredients: Start by rinsing those fresh basil leaves under cool water to remove any dirt. Pat them dry gently with a clean towel. It’s all about keeping that fresh flavor pristine!
-
Add to Blender: Toss the basil leaves into a blender or food processor. There’s no need to chop them beforehand; the blender will take care of that magic for us!
-
In Goes the Oil: Pour in the avocado oil or olive oil. You can drizzle it in while the blender is running for an emulsion effect, but feel free to simply toss it in!
-
Vinegar Next: Add that lovely apple cider vinegar. The acidity here is going to balance out the richness of the oil like a dream!
-
Crushed Garlic: Ideally, add a peeled garlic clove right into the mixture. Want a punchier flavor? Add two! Let’s make it sing!
-
Sweeten with Honey: Measure out those sweet tablespoons of honey and pour it in. You’ll want to taste-test later to ensure the sweetness level is just right.
-
Season It Up: Sprinkle in the sea salt and ground pepper. Seasoning is key here—don’t be shy, but remember that you can always add more later!
-
Blend It Together: Secure the lid and blend everything together until smooth and creamy. If it’s too thick for your liking, add a tad more oil or a splash of water until you reach your perfect consistency.
-
Taste Test: Now’s the fun part! Grab a spoon and taste that vinaigrette. Adjust sweetness, acidity, or salt—making it truly yours is the name of the game.
-
Serve & Store: Transfer your vinaigrette into a jar or bottle. It stores beautifully in the fridge for up to a week—if it lasts that long!
Serving Suggestions
What’s a great vinaigrette without the perfect way to serve it? Drizzle this gorgeous Sweet Basil Vinaigrette over a vibrant green salad tossed with mixed greens, ripe tomatoes, and crunchy carrots for a refreshing start to any meal. For a gourmet touch, consider topping grilled vegetables or roasted chicken with a splash of this dressing to elevate the dish’s flavor.
Want to take it a step further? Use it as a marinade for your chicken or fish before roasting or grilling. The basil and vinegar soak in nicely, helping to keep your protein tender and flavorful. You can also provide it as a dipping sauce alongside fresh veggies or as a tasty drizzle over whole grain bowls. Possibilities are endless!
Recipe Variations
Want to mix things up? Here are a few fun twists that you can put on this classic vinaigrette:
-
Citrus Twist: Squeeze in a tablespoon of fresh lemon or lime juice for a zesty kick. The citrus complements the basil beautifully!
-
Nutty Delight: Add a tablespoon of finely chopped walnuts or pecans to the mixture for a lovely crunch and added flavor.
-
Herb Medley: Experiment with adding a combination of fresh herbs like parsley or mint alongside the basil for a more complex flavor profile.
-
Spicy Kick: Toss a pinch of red pepper flakes or a dash of hot sauce into the blender for those who appreciate a little heat.
-
Creamy Basil Vinaigrette: Want something extra luscious? Add a dollop of Greek yogurt for a creamy twist without losing that refreshing basil zing.
Chef’s Notes
You know, every chef has that one recipe they can’t help but tweak over time—like an artist refining their masterpiece. This Sweet Basil Vinaigrette, for me, has evolved from a simple dressing to a true reflection of my culinary adventures. I remember the days of juggling different vinegars and oils until I struck gold with the perfect combo. Every time I make it, it reminds me of sunny days, full bellies, and the joy of sharing great food with wonderful people.
Sometimes, I even sneak in a little fruit puree—like peach or mango—when I’m in the mood for something extra vibrant! Let creativity run wild in your kitchen!
FAQs and Troubleshooting
1. Why isn’t my vinaigrette blending smoothly?
If your vinaigrette has turned out a bit chunky, you might need to give that blender a little longer! Make sure your basil leaves are chopped well, and consider adding more oil to help create that emulsion.
2. How can I thicken my dressing?
If you prefer a thicker consistency, simply add a bit more honey or a spoonful of Dijon mustard. Mustard not only thickens but also adds a delightful tang!
3. My vinaigrette tastes too tart; how do I fix it?
Tartness typically comes from too much vinegar. A spoonful of honey can balance it out beautifully. Don’t hesitate to taste as you go!
4. How long does it last in the fridge?
Your Sweet Basil Vinaigrette will keep well in an airtight container in the fridge for up to a week. Just give it a good shake before using because some sediment might settle.
Nutritional Info
While exact values can vary based on exact ingredients used and serving size, here’s a quick breakdown for a 2-tablespoon serving of this Sweet Basil Vinaigrette:
- Calories: Approximately 100
- Total Fat: 10g
- Saturated Fat: 1g
- Sodium: 50mg
- Carbohydrates: 4g
- Sugars: 3g
This vinaigrette is a heart-healthy option packed with essential fatty acids from the avocado oil and the nutritional benefits of fresh basil. It’s a delightful addition to any meal without overwhelming those healthy eating goals!
Final Thoughts
There you have it—your very own Sweet Basil Vinaigrette just waiting to add a pop of flavor to your meals! I hope you had a blast whipping this up with me, and I can’t wait for you to share your creations with family and friends. Remember, cooking isn’t just about the final dish; it’s about the stories you gather and the joy you spread along the way.
So go ahead, drizzle it generously over your favorite salads, use it as a dip, or add it to your marinades for that little extra flair. Every drop is a reminder that food, like life, is all about balance, bright flavors, and spreading happiness. Until next time, keep cooking, keep exploring, and most importantly—keep loving your food! Cheers!
PrintSweet Basil Vinaigrette
- Total Time: 10 minutes
- Yield: 8 servings (2 tablespoons per serving) 1x
- Diet: Vegetarian
Description
A delightful and fresh vinaigrette that enhances salads and grilled dishes with aromatic basil flavor.
Ingredients
- 1 cup fresh basil leaves
- 2/3 cup avocado oil or olive oil
- 1/3 cup apple cider vinegar
- 1 clove garlic (crushed)
- 3 tbsp honey
- 1/4 tsp sea salt
- 1/2 tsp ground pepper
Instructions
- Prep your ingredients: Start by rinsing the fresh basil leaves under cool water.
- Add to the blender: Toss the basil leaves into a blender or food processor.
- Pour in the avocado oil or olive oil, drizzling while blending if desired.
- Add the apple cider vinegar for balance.
- Include the crushed garlic clove.
- Measure and sweeten with honey.
- Sprinkle in the sea salt and ground pepper.
- Blend everything together until smooth and creamy.
- Taste test and adjust seasonings as needed.
- Transfer to a jar and store in the fridge for up to a week.
Notes
Perfect for salads, grilled vegetables, or as a marinade for meats.
- Prep Time: 10 minutes
- Cook Time: 0 minutes
- Category: Sauce
- Method: Blending
- Cuisine: Italian
Nutrition
- Serving Size: 2 tablespoons
- Calories: 100
- Sugar: 3g
- Sodium: 50mg
- Fat: 10g
- Saturated Fat: 1g
- Unsaturated Fat: 9g
- Trans Fat: 0g
- Carbohydrates: 4g
- Fiber: 0g
- Protein: 0g
- Cholesterol: 0mg
Keywords: basil vinaigrette, salad dressing, homemade dressing, fresh dressing, healthy recipes
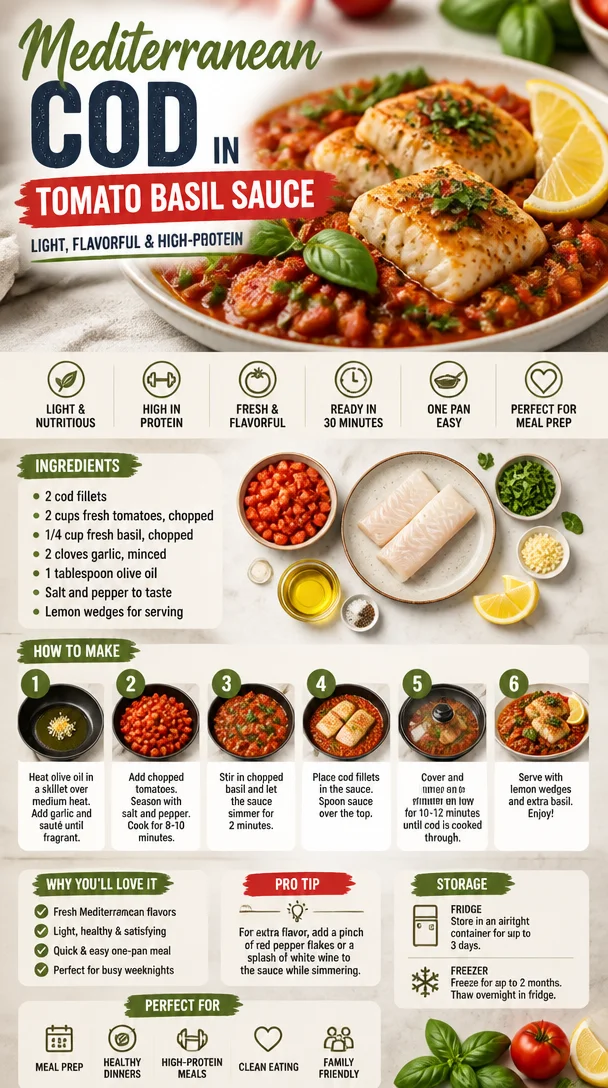
Mediterranean Cod in Tomato Basil Sauce
Mediterranean Cod in Tomato Basil Sauce: A Culinary Journey to the Heart of the Mediterranean
Hey there, food lovers! Welcome back to Feastical, where we whip up dishes that not only tickle your taste buds but also warm the soul. Today, I’m super excited to share a culinary gem: Mediterranean Cod in Tomato Basil Sauce. This dish is like a little escape to the sun-drenched coastlines of Italy and Greece—where fresh ingredients reign supreme, and every bite tells a story.
Now, cooking isn’t just about throwing things together; it’s about creating moments, making memories, and connecting with the vibrant flavors of life. Whether you’re devouring it with friends over a glass of red wine or savoring it solo on a quiet evening, this dish is here to bring a bit of that Mediterranean sunshine into your kitchen. So, roll up those sleeves, and let’s dive right into this delicious adventure!
A Trip Down Memory Lane
Let me whisk you back in time to my childhood, where my weekends were filled with the intoxicating aromas wafting from my grandmother’s kitchen. She was a master of Mediterranean cuisine, and her specialty was a simple fish dish much like this one. I remember standing on a stool, peeking over the counter while she expertly mingled fresh tomatoes with fragrant basil and glistening olive oil. My job? Chopping basil and trying not to munch on it all before it hit the pot!
The best part was watching her sprinkle in the garlic, which always seemed to make the entire house come alive with flavor. As we cooked together, she shared stories of her grandmother and the summers spent by the Mediterranean Sea, where each meal brought family and friends together. This Mediterranean Cod in Tomato Basil Sauce is not just a recipe; it’s a gateway to those cherished memories, and I can’t wait for you to create some of your own!
Ingredients
For our Mediterranean Cod, we’ll need the following ingredients:
-
2 cod fillets
Cod is a mild, flaky fish that absorbs the flavors around it beautifully. If you’re looking for a substitute, try halibut or tilapia—both are equally lovely in this dish! -
2 cups fresh tomatoes, chopped
Fresh tomatoes are a must for a vibrant sauce. If they’re out of season, don’t feel guilty about using a can of good-quality diced tomatoes. They can be just as flavorful! -
1/4 cup fresh basil, chopped
Basil is the heart of Mediterranean cuisine. For a twist, consider using fresh parsley or oregano if basil isn’t available or if you’re looking for a different flavor profile! -
2 cloves garlic, minced
Garlic adds a beautiful depth to the sauce. You can swap it for shallots for a milder flavor, although I wouldn’t want to let go of that garlicky goodness! -
1 tablespoon olive oil
A good olive oil can elevate the whole dish. If you’re in the mood for something different, try avocado oil or even flavored oils for an extra kick. -
Salt and pepper to taste
Essential seasonings that help bring out the best in your dish. Don’t forget to taste along the way! -
Lemon wedges for serving
A squeeze of fresh lemon brightens the dish and adds that refreshing Mediterranean flair. It’s a must!
Step-by-Step Instructions
Now that we’ve gathered our ingredients, let’s get cooking! Follow these steps, and you’ll be rewarded with a stunning, mouth-watering dish:
-
Prep your ingredients.
Start by washing your tomatoes and basil. Chop the tomatoes into small pieces—roughly the size of your thumb. Remember, rustic is beautiful! Mince the garlic cloves and chop the basil, setting it aside for later. Trust me, having everything prepped makes for a smooth cooking experience—it’s like having your own little kitchen assembly line! -
Heat the olive oil.
In a large skillet, heat the olive oil over medium heat. You want to warm it nicely but not smoke it! When you throw in a drop of water, it should sizzle. This step is essential—it creates the perfect base for your sauce! -
Sauté the garlic.
Add the minced garlic to the hot oil and sauté for about 30 seconds until it’s fragrant but not browned. Browned garlic can turn bitter, so keep an eye on it. This is where the magic begins! -
Cook the tomatoes.
Toss in your chopped tomatoes and gently stir them in. Let them simmer for about 5-7 minutes until they begin breaking down and releasing their juices. This is the heart of our sauce—so don’t rush it! You want a nice, saucy consistency. -
Season the sauce.
Now, sprinkle in some salt and pepper to taste. Taste it! This is where the fun part of being a chef comes in—adjust the seasoning to your preference. Want a little more kick? A dash of red pepper flakes will do the trick! -
Add the cod fillets.
Carefully nestle the seasoned cod fillets into the sauce, spooning some of the tomatoy goodness over the fish. Make sure the fillets are mostly submerged. Cover the skillet with a lid and let it cook for about 8-10 minutes, or until the fish flakes easily with a fork. This step seals in all the flavor and moisture! -
Finish with fresh basil.
Just before serving, sprinkle the chopped basil over the cod and give it a little toss—incredible! The aroma will be simply divine. -
Serve it up.
Plate your cod generously with the sauce, making sure to scoop up those lovely chunks of tomato and basil.
Serving Suggestions
Now that your Mediterranean Cod in Tomato Basil Sauce is sizzling and ready to go, here’s how to serve it up right!
-
On a Bed of Rice: Fluffy jasmine or basmati rice makes an excellent base to soak up that flavorful sauce. It’s a comforting combo!
-
With Crusty Bread: Serve with a side of fresh, crusty bread or garlic bread for dipping. You’ll want something to scoop up every last bite!
-
Accompany with a Salad: A simple green salad with cucumber, olives, and feta cheese would elevate the meal and add a refreshing crunch.
-
Garnish with Lemon: Placing lemon wedges on the side is not just for aesthetics; a squeeze of lemon right before eating brightens the whole dish.
Recipe Variations
As much as I adore the classic Mediterranean Cod, there are so many delightful ways to mix things up. Here are a few creative twists:
-
Spicy Mediterranean Cod: Add red pepper flakes to the sauce for a little heat. Perfect for those who love a kick!
-
Coconut-Curry Twist: Swap the tomato sauce for a can of coconut milk and curry paste for a unique take on this dish. A wonderful fusion of flavors!
-
Mediterranean Veggie Medley: Toss in diced zucchini or bell peppers with the tomatoes for added nutrient-rich veggies.
-
Pesto Infusion: Stir in a tablespoon of basil pesto into the sauce before adding the cod for an extra layer of flavor.
-
Herb Variety: Try swapping basil for different fresh herbs, like dill or cilantro, to match your preference—go ahead and get creative!
Chef’s Notes
Over the years, this Mediterranean Cod recipe has evolved, reflecting my own culinary journey. I started with just a few simple ingredients and have played with different flavors, techniques, and twists to make it my own. I fondly remember the time I collaborated with a friend’s Italian grandmother—she taught me the importance of letting the tomatoes speak for themselves.
Cooking is a fantastic adventure, and I encourage you to embrace your own kitchen experiments. Don’t stress about being perfect; imperfections and happy accidents often lead to delicious discoveries!
FAQs and Troubleshooting
You might have some questions while you’re cooking, and I’ve got you covered with a few common queries:
Q: My fish seems tough after cooking. What did I do wrong?
A: Overcooking can turn your lovely cod into a rubbery mess. Ensure your cooking time is accurate and remove it from heat as soon as it flakes easily.
Q: What if I can’t find fresh tomatoes?
A: No worries! Good quality canned tomatoes are a great substitute. Drain excess liquid if you need a thicker sauce.
Q: Can I store leftovers?
A: Absolutely! Store in an airtight container in the fridge for up to 2-3 days. Just know that the texture might change a bit—always best fresh!
Q: How do I know if my cod is fresh?
A: Look for fish with a mild scent, firm texture, and bright color. It should be glossy and slightly translucent—avoid any fish that has an overly fishy smell or looks dull.
Nutritional Info
A serving of Mediterranean Cod in Tomato Basil Sauce is not only delicious, but it’s also packed with health benefits:
- Calories: Approximately 250-300 calories per serving
- Protein: High in lean protein, about 25g per serving
- Fat: Healthy fats from olive oil, around 8g
- Carbohydrates: Minimal carbs, about 10g, mainly from tomatoes
- Vitamins & Minerals: Rich in vitamins A, C, and E, as well as potassium and magnesium from the tomatoes and basil
This dish is a great lean protein option, full of healthy fats and nutrients—perfect for a balanced meal!
Final Thoughts
And there you have it—your own Mediterranean Cod in Tomato Basil Sauce, hot and ready to enjoy! Cooking is about more than just food; it’s a journey of flavors, memories, and sharing love through the art of cuisine. I hope this dish brings joy to your kitchen as it has to mine.
Next time you’re looking for that perfect feel-good meal, remember this Mediterranean delight. It’s simple, heartwarming, and best shared with loved ones. Don’t forget to make it your own—play around with it, share your stories, and savor each bite.
Thank you for joining me here in the kitchen today. Until next time, keep spreading the love through food! Let’s feast together!
PrintMediterranean Cod in Tomato Basil Sauce
- Total Time: 45 minutes
- Yield: 4 servings 1x
- Diet: Pescatarian
Description
A delightful Mediterranean dish featuring cod fillets cooked in a vibrant tomato basil sauce, perfect for a comforting meal.
Ingredients
- 2 cod fillets
- 2 cups fresh tomatoes, chopped
- 1/4 cup fresh basil, chopped
- 2 cloves garlic, minced
- 1 tablespoon olive oil
- Salt and pepper to taste
- Lemon wedges for serving
Instructions
- Prep your ingredients by washing the tomatoes and basil. Chop tomatoes and mince garlic.
- Heat the olive oil in a large skillet over medium heat.
- Sauté the minced garlic in the hot oil for about 30 seconds.
- Cook the chopped tomatoes in the skillet, stirring for about 5-7 minutes.
- Season the sauce with salt and pepper to taste.
- Add the cod fillets to the sauce, covering with a lid to cook for 8-10 minutes.
- Finish with fresh basil before serving.
- Serve the dish plated generously with sauce and lemon wedges on the side.
Notes
Serve on a bed of rice, with crusty bread, or alongside a fresh salad for a complete meal.
- Prep Time: 15 minutes
- Cook Time: 30 minutes
- Category: Main Course
- Method: Sautéing
- Cuisine: Mediterranean
Nutrition
- Serving Size: 1 serving
- Calories: 300
- Sugar: 5g
- Sodium: 450mg
- Fat: 12g
- Saturated Fat: 1.5g
- Unsaturated Fat: 10g
- Trans Fat: 0g
- Carbohydrates: 20g
- Fiber: 3g
- Protein: 25g
- Cholesterol: 50mg
Keywords: cod, Mediterranean, tomato sauce, basil, healthy dinner
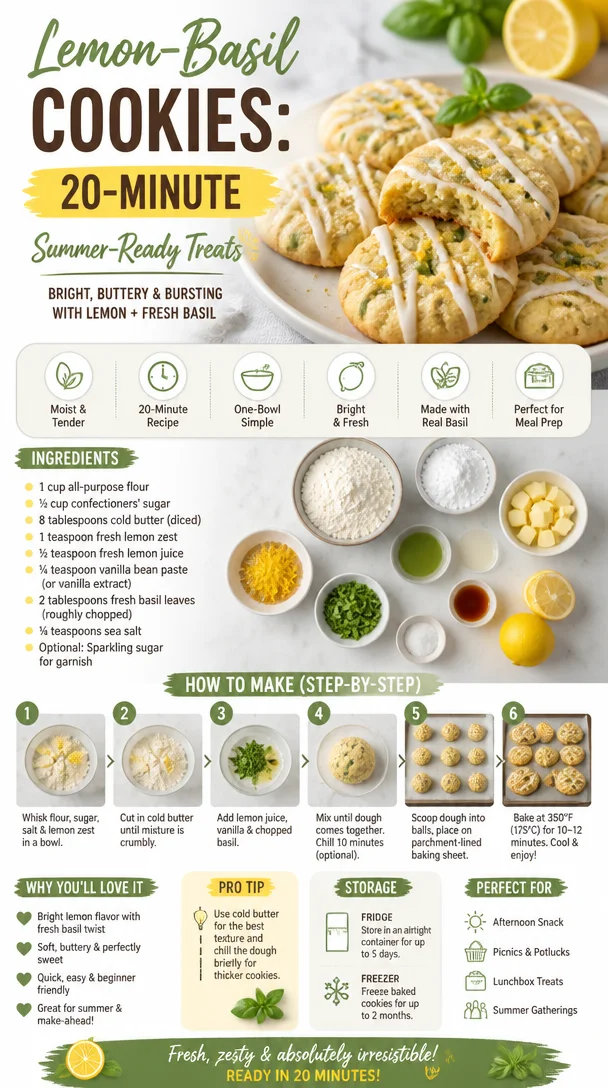
Lemon-Basil Cookies: 20-Minute Summer-Ready Treats
Lemon-Basil Cookies: A Refreshing Twist on a Classic Treat
Hey there, food lovers! I’m Beau Collier, your guide to all things delicious here at Feastical. Today, I’ve got something super special that’s perfect for any occasion—Lemon-Basil Cookies! Trust me, these cookies are a delightful mix of sweet and zesty, with a hint of herbaceous goodness from fresh basil. They’re not just your average cookie; they bring a bright twist to the traditional cookie lineup. Are you ready to dive into a recipe that’s sure to impress your friends and family? Grab your apron and let’s get started!
The Nostalgic Taste of Summer
Let me take you back a few summers ago when I first discovered the magical combination of lemon and basil. I was wandering through a local farmer’s market, soaking up the sun, when I stumbled upon a stall selling homemade cookies. The baker was sharing samples, and I was immediately hooked. One bite of their lemon-basil cookie transported me to a sun-drenched Italian kitchen where the aroma of fresh basil and lemons danced in the air. It was a match made in heaven!
That day sparked my passion for experimenting with flavors in the kitchen. I rushed home, determined to recreate that enchanting cookie. After a bit of trial and error (and a few too many taste tests), I finally settled on a recipe that had a delightful balance of sweetness and herbiness. Now, each time I whip up these cookies, I’m reminded of that sunny day and the creative spark it ignited in me. Let’s make some memories in your kitchen with these Lemon-Basil Cookies!
Ingredients You’ll Need
Before we dive into the mixing bowl, let’s gather our ingredients. Here’s your shopping list, along with some handy tips and substitutions:
-
1 cup all-purpose flour: This is the base for your cookies. You can substitute it with gluten-free flour if you’re looking to cut gluten.
-
½ cup confectioners’ sugar: The secret to that melt-in-your-mouth texture. If you don’t have confectioners’ sugar, you can blend regular sugar in a blender until fine.
-
8 tablespoons cold butter (diced): Butter adds richness. Ensure it’s cold for flakier cookies. For a dairy-free option, try using vegan butter or coconut oil.
-
1 teaspoon fresh lemon zest: This adds vibrant citrus notes. Always zest before juicing—it’s easier, and you won’t waste any fruit!
-
½ teaspoon fresh lemon juice: Brightens the flavor profile. Fresh is essential here; bottled lemon juice just doesn’t cut it.
-
¼ teaspoon vanilla bean paste (or vanilla extract): Vanilla enhances the overall flavor. If you only have extract, that’ll work fine too.
-
2 tablespoons fresh basil leaves (roughly chopped): The star ingredient! Use whole or torn leaves for a more rustic look. You can substitute with mint if you’re feeling adventurous.
-
¼ teaspoon sea salt: Elevates the flavors. If you’re using salted butter, you can skip this ingredient.
-
Optional: Sparkling sugar for garnish: Adds a delightful crunch and sparkle on top. If you don’t have it, granulated sugar works too!
Step-by-Step Instructions
Alright, here we go! Grab your mixing bowls, and let’s get baking.
-
Preheat the Oven: Begin by preheating your oven to 350°F (175°C). This ensures that your cookies bake evenly. Pro tip: If your oven tends to run hot, don’t hesitate to invest in an oven thermometer!
-
Combine Dry Ingredients: In a mixing bowl, whisk together the flour, confectioners’ sugar, and sea salt until well combined. This helps to evenly distribute the salt and sugar throughout the flour. No one wants a salted bite!
-
Add the Butter: Toss in the diced cold butter. Using your fingers or a pastry cutter, blend the butter into the flour mixture until it resembles coarse crumbs. This step is crucial; the cold butter is what gives your cookies that lovely tender texture.
-
Mix in the Flavorings: In a separate bowl, combine the lemon zest, lemon juice, vanilla paste, and chopped basil. Make sure to mix well—this magic blend is what really makes these cookies sing with flavor!
-
Combine Wet and Dry Ingredients: Gently pour the wet mixture into the dry ingredients. Stir until just combined. Don’t overmix; you want those cookies to stay wonderfully tender! A few floury patches are okay.
-
Shape the Cookies: Using a tablespoon, scoop out dough and roll it into balls. Place them on a baking sheet lined with parchment paper about 2 inches apart. They’ll spread a bit while baking.
-
Add the Sparkling Sugar: If you’re feeling fancy, sprinkle some sparkling sugar on top of each cookie. This adds a lovely crunch and shimmer that’s totally Instagram-worthy!
-
Bake: Pop the sheet in the preheated oven and bake for 12-15 minutes, or until the edges are lightly golden. Keep an eye on them—to achieve that perfect balance of chewy and crisp, you want them just set.
-
Cool: Once baked, remove from the oven and let the cookies cool on the baking sheet for a few minutes before transferring them to a wire rack. This helps them firm up and makes them easier to move without breaking.
-
Enjoy!: Once cooled, grab yourself a cup of tea or coffee (perhaps a glass of lemonade if you’re feeling extra zesty!) and enjoy these delightful cookies.
Serving Suggestions
When it comes to serving your Lemon-Basil Cookies, presentation is key! You can stack them on a beautiful plate to showcase their golden edges and vibrant green flecks of basil. Dust with a bit more confectioners’ sugar for that bakery feel. These cookies are fantastic alongside a refreshing glass of iced lemon tea or a chilled glass of prosecco for a summer soirée. If you’re serving them at a gathering, consider pairing them with a fresh fruit platter or a light salad to balance the flavors.
Recipe Variations
Now, let’s get creative! Here are a few delicious variations to try out:
-
Lemon-Basil Poppy Seed Cookies: Add a tablespoon of poppy seeds for a delightful crunch and a nutty flavor.
-
Lemon-Lavender Cookies: Swap out basil for culinary lavender for a fragrant twist that gives your cookies a flowery essence.
-
Lemon-Basil Shortbread Bars: Press the dough into a greased baking pan and bake as bars. Cut into squares for easy serving!
-
Chill for a Citrus Twist: For a refreshing twist, chill the cookie dough for an hour before baking. This helps with texture and intensifies the flavors!
-
Gluten-Free Option: Use a certified gluten-free flour blend to make these cookies gluten-free. They will still taste fabulous!
Chef’s Notes
As with any recipe, these Lemon-Basil Cookies have seen their fair share of tweaks and adaptations over the years. I remember baking these for the first time with my niece, who was only seven at the time. We had the most grand time making a mess—instead of zesting lemons, she promptly filled the bowl with basil leaves! We ended up with a very herb-friendly take on the cookies, proving that sometimes the best recipes come from accidental "kitchen catastrophes”!
FAQs and Troubleshooting
Here are a few common questions I often get about these cookies, along with some troubleshooting tips:
1. My cookies turned out too flat; what went wrong?
It sounds like your butter may have been too warm, or the dough wasn’t chilled. Make sure to use cold butter and let the dough chill in the fridge to firm it up before baking.
2. How do I know when the cookies are done?
Look for those golden edges! They might feel a bit soft at the center, but they will finish cooking as they cool on the baking sheet.
3. Can I freeze these cookies?
Absolutely! Once cool, place cookies in an airtight container. They’ll stay fresh in the freezer for up to three months. Just thaw them at room temperature before serving.
4. What if I don’t have fresh basil?
Fresh herbs make a big difference, but if you can’t find any, you could use a teaspoon of dried basil in a pinch. Just remember that dried herbs are more concentrated, so a little goes a long way!
Nutritional Information
Curious about the nutrition? Here’s a rough breakdown for one cookie (based on making about 12 cookies):
- Calories: 130
- Total Fat: 8g
- Saturated Fat: 5g
- Carbohydrates: 14g
- Sugars: 6g
- Protein: 1g
Of course, nutritional values can vary based on your ingredients and serving sizes, so be sure to adjust as needed!
Final Thoughts
And there you have it! Your very own batch of Lemon-Basil Cookies that brings a bit of sunshine to your kitchen. Whether you enjoy them fresh out of the oven or paired with tea on a rainy afternoon, these cookies are sure to become a favorite. Remember, cooking is all about experimenting and having fun, so don’t hesitate to make this recipe your own.
Get ready to share these zesty treats with the world, and don’t forget to leave a comment about your kitchen adventures with these cookies. Happy baking, and I can’t wait to share more yummy recipes with you soon! So, are you ready to take a bite of summer? Let’s bake!
PrintLemon-Basil Cookies
- Total Time: 30 minutes
- Yield: 12 cookies 1x
- Diet: Vegetarian
Description
A delightful mix of sweet and zesty cookies with a hint of fresh basil, perfect for any occasion.
Ingredients
- 1 cup all-purpose flour
- ½ cup confectioners’ sugar
- 8 tablespoons cold butter (diced)
- 1 teaspoon fresh lemon zest
- ½ teaspoon fresh lemon juice
- ¼ teaspoon vanilla bean paste (or vanilla extract)
- 2 tablespoons fresh basil leaves (roughly chopped)
- ¼ teaspoon sea salt
- Optional: Sparkling sugar for garnish
Instructions
- Preheat the oven: Begin by preheating your oven to 350°F (175°C).
- Combine dry ingredients: In a mixing bowl, whisk together the flour, confectioners’ sugar, and sea salt until well combined.
- Add the butter: Toss in the diced cold butter and blend until it resembles coarse crumbs.
- Mix in the flavorings: In a separate bowl, combine the lemon zest, lemon juice, vanilla paste, and chopped basil.
- Combine wet and dry ingredients: Gently pour the wet mixture into the dry ingredients and stir until just combined.
- Shape the cookies: Using a tablespoon, scoop out the dough and roll it into balls, placing them on a baking sheet lined with parchment paper.
- Add the sparkling sugar: Sprinkle some sparkling sugar on top of each cookie if desired.
- Bake: Bake for 12-15 minutes, or until the edges are lightly golden.
- Cool: Let the cookies cool on the baking sheet for a few minutes before transferring to a wire rack.
- Enjoy: Serve with tea or lemonade.
Notes
These cookies are fantastic alongside iced lemon tea or prosecco. Store in an airtight container for freshness.
- Prep Time: 15 minutes
- Cook Time: 15 minutes
- Category: Dessert
- Method: Baking
- Cuisine: Italian
Nutrition
- Serving Size: 1 cookie
- Calories: 130
- Sugar: 6g
- Sodium: 100mg
- Fat: 8g
- Saturated Fat: 5g
- Unsaturated Fat: 3g
- Trans Fat: 0g
- Carbohydrates: 14g
- Fiber: 0g
- Protein: 1g
- Cholesterol: 20mg
Keywords: cookies, lemon, basil, dessert, summer treats