
Almond Pesto
Almond Pesto: A Flavorful Twist on a Classic
Hey there, food lovers! If you’ve ever wandered into the delightful world of pesto, you probably already know that it’s a green sauce that brings a burst of flavor and excitement to any meal. But today, let’s kick things up a notch with a nutty twist—welcome to the wonderful world of Almond Pesto!
This isn’t just any old recipe; it’s a vibrant fusion of herbs, garlic, and yes, you guessed it, almonds! Picture this: You have a bowl of perfectly cooked pasta, and then you drizzle your homemade almond pesto over it, transforming a simple dish into something that even your fancy restaurant could envy. Whether you spread it on toast, stir it into pasta, or use it as a dip for crunchy veggies, this almond pesto has versatility written all over it. So, grab your apron and let’s dive into this nutty, green creation!
A Taste of Nostalgia
I can’t help but smile when I think back to summers spent at my grandmother’s house. Her garden was a veritable wonderland of fresh herbs, and it was there that I first discovered pesto. She would take us outside to gather basil—her pride and joy—while the scent filled the air, wrapping around us like a warm hug. The moment she transformed those vibrant green leaves into pesto was pure magic. We would slather it on crusty bread, toss it with pasta, and sometimes even mix it into a chicken dish for a pop of flavor.
Years later, I decided to experiment with ingredients that spoke to my own culinary identity and personal tastes. That’s when I stumbled upon almond pesto. The creamy texture and nutty flavor instantly took me back to those sunny afternoons in my grandmother’s kitchen. Just like her, I love sharing joy through food, and this almond pesto is my way of inviting you into this flavorful journey.
Ingredients
Let’s gather our ingredients for this delightful almond pesto:
-
2 cups fresh basil leaves
- The star ingredient! Look for vibrant green leaves that are lush and fragrant. Dull leaves? Pass! If you can’t find basil, try spinach, arugula, or a mix of greens for a slightly different flavor.
-
1/2 cup almonds
- Almonds provide that lovely nutty flavor and give the pesto a creamy texture. You can use raw or toasted almonds, but toasting them brings out a deeper flavor. No almonds? No problem! Substitute with pine nuts or walnuts for a change.
-
2 cloves garlic
- Garlic brings boldness and warmth to the pesto. Feel free to adjust based on your love for garlic. If you find raw garlic a bit too pungent, consider roasted garlic for a sweeter, more mellow taste.
-
1/2 cup grated Parmesan cheese
- While traditional pesto uses Pecorino Romano, Parmesan adds a lovely saltiness and creaminess. Want a dairy-free version? Try nutritional yeast or a vegan cheese alternative.
-
1/2 cup olive oil
- This liquid gold is essential for the texture and flavor of the pesto. Extra virgin is ideal, but a light olive oil works fine if you prefer a milder taste.
-
Salt and pepper to taste
- Simple but effective! Adjust according to your preferences, keeping in mind the saltiness of the cheese.
Step-by-Step Instructions
Now that we have our ingredients ready, let’s transform them into almond pesto!
-
Prep your ingredients.
Start by gathering all your lovely ingredients. It makes the process smoother and more exciting! Wash and dry your basil leaves thoroughly to avoid any unwanted moisture. -
Toast the almonds (optional, but recommended!).
Heat a skillet over medium heat. Toss in the almonds and stir occasionally for about 3-5 minutes until they’re golden brown and fragrant. This step intensifies their nutty flavor, making your pesto sing! Be careful not to burn them—your nose will be your best friend here. -
Blend the base.
In a food processor, combine the toasted almonds, basil leaves, garlic, and Parmesan cheese. Pulse a few times until the ingredients are roughly combined. Stop and scrape down the sides with a spatula to ensure everything gets mixed evenly. -
Add the olive oil.
With the processor running, slowly drizzle in the olive oil until the mixture becomes smooth and creamy. You can adjust the amount of oil depending on how thick or thin you want the pesto. -
Season it up!
Taste your almond pesto and sprinkle in salt and pepper as desired. Blend again. Feel free to adjust flavorings—maybe a splash more lemon juice if you like it zesty! -
Serve or store.
Your almond pesto is ready for adventures! Use it right away or store it in an airtight container in the refrigerator. Drizzle a bit more olive oil on top to help keep it fresh. It holds up well for about a week—if it lasts that long!
Serving Suggestions
Now that you’ve whipped up this luscious almond pesto, let’s talk about the best ways to serve it!
-
Pasta Delight: Toss it with your favorite pasta; it works beautifully with spaghetti, fusilli, or even zucchini noodles. Top with sliced cherry tomatoes and a sprinkle of extra Parmesan for a pop of color and acidity.
-
Spread it: Want a quick appetizer? Spread almond pesto over toasted baguette slices or bagels for a delightful twist on crostini.
-
Veggie Dip: Pair it with fresh veggies like carrots, cucumbers, or bell peppers—crunch meets creaminess; perfection!
-
Drizzle it: Use almond pesto as a delicious sauce over grilled chicken, fish, or roasted veggies, giving your dishes a gourmet touch.
Recipe Variations
Get ready to mix things up! Here are a few creative twists on the classic almond pesto:
-
Citrus Burst: Add a tablespoon of lemon juice or zest for a zingy flavor that brightens up the dish. Perfect for summer!
-
Herb Medley: Swap out some basil for parsley or cilantro for an entirely new herbal profile.
-
Cheesy Goodness: Amp up the cheesiness with a mix of Pecorino Romano and Parmesan, or even throw in some feta for an extra kick.
-
Spicy Kick: Want to bring the heat? Add a pinch of red pepper flakes or a fresh jalapeño to your food processor.
-
Nut-Free Version: For a nut-free or allergy-friendly option, replace the almonds with sunflower seeds—they’ll give you that creamy texture too!
Chef’s Notes
Every recipe tells a story, and my almond pesto has evolved over the years. Initially, I followed my grandmother’s classic basil pesto recipe, but once I started playing around with different nuts, it opened up a whole new world of flavors! The best part? I’ve experimented with almonds, walnuts, and even pistachios, each giving a unique twist to the dish.
Oh, and can we talk about the time I accidentally dropped a whole clove of garlic into the food processor? It turned out stronger than a garlic lover’s dream—let’s just say I had some aromatic friends that day!
FAQs and Troubleshooting
-
Why is my pesto turning brown?
- Pesto can oxidize if exposed to air for too long. To keep it green, store it with a thin layer of olive oil on top or press plastic wrap directly on the surface before sealing.
-
Can I freeze almond pesto?
- Absolutely! Spoon it into ice cube trays and freeze, then transfer to a bag for easy portions. Just thaw and enjoy whenever you want!
-
What can I substitute for Parmesan cheese?
- Nutritional yeast is a fantastic dairy-free alternative. Alternatively, try pecorino or a vegan cheese option for a similar savory kick.
-
How can I make it creamier?
- If you prefer a creamier texture, blend in some ricotta cheese or cream cheese, or simply add more olive oil as needed.
Nutritional Info
While I can’t get too technical here, almond pesto is overflowing with good stuff! It’s filled with healthy fats from the almonds and olive oil, which support heart health. Plus, that fresh basil provides antioxidants while keeping your taste buds dancing. Just keep an eye on the amount you serve, as the olive oil and cheese can add up in calories if you’re watching your intake—but trust me, every bite is worth it!
Final Thoughts
There you have it—your go-to guide for creating delicious, homemade almond pesto! I hope this recipe brings as much joy to your kitchen as it has to mine. Remember, the beauty of cooking lies in its ability to evoke memories and create new ones. So, don’t hesitate to share this incredible dish with friends and family.
Gather around the table, laugh a little, and indulge in the rich flavors of almond pesto. If you try this recipe, I’d love to hear your experiences! Whether you put your spin on it or keep it classic, the important thing is to enjoy the food, celebrate the moment, and let the flavors shine. Happy cooking, my friends!
PrintAlmond Pesto
- Total Time: 15 minutes
- Yield: 4 servings 1x
- Diet: Vegetarian
Description
A flavorful twist on classic pesto with almonds, perfect for pasta, dips, and more.
Ingredients
- 2 cups fresh basil leaves
- 1/2 cup almonds
- 2 cloves garlic
- 1/2 cup grated Parmesan cheese
- 1/2 cup olive oil
- Salt and pepper to taste
Instructions
- Prep your ingredients. Start by gathering all your lovely ingredients. Wash and dry your basil leaves thoroughly.
- Toast the almonds (optional, but recommended!). Heat a skillet over medium heat. Toss in the almonds and stir occasionally for about 3-5 minutes until golden brown.
- Blend the base. In a food processor, combine the toasted almonds, basil leaves, garlic, and Parmesan cheese. Pulse until roughly combined.
- Add the olive oil. With the processor running, slowly drizzle in the olive oil until the mixture is smooth and creamy.
- Season it up! Taste your almond pesto and sprinkle in salt and pepper as desired. Blend again.
- Serve or store. Your almond pesto is ready! Use immediately or store in an airtight container in the refrigerator.
Notes
Drizzle a bit more olive oil on top to keep it fresh. Holds well for about a week.
- Prep Time: 10 minutes
- Cook Time: 5 minutes
- Category: Sauce
- Method: Blending
- Cuisine: Italian
Nutrition
- Serving Size: 2 tablespoons
- Calories: 250
- Sugar: 1g
- Sodium: 150mg
- Fat: 20g
- Saturated Fat: 3g
- Unsaturated Fat: 15g
- Trans Fat: 0g
- Carbohydrates: 8g
- Fiber: 3g
- Protein: 6g
- Cholesterol: 10mg
Keywords: pesto, almond pesto, sauce, vegetarian, Italian, pasta
Zucchini Pasta
Welcome to the World of Zucchini Pasta: A Comfort Food Classic!
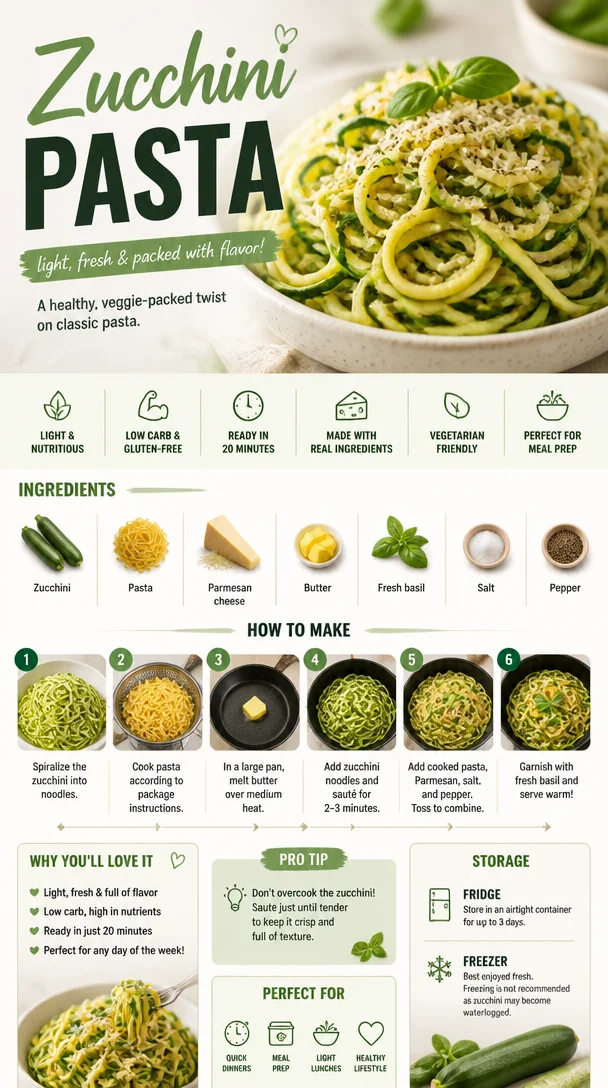
Hey there, food lovers! I’m Beau Collier, and today I’m excited to share one of my all-time favorite comfort dishes—Zucchini Pasta. If you think you can’t enjoy a comforting bowl of pasta without guilt, then think again! This delightful dish combines the heartiness of pasta with the fresh, vibrant flavors of summer zucchini. It’s flavorful, nourishing, and oh-so-simple to prepare—perfect for those busy weeknights or when you want to impress your friends at dinner parties.
Now, let me tell you, this isn’t just any pasta dish. Zucchini pasta, often referred to as “zoodles,” offers a light and healthy twist on traditional pasta. It’s a fantastic way to sneak in more vegetables, and trust me when I say it feels as good to eat as it does to prepare. With a sprinkle of freshly grated Parmesan cheese, a dollop of butter, and some fragrant basil, you will feel like an Italian culinary wizard in your own kitchen!
So, why zucchini pasta? Well, zucchini has been a long-time favorite of mine. Growing up, my grandmother had a thriving garden, and zucchini was one of her star vegetables. She would whip up countless recipes that not only celebrated its versatility but also reminded us of warm family gatherings around the dinner table. Those memories of laughter, good food, and family are what inspired me to experiment in the kitchen, and Zucchini Pasta is a celebration of those cherished moments.
Now that I’ve given you the scoop, let’s dive into the delicious details of making Zucchini Pasta!
A Stirring Memory: The Roots of My Zucchini Love
Growing up, summer meant one thing—zucchini season! I remember rushing into my grandmother’s garden, my small hands scooping up the bright green zucchinis that seemed to multiply overnight. My grandmother would say, “Beau, little chef, let’s make a dish people won’t forget!”
It was during these moments that she taught me to appreciate what fresh produce could do. She had a magic touch with butter, a sprinkle of salt, and fresh basil. I can still hear her laughter mixing with the sounds of sizzling garlic in the pan. One particular Saturday, she decided we’d make a pasta with the seasonal zucchini abundance. That dish, created in our cozy little kitchen, not only filled our stomachs but warmed our hearts.
So here I am, sharing her influence on my cooking passion through this wonderful Zucchini Pasta recipe. Each bite is like a little hug from the past, reminding me of family, joy, and the magic of cooking together.
Ingredients: Gather Your Essentials!
Let’s talk about the star players in this wonderful dish. Here’s what you’ll need to create the perfect bowl of Zucchini Pasta:
-
Zucchini: The main event! Look for firm, bright green zucchinis. You can spiralize them for zoodles, slice them thinly, or use a vegetable peeler for ribbons. If you’re in the mood for something with a little more structure, yellow squash is a great substitute.
-
Pasta: Your choice! Go with traditional spaghetti, fettuccine, or even a gluten-free option. I love using whole wheat pasta for a hearty texture; it pairs nicely with the tender zucchini.
-
Parmesan cheese: A handful of freshly grated Parmesan adds a nutty, savory kick. If you don’t have Parmesan, Pecorino Romano or nutritional yeast (for a vegan version) can work beautifully too!
-
Butter: A tablespoon of butter for that creamy, comforting flavor. If you want a dairy-free option, you can swap it for olive oil or vegan butter.
-
Fresh basil: Nothing beats the magical aroma of fresh basil! It elevates the dish and adds a vibrant freshness. If you don’t have fresh, dried basil will do—just use less since dried herbs are more potent.
-
Salt and pepper: Essential for seasoning! Don’t shy away from seasoning; it’s your best friend in creating flavor.
Looking for an extra pop of flavor? Try adding some minced garlic or red pepper flakes for a little kick.
Step-by-Step Instructions: Time to Cook!
Let’s roll up our sleeves and get cooking! Follow these step-by-step instructions for a delightful Zucchini Pasta experience:
-
Prep Your Ingredients: First things first—let’s wash and dry those zucchinis. Use a spiralizer to create zoodles, or slice them into thin rounds. Set them aside. Cook your chosen pasta according to package directions until al dente.
Chef NOTE: Remember, the pasta will continue to cook a little after draining, so you want it to be slightly firm!
-
Sauté the Zucchini: In a large skillet over medium heat, melt 1 tablespoon of butter (or olive oil). Add the zucchini and a pinch of salt and cook for about 3-4 minutes until they’re tender but still crisp.
Tip: Keep an eye on the cook time! Overcooked zucchini can become mushy. We want some bite!
-
Combine Pasta and Zucchini: Once the pasta is cooked, reserve about a cup of the pasta water and drain the rest. Add the drained pasta to the pan with the zucchini.
Bonus Tip: Use tongs to toss everything gently. Adding a splash of the reserved pasta water can help create a lovely sauce that clings to your zoodles.
-
Add Cheese and Seasoning: Grate a generous sprinkle of Parmesan cheese over the pasta and zucchini mix. Toss to combine. Season with freshly cracked black pepper and adjusted salt to taste.
Little Secret: If you want it creamier, feel free to add another tablespoon of butter or a splash of cream to the mix—heaven!
-
Finish with Fresh Basil: Just before serving, add a handful of roughly torn fresh basil leaves for a pop of color and flavor. Toss gently again.
-
Serve Immediately: Your delicious Zucchini Pasta is ready to serve! Scoop it into bowls and top with additional cheese and fresh basil garnishes.
Serving Insight: A drizzle of high-quality extra virgin olive oil over the top can also elevate the dish.
Serving Suggestions: Dress It Up!
Now that your Zucchini Pasta is all dressed and ready to eat, let’s talk about how to serve it up right.
-
Plate Presentation: For that restaurant-style plating, use tongs to twirl your zoodles into a nest-like pile in the center of your bowl. Top it off with a good sprinkle of grated cheese and a few fresh basil leaves.
-
Accompaniments: Serve it with a side of toasted garlic bread or a crisp salad for a complete meal. A simple arugula salad with lemon and olive oil complements the flavors wonderfully.
-
Wine Pairing: If you enjoy a glass of wine, a chilled white wine, like Sauvignon Blanc, pairs beautifully with the lightness of the dish.
Recipe Variations: Get Creative!
This Zucchini Pasta recipe is super versatile! Here are a few fun variations you can try:
-
Add Protein: Toss in cooked shrimp or grilled chicken for a heartier meal. It’s a great way to switch things up.
-
Veggie Medley: Add your favorite vegetables, such as bell peppers, cherry tomatoes, or spinach, for added flavor and color.
-
Spicy Kick: If you like it spicy, try adding red pepper flakes to the butter as it melts to infuse some heat into the dish.
-
Pasta Alternative: For a completely low-carb option, skip the pasta and use only zoodles or add a base of cauliflower rice instead.
-
Creamy Version: Swap out the butter for a heavy cream base, plus some garlic and Italian seasoning, to make a creamy zucchini alfredo!
Chef’s Notes: A Dash of Nostalgia
As a chef, I always find joy in evolving recipes over time. This Zucchini Pasta started as a simple family dish and has transformed into one of my go-to meals for entertaining.
I can remember the time I made it for a potluck and—spoiler alert—everyone devoured it! They were shocked to find out it was a healthy recipe and still packed with so much flavor. I love hearing from fellow foodies about their tales in the kitchen—nothing brings us together quite like sharing food!
FAQs and Troubleshooting: Don’t Stress the Small Stuff
1. My zoodles are too watery. What can I do?
No worries! To avoid wateriness, salt your zucchini before cooking to draw out excess moisture, pat them dry with a paper towel, and cook them quickly.
2. Can I prepare this dish ahead of time?
Yes, but keep the zucchini separate until you’re ready to eat. Cooked zucchini does not reheat well and may lose its crunch. You can prepare the sauce and pasta in advance and combine them just before serving!
3. What if I don’t like zucchini?
Give yellow squash a try! It has a similar texture and flavor. You can also replace it with another vegetable like spaghetti squash—just roast it and scrape out those strands!
4. How do I store leftovers?
You can store leftovers in an airtight container in the refrigerator for up to three days. Reheat in the microwave or on the stove, adding a little water to rehydrate any zucchini that may have lost its crispness.
Nutritional Info: Love Your Health
This Zucchini Pasta is not only delicious; it’s also nutritious! Here’s a quick breakdown of what you’re getting with a single serving:
- Calories: 350
- Protein: 12 grams (more with added protein)
- Carbohydrates: 45 grams
- Fiber: 5 grams
- Fats: 10 grams
Zucchini adds low calories and valuable nutrients while the pasta provides energy. This makes it a perfect option for a balanced meal.
Final Thoughts: Let’s Enjoy Every Bite
I hope you’re ready to take on the kitchen and whip up your very own Zucchini Pasta! With its vibrant flavors and comforting embrace, this dish is perfect for any occasion. Take it from me, there’s something truly special about gathering around a table with loved ones, enjoying delicious food, and sharing stories.
So get your spatula ready, let your creative juices flow, and remember that cooking should always be about fun and enjoyment. I can’t wait to hear how your Zucchini Pasta turns out—share your experiences and let’s keep this delicious food journey going together! Happy cooking, friends!
Print
Zucchini Pasta
- Total Time: 30 minutes
- Yield: 4 servings
- Diet: Vegetarian
Description
A delightful twist on traditional pasta, this Zucchini Pasta combines the heartiness of pasta with the fresh flavors of summer zucchini for a comforting and healthy dish.
Ingredients
- Zucchini: Firm, bright green zucchinis, spiralized or sliced
- Pasta: Your choice (spaghetti, fettuccine, whole wheat, or gluten-free)
- Parmesan cheese: Freshly grated
- Butter: 1 tablespoon (or olive oil for dairy-free)
- Fresh basil: A handful, roughly torn
- Salt and pepper: To taste
- Optional: Minced garlic or red pepper flakes for extra flavor
Instructions
- Prep your ingredients by washing and drying zucchinis, spiralizing or slicing them. Cook pasta according to package directions until al dente.
- Sauté the zucchini in a large skillet over medium heat with melted butter or olive oil, adding a pinch of salt and cooking for about 3-4 minutes until tender but still crisp.
- Combine the drained pasta with the zucchini in the skillet, tossing gently. Add a splash of reserved pasta water to create a sauce.
- Add grated Parmesan cheese, tossing to combine. Season with salt and freshly cracked black pepper.
- Finish by mixing in fresh basil leaves just before serving.
- Serve immediately, topped with additional cheese and basil.
Notes
For a creamier texture, add another tablespoon of butter or a splash of cream. Serve with a side of toasted garlic bread or a crisp salad.
- Prep Time: 15 minutes
- Cook Time: 15 minutes
- Category: Main Course
- Method: Sautéing
- Cuisine: Italian
Nutrition
- Serving Size: 1 serving
- Calories: 350
- Sugar: 5g
- Sodium: 400mg
- Fat: 12g
- Saturated Fat: 4g
- Unsaturated Fat: 6g
- Trans Fat: 0g
- Carbohydrates: 45g
- Fiber: 5g
- Protein: 12g
- Cholesterol: 30mg
Keywords: zucchini pasta, healthy pasta, comfort food, vegetarian, quick meals

Minute Tortellini Caprese Salad for Summer Lunches
Tortellini Caprese Salad: A Perfect Mix of Comfort and Freshness
Hey there, food enthusiasts! Today, we’re diving into the vibrant world of summer flavors with a dish that perfectly balances comfort and freshness—Tortellini Caprese Salad. With cheese tortellini playing a starring role alongside juicy cherry tomatoes, creamy mozzarella, and the aromatic embrace of basil, this salad is nothing short of an edible celebration! Each mouthful is like a sunny day in Italy, and trust me, once you whip this up, it’ll become a staple in your kitchen repertoire.
Now, before we get into the cooking part, let’s keep it real. We all lead busy lives, and the last thing we want is to feel overwhelmed when stepping into the kitchen. That’s where the magic of this Tortellini Caprese Salad comes in. It’s quick, effortless, and oh-so-satisfying! Whether you’re prepping for a summer barbecue, hosting friends, or just whipping up a cozy family dinner, this dish has got you covered.
A Personal Touch: My Love for Tortellini
Ah, tortellini! For me, it’s more than just carbohydrates—it’s a vessel of cherished memories. I remember my first cooking adventure with my grandmother, who had a knack for making the kitchen come alive with her traditional Italian recipes. One sunny afternoon, she gathered me around the kitchen counter, her apron dusted with flour.
She showed me the art of folding tortellini—how to create those perfect little pockets filled with cheesy goodness. As I attempted to fold the pasta, my patience wavered, and more than a few “mishaps” occurred! But through laughter and some kitchen chaos, I discovered the joy of cooking and the beauty of sharing meals with loved ones. That day sparked my passion for cooking, making tortellini a centerpiece in my culinary repertoire.
So, when I think of this Tortellini Caprese Salad, I’m whisked back to those warm family gatherings, where food brought us all together. You know that feeling of biting into something that transports you straight into nostalgia? That’s exactly what this salad does, and I can’t wait to share it with you!
Ingredients You’ll Need
Let’s gather our ingredients! This Tortellini Caprese Salad is packed with fresh, lively flavors and simple ingredients that you can easily find at your local market. Here’s what you’ll need:
-
20 oz cheese tortellini, uncooked (approximately 5 cups uncooked)
These delightful pasta pockets are filled with a mix of cheese—think ricotta and Parmesan. You can substitute with spinach or mushroom tortellini for a different flavor profile or go for whole-grain for added nutrition! -
10 oz cherry tomatoes, halved
Bursting with sweetness, these little gems add a lovely pop of color. If cherry tomatoes aren’t available, feel free to use grape tomatoes or any small, flavorful variety. -
8 oz mozzarella pearls
Creamy and soft, these little balls of cheesy goodness are easy to pop in your mouth. For a non-dairy option, try marinated tofu or a vegan mozzarella alternative. -
1 cup chopped spinach
Bringing in a green touch, fresh spinach adds a nutritious boost. If you prefer, you can swap it out for arugula for a peppery flavor or even kale for a heartier bite! -
1/4 cup chopped basil
This fresh herb is the heart of the dish, giving it that classic Caprese flair. In a pinch, use parsley or fresh mint, though they will lend a different vibe to the dish! -
1/2 cup olive oil
Extra virgin olive oil is best for dressing our salad, drizzling some healthy fats while enhancing the flavors! Avocado oil could be a great alternative if you’re looking for a change. -
2 tablespoons balsamic vinegar
This adds a delightful tang! If you don’t have balsamic on hand, a splash of red wine vinegar can work beautifully too. -
3-4 garlic cloves, minced
Garlic is a flavor powerhouse that elevates any dish. You can use garlic powder in a pinch, but there’s nothing like the real thing! -
3/4 teaspoon Italian seasoning
A beautiful blend of herbs that brings an aromatic quality to the salad. You can easily swap this for a mix of dried oregano, thyme, and rosemary if needed. -
1/2 teaspoon salt and pepper
Simple seasoning to make everything pop! Feel free to adjust to your taste. -
Balsamic glaze (optional)
A drizzle of balsamic glaze at the end adds a nice finish and visual appeal. If you’re feeling adventurous, try a citrus glaze, too!
Step-by-Step Instructions
Ready to get cooking? Let’s put this Tortellini Caprese Salad together, step by step!
-
Cook the Tortellini:
Bring a large pot of salted water to a rolling boil. Toss in your tortellini and cook according to package instructions until they float to the top, typically 2-4 minutes. Make sure not to overcook them; we want that perfect al dente texture! Once cooked, drain and set aside. Chef tip: Remember to reserve a little pasta water in case you want to adjust the consistency later! -
Prep the Veggies:
While your pasta is cooking, grab your chopping board! Halve the cherry tomatoes, slice up your spinach, and chop the basil—let your inner chef shine as you bring those beautiful colors to life. -
Make the Dressing:
In a small bowl, whisk together the olive oil, balsamic vinegar, minced garlic, Italian seasoning, salt, and pepper. Taste it to see if it needs any extra seasoning. Quick insight: If you want to pack the dressing with flavor, let it sit for a bit to allow the garlic and herbs to infuse! -
Combine Everything:
In a large mixing bowl, combine the cooked tortellini, halved cherry tomatoes, mozzarella pearls, chopped spinach, and basil. Pour the dressing over the mixture and gently toss until everything is well coated. Pro tip: Use a spatula to be gentle yet thorough—no one likes a mushy tortellini! -
Chill Out (Optional):
For best results, let your salad sit for about 15 minutes before serving. This allows the flavors to meld together beautifully. If you want to prep in advance, you can refrigerate it for up to a few hours! -
Serve and Enjoy:
Give it one last gentle toss before serving. You can garnish it with a drizzle of balsamic glaze on top for that gourmet touch. Serve it fresh and enjoy the masterpiece you’ve created!
Serving Suggestions
Presentation is key, right? To serve your Tortellini Caprese Salad beautifully, use a large, shallow bowl that showcases the vibrant colors and textures. Scoop generous portions and sprinkle some fresh basil or a few extra mozzarella pearls on top for that wow factor! You might also dust a little freshly cracked black pepper or sea salt just before sharing it with your loved ones.
Pair this salad with a crusty bread to soak up the delicious dressing, or serve it alongside grilled chicken or fish for a complete meal. Whether it’s a picnic, a family gathering, or just a cozy dinner at home, this dish is sure to steal the show!
Recipe Variations
Now, let’s get creative with some fun variations!
-
Pesto Tortellini Caprese: Instead of dressing it with olive oil and balsamic vinegar, give it a swirl of fresh basil pesto. Talk about bursting with flavor!
-
Mediterranean Twist: Add kalamata olives, sun-dried tomatoes, and feta cheese for a Mediterranean vibe. You could skip the mozzarella, too, to keep it dairy-free!
-
Spicy Kick: Spice things up by adding sliced jalapeños or a sprinkle of red pepper flakes to the dressing for heat.
-
Fruit Fusion: Toss in some diced avocado for creaminess or even some diced watermelon for a refreshing twist.
-
Grill it: Grill the cherry tomatoes and toss them in with the salad for that smoky flavor. They’ll add a new depth that you’ll absolutely love!
Chef’s Notes
As we wrap things up, I can’t help but share how this dish has evolved for me over the years. Originally, I started with a very straightforward Caprese salad topped with just tomatoes and mozzarella. But as I grew as a cook, I fell in love with the depth that tortellini brings to this dish.
And let’s not forget the funny kitchen moments! One time, I thought I could multitask and answer a call while cooking. Let’s just say I ended up burning the garlic and had to start all over again—a classic case of kitchen mayhem! But hey, every mishap is a lesson learned, right?
FAQs and Troubleshooting
Q1: Why did my tortellini fall apart while cooking?
Overcooking is usually the culprit! Make sure to watch the clock and follow the package directions closely—tortellini should only take a few minutes.
Q2: Can I make it ahead of time?
Definitely! To keep the fresh flavors intact, prepare everything except the dressing, then toss it all together just before serving.
Q3: What can I use instead of tortellini?
Try using farfalle or penne for a pasta salad twist, or even zoodles (zucchini noodles) for a low-carb version!
Q4: How long can I store leftovers?
Store leftovers in an airtight container for up to 3 days in the fridge. Just note that the pasta may absorb some dressing, so give it a quick toss before enjoying!
Nutritional Info
When it comes to this Tortellini Caprese Salad, you’re not just treating your taste buds but also nourishing your body! Here’s a rough breakdown of the nutritional content per serving (based on 8 servings):
- Calories: 300–350
- Fat: 18-20g
- Carbohydrates: 30-35g
- Protein: 11-13g
- Fiber: 2-3g
This salad is packed with healthy fats from the olive oil and plenty of nutrients from the veggies, keeping you satisfied and energized!
Final Thoughts
So there you have it, folks! Tortellini Caprese Salad is the perfect dish for those lazy summer afternoons or any time you crave a taste of Italy. It’s a great way to enjoy fresh ingredients, cherish their vibrant flavors, and create lasting memories around the dining table.
I hope this recipe brings a smile to your face and warms your heart, just like it does for me. So grab your apron, put on a fun playlist, and let’s dive into the wonderful world of flavors. Happy cooking, my foodie friends—until next time, let’s keep the good vibes rolling and the flavors tangy!
Print
Tortellini Caprese Salad
- Total Time: 15 minutes
- Yield: 4 servings 1x
- Diet: Vegetarian
Description
A delightful mix of cheese tortellini, fresh cherry tomatoes, mozzarella, and basil in a vibrant salad.
Ingredients
- 20 oz cheese tortellini, uncooked (approximately 5 cups uncooked)
- 10 oz cherry tomatoes, halved
- 8 oz mozzarella pearls
- 1 cup chopped spinach
- 1/4 cup chopped basil
- 1/2 cup olive oil
- 2 tablespoons balsamic vinegar
- 3–4 garlic cloves, minced
- 3/4 teaspoon Italian seasoning
- 1/2 teaspoon salt and pepper
- Balsamic glaze (optional)
Instructions
- Cook the tortellini: Bring a large pot of salted water to a rolling boil. Toss in your tortellini and cook according to package instructions until they float to the top, typically 2-4 minutes. Drain and set aside.
- Prep the veggies: Halve the cherry tomatoes, slice up your spinach, and chop the basil.
- Make the dressing: In a small bowl, whisk together the olive oil, balsamic vinegar, minced garlic, Italian seasoning, salt, and pepper.
- Combine everything: In a large mixing bowl, combine the cooked tortellini, halved cherry tomatoes, mozzarella pearls, chopped spinach, and basil. Pour the dressing over the mixture and gently toss until well coated.
- Chill out (optional): Let your salad sit for about 15 minutes before serving to allow the flavors to meld together.
- Serve and enjoy: Give it one last gentle toss before serving, garnishing with balsamic glaze if desired.
Notes
You can prepare everything except the dressing in advance, and refrigerate for freshness.
- Prep Time: 10 minutes
- Cook Time: 4 minutes
- Category: Salad
- Method: Boiling and Mixing
- Cuisine: Italian
Nutrition
- Serving Size: 1 serving
- Calories: 350
- Sugar: 5g
- Sodium: 400mg
- Fat: 20g
- Saturated Fat: 3g
- Unsaturated Fat: 13g
- Trans Fat: 0g
- Carbohydrates: 30g
- Fiber: 3g
- Protein: 12g
- Cholesterol: 30mg
Keywords: tortellini, caprese salad, summer salad, vegetarian, Italian

Caesar Pasta Salad
Get Ready to Love Life with Caesar Pasta Salad!
Hey there, fellow food lover! I’m Beau Collier, your trusty guide to all things delicious here at Feastical. Today, we’re diving into a dish that screams summer vibes and is a constant crowd-pleaser—Caesar Pasta Salad! This delightful combination marries the creamy, tangy flavors of Caesar dressing with the fun and hearty texture of pasta. It’s a recipe that’s not only quick to whip up but also perfect for potlucks, picnics, or just a cozy dinner at home. So, roll up your sleeves, grab a fork, and let’s get cooking!
Personal Story: A Taste of Nostalgia
I can still recall my first experience with Caesar salad. I was just a kid, sitting in a bustling family restaurant, filled with laughter and the aroma of sizzling garlic. My mom ordered Caesar salad as an appetizer, and from the first bite, I was hooked by the creamy dressing and the crunch of fresh romaine. I felt like a grown-up as I savored my mom’s salad. Fast forward a few years—my family and I were on a road trip and decided to pack a meal, including that unforgettable Caesar salad flavor. In truth, we ended up transforming it into a pasta salad with whatever ingredients we had on hand. Oh, the joy of creativity in cooking! That’s how Caesar Pasta Salad came to be one of my go-to recipes. It’s become a staple in my kitchen and a dish that brings together friends and family.
Ingredients
Here’s what you’ll need to create this vibrant dish:
-
8 oz pasta (penne or rotini)
Choose your favorite type of pasta! Penne or rotini captures the dressing beautifully, but feel free to switch it up with farfalle or even whole wheat options for a healthier twist. -
1 cup romaine lettuce, chopped
Romaine brings that classic Caesar crunch. If you’re looking for a little extra flavor, consider adding kale or baby spinach for a nutrient boost! -
½ cup cherry tomatoes, halved
These little gems add a burst of freshness to each bite. You can swap them out with sun-dried tomatoes if you want a deeper flavor profile. -
1 cup croutons
Store-bought croutons are super convenient, but you can easily make your own by toasting leftover bread tossed in olive oil and seasoning! -
½ cup Caesar dressing
Homemade or store-bought, the dressing is where the magic happens. If you’re feeling adventurous, try a yogurt-based dressing for a tangy twist or a dairy-free version made with cashews or tahini. -
¼ cup grated Parmesan cheese
Parmesan is key for that authentic flavor, but feel free to substitute with nutritional yeast for a vegan option. -
Salt and pepper to taste
Always taste as you go! A pinch of salt can elevate the whole dish, but keep in mind that croutons and cheese can be salty too.
Step-by-Step Instructions
Alright, my friend! Let’s get into the cooking. Follow these steps to whip up your very own Caesar Pasta Salad!
-
Cook the Pasta:
Start by bringing a large pot of salted water to a rolling boil. Add the pasta and cook according to the package instructions until al dente—usually around 8-10 minutes. Remember, nobody likes mushy pasta, so keep an eye on it! Bonus tip: reserve about ½ cup of pasta water before draining; it’s great for adjusting the consistency of your dressing later if needed! -
Prepare the Veggies:
While your pasta is cooking, grab a cutting board! Chop up the romaine lettuce into bite-sized pieces and halve those bright cherry tomatoes. If you’ve got kids helping out, this is a great time to let them lend a hand—kids love cutting tomatoes; it’s like a mini skill session! -
Make It Tangy:
In a large mixing bowl, toss together the romaine, cherry tomatoes, and croutons. This ensures that every ingredient gets noticed! -
Mix the Dressing:
Pour the Caesar dressing over your salad ingredients. Here comes the fun part—use tongs or a spoon to toss everything together until well coated. If you find the salad a bit too dry, that saved pasta water can come to the rescue! A tablespoon or two will help create a creamy, luscious dressing that hugs every bite. -
Add the Pasta:
Once your pasta is cooked, drain it and let it cool slightly (nobody wants to wilt the lettuce, right?). Then, add it to your vibrant veggie mix. Toss gently to combine all those delicious flavors! -
Sprinkle the Cheese:
Finally, sprinkle the grated Parmesan cheese over the top and give it one last gentle toss. Trust me, that cheese adds a whole new level of yum! -
Taste and Adjust:
Take a moment to taste your masterpiece. Add salt and pepper as needed for flavor. This step is crucial! The balance of flavors is where the love goes in. -
Chill if Desired:
You can serve it right away, but I always recommend letting it chill in the fridge for about 30 minutes. This allows all those wonderful flavors to meld together beautifully.
Serving Suggestions
Now that your Caesar Pasta Salad is ready, it’s time to serve! To plate, I like to use a large, shallow bowl to really showcase all those bright colors. You can garnish with a little extra Parmesan cheese on top or even a sprinkle of freshly cracked pepper for that gourmet touch. Serve it alongside grilled chicken or shrimp for a complete meal, or prepare individual portions for a potluck. Don’t forget about those beautiful plates—it’s all about the presentation!
Recipe Variations
Want to switch things up a bit? Here are a few fun variations you can try:
-
Mediterranean Caesar: Swap out the croutons for toasted pine nuts or add some Kalamata olives and some feta cheese for a Mediterranean twist! The briny olives complement the Caesar dressing wonderfully.
-
Spicy Kick: Add some diced jalapeños or a few dashes of hot sauce to your dressing for a spicy twist. It adds a zing that elevates the salad to a whole new level!
-
Protein Power: Toss in some grilled chicken slices, shrimp, or chickpeas to turn your pasta salad into a hearty meal. It’s perfect for meal prep, giving you a satisfying option you can take on the go.
-
Vegan Delight: Use plant-based Caesar dressing and keep it dairy-free with nutritional yeast instead of Parmesan. Load up on extra veggies like bell peppers and cucumbers for extra texture and crunch.
-
Pasta Salad Bites: Make mini versions using bite-sized pasta shapes and serve in little cups as appetizers at parties. Perfect finger food for gatherings!
Chef’s Notes
Over the years, I’ve tweaked this recipe time and again. I’ve experimented with different dressings, from homemade garlic-infused lemon dressing to avocado-based versions. Each variation brought something unique and delicious to the table! Plus, there’s something so comforting about a salad that feels indulgent while being packed with fresh ingredients. Remember, cooking is about exploration—don’t be afraid to make it your own!
FAQs and Troubleshooting
-
What can I do if my salad is too dry?
If your salad feels a bit dry, you can always add a splash of olive oil or your saved pasta water while tossing the salad. This will help moisten the ingredients. -
I don’t have croutons; what can I use instead?
No worries! Crunchy ingredients like toasted nuts or seeds, or even crispy chickpeas will add that necessary texture. -
Can I make this salad ahead of time?
Absolutely! Just keep the dressing separate until you’re ready to serve. This prevents the lettuce from wilting and keeps everything fresh. -
What should I serve this dish with?
Caesar Pasta Salad pairs beautifully with grilled meats or seafood, or it can stand alone as a light, refreshing meal. It’s particularly perfect for summer barbecues and gatherings!
Nutritional Info
This Caesar Pasta Salad is not only delicious but also quite balanced! Here’s a rough breakdown per serving (assuming 4 servings):
- Calories: 350
- Protein: 12g
- Carbohydrates: 45g
- Fiber: 3g
- Fat: 15g
Feel free to tweak the ingredients based on your dietary needs (using whole grain pasta can give you an extra fiber boost!).
Final Thoughts
And there you have it, my friends! Caesar Pasta Salad—a dish that brings back memories and flavors sure to brighten your day. Whether you’re whipping it up for a family BBQ, potluck, or just a simple weeknight dinner, this fresh and tangy salad will always deliver.
Let this recipe inspire you to experiment and explore in your kitchen. Remember, cooking should feel like a celebration, so don’t shy away from making it your own! Now, grab that fork and dig in; you’re going to love this!
Until next time, keep spreading joy through food. Happy cooking! 🥗✨
Print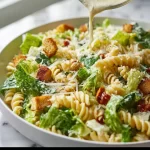
Caesar Pasta Salad
- Total Time: 20 minutes
- Yield: 4 servings 1x
- Diet: Vegetarian
Description
A delightful Caesar Pasta Salad that combines creamy dressing with hearty pasta, perfect for summer gatherings.
Ingredients
- 8 oz pasta (penne or rotini)
- 1 cup romaine lettuce, chopped
- ½ cup cherry tomatoes, halved
- 1 cup croutons
- ½ cup Caesar dressing
- ¼ cup grated Parmesan cheese
- Salt and pepper to taste
Instructions
- Cook the pasta by bringing a large pot of salted water to a boil and cooking according to package instructions until al dente.
- Prepare the veggies by chopping romaine lettuce and halving cherry tomatoes.
- Toss the romaine, cherry tomatoes, and croutons in a large bowl.
- Pour the Caesar dressing over the salad ingredients and toss until well coated.
- Add the cooled pasta to the veggie mix and toss gently.
- Sprinkle the grated Parmesan cheese over the salad and give it a final toss.
- Taste and adjust seasoning with salt and pepper as needed.
- Chill in the fridge for about 30 minutes before serving, if desired.
Notes
For added flavor, let the salad chill before serving to allow the flavors to meld.
- Prep Time: 10 minutes
- Cook Time: 10 minutes
- Category: Salad
- Method: Mixing
- Cuisine: Italian
Nutrition
- Serving Size: 1 serving
- Calories: 350
- Sugar: 3g
- Sodium: 400mg
- Fat: 15g
- Saturated Fat: 4g
- Unsaturated Fat: 8g
- Trans Fat: 0g
- Carbohydrates: 45g
- Fiber: 3g
- Protein: 12g
- Cholesterol: 30mg
Keywords: Caesar pasta salad, summer salad, easy pasta recipes, vegetarian salad, potluck recipes

Caesar Pasta Salad
Caesar Pasta Salad: A Fresh Take on a Classic Favorite
Hey there, fellow food lovers! If you’re ready for a delightful twist on an all-time classic, you’re in for a treat with my Caesar Pasta Salad. This dish combines the creamy, zesty flavors of traditional Caesar salad with heartwarming pasta goodness. I’m Beau Collier, and I believe that food should not only bring comfort but also bring us together. Nothing sparks joy like gathering around a table, sharing laughter and delight over a delicious meal.
Picture this: it’s a sun-drenched afternoon, and you find yourself whipping up this salad for friends and family. It’s simple yet elegant, a true crowd-pleaser, perfect for picnics, potlucks, or even a cozy dinner at home. You get to enjoy the crunchy romaine, succulent cherry tomatoes, and delightful croutons, all coated in a luscious Caesar dressing that dances on your palate. Plus, you can spice things up with grilled chicken or shrimp for an extra protein punch.
In this post, I’m diving deep into the world of Caesar Pasta Salad—sharing not only the recipe, but also personal stories, savvy tips, and some extra delicious variations. Whether you’ve been cooking for years or are just starting your culinary adventure, this recipe is designed to be accessible, fun, and, above all, tasty. So grab your apron, and let’s get cooking!
Personal Story
As a child, my culinary journeys often began in my grandmother’s kitchen. She had this authentic way of crafting meals filled with love and warmth—it was where I fell in love with cooking. I remember one sunny afternoon, perched on a stool, watching her prepare a classic Caesar salad. The way she expertly tossed the crisp romaine and creamy dressing brought a twinkle to my young eyes. She would tell stories about her youth as she made her famous homemade dressing, and I was completely captivated.
Years later, inspired by those memories, I wanted to recreate that experience in my kitchen, but with a twist. Enter the Caesar Pasta Salad, which became a staple at family gatherings. Bringing that same love and joy into a modern dish was my goal. It’s more than just food; it’s a heartfelt connection to my past, a way to honor those cherished moments while creating new memories. Now, every time I make this salad, I can hear her voice, guiding me along the way. It’s a dish that reminds us of the joys of cooking with loved ones, making it a perfect addition to any table.
Ingredients
Gather your ingredients, and let’s get started on this delightful Caesar Pasta Salad! Here’s what you’ll need:
-
8 ounces of pasta (e.g., rotini or penne): I love using rotini because the spirals catch the dressing perfectly, but feel free to use any pasta you have on hand! Whole wheat or gluten-free varieties work great, too.
-
2 cups romaine lettuce, chopped: Fresh romaine adds the perfect crunch! If you’re feeling adventurous, you can mix in some kale or spinach for added greens.
-
1/2 cup cherry tomatoes, halved: These little bursts of sweetness are essential. If you can’t find cherry tomatoes, diced regular tomatoes will do just fine.
-
1/2 cup croutons: Store-bought is fine, but if time allows, homemade croutons are a fun and crispy addition! Just toss some bread cubes in olive oil and season them before baking until golden.
-
1/4 cup grated Parmesan cheese: Freshly grated cheese will elevate the dish—don’t skimp on this! You can also substitute with Pecorino Romano for a sharper taste.
-
1/2 cup Caesar dressing: A good, creamy dressing is key! You can go store-bought for convenience or whip up your own if you’re feeling ambitious.
-
Salt and pepper to taste: Basic yet crucial for enhancing all the flavors in the salad.
-
Optional: Grilled chicken or shrimp: If you’re looking to make this a wholesome meal, adding grilled chicken or shrimp will amp up the protein and flavor!
Step-by-Step Instructions
Alright, let’s jump into the cooking process! Follow these steps to whip up your Caesar Pasta Salad:
-
Cook the Pasta:
- Bring a large pot of salted water to a boil. Add the pasta and cook according to package instructions until al dente. This usually takes about 8 to 10 minutes, depending on the type of pasta.
- Tip: Reserve a cup of pasta water before draining! This starchy liquid can help loosen your dressing later if needed.
-
Prep the Veggies:
- While the pasta is cooking, chop your romaine lettuce and halve the cherry tomatoes. Set them aside in a large mixing bowl.
- Chef Hack: To keep lettuce crispier for longer, rinse it in cold water and dry it right before use.
-
Combine Ingredients:
- Once the pasta is cooked, drain it and let it cool for a few minutes in a colander. This prevents wilting the lettuce when you combine everything.
- Add the cooled pasta to the bowl with the lettuce and tomatoes.
-
Dress it Up:
- Pour in the Caesar dressing and toss everything gently to coat the pasta and veggies evenly. If the mixture appears too thick, add a splash of your reserved pasta water to loosen it up.
- Commentary: Mind the dressing—different brands have varying flavors and thickness! Taste as you go and adjust according to your preference.
-
Add the Crunch:
- Toss in the croutons and grated Parmesan cheese. Give it one last gentle mix to combine everything without crushing the croutons.
- Chef Hack: You can save some cheese and croutons for topping later to keep that crunchiness intact!
-
Season and Serve!:
- Season your salad with salt and pepper to taste. Now it’s time to plate!
- Tip: If you’re adding grilled chicken or shrimp, slice them up and place them on top of the salad for that restaurant-style presentation.
Serving Suggestions
Now that your beautiful Caesar Pasta Salad is ready, how can you serve it up like a pro?
-
Plating: Grab a sizable bowl or serving platter and fill it generously with the salad. If you want to impress your guests, layer it—start with the pasta, then add the lettuce and top with a sprinkle of croutons and Parmesan.
-
Garnishes: Consider garnishing with a few additional cherry tomatoes for color or a drizzle of extra Caesar dressing for that restaurant flair. A sprinkle of fresh parsley can elevate the visual appeal as well.
-
Sides: Pair your salad with a warm baguette on the side or a light soup for a complete meal.
Recipe Variations
Let’s get a little adventurous! Here are some ways to give your Caesar Pasta Salad a flavorful twist:
-
Add More Veggies: Incorporate bell peppers for color and crunch, or throw in some sliced cucumbers for extra freshness.
-
Zesty Lemon: For a citrusy kick, squeeze some lemon juice over the salad just before serving. It brightens up the flavors wonderfully!
-
Protein Swaps: Instead of grilled chicken or shrimp, try adding canned tuna, chickpeas, or even roasted tofu for a vegetarian option.
-
Creamy Avocado: Mash up some ripe avocado and mix it in or cut it into slices as a topping for a creamy texture.
-
Herbed Twist: Experiment with adding fresh herbs like basil or dill for a unique flavor punch! A sprinkle of fresh herbs can really elevate the taste.
Chef’s Notes
This Caesar Pasta Salad is a recipe that has evolved since I first started making it. Initially, I strictly followed my grandmother’s Caesar salad recipe, but over the years, I began to incorporate pasta and other ingredients as I got more experimental in the kitchen. The beauty of this dish is its versatility; you can tailor it to fit seasonal ingredients or flavor profiles that tickle your fancy.
One cooking mishap I laugh about happened during a family barbecue. I accidentally threw in too much dressing and turned the salad into something resembling a pasta soup! We laughed it off and labeled it "experimental cuisine." It’s stories like these that keep cooking fun and lead to new favorites!
FAQs and Troubleshooting
-
Q: My pasta is too sticky! What did I do wrong?
- A: If your pasta sticks together, it could be that it wasn’t stirred during cooking or was overcooked. Remember to give it a good stir in the boiling water, and try to drain it immediately after reaching al dente.
-
Q: How can I prevent my lettuce from wilting?
- A: After slicing your lettuce, keep it washed and chilled in the refrigerator until you’re ready to serve. Always add the dressing just before serving to keep it crisp.
-
Q: What if my dressing is too tangy?
- A: If your dressing is overly tangy, try balancing it out with a pinch of sugar or a splash of cream to mellow the flavors. Taste as you go to find the perfect balance!
-
Q: Can I make this salad ahead of time?
- A: You can prep the ingredients, but for the best results, mix everything just before serving to keep the textures fresh and crisp.
Nutritional Info
While the exact nutritional values depend on ingredient choices, here’s a rough estimate for one serving (without chicken or shrimp):
- Calories: 350
- Protein: 12g
- Carbohydrates: 40g
- Fat: 15g
- Fiber: 3g
Additions such as grilled chicken or shrimp will increase the protein content, making this salad more filling!
Final Thoughts
There you have it—my Caesar Pasta Salad recipe, soaked in nostalgia and bursting with flavor! I hope this dish brings you as much comfort and joy as it does for me. Whether you’re having a picnic, attending a potluck, or simply want a satisfying meal at home, this salad checks all the boxes. Don’t forget to share it with your loved ones; food is always better when it’s enjoyed together!
So, what are you waiting for? Grab your fork, toss on your apron, and let the cooking magic begin! If you have any fun stories or variations to share, I would love to hear them. Happy cooking, friends, and may your kitchens always be filled with laughter and delicious aromas!
Print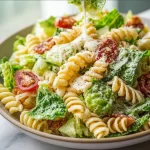
Caesar Pasta Salad
- Total Time: 25 minutes
- Yield: 4 servings 1x
- Diet: Vegetarian
Description
A delightful twist on a classic, this Caesar Pasta Salad combines creamy, zesty flavors with heartwarming pasta goodness.
Ingredients
- 8 ounces of pasta (e.g., rotini or penne)
- 2 cups romaine lettuce, chopped
- 1/2 cup cherry tomatoes, halved
- 1/2 cup croutons
- 1/4 cup grated Parmesan cheese
- 1/2 cup Caesar dressing
- Salt and pepper to taste
- Optional: Grilled chicken or shrimp
Instructions
- Bring a large pot of salted water to a boil. Add the pasta and cook according to package instructions until al dente, about 8 to 10 minutes.
- Chop the romaine lettuce and halve the cherry tomatoes. Set aside.
- Drain the cooked pasta and let it cool for a few minutes in a colander.
- Add the cooled pasta to the bowl with the lettuce and tomatoes.
- Pour in the Caesar dressing and toss everything gently to coat.
- Toss in the croutons and grated Parmesan cheese and mix gently.
- Season your salad with salt and pepper to taste and plate.
Notes
For added flavor, consider garnishing with extra cherry tomatoes or a sprinkle of fresh parsley.
- Prep Time: 15 minutes
- Cook Time: 10 minutes
- Category: Salad
- Method: Mixing
- Cuisine: American
Nutrition
- Serving Size: 1 serving
- Calories: 350
- Sugar: 3g
- Sodium: 400mg
- Fat: 15g
- Saturated Fat: 4g
- Unsaturated Fat: 6g
- Trans Fat: 0g
- Carbohydrates: 40g
- Fiber: 3g
- Protein: 12g
- Cholesterol: 30mg
Keywords: Caesar salad, pasta salad, vegetarian recipes, summer recipes, easy recipes
Lemon Butter Fish Fillet
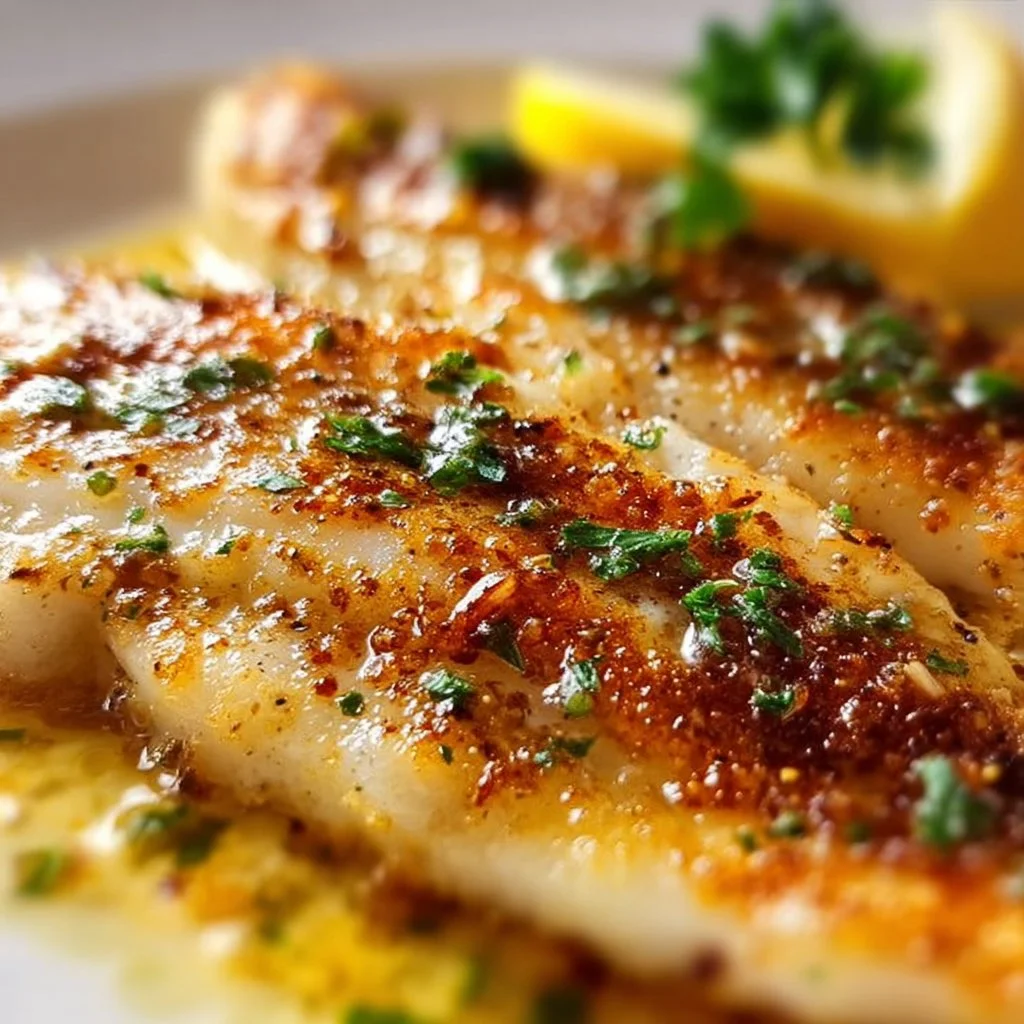
Lemon Butter Fish Fillet: A Delightful Culinary Journey
Hey food lovers! I’m Beau Collier, and I’m thrilled you’ve joined me at Feastical today. We’re diving into a dish that’s as refreshing as a coastal breeze and as comforting as a home-cooked meal: Lemon Butter Fish Fillet. This recipe is not just about the flavors; it’s a celebration of life, laughter, and the connections we create around a hearty plate of food. So let’s roll up our sleeves, grab our spatulas, and embark on this delicious adventure together!
Nothing beats the combination of fresh fish and zesty lemon, especially when you add the richness of butter into the mix. The Lemon Butter Fish Fillet is a dish that puts a spotlight on simplicity without sacrificing flavor. One taste of this light, flaky fish coated in a decadent, creamy lemon sauce will transport you straight to a sunny beachside dinner. Whether you’re preparing a weeknight meal for your family or hosting a dinner party, this dish will effortlessly impress.
Imagine the scene: your loved ones gather around the table, the aroma of garlic and lemon fills the air, and everyone’s faces light up the moment you bring this dish to the table. One bite, and you’ll hear the subtle “mmms” of satisfaction as they savor the buttery goodness nestled on their plates. This isn’t just cooking; this is about crafting experiences and making memories with every forkful.
Not only is this dish easy to make, but it also caters to several palates. With a few simple ingredients that you likely already have in your pantry, you’ll create a delightful seafood dish that’s sure to become a household favorite. So, let’s jump right in and explore how to create this perfect Lemon Butter Fish Fillet!
Personal Story: A Bite of Nostalgia
Growing up, my family hosted Sunday dinners that could put any restaurant to shame. My mom would whip up the most incredible meals, and everyone would gather around the table, sharing stories, laughter, and all sorts of delicious food. One summer, we decided to go on a fishing trip, and I caught my very first fish—I was over the moon! My dad and I filleted it that day, and my mom transformed it into a mouthwatering dish with lemon, butter, and herbs. The taste was beyond words, and it solidified my love for cooking fish.
Years later, I’ve put my own spin on that memory with this Lemon Butter Fish Fillet recipe. Each time I prepare it, I’m transported back to those sun-drenched Sundays filled with love and laughter. It’s a reminder of the simple joys of cooking and sharing good food. And even though my fishing skills may have improved, my love for this dish has only deepened. Every time I make this dish, I cherish that comforting nostalgia and it reminds me how food can weave the fabric of memories we hold dear.
Ingredients: What You’ll Need
Let’s gather our supplies! Here’s what you’ll need to make your Lemon Butter Fish Fillet:
-
2 tablespoons Olive oil
A key player in achieving that golden crust on the fish fillets. If you’re looking for a healthier alternative, grapeseed or avocado oil also works beautifully. -
4 fillets White fish (cod, tilapia, or haddock)
Fresh is best! Each of these options brings its unique flavor and texture to the dish. If you’re feeling adventurous, try salmon or sole for a different twist. -
1 teaspoon Paprika
Adds a rich red color and a subtle warmth. If you’re looking for a smokier flavor, smoked paprika is an excellent choice. -
1 teaspoon Garlic powder
Intensifies flavor without the hassle of peeling and chopping. If you’d rather use fresh garlic, about two cloves minced would do the trick. -
1 teaspoon Onion powder
Another flavorful addition that brings depth to the seasoning profile. You could swap it for finely minced shallots for a fresh flavor boost. -
4 tablespoons Butter
This is where the magic happens! Butter adds creamy richness that complements the fish perfectly. Use a plant-based alternative if you prefer a vegan option. -
2 tablespoons Olive oil (for sauce)
A complementary oil that lightens up the richness of the butter while enhancing the overall flavor. -
4 cloves Garlic, minced
Fresh garlic packs a punch of aromatic flavor. If you’re in a pinch, garlic paste can make for a quick substitute. -
2 lemons (juice and zest)
The star of the dish! Their bright acidity elevates the entire meal. If you don’t have fresh lemons, bottled lemon juice can be used, but fresh is always best. -
1 tablespoon Fresh parsley, chopped
This adds a pop of color and freshness to the final dish. You could swap it with dill for a different herbal note. -
Salt and Pepper (to taste)
Essential for seasoning the fish and balancing the flavors. Always start with a pinch; you can always add more!
Step-by-Step Instructions: Cooking Up a Storm
Alright, culinary enthusiasts, let’s get cooking! Here’s how to whip up these scrumptious Lemon Butter Fish Fillets step-by-step.
-
Prepare the Fish
- Rinse the fish fillets under cold water and pat them dry with paper towels. This step is crucial for getting that lovely sear! Aim to have them as dry as possible, so they can brown beautifully.
-
Seasoning Time
- In a small bowl, mix the paprika, garlic powder, onion powder, salt, and pepper. Sprinkle this seasoning mix evenly over both sides of the fish fillets. This creates a flavorful crust! Don’t be shy; season generously to infuse every bite with flavor.
-
Heat Things Up
- In a large skillet, heat 2 tablespoons of olive oil over medium-high heat. Keep an eye on the oil—it should shimmer when hot, but not smoke.
-
Sear the Fillets
- Carefully add the fish fillets to the skillet, skin side down if applicable. Cook for about 4-5 minutes on one side without moving them. You want to hear that lovely sizzling sound! The fish should lift easily from the pan when it’s ready to flip. If it’s sticking, give it a minute longer.
-
Flip and Finish
- Gently flip the fillets using a spatula and cook for an additional 3-4 minutes on the other side. You want the fish to be opaque and easily flake with a fork. Trust your instincts; fish cooks quickly, so keep an eye on it!
-
Make the Lemon Butter Sauce
- Once the fish is beautifully cooked, carefully remove it from the skillet and keep it warm on a plate. In the same skillet, reduce the heat to medium and add the butter. Let it melt, then toss in the minced garlic. Sauté for about 1-2 minutes until the garlic turns fragrant—don’t let it brown!
-
Zesty Addition
- Squeeze the juice of both lemons into the skillet and add the zest. Stir well and let it simmer for a couple of minutes until the sauce slightly thickens. This is where the magic happens!
-
Combine and Serve
- Return the fish to the skillet for just a minute to coat it in that luscious sauce. Transfer the fillets to your serving plate and pour any remaining sauce over the top. Garnish with fresh parsley for a pop of color and flavor.
Chef’s Tips
- Cooking Temperature: Always cook fish on medium-high heat to get that perfect crust without overcooking the fish.
- Don’t Overcrowd: Give the fish space in the skillet. Overcrowding may cause steaming instead of searing, which we want to avoid.
Serving Suggestions: How to Plate Like a Pro
Now that you’ve prepared this delicious Lemon Butter Fish Fillet, let’s talk about how to serve it up! When plating, presentation is key. Here’s a tip to impress your guests:
- Build the Base: Start with a bed of fluffy couscous or buttery mashed potatoes on the plate. This gives a lovely foundation and absorbs the delicious lemon butter sauce!
- Add the Fish: Place the fish fillet on top, slightly tilted for visual appeal.
- Garnish: Drizzle the remaining lemon butter sauce over the fish and sprinkle fresh parsley on top. The vibrant green will contrast beautifully with the golden fish.
- Serve with Sides: Pair this dish with some sautéed green beans or a simple summer salad for a complete meal that’s not only stunning but also mouthwatering!
Recipe Variations: Mix It Up!
Feeling adventurous? Here are some delightful variations to add a creative twist to your Lemon Butter Fish Fillet:
-
Herb Crusted Version: Before searing, coat the fish in panko breadcrumbs mixed with finely chopped herbs like dill or cilantro. It gives a crunchy, flavorful crust!
-
Spicy Kick: Add a pinch of cayenne pepper or chili flakes to the seasoning mix for a subtle heat that balances beautifully with the lemon.
-
Coconut Twist: Substitute half of the butter with coconut oil and add coconut milk to the sauce for a tropical flair. Pair it with jasmine rice for a fantastic combo!
-
Mediterranean Flair: Add a handful of chopped olives and sun-dried tomatoes to the lemon butter sauce for a robust Mediterranean flavor explosion.
-
Vegan Delight: Use tofu slices marinated in lemon juice and a sprinkle of nutritional yeast for a delightful vegan alternative.
Chef’s Notes
Cooking this Lemon Butter Fish Fillet has become a ritual in my home. It has evolved over the years as new flavors and ingredients have danced their way into my kitchen. I vividly remember a dinner where I turned this dish into a full family affair by asking my kids to help with the seasoning and garnishing. Seeing their little hands sprinkle parsley over the fish while laughing is a memory I cherish.
Every time I make this dish, I keep experimenting and finding new ways to elevate it. It encourages me to be adventurous in the kitchen and to embrace those spontaneous moments that can become wonderful culinary stories.
FAQs and Troubleshooting
-
What if my fish sticks to the pan?
Be sure the pan is properly preheated before adding the fish. If the fillets stick, give them a bit more time to cook—the proteins need a chance to sear and release. -
Can I use frozen fish?
Absolutely! Just ensure it’s fully thawed and patted dry before seasoning. Frozen fish can be just as delicious but needs to be cooked a little longer. -
How can I tell when the fish is done?
Fish is done when it becomes opaque and flakes easily with a fork. A meat thermometer should read 145°F (63°C) at the thickest part of the fillet. -
Can I make the sauce in advance?
Yes! You can prepare the lemon butter sauce ahead of time, just reheat it gently before pouring it over your freshly cooked fish.
Nutritional Info
Let’s take a look at the nutritional makeup of this dish!
- Calories: Approximately 400 per serving (with a standard fillet and sauce).
- Protein: Around 30 grams, making it a fantastic option for filling your belly with goodness.
- Fat: Total fat content is approximately 25 grams (mostly from healthy fats), which includes the benefits of omega-3 fatty acids found in fish.
- Vitamins: Provides a good level of Vitamin D from the fish and Vitamin C from the fresh lemons.
- Carbohydrates: Keep it low if you skip the sides; otherwise, adding a grain will increase it based on your choice.
Keep in mind that nutritional values will vary depending on the type of fish and exact ingredients used.
Final Thoughts
As we wrap up this culinary adventure, I hope you’re as excited about making Lemon Butter Fish Fillet as I am about sharing it with you! Food is more than just sustenance; it’s an experience that brings loved ones together—each bite echoing laughter and joy. With this simple, wholesome recipe, I believe you’ll create not just a cherished meal but treasured memories that linger long after the plates are cleared.
So, gather your loved ones, cook up this delightful dish, and enjoy every moment at the dining table. After all, feel-good food isn’t just a recipe; it’s a celebration of life. Remember, cooking should always feel like a warm hug—not a chore. Until next time, happy cooking! 🍽️✨
Print
Lemon Butter Fish Fillet
- Total Time: 30 minutes
- Yield: 4 servings 1x
- Diet: Gluten-Free
Description
A refreshing and comforting dish featuring flaky fish coated in a creamy lemon butter sauce.
Ingredients
- 2 tablespoons Olive oil
- 4 fillets White fish (cod, tilapia, or haddock)
- 1 teaspoon Paprika
- 1 teaspoon Garlic powder
- 1 teaspoon Onion powder
- 4 tablespoons Butter
- 2 tablespoons Olive oil (for sauce)
- 4 cloves Garlic, minced
- 2 lemons (juice and zest)
- 1 tablespoon Fresh parsley, chopped
- Salt and Pepper (to taste)
Instructions
- Prepare the fish. Rinse the fish fillets under cold water and pat them dry with paper towels.
- Mix the paprika, garlic powder, onion powder, salt, and pepper in a small bowl. Sprinkle this seasoning mix evenly over both sides of the fish fillets.
- Heat 2 tablespoons of olive oil in a large skillet over medium-high heat.
- Sear the fish fillets in the skillet, skin side down if applicable, for about 4-5 minutes on one side.
- Flip the fillets and cook for an additional 3-4 minutes on the other side until opaque.
- Remove the fish from the skillet and keep warm on a plate.
- Add butter to the skillet, letting it melt, then toss in the minced garlic and sauté for 1-2 minutes.
- Squeeze the juice and add the zest of both lemons to the skillet, stirring well and letting it simmer.
- Return the fish to the skillet for a minute to coat in the sauce, then transfer to a serving plate and pour remaining sauce over.
- Garnish with fresh parsley before serving.
Notes
Serve with a bed of fluffy couscous or mashed potatoes and sautéed green beans for a complete meal.
- Prep Time: 15 minutes
- Cook Time: 15 minutes
- Category: Main Course
- Method: Searing
- Cuisine: Seafood
Nutrition
- Serving Size: 1 fillet with sauce
- Calories: 400
- Sugar: 2g
- Sodium: 300mg
- Fat: 25g
- Saturated Fat: 10g
- Unsaturated Fat: 12g
- Trans Fat: 0g
- Carbohydrates: 5g
- Fiber: 0g
- Protein: 30g
- Cholesterol: 70mg
Keywords: Lemon Butter, Fish Fillet, Seafood Recipe, Easy Dinner
Healthy High-Protein Meal Prep Breakfast Bowls
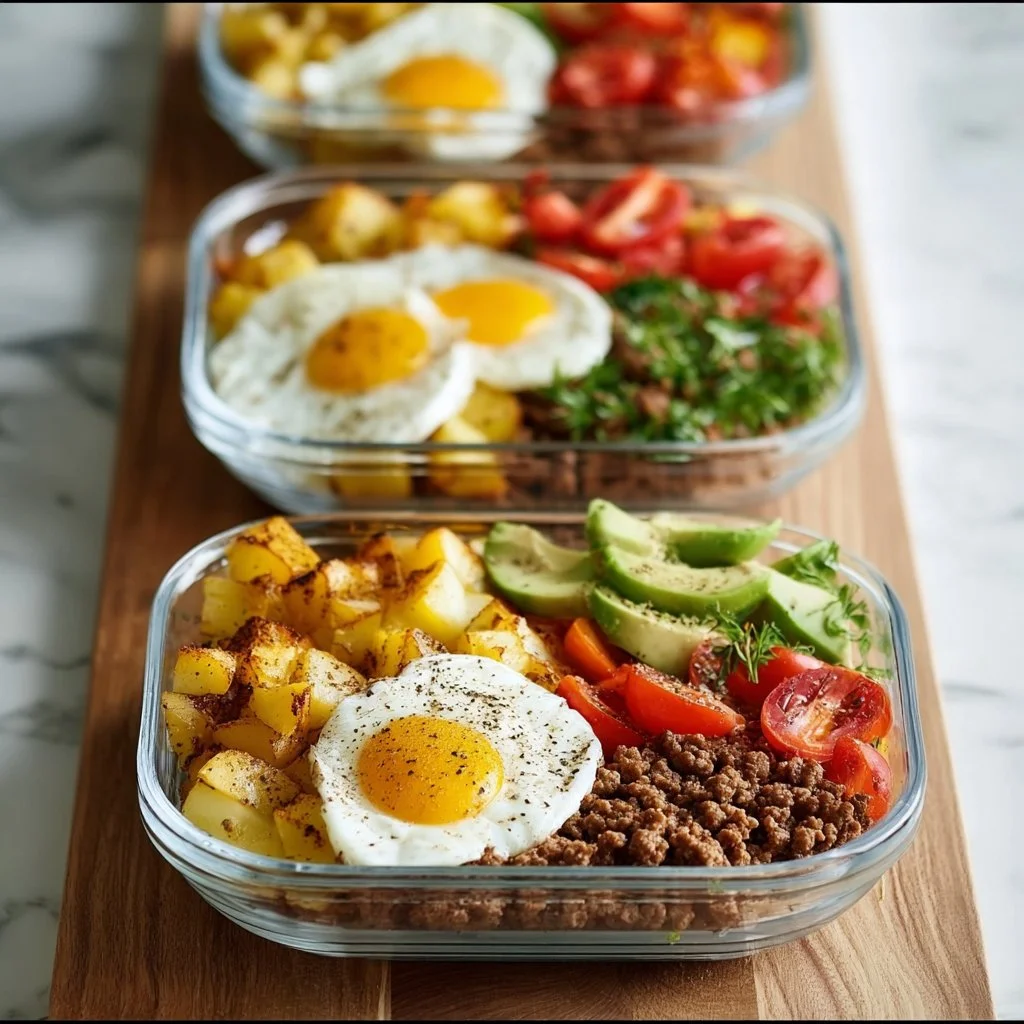
The Ultimate Healthy High-Protein Meal Prep Breakfast Bowl
Hey there, food lovers! Welcome back to Feastical, your go-to spot for mouth-watering recipes that not only tickle your taste buds but also nourish your body. Today, I’m super excited to share one of my favorite healthy breakfast options—High-Protein Meal Prep Breakfast Bowls. With protein-packed ingredients and a variety of flavors, these bowls will have you bright-eyed and bushy-tailed, ready to take on your day. So grab your spatula, and let’s get cooking!
The Heart of the Feast: A Personal Story
Before we dive into the recipes, let me share a little backstory. Growing up, Sunday mornings were sacred in my house. My family would gather around the kitchen table, and my mom would whip up a feast that made our hearts and stomachs happy. One of the staples was her famous breakfast skillet, where she would combine whatever veggies we had in the fridge with eggs, cheese, and a protein or two. It was never the same dish twice, but it was always delicious.
When I started my own cooking journey, I carried this tradition forward but put my own twist on it. These High-Protein Meal Prep Breakfast Bowls are inspired by those nostalgic mornings. They keep me fueled throughout the day while reminding me of those cozy family breakfasts. Plus, they are super easy to prep, making them perfect for busy weekdays!
Ingredients: Let’s Gather the Goodies!
Before we start cooking, let’s take stock of what we’ll need for our scrumptious High-Protein Meal Prep Breakfast Bowls. Here’s a handy list of ingredients along with some chef insights.
-
Baby potatoes (1½ lbs, cut into small cubes): These little gems bring heartiness to your breakfast. If you’re in a rush, you can substitute them with frozen hash browns for quick cooking.
-
Olive oil (2 tbsp): A fantastic source of healthy fats, this gives our potatoes that crispy, golden-brown texture. Feel free to use avocado oil or even cook with butter for a different flavor profile.
-
Salt (1 tsp, divided): It enhances all the flavors. You can also use sea salt or Himalayan salt for a pinch of extra goodness.
-
Black pepper (½ tsp): A must-have for a little kick. If you love heat, try adding crushed red pepper for an extra zing!
-
Smoked paprika (½ tsp): This adds a delightful smokiness. Substitute with regular paprika if you prefer a more subtle flavor.
-
Garlic powder (½ tsp): It’s the secret weapon in so many savory dishes. Fresh garlic works too; just be careful not to burn it!
-
Eggs (10 large): The star of our dish! For a vegan version, swap eggs for tofu scramble or chickpea flour mixed with water.
-
Milk (¼ cup): This helps make the eggs fluffy. You can use almond milk, oat milk, or any other milk of your choice.
-
Lean ground turkey or chicken sausage (1 lb): Packed with protein! Swap for plant-based sausage to keep it vegetarian.
-
Bell peppers (1 cup, chopped): They add color and crunch. Use any color you fancy—red, yellow, or green for a pop!
-
Onion (½ cup, diced): Onions add depth and sweetness. If you’re not a fan, feel free to leave them out or use green onions instead.
-
Spinach (2 cups): This leafy green is loaded with nutrients. Kale or Swiss chard work just as well.
-
Shredded cheddar or Mexican-blend cheese (1 cup): The creamy finishing touch! Go dairy-free with nutritional yeast or vegan cheese.
Step-by-Step Instructions: Cooking Made Simple!
Alright, it’s time to bring our breakfast bowls to life! Follow these step-by-step instructions to create your own delicious masterpiece.
1. Roast the Potatoes
Tip: Preheat your oven to 425°F (220°C).
Start by tossing the cubed baby potatoes in a baking dish with 1 tablespoon of olive oil, ½ teaspoon of salt, black pepper, smoked paprika, and garlic powder. Ensure they’re evenly coated, then spread them out in a single layer. Bake for about 20–25 minutes or until they’re golden and crispy. Halfway through, give ‘em a stir to ensure they cook evenly.
2. Cook the Sausage
Chef Hack: Use a non-stick skillet or cast-iron pan!
While the potatoes are roasting, heat a skillet over medium heat and add the remaining tablespoon of olive oil. Once hot, add the ground turkey or chicken sausage. Break it up with a spatula as it cooks, about 5–7 minutes, until it’s browned and cooked through. If you’re using plant-based sausage, just follow the package instructions for cooking.
3. Sauté the Veggies
Once the sausage is browned, add the diced onion and chopped bell peppers to the pan. Sauté for 3–4 minutes until the veggies are tender. Then, toss in the fresh spinach, cooking until it wilts down—around 1–2 minutes. Add this mixture to the bowl with your sausage.
4. Whisk the Eggs
In a large bowl, beat the eggs with the milk and the remaining ½ teaspoon of salt until well combined and frothy. This step is vital for fluffy scrambled eggs.
5. Cook the Eggs
Use the same skillet again—keeping all those great sausage and veggie flavors! Pour in the egg mixture over medium-low heat. Gently stir with a spatula, scraping the bottom of the pan to create large curds until they’re just set but still soft, about 4–5 minutes.
6. Assemble the Bowls
Now comes the fun part! In meal prep containers, layer your roasted potatoes at the bottom, followed by the sausage and veggie mixture, and top it all off with the fluffy scrambled eggs. Sprinkle shredded cheese on top if you wish!
Serving Suggestions: How to Plate Your Joy
When it comes to serving your High-Protein Meal Prep Breakfast Bowls, it’s all about presentation! Here are a few my favorite ideas to make your bowls pop:
-
Colorful Layering: Use clear glass containers to showcase those vibrant layers of potatoes, eggs, and veggies. It’ll look as good as it tastes!
-
Garnish: A sprinkle of fresh herbs like parsley or chives adds a beautiful touch. You could even add sliced avocados on top for extra creaminess!
-
Meal Prep Magic: If you’re prepping for the week ahead, divide everything into individual airtight containers. These bowls are perfect for a quick grab-and-go breakfast!
Recipe Variations: Let Your Creativity Shine!
The beauty of these breakfast bowls is how easily customizable they are! Here are a few fun variations to keep your breakfasts interesting:
-
Mediterranean Twist: Swap the sausage for crumbled feta, add sun-dried tomatoes, black olives, and fresh dill. Serve with a dollop of tzatziki!
-
Spicy Southwest Delight: Add jalapeños to the mix, substitute the cheese with pepper jack, and stir in some black beans for an extra protein kick!
-
Veggie-Heavy: Amp up the veggies by adding zucchini, asparagus, or mushrooms. Go for a rainbow of colors!
-
Breakfast Burrito Bowls: Swap potatoes for brown rice or quinoa. Roll everything up in a tortilla for a delicious breakfast burrito!
-
Sweet Potato Super Bowl: Replace baby potatoes with roasted sweet potatoes for a hint of sweetness and extra nutrients.
Chef’s Notes: Reflections from My Kitchen
Over the years, I’ve had my share of breakfast bowl adventures! I still remember one time where I accidentally poured an entire container of garlic powder into the mix instead of measuring. Let’s just say, I learned the importance of careful measuring!
This recipe has evolved beautifully; I originally started with just eggs and sausage, but as I dug deeper into healthy eating, I realized how important it is to load up on veggies and protein. Now, I have a breakfast that not only feels good but also sets me up for success.
FAQs and Troubleshooting
1. Can I prepare breakfast bowls ahead of time?
Absolutely! These bowls are perfect for meal prepping. Keep them in the fridge for up to five days.
2. My eggs turned out rubbery; what did I do wrong?
This usually happens from cooking eggs at too high of a heat. Always remember—low and slow is the way to go for fluffy scrambled eggs!
3. Can I freeze these breakfast bowls?
Yes! Just make sure to leave off the cheese until you’re ready to enjoy. They can be stored in the freezer for up to a month.
4. What if I don’t like spinach?
No problem! Feel free to swap in your favorite leafy green or even skip it entirely. You can use kale, swiss chard, or even broccoli for a different texture!
Nutritional Info
These breakfast bowls pack a nutritional punch that’ll keep you energized throughout your day! Here’s a breakdown of what each serving includes (estimates may vary based on specific brands and ingredients):
- Calories: 380
- Protein: 30g
- Fat: 22g (mostly healthy fats from olive oil and cheese)
- Carbohydrates: 25g
- Fiber: 5g
- Sugar: 3g
With a healthy balance of protein, carbs, and fats, you’ll be fueled and ready to conquer anything that comes your way!
Final Thoughts
And there you have it, friends! Your complete guide to creating scrumptious High-Protein Meal Prep Breakfast Bowls that’ll not only make your mornings easier but also tastier.
With super easy steps, countless variations, and meal prep possibilities, you can enjoy these delicious bowls all week long. So, whether you’re cooking for one or for a crowd, remember that good food brings joy and connection to our daily lives.
Thanks for joining me at Feastical today! I can’t wait to hear how your breakfast bowls turn out—snap a picture and share it with me! Happy cooking, and until next time, keep stirring up love in your kitchen!
Print
High-Protein Meal Prep Breakfast Bowls
- Total Time: 45 minutes
- Yield: 4 servings 1x
- Diet: High-Protein
Description
Enjoy a nutritious and delicious breakfast with these high-protein meal prep bowls packed with flavor and health benefits.
Ingredients
- 1½ lbs Baby potatoes, cut into small cubes
- 2 tbsp Olive oil
- 1 tsp Salt, divided
- ½ tsp Black pepper
- ½ tsp Smoked paprika
- ½ tsp Garlic powder
- 10 large Eggs
- ¼ cup Milk
- 1 lb Lean ground turkey or chicken sausage
- 1 cup Bell peppers, chopped
- ½ cup Onion, diced
- 2 cups Spinach
- 1 cup Shredded cheddar or Mexican-blend cheese
Instructions
- Preheat your oven to 425°F (220°C).
- Toss the cubed baby potatoes in a baking dish with 1 tablespoon of olive oil, ½ teaspoon of salt, black pepper, smoked paprika, and garlic powder.
- Bake for about 20–25 minutes or until golden and crispy, stirring halfway through.
- Heat a skillet over medium heat and add the remaining tablespoon of olive oil.
- Add the ground turkey or chicken sausage to the skillet and cook for about 5–7 minutes until browned.
- Sauté the diced onion and chopped bell peppers in the skillet for 3–4 minutes, then add the spinach until it wilts.
- Beat the eggs with the milk and remaining salt until frothy.
- Pour the egg mixture into the skillet over medium-low heat and cook gently for 4–5 minutes until set but still soft.
- Layer your meal prep containers with roasted potatoes, the sausage and veggie mixture, and top with fluffy scrambled eggs.
- Sprinkle shredded cheese on top before serving.
Notes
These bowls are great for meal prepping and can be stored in the fridge for up to five days. Feel free to customize with your favorite ingredients!
- Prep Time: 15 minutes
- Cook Time: 30 minutes
- Category: Breakfast
- Method: Baking
- Cuisine: American
Nutrition
- Serving Size: 1 bowl
- Calories: 380
- Sugar: 3g
- Sodium: 800mg
- Fat: 22g
- Saturated Fat: 6g
- Unsaturated Fat: 12g
- Trans Fat: 0g
- Carbohydrates: 25g
- Fiber: 5g
- Protein: 30g
- Cholesterol: 380mg
Keywords: meal prep, breakfast, high-protein, healthy bowls, savory breakfast