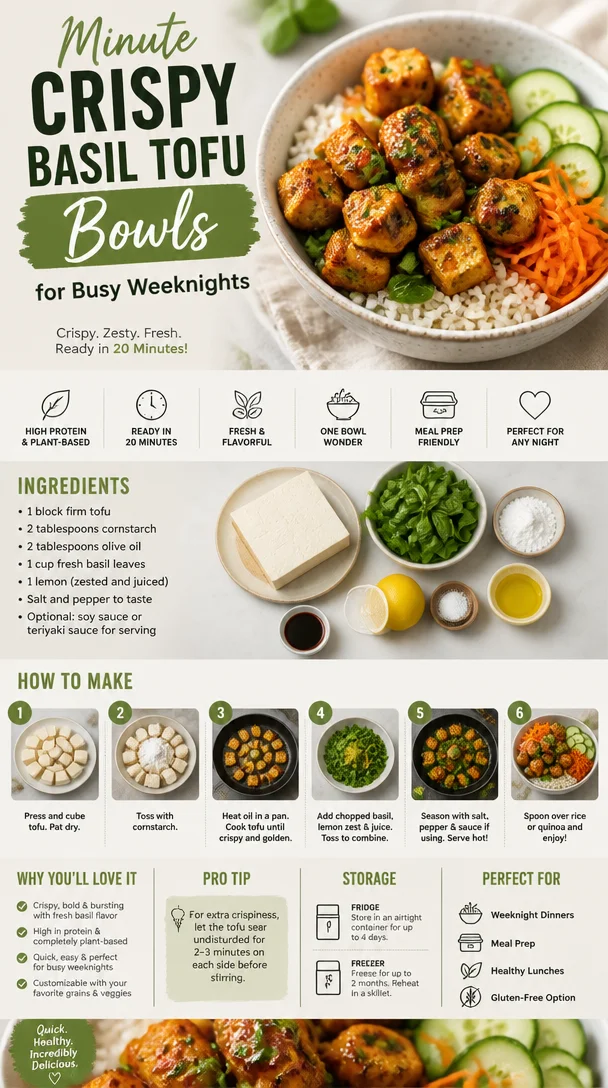
Minute Crispy Basil Tofu Bowls for Busy Weeknights
Crispy Basil Tofu: A Delight for Your Taste Buds
Hey there, fellow food lover! If you’ve ever found yourself scrolling through recipe sites or flipping through cookbooks, searching for something that speaks to your culinary soul, you’re in for a treat. Today, we’re diving into a crispy basil tofu recipe that’s as vibrant as a summer garden and as comforting as that long-awaited hug from a friend.
When I created this dish for Feastical, I wanted to merge simplicity with deliciousness, crafting something that’s not only easy to whip up but also brings a sense of joy to every bite. Tofu can sometimes get a bad rap, but let me tell you, when it’s done right, it can be the star of your dining table! Trust me; this crispy basil tofu will have everyone singing its praises and begging for seconds.
So, grab your apron, invite a friend into the kitchen, and let’s get cooking. You’re about to discover how crispy, flavorful, and delightful tofu can truly be!
A Personal Story: My Tofu Awakening
Let me take you back to my college days. Picture this: a cramped dorm room with a tiny hot plate, my trusty collection of cookbooks spilling over (some of which have questionable stains from my experimental cooking phase), and a whole lot of takeout menus. The truth is, I had no clue how to cook, but I was determined to learn.
One chilly evening, I stumbled across a recipe for crispy tofu. It called for simple ingredients and promised something delicious. Skeptical but intrigued, I gave it a shot. Fast forward to me in the kitchen, cranking up the heat, and witnessing those little cubes of tofu turn golden brown—oh, the magic! Tossing in fresh basil from a friend’s herb garden turned out to be the icing on the cake. That evening, I savored every crunchy bite and felt like a culinary genius. From that moment on, tofu became my go-to for quick, nutritious meals and a canvas for flavor. It opened up a world of possibilities, and I couldn’t wait to share that joy with everyone around me.
Ingredients
Let’s dive into the star ingredients of our crispy basil tofu. Here’s what you’ll need:
-
1 block firm tofu
The foundation of our dish! Firm tofu holds its shape when cooked and offers just the right texture. Soft or silken tofu won’t yield the crispy results we’re aiming for! If you can’t find firm tofu, check out “extra-firm” in your local grocery; it works like a charm! -
2 tablespoons cornstarch
This is our secret weapon for achieving that crispy, golden crust. Cornstarch helps absorb moisture from the tofu’s surface, leading to a delightful crunch. A substitute? Potato starch can work similarly if you have it on hand! -
2 tablespoons olive oil
For frying, olive oil gives a lovely flavor and a nice crisp. If you’re seeking a stronger flavor profile, you can swap this for sesame oil or even coconut oil! -
1 cup fresh basil leaves
Fresh basil is the flavor hero of this dish. Its aromatic, slightly sweet taste complements the tofu perfectly. If you don’t have basil, feel free to use cilantro, parsley, or even a mix of herbs that you love! -
1 lemon (zested and juiced)
This adds a zesty brightness that elevates the dish. Zest activates those aromatic oils, so don’t skip this! If you’re out of lemons, lime juice works well too! -
Salt and pepper to taste
The quintessential seasoning duo! Adjust these to your preference, remembering that a little salt can go a long way. -
Optional: soy sauce or teriyaki sauce for serving
Want to take it up a notch? These sauces can add a savory depth to your crispy basil tofu, creating a perfect dipping sauce or drizzle.
Step-by-Step Instructions
Ready to turn those ingredients into a dish worth raving about? Let’s jump into the cooking process!
-
Press the Tofu
Start by pressing your tofu to remove excess moisture. Wrap the block in a clean kitchen towel and place something heavy on top (a cast-iron skillet works wonders!). Let it sit for about 15-20 minutes. This step is essential because drier tofu will crisp up beautifully! (Chef tip: You can press it in the morning and leave it in the fridge if you’re busy!) -
Cube the Tofu
Once your tofu is pressed, cut it into bite-sized cubes—around 1-inch pieces are ideal. The smaller the cubes, the crispier they’ll get! -
Toss with Cornstarch
In a large bowl, toss the cubed tofu with cornstarch, salt, and pepper until evenly coated. The cornstarch creates a lovely crust when you fry it! (A little chef hack: You can do this step in a Ziploc bag for mess-free coating!) -
Heat the Oil
In a non-stick skillet, heat the olive oil over medium-high heat. The pan should be hot but not smoking. If you see it shimmering, we’re ready to go! -
Fry the Tofu
Carefully place the tofu cubes in the hot skillet in a single layer—avoid overcrowding, as this prevents crisping! Fry for about 5-7 minutes on one side until golden brown, then flip and repeat. (Chef’s secret: For extra crunch, allow the tofu to sit undisturbed for a few moments before flipping!) -
Add the Basil
Once the tofu is golden and crispy on all sides, add the fresh basil leaves to the skillet, along with the lemon juice and zest. Toss everything gently, allowing the basil to wilt slightly and coat the tofu with its aromatic flavor. Cook for an additional 1-2 minutes and season with salt and pepper to taste. -
Serve Up the Goodness
Transfer your crispy basil tofu onto a platter, and drizzle with soy sauce or teriyaki sauce if desired. Enjoy while hot!
Serving Suggestions
Now that you’ve got your crispy basil tofu ready, let’s talk presentation! Here’s how to plate this vibrant dish:
- Serve the tofu over a mound of fluffy jasmine rice or quinoa for a hearty meal.
- Garnish with extra basil leaves for a pop of green.
- Add a few lemon wedges on the side for that extra zing!
- You can even serve it alongside a fresh salad or steamed veggies for a well-rounded plate.
Make sure to invite friends or family to the table; this dish deserves to be shared!
Recipe Variations
Why stick to just one version when you can switch things up? Here are some creative twists on the classic crispy basil tofu:
- Spicy Sriracha Glaze: Add a kick by drizzling sriracha or a sweet chili sauce over the tofu before serving. The heat complements the basil beautifully!
- Coconut Crunch: Add shredded coconut to the cornstarch mixture for a tropical twist—perfect with a side of mango salsa!
- Garlic Lovers’ Delight: Sauté minced garlic in the oil before adding the tofu for a garlicky explosion of flavor.
- Peanut Sauce Drench: Serve your tofu with a homemade or store-bought peanut sauce for a nutty blend of tastes that pairs so well with Thai-inspired dishes.
- Herbed Variations: Mix and match with other herbs like cilantro or mint for a unique flavor profile!
Chef’s Notes
As I’ve played with this recipe over the years, I’ve found endless variations that can adapt to seasons and personal tastes. The humble tofu really does shine as a versatile ingredient. I once had a hilarious kitchen disaster when I mistook powdered sugar for cornstarch while making this dish. The result? Sweet, soggy tofu! Learning from that, I also became a believer in keeping my pantry organized to avoid any funny mix-ups.
FAQs and Troubleshooting
-
Why isn’t my tofu crispy?
If your tofu isn’t crisping up, it might be due to excess moisture. Ensure you press it thoroughly before cooking and coat it evenly with cornstarch. -
Can I use soft tofu instead of firm?
While it’s not recommended for frying, soft tofu can be great for a different dish. If you’re craving a crispy texture, stick with firm or extra-firm tofu! -
How do I store leftovers?
Store any leftovers in an airtight container in the refrigerator for up to 3 days. Reheat in a hot skillet for that delicious crunch again! -
Can this dish be frozen?
While you can freeze cooked tofu, the texture may change once thawed. It’s best served fresh for optimal crunchiness.
Nutritional Info
This crispy basil tofu is not only delicious but also packed with nutrients! Here’s a quick breakdown:
- Protein: Tofu is a fantastic source of plant-based protein, perfect for vegetarian or vegan diets.
- Healthy Fats: Olive oil provides healthy fats that support heart health.
- Vitamins and Minerals: Basil is rich in vitamins A, K, and C, while lemon boosts your vitamin C intake.
- Low-Calorie Option: This dish is a low-calorie delight that keeps you satisfied without feeling heavy.
Final Thoughts
There you have it—your guide to making crispy basil tofu a star on your dinner table! Whether you’re looking for a quick weeknight meal or a dish to impress your guests, this recipe is your new go-to. Remember to flavor your journey by experimenting and finding your unique twist on it.
I hope you find as much joy in cooking and sharing this dish as I do. Food is about connection, laughter, and creating cherished memories. So grab a fork, dig in, and let’s celebrate the wonderful world of cooking together. Happy feasting, my friend!
PrintCrispy Basil Tofu
- Total Time: 35 minutes
- Yield: 4 servings 1x
- Diet: Vegetarian
Description
A vibrant and crispy basil tofu recipe that’s simple to make and full of flavor.
Ingredients
- 1 block firm tofu
- 2 tablespoons cornstarch
- 2 tablespoons olive oil
- 1 cup fresh basil leaves
- 1 lemon (zested and juiced)
- Salt and pepper to taste
- Optional: soy sauce or teriyaki sauce for serving
Instructions
- Press the tofu to remove excess moisture, wrapping it in a towel and placing something heavy on top for 15-20 minutes.
- Cube the pressed tofu into bite-sized pieces.
- Toss the cubed tofu with cornstarch, salt, and pepper in a bowl until evenly coated.
- Heat olive oil in a non-stick skillet over medium-high heat.
- Fry the tofu cubes in a single layer for 5-7 minutes on one side until golden brown, then flip and repeat.
- Add fresh basil leaves, lemon juice, and zest; cook for an additional 1-2 minutes, seasoning with salt and pepper.
- Serve hot, drizzled with soy sauce or teriyaki sauce if desired.
Notes
Pair this dish with jasmine rice or quinoa for a complete meal. Great for sharing!
- Prep Time: 20 minutes
- Cook Time: 15 minutes
- Category: Main Course
- Method: Frying
- Cuisine: Asian
Nutrition
- Serving Size: 1 serving
- Calories: 350
- Sugar: 5g
- Sodium: 400mg
- Fat: 12g
- Saturated Fat: 2g
- Unsaturated Fat: 8g
- Trans Fat: 0g
- Carbohydrates: 45g
- Fiber: 3g
- Protein: 15g
- Cholesterol: 0mg
Keywords: tofu, basil, vegetarian, crispy, easy recipes
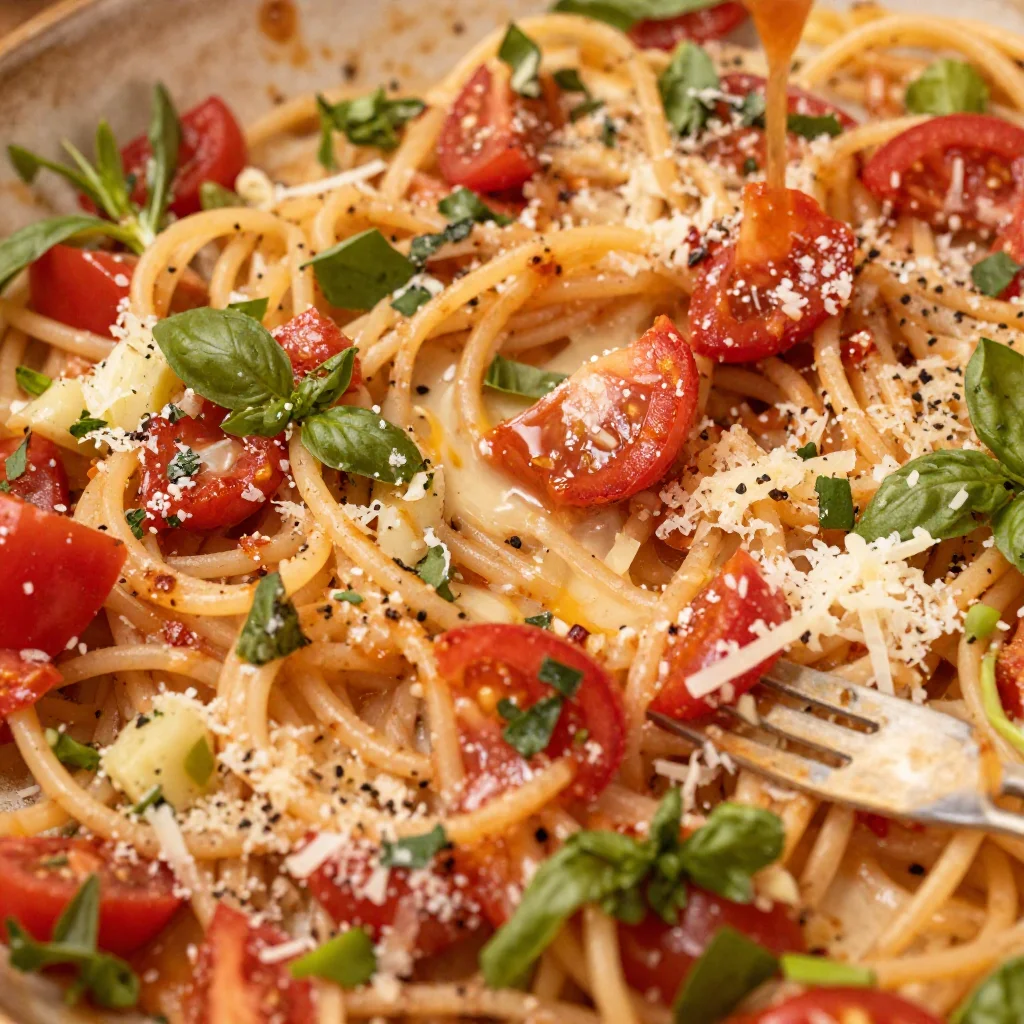
Min Tomato Basil Pasta: Fresh, Fast Weeknight Dinner
Tomato Basil Pasta: A Flavorful Embrace
Hey there, food lover! Today, we’re diving into one of the coziest, heartwarming dishes that effortlessly blends simplicity and flavor—Tomato Basil Pasta. If you’re like me, nothing says “I’ve got this cooking thing down” quite like a plate of spaghetti drenched in vibrant tomato and fresh basil. It’s comfort food at its finest, and I can promise you, it’ll tickle your taste buds in the best way possible!
A Slice of Nostalgia
Let me take you back to a sun-drenched kitchen, the kind with bright checkered curtains and the aroma of Italian herbs swirling in the air. I remember the first time I made Tomato Basil Pasta. I was just a teenager, trying to impress my friends with my supreme culinary skills (or at least my hot-off-the-press pasta creation!). My grandma had just gifted me her treasured handwritten recipe—dog-eared and splattered with evidence of years of love.
I remember the laughter echoing around the dining table, the clinking of forks against bowls, and the unanimous “Mmm” that punctuated every bite. The magic was not just in the pasta; it was in that moment of sharing, of bonding, and of flavors coming together like old friends. Fast forward to today, and I still find myself reaching for this recipe. It’s an eternal source of comfort and joy. So, are you ready to whip up some pasta magic? Let’s get cooking!
Ingredients
Here’s what you’ll need to create this fabulously simple Tomato Basil Pasta dish:
-
2 tablespoons olive oil
A key player in our flavor dance! Olive oil not only adds richness but helps to sauté and release the essential oils from our veggies. You can substitute it with avocado oil for a high smoke point or even butter if you want a creamier taste. -
1 small yellow onion, diced
Onions provide a delightful sweetness and depth of flavor. The smallest size will cook down nicely while adding just the right touch of sweetness. If you’re sensitive to onions, feel free to swap this out for leeks or chives—they bring a milder yet fragrant note! -
4 garlic cloves, minced
Garlic is the heart of Italian cuisine. It’s aromatic and naturally pairs beautifully with tomatoes. If you’re looking to make it milder, try roasting the garlic before adding it, or if you’re in a pinch, garlic powder will do, but use a little less since it’s quite concentrated. -
Salt and pepper
The simplest seasoning duo, but essential for bringing all the flavors to life! Use kosher salt for cooking, and feel free to finish with cracked black pepper for a little gourmet flair. -
1 (28-ounce) can diced tomatoes, drained
The star of this dish! Canned tomatoes are a time-saver and packed with flavor. Look for whole peeled tomatoes that you can crush by hand for a fresher taste. If you prefer fresh tomatoes, about 6 ripe ones will work too—just chop them and remove excess liquid. -
1-2 tablespoons balsamic vinegar
This little splash adds a fantastic layer of acidity and sweetness. If you’re looking for a different note, red wine vinegar or even a squeeze of lemon could do the trick! -
½-1 cup pasta water
Our secret weapon for a silky sauce! The starchy pasta water helps bind and thicken our dish. Just remember to reserve some before draining the pasta. The amount depends on how saucy you like it! -
16 ounces thin spaghetti or angel hair
This is your carb hit! You can switch it up with whole grain for a healthier twist or even spiralized zucchini or spaghetti squash for a low-carb alternative. -
½ cup basil, chopped
Fresh basil is crucial for that vibrant flavor. If you can’t find fresh, dried basil will work—just use about a third of the amount since dried is more concentrated. -
½ cup Parmesan cheese, grated
Oh, cheese—what’s life without you? The nuttiness of Parmesan sings in this dish. For dairy-free options, try nutritional yeast or a vegan cheese substitute.
Step-by-Step Instructions
Now that we’ve gathered all our ingredients, let’s get cooking! Follow these easy steps for a mouthwatering Tomato Basil Pasta that will have everyone asking for seconds!
-
Heat the Oil
In a large skillet, heat the 2 tablespoons of olive oil over medium heat. Feel the oil warming up as it coats the bottom of your pan. This is where the magic begins! -
Sauté the Onions
Next, toss in the diced onion. Stir occasionally until they become translucent—about 5 minutes. This releases the onion’s sweet aroma. If they happen to stick to the pan, don’t fret! A quick splash of water will help loosen them up without losing flavor. -
Add the Garlic
Time to add your minced garlic. Sauté for about 1-2 minutes, keeping an eye out—garlic can go from perfect to burnt in a blink! The magic moment is when you can just start to smell that glorious garlicky goodness! -
In with the Tomato
Pour in the drained diced tomatoes and mix them with the presence of your caramelized onions and garlic. Let them simmer for about 10-15 minutes. The longer it cooks, the richer the flavor. Stir occasionally and enjoy the intoxicating smell filling your kitchen! -
Season It Up
Season your tomato mixture with salt, pepper, and balsamic vinegar. Taste as you go! A little balancing act of acidity will make all the difference. Let it simmer for another 5 minutes. -
Cook the Pasta
While your sauce is bubbling away, boil a pot of salted water and cook your spaghetti or angel hair according to the package instructions. For al dente perfection, aim for a minute less than what it states. Remember to save that precious pasta water before draining! -
Combine Everything
Add your cooked pasta directly into the skillet with the sauce. If things seem a bit dry, gradually add in the reserved pasta water, a little at a time, until you achieve the desired sauce consistency. The starchiness will help marry everything together beautifully. -
Finish With Basil and Cheese
Toss in the chopped basil and grated Parmesan, giving one last stir to blend it all in. The fresh basil brings a burst of summer to the dish! Just like that, your Tomato Basil Pasta is ready to rock on your plates!
Serving Suggestions
Now it’s time to plate up your labor of love! For the ultimate serving experience, twirl your pasta onto a plate or into a shallow bowl. A sprinkle of extra Parmesan on top adds that little touch of decadence. Maybe even a few fresh basil leaves for a pop of color and a drizzle of good-quality olive oil. Pair your pasta with a crisp green salad or some crusty garlic bread, and you’ve got a meal that’s not just delicious but Instagram-ready!
Recipe Variations
If you’re feeling adventurous, here are some fun twists you can put on this Tomato Basil Pasta:
-
Add Protein: Toss in grilled chicken, sautéed shrimp, or even chickpeas for a heartier meal.
-
Veggie Boost: Toss in some spinach, zucchini, or bell peppers just before adding the pasta for extra nutrition and flavor.
-
Spicy Kick: If you love a little heat, add red pepper flakes when you cook the garlic. It’ll give your dish a delightful kick!
-
Creamy Version: Stir in a splash of heavy cream or a dollop of cream cheese for an ultra-rich sauce that’s oh-so-satisfying.
-
Herb Infusion: Experiment with different herbs like oregano, thyme, or even a hint of rosemary for a flavor profile that speaks to your palate.
Chef’s Notes
This Tomato Basil Pasta recipe has seen its fair share of modifications and love over the years. I remember a time when I added way too much balsamic vinegar and turned it into a sweet disaster (oops!). After some tweaks and plenty of taste-testing, I learned that less is more—especially when it comes to balancing flavors.
I also love to make this dish on lazy Sundays, where I can take my time, sip some wine, and immerse myself in nostalgia. For me, it’s not just about the cooking; it’s about the stories and memories we create in the kitchen!
FAQs and Troubleshooting
Here are some common questions and issues you might encounter while cooking this delicious dish:
-
Why is my sauce watery?
This could be due to excess liquid in canned tomatoes or not cooking long enough. Keep simmering to reduce the sauce and concentrate flavors. -
Can I make this ahead of time?
Yes! Prepare the sauce ahead of time and store it in the fridge. Just cook your pasta fresh for an easy, quick mealtime! -
What if my pasta is sticky?
This usually happens when pasta is overcrowded or not cooked enough. Ensure your pot is large and generously salted! -
Can I use dried herbs instead?
Absolutely! Just remember dried herbs are more potent, so go with about one-third of the fresh amount.
Nutritional Info
This Tomato Basil Pasta is not just scrumptious but packed with nutrients, too!
- Calories: Approximately 350-400 per serving (depending on additions)
- Protein: Around 12 grams per serving
- Carbohydrates: Approximately 55 grams per serving
- Fats: About 8-10 grams per serving
- Fiber: Roughly 3 grams per serving
Pair it with a protein source or side salad, and you’ve got a balanced meal any day of the week!
Final Thoughts
As we wrap up our cooking adventure, remember that cooking is about joy and connection. Whether you’re whipping this up for yourself, your family, or a group of friends, it’s about sharing love through food. Tomato Basil Pasta isn’t just a meal; it’s a hug on a plate, a reminder of simpler times, and a delicious gateway to new memories.
So grab your apron, hold that spatula like a wand, and let’s make some culinary magic happen! Bon appétit!
Print
Tomato Basil Pasta
- Total Time: 45 minutes
- Yield: 4 servings 1x
- Diet: Vegetarian
Description
A heartwarming and cozy Tomato Basil Pasta recipe that blends simplicity and flavor, perfect for any occasion.
Ingredients
- 2 tablespoons olive oil
- 1 small yellow onion, diced
- 4 garlic cloves, minced
- Salt and pepper to taste
- 1 (28-ounce) can diced tomatoes, drained
- 1–2 tablespoons balsamic vinegar
- ½–1 cup pasta water
- 16 ounces thin spaghetti or angel hair
- ½ cup basil, chopped
- ½ cup Parmesan cheese, grated
Instructions
- Heat the oil in a large skillet over medium heat.
- Sauté the diced onion until translucent, about 5 minutes.
- Add the minced garlic and sauté for 1-2 minutes.
- Pour in the drained diced tomatoes and let them simmer for about 10-15 minutes.
- Season the mixture with salt, pepper, and balsamic vinegar, and simmer for another 5 minutes.
- Cook the spaghetti or angel hair according to the package instructions.
- Combine the cooked pasta with the sauce, adding reserved pasta water as needed.
- Finish by tossing in the basil and Parmesan cheese.
Notes
For variations, consider adding protein or extra veggies, or try a creamy version with heavy cream.
- Prep Time: 15 minutes
- Cook Time: 30 minutes
- Category: Main Course
- Method: Baking
- Cuisine: Italian
Nutrition
- Serving Size: 1 serving
- Calories: 375
- Sugar: 6g
- Sodium: 420mg
- Fat: 10g
- Saturated Fat: 4g
- Unsaturated Fat: 5g
- Trans Fat: 0g
- Carbohydrates: 55g
- Fiber: 3g
- Protein: 12g
- Cholesterol: 30mg
Keywords: pasta, tomato, basil, Italian, comfort food

One-Pot Cajun Chicken & Sausage Gumbo in 30 Minutes
A Taste of Louisiana: Cajun Chicken and Sausage Gumbo
Hey there, food lovers! Welcome back to Feastical, where the aroma of home-cooked meals fills the air and every dish tells a story. Today, I’m jazzing things up with a recipe that’s a warm hug on a plate: Cajun Chicken and Sausage Gumbo. If you’ve never had the pleasure of slurping a steaming bowl of gumbo, get ready for a delicious adventure. Whether you’re cozying up in the kitchen or entertaining friends, this dish is bound to become a favorite in your culinary repertoire.
Introduction
What is it about gumbo that feels like a comforting old friend? It’s hearty, it’s full of flavor, and it’s the kind of dish that brings people together. Originating from the vibrant state of Louisiana, gumbo is a staple that showcases the unique blend of cultures—African, French, Spanish, and Native American—within the region. This rich stew is typically made in a single pot, making it a delightful way to feed a crowd or simply enjoy a hearty meal at home.
In my own kitchen, I’ve stirred up countless pots of gumbo, each time putting my twist on the classic dish. There’s something magical about caramelizing the roux and watching the ingredients mingle to create an explosion of flavor. The beauty of gumbo is its adaptability; you can make it your own by adjusting the spices, adding seasonal vegetables, or even switching up proteins.
So, strap on your apron and let’s dive deep into the colorful world of Cajun cooking! Trust me, once you master this dish, you’ll realize that cooking gumbo is not just about the food—it’s an experience that brings back memories of laughter, warmth, and gatherings around the dinner table. Ready to get cookin’?
Personal Story
Speaking of gatherings, I remember my first gumbo experience like it was yesterday. I was invited to a friend’s housewarming party in New Orleans, where the scent of spicy sausage and peppery chicken wafted through the air, beckoning me closer. There, I met “Big Mama,” my friend’s grandmother, who was famous for her gumbo. With a big spoon in hand and the biggest smile on her face, she served up steaming bowls of her creation, laden with sausage, chicken, and a generous helping of okra.
Each bite was magical. The roux was perfectly dark, a deep cocoa brown, and the flavors danced on my palate. I couldn’t get enough. I spent the evening sipping sweet tea and swapping stories with friends as we filled our bellies with love and laughter. That night solidified my love for gumbo, and I knew I had to try making it myself.
Fast forward a few years, and here I am, sharing my own version of Cajun Chicken and Sausage Gumbo with you. It’s a dish that’s carried forward with not only the flavors of Louisiana but also the memories of friends, family, and the bonds we create over good food.
Ingredients
Here’s what you’ll need to whip up this Cajun delight:
-
1/2 cup vegetable oil
The base for your roux. You can substitute with canola or grapeseed oil if you prefer. -
1/2 cup all-purpose flour
The key to thickening the gumbo. For a gluten-free option, you can use a gluten-free flour blend. -
1 pound Andouille sausage, sliced
This spicy smoked sausage is a must for authentic flavor. Chicken or turkey sausage works well too! -
1 pound boneless chicken thighs, diced
Thighs are juicy and flavorful; however, you can use chicken breasts for a leaner option. -
1 cup okra, sliced (fresh or frozen)
This adds a unique taste and some thickness to the gumbo. If you’re not a fan, you can leave it out or substitute with sliced zucchini. -
1 green bell pepper, chopped
This enhances the gumbo’s flavor and color. Feel free to experiment with red or yellow bell peppers for a sweeter taste. -
1 onion, chopped
A flavor powerhouse! You can use shallots or even leeks if you’re feeling fancy. -
4 cloves garlic, minced
Because everything is better with garlic! You can amp it up with more if you love that garlicky punch. -
2 tablespoons Cajun seasoning (adjust to taste)
This is where you kick up the flavor. You can use store-bought or make your own! For a milder version, reduce the amount. -
6 cups low-sodium chicken broth
A rich base for your gumbo. You can substitute vegetable broth for a vegetarian option. -
2 cups cooked white rice (for serving)
Serve your gumbo over fluffy white rice—instant comfort food! Brown rice works, too, for a nuttier flavor. -
1/4 cup green onions, chopped (for garnish)
Bright and fresh! A lovely finishing touch. -
1/4 cup parsley, chopped (for garnish)
Adds a pop of color and freshness. Cilantro can also substitute for a change.
Step-by-Step Instructions
-
Make the Roux:
In a large pot or Dutch oven, heat the vegetable oil over medium heat. Once it’s shimmering, slowly whisk in the flour. You want to cook this mixture, stirring constantly, until it turns a rich brown color. This can take about 20-30 minutes, so be patient! If it starts to smell nutty and looks like chocolate, you’re on the right track. Pro tip: Keep the heat low to prevent burning. -
Add the Holy Trinity:
Once your roux is perfect, toss in the chopped onion, green bell pepper, and minced garlic. Stir well and cook until the vegetables are tender, about 5-7 minutes. The smell will be intoxicating at this point! -
Brown the Sausage and Chicken:
Add the sliced Andouille sausage to the pot and let it cook for about 5 minutes. Then, add the diced chicken thighs, stirring to coat with the roux and veggies. Cook until the chicken is browned on the outside, about 5 more minutes. -
Incorporate the Rest:
Pour in the low-sodium chicken broth, followed by the sliced okra and Cajun seasoning. Stir it all together, allowing the flavors to meld. If you want a little kick, you can add a pinch of cayenne pepper! Bring the mixture to a boil, then reduce the heat and let it simmer gently for at least 30 minutes. Letting it simmer allows those hearty flavors to truly shine through. -
Serve it Up:
To serve, ladle the gumbo into a bowl over a scoop of fluffy white rice. Garnish with chopped green onions and parsley for that fresh touch. And there you have it—gorgeous, savory Cajun Chicken and Sausage Gumbo!
Serving Suggestions
Gumbo is best served with a side of crusty French bread for dipping and some hot sauce for those who like to spice things up. You could also offer up a light salad as a starter to complement the rich flavors of the gumbo.
When plating, you can make it look extra appealing by placing a mound of the cooked rice right in the center of the bowl and carefully pouring the gumbo around it. A sprinkle of green onions and parsley on top will give it that restaurant-quality flair! Trust me, your friends and family will be impressed.
Recipe Variations
-
Seafood Gumbo: Swap the chicken and sausage for shrimp and crab. Toss the seafood in towards the end to avoid overcooking.
-
Vegetarian/Garden Gumbo: Leave out the meat altogether and load it with seasonal veggies like bell peppers, eggplant, and zucchini. Use vegetable broth for the base.
-
Spicy Kick: Add some diced jalapeños or a dash of Tabasco sauce if you crave that extra heat!
-
One-Pot Wonder: Mix in some lentils or beans for additional protein while keeping it vegetarian; just adjust the broth amount accordingly.
-
Coconut-Curry Gumbo: For an exciting flavor twist, replace part of the chicken broth with coconut milk and toss in some curry powder for a fusion twist!
Chef’s Notes
Over the years, I’ve played around with my version of gumbo, experimenting with the ingredients and techniques. One funny moment that stands out was when I mistakenly grabbed powdered sugar instead of salt during a dinner party prep. Imagine my guests’ faces when they tasted a hint of sweetness in my gumbo! While it wasn’t a total disaster, it certainly made for a memorable evening filled with laughter.
Yet, that’s the beauty of cooking. It’s all about exploration and connection—both with the ingredients and the people you share meals with. Gumbo is forgiving, and you can adjust it to suit your taste. So don’t be afraid to make it your own!
FAQs and Troubleshooting
-
Why did my roux burn?
Burning roux is often due to too high heat or not stirring enough. Keep the heat low and be patient. -
My gumbo is too thick. What should I do?
Simply add more broth or water to reach your desired consistency. Adjust the seasoning afterward! -
Can I make gumbo ahead of time?
Absolutely! It often tastes even better the next day! Just store it in the fridge, and reheat on the stove until hot. -
How do I store leftover gumbo?
Place it in an airtight container in the fridge for up to 3 days, or freeze it for longer storage (up to 3 months).
Nutritional Info
This hearty gumbo packed with protein and vegetables provides a well-rounded meal. A typical serving (one bowl with rice) contains approximately:
- Calories: 450
- Protein: 30g
- Fat: 24g
- Carbohydrates: 38g
- Fiber: 3g
- Sodium: 800mg
Adjustments in fat or ingredients can affect nutritional values, so feel free to customize based on your dietary preferences.
Final Thoughts
There you have it, my friends! Cajun Chicken and Sausage Gumbo is not just a recipe; it is a delightful homage to the flavors of Louisiana and the memories created around the table. Whether you’re a novice cook or a seasoned chef, I hope this recipe inspires you to gather your loved ones and serve up a hearty bowl of comfort.
So, roll up your sleeves, put on some jazzy tunes, and let’s get cookin’! Remember, at the end of the day, it’s all about enjoying the process, embracing the flavors, and creating moments that linger long after the last spoonful. Happy cooking!
Print
Cajun Chicken and Sausage Gumbo
- Total Time: 75 minutes
- Yield: 6 servings 1x
- Diet: Paleo
Description
A hearty and flavorful Cajun Chicken and Sausage Gumbo that brings together the vibrant flavors of Louisiana in a warm bowl of comfort.
Ingredients
- 1/2 cup vegetable oil
- 1/2 cup all-purpose flour
- 1 pound Andouille sausage, sliced
- 1 pound boneless chicken thighs, diced
- 1 cup okra, sliced (fresh or frozen)
- 1 green bell pepper, chopped
- 1 onion, chopped
- 4 cloves garlic, minced
- 2 tablespoons Cajun seasoning (adjust to taste)
- 6 cups low-sodium chicken broth
- 2 cups cooked white rice (for serving)
- 1/4 cup green onions, chopped (for garnish)
- 1/4 cup parsley, chopped (for garnish)
Instructions
- Make the roux: In a large pot or Dutch oven, heat the vegetable oil over medium heat. Whisk in the flour until it turns a rich brown color, about 20-30 minutes.
- Add the Holy Trinity: Toss in the chopped onion, green bell pepper, and minced garlic. Cook until tender, about 5-7 minutes.
- Brown the sausage and chicken: Add the sliced Andouille sausage and cook for 5 minutes. Add the diced chicken thighs and cook until browned, about 5 more minutes.
- Incorporate the rest: Pour in the chicken broth, add the okra and Cajun seasoning. Bring to a boil, then reduce the heat and let it simmer for at least 30 minutes.
- Serve it up: Ladle the gumbo into bowls over a scoop of white rice. Garnish with green onions and parsley.
Notes
Gumbo can be made ahead of time and often tastes even better the next day. Store it in an airtight container in the fridge for up to 3 days.
- Prep Time: 15 minutes
- Cook Time: 60 minutes
- Category: Main Course
- Method: Stovetop
- Cuisine: Cajun
Nutrition
- Serving Size: 1 serving
- Calories: 450
- Sugar: 3g
- Sodium: 800mg
- Fat: 24g
- Saturated Fat: 8g
- Unsaturated Fat: 12g
- Trans Fat: 0g
- Carbohydrates: 38g
- Fiber: 3g
- Protein: 30g
- Cholesterol: 80mg
Keywords: gumbo, cajun, chicken, sausage, comfort food, Louisiana
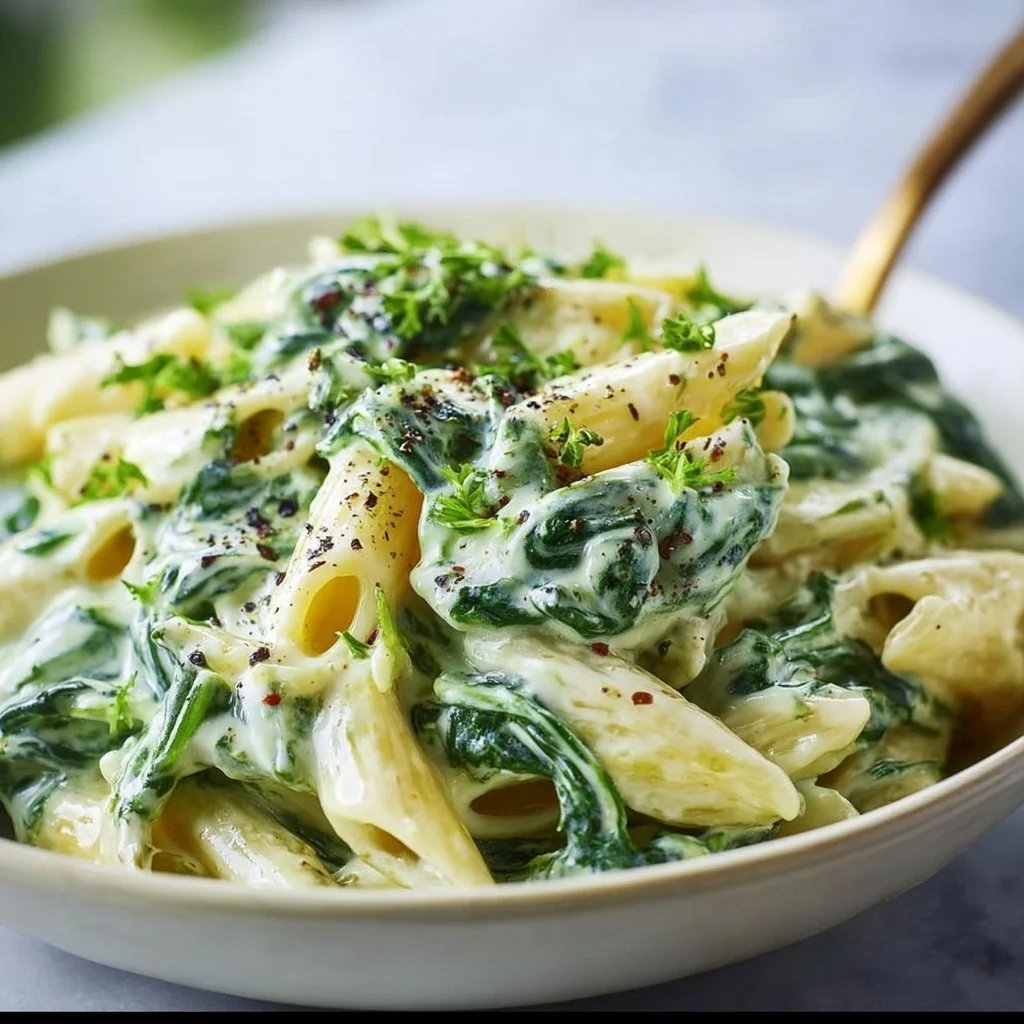
Creamy Spinach Pasta
Creamy Spinach Pasta: A Heartfelt Dish to Cozy Up With
Hey there, fellow foodies! Welcome back to Feastical, where deliciousness reigns supreme and my kitchen is always filled with laughter and love. Today, I’m serving up a luxurious yet simple recipe that’s bound to become your go-to comfort dish: Creamy Spinach Pasta. If you’re looking for something that warms your soul and tucks you in like your favorite blanket on a chilly evening, keep reading!
There’s just something about pasta that makes everything feel right in the world, isn’t there? Maybe it’s the way it twirls on your fork or how it can transport you to Italy with just one bite. But let’s not settle for the ordinary! With my Creamy Spinach Pasta, you’ll experience a dish that’s not just about filling your stomach, but also feeding your soul.
Picture this: a cozy evening, Italian music playing softly in the background, and the rich, creamy aroma wafting through the air as you whip up this delightful dish. It’s easy to make, and even easier to love. You won’t spend hours scrubbing pots and pans, and your kitchen will be filled with laughter and stories—just like mine.
This Creamy Spinach Pasta is not just a recipe; it’s a culinary hug. The fresh spinach adds a pop of color and nutrition, while the heavy cream and Parmesan cheese create a silken sauce that clings lovingly to each strand of pasta, making every bite pure bliss. Whether you’re twirling the noodles in your bowl or spooning it into your plate, this dish is all about celebration—and yes, love!
So, put on your apron, grab that spatula, and let’s dive into the wonderful world of creamy goodness that is my Creamy Spinach Pasta!
Personal Story
Let me take you back to a Sunday afternoon at my grandma’s kitchen table, a place where the magic of family and food intertwined. The smell of garlic filled the air as she sautéed fresh spinach, a staple in her cooking. It was one of those dishes that melted away any worries, reminding me of carefree days spent laughing with loved ones.
I remember watching her closely—her nimble fingers dancing around the kitchen, slicing and stirring with such finesse. She would always turn to me, smile, and say, "Food is love, Beau! So let’s keep the love coming!" And oh, how she did! Every bowl of pasta she served, topped with her signature creamy spinach sauce, felt like warm hugs for the soul. It was a staple during family gatherings, and the joy it brought us reminded me that cooking is as much about sharing as it is about eating.
That creamy spinach pasta became my benchmark for comfort food, and it only feels right for me to pass on that legacy to you today. So, with a sprinkle of my grandma’s love, let’s create our own delicious memories!
Ingredients
Here’s what you’ll need to whip up this delightful dish:
-
8 oz pasta of choice
- Tip: Feel free to use anything you love! Spaghetti, penne, or even gluten-free options all work beautifully.
-
2 cups fresh spinach
- Substitution: If fresh isn’t available, you can use canned spinach, but drain well, or frozen spinach that’s thawed and drained.
-
1 cup heavy cream
- Chef insight: Heavy cream gives that luscious texture, but you can swap it for half-and-half for a lighter version.
-
1/2 cup grated Parmesan cheese
- Quick tip: Freshly grated cheese melts better, but pre-grated works in a pinch.
-
2 tbsp olive oil
- Substitution: Butter is a lovely swap for a richer flavor!
-
3 cloves garlic, minced
- Insight: Garlic is a flavor powerhouse! You can increase or decrease according to your taste.
-
Salt to taste
- Tip: Always taste as you go! It makes a world of difference.
-
Black pepper to taste
- Quick insight: Freshly cracked pepper elevates your dish, but pre-ground will work!
Step-by-Step Instructions
Now that we’ve got our ingredients lined up and prepped, let’s get cooking! Follow these steps for a fabulous Creamy Spinach Pasta:
-
Boil the Pasta:
- Fill a large pot with water, add a pinch of salt, and bring it to a rolling boil. Toss in your pasta and cook according to the package instructions until al dente. And remember, don’t forget to stir occasionally! This will help prevent sticking.
Chef’s Hack: Reserve about a cup of pasta water before draining. It’s liquid gold for adjusting your sauce!
-
Sauté the Garlic:
- While your pasta is cooking, grab a large skillet and heat up the olive oil over medium heat. Add the minced garlic and sauté for about a minute until fragrant. Be careful not to burn it; burnt garlic is no bueno!
Tip: If you want extra flavor, throw in a pinch of red pepper flakes for a little kick!
-
Add the Spinach:
- Toss in the fresh spinach and cook, stirring occasionally, for about two minutes, or until the spinach has wilted. It shrinks down quite a bit, but don’t worry, it’s still packed with flavor!
Chef Insight: If you want an earthy kick, you can add in some chopped mushrooms along with the spinach!
-
Make it Creamy:
- Lower the heat and pour in the heavy cream. Gently stir to combine, and let it simmer for a couple of minutes until it thickens slightly.
Hack: If you find your sauce a bit too thick, add a splash of that reserved pasta water to loosen things up!
-
Cheesy Goodness:
- Gradually sprinkle in the grated Parmesan cheese while stirring continuously. This will create a luscious, gooey sauce that clings lovingly to your pasta!
Tip: For a stronger cheese flavor, feel free to add more cheese!
-
Combine It All:
- Add in your drained pasta to the skillet, and toss everything together until the pasta is well coated in that creamy goodness. Season with salt and black pepper to taste.
Chef’s Note: This is where you can really personalize the dish—adjust seasonings, add more garlic, or sprinkle in some dried herbs if you wish!
-
Serve It Up:
- Plate your creamy spinach pasta while it’s hot! Garnish with a sprinkle of extra Parmesan and perhaps some fresh basil if you’ve got it on hand.
Pro Tip: A few toasted pine nuts or walnuts can add a delightful crunch on top!
Serving Suggestions
Now that your Creamy Spinach Pasta is all dressed and ready to impress, here’s how I like to serve it:
- Plate It Beautifully: Twirl a generous serving of pasta in the center of your plate. A little mound goes a long way!
- Garnish to Impress: Add a sprinkle of freshly grated Parmesan and a light dusting of black pepper on top. A pop of color with fresh basil or parsley not only looks gorgeous but adds delightful freshness!
- Side Sidekicks: Pair this dish with a crisp green salad drizzled with lemon vinaigrette or some garlic bread for a decadent meal.
Recipe Variations
Want to get creative? Here are a few spins on my Creamy Spinach Pasta:
-
Add Protein: Sauté some shrimp or grilled chicken to toss in for a heartier meal!
-
Make It Vegan: Replace the heavy cream with coconut cream and the cheese with nutritional yeast. You won’t miss the creaminess, I promise!
-
Zesty Lemon Spinach Pasta: Add a squeeze of fresh lemon juice right before serving for a zesty pop of flavor!
-
Mushroom & Spinach Delight: Incorporate sautéed mushrooms into the dish for an earthy flavor that pairs perfectly with the creaminess.
-
Cheesy Broccoli Spinach Pasta: Add some steamed broccoli florets for a nutritious twist!
Chef’s Notes
As I look back on many kitchen adventures, I can’t help but chuckle at the disaster casserole I once attempted to create. Let’s just say that it was an unfortunate mix of burnt cheese and “interesting” spices. But it guided me toward the comfort dishes I create today!
With time, I’ve learned that less can definitely be more. This Creamy Spinach Pasta embodies simplicity without compromising on flavor. It’s grown familiar in my kitchen, and just as my grandma taught me, cooking is all about sharing love—and a bit of laughter!
FAQs and Troubleshooting
Q: What can I do if my sauce is too watery?
- If the sauce is too thin, continue to simmer it over low heat to reduce it, and consider adding more cheese for thickness!
Q: My spinach is overcooked! What now?
- Don’t fret! Spinach gives a wonderful dose of nutrition even when slightly wilted. Just season it to make up for lost texture!
Q: Can I make this ahead of time?
- Absolutely! You can prepare the sauce in advance and store it in the fridge. Just reheat on low and toss in the pasta when ready to serve.
Q: How do I store leftovers?
- Keep any leftovers in an airtight container in the fridge for up to 3 days. Just be aware that pasta can absorb some sauce over time, so you may want to add a splash of cream when reheating.
Nutritional Info
While comfort food is all about taste, I know many of us look for a bit of nutritional awareness too! This Creamy Spinach Pasta is hearty and filling, yet features spinach for some essential vitamins. Here’s a rough idea of what you’re looking at per serving:
- Calories: Approximately 450
- Protein: 15g
- Carbohydrates: 50g
- Fat: 20g
- Fiber: 3g
Of course, the numbers may vary based on the ingredients you use, so feel free to adjust as you see fit!
Final Thoughts
And there you have it! My Creamy Spinach Pasta—a dish that embraces the comforting memories of my grandmother while allowing you to create new ones in your own kitchen.
Food is more than just sustenance; it’s a journey filled with flavors, love, and shared stories. So gather your loved ones, dig into this creamy delight, and savor every moment. Remember, cooking should be fun and forgiving, so don’t be afraid to add your own flair to this recipe!
Whether you decide to stick to the classic or put your twist on it, I encourage you to enjoy the process. After all, the heart of any kitchen is the love poured into every dish. Until next time, keep those spatulas at the ready and stay hungry! Bon appétit!
Print
Creamy Spinach Pasta
- Total Time: 45 minutes
- Yield: 4 servings 1x
- Diet: Vegetarian
Description
A luxurious yet simple creamy spinach pasta dish that’s perfect for cozy evenings.
Ingredients
- 8 oz pasta of choice
- 2 cups fresh spinach
- 1 cup heavy cream
- 1/2 cup grated Parmesan cheese
- 2 tbsp olive oil
- 3 cloves garlic, minced
- Salt to taste
- Black pepper to taste
Instructions
- Boil the Pasta: Fill a large pot with water, add a pinch of salt, and bring it to a rolling boil. Toss in your pasta and cook according to the package instructions until al dente. Remember to stir occasionally!
- Sauté the Garlic: While your pasta is cooking, heat up the olive oil over medium heat. Add the minced garlic and sauté for about a minute until fragrant. Be careful not to burn it!
- Add the Spinach: Toss in the fresh spinach and cook, stirring occasionally, for about two minutes, or until the spinach has wilted.
- Make it Creamy: Lower the heat and pour in the heavy cream. Stir to combine, and let it simmer for a couple of minutes until it thickens slightly.
- Cheesy Goodness: Gradually sprinkle in the grated Parmesan cheese while stirring continuously.
- Combine It All: Add in your drained pasta to the skillet, and toss everything together until the pasta is well coated. Season with salt and black pepper to taste.
- Serve It Up: Plate your creamy spinach pasta while it’s hot! Garnish with a sprinkle of extra Parmesan and perhaps some fresh basil.
Notes
For a lighter version, swap heavy cream with half-and-half. You can also add protein like shrimp or chicken for a heartier meal.
- Prep Time: 15 minutes
- Cook Time: 30 minutes
- Category: Main Course
- Method: Sautéing & Boiling
- Cuisine: Italian
Nutrition
- Serving Size: 1 serving
- Calories: 450
- Sugar: 3g
- Sodium: 300mg
- Fat: 20g
- Saturated Fat: 10g
- Unsaturated Fat: 8g
- Trans Fat: 0g
- Carbohydrates: 50g
- Fiber: 3g
- Protein: 15g
- Cholesterol: 60mg
Keywords: creamy spinach pasta, comfort food, vegetarian pasta, Italian recipe, quick pasta dish

Honey Garlic Chicken Bites | Ultimate 25-Min Dinner Delight
Honey Garlic Chicken Bites | Ultimate 25-Min Dinner Delight
Hey there, Feastical friends! Imagine this: it’s a weeknight, the clock is ticking, and you’re staring blankly at your pantry, wondering what to whip up for dinner. You could settle for takeout, but what if I told you there’s a mouthwatering dish you can make in just 25 minutes? That’s right—today, we’re diving into the delightful world of Honey Garlic Chicken Bites!
These little treasures are simply irresistible. Picture tender chicken pieces caramelized in a sweet and savory honey garlic sauce, with a hint of spice that will make your taste buds dance. Best of all, they’re super easy to whip up, so you can channel your inner chef without stressing out. Whether you’re cooking for yourself, a special someone, or the whole family, this dish is bound to impress without consuming your entire evening.
Why Honey Garlic Chicken Bites, you ask? Well, they’re quick, they’re versatile, and they’re a dreamy combination of flavors. This recipe is like a warm hug for your taste buds, and trust me, once you get hooked on this dish, it’ll become a staple in your weeknight rotation. I can’t wait for you to try it!
Ready to embark on this kitchen adventure? Grab your spatula, and let’s get cooking!
Personal Story
Let me take you back to a quieter, cozier time—a rainy Sunday afternoon at my grandparents’ home. The scent of garlic wafting through the air mixed with the warmth of honey brought all of us kids to the kitchen like moths to a flame. My grandmother would make her version of honey garlic chicken on special occasions, and it was always a family affair. We’d gather around the kitchen island, dipping pieces of chicken straight from the pan and giggling about memories while sneaking bites as she cooked.
It was more than just food; it was connection, laughter, and love—all wrapped up in a delicious meal. Every bite transported me to that moment in time, and it’s the reason I cherish this recipe so much. Each time I make Honey Garlic Chicken Bites, I’m reminded of those cozy Sundays and how food truly brings people together. That’s the magic of cooking, my friends—it’s about sharing love, joy, and a plate of something scrumptious with the people you care about!
Ingredients
Let’s gather our ingredients and gear up for cooking! Here’s what you’ll need:
-
1 lb (450g) boneless, skinless chicken breast, cut into 1-inch cubes
Why? Chicken breast is lean and cooks quickly. You can substitute with thighs for richer flavor; just adjust cooking time accordingly. -
2 teaspoons cornstarch (optional)
Why? This is our secret weapon for achieving an extra crispiness on the chicken when sautéing. You can skip it for a lighter dish! -
Kosher salt and freshly ground black pepper, to taste
Why? Salt and pepper elevate flavors; feel free to sprinkle more or less based on your preference. -
1 tablespoon olive oil
Why? Olive oil adds a nice richness; however, you can use avocado or vegetable oil if that’s what you have. -
1 tablespoon unsalted butter
Why? This gives the dish a creamy touch. If you prefer dairy-free cooking, opt for margarine or a plant-based butter alternative. -
4 cloves garlic, finely minced
Why? Garlic is the star of this dish, bringing that unmistakable flavor. If you’re short on fresh garlic, sub with 1 teaspoon of garlic powder. -
1/4 cup honey
Why? The natural sweetness of honey pairs perfectly with the garlic. For a vegan option, use maple syrup or agave nectar. -
3 tablespoons low-sodium chicken stock
Why? Chicken stock adds depth to the sauce; vegetable stock works just as well for veggie lovers! -
1–2 tablespoons lemon juice
Why? The acidity from lemon juice brightens all the flavors. You can also use lime if that’s what you have handy. -
1 teaspoon hot sauce (optional; Sriracha recommended)
Why? This adds a kick! Feel free to leave it out if spice isn’t your thing. -
1 teaspoon red chili pepper flakes (for garnish)
Why? A sprinkle adds color and heat. You can substitute with fresh chopped chilies for an added pop. -
1 tablespoon chopped fresh parsley (for garnish)
Why? Fresh herbs make everything better! Basil or cilantro would make lovely substitutes as well.
Step-by-Step Instructions
Let’s get our cooking hats on! Follow these steps to make your dish come to life:
-
Prep the Chicken:
Start by cutting your boneless, skinless chicken breasts into bite-sized cubes (about 1 inch). This allows them to cook quickly and evenly. Sprinkle a bit of kosher salt, pepper, and the cornstarch (if using) over the chicken, tossing to coat. This not only flavors the bites but helps create a lovely crust when they hit the pan. -
Heat the Oil and Butter:
In a large skillet, heat the olive oil and butter over medium-high heat until the butter is melted and starts to bubble. You want it hot enough to sear the chicken but not so hot that it burns. A little tip: if you see the butter sizzling, you’re ready to go! -
Sear the Chicken:
Add the chicken to the pan in a single layer, ensuring not to overcrowd the skillet. Let the pieces cook for about 3-4 minutes without moving them. This will help achieve that golden, crispy exterior. After that, flip the bites over, allowing them to cook for another 3-4 minutes until they are golden brown and fully cooked through. Pro Tip: Use a meat thermometer—round 165°F (74°C) for perfectly cooked chicken every time! -
Add the Garlic:
Once the chicken is cooked, add in the finely minced garlic to the pan. Sauté for about 30 seconds, just until fragrant. Be careful not to let it burn because burnt garlic is not a flavor we want in our lives. -
Make the Sauce:
Now, it’s time for our star ingredient: the honey! Pour the honey over the chicken and mix it well, followed by the low-sodium chicken stock and lemon juice. Stir to combine everything, letting the mixture bubble for about 2-3 minutes. This way, the sauce thickens just enough to coat those delicious chicken bites! -
Spice It Up:
If you’re going for that spicy kick, now’s the time to drizzle in the hot sauce! Give it a good stir to incorporate all those flavors. And if you’re feeling adventurous, add a pinch of red chili flakes as well. -
Plate and Garnish:
Once everything is well-coated and the sauce has thickened slightly, it’s time to serve! Transfer the honey garlic chicken bites to a serving dish or individual plates, and sprinkle with a pinch of red chili flakes and fresh parsley for a pop of color. -
Serve Warm:
These bites are best enjoyed warm, so dive in right away! You can also reserve some extra sauce from the pan to drizzle over the top before serving.
Serving Suggestions
Now that your Honey Garlic Chicken Bites are ready, let’s talk about how to serve them! These bites would pair wonderfully with a variety of sides. Here are a few scrumptious ideas:
-
Over Rice or Quinoa: Spoon the chicken atop a bed of fluffy jasmine rice or protein-packed quinoa for a hearty meal. The grains soak up the delicious sauce beautifully!
-
With Vegetables: Serve alongside steamed broccoli, roasted asparagus, or even a fresh cucumber salad for a balanced dish.
-
As Sliders: For a fun twist, place the chicken bites in mini slider buns with some crunchy slaw and a drizzle of sauce to create delightful little sandwiches.
-
In Tacos: Soft taco tortillas filled with the chicken bites, avocados, and a sprinkle of lime create a fresh and exciting meal.
Get creative—this dish is super versatile, so don’t hesitate to experiment with your favorite sides!
Recipe Variations
And here’s where things get even more fun! Here are some creative twists on this Honey Garlic Chicken Bites recipe you might want to try:
-
Honey Ginger Chicken Bites: Swap out half of the honey for fresh ginger juice or add minced fresh ginger right along with the garlic for an extra flavor layer.
-
Sweet and Spicy Pineapple Chicken: Add chunks of fresh pineapple into the dish during the last few minutes of cooking for a fruity kick! This tenderizes the chicken and adds tropical vibes.
-
Sesame Chicken Bites: Incorporate 1-2 tablespoons of sesame oil in place of olive oil and garnish with toasted sesame seeds for a nutty flavor that pairs perfectly with honey!
-
Gluten-Free Option: Swap out the soy sauce for tamari or coconut aminos for a gluten-free variation that tastes equally delicious and still offers a rich, savory flavor!
-
Vegetarian Delight: Replace chicken with firm tofu or seitan and follow the same cooking process for a vegetarian option that’s just as satisfying.
Chef’s Notes
I’ll let you in on a little kitchen secret: this recipe has evolved over the years. I started off with just a basic honey garlic sauce, but as I fell in love with cooking, I began experimenting with spices and heat. Each time I shared this dish with friends or family, I noticed how it always sparked joy and conversation at the table. That’s why I love sharing this recipe with all of you—it’s not just about food, it’s about creating memories.
And here’s a funny kitchen mishap—one time, I accidentally mixed up the salt and sugar measurements because I was so engrossed in a podcast while cooking. Let’s just say that was one sweet chicken! (Lesson learned: always double-check those measurements!)
FAQs and Troubleshooting
I know you’re going to love making this dish, but just in case, here are a few common questions:
-
What should I do if my sauce is too thin?
Don’t fret! If your sauce isn’t thickening up, you can mix 1 teaspoon of cornstarch with 1 tablespoon of cold water, add that to the pan, and let it simmer for another minute. It’ll thicken right up! -
Can I use frozen chicken?
Sure! Just remember to thaw it before cooking, as frozen chicken can release extra water and throw off the sauce’s consistency. -
How do I store leftovers?
Place any leftover chicken bites in an airtight container in the fridge for up to 3 days. Reheat gently on the stovetop or in a microwave. -
Is this dish good for meal prep?
Absolutely! These chicken bites hold up well in the fridge and can be reheated for a quick meal throughout the week.
Nutritional Info
Let’s take a quick look at the nutrition breakdown (approximate values per serving, based on 4 servings):
- Calories: 280-300 kcal
- Protein: 25g
- Fat: 12g
- Carbohydrates: 20g
- Sugars: 10g
- Fiber: 0g
- Sodium: 400mg
This dish offers a great protein boost along with healthy fats and a kick of flavor! Perfect for anyone needing quick energy food without the fuss!
Final Thoughts
Cooking should be a joyful adventure, not a chore, and I hope this Honey Garlic Chicken Bites recipe helps you experience just that! It’s all about those essential ingredients and love infused into each dish. Whether you’re gathered around the dinner table with family or enjoying a quiet meal alone with your favorite show, these bites are bound to put a smile on your face!
So, what are you waiting for? Roll up your sleeves, get those ingredients, and make some memories in the kitchen. I can’t wait to hear your thoughts and tweaks on this recipe! Here’s to happy cooking—I’ll catch you next time with more delicious kitchen stories and culinary creations. Cheers! 🍯🍗✨
Print
Honey Garlic Chicken Bites
- Total Time: 25 minutes
- Yield: 4 servings 1x
- Diet: Gluten-Free
Description
Quick and easy honey garlic chicken bites cooked in just 25 minutes, perfect for busy weeknights.
Ingredients
- 1 lb (450g) boneless, skinless chicken breast, cut into 1-inch cubes
- 2 teaspoons cornstarch (optional)
- Kosher salt and freshly ground black pepper, to taste
- 1 tablespoon olive oil
- 1 tablespoon unsalted butter
- 4 cloves garlic, finely minced
- 1/4 cup honey
- 3 tablespoons low-sodium chicken stock
- 1–2 tablespoons lemon juice
- 1 teaspoon hot sauce (optional; Sriracha recommended)
- 1 teaspoon red chili pepper flakes (for garnish)
- 1 tablespoon chopped fresh parsley (for garnish)
Instructions
- Prep the Chicken: Cut chicken into bite-sized cubes, season with salt, pepper, and cornstarch (if using).
- Heat the Oil and Butter: In a large skillet, heat olive oil and butter until melted.
- Sear the Chicken: Add chicken to the pan, cooking for about 3-4 minutes on each side until golden brown.
- Add the Garlic: Sauté minced garlic for about 30 seconds until fragrant.
- Make the Sauce: Pour honey, chicken stock, and lemon juice over chicken and stir, letting it bubble for about 2-3 minutes.
- Spice It Up: Add hot sauce if desired and stir.
- Plate and Garnish: Transfer chicken to a serving dish and sprinkle with chili flakes and parsley.
- Serve Warm: Enjoy immediately or drizzle with extra sauce.
Notes
Perfect for serving over rice or as sliders. Experiment with sides like veggies or tortillas!
- Prep Time: 10 minutes
- Cook Time: 15 minutes
- Category: Main Course
- Method: Sautéing
- Cuisine: American
Nutrition
- Serving Size: 1 serving
- Calories: 300
- Sugar: 10g
- Sodium: 400mg
- Fat: 12g
- Saturated Fat: 4g
- Unsaturated Fat: 7g
- Trans Fat: 0g
- Carbohydrates: 20g
- Fiber: 0g
- Protein: 25g
- Cholesterol: 70mg
Keywords: chicken, honey garlic, quick dinner, weeknight meal, easy recipe