Minute Dinner Rolls: Fluffy, Quick Weeknight Staples
30-Minute Dinner Rolls: The Quickest Way to a Warm Hug on Your Table
Hey there, fellow foodies! Today, I’m sharing one of my absolute favorite recipes that’ll have you creating delightful, pillowy dinner rolls in just 30 minutes. Yes, you read that right—30 minutes! Get ready for an adventure in the kitchen that’s all about warmth, comfort, and a little magic from yeast.
A Memory to Rise
Let me take you back to a chilly Sunday afternoon when I was a kid. My mom would spontaneously decide to make dinner rolls, and the whole house would light up with the heavenly aroma of freshly baked bread. I would wander into the kitchen, drawn like a moth to a flame, and find her with flour dusting her apron, her hands busy kneading the dough. She would always make the process look so effortless while radiating joy, sharing stories as she shaped the perfect little buns.
She taught me that baking is more than just a task—it’s about love, connection, and creating memories. We’d tear into those warm rolls, slather them with butter, and feel an instant sense of comfort. So, when I tell you these 30-minute dinner rolls are a game-changer, you better believe they’ll bring back those cozy memories and uplift your dinner table just like they did for me as a kid!
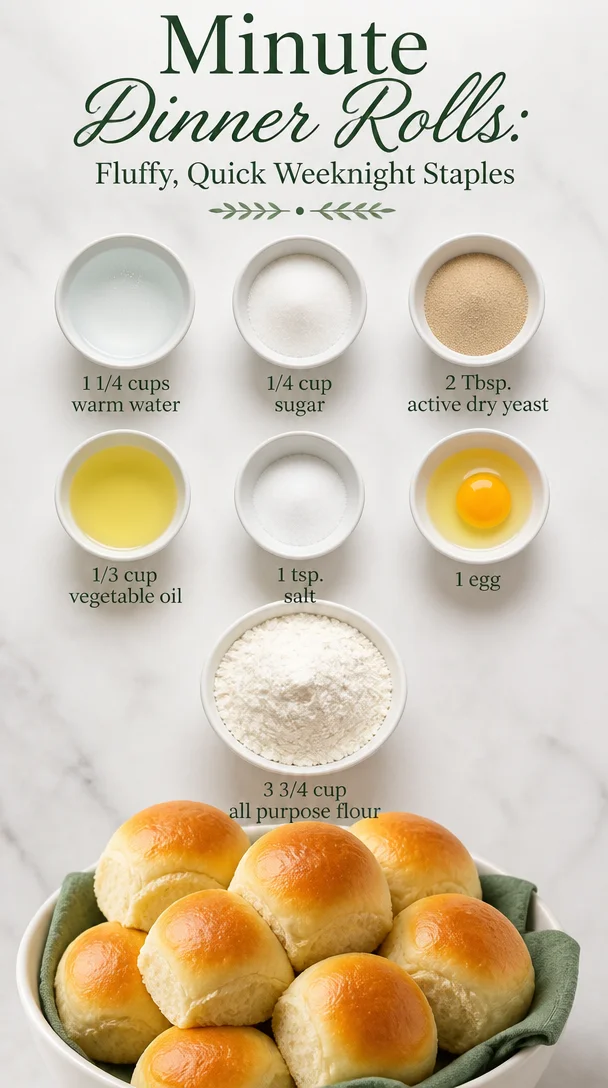
Ingredients
Here’s what you’ll need to whip up these delightful rolls, along with a few chef insights:
-
1 1/4 cups warm water
Make sure it’s warm but not too hot—about 110°F. This encourages the yeast to activate without killing it! -
1/4 cup sugar
Sugar feeds the yeast and helps the rolls bloom beautifully. You can substitute with honey or maple syrup for a natural sweetness! -
2 Tbsp. active dry yeast
This is our magical ingredient that helps the dough rise. If you can only find instant yeast, you can use the same amount and skip the proofing step! -
1/3 cup vegetable oil
Oil keeps the rolls moist. You could also use melted butter for added richness or olive oil for a fruity twist! -
1 tsp. salt
Salt is essential for flavor and helps control yeast activity. Try using sea salt for a touch of elegance! -
1 egg
This adds richness and helps create a nice golden-brown crust. For an egg-free version, you can use a flax egg (1 Tbsp ground flaxseed mixed with 2.5 Tbsp water). -
3 3/4 cups all-purpose flour
All-purpose flour works perfectly, but you could substitute half with whole wheat flour for a healthier roll, or gluten-free flour if you’re avoiding gluten!
Step-by-Step Instructions
Let’s dive into the fun part—the making! Get your apron on and let’s bake some rolls.
-
Proof the Yeast:
In a bowl, mix warm water, sugar, and active dry yeast. Stir gently and let it sit for about 5-10 minutes until it gets foamy. This means your yeast is alive and kicking! (If it doesn’t foam, you might need to start over with a new batch of yeast.) -
Mix the Wet Ingredients:
Once your yeast is all frothy, whisk in the vegetable oil and the egg. This is when you can get creative—if you’re feeling adventurous, adding a splash of garlic oil or any herbs at this stage adds flavor! -
Combine Flour and Salt:
In a separate bowl, mix the flour and salt. Gradually add this to your wet mixture. I recommend using one hand to mix and the other to keep your bowl steady. You want a slightly sticky dough, so don’t worry if it’s a little messy at this point, embrace it! -
Knead the Dough:
Turn the dough out onto a floured surface and knead it for about 5 minutes. Here’s a chef hack: if it sticks to your hands, a little extra flour is your friend—but don’t overdo it. You want it to be soft and smooth. -
Let it Rise:
Shape your dough into a ball and place it in a greased bowl, covering it with a clean kitchen towel. Set it in a warm place for about 10 minutes. You’ll see it puff up nicely—what a sight! -
Shape the Rolls:
Once risen, punch the dough down, then divide it into 12 equal pieces (you can make them smaller or larger depending on your needs). Shape each piece into a round ball by rolling it gently between your palms. -
Final Rise:
Place the shaped rolls in a greased baking dish, leaving a little space between them, and cover for another 10 minutes. They’ll rise again, creating a fluffy texture. -
Bake ‘Em Up:
Preheat your oven to 375°F (190°C). Once your rolls have risen, pop them in the oven for 15-20 minutes, or until golden brown and fragrant. Brush with melted butter at the end for an irresistible shiny finish!
Serving Suggestions
When those rolls come out of the oven, they’ll be calling your name! For the perfect presentation, place them in a rustic basket lined with a charming cloth. You can serve them warm with an assortment of toppings—think honey butter, herb-infused oil, or a sprinkle of flaked sea salt. Pair them up with a hearty soup or your favorite roast, and watch how they disappear before your eyes!
Recipe Variations
Here are a few creative twists you can try with these dinner rolls:
-
Garlic-Parmesan Rolls:
Brush melted butter mixed with minced garlic on top before baking, then sprinkle with grated Parmesan cheese just before they finish baking. -
Herb-Infused Rolls:
Mix dried herbs like rosemary, thyme, or garlic powder into the flour! It adds fragrant flavor that elevates the rolls to your next dinner party! -
Cinnamon Rolls:
For sweet breakfast buns, add a sprinkle of cinnamon and sugar to the rolled pieces and enjoy them with cream cheese frosting! -
Cheesy Jalapeño Rolls:
Add a handful of shredded cheddar cheese and chopped jalapeños to the dough for a spicy kick! -
Chocolate Chip Rolls:
Fold in mini chocolate chips for a sweet treat, perfect as a dessert option!
Chef’s Notes
Baking is always a little wild, and my journey with these 30-minute dinner rolls has been no exception. I’ve had my share of experiments—from oversized rolls that turned into soft breadsticks (delicious nonetheless) to using leftover pizza dough for fun variations. Embrace the journey, folks! Each roll might be slightly different, but that’s part of the fun. And remember, the best recipes are not only about the ingredients, but the love you put into it!
FAQs and Troubleshooting
-
Why didn’t my rolls rise?
Double-check your yeast! If it’s not active (no foamy bubbles), the rolls won’t rise. Ensure water is warm—not hot! -
My dough is too sticky. What should I do?
A bit of extra flour while kneading should help. Just make sure to keep the stickiness since this will give you fluffy rolls. -
Can I make the dough ahead of time?
Yes! You can make the dough and place it in the fridge for up to 24 hours. Let it come to room temperature before shaping. -
How do I store leftovers?
Keep them in an airtight container at room temperature for about 2 days or in the fridge. You can reheat them in the microwave or the oven for a few minutes!
Nutritional Info
While I won’t bore you with a hard calorie count (because joy in cooking is all about savoring—right?), each dinner roll will give you that warm and happy feeling without too much guilt! As a rough estimate, each roll contains around 130 calories, depending on size and toppings.
These rolls are relatively low in sugar and fat, especially if you make swaps like Greek yogurt instead of oil or whole wheat flour. They also provide a good dose of carbohydrates for that quick energy boost!
Final Thoughts
So there you have it, my friend! Your guide to whipping up the most delicious, 30-minute dinner rolls that’ll have everyone around your table clamoring for another helping. Just remember—baking is an adventure, one that should be enjoyed and shared! Set aside your hesitations, roll up your sleeves, and don’t forget to enjoy every moment, especially when that first golden, soft roll comes out of the oven.
Let’s create more kitchen memories together! Happy baking, and bon appétit!
Print
30-Minute Dinner Rolls
- Total Time: 45 minutes
- Yield: 12 servings 1x
- Diet: Vegetarian
Description
Delightful, pillowy dinner rolls ready in just 30 minutes, bringing warmth and comfort to your table.
Ingredients
- 1 1/4 cups warm water
- 1/4 cup sugar
- 2 Tbsp. active dry yeast
- 1/3 cup vegetable oil
- 1 tsp. salt
- 1 egg
- 3 3/4 cups all-purpose flour
Instructions
- Proof the yeast: In a bowl, mix warm water, sugar, and active dry yeast. Stir gently and let it sit for about 5-10 minutes until it gets foamy.
- Mix the wet ingredients: Once your yeast is all frothy, whisk in the vegetable oil and the egg.
- Combine flour and salt: In a separate bowl, mix the flour and salt. Gradually add this to your wet mixture.
- Knead the dough: Turn the dough out onto a floured surface and knead it for about 5 minutes.
- Let it rise: Shape your dough into a ball and place it in a greased bowl, covering it with a clean kitchen towel. Set it in a warm place for about 10 minutes.
- Shape the rolls: Once risen, punch the dough down, then divide it into 12 equal pieces.
- Final rise: Place the shaped rolls in a greased baking dish, leaving a little space between them, and cover for another 10 minutes.
- Bake ‘em up: Preheat your oven to 375°F (190°C). Once your rolls have risen, pop them in the oven for 15-20 minutes.
Notes
You can substitute ingredients like honey instead of sugar or use melted butter for the oil. Store leftovers in an airtight container for up to 2 days.
- Prep Time: 15 minutes
- Cook Time: 30 minutes
- Category: Bread
- Method: Baking
- Cuisine: American
Nutrition
- Serving Size: 1 roll
- Calories: 130
- Sugar: 5g
- Sodium: 200mg
- Fat: 5g
- Saturated Fat: 1g
- Unsaturated Fat: 4g
- Trans Fat: 0g
- Carbohydrates: 20g
- Fiber: 1g
- Protein: 3g
- Cholesterol: 20mg
Keywords: dinner rolls, quick bread, baking, yeast rolls
Minute Pumpkin Buttermilk Biscuits for Fall Breakfast
The Irresistible Allure of Pumpkin Buttermilk Biscuits
Hey there, food lovers! If you’re anything like me, you believe that each season deserves its own special flavor, and nothing embodies the cozy magic of fall quite like the aroma of freshly baked pumpkin buttermilk biscuits wafting through the kitchen. Imagine waking up on a crisp autumn morning, the leaves crunching underfoot, and the warmth of the oven welcoming you like an old friend. That’s the feeling we’re capturing today, and I couldn’t be more excited to share my fabulous recipe for these delightful biscuits.
Pumpkin buttermilk biscuits are the perfect blend of sweet and savory. With a tender crumb and a hint of warm spices, they make a delightful addition to any breakfast or brunch spread, slathered with butter and maybe even a drizzle of honey. Plus, they’re super easy to whip up, making them an ideal choice for both beginner bakers and seasoned chefs.
But these biscuits are more than just savory goodness; they’re a heartfelt nod to cherished moments—those comfy kitchen gatherings where stories are exchanged over shared plates. So let’s roll up our sleeves, dust off our aprons, and dive into this delightful recipe together!
A Cozy Culinary Memory
The inspiration for these pumpkin buttermilk biscuits comes from a cherished memory with my grandmother during my childhood. Every autumn, she would gather the family for a cozy weekend in her old farmhouse. The air would be filled with the intoxicating scent of cinnamon and nutmeg as we prepped for our annual fall feast.
I remember one particularly chilly morning when she decided to try her hand at something new: pumpkin buttermilk biscuits. While we fumbled with the dough, she shared stories of her own grandmother who would bake similar treats. I still hold onto that feeling of warmth and love, standing shoulder to shoulder in the kitchen, flour dust raining like confetti. We pulled those golden-brown biscuits from the oven, letting the warmth wrap around us like a hug.
As we sat around the table, biscuits in hand, piled high with honey and butter, I realized that food was more than just sustenance; it was a way of connecting with the ones we love. And every time I whip up a batch of these biscuits, that memory comes flooding back, reminding me of the special bonds we create over shared meals.
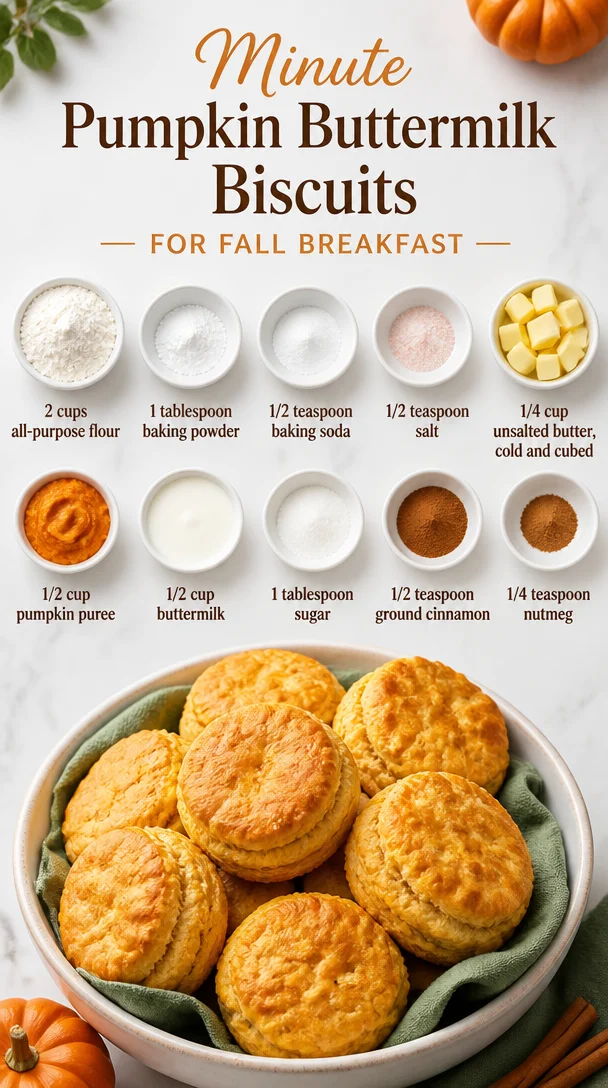
Ingredients: Building Blocks of Flavor
Let’s gather our ingredients! Here’s what you’ll need to create these scrumptious biscuits:
-
2 cups all-purpose flour
This is the foundation of your biscuits. If you want a healthier twist, feel free to substitute half with whole wheat flour for added fiber and a nutty flavor. -
1 tablespoon baking powder
This helps our biscuits rise. If you’re out of baking powder, you can make a quick substitute using 1/2 teaspoon baking soda plus 1 teaspoon vinegar. -
1/2 teaspoon baking soda
A companion to the baking powder to enhance the rise and create a tender biscuit. -
1/2 teaspoon salt
This balances the flavors perfectly. You could swap it for sea salt or Himalayan salt if you prefer. -
1/4 cup unsalted butter, cold and cubed
The key to flaky biscuits! Cold butter ensures that your biscuits maintain their structure. If you want a dairy-free option, coconut oil works well too. -
1/2 cup pumpkin puree
Not just for flavor; it adds moisture and a beautiful orange hue! You can also use mashed sweet potato if you’re looking for a twist. -
1/2 cup buttermilk
Its tanginess and acidity create a soft texture. If you don’t have buttermilk, mix 1/2 cup of milk with 1/2 tablespoon of lemon juice or vinegar to mimic the acidity. -
1 tablespoon sugar
Just a touch of sweetness to balance flavors. Coconut sugar or honey can be used as alternatives. -
1/2 teaspoon ground cinnamon
This warm spice adds a fall flair. Feel free to experiment with pumpkin pie spice for an extra kick! -
1/4 teaspoon nutmeg
Nutmeg offers a lovely depth of flavor. It’s stronger than cinnamon, so a pinch goes a long way.
With these simple yet flavorful ingredients, you’re on your way to creating a batch of heavenly pumpkin buttermilk biscuits!
Step-by-Step Instructions: Bake Your Biscuits with Love
Ready to bring these biscuits to life? Follow these steps for biscuit perfection!
Step 1: Preheat Your Oven
Preheat your oven to 425°F (220°C). The high heat is what will make these biscuits rise beautifully!
Step 2: Mix Dry Ingredients
In a large mixing bowl, whisk together the flour, baking powder, baking soda, salt, cinnamon, and nutmeg until well combined. This step ensures that the leavening agents and spices are evenly distributed, giving you that perfect rise and flavor.
Step 3: Cut in the Butter
Take your cold, cubed butter and add it to the flour mixture. Using a pastry cutter or your fingertips, cut the butter into the flour until you have a mixture that resembles coarse crumbs. The goal is to have small, pea-sized pieces of butter visible. This is what will keep your biscuits flaky!
Step 4: Fold in Pumpkin and Buttermilk
Now, create a well in the center of the dry ingredients and add in the pumpkin puree and buttermilk. Gently fold everything together with a spatula. Be careful not to overmix! You want just combined—overworking the dough can lead to tough biscuits.
Step 5: Shape the Dough
Lightly flour your work surface and turn out the dough. Gently pat it down until it’s about 1-inch thick. You can use a dough cutter or biscuit cutter to cut out rounds.
Step 6: Bake the Biscuits
Place the biscuits on a parchment-lined baking sheet, leaving a little space between each. Bake them in your preheated oven for 12-15 minutes, until they are golden brown on top and a toothpick comes out clean.
Step 7: Cool and Enjoy
Let the biscuits cool slightly on a wire rack. Trust me, the aroma will be irresistible! Serve them warm with butter, honey, or your favorite jam.
Chef’s Tip: Want to add a little flair? Brush the tops with melted butter just after taking them out of the oven for that extra sheen and richness.
Serving Suggestions: How to Plate Like a Pro
When it comes to serving these delightful pumpkin buttermilk biscuits, presentation is key! Here are a few suggestions to make them truly shine:
-
Classic Serving: Place the biscuits in a basket lined with a clean kitchen towel to keep them warm. This rustic style is perfect for brunches or casual gatherings.
-
Fancy Touch: For a more gourmet approach, stack the biscuits on a tiered cake stand and drizzle some honey or maple syrup over the top for an inviting centerpiece.
-
Pairing Ideas: Don’t stop at just biscuits! Serve with scrambled eggs, crispy bacon, or a fresh fruit salad for a complete breakfast experience.
-
Spread It Out: Offer a variety of spreads—think butter, pumpkin butter, or even flavored cream cheese to cater to different tastes.
Recipe Variations: Get Creative!
The beauty of these pumpkin buttermilk biscuits is their versatility! Here are some fun variations you can try to mix things up:
-
Cheese and Herb Biscuits: Add shredded cheddar cheese and fresh herbs like rosemary or thyme for a savory spin.
-
Chocolate Chip Delight: Stir in some semi-sweet chocolate chips for a sweet treat, perfect for brunch!
-
Spicy Maple: Add a teaspoon of cayenne pepper to the dry ingredients for a spicy kick, balancing it with a drizzle of maple syrup.
-
Gluten-Free Option: Substitute the all-purpose flour with a gluten-free blend. Just ensure your baking powder is gluten-free as well.
-
Dairy-Free: Use almond milk and a dairy-free butter alternative, and you’ve got a delicious version for those with lactose intolerance!
Chef’s Notes: A Little Extra Love
As I mentioned earlier, these biscuits have a special place in my heart. They remind me of family, laughter, and comforting moments spent in the kitchen. Over the years, I’ve played around with this recipe, and each tweak has only enhanced the experience.
I vividly recall a time when I forget to add baking powder—can you imagine? The biscuits still tasted good, but they were flat as pancakes! I learned that day the importance of that little pink cap can. So don’t rush the steps; each one has its purpose.
And remember: cooking is as much about enjoying the process as it is about the outcome. Don’t worry if they don’t look perfect; just embrace the love you put into them!
FAQs and Troubleshooting
1. Why are my biscuits tough?
If your biscuits come out tough, it may be due to overmixing the dough. Gently fold the ingredients just until combined for tender, flaky biscuits.
2. Can I make this dough ahead of time?
Absolutely! You can prepare the dough and refrigerate it for up to 24 hours before baking. Just remember to let it sit at room temperature for a few minutes before cutting.
3. What if I don’t have buttermilk?
You can easily make a buttermilk substitute! Just mix 1/2 cup of milk (dairy or plant-based) with 1/2 tablespoon of vinegar or lemon juice. Let it sit for a few minutes until it thickens.
4. How can I store leftover biscuits?
Store any leftovers in an airtight container at room temperature for a couple of days, or pop them in the fridge for up to a week. They’re also great to freeze for up to three months—just reheat when the cravings hit!
Nutritional Info
While I believe in enjoying food and indulging in treats like these biscuits, it’s good to be aware of what’s going into your beloved recipes. Here’s a rough breakdown of the nutrition per biscuit (from the full batch of about eight):
- Calories: ~180
- Fat: 6g
- Carbohydrates: 26g
- Protein: 3g
- Fiber: 1g
- Sugar: 2g
- Sodium: 190mg
(These values can vary based on ingredient brands and measurements.)
Final Thoughts
There you have it, my friends—a warm, inviting journey into the world of pumpkin buttermilk biscuits! Whether you’re crafting them for family gatherings, brunch with friends, or just because you need a little comfort in your life, I hope these biscuits bring as much joy to you as they do for me.
Remember, good food isn’t just about the recipe; it’s about the memories, the laughter, and the connections it creates. So get ready to indulge in a little piece of autumn heaven—I can’t wait to hear about your biscuit adventures!
Join me next time, and until then, happy cooking! 🍂🍴
Print
Pumpkin Buttermilk Biscuits
- Total Time: 30 minutes
- Yield: 8 biscuits 1x
- Diet: Vegetarian
Description
Delightful pumpkin buttermilk biscuits with a tender crumb and warm spices, perfect for breakfast or brunch.
Ingredients
- 2 cups all-purpose flour
- 1 tablespoon baking powder
- 1/2 teaspoon baking soda
- 1/2 teaspoon salt
- 1/4 cup unsalted butter, cold and cubed
- 1/2 cup pumpkin puree
- 1/2 cup buttermilk
- 1 tablespoon sugar
- 1/2 teaspoon ground cinnamon
- 1/4 teaspoon nutmeg
Instructions
- Preheat your oven to 425°F (220°C).
- Mix the flour, baking powder, baking soda, salt, cinnamon, and nutmeg in a large mixing bowl until combined.
- Cut in the cold, cubed butter until the mixture resembles coarse crumbs.
- Fold in the pumpkin puree and buttermilk gently until just combined.
- Shape the dough on a floured surface and cut out rounds.
- Bake the biscuits on a parchment-lined sheet for 12-15 minutes until golden brown.
- Cool slightly on a wire rack and serve warm with butter or honey.
Notes
For extra flavor, brush the tops with melted butter after baking. You can also add cheese and herbs or chocolate chips for variations.
- Prep Time: 15 minutes
- Cook Time: 15 minutes
- Category: Breakfast
- Method: Baking
- Cuisine: American
Nutrition
- Serving Size: 1 biscuit
- Calories: 180
- Sugar: 2g
- Sodium: 190mg
- Fat: 6g
- Saturated Fat: 4g
- Unsaturated Fat: 2g
- Trans Fat: 0g
- Carbohydrates: 26g
- Fiber: 1g
- Protein: 3g
- Cholesterol: 15mg
Keywords: pumpkin, biscuits, fall recipe, breakfast, easy baking
Minute Apple Crumble Cheesecake: Easy One-Bowl Recipe
The Ultimate Guide to Making an Irresistible Apple Crumble Cheesecake
Hey there, fellow foodies! I’m Beau Collier, your friendly guide to all things delicious here at Feastical! If you’ve ever found yourself longing for a dessert that combines the richness of cheesecake with the comforting crunch of apple crumble, then you’ve hit the jackpot! Today, we’re diving into the delightful world of Apple Crumble Cheesecake, a dessert that’s sure to steal the show at any gathering. Buckle up as we whip together a treat that feels like a warm hug on a plate!
Introduction: A Dessert to Remember
There’s something magical about dessert that brings people together. I can still remember the very first time I tasted an Apple Crumble Cheesecake. I was at my grandmother’s house for Thanksgiving, and the sweet aromas of cinnamon, butter, and baked apples wafted through her cozy kitchen. As we gathered around the table, she brought out this beautiful cheesecake adorned with the golden crumble topping. With whipped cream in hand, we knew we were in for something special.
Why do I love this dessert so much? It’s a beautiful fusion of textures and flavors—the creamy, smooth cheesecake perfectly complemented by the creamy apple filling and a crunchy, buttery crumble topping. It’s a classic comfort food with a twist, making it an ideal dessert for any occasion, from family gatherings to a cozy night in.
And let’s not forget the best part: it’s surprisingly simple to make! Trust me, even if you’re still trying to figure out where your spatula went, you can whip this up and impress your friends and family. So, are you ready to create a dessert that not only tastes incredible but also fills your kitchen with heavenly aromas? Let’s get started on this Apple Crumble Cheesecake!
Personal Story: A Family Tradition
Every family has its own cherished traditions, and mine certainly includes dessert. My grandmother was the queen of sweets, and gatherings at her house were always centered around her infamous cheesecake. One memorable evening, she added her own twist to the classic recipe by incorporating apple pie filling and a crumbly topping. That first bite was like a party in my mouth—a creamy cheesecake layer topped with sweet, spiced apples and finished off with the crunch of a homemade crumble.
After we demolished that cheesecake, Grandma shared her secret ingredient: love. “Everything tastes better when made with love,” she said, with a twinkle in her eye. It’s a lesson I carry with me in every dish I create, and I hope it resonates with you as we embark on this Apple Crumble Cheesecake adventure together.
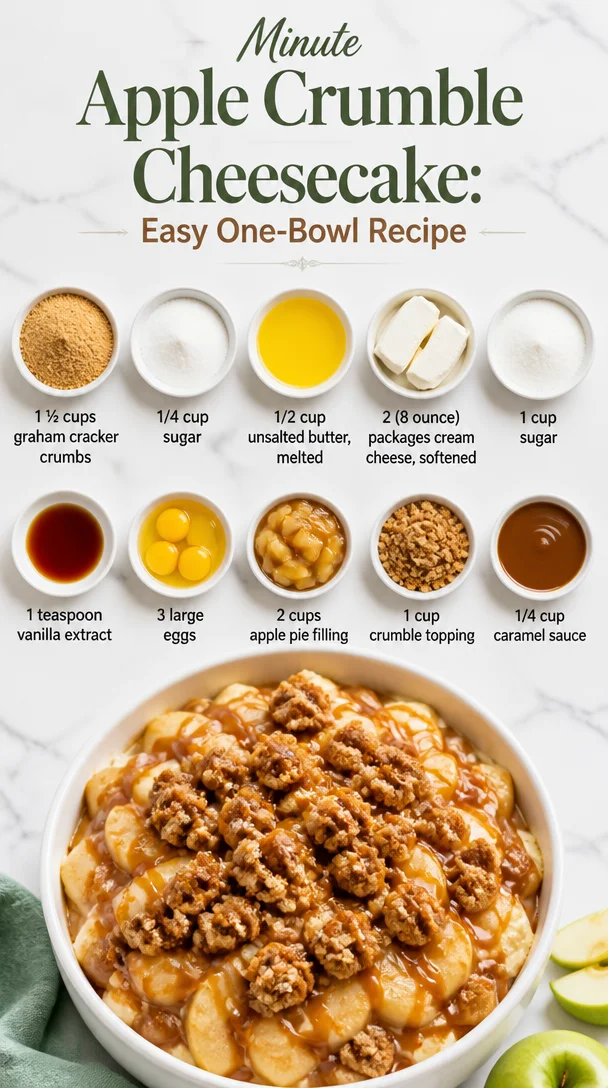
Ingredients
Here’s what you’ll need to whip up this amazing dessert:
-
1 ½ cups graham cracker crumbs
Perfect for that classic cheesecake crust. You can substitute with crushed digestive biscuits for a different flavor profile. -
1/4 cup sugar
This adds sweetness to the crust. Brown sugar can be used for a deeper flavor, or you can skip it altogether if you prefer. -
1/2 cup unsalted butter, melted
Butter holds the crust together and gives it richness. If you’re looking for a dairy-free option, coconut oil works wonders! -
2 (8-ounce) packages cream cheese, softened
Cream cheese is the star of the cheesecake. For a lighter option, use Neufchâtel cheese, which has less fat but a similar taste. -
1 cup sugar
This sweetens up the filling nicely! Feel free to experiment with less sugar or even a sugar substitute like agave or honey if you’re watching calories. -
1 teaspoon vanilla extract
Vanilla adds depth and flavor to the cheesecake. Don’t skimp here—use pure vanilla for the best taste! -
3 large eggs
They help set the structure of the cheesecake. If you’re looking for an eggless version, consider using a flax egg (1 tablespoon ground flaxseed mixed with 3 tablespoons of water) for every egg. -
2 cups apple pie filling
This gives a wonderful apple flavor without the hassle of making filling from scratch! If you’re feeling adventurous, homemade filling is also an option. -
1 cup crumble topping
A delightful, crunchy layer for that extra texture. You can use store-bought crumble mix or make your own for freshness. -
1/4 cup caramel sauce
For drizzling on top! Using homemade caramel elevates this dessert, but store-bought works perfectly in a pinch.
Step-by-Step Instructions
Now that we have our ingredients ready, let’s get down to business! Here’s how to make this scrumptious Apple Crumble Cheesecake step by step.
-
Preheat the Oven:
Start by preheating your oven to 325°F (160°C). This ensures the cheesecake cooks evenly. While it heats, let’s prepare the crust! -
Make the Crust:
In a mixing bowl, combine the graham cracker crumbs, sugar, and melted butter. Mix until the crumbs are well-coated and resemble wet sand. Press this mixture firmly into the bottom of a 9-inch springform pan. Use the back of a measuring cup to pack it down for a solid base. This step is crucial for keeping the crust crunchy, so make sure it’s nice and compact! -
Bake the Crust:
Place the crust in the preheated oven for about 10 minutes. This helps to set the crust and avoid a soggy bottom. While it’s baking, let’s prepare the cheesecake filling. -
Prepare the Filling:
In a large mixing bowl, beat the softened cream cheese and sugar together until smooth and creamy. Scrape down the sides of the bowl to ensure everything is incorporated. This step is essential; it helps to avoid lumps in your cheesecake. -
Add the Eggs:
Add the eggs one at a time, mixing after each addition until just combined. Don’t overmix; you want the mixture to be smooth but not frothy. -
Add the Vanilla:
Mix in the vanilla extract. This is where that delicious flavor really starts to come through! -
Layer the Apple Filling:
Pour half of the cheesecake batter into the crust. Spread the apple pie filling evenly over it, then pour the remaining cheesecake batter on top. This layering technique creates beautiful swirls of apple goodness throughout your cheesecake. -
Add the Crumble:
Sprinkle the crumble topping over the cheesecake batter—don’t be shy, make it generous! This will bake into the top, creating that perfect crunchy finish we love. -
Bake the Cheesecake:
Place the cheesecake in the oven for about 55-60 minutes, or until the edges are set and the center is slightly jiggly. Don’t panic if it’s a tad wobbly still; it will firm up as it cools! -
Cool:
Once it’s done baking, turn off the oven and crack the door ajar. Let the cheesecake cool slowly in the oven for about an hour. This prevents cracking and helps it set perfectly. -
Chill:
After the cheesecake cools in the oven, transfer it to the fridge and chill for at least 4 hours, or overnight if you can wait that long! -
Serve with Caramel:
When you’re ready to serve, drizzle caramel sauce over the top and slice it up. Get your forks ready—it’s time to dig in!
Serving Suggestions
To wow your guests, consider serving your Apple Crumble Cheesecake with a dollop of freshly whipped cream or a scoop of vanilla ice cream on the side. You can even add a sprinkle of cinnamon for that comforting, warm aroma. If you’re feeling extra fancy, a pinch of sea salt on top of the caramel sauce elevates the flavors beautifully. Alternatively, serve it along with a hot cup of coffee or tea for the ultimate comforting experience!
Recipe Variations
While this Apple Crumble Cheesecake is divine as is, there are tons of ways to mix it up!
-
Nutty Crumble: Add chopped walnuts or pecans to the crumble topping for a delightful crunch and a burst of nutty flavor.
-
Spiced Pear: Swap the apple pie filling for spiced pear filling for a different fruity experience that’s equally comforting.
-
Chocolate Drizzle: For a twist on flavors, add a chocolate drizzle alongside the caramel for a peanut butter cup vibe.
-
Mini Cheesecakes: Want to impress at parties? Make mini cheesecakes in muffin tins! Just adjust the bake time to about 20-25 minutes.
-
Vegan Version: Use cashew cream or silken tofu blended with cocoa for a vegan-friendly cheesecake. Just make sure to substitute your sugar and crust with vegan alternatives.
Chef’s Notes
This Apple Crumble Cheesecake has been a personal favorite of mine for many years, and I love how it makes people feel! The beauty of this recipe is its versatility. I’ve often added seasonal spices or fresh fruits, depending on what I had on hand or what appealed to my mood that day. I remember one Thanksgiving where I decided to throw in some cranberries for a festive touch, and let me tell you, it was a hit! Remember, the kitchen is a place of joy and creativity. Don’t be afraid to make it your own!
FAQs and Troubleshooting
-
Why did my cheesecake crack?
Cheesecakes can be sensitive to temperature changes. Make sure you cool it gradually in the turned-off oven and avoid opening the door frequently while it bakes. -
How do I know when my cheesecake is done?
Check for a set outer edge and a slightly jiggly center. It will continue to set as it cools, so don’t over-bake! -
Can I freeze the cheesecake?
Absolutely! Wrap it tightly and freeze for up to 3 months. Just let it thaw in the fridge overnight when you’re ready to enjoy it again. -
What’s the best way to cut cheesecake?
Use a hot knife (run it under hot water and dry it) for clean slices. Wipe the knife between cuts to keep each piece looking pristine!
Nutritional Info
While it’s always tempting to dive into dessert without thinking about the nutritional aspects, it’s good to keep in mind that this Apple Crumble Cheesecake is considered a treat.
- Approximate Serving Size: 1 slice (based on 12 servings)
- Calories: 380
- Total Fat: 25g
- Saturated Fat: 15g
- Cholesterol: 90mg
- Sodium: 350mg
- Total Carbohydrates: 38g
- Dietary Fiber: 1g
- Sugars: 24g
- Protein: 5g
Remember, this dessert shines best when shared with loved ones, so enjoy every bite guilt-free!
Final Thoughts
Embarking on the journey of creating an Apple Crumble Cheesecake is not just about the destination of enjoying a delicious dessert; it’s about the joy of creating something wonderful with your own hands. Each step carries the spirit of togetherness, nostalgia, and sweetness that makes this dish a true celebration of life.
So, whether you’re sharing it at a family gathering, a friendly get-together, or a cozy evening just for yourself, I hope this cheesecake brings as much joy to your heart as it has to mine over the years. Remember, friends, cooking should be fun and filled with love, so take your time, experiment, and enjoy every moment. Happy baking, and I can’t wait to hear how your Apple Crumble Cheesecake turns out! Cheers!
Print
Apple Crumble Cheesecake
- Total Time: 80 minutes
- Yield: 12 servings 1x
- Diet: Vegetarian
Description
A delightful fusion of creamy cheesecake and crunchy apple crumble, this Apple Crumble Cheesecake is the perfect dessert for any occasion.
Ingredients
- 1 ½ cups graham cracker crumbs
- 1/4 cup sugar
- 1/2 cup unsalted butter, melted
- 2 (8-ounce) packages cream cheese, softened
- 1 cup sugar
- 1 teaspoon vanilla extract
- 3 large eggs
- 2 cups apple pie filling
- 1 cup crumble topping
- 1/4 cup caramel sauce
Instructions
- Preheat the oven to 325°F (160°C).
- Combine the graham cracker crumbs, sugar, and melted butter in a mixing bowl. Press the mixture into the bottom of a 9-inch springform pan.
- Bake the crust in the preheated oven for about 10 minutes.
- Beat the softened cream cheese and sugar together until smooth and creamy.
- Add the eggs one at a time, mixing after each addition until just combined.
- Mix in the vanilla extract.
- Pour half of the cheesecake batter into the crust and spread the apple pie filling evenly over it. Then pour the remaining cheesecake batter on top.
- Sprinkle the crumble topping over the cheesecake batter generously.
- Bake the cheesecake in the oven for about 55-60 minutes.
- Cool the cheesecake in the oven with the door ajar for about an hour before transferring it to the fridge.
- Chill for at least 4 hours, or overnight.
- Drizzle caramel sauce over the cheesecake before serving.
Notes
Serve with whipped cream or a scoop of vanilla ice cream for added indulgence.
- Prep Time: 20 minutes
- Cook Time: 60 minutes
- Category: Dessert
- Method: Baking
- Cuisine: American
Nutrition
- Serving Size: 1 slice
- Calories: 380
- Sugar: 24g
- Sodium: 350mg
- Fat: 25g
- Saturated Fat: 15g
- Unsaturated Fat: 5g
- Trans Fat: 0g
- Carbohydrates: 38g
- Fiber: 1g
- Protein: 5g
- Cholesterol: 90mg
Keywords: cheesecake, dessert, apple crumble, baking, sweet treat
Autumn Pumpkin Trifle Recipe: Make-Ahead Creamy Dessert
Pumpkin Trifle Recipe: A Cozy Slice of Autumn
Hey there, food enthusiasts! Today we’re diving into a delightful dessert that will make your taste buds dance and your heart hum with joy: a Pumpkin Trifle! There’s just something about fall that brings out the warm and cozy flavors, right? And this trifle recipe is the perfect way to celebrate the season while bringing a little bit of cheer to your kitchen.
Introduction
Picture this: the crisp autumn air is mingling with the sweet aroma of spices, the leaves are turning golden, and the excitement of gathering around the dinner table with family and friends is palpable. That’s the magic of the fall season—and what better way to embrace it than with a stunning Pumpkin Trifle?
This dessert is not just a feast for the eyes; it’s an explosion of flavors that combines creamy pumpkin goodness, spiced cake, and a heavenly whipped cream topping. The layers come together beautifully, creating a lovely presentation that will impress your guests. Plus, the best part is, it’s super easy to whip up, so you won’t be drowning in dishes after dessert.
I love whipping up this Pumpkin Trifle for gatherings, cozy get-togethers, or just a little indulgence on a chilly evening. It’s a straightforward recipe that embodies the comfort food essence—I promise you’ll be spooning up seconds (and maybe even thirds) before you know it!
So, strap on that apron, grab your favorite mixing bowl, and let’s get started on this mouthwatering journey together!
Personal Story
One of my fondest memories is making this Pumpkin Trifle with my grandmother every fall. Her kitchen always smelled like a blend of spices and sweetness, a warmth that enveloped you as soon as you stepped inside. I remember the first time we made it together—I was just a kid, barely able to see over the counter, but I loved every minute of our baking session.
My grandma had this magical way of making cooking feel like an adventure. As we folded the whipped cream into the pumpkin mixture, she shared stories of her childhood and how her mother made pumpkin desserts for holiday feasts. That connection we shared over mixing and layering was priceless. This Pumpkin Trifle held a special place in my heart, representing not just the flavors of fall but the love and laughter that filled our kitchen.
Now, whenever I make this trifle, I can almost hear her voice, reminding me that cooking is about more than just food—it’s about creating memories. So, whether you’re making this for a party, a family gathering, or just for you, remember that love is the secret ingredient!
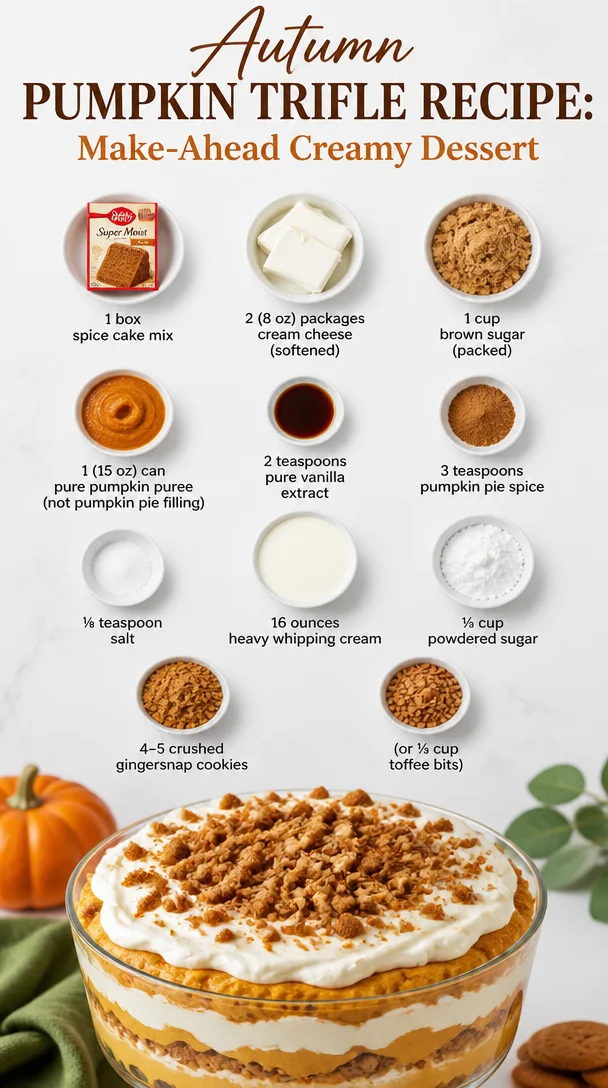
Ingredients
Gathering your ingredients is half the fun! Here’s what you’ll need for this luscious Pumpkin Trifle:
-
1 box spice cake mix
The star base! Feel free to swap in a vanilla cake mix if spices aren’t your thing. For a gluten-free version, look for a gluten-free cake mix at your local store. -
2 8-ounce packages cream cheese (softened)
Cream cheese adds a delightful tanginess. If you want a lighter option, try using Neufchâtel cheese or even mascarpone for a richer flavor. -
1 cup brown sugar (packed)
This sweetener enhances the molasses flavor from the brown sugar. You can substitute it with coconut sugar for a healthful twist. -
1 15-ounce can pure pumpkin puree (not pumpkin pie filling)
Pure pumpkin puree provides that earthy sweetness and bright orange color. Make it from scratch if you’re feeling adventurous, just roast fresh pumpkins! -
2 teaspoons pure vanilla extract
Always go for pure vanilla for depth in flavor. It can be swapped with almond extract for a nutty note. -
3 teaspoons pumpkin pie spice
A blend of cinnamon, nutmeg, ginger, and allspice that defines fall. You can make your own by mixing these spices in equal parts. -
⅛ teaspoon salt
Just a pinch elevates all the flavors! You can omit it if you’re watching sodium intake. -
16 ounces heavy whipping cream
This is what makes that fluffy whipped topping! For a dairy-free option, try coconut cream or whipped silken tofu. -
⅓ cup powdered sugar
Sweetens the whipped cream seamlessly. Dates or honey can be alternatives if you want to skip processed sugar. -
4-5 crushed gingersnap cookies (or ⅓ cup toffee bits)
These add an extra crunch and flavor dimension! Feel free to use crushed graham crackers if you prefer a milder flavor.
Step-by-Step Instructions
Now, let’s get cooking! Follow these detailed steps for your Pumpkin Trifle:
-
Prepare the Spice Cake:
- Preheat your oven to 350°F (175°C). First things first, let’s bake that spice cake! Follow the directions on the box to mix up your batter. An easy chef hack: always mix the wet ingredients separately before combining them with the dry to ensure an even batter.
- Grease a 9×13-inch baking dish or your preferred cake pan, then pour in the batter. Bake as directed (usually around 25-30 minutes) or until a toothpick comes out clean. Once done, let it cool completely before proceeding.
-
Make the Cream Cheese Mixture:
- In a mixing bowl, beat the softened cream cheese until smooth. You can use a hand mixer or stand mixer for this, making your life simpler!
- Gradually add the packed brown sugar, the pumpkin puree, pumpkin spice, vanilla extract, and salt. Beat until everything is perfectly combined and fluffy. You’ll notice it should be smooth with no lumps!
-
Whip the Cream:
- In a separate mixing bowl, whip your heavy cream using a mixer until it forms soft peaks (not too stiff!). Slowly add the powdered sugar while mixing. This helps stabilize the whipped cream and gives it a subtle sweetness.
-
Fold it All Together:
- Now, here’s the fun part! Take a third of the whipped cream and gently fold it into the cream cheese mixture. This process lightens up the cream cheese, making it easier to blend with the rest of the whipped cream.
- Once combined, add the rest of the whipped cream and fold gently until it’s all incorporated. The fluffiness is part of what makes this trifle irresistible.
-
Layer the Trifle:
- To assemble, break your cooled spice cake into chunks or crumble it into pieces. Start with a layer of cake at the bottom of your trifle dish or individual serving cups. It doesn’t have to be perfect—rustic is charming!
- Follow with a layer of the pumpkin cream cheese mixture, followed by a layer of whipped cream. Repeat these layers until you reach the top of your trifle dish. I love finishing with whipped cream because it looks so inviting.
-
Top It Off:
- To add that finishing touch, sprinkle crushed gingersnap cookies or toffee bits on the top. This will add a delightful crunch that contrasts beautifully with the creamy layers.
-
Chill and Serve:
- Let your trifle chill in the refrigerator for at least an hour to set the flavors and for everything to marry beautifully. You can keep it chilled until you’re ready to serve, making this a perfect make-ahead dessert!
Serving Suggestions
When it comes to serving, presentation is everything! Here are a few ideas to dish out your Pumpkin Trifle in style:
-
Layered Glass Bowls: A clear glass bowl allows everyone to see the beautiful layers of cake and cream, adding a wow factor to your dessert. You can also use individual cups or jars for a personal touch.
-
Garnish: Top with a dollop of whipped cream and a sprinkle of pumpkin pie spice or a single gingersnap cookie for a lovely pop of color.
-
Spoon It Out: Grab a big serving spoon and let everyone help themselves. There’s something delightful about sharing dessert directly from a big bowl.
-
Add Some Fresh Whip: Right before serving, consider whipping up a bit more cream and placing a fluffy mound on top for that picture-perfect finish!
Recipe Variations
If you’re up for experimenting (which I highly encourage!), here are some creative twists on the classic Pumpkin Trifle:
-
Chocolate Pumpkin Trifle: Layer crushed chocolate cake instead of spice cake, and add chocolate chips to the cream cheese mixture for a rich chocolate experience.
-
Nutty Delight: Incorporate toasted nuts such as pecans or walnuts between layers for that crunch and flavor! Just make sure to chop them finely.
-
Fall Fruit Addition: Layer in some diced apples or pears for a fruity twist. Their sweetness will complement the pumpkin beautifully!
-
Dairy-Free Version: Swap out dairy ingredients with coconut cream, vegan cream cheese, and use maple syrup instead of powdered sugar for a delicious dairy-free mishmash.
-
Chai Spice Variation: Instead of the typical pumpkin pie spice, consider adding a chai spice blend for a unique flavor twist that packs a spicy punch!
Chef’s Notes
Over the years, this Pumpkin Trifle recipe has evolved significantly. I used to make it with a store-bought whipped topping, but honestly, nothing beats fluffy whipped cream made from scratch! The flavor is just unmatched—and it’s such a joy to fold it all together.
Funny enough, the first time I served this trifle at a family gathering, everyone dove in with spoons, and I didn’t even get a taste until the very end—my family loved it so much, they wolfed it down! Now, I always make a double batch just to ensure I can indulge too.
FAQs and Troubleshooting
1. Can I prepare the trifle in advance?
Absolutely! This trifle is fantastic to make ahead of time. Just prepare it a day in advance, store it covered in the fridge, and it will be ready when your guests arrive!
2. What can I do if my whipped cream deflates?
If your whipped cream deflates, it may be due to overmixing or not enough sugar. Chill your mixing bowl and beaters before whipping cream, and ensure you stop mixing as soon as soft peaks form.
3. Can I freeze the Pumpkin Trifle?
I’d recommend against freezing it, as the cream can separate upon freezing and thawing. It’s best enjoyed fresh after it has set in the fridge.
4. How can I make it less sweet?
You can reduce the amount of brown sugar in the cream cheese mixture and powdered sugar in your whipped cream. This will allow the pumpkin flavor to shine through even more!
Nutritional Info
This Pumpkin Trifle, though indulgent, provides a delightful treat during the fall festivities! Here’s a quick overview of the nutritional info (per serving based on 12 servings):
- Calories: 350
- Total Fat: 22g
- Saturated Fat: 12g
- Cholesterol: 80mg
- Sodium: 200mg
- Total Carbohydrates: 31g
- Dietary Fiber: 1g
- Sugars: 18g
- Protein: 6g
As with any dessert, moderate indulgence is key—so enjoy responsibly!
Final Thoughts
And there you have it—an easy, scrumptious Pumpkin Trifle that’s sure to be the star of your next gathering! Remember, cooking should be fun, so put your own spin on the recipe, make it your own, and savor every spoonful.
Whether you’re whipping it up for Thanksgiving, a cozy night in, or simply to celebrate fall, this trifle will wrap you in the warmth of the season. From one foodie to another, I hope you love it as much as I do. Happy cooking, and until next time—stay hungry for adventure in the kitchen!
Print
Pumpkin Trifle
- Total Time: 60 minutes
- Yield: 12 servings 1x
- Diet: Vegetarian
Description
A delightful and creamy Pumpkin Trifle that captures the essence of autumn with layers of spiced cake, pumpkin cream cheese, and fluffy whipped cream.
Ingredients
- 1 box spice cake mix
- 2 8-ounce packages cream cheese (softened)
- 1 cup brown sugar (packed)
- 1 15-ounce can pure pumpkin puree
- 2 teaspoons pure vanilla extract
- 3 teaspoons pumpkin pie spice
- ⅛ teaspoon salt
- 16 ounces heavy whipping cream
- ⅓ cup powdered sugar
- 4–5 crushed gingersnap cookies (or ⅓ cup toffee bits)
Instructions
- Preheat your oven to 350°F (175°C) and prepare the spice cake according to the box instructions.
- Grease a 9×13-inch baking dish and pour in the batter, baking as directed (25-30 minutes) until a toothpick comes out clean. Let it cool completely.
- Beat the softened cream cheese in a mixing bowl until smooth, then gradually add brown sugar, pumpkin puree, pumpkin spice, vanilla extract, and salt. Mix until fluffy.
- Whip the heavy cream in a separate bowl until soft peaks form. Slowly add the powdered sugar while mixing.
- Fold a third of the whipped cream into the cream cheese mixture, then gently incorporate the remaining whipped cream.
- Layer pieces of the cooled spice cake, followed by the pumpkin cream cheese mixture, and then whipped cream in a trifle dish or individual cups. Repeat layers and finish with whipped cream.
- Sprinkle crushed gingersnap cookies or toffee bits on top before chilling in the refrigerator for at least an hour.
Notes
For a gluten-free version, use a gluten-free cake mix. You can also try different variations like chocolate pumpkin trifle or add fresh fruit layers for a twist.
- Prep Time: 30 minutes
- Cook Time: 30 minutes
- Category: Dessert
- Method: Layering
- Cuisine: American
Nutrition
- Serving Size: 1 serving
- Calories: 350
- Sugar: 18g
- Sodium: 200mg
- Fat: 22g
- Saturated Fat: 12g
- Unsaturated Fat: 0g
- Trans Fat: 0g
- Carbohydrates: 31g
- Fiber: 1g
- Protein: 6g
- Cholesterol: 80mg
Keywords: Pumpkin Trifle, Fall Dessert, Autumn Recipe, Spiced Cake, Cream Cheese, Whipped Cream

One-Bowl 4-Ingredient Gluten-Free Pumpkin Oatmeal Cookies
Gluten-Free Pumpkin Oatmeal Cookies: A Cozy Treat
Hey there, fellow foodies! Today, we’re whipping up a batch of delightful Gluten-Free Pumpkin Oatmeal Cookies. These little wonders are not just a treat; they’re a warm hug in cookie form, perfect for snuggling up with a cup of tea or coffee. There’s something magical about the spices, the warmth of pumpkin, and, of course, the chocolate chips that can turn any day around—trust me on this one!
As the leaves begin to turn and the air fills with that famous fall scent—think cinnamon and nutmeg—I can’t help but think of the countless afternoons I spent baking with my grandmother. You see, she had this incredible knack for making the kitchen feel like home, and her pumpkin cookies were always the highlight of our fall gatherings. They were a simple mix of ingredients but felt like a celebration, especially when shared with family and friends.
Now, let me tell you, these gluten-free cookies come together with minimal fuss and maximum flavor. If you’ve ever struggled to find a cookie that checks all the boxes—delicious, easy to make, and a healthier choice—then you’re in for a treat. Let’s roll up our sleeves, don our aprons, and dive into this delightful recipe together!
A Little Taste of My Past
One of the fondest memories I have about baking came when I was about eight years old. I can vividly remember standing on a stool, peering over the counter where my grandmother prepped her famous pumpkin cookies. She would let me mix the dough with my tiny hands (which, let me tell you, felt like an absolute privilege). The moment the dough hit the oven, the scent filled the house, and we would have to restrain ourselves from stealing the first batch before the frosting had a chance to set!
Those afternoons weren’t just about baking; they were about lessons in patience, creativity, and the joy of cooking. And now, as I craft this gluten-free version of those beloved cookies, I can’t help but feel that same warmth spreading through my heart (and home). Each bite reminds me of those simpler times and how food can create lasting memories.
Ingredients
Now, let’s gather our ingredients for these gluten-free pumpkin oatmeal cookies. Here’s what you’ll need:
-
1 cup gluten-free oats: These will give your cookies that chewy texture. If you can’t find gluten-free oats, regular rolled oats could work, but make sure they’re certified gluten-free to avoid cross-contamination.
-
3/4 cup pumpkin puree: Pure pumpkin puree is the star of the show here! You can even use homemade pumpkin puree if you’re feeling adventurous! If you happen to be out of pumpkin, unsweetened applesauce can be a nice substitute—though you’ll lose that cozy pumpkin flavor.
-
1/4 cup maple syrup: This natural sweetener adds a delightful flavor. If you’re looking for a sugar-free option, try using monk fruit sweetener or stevia; just be mindful of the measurement conversions, as they vary.
-
1/2 cup chocolate chips: Because chocolate! Dark chocolate or dairy-free chocolate chips work perfectly here. If chocolate isn’t your thing, chopped nuts or dried fruit can add a lovely crunch or sweetness.
-
1 tsp cinnamon: This warm spice elevates the pumpkin flavor. Feel free to get creative—add a pinch of nutmeg or ginger for an extra kick!
-
A dash of salt: A little salt balances the sweetness and enhances all the flavors.
Step-by-Step Instructions
Alright, my culinary comrades, it’s time to roll up our sleeves and get cooking! Here’s how you make these scrumptious cookies:
-
Preheat your oven to 350°F (175°C). This is the perfect temperature for cookies: hot enough to get them fluffy but not so hot that they’ll burn.
-
Mix the dry ingredients: In a large mixing bowl, combine the gluten-free oats, cinnamon, and a dash of salt. Give it a gentle mix with a spoon or a whisk. This might sound a bit basic, but this ensures even distribution of the cinnamon!
-
Combine the wet ingredients: In a separate bowl, blend the pumpkin puree and maple syrup. If you want to give it even more flavor depth, consider adding a splash of vanilla extract!
-
Merge the mixtures: Pour the wet ingredients into the bowl with the dry ingredients. It’s a glorious mess at this stage—get in there and mix everything until just combined! A spatula or spoon works fine, but if you’re feeling cheeky, your hands will do a fantastic job.
-
Add chocolate chips: Now for the best part! Fold in those glorious chocolate chips until they’re evenly scattered. Is it just me, or does this part always feel like the cookie equivalent of adding sprinkles to ice cream?
-
Scoop and drop: Line a baking sheet with parchment paper (trust me, your future self will thank you for this). Use a cookie scoop or just two spoons to drop tablespoon-sized balls of dough onto the sheet. Leave some space between them; they’ll spread a little while baking.
-
Bake: Pop them in the oven and bake for 10-12 minutes. Keep an eye on them; you’re looking for the edges to turn golden brown. They will continue to firm up as they cool, so don’t worry if they seem a little soft coming out.
-
Cool and enjoy: Let them cool on the baking sheet for a few minutes before transferring to a wire rack. The aroma will be irresistible—you might just find it hard to resist one (or three) straight from the oven!
Serving Suggestions
Now that our cookies are baked to perfection, let’s talk about plating! These gluten-free pumpkin oatmeal cookies are fantastic on their own but can also be served in style.
-
Cookie Platter: Arrange them on a charming wooden board or a colorful plate. Add some fall-themed decorations like mini pumpkins or cinnamon sticks for that cozy vibe.
-
With a Drink: Pair these cookies with a warm chai latte, a cup of spiced apple cider, or even a simple glass of cold almond milk. The flavors will sing together, making for a delightful snack!
-
Store in Style: If you’re not devouring them all immediately (which, let’s be honest, is a real possibility), store them in an airtight container. Toss in a slice of bread to keep them fluffy and fresh.
Recipe Variations
Now, let’s get creative! Here are a few fun variations you might want to try:
-
Nutty Cinnamon Swirl: Add 1/2 cup of chopped walnuts or pecans for extra crunch and a boost of healthy fats. It gives a rustic vibe to your cookies!
-
Spiced Up Pumpkin: Add 1/4 teaspoon of nutmeg or ginger for a little more warmth. It’ll have your taste buds dancing!
-
Nut Butter Bliss: Stir in a couple of tablespoons of almond butter or peanut butter into the wet mixture for a creamier, richer cookie. It’s an absolute game-changer!
-
Coconut Cookie: Swap half of the oats for unsweetened shredded coconut. The combination of pumpkin and coconut is simply divine!
-
Vegan-Friendly: To cater to a vegan diet, ensure that the chocolate chips are dairy-free, and you can substitute maple syrup with agave syrup.
Chef’s Notes
Ah, the beauty of cookies is their adaptability. This particular recipe has evolved over the years. Initially, I thought I could only enjoy pumpkin in pie form. But after some trial and error (and more than a few cookie failures), I realized that pumpkin flourishes in cookies, too—especially gluten-free ones!
The moment I decided to incorporate oats into my pumpkin cookies was a game changer. Not only did it add heartiness, but it gave a wonderful chewy texture that holds up with each bite. Plus, let’s be real—who doesn’t want an excuse to have cookies that feel just a tad healthier?
If you have any kitchen adventures of your own using this recipe, please share! I love hearing about your baking tales and modifications!
FAQs and Troubleshooting
-
Why are my cookies dry? If you find your cookies are coming out dry, the culprit often lies in overmixing or over-baking. Keep an eye on them in the oven and take them out while they’re still slightly underdone; they’ll firm up as they cool.
-
Can I use pumpkin pie filling instead? While you can use pumpkin pie filling, it’s best to stick to pure pumpkin puree for this recipe to maintain control over sweetness and spices. The pre-seasoned filling may throw off the cookie flavor.
-
How do I prevent my cookies from sticking? Using parchment paper or a silicone baking mat on your baking sheet works wonders for preventing stickiness. Letting cookies cool slightly before moving them is also helpful.
-
What can I do with leftover pumpkin puree? Get creative! Mix pumpkin puree into smoothies, add it to oatmeal, or make a simple pumpkin soup. It freezes well, too, if you’re not ready to use it all at once.
Nutritional Info
These cookies are not only tasty but also packed with nutritious ingredients! Here’s a rough estimate of the nutritional breakdown for one cookie (assuming the recipe makes about 12 cookies):
- Calories: 120
- Protein: 2g
- Carbohydrates: 16g
- Fat: 5g
- Fiber: 2g
- Sugar: 5g
Of course, this can vary based on the specific brands and ingredients you use, but it highlights the fact that you’re indulging in a cookie that offers some nutritional value along with its delicious taste!
Final Thoughts
There you have it, my fellow bakers! A simple yet delightful recipe for gluten-free pumpkin oatmeal cookies that evokes warmth, nostalgia, and joy. Whether you’re making them for a cozy night in, a festive gathering, or just because it’s a Tuesday, they’re sure to brighten your day. Remember, cooking should be a joy—an experience to share, to experiment, and to create memories.
I hope you loved this recipe as much as I do! Don’t forget to share your baking adventures and variations with me. Until next time, happy baking, and may your kitchen always smell like cookies!
Print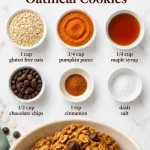
Gluten-Free Pumpkin Oatmeal Cookies
- Total Time: 27 minutes
- Yield: 12 cookies 1x
- Diet: Gluten-Free
Description
Delightful gluten-free pumpkin oatmeal cookies that evoke warmth and nostalgia, perfect for enjoying with a cup of tea or coffee.
Ingredients
- 1 cup gluten-free oats
- 3/4 cup pumpkin puree
- 1/4 cup maple syrup
- 1/2 cup chocolate chips
- 1 tsp cinnamon
- A dash of salt
Instructions
- Preheat your oven to 350°F (175°C).
- Mix the dry ingredients: In a large mixing bowl, combine the gluten-free oats, cinnamon, and a dash of salt.
- Combine the wet ingredients: In a separate bowl, blend the pumpkin puree and maple syrup.
- Merge the mixtures: Pour the wet ingredients into the bowl with the dry ingredients and mix until just combined.
- Add chocolate chips: Fold in the chocolate chips until evenly scattered.
- Scoop and drop: Line a baking sheet and drop tablespoon-sized balls of dough onto it, leaving some space.
- Bake: Pop them in the oven and bake for 10-12 minutes until edges turn golden brown.
- Cool and enjoy: Let them cool on the baking sheet for a few minutes before transferring to a wire rack.
Notes
These cookies are well enjoyed warm and can be stored in an airtight container with a slice of bread to keep them fluffy.
- Prep Time: 15 minutes
- Cook Time: 12 minutes
- Category: Dessert
- Method: Baking
- Cuisine: American
Nutrition
- Serving Size: 1 cookie
- Calories: 120
- Sugar: 5g
- Sodium: 50mg
- Fat: 5g
- Saturated Fat: 2g
- Unsaturated Fat: 3g
- Trans Fat: 0g
- Carbohydrates: 16g
- Fiber: 2g
- Protein: 2g
- Cholesterol: 0mg
Keywords: gluten-free, pumpkin cookies, oatmeal cookies, fall recipes, healthy desserts
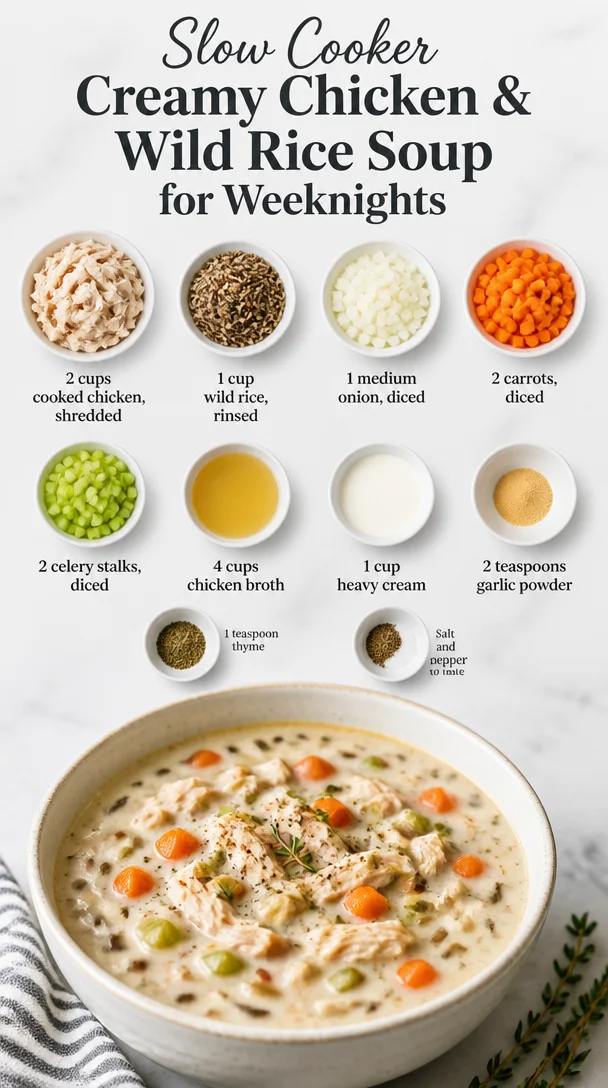
Slow Cooker Creamy Chicken & Wild Rice Soup for Weeknights
Welcome to Comfort: Crockpot Chicken and Wild Rice Soup
Hey there, all you food enthusiasts! Beau Collier here, and I’m thrilled to share one of my all-time favorite cozy recipes with you today: Crockpot Chicken and Wild Rice Soup. There’s just something magical about this dish, especially when the temperatures drop and the chill of winter sets in. It’s like a warm blanket for your soul, and I can’t wait to guide you through my tried-and-true method.
Let me tell you, there’s nothing easier—or more satisfying—than coming home to the comforting aromas wafting through your kitchen after a long day. This soup is not only easy to throw together, but it also allows the flavors to meld beautifully while you go about your day. A perfect option for busy weeknights or lazy Sundays! So grab your favorite mug, settle in, and let’s dig into this delightful recipe that’s sure to please even the pickiest eaters.
A Flavorful Memory
Every time I make this Crockpot Chicken and Wild Rice Soup, I’m transported back to my childhood! Picture this: a chilly autumn evening, and I’m sitting at the kitchen table, eager to hear about my family’s day. My mom would often make a big pot of soup that would simmer away gently, filling our home with comforting aromas. The sound of the spoon clinking against the pot would create a rhythm that felt so warm and inviting.
Wild rice was always a special treat in our house—we’d only have it a few times each year. My mom would urge us to be patient as the soup simmered, a task that tested my young enthusiasm. But when it was finally time to eat, wow! Each spoonful was a mix of tender chicken, hearty vegetables, and rich, creamy goodness that made all the waiting worthwhile. Those evenings were filled with laughter, stories, and a feeling of togetherness that I cherish to this day. Now, I love recreating that experience in my kitchen, hoping to pass on that same warmth and joy to everyone who shares this meal with me.
Ingredients
Let’s gather our ingredients! Here’s what you’ll need for this soul-warming soup:
-
2 cups cooked chicken, shredded
This can be rotisserie chicken or leftovers—whatever’s easiest for you! If you have leftover turkey, that works great too. Just remember to season it well as that sets the flavor base for our soup. -
1 cup wild rice, rinsed
Wild rice adds a unique nutty flavor and a chewy texture. Always rinse it before cooking to remove any debris. If you can’t find wild rice, a blend of brown rice or whole-grain rice can be a good substitute, though cooking times may vary. -
1 medium onion, diced
Onion is the foundation of flavor in many dishes. This will add a lovely sweetness! You can swap it for shallots if you want a milder taste. -
2 carrots, diced
Carrots add a pop of color and sweetness. You could use parsnips instead for a different flavor if you’re adventurous! -
2 celery stalks, diced
Celery adds crunch and brightness. Feel free to add more or omit it if you’re not a fan—no worries! -
4 cups chicken broth
Homemade broth is best, but store-bought works perfectly too. Low-sodium versions are great to control the saltiness of the final dish. -
1 cup heavy cream
This provides a creamy richness. You could substitute with half-and-half or coconut milk if you’re looking for a lighter or dairy-free option. -
2 teaspoons garlic powder
I love garlic flavor! But fresh minced garlic is also an excellent option if you prefer that punch of flavor. -
1 teaspoon thyme
A classic herb that pairs beautifully with chicken. You can also play around with fresh herbs like rosemary or oregano for additional depth. -
Salt and pepper to taste
Don’t skip these! They enhance all the flavors beautifully.
Step-by-Step Instructions
You ready? Let’s dive into the steps to create this fantastic Crockpot Chicken and Wild Rice Soup!
-
Prepare Your Ingredients:
Start by shredding your cooked chicken—whether you’re using leftovers or rotisserie chicken, make sure it’s bite-sized. Dice the onion, carrots, and celery. The key to a great soup is in the prep, folks! The more uniform your vegetable pieces, the better they’ll cook evenly. -
Layer in the Crockpot:
No need to fuss! Layer the shredded chicken, wild rice, diced onion, carrots, and celery directly into your crockpot. Make it colorful! The visual appeal will add to the experience when serving. -
Add Broth and Seasonings:
Pour the 4 cups of chicken broth over your layered ingredients. Next, sprinkle in the garlic powder, thyme, salt, and pepper. Give it a gentle stir to combine all the flavors. This is where the magic begins! -
Set It and Forget It:
Cover your crockpot and set it to low for 6-8 hours or high for 4-5 hours. This is the BEST part. You can walk away—go run errands, binge your favorite show, or maybe tackle that book you’ve been meaning to read. The longer it cooks, the better the flavors meld together! -
The Creamy Finish:
About 30 minutes before you’re ready to eat, stir in the heavy cream and let it warm through. This step makes the soup incredibly rich and creamy. If you’re using coconut milk, be sure to taste and adjust seasonings accordingly. -
Check for Doneness:
If your wild rice is tender and the soup has thickened slightly, congratulations! You’ve nailed this! If the rice needs a little more time, give it an extra 30 minutes to simmer. -
Taste and Adjust:
Take a moment to taste your soup and adjust the seasoning if necessary. Sometimes a little extra pinch of salt can elevate the whole dish. -
Serve It Up:
Scoop your hearty soup into bowls, sprinkle with fresh herbs if desired, and serve warm!
Serving Suggestions
When it comes to serving this glorious soup, keep it simple yet elegant! Ladle generous portions into your favorite bowls. A sprinkle of freshly chopped parsley or thyme just before serving adds a touch of color and enhances the aroma.
Pair your soup with crusty bread or buttery rolls to soak up all that delicious broth—a perfect complement to the meal! If you want to elevate it further, serve with a side salad dressed in lemon vinaigrette to contrast the creaminess of the soup.
Recipe Variations
Here are a few of my favorite variations you can try for an extra twist on this comforting classic:
-
Herbed Chicken and Wild Rice Soup: Replace thyme with fresh dill or tarragon for an amazing herbaceous twist.
-
Spicy Kick: Add a pinch of red pepper flakes or diced jalapeño to the mix for a subtle heat that complements the creaminess.
-
Vegetarian Delight: Skip the chicken and use vegetable broth, along with a hearty mix of mushrooms and green beans for a great meat-free option.
-
Italian-Inspired: Incorporate a can of diced tomatoes and Italian herbs like basil and oregano for a tomato-based version that’s equally comforting.
-
Nutty Rice Blend: Try mixing wild rice with quinoa! The quinoa will cook more quickly, so be sure to cook the rice a bit longer before adding the other ingredients.
Chef’s Notes
Over the years, this recipe has become a staple in my home, evolving with each iteration. I’ve played around with various add-ins and spices—sometimes even throwing in some fresh spinach at the end for a pop of green! One memorable time, I was out of heavy cream and used Greek yogurt instead. What a delightful accident! It not only worked wonders, but it added a tangy twist that I now incorporate regularly.
Whenever I share this soup with friends and family, it sparks conversations about their own kitchen stories and childhood meals. That’s what connecting over food is all about, right?
FAQs and Troubleshooting
Q1: Can I use uncooked chicken in this recipe?
Yes! You can absolutely toss in uncooked chicken breasts or thighs. Just increase the cooking time by a couple of hours, and make sure the chicken is fully cooked before shredding.
Q2: What if my soup is too thick?
Not a problem! Add a little more chicken broth or water to loosen it up. Stir well and let it warm for a few moments.
Q3: Can I freeze leftovers?
Totally! This soup freezes beautifully. Just make sure to cool it completely before placing it in an airtight container. When it’s time to enjoy again, thaw overnight in the fridge, then warm gently on the stovetop.
Q4: My rice didn’t cook all the way—what happened?
If there’s too much liquid, wild rice can sometimes remain tough. Make sure you’ve rinsed the rice well and that you added enough broth. Different brands of wild rice can also vary in cooking times.
Nutritional Info
While everyone’s looking to keep things healthy, this soup strikes a balance between comfort and nourishment. One serving (about 1.5 cups) contains approximately:
- Calories: 350
- Protein: 24g
- Carbohydrates: 30g
- Fat: 15g
- Fiber: 3g
You can reduce the calories by swapping out heavy cream for a lighter option, and using lean chicken breast can lower the fat content as well.
Final Thoughts
There you have it: my beloved Crockpot Chicken and Wild Rice Soup! I hope you feel inspired to try this recipe and share it with your loved ones. Food is a universal language of love, and this dish speaks volumes. My kitchen always feels more vibrant when there’s a bubbling pot of soup enriching the atmosphere.
I’d love to hear about your experiences while making this soup—did you add your own twist? Did it spark a nostalgic memory? Let’s keep the conversation going, and make this a regular feature in your kitchen, just like it has been in mine. Now, go ahead, roll up your sleeves, and let’s create some flavor-packed memories! Happy cooking!
Print
Crockpot Chicken and Wild Rice Soup
- Total Time: 375 minutes
- Yield: 4 servings 1x
- Diet: Poultry
Description
A cozy and comforting soup made with shredded chicken, wild rice, and hearty vegetables, perfect for chilly days.
Ingredients
- 2 cups cooked chicken, shredded
- 1 cup wild rice, rinsed
- 1 medium onion, diced
- 2 carrots, diced
- 2 celery stalks, diced
- 4 cups chicken broth
- 1 cup heavy cream
- 2 teaspoons garlic powder
- 1 teaspoon thyme
- Salt and pepper to taste
Instructions
- Prepare your ingredients: Shred your cooked chicken, dice the onion, carrots, and celery.
- Layer in the crockpot: Layer the shredded chicken, wild rice, diced onion, carrots, and celery.
- Add broth and seasonings: Pour the chicken broth over the ingredients and sprinkle in the garlic powder, thyme, salt, and pepper. Stir gently.
- Set it and forget it: Cover your crockpot and set it to low for 6-8 hours or high for 4-5 hours.
- The creamy finish: About 30 minutes before serving, stir in the heavy cream.
- Check for doneness: Ensure the wild rice is tender and the soup has thickened.
- Taste and adjust: Taste your soup and adjust the seasoning as needed.
- Serve it up: Ladle the soup into bowls and garnish with fresh herbs if desired.
Notes
This soup freezes beautifully. Make sure to cool completely before storing.
- Prep Time: 15 minutes
- Cook Time: 360 minutes
- Category: Main Course
- Method: Crockpot
- Cuisine: American
Nutrition
- Serving Size: 1.5 cups
- Calories: 350
- Sugar: 4g
- Sodium: 800mg
- Fat: 15g
- Saturated Fat: 8g
- Unsaturated Fat: 7g
- Trans Fat: 0g
- Carbohydrates: 30g
- Fiber: 3g
- Protein: 24g
- Cholesterol: 70mg
Keywords: chicken soup, wild rice, comfort food, crockpot recipes, winter recipes
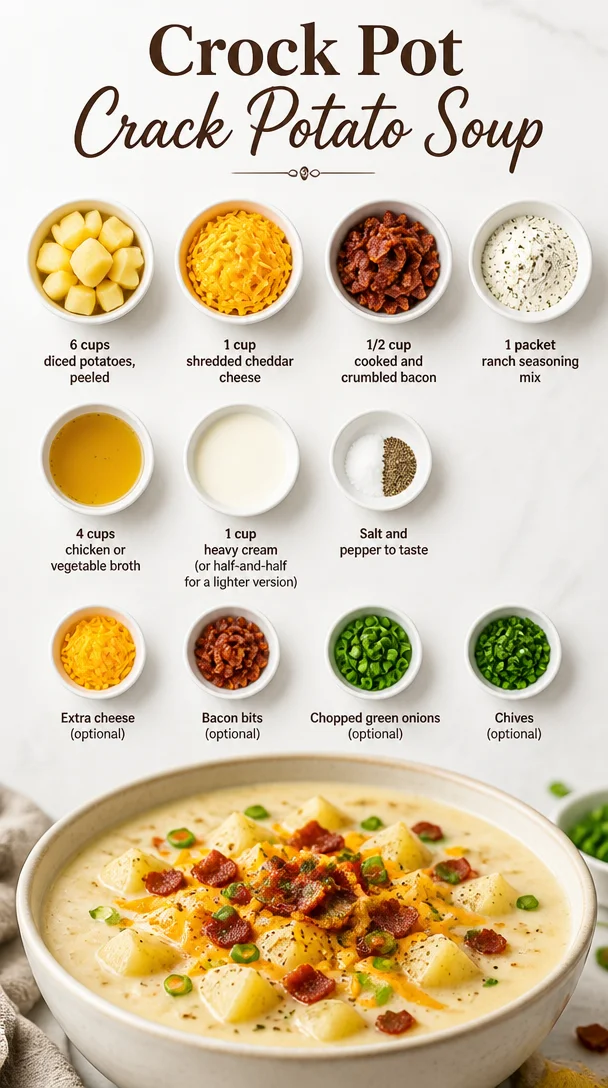
Crock Pot Crack Potato Soup
The Creamy Comfort of Crock Pot Crack Potato Soup
Hey there, food lovers! Beau Collier here, and today we’re diving into the wonderful world of comfort food with a delightful dish that feels like a warm hug on a chilly evening: Crock Pot Crack Potato Soup. I promise, this recipe is easy, tasty, and sure to become a staple in your home. So grab your favorite mug and let’s dig into this soul-satisfying bowl of goodness!
Introduction
Imagine coming home after a long day—maybe you’ve dealt with an endless stream of emails, the chaos of the morning rush, and those pesky errands that never seem to end. As you walk through your door, the comforting aroma of a rich, creamy soup greets you. That, my friends, is the magic of slow cooking!
Crock Pot Crack Potato Soup is one of those recipes that feels like it was made for days just like this. It combines the wholesome goodness of diced potatoes with the indulgent flavors of cheddar cheese and crispy bacon, finished off with a smooth, silky creaminess that just wraps around your insides like a cozy blanket. And let’s be real—it’s the perfect antidote for a hectic day!
This soup is not just quick to throw together; it’s comforting enough to make you feel at home, no matter where you are. Plus, utilizing a crockpot means you can set it and forget it until dinner time. You’ll barely lift a finger (unless you want to add some extra cheese, which I definitely recommend!).
So, whether you’re hosting a cozy gathering, enjoying a casual night in, or just want to impress your family with minimal effort, this Crock Pot Crack Potato Soup has got your back. Let’s get cooking!
Personal Story
Growing up, my family had a tradition of Sunday dinners that revolved around comfort food. My mom would whip up all kinds of hearty dishes, but my favorite was her potato soup. It was thick, creamy, and filled with so much love that you could practically feel it. Every spoonful felt nostalgic, wrapping you in that warm hug I talked about earlier.
One Sunday, I decided to surprise her by taking the reins in the kitchen. I mustered up all my courage, figuring that if I could make a simple potato soup, it would undoubtedly impress everyone. However, in my excitement, I may have gone a little overboard with the seasonings! The soup turned out to be a salty mess (sorry, Mom!).
But that mishap taught me a valuable lesson about flavor balance, and I’ve cherished that memory ever since. That’s why I love this Crock Pot Crack Potato Soup recipe: it’s simple, forgiving, and, best of all, you can add or tweak flavors to your heart’s content!
Ingredients
Here’s what you’ll need to make this magical comfort soup come to life:
-
6 cups of diced potatoes, peeled: The star of the show! I recommend using Russet or Yukon Gold potatoes for their creamy texture. If you’re in a pinch, frozen diced potatoes can work too!
-
1 cup of shredded cheddar cheese: This adds that ooey-gooey cheesiness we all crave. Swap it for Monterey Jack or a dairy-free cheese if you’re looking for alternatives.
-
1/2 cup of cooked and crumbled bacon: The crispy bits of bacon elevate the flavor and add a wonderful crunch. Looking to keep it vegetarian? Go for smoked paprika to get that savory edge instead!
-
1 packet of ranch seasoning mix: This brings a zesty kick to the soup. You can easily make your own ranch seasoning at home with a mix of herbs and spices if you prefer a DIY approach.
-
4 cups of chicken or vegetable broth: This is your soup’s foundation. Feel free to use store-bought or homemade broth; just be sure it’s low-sodium to keep the flavors balanced!
-
1 cup of heavy cream (or half-and-half for a lighter version): Cream makes things dreamy! But if you’re looking for a lighter option, half-and-half or even coconut milk can replace it.
-
Salt and pepper to taste: Always season to your preference as potatoes love a bit of salt!
-
Optional garnishes: Extra cheese, bacon bits, chopped green onions, or chives. These toppings add a personal touch and a pop of color to your bowl!
Step-by-Step Instructions
Alright, let’s get down to business! Here’s how to make your comforting Crock Pot Crack Potato Soup.
-
Prep the Potatoes: Start by peeling and dicing your potatoes into small cubes—about 1-inch pieces work best. This helps them cook evenly. You can totally get those little hands in the kitchen to help with this step!
-
Add Ingredients to the Crock Pot: Throw those diced potatoes into the crock pot. Next, sprinkle in the ranch seasoning mix, and pour in the chicken or vegetable broth. Trust me, the broth will bloom with flavor as it cooks and melds with the potatoes.
-
In with the Cream: Add the heavy cream (or half-and-half) directly into the pot—as it cooks, it will help create that creamy texture we all love. Give everything a gentle stir to mix it up!
-
Cook Low and Slow: Cover your crock pot and set it to low for 6-8 hours, or on high for 3-4 hours. Make sure to resist the urge to peek too often—keeping the lid on allows the flavors to develop beautifully.
-
Finish with Cheese and Bacon: An hour before serving, stir in the shredded cheese and cooked bacon. This will give your soup that luxurious taste and texture. It’s like a surprise party for your taste buds!
-
Season and Serve: About 30 minutes prior to serving, taste your soup and add salt and pepper as needed. Just remember, you can always add more!
Serving Suggestions
Serving this soup is a treat in itself. Ladle the steaming soup into bowls and don’t skimp on those garnishes! Sprinkle extra shredded cheddar cheese on top to melt into the warm soup, followed by crispy bacon bits (if you have any left)! A sprinkle of green onions or chives adds a lovely pop of color and freshness.
If you’re feeling extra fancy, serve the soup with crusty bread or homemade garlic knots for dipping. Trust me, it takes this comforting dish to a whole new level.
Recipe Variations
The beauty of this soup is its versatility! Here are some fun variations to keep things exciting:
-
Spicy Kick: If you like a little heat, add diced jalapeños or a few dashes of hot sauce to the mix. Spice lovers will appreciate this flavor enhancer!
-
Loaded Baked Potato Style: Top your soup with all the fixins of a loaded baked potato: sour cream, additional cheese, crispy bacon, and even some sautéed broccoli for a veggie boost.
-
Vegan Version: Switch out the cream for coconut milk or cashew cream and use your favorite plant-based bacon. Just ensure your ranch seasoning is vegan-friendly, and you’re golden!
-
Smoky Flavor: For an enticing twist, toss in smoked Gouda cheese instead of cheddar. This will add depth and a unique smoky profile to your dish.
-
Herbaceous Touch: Fresh herbs like thyme or rosemary can be added for a fragrant twist. Toss these in during the last hour of cooking for an aromatic flavor burst.
Chef’s Notes
As with any recipe, the beauty lies in the details! Over the years, I’ve made this soup countless times, and it just keeps getting better (and easier!). There’s something incredibly gratifying about taking a simple dish and turning it into a comforting experience.
I remember one chilly evening, I decided to experiment by adding some leftover veggies—think carrots and celery—into the mix. The result was a heartier soup that turned out to be a hit! So, don’t hesitate to modify this recipe as per your fridge’s inventory.
FAQs and Troubleshooting
Q: My soup seems too thick. What should I do?
If your soup is thicker than you’d like, simply add an extra cup of broth or cream and stir until you reach your desired consistency.
Q: Can I freeze leftover soup?
Absolutely! Let the soup cool completely and then transfer it to an airtight container. It can be frozen for up to three months. Just remember to thaw and reheat gently to maintain creamy texture!
Q: What can I use if I don’t have a crock pot?
No worries! You can easily make this soup in a large pot on the stove. Just simmer until the potatoes are tender, then proceed with the rest of the recipe.
Q: How can I make this more nutritious?
Consider adding in more veggies like spinach, broccoli, or cauliflower for added fiber and nutrients. You’ll hardly notice they’re in there with the creamy goodness!
Nutritional Info
Now, you might be wondering about the nutrition—because comfort food can often come with that guilty feeling. Here’s a quick rundown of what to expect:
- Calories: Approximately 300-400 per serving (varies based on toppings and portion size).
- Protein: Thanks to the cheese and bacon, you can get about 10-15 grams of protein in each hearty bowl.
- Fat: With the cream and bacon, fat content could range around 20 grams per serving. You can make it lighter by choosing half-and-half or skipping the bacon.
- Carbohydrates: The potatoes will generally contribute around 40-50 grams of carbs, which will definitely fuel your day.
Remember, indulgence is part of the culinary journey, so enjoy every spoonful!
Final Thoughts
And there you have it, friends! Your guide to creating an utterly satisfying Crock Pot Crack Potato Soup that will win over hearts and warm souls. Cooking doesn’t have to be complicated or stressful; with recipes like this, you’ll be able to whip up comfort food goodness in no time at all.
So, the next time life gets busy, and you find yourself longing for something comforting, remember this soup will always have your back. Enjoy it, share it, and feel the love in every delicious bite!
Now, let’s pull out that crock pot and unleash the magic. Happy cooking, and don’t forget to share your delicious creations with all of us at Feastical! 🍲💖
Print
Crock Pot Crack Potato Soup
- Total Time: 255 minutes
- Yield: 6 servings 1x
- Diet: Omnivore
Description
A comforting and creamy potato soup made in a slow cooker, featuring potatoes, cheddar cheese, and crispy bacon.
Ingredients
- 6 cups of diced potatoes, peeled
- 1 cup of shredded cheddar cheese
- 1/2 cup of cooked and crumbled bacon
- 1 packet of ranch seasoning mix
- 4 cups of chicken or vegetable broth
- 1 cup of heavy cream (or half-and-half)
- Salt and pepper to taste
- Optional garnishes: Extra cheese, bacon bits, chopped green onions, or chives
Instructions
- Prep the Potatoes: Peel and dice your potatoes into small cubes.
- Add Ingredients to the Crock Pot: Place diced potatoes in the crockpot, sprinkle in ranch seasoning, and pour in broth.
- In with the Cream: Add heavy cream and stir gently.
- Cook Low and Slow: Cover and set the crock pot to low for 6-8 hours or high for 3-4 hours.
- Finish with Cheese and Bacon: Stir in cheese and bacon an hour before serving.
- Season and Serve: Adjust seasoning and serve hot with garnishes.
Notes
Feel free to customize with additional vegetables or spices according to your preference.
- Prep Time: 15 minutes
- Cook Time: 240 minutes
- Category: Soup
- Method: Slow Cooker
- Cuisine: American
Nutrition
- Serving Size: 1 cup
- Calories: 350
- Sugar: 5g
- Sodium: 550mg
- Fat: 24g
- Saturated Fat: 12g
- Unsaturated Fat: 8g
- Trans Fat: 0g
- Carbohydrates: 45g
- Fiber: 4g
- Protein: 12g
- Cholesterol: 50mg
Keywords: crock pot, soup, potato soup, comfort food, creamy soup
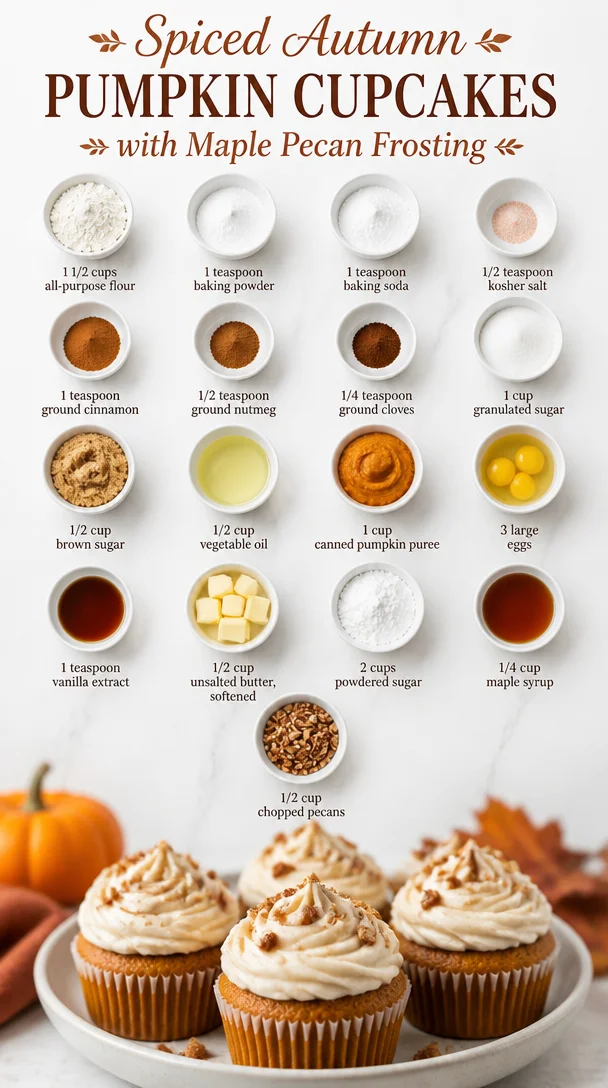
Spiced Autumn Pumpkin Cupcakes with Maple Pecan Frosting
Irresistible Pumpkin Cupcakes with Maple Pecan Frosting: A Sweet Fall Treat
Hey there, friends! It’s Beau Collier here, and I’m absolutely thrilled to share one of my most cherished fall recipes with you today: Pumpkin Cupcakes with Maple Pecan Frosting. As soon as autumn rolls around, I find myself daydreaming of those vibrant orange pumpkins, cozy sweaters, and, of course, the irresistible aroma of freshly baked pumpkin treats wafting through the kitchen. There’s something about these cupcakes that brings a warm, fuzzy feeling to my heart and a delicious smile to my face. Let’s dive into this delightful recipe that’s sure to make your kitchen smell like a slice of fall!
A Little Slice of Nostalgia
I remember the first time I made pumpkin cupcakes. It was a chilly October afternoon, and my childhood best friend, Sarah, came over for a baking session. We had our playlist blasting, the leaves were rustling outside, and there was a sense of magic in the air as we tackled our mission of creating the most delicious fall dessert imaginable. We decided on pumpkin cupcakes, inspired by our favorite coffee shop that always sold out too quickly.
As we mixed the velvety pumpkin puree with spices that smelled like autumn—cinnamon, nutmeg, and cloves—I couldn’t help but reminisce about the many family gatherings we had where dishes overflowing with pumpkin treats took center stage. The joy we felt that day was palpable, and despite a few flour fights and giggles filling the kitchen, we managed to whip up a batch of the fluffiest cupcakes topped with the silkiest maple pecan frosting.
Those cupcakes were a hit! Friends and family couldn’t get enough of them, and from that day on, they became a staple at every gathering. So, let’s recreate that joy in your kitchen and bring some of this pumpkin magic to your home!
Ingredients
Here’s what you’re going to need to whip up your scrumptious pumpkin cupcakes:
-
1 1/2 cups all-purpose flour
- Great for a classic cupcake structure! If you prefer a gluten-free option, use a 1:1 gluten-free flour blend.
-
1 teaspoon baking powder
- This is your rising agent! Ensure it’s fresh for the best puff.
-
1 teaspoon baking soda
- Another leavening hero that gives your cupcakes that airy lightness.
-
1/2 teaspoon kosher salt
- A little salt enhances all the flavors—don’t skip it!
-
1 teaspoon ground cinnamon
- The quintessential spice of fall! You can also use pumpkin pie spice if you have it handy.
-
1/2 teaspoon ground nutmeg
- Adds a warm, nutty flavor. Freshly grated nutmeg makes a world of difference!
-
1/4 teaspoon ground cloves
- Just a hint of clove lends an aromatic punch for that cozy feeling.
-
1 cup granulated sugar
- Sweetness is key! Brown sugar can give a deeper flavor if mixed half and half.
-
1/2 cup brown sugar
- For that moist texture! It also enhances the caramel notes.
-
1/2 cup vegetable oil
- Keeps these cupcakes fluffy and moist. Can be substituted with melted coconut oil for a tropical twist!
-
1 cup canned pumpkin puree
- The star of the show! Make sure it’s pure pumpkin, not pumpkin pie filling.
-
3 large eggs
- Binding and fluffing agents—room temperature eggs work best!
-
1 teaspoon vanilla extract
- A splash of vanilla elevates everything; opt for pure for more flavor.
-
1/2 cup unsalted butter, softened
- Provides creaminess to the frosting. Margarine can work in a pinch.
-
2 cups powdered sugar
- For that sweet, dreamy frosting!
-
1/4 cup maple syrup
- Adds depth and a beautiful, subtly sweet flavor to the frosting.
-
1/2 cup chopped pecans
- Toast them for an extra flavor boost! Pecans complete the frosting beautifully.
Step-by-Step Instructions
-
Preheat the Oven: Start by preheating your oven to 350°F (175°C). This way, your cupcakes will be ready to go as soon as you’re done mixing.
-
Prepare the Muffin Tin: Line a muffin tin with cupcake liners or grease it well with non-stick spray. I love the festive feel of colorful liners—pick your favorite!
-
Mix Dry Ingredients: In a medium bowl, whisk together the all-purpose flour, baking powder, baking soda, salt, cinnamon, nutmeg, and cloves. This not only combines them evenly, but also helps incorporate air for fluffier cupcakes.
-
Combine Wet Ingredients: In a large bowl, mix the granulated and brown sugars with the vegetable oil until it’s light and fluffy. Slowly add in the canned pumpkin, eggs, and vanilla extract, beating until well combined. It’s like a warm embrace for your spatula!
-
Combine the Mixtures: Gradually add the dry ingredients into the wet mixture, folding gently until just combined. Avoid overmixing, as we want these beauties to be light and airy!
-
Fill the Cupcake Liners: Fill the muffin tin about two-thirds full with the batter. Sip on your favorite beverage while it bakes; it’s time to let the oven work its magic!
-
Bake: Place your pan in the preheated oven and bake for 18-20 minutes, or until a toothpick inserted in the center comes out clean. This is the moment of truth!
-
Cool: Once baked, allow the cupcakes to cool in the pan for about 5 minutes. Then transfer them to a wire rack to cool completely before frosting.
-
Make the Frosting: In a mixing bowl, beat the softened butter and powdered sugar until fluffy. Add the maple syrup and continue to beat until smooth and creamy. For a fun challenge, try spreading the frosting with a spatula for a rustic look!
-
Frost and Garnish: Once your cupcakes are cool, slather on that velvety maple pecan frosting and sprinkle chopped pecans on top for that extra crunch.
Serving Suggestions
Time to serve up those heavenly pumpkin cupcakes! Place them on a vibrant serving platter, and if you’re feeling fancy, arrange a few additional pecans around the edges for a beautiful presentation. Pair them with a hot cup of coffee or tea for an ultimate fall treat, or serve them at gatherings for a delightful dessert. Why not take them to your next potluck? I guarantee they’ll be the star of the show!
Recipe Variations
Feel free to get creative with these pumpkin cupcakes! Here are a few ideas to spark your imagination:
-
Chocolate Chip Pumpkin Cupcakes: Fold in a cup of semi-sweet chocolate chips into the batter for a decadent twist!
-
Spiced Rum Frosting: Add a splash of spiced rum to your frosting for a grown-up flavor.
-
Gluten-Free Option: Use a gluten-free flour blend and a gluten-free baking powder for a delicious alternative.
-
Vegan Version: Replace the eggs with flax eggs (1 tablespoon ground flaxseed mixed with 2.5 tablespoons water = 1 egg) and use coconut oil instead of vegetable oil.
-
Cream Cheese Frosting: Swap in cream cheese for a tangier topping that pairs beautifully with pumpkin.
Chef’s Notes
As with all good recipes, this one has evolved over the years. I’ve played with flavors, tried different frostings, and experimented with various mix-ins. The simplest, purest version of these pumpkin cupcakes always brings me back to that cozy kitchen with Sarah. So here’s my open invitation: invite your friends or family to bake with you! It turns the task of cooking into a cherished memory—much like it did for me.
FAQs and Troubleshooting
1. Why are my cupcakes dense?
Overmixing the batter can cause this. Mix just until the dry is incorporated, and use room-temperature ingredients!
2. Can I use fresh pumpkin?
Absolutely! Just make sure it’s well-cooked and blended until smooth before using it in your mix.
3. What’s the best way to store these?
Store them in an airtight container at room temperature for up to 3 days or refrigerate for a week (if they last that long!)
4. My frosting is too runny. What can I do?
If your frosting is too runny, simply add more powdered sugar until you reach your desired consistency.
Nutritional Info
For those keeping an eye on their nutritional intake, each pumpkin cupcake with frosting is approximately:
- Calories: 250
- Total fat: 12g
- Saturated fat: 4g
- Carbohydrates: 35g
- Fiber: 1g
- Sugar: 20g
- Protein: 2g
Of course, if you make any of the variations, keep in mind that the nutrition might differ a bit—especially if you add chocolate chips or different frostings.
Final Thoughts
There you have it, my friends! These Pumpkin Cupcakes with Maple Pecan Frosting capture the essence of fall in each fluffy bite. I hope this recipe not only fills your kitchen with delectable aromas but also brings a smile to your face, just like it does for me. Don’t forget to share your cupcake creations on social media and tag me at @Feastical, because I can’t wait to see your beautiful versions!
Now, grab your apron, gather your ingredients, and start baking—your taste buds are in for a treat! Happy baking! 🍂🧁
Print
Irresistible Pumpkin Cupcakes with Maple Pecan Frosting
- Total Time: 35 minutes
- Yield: 12 servings 1x
- Diet: Vegetarian
Description
Delicious pumpkin cupcakes topped with creamy maple pecan frosting, perfect for fall celebrations.
Ingredients
- 1 1/2 cups all-purpose flour
- 1 teaspoon baking powder
- 1 teaspoon baking soda
- 1/2 teaspoon kosher salt
- 1 teaspoon ground cinnamon
- 1/2 teaspoon ground nutmeg
- 1/4 teaspoon ground cloves
- 1 cup granulated sugar
- 1/2 cup brown sugar
- 1/2 cup vegetable oil
- 1 cup canned pumpkin puree
- 3 large eggs
- 1 teaspoon vanilla extract
- 1/2 cup unsalted butter, softened
- 2 cups powdered sugar
- 1/4 cup maple syrup
- 1/2 cup chopped pecans
Instructions
- Preheat the oven to 350°F (175°C).
- Prepare a muffin tin with cupcake liners or grease it.
- Mix dry ingredients in a medium bowl: flour, baking powder, baking soda, salt, cinnamon, nutmeg, and cloves.
- Combine wet ingredients in a large bowl: sugars and vegetable oil until fluffy. Add pumpkin, eggs, and vanilla, and mix well.
- Combine the dry ingredients with the wet mixture, folding gently until just combined.
- Fill muffin tin liners about two-thirds full with batter.
- Bake for 18-20 minutes, or until a toothpick comes out clean.
- Cool cupcakes in the pan for 5 minutes, then transfer to a wire rack.
- Make the frosting by beating butter and powdered sugar until fluffy, then add maple syrup.
- Frost cooled cupcakes with maple pecan frosting and garnish with pecans.
Notes
Store cupcakes in an airtight container at room temperature for up to 3 days or refrigerate for a week.
- Prep Time: 15 minutes
- Cook Time: 20 minutes
- Category: Dessert
- Method: Baking
- Cuisine: American
Nutrition
- Serving Size: 1 cupcake
- Calories: 250
- Sugar: 20g
- Sodium: 250mg
- Fat: 12g
- Saturated Fat: 4g
- Unsaturated Fat: 6g
- Trans Fat: 0g
- Carbohydrates: 35g
- Fiber: 1g
- Protein: 2g
- Cholesterol: 30mg
Keywords: pumpkin cupcakes, fall dessert, maple pecan frosting, autumn recipes
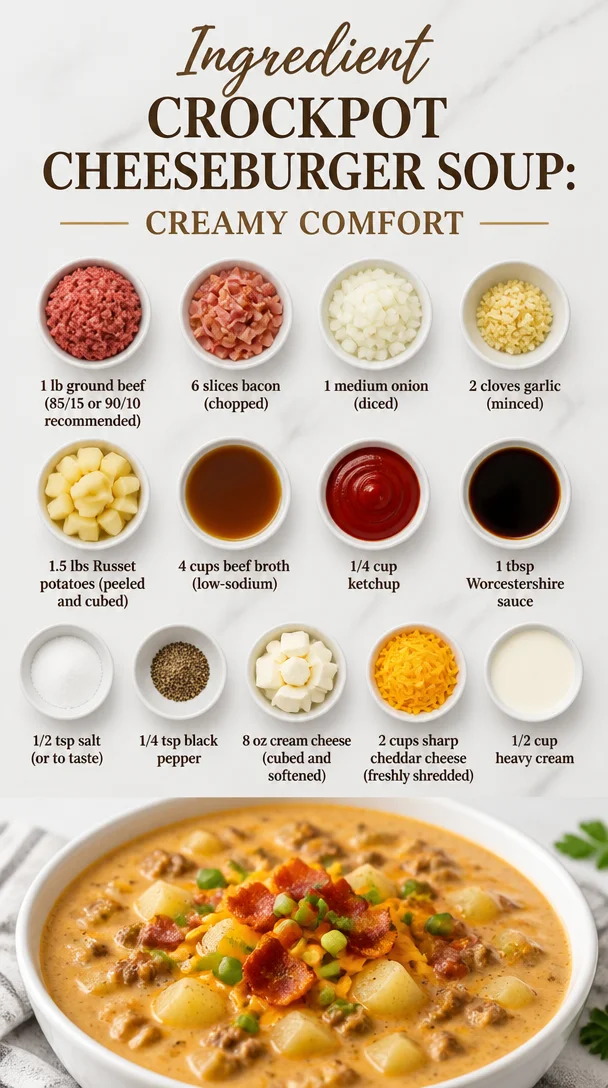
Ingredient Crockpot Cheeseburger Soup: Creamy Comfort
Crockpot Cheeseburger Soup: The Ultimate Comfort Meal
Hey there, fellow foodies! I’m thrilled to take you on a culinary journey today as we dive into one of my all-time favorite comfort dishes: Crockpot Cheeseburger Soup. It’s like a warm hug in a bowl, and believe me, after a long day, there’s nothing better than coming home to a hearty meal that practically cooks itself.
Introduction: The Magic of Slow Cooking
Can you picture it? The sun is setting, and the cozy aroma of mouth-watering soup wafts through your kitchen as you kick back after a busy day. You’ve got that beloved Crockpot working its magic, and your family or friends are gathering around the table, eager and hungry. That’s the kind of joy I’m talking about, my friends!
Crockpot Cheeseburger Soup is more than just a recipe; it’s an experience that brings everyone together. With layers of cheesy goodness, crispy bacon, and rich beef flavors simmering away, this dish is sure to satisfy even the pickiest of eaters. Plus, the best part? It’s super simple to make; just toss everything into that crockpot and let it do its thing. It’s the ideal blend of convenience and comfort—a true culinary delight!
Whether you’re looking to impress your family with a delectable weeknight meal or wanting something fulfilling to share with friends, this soup is your secret weapon. So, let’s don our aprons and get cooking!
Personal Story: A Fond Memory
You know, every great recipe has a backstory, and this one is no exception! Many moons ago, before I became Chef Beau, there was a chilly evening when I decided to throw together a batch of cheeseburger soup for some friends who were coming over. I rifled through my kitchen, grabbing ingredients that reminded me of a classic cheeseburger—yet in a cozy, soup form.
As the soup simmered away, my friends arrived to the scent of comfort wafting through the air. It was one of those evenings filled with laughter, stories, and extra slices of cheesy bread on the side. The soup was a hit! As we slurped it down, I couldn’t help but feel nostalgic; it took me back to backyard barbecues and summer cookouts. Little did I know, that night would inspire countless variations of the recipe, becoming a staple in my household ever since!
Ingredients
Before we start taking those culinary steps, let’s gather our heroes for this Crockpot cheeseburger soup!
-
1 lb ground beef (85/15 or 90/10 recommended): This lean beef will give you the perfect balance of flavor and richness without excess greasiness. Feel free to swap beef for turkey or chicken if you prefer leaner meat.
-
6 slices bacon (chopped): Oh, bacon! It adds a delightful smokiness and crunch that makes everything better. If you’re looking for a healthier option, turkey bacon works too!
-
1 medium onion (diced): A classic base for flavor. If you want a sweeter soup, try using shallots or sweet onions instead.
-
2 cloves garlic (minced): Nothing brings a dish to life like garlic! Don’t have fresh? You can substitute with 1/2 teaspoon of garlic powder.
-
1.5 lbs Russet potatoes (peeled and cubed): These hearty potatoes will fill you up and create a lovely texture. Yukon Gold works too if you want a creamier mash-up!
-
4 cups beef broth (low-sodium): Using low-sodium broth helps you control the salt in the dish. Homemade or store-bought works well—just make sure it’s flavorful.
-
1/4 cup ketchup: A surprising yet crucial ingredient for that tangy cheeseburger taste. Swap with BBQ sauce for a smokier profile.
-
1 tbsp Worcestershire sauce: This brings an umami kick to the soup. A dash of soy sauce can work in a pinch if you’re out.
-
1/2 tsp salt (or to taste): Season to your liking! Just remember that the broth and bacon will also add saltiness.
-
1/4 tsp black pepper: Freshly cracked makes all the difference! Don’t skimp on this; it enhances the overall flavor.
-
8 oz cream cheese (cubed and softened): This is the secret to creamy decadence. For a lighter version, use reduced-fat cream cheese or Greek yogurt.
-
2 cups sharp cheddar cheese (freshly shredded): Trust me, fresh cheese is worth it. It melts beautifully. Swap it for a different cheese like gouda or pepper jack for a kick!
-
1/2 cup heavy cream: A touch of richness to finish it off. You can substitute coconut cream for a dairy-free version.
Step-by-Step Instructions
Ready to create some culinary magic? Let’s do this!
-
Prep Your Ingredients: First things first, let’s dice that onion and garlic, chop the bacon, and peel and cube those beautiful Russet potatoes. I like to use a sharp knife for this; it makes the task much more enjoyable.
-
Cook the Bacon: In a skillet over medium heat, cook the chopped bacon until crunchy (about 4-5 minutes). This little piece of magic not only adds flavor but also gives you some glorious bacon grease! Drain it on a paper towel and set it aside, but don’t get rid of that grease—it’s going to add soul to your soup!
-
Brown the Ground Beef: In the same skillet (using a little bacon grease), add the ground beef, season it with salt and pepper, and cook until browned (about 5-7 minutes). Break it up with a spatula as it cooks; no one likes big clumps of meat in their soup. Drain the excess fat if necessary.
-
Ingredient in the Slow Cooker: Toss the browned beef and crispy bacon into the crockpot, along with the diced onions, garlic, cubed potatoes, beef broth, ketchup, Worcestershire sauce, salt, and pepper.
-
Stir & Cook: Give everything a good stir to combine. Set your crockpot to low, cover, and let it cook for about 6-7 hours. If you’re in a hurry, you can set it to high for 3-4 hours. Just remember, low and slow develops better flavors!
-
The Creamy Finish: About 30 minutes before serving, add the cubed cream cheese and heavy cream to the slow cooker. Stir until everything is beautifully blended and oozing with delicious creaminess. Don’t you just love that transformation?
-
Add Cheddar: Right before serving, mix in the freshly shredded cheddar cheese until it melts. This step is crucial; it makes the soup so delightful!
-
Serve It Up: Ladle the soup into bowls and top with additional shredded cheese, or even some crispy bacon bits for a finishing touch!
Serving Suggestions
Now that the soup is ready, let’s talk presentation. Serve it hot in a rustic bowl (because who doesn’t love the aesthetic?). A sprinkle of green onions or fresh parsley adds that pop of color and freshness. Pair it with a side of crusty bread for dipping or a simple green salad to balance out the richness.
Feeling fancy? You can even serve the soup in bread bowls—cut out the center of some sourdough loaves, pour in the soup, and enjoy every bite! It’s a great way to add comfort to comfort food.
Recipe Variations
This soup is incredibly versatile, and you can switch it up in numerous ways! Here are a few ideas:
-
Meat Madness: Swap out beef for ground turkey or chicken for a leaner option, or add sausage for an extra flavor punch.
-
Veggie Delight: Add in diced carrots or bell peppers for extra nutrients and crunch. Just toss them in with the potatoes.
-
Spicy Kick: Mix in some diced jalapeños or a dash of hot sauce to turn up the heat!
-
Dairy-Free Version: Use coconut cream and substitute nutritional yeast for the cheese to keep that cheeseburger flavor.
-
Low-Carb Option: Replace the potatoes with cauliflower florets for a lighter twist that’s still hearty!
Chef’s Notes
Over the years, this cheeseburger soup has found its way into gatherings, potluck parties, and even cozy family nights on the couch. It has evolved, just like me! From initially being a random mix of leftovers, it has become a staple that brings everyone together. And let me tell you, the laughter and memories created while sharing a bowl of this soup are unforgettable.
Here’s a little foodie tip: Experiment with your favorite burger toppings—like adding sliced pickles or a drizzle of mustard on top of your serving. It brings an extra layer of burger vibes to the dish!
FAQs and Troubleshooting
Q: Can I make this soup ahead of time?
Absolutely! This cheeseburger soup reheats beautifully. Just store it in an airtight container in the fridge for up to 4 days. You can also freeze it—just be cautious of the potatoes, as they may change texture when thawed.
Q: My soup is too thick. What can I do?
No worries! Just add a little more broth or water while gently heating it up on the stove until you reach your desired consistency.
Q: Can I use frozen ground beef?
Yes, but I recommend thawing it first for even cooking. If you’re in a pinch, you can initially cook it in the crockpot directly; just allow a little more cooking time.
Q: How can I store leftovers?
Store any leftover soup in an airtight container in the refrigerator for up to four days. You can also freeze it for longer storage!
Nutritional Info
While comfort food is all about flavor, it’s also good to know what’s in it! A serving of this Crockpot Cheeseburger Soup (about 1 cup) roughly contains:
- Calories: ~400
- Total Fat: 30g
- Saturated Fat: 15g
- Carbohydrates: 20g
- Fiber: 2g
- Protein: 20g
This hearty soup is certainly rich and satisfying, so it’s perfect for a filling meal after a long day.
Final Thoughts
There you have it: the ultimate comfort food recipe—Crockpot Cheeseburger Soup! This dish is proof that good food doesn’t have to be complicated. With just a few simple ingredients and some time on your hands, you can create magic in the kitchen.
I hope this recipe becomes a cherished tradition in your home, just as it has in mine. Whether you’re gathered around the table with loved ones or cozying up on the couch solo, there’s always a bowl of warmth waiting for you. So, grab your crockpot, roll up your sleeves, and let’s make some delicious memories together!
Happy cooking, my friends! 🍲
Print
Crockpot Cheeseburger Soup
- Total Time: 375 minutes
- Yield: 6 servings 1x
- Diet: Omnivore
Description
This hearty Crockpot Cheeseburger Soup is the ultimate comfort food, packed with cheesy goodness, crispy bacon, and rich beef flavors that will satisfy even the pickiest eaters.
Ingredients
- 1 lb ground beef (85/15 or 90/10 recommended)
- 6 slices bacon (chopped)
- 1 medium onion (diced)
- 2 cloves garlic (minced)
- 1.5 lbs Russet potatoes (peeled and cubed)
- 4 cups beef broth (low-sodium)
- 1/4 cup ketchup
- 1 tbsp Worcestershire sauce
- 1/2 tsp salt (or to taste)
- 1/4 tsp black pepper
- 8 oz cream cheese (cubed and softened)
- 2 cups sharp cheddar cheese (freshly shredded)
- 1/2 cup heavy cream
Instructions
- Prep your ingredients by dicing the onion and garlic, chopping the bacon, and peeling and cubing the potatoes.
- Cook the bacon in a skillet over medium heat until crunchy (about 4-5 minutes) and set aside.
- Brown the ground beef in the same skillet, seasoning with salt and pepper, cooking until browned (about 5-7 minutes).
- Toss the browned beef and crispy bacon into the crockpot along with the onion, garlic, potatoes, beef broth, ketchup, Worcestershire sauce, salt, and pepper.
- Stir to combine, cover, and set the crockpot to low for 6-7 hours or high for 3-4 hours.
- Add the cream cheese and heavy cream 30 minutes before serving and stir until blended.
- Mix in the freshly shredded cheddar cheese until melted right before serving.
- Serve the soup hot in bowls, optionally topped with additional cheese or crispy bacon bits.
Notes
This soup can be made ahead of time and reheats beautifully. Feel free to customize with your favorite burger toppings like pickles or mustard.
- Prep Time: 15 minutes
- Cook Time: 360 minutes
- Category: Main Course
- Method: Slow Cooking
- Cuisine: American
Nutrition
- Serving Size: 1 serving
- Calories: 400
- Sugar: 4g
- Sodium: 900mg
- Fat: 30g
- Saturated Fat: 15g
- Unsaturated Fat: 10g
- Trans Fat: 1g
- Carbohydrates: 20g
- Fiber: 2g
- Protein: 20g
- Cholesterol: 85mg
Keywords: soup, comfort food, crockpot, cheeseburger, easy recipe
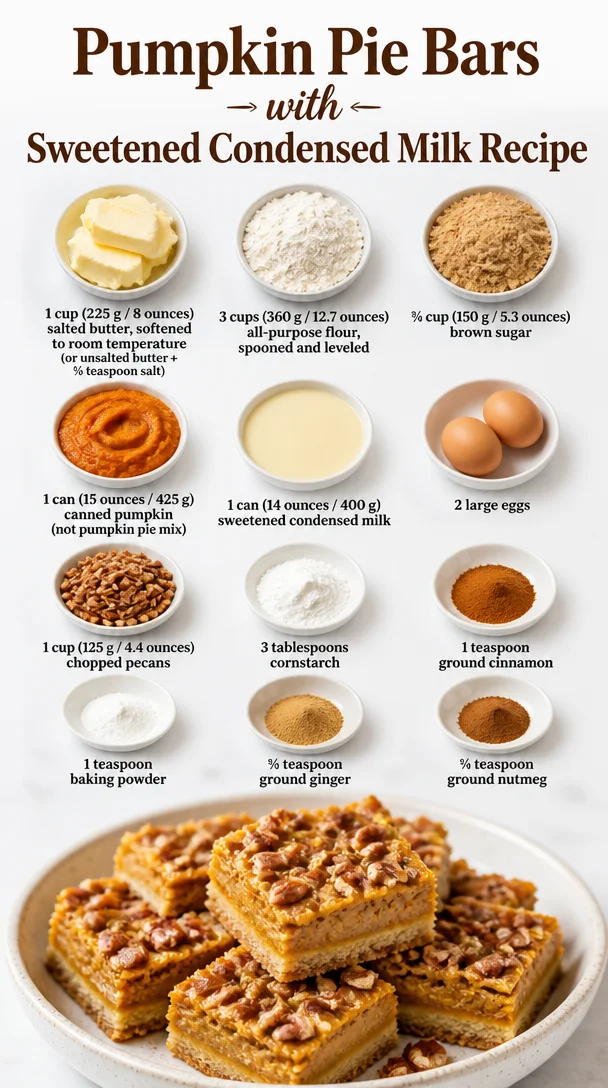
Pumpkin Pie Bars with Sweetened Condensed Milk Recipe
Pumpkin Pie Bars with Sweetened Condensed Milk Recipe
Hey foodies! It’s Beau Collier here, and let me tell you, if there’s one dessert that brings back sweet memories and makes my heart sing in the kitchen, it’s pumpkin pie. But wait—don’t stop there! Today, I’m super excited to share my favorite twist on this classic: Pumpkin Pie Bars with Sweetened Condensed Milk. If you’re like me and you love the rich, warm flavors of fall, then you’ll want to keep your spatula ready while we dive into this mouthwatering recipe!
Picture this: the leaves are changing colors, the air is getting crisper, and it’s the perfect time to indulge in cozy, fall flavors. These Pumpkin Pie Bars are so delectable, they’ll make your taste buds do a happy dance! Not only do they capture the essence of a traditional pumpkin pie, but they’re also a breeze to make—perfect for sharing with family and friends (or sneaking a few bites by yourself while cozying up on the couch!).
The unique touch of sweetened condensed milk makes these bars super creamy and holds all that beautiful pumpkin flavor intact. Plus, they’re cut into easy-to-handle squares, so they’re great for parties or just snacking throughout the day. Grab a cup of coffee or hot cider, and let’s embark on this pumpkin-filled adventure together!
So, are you ready to bake up a storm? Put on your favorite apron and maybe crank up some tunes, because we’re about to create a dessert that’s not just food—it’s a celebration!
Personal Story
I can still remember the first time I made pumpkin pie with my grandmother. It was one of those golden afternoons where the sun streamed through the kitchen windows, filling the space with warmth and the smell of spices. I was about eight years old, standing on a stool so I could reach the counter. My grandma let me mix together the pumpkin puree, spices, and sweetened condensed milk, and oh, what a magical moment it was!
As the pie baked, we chatted away, sharing stories and laughter. The best part was when we finally took that first bite; it tasted like love and sunshine with an extra sprinkle of joy! That experience taught me that cooking isn’t just about the ingredients—it’s about the connections we create with those we share the kitchen with.
Fast forward to today, and I’ve taken that cherished memory and transformed it into delicious pumpkin pie bars. This recipe captures all the nostalgic flavors while being super easy to whip up. Feel free to think of this as your modern-day pie!
Ingredients
Here’s what you’ll need to create your own pumpkin pie bars. Don’t worry; I’ll sprinkle in some substitution tips and chef insights along the way!
-
1 cup (225 g / 8 ounces) salted butter, softened to room temperature
Butter gives these bars a rich flavor. If you prefer unsalted butter, just add ½ teaspoon of salt to the mix! -
3 cups (360 g / 12.7 ounces) all-purpose flour, spooned and leveled
This is the base for our delicious crust. Spooning and leveling helps get the correct measurement, ensuring your bars aren’t too dense. -
¾ cup (150 g / 5.3 ounces) brown sugar
Brown sugar adds a delightful caramel flavor. If you’re out of brown, you can substitute with granulated sugar or coconut sugar! -
1 can (15 ounces / 425 g) canned pumpkin (not pumpkin pie mix)
Make sure it’s plain pumpkin puree for the best results! The flavor is the star here, and we want it to shine! -
1 can (14 ounces / 400 g) sweetened condensed milk
This is the secret ingredient for that creamy texture! You can also use coconut milk for a dairy-free version, though the flavor will be slightly different. -
2 large eggs
Eggs help bind everything together. If you want to go vegan, replace with a flax egg (1 tbsp flaxseed meal + 2.5 tbsp water per egg). -
1 cup (125 g / 4.4 ounces) chopped pecans
Pecans bring in a lovely crunch! If you’re not a fan, try walnuts or leave them out for a smoother texture. -
3 tablespoons cornstarch
Cornstarch helps create that perfect texture. If you want to avoid it, try arrowroot powder as an alternative! -
1 teaspoon ground cinnamon
Cinnamon is what truly brings out fall flavors. You can experiment using pumpkin pie spice for a bit of a flavor bomb! -
1 teaspoon baking powder
This helps the bars rise a little. Just be sure it’s fresh! -
½ teaspoon ground ginger
Ginger adds a wonderful zing! If you like heat, consider adding more. -
¼ teaspoon ground nutmeg
Nutmeg is the final touch that’ll have everyone asking for seconds. Freshly grated nutmeg is a real treat if you have it on hand!
Step-by-Step Instructions
Now let’s bring it all together! Follow these steps to create your fabulous pumpkin pie bars:
Step 1: Preheat the Oven
First off, preheat your oven to 350°F (175°C). Get that oven nice and toasty! It’s the first step to those dreamy bars.
Step 2: Prepare Your Baking Pan
Grab a 9×13-inch baking dish and grease it lightly with butter or cooking spray. You can also line the bottom with parchment paper for easy removal. Your future self will thank you!
Step 3: Make the Crust
In a large mixing bowl, cream together the softened butter and brown sugar until it’s light and fluffy. This should take about 2-3 minutes with an electric mixer. You can totally do it by hand, but why put in extra muscle?
Next, gradually add in your flour and cornstarch, mixing until combined. You want a crumbly mixture that resembles wet sand. If it feels too powdery, don’t panic—just use your hands to press it together firmly.
Step 4: Press the Crust into the Baking Pan
Pour the crumbly crust mixture into the prepared pan. Use your fingers to press it evenly across the bottom—don’t worry about making it look perfect! A little rustic charm adds character. Bake it in the preheated oven for about 15 minutes, just until it’s lightly golden.
Step 5: Prepare the Pumpkin Filling
While that crust is baking, grab another mixing bowl. Whisk together the canned pumpkin, sweetened condensed milk, eggs, cinnamon, ginger, nutmeg, and baking powder until it’s smooth. You can even mix it in a blender if you prefer a super creamy consistency—whatever works for you!
Step 6: Add the Chopped Pecans
Fold in the chopped pecans, and you’ll see how the mixture transforms! Feel free to save a few for topping later.
Step 7: Pour the Filling
Once the crust is ready, carefully take it out from the oven and pour in the pumpkin filling. Spread it evenly using a spatula. Now, this is the moment where you can add those reserved pecans for a delightful crunch on top!
Step 8: Bake
Return the pan to the oven and bake for about 30-35 minutes, or until the center is set and a toothpick comes out clean. You might smell that pumpkin spice scent wafting through the kitchen—oh, yes!
Step 9: Cool and Cut
Once baked, let the bars cool in the pan on a wire rack. This is the tough part—waiting! Once they’re completely cool, you can cut them into squares or rectangles. A sharp knife works best, and they are easier to handle when chilled in the fridge for a bit!
Serving Suggestions
Now that you’ve got your delightful pumpkin pie bars ready to go, how should you serve them? The possibilities are endless!
-
With a Whipped Topping: A dollop of whipped cream or a scoop of vanilla ice cream on top will elevate these bars to luxurious status. (Also, who wouldn’t love a bit of a cream crown?)
-
Drizzled with Caramel Sauce: For an extra touch of decadence, drizzle some caramel sauce over the top before serving. You can even sprinkle a few extra chopped pecans on top—because, why not?
-
Sliced into Individual Bars: Present them on a platter with a warm cup of coffee or a spiced latte. They’re perfect for holiday gatherings, potlucks, or just cozy nights in!
Recipe Variations
Feeling creative? Here are some fun variations you can try with this recipe:
-
Maple Pumpkin Bars: Swap the sweetened condensed milk for pure maple syrup for a whole new flavor experience!
-
Chocolate Chip Pumpkin Bars: Add ½ cup of chocolate chips to the filling for a chocolatey surprise that pairs beautifully with pumpkin.
-
Vegan Pumpkin Bars: As mentioned, swap the eggs for flax eggs and use coconut or almond milk instead of sweetened condensed milk. You can also replace the butter with a plant-based option.
-
Spiced Pumpkin Bars: Ramp up the spice! Add in a pinch of cloves or allspice to magnify the flavor.
-
Nut-Free Option: Omit the pecans altogether and sprinkle some sweetened coconut flakes on top for added texture and flavor!
Chef’s Notes
This recipe has evolved quite a bit since I first attempted to blend my grandmother’s classic pie recipe with my flair for simple bar desserts. I’ve played around with different spices, fillings, and toppings, and honestly, I could go on forever!
I also have a funny story to share: When I first made these for a party, I forgot to add the sugar to the filling! You can imagine my friends’ faces as they tasted the bittersweet disaster. But rest assured, it only fueled my passion more to perfect it. Now, if there’s one thing I’ve learned, it’s that baking—and cooking in general—is all about experimenting. So don’t shy away from trying new twists!
FAQs and Troubleshooting
Here are some common questions you might have while preparing your own pumpkin pie bars:
-
Why is my pumpkin filling watery?
Sometimes, if you use fresh pumpkin or make puree yourself, the moisture content can vary. Try draining off excess liquid before mixing! -
Can I store leftovers, and how?
Absolutely! These bars can be stored in an airtight container in the fridge for up to 5 days (if they last that long). You can also freeze them for later indulgence. Just wrap them well! -
How can I tell when they are done baking?
Use a toothpick to test the center. It should come out clean or with just a few moist crumbs—no gooey filling should cling to it! -
Can I use pumpkin pie filling instead of pumpkin puree?
While you could, I highly recommend against it for this recipe. The spices in pumpkin pie filling can overpower the balance we’re after. Stick to plain pumpkin!
Nutritional Info
Each of these delectable pumpkin pie bars contains about 190 calories, depending on how large you cut them. Here’s a quick nutritional breakdown per bar, so you can snack guilt-free:
- Calories: 190
- Total Fat: 9g (Saturated Fat: 4g)
- Cholesterol: 35mg
- Sodium: 210mg
- Total Carbohydrates: 29g (Dietary Fiber: 1g; Sugars: 8g)
- Protein: 3g
Of course, these values may change based on your specific ingredients and adjustments, but this gives you a ballpark.
Final Thoughts
Thank you for joining me on this delightful culinary adventure to create Pumpkin Pie Bars with Sweetened Condensed Milk! Whether you’re reliving fond memories or creating new ones, I hope this recipe brings warmth and joy to your kitchen.
Remember, it’s not just about cooking; it’s about making connections with those around you. So, gather your loved ones, whip these up, and share your pumpkin pie bars with the world—one slice at a time!
Until next time, keep it simple, soulful, and always satisfying. Happy baking, my friends!
Print
Pumpkin Pie Bars with Sweetened Condensed Milk
- Total Time: 60 minutes
- Yield: 12 servings 1x
- Diet: Vegetarian
Description
A delightful twist on classic pumpkin pie, these bars combine the rich flavors of pumpkin with sweetened condensed milk for a creamy dessert perfect for fall gatherings.
Ingredients
- 1 cup (225 g / 8 ounces) salted butter, softened to room temperature
- 3 cups (360 g / 12.7 ounces) all-purpose flour, spooned and leveled
- ¾ cup (150 g / 5.3 ounces) brown sugar
- 1 can (15 ounces / 425 g) canned pumpkin (not pumpkin pie mix)
- 1 can (14 ounces / 400 g) sweetened condensed milk
- 2 large eggs
- 1 cup (125 g / 4.4 ounces) chopped pecans
- 3 tablespoons cornstarch
- 1 teaspoon ground cinnamon
- 1 teaspoon baking powder
- ½ teaspoon ground ginger
- ¼ teaspoon ground nutmeg
Instructions
- Preheat your oven to 350°F (175°C).
- Prepare a 9×13-inch baking dish by greasing it lightly with butter or cooking spray.
- Make the crust by creaming together the softened butter and brown sugar until light and fluffy.
- Gradually add in your flour and cornstarch, mixing until a crumbly mixture forms.
- Press the crumbly crust mixture into the prepared pan evenly.
- Bake it in the preheated oven for about 15 minutes, just until lightly golden.
- Meanwhile, whisk together the canned pumpkin, sweetened condensed milk, eggs, cinnamon, ginger, nutmeg, and baking powder until smooth.
- Fold in the chopped pecans.
- Pour the pumpkin filling over the baked crust, spreading it evenly.
- Bake for about 30-35 minutes, until the center is set.
- Cool in the pan on a wire rack before cutting into squares.
Notes
Serve with whipped cream or a drizzle of caramel sauce for added decadence.
- Prep Time: 15 minutes
- Cook Time: 45 minutes
- Category: Dessert
- Method: Baking
- Cuisine: American
Nutrition
- Serving Size: 1 square
- Calories: 190
- Sugar: 8g
- Sodium: 210mg
- Fat: 9g
- Saturated Fat: 4g
- Unsaturated Fat: 5g
- Trans Fat: 0g
- Carbohydrates: 29g
- Fiber: 1g
- Protein: 3g
- Cholesterol: 35mg
Keywords: pumpkin, dessert, fall recipes, bars, sweetened condensed milk