Apricot Butter
The Sweet Symphony of Apricot Butter: A Culinary Adventure
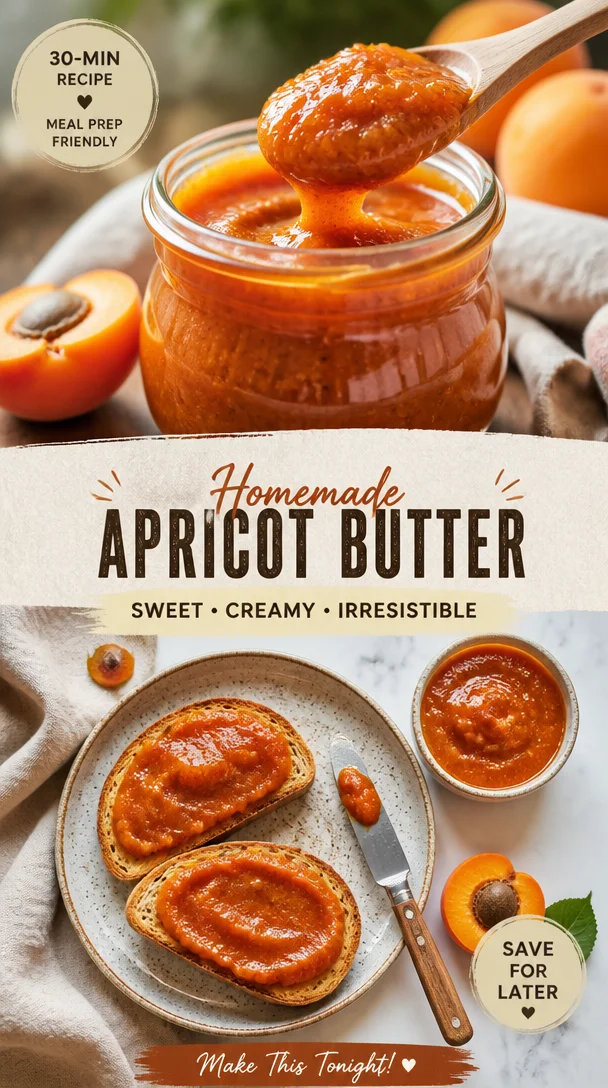
Hey there, food lovers! Whether you’re an experienced cook or still chasing down your spatula, you’ll find something delightful here at Feastical. Today, I’m thrilled to share with you a recipe that’s close to my heart—Apricot Butter. This isn’t just any spread; it’s a luscious, vibrant treat that captures the essence of summer in each velvety bite. Imagine spreading this on warm, buttery toast or dolloping it atop fresh scones as you sip your morning coffee—oh, the bliss!
A Toast to Nostalgia
Let me take you back to a warm July afternoon many years ago. Picture this: I’m standing in my grandmother’s sun-drenched kitchen, the sweet scent of ripe apricots wafting through the air. As a kid, those afternoons were magical. Grandma had this special knack for turning simple ingredients into something extraordinary. I remember her showing me how to pick the juiciest apricots from her tree, their bright orange skins glistening in the sunlight. We’d carefully pit and chop them, our hands sticky with sweet juice, laughter echoing off the walls.
She’d often pull out her trusty old pot and a wooden spoon, and together we’d transform those sun-kissed fruits into apricot butter. The bubbling concoction filled the kitchen with warmth and comfort, reminding me of the love that went into every spoonful. Fast forward to now, that cherished recipe has found a permanent place in my heart and kitchen. I invite you to join me on this flavorful journey, where we’ll recreate that same sense of joy and satisfaction.
Ingredients You’ll Need
Let’s gather our ingredients! Here’s what you’ll need to whip up this dreamy apricot butter:
-
4 cups apricots, pitted and chopped
The star of our show! Ripe apricots are crucial, as they give the butter its vibrant color and sweet-tart flavor. If you can’t find fresh apricots, feel free to use frozen ones—just make sure they’re thawed and pitted! -
1 cup sugar
This is what sweetens the deal. You can adjust the sugar based on how sweet your fruit is. For a healthier alternative, consider using honey or maple syrup—just keep in mind that it may slightly alter the final flavor. -
1/4 cup lemon juice
The zesty kick that brightens up the apricots! Freshly squeezed lemon juice really enhances the flavor of your butter, but you can use bottled juice if that’s what’s handy. -
1 teaspoon cinnamon
This aromatic spice adds warmth and depth to your apricot butter. If you’re not a huge cinnamon fan, feel free to swap it for allspice or nutmeg for a different flavor profile. -
1/2 teaspoon nutmeg
A little goes a long way! Nutmeg adds a warm, nutty flavor that complements the sweetness of apricots beautifully. If you want something a bit different, try using cardamom instead.
Step-by-Step Instructions
Now, let’s dive into the fun part—making the apricot butter! Follow these steps, and you’ll be spreading joy in no time.
-
Prepare the Apricots
Start by washing and pitting your apricots. Then, chop them into small pieces. This helps them cook down evenly. If you like a chunkier texture in your butter, feel free to leave some bigger pieces in the mix! -
Combine in a Pot
In a large saucepan, combine your chopped apricots, sugar, and lemon juice. Stir everything together, making sure the sugar is evenly distributed. Let this mixture sit for about 15-20 minutes. This step helps the apricots release their natural juices and makes for a more flavorful butter! -
Cook It Down
Place the saucepan over medium heat. Stir the mixture frequently and bring it to a gentle simmer. As it cooks, you’ll notice the apricots breaking down and forming a jam-like consistency. Keep stirring to prevent sticking—this is where the magic happens! Allow it to simmer for about 30-40 minutes, or until the butter reaches your desired thickness. -
Add the Spices
Once the mixture has thickened, add in your cinnamon and nutmeg. Give it a good stir to combine. At this stage, taste and adjust the sweetness if necessary. If you like a smoother texture, you can use an immersion blender to blend it to your desired consistency. -
Cool and Store
Remove the pot from the heat and let the apricot butter cool slightly. Transfer it to sterilized jars and store in the refrigerator. It’s that simple!
Serving Suggestions
Your apricot butter is now ready to shine! Here are a few delightful ways to serve it:
-
Spread it on Toast: A classic choice! Spread apricot butter generously on warm, toasted bread or bagels for a delicious breakfast.
-
Dollop it on Pancakes and Waffles: Elevate your breakfast game! It complements fluffy pancakes or crispy waffles beautifully.
-
Pair with Cheese: Create a stunning cheese platter with your apricot butter. It pairs wonderfully with creamy brie or sharp cheddar.
-
Use it in Baking: Add a dollop into your muffin or cake batter for a burst of flavor, or use it as a filling in pastries.
-
Gift it: Sweeten someone’s day by gifting a jar of your homemade apricot butter—they’ll love you for it!
Recipe Variations
Let’s get creative! Here are some exciting variations to shake things up:
-
Spicy Apricot Butter: Add a pinch of cayenne or some finely chopped fresh jalapeños for a sweet-spicy kick.
-
Jammy Apricot Butter: Stir in other fruits like peaches or plums for a mixed fruit version that’s bursting with flavor.
-
Vanilla Apricot Butter: Add a splash of vanilla extract during cooking for an extra layer of sweetness.
-
Herbed Apricot Butter: Incorporate fresh herbs, such as thyme or rosemary, for a unique savory twist.
-
Low-Sugar Version: Substitute with a low-sugar alternative sweetener to create a version that’s perfect for those watching their sugar intake.
Chef’s Notes
As I reflect on my journey with apricot butter, I can’t help but chuckle at the mishaps along the way! Once, I got so caught up in the cooking process that I accidentally grabbed salt instead of sugar. Let’s just say, no one wanted to taste that batch!
Over the years, I’ve experimented with different spice combinations, and I’ve come to adore the balanced warmth of cinnamon and nutmeg. Making apricot butter has also become a lovely tradition at our family summer picnics. It’s more than just a recipe; it’s a little piece of nostalgia that brings everyone together.
FAQs and Troubleshooting
1. Why is my apricot butter too runny?
If your apricot butter turned out too runny, it might need more cooking time. Just simmer it a little longer to evaporate the excess liquid. You can also mix in a small amount of cornstarch dissolved in water to thicken it up.
2. Can I can this recipe for storage?
Absolutely! If you want longer shelf life, consider canning your apricot butter in sterilized jars, making sure to follow proper canning guidelines.
3. What can I substitute for sugar?
You can replace the sugar with coconut sugar, honey, or even maple syrup. Just remember that different sweeteners may slightly change the flavor profile.
4. How long will this apricot butter last in the fridge?
When stored properly in the fridge, your apricot butter should last around 2-3 weeks. If you’ve canned it, it can last over a year in a cool, dark place.
Nutritional Info
Now, let’s break down the nutritional info! Per tablespoon of this delicious apricot butter, you can expect roughly:
- Calories: 50 calories
- Total Fat: 0g
- Sodium: 0mg
- Total Carbohydrates: 13g
- Sugars: 10g
- Protein: 0g
Final Thoughts
There you have it, food friends—your very own apricot butter! This vibrant, flavorful spread captures the essence of sunshine and love, all wrapped up in a jar. I hope this recipe fills your kitchen with warmth and sparks joy in your culinary adventures. Remember, cooking is an expression of love, so don’t be afraid to get a little creative in your kitchen!
So grab your apron, and let’s make some apricot magic. I can’t wait to hear about your own culinary journeys and stories that resonate with this recipe. Happy cooking!
Print
Apricot Butter
- Total Time: 55 minutes
- Yield: 4 servings 1x
- Diet: Vegetarian
Description
A luscious, vibrant spread that captures the essence of summer in each velvety bite, perfect for toast, pancakes, or as a gift.
Ingredients
- 4 cups apricots, pitted and chopped
- 1 cup sugar
- 1/4 cup lemon juice
- 1 teaspoon cinnamon
- 1/2 teaspoon nutmeg
Instructions
- Prepare the apricots: Wash and pit your apricots, then chop them into small pieces.
- Combine in a pot: In a large saucepan, combine chopped apricots, sugar, and lemon juice. Stir and let sit for 15-20 minutes.
- Cook it down: Place over medium heat, stirring frequently until it reaches a gentle simmer. Cook for 30-40 minutes.
- Add the spices: Once thickened, stir in cinnamon and nutmeg. Adjust sweetness if necessary.
- Cool and store: Remove from heat, let cool, then transfer to sterilized jars.
Notes
Perfect for spreading on toast, pancakes, or as a filling in pastries. Can also be canned for longer storage.
- Prep Time: 15 minutes
- Cook Time: 40 minutes
- Category: Condiment
- Method: Stovetop
- Cuisine: American
Nutrition
- Serving Size: 1 tablespoon
- Calories: 50
- Sugar: 10g
- Sodium: 0mg
- Fat: 0g
- Saturated Fat: 0g
- Unsaturated Fat: 0g
- Trans Fat: 0g
- Carbohydrates: 13g
- Fiber: 0g
- Protein: 0g
- Cholesterol: 0mg
Keywords: apricot butter, fruit spread, summer recipes, homemade condiments, easy recipes

Ingredient Raspberry Peach Jam in 15 Minutes (Beginner)
Get Ready for a Sweet Adventure: Easy Raspberry Peach Jam
Hey there, food lovers! It’s Beau Collier here, and I’m thrilled to take you on a delicious journey today! If you’ve ever tasted fresh, homemade jam, you know it’s an experience that goes beyond flavor—it’s nostalgia in a jar. Bursting with the sweet-tart zing of raspberries and the mellow sweetness of peaches, Easy Raspberry Peach Jam is an inviting treat that can transport you right back to sunny summer days.
There’s something magical about fruit preservation, isn’t there? It’s like capturing sunshine and happiness all in one jar. Imagine waking up in the morning to the smell of fresh bread toasting, and then slathering on a gooey layer of this vibrant jam. Whether you’re spreading it on warm scones or swirling it into your yogurt, this jam is bound to become a family favorite.
The beauty of making your own jam is that it’s not just about the end product; it’s about the journey! You don’t have to be a kitchen ninja to whip up this delightful treat. Let’s dive into some juicy memories and get those creative juices flowing!
My Jam-Making Journey: A Nostalgic Tale
Growing up, my grandmother was the queen of all things jam. Every summer, she would gather the ripest fruits from her garden, her hands deftly transforming nature’s bounty into colorful jars that lined her kitchen shelf. I can still picture our summer afternoons spent together, the air thick with the sweet aroma of boiling fruit and sugar. It was a mix of excitement and patience as we waited for the fruits to simmer down into that glossy, luscious concoction.
One particular year, when I was about ten, we decided to have a jam-making competition. Each of us would create our own flavor, and the winner would get the first choice of flavor for our family’s traditional Sunday breakfast. I went on a quest around the neighborhood, gathering insights and tips from friends and local farmers. My secret weapon? Ripe peaches from the tree in my front yard—and the tangy raspberries my friend Timmy’s mom grew in endless abundance. As we stirred, laughed, and shared memories, we not only made jam together but also created precious moments. To this day, I still cherish those jars of jam filled with love and memories.
Now, I can’t help but carry that cherished tradition forward! So grab your spatula, roll up your sleeves, and let’s get jamming with this Easy Raspberry Peach Jam recipe that will surely make your taste buds dance!
Ingredients You’ll Need
Here’s what you’ll need to create your perfect batch of Easy Raspberry Peach Jam. Each ingredient plays a vital role, and I’ll share some quick insights along the way!
-
3 cups raspberries, mashed
Fresh raspberries pack a punch with their vibrant flavor and natural acidity. If you can’t find fresh ones, frozen raspberries work beautifully too—just thaw and drain excess liquid before mashing. -
5 ripe peaches, peeled, chopped, & mashed
Sweet and juicy, ripe peaches bring in a lovely subtleness to balance the tartness of raspberries. If peaches are out of season, feel free to substitute with nectarines or even canned peaches—just look for those packed in juice, not syrup! -
1.75-ounce package premium fruit pectin
This magical ingredient helps your jam set beautifully! Choose a pectin that suits your recipe; I love using the premium kind as it gives a wonderfully bright flavor. Did you know that less sugar pectin is available too? If you’re watching your sugar intake, it’s a great alternative! -
4 cups white sugar
The sugar not only sweetens but also works hand-in-hand with the pectin to achieve that iconic jam consistency. If you prefer, you can try swapping with half honey or a sugar substitute, but bear in mind it may alter the flavor and texture slightly.
Step-by-Step Instructions
Ready to bring our fruity concoction to life? Here are the step-by-step instructions, along with some chef hacks to ensure your jam turns out perfectly!
-
Prep Your Ingredients
First thing’s first, you need to prepare the fruits. Wash those beautiful raspberries gently to avoid squishing them. For the peaches, peel them (a little tip: boiling them for 30 seconds helps peel off the skin easily). After peeling, chop them into small pieces and then mash them with a fork or potato masher. You’ll want a consistency that still has some texture but is mostly smooth. -
Combine the Fruits
In a large, heavy-bottomed pot, combine the mashed raspberries and peaches. Stir them together so they get cozy! -
Add the Pectin
Now it’s time to sprinkle the premium fruit pectin over the fruit mixture. Stir it in, ensuring there are no lumps. This is important, as it helps integrate the pectin throughout the fruit. -
Bring to a Boil
Place the pot over medium heat. You’re going to want to cook this, stirring frequently, until the mixture comes to a full, rolling boil. This is where the magic starts—get excited! -
Add Sugar
Once at that full boil, pour in the 4 cups of sugar all at once. Yes, it seems like a lot, but trust me, this is what brings the jam together! Stir continuously until the sugar fully dissolves—this can take a couple of minutes. -
Boil Again
Bring the mixture back to a full boil. You should be able to see big bubbles popping away! Let it boil for about 1 minute—this is what activates that pectin! -
Test for Doneness
If you have a candy thermometer, now’s the time to use it! You’ll want your jam to hit 220°F (104°C). If you don’t have a thermometer, don’t worry; take a spoonful of the mixture and let it cool on a plate for a couple of minutes. Run your finger through it—if it holds its shape, you’re golden! -
Can It Up!
Pour the hot jam into sterilized jars, leaving about 1/4 inch of headspace at the top. Secure the lids but don’t tighten them too much—you want some air to escape during the cooling process. -
Water Bath
Process your jars in a boiling water bath for about 10 minutes. This ensures your jam is shelf-stable and safe! Let them cool on a towel-lined counter.
Serving Suggestions
Now that you’ve whipped up this amazing Raspberry Peach Jam, let’s chat about some serving suggestions!
The brilliant thing about jam is its versatility. Here are a few ideas to get those creative juices flowing:
-
Classic Toast: Slather a thick layer on your favorite buttered toast. The contrast of warm, crispy bread with this luscious jam is a match made in heaven!
-
Perfect Pairing with Cheese: Spread some jam over a creamy brie or sharp cheddar cheese. Add some crackers, and you’ve got a beautiful cheese board that will impress your friends!
-
Swirl it into Yogurt or Oatmeal: For a delightful breakfast treat, spoon some jam over your morning yogurt or oatmeal. It’s like a little sunshine in your bowl!
-
Homemade Gifts: Package them in cute jars with ribbons for thoughtful gifts during holidays or special occasions. Everyone appreciates a jar of homemade goodness!
Recipe Variations
Feeling adventurous? Here are a few variations you might want to consider:
-
Spicy Twist: Add a touch of jalapeño or a sprinkle of crushed red pepper flakes for a sweet and spicy kick!
-
Herb-Infused: Toss in some fresh basil or mint leaves while simmering to give a unique herbaceous layer to your jam.
-
Citrus Zing: For a bright twist, grate some lemon or orange zest into the mixture. The citrus element enhances the flavors and adds complexity.
-
Berry Medley: Blend in other berries like blueberries or blackberries if you have them on hand for a mixed berry jam!
Chef’s Notes
This Raspberry Peach Jam recipe is one I’ve developed and refined over the years. Every batch tells a story! Sometimes all it takes is finding that perfectly ripe peach at the farmer’s market or a last-minute raspberry haul from the back of the fridge. It’s all about embracing the creative process!
I remember one year running into a minor disaster when my first batch boiled over. My kitchen looked like a fruity crime scene! But that’s the beauty of cooking—you learn, adapt, and try again. The kitchen is our canvas, my friends, so don’t shy away from making mistakes. They often lead to the best recipes!
FAQs and Troubleshooting
-
Why is my jam too runny?
If your jam didn’t set, it could be due to not boiling long enough or lacking enough sugar. You can reheat it, add more pectin, and boil it again! -
How do I know if my jam is safe?
Always use sterilized jars, and make sure the seal on the lid is tight after it cools down. If the lid pops back when pressed, it hasn’t sealed properly. -
Can I use lower sugar alternatives?
Yes! However, it may affect the flavor and consistency. Look for pectins specifically designed for low-sugar recipes. -
How long can I store the jam?
Unopened, your jam can last for up to a year in a cool, dark place. Once opened, store it in the fridge and use it within a month.
Nutritional Info
While this jam is primarily a delightful treat, it’s worth noting its nutritional profile (based on a 1-tablespoon serving):
- Calories: 50
- Total Fat: 0g
- Sodium: 0mg
- Total Carbohydrates: 13g
- Sugars: 12g
- Fiber: 0g
- Protein: 0g
Naturally, this jam is high in sugar, so enjoy in moderation. Spread it on your creations generously and let the flavors shine!
Final Thoughts
And there you have it, my friend—your very own jar of Easy Raspberry Peach Jam! It’s more than just a recipe; it’s a slice of life, and a taste of the joy that comes from the kitchen. I hope this inspires you to whip up your batch while creating memories along the way.
Whether you’re sharing it with friends, enjoying it at breakfast, or savoring it on a quiet evening, know that each spoonful holds a story. Let the flavors connect you to moments that make life sweet—much like this jam.
So go ahead, grab those fruits, and let’s make some magic happen in your kitchen. Happy jamming! 🍑🍇✨
Print
Easy Raspberry Peach Jam
- Total Time: 45 minutes
- Yield: 4 servings 1x
- Diet: Vegetarian
Description
A delightful homemade jam bursting with sweet-tart raspberries and juicy peaches, perfect for spreading on toast or swirling into yogurt.
Ingredients
- 3 cups raspberries, mashed
- 5 ripe peaches, peeled, chopped, & mashed
- 1.75-ounce package premium fruit pectin
- 4 cups white sugar
Instructions
- Prep the fruits: Wash raspberries and peel the peaches.
- Combine the mashed raspberries and peaches in a large pot.
- Add the premium fruit pectin over the fruit mixture and stir.
- Bring to a boil over medium heat, stirring frequently.
- Add the 4 cups of sugar all at once and stir until dissolved.
- Boil again for about 1 minute.
- Test for doneness using a spoonful.
- Can the jam into sterilized jars.
- Process jars in a boiling water bath for about 10 minutes.
Notes
Ensure jars are sterilized for safety. Adjust sugar based on preference.
- Prep Time: 15 minutes
- Cook Time: 30 minutes
- Category: Condiment
- Method: Canning
- Cuisine: American
Nutrition
- Serving Size: 1 tablespoon
- Calories: 50
- Sugar: 12g
- Sodium: 0mg
- Fat: 0g
- Saturated Fat: 0g
- Unsaturated Fat: 0g
- Trans Fat: 0g
- Carbohydrates: 13g
- Fiber: 0g
- Protein: 0g
- Cholesterol: 0mg
Keywords: jam, raspberry, peach, homemade, preserves, fruit spread